Le Derby du Nord took place on Sunday as Lille hosted Lens at Stade Pierre Mauroy in a clash between two of Ligue 1’s in-form sides for the start of the 2020/21 campaign. Just one point separated these two going into Sunday’s clash.
Lille came away with all of the spoils as they claimed a dominant 4-0 victory over local rivals Lens, extending their unbeaten run for the 2020/21 Ligue 1 campaign to seven games and giving them a two-point lead at the top of the table over second-placed PSG and third-placed Rennes, who will be hoping to secure a UEFA Champions League place for a second-straight season this term. Meanwhile, Lens dropped to fifth place on the league table following Sunday’s defeat, which is a position they would likely have taken heading into the season, given they only achieved promotion from Ligue 2 last term.
In this tactical analysis piece, we will look at the tactics that were used by both of these sides in last Sunday’s Ligue 1 encounter. We will determine how Christophe Galtier’s tactics helped his team to overcome Franck Haise’s in-form newly-promoted side and we will provide some tactical analysis of both these teams’ main strengths and weaknesses from Sunday’s game.
Lineups and formations
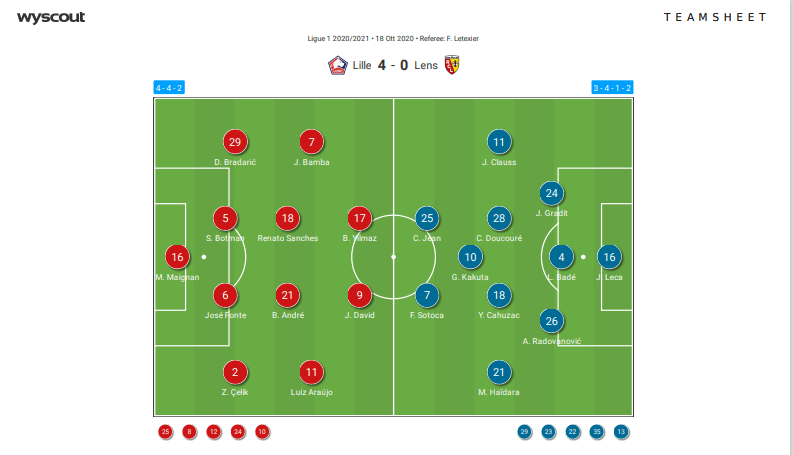
Starting with the home side, Galtier lined his Lille side up in their usual 4-4-2 shape for this game. Mike Maignan started between the sticks and in front of him sat a back four consisting of right-back Mehmet Zeki Çelik, left-back Domagoj Bradarić and the centre-back duo of Sven Botman and José Fonte.
Renato Sanches and Benjamin André started in central midfield for Les Dogues in this one, while Jonathan Bamba started on the left-wing and Luiz Araújo started on the right-wing. Meanwhile, the strike duo of Burak Yılmaz and Jonathan David rounded out this Lille starting XI.
As for the visitors, there was also no surprises with regard to their shape, as they set up in their regular 3-4-1-2 system for Sunday’s fixture.
Veteran stopper Jean-Louis Leca started in goal for Haise’s side, while the centre-back trio of Jonathan Gradit, Loïc Badé and Aleksandar Radovanović played just in front of him. Meanwhile, Jonathan Clauss played at right wing-back, while Massadio Haïdara played at left wing-back for Les Sang et Or.
Yannick Cahuzac was joined by Cheick Doucouré in the centre of midfield, while Gaël Kakuta played just between that midfield pairing and Lens’ centre forward duo of Florian Sotoca and Corentin Jean.
Lens were forced into a couple of structural changes during this game. The first came in the 57th minute of the contest when right centre-back Gradit was sent off. This resulted in Les Sang et Or switching from their 3-4-1-2 shape to a 4-3-2 shape which they then used until the 75th minute when Clément Michelin, who had only been introduced to the game four minutes prior when he was brought off the bench to replace Clauss, was also sent off, resulting in Lens switching to a 4-3-1 shape for the remainder of the contest.
Tactical analysis of Lille’s defensive tactics
Lille were quite organised when set up in their 4-4-2 shape off the ball in this game. While both Yılmaz and David are players who like to work hard off the ball, they generally only pressed Lens’ centre-backs aggressively when the defenders were receiving the ball from a backwards pass. This was seemingly a pressing trigger for the Lille forwards to press the Lens centre-backs in this game.
However, David was ultimately far more active than Yılmaz in the defensive phase during this game, with the Canadian engaging in eight defensive duels in this contest, winning three of them, and the 35-year-old Turkey international engaging in just one defensive duel.
Lille typically defended in a mid-block in terms of depth, while their defensive width was very narrow. They also tried to keep the centre of the midfield and defensive lines quite vertically compact, in addition to the clear horizontal compactness that existed throughout the side.
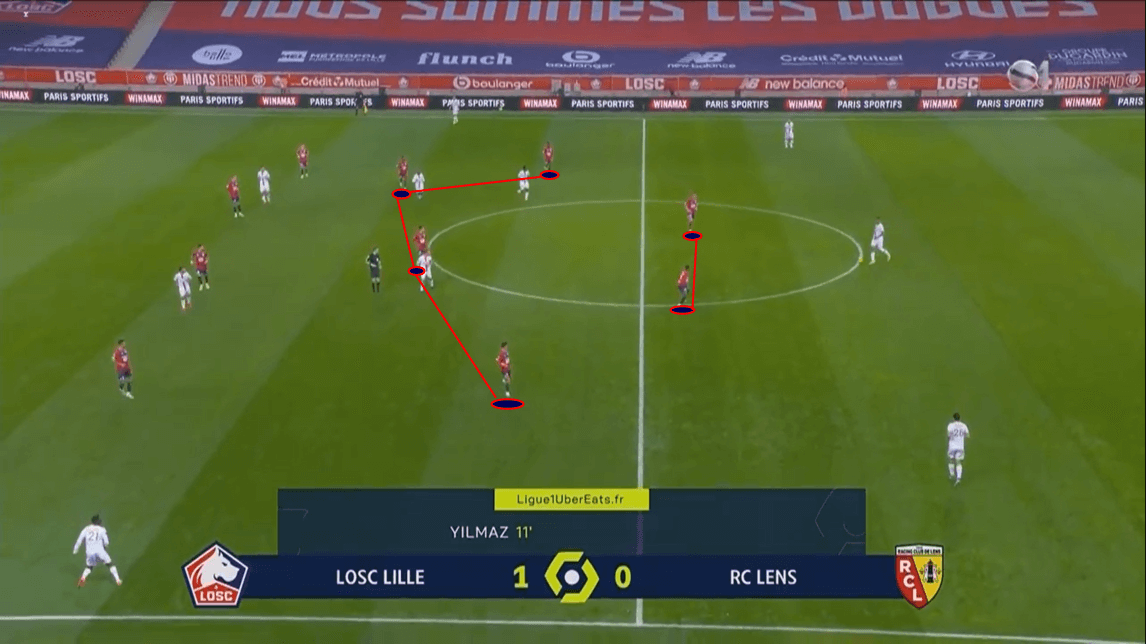
This image above shows us an example of Lille’s typical defensive shape prior to initiating a more aggressive press, during Sunday’s derby clash with Lens. We can see how compact the structure is in this image, which is making it difficult for the visiting side, in possession here, to play through the centre of the pitch.
This image also shows us another aspect of Lille’s defensive shape which was evident throughout this game, which was that they allowed a lot of space out wide, however, they prevented this from being easily exploited through their pressing.
Lille’s press wasn’t very aggressive all of the time but they did have some specific pressing triggers which saw them spring into action and deploy a more aggressive press. One of these triggers was on occasions where Lens’ centre-backs received the ball via a backwards pass, as we already established, and another of these pressing triggers saw Lille spring into action more aggressively when the ball was played out to one of Lens’ two wide centre-backs during the build-up.
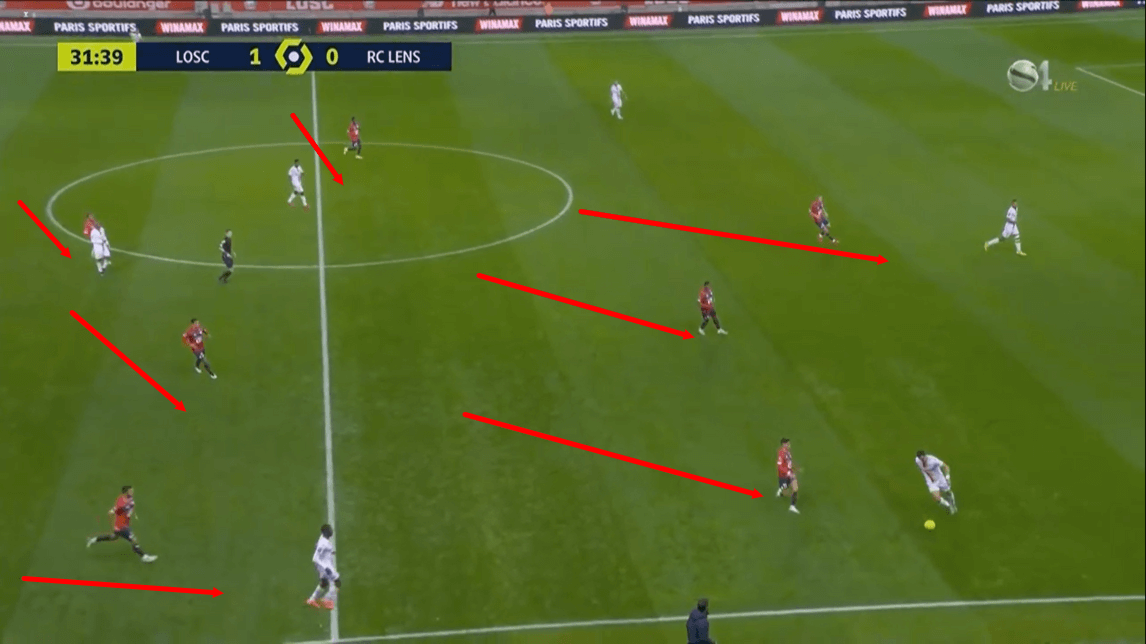
As the passage of play from the previous image moves on, Lens’ central centre-back – Badé – played the ball out to left centre-back Radovanović. As he received the ball, Lille began to press far more aggressively, with Araújo leading the press and going to the man on the ball and the two forwards blocking off the potential passing options of the other two Lens centre-backs.
Meanwhile, the remaining midfielders also shifted over to this side of the pitch, maintaining Lille’s compactness and picking up the nearest potential passing options if one was present within the vicinity of their particular zone. The near-side full-back of Lille also advanced onto the nearest progressive passing option on the wing for Lens.
This made it very difficult for the man in possession to continue to build this attack for the away side and he ended up attempting a long-ball down the line, which saw the ball fly out of play for a Lille throw-in – making this an example of a successful Lille press and showing how they prevented Lens from exploiting the wings despite their compact and narrow nature and perhaps made it even more difficult for the visitors to try and build-up through this part of the pitch.
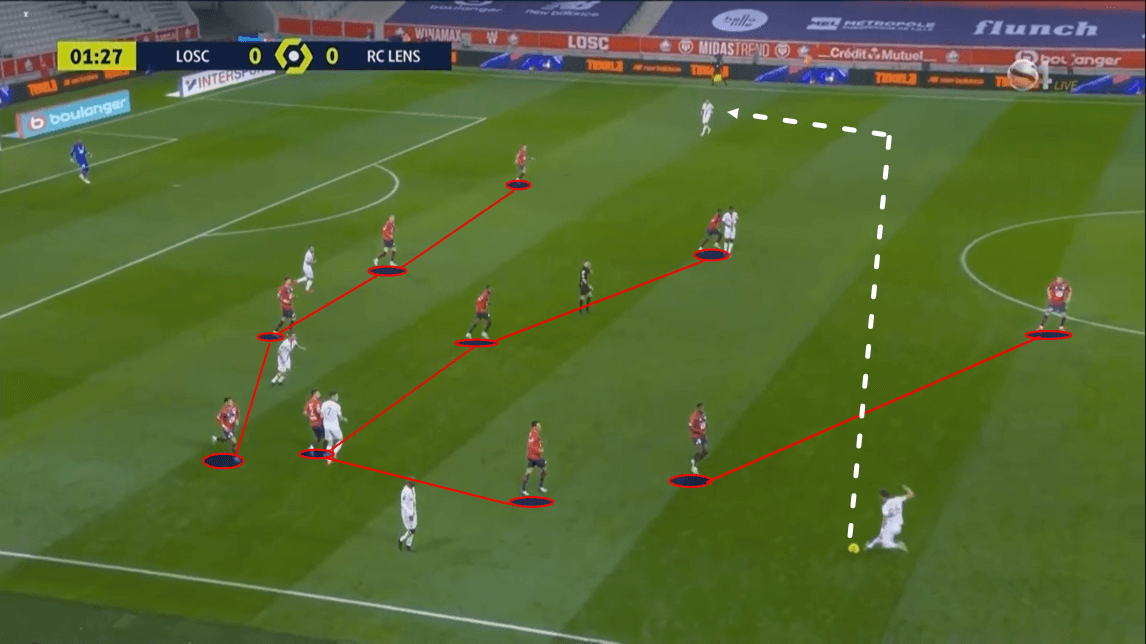
One issue for Lille when defending in this way, was that their compactness when pressing on one wing while marking the nearest short-passing options in their zonal defensive system, allowed the Lens player(s) on the opposite wing to enjoy a great deal of space which could potentially be exploited if Les Sang et Or could get the ball from the wing they were on, over to the other wing, quickly enough to exploit this space.
We can see an example of this space being created on the opposite wing as a result of Lille’s defensive system in the image above, while we also see a Lens player on this wing attempting to quickly switch the play via long-ball to exploit this space in the image above.
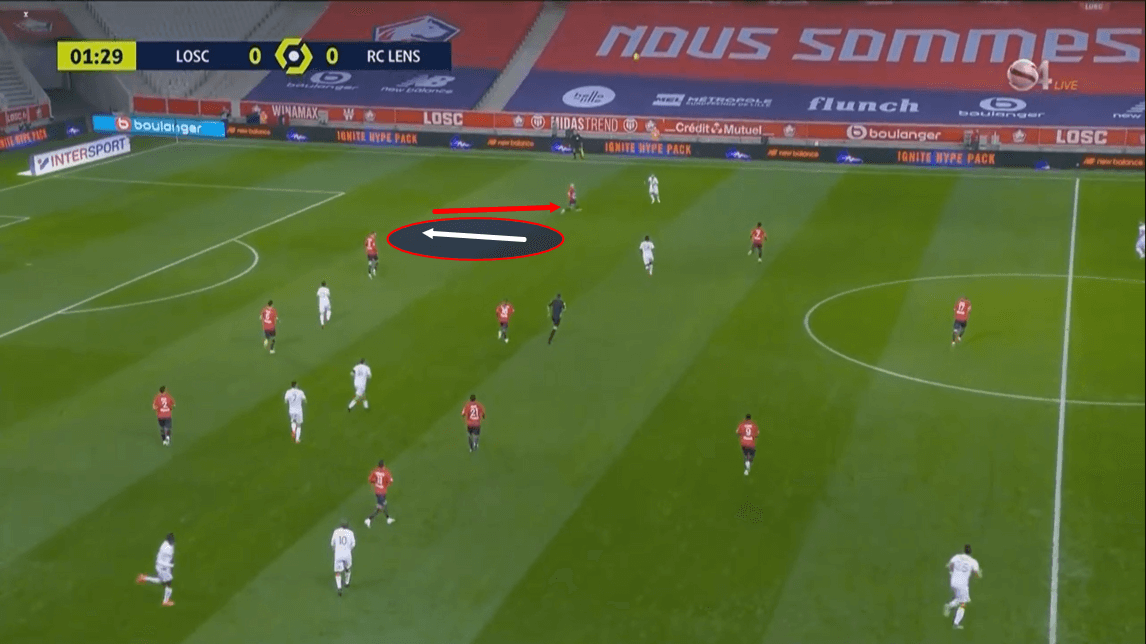
As this long-ball makes its way over to the opposite wing, the Lille player waiting to meet it on that side of the pitch dragged the nearest full-back to him out of the defensive line as he was the nearest player to potentially challenge him for this ball. This resulted in quite a bit of space opening up between that full-back and the nearest centre-back to him.
This shows us how gaps could be and were created between Lille’s defenders despite their best attempts to maintain their horizontal compactness during this game. We saw these kinds of gaps open up on a couple of occasions, however, Lens didn’t exploit this space when it did open up.
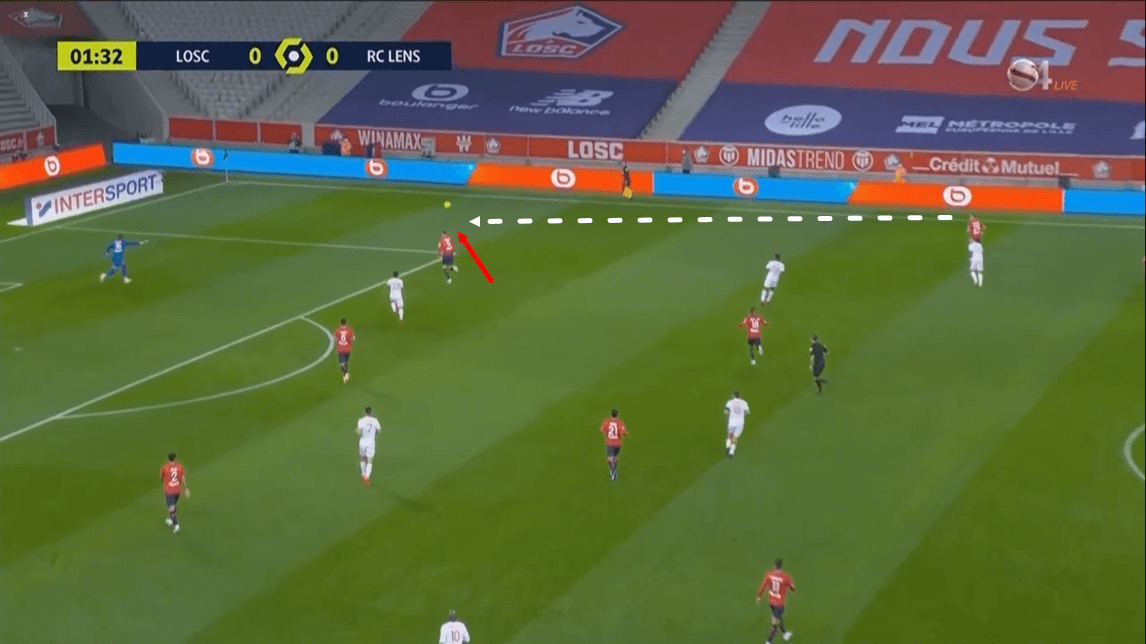
We see that is the case on this particular occasion as play moves on. The Lens man on this wing managed to beat the Lille full-back in the air to send this ball down the wing for a teammate to potentially chase and keep this attack going, however, nobody made a run into the space that opened up in this position and the ball was quickly returned to the feet of Lille centre-back Botman.
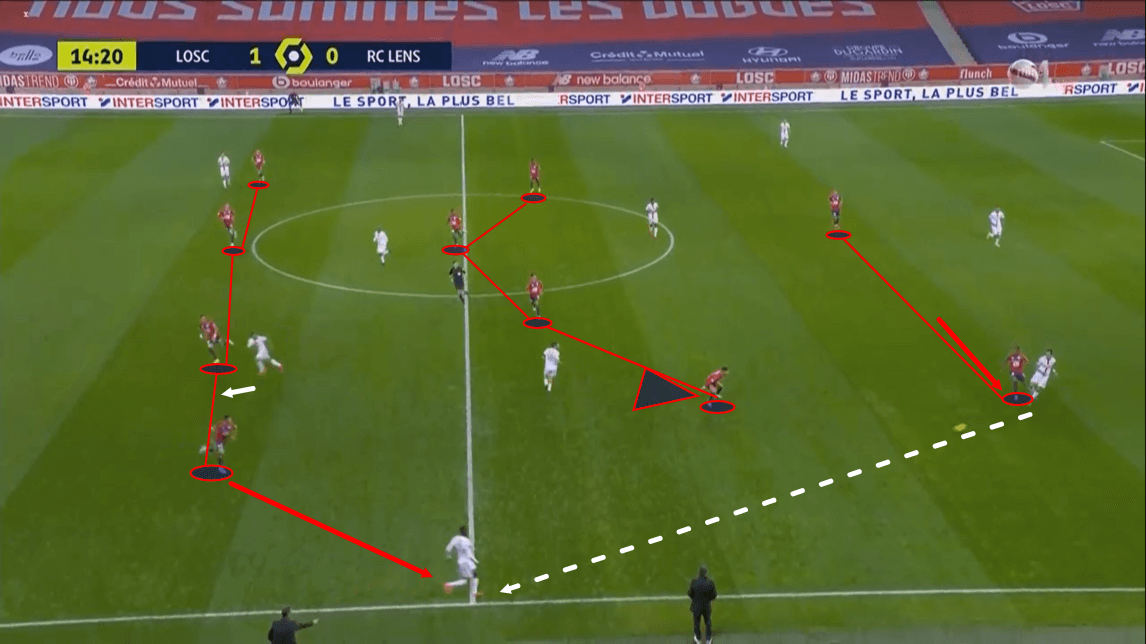
This next image shows us one more example of Lille’s defensive shape being manipulated by Les Sang et Or in Sunday’s game. On this occasion, we can see Lens building out from the centre-back to the left wing-back, with this pass essentially helping Lens to bypass two lines of pressure, while dragging a full-back out of position again, thus creating space between that player and the nearest centre-back once more, as we see here.
This time, we can see a Lens player moving into this space, however, on this occasion, with the ball on the ground, the full-back is able to block this passing lane while pressing the ball receiver.
However, left wing-back Haïdara managed to utilise his dribbling ability well and draw a foul from the pressing full-back, so perhaps this is a better example of how Lens did manage to exploit Lille’s defensive shape in this game, however, unfortunately for Les Sang et Or, these occasions were ultimately too few and far between in this contest.
Furthermore, though they did win the foul, they failed to exploit the space that opened up between the full-back and centre-back despite having a runner move into the space on this occasion and if they had managed to play the ball there, it may have been even more beneficial for them than the free-kick.
So, with that in mind, it would seem as though Lille’s defensive tactics ended up proving successful as despite leaving some glaring weaknesses in their defensive set up, they were weaknesses that Lens couldn’t exploit so they may have focused on the correct areas here.
Tactical analysis of Lens’ defensive tactics
Lens ended this game with a PPDA of 12.6 which was higher than Lille’s PPDA of 10.7, indicating that they pressed with less intensity than the hosts did, overall, in this match and while that’s technically true on average, it doesn’t tell the whole story of the match as the stat is somewhat skewed due to a change in Lens’ defensive tactics after going down to 10, and then nine, men.
Lens’ PPDA was lower than Lille’s for the period of the first to the 15th minute, the period of the 31st to the 45th minute and for the period of the 46th to the 60th minute – when it reached a match-low of 5.6 for them – in this past Sunday’s fixture. While their pressing intensity dropped off significantly after that point, up until then, these numbers suggest that they pressed with more intensity than the home side.
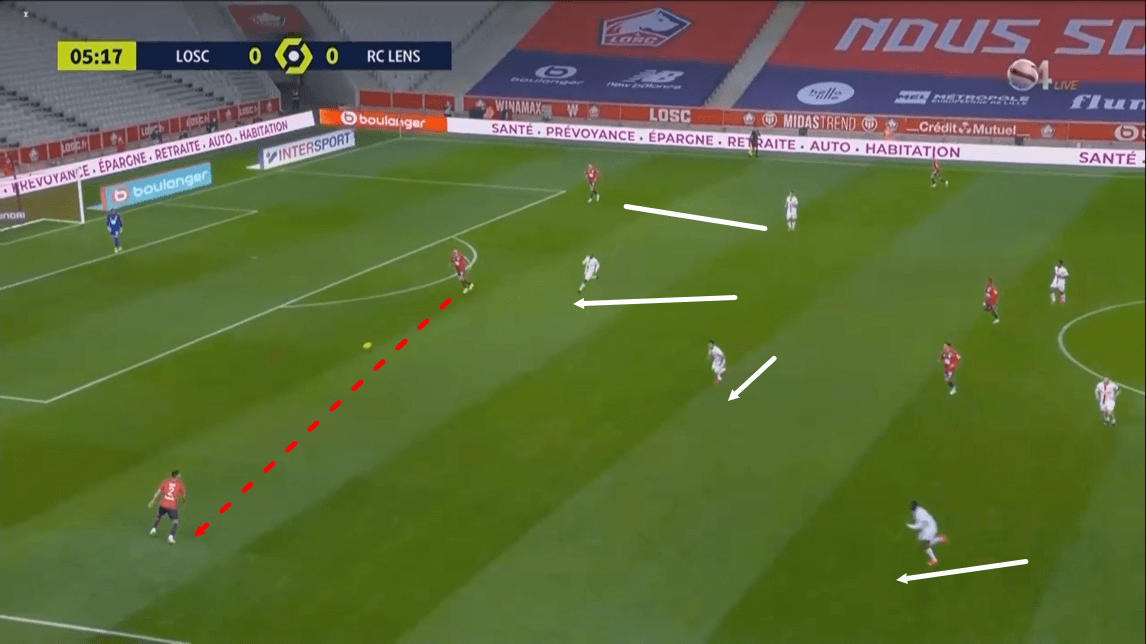
So, while the numbers tell us that Lens pressed with a relatively high level of intensity for the majority of this game, how exactly did they press Lille in this game?
The image above shows us an example of Lens’ 3-4-1-2 defensive shape just before initiating an aggressive press high up the pitch during this past Sunday’s game. As we can see, the ball is just being played out from the centre-back to the right-back here and this pass triggers Lens’ press to go up a level in terms of intensity. So, somewhat similarly to Lille’s defensive tactics, this ball out to the wide defender triggers the press.
One way, other than the shape, in which the two teams’ presses differed from one another, though, is that while Lille defended in a very narrow, compact shape and tended to press in a more option-oriented manner, Lens’ shape didn’t quite get as compact when pressing, with the away side retaining a greater level of width, whole their press was also more man-oriented.
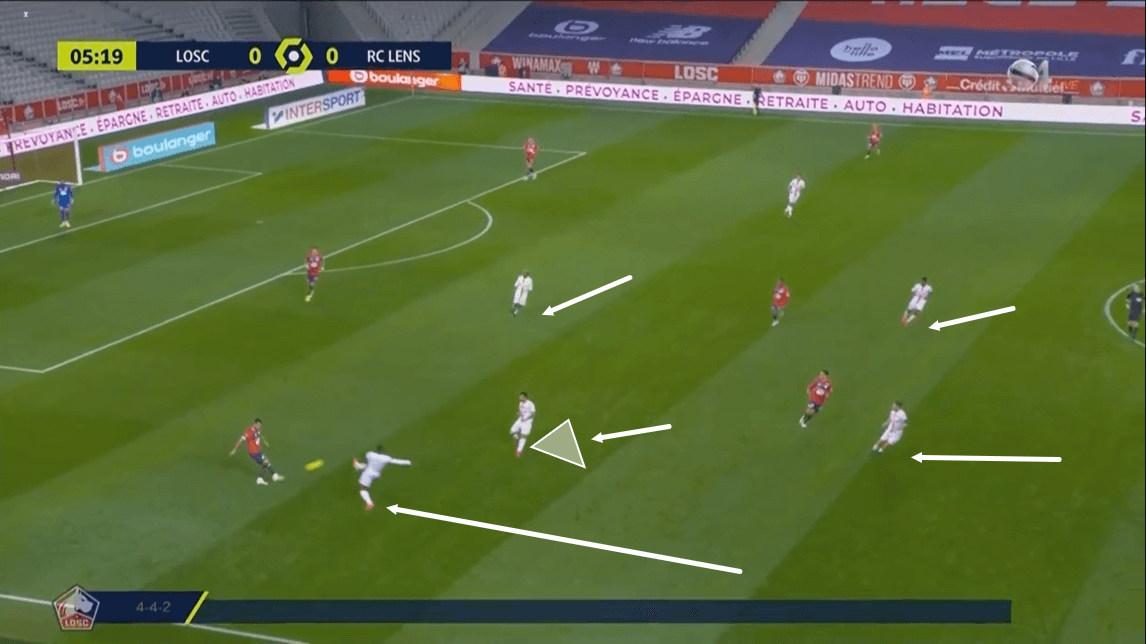
This image above shows us how this press develops as this passage of play moves on. We can see that the right-back has received the ball but he is under immediate pressure from the Lens left wing-back who actually manages to perform a block as the right-back attempts to play a long-ball.
We can see that one Lens player blocked off the short passing lane into the nearest central midfielder, while Lens’ central midfielders also advanced onto Lille’s centre midfielders to mark them out of the game, meanwhile, another Lens player stayed high up the pitch maintaining access to the centre-back who had played the ball out to the right-back in the first place.
This essentially cut off all of this player’s simple short passing options and even the long-ball he attempted was then cut off, showing us how effective this high press of Lens’ was at times in this game.
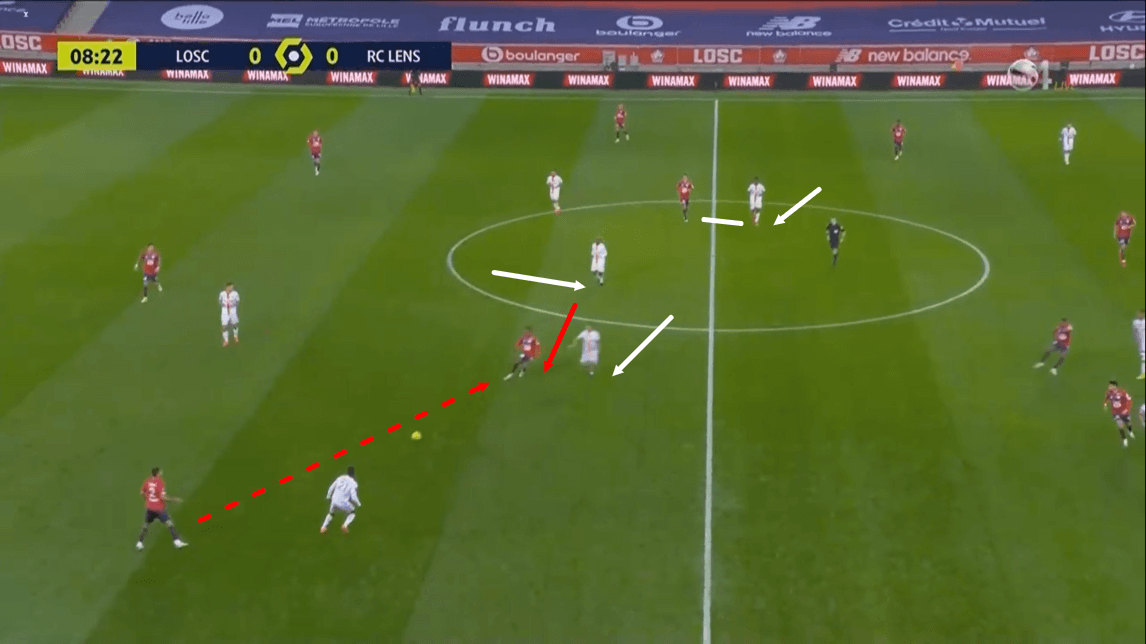
Another important aspect to Lens’ defensive play in this game was Kakuta’s role in the defensive phase. We can see that Lille have built-up past Lens’ first line of defence into the central midfield area in this image above. On paper, both teams had two central midfielders in this game, indicating that this could be a game of individual battles in the midfield, however, when not leading a high press and when the opposition advanced past that stage of their attack into the middle third of the pitch, Kakuta tended to drop into the midfield in an attempt to help his side overload this area.
We can see Lens’ two central midfielders marking Lille’s two central midfielders tightly in this image, while Kakuta is seemingly free in the centre of the pitch, while Sanches prepares to receive the ball for Lille here in this image.
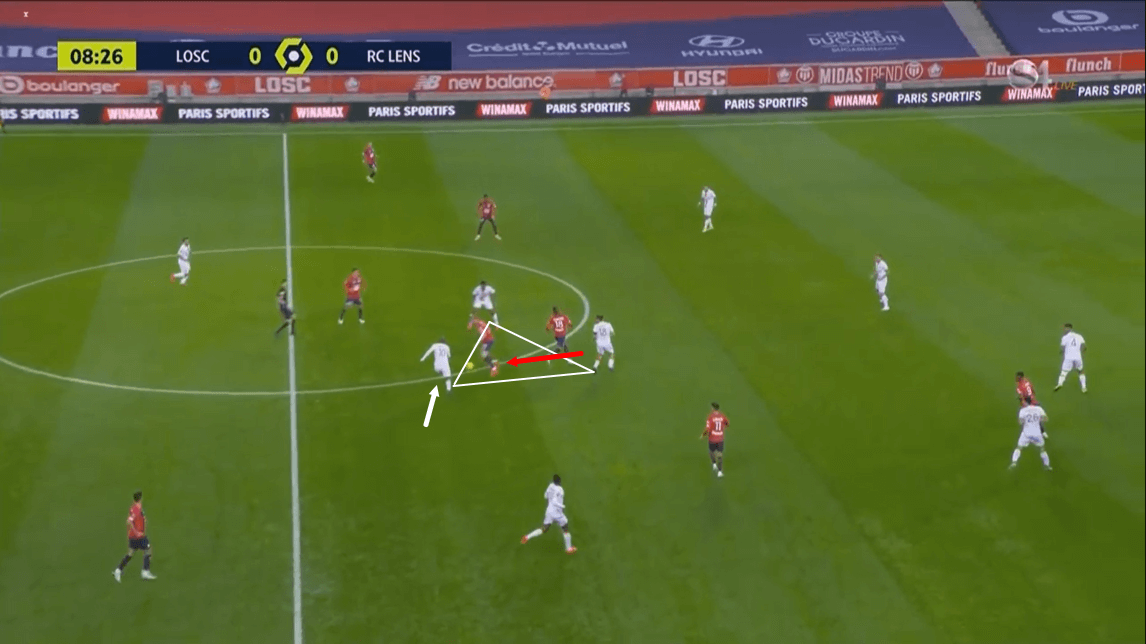
As play moves on, Yılmaz drops in to provide a short passing option for Sanches, which the Portuguese midfielder took up, however, as this player received the ball, he found himself in the middle of this compact triangle of Lens players in the centre of the park and Kakuta ultimately wins the ball back for his side and begins a counterattack.
So, we can see that Kakuta played an important role in helping his side to gain some control in the middle of the park off the ball during this fixture, helping them to win the ball back on some occasions. While he may mainly be known for his attacking contribution, Kakuta engaged in more defensive duels (eight) than all but three other Lens players in this fixture, which indicates how heavily involved he was in the defensive side of the game for his side in this one.
Tactical analysis of Lille’s attacking tactics
Lille were quite patient in attack for the majority of this fixture. They ended the contest having kept 59% of the ball possession in the game. In addition to that, they had a total of 100 possessions in this game, while their opponents had a total of 94 possessions, so there wasn’t much between the two in terms of the total number of possessions that they had.
However, Lille’s total possession time was 30:29, while Lens’ total possession time was 21:35, so this tells us that Lille spent far more time on the ball and were generally a lot more patient on the ball than Lens were, having spent far more time in possession than the away side.
One important aspect to their game in possession that helped them to retain so much of the ball was how they packed the centre of the pitch to try and ensure that they held onto control of that area by dominating the ball there.
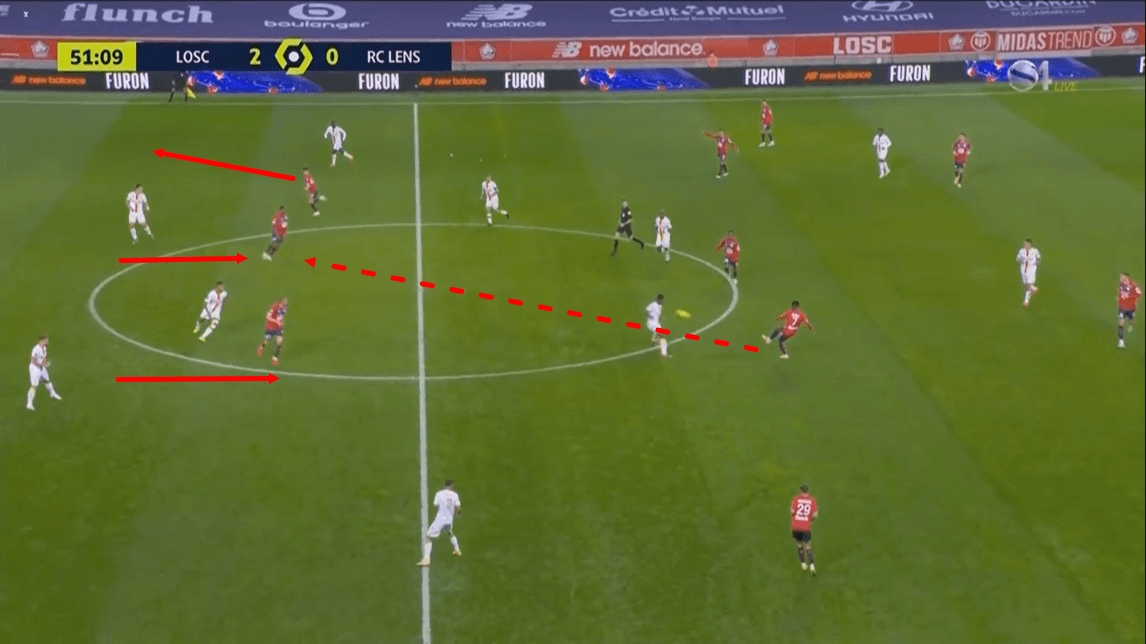
In the image above we can see left-winger Bamba in possession, playing a pass from a central position into the forwards.
Both Bamba and right-winger Araújo drifted into a central position like this at times during Sunday’s game in order to help their side to create an overload in this area, helping them to retain the ball and to build from this area of the pitch into the final third, as we can see the winger doing here.
Additionally, this image shows us another important aspect of Lille’s tactics in the attack in action – which is how much positional freedom Bamba was given in possession during this contest.
We saw the 24-year-old pop up in a central position like this, while he also appeared up and down the left-wing during this game. As a result of this freedom, he was able to participate in the build-up on occasions, he was able to try and create from relatively deep positions, while he was also, on other occasions, active in the final third either trying to finish chances off or play the final ball for a teammate.
Bamba provided one assist during this contest and this positional freedom may have played an important role in enhancing the creative side of his game.
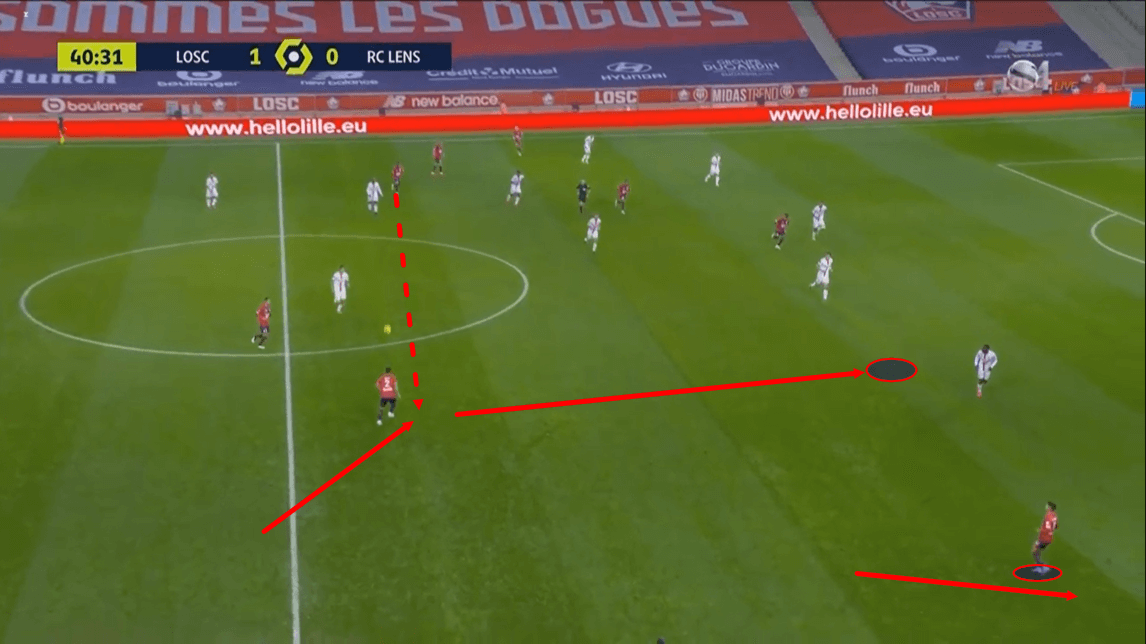
Bamba and Araújo weren’t the only ones who drifted into a central midfield-type position during periods of possession for Lille in Sunday’s fixture as right-back Çelik also moved into these positions at times during the game. We can see an example of one such occasion when this happened in the image above.
Çelik drifted inside from the right-back position to offer his teammates an option on the right side of central midfield on occasions when this part of the pitch wasn’t occupied, which occurred a variety of times during the match.
From this position, he tended to play an important role both in the attack and in the build-up. His ball-carrying ability proved to be quite important for his side in this one, as he helped Lille significantly in building through the middle third of the pitch and into the final third, while he also provided an option for his side further up the pitch once the ball reached that area.
He usually remained quite central during the build-up, acting almost like a box-to-box midfielder when he popped up in this position during a period of possession and he also made various underlapping runs during this game, however, he also overlapped at times, particularly during the second half.
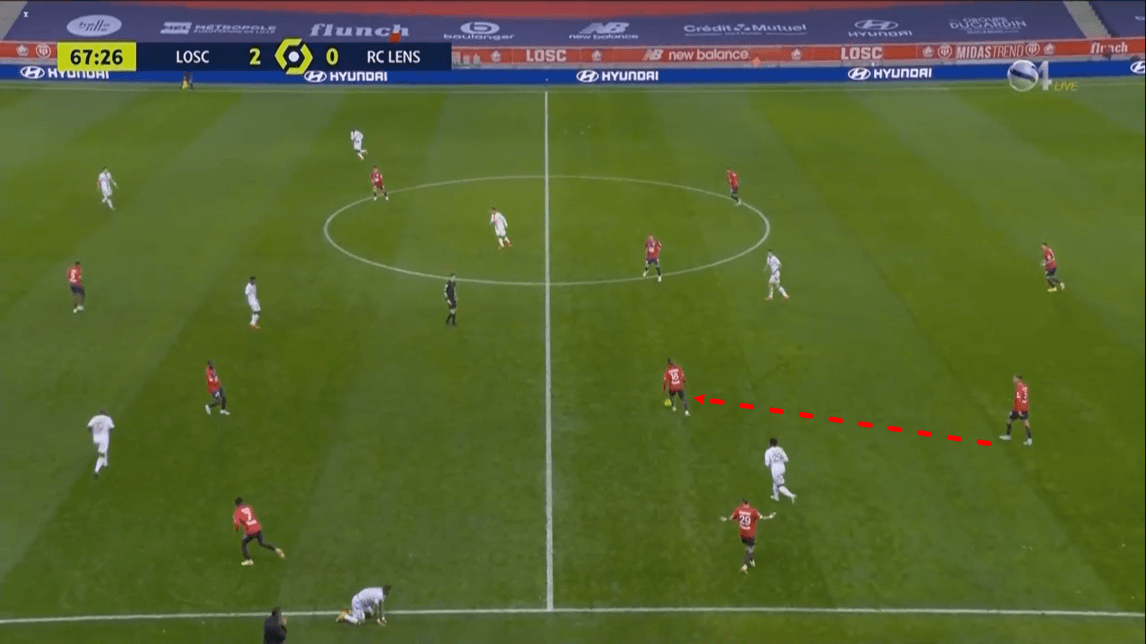
One area in which Lille outclassed Lens during this game, and a major reason for their success, was their transition to attack. Lille performed far better in transition than Lens did in this game and this may have been one of the key factors in their 4-0 victory. The image above shows us one example of how Lille exploited Lens during the transition.
We can see Sanches picking up the ball just inside of his own half here and just prior to this image being taken, Lille forced a turnover inside their own half and the defender who won the ball back sent the ball upfield to Sanches.
The Portuguese midfielder enjoyed a lot of space as he received the ball during the transition to attack and he could then turn and carry it upfield, thus starting an attack for his side. The reason Sanches enjoyed so much space is that Lens struggled in the transition to defence and left quite a lot of gaps in their defensive shape which Lille exploited on a variety of occasions during the transition to attack.
Lens lacked compactness when transitioning to defence and their transition was also quite slow, which Lille took advantage of by exploiting areas in which Lens left space and by being quicker to transition to attack than Lens were to transition to defence.
Lille attempted 43 dribbles in this game, 65% of which were successful. 11 of their dribbles were attempted by Bamba, 11 were attempted by Çelik and nine were attempted by Sanches. This shows how important these three players’ dribbling quality was for Lille in this one. All three of these players’ dribbling ability was key for Lille in the transition to attack in this game.
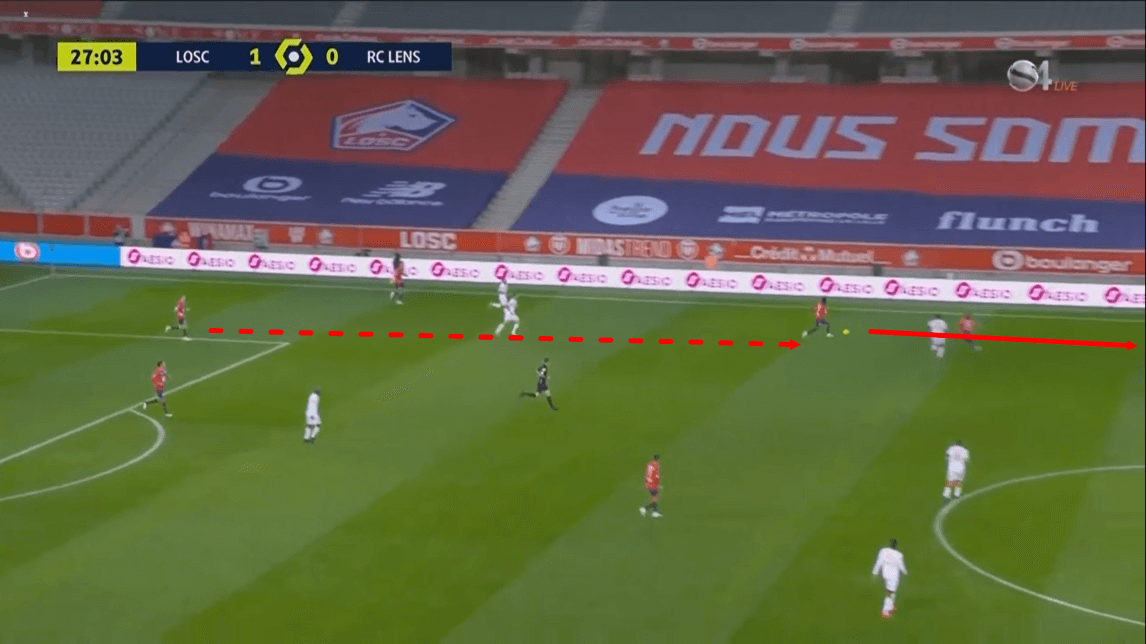
The image above shows us an example of Bamba exploiting space between Lens’ first and second line of defence during a transition phase. The winger picked up the ball in between these two lines and then went on to use his dribbling quality to carry it up the pitch, past opposition challengers, to drive into the opposition’s half and start an attack. Meanwhile, Sanches and Çelik tended to pick up the ball between the lines in more central areas, from where they would dribble upfield.
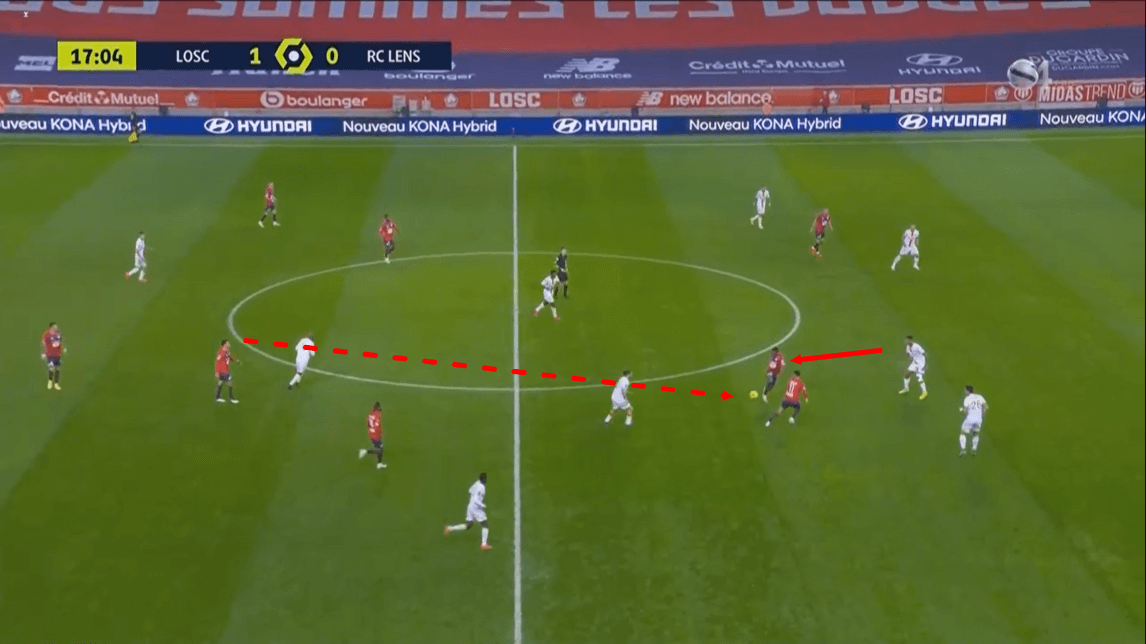
Lastly, another important aspect of Lille’s attack, particularly during the transition to attack, was the movement of David and Yılmaz into positions like the one we can see David occupying in this image above.
The Lille centre forwards would typically drop in between Lens’ midfield and defensive lines into positions like this to try and help their side to build into the final third. The two centre forwards played an important role in the build-up of attacks, with David typically using his dribbling ability and Yılmaz relying more on his physicality, to help their side build forward from and/or win free-kicks in these areas during Sunday’s game.
David didn’t enjoy a very productive game in terms of his dribbling and playmaking attempts, with his dribbles often being forced away from goal into non-threatening positions, however, he did play an important role in getting his side into attacking positions by dropping into these areas to help Lille build into the final third.
Tactical analysis of Lens’ attacking tactics
In contrast to their local rivals, Lens struggled significantly in the transition to attack in this fixture, which was a shame for them considering that we’ve already seen that they deployed some effective tactics off the ball to force turnovers.
Lens made 0.33 recoveries per minute in this game and had 0.22 attacks per minute, while Lille made 0.27 recoveries per minute and had 0.46 attacks per minute. These stats may back up our point that Lens were good at winning the ball back but they then struggled to be very productive with it once they had won it back, at least when compared with their opponents.
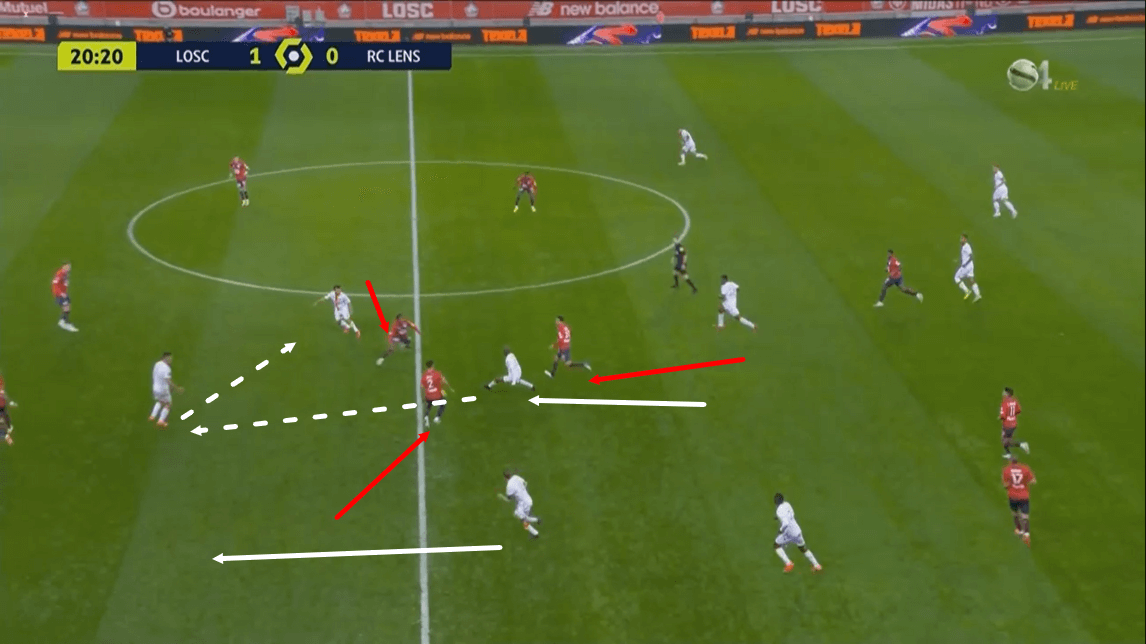
The image above shows us an example of a Lens attack in action just after they had won the ball back in a slightly deeper position than we see them occupying here. Kakuta managed to get himself on the ball here and he plays an important role for Lens’ attack, being the primary playmaker of the side in his ‘10’ position.
As he dribbles the ball upfield, he attracts pressure from three Lille players but he is comfortable in this situation and he goes on to play the ball past these pressing players and onto one of his side’s centre forwards, who is enjoying an increased amount of space thanks to Kakuta’s dribble that drew players to him and away from the centre forward.
As this player receives the ball, however, the attack begins to break down. Rather than playing the ball out to the wide man who we can see overlapping into space that has been created as a result of Kakuta drawing pressure from Lille’s right-back, this forward plays the ball inside to the other centre forward who is in a tighter situation and under more pressure.
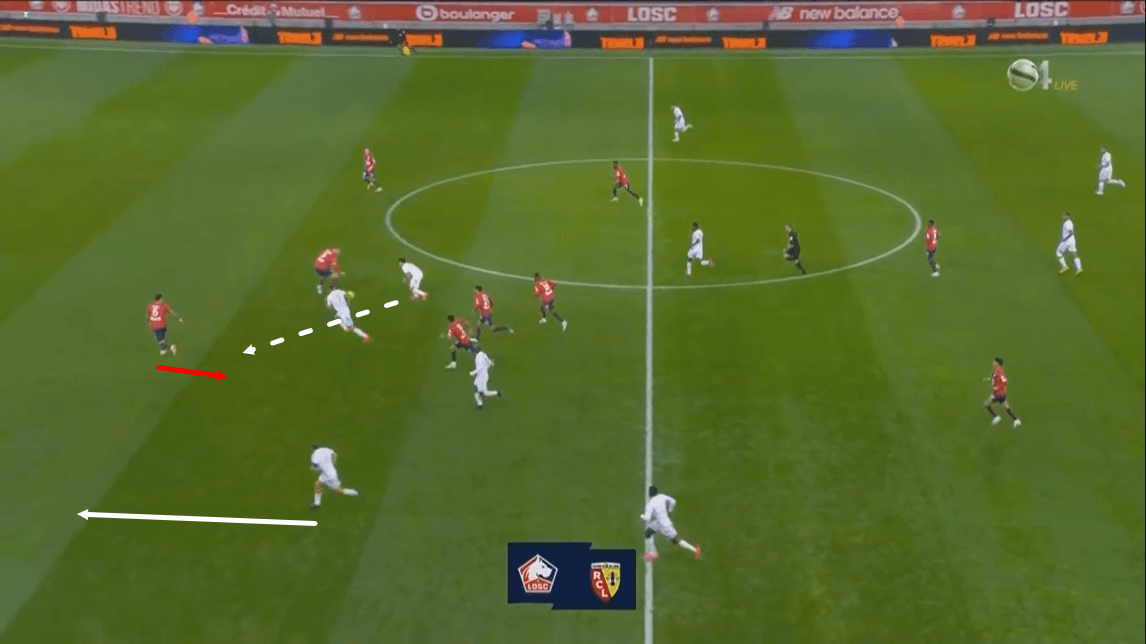
As play moves on, this player then tries to salvage the move by playing the pass that the forward should originally have played but the ball isn’t good enough to beat Fonte and Lille regain possession. This attack shows us just one example of how some of Lens’ decision-making and sheer technical quality in the final third was lacking in Sunday’s game and may have cost them at crucial stages of the contest, particularly during the transition to attack.
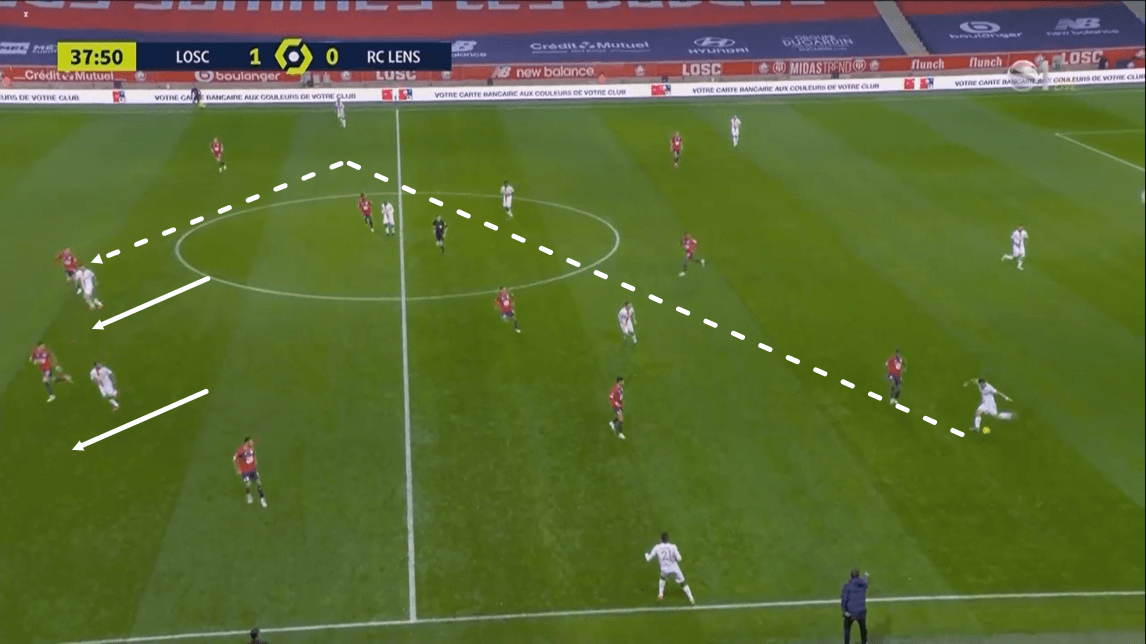
This next image shows us an example of Lens beating Lille’s first couple of lines of pressure via a long-ball during Sunday’s game. This pass makes its way up to the centre forward who wins the first ball and knocks it into the path of a teammate who manages to win the second ball, thus carrying on this attack.
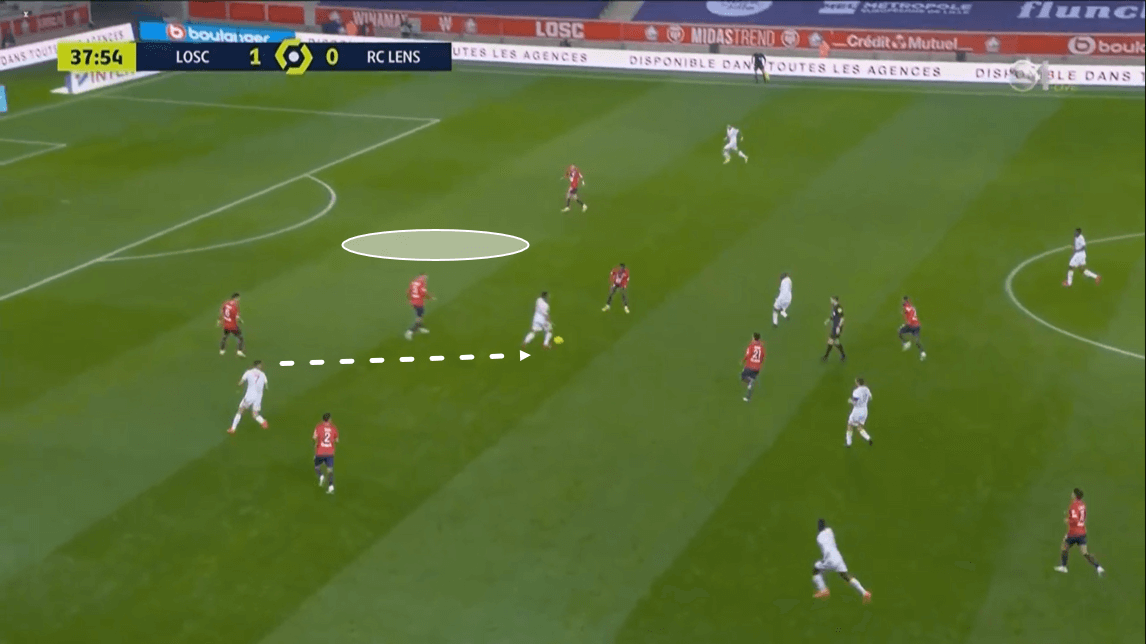
This next image shows us the next stage of this particular passage of play and how the attack ended up breaking down, in the same manner that a lot of Lens’ attacks broke down in this fixture, with the man in possession having very few progressive passing options available to him, essentially resulting in the attack fizzling out with Lens having to play the ball backwards and eventually turning it over to the home side.
After this player won the second ball, there was a lot of space ahead in the centre for Lens to potentially attack but no player made the run, similarly to how no player exploited the space between the centre-back and full-back during another stage of the match, as we analysed previously. So, it would certainly seem as though Lens’ movement in attack didn’t help them a great deal during this game, with plenty of opportunities going begging due to a lack of movement up top.
Conclusion
To conclude this tactical analysis piece, both of these sides demonstrated plenty of interesting tactics on and off the ball in Sunday’s game. Both teams were generally quite effective in the press and demonstrated some effective defensive tactics, however, with Lens conceding four, it’s clear that their defensive tactics were far from perfect, though we feel it was mainly the transition to defence, in which they let themselves down, while they also did themselves no favours in the transition to attack, whereas Lille were impressive in both of these areas.



Comments