After being stuck in First Division B for four straight seasons, OH Leuven were finally promoted back to the Belgian Pro League in the 2019/20 season. That summer, the club hired former Mechelen, Beerschot, and Sint-Truiden boss Marc Brys. In his first season in charge, the Belgian guided the club to an 11th-place finish. Another 11th-place finish followed last season, but they have had a great start this campaign. The club currently sit in fifth, two points outside of the Championship playoffs.
This tactical analysis and scout report will look at some of the keys to Brys’ success at Leuven so far this season, and whether or not it will be possible for the Belgian manager to keep the Den Dreef side in contention for a European playoff, or even Championship playoff spot, come the end of the season.
Preferred lineup and formation
At the beginning of the season, Brys opted to set his side up in a back three, normally a 3-4-2-1, but the early returns were not promising. As a result, the Belgian tactician swapped to a back four, with the formation altering between a 4-2-3-1 and a 4-4-1-1 mid-match.
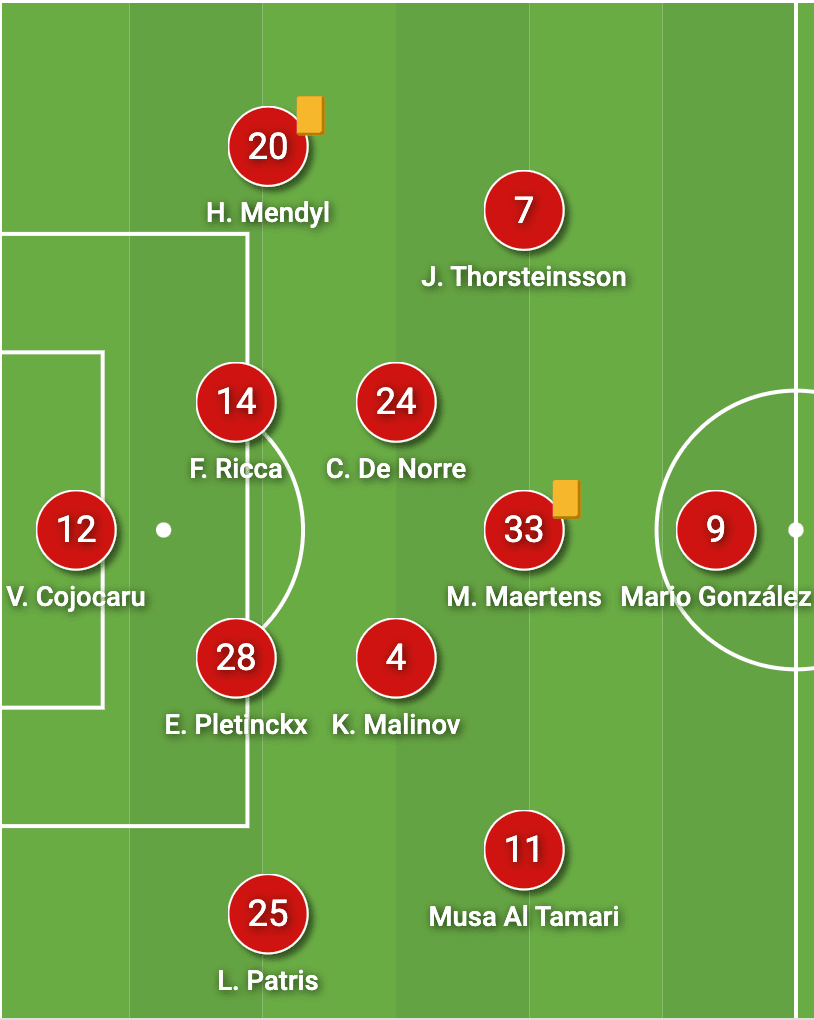
Both formations are relatively similar, with the positioning of the wide players determining whether it is a 4-2-3-1 or a 4-4-1-1. This image also shows the usual starters for Oud-Heverlee Leuven so far this season, with Braga loanee Mario Gonzalez becoming the undisputed starting number nine after 6 goals in 6 appearances so far this season. The attacking four in particular have been instrumental for Brys’s side, with 15 goals and 4 assists between them so far this season.
They have, however, not been the strongest side defensively this season, with their 18 goals conceded being the joint most (along with Westerlo) of all sides in the top eight in Belgium so far. This is not to say, however, that Leuven do not have talented defenders in their ranks. 21-year-old Louis Patris has 5 assists so far this season playing as either a right-back or a centre-back in a back three, while Ewoud Pletinckx is a promising up-and-coming Belgian central defender.
As we can see, Marc Brys has a talented squad at his disposal and has so far been able to utilise it to its full potential. So what exactly are some of the keys to the manager’s success this season? These next couple of sections will take a deep dive into this.
Fullbacks joining the attack to overload the wide areas
When watching OH Leuven from an attacking perspective, what stands out is their ability to stretch the opposition’s defensive line, with the fullbacks often getting heavily involved in attacking movements to create 2v1 overloads in the wide areas. This is more evident when looking at the involvements of both fullbacks for Leuven from an attacking perspective so far this season. The two data vizzes below show the penetrating carries of both Leuven fullbacks, which illustrates their involvement in the attacking third for the Belgian side.
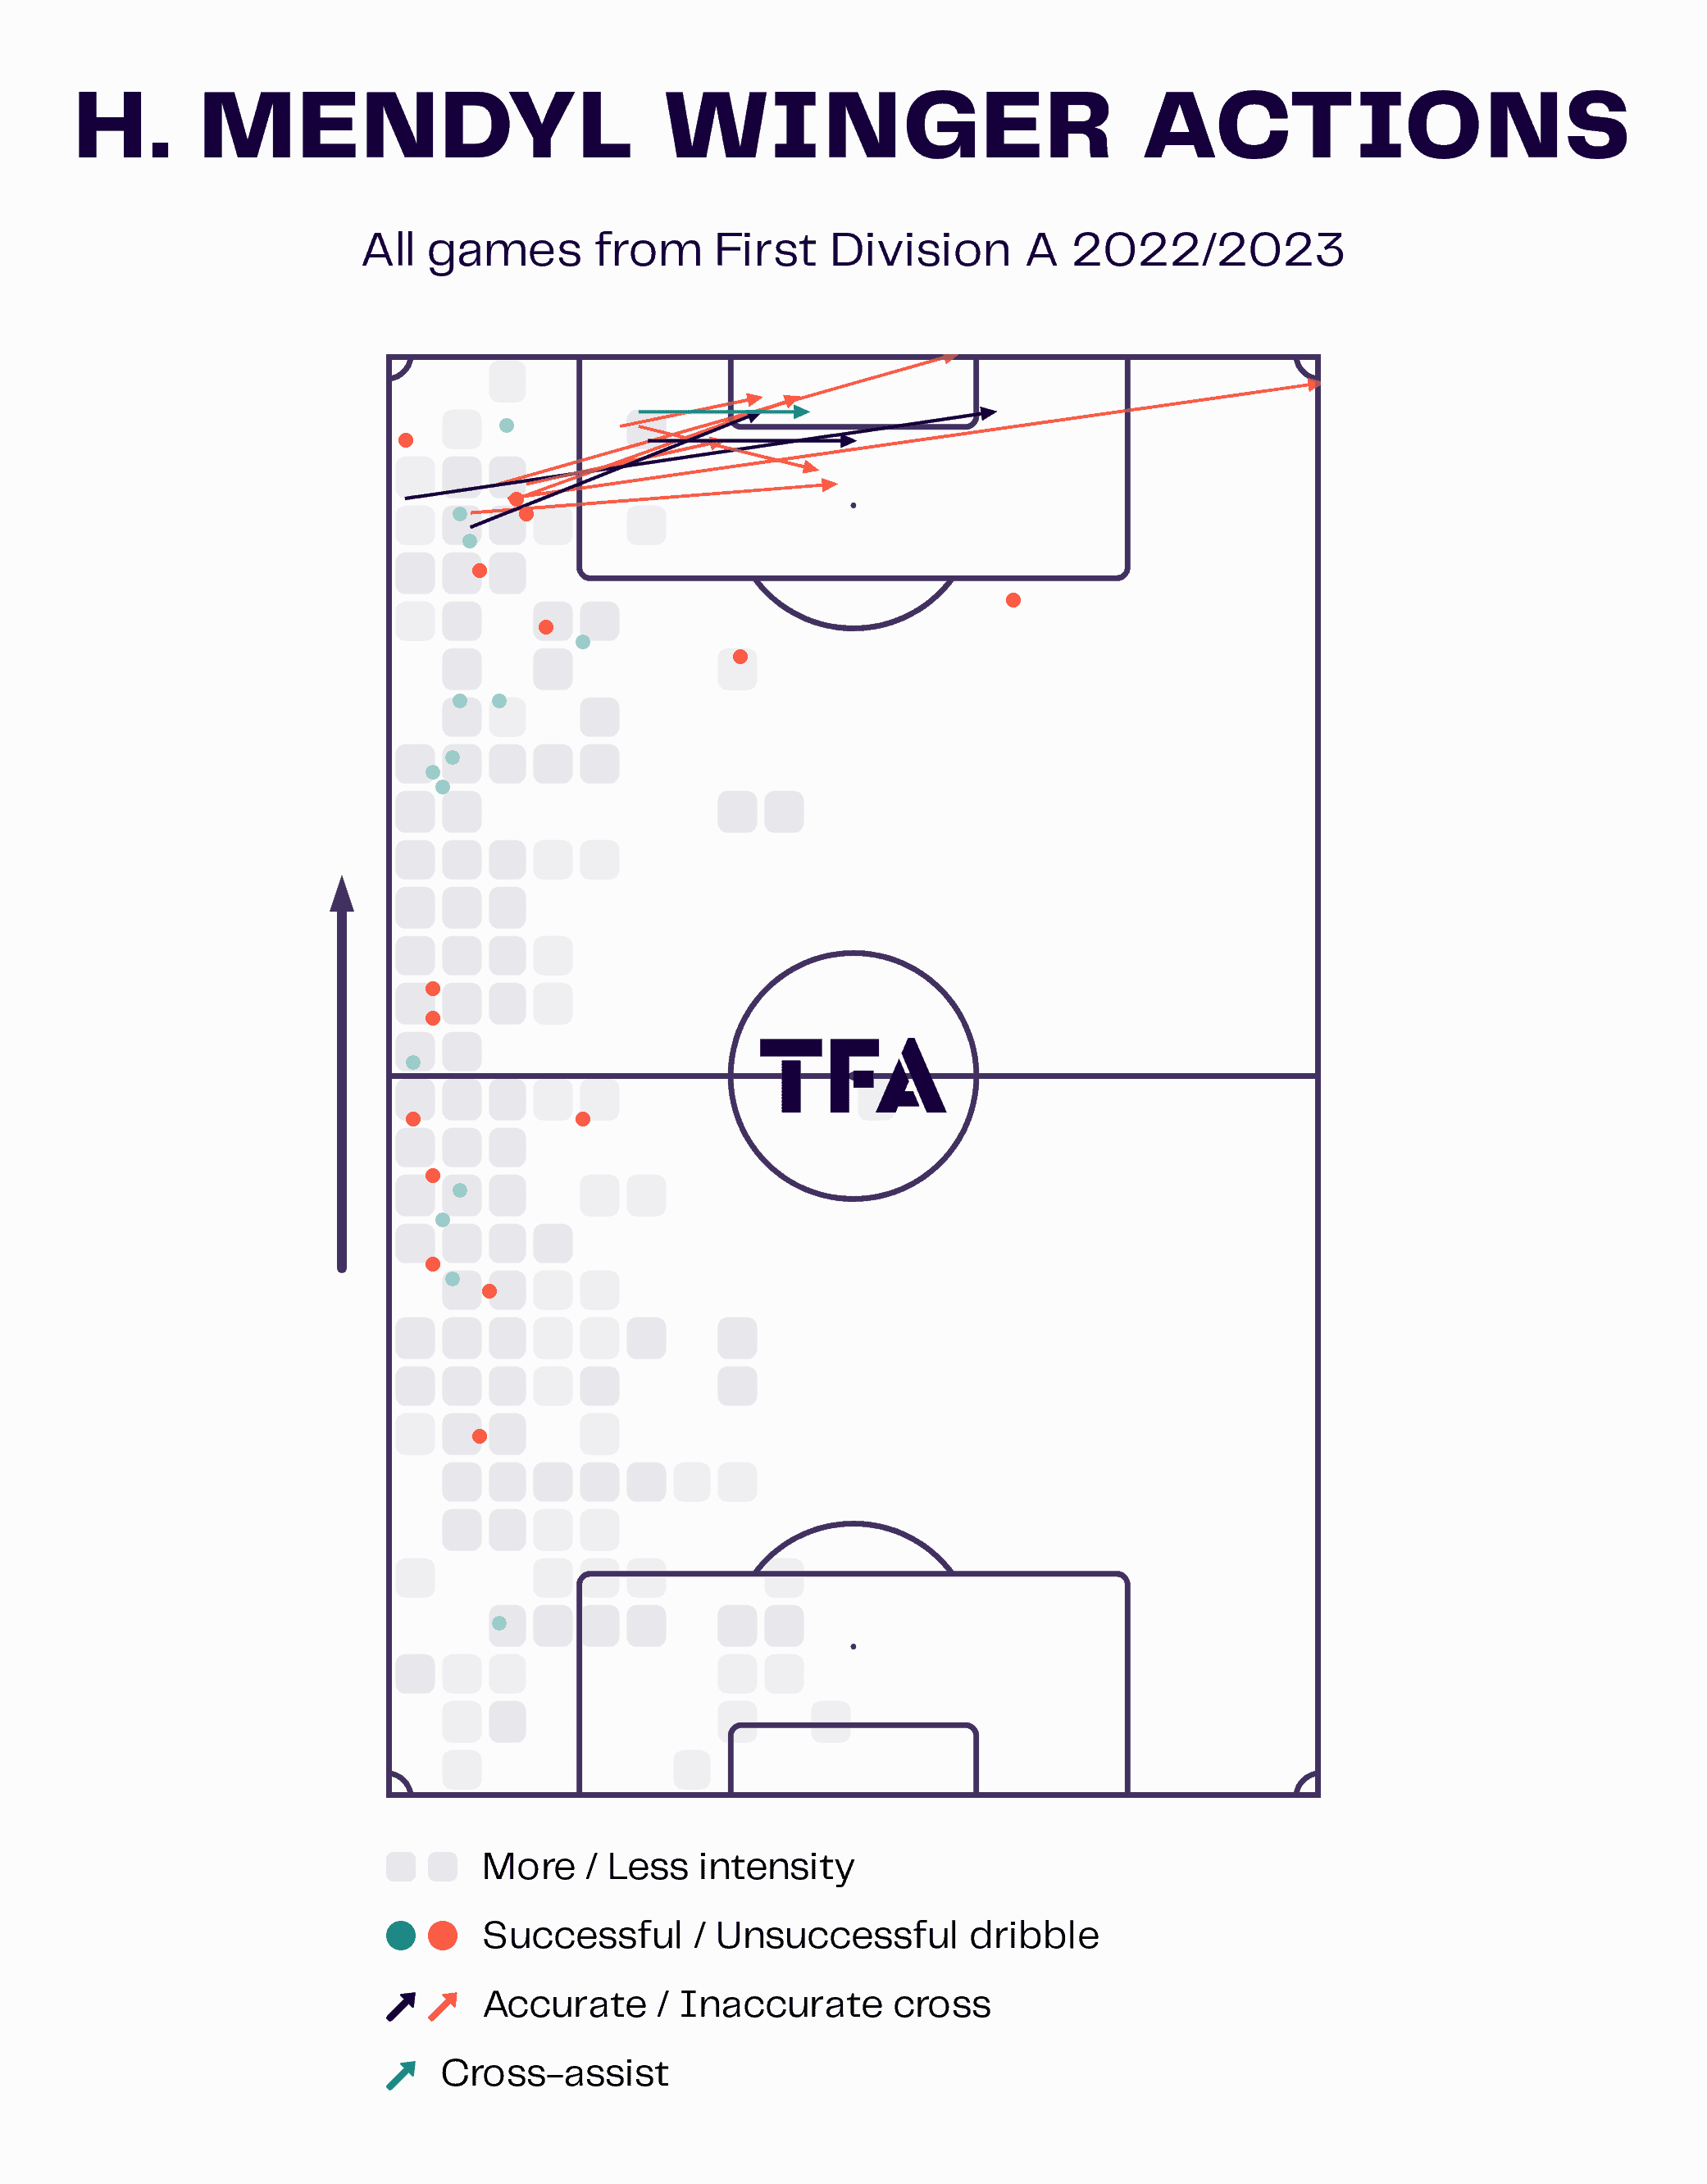
First up is left-back Hamza Mendyl. While the Moroccan international does not have as many goal involvements as Patris this season (only 1 assist), the fullback has shown his tendency to get involved in the final third of the pitch. As the heat map shows in the viz, Mendyl spends just as much time in the attacking third as he does in his own defensive third.
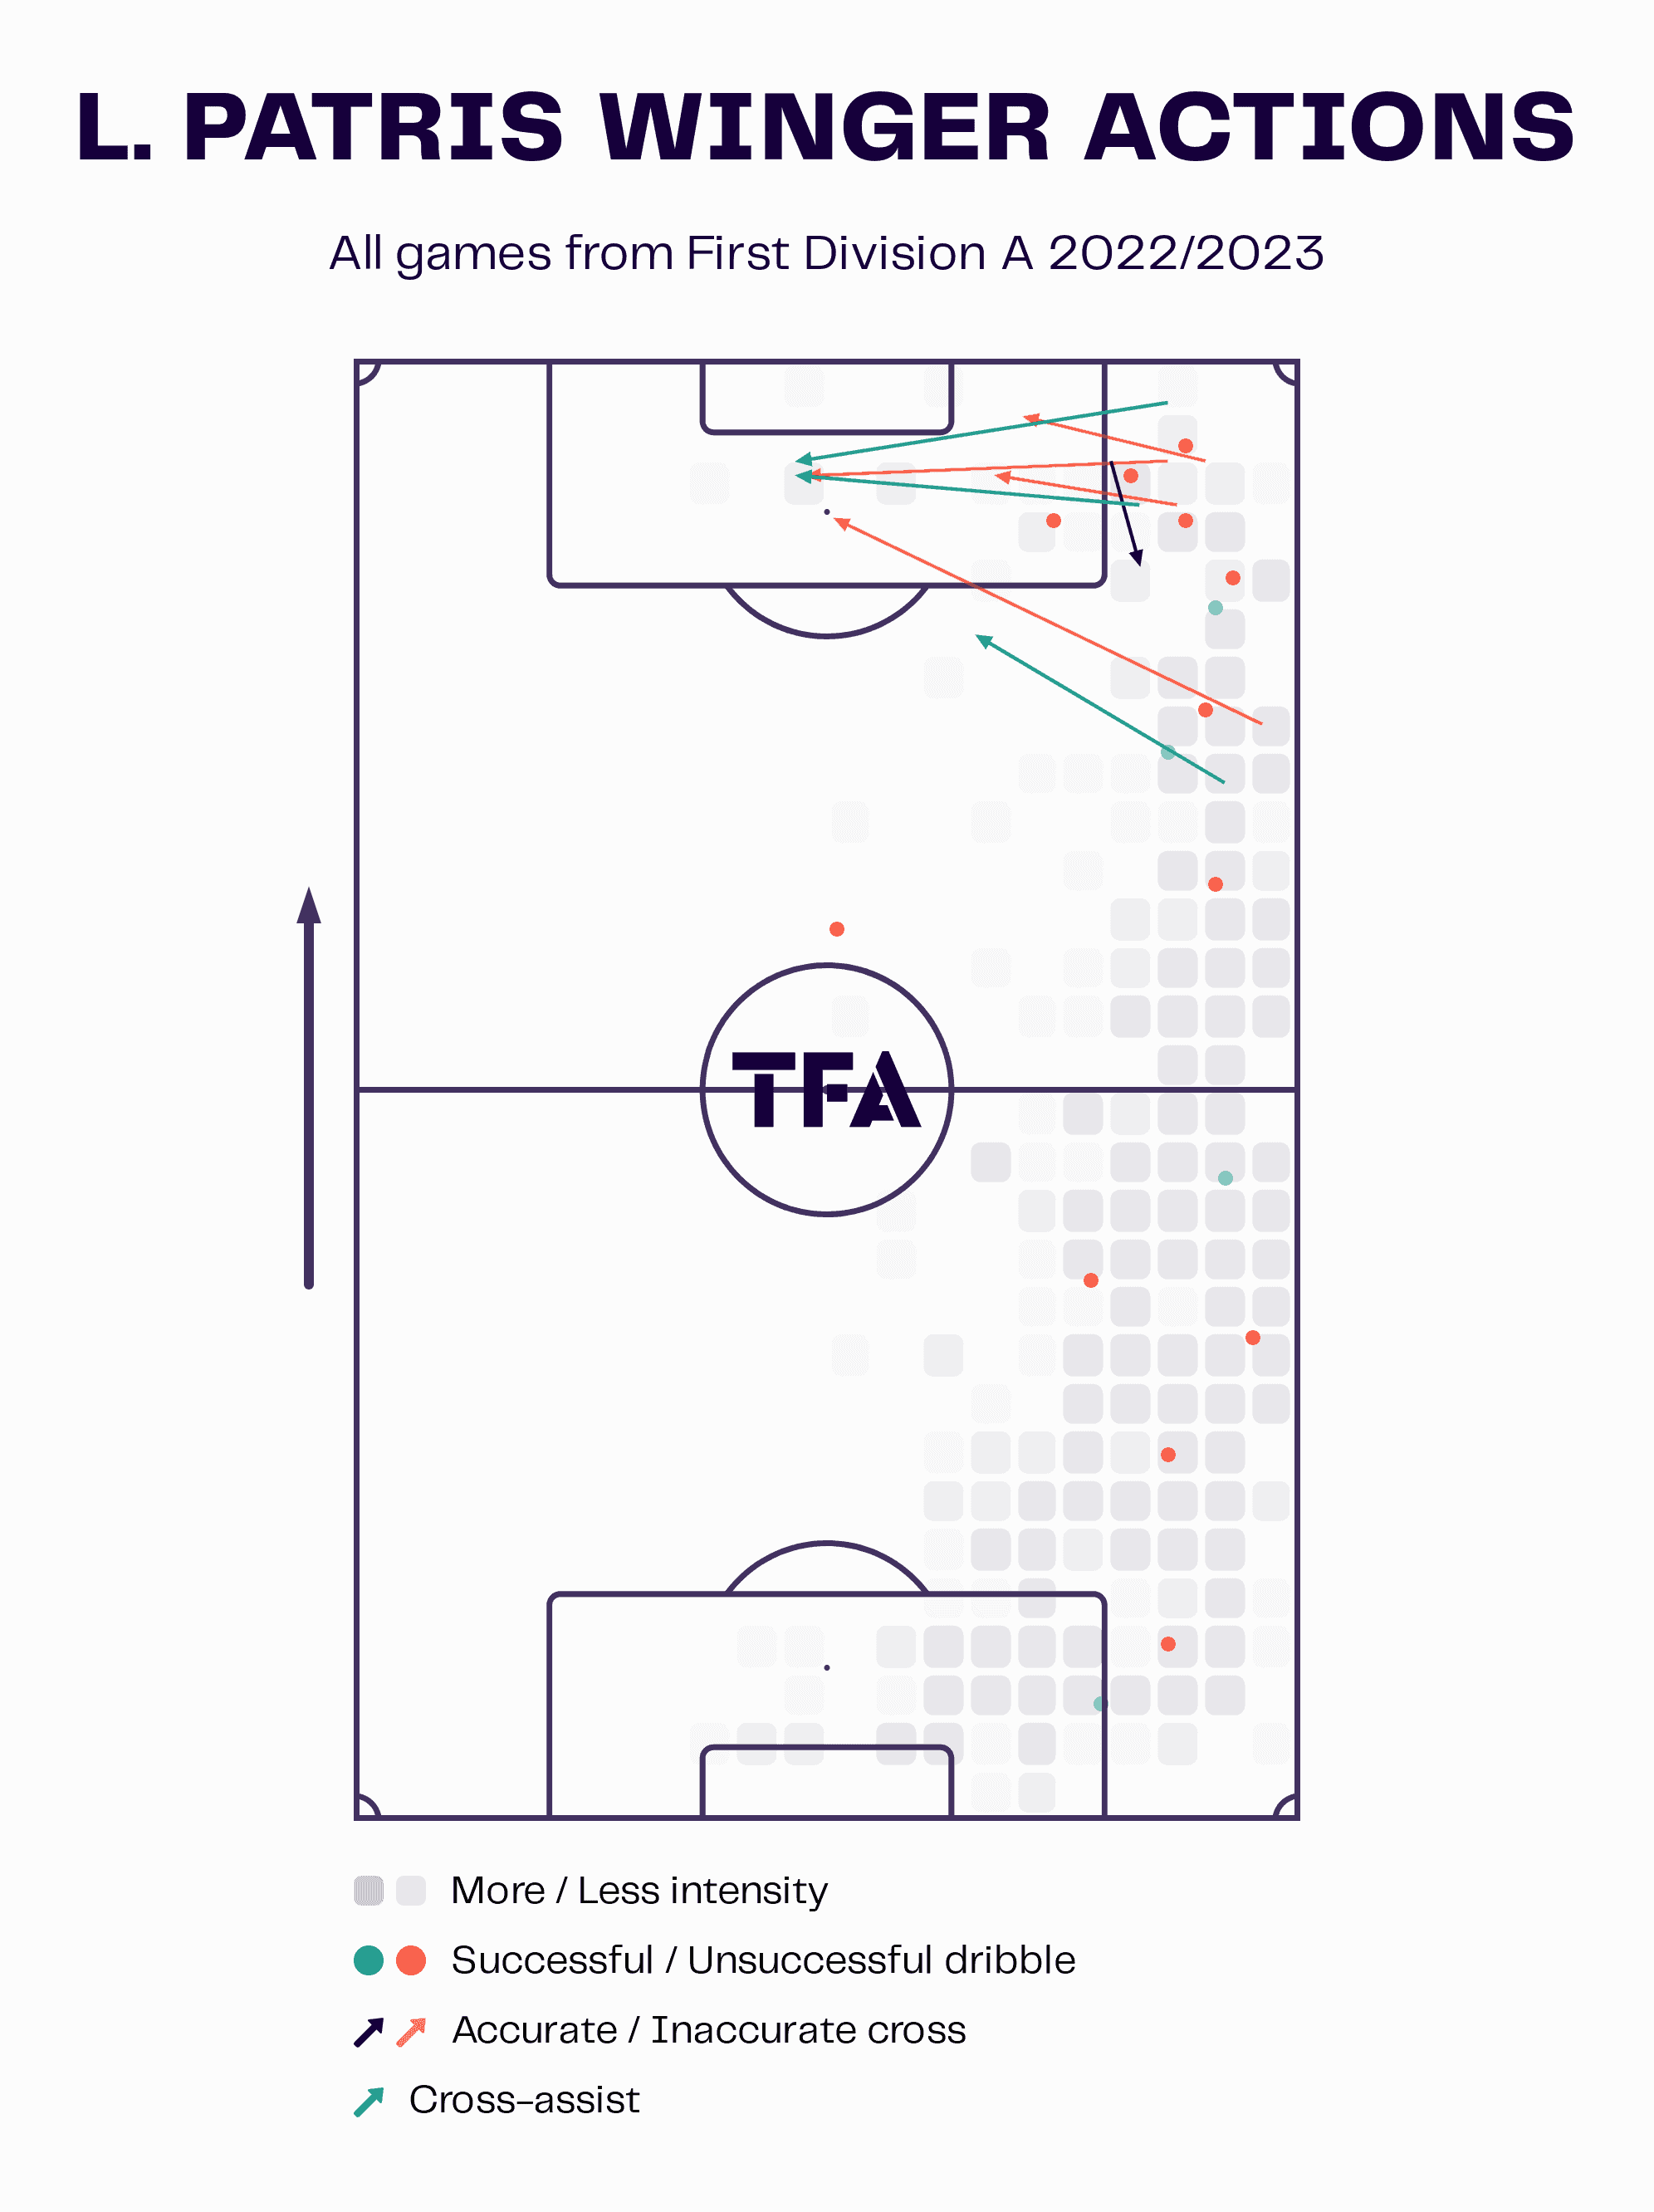
Above is Louis Patris’ penetrating carries as well as his heatmap, which actually shows that he is slightly less involved in the attacking third than Mendyl. However, the young Belgian defender has 1 goal and 5 assists so far this season, showing that he is a consistent contributor in these areas of the pitch. The following examples demonstrate this width used by Leuven when attacking, as well as the contributions the two fullbacks make.
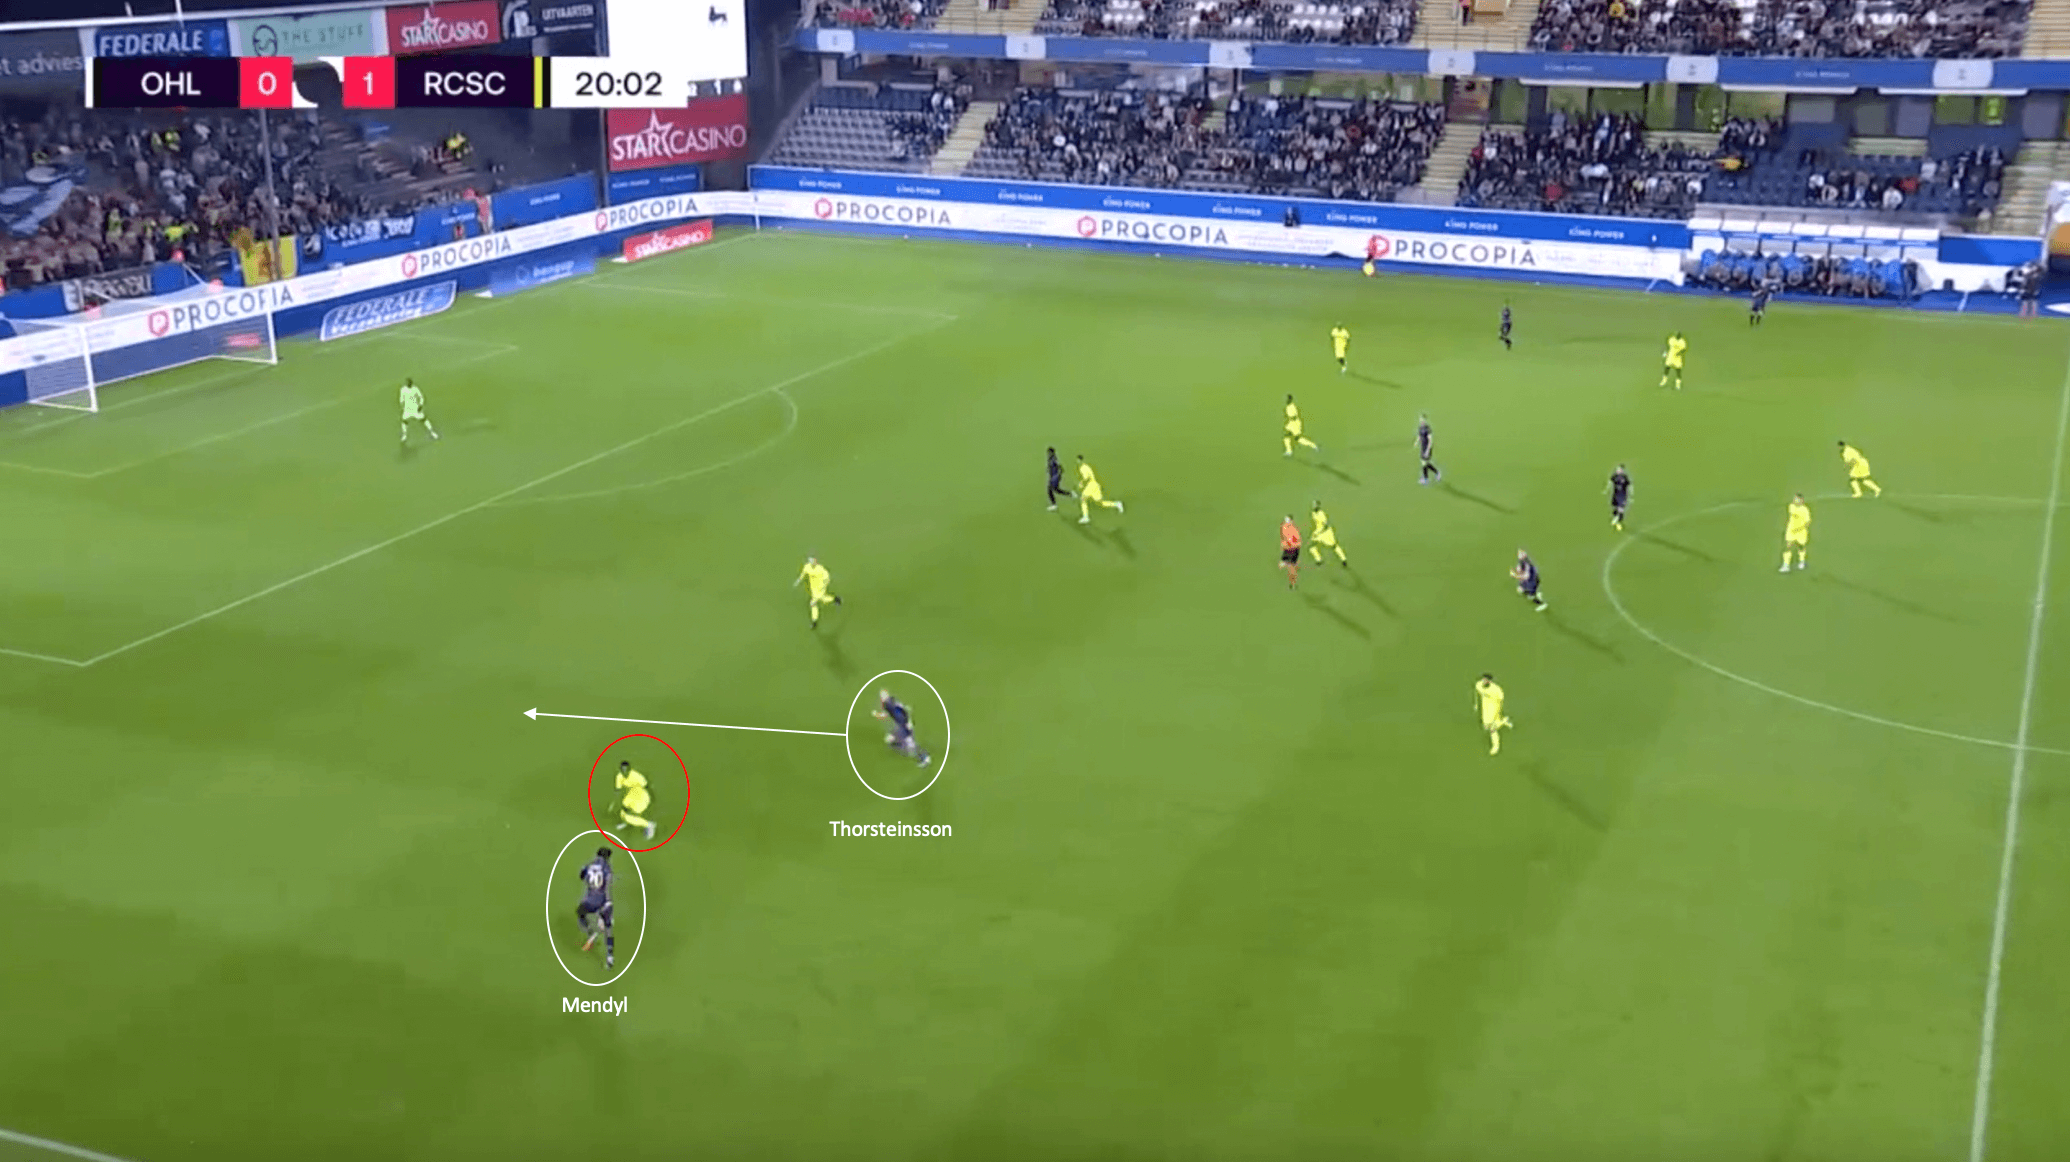
The image above shows an example of the width that OH Leuven uses to attack, as well as the numbers they push forward, which make them susceptible at times to opposition counterattacks if they lose possession in these advanced positions.
As mentioned earlier, the fullbacks look to join the attack to try and create 2v1 overloads in the wide areas with the wide attacking midfielders. The phase of play above shows a good example of this movement. On the near side, Hamza Mendyl has received possession in an advanced position on the left wing. This space was opened up by left attacking midfielder Jon Torsteinsson tucking inside. As a result, it creates an overload against the Charleroi defender, which allows the Iceland international to make a run behind the Charleroi defence.
Also, notice how the same type of overload situation is presenting itself on the far side, with right-attacking midfielder Mousa Al-Tamari and right-back Louis Patris being in similar positions, attempting to isolate the defender. A lot of these number-up situations in the attacking half can be attributed to how many Leuven players join the attacks, with eight of the ten outfield players positioned in the attacking half of the pitch during this offensive phase.
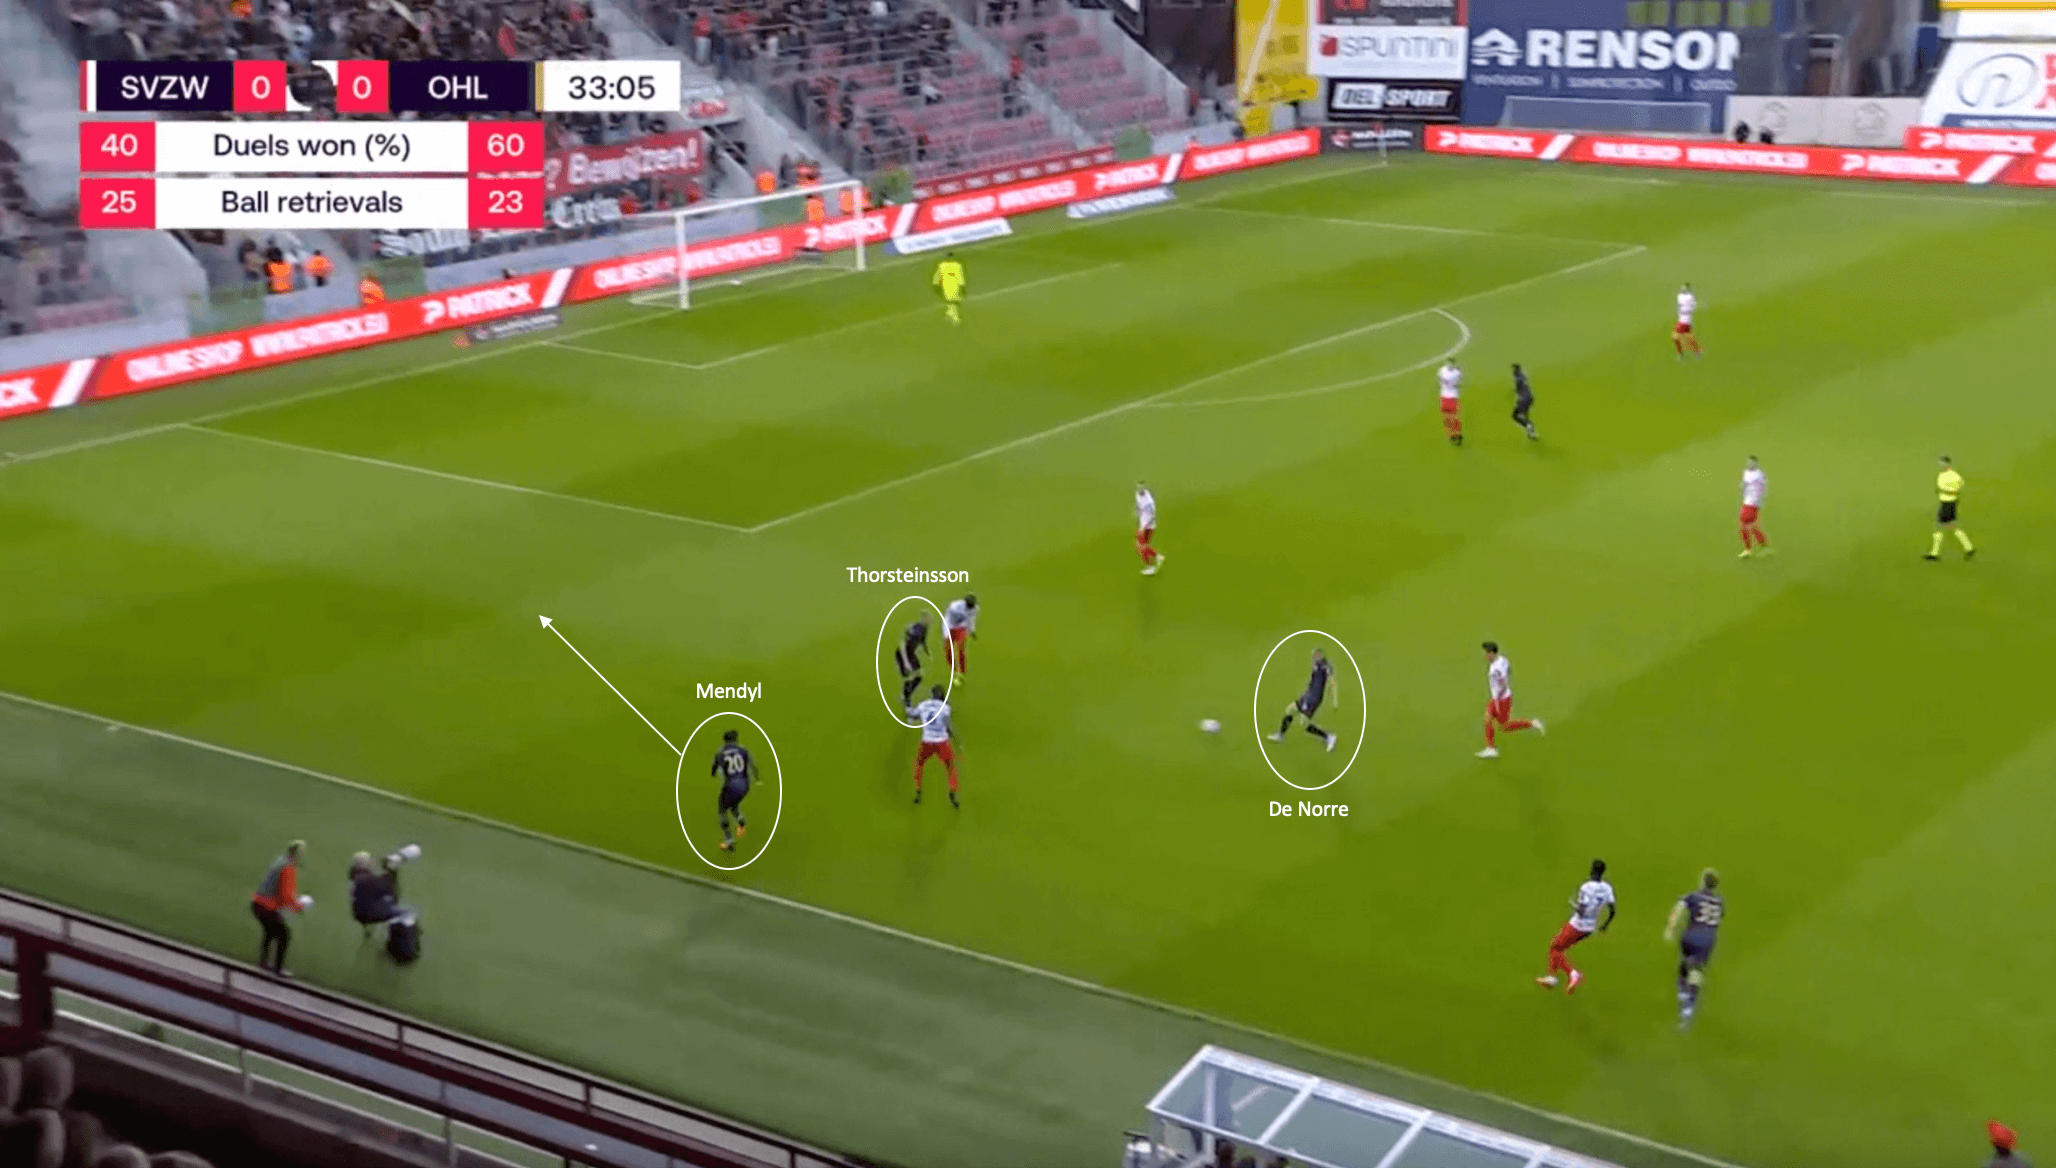
The image above shows another example of Leuven’s attacking width creating an overload in the final third. In this phase of play, Casper de Norre has drifted into the left halfspace to make it a 3v2 in Leuven’s favour in this area. This allows the unmarked Mendyl to make a run in behind the Zulte Waregem defence, with the Belgian midfielder playing a through pass into the Moroccan’s path. Unfortunately, the ensuing cross from the fullback is mishit, but still demonstrates the danger that the Belgian side are able to cause from these wide areas of the pitch.
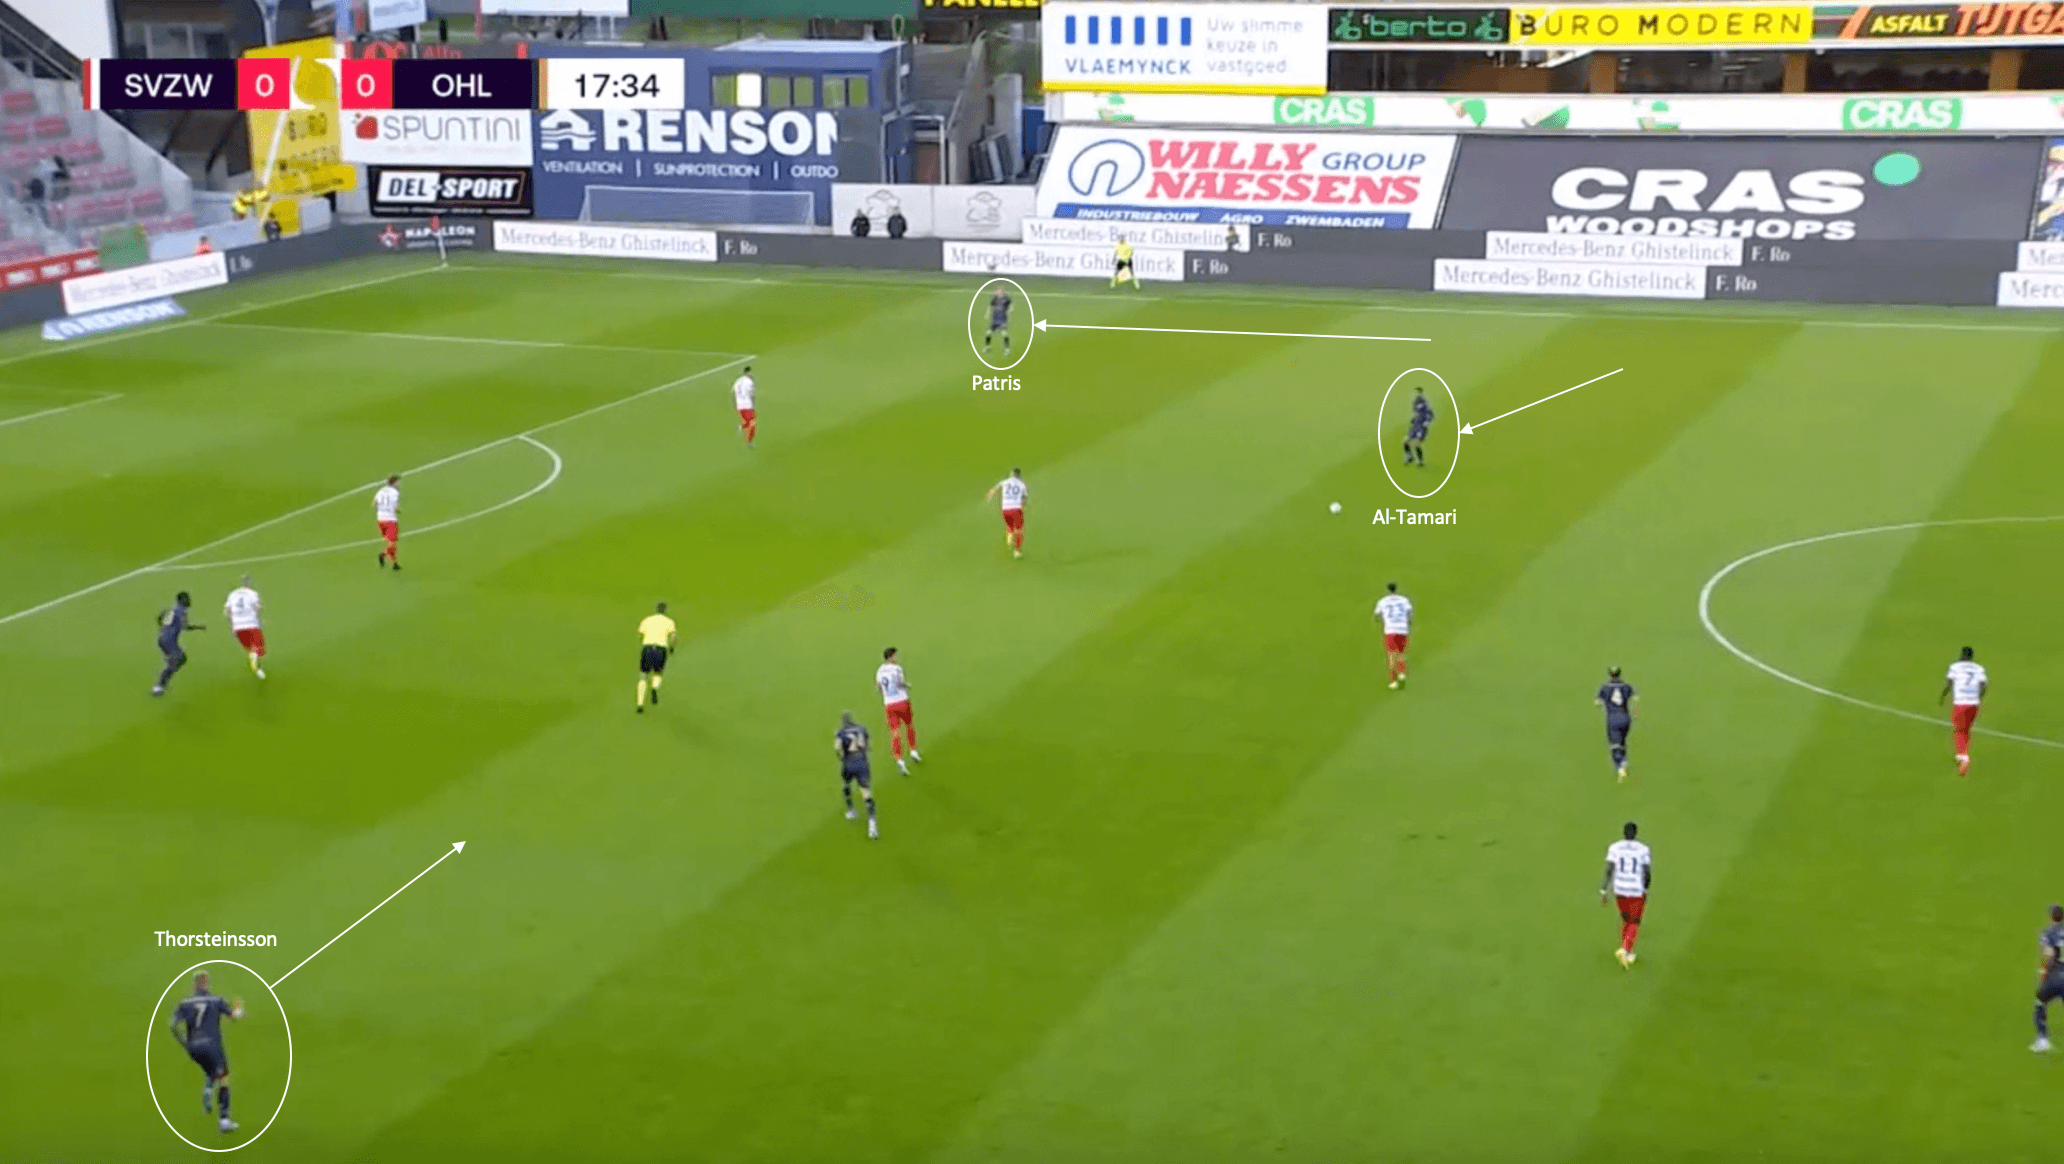
The final example for this section on Leuven’s attacking principles once again is able to illustrate the positional movement by both the wide attacking midfielders and the fullbacks to create space in the wide areas, as well as create width to stretch the opposition’s backline to try and open spaces centrally. In the phase of play above, Jordan international Mousa Al-Tamari has tucked inside into an inverted winger role, allowing him to receive possession in the halfspace. His movement inside also allows Louis Patris to move forward into the attacking third, making himself a passing option out wide.
On the far side of the field, Thorsteinsson and Mendyl do the exact same thing. Although Mendyl is not in the picture, the movement of the Icelandic international to tuck inside allowed the fullback space out wide to move into. Al-Tamari’s ensuing pass is played out wide to Patris, who is allowed the space and time to send a cross into the box. The ensuing cross is cleared away by the opposition defence, but once again, the ability for Leuven to create space out wide allowed for a chance to score.
When looking at the chance creation statistics for both fullbacks, as well as the wide attacking midfielders, one can see how their attacking involvements have been crucial to Leuven’s early success this season under Marc Brys. Between the four players (Thorsteinsson, Al-Tamari, Mendyl, and Patris), they have 7 goals and 7 assists this season. This contributes to 66.7% of Leuven’s goals coming from these four players alone (14/21). These contributions have been one of the major reasons that Brys’s attack has been so successful this season, which so far sees the club positioned as one of the best attacking sides in the league this season.
Strong at defending set pieces
Though OH Leuven have the joint most goals conceded in the top eight of the Belgian Pro League with 18, the vast majority of these have come from open play. In regards to defensive set pieces, they have only conceded 3 from these phases of play, one of the best tallies in the league. This section will take a more detailed look at their defensive set piece set-up, and analyze why Marc Brys’ side have been one of the best at defending them this season.
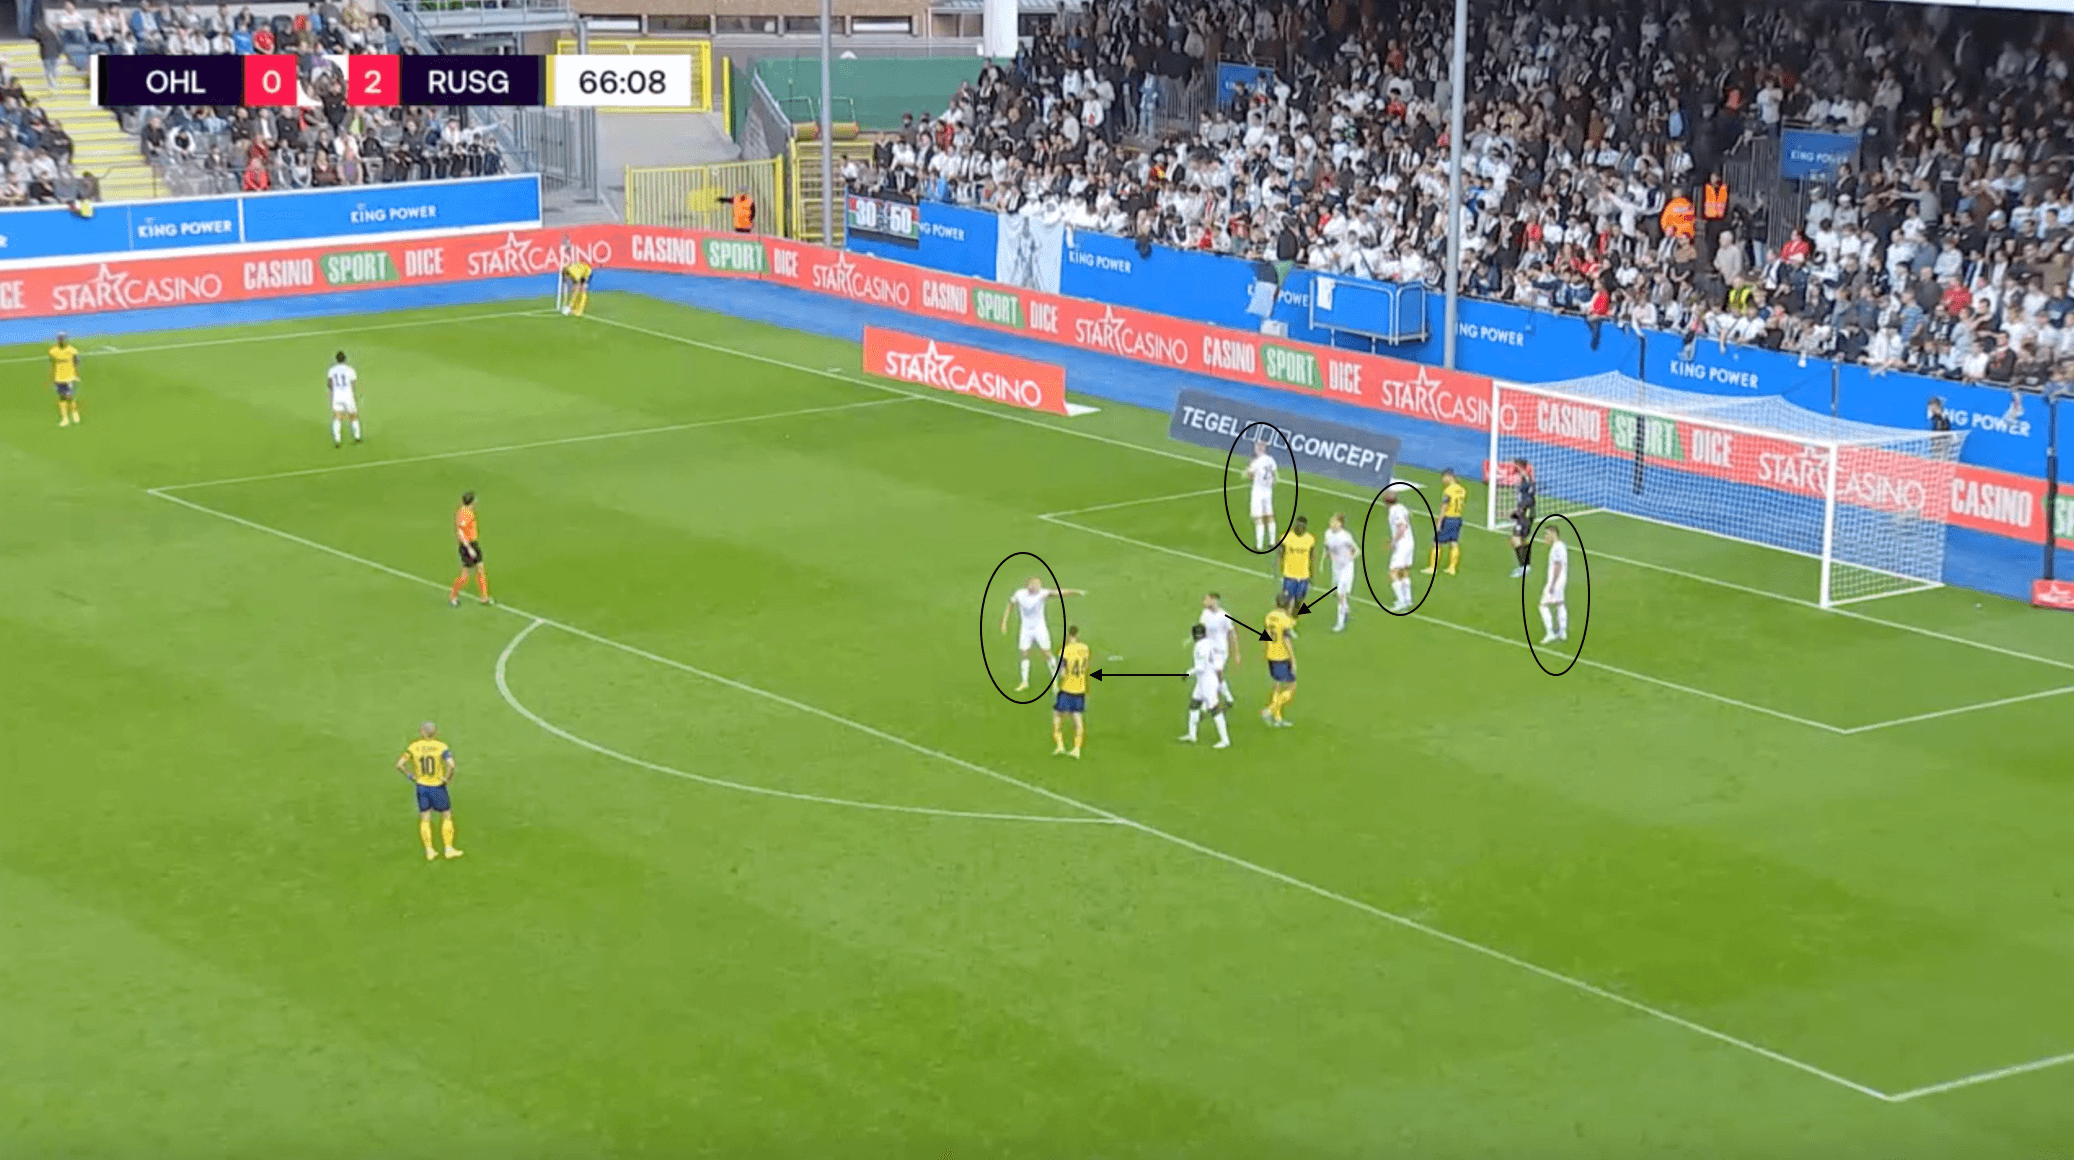
The image above shows an example of Leuven’s defensive corner setup under Marc Brys, with the Belgian side opting for a mixture of a man-marking and zonal system. As we can see from the set piece phase above, Leuven have seven players defending the corner from inside the box. Three players set up a zone in front of the goalkeeper and just inside the six-yard box, with three players man-marking in and around the penalty spot. The last Leuven defender is free, allowing him to pick up a late run into the box, or to help with either the zone or someone who has lost their man.
In this specific corner, the defensive setup does the trick. The ball is played towards the six-yard box, but the Leuven goalkeeper is able to punch the ball away from danger. Also, with Leuven only defending with eight outfield players, there is a chance for counter-attacking opportunities with the two other outfield players positioned further up the pitch to gather balls cleared away, or to be options for long passes.
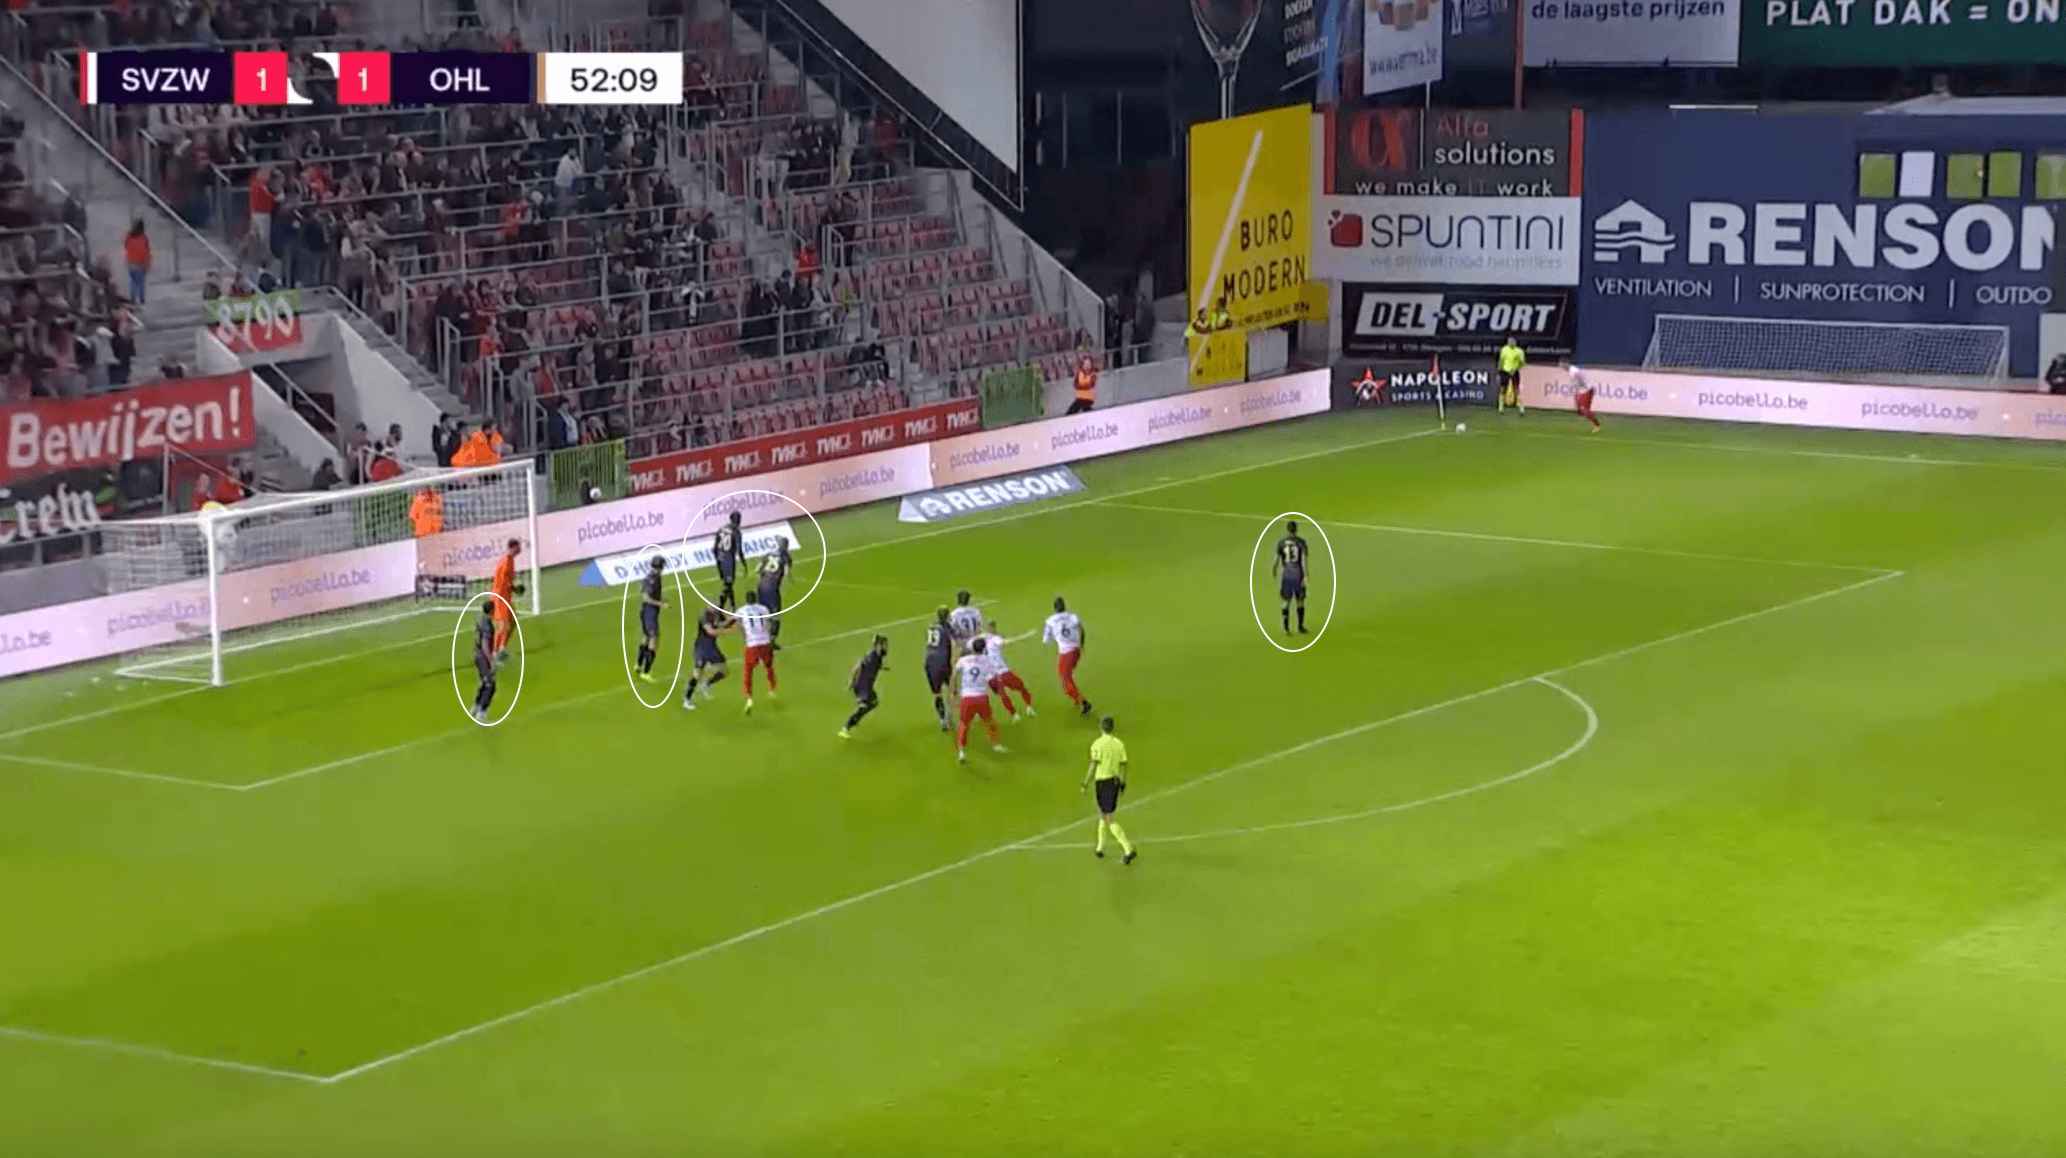
Above shows another defensive corner setup for Leuven, this time against Zulte-Waregem. Once again, they form a zone just inside the six-yard box, this time a four-player zone. Outside the six, they are once again in a man-marking setup, with a free player positioned to the right of the penalty spot. As the corner is played in, the attackers move towards the edge of the six-yard box, where the ball is played.
The zone, however, does the trick, with the ball not getting past the near post before being headed away by one of the players in the zone. Notice also how two of the Zulte players are not being man-marked and, as a result, are allowed free runs towards the ball. However, due to the confidence in the zone, they do not need to be marked.
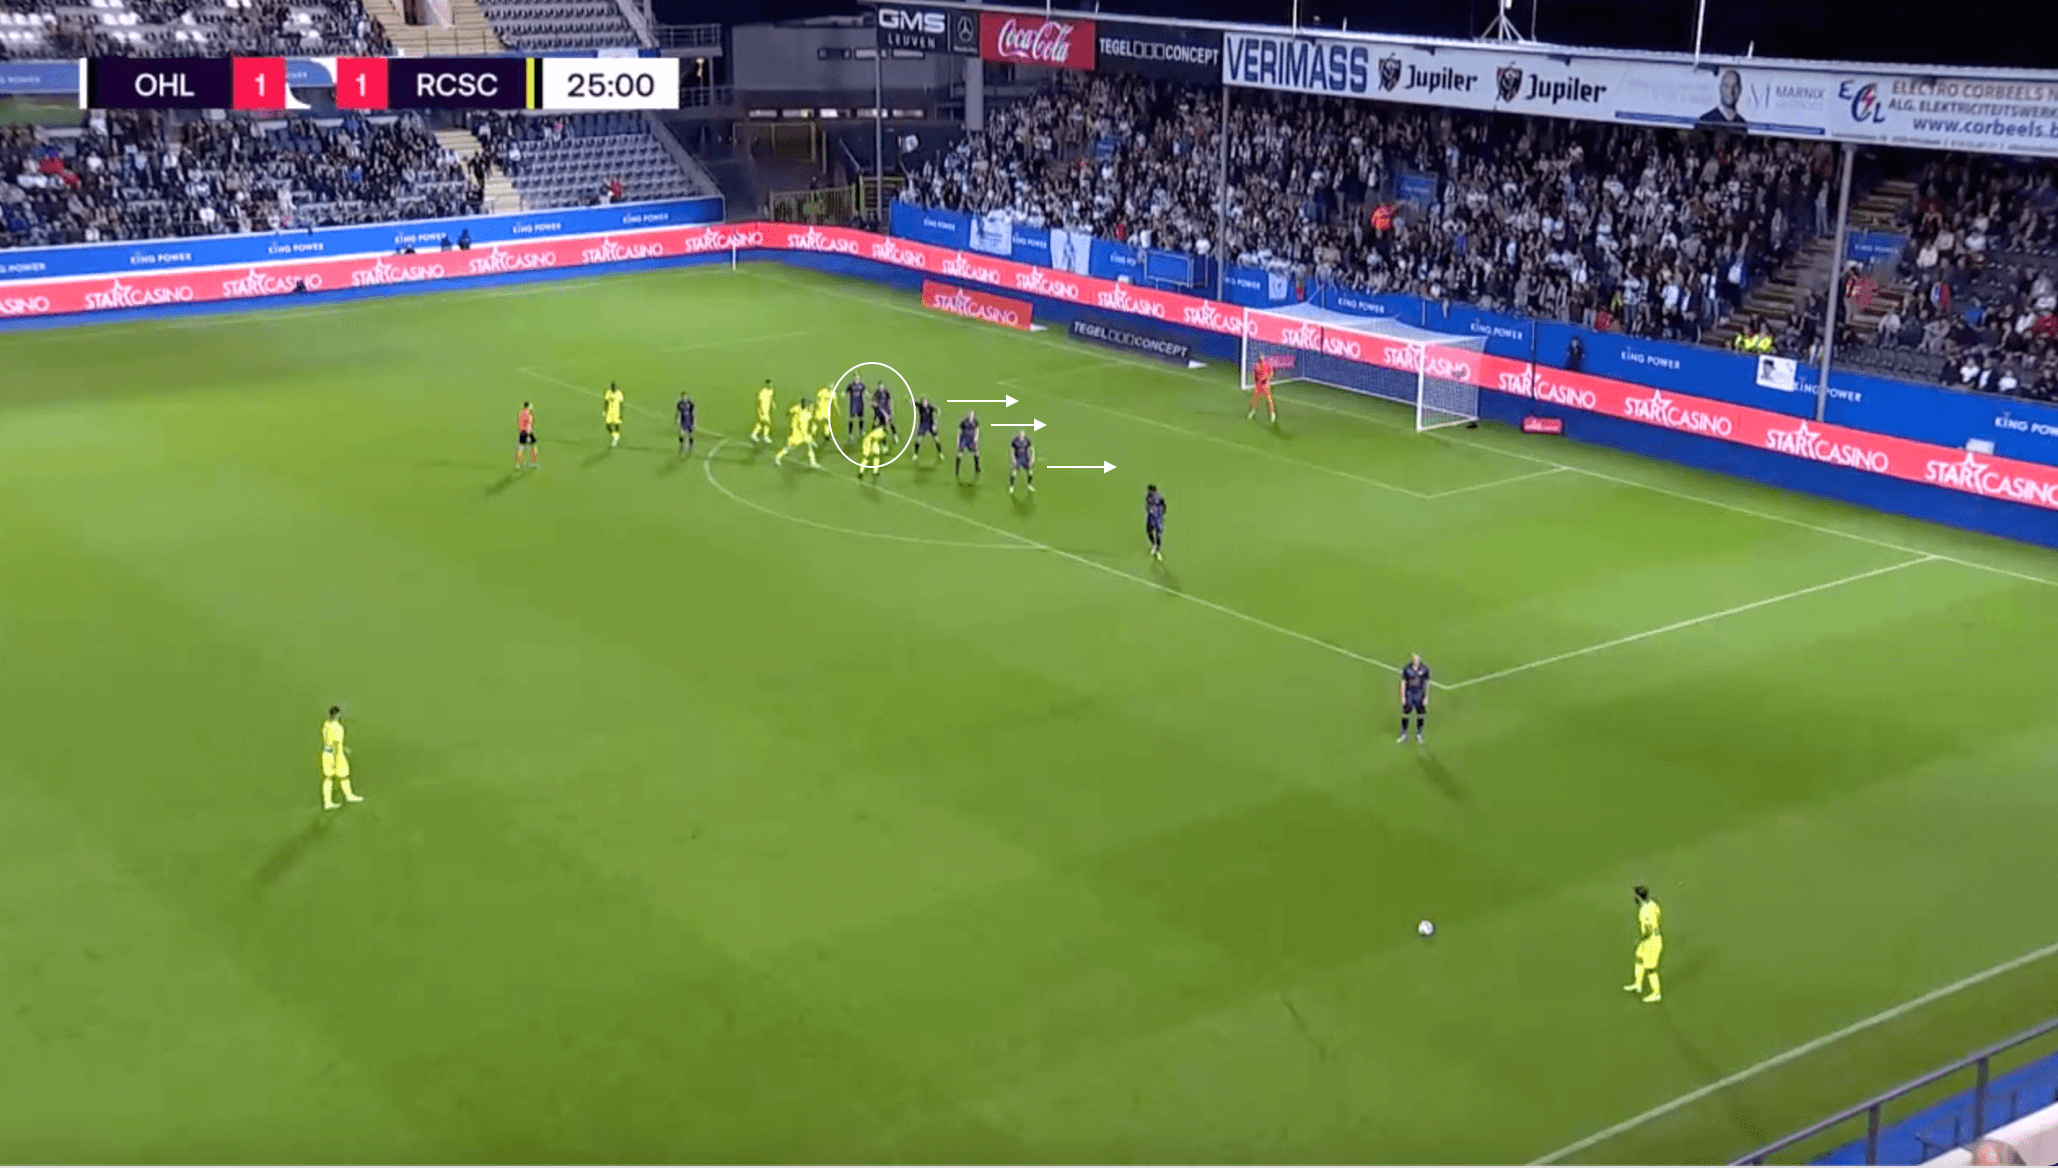
Next, we will take a quick look at the free-kick setup that Leuven use defensively. In the phase of play above, Charleroi had a free kick in a dangerous area. Notice how the Leuven defensive shape had six players in the defensive wall, with two positioned just outside of this wall. As the free kick is about to be taken, the three players on the right side drop back towards the edge of the six-yard box. The other three Leuven defenders, who are positioned in the crowd, look to screen the Charleroi runners, putting them off and delaying their entries into the box as a result.
This delaying strategy by the screeners works, because as the ball is played in, one of the three players who dropped is able to win the header, clearing the ball away from danger.
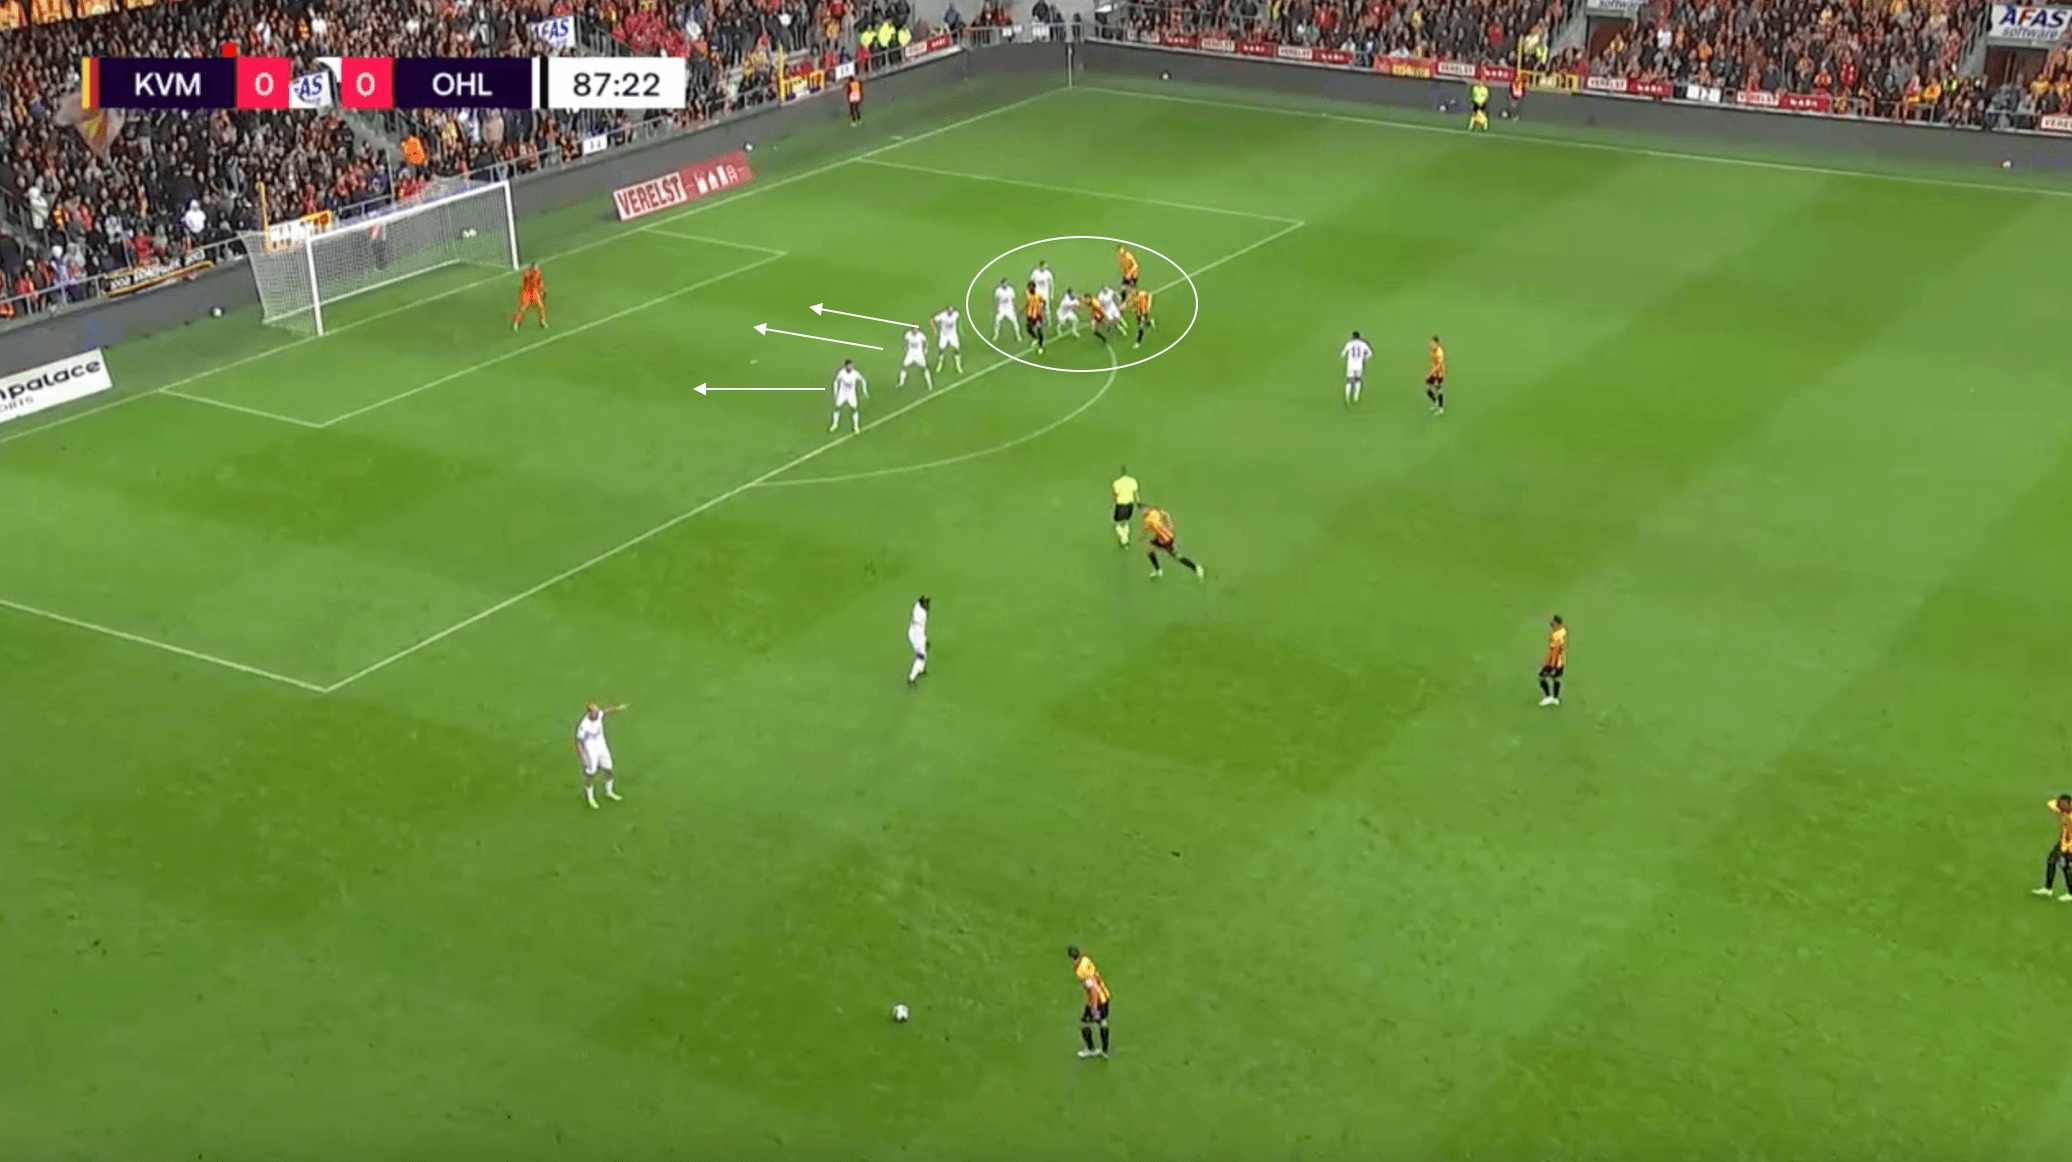
Above shows the defensive free kick setup again from Leuven, this time against Mechelen. Once again, as the free kick is about to be taken, the three closest defenders to the ball drop off to form a zone on the edge of the six-yard box. The other four Leuven defenders who are circled are once again tasked with screening the Mechelen attackers, attempting to prevent them from getting onto the end of the ball. It works once again, with one of the three players who dropped able to head the ball away from danger.
Though their 18 goals conceded this season is one of the higher tallies in the Belgian Pro League, the vast majority of these have been from open play. With only 3 set-piece goals conceded so far this season, this is a strong suit for Leuven under Marc Brys and one that will have to continue if the club want to stay in contention for either the European or even Championship playoffs.
Conclusion
As this scout report and tactical analysis has shown, Marc Brys’s tactics at OH Leuven have played their part in the club currently sitting in fifth place in the Belgian Pro League. Challenging for the title will be pretty difficult, with former Barcelona and Bayern Munich striker Mark van Bommel’s Royal Antwerp flying high at the top of the league. Also, Club Brugge are still top of their Champions League group after beating Atletico Madrid, so they are also beginning to find their form.
It will, however, be interesting to see how the season continues to develop for Marc Brys and Leuven, and whether or not they can stay near the top of the league come the end of the season.


Comments