Two weeks ago, we put out an analysis on tactical principles for efficient penalty area entries.
Let’s build on that.
In this week’s tactical theory article, we’ll look at the passing sequences that position a team to attack the box. That moves beyond the entry, scaling our focus back to how to create attacking sequences that lead to high xG shots.
While xG is best used within a large sample size to determine whether a player gets into quality shooting positions or a team’s ability to create shots, this analysis uses xG per shot as a means of identifying and determining which shots to hone in on. Your average xG for the top five UEFA leagues is 0.13, so to be more deliberate with our approach, the only shots considered for this tactical analysis were those that registered a 0.3 xG or higher.
Once those shots were identified, we looked at the tactics leading up to the opportunity. And that’s really our focus in this piece. We’re researching attacking sequences that lead to clear-cut opportunities on goal. We’ll start with shots created through attacking transitions and then finish with a case against the low block, rounding out this analysis.
Attacking transition from mid-block
The first sequence we’ll look at is attacking transitions from a mid-block. For starters, it’s probably the easiest to assess. The more quickly a team can advance the ball from Point A to Point B, the more likely they are to produce a high-quality goal-scoring opportunity.
Any deviation from point A to point B adds time to the attacking sequence. If the counterattack takes a lower tempo, the opposition has the opportunity to recover numbers behind the ball and strengthen key parts of the pitch, especially the central channel, to contest any delivery.
Quick progression is critical.
That comes in the form of the first attacker carrying the ball up the pitch as well as the supporting runners. The interaction between the attacking players is pivotal to the sequence’s success.
Let’s look at an example from the EPL: Newcastle recovered the ball while in the mid-block and looked to counterattack against Aston Villa. We can see the first attacker immediately runs at the nearest defender. The second attacker is providing an overlapping run, meaning the two players have a 2v1 numeric superiority. Aston Villa must respond by delaying the attack as best they can and gradually shift a cover defender without sacrificing too much space centrally.
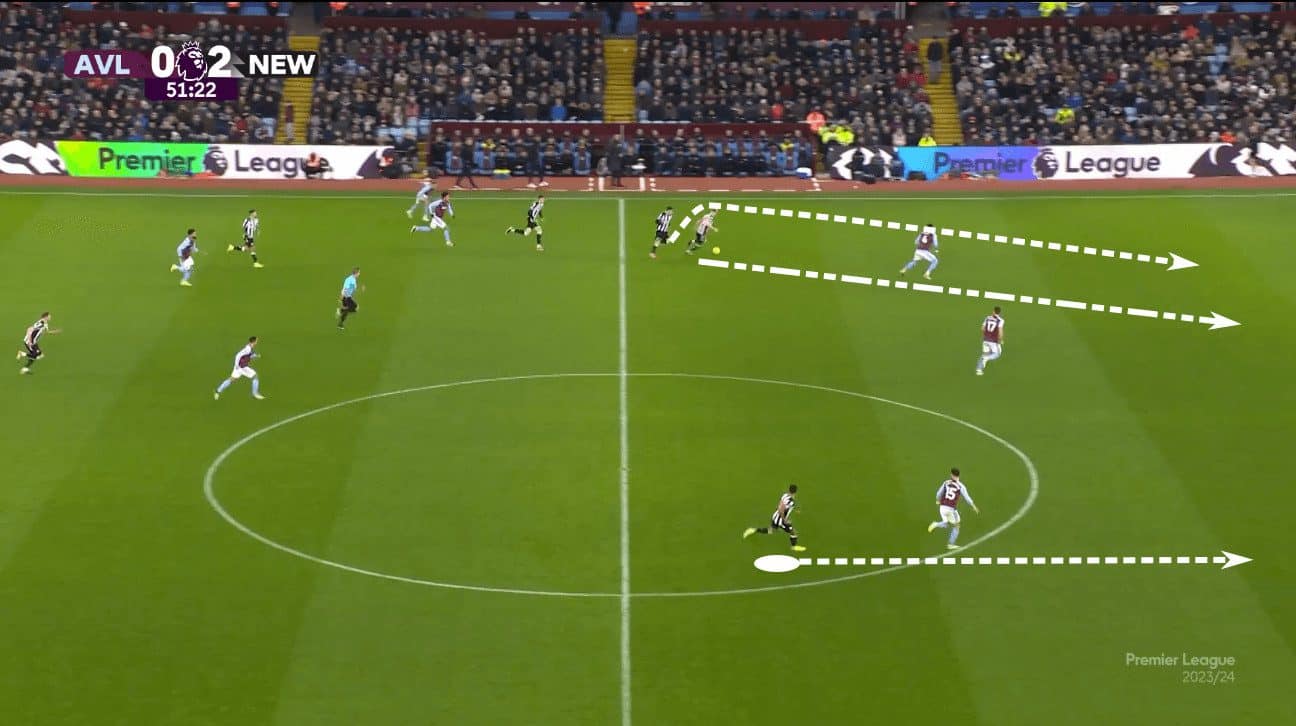
Looking at the far side of the pitch, the third man prepares his move into the box. Initially, he moves slightly wider to get on the blind side of his defender and tries to widen the gap between his mark and the nearest centre-back.
Aston Villa does reasonably well to recover along the backline and complicate Newcastle’s path forward. As Newcastle looks to attack the box, the first attacker slows his forward movement for a split second to impact the tempo of the right-back’s recovery. Once he baits the defender into a moment of hesitation, he can spring the second attacker into the box.
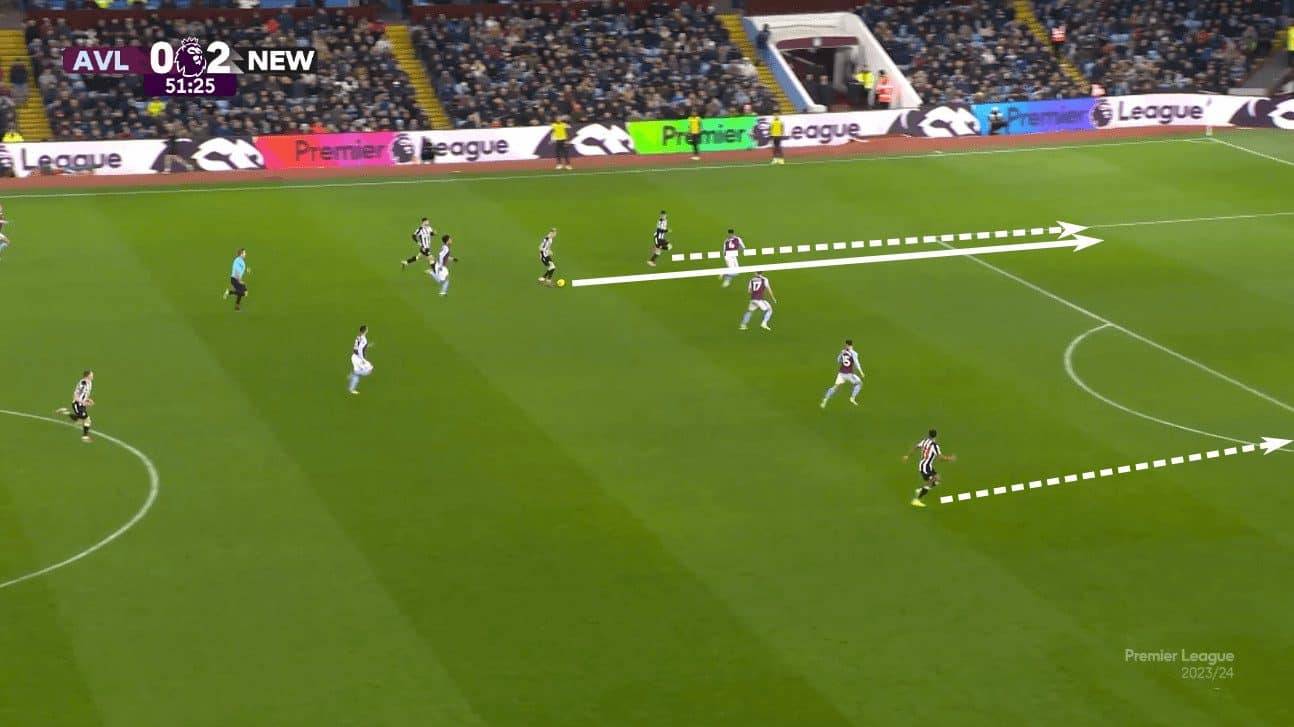
Notice again the wide positioning of the third runner, Jacob Murphy, on the right. There are a few objectives in place here. First, he remains on the blind side of his defender. Second, his wide run allows him to keep the service in front of him, ensuring that the delivery will not be overhit. Third, his positioning maximises the amount of ground his opponent has to cover. Think of how a cross-court hit in tennis stretches the opponent’s court coverage. There’s a similar theme in taking this wider positioning when approaching a delivery that’s played across the goal mouth.
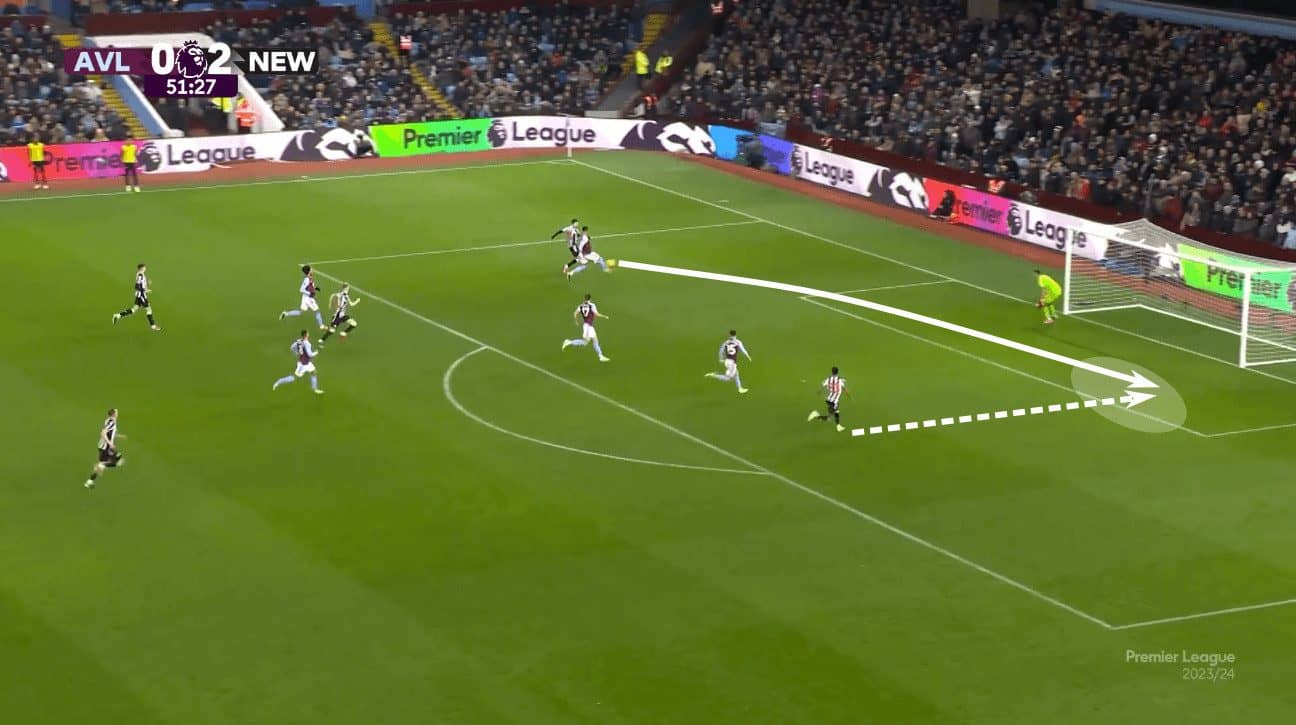
The finish wasn’t quite as clean as our fourth image would have you believe. The Àlex Moreno does slide in and get a touch on the ball, but he ends up taking the ball with him into the goal.
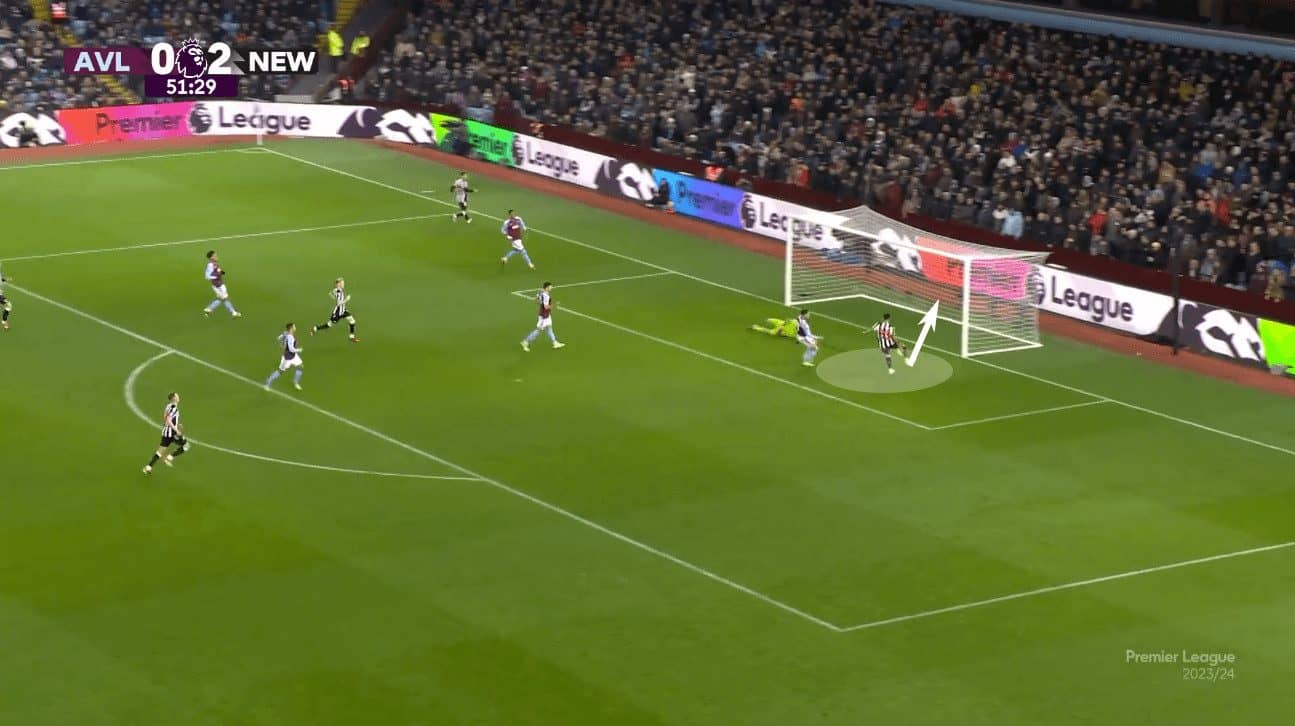
It was a clinical counterattack that produced a high xG shot (0.71 xG) into a virtually open goal. As far as shot quality creation on the counterattack, this one is difficult to top. It was textbook from start to finish.
Attacking transition from high press
We’ll stay within the realm of attacking transitions, but this time, we’ll look at Inter Milan’s goal against Genoa, which started with a high press. One of the key distinctions to make in this section is that while the opponent is in a more expansive attacking shape, they are in a far better position as they transition to defence. Their recoveries are mostly lateral as opposed to horizontal and vertical. In this example, Inter still has a lot to do.
One crucial element that remains the same is the attacking tempo. This is a very direct move to goal. By direct, we mean they get from Point A to Point B quickly, adding little time beyond what’s necessary. Some lateral and diagonal passes set up the sequence, but strong starting positions and quick ball circulation are at the heart of this goal-scoring sequence.
To set up the example, Genoa was playing out of the back until the goalkeeper was under heavy pressure from the Inter high press. He played the ball in the direction of his #9, but Inter was able to recover and start their attack. As Stefan de Vrij dribbles forward, he spots a nice out-to-in counter movement by Nicolò Barella and leads the midfielder towards the central channel.

Once Barella turns inside, The attacking tempo increases significantly. He bends a ball into Lautaro Martínez on the left while the right-centre forward, Alexis Sánchez, checks near to the ball, drawing his defender out of the backline. The Serie A leaders quickly spot the space that was vacated and attack it.
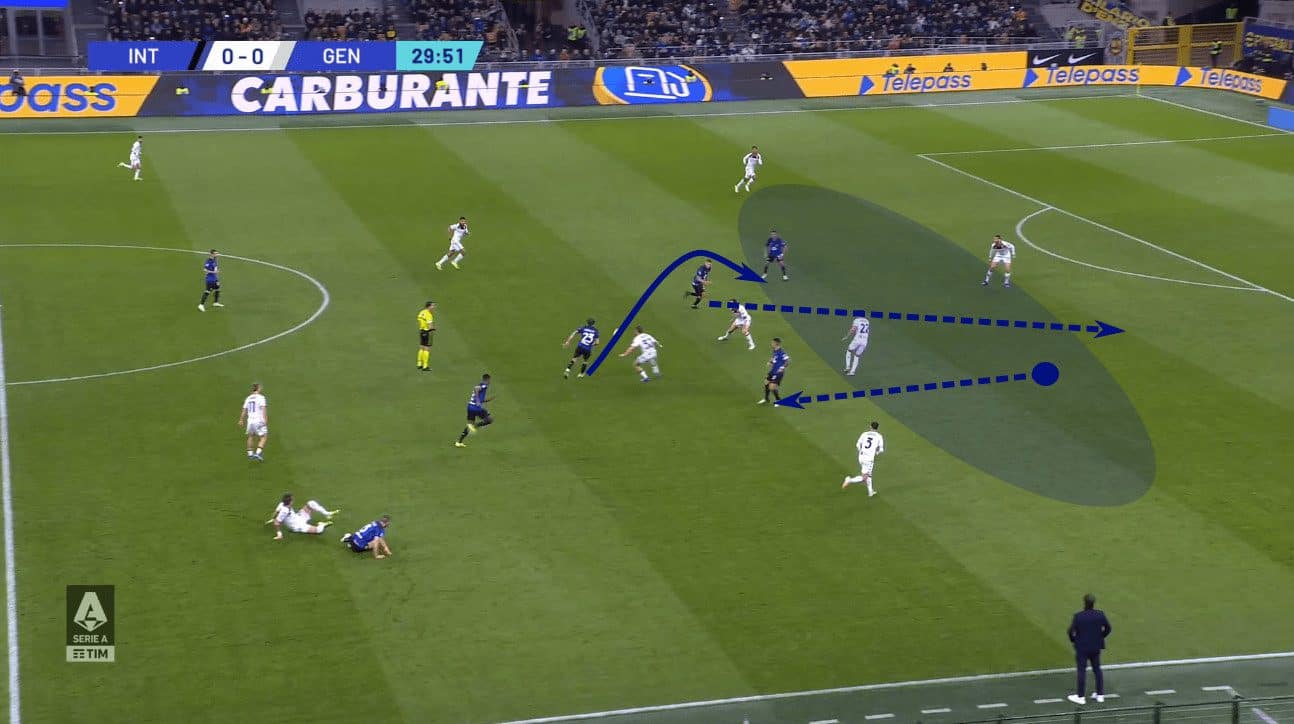
Kristjan Asllani runs off the shoulder of Genoa’s right centre-back, splitting the two defenders. The pass leads him into the box, providing a 0.30 xG shot from 8 m out.
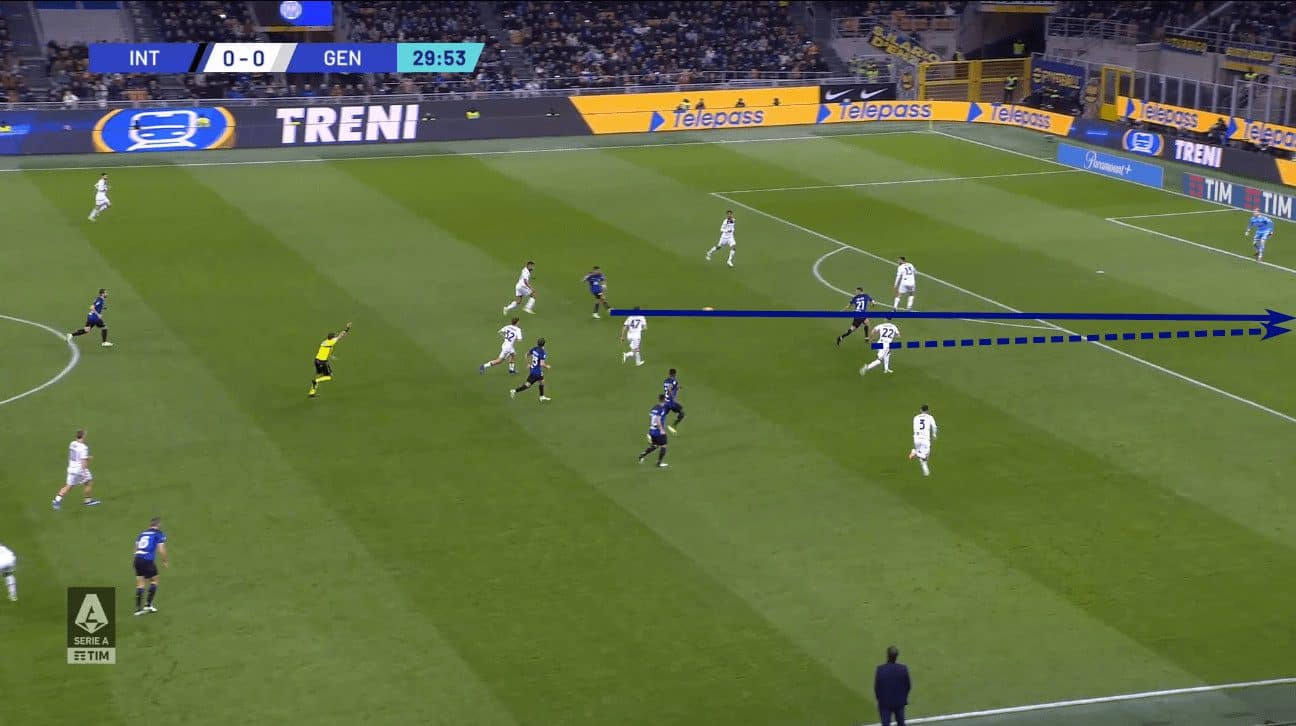
Asllani hits it with authority, smashing the ball into the top of the net. Much like the Newcastle example, this direct passing sequence sets up a high xG shot with limited opposition between the ball and the goal.
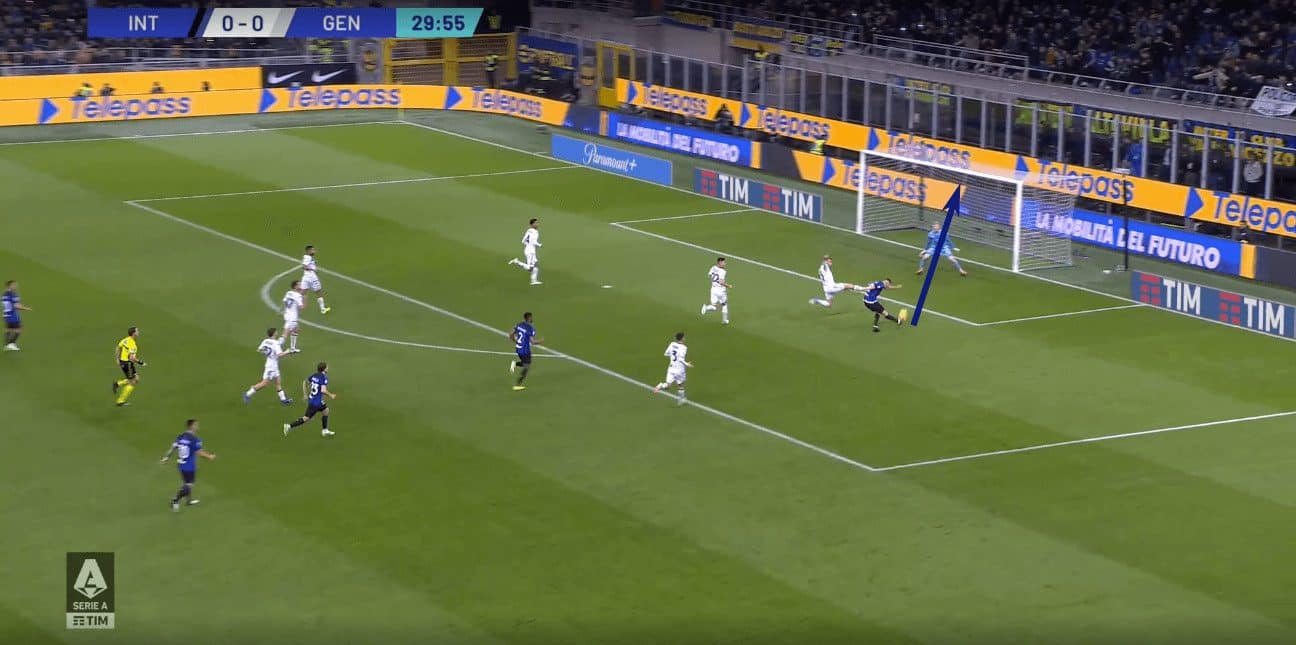
While the Newcastle example featured an open goal, this one leaves Asllani with just the goalkeeper to beat. Plus, with the goalkeeper stuck to his line, the angle to goal is excellent, and any shot hit with pace, even if it falls within the goalkeeper’s bubble, will be difficult to save.
It’s a quick, no-nonsense attack that slices through the opposition while space is available. That’s certainly the easiest time to attack the opposition, even if they do have numbers near the ball, as in this example, but they’re not properly organised. But let’s move to an example against an organised defence.
Attacking a low-block
Nothing screams organised and difficult to break down in football quite like a low block. That’s especially the case at the end of a game, with one team desperately clinging to a lead. In these situations, which we see in the example below, all 10 outfield players are likely to drop into the defensive third and ensure the defending team has numerical and positional superiorities as they desperately defend the box.
This is one of the most difficult situations a team can encounter. Breaking down that low block is no easy task. Even if the team chasing the game is arguably more talented, with little space to penetrate on the ground and even less space to serve into in the midst of opposition bodies heavily concentrated centrally in the box, these attacks often turn to aerial duels.
That’s precisely the angle we’re taking. Our example comes courtesy of Lille in Ligue 1. A resolute Rennes side hoped to escape this away fixture with three points and were well positioned to do so. As we can see in the first image, the entire team has dropped behind the ball and is within 35 m of goal. If Lille want to snatch a point, they have to break through a wall of bodies.
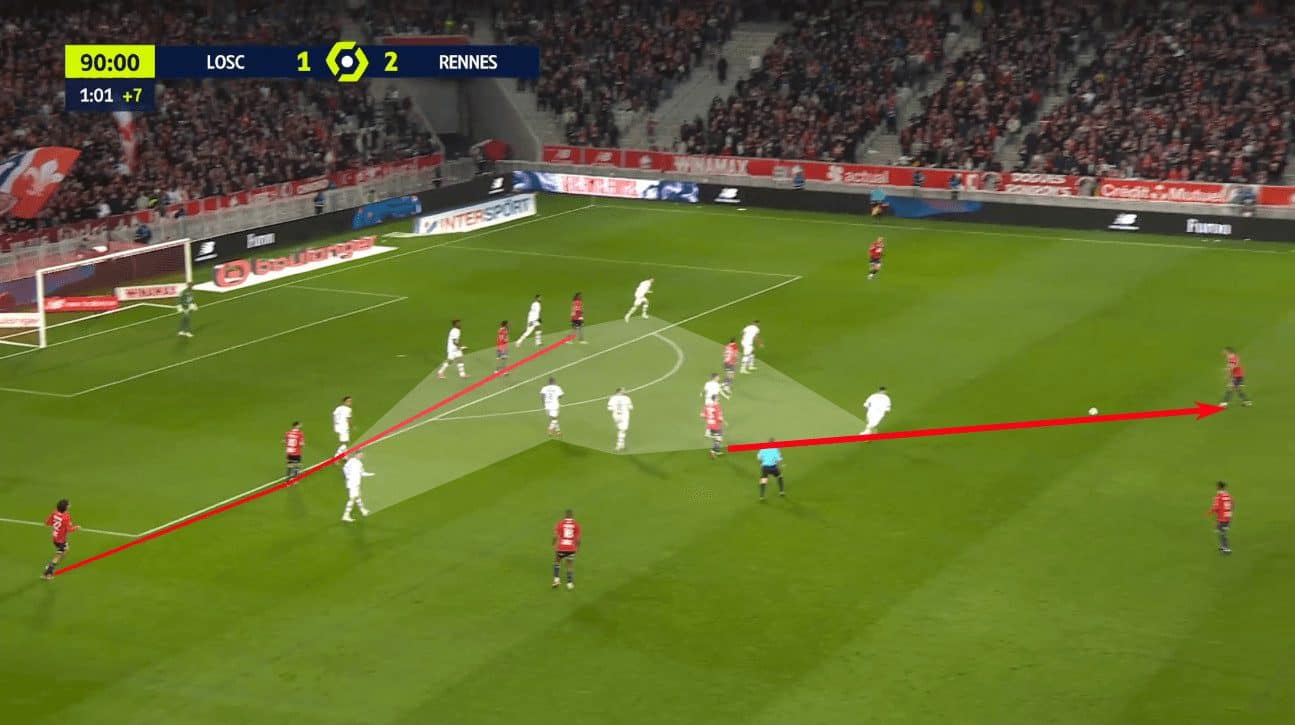
In that first image, Lille was attacking on their left side of the pitch before accepting that they could not find a way through the block. Rather than forcing a highly optimistic box entry, they calmly played the ball back before moving it onto the right wing.
One thing to notice in these first two pictures is the positioning of the players in that highest line. In the first image, Lille had two players centrally and two offset to the left in support of the ball. As the ball is switched to the right side, Lille’s highest line has a chance to move more numbers centrally to attack a delivery.
Another note is how the switch of play moves the low block. The white shadow in the first two images indicates the area of the pitch covered by Rennes as Lille switched the point of attack. The blue-shaded area shows the movement of the low block. Initially, Rennes was highly concentrated centrally, complicating an assault on the box. Once play was switched to the right, that low block over-committed near the ball, leaving more space for the home side to attack.
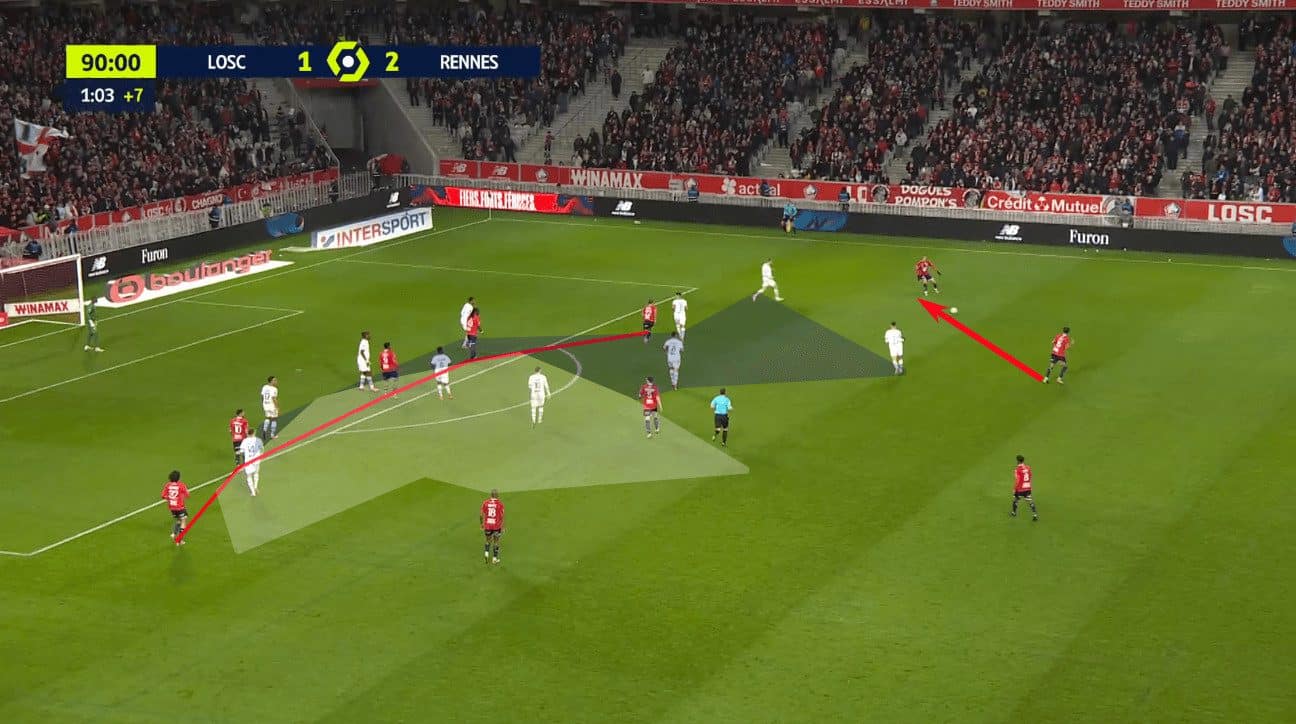
With the low block over-committed near the ball and Lille’s highest players overloaded at the far post, the timing for an early cross was perfect.
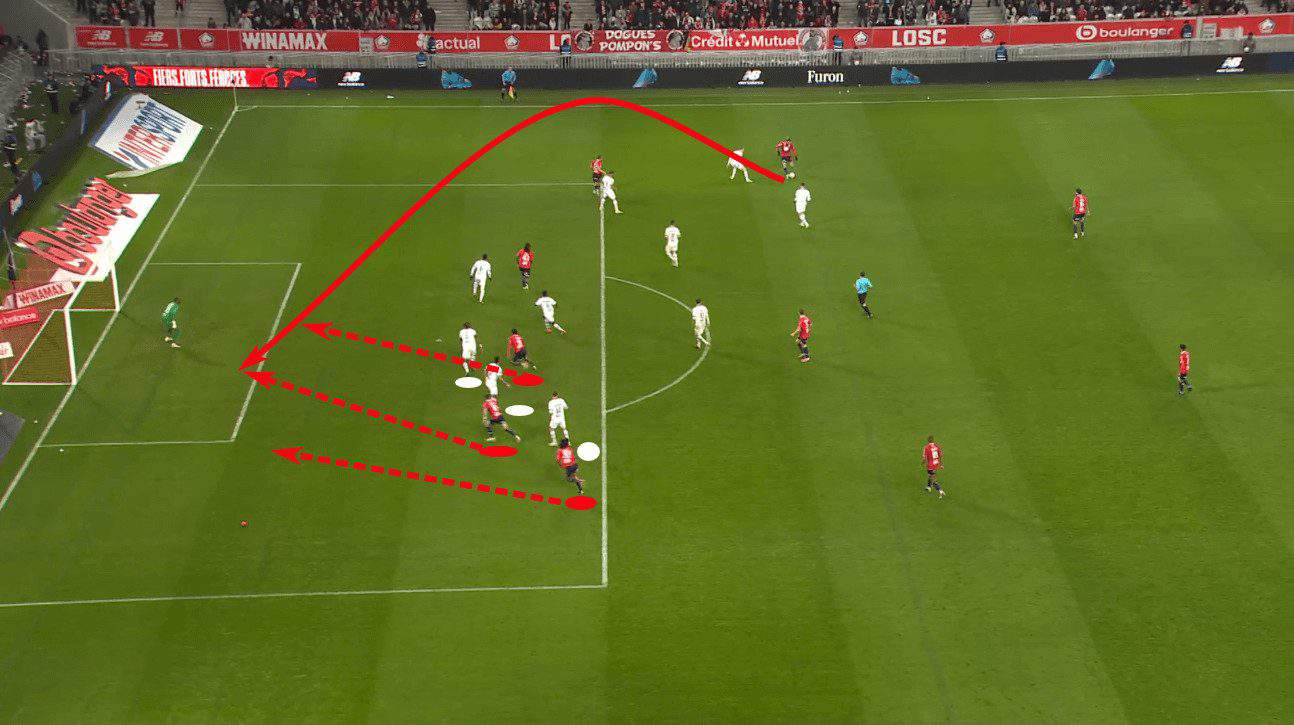
An additional note is to look at the body orientation of the Rennes defenders. Of the three highlighted, two are facing the ball and unaware of their mark’s positioning. The most central player of the three initially tracks his runner, but he has a lot of ground to cover, which will prove decisive.
Lille does win the cross, and Trevis Dago directs the header on frame. The initial shot is not well placed, hit right at the goalkeeper, but it deflects to Jonathan David for an easy tap-in. Ultimately, that central space proved too difficult to defend once the ball was redirected. The initial header registered a 0.42 xG, and the follow-up measured at 0.80.

The cross is a brilliant one, but it’s the execution of the ideas leading up to the service that creates the opportunity. Lille’s decision to switch the point of attack due to the lack of progress they can make on the left and limited numbers in the box was a good one. They couldn’t penetrate the block on the left, so the decision was made to move it entirely in an attempt to disorganise the lines. That’s precisely what the switch of play achieved.
Additionally, the switch of play bought Lille time to move those high left-sided players into more advantageous central positions. Further, since they were behind their marks, They were able to take advantage of the limited vision and awareness of their opponents. This is a perfect example of disorganising the press before attacking the box and getting numbers into goal-scoring positions while simultaneously offering an obvious target by overloading an area of the box.
Conclusion
If there are two main takeaways from this tactical theory piece, one is that transitional moments are best executed with limited touches, passes, time, elapsed and direction. It’s an obvious insight, but Newcastle and Inter Milan allowed us to dig deeper into the execution of those principles with textbook counterattacks.
Second, when in-possession against an organised opponent, move the press to create the space you want to attack. Again, another very simplistic principle, but the example offered by Lille gives a more tangible understanding of how to execute the idea.
Playing through an organised opponent and creating high xG shooting opportunities is very difficult. The defending team typically owns a numeric and positional advantage as they are nearer to their goal. The tactics highlighted in this analysis give an idea of how to attack more effectively in transition and create in open play, even in the most difficult of scenarios.


Comments