The last game of the Premier League this round was played by Manchester City, who took on Burnley at the Etihad Stadium. The result of 5-0 might be very unsurprising for many fans, as this was how good Manchester City should be.
With 18 shots and 71.05% possession, City totally dominated the game. On the contrary, Burnley only registered one shot, which was a direct free-kick from Dwight McNeil. In this tactical analysis, we will show you the weapons in City’s arsenal to break a defensive block.
Lineups

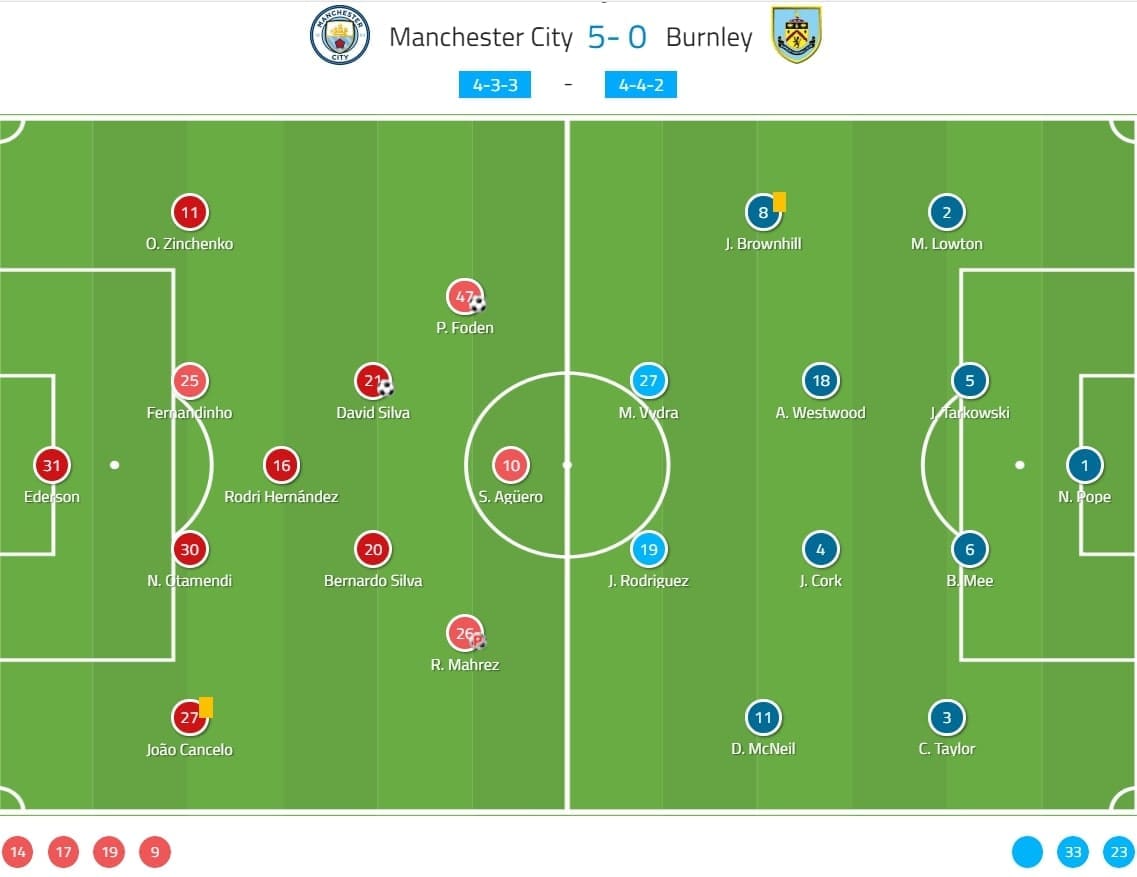
Pep Guardiola has made changes to the starting eleven comparing to the last game. Only David Silva and Riyad Mahrez were the outfield players who started against Arsenal. Intriguingly, Phil Foden was deployed as a left-winger while Bernardo Silva was the partner of D. Silva at the midfield. It was a usual 4-3-3 from City.
Burnley were missing a few players: Chris Wood because of fitness, also Aaron Lennon, Jeff Hendrick and Phil Bardsley due to the contract status. Therefore, Jay Rodriguez partnered Matěj Vydra as the strikers. Josh Brownhill played as the right-winger of the 4-4-2 formation.
Defensive block of Burnley
In this analysis, we will first explain the defensive scheme of Burnley, then look at how City beat the block. With an average PPDA of 37.43 and reaching the lowest point at 96 before the break, the Clarets were defending passively in this game, a bit unlike their aggressive pressing against Arsenal and Manchester United.
The defensive shape was always a 4-4-2 midblock. Although they intended to set the block higher and closer to the central third, City always progressed by moving the Burnley players and they had to retreat deeper and deeper as below.
Some very common concepts were applied in Burnley’s defensive block, such as shielding the ball side with the midfield, maintaining compactness, and guiding the ball wide were some objectives.
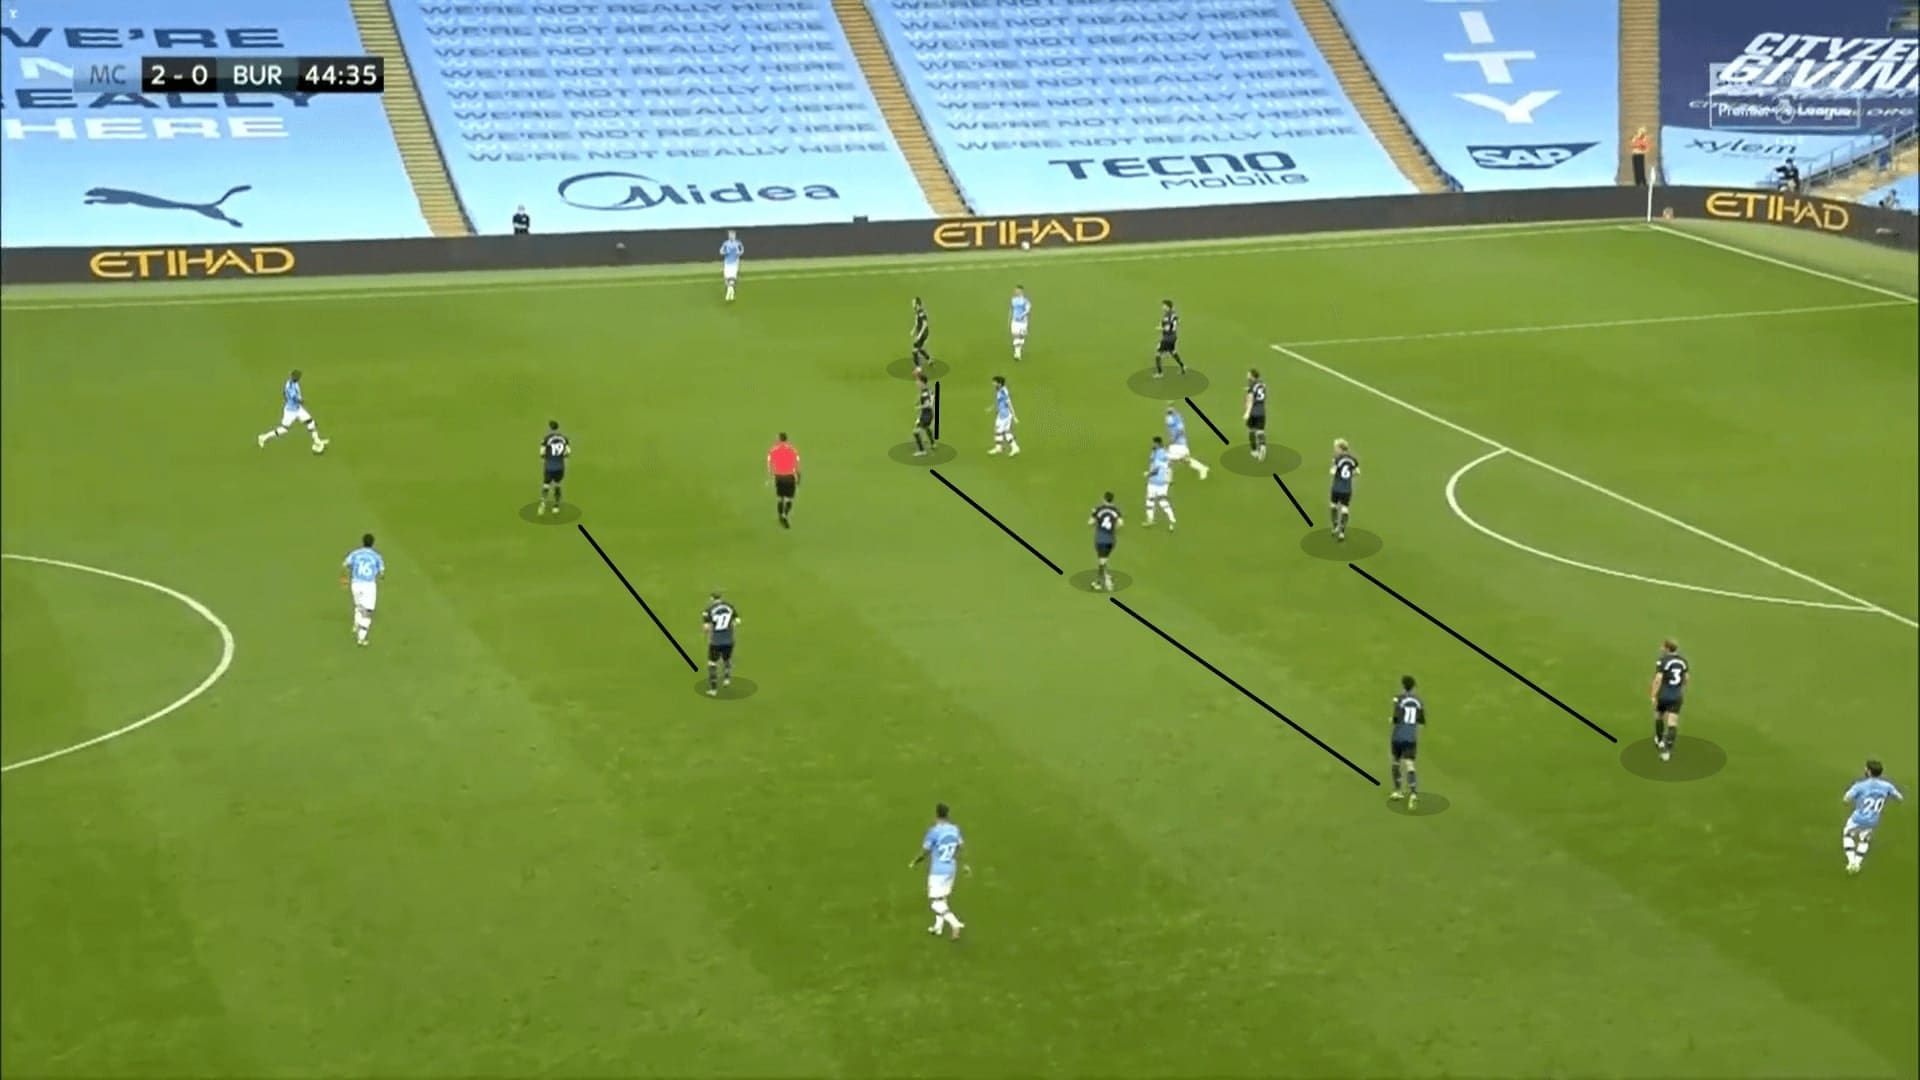
When City passed the ball to the wide areas, Burnley tried to shift the block and utilize the structural advantage to regain possession. In a 4-4-2, the Clarets would at least be committing the ball side winger, full-back and centre-back to the flank, pressuring the opponent.
Since City were playing in a 4-3-3, they might not match the above three of Burnley numerically unless Oleksandr Zinchenko also joined the attack.
As an example, the moment Foden passed the ball, D. Silva was surrounded by three players at least. Compressing spaces in such a tight area quickly would increase the chances of City playing a suboptimal pass.
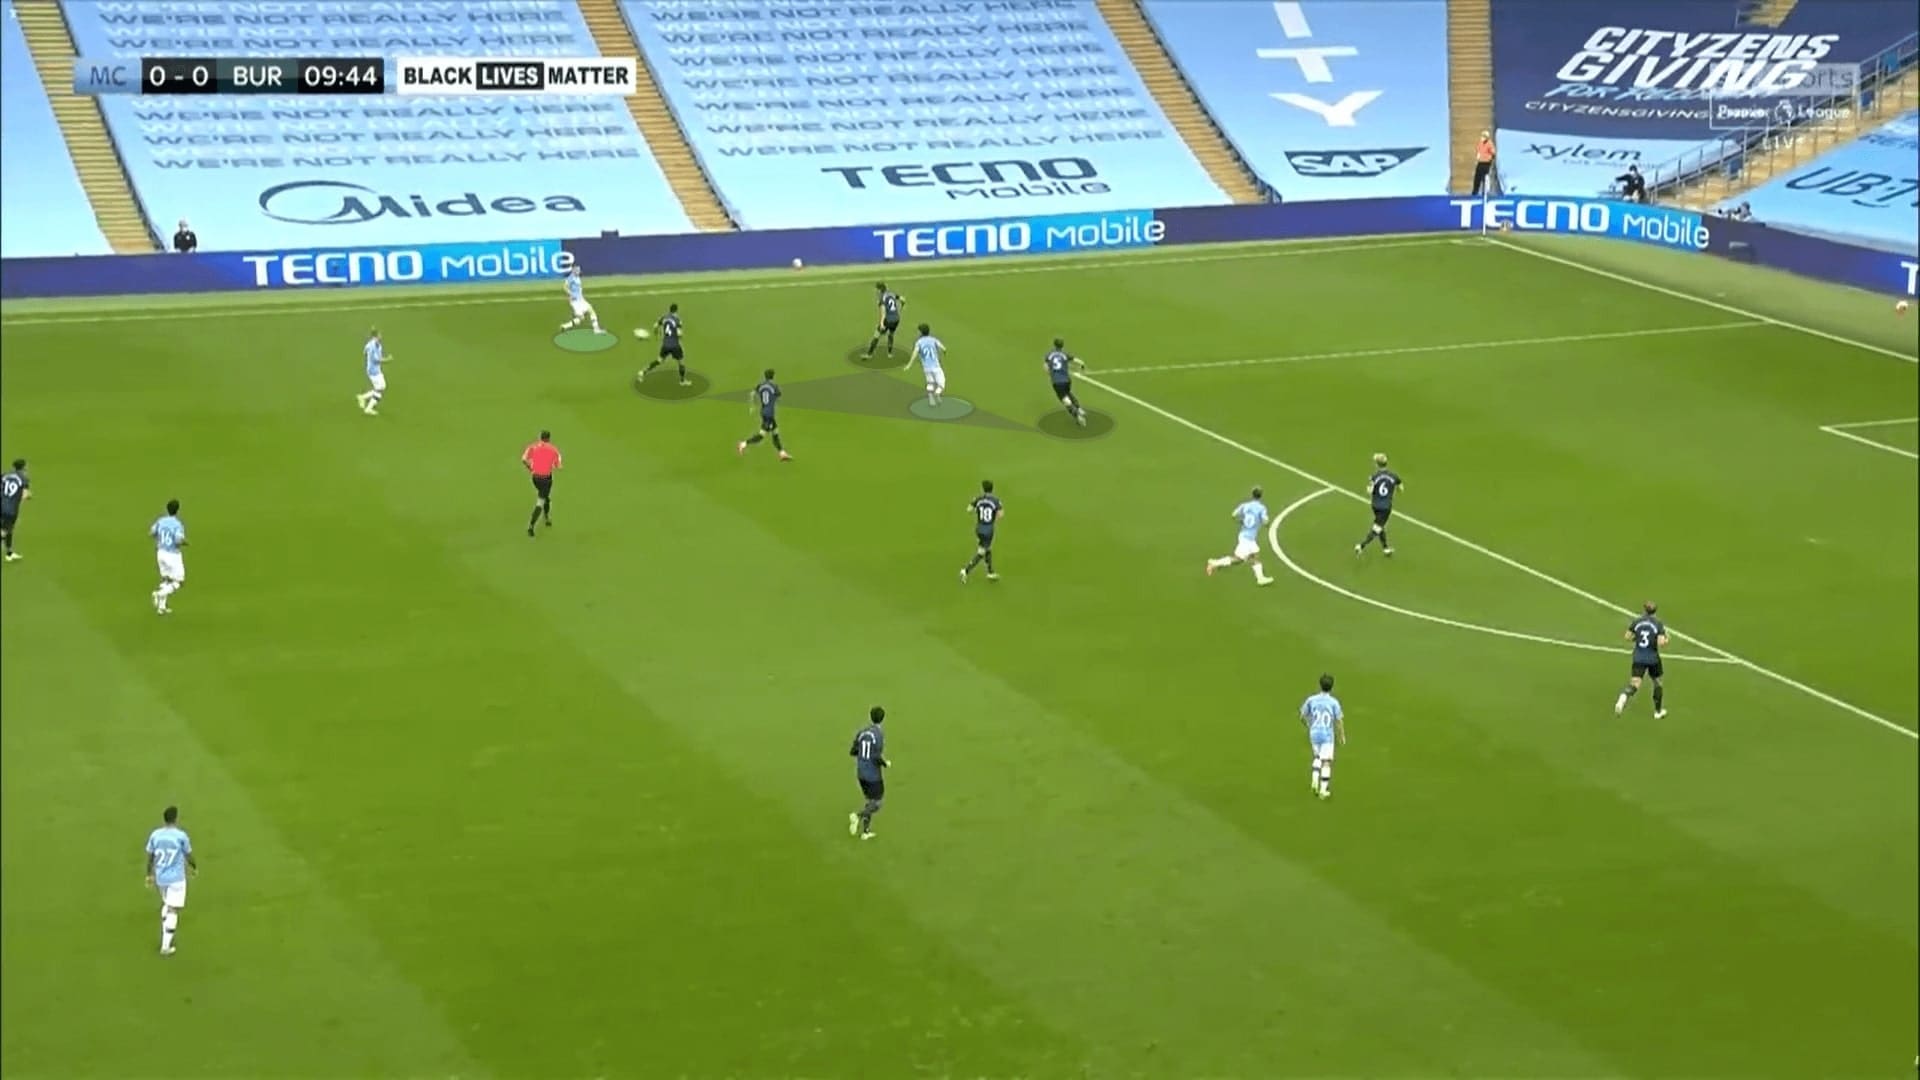
Another key part of the pressure was to prevent the receivers from turning. This was especially useful when dealing with the left-footers (B. Silva and Mahrez) on City’s right flank.
When progressing, the left-footed players dropped and received the ball with closed body orientation, such as the one from Mahrez below. The task of the Burnley left-back: Charlie Taylor was to stick to him tightly and forced the receiver to play the ball back.
If the return pass was poor (such as too soft, bouncing, inaccurate), this was the moments to press and look for a counter-attack. However, City were playing with a high standard and seldom caught by the Clarets.
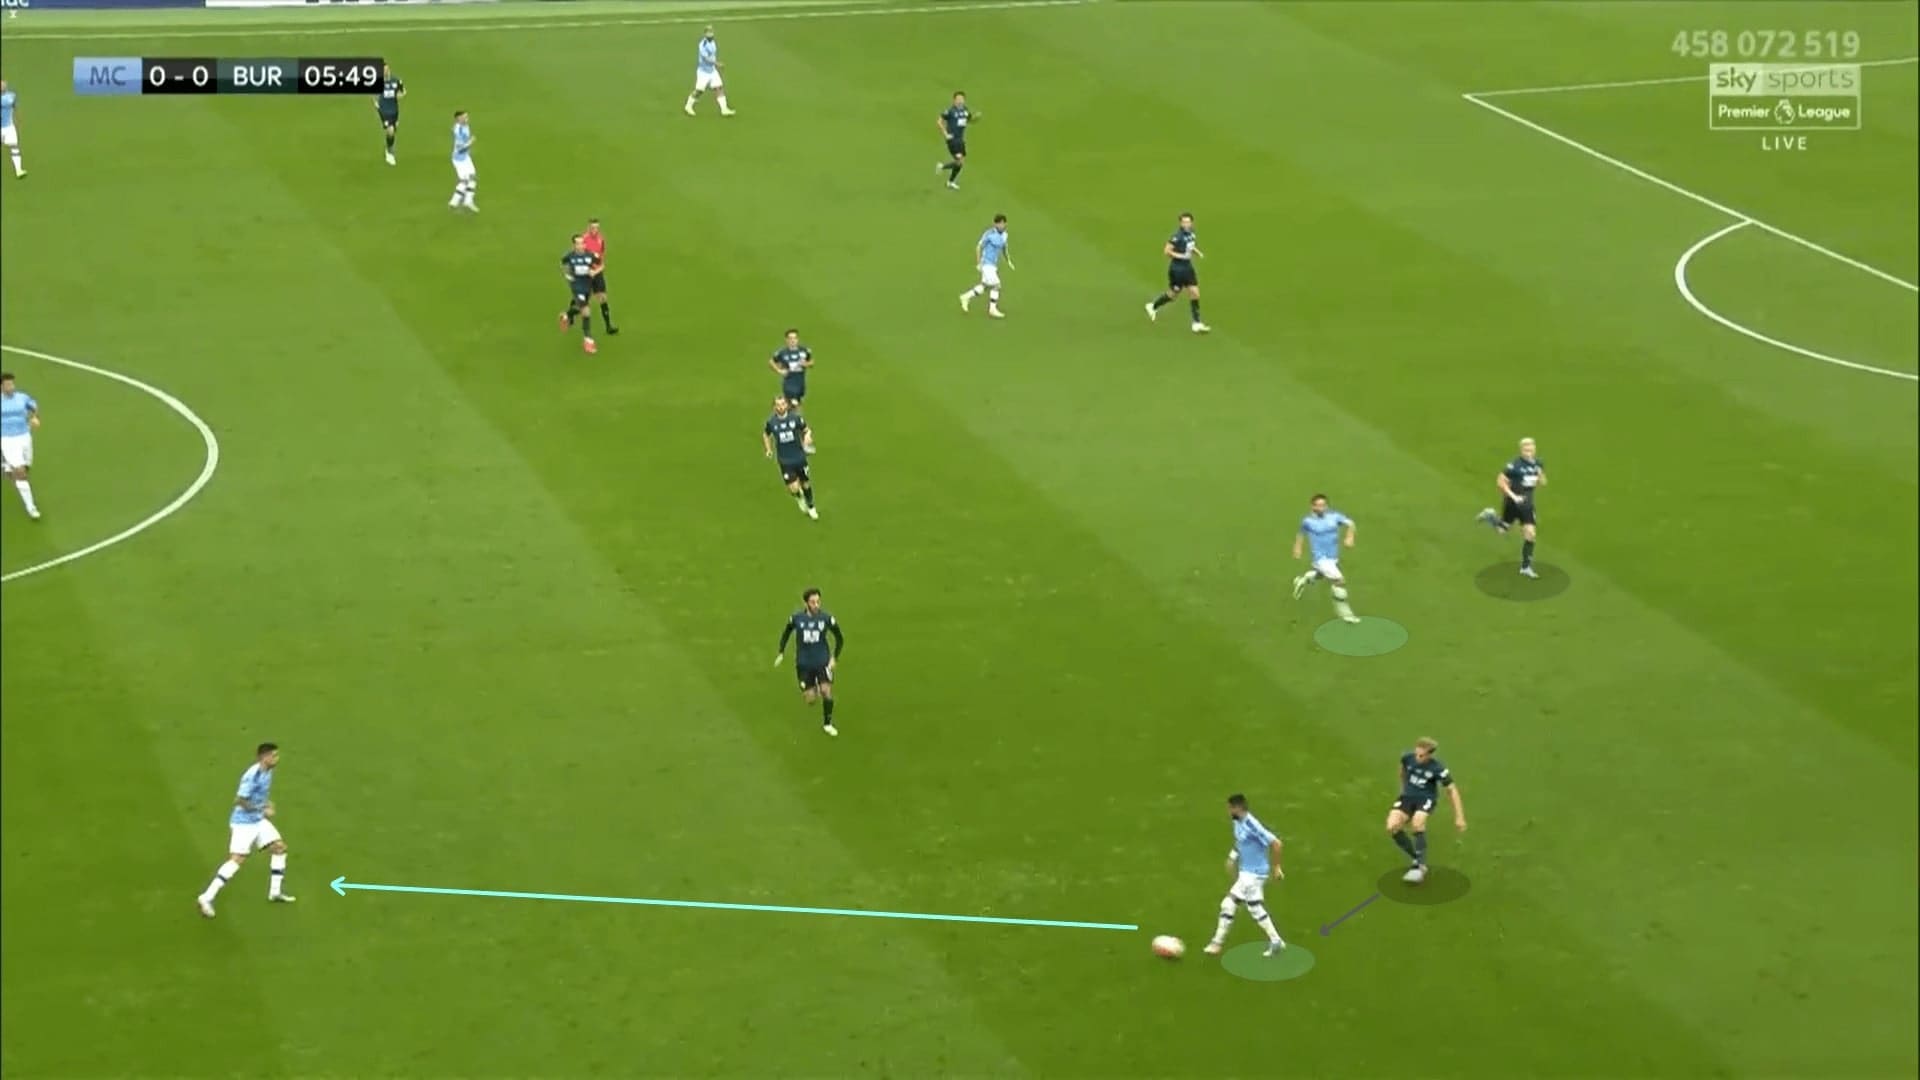
After the break, Burnley tried to go more aggressive when pressing. In the first half, the first line (formed by two strikers) were easily overloaded by City’s triangular build-up shape. Sean Dyche might have instructed the midfielders to step up a bit and provide the defensive cover for the first line.
However, this arrangement was not a success because of the following reasons: firstly, the strikers were never sprinting to force into a duel, allowing City players to move the ball with time; second, the block was asymmetrical as the far side winger was never involving.
Also, City’s shape was too good here. Fernandinho providing the offensive depth, while having Ederson and Nicolás Otamendi on the same line for the switch of plays. As a reference, although D. Silva received the ball with closed body shape, the marker: Ashley Westwood was still far from accessing the Spaniard, which allowed an easy return pass.
Central overload
Of course, City were playing in the usual Guardiola way: possession-based, moving the ball and opponents, overloading. What we are taking into account in this analysis was the personnel in this game, and how did the players affect the tactics.
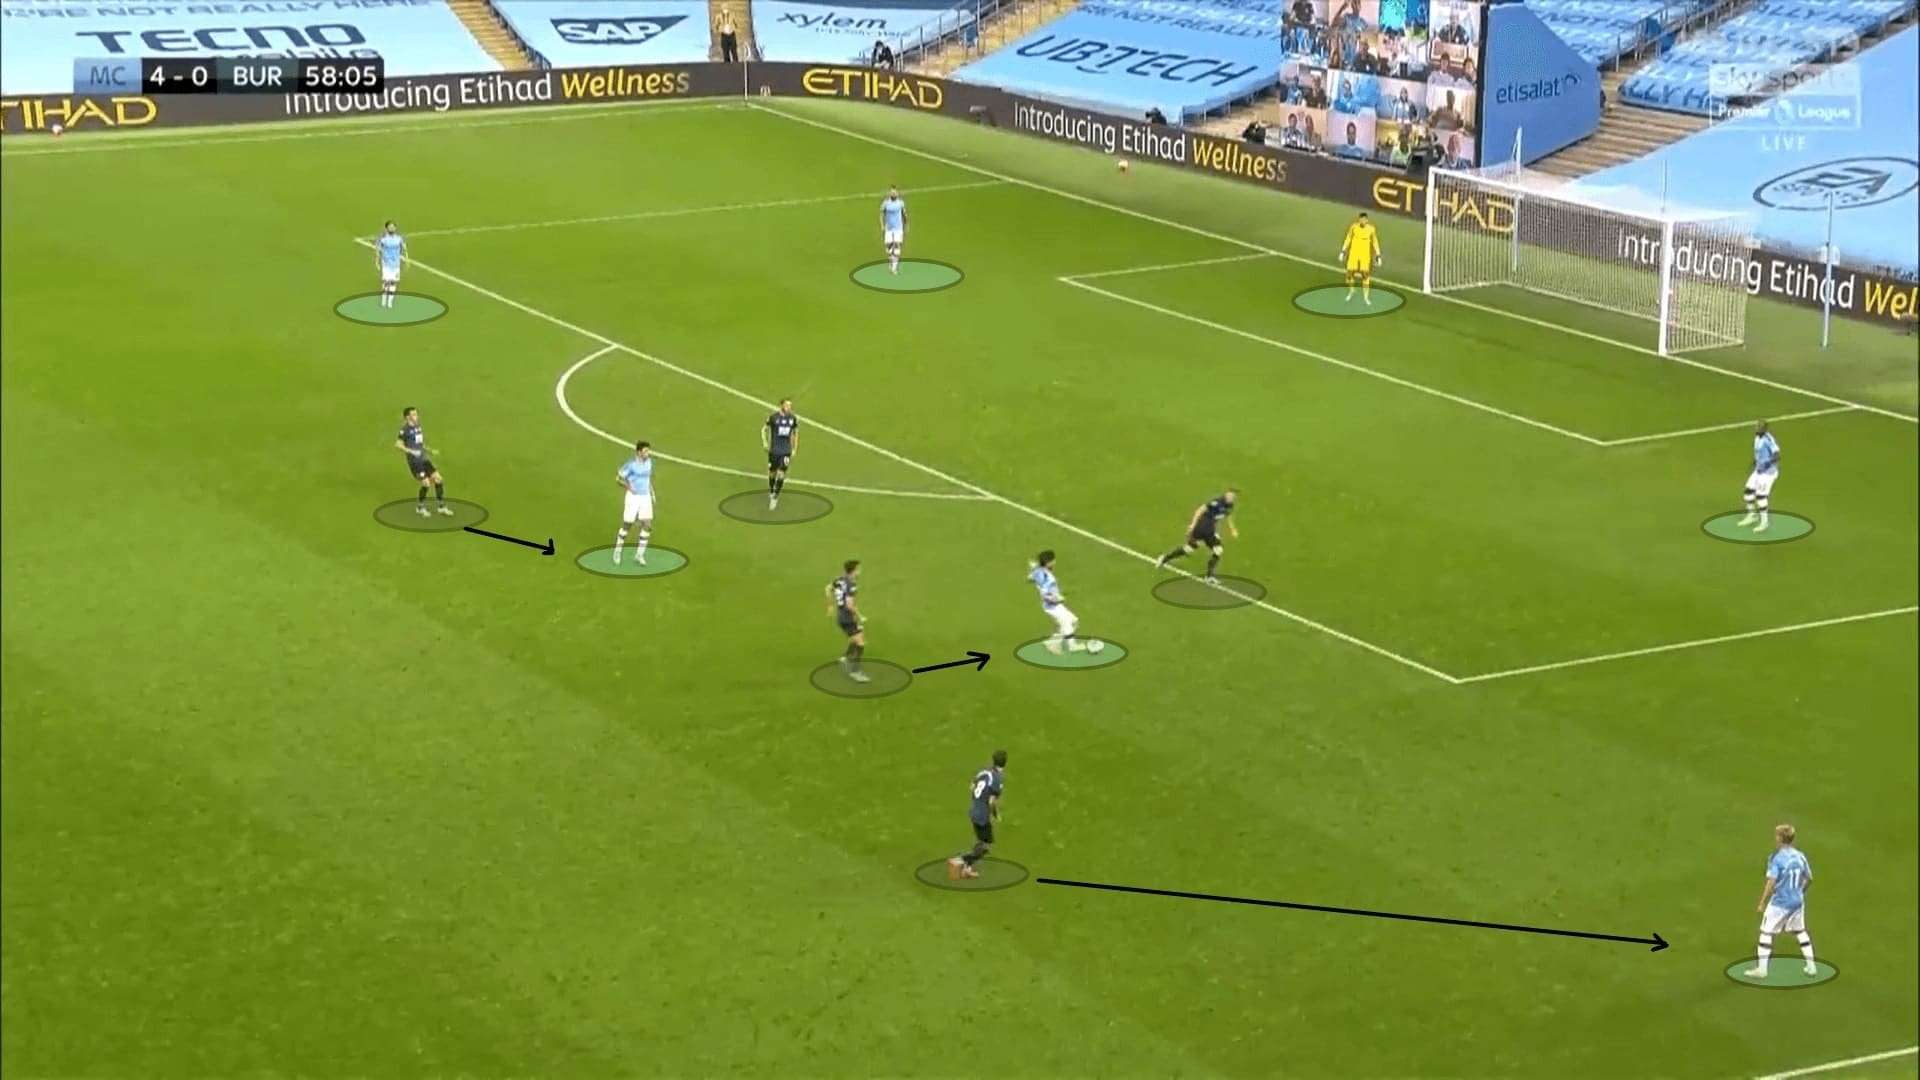
City were looking for a central overload, which could offer a stable build-up. As an example, we outlined the 6 v 4 numerical advantage below, there were some considerations when James Tarkowski and Ben Mee were excluded in the frame. Despite Sergio Agüero dropping deep to the midfield, City still manipulated the Burnley last line by Foden’s high positioning as a compliment. Therefore, the centre-backs could not recklessly follow the Argentine to the midfield, they were aware of protecting spaces behind.
Benefits of the overload were even greater since Burnley’s first line and the second line were loose vertically. This allowed City to bypass the lines one by one, and often maintain the numerical superiority.
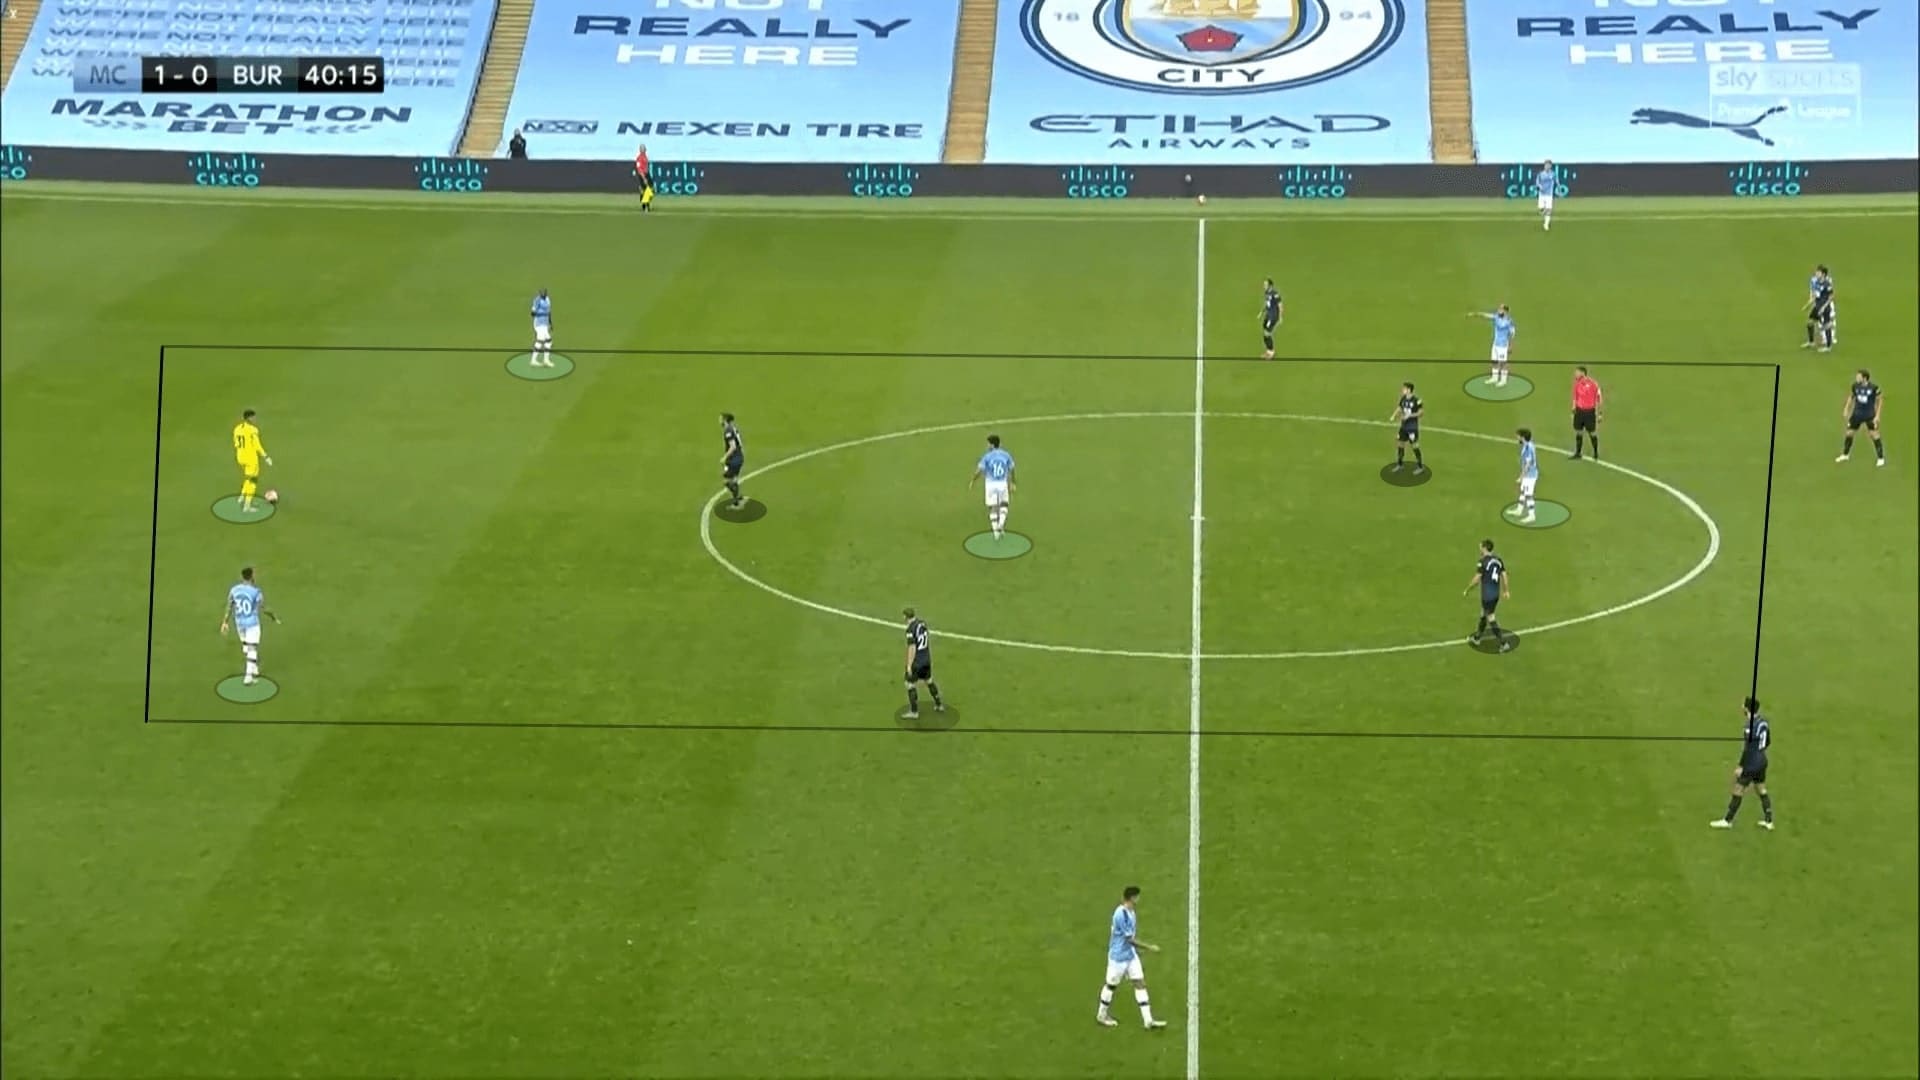
The idea was simple, in the first phase, City only deal with Rodriguez and Vydra. Rodrigo Hernández always capitalized on his positional superiority and occupied the first line. This means the Spanish pivot was not necessary to receive the ball in the build-up. Instead, staying around the strikers and kept them busy already bought time and spaces for the centre-backs.
If either Vydra or Rodriguez initiated the press, City could still find the free man because of the 3 v 2 numerical superiority. Here, The Burnley strikers were moving to the ball side, leaving Otamendi to be the free player and the ball progressor.
Just in case the passing lane to the free man was blocked, Ederson, as the sweeper-keeper was always keen to involve in the build-up. He could provide the offensive depth for ball circulation, though the Brazilian keeper was not always needed in this game.
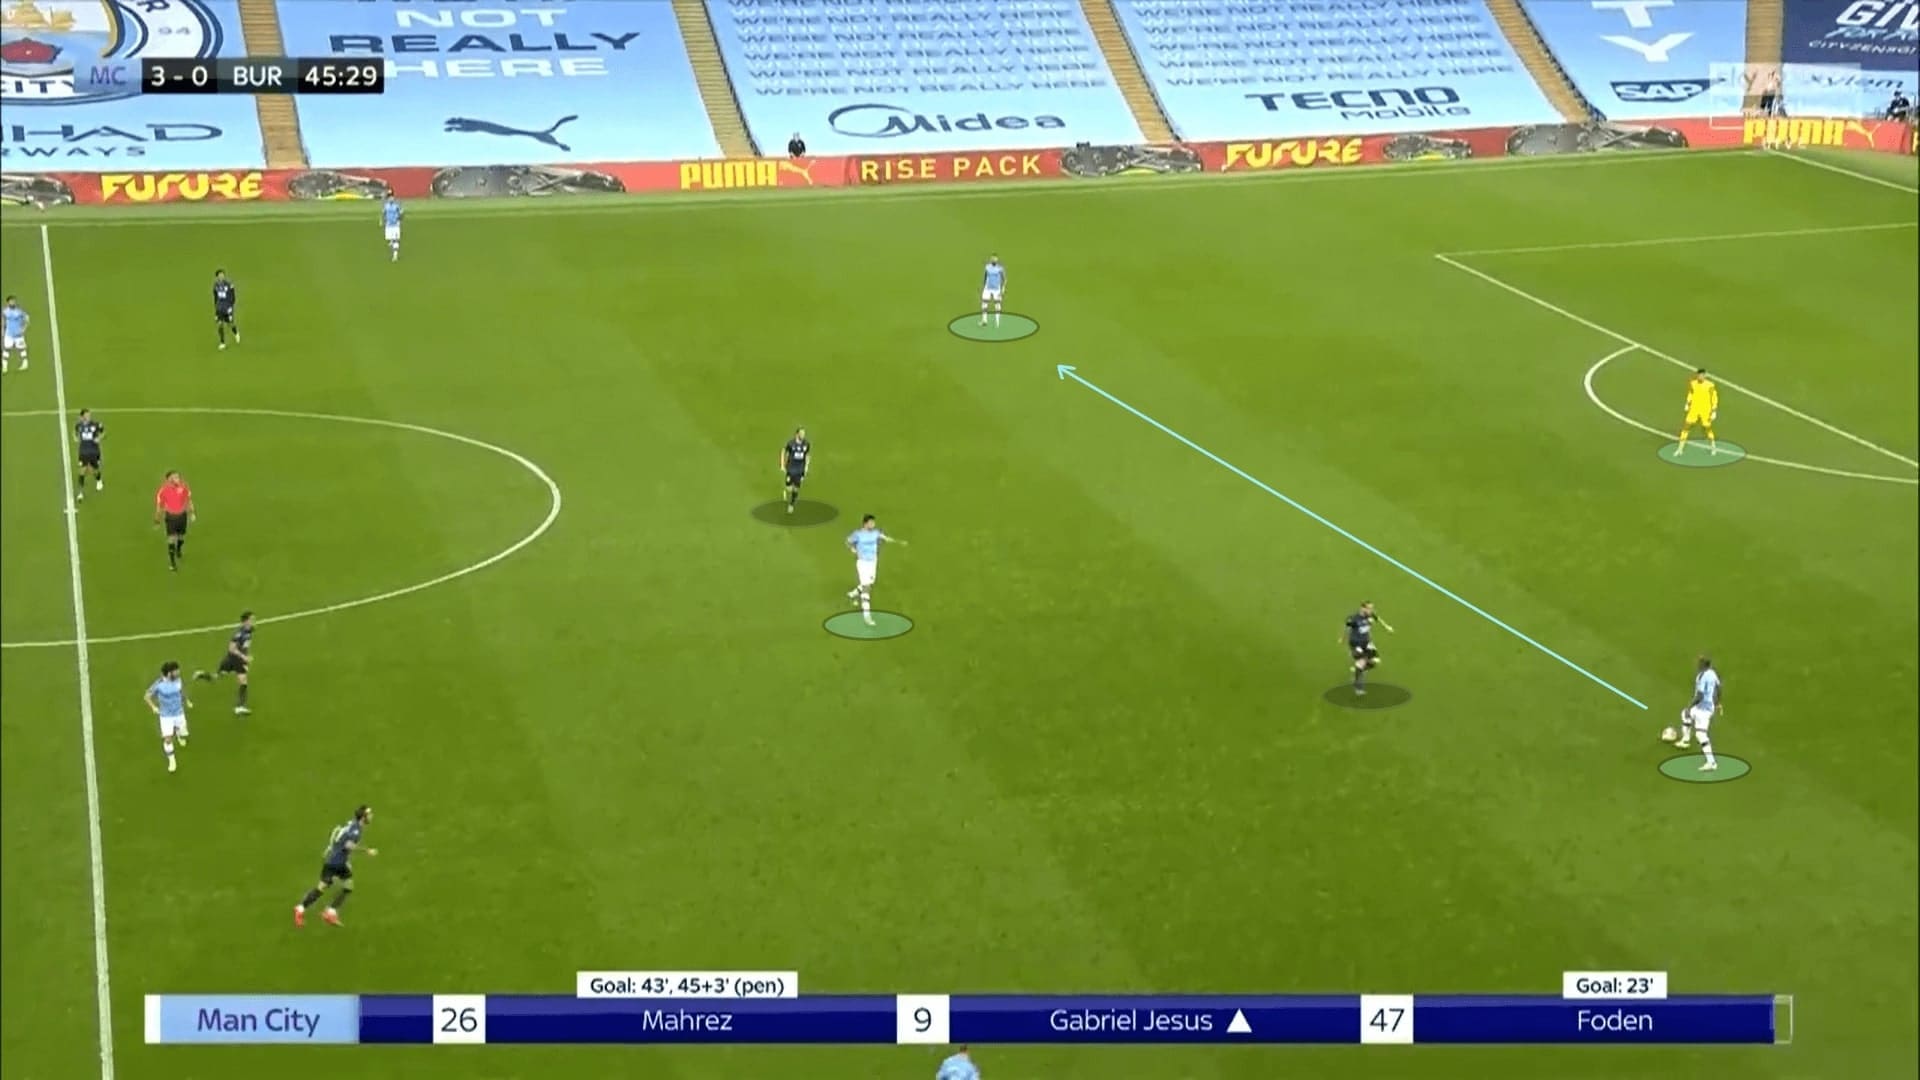
When Gabriel Jesus replaced Agüero as the striker, he offered something different from the Argentine. Jesus was more likely to drop into the midfield, adding an additional man as a “false-9”.
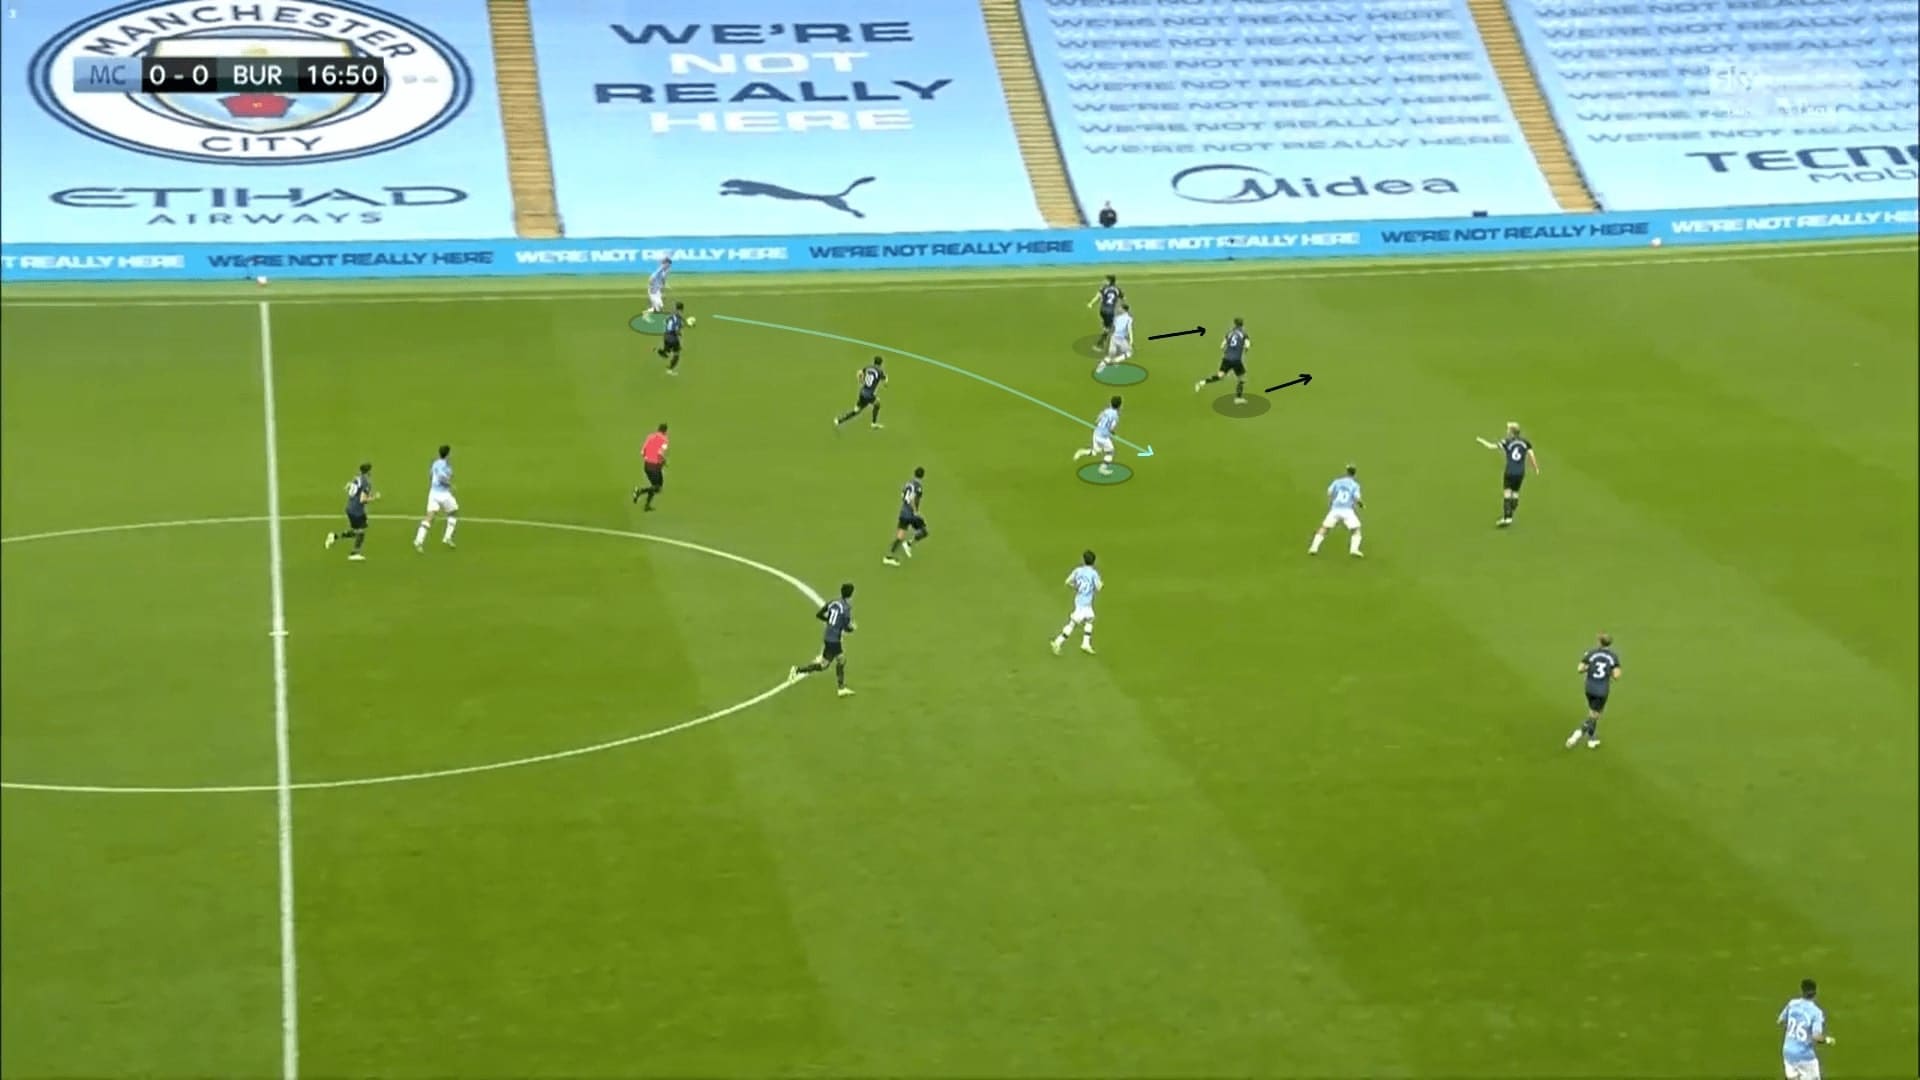
With Jesus and the ability to manipulate the lines, City were more likely to progress through the third man combinations. In this example, D. Silva adjusted his position slightly wider to open a passing lane to Jesus, allowed Rodri to find the Brazilian forward between players. Soon, Jesus releases to the third man: back to D. Silva.
Kevin De Bruyne was also part of the attack in this example. The Belgian international was clever to push higher and occupy the last line when Jesus dropped. This left Jesus free from pressure at his back. If Mee or Tarkowski stepped up, City could try playing behind the defence.
Positional interchanges
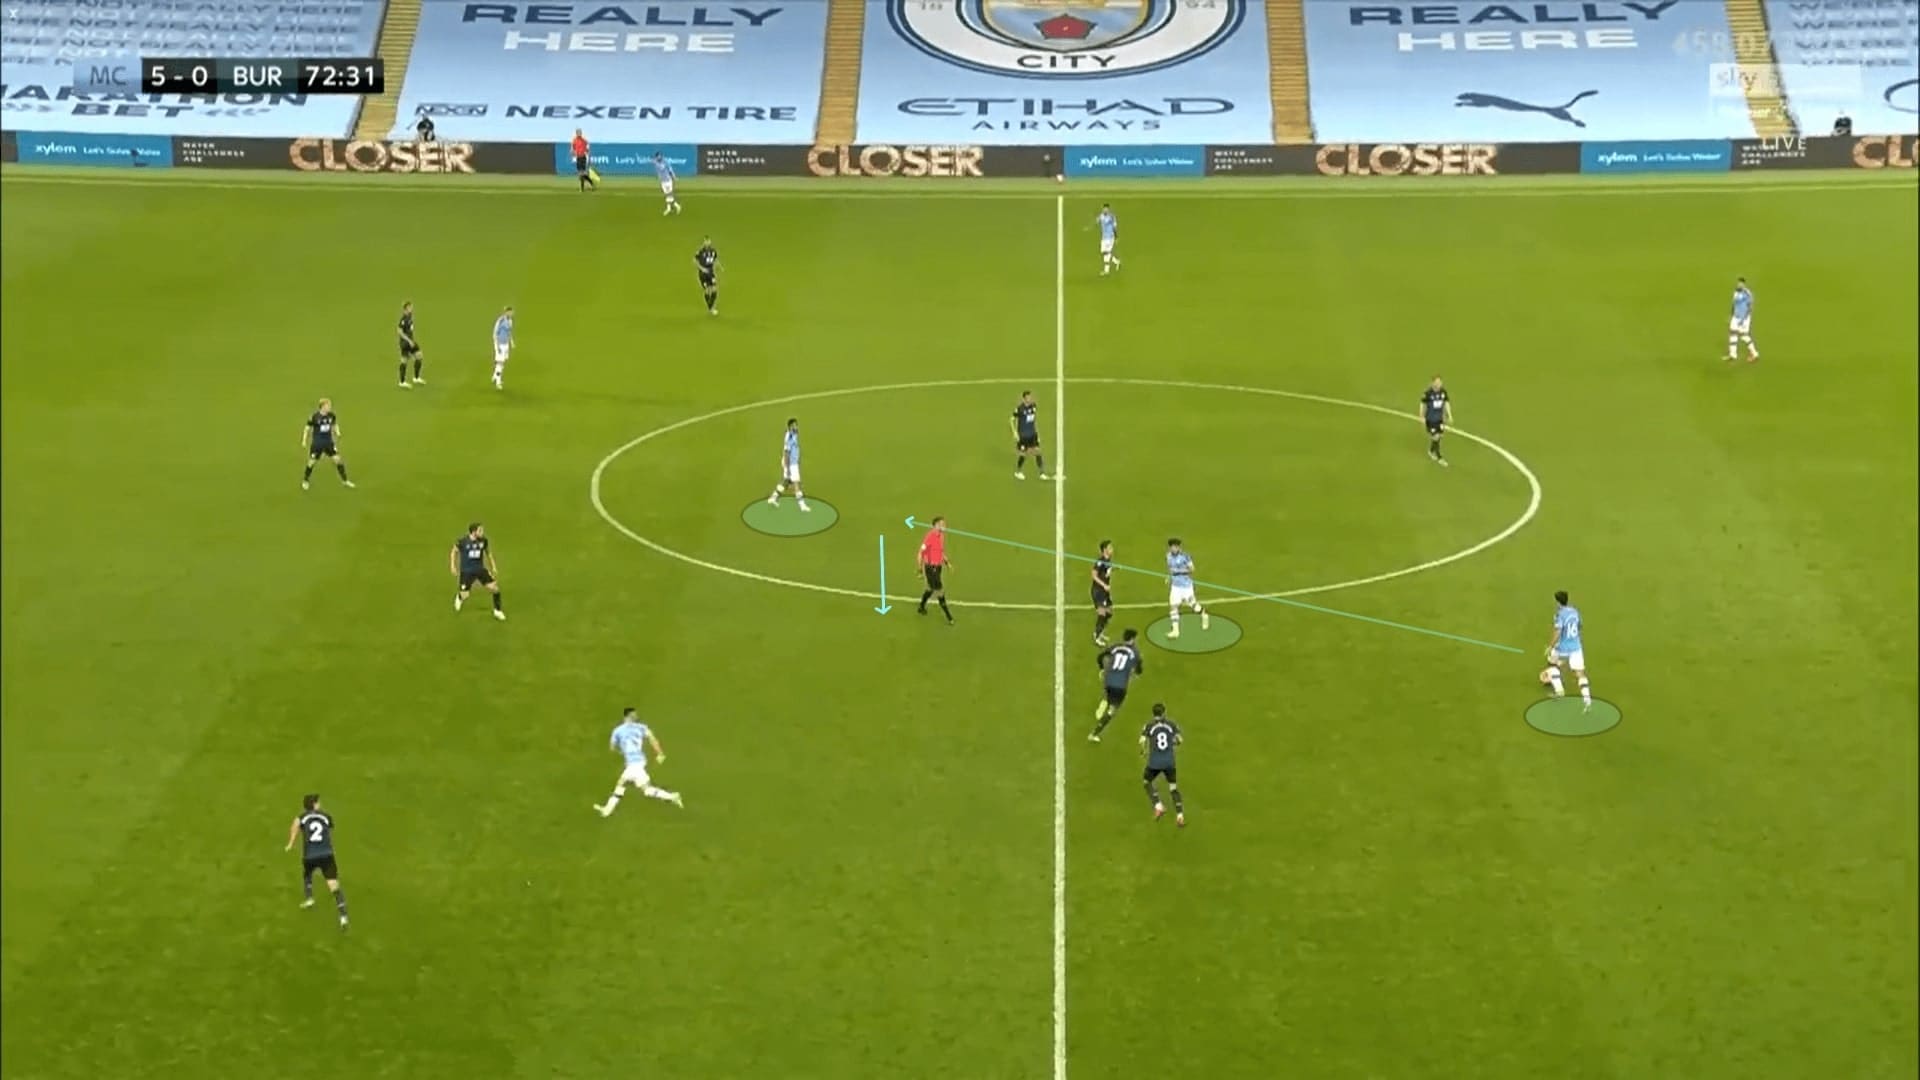
The combination on the right flank was B. Silva and Mahrez today, both were wingers though the Portuguese dropped to the midfield. This encouraged the duo to exchange the positions: B. Silva pushing high as a right-winger while releasing Mahrez to roam his positions at the centre. This helps Mahrez to get rid of the markers unless Taylor tracked him tightly at the expense of leaving his line.
Firstly, the clever positioning of B. Silva maximized the positional superiority in the first phase. The former Benfica player tended to stay between the lines, and behind the Burnley left-winger. This always overloaded McNeil with João Cancelo, giving the Burnley #11 a decisional crisis.
Here, McNeil wanted to press Cancelo but realized B. Silva was behind him. He was in a dilemma and chose to leave Cancelo free, allowing the City right-back pushing higher.
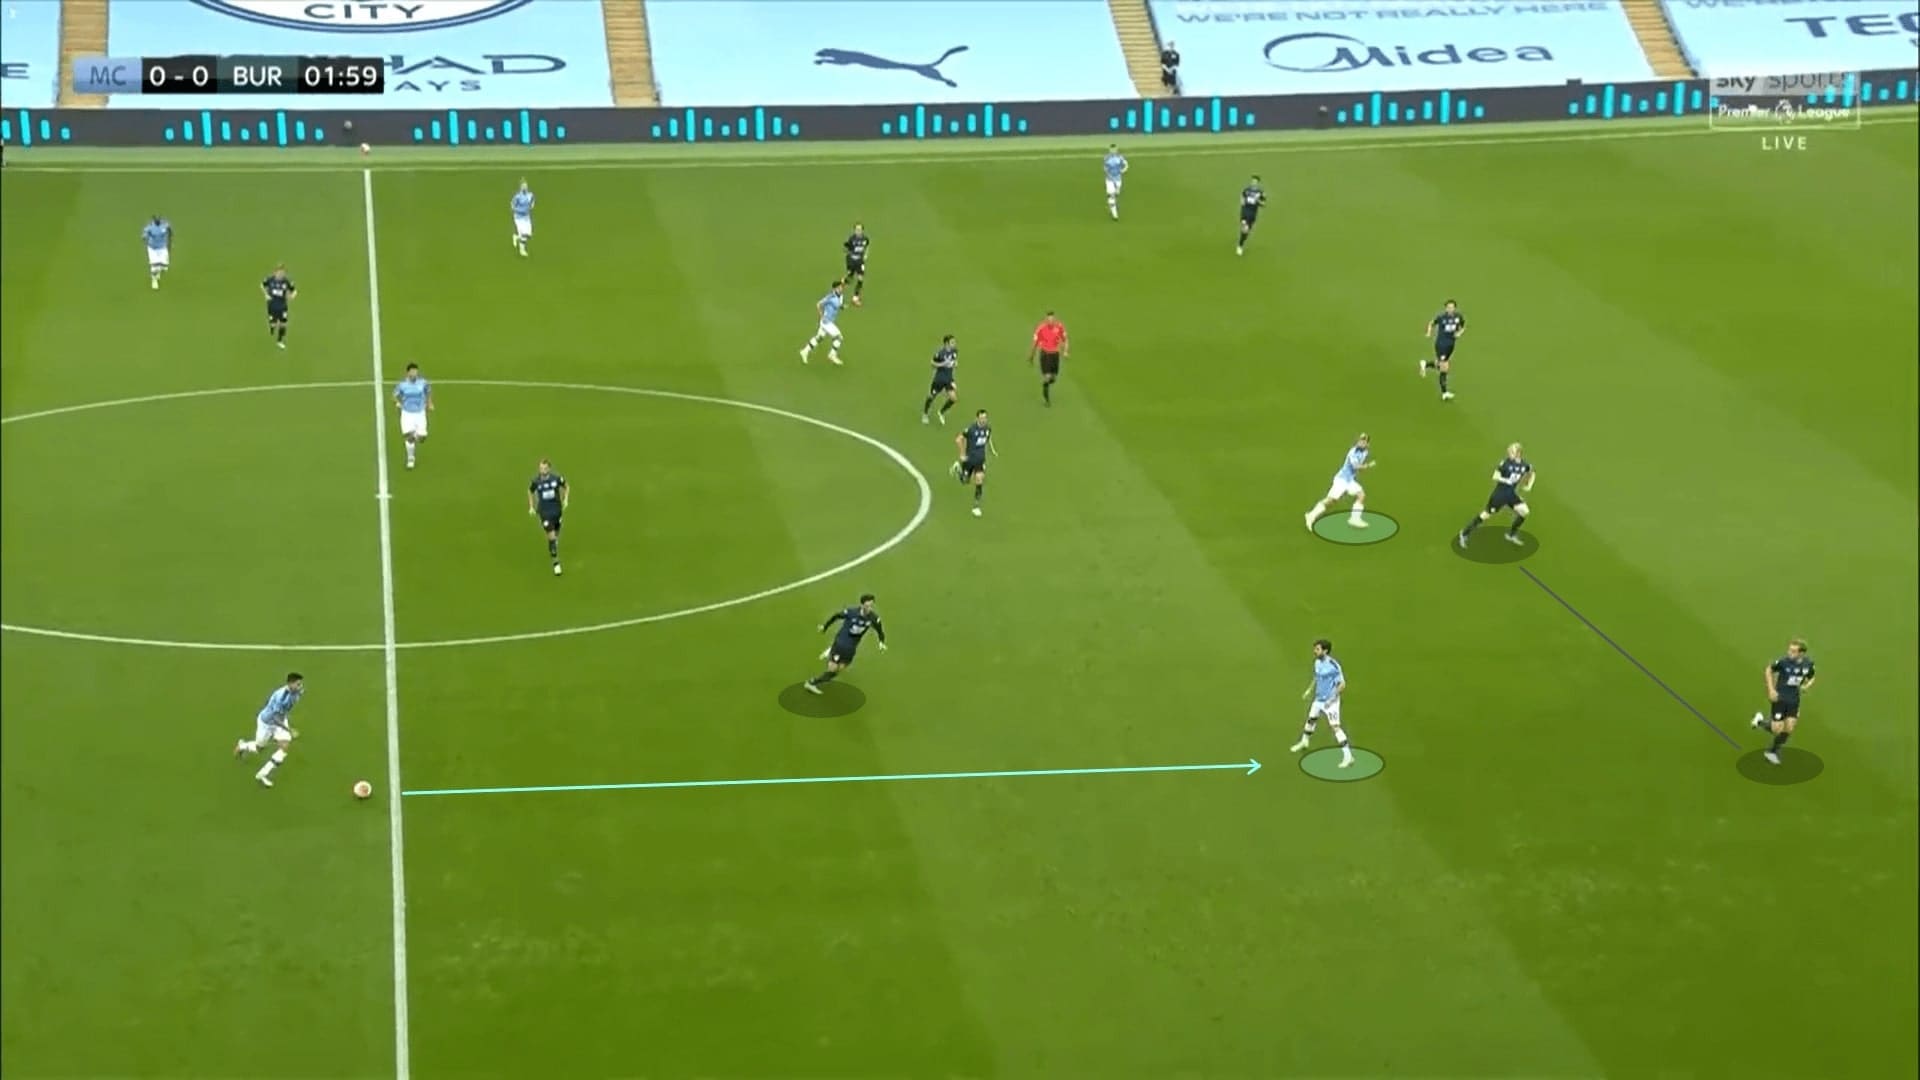
There were some few patterns of rotations at this flank too. The one we are showing here mingled the concept above (the decisional crisis). In this case, it was Mahrez and B. Silva switching the position. Now, the Algerian winger was at the half-spaces while B. Silva moved wide, offered two options for Cancelo.
Again, the positioning of Mahrez was vital to confuse the oppositions on who to mark. This kept the Burnley second line away from City’s build-up players, such as Cancelo in this case.
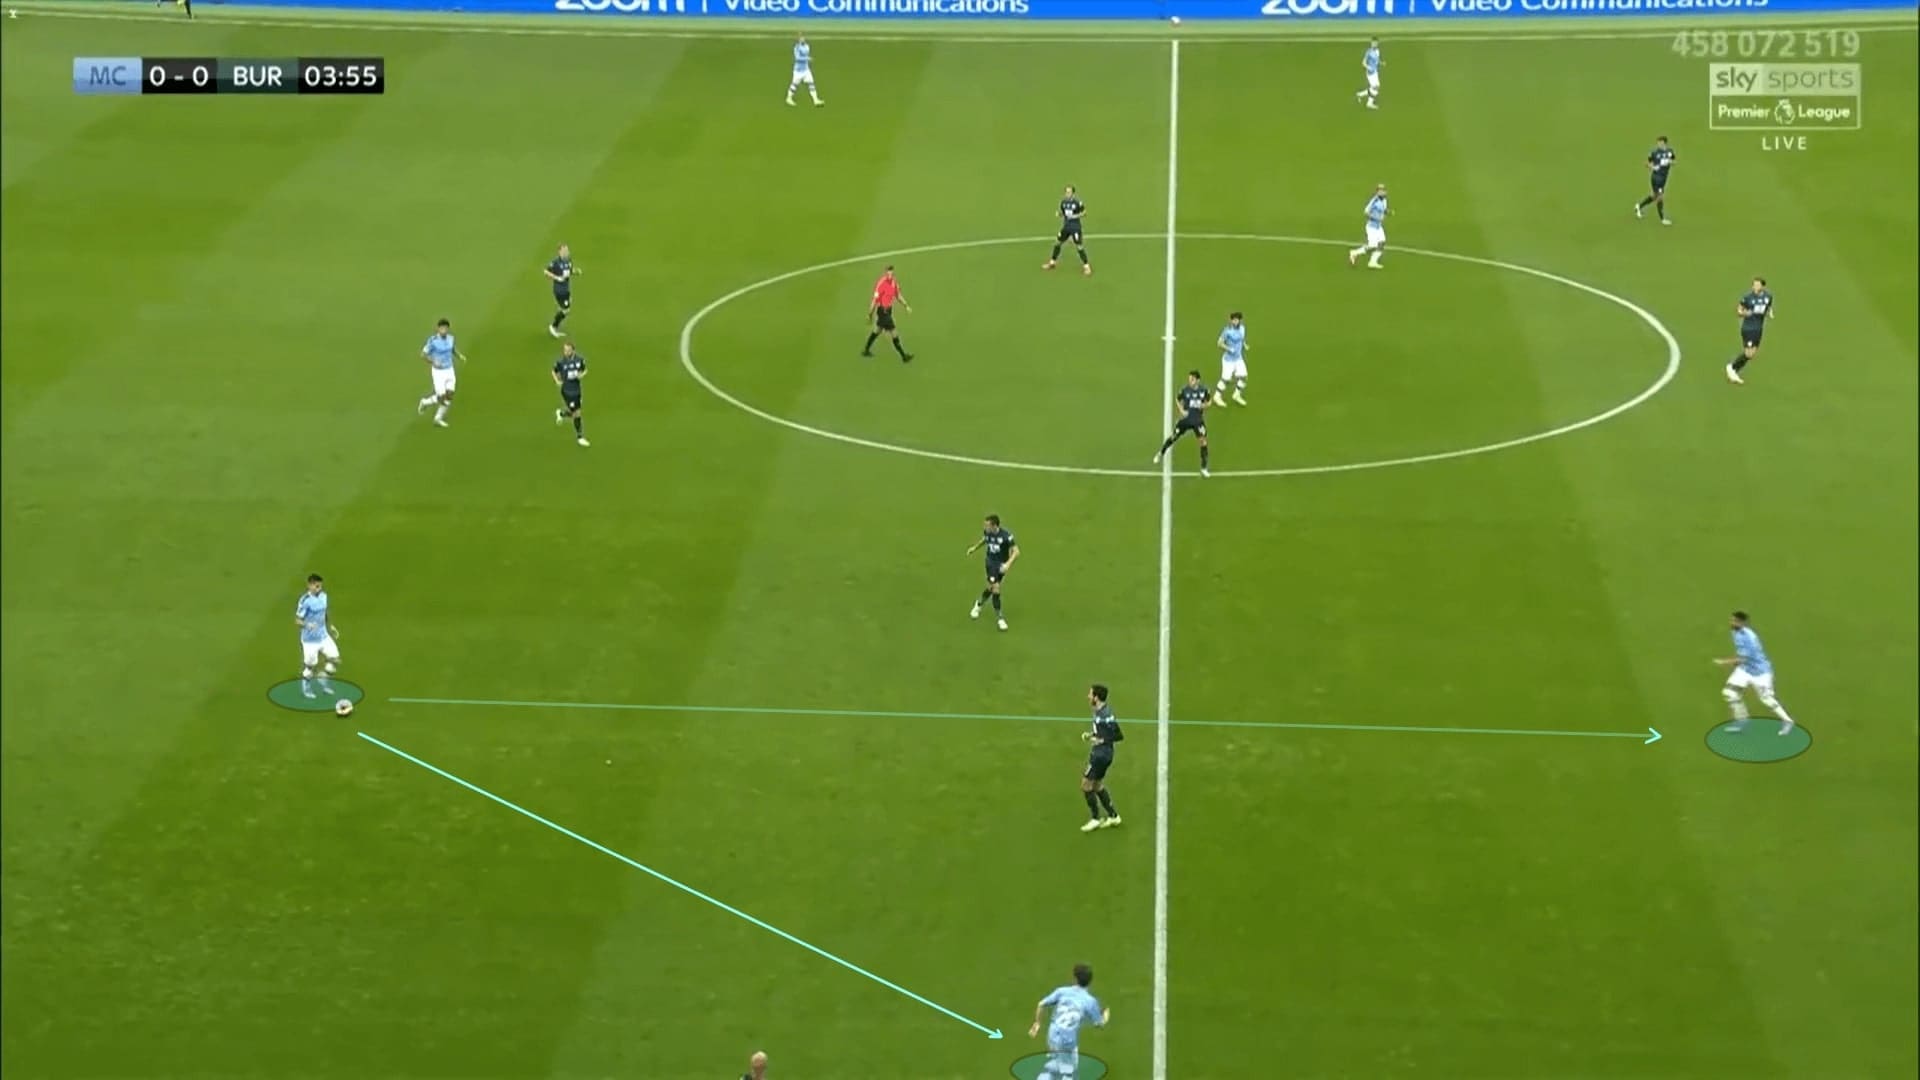
Another pattern we called out hear was the anti-clockwise rotations at flanks. Cancelo has an offensive mindset, pushing high and support the attack was his playing style. When B. Silva dropped to pick the ball at the half-spaces, Mahrez and Cancelo also tweaked the positionings to rotate and creating chaos for Burnley defence.
In this example, Mahrez opened the wide corridor for Cancelo as Taylor was impossible to approach both targets. Also, the right-winger at the half-spaces (still Mahrez here) has created a decisional crisis for McNeil again, so he had to leave B. Silva free.
Foden and D. Silva
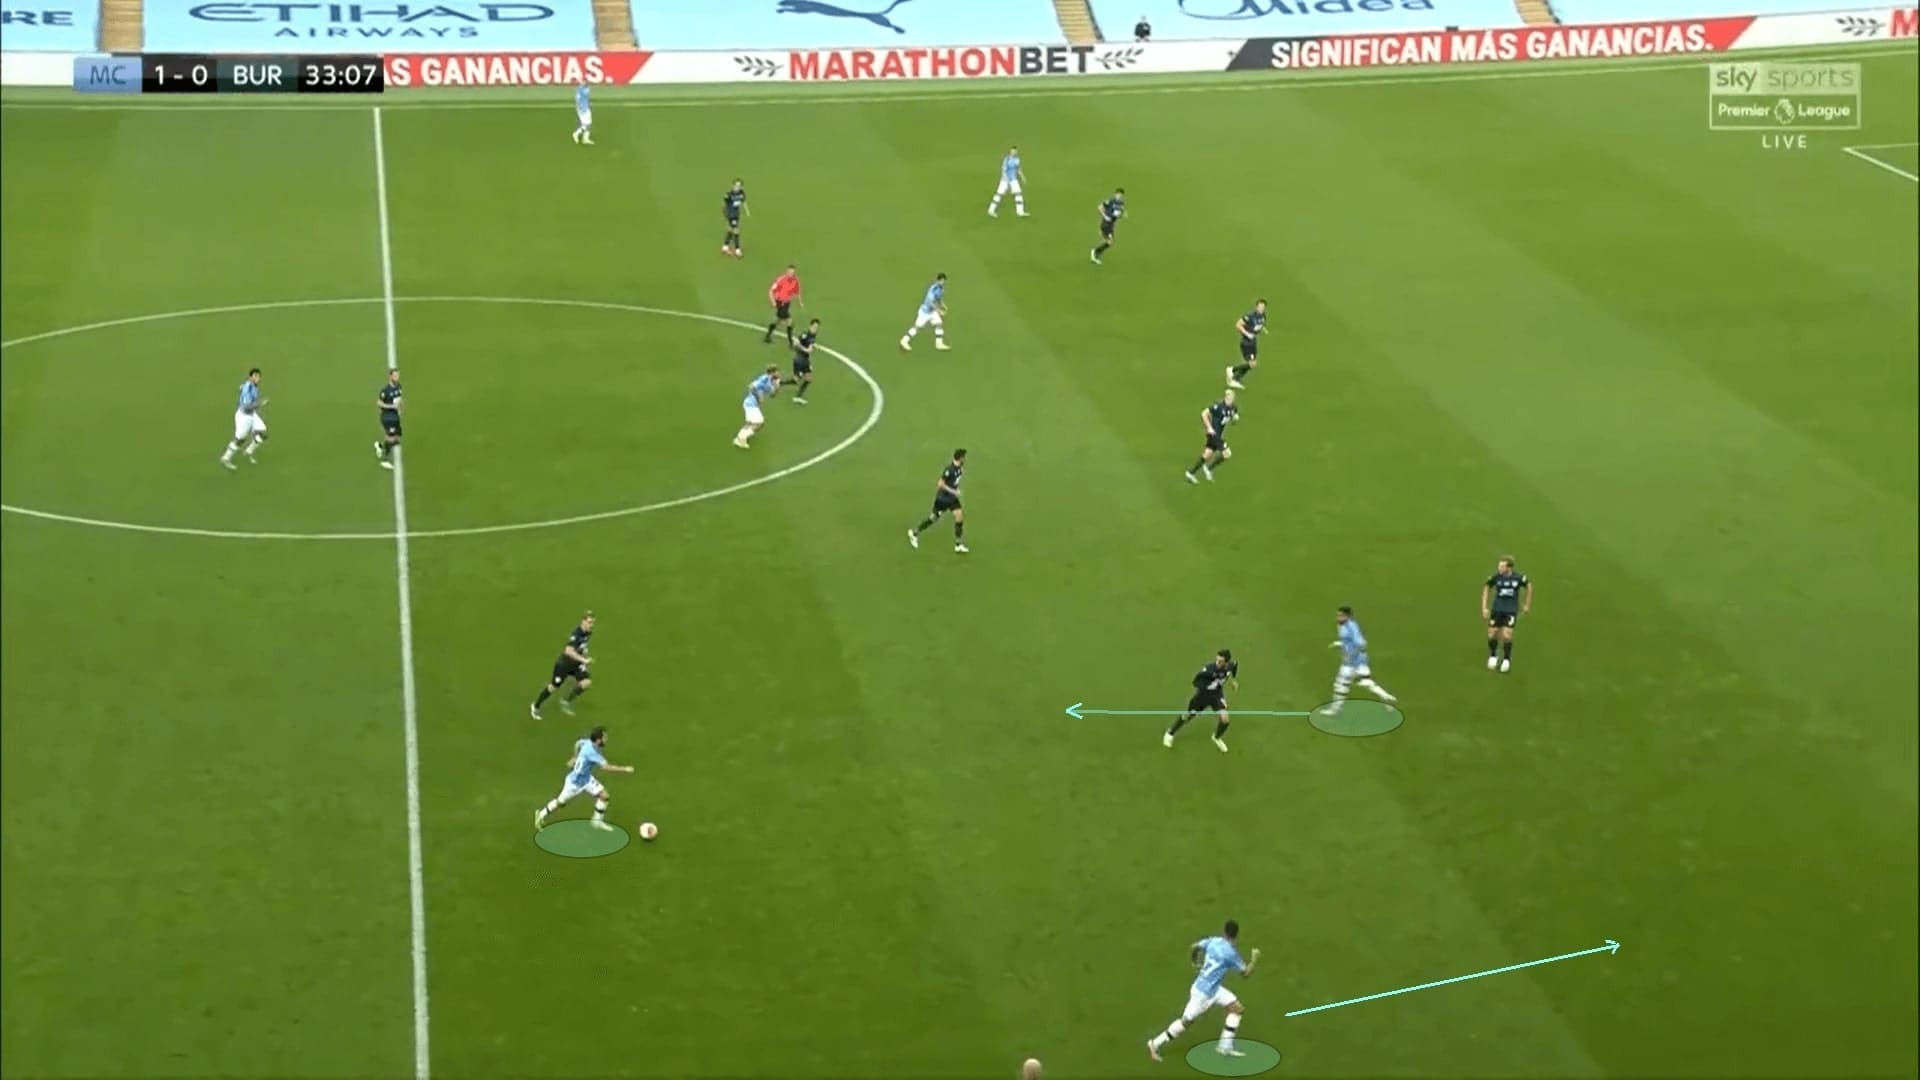
On the opposite flank, things were different because the players were Foden and D. Silva. The combinations on Mahrez’s side had more rotations, inward and horizontal movements. For Foden and D. Silva, the movements were more vertical and forward-oriented.
A reoccurring pattern that helped City to reach the left flank was the progressive passes of Fernandinho. We explained how City free the centre-backs in the first phase, and the Brazilian always played the ball to the widest player at his side, Zinchenko here.
Some creation decisional crisis and behaviours to manipulate the defence were done very well by City here. D. Silva’s positioning was vital to keep Brownhill narrow, ensuring the pass of Fernandinho would arrive the left-back safely. Meanwhile, the whole process was completed as Foden and Agüero stayed at the last line and kept the defenders busy.
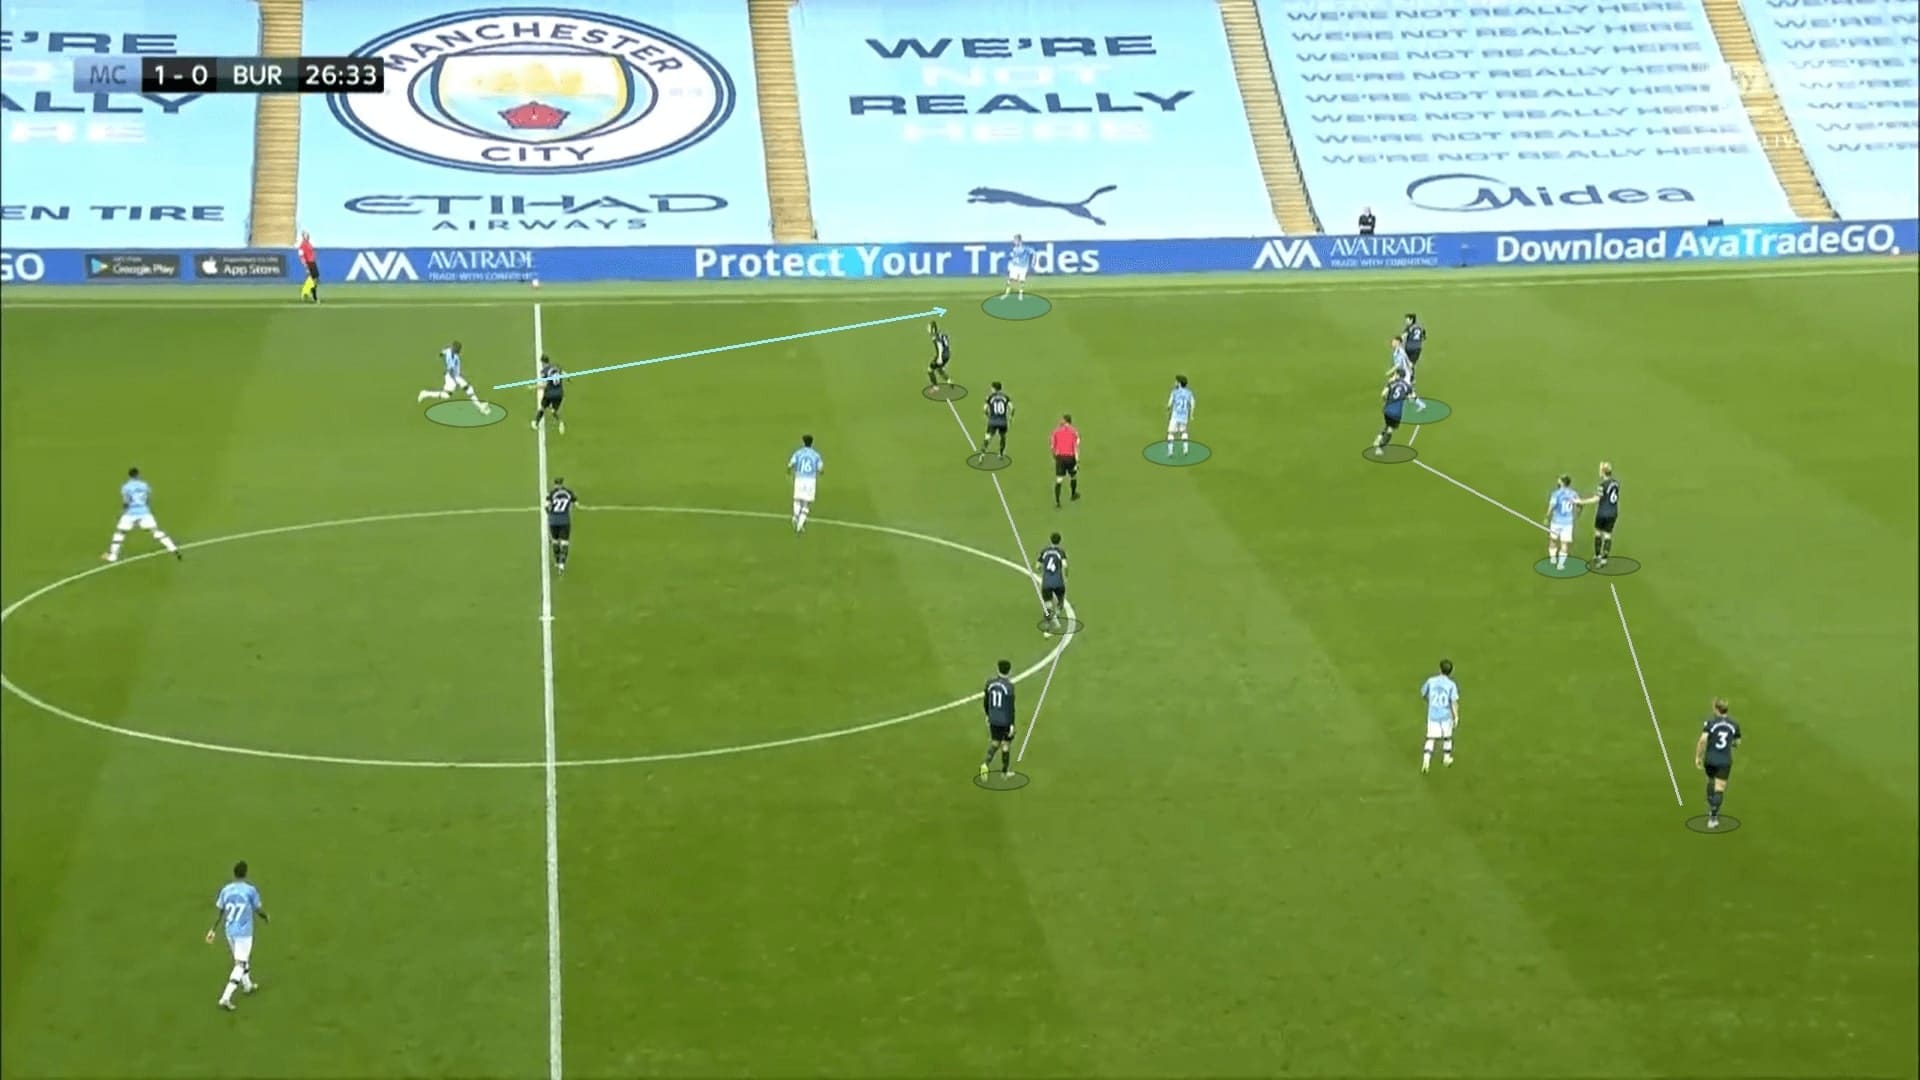
When the ball was moved to Zinchenko, the Ukrainian left-back tried to play an in-ball to find D. Silva instead of passing to Foden. The forward runs from Foden were mostly decoys, creating a wider passing lane. Here, he took Matthew Lowton and Tarkowski with him.
Zinchenko has improved to play these passes, spins were added to keep the ball away from the nearest pressing player. When the ball was fallen to D. Silva, the Spanish midfielder could free to create the dynamics.
Final remarks
City were playing very well in this game, it was their third consecutive 5-0 victory against the Clarets at the Etihad stadium. It was very intriguing to see Foden was deployed as a left-winger again, as we expected the “Stockport Iniesta” was the replacement of D. Silva, hence, should be playing as a number eight. However, it seems Foden offered more than purely creativity, his shootings were very fine too, bagged two goals in this game.
Burnley have lost completely, the defensive scheme collapsed as we saw how City dominated the game and did whatever they want. The result was not a big problem as the Clarets were quite safe from the relegation zone already, and they will look to take all three points in the next match against Watford.

Comments