Apart from the Champions League clashes, there was another Premier League match played on Wednesday night. Despite troubles with UEFA, Manchester City managed to beat West Ham convincingly and took all three points at the Etihad Stadium.
Manchester City dominated the game, enjoyed 72.89%. With Rodrigo Hernández’s and Kevin De Bruyne’s goal, City have 54 points and keep a four-point gap with Leicester City and stay second in the table.
In this tactical analysis, we will focus on how Pep Guardiola’s team outplayed David Moyes’ West Ham.
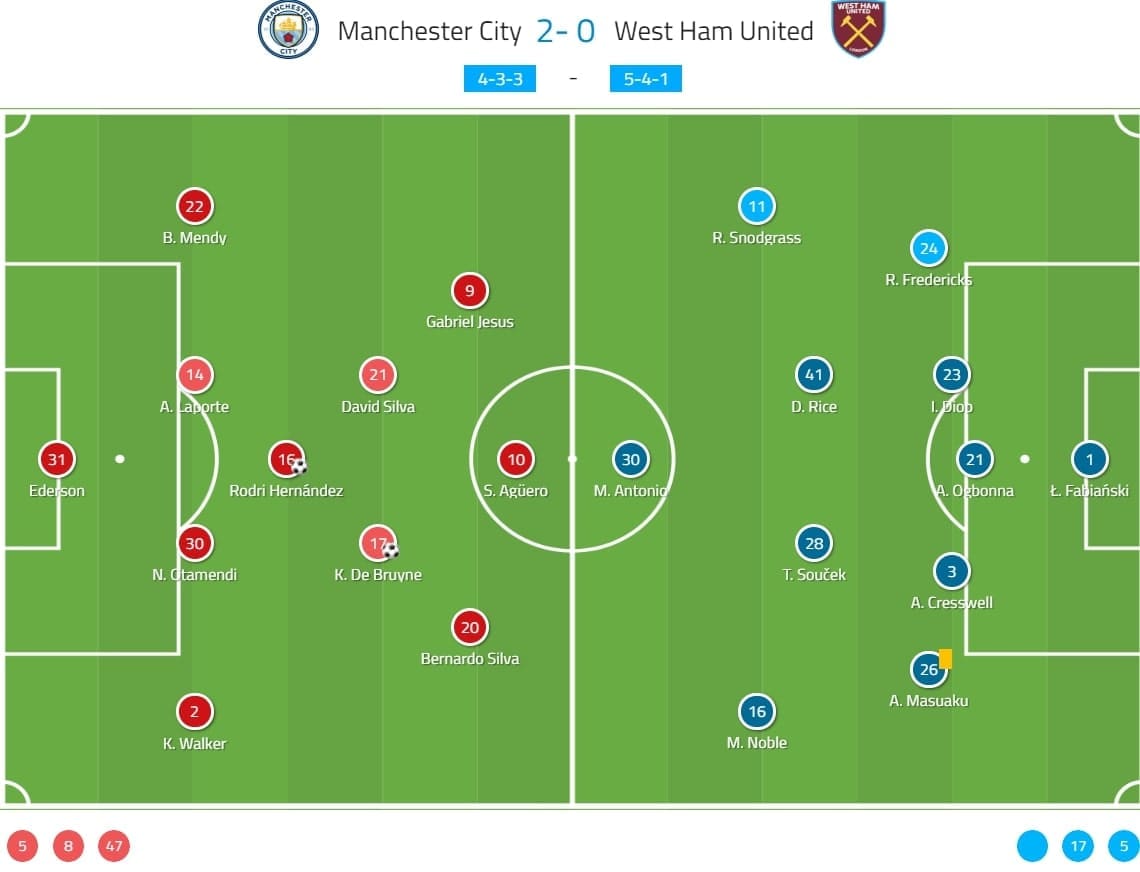
Lineups
City played with a 4-3-3 formation. Both wingers, Raheem Sterling and Leroy Sane were not available to join the match; which meant Gabriel Jesus started on the left flank, which was a huge part of the setup. City fans would be glad to see Aymeric Laporte return to the starting eleven giving Fernandinho a chance to rest.
Moyes played his team in a 5-4-1 formation, he kept some offensive players on the bench, including Manuel Lanzini, Felipe Anderson, Sébastien Haller and the new signing Jarrod Bowen. Another arrival, Tomáš Souček started in midfield with Mark Noble and Declan Rice. Michail Antonio played as the lone striker.
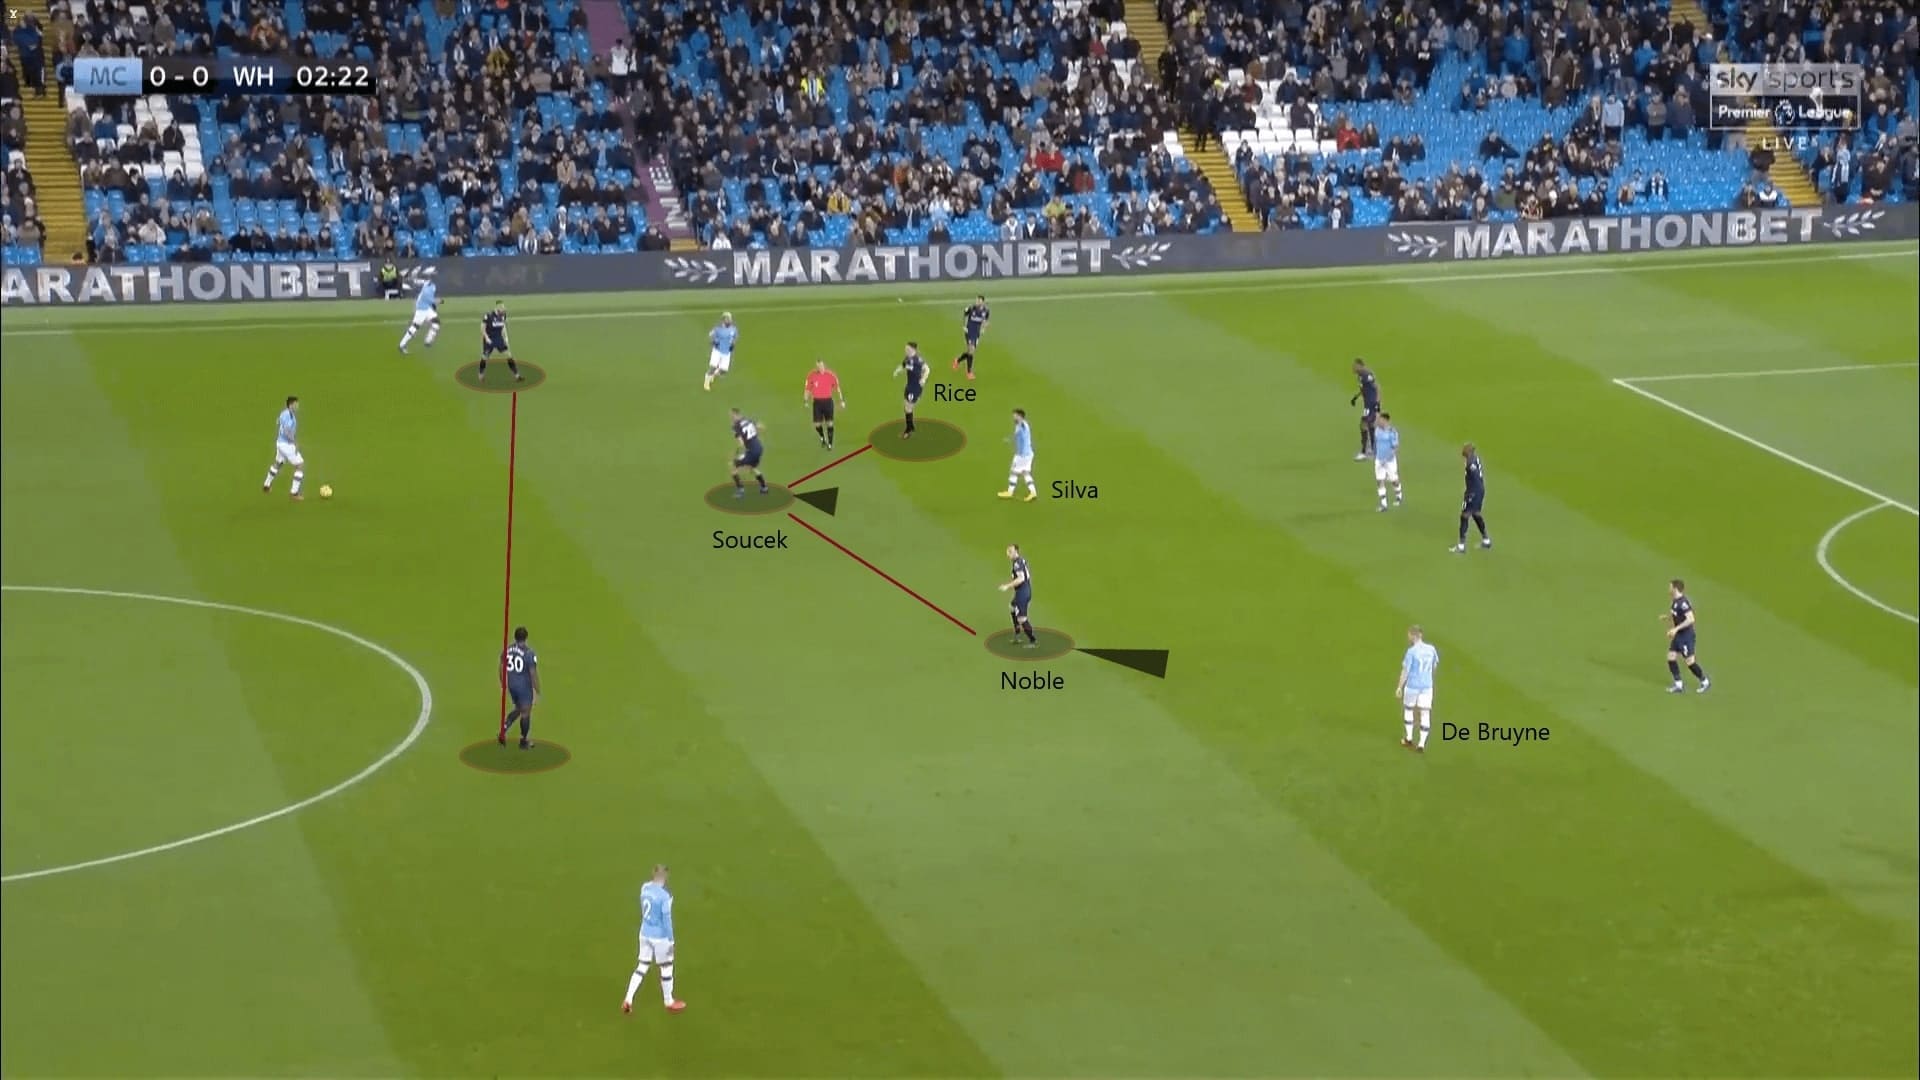
Defensive setup of West Ham
Despite starting in a 5-4-1, Moyes tried to retain numbers in the offensive transitions of his team. On occasion, he reduced Robert Snodgrass’ defensive responsibility, allowing his team to defend in a 5-3-2 low block. Therefore, the defensive responsibility was on the midfielders.
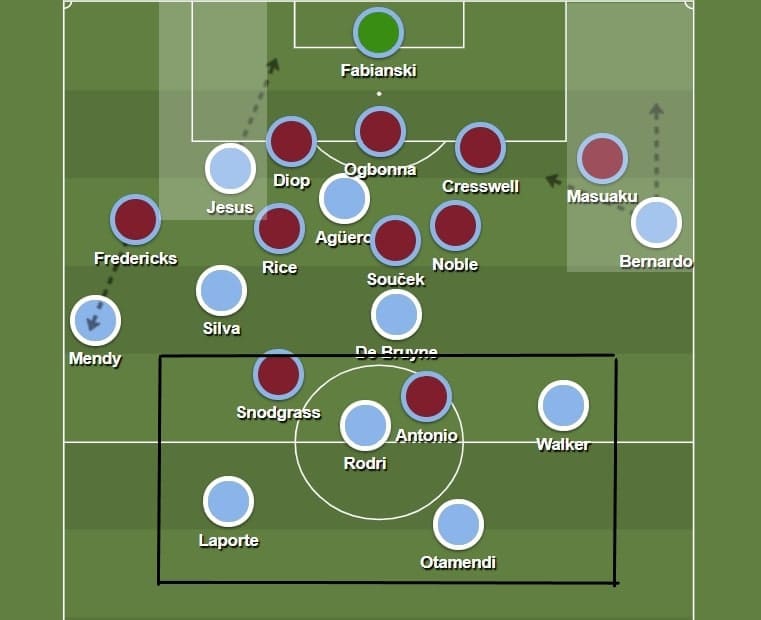
In hopes of keeping both advanced creative playmakers David Silva and De Bruyne silent, he used his midfield three to cover both players, while Souček pressed Rodri in most cases. Ideally, this would force City to play wide, and given that both wingers were not conventional wingers, City were likely to cross from deep through Benjamin Mendy. With the physical superiority of Angelo Ogbonna and Issa Diop, Moyes felt his team had sufficient numbers and ability to deal with the crosses in a back three.
This image reflected the defensive shape of West Ham. As mentioned, Snodgrass was slightly higher when defending; the winger did not stay behind and mark Mendy tightly. The midfield three of West Ham was in a ‘reversed-V’ shape, with Souček pressing Rodri. The Czech international used his body language to instruct his partner, Rice to cover D. Silva when he stepped up. Noble also shut the passing lanes to De Bruyne, City could not progress through the advanced midfielders. Moyes believed the elimination of central penetrations towards De Bruyne and D. Silva could minimize City’s offensive threat.
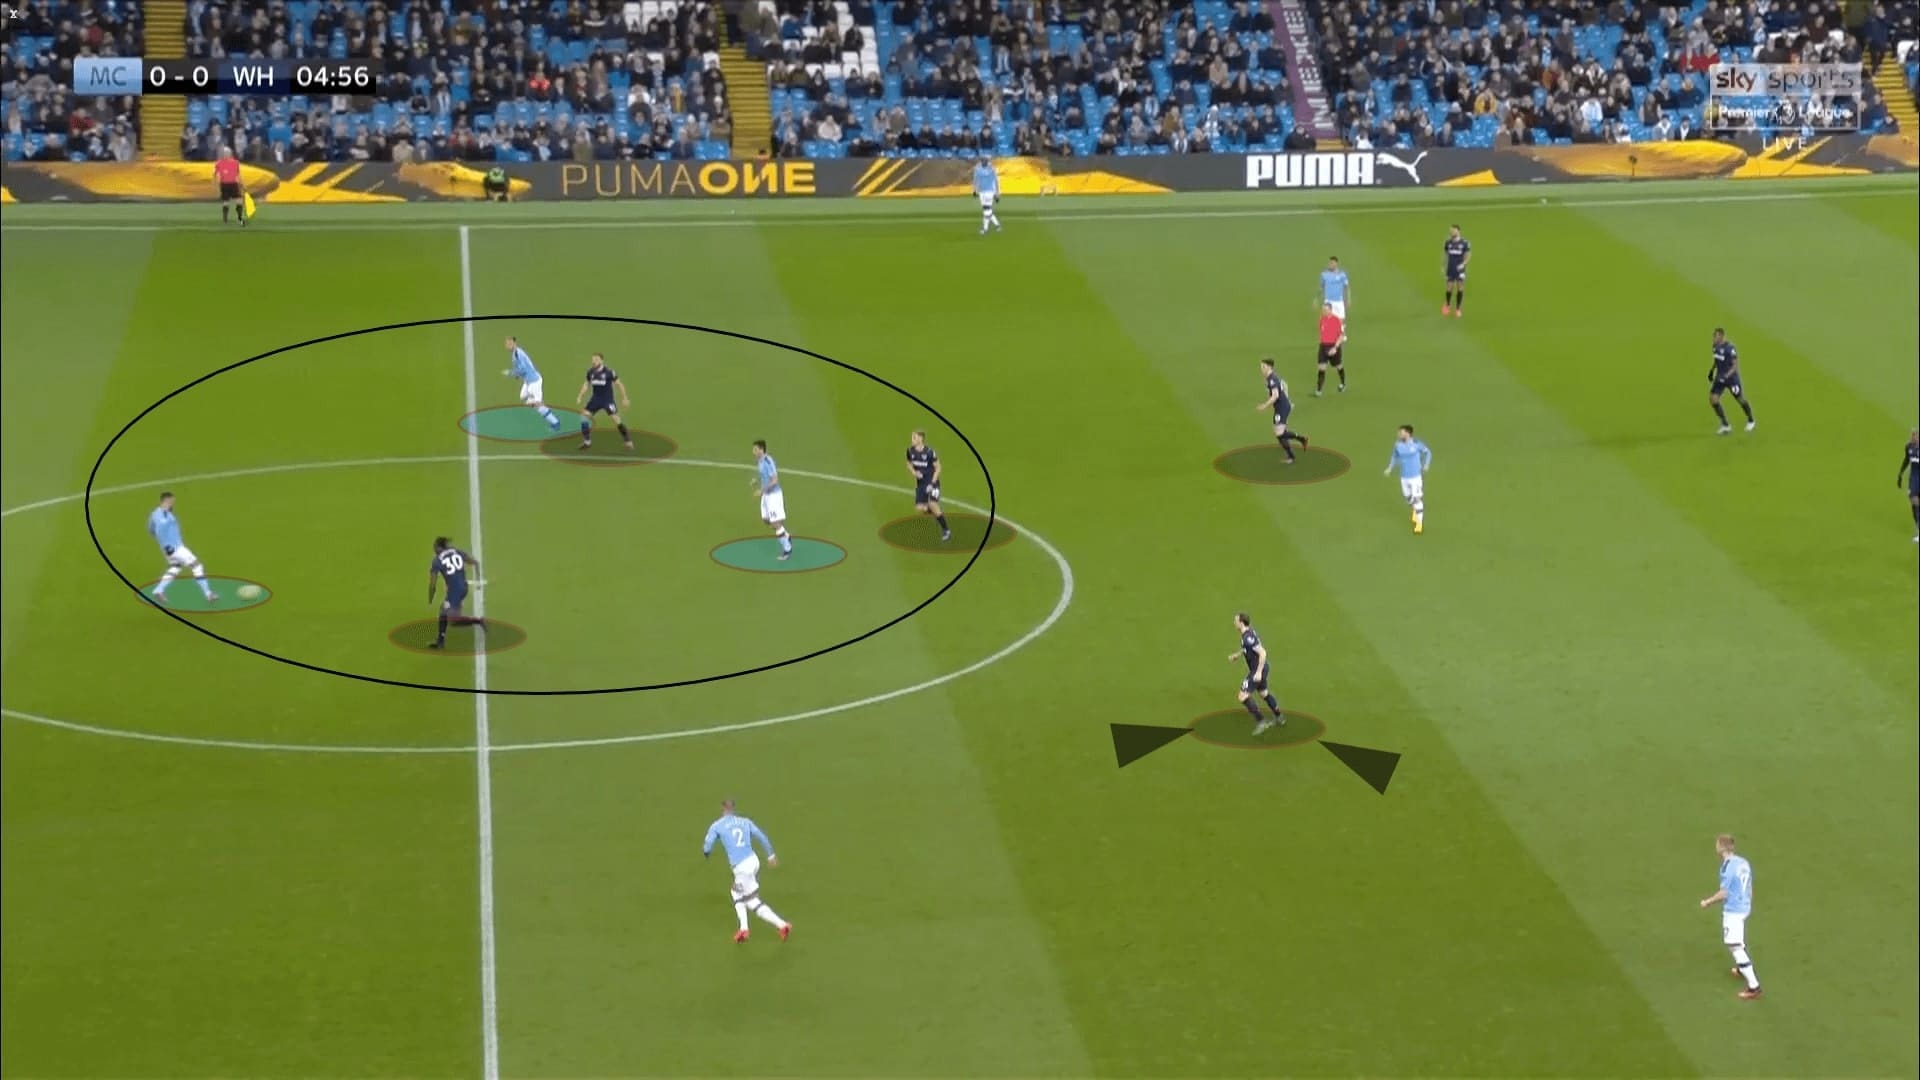
On some occasion, when West Ham reached numerical equality in the central third, they even tried to press City. As demonstrated in the following image, the Hammers pressed with Antonio leading his teammates. It was a three-v-three situation. However, Souček gave Rodri too much space to receive the first-time pass from Nicolás Otamendi. City broke the press with a third-man play. The pressing was a reoccurring issue, as explained in our previous analysis, West Ham lacked dashed sprints when pressing.
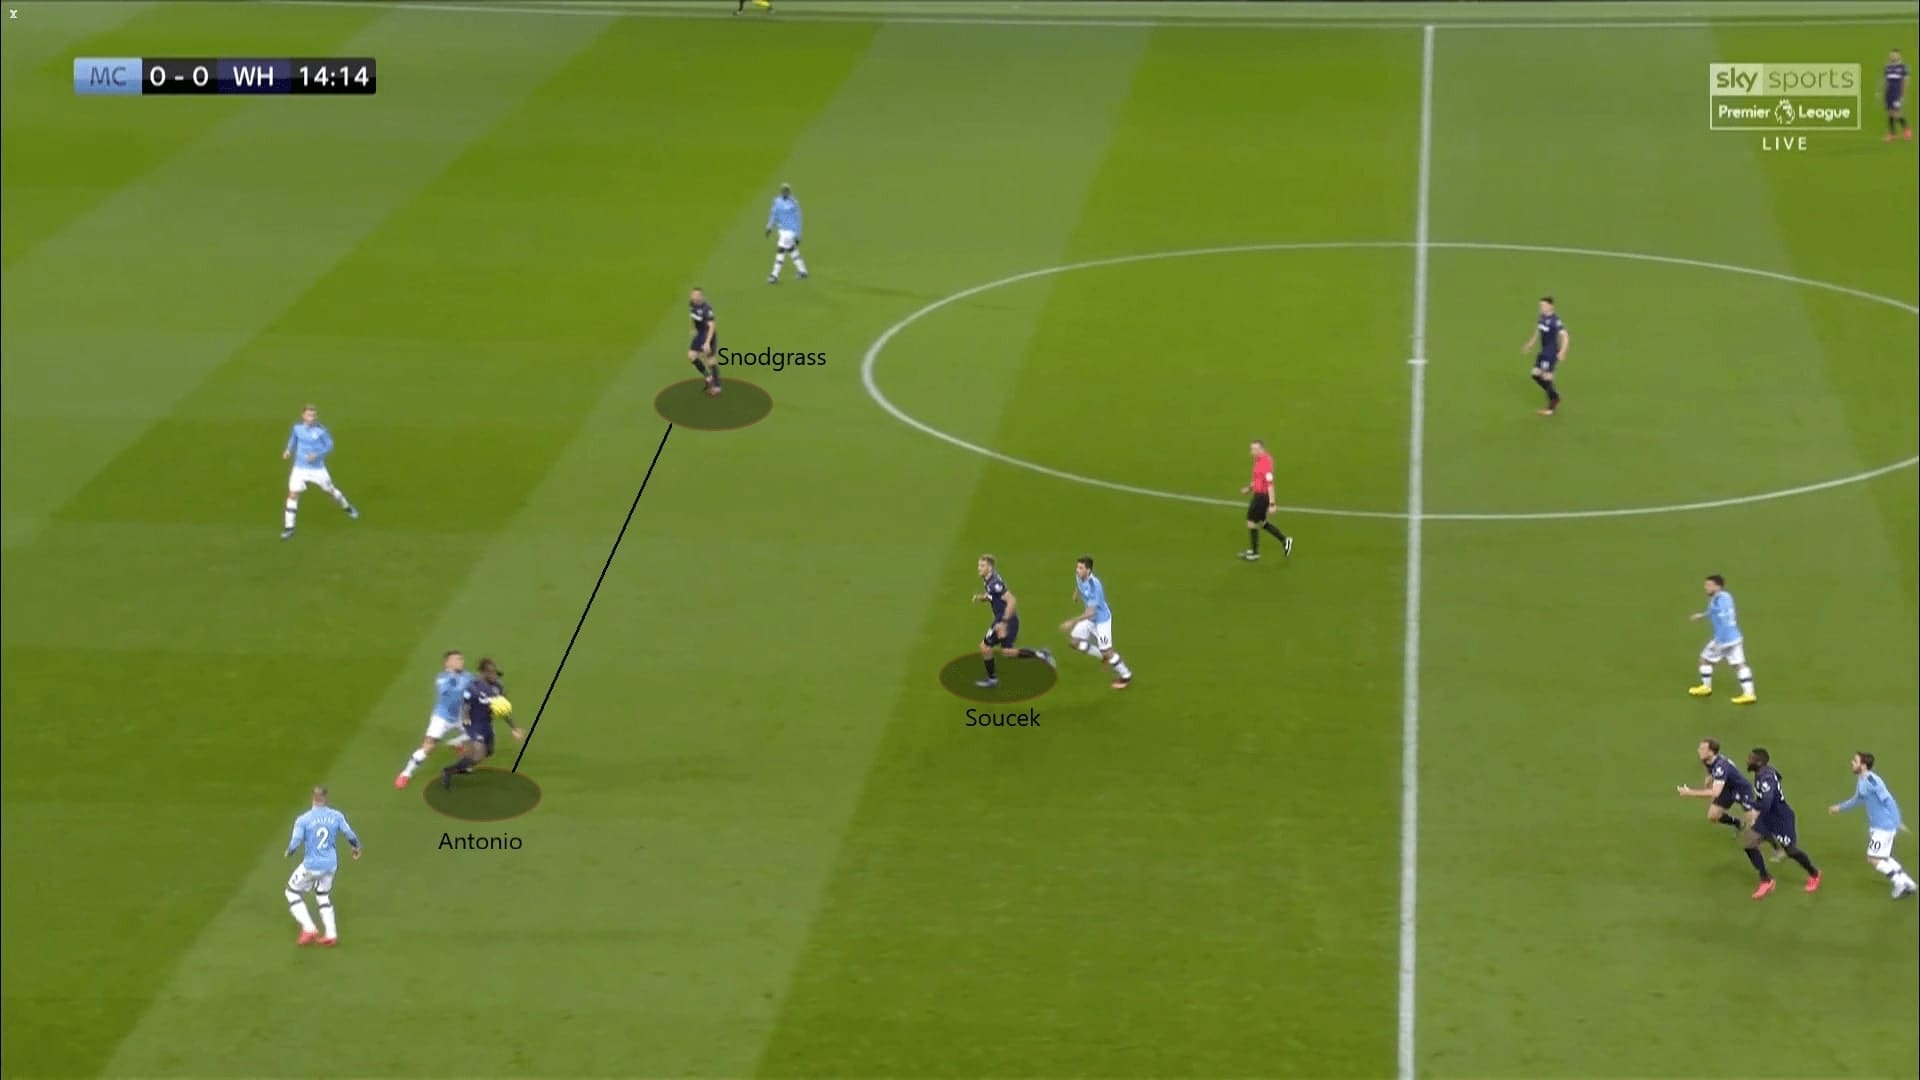
How West Ham played in the counter-attacks
To further explain why the positioning of Snodgrass was out of an offensive consideration, we briefly explain the counter-attacks of West Ham. When given the chance to play long, Antonio served as a target man, and his supporting player was Souček. So, as shown below, when the forward controlled the ball with his chest and held it against Otamendi, the Czech made a forward run to support him.
Snodgrass positioned himself higher on the pitch as he looked to lurk behind the last City defenders. In this case, City were defending high, so he was between Mendy and Laporte. However, when progressing to the final third, Snodgrass tended to stay at the far post. In the hope of allowing the Scottish international being available early, he stayed higher to participate in the counters quickly.
Another tactical consideration from Moyes was the chances of being counter-pressed. If Snodgrass defended deep, Antonio was left alone against Laporte and Otamendi, West Ham would be difficult to find a way out. Keeping the ball in their own third was dangerous, especially on the occasions that City were counter-pressing intensely (City’s PPDA was 7.00 in this match, the lowest point was 2.90). When Snodgrass defended deeper, City recovered the ball and re-countered in West Ham’s defensive third. This happened in some cases as West Ham failed to start a counter.
City utilized the ‘false-winger’: Jesus
However, the tactical masterclass of Guardiola that shaped City was too good for West Ham. His tactics created dilemmas for Moyes to solve. In general, City’s offence included many basic components of a possession-based attacking style. His men created an overload in the first phase, utilized the width, also attacked spaces and switched the ball from side to side appropriately.
As illustrated in this image, for City’s build-up play, they maintained a numerical advantage against Antonio and Snodgrass with four players. Since Mendy provided the width on the left, Kyle Walker tucked inside as an ‘inverted right-back’ at times.
The overload of the second phase occurred on the left side of the pitch, which was the focus of City’s attack in the first half. This created two advantages. On the stronger side, Guardiola instructed Jesus to played as a ‘false-winger’, releasing him or D. Silva to attack the half-spaces between Diop and Ryan Fredericks. In hopes of increasing that gap, City used Mendy to lure the West Ham right wing-back’s press, as shown below. In addition, the idea of using Jesus to attack the half-spaces was to avoid Rice’s press. City could use D. Silva to manipulate Rice’s position, as a result, the Brazilian became the free player. This was a fluid move with Sergio Agüero dropping between the lines. These players were pleased to rotate their positions to confuse their opponents.
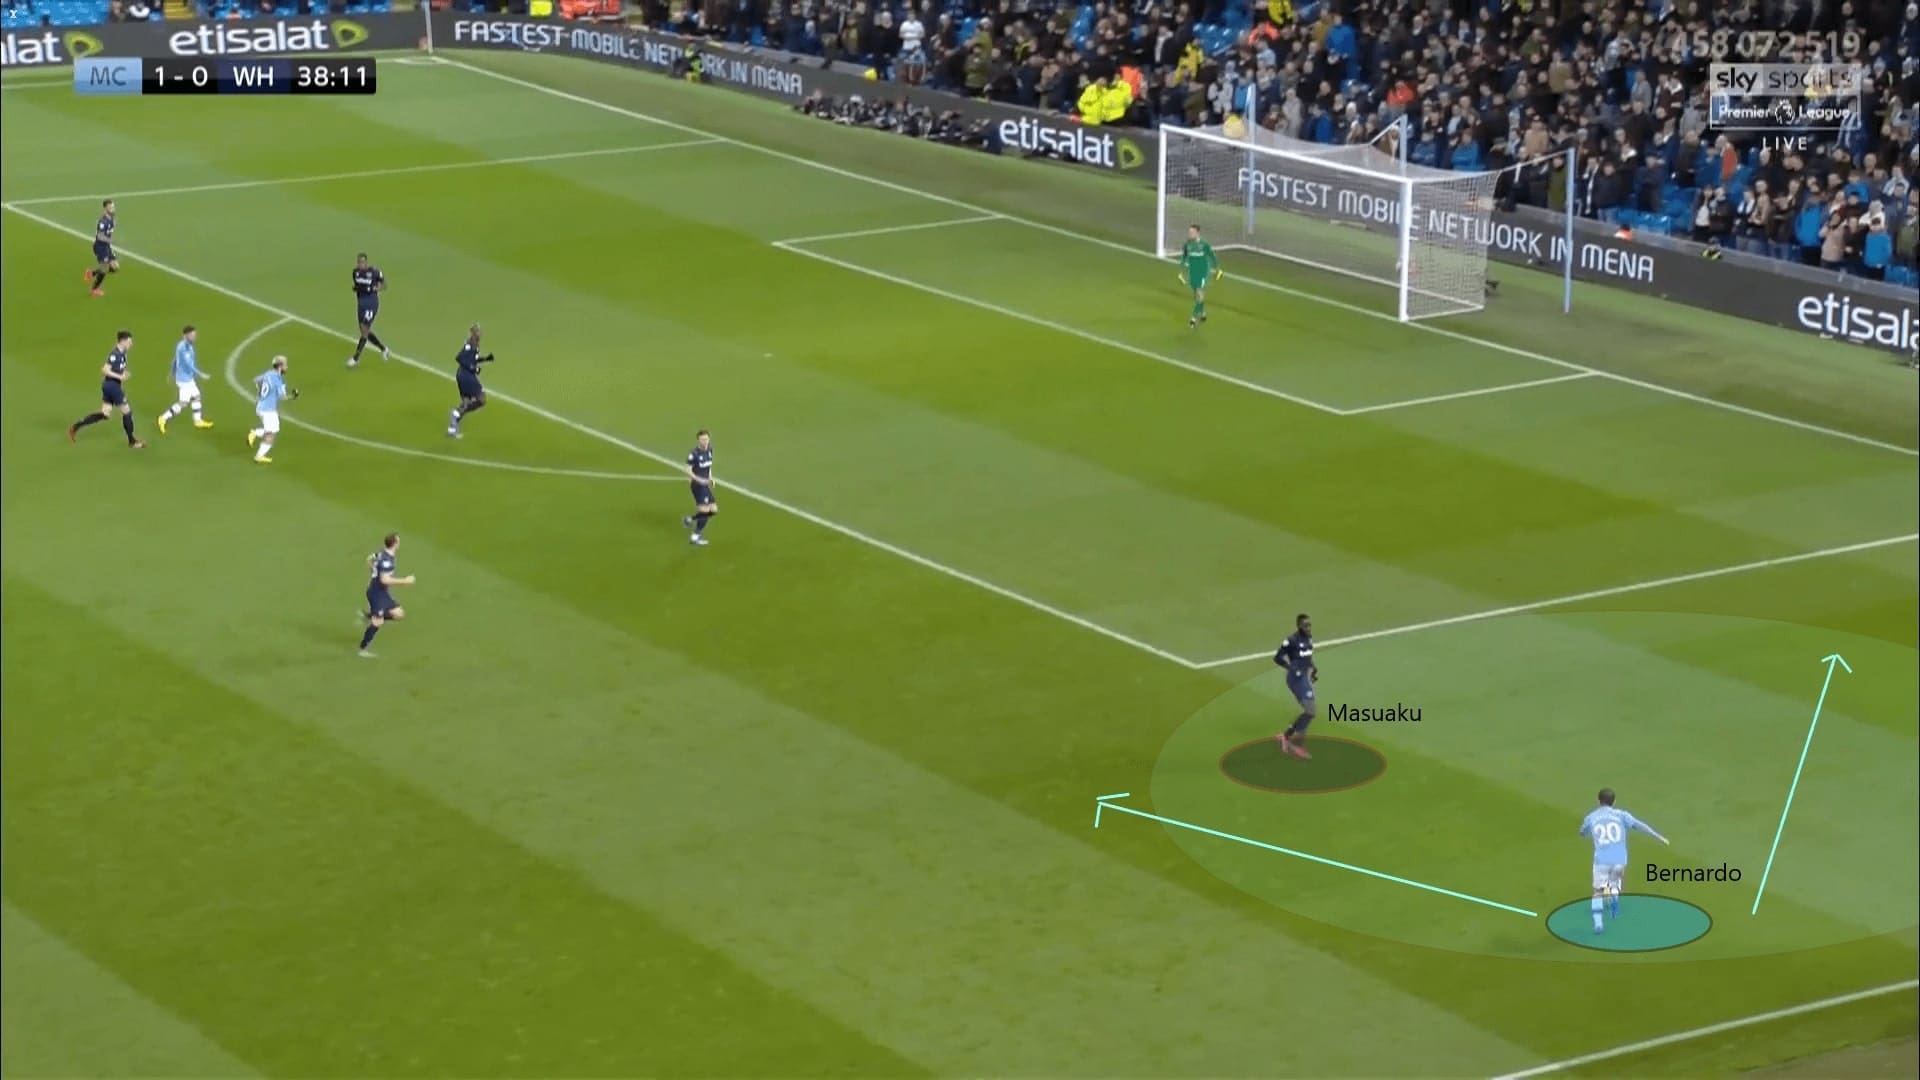
On the far side, it was a favourable for Bernardo Silva as he was in a one-v-one situation against the left wing-back of West Ham, Arthur Masuaku. He could capitalize on those occasions when City switched the ball to his side quickly.
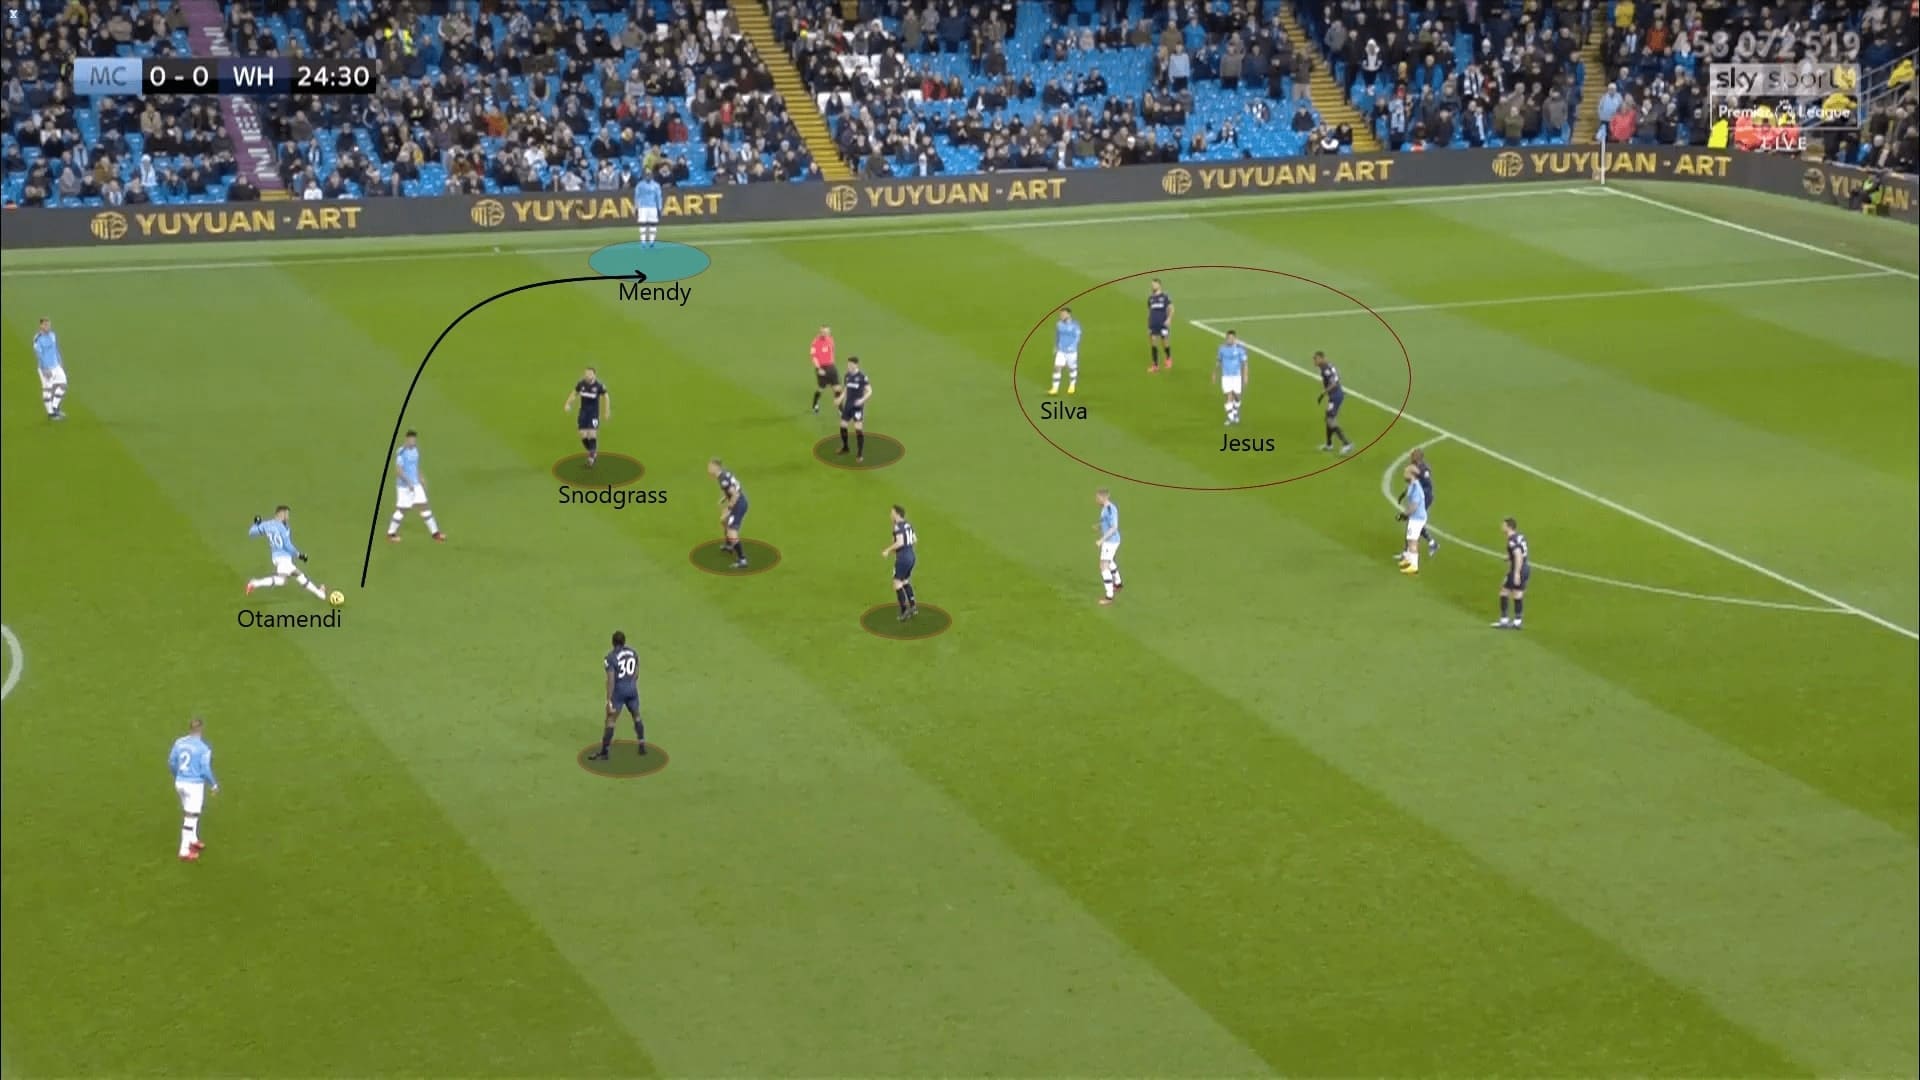
Below was a game example. Given the awkward positioning of Snodgrass as explained, City found Mendy with a lofted ball over the midfielders of West Ham. In this situation, it was Otamendi to send the ball over Snodgrass to find Mendy. Both West Ham defenders, Fredericks and Diop could not step out as they were pinned by D. Silva and Jesus. This gave City rooms to develop the attack on the left.
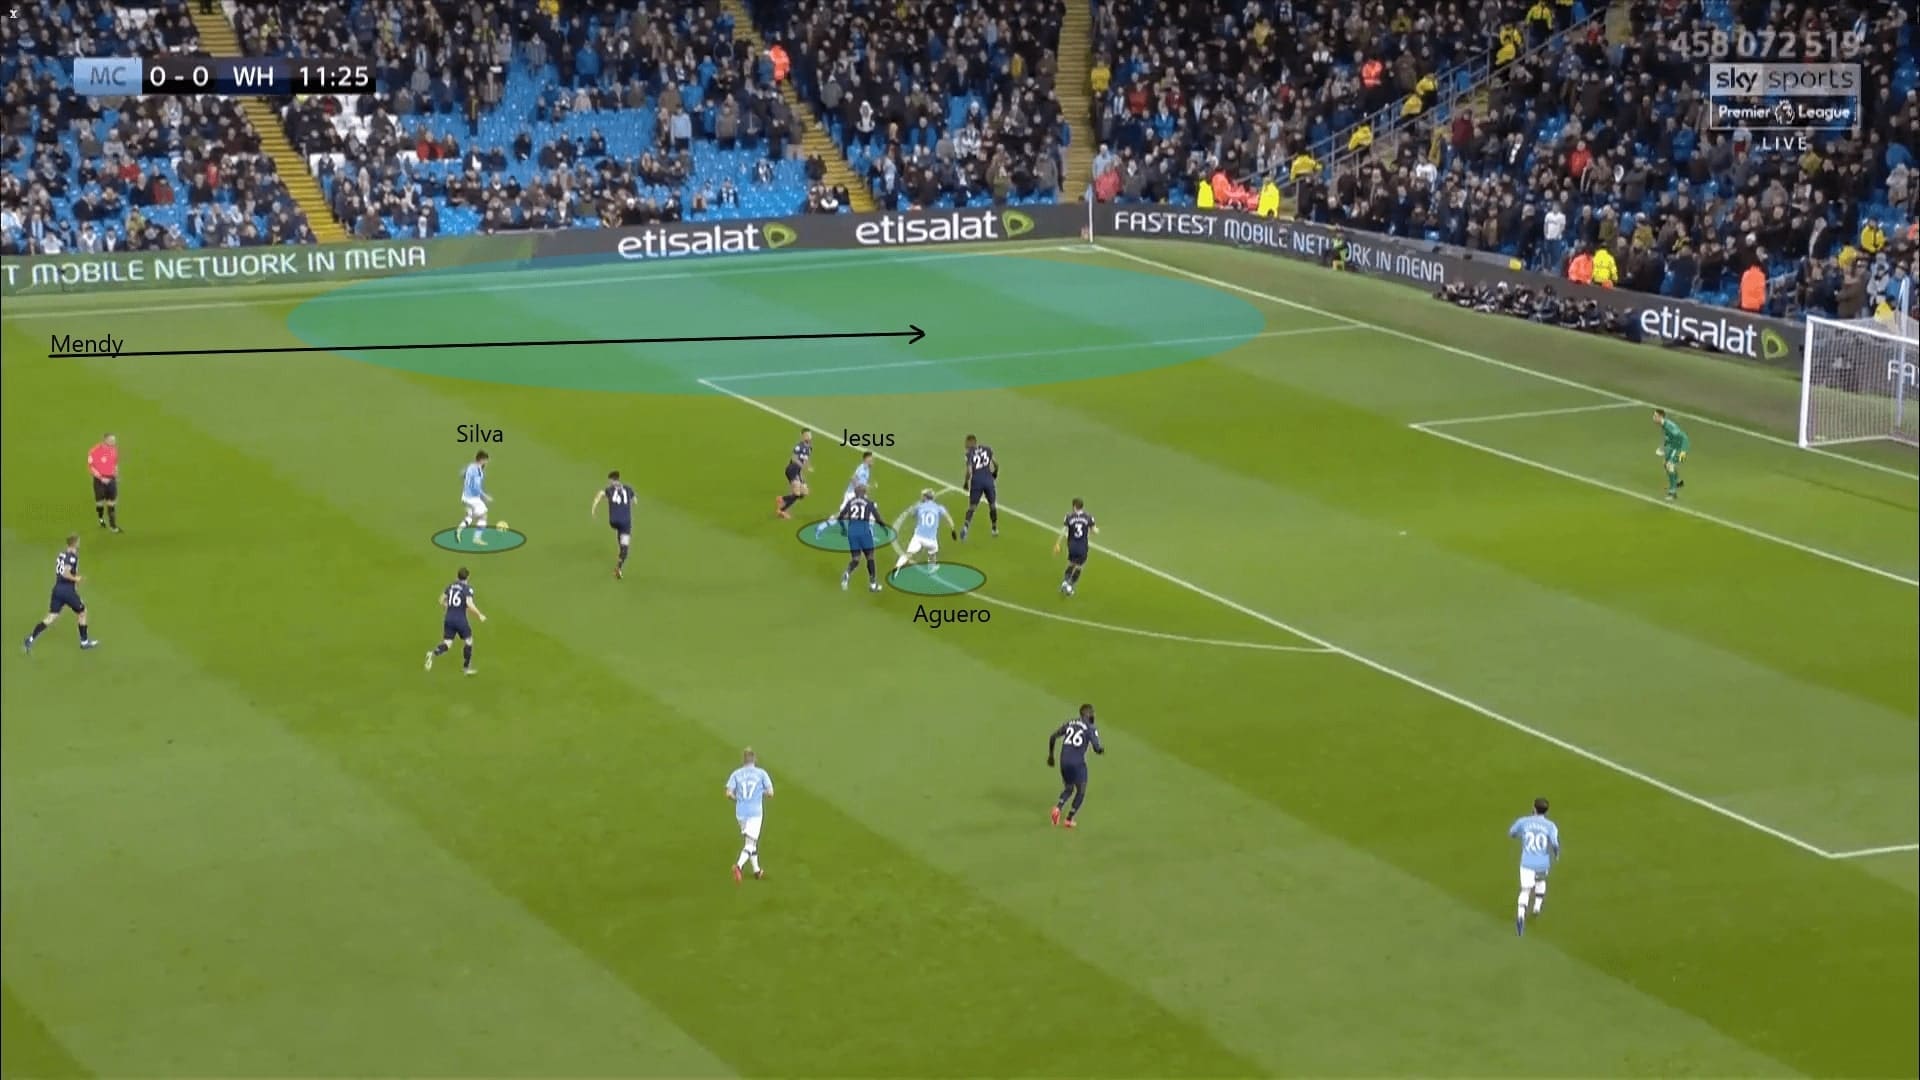
Below is another example. As mentioned, Jesus had the freedom to roam his position, including making runs towards the centre and attack the box. In this case, his movement forced Fredericks to track him, created enormous spaces on the left flank. This time, D. Silva had the ball, Rice was far from him as he was bypassed by a third-man play of City, thanks to Agüero’s dropping movement. Mendy was released by D. Silva sprinted to make the cross in this case.
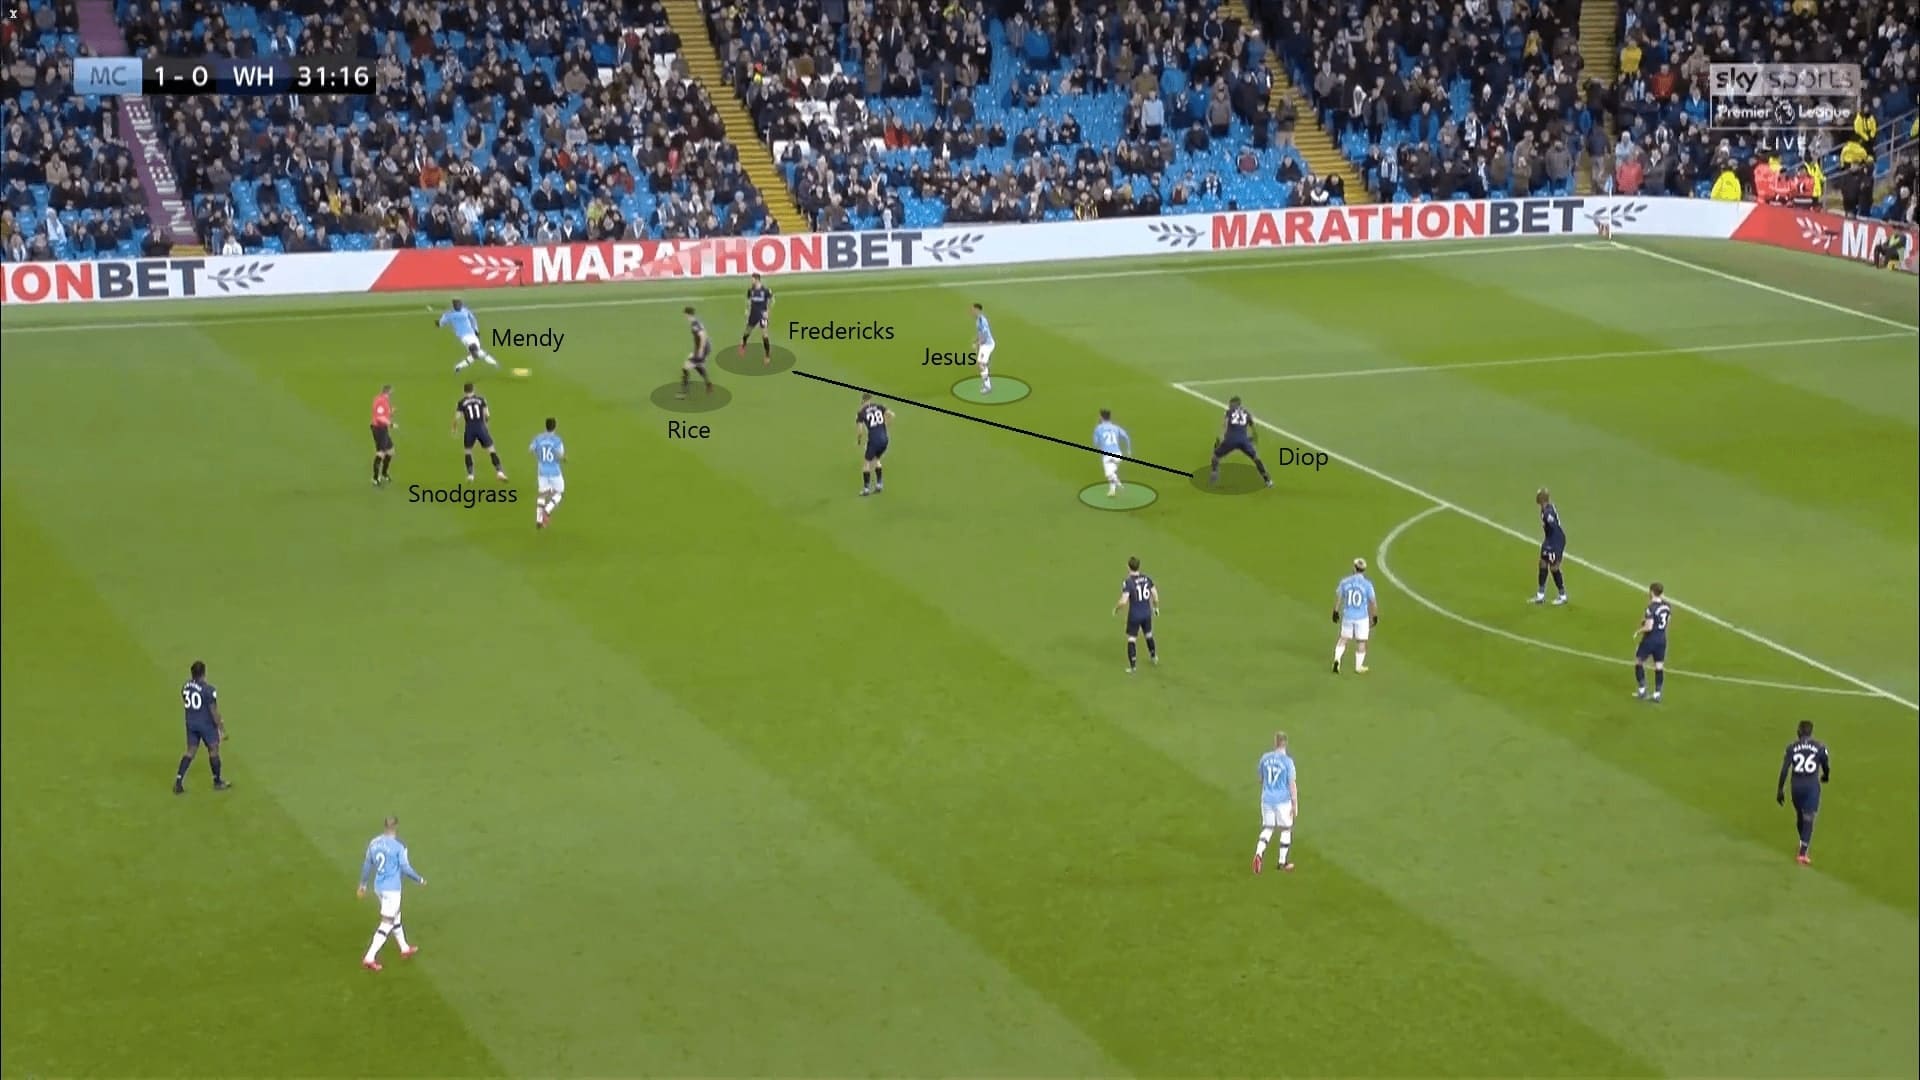
This was an example that demonstrates how City attacked the half-spaces as explained. In this case, Fredericks was far from Diop as he was lured by Mendy. The right-back thought he closed the flank, in fact, the gap between Diop and Fredericks was occupied by Jesus.
Mendy was clever, as Rice initially shut the penetrating passing lane by covering Jesus. However, the Frenchman carried the ball forward, resulted in a two-v-one situation temporarily, forced Rice to react and step up. This opened the passing lane to Jesus. The other part that Mendy did well was his choice to use his right foot to pass, that was unpredictable from a left-footed full-back.
This situation was showing the overload of City. On the strong side, City had five players in the centre, with Mendy staying on the touchline and providing width for the team. As a result, Masuaku was isolated on the far side.
When City found the majority of West Ham players they were lured to the ball side, their midfielders, Rodri and De Bruyne switched the ball to the weak side. In this case, nine Hammers were on the ball side, hence, the Belgian picked this chance to switch the ball to B. Silva.
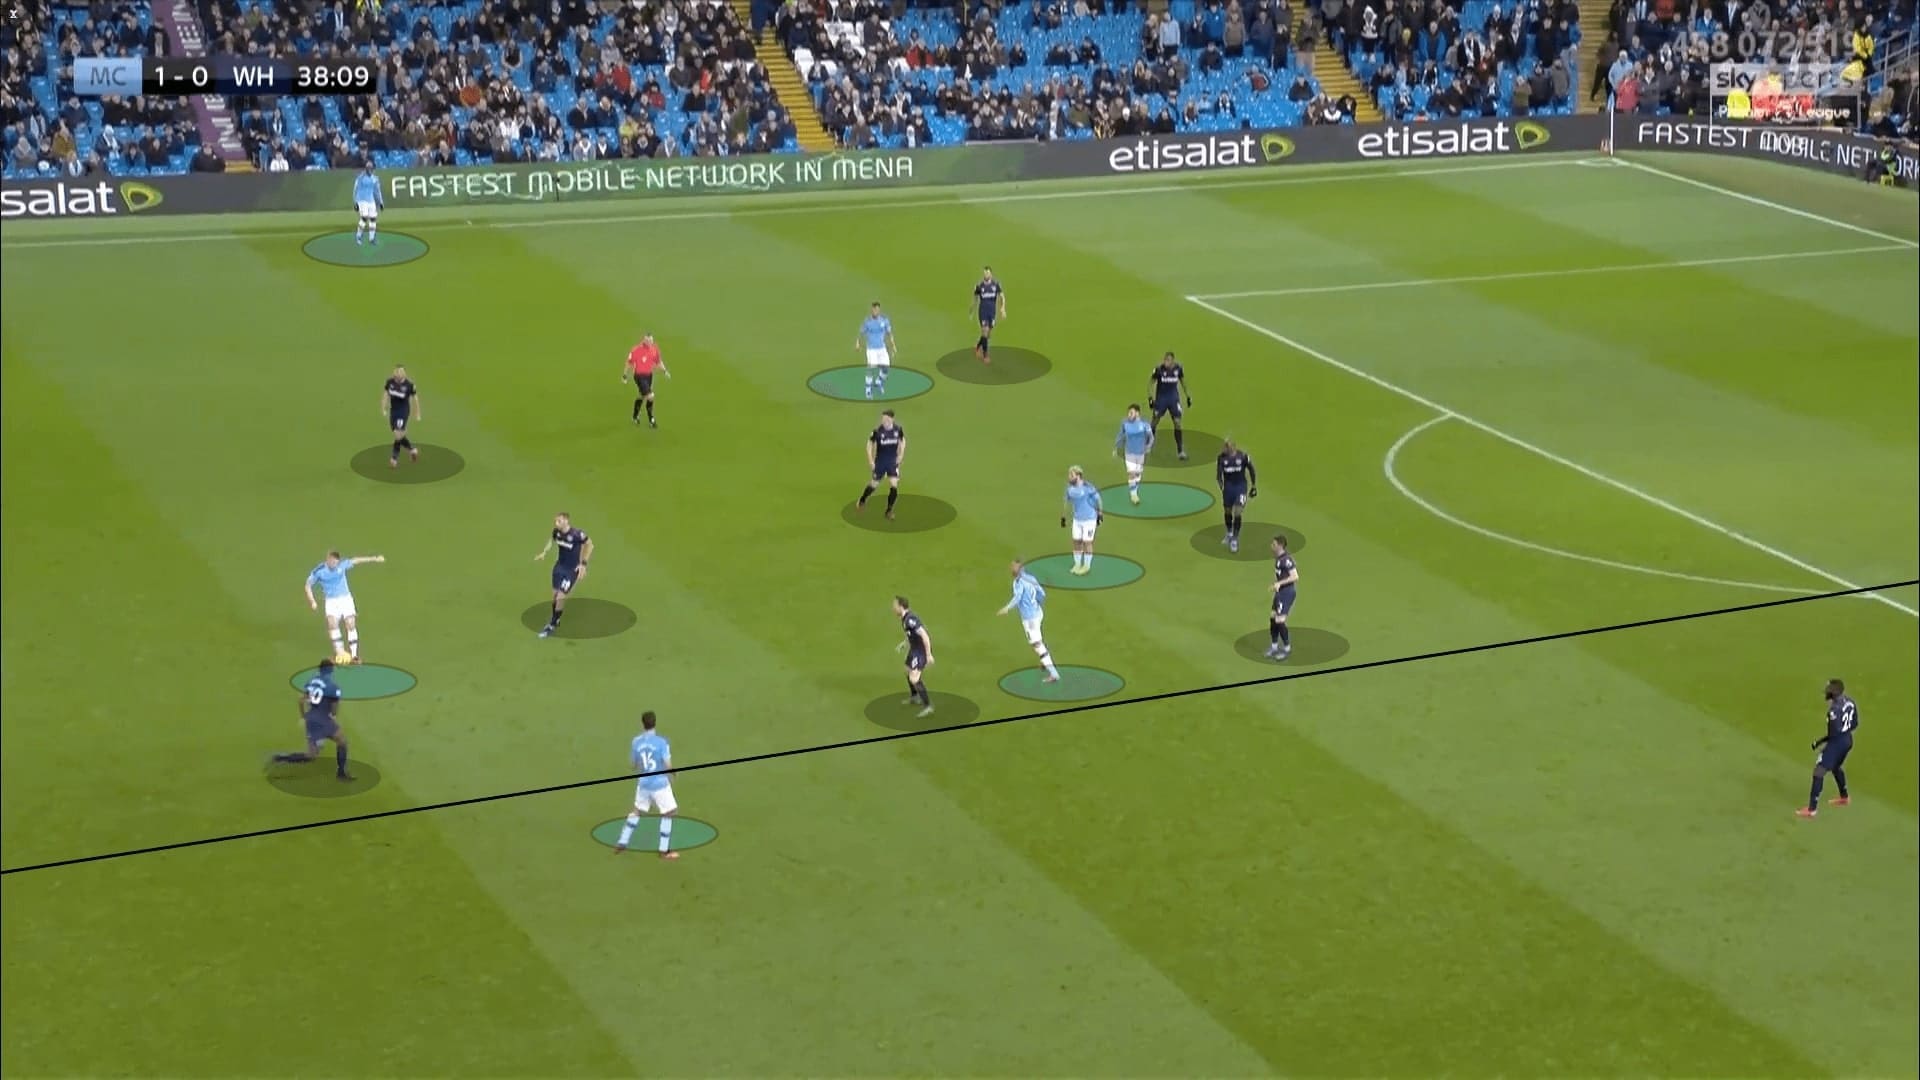
Once the ball was under B. Silva feet, he was in a favourable condition which has the chance to take on Masuaku. With this setup, both right players of City, Walker and B. Silva recorded impressive dribbling statistics. B. Silva completed six of his nine dribbles (67%); Walker completed two out of three (67%).
Given B. Silva is a left-footed player, receiving the ball with an opened body orientation was difficult for Masuaku to predict where the Portuguese was going. Naturally, B. Silva would cut inside, however, in this match, he drifted to the byline and crossed with his right foot as well.
Guardiola’s tactical masterclass
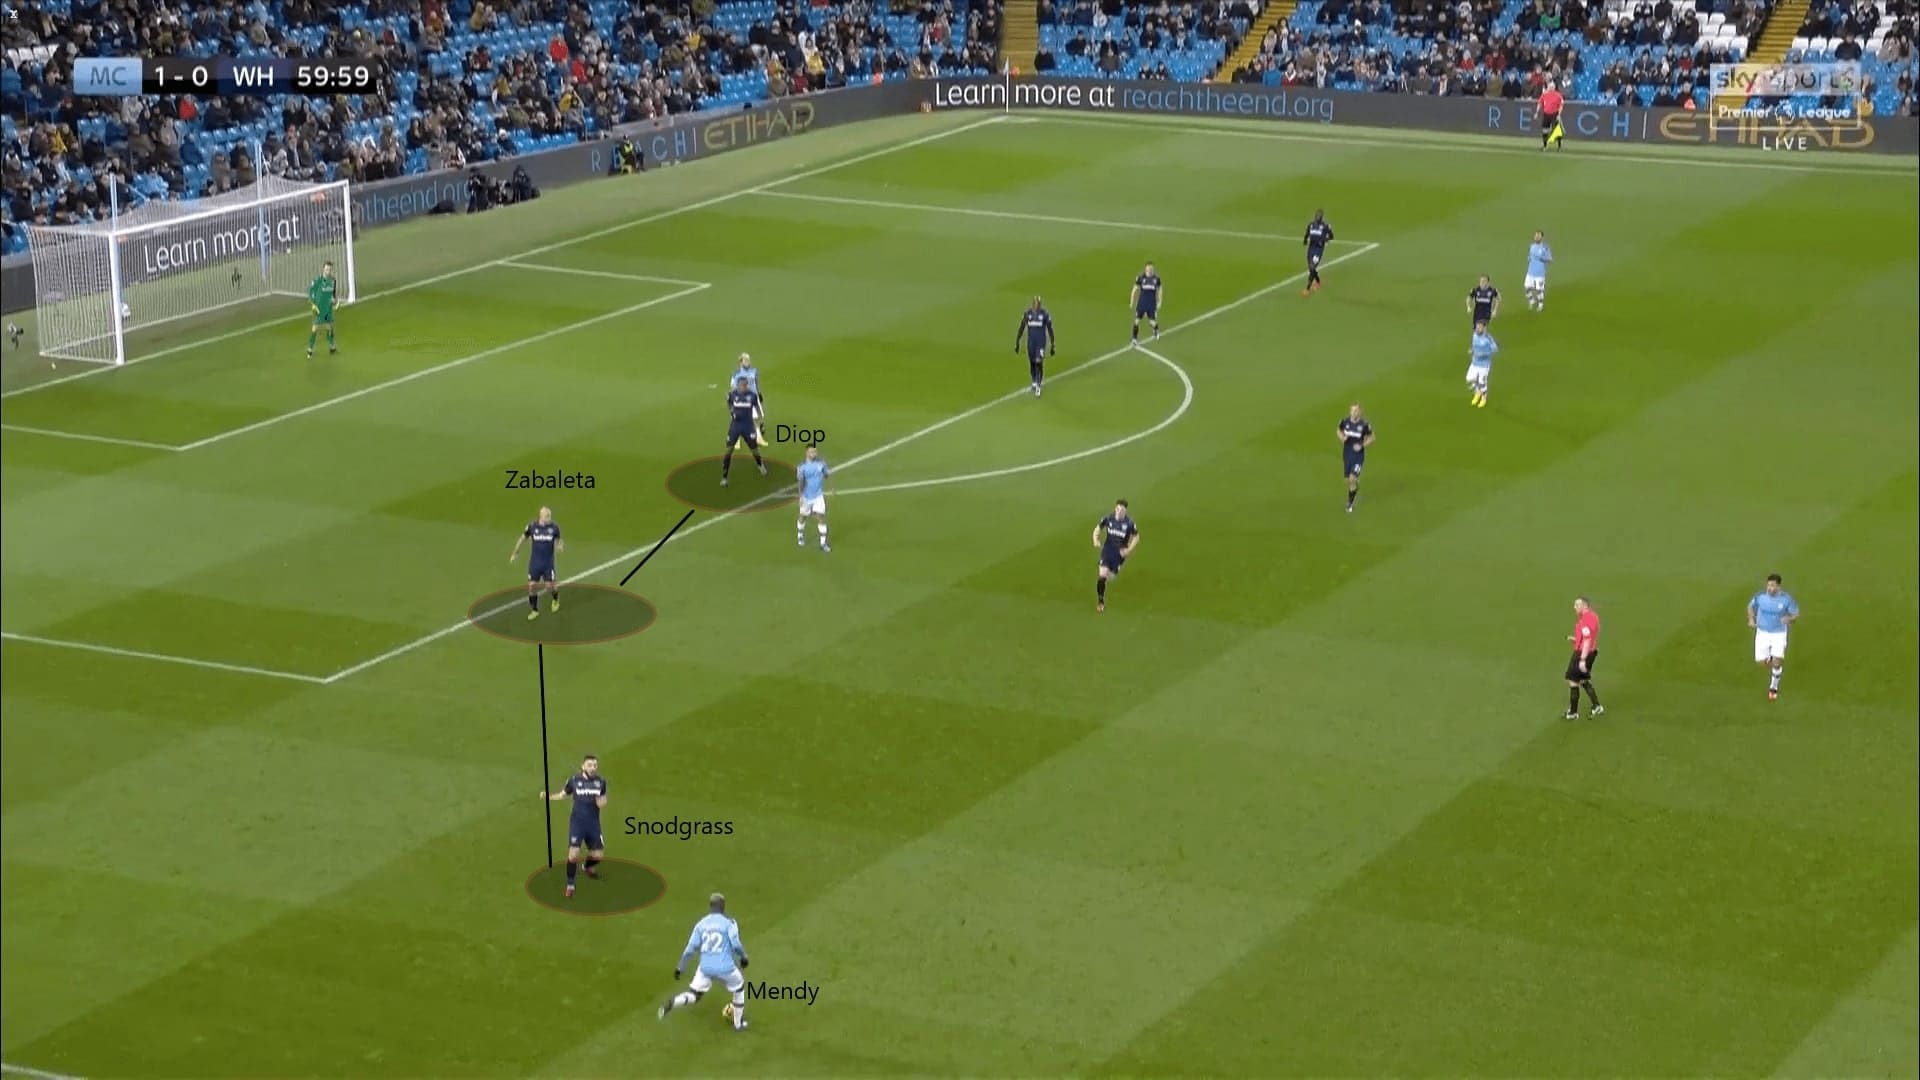
Part of the brilliance of City in this match should be credited to the instructions of the manager at the break. We believe Guardiola anticipated Moyes would order Snodgrass to stay deeper to contain Mendy, so the right wing-back no longer had to step up to approach the Frenchman. This could be a solution which potentially hindered City’s access to the attacking third.
As shown in this image, when Mendy received the ball wide, Snodgrass was already defending in his own third. Pablo Zabaleta did not have to step up to close the Frenchman, thus, the gap no longer exists. In this case, Mendy could not progress and he returned the ball.
In the second half, City tried a very different approach to attack, they still attacked with a full-back. This time, they focused on the right. Despite all the changes, in fact, these were just the basics of football.
In hopes of getting their best player, De Bruyne on the ball, they allowed the Belgian to drop deeper into the central third. City’s total dominance at the midfield was completed as Snodgrass moved to wide areas, hence, Guardiola’s men no longer have to worry about the build-up plays. De Bruyne could face to the goal given to the space around him, which helped him to exercise his next passes even better. This was also a defensive consideration, as, De Bruyne’s deeper positioning added an additional number when defending the transitions. Rodri’s burden was eased with a new partner.
Overloading still occurred, as City possessed a numerical advantage at the centre. With Walker staying high and wide, B. Silva could move to the half-spaces at times. At the centre, City had a five-v-four numerical superiority. On the right flank, they had Walker against an isolated Masuaku. If Noble did not track B. Silva, then, it became a two-v-one on City’s right flank.
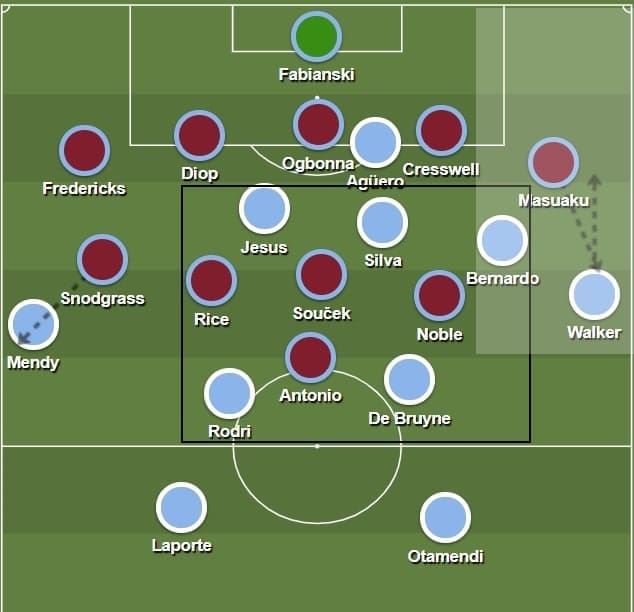
The effects of these setups were shown instantaneously after the break. In this image, as mentioned, Snodgrass stayed deep to contain Mendy. Since West Ham reduced a man centrally, De Bruyne could drop deep and face goal. This wider angle of vision allowed the Belgian to observe the pitch better. In this scene, he noticed the gap between Masuaku and Aaron Cresswell and the dashing Walker. Given the spaces around him, he could exercise his pass better and helped City to access the final third.
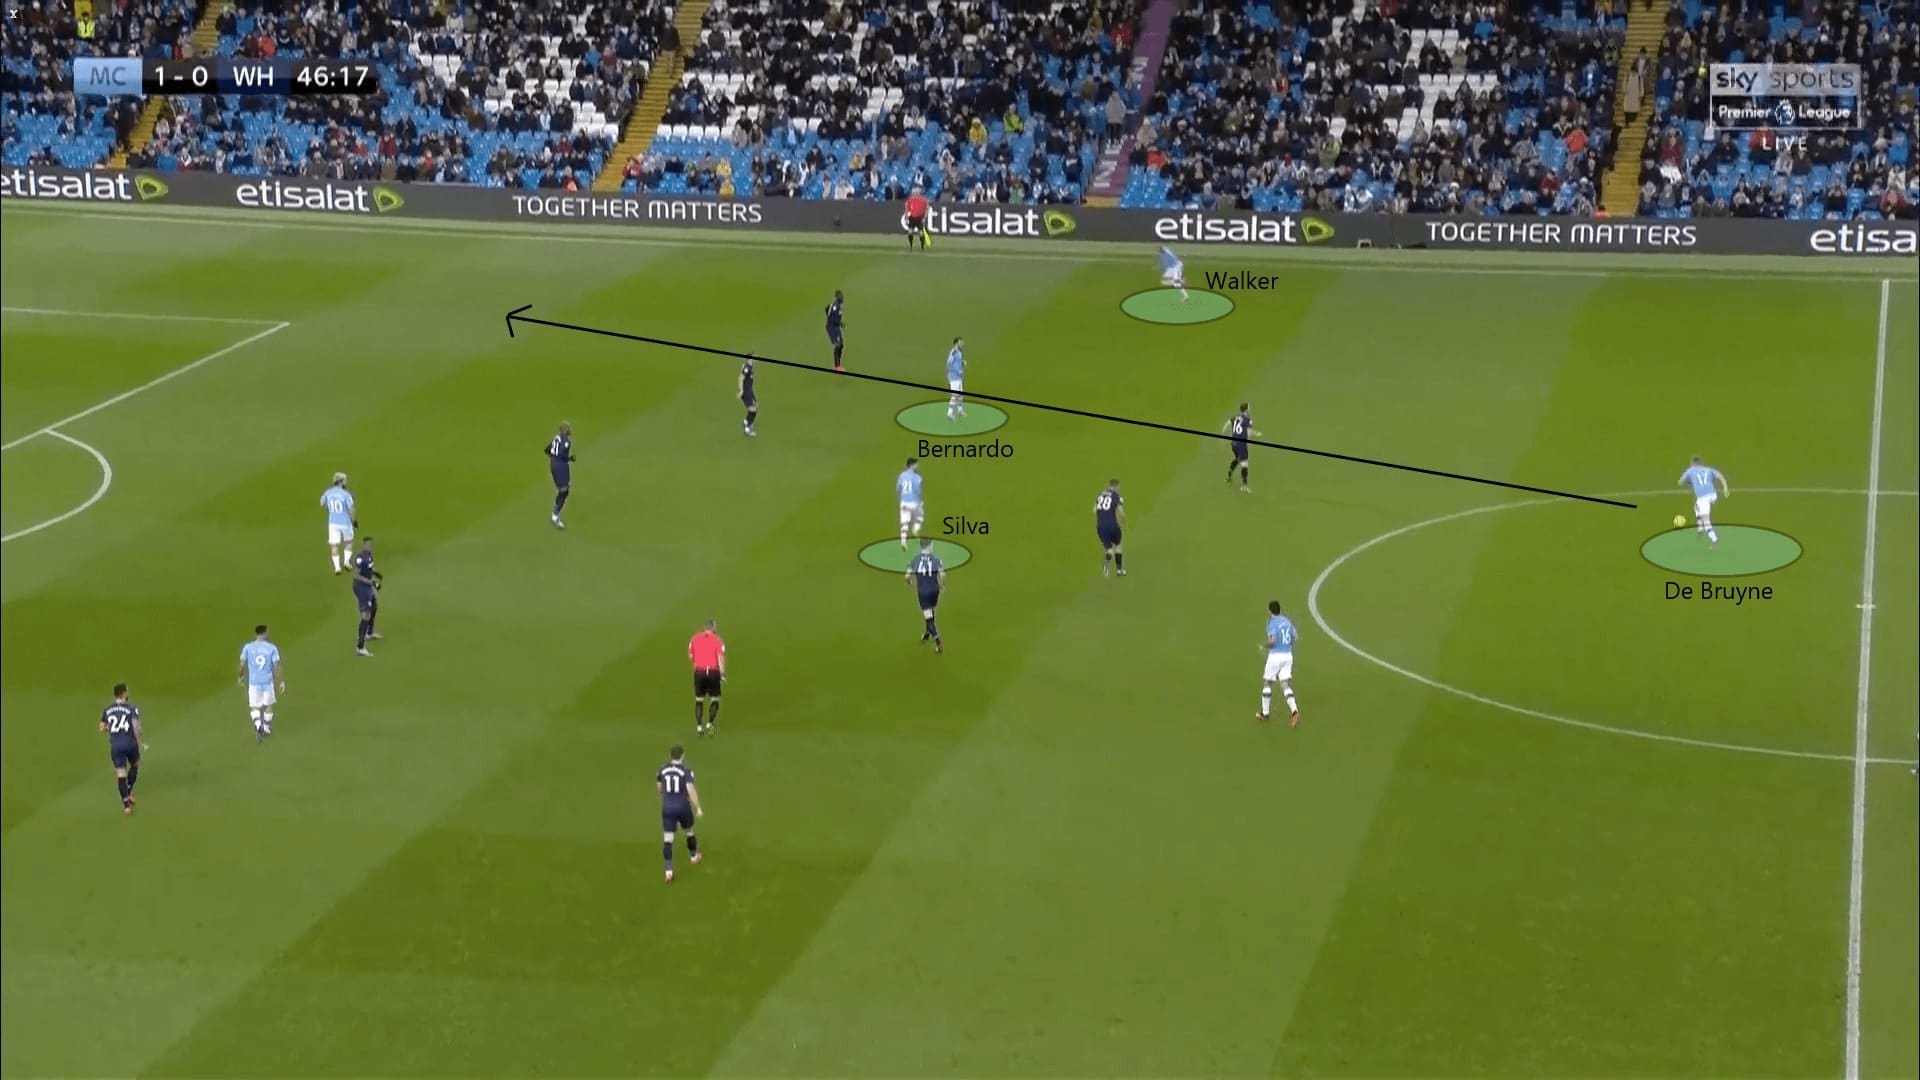
This image showed the impact of De Bruyne. As one of the best midfielders in the world, their opponents were very likely to keep an eye on him when the Belgian was on the ball. This was a good way to attract pressure and create more room for other players.
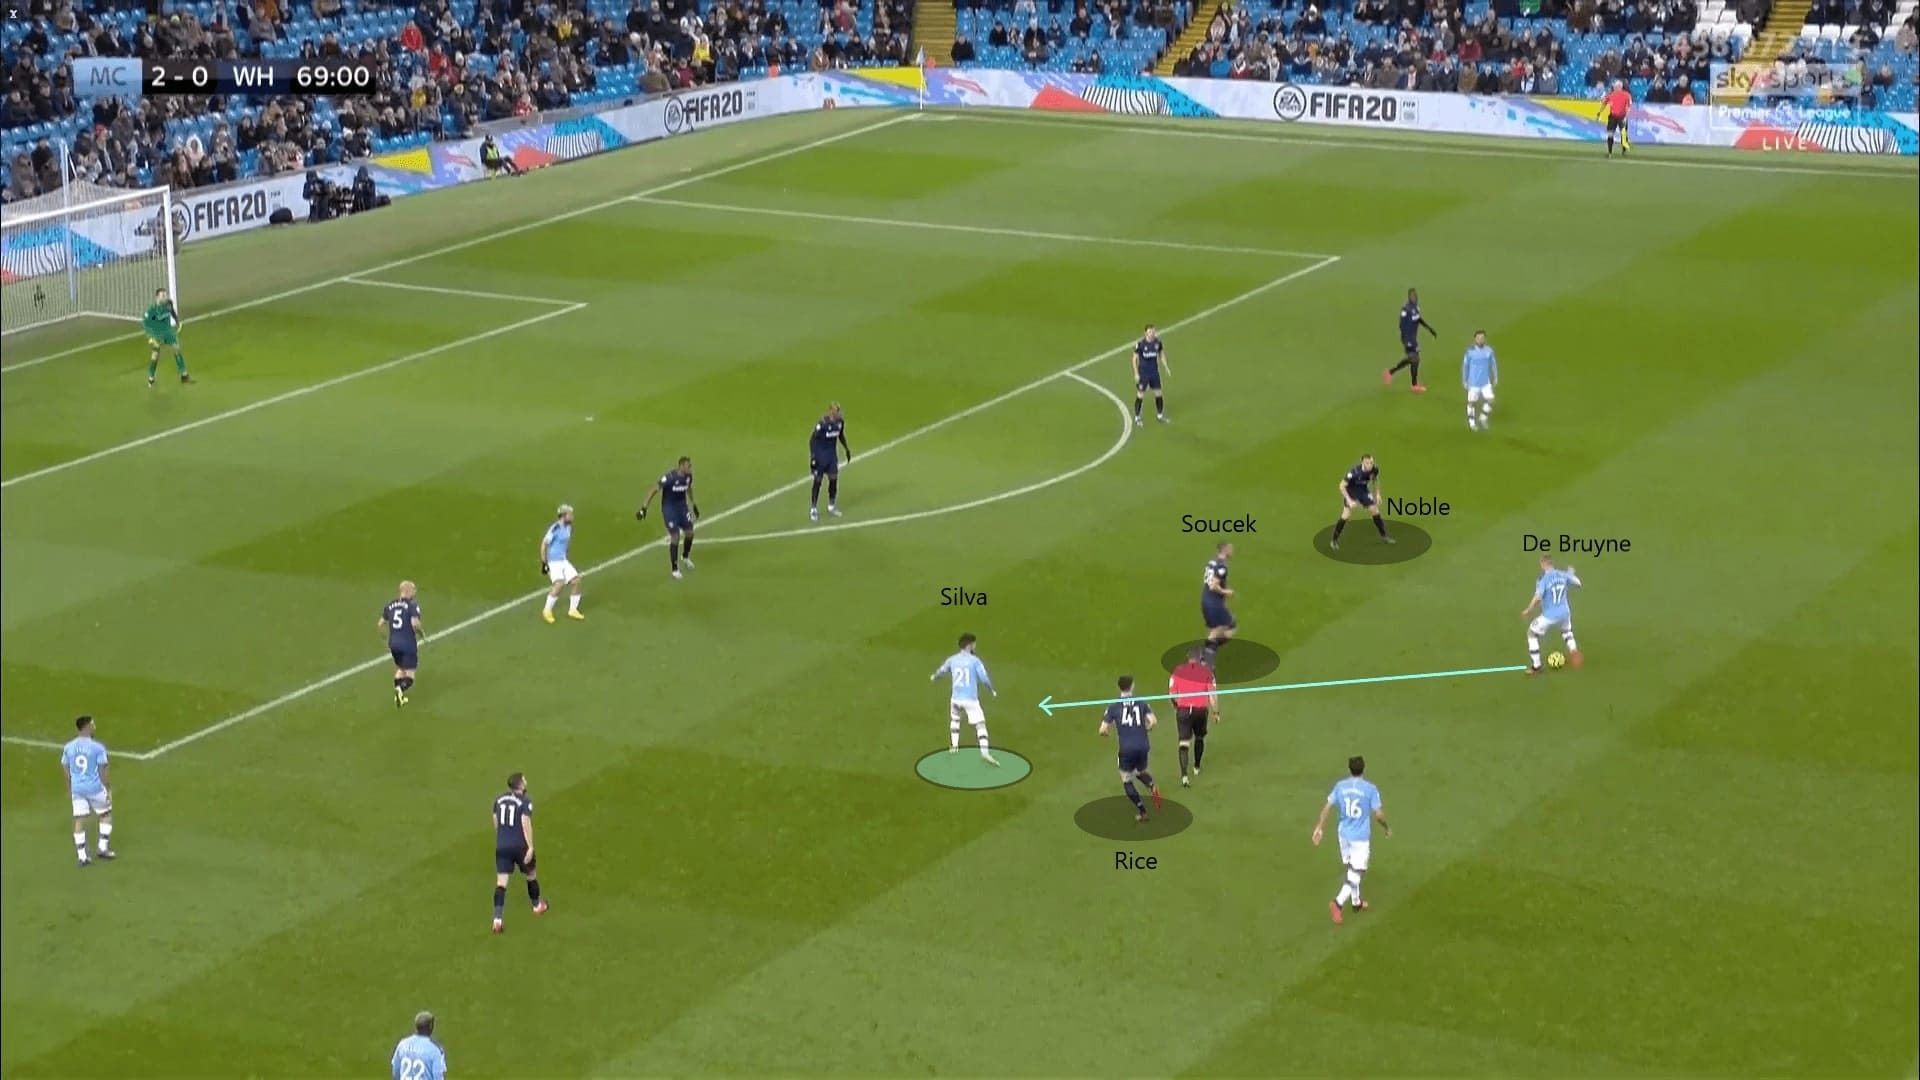
In this image, De Bruyne had the ball and immediately drew the attention of all three West Ham midfielders. Rice, who should be tracking Silva, forgot the Spaniard. Again, given the good body orientation of De Bruyne, he could pass to Silva between the gaps. City progressed to the edge of the box.
To wrap up the analysis, we show you the heat maps of De Bruyne in this game. Statistically, the Belgian handed in an impressive performance. He had 108 passes (82%); three dribbles (100%); nine crosses (56%); seven offensive duels (57%); four shot assists; three progressive runs; of course, a goal and an assist.
The heat maps also proved the changes in De Bruyne’s positionings when comparing both halves. In the first half, he appeared in both half-spaces, and even zone 18. He also had some actions in zone 14. However, when we looked at the graph on the right, it showed the differences in his role. He was heavily involved at the right half-spaces, there were few involvements in the attacking third.

Conclusion
City deserved this two-goal victory, their xG in this game was 2.07, though they could have scored more if Jesus was more clinical in front of goal. City played very well, demonstrated the basics of football. It showed a small change of City, which in this match, they attacked with their full-backs. Given the past games, this was not very common to see. Guardiola would be pleased to see his team keep up with this standard, and even improve more than this one at the King Power Stadium.
For West Ham, they continued to stay in the relegation zone after this loss. They had 24 points, just one behind Aston Villa. However, their next opponent, Liverpool, were also a tough one, let’s see can the Hammers produce something out of expectations.


Comments