Who would have even thought at the end of January, Sheffield United would be fighting for a place in Europe? When the other teams are enjoying the warm weather in the Middle East, Sheffield have earned vital three points which takes them to two points within the top four. A feat well worthy of praise.
Bournemouth have enjoyed their Premier League campaigns under Howe. However, this season the Cherries are facing a topsy turvy curve and any wrongdoings now will push them down to the Championship.
Bournemouth started the game against Sheffield United on a brilliant note. Vying for every ball, winning every second ball, Harry Wilson causing problems with his positioning and everything else favoured Bournemouth. Bournemouth were on top of their opponent for most of the first half. But once the Blades got a hold of the game, it was mostly them who looked to secure all three points. Let’s have a look at the xG dynamics to verify how the game turned out.
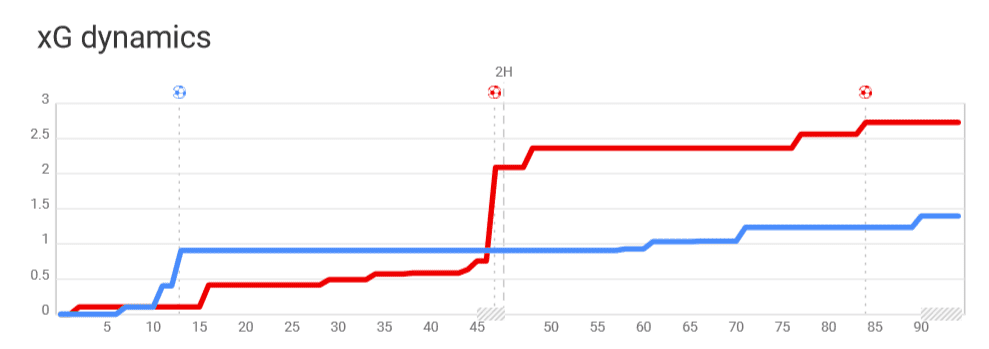
If this fixture was given a title, it could easily have been ‘A game of two halves’ if looked solely at the xG dynamics. But there was much more to the game. Let’s dive deep into the tactical analysis of the fixture and decipher the ‘more to the game’.
Lineups
Chris Wilder has been lucky with respect to injuries. With his well-drilled machine continuously putting in performances with minimal change in personnel. The tactics used by Wilder remains more or less similar as is the formation. He sets up his team in 3-5-2 formation and is famous for his unique overlapping centre-backs. In this game too, he followed a similar tactic but used Jack O’Connell in a bit withdrawn role than other games.
The new signing, Scandinavian sensation, Sander Berge, again started in place of John Lundstram. But couldn’t leave much impact on the game. Subbing in Lundstram in place of Berge did the trick for Sheffield. Not only because of his winner but also the position he occupied stabilised Sheffield United’s defence.
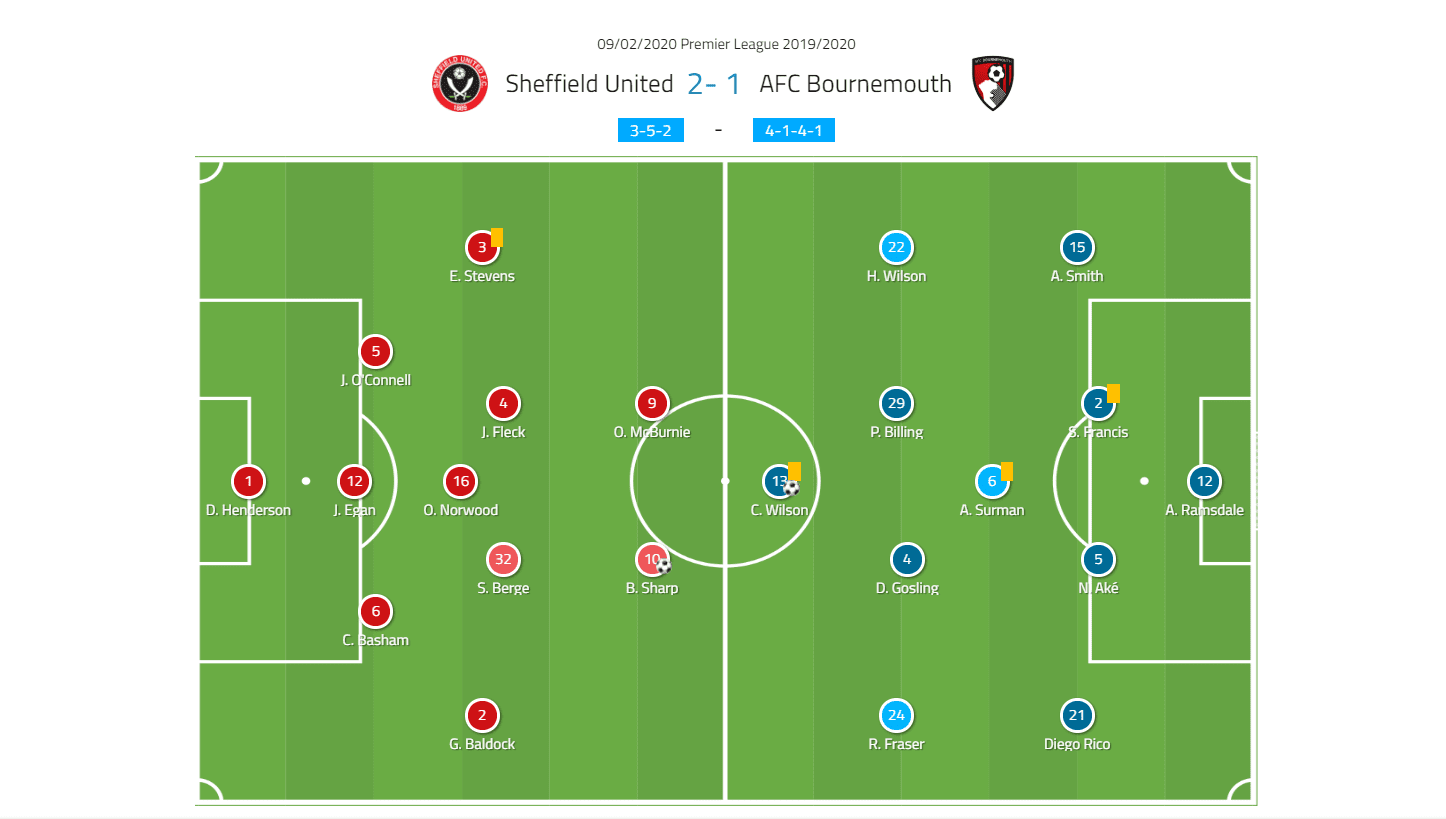
Eddie Howe has been fluctuating between 4-4-2, 4-4-1-1 and 4-1-4-1 in this season. Against Sheffield, he started with a similar 4-1-4-1 that earned him all three points against Aston Villa. Bournemouth were without Jefferson Lerma due to his red card in the previous game against Aston Villa. Andrew Surman took over his role and had a decent game. There were no other changes in the playing XI even though Steve Cook was back from injury.
Defensive Setup of Sheffield United
Sheffield United have been using an organised, well-drilled mid-block or deep block to keep the opponent’s attack at bay. They force the wingers to go wide and then overloads the wings with the wide midfielders and wing-backs.
Against Bournemouth, the Blades approached a completely different approach, which was astonishing. It might be because of two reasons. Bournemouth’s continuous problems in playing out from the back or Bournemouth’s use of wide channels in the buildup rather than through the middle.
Against other teams, the Sheffield United forwards generally go for ‘pendulum pressing’. Pendulum pressing means the two forwards won’t go for aggressive pressing rather they would be blocking the passing channel to the opponent’s ball carrier. One player would be behind the ball carrier to mark him closely and another would be moving towards the opponent’s centre-back who has the ball in his feet. The player moving away from the ball carrier should maintain a position and body orientation where he blocks the passing channel to the carrier.
Against Bournemouth, the Blades adopted man-to-man high pressing. The two forwards in Billy Sharp and Oliver McBurnie pressed the two Bournemouth centre-backs, Nathan Aké and Simon Francis, high. Oliver Norwood moved up to mark the single pivot, Andrew Surman.

John Egan mostly positioned himself in between Philip Billing and the right-back Adam Smith. Sander Berge did the same on the opposite side. He positioned himself in between Dan Gosling and the left-back Diego Rico.
When the ball was played from the centre-back to the full-backs, the Sheffield United attacking midfielders would move and press them. When the ball is played to Billing or Gosling, the two midfielders would mark the two Bournemouth midfielders respectively.
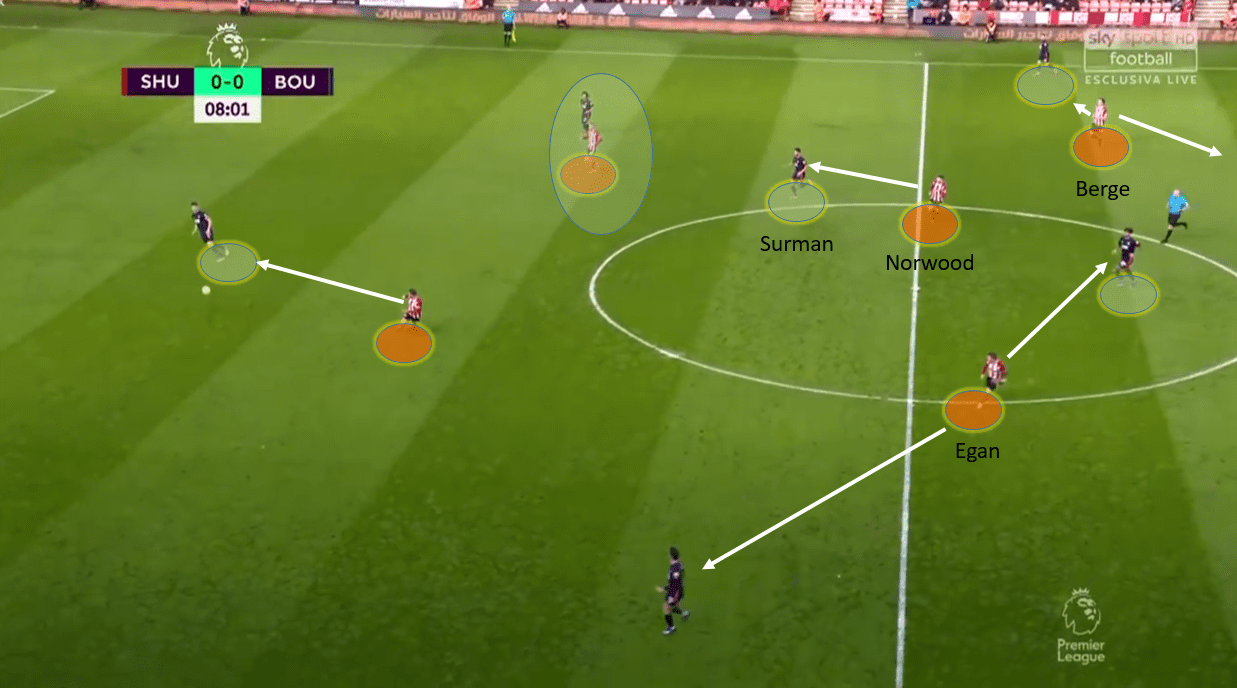
The above screenshot gives us a better scenario of the Blades’ pressing. As you can see, Egan sits in between Billing and Smith. Berge positions himself in between Rico and Gosling and Norwood closely marks Surman. When Francis plays the ball to Smith, Egan moves to his direction to press him.
Due to Sheffield United’s midblock in other games, the Blades had a season average PPDA (passes allowed per defensive action) of 13.42. In this game, due to their high pressing, Sheffield registered a PPDA of 10.17. The difference in numbers is clearly visible and it’s due to the change in pressing style by Sheffield.
Harry Wilson’s positioning
There has been criticism of Howe’s methods recently. His buildup pattern has become too one-dimensional. Centre-back to full-back, full-back to winger and then turnover. This has been Bournemouth’s story of this season mostly which has been well documented in Cam Meighan’s analysis of Bournemouth.
Against Sheffield, Harry Wilson was used in a more central position than out wide in the flanks. He occupied the half-space, dropped deep to the central areas, positioned himself between the lines. His positioning troubled the Sheffield United players and he was hard to deal with, in the first half. Looking at the heat map it’s clearly visible he was positioning himself either in the right flank or in the central positions, especially in his own half helping in the buildup.
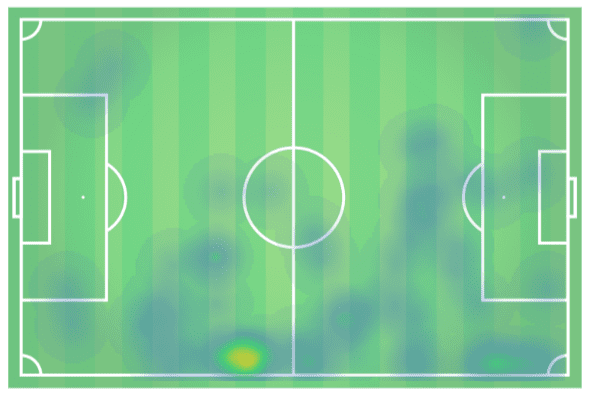
During buildup from the back, he often dropped deep in his own half either in the flanks or in the middle channel. His positioning in the mid-channel in his own half helped Bournemouth to buildup swiftly.
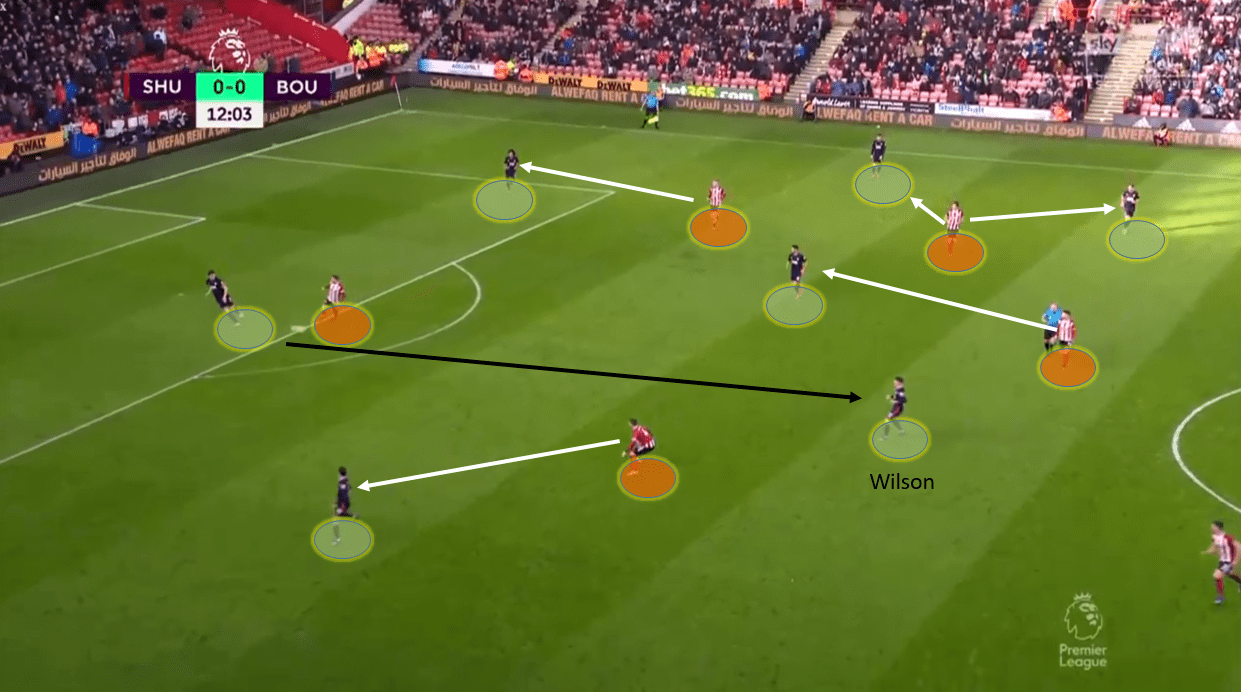
In this situation, Wilder’s men marked the Bournemouth players as described in the previous section. Both the centre-backs were well pressed by the two Sheffield forwards. Norwood kept a close tab on Surman. Egan thought he positioned himself between Billing and Adams. Everything was done right. However, when Francis had the ball, Billing moved a bit front and Harry Wilson dropped deep. Egan thought he had it all covered and anticipated a pass from Francis to Smith, which can be seen through his body orientation. But, Wilson opened up a passing lane for his captain and helped in the buildup.
Even in the opposition half, he positioned himself mostly in an infield position, either occupying the half-space or in between the lines.
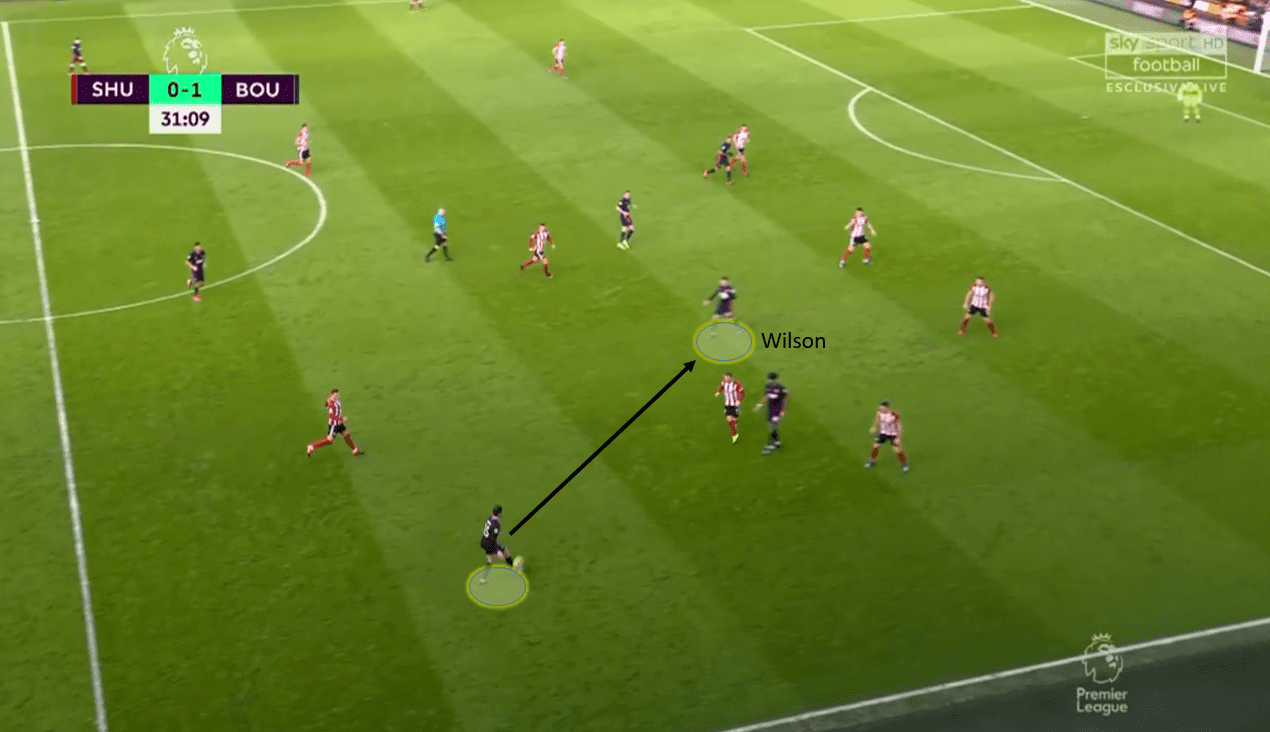
Sheffield United players had it all covered. Billings was well marked by two Sheffield players and the only passing options left opened by the Blades were the Bournemouth centre-backs. However, sensing the situation, Harry Wilson occupied the half-space between the backline and the midline and opened up a forward passing lane for Adams.
When the game is played in the Bournemouth left-flank, Harry Wilson mostly occupied the CAM position, leaving the right flank for Adams to exploit.
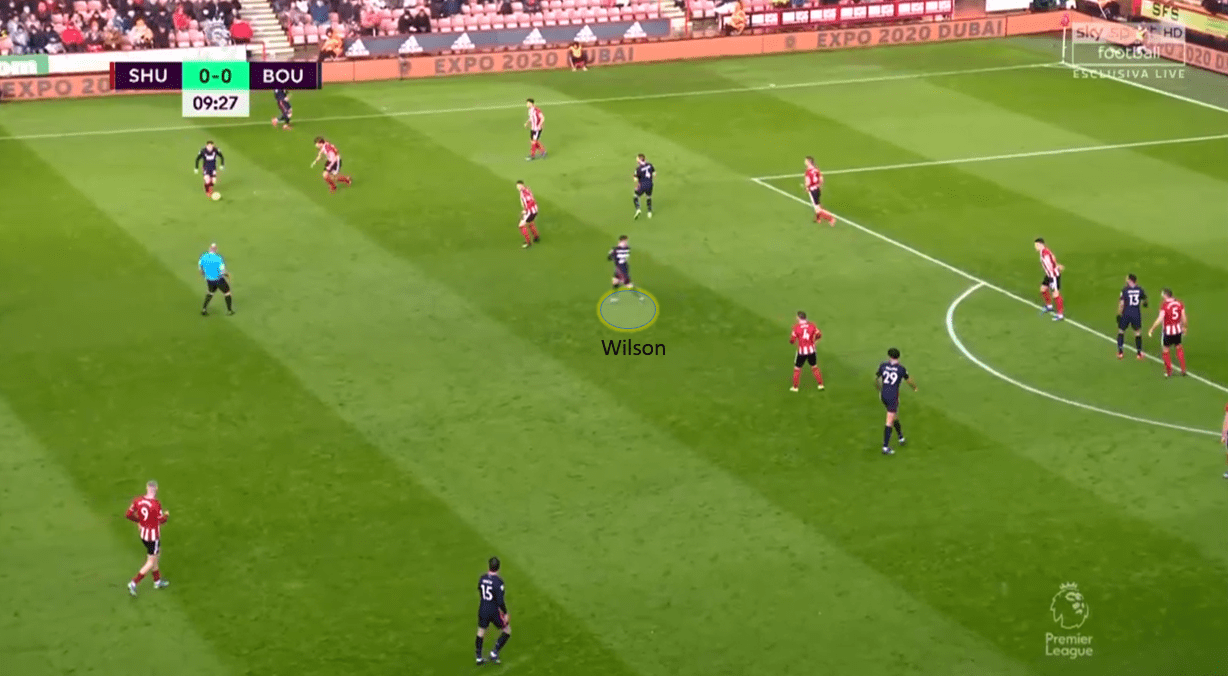
In this situation, Wilson occupied a position in between Egan and Norwood, playing a one-two with Fraser and helping Bournemouth to create chances.
The goal Bournemouth scored was due to the positioning of Wilson in the central attacking midfield.
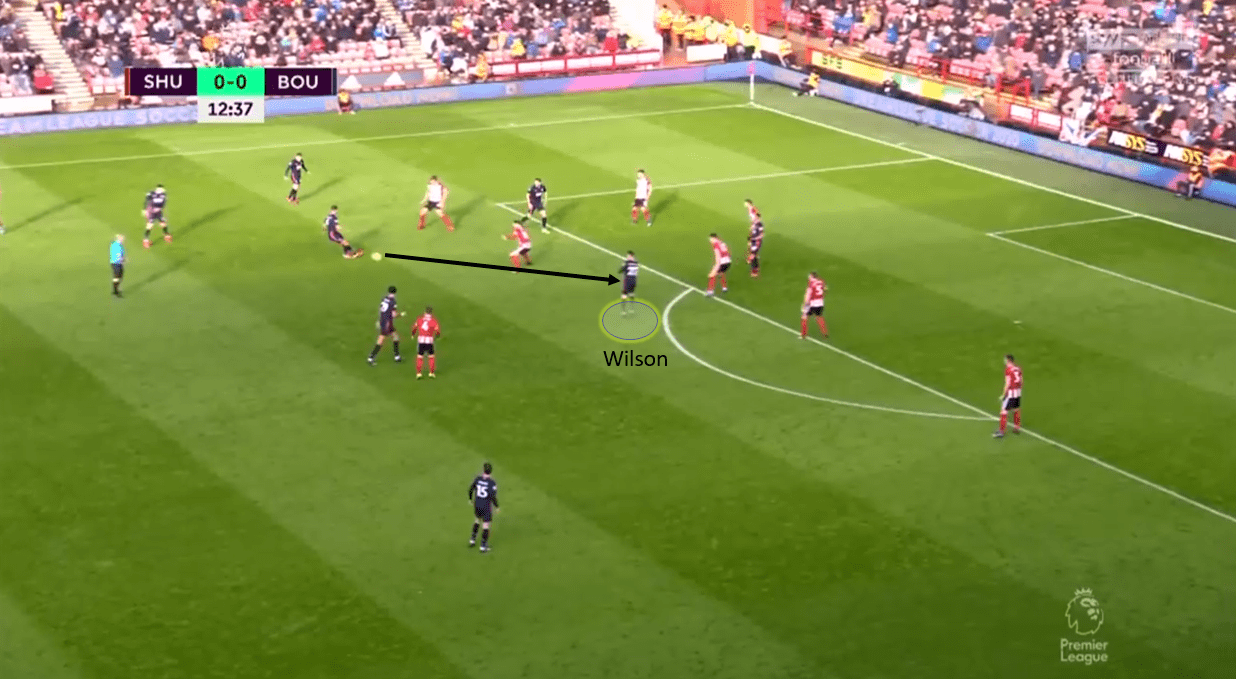
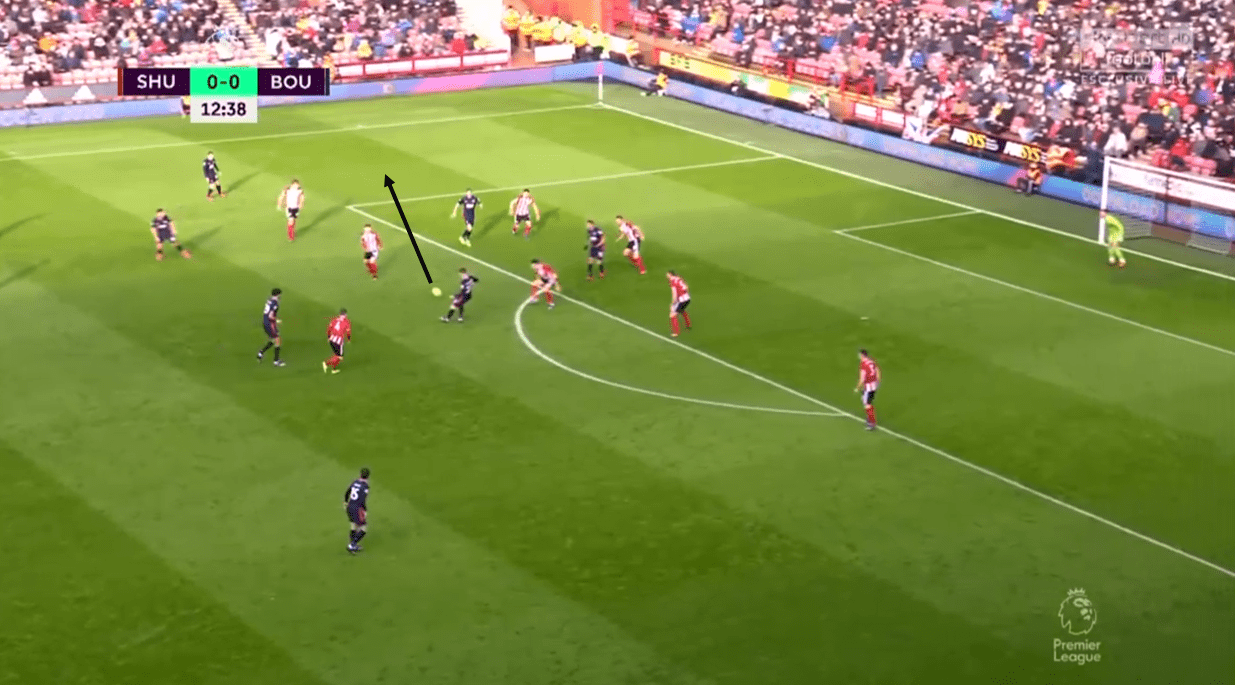
As you can see in the above screenshots, Harry Wilson sat just at the edge of the Sheffield United box, which drew out Egan from his defensive line. Surman passed the ball to Wilson and Wilson, in turn, passed the ball to Fraser in the left flank. Gosling pinned the right wing-back, Baldock with him, leaving enough space for Fraser to operate.
Fraser’s cross from the left flank led to Bournemouth’s only goal.
Bournemouth’s defensive setup
Bournemouth followed the same approach as they followed against Aston Villa the last match, when out of possession.
Wilson roamed around in the opposition half, mainly taking care of the central centre-back. Billing was given the task to move up and keep a tab on the left centre-back, Fraser marked the right centre-back. Gosling stayed in between the CDM and right centre-back, focussing mainly on the CDM. Harry Wilson kept tab of the left wing-back and Surman mostly stayed with an advanced midfielder.
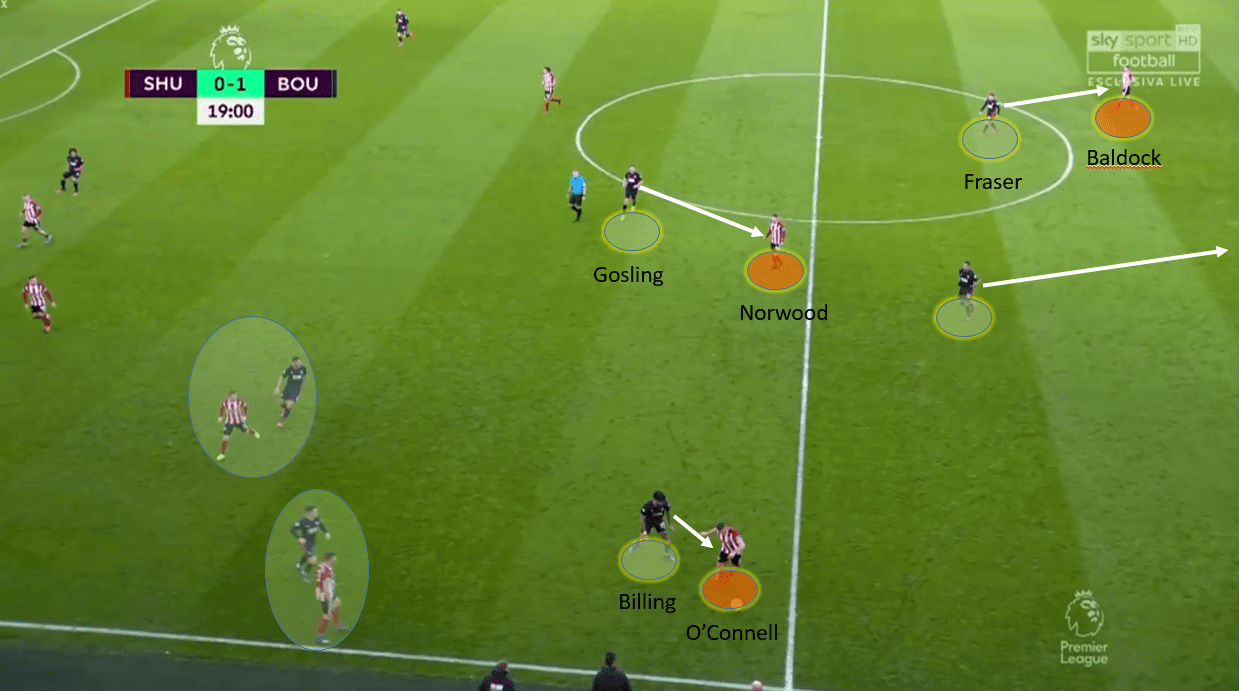
This image vividly describes Bournemouth’s pressing. Bournemouth didn’t press high but mostly pressed the Sheffield players when in the middle third. Billing pressed O’Connell, Harry Wilson followed the left wing-back, Enda Stevens, closely. Gosling moved right to follow Norwood. Fraser stayed with Basham, the right centre-back and Surman sealed the press by keeping a tab on Egan.
Bournemouth exploiting Sheffield’s right flank and Lundstram providing the much essential cover
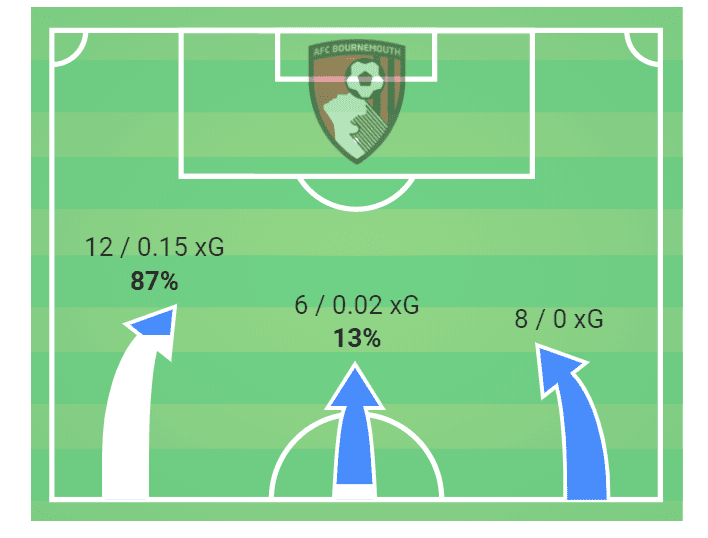
Sheffield United has become the household name when it comes to overlapping centre-backs. During buildup, Chris Wilder pushes his outside centre-backs in the opposition final third to create an overload in both the wings. The Blades in this game mostly attacked from the right-hand side, with 19 positional attacks out of 43, from the right side. It instigated Basham to move up in the final third and Berge failed to provide the much needed cover which Lundstram has been doing it this season brilliantly.
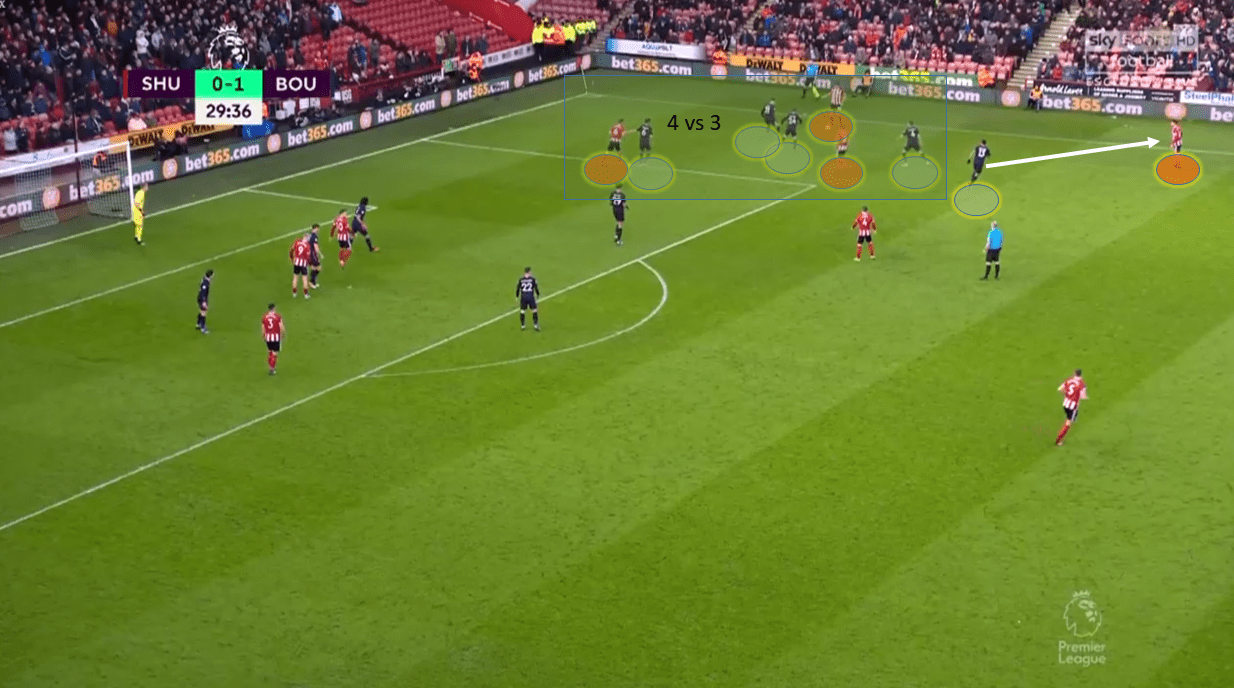
In this screenshot, Berge has the ball wide in the right flank. Basham and Baldock is the nearest passing option in the right flank. Norwood is another option to pass back in the right flank.
The use of overlapping centre-back by Sheffield United is negated by Bournemouth players. Four Bournemouth players in the right flank covered three Sheffield United players. Even Callum Wilson dropped back to help in defence (marking Norwood here).
What’s intriguing is that eight Sheffield United players are in the final third. In case of a turnover, Bournemouth could easily exploit the Blades through fast break in transition. Bournemouth did exactly that and produced three explosive counter-attacks in the first half, each could have resulted in a goal. Unfortunately, the Cherries couldn’t score from the situations.
Sheffield United mostly attacked from the right side and it led Basham, the right centre-back, to play in a more advanced role. This is where Bournemouth won the battle in the first half.
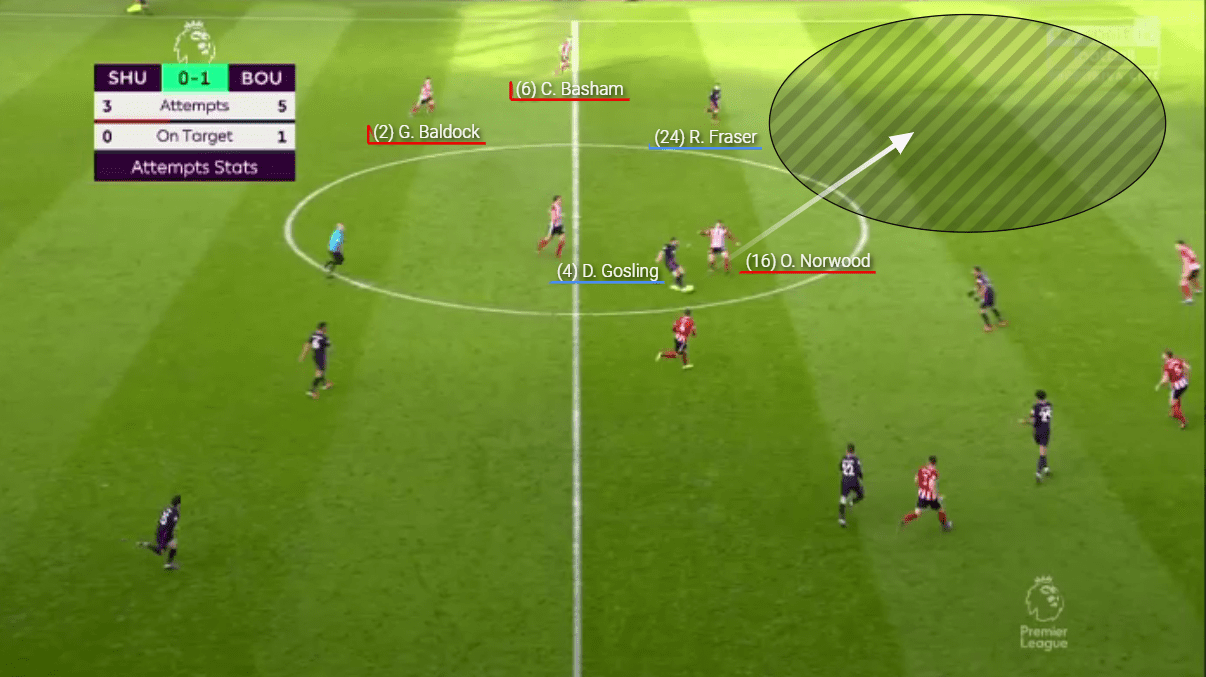
Here, Surman wins the ball in his own half and passed the ball to Gosling, who brilliantly played it to Fraser through the legs of Norwood. The right-flank of Sheffield United is completely empty due to Basham moving forward. Fraser is left with too much space to run forward. Fraser bursts forward and plays a poor pass to waste the opportunity.
It was pre-planned from Eddie Howe to exploit the right side as Basham is the one who goes to the advanced position more often. Bournemouth exploited the Blades’ right and attacked the most through the left-flank.
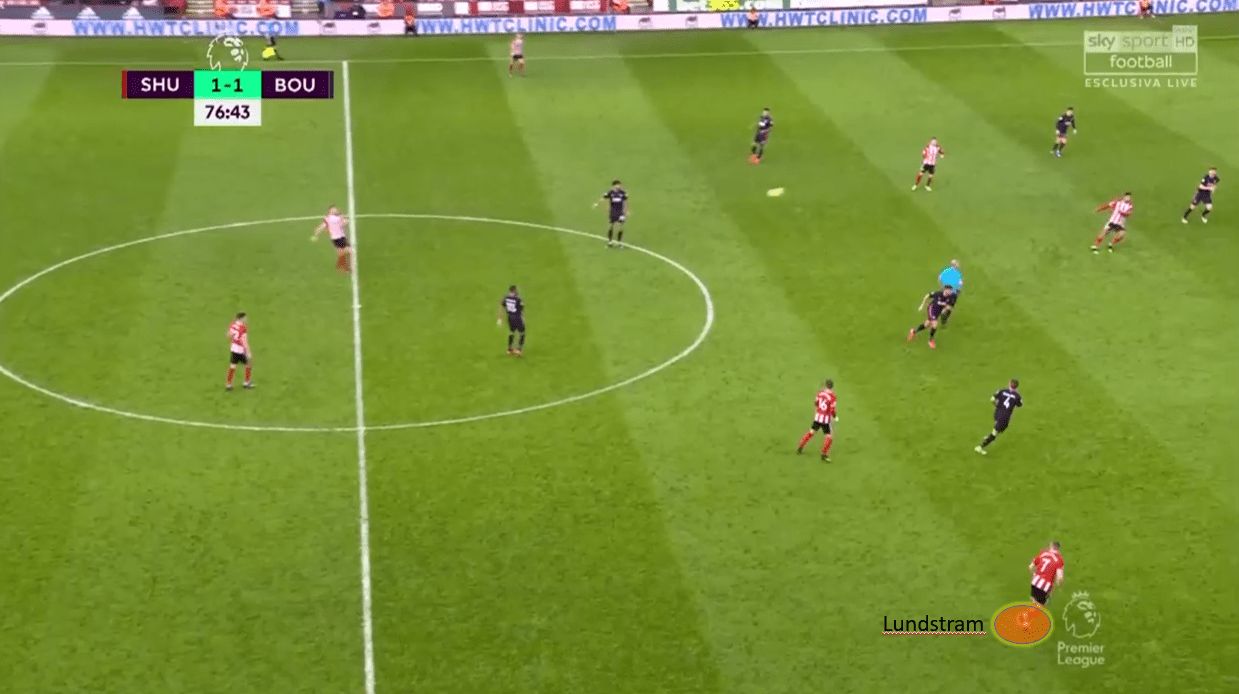
Lundstram’s introduction sealed the right-flank. He provided the much needed cover to Basham’s advanced movement which Berge failed to provide. He occupied a position parallel to Norwood and provided a better cover which also helped Sheffield United to attack better from the right flank.
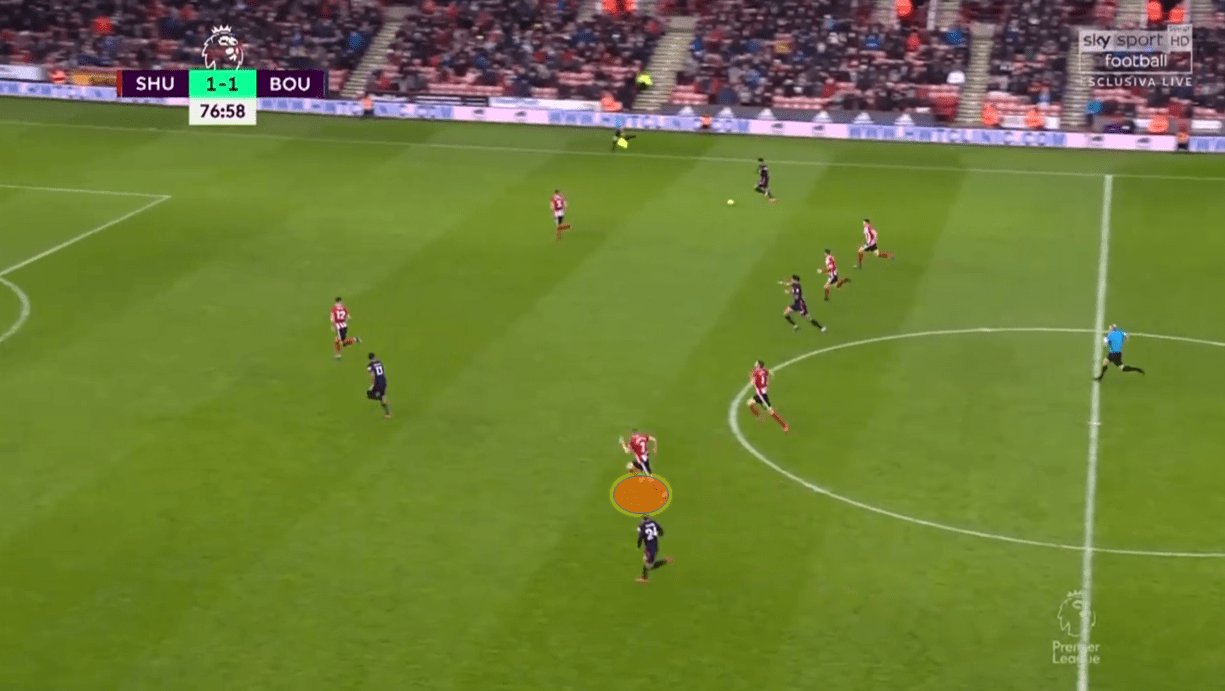
Even when Bournemouth indulged in quick counter-attack, it was Lundstram who provided cover in the right.
It gave free license to the attacking-minded Basham and Baldock to take care of the offense without thinking much about the Bournemouth counter-attacks.
Conclusion
It was a game of two halves with Bournemouth dominating the first half in terms of goal scoring opportunities and Sheffield United in the second half.
Bournemouth exploited Sheffield United’s right flank due to Basham indulging in more attacking plays. Unfortunately, the Cherries could not convert their chances and let the Blades win the game which they could have easily won in the first half.
Sheffield sealed up their defence subbing in Lundstram in place of Berge. Lundstram scored the winner but most importantly he provided defensive cover in the right which freed up Basham and Baldock.
Berge had a poor game. It’s just his second game for Sheffield and it’s obvious he needs more time to get acquainted with the new style.
If it was up to me, I would have continued with Lundstram who has been amazing throughout the season and incorporate Berge slowly and steadily into the system as Jürgen Klopp did with Fabinho.


Comments