Friday night’s Premier League clash between Sheffield United and West Ham United offered several talking points beyond that of the Video Assistant Referee, some of a much more tactical nature. Chris Wilder has taken England’s top-flight by storm this season with his impressively drilled Blades defying belief in sixth position.
A 1-0 victory over David Moyes’ outfit under the Bramall Lane floodlights only further cemented how deserving of respect the Yorkshire side have been this season. The defeat for the Hammers also put an end to the Scotsman’s winning start with the London club.
This tactical analysis will break down the match between the two and highlight key tactics employed by the two sides while using analysis to explain how they led to the game’s outcome, a 1-0 victory for the home side.
Lineups
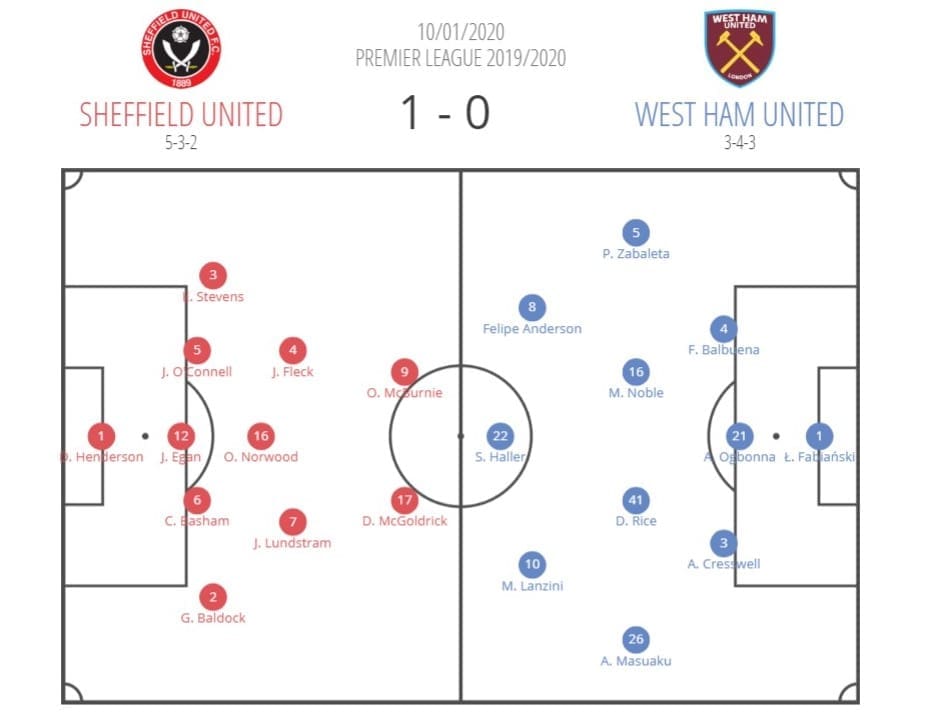
For the clash with the Hammers, Wilder deployed the formation which he has shown a clear and strong preference to all season. As shown by the Wyscout graphic, a 5-3-2, which it is, of course, when the Blades are out of possession but can be considered a 3-5-2 when they do have the ball. Following the home side’s 2-1 victory over AFC Fylde in the FA Cup, Wilder made 11 changes to his starting lineup for the return to league action.
In the away dugout, Moyes opted for his third different starting formation of his three games back in charge of West Ham. Perhaps showing tactical fluidity, or perhaps an unknowing of his best set up yet. Following the 3-1-4-2 that was used against Gillingham in the FA Cup, the Scot switched to a 3-4-3 for the trip to Bramall Lane. In terms of personnel changes, three were made. Issa Diop, Ryan Fredericks and Robert Snodgrass made way for Aaron Creswell, Pablo Zabaleta and Mark Noble.
Sheffield United, masters of overloads
The most clear and obvious way in football to create a tactical advantage is to create a numerical advantage, these are called overloads. This is just one area of the game which Chris Wilder’s Sheffield United side have mastered and that paid dividends against West Ham. To create both effective offensive and defensive overloads, it is vital to be incredibly quick in transitioning from being in possession to out of possession, should the ball be lost, to prevent counterattacks.
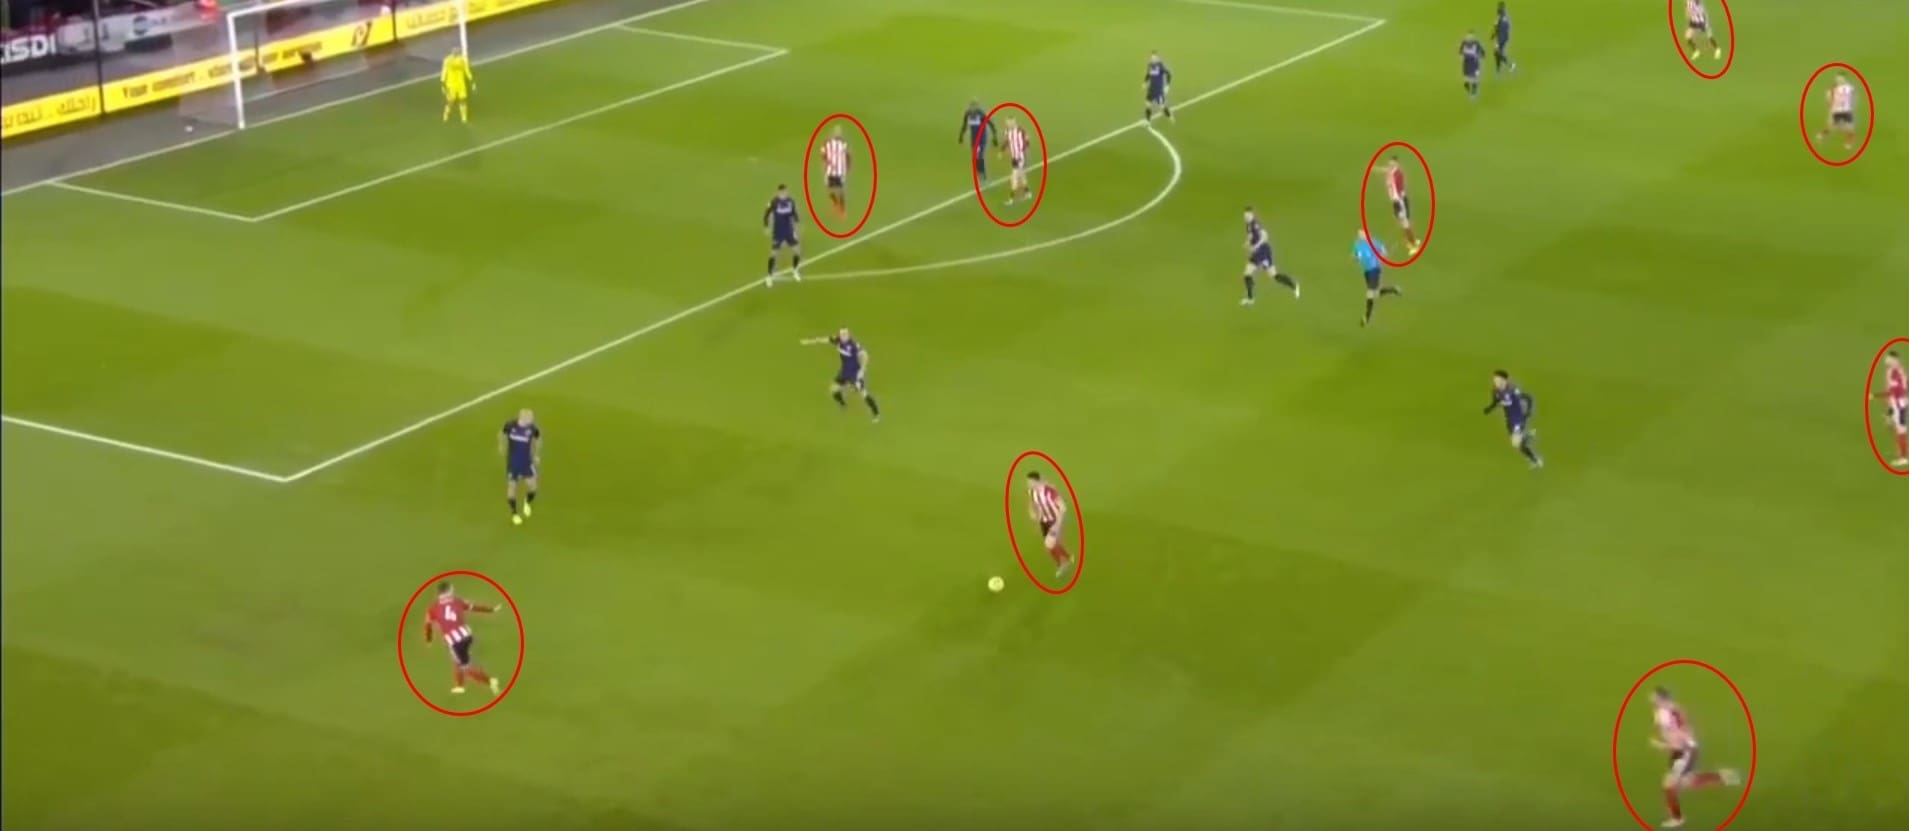
In this annotation, the Blades looking to create an offensive overload can be seen. Here, Sheffield United have six men ahead of the ball and nine of their ten outfielders visibly in the opposition’s half. Had the Hammers not been sat deep with such a low line of engagement, which will be discussed later in the piece, the odds would be in United’s favour to create an effective overload. However, this annotation is taken just seconds before possession is lost.
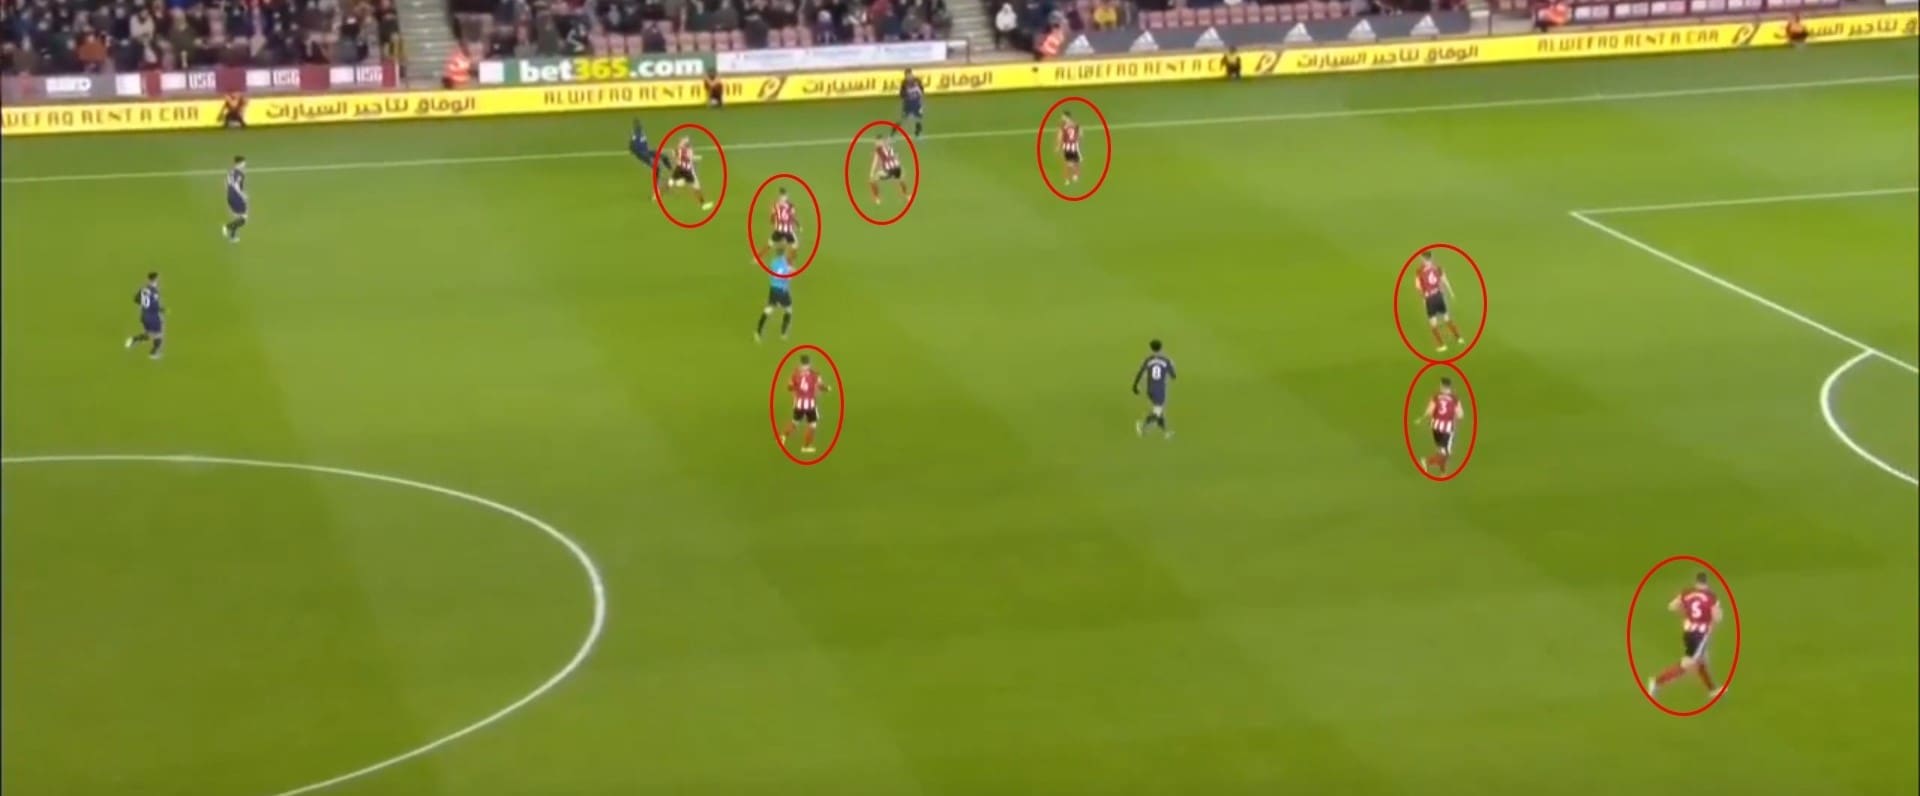
This annotation is then taken 18 seconds following the first, where the visitors have reclaimed possession and travelled to the opposite end of the pitch. From having six players ahead of the ball and nine in West Ham’s half, the Blades now have eight outfield players level with or behind the ball in their own half. It is this quick speed of transition which makes Wilder’s side so difficult to counterattack. This frustrated the West Ham frontline due to defensive overloads which made the home side difficult to play through and ensured a clean sheet for Dean Henderson.
West Ham’s lower line of engagement
A tactic that David Moyes employed to frustrate the home side on the goal-scoring front was to have his defenders keep a much deeper line of engagement with attackers. This meaning that the Hammers’ backline was much less reluctant to press Sheffield United’s attackers, leaving this to midfielders. The idea behind this was to prevent the home side being able to create underlaps and overlaps.
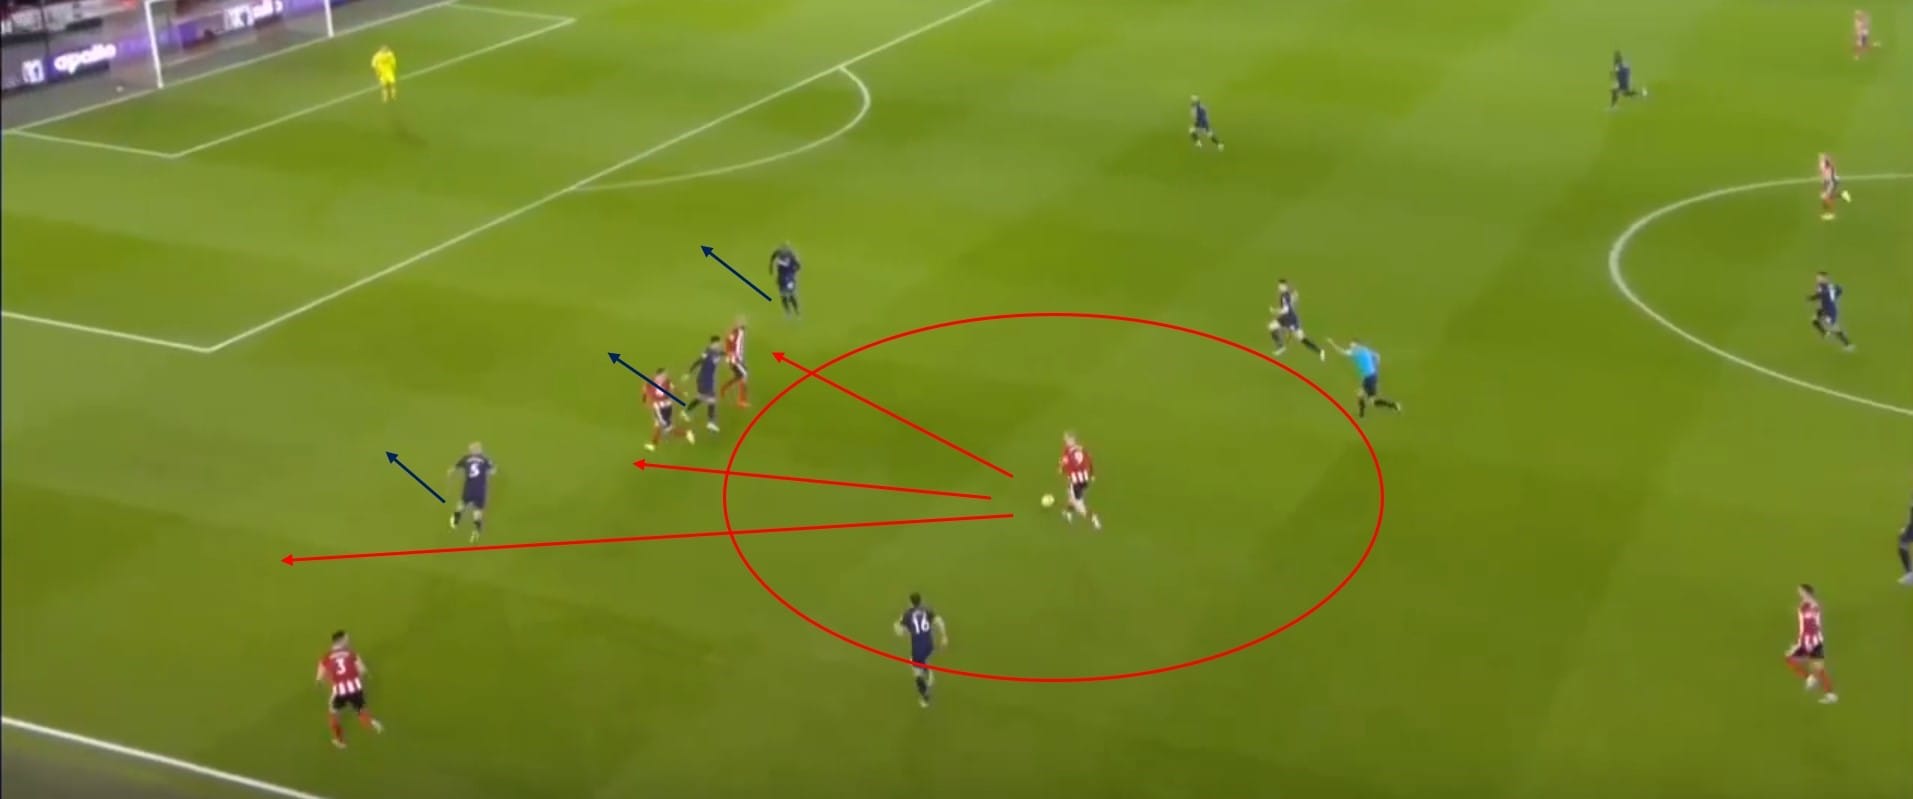
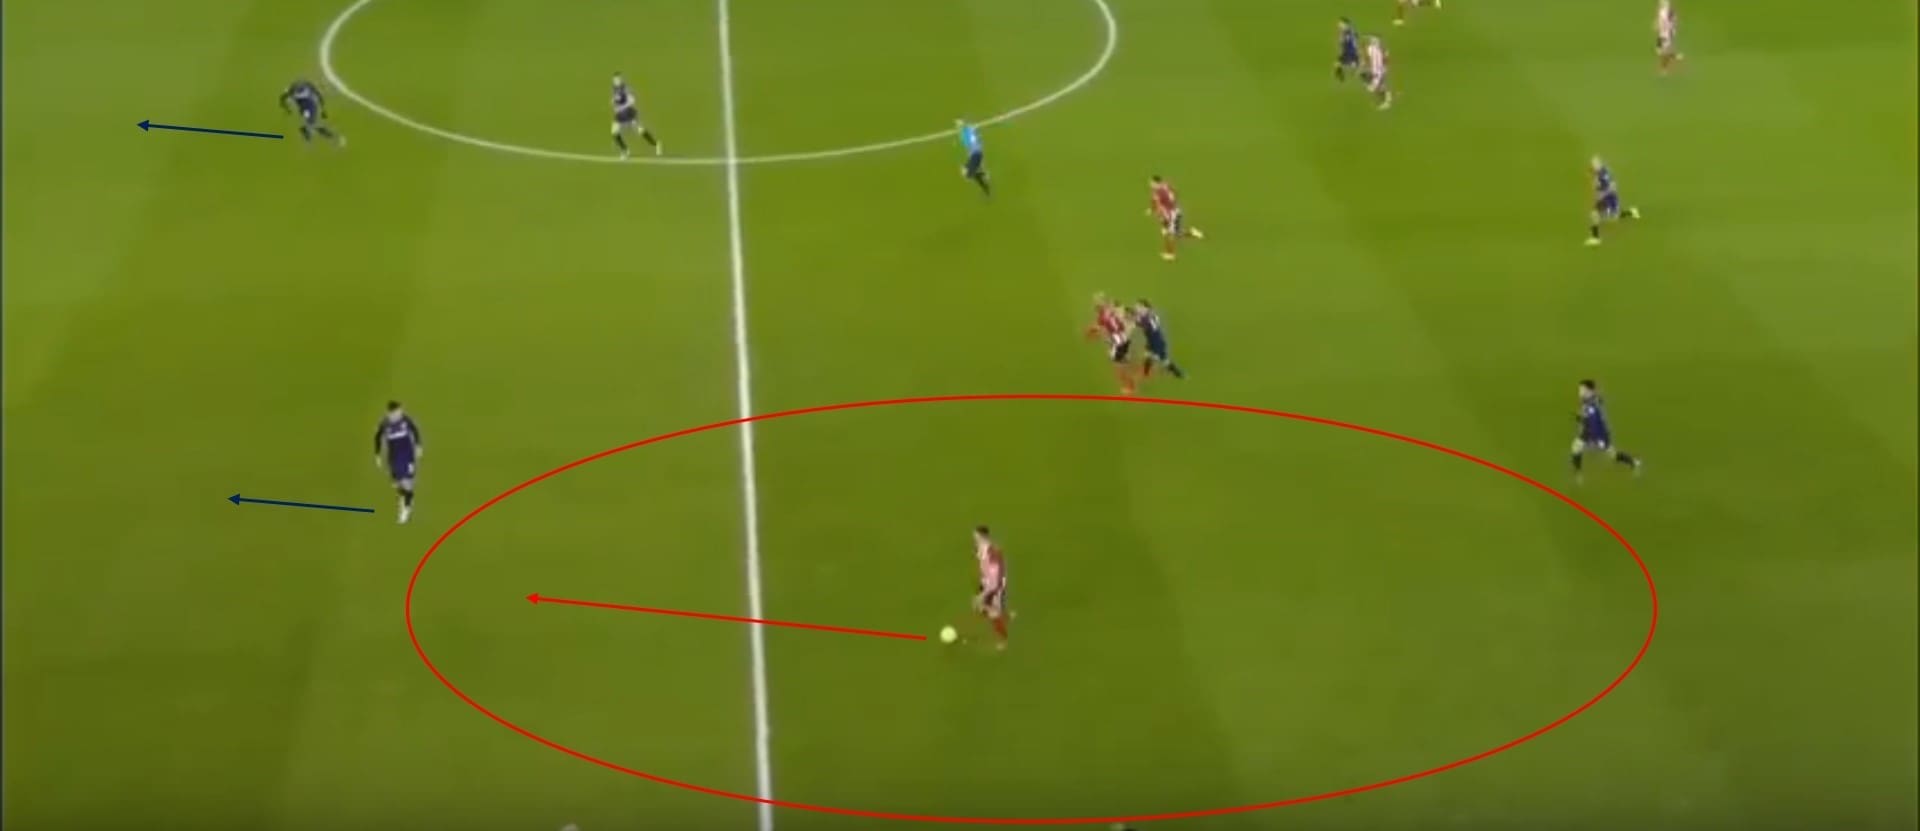
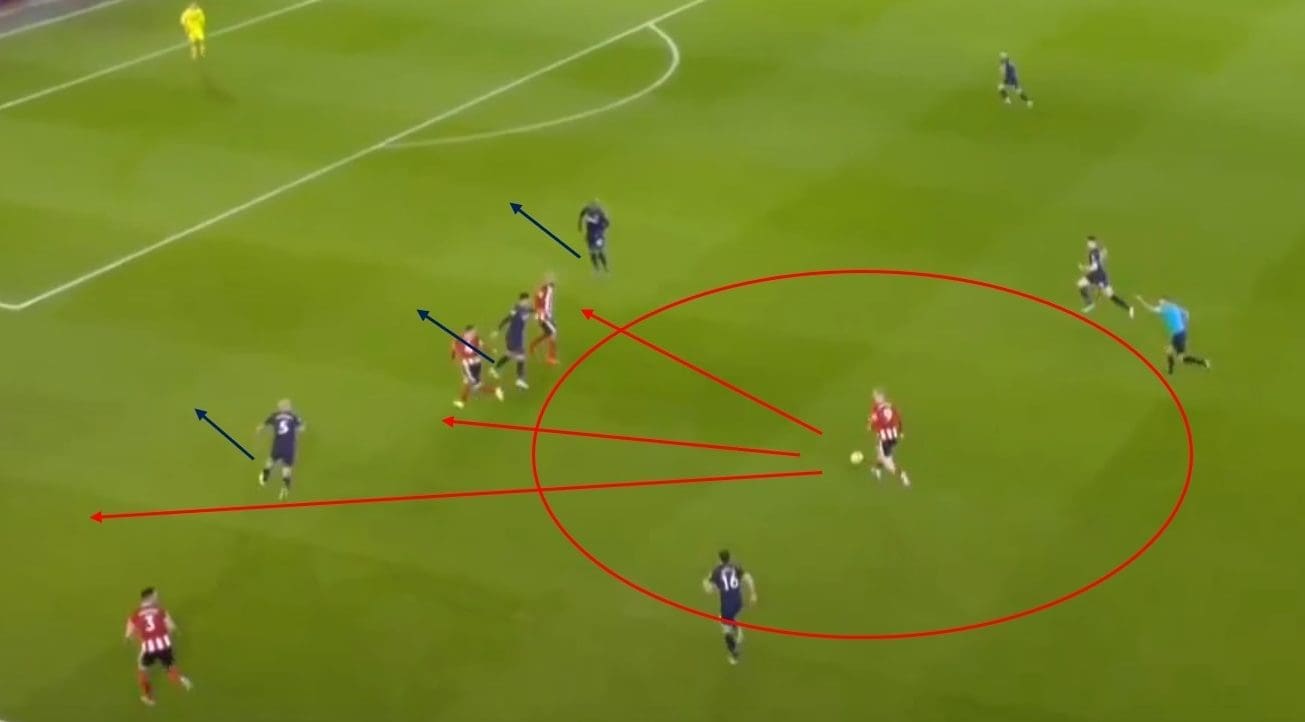
As can be seen here, Oli McBurnie is driving forward with possession towards West Ham’s third of the pitch. Instead of a defender breaking the defensive line to come out and meet the striker, they drop off and keep their line intact, as marked by the blue arrows, which allows McBurnie space. This is a dangerous game from West Ham, but it worked to perfection. The Blades’ striker has three forward passing options, however, due to the lower line of engagement a defender is positioned to intercept the ball should it be played in any direction – as Zabaleta does do when McBurnie attempts a pass to Enda Stevens.
Here, West Ham enforcing a lower line of engagement can again be seen from the backline. With Sheffield United launching a counterattack towards the away side’s goal, the defence continue to drop off. Instead of going to meet the man in possession, he is allowed space and time but ultimately the backline is able to intercept a pass due to their deeper positions.
Sheffield United’s high press
While the two previously mentioned tactics went a long way to frustrating one another, leading to few clear-cut opportunities in the game, the Blades’ high press was where the game was won and lost. This is another area of Wilder’s tactics which require a large degree of intensity from Sheffield United and that was pivotal in the outcome of this clash.
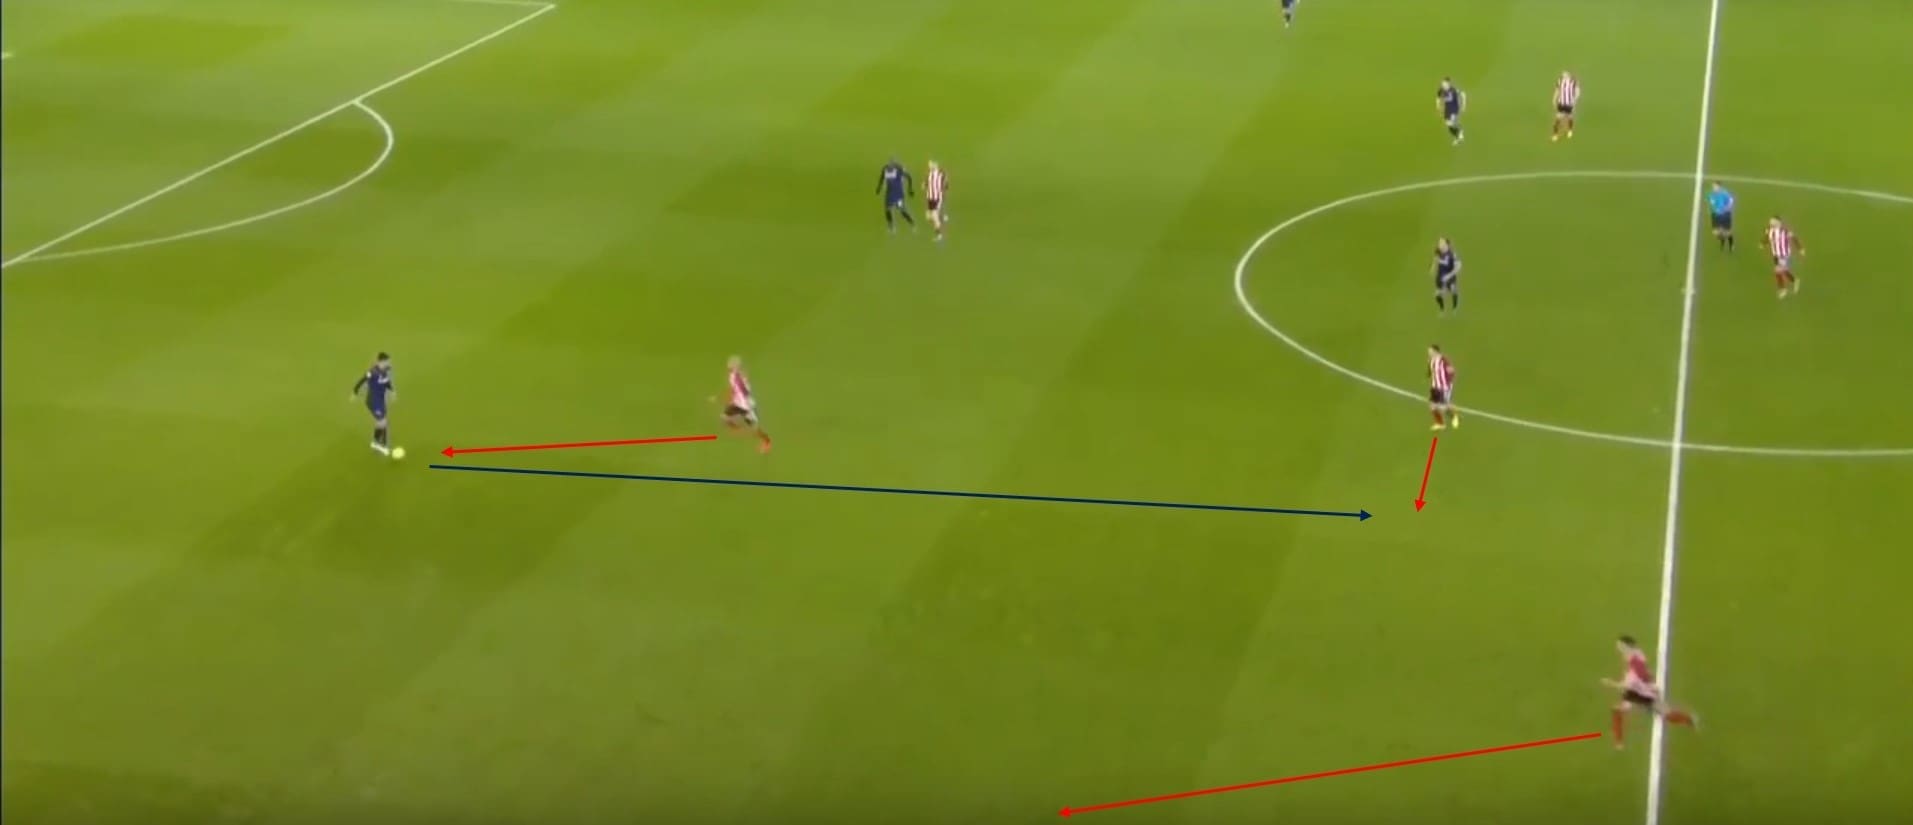
As can be seen here, the Blades looked to pressure the West Ham defensive line whenever they were in possession of the ball. This did not always have great structure to it beyond the striker closest to the ball quickly closing the man in possession down while the surrounding players then cut passing lanes. In this instance, David McGoldrick intensely presses the ball while John Fleck and Stevens cut passing lanes. Fabian Balbuena, panicking in possession due to the speed of the press, plays the ball straight to Fleck, as marked by the blue arrow.
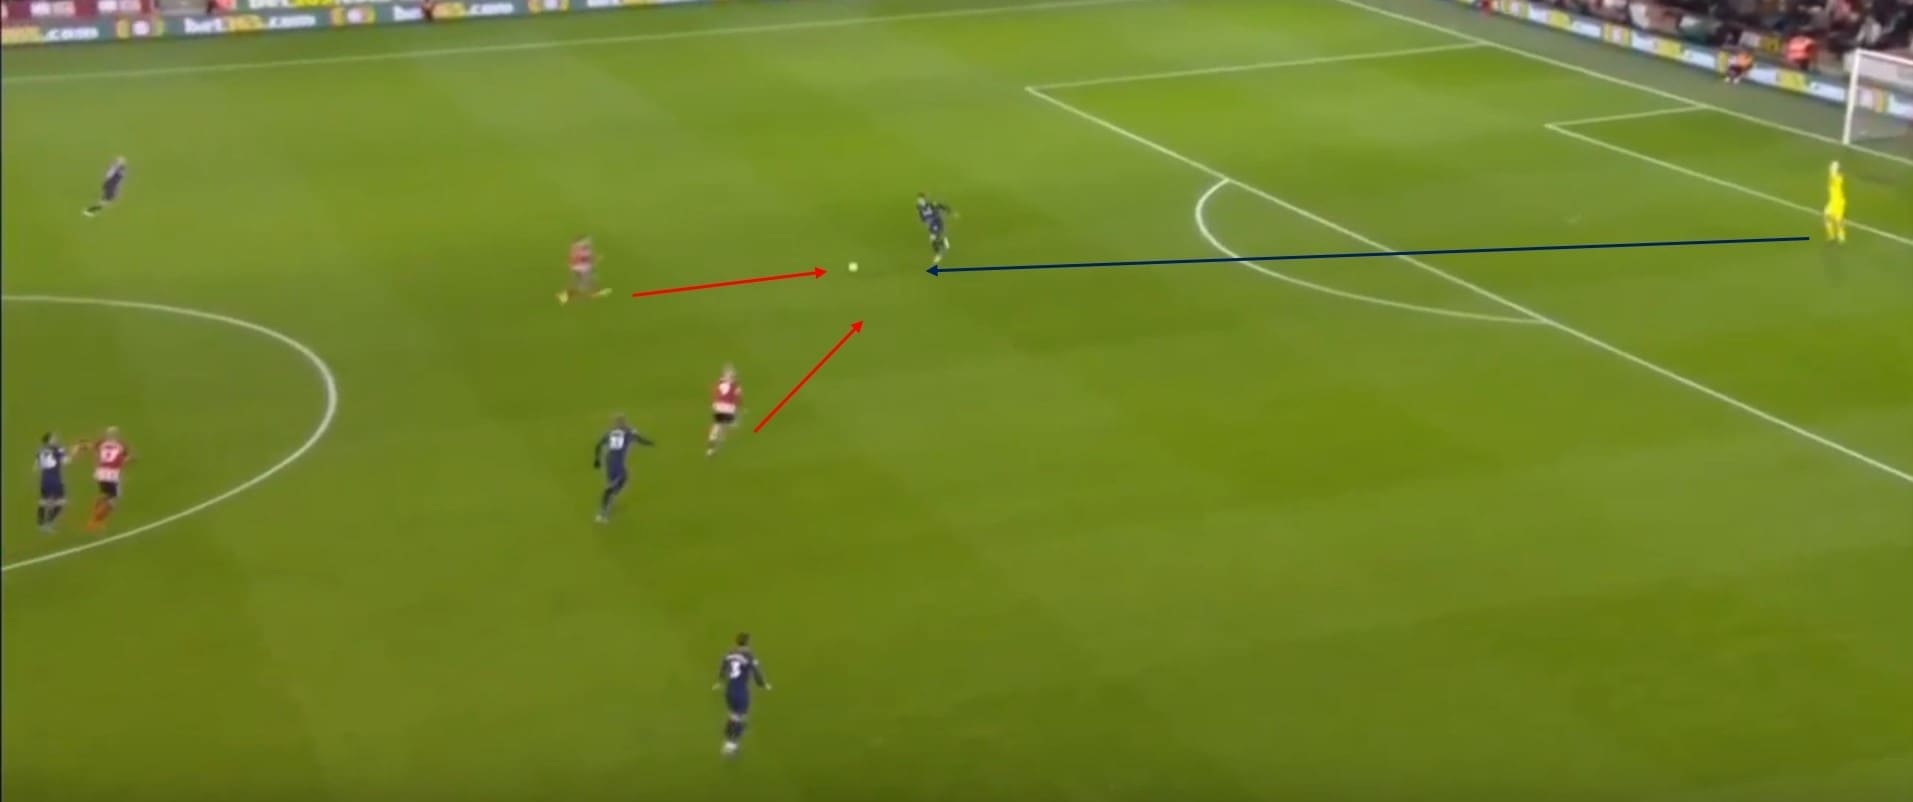
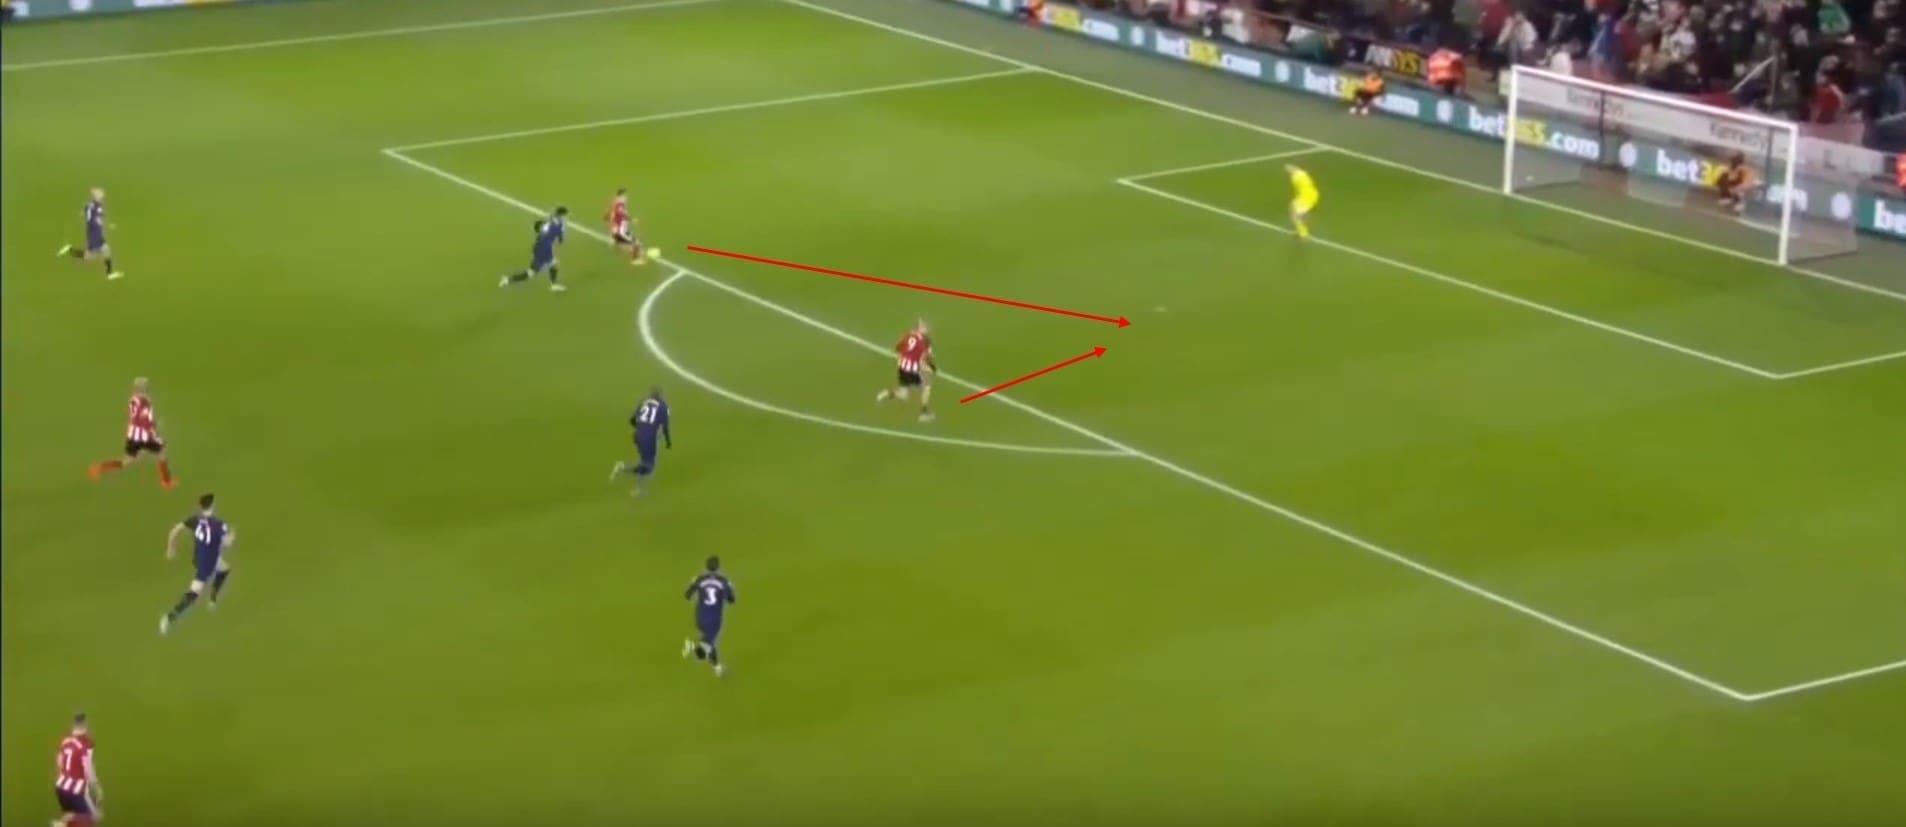
This annotation is taken just seconds before McBurnie slots home the Blades’ winner. With the visitors looking to play the ball short and play through the thirds, Fleck and McBurnie were stationed, ready to pounce should a good opportunity to press arrive. A stray ball from David Martin later and Fleck launched into his press, picking up the loose ball and creating the evening’s most decisive overload, a two-versus-one, as seen below.
Conclusion
While the home side was certainly given a helping hand from VAR on their way to victory, to prevent three points becoming just one, it was a thoroughly interesting tactical battle at Bramall Lane. However, Chris Wilder will have been pleased that his well-drilled side was able to frustrate West Ham to the degree that they did and that their ability to quickly and effectively press proved decisive.
This tactical analysis has dissected the clash between Sheffield United and West Ham United, highlighting key tactics and using analysis to show how they impacted the game’s outcome, a 1-0 win for the Blades.

Comments