The Premier League is back as a big game between Tottenham and Manchester United took place on a Friday night. Steven Bergwijn exploited the individual mistakes of David de Gea and Harry Maguire to score the opener, while Bruno Fernandes equalised from the penalty spot in the second half. The game ended in a 1-1 draw.
There are some interesting tactics adopted by José Mourinho and Ole Gunnar Solskjær, and we will go through them in this tactical analysis.
Lineups
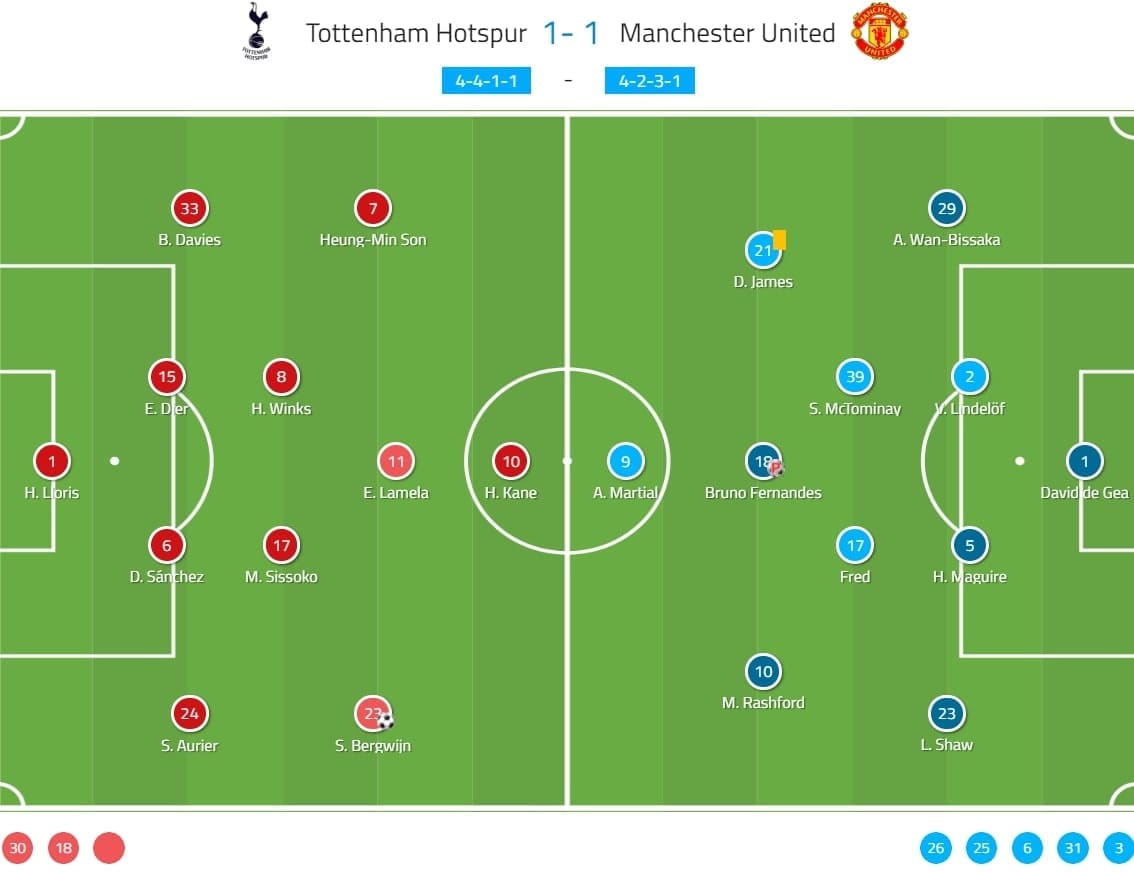
Tottenham played in a 4-4-1-1 formation while several poor performers before the COVID-19 lockdown were left on the bench. They welcomed the returns of some key players, including Harry Kane, Moussa Sissoko, and Bergwijn. The younger Eric Dier and Davinson Sánchez formed the centre of the defence, as Toby Alderweireld and Jan Vertonghen were not taking part in this game.
Manchester United also had the return of Paul Pogba on the bench. Solskjær played his trusted squad with Bruno Fernandes, Marcus Rashford, and Daniel James supporting Anthony Martial. This was a 4-2-3-1 formation instead of the 4-4-2 diamond we often saw before the break.
United: positional play analysis
Although the Red Devils were better in the counter-attacks, they controlled 62% of possession, trying to create the chances from positional plays and break the defence of Tottenham. The 1.44 xG might suggest the team performance was quite fine, but if we are deducting the 0.76 xG from Fernandes’ penalty goal, the real xG was merely 0.68.
Solskjær tried a few patterns of build-up plays in this game, but before the introduction of Pogba, most of them were ineffective. United were just not creating huge chances or entering the final third in a favourable condition.
In the early stages of the game, the full-backs positioned themselves asymmetrically: Luke Shaw pushing higher and Aaron Wan-Bissaka forming a back three with the central defenders. We have drawn the shape here and the benefits are further explained afterwards.
Meanwhile, the pivots Scott McTominay and Fred stayed narrow and behind the first line which was suboptimal as none of them utilised the positional superiorities to occupy or manipulate the second line. Also, the pivots failed to be involved by receiving a pass due to the static positionings and the lack of movements. Here, it was extremely easy for Kane and Erik Lamela to cover McTominay and Fred.
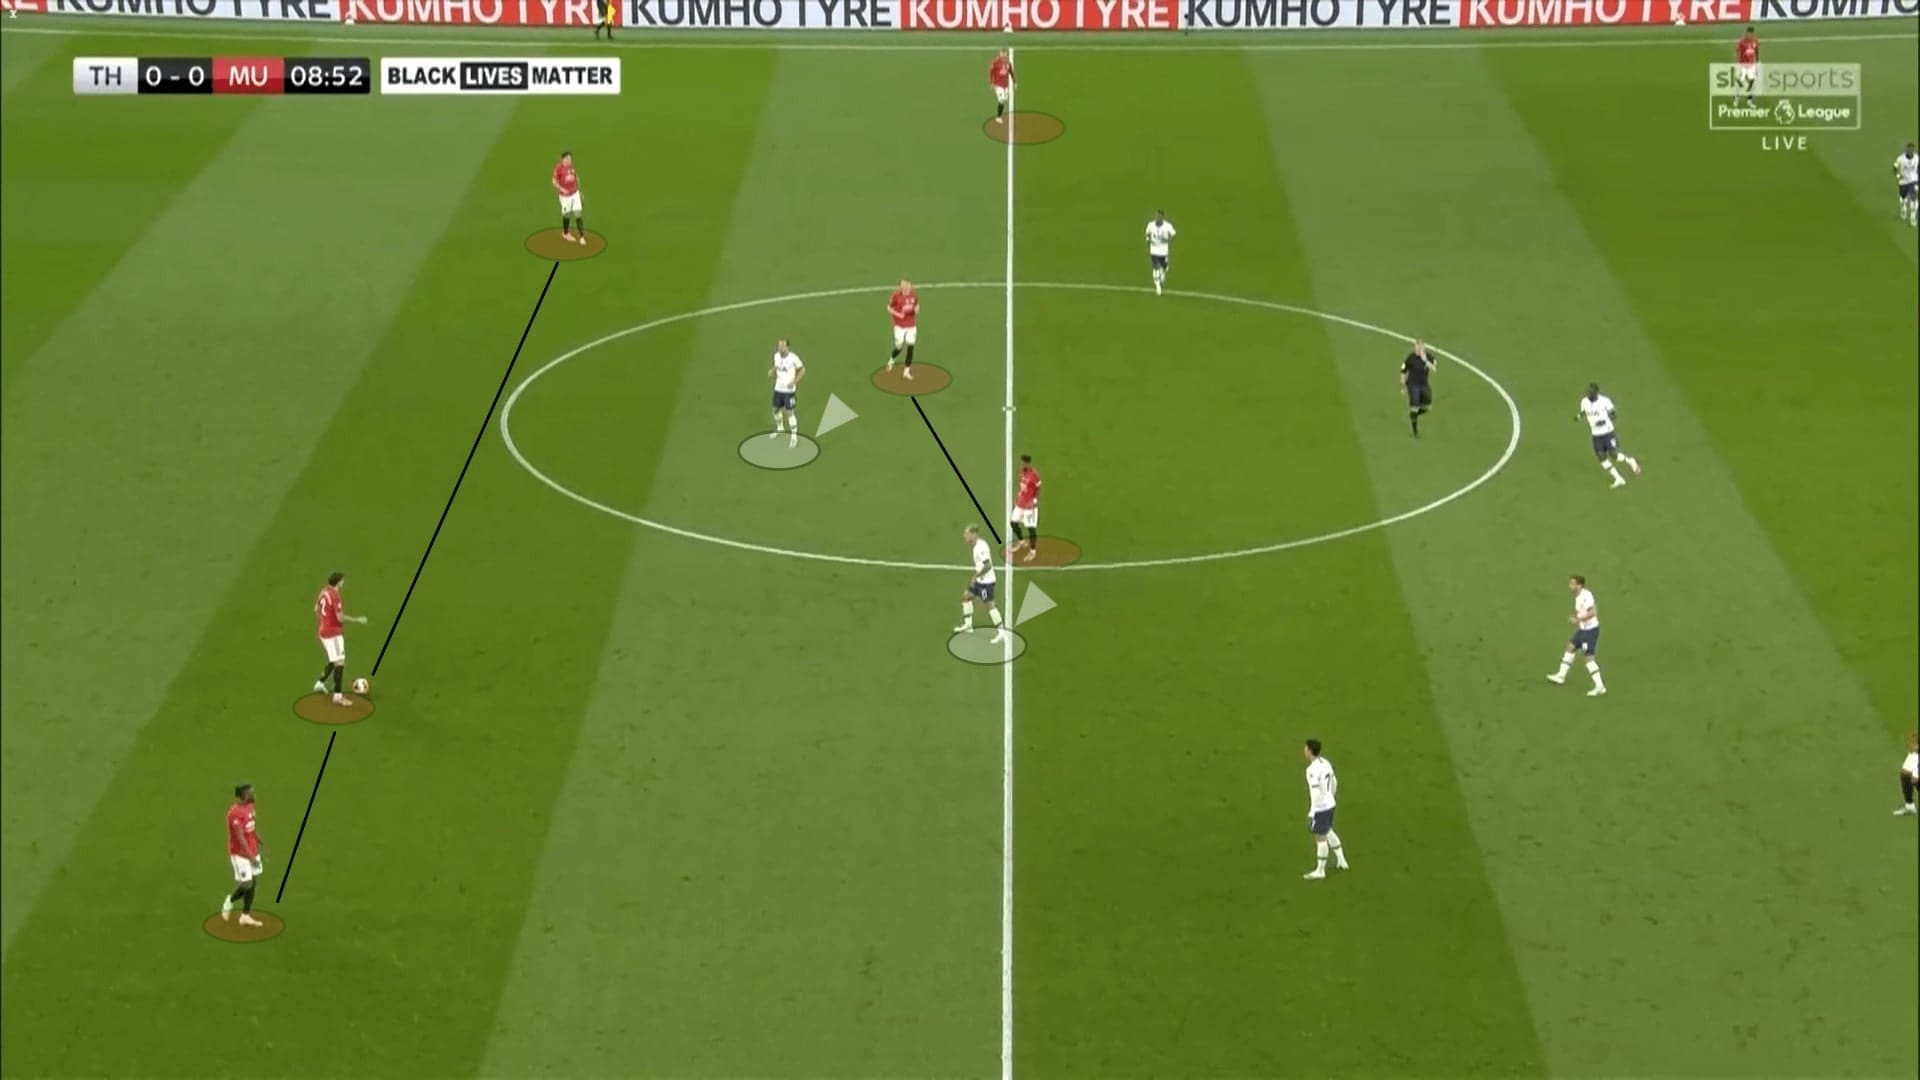
A benefit of this setup was allowing Maguire to drift forward as the ball-playing centre-back. As mentioned, this asymmetrical setup released Shaw to the wide corridor, and Rashford stayed inner.
Ideally, it was optimal to let Maguire playing the ball at the half-spaces as he should have two progressive options – Rashford and Shaw. However, this advantage was nullified because of the discipline of Sissoko. In this image, Sissoko was clear on his duty – protecting spaces instead of approaching the players. Consequently, Rashford was eliminated as an option.
Also note Bergwijn’s position – the Dutchman winger was quick to drop between the two lines, keeping an accessible distance to Shaw. The instant pressure was applied when Maguire played the ball wide, and he would, as this was his only progressive ground option.
A further note of the pivots’ positionings here: Fred and McTominay were still under the markings of Kane and Lamela, hence why they were unavailable for a pass.
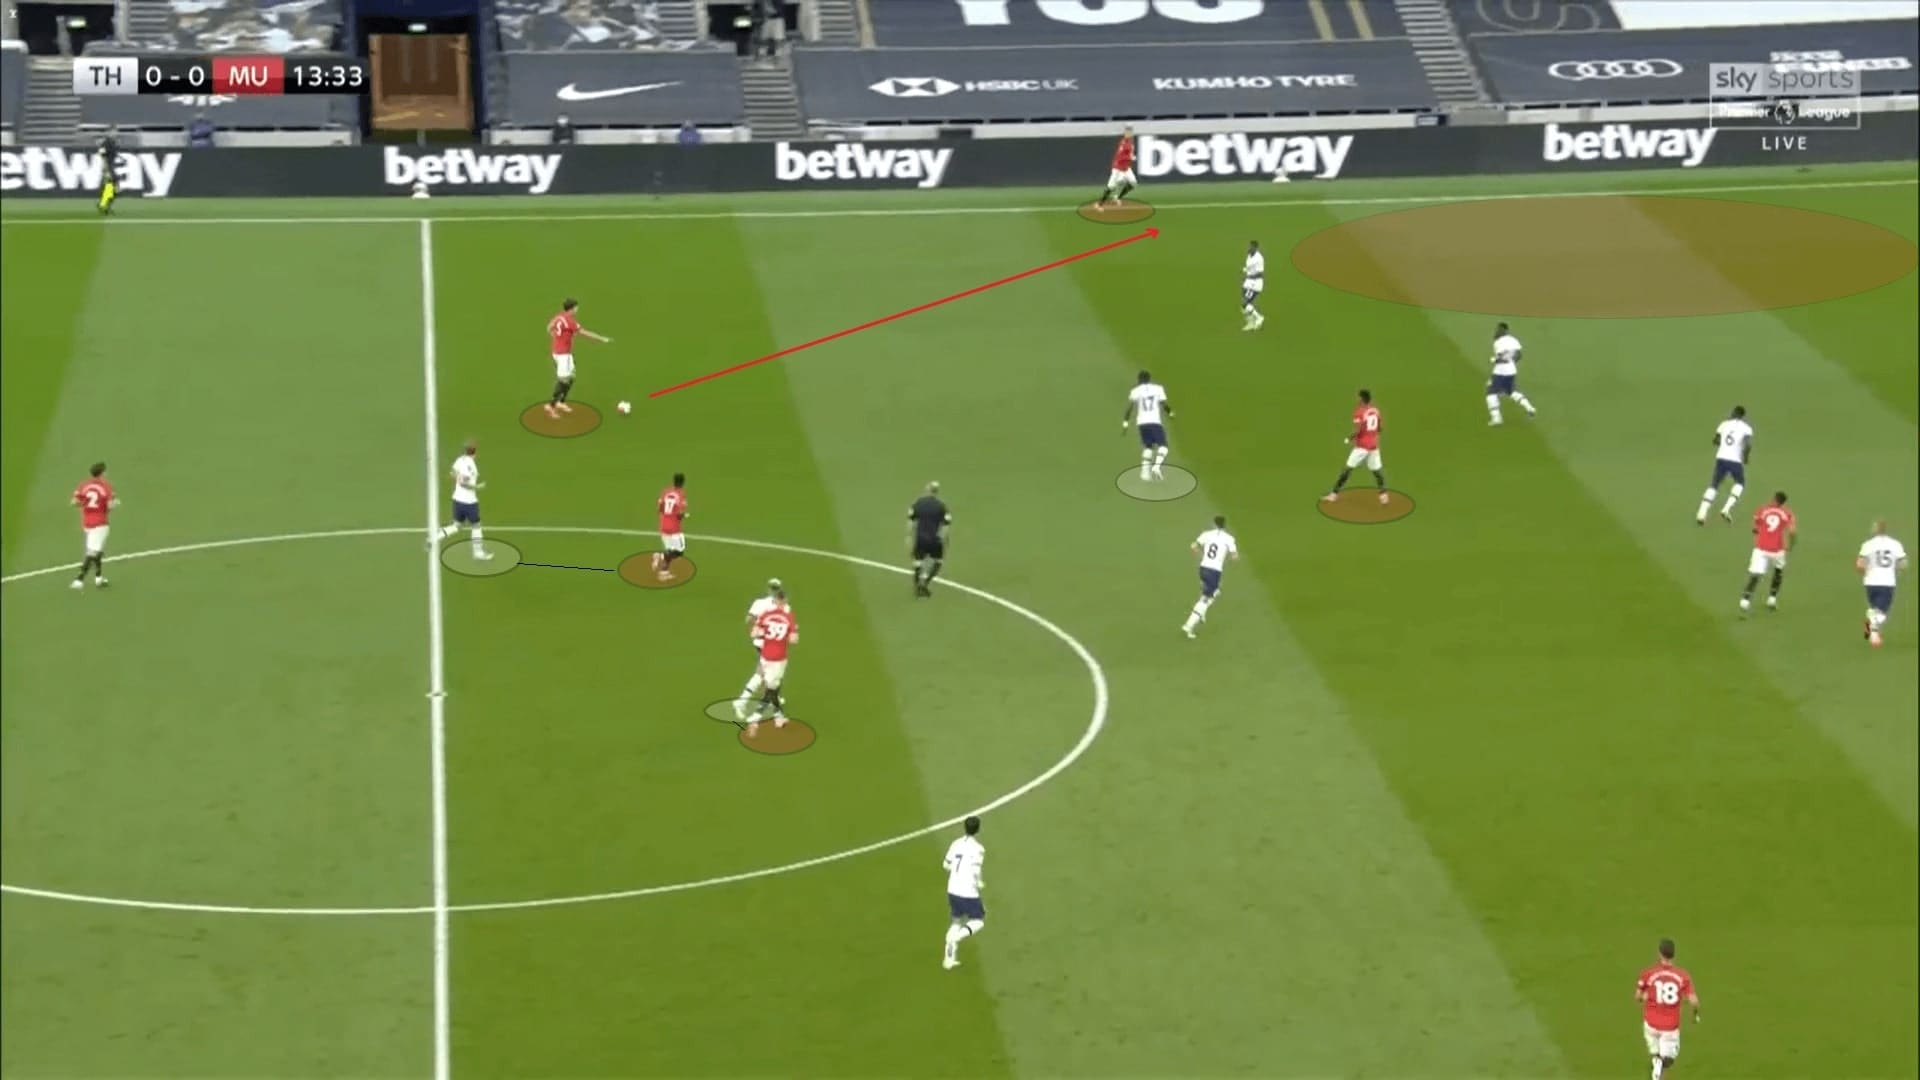
Despite focusing to create the attacks from the left flank, United struggled to create something because of the above issues. Everyone would anticipate Maguire’s pass to the flank and Tottenham pressured that area quickly. And when Rashford moved to the half-spaces, no one made those runs to exploit the spaces at the flanks which serve as an option for Shaw.
How about passing to the right flank? The story was similar to the opposite flank: since Wan-Bissaka was part of the back three, James became the receiver in the wide zone. However, given the Welshman’s suboptimal body orientations and the instant pressure from Tottenham, he could not progress either.
This graph is the pass map of James in the first 30 minutes, in which he registered merely eight successful passes out of 13 (61.53%). In those passes, none of them was a forward pass and most of them were back passes, which were shown on the map. He provides no progression even receiving passes.
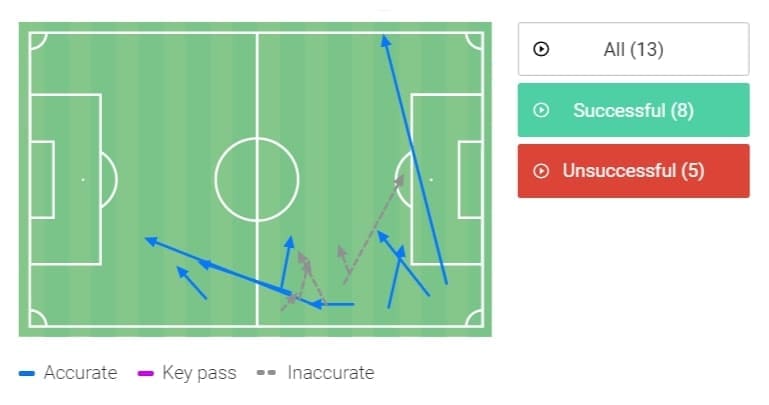
The below scenario is an example: James’ body shape was suboptimal as he was not facing the goal. It was difficult to deal with the pressure from left-back, quite impossible to dribble past the challenger.
Similar to the left flank, no United player was making the runs to exploit the flanks or stretch the defence. As the widest player on the right, James received the ball, but he could not play to the space behind Ben Davies.
Tottenham were doing well to pressure the receiver when the ball was moved wide. Here, the press was coming from three angles because of the three-layer defensive structure. They also successfully trapped the ball and shut all central passing lanes, leaving James the only option: playing the ball back.
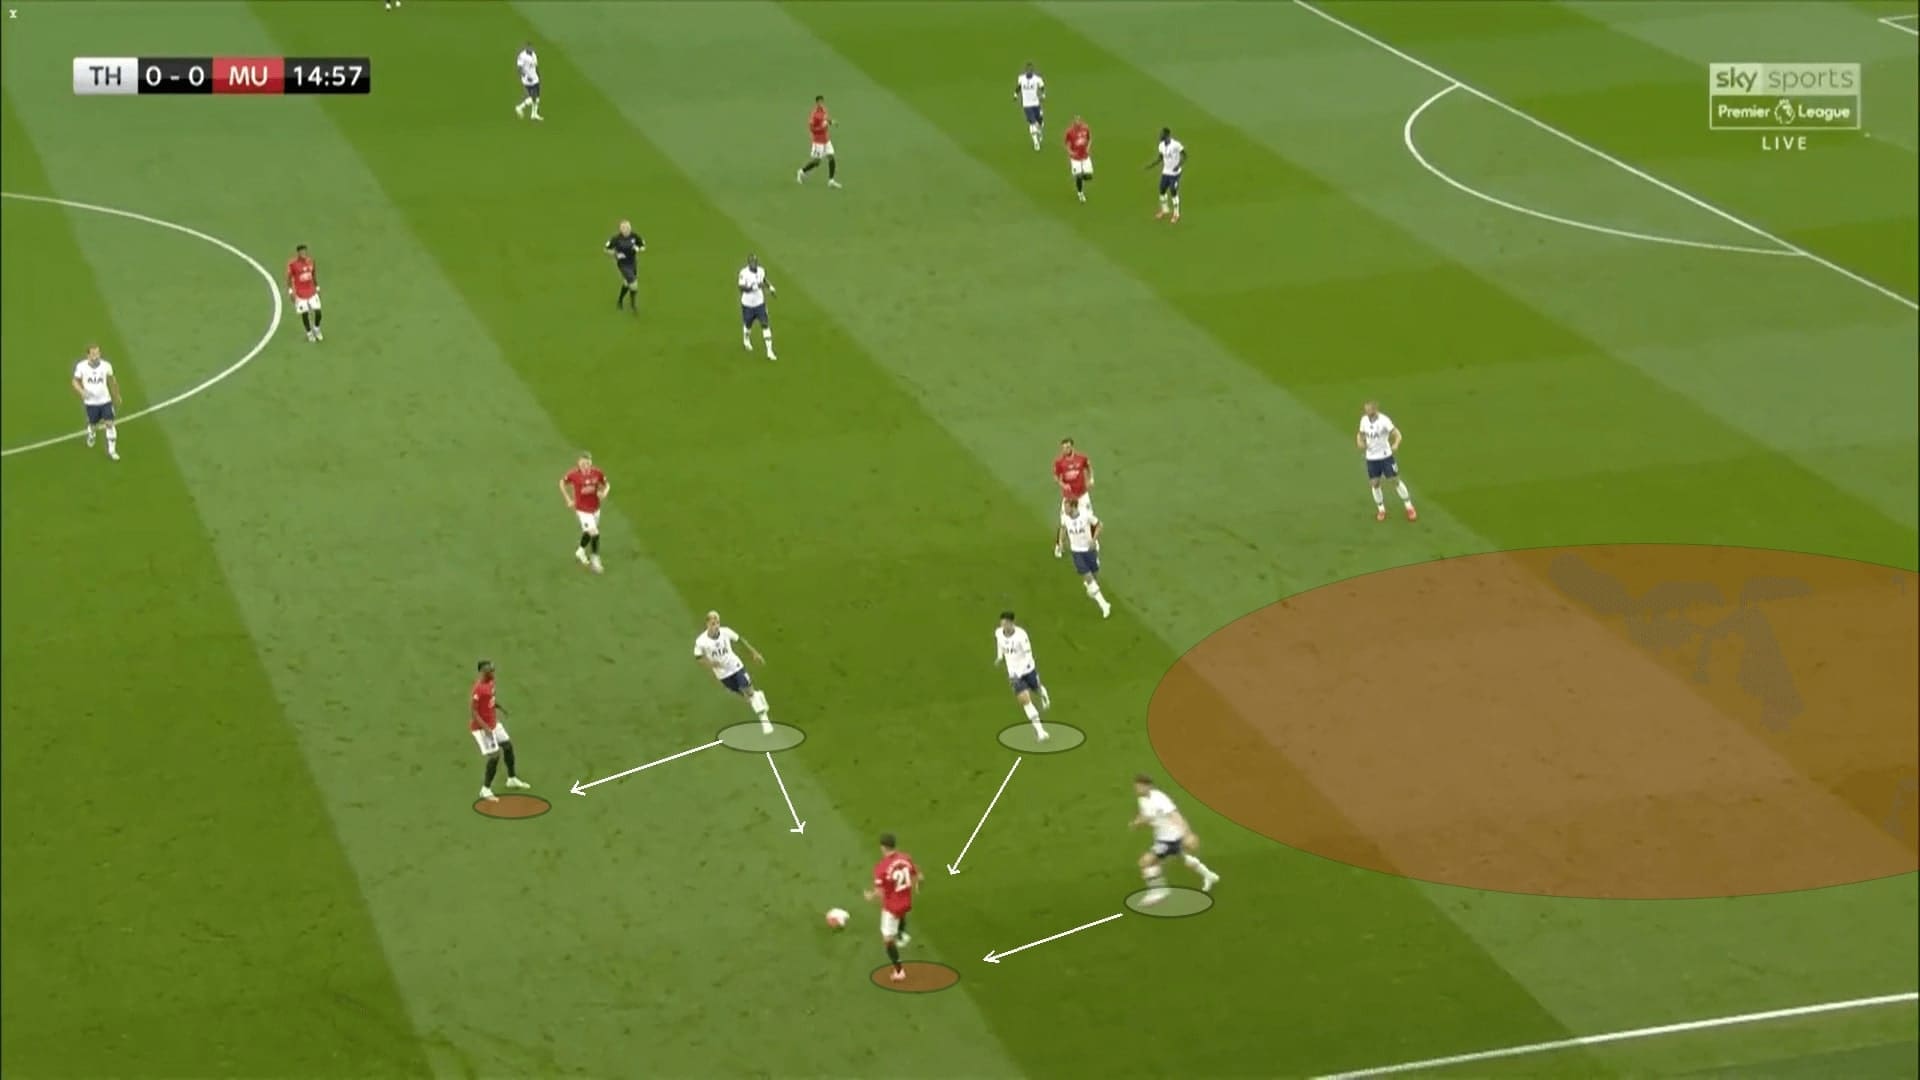
On some occasions, United tried to attack the space behind the defence after they failed to break into the block. It was their playing style as players like Martial, Rashford, and James were always keen to run behind the defenders. However, this tactic could not be used as Tottenham were setting a low line in the positional plays. The United pivots were tightly controlled by Kane and Lamela, they could hardly play a pass without pressure.
Here, Wan-Bissaka found McTominay with a difficult forward pass, but the United #39 did not have time to scan and think, he was immediately under the pressure from Lamela, and so forced to play a long ball and Tottenham were ready for it.
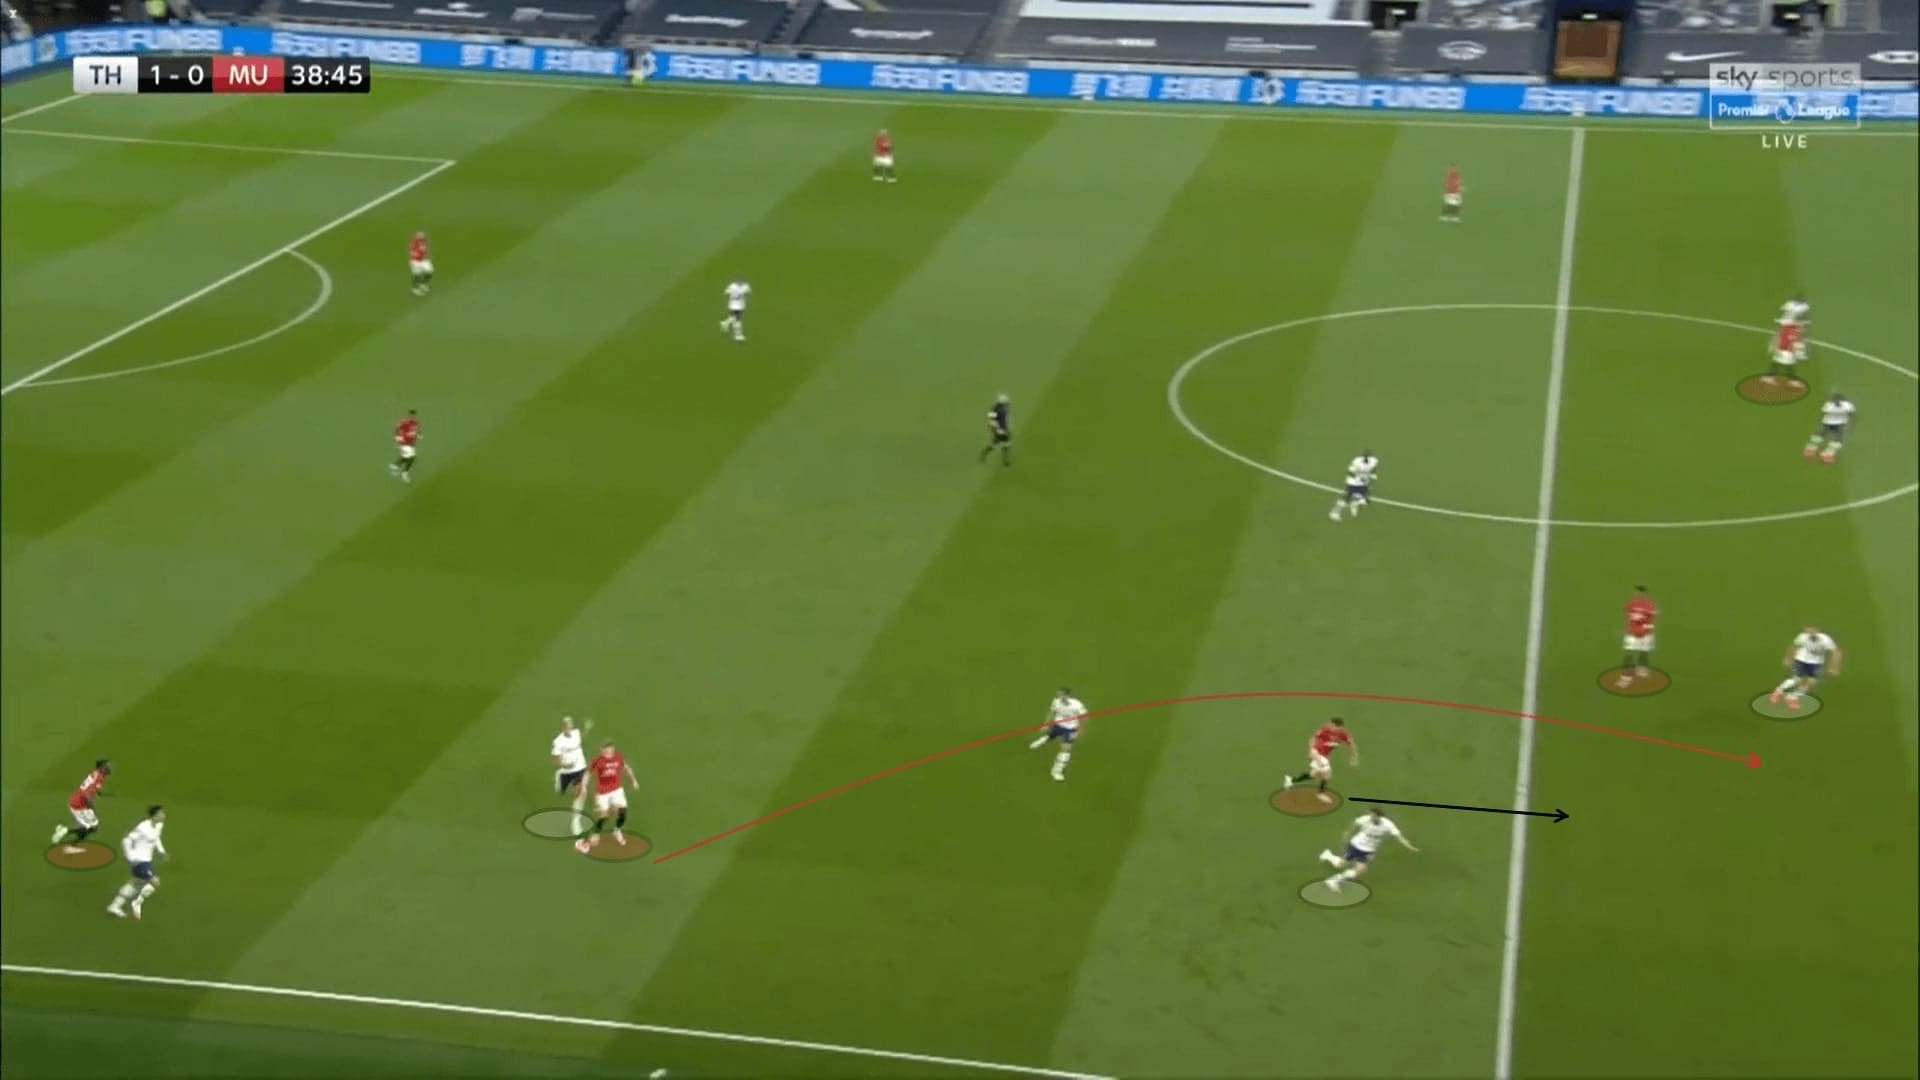
We could summarise the above build-up strategies of United who were aiming to progress the ball by moving around the block, instead of penetrating centrally with vertical passes and third man plays. Fernandes was yet to be a part of the first phase as he tended to stay higher in the first 30 minutes.
Since all these methods of progression were suboptimal, Solskjær adjusted the build-up shape after a water break, we will dive into it in the last section together with Pogba’s impacts.
Tottenham: defensive improvement
As hinted above, the defence of Tottenham did quite well to contain United throughout the game. They seldom pressed high and mostly formed a 4-4-2 midblock to deny United’s progression, by Lamela and Kane forming the first line. The midblock was always compact on the ball side, shutting the central passing lanes and often forcing United to play the ball wide.
In the early minutes, the first line was doing well to control the opposition pivots, as we have provided a few examples in the above section already. Given how suboptimal United were in the first phase as explained earlier, they mostly defended and maintain the pressure at the flanks.
An intriguing tactic was the task of Bergwijn as he was a tremendous part in the defence, containing Shaw all the time and minimised the threat. Instead of dogmatically sticking to the midfield, he tended to position himself between the last and second line. This additional layer allowed Tottenham to press the ball at the flanks with at most four angles.
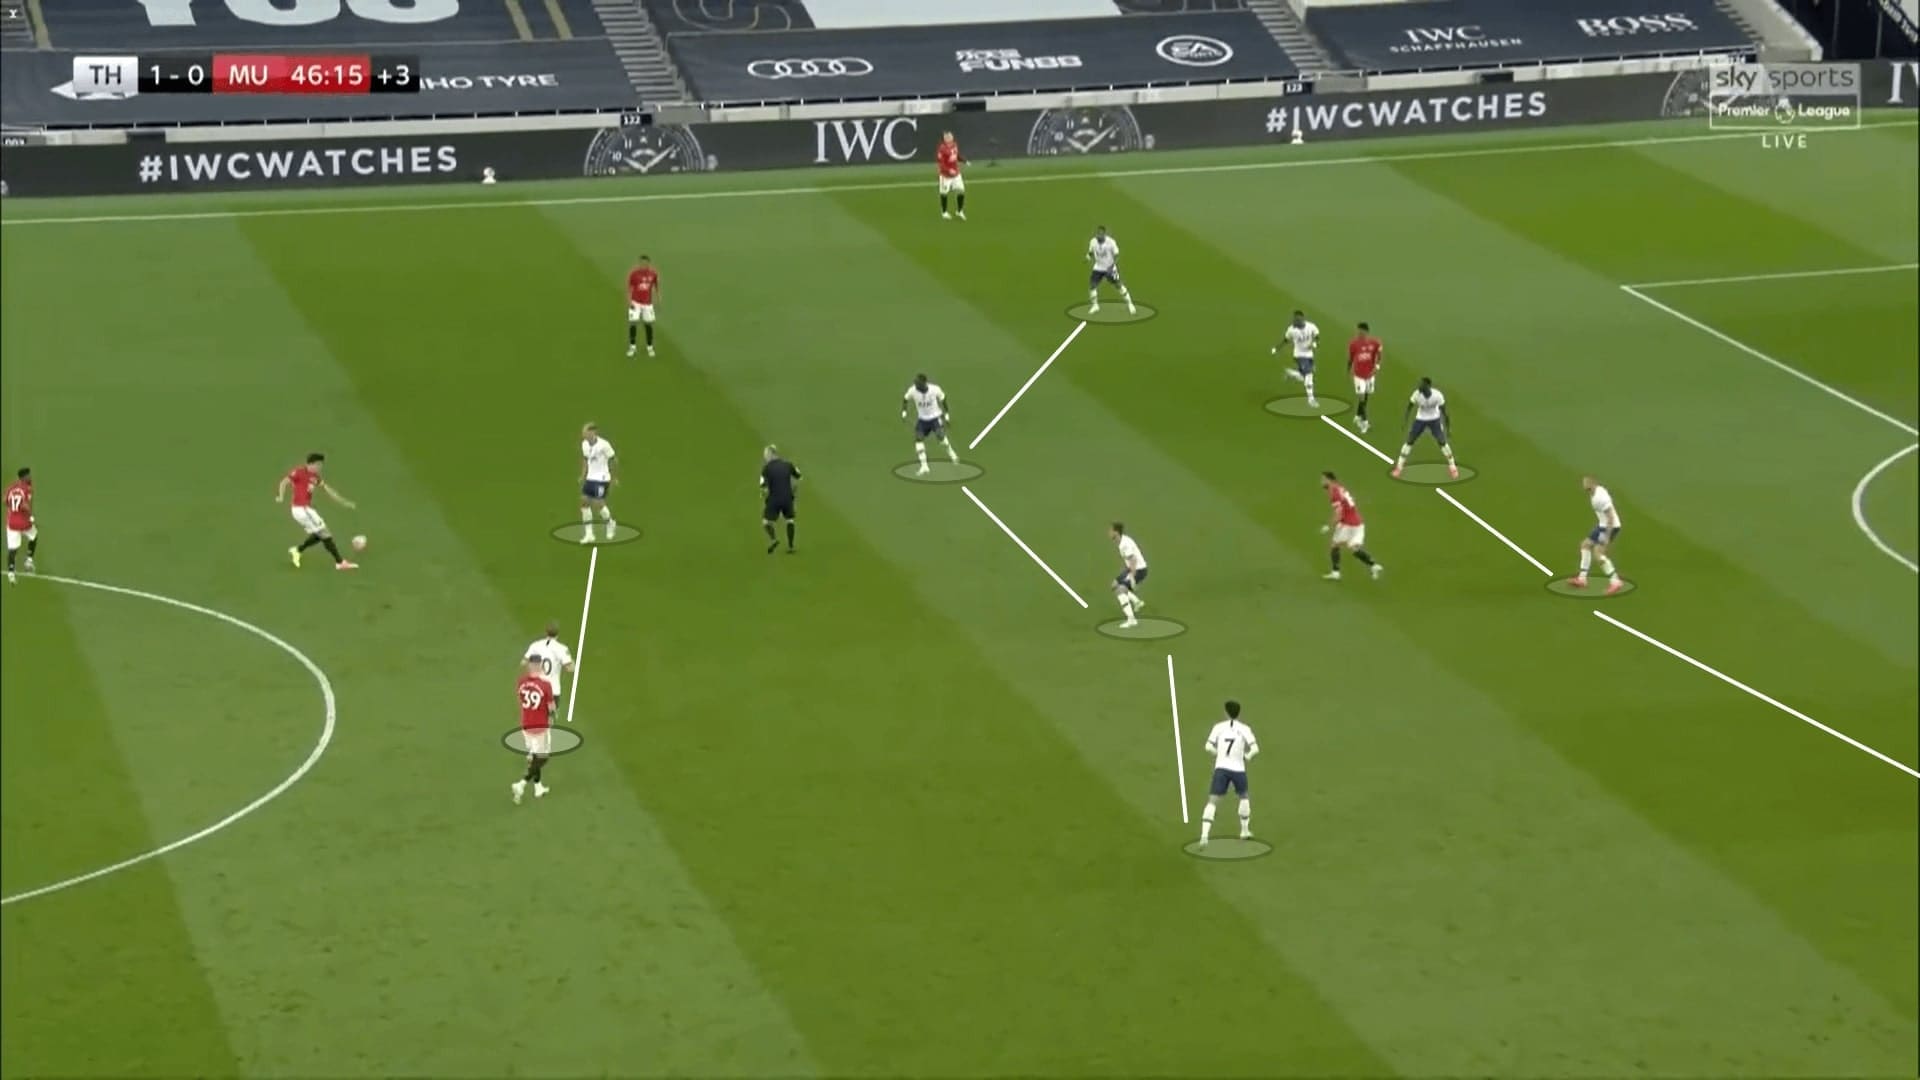
As we can see here, Sissoko had a good positional awareness by maintaining a reasonable distance with Harry Winks, and he did this throughout the game. The midfield duo served as a shield to deny potential vertical passes to reach the back four.
Even Aurier sometimes pressed aggressively on the right, while Sánchez was alert to push higher and provide the defensive cover.
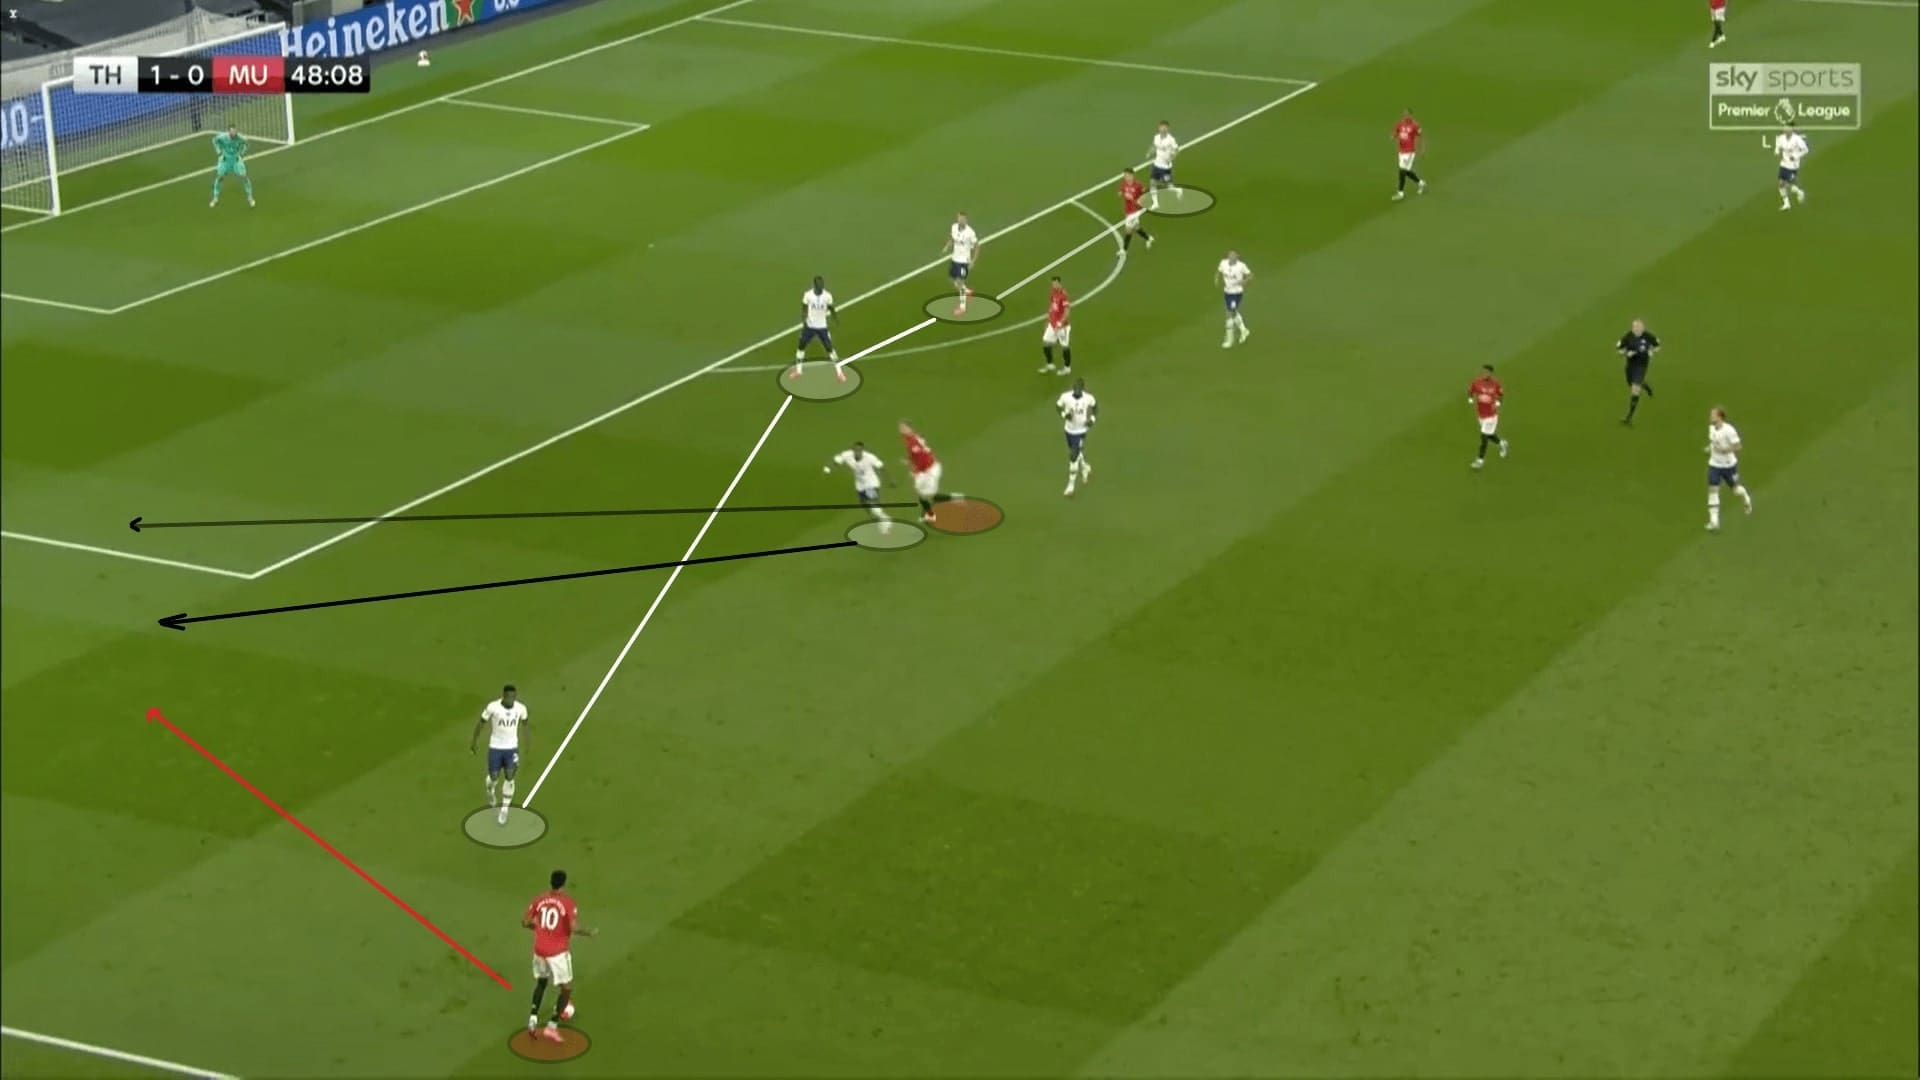
There were some cases which Rashford switched the position with Shaw as the wide receiver. This often pulled the Tottenham right-back Aurier out of the defence, creating space behind and at the half-spaces.
Thanks to Bergwijn’s efforts, the threat of these positional interchanges was minimised as the former PSV man always tracked runs. This made sure that even when the attack developed in the flanks by a pass, the receiver was under instant pressure and failed to further access the centre.
In this example, Rashford went wide to receive the ball and adjusted his body shape for a releasing pass for Shaw. Aurier was pulled wide, thus, unable to track the left-back. This showed the importance of Bergwijn, who read the pass, reached the ball before Shaw.
Sometimes we interpret the Tottenham defence as a 4-3-3, and this mostly happened in the second half when United adjusted the build-up shape. In this scenario, McTominay dropped to the defence and received the ball. This wide positioning freed himself from Kane’s marking.
The most important task of the block was to shut the central access, so the midfield duo shifted their positionings to cover the centre at the ball side. Therefore, even when United circulated the ball at the back, it was not an issue as Tottenham could deal with it.
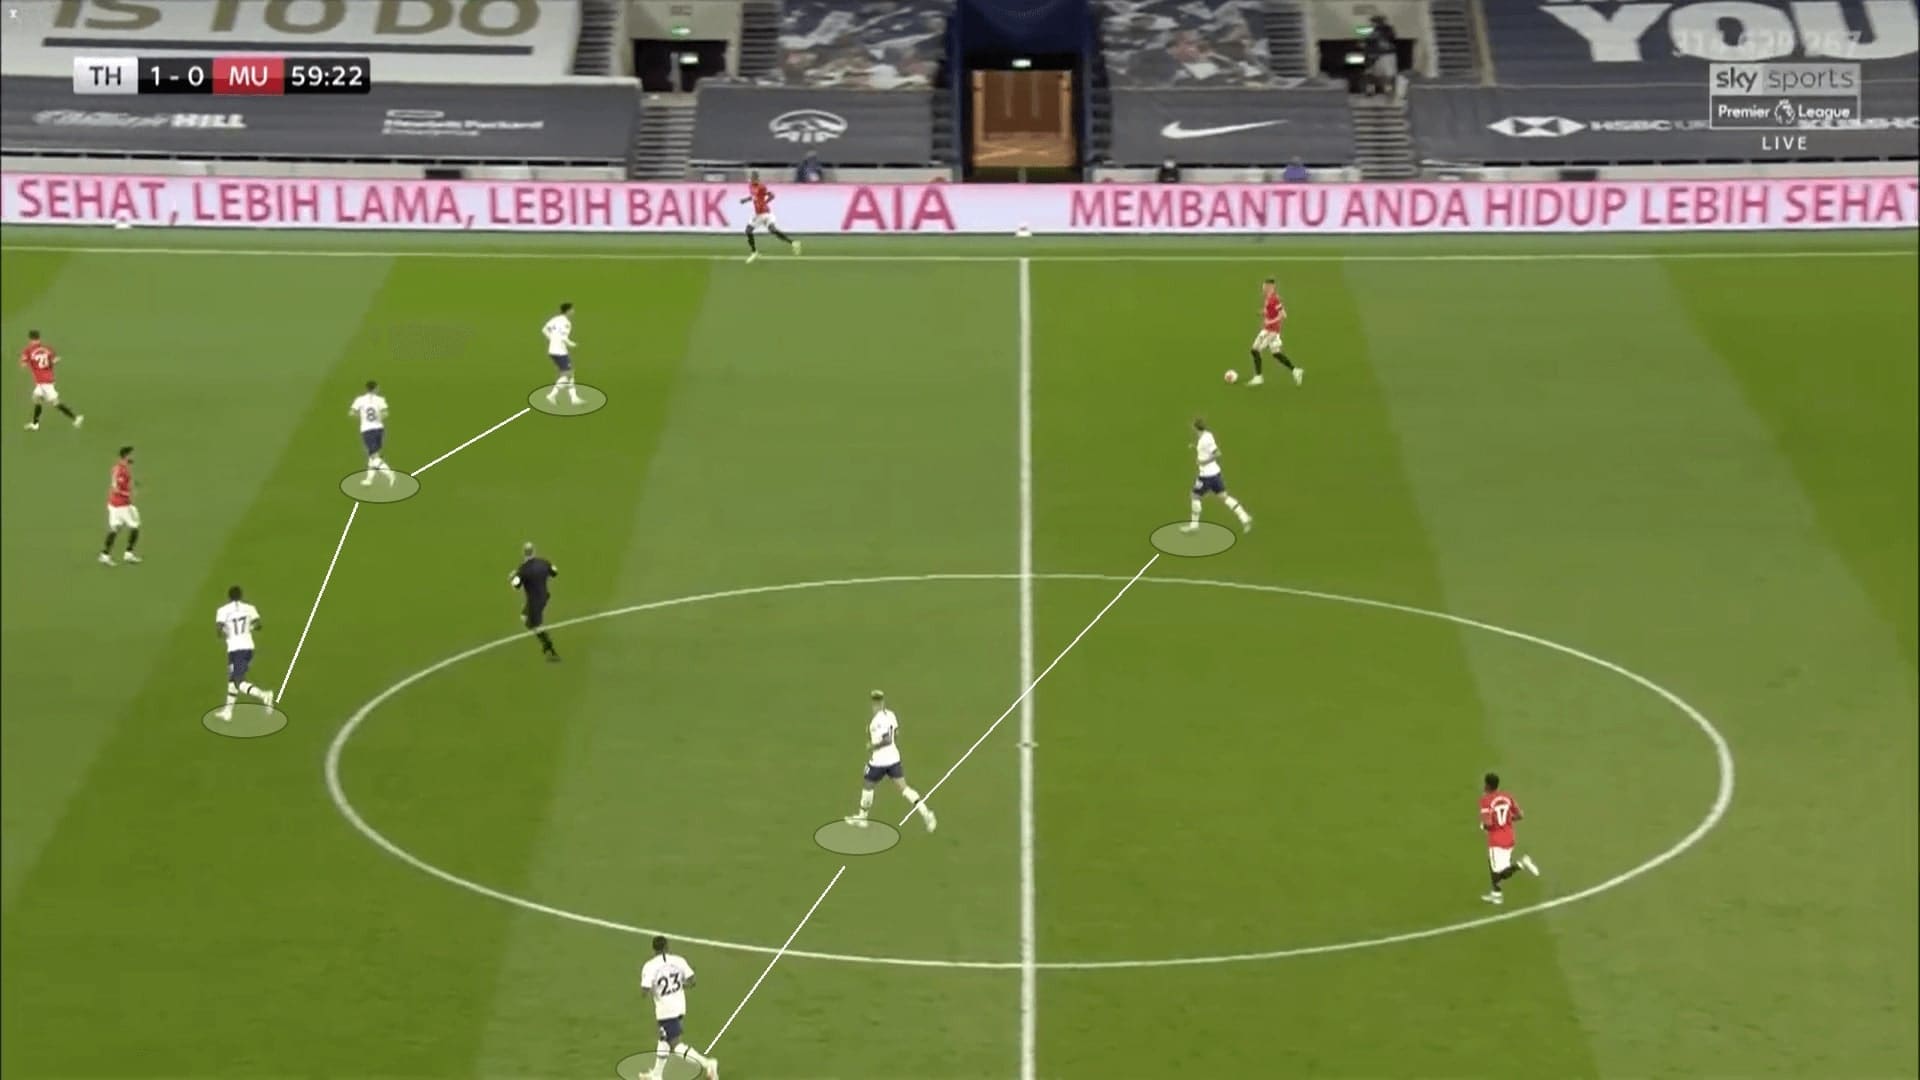
United: man-marking approach
Solskjær’s team had a low PPDA: 7.7 on average in this game. As usual, they tried to defend by a man-marking approach and the players stepping out to press every ball. This high pressure suffocated the build-up of Tottenham, as Mourinho would never want his man to move the ball riskily in the own third. The passing stats of Hugo Lloris (playing 15 long passes and five short passes only) can be considered proof of the effects in the high press.
Here, we draw the man-marking scheme of United when defending a goal kick. Tottenham were in a 3-1-1 shape in this scenario, so the United front three matched the opposition three perfectly. Meanwhile, Fernandes utilised his positional superiority to keep Winks and Sissoko under control. If Martial went to Dier, Fernandes would approach Winks.
Facing the high positionings of United’s defence, Lloris played a lofted ball to try finding Aurier instead of passing to the short options.
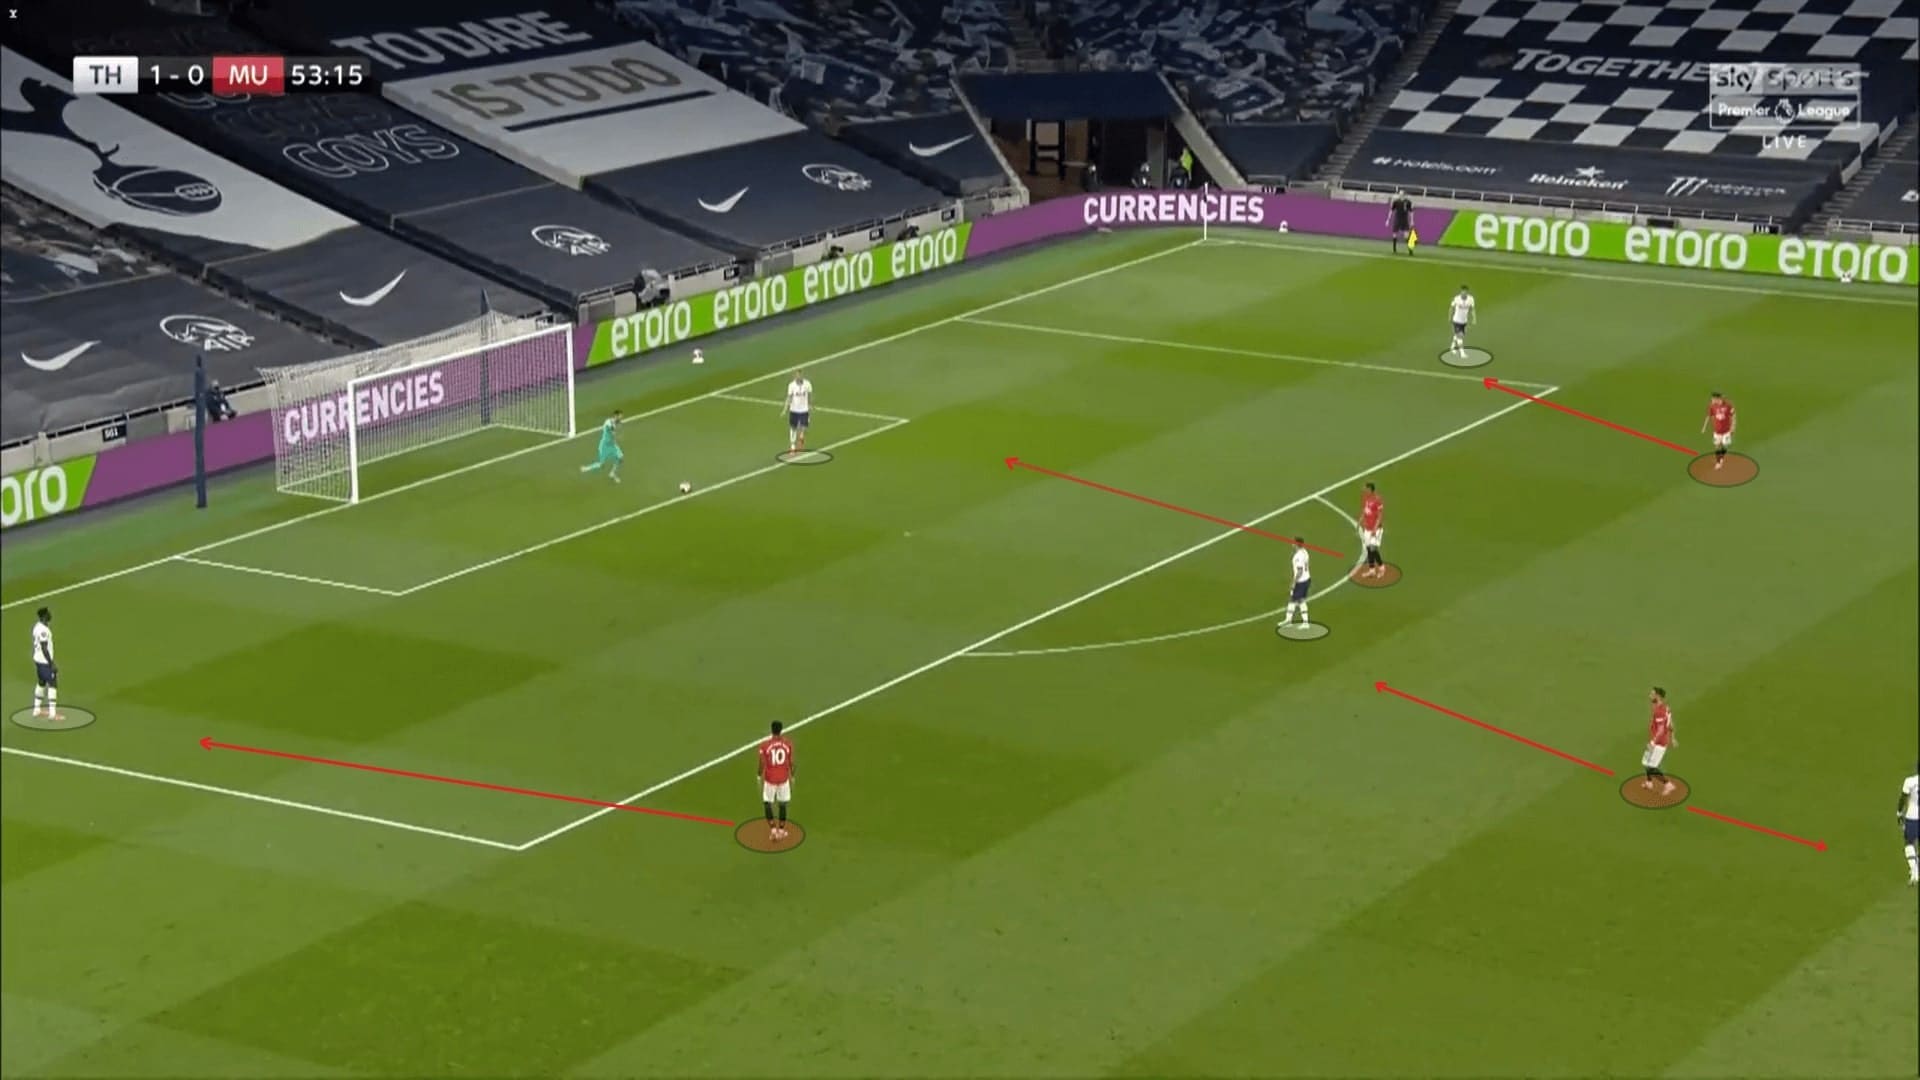
It was quite fine to use this approach in the positional plays, as Tottenham often played long to escape the pressure and the travel distance gave the centre-backs time to read the pass and go for a duel.
However, the man-marking scheme was adversely affecting the defensive performance. Assuming the front three were pressing the Tottenham backline three, then the wide players would be left free, requiring the full-back or even the centre-back to step up. This became an issue when Victor Lindelöf was marking the player but Maguire seldom adjusted his position.
Kane was flexibly roaming his position in this game while Lindelöf always left his positions, and sometimes it was too far for Maguire to provide a defensive cover. The distancing between centre-backs was too large, just like in this example when the United defence was exposed since the Swedish centre-back went very wide to track Kane.
Another issue was the performance when setting an offside trap, as the Red Devils were tracking runs in the first sense, hence why this kept players onside when holding a high line. These issues were related to the goal of Bergwijn, if we are viewing the event from a macro perspective.
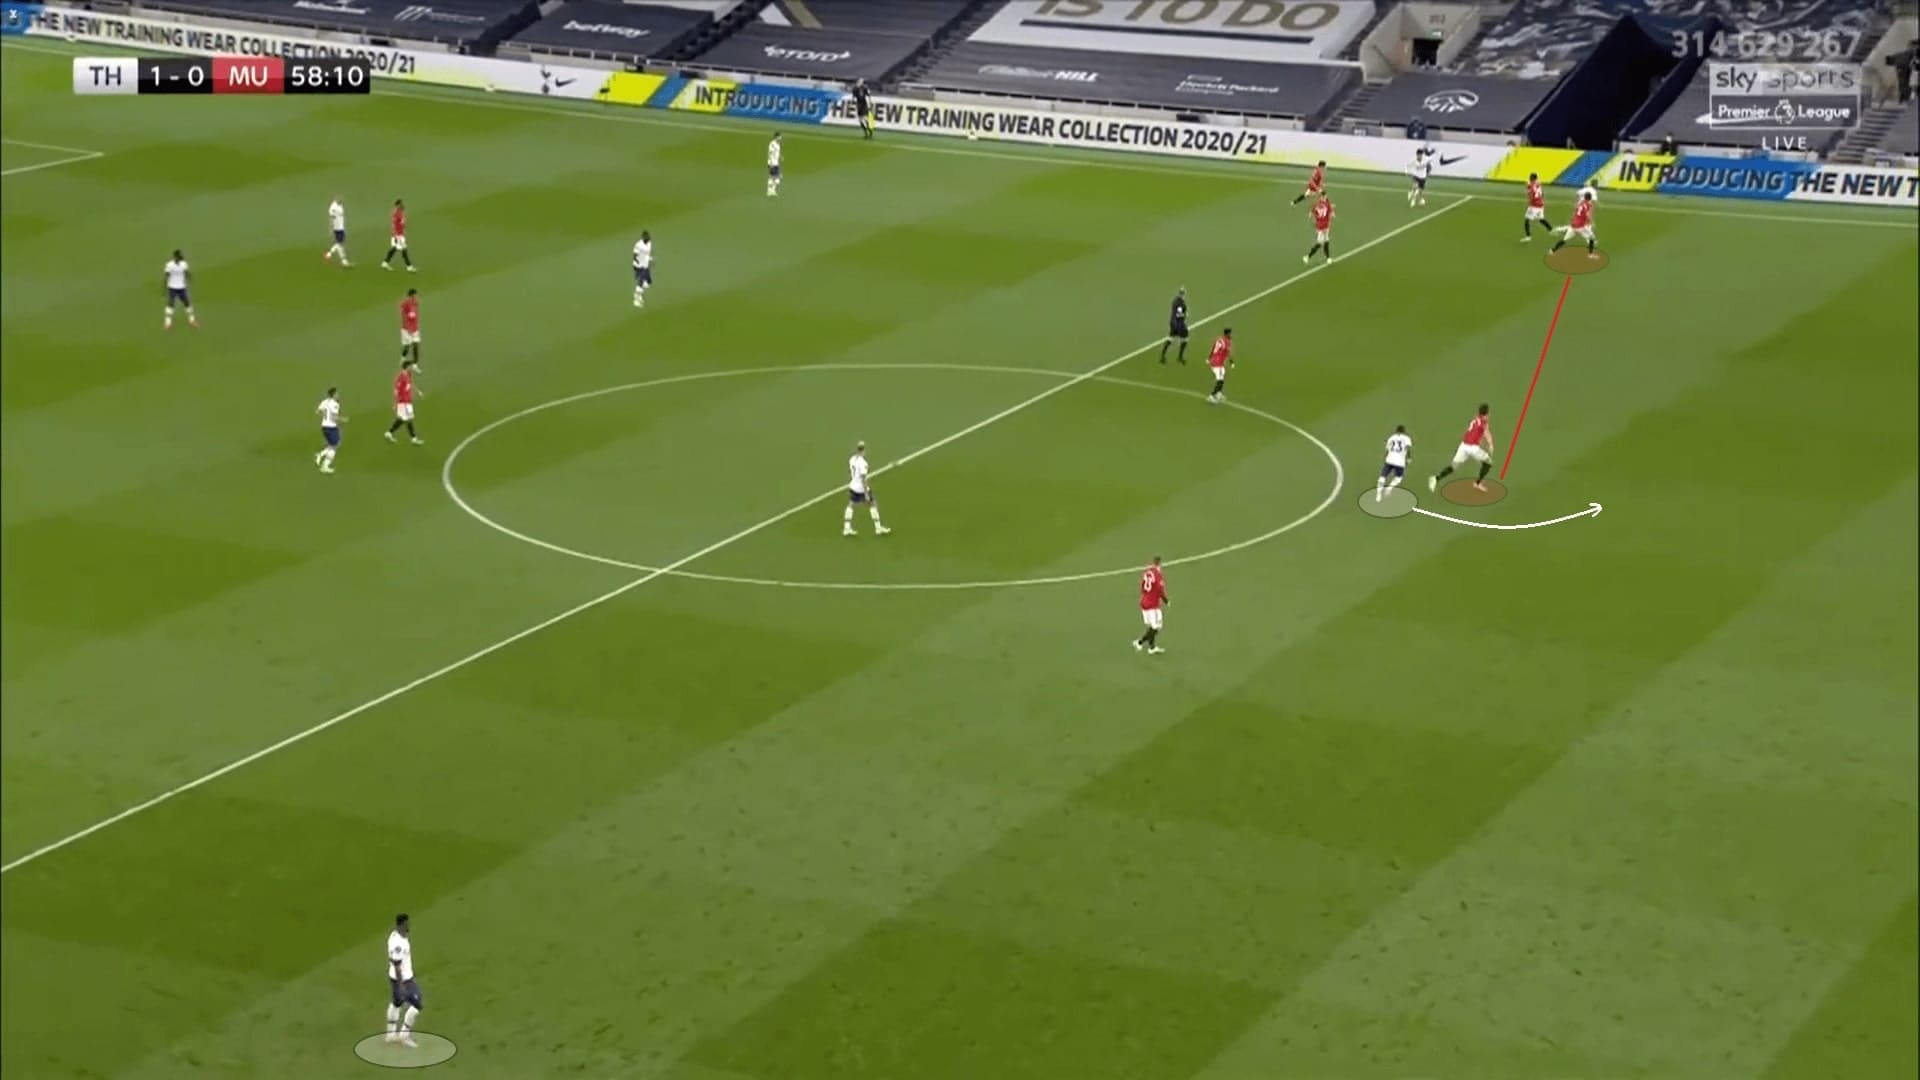
Tottenham offensive style of play
Of course, Tottenham used the famous 3-2-5 shape by pushing Aurier higher. As mentioned above, Mourinho’s team was not taking the risks to move the ball under pressure in the build-up. Lloris always played long when receiving a back pass.
Here, we drew the 3-2 shape of Tottenham. Credit should be given to Sissoko and Winks, as they were always staying close to each other. Even this has turned into a defensive transition – they could immediately reduce the distance and shield the centre.
Under the pressure from Martial, even Sánchez looked like a free option, though Lloris still kicked the ball long to escape the pressure. Therefore, this section of the analysis focuses on the movements of Tottenham attacking players mostly.
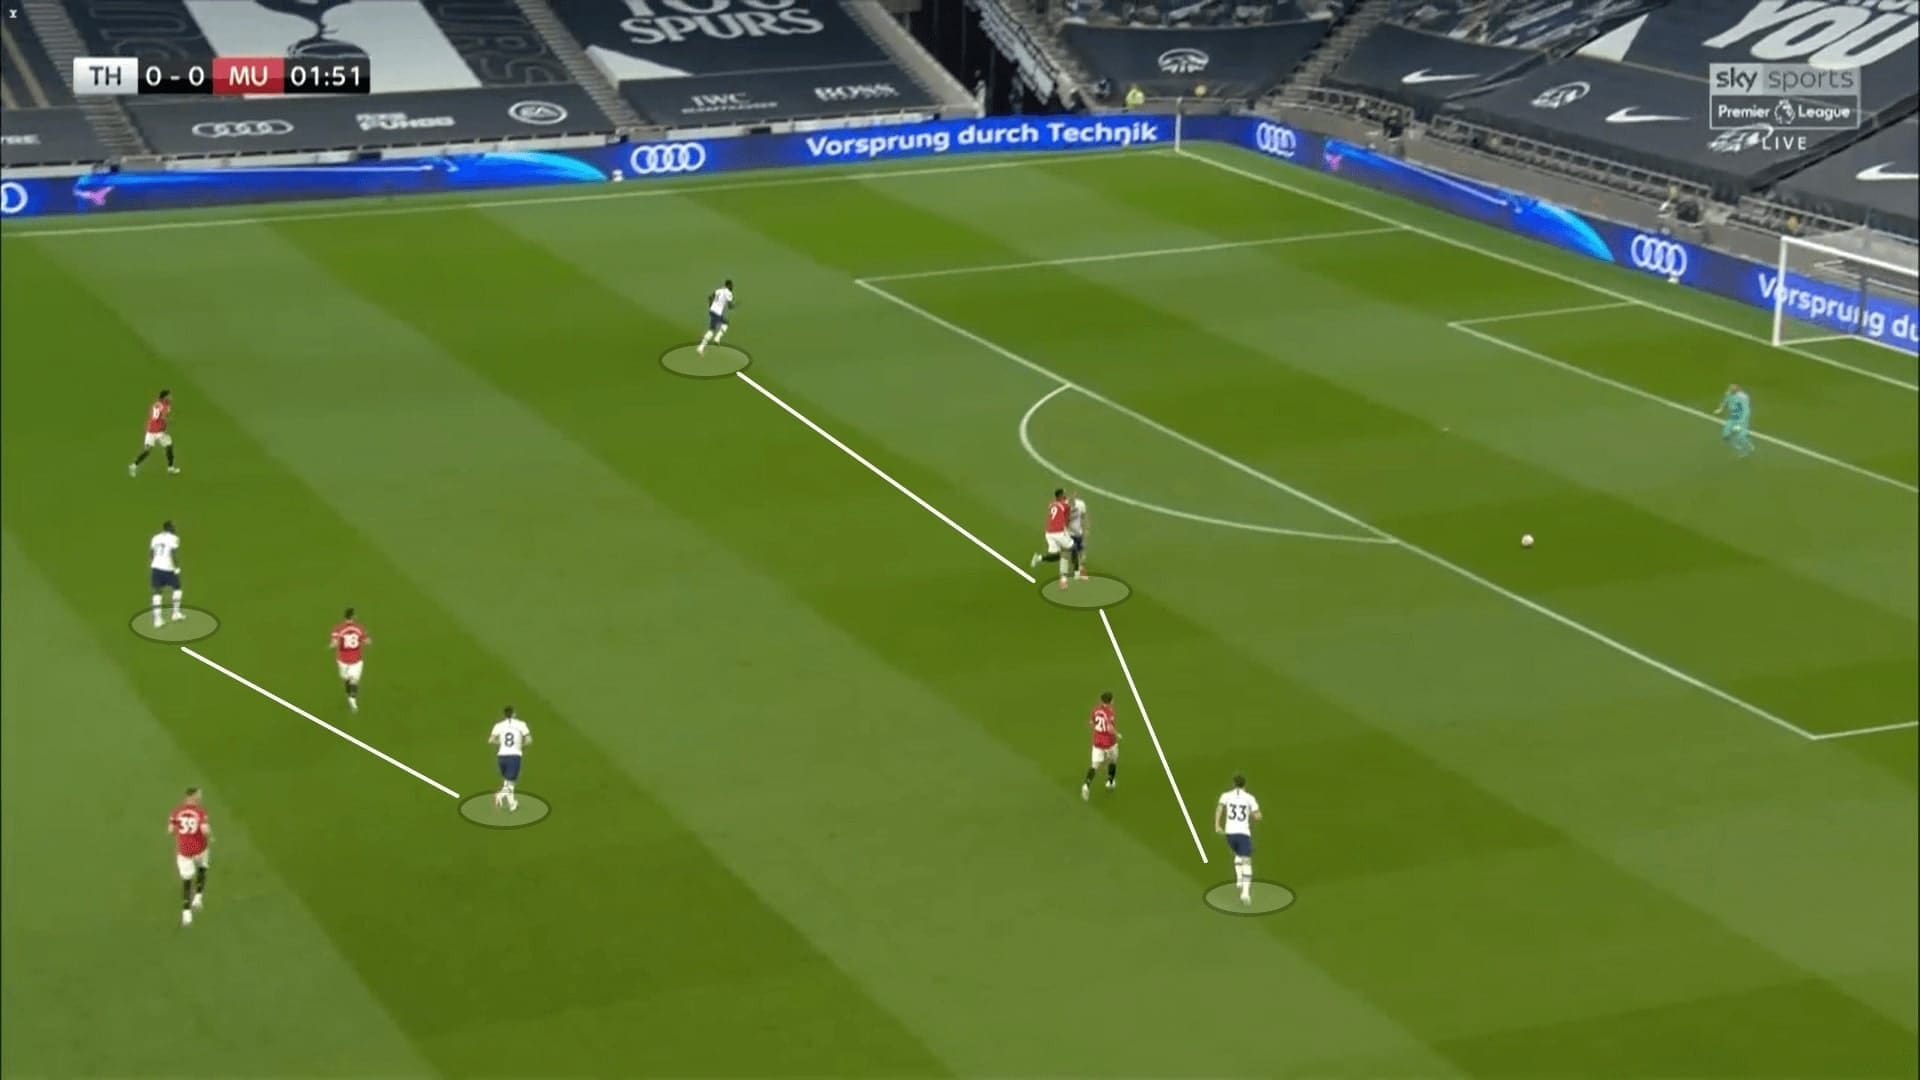
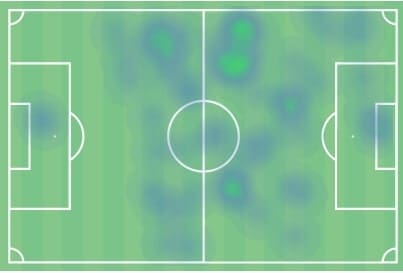
We mentioned the positioning of Kane and for this game, the English forward was not a traditional striker – instead, he was playing like a false 9. Below is Kane’s heat map, showing his active participation in the central third and at the half-spaces. The freedom given to Kane to roam his position was vital to disrupt the defence of United.
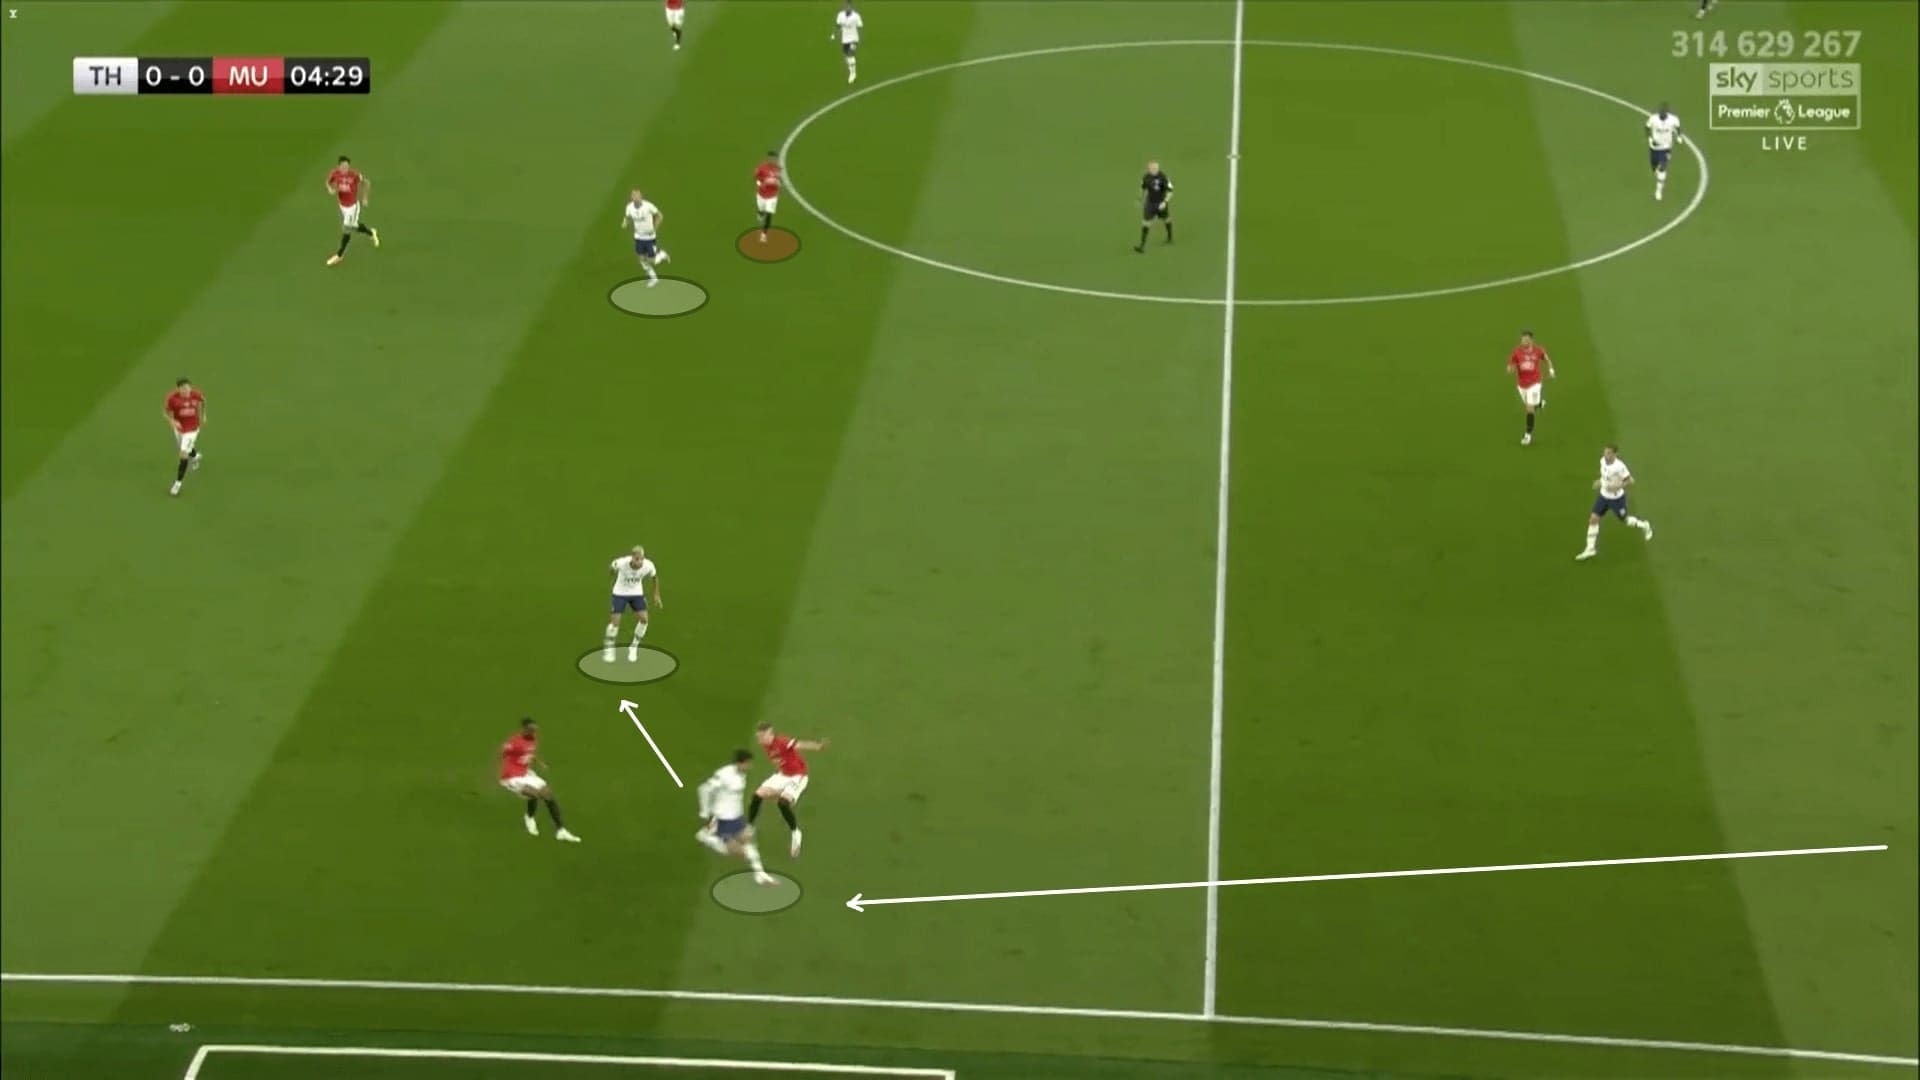
We have a game example that was a typical ground-progressed attack of Tottenham in this game. Since Davies became a part of the back three in the build-up, the Lilywhites were more likely to progress at this flank.
Here, Davies passed to Heung-min Son. Because of the man-marking approach, Wan-Bissaka stepped out even when McTominay was pressuring the South Korean winger.
Note Lamela and Kane’s positions – they stayed on the same line. The deeper positioning of Kane was always serving as the additional free player to overload United’s midfield.
Son passed to Lamela with a clever backheel.
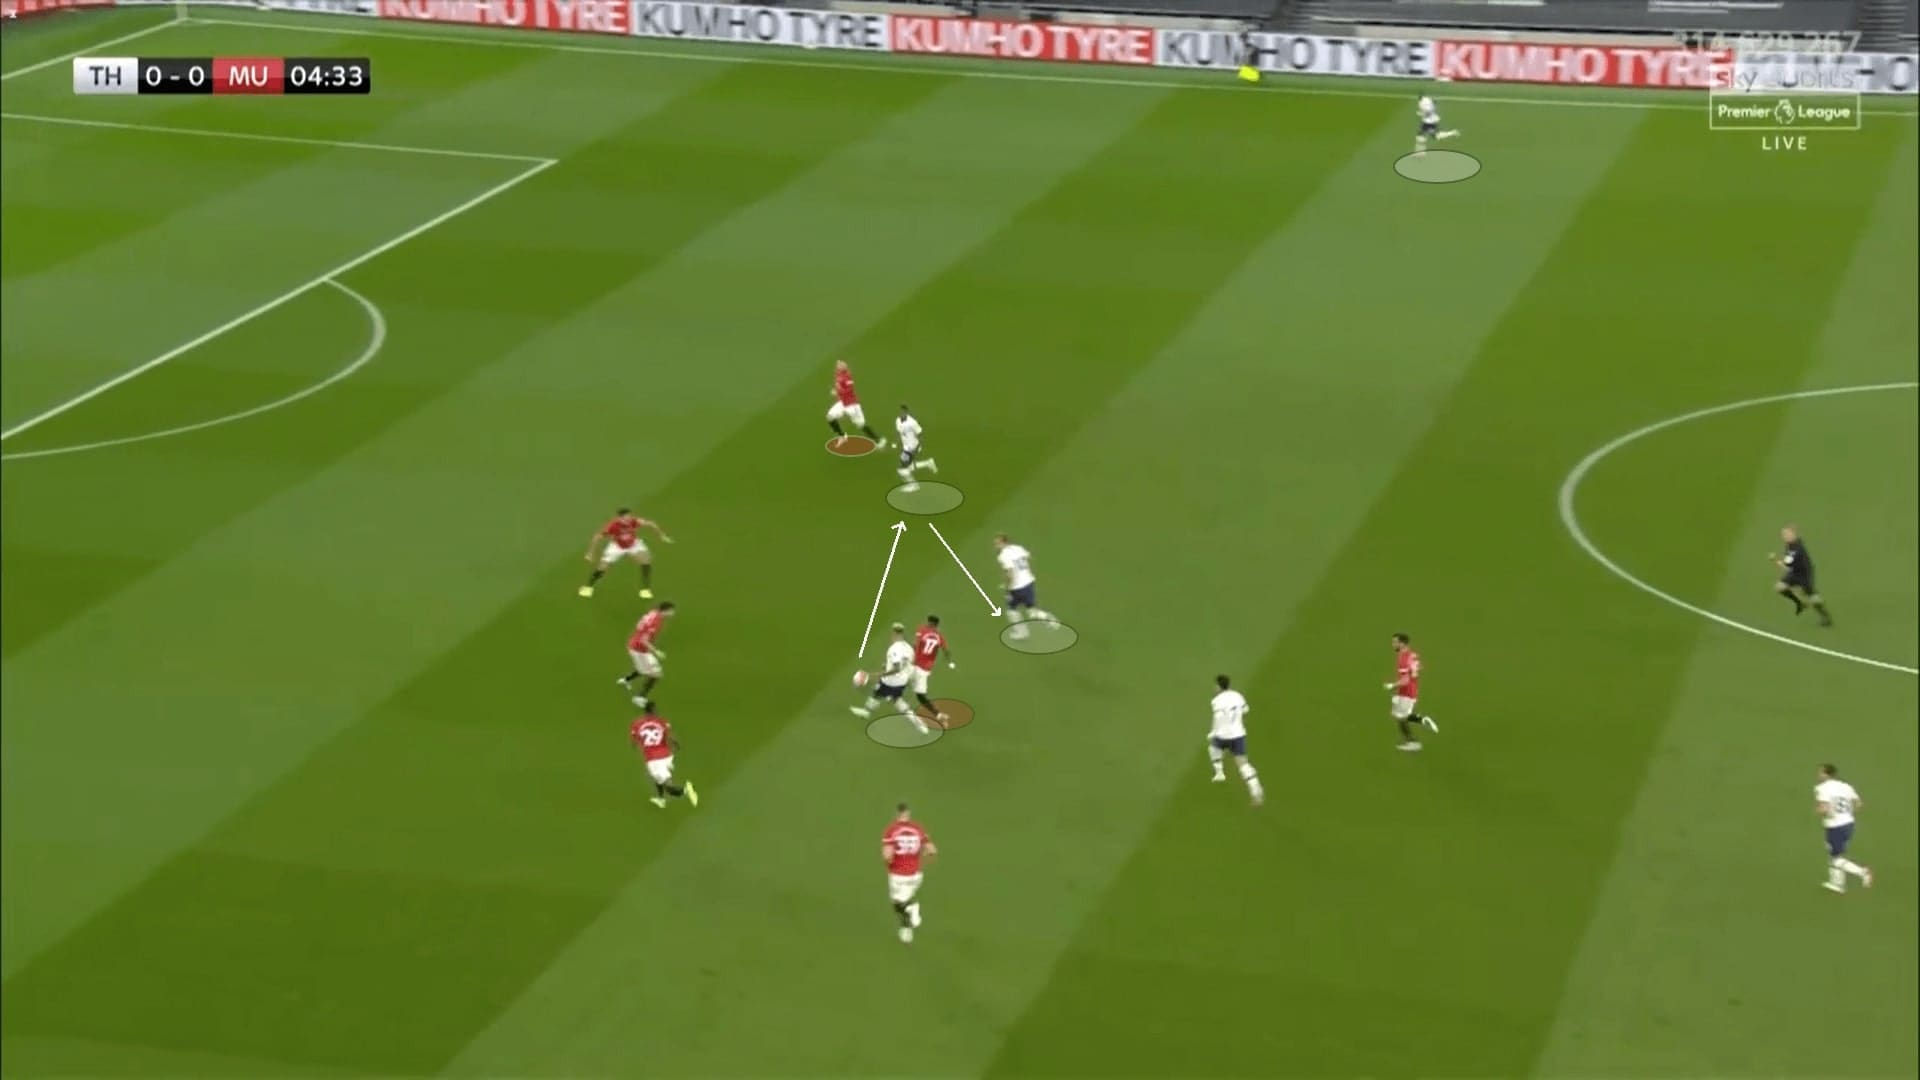
After moving the ball inward, this was how Tottenham capitalised with numerical superiority. Fred had to get to Lamela, and Maguire was reluctant to stick to Kane because of his deep positioning.
It was a shame that Tottenham were not utilising the numerical overload by finding the free man enough. However, some attacks were developed because of Aurier’s presence.
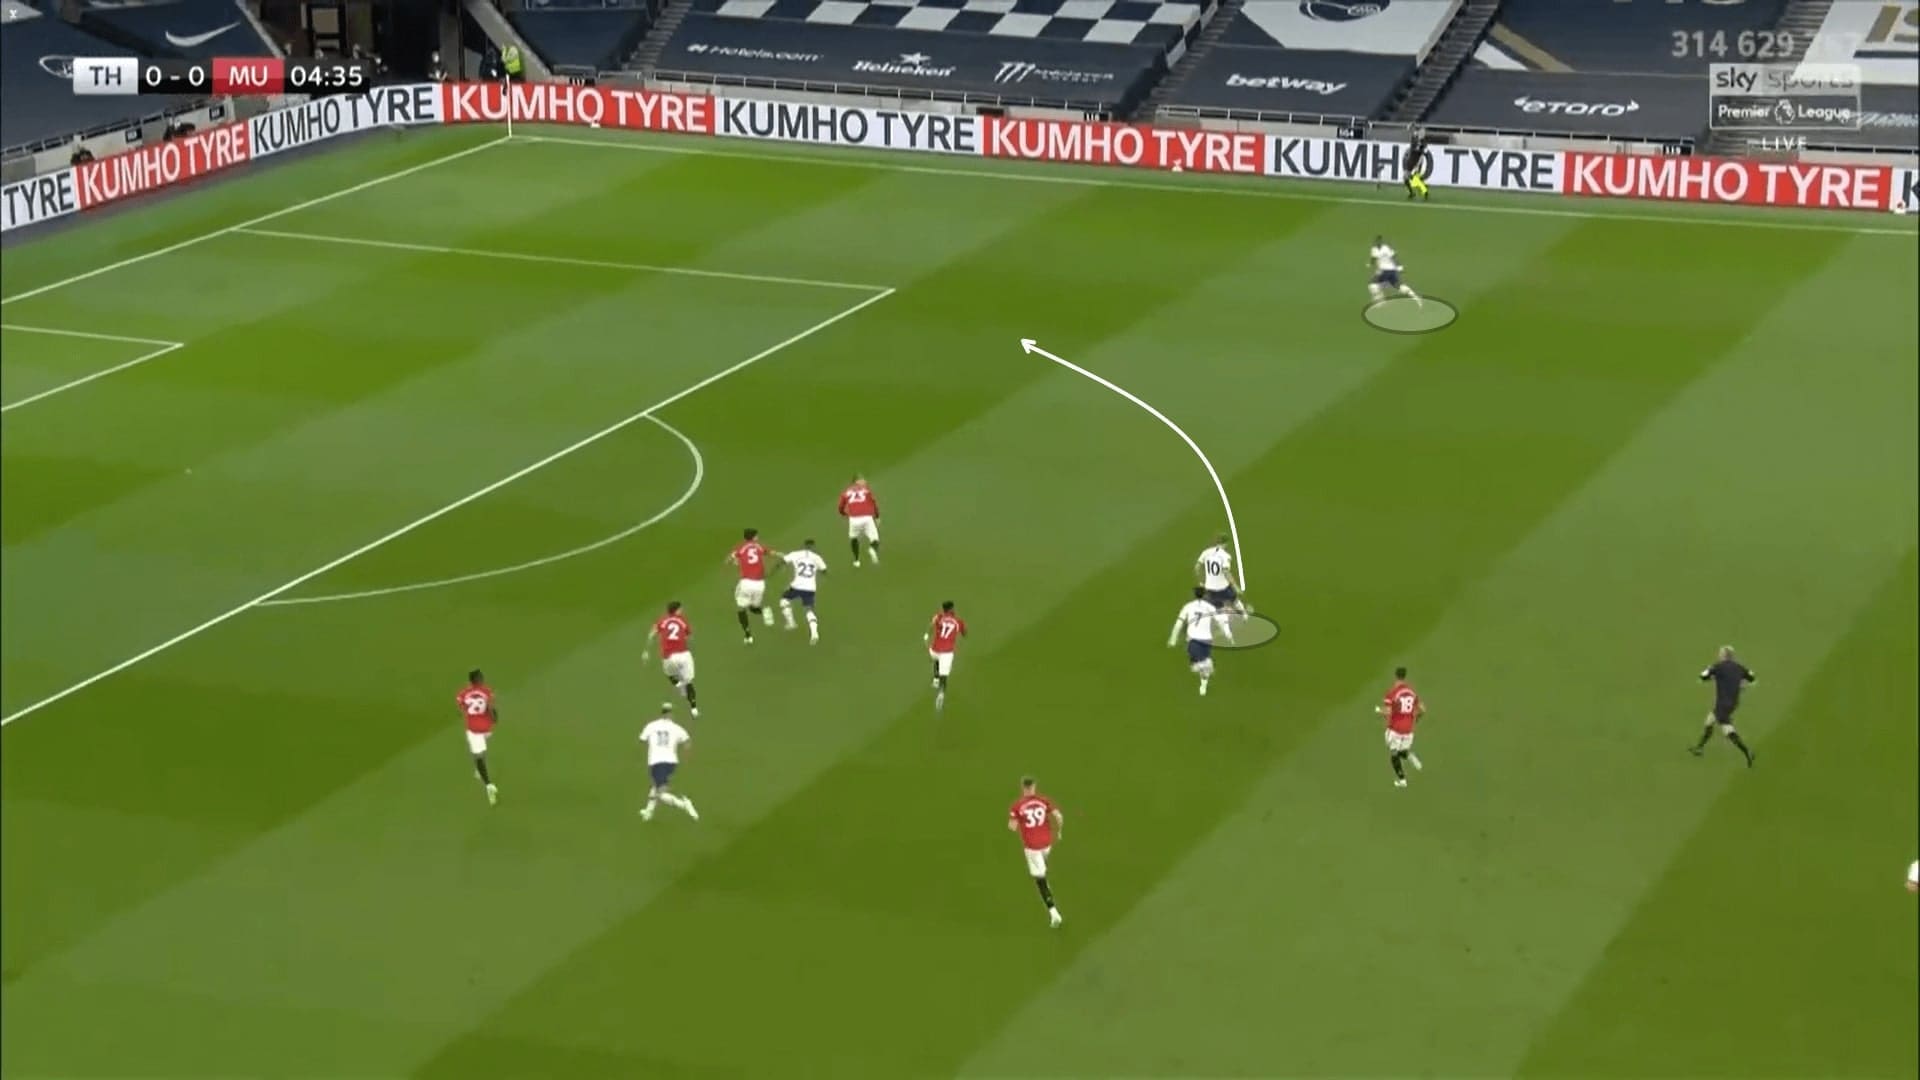
Bergwijn was good at manipulating the position of Shaw by staying narrow, as he did in this example. Kane was eventually found in this attack as a free man because of the numerical advantage.
Aurier is a secret weapon
Note Aurier’s positions at flank. The Ivorian right-back stayed extremely wide as an option in this game. He was energetic to cover the whole flank in all phases. Here, after receiving the ball from Bergwijn, Kane released to Aurier, who was dashing forward to provide the support.
We described Aurier as a secret tool of Mourinho as he was often the free man in this game. We mentioned Rashford tended to press the right centre-back, Sánchez, therefore leaving Aurier free behind him.
This was a commonly seen situation in the offensive transitions – when Rahsford pressed the central players, Aurier was free to receive the ball. Here, the United #10 was with Winks, leaving Aurier free to play the forward pass.
Tottenham had 38% from the right, which was a stark contrast to the 2% on the left. Aurier handed 12 progressive passes, two deep completions and a shot assist, the joint-highest among his teammates. This suggested the contributions of Ivorian.
Notice the failed offside trap of United. As an echo of the previous section, the arrangement collapsed as Wan-Bissaka was too focused on tracking Kane in this scenario.
Introduction of Pogba
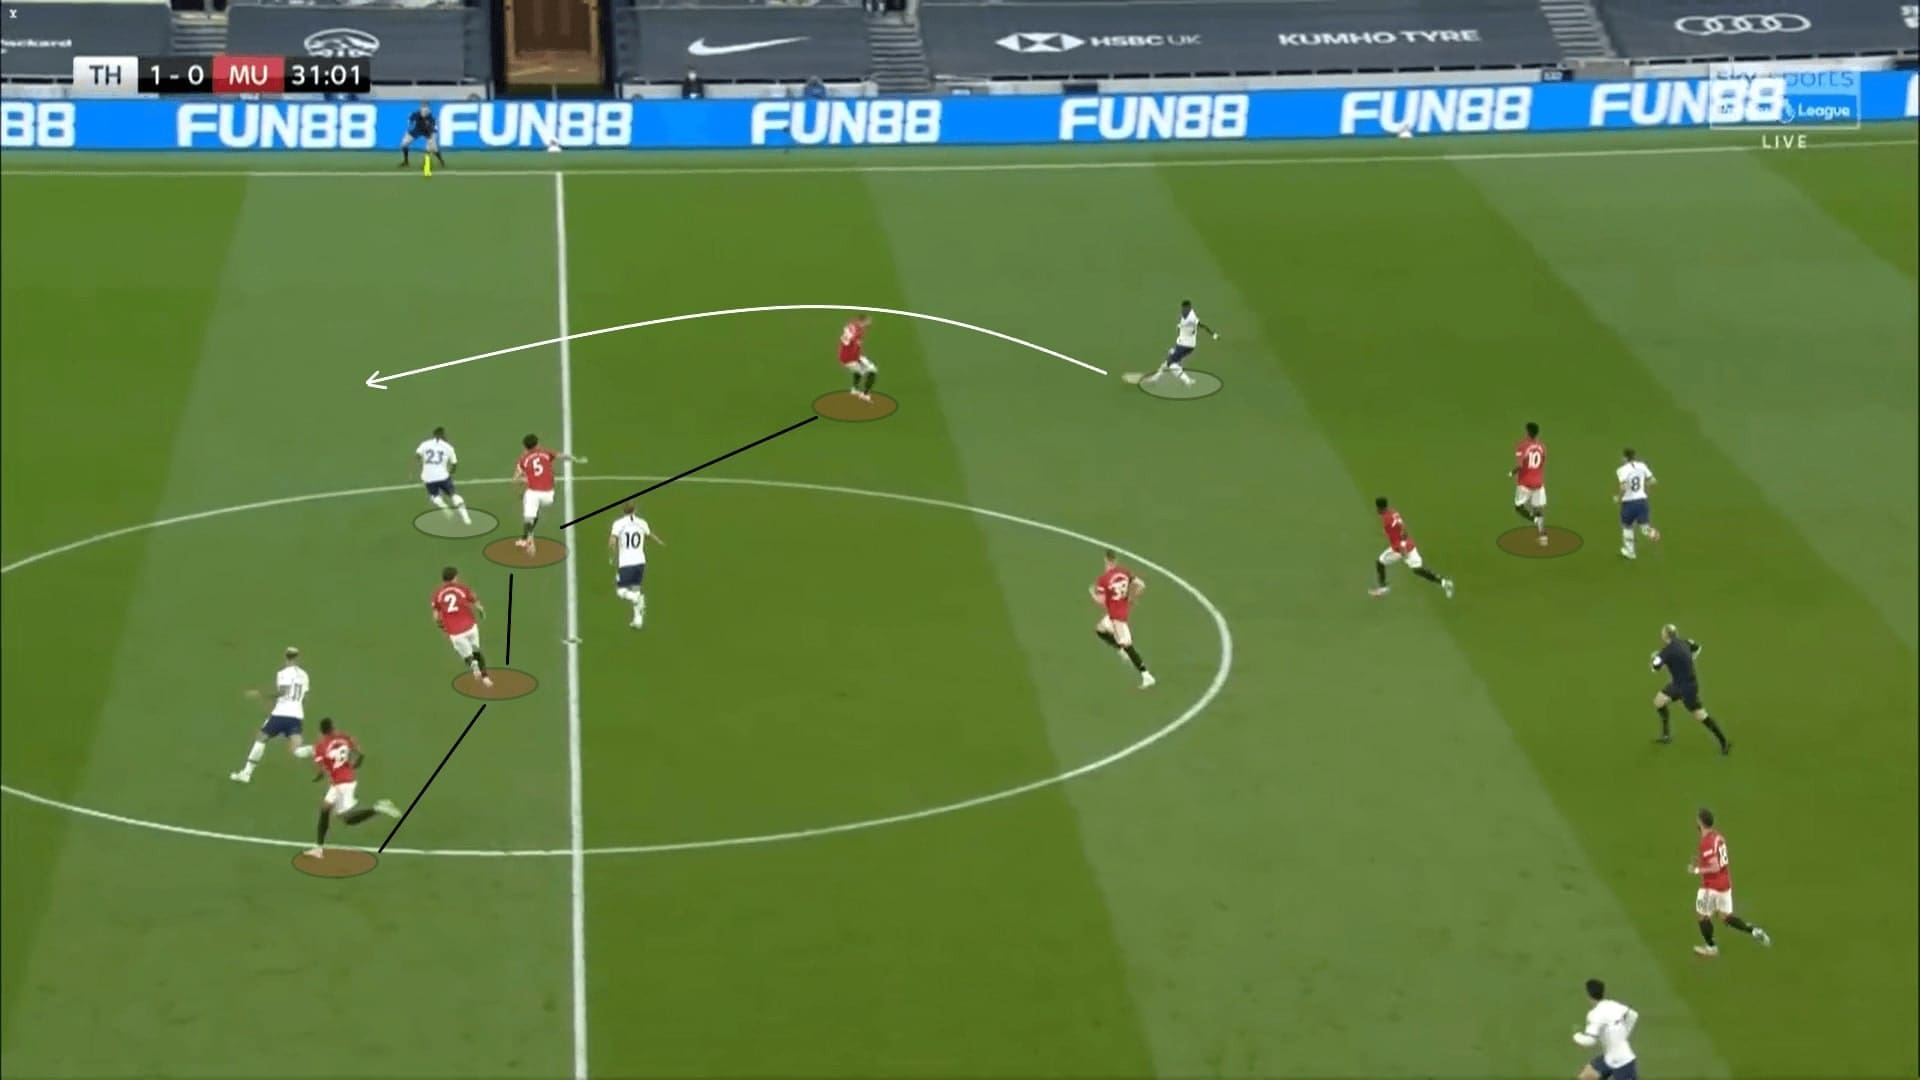
Going back to United’s positional plays, Solskjær changed the setups a bit by pushing Wan-Bissaka higher while moving McTominay to the half-spaces. This allowed the United #39 to receive the ball from the defence and avoid the pressure from Tottenham’s first line. Meanwhile, Fernandes dropped deeper to offer himself as an option to connect plays.
As we have drawn here, McTominay had two options: Wan-Bissaka or Fernandes when given the ball. Since James stayed at the half-spaces to draw Davies narrow, Wan-Bissaka was always the seemingly free option and so often received the pass.
However, an issue remained unsolved – United failed to access the centre through ground passes. We believe the reasons for this is the insufficient (or lack of) behaviours to manipulate the Tottenham second lines. With only Fernandes staying between the lines and within the block, this did not affect the Tottenham players hugely.
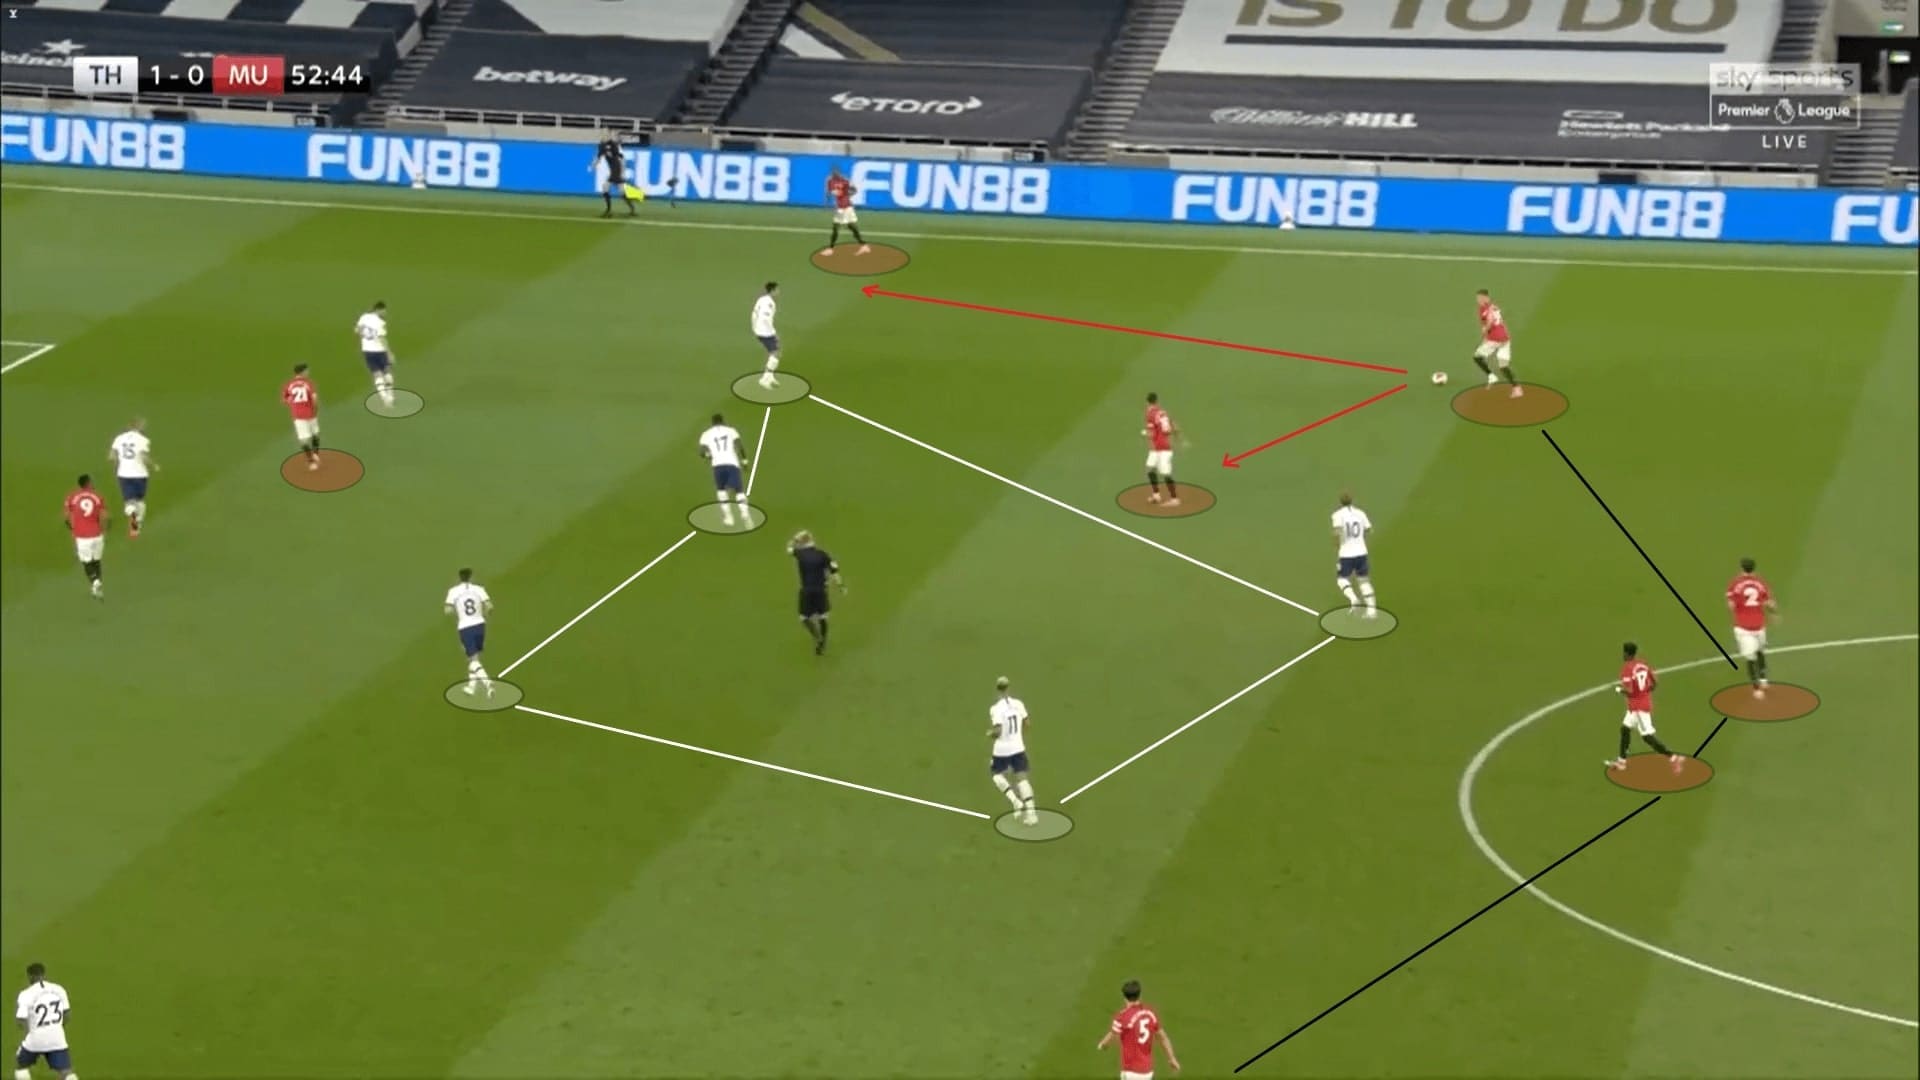
What Pogba offered was the dominance in the attack, his presence pushed the defence deeper. The Frenchman midfielder tended to stay between players with Fernandes, utilising the positional superiorities. In this example, both were staying between the first and second Tottenham line, occupying spaces around the penalty area.
On the contrary, Fred was too conservative in the above image. Since having the centre-backs at the backline already, the Brazilian midfielder should try stretching the second line by moving into the block.
The creativity and individual ability of Pogba operating in the offensive third was a huge boost to United, and because of his clever positionings, Tottenham had a tough time to defend.
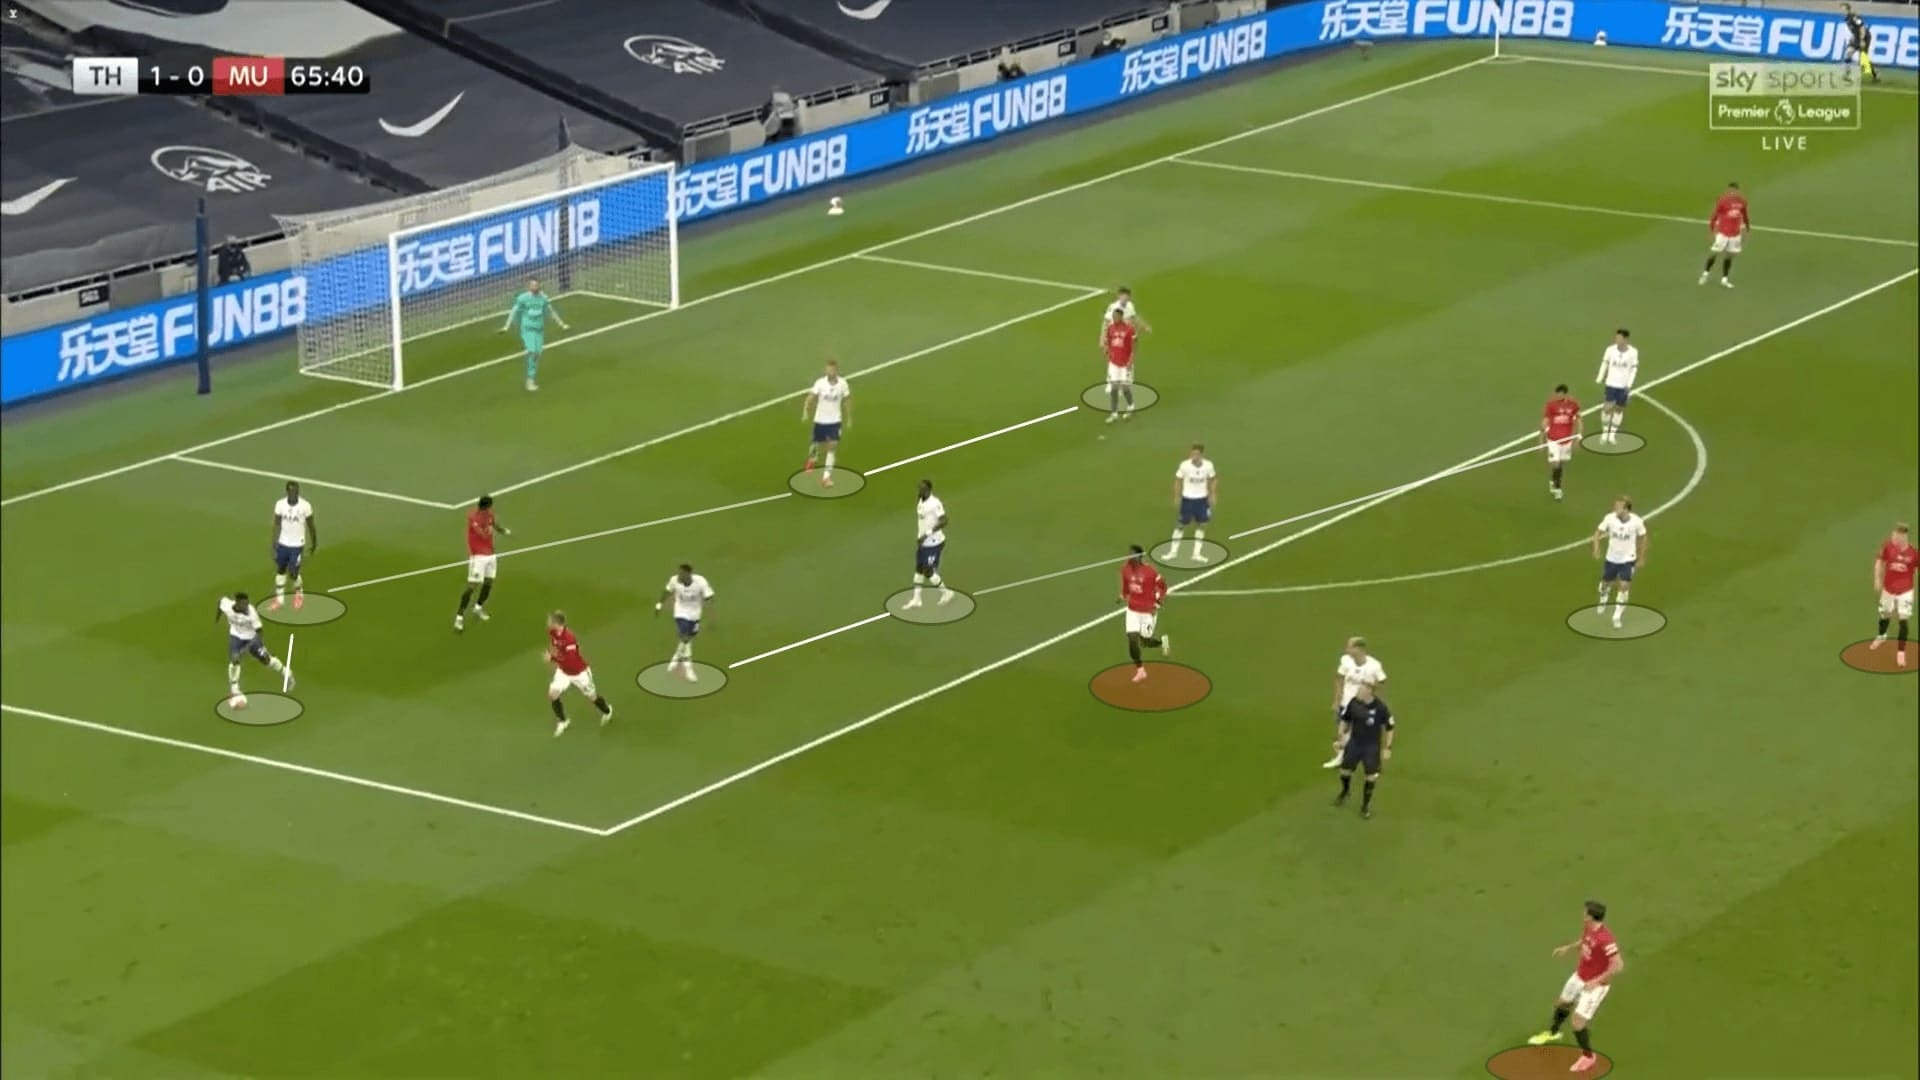
With Pogba, United not only pushed Tottenham deeper, but they also won the ball easier as they surrounded the opposition. Here, even when Aurier was looking for an option to initiate a counter-attack, no one was available as even Kane was in zone 14. United regained the ball easily and reorganised the attack in the final stages of the game because of this advantage.
Final remarks
Tottenham have shown improvement when compared to the sluggish form before the COVID-19 lockdown. Defensively, the solidity improved because of the hardworking midfielders. Offensively, there was still room for improvement on finding the free player, or on how to further utilise Kane’s goal-scoring ability.
United were showing something different from usual, including keeping possession and trying to enter the final third by the positional plays. However, there were too many suboptimal domains in the attack – no behaviours to manipulate the second line, not playing through the centre, pivots failing to maximize the positional superiorities and failed to exploit the dynamics at flanks. There was a lot to improve if they want to continue playing in this way. The combination of Fernandes and Pogba was an interesting one, and we will see whether Solskjær starts the duo together in the future.


Comments