Before the international fixtures, West Ham were still looking for their first home win in the Premier League. They suffered a 0-5 defeat against Manchester City in their first game. In the previous three games, West Ham won two and drew the other one so their results reflected they were increasing their standard recently.
For Norwich, they faced giants like Liverpool and Chelsea in their first few fixtures. They lost both games but their style of play and performances were applauded by the fans. Finnish striker Teemu Pukki scored five already in just three Premier League matches. Norwich were eye-catching this year. This tactical analysis is going to reveal the tactical battle between both teams, in which West Ham got their first home win.
Lineups
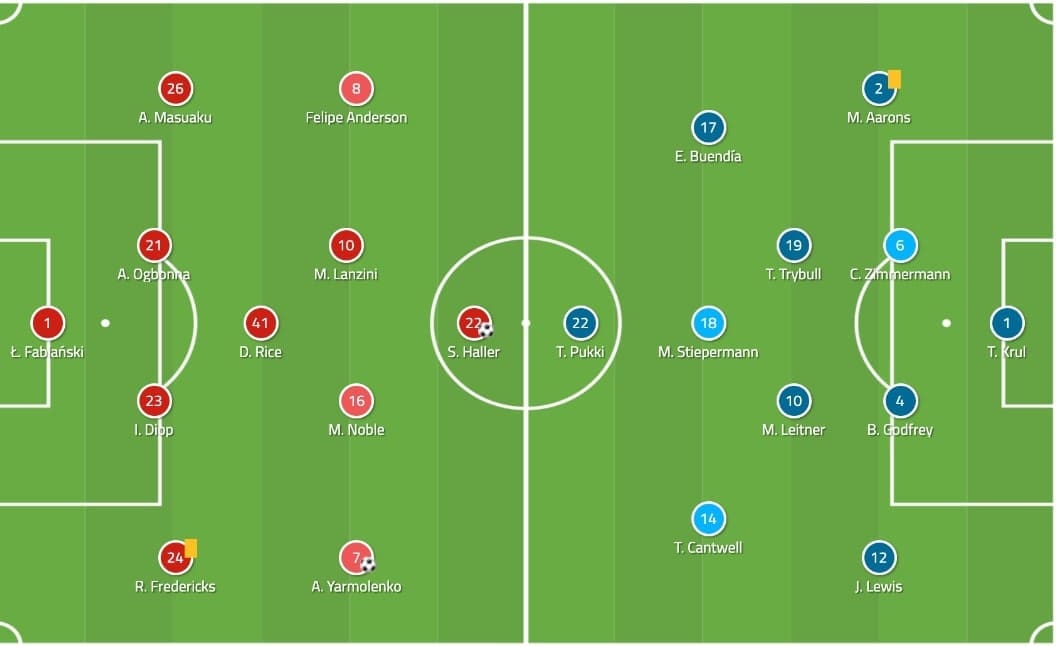
West Ham started a very strong eleven despite new signing Pablo Fornals sitting on the bench. Fabián Balbuena was injured so Angelo Ogbonna took his position. Andriy Yarmolenko started again after suffering from an Achilles tendon rupture last season. Another new arrival Sébastien Haller started as a striker. Manuel Lanzini, who signed a new contract with West Ham days ago partnered alongside Mark Noble in the midfield. It was a 4-1-4-1 formation.
Daniel Farke’s Norwich played in a 4-2-3-1 formation again. Grant Hanley was injured so Christoph Zimmermann replaced the Scottish captain. These group of players played the previous games. Apart from Pukki, Todd Cantwell and Emiliano Buendía were are also attacking players who shined in the previous games. This tactical analysis will show you how Farke instructed his team to attack with the front players plus full-backs.
Norwich countered West Ham’s ineffective press
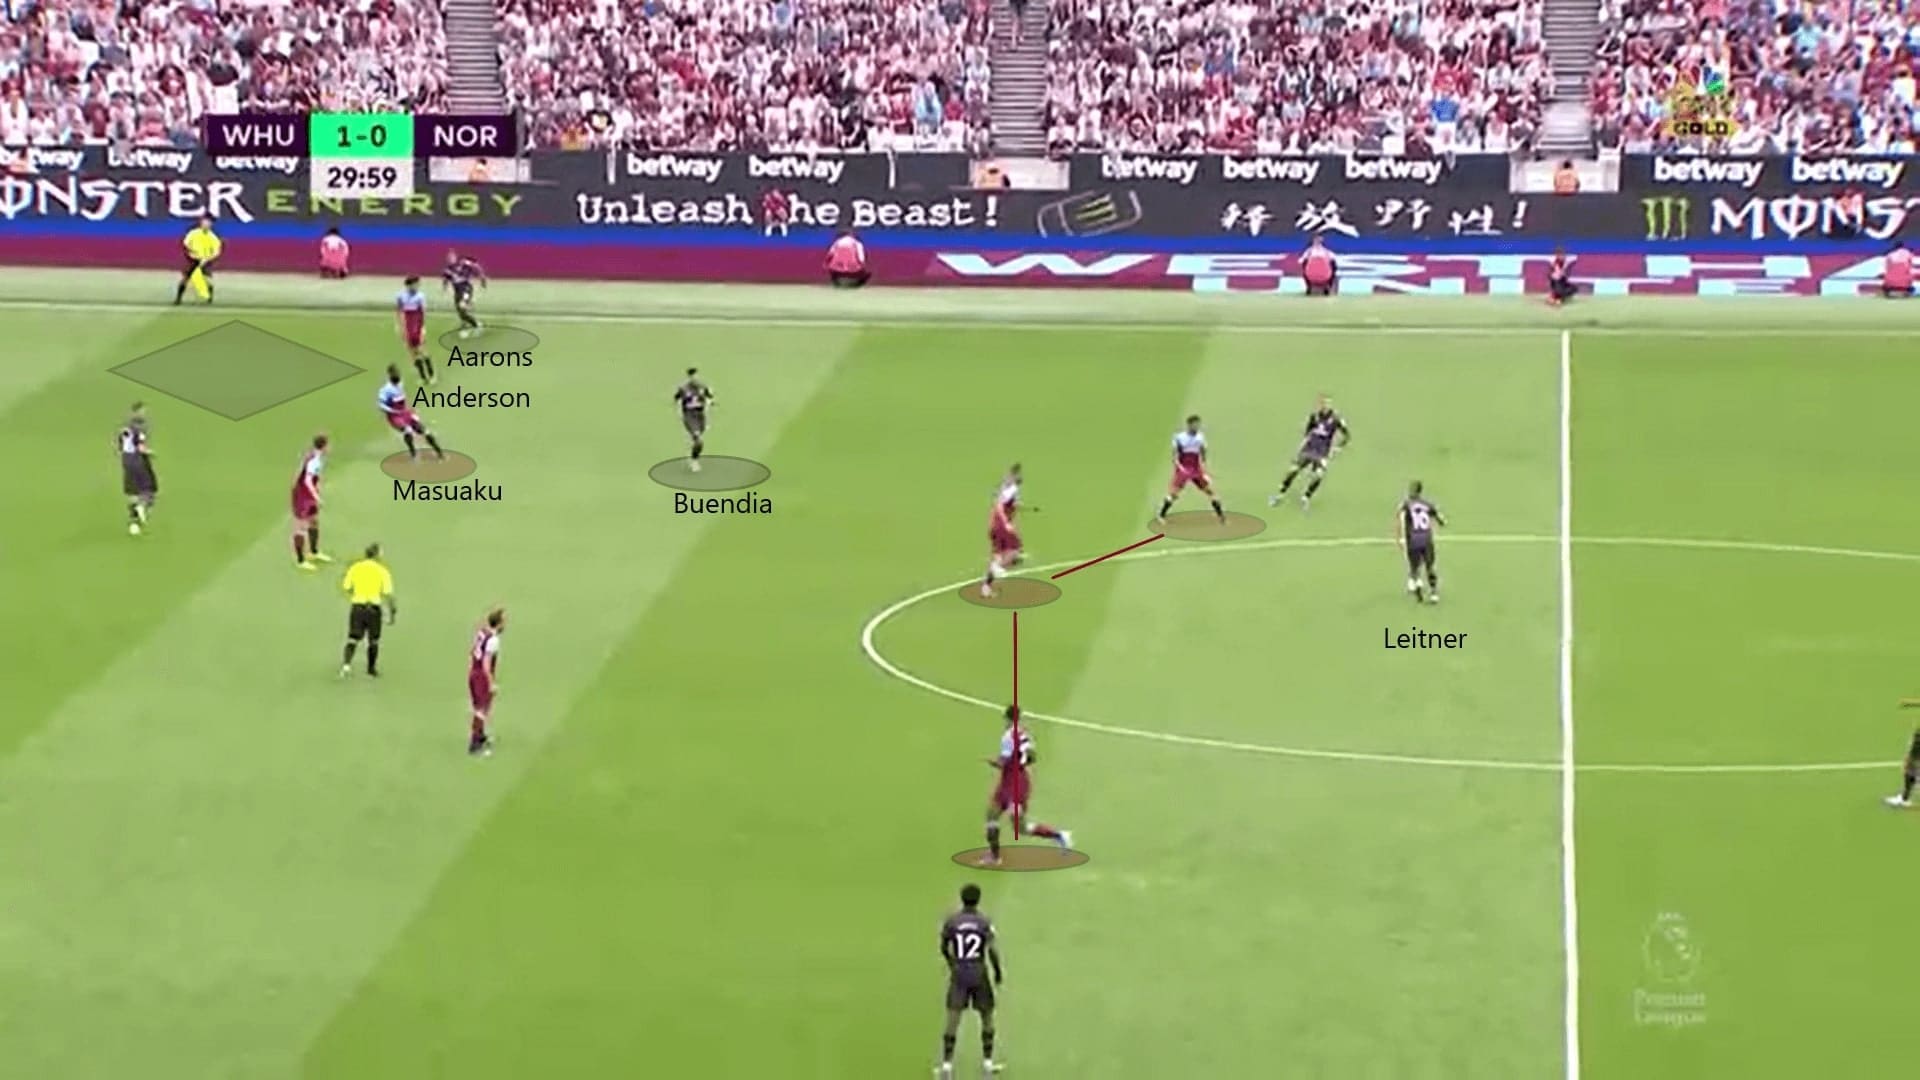
Norwich also utilised West Ham’s ineffective press to build-up. When pressing, the Hammers were unaware of the spaces between the lines. They were not compact vertically and this gave Norwich huge spaces to exploit. West Ham’s defence also hugely relied on the anticipation of defenders to press the ball receiver. Therefore, they always stayed alert to step out early. When these two indicators happened at the same time, Norwich could easily bypass West Ham’s defensive line.
In the below scene, the West Ham block was composed of three midfielders, then another four. No one was really pressing Leitner. Buendía read those space and positioned himself between the lines. The positioning of the Argentina midfielder triggered Arthur Masuaku to step out. Meanwhile, Aarons was running forward along the touchline. Felipe Anderson was unaware of that and he just let Aarons run into space behind Masuaku. Leitner’s diagonal ball found Aarons and Norwich entered the final-third easily.
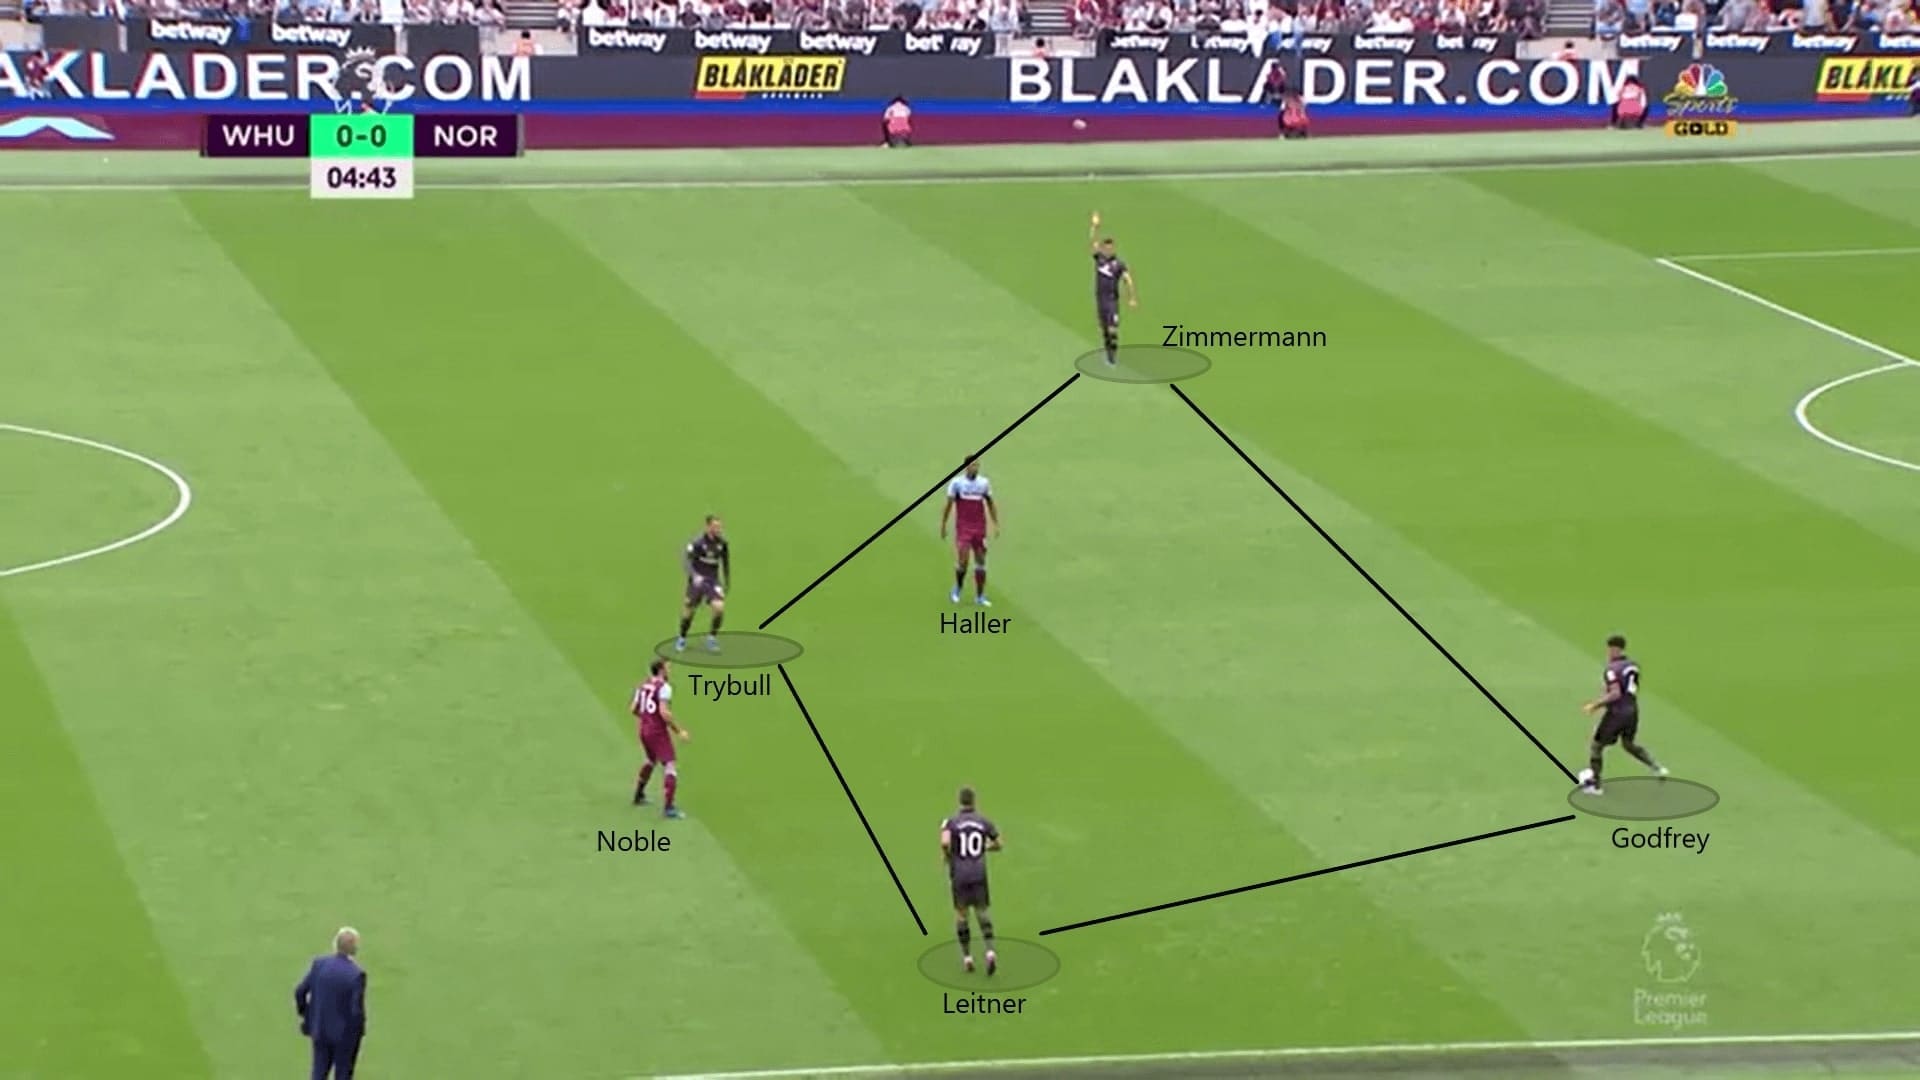
In the early stages, West Ham usually pressed with Haller and a midfielder, while the others fell back to form the defensive line. In order to eliminate the first wave of the press by West Ham players, Norwich committed four players in the build-up process to ensure numerical superiority. Both Norwich full-backs stayed up high and wide. The double-pivot of Norwich: Moritz Leitner and Tom Trybull dropped deeper to provide options and cover the full-backs. With this tactic, Norwich were always in a 4 v 2 situation in the first phase.
The below image showed the setup of Norwich. Noble joined Haller to pressure the Norwich players. Leitner covered Jamal Lewis’ position. Trybull stayed at the centre to link his teammates. Both centre backs: Zimmermann and Ben Godfrey split wide. In this phase, they can play like a rondo game to eliminate the press of Haller and Noble.
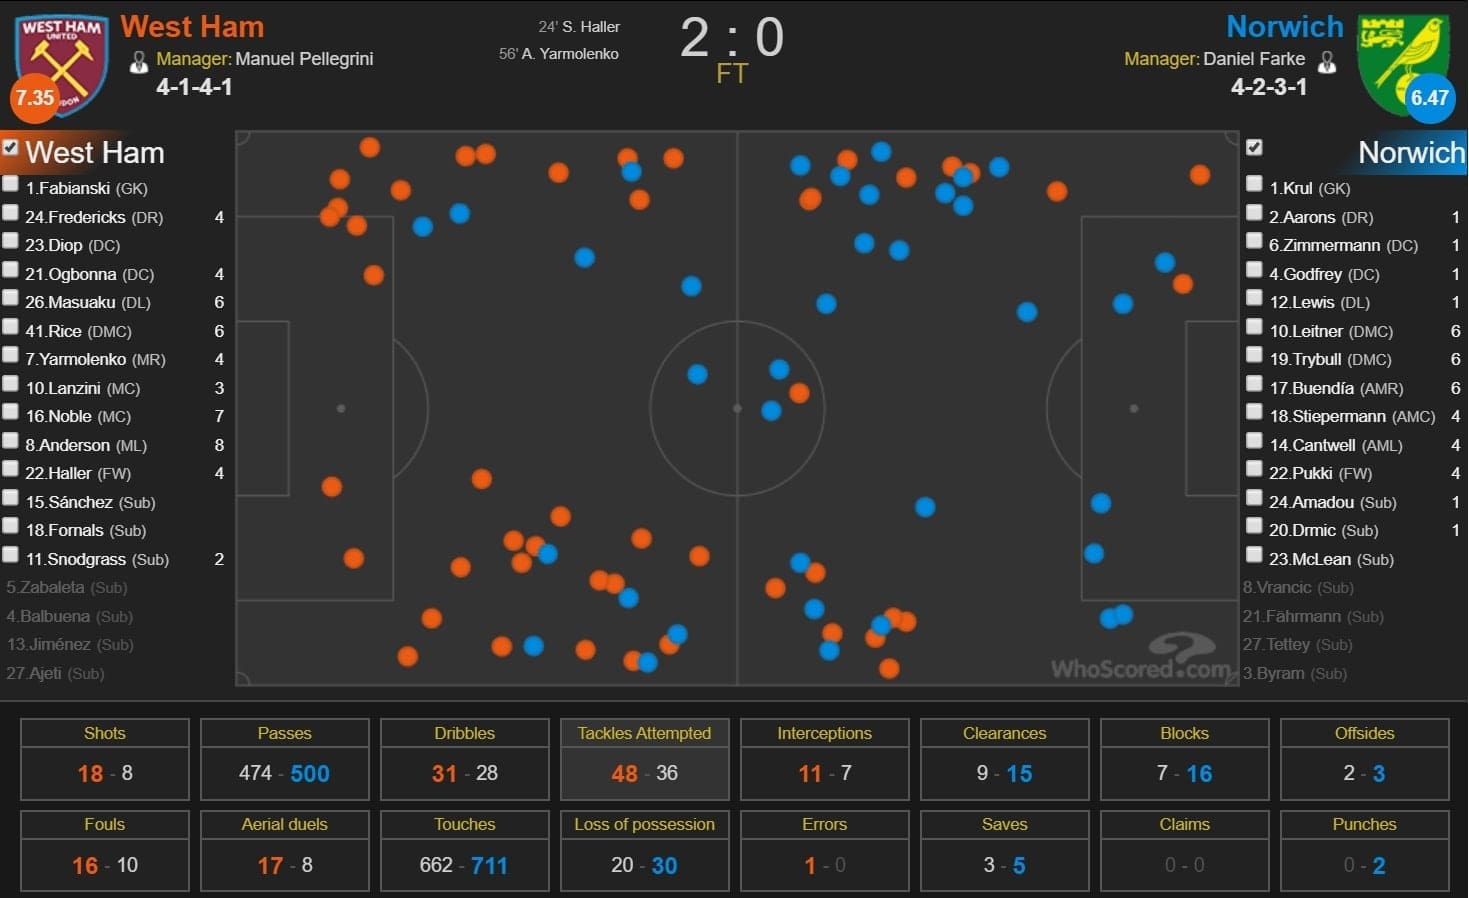
The following graph shows how successful the tactics were. West Ham did not attempt any tackle in the centre part of the pitch, while the only attempt from Haller was in vain in the first half. Therefore, Norwich enjoyed more possession in the early stages of the game. West Ham committed one more player to press after 30 minutes, and this made it difficult for Norwich to maintain possession as above.
Norwich’s game plan
Norwich’s four-man build-up was only their first phase of the attack. Their game plan was similar to the previous games. By staying at the centre or a flank closely, Buendía, Marco Stiepermann, Cantwell and Pukki overloaded an area of the pitch. This approach could release at least one full-back at a flank. If the attacking midfielders and striker were staying at the centre, it kept the West Ham defence compact and opened the wide corridor for either Lewis or Max Aarons. If they overload a flank, then the opposite flank must be the vacuum area on the field. They then would switch plays to hit the weak side of the defence.
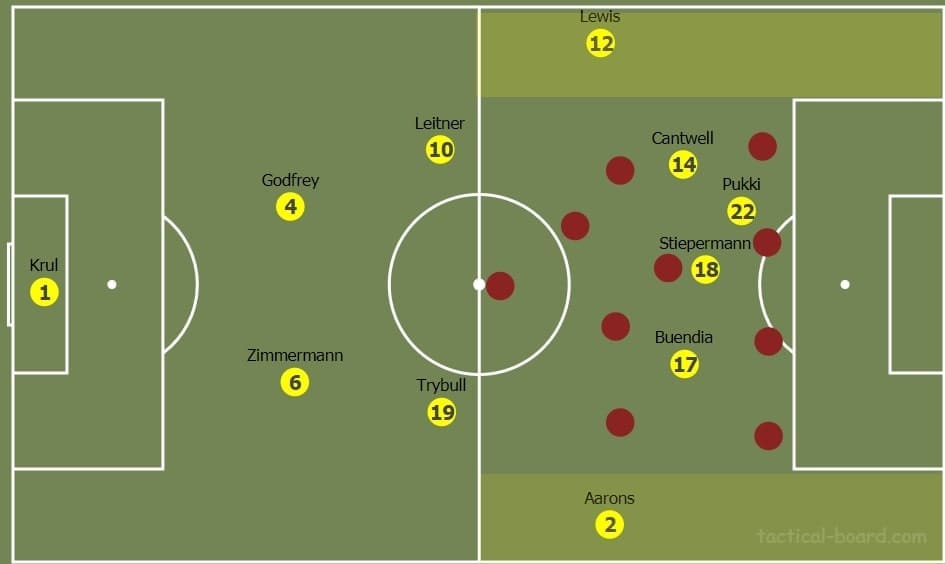
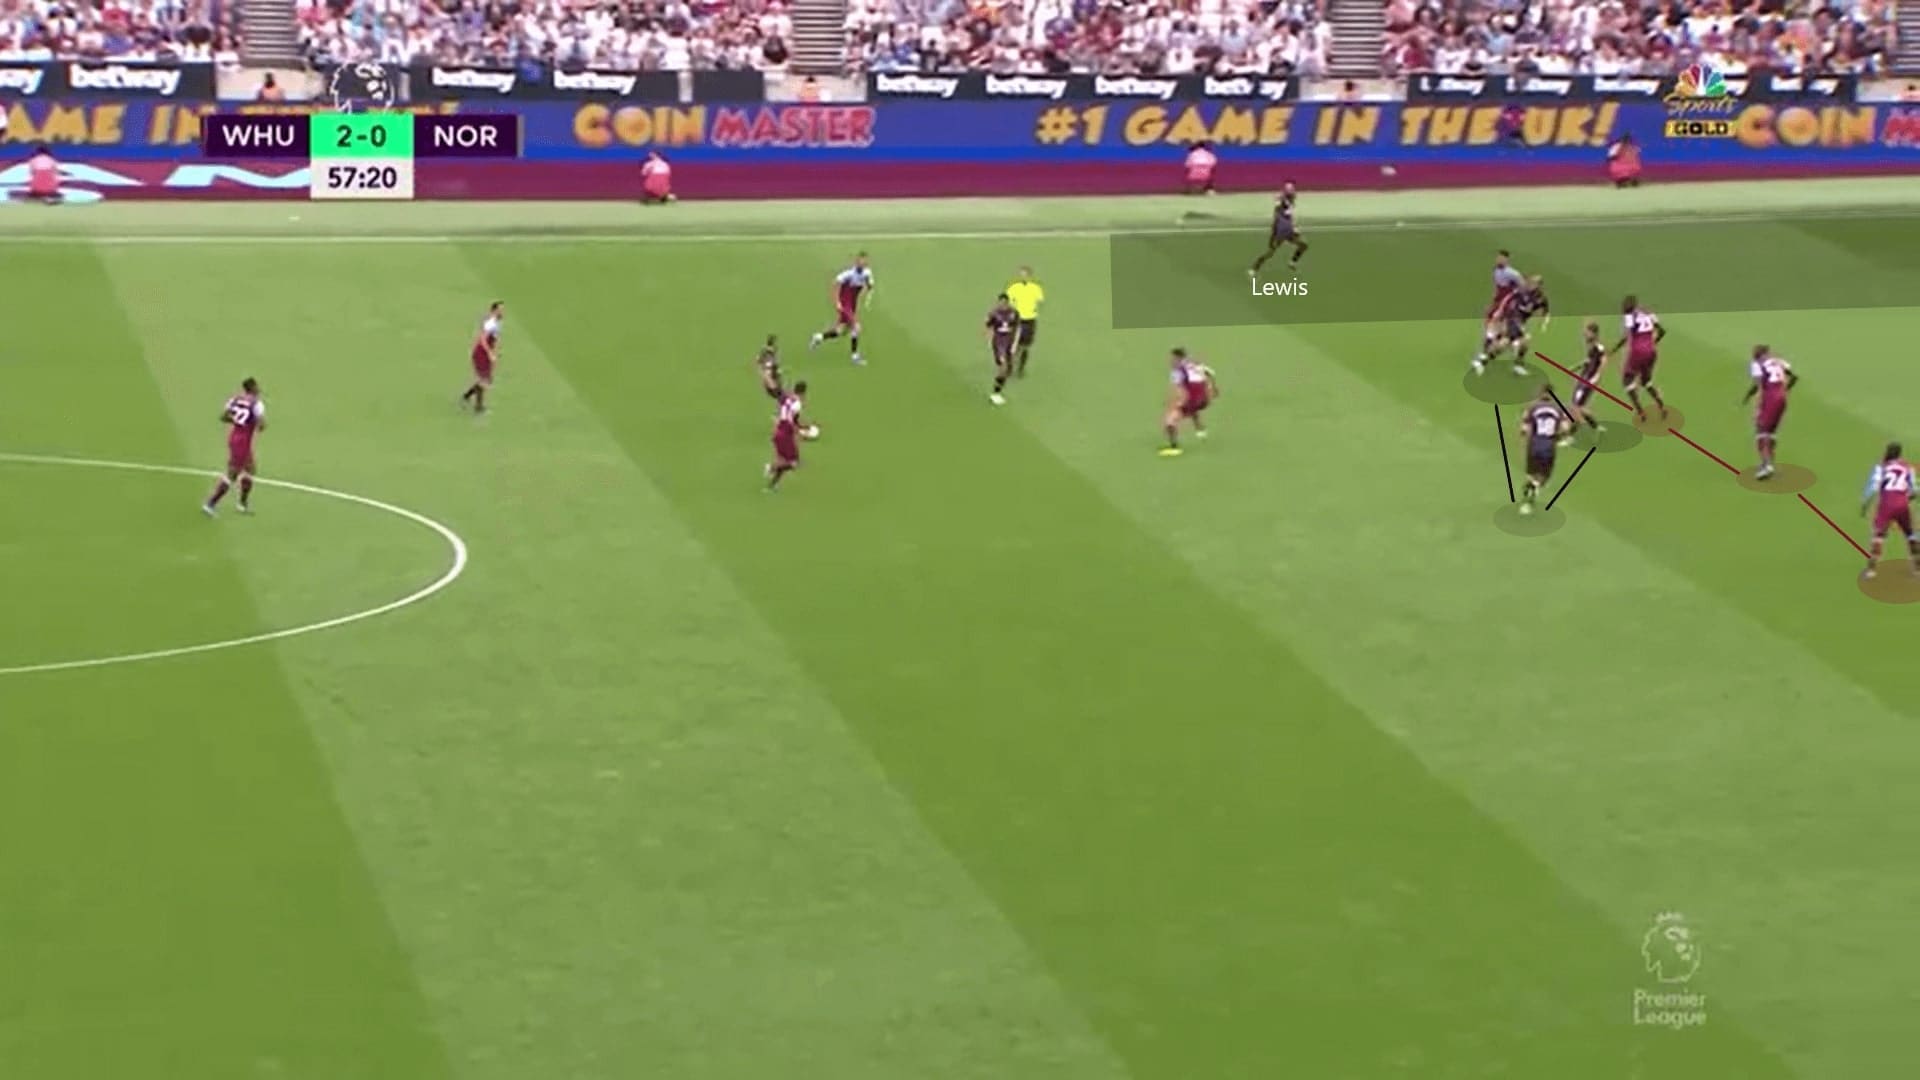
Below was a game situation which demonstrated Norwich’s plan- Pukki, Stiepermann and Cantwell were staying narrow and close to each other at the centre, occupying the West Ham defenders. They occupied Issa Diop and Ryan Fredericks, which opened the left flank for the Northern Ireland left-back, Lewis. Then they were looking for crosses to find players in the box. In this game, the quality of cross by Norwich players was not good enough, also the centre-halves of West Ham headed the ball away in most cases. However, one of their biggest goal threats came from Max Aarons’ cross at the right.
Norwich could not create huge chances
However, when we are looking at the statistics, the xG of Norwich was only 0.88. This figure represents how they struggle to create big chances in front of goal. The reasons behind were twofold. First, this could be attributed to the habit of the players. When attacking, the Norwich players tended to overload an area and move closely to each other. In this match, they were lacking forward runs or a third man run. When a Norwich player dragged away from a West Ham defender, they did not have a player to exploit that space immediately.
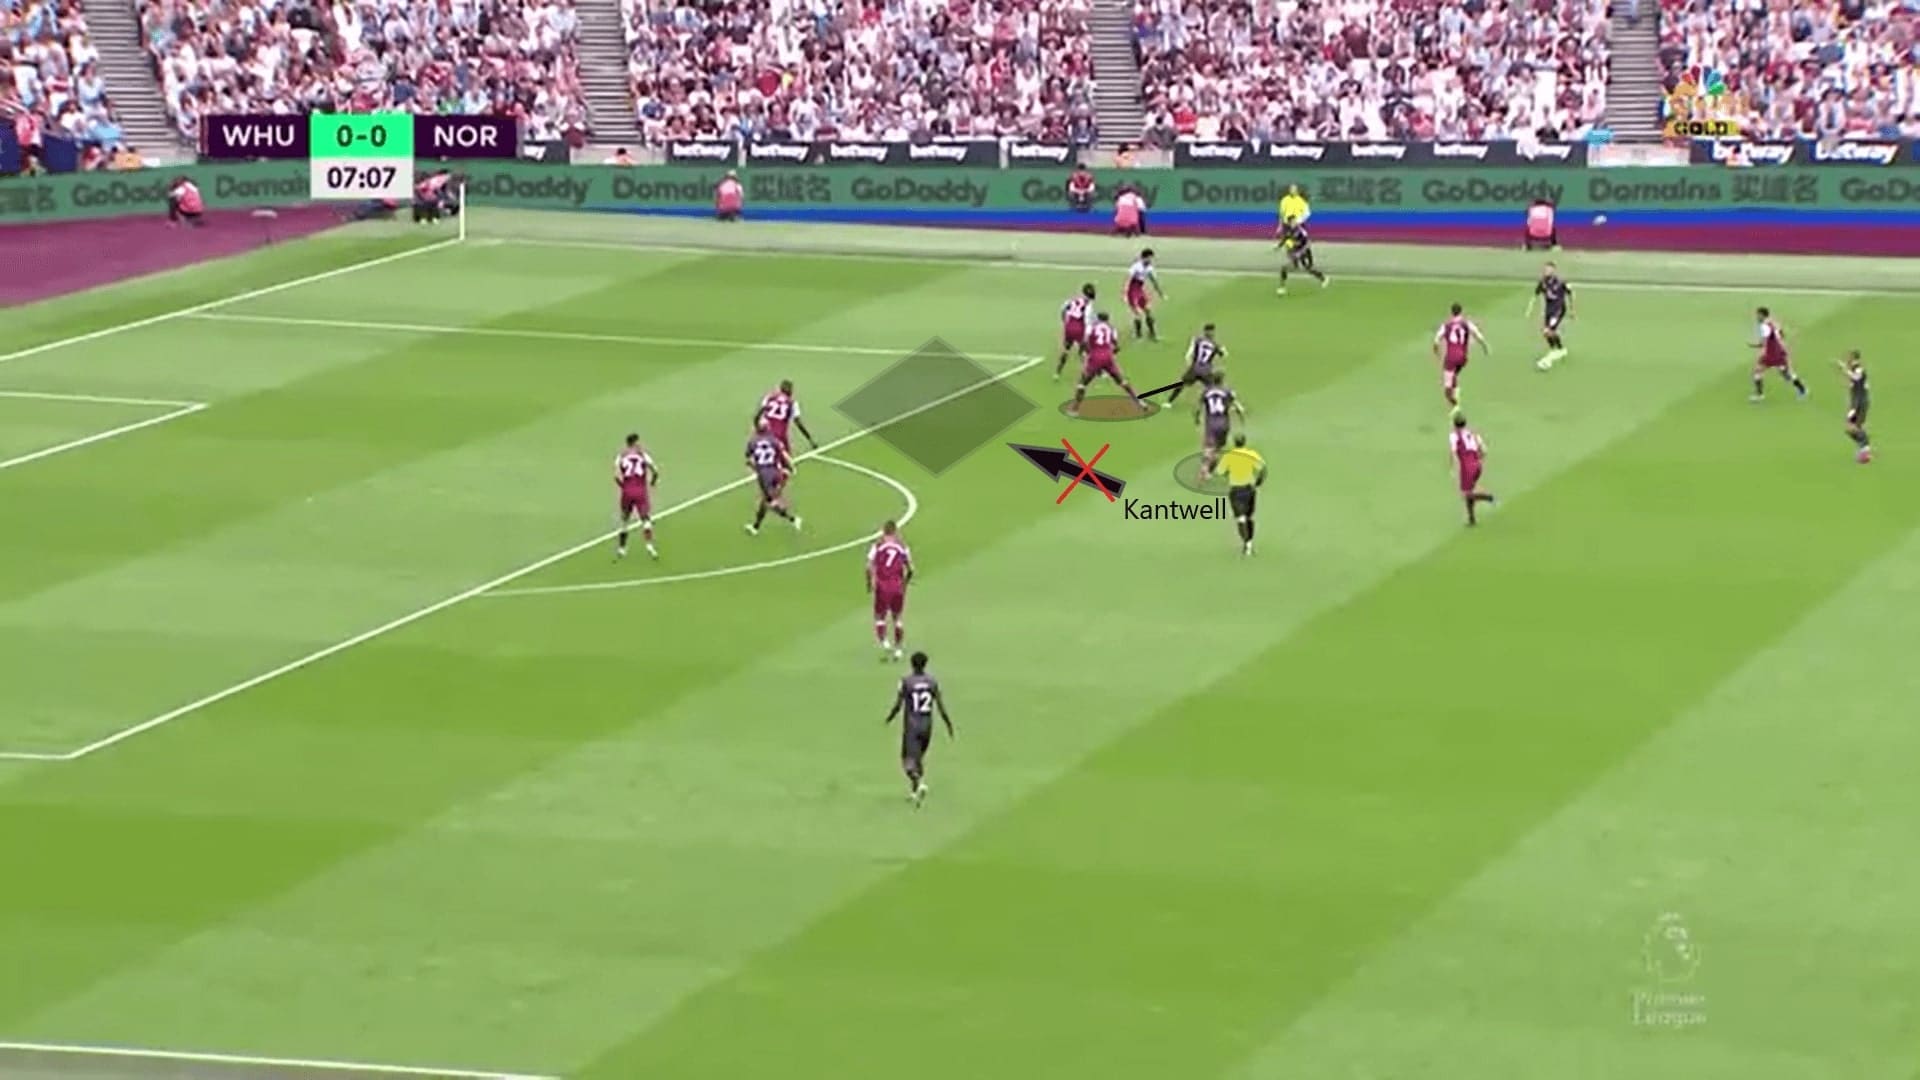
The below scene was an example. Even though Buendía successfully took away Ogbonna, Cantwell did not make the forward run to that space in that instant. Instead, Cantwell dropped deeper to provide a short passing option for his teammate. As a result, the ball was still staying outside of the box- no threat for West Ham at all. If Cantwell ran into space behind Ogbonna and receive a chip pass, this can be dangerous.
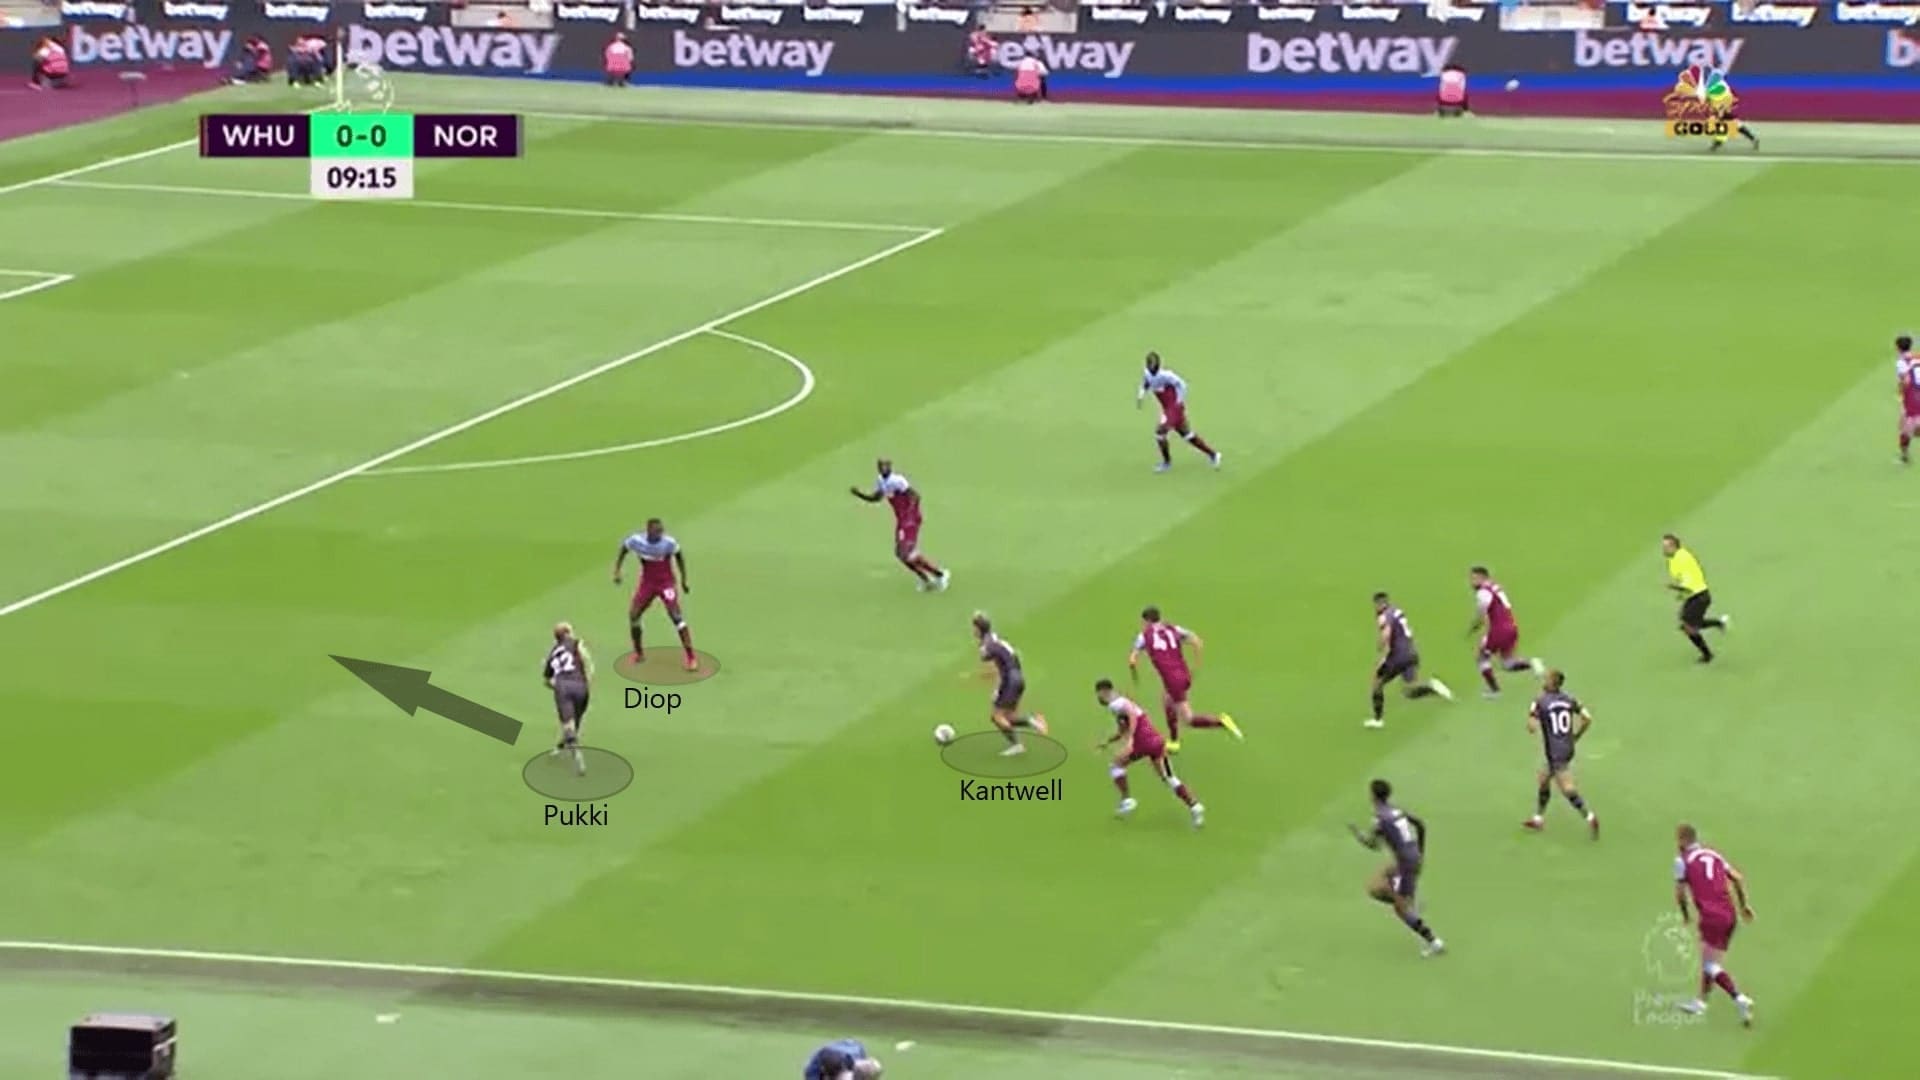
The other reason that Norwich did not create many chances was the strong performance by Diop. As mentioned earlier, the defence of West Ham relied on the defenders to anticipate and step out early. Diop was calm to deal with the different situations in this game. Taking the below situation as an example, Diop did well to prevent Pukki from entering the box.
The second image below shows Cantwell on the ball as he faced Diop, with Pukki running beside of Diop. At this moment, Diop could not press Cantwell since this will let Pukki free behind him. However, he should not move too close to the Finnish forward as this will increase the gap between him and Ogbonna so that Cantwell could pass through this gap to find Pukki. Diop’s decision was perfect. He did not panic, he waited for Cantwell to release Pukki, accelerated and prevented the Finnish forward from getting the ball.
West Ham’s attacking plan
Pellegrini’s team is always an attacking team, West Ham is no exception. However, there’s room for improvement for the Hammer’s build-up: they did not move the ball on the ground; when they faced the press, they will go long to find Haller; and Haller was without support in most cases. This resulted in a loss of possession.
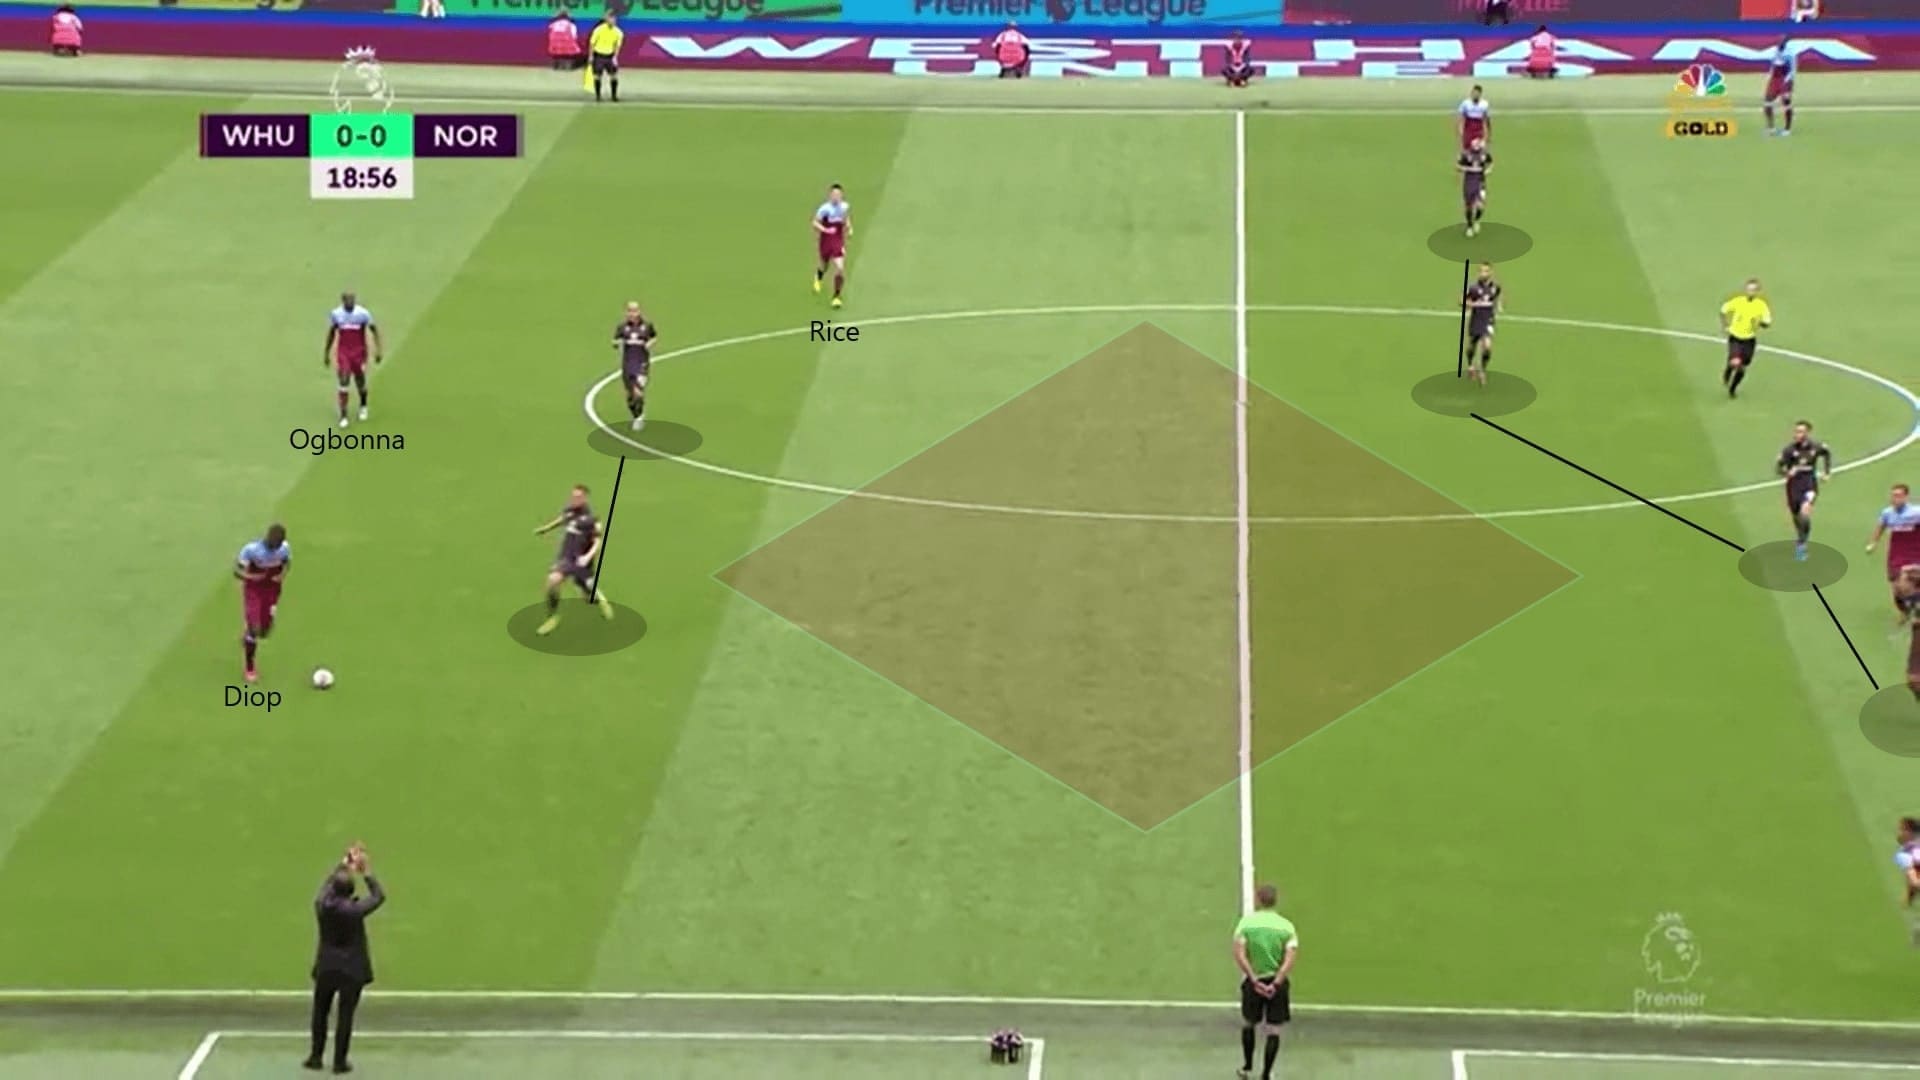
In the below scene, only Ogbonna and Diop stayed at the back. Declan tried to cover Masuaku’s position and no one else was here. Norwich pressed with two players but the midfielders did not push up. The huge space generated between the lines did not have any players- no West Ham players exploited those spaces. This is why it was an easy job for the Norwich frontmen, they just have to force Diop to play long.
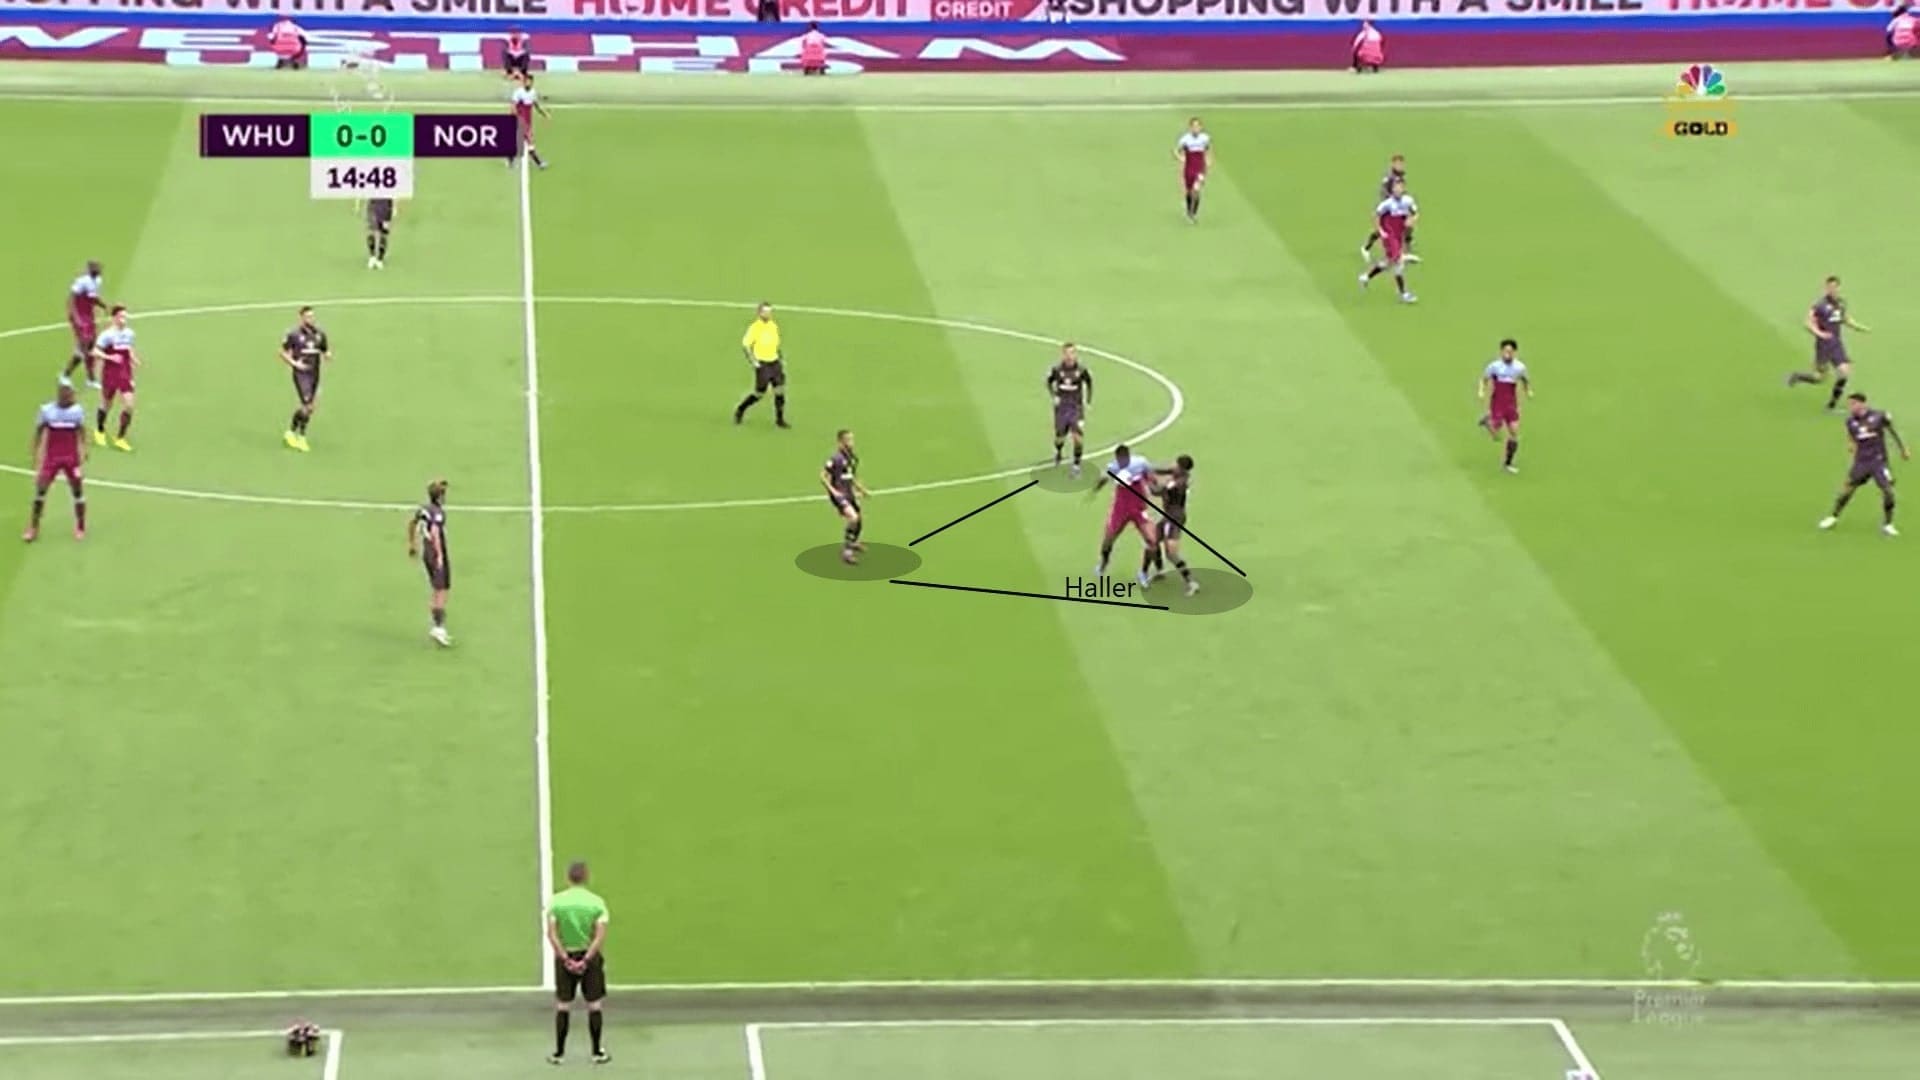
Haller is a hardworking striker and he is also physically strong to win aerial duels. Statistics showed that he won 8 aerial duels out of 13 in this game. However, he did not have enough support from his teammates. You can see in the below image, Haller did win the ball in the air but he was surrounded by three Norwich players- he could not turn. No one was going to receive a lay off from the French. Not even a forward run behind him to provide an option, he was trapped by three Norwich players, and as a result, West Ham loses the ball.
Anderson and Hammers’ transitions
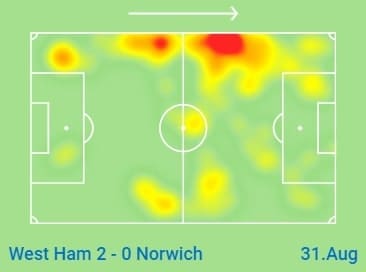
The real threat from West Ham was their transition, statistics show West Ham only got 48.6% of possession. They did well in this game and a player was key: Anderson. The Brazilian started many transitions and he was dangerous on the ball, a total of three key passes reflects this. Other than attack, Andersson also fulfilled his defensive duty: marking Aarons nicely. From the heatmap below, we could see the effort of the winger, he nearly occupied the whole left flank.
With the technique, vision and passing quality of Anderson, West Ham were dangerous during transitions. According to the stats, the Brazilian attempted 8 dribbles and 87.5% of those were successful. Norwich players were focused on the No.8 and this gives room for other West Ham players to perform.
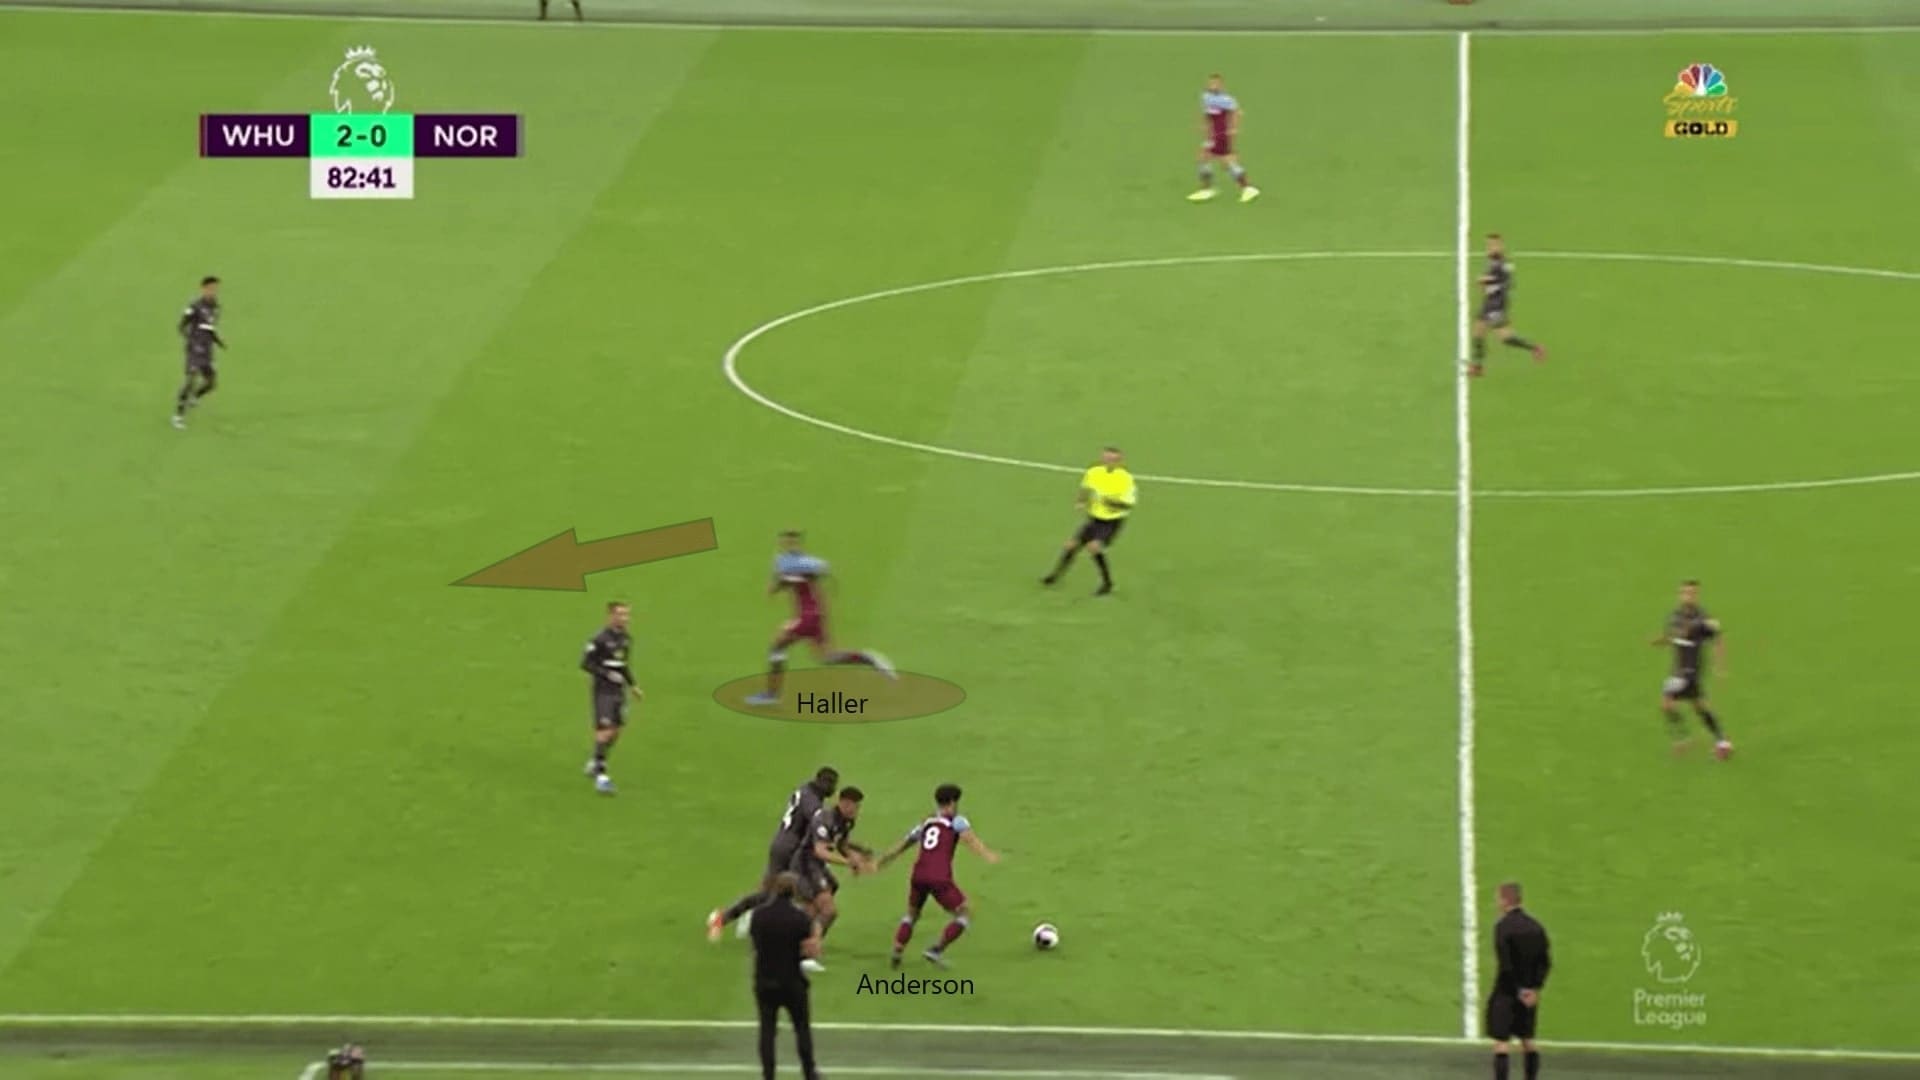
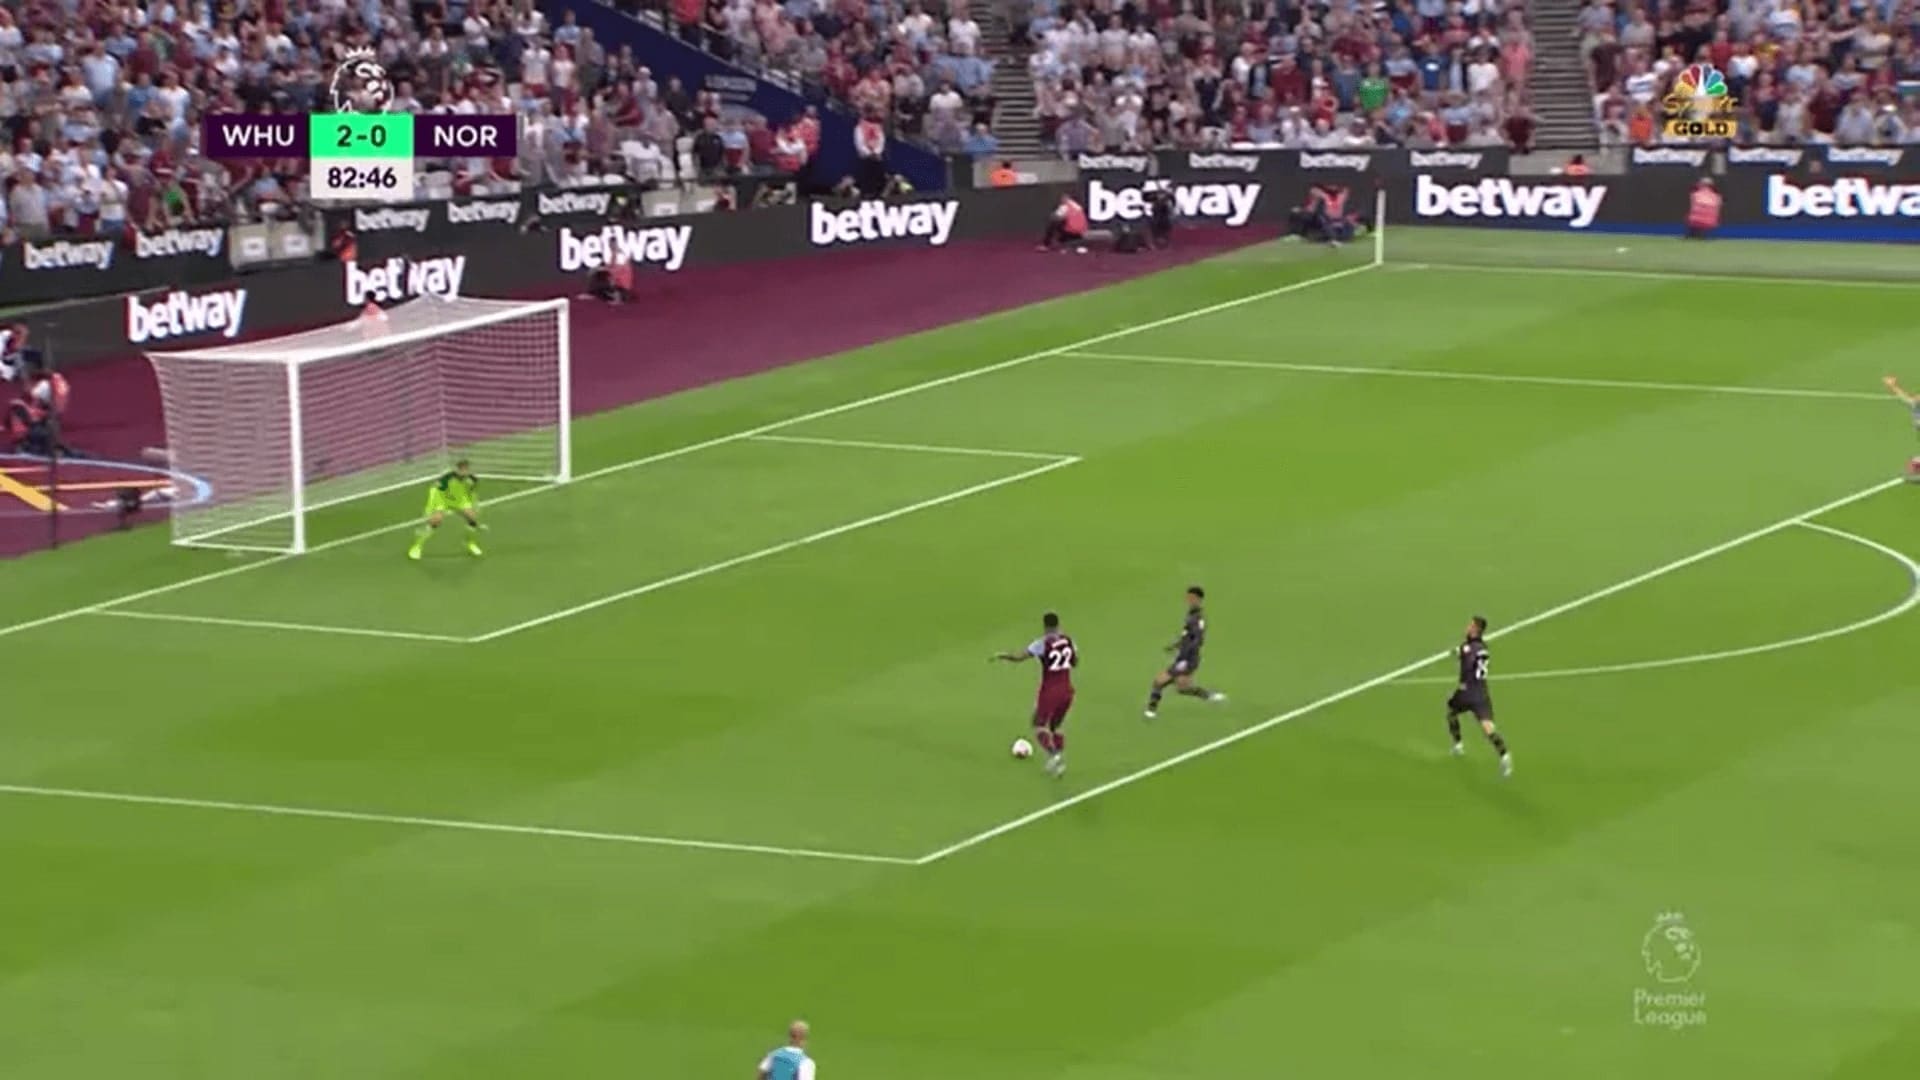
In the below example, Anderson got the ball on the left flank and he immediately dragged the attention of two to three Norwich players. At the same time, Haller was making a forward run and Anderson played a delicious ball to pick the Frenchman. Haller easily entered Norwich’s box and nearly won a penalty. This showed the ability of Anderson, he could always pick his teammates in transitions.
Attacking left-back
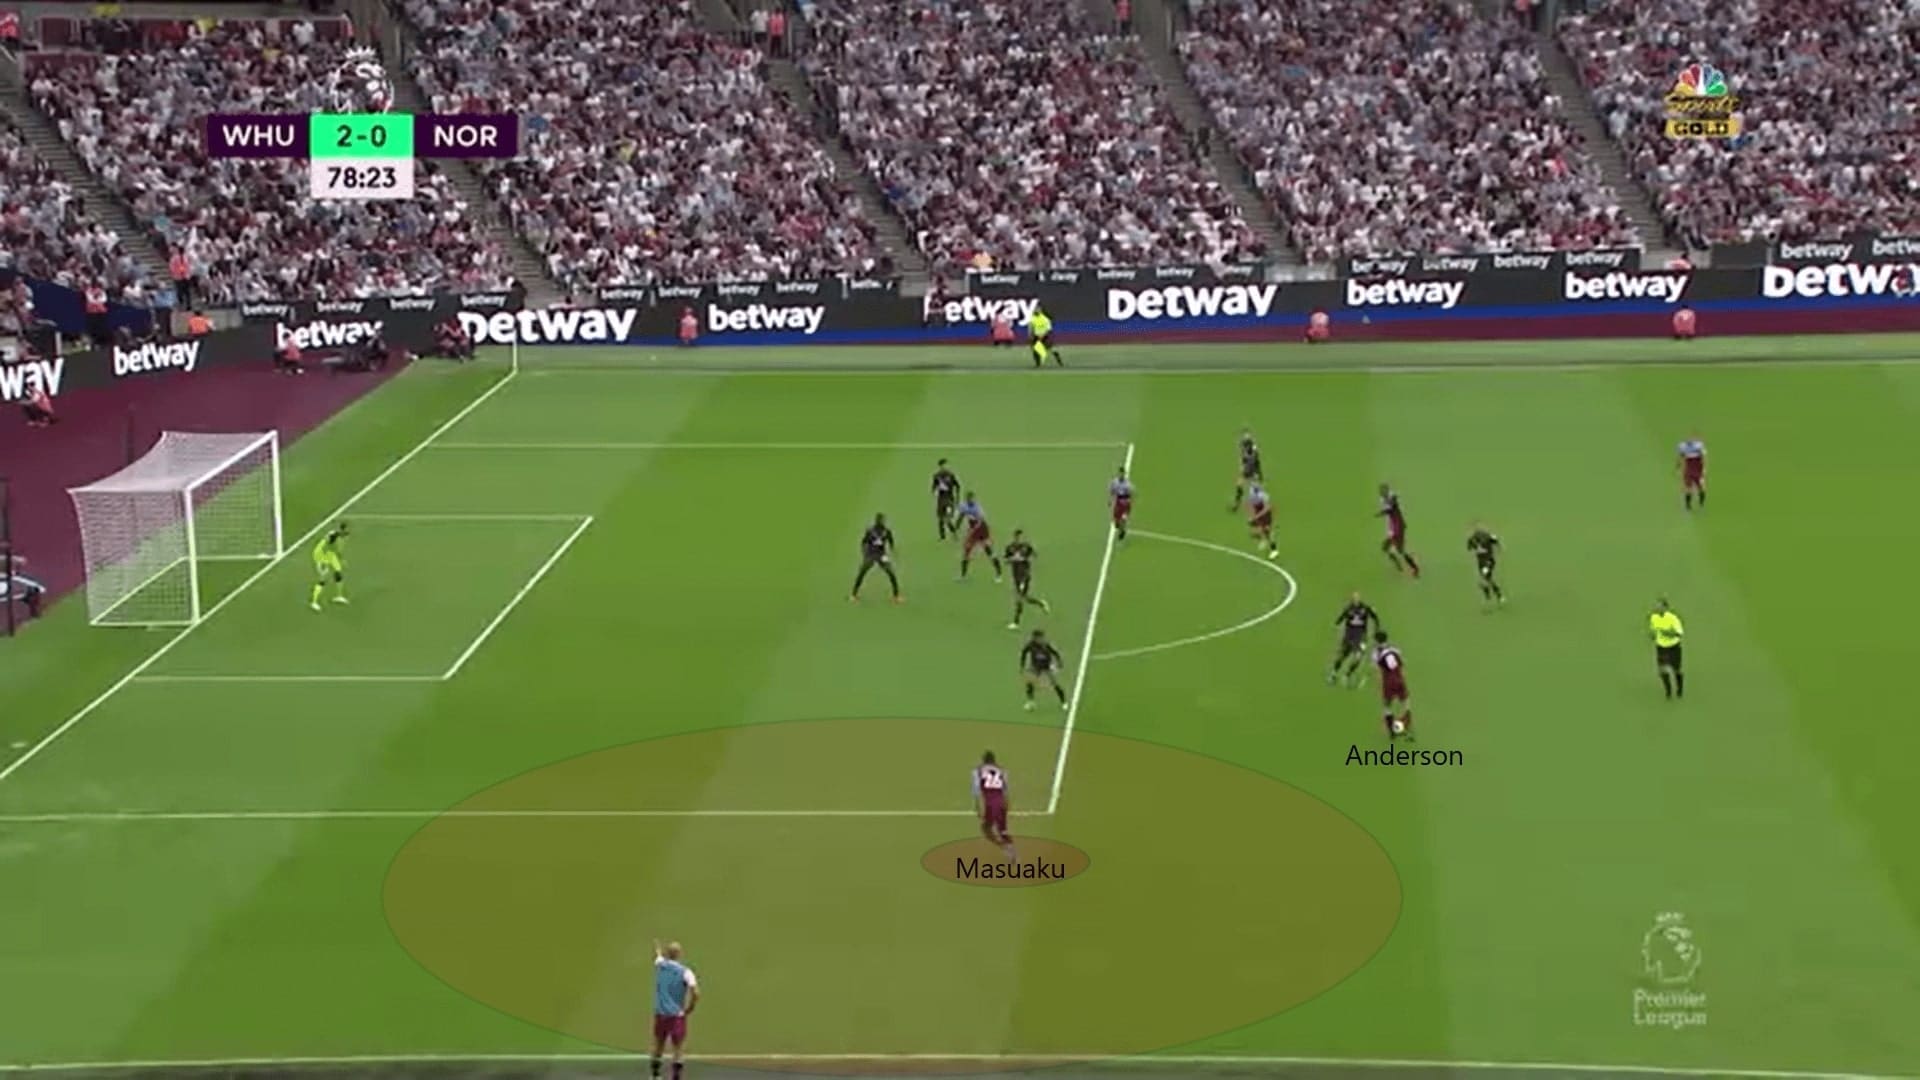
Another approach of West Ham’s attack was their attacking left-back: Masuaku. With Anderson getting the ball and cutting inside, this opened space for Masuaku to run into. Their first goal also came from the Congolese left-back’s forward run. Masuaku was energetic and his movement provided width for West Ham. In this match, he provided big chances for his teammates.
In the following image, Anderson was on the ball and drifting inside. Again, the Brazilian drew attention from numerous Norwich players. Masuaku stayed on the left flank and he was freed. An easy pass from Anderson could release Masuaku and West Ham can cross the ball.
Conclusion
Pellegrini was delighted for his team’s performance. As the Chilean said, if not for Tim Krul, the scoreline would have been larger. West Ham’s biggest threat was from their counter-attacks in transitions, not build-up. Therefore, it was interesting to see how Pellegrini adjusts his teams to create chances from build-up in the future.
Farke’s team played bravely from the back again. Although the result was disappointing, they should still stick to their game plan since they only lack inspiring touches in the final third. If their decisions and passing quality were better in the final third, they can score far more goals in the future.
If you love tactical analysis, then you’ll love the digital magazines from totalfootballanalysis.com – a guaranteed 100+ pages of pure tactical analysis covering topics from the Premier League, Serie A, La Liga, Bundesliga and many, many more. Buy your copy of the August issue for just ₤4.99 here.

Comments