The Premier League is back! José Mourinho is back! A few days ago, Tottenham sacked Mauricio Pochettino, given the poor results in the 2019/20 campaign. They suffered from a terrible away form, which their last away victory was in January. With a new manager, they had a chance to win at the London Stadium, then preparing for the midweek fixtures.
Despite starting the season well, West Ham had a terrible form recently, they only won once in their last six Premier League matches. Manuel Pellegrini has been under pressure, looking for the way back to win.
In this tactical analysis, we will show you the tactics of West Ham and Tottenham.
Lineups
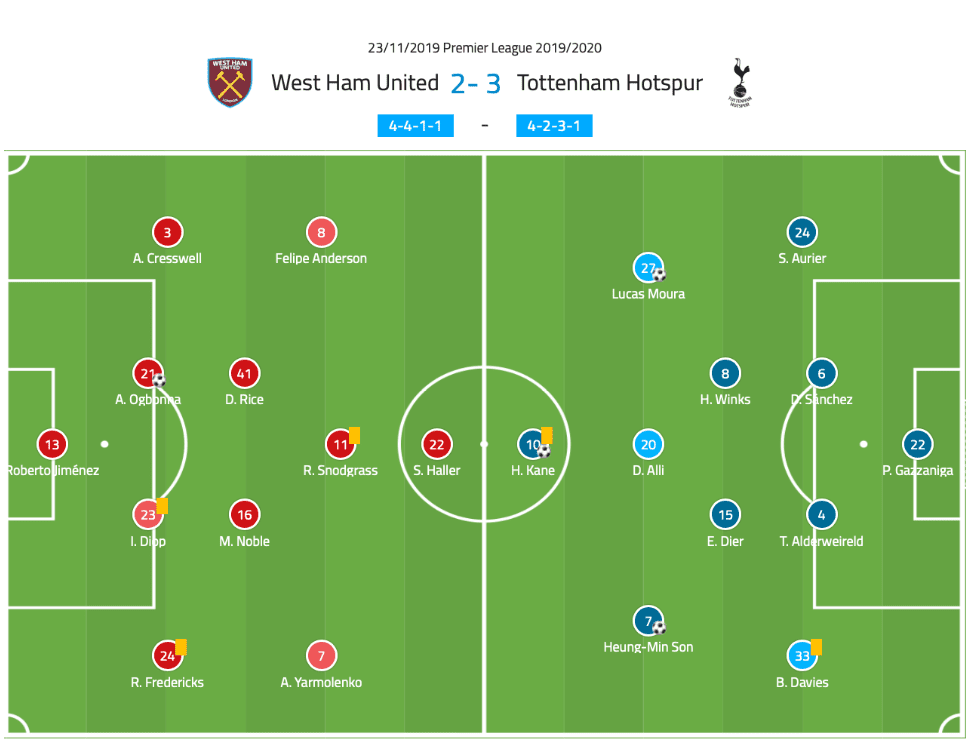
West Ham started in a 4-4-1-1 shape, with Roberto in goal. Angelo Ogbonna, Issa Diop formed the centre-back duo. Aaron Cresswell and Ryan Fredericks were the full-backs, with Declan Rice and Mark Noble in front of them. Their top scorer, Sébastien Haller played as a lone striker.
For Mourinho’s first Tottenham game in charge, he favoured his standard 4-2-3-1 formation. Danny Rose, Moussa Sissoko, Christian Eriksen and Giovani Lo Celso were all left on the bench. Harry Winks and Eric Dier were the defensive midfielders. Lucas Moura earned his chance to impress the new manager, while Dele Alli played as an attacking midfielder.
Improvement in the defence of Tottenham
In the first section of the analysis, we will analyse the improvement of Tottenham when they were off the ball. Their players looked motivated to execute the plan of Mourinho, who emphasized the concept of ‘compactness’ during the defensive phase. Some criticized the defensive style, however, this was not the case in his first match of Tottenham.
Instead, Tottenham maintained their block high when defending. A huge difference was the commitment of the players’ willingness to defend. Therefore, even with a high block they still maintained a compact shape, horizontally, and vertically, which trapped oppositions in tight areas.
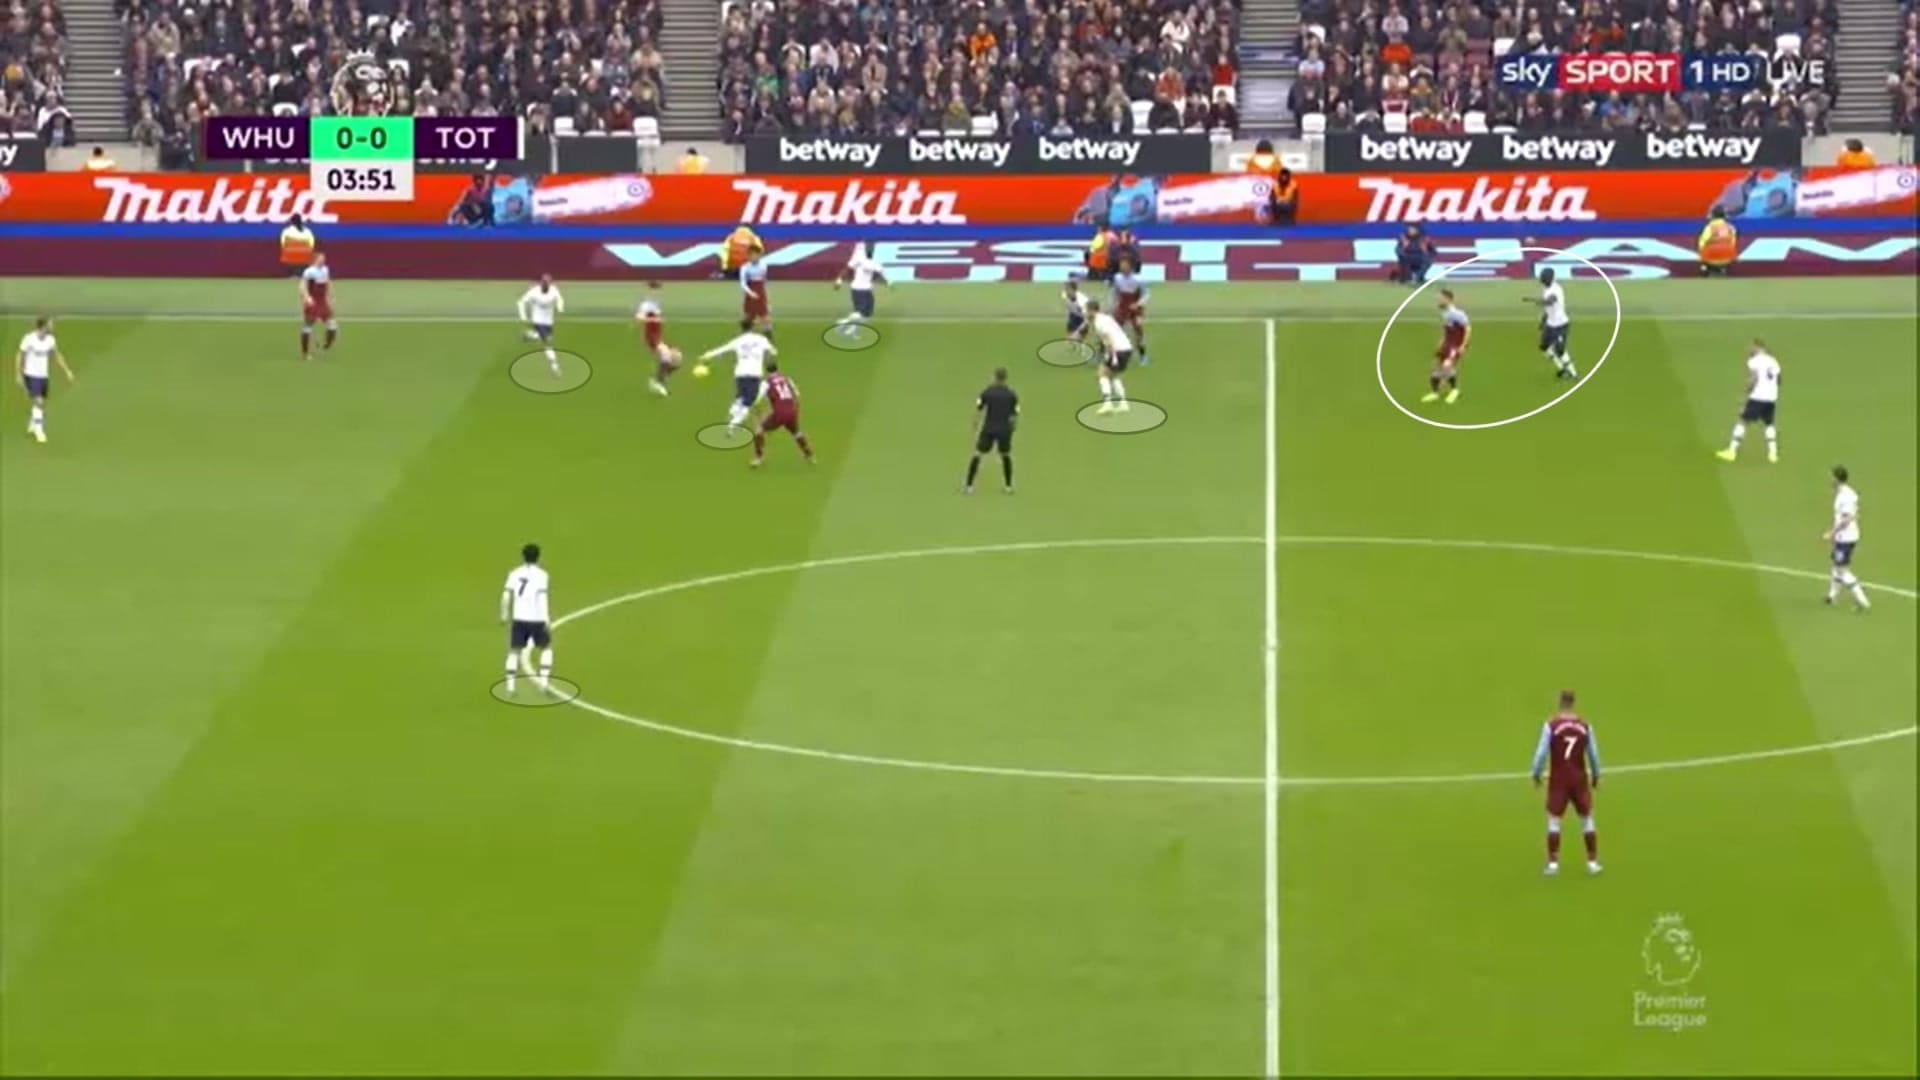
This image illustrated the positioning of Tottenham players when defending higher. Except for Harry Kane, all the midfielders were involved, including Serge Aurier. Meanwhile, a winger at the far side positioned himself more centrally to protect the central areas. Tottenham gained a numerical superiority at flanks, West Ham players were trapped, and they found themselves difficult to play out from the back with such tight spaces.
Given Aurier left his position, the entire Tottenham defensive line adjusted the position to cover spaces behind the Ivorian. Davinson Sánchez marked the free player of West Ham, Robert Snodgrass, which prevented West Ham escaping from the press.
Apart from the block, Tottenham reacted well to defend transitions. Their players were focused and willing to defend in front of their own box. A solution to breaking the previously explained block of Tottenham was switching plays to the far side since the winger of the away team was not defending in that area.
West Ham did it on occasions, such as the following example, which Andrii Yarmolenko received the ball on the far side. There were points to pay attention to, which the isolation on the far side came first. Tottenham committed numbers forward, Ben Davies alone to face the Ukrainian. Furthermore, Tottenham lost their defensive shape totally, which their defence, at that moment, constituted by three defenders, and players eliminated by the switch play.
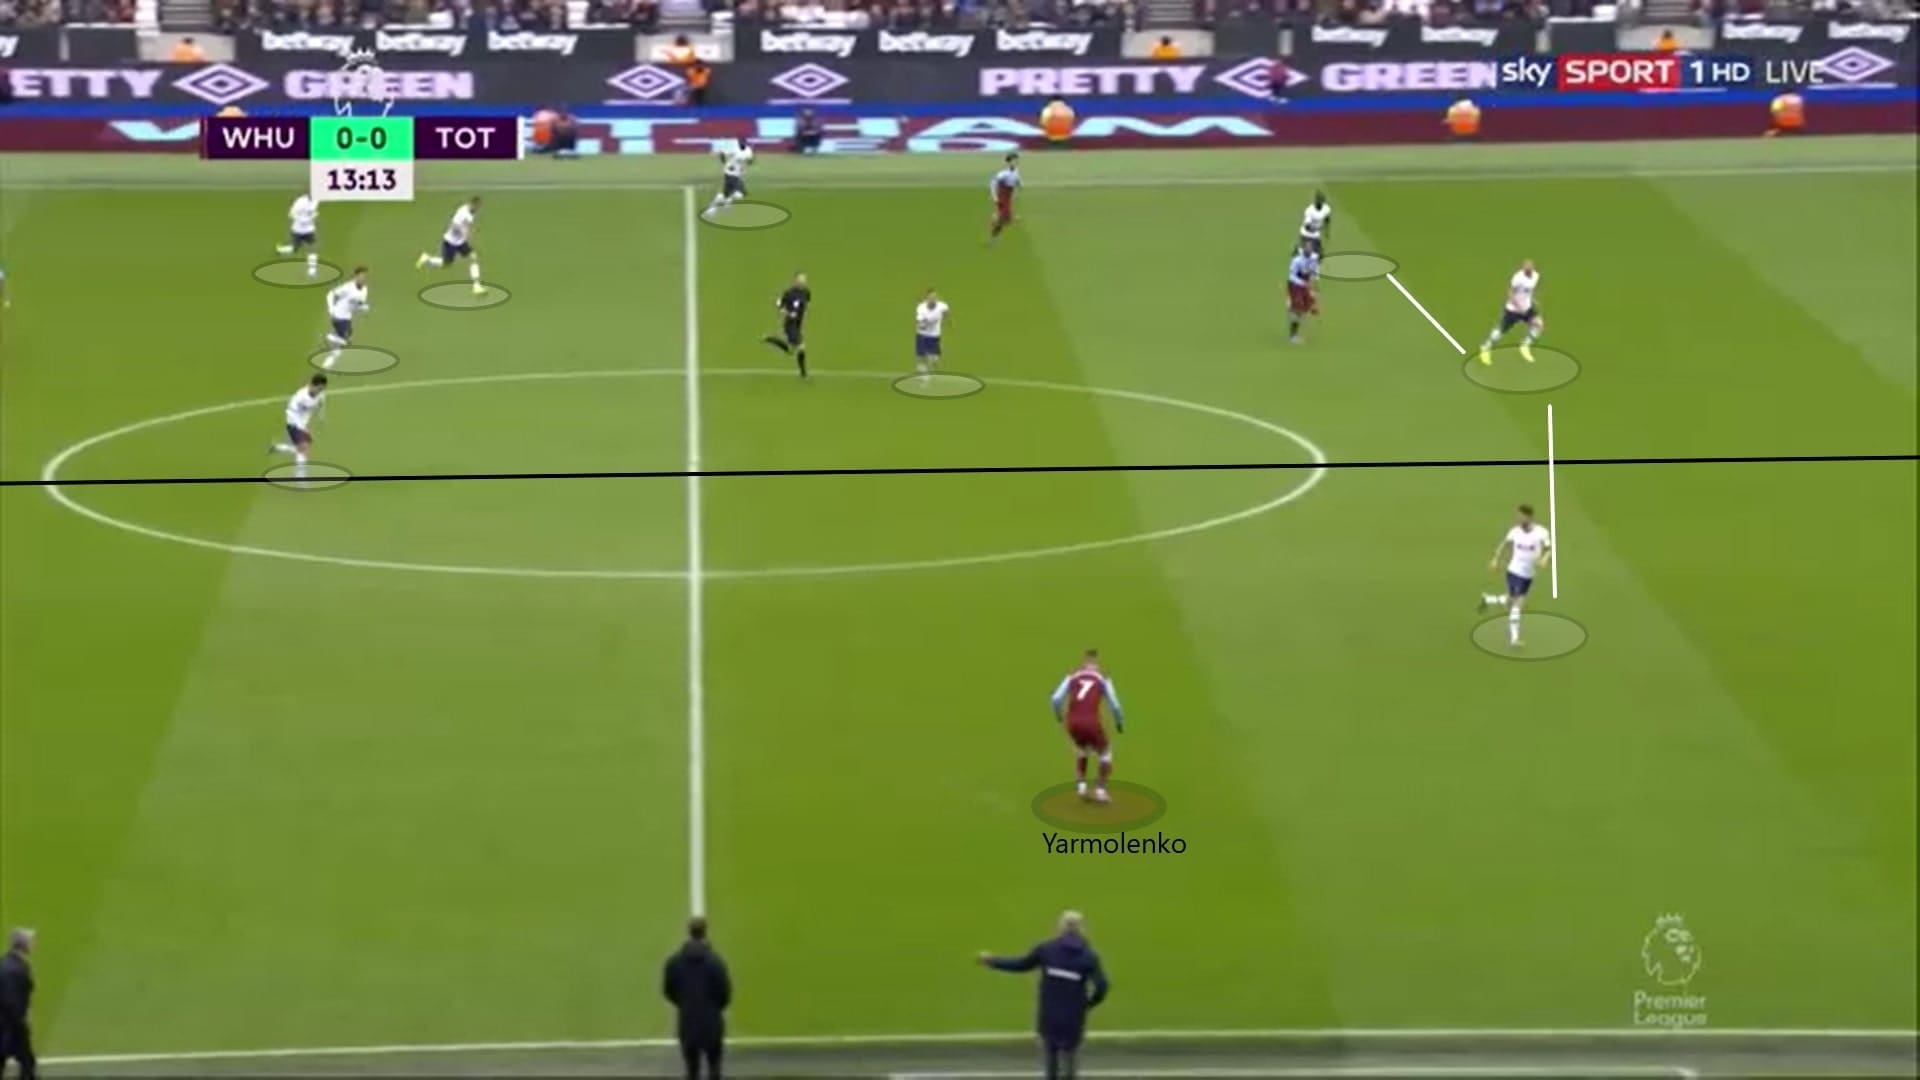
Surprisingly, Tottenham did not panic and allow West Ham to further progress. Davies did not press the Ukrainian and kept retreating. Meanwhile, he instructed Winks to cover the centre, credits should be given to the midfielder, since he sprinted and covered the space. Since Yarmolenko has been a left-footed player, he drifted inside, exchanged a pass with Haller. West Ham lost their numerical advantage in just six seconds!
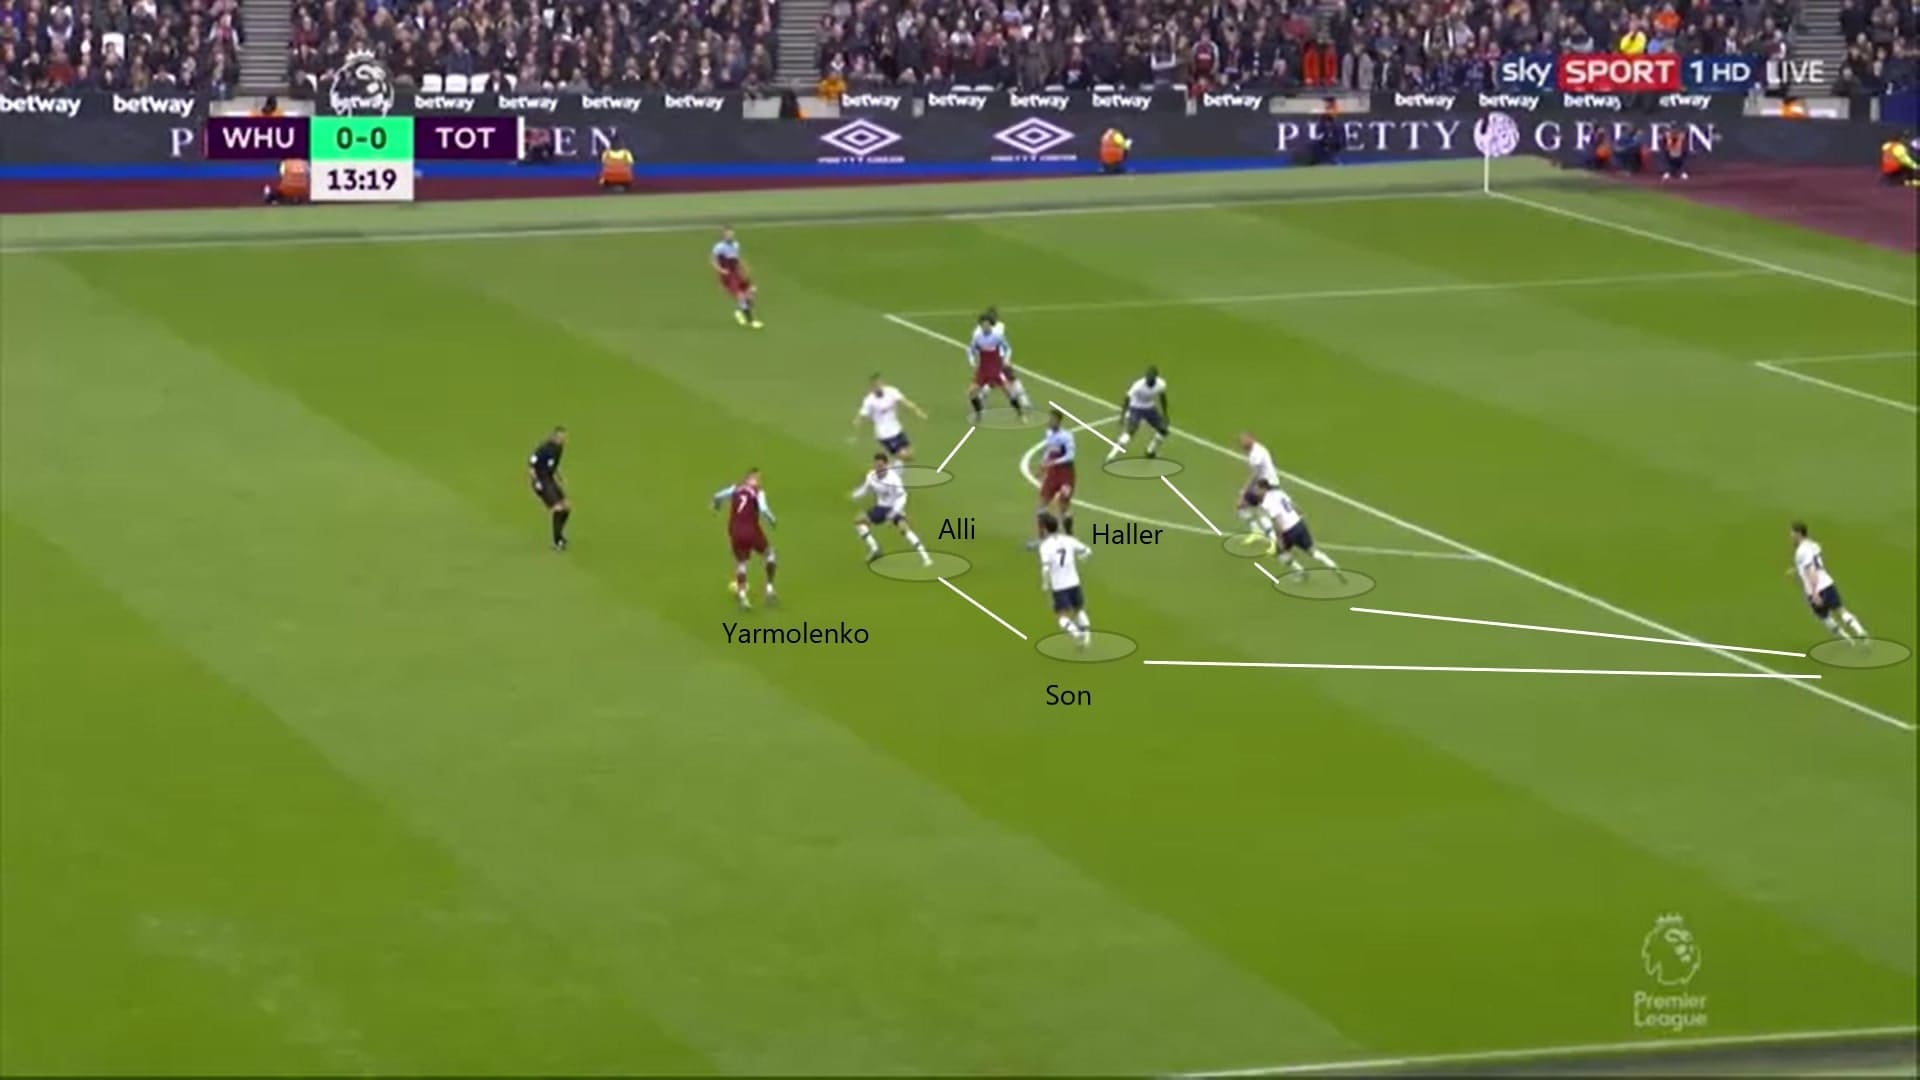
Furthermore, the Tottenham reaction was brilliant. In this scene, showed the positionings of players. Once again, they executed the key tactical concept of Mourinho: compactness. The centre backs stayed close to each other, with Aurier positioned himself narrow. Dier, Alli and Son, formed another line of defence for Tottenham. In front of their area, they stayed compact and denied any possible central penetration at the centre. Neither Felipe Anderson nor Haller was going to receive the ball in this attack. West Ham lost their chance to break.
West Ham lacked intensity in the first half
Before we moved onto the offensive setups of Tottenham, we focused on the defence of West Ham. To summarize, their defence was terrible, no shape and lacked intensity. It was conceivable the unstable shape of West Ham was attributed to the approach of Pellegrini, which he instructed his players to close off oppositions whenever possible. Therefore, this highlighted the importance of the level of intensity, slow engagements would not put the ball carrier under pressure.
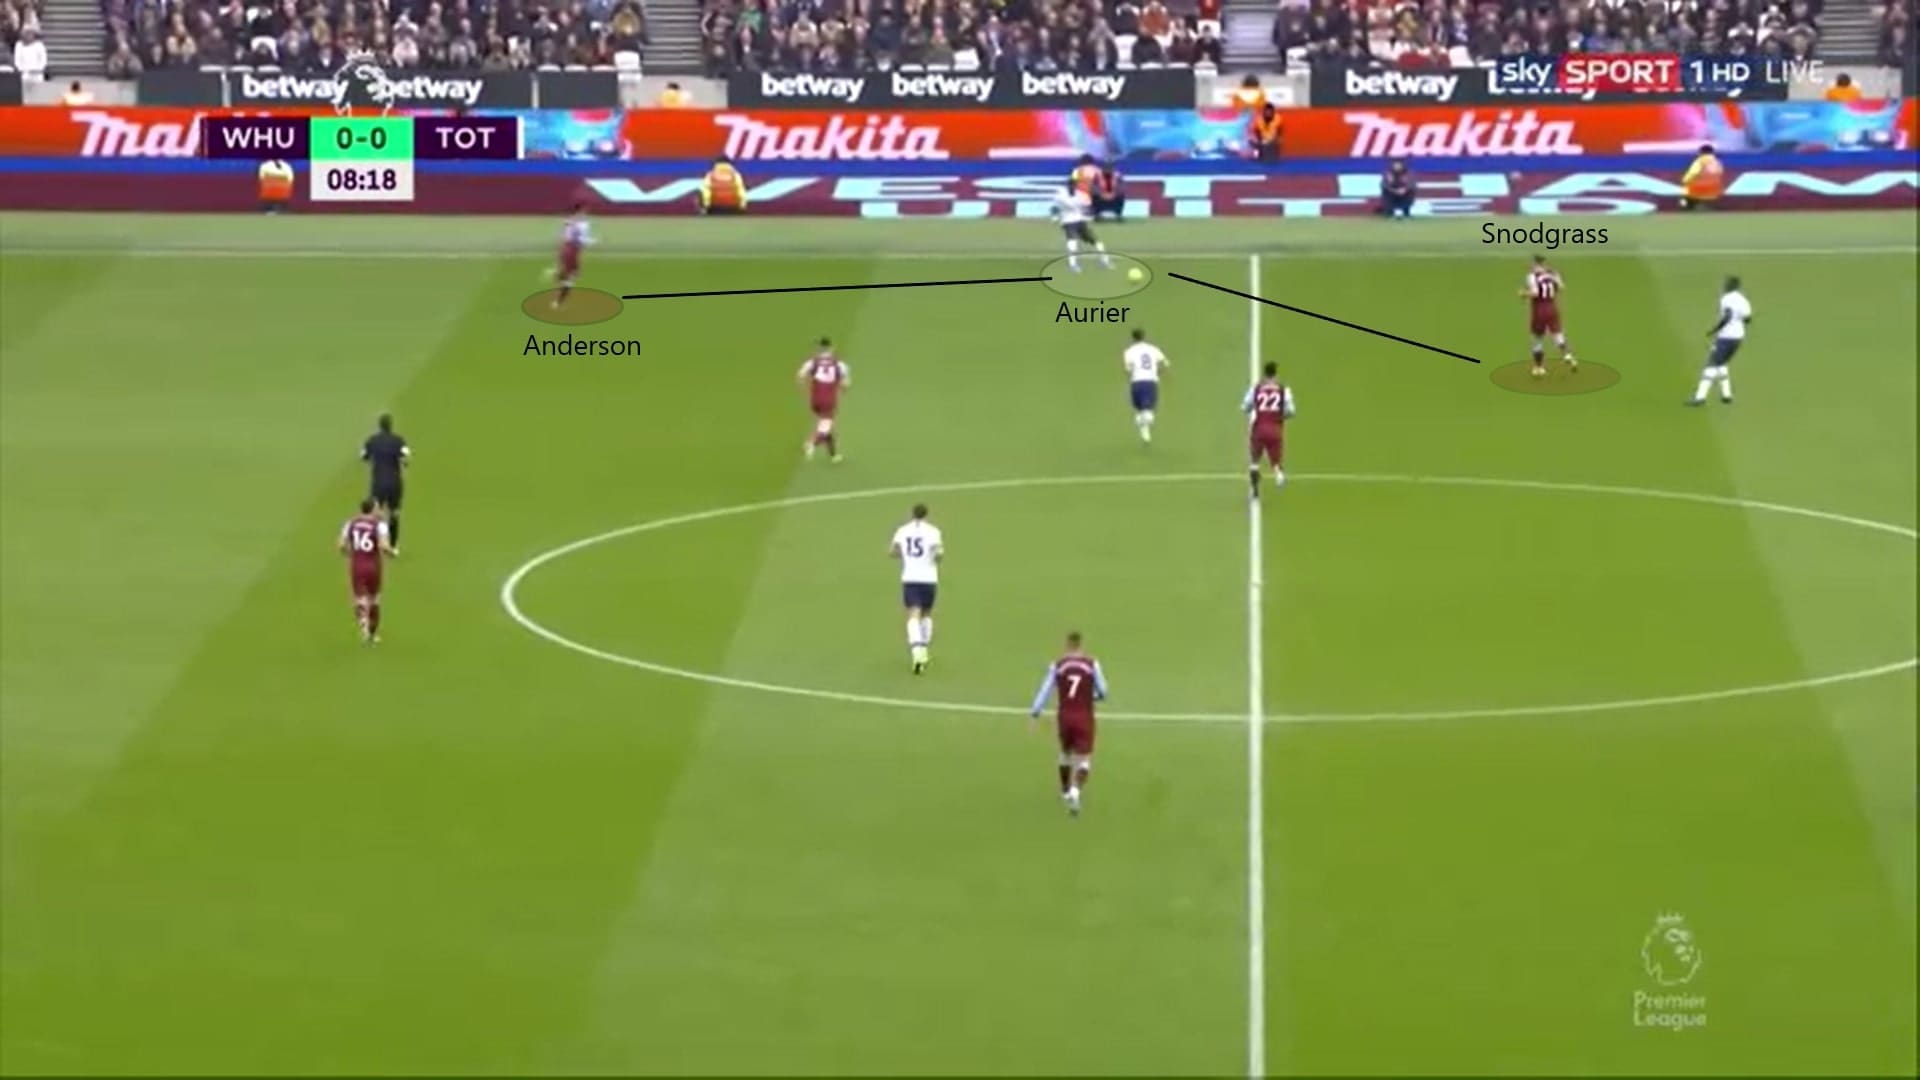
Anderson played poorly when we considered his intensity during the defensive phase. In general, West Ham defended in a 4-4-1-1 or 4-4-2 shape, depending on the positions of Haller and Snodgrass. By position, Anderson should have marked Aurier, but the Tottenham right-back was never marked tightly.
Anderson was often late on his target. The following example was one of many. When Tottenham moved the ball to Aurier, the right-back got huge space to receive the pass, including this case. The Ivorian dropped from a higher position to receive a pass, Anderson should have marked him tightly, denied space and forced away to decide. Despite several West Ham players surrounded Aurier, he was not under pressure since they did not close him off enough.
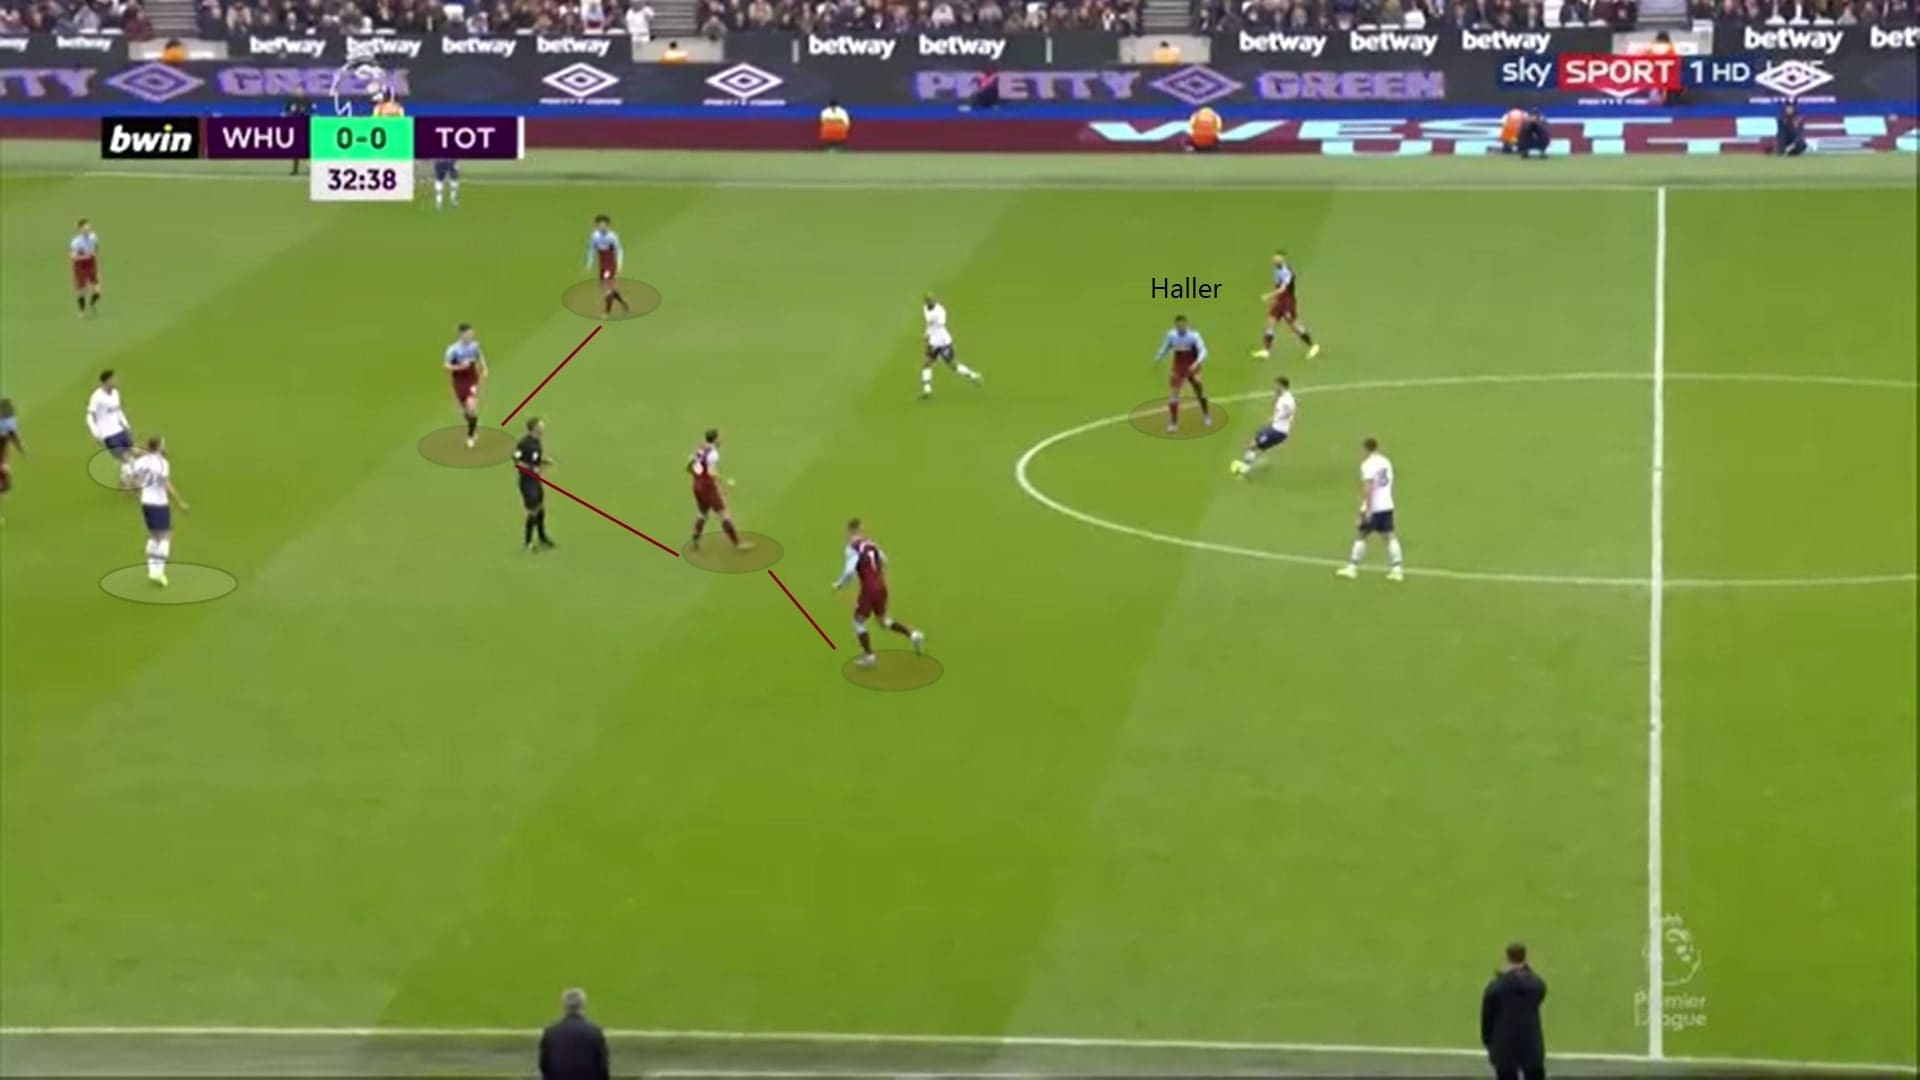
Apart from Anderson’s side, Tottenham enjoyed many rooms given to the low intensity of West Ham press. Neither Snodgrass nor Haller provided the energy to press the ball. Meanwhile, Noble and Rice were cautious to step out, with Tottenham players exploiting spaces between the lines. Therefore, Tottenham double pivots faced the goal usually, had a wider angle to screen the pitch, without pressure behind them.
This example showed how easy the double pivots could pick the front players. After exchanged the pass with Moura, Winks faced the goal without pressure from Haller. This explained why Noble stepped forward, we guessed he intended to close off Winks, but West Ham lost shape. The poor defensive shape of West Ham allowed a pass from Winks to find Alli, who positioned himself between the lines and created a shooting chance.
Yarmolenko confused by Mourinho’s tactics
Another reason to explain the easy build-up of Tottenham was the tactics prepared by Mourinho. West Ham planned to defend in a 4-4-1-1 shape, they seldom pressed as a unit. On occasions, only the Snodgrass and Haller stayed high to defend, they recovered possession only once in opponent half throughout the game.
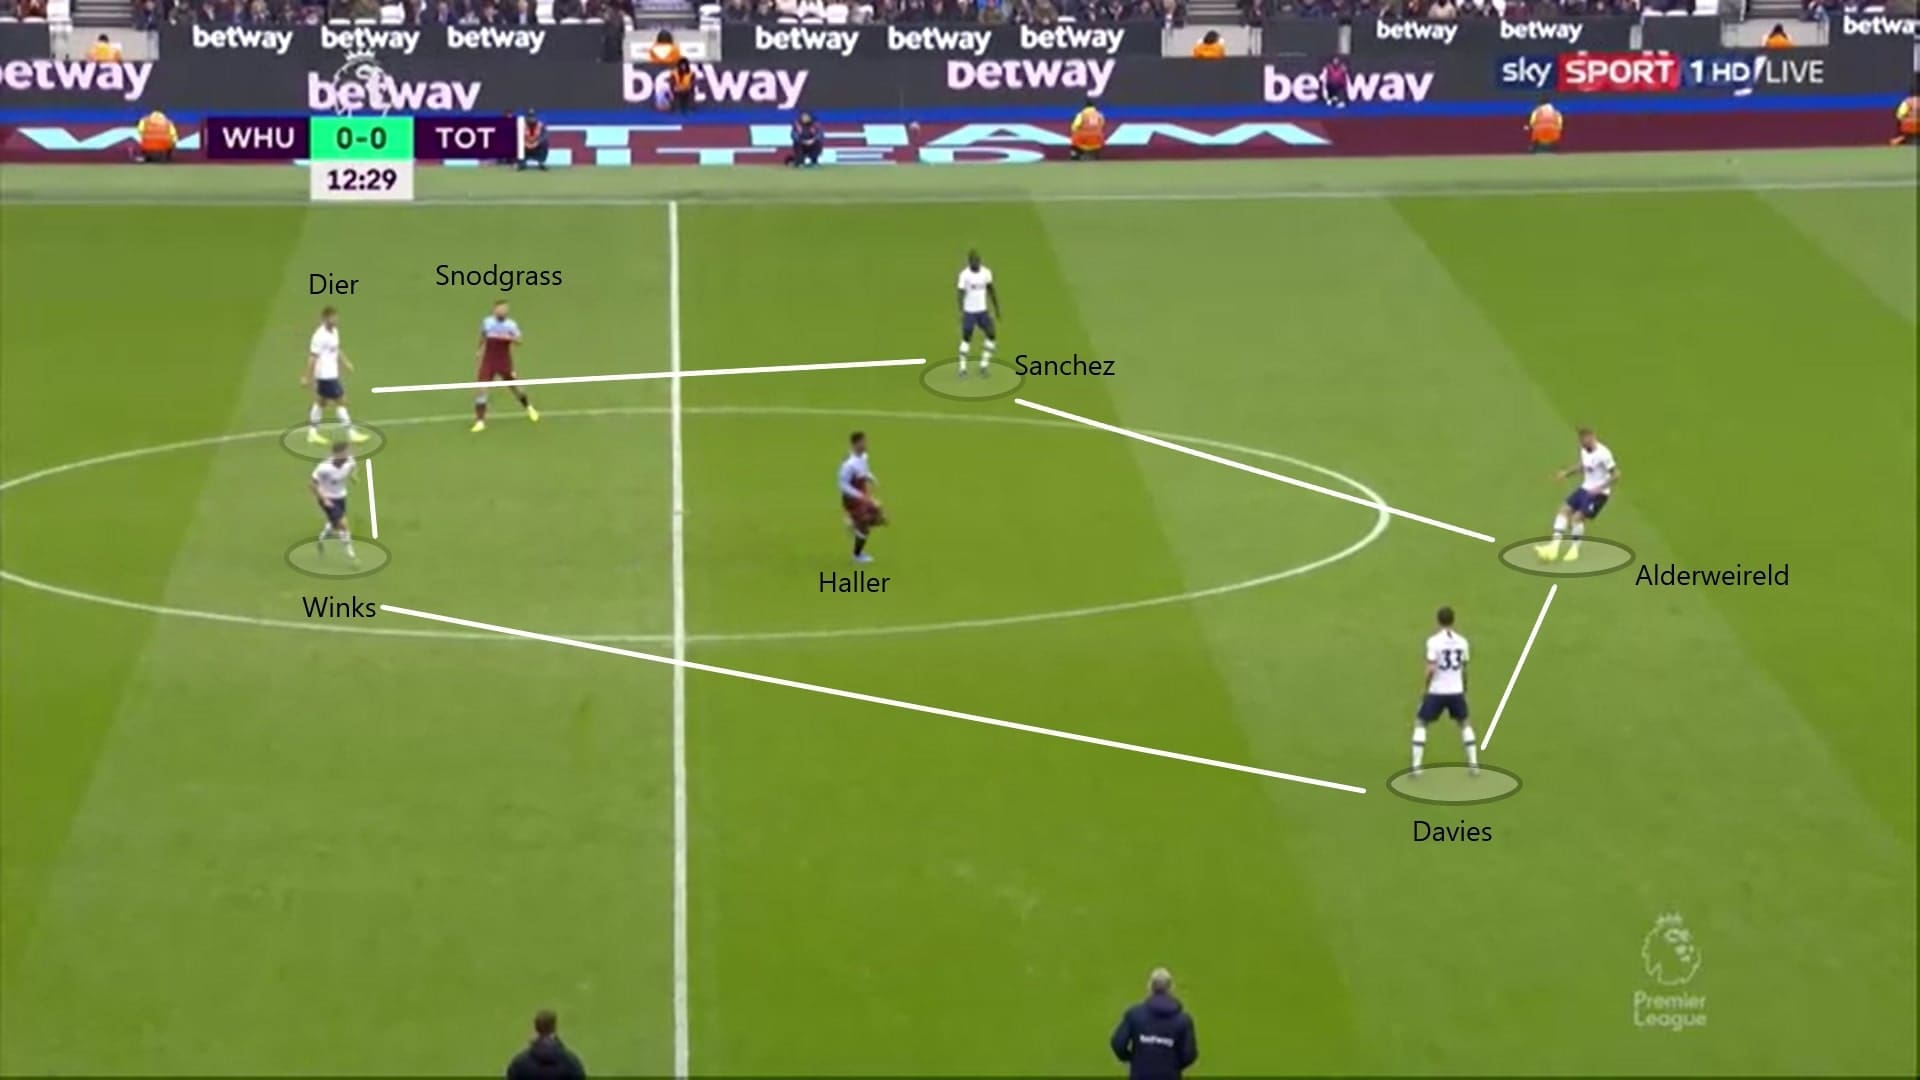
The build-up of Tottenham ensured a numerical superiority in the first phase of the attack. With Aurier stayed high and wide on the pitch, Sánchez, Toby Alderweireld and Davies formed the first line, with the Belgian staying deep. Winks and Dier formed another line, which allowed themselves to receive a pass behind West Ham front players. It was often a five v two situation, hardly could Tottenham loss the ball.
From a defensive point of view, the positioning of Tottenham players also hinted the cautiousness of Mourinho. By staying deep, Alderweireld could be the last man of defence if the ball loss between Sánchez or Davies; Dier and Winks usually stayed tight, occupying and protecting the central areas.
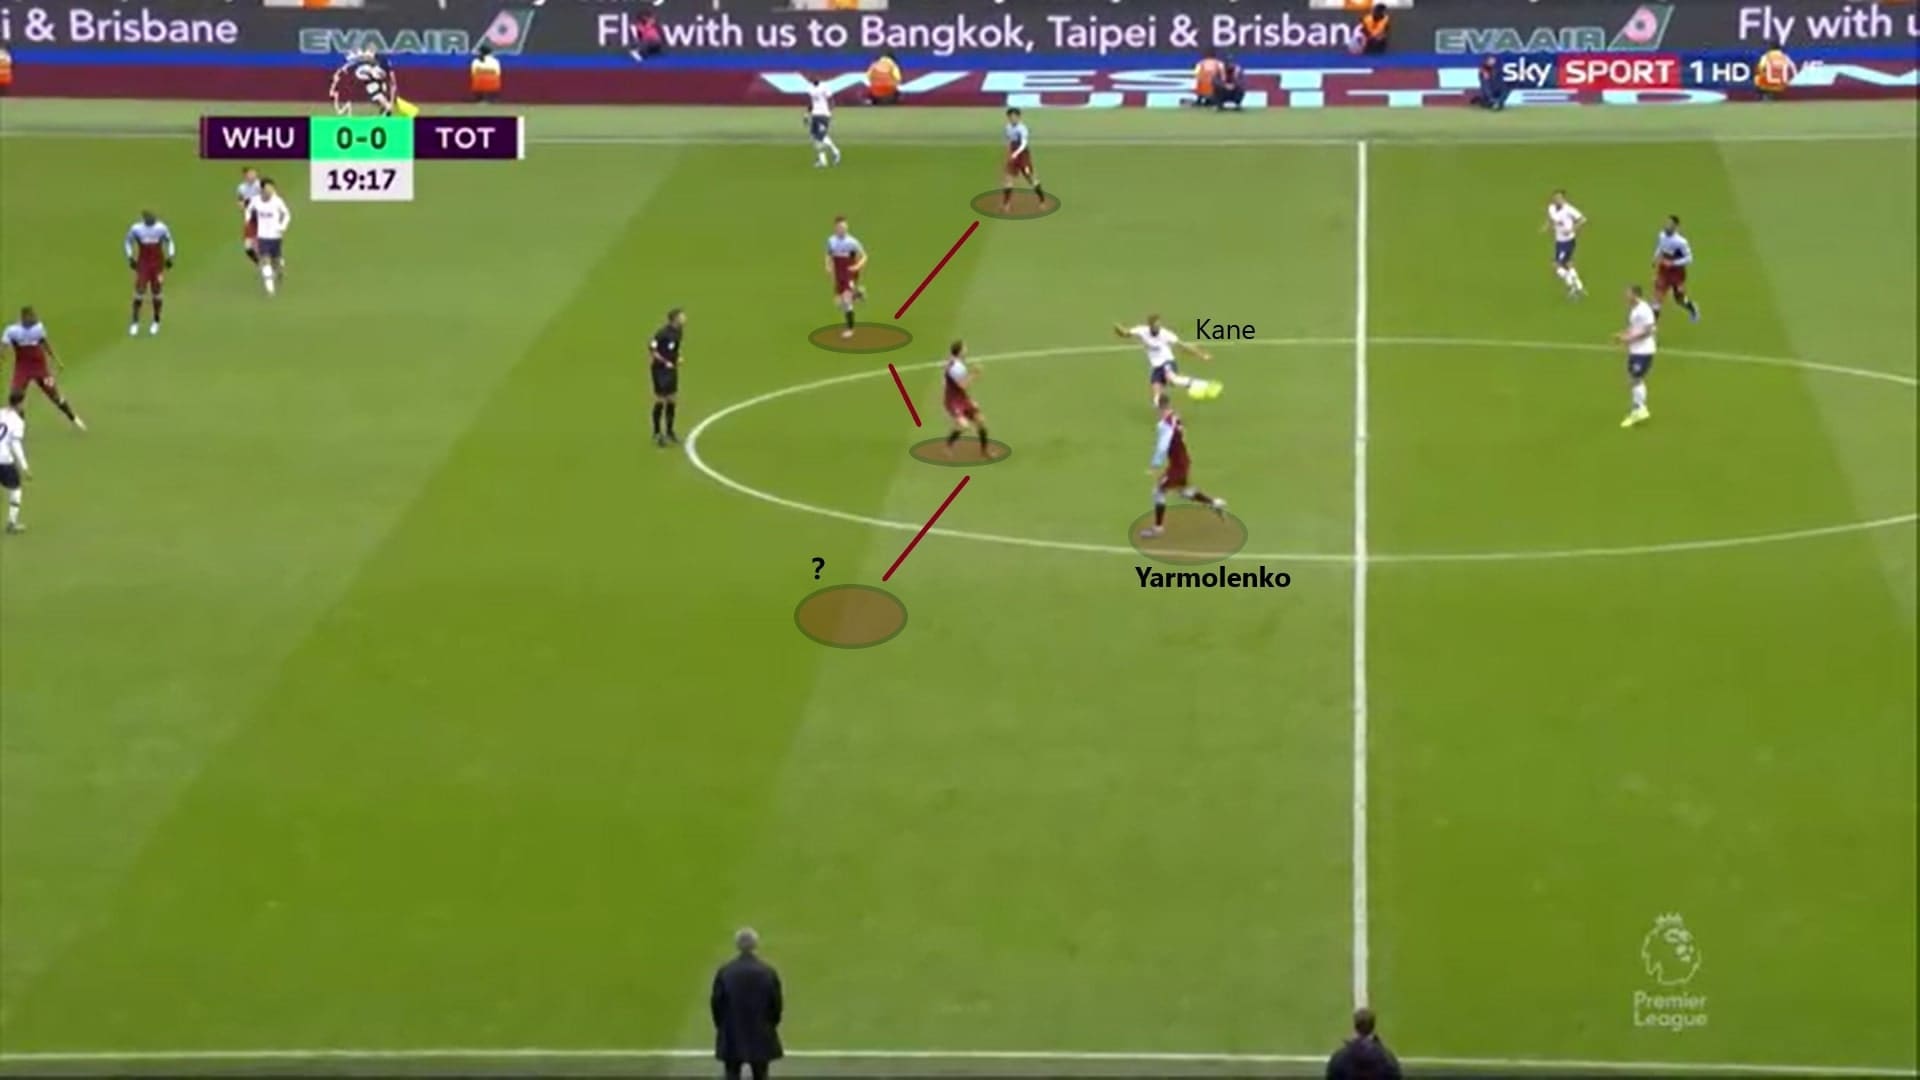
By positions, Yarmolenko should be marking Davies in the game. But, given Davies inverted to the midfield, and he stayed relatively deeper compared to Aurier, the Ukrainian was confused. He was in an awkward situation.
Pellegrini allowed did not instruct Yarmolenko’s defensive positioning, so Tottenham capitalized on this. The Ukrainian often stayed higher to match Davies, but not closing him down. At the same time, he left the midfield line, so sometimes West Ham were defending in an asymmetrical 4-3-3.
Tottenham players, who was Kane in this case, faced the goal without pressure again. Given Yarmolenko left his position, Kane easily found Son on the left, because no one shut the passing lane. Tottenham entered the final third easily.
Tottenham in the final third
Despite controlling 60% of possession in the first half, Tottenham did not emphasize on maintaining width during the attack. Instead, the concept was clear, for Moura, Kane, Alli and Son, two dropped to space between lines while the other two made forward runs.
Thanks to the dropping movements from West Ham defensive line, Tottenham players easily pulled away defenders, such as Moura took Ogbonna out of position as this case. Although the Brazilian did not find Alli this time, he still got huge rooms to turn, carried the ball forward.
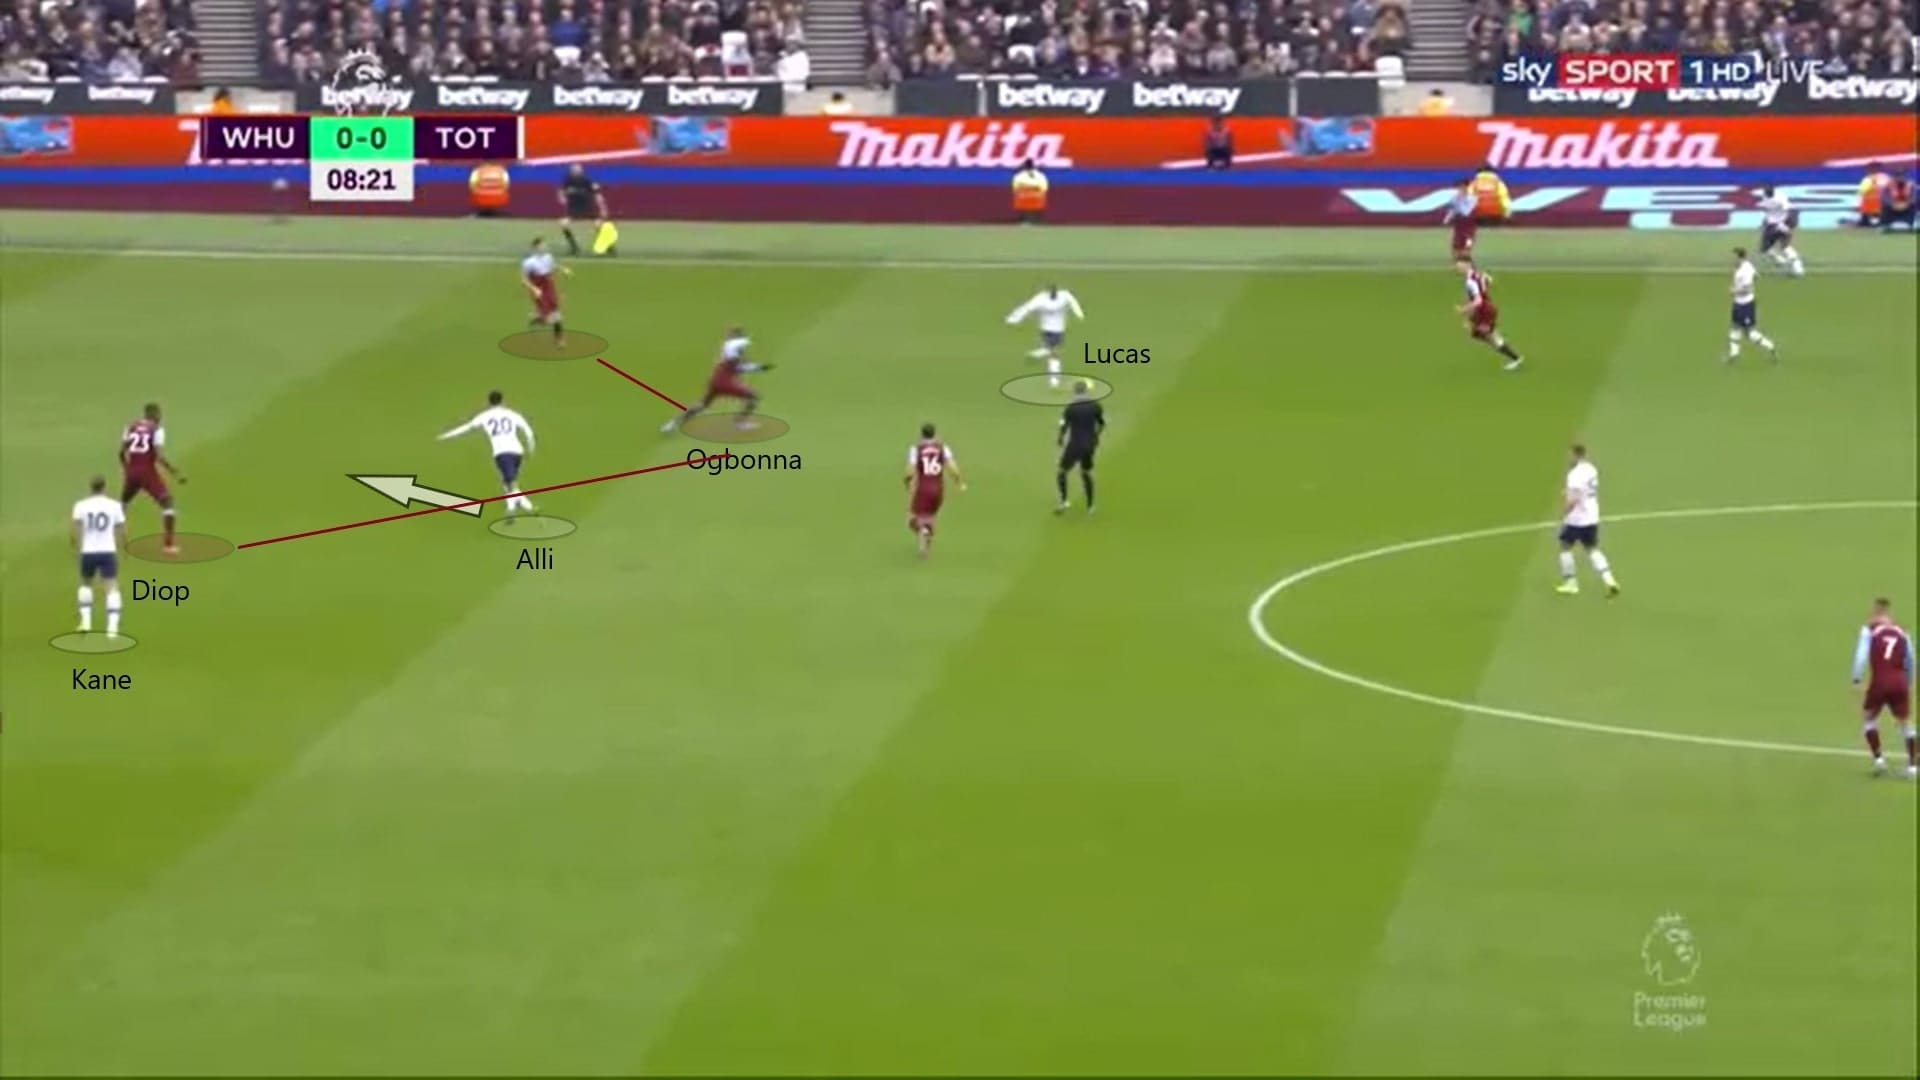
On other cases, which Kane and Alli dropped, the wingers made forward runs behind the lines. In order to make these runs, Son and Moura stayed narrow at the half-spaces. Only in the first minutes, Kane was caught offside for a couple of times. When the game continued, Tottenham, finally, scored their first goal.
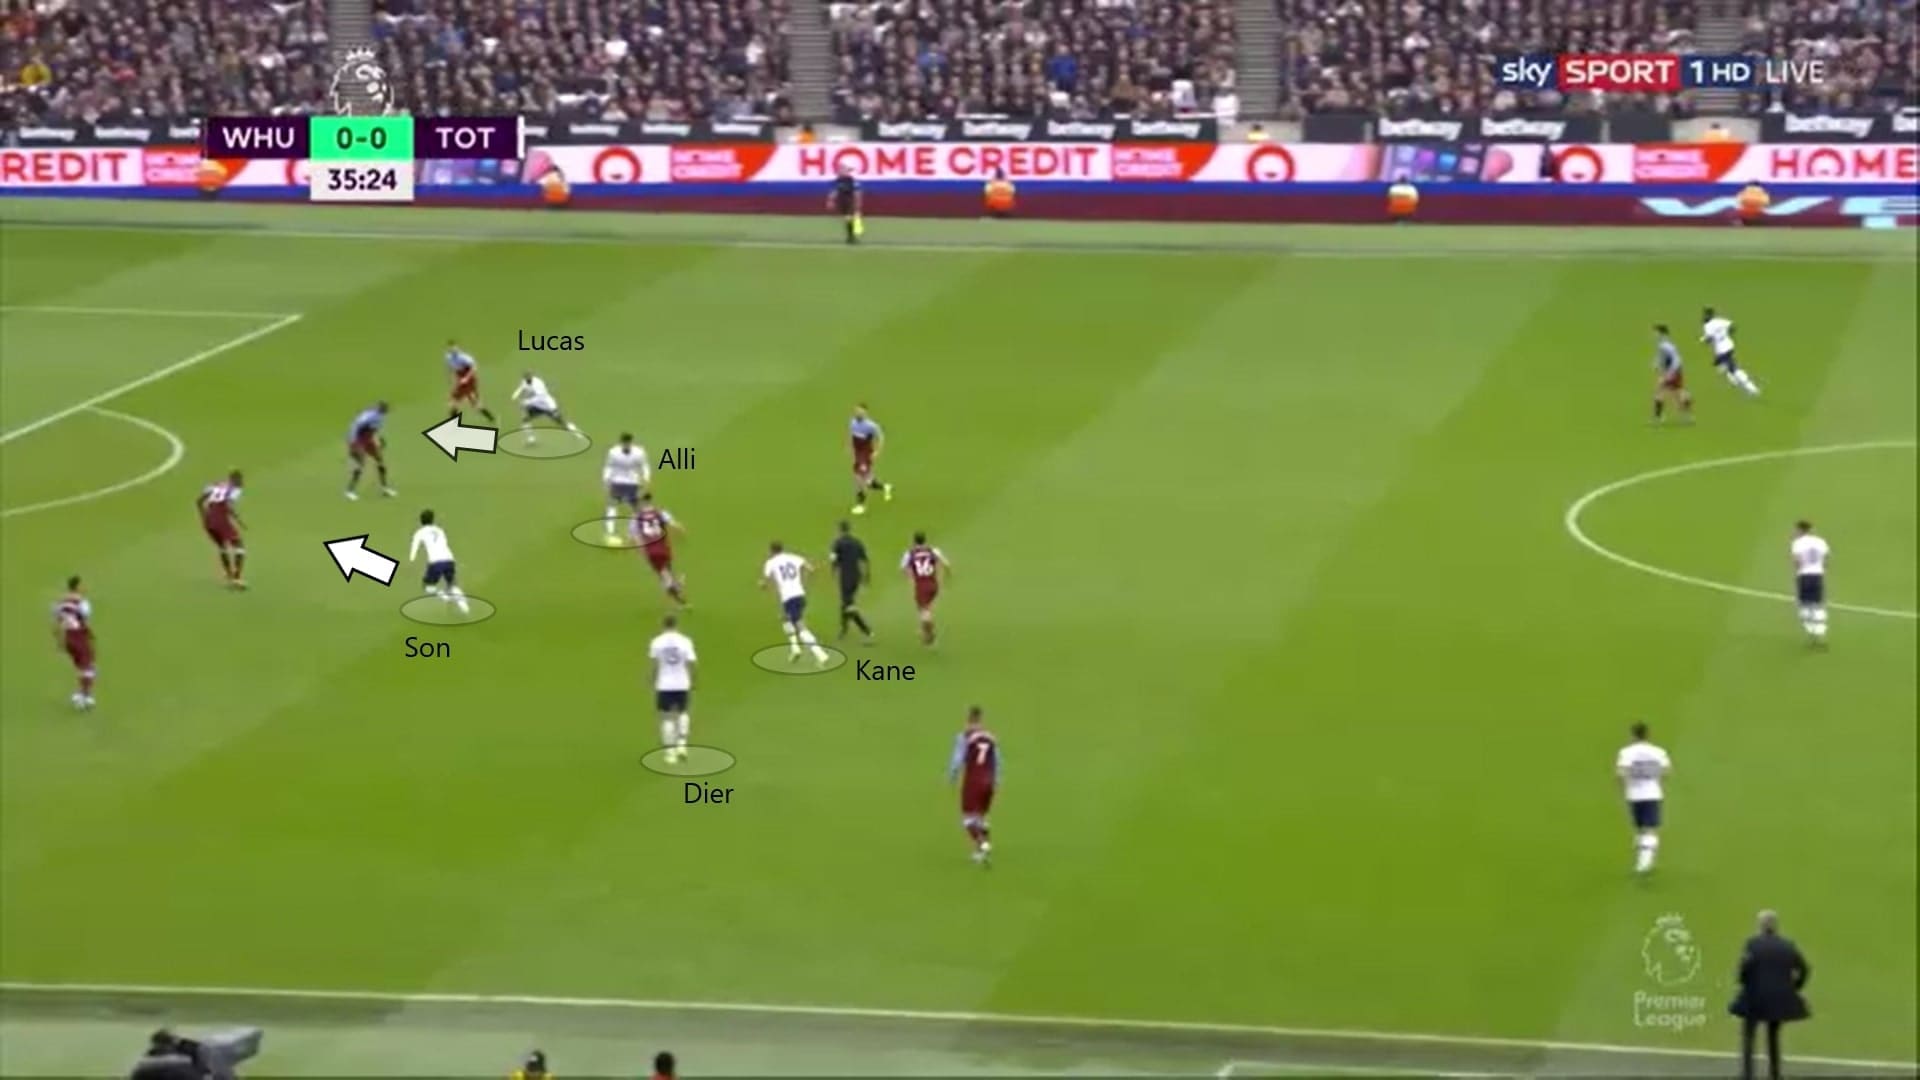
This goal contained the above elements. First, it was Winks to pick Alli between the lines without pressure. The pass was made easily given to the poorly positioned midfielders of West Ham. Meanwhile, Son and Moura both made a forward run behind the West Ham defenders. Since Diop focused on the ball, Son got behind him, and agonizingly, Roberto did not make the save.
Changes in Tottenham tactics
Kane scored an easy goal just three minutes after the break, it was very possible for Tottenham to take all the points. Mourinho utilized this chance to try other tactics, which the major change was their defensive setups.
In the second half, Tottenham sat deeper, with a 4-4-2 midblock. They seldom began their defensive actions in West Ham half, statistically speaking, the PPDA (pressing intensity) figures reflected. In the second half, this figure of Tottenham was 23.5, higher than that in the first half, 9.1.
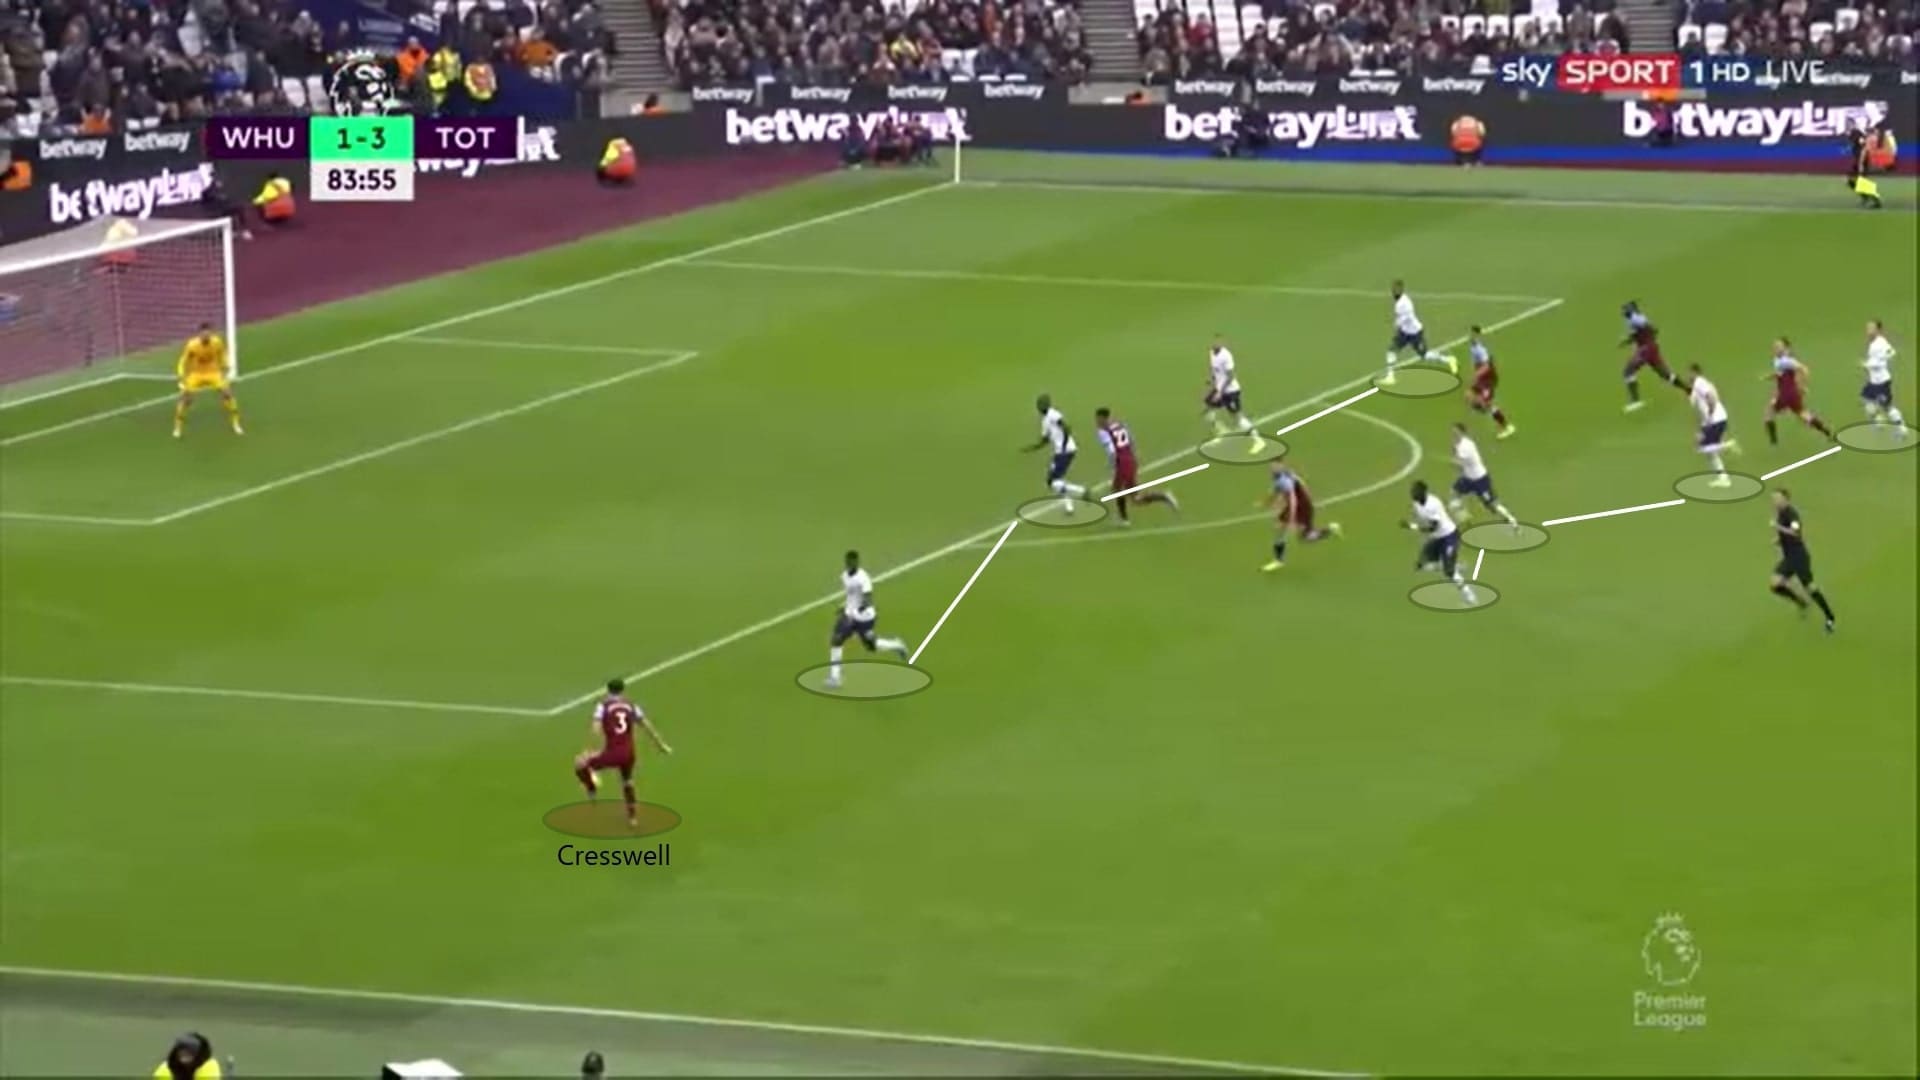
The key concept, ‘compactness’ was applied, no matter how the defensive shape changed. The block of Tottenham left the wide areas vacuum, encouraged West Ham full-backs to exploit those spaces. This was not a huge problem as Mourinho had confidence on his players, which he believed the defenders could deal with the crosses, including the below one. Cresswell capitalized on the fragile wide areas of Tottenham defence and delivered the ball into the box, cleared by Sánchez.
On attack, Tottenham relied on the quick counter in transitions, but their front players looked tired as the game went on. Alli and Moura were replaced by Eriksen and Sissoko.
Pellegrini tried to save the day
For Pellegrini’s side, we used statistics and graphs obtained from Wyscout to explain their changes in attack. In the first half, West Ham only recorded one shot, hinted their failure in creating chances. So, where did it went wrong?
The figure of ball losses recorded provided some clues. For the last five matches, Haller loss the ball 18.4 per game. However, the French lost the ball 24 times against in the game. We believed this was a result of his lack of supports. As highlighted, in the first half, Haller frequently gave away possession at the centre of the pitch. On occasions, he won the aerial duels, but his teammates looked uninterested to fight for the second balls. He was isolated.
As discussed, Pellegrini changed the attack on the left of West Ham. Therefore, the left flank lost many possessions in the second half as highlighted. The shift of attacking focus was reflected through the ball loss at the centre of the pitch.
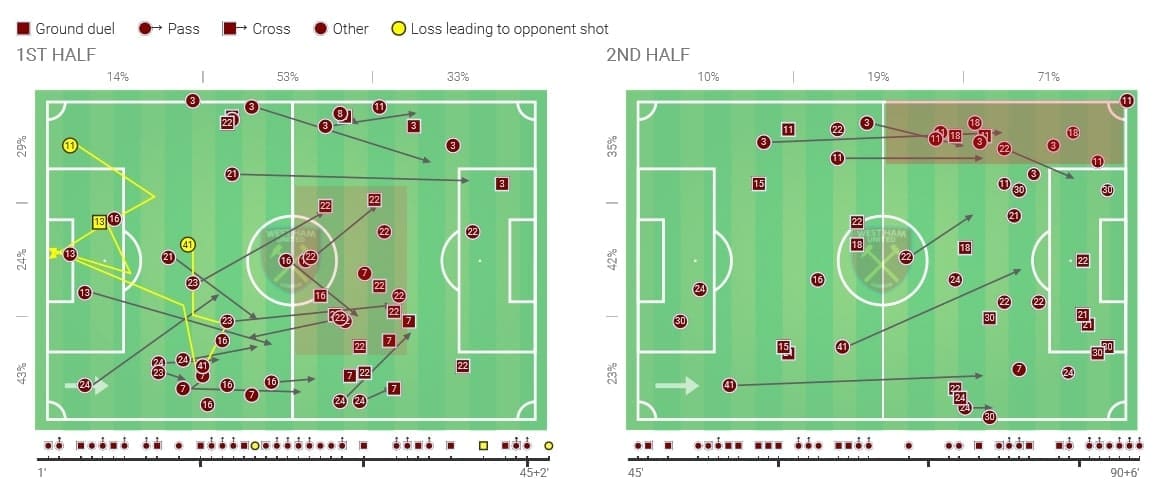
With the graphs of West Ham’s ground duels, we tried to explain the change of tactics and the introduction of Michail Antonio.
In the first half, most duels occurred in West Ham own half, while in the second half, Antonio was involved in those duels frequently. Despite coming on from the bench, the former Reading man attempted 14 ground duels, ranked the fourth of the team, same with Haller. For the ground duels, almost all of them happened on both sides, and almost none of them occurred in the middle third or at the centre of the pitch.
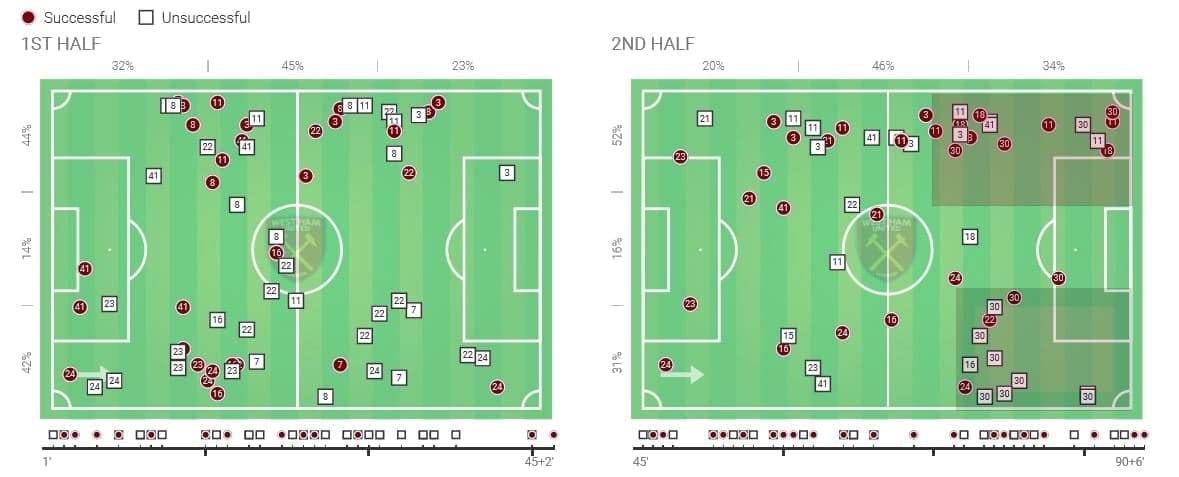
With these, we could construct the pattern of West Ham’s attacking plays in the second half. By distributing the ball to flanks, they hit wide areas of Tottenham. The introduction of Antonio was to provide some strengths on the pitch. West Ham chose to avoid the crammed central areas to attack since Tottenham players remained compact at the centre, they went wide and crossed. In this game, West Ham tried 17 crosses.
Conclusion
West Ham could not find their road to victory, and the pressing intensity and the defending structure were areas required improvement as soon as possible. For the attack, they need players to support Haller, leaving the Frenchman isolated was unwise. Furthermore, they could develop their attack through penetrating the centre, this was an element missing in the game. It is believed that there is not much tieleft for Pellegrini now – and so the Chilean must produce positive results.
For Mourinho’s Tottenham, they did better, in terms of both attack and defence. The key tactical element of Mourinho, compactness, was applied throughout the game. Given the fragile defensive displays of Tottenham this season, how quickly could the players adapt to the new tactics, was the key to their results. Their fans should look forward to this team since we saw a motivated Tottenham again.

If you love tactical analysis, then you’ll love the digital magazines from totalfootballanalysis.com – a guaranteed 100+ pages of pure tactical analysis covering topics from the Premier League, Serie A, La Liga, Bundesliga and many, many more. Buy your copy of the November issue for just ₤4.99 here


Comments