West Ham United hosted Wolverhampton Wanderers in the Round 30 of the English Premier League after the lockdown period with both teams previously having played a game of football in March. West Ham, battling with Bournemouth in the lower half of the league table to avoid relegation, were desperately looking for points while Wolves were fighting for a spot in the top five behind Manchester United.
Wolves managed to win the game 2-0 with both goals scored in the second half. What were their tactics that managed to unlock the hosts after half-time? How big was the impact of Adama Traoré in this game? I take a look at the tactical set up of both teams and an analysis of the statistics during the game to examine Wolves’ win in this tactical analysis.
Lineups
West Ham: Fabianski, Ngakia (Fredericks 81), Rice, Diop, Cresswell, Noble, Soucek, Antonio, Fornals (Yarmolenko 81), Anderson (Lanzini 67), Bowen.
Unused subs: Randolph, Balbuena, Johnson, Silva, Wilshere, Ajeti.
Manager: David Moyes
Wolves: Patricio, Doherty, Boly, Coady, Saïss, Jonny (Vinagre 89), Neves, Moutinho, Dendoncker (Neto 64), Jota (Traore 64), Jimenez (Gibbs-White 90).
Unused subs: Ruddy, Kilman, Buur, Jordao, Podence.
Manager: Nuno Esprito Santo
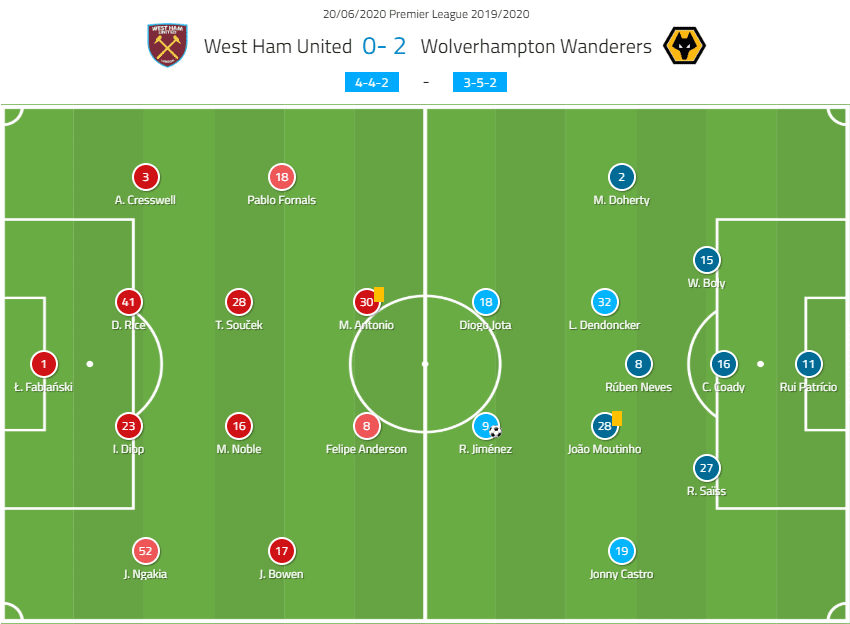
The hosts lined up in a 4-4-2 with wide player Michail Antonio alongside the creative Brazilian Felipe Anderson as the front two. Jared Bowen and Pablo Fornals had the license to drift into central areas from wide during the attacking phase. Mark Noble played as the deep solo pivot to build out from the back and the fullbacks, Jeremy Ngakia and Aaron Cresswell pushed up along the wide flanks. We also saw Declan Rice, who usually plays as the pivot for West Ham line up as a central defender alongside Diop.
The visitors deployed their regular 3-5-2 formation with Raúl Jiménez and Diogo Jota as the front two for Wolves. Rúben Neves sat in the playmaking role from deep while João Moutinho and Leander Dendoncker operated in more advanced positions along the left and right half-spaces respectively. The wing-backs were Jonny Castro and Matt Doherty who could fall back alongside the back three to make it a back five in the defensive phase.
Wolves exploit depth and width in attack
Wolves enjoyed a slightly higher percentage of possession (54%) than West Ham and were more clinical in front of goal with four of their eight shots on target compared to two out of seven for the hosts. But more importantly, Wolverhampton looked much better organised and tactically superior.
Wolves looked to exploit width and depth when in possession of the ball. The wingbacks would stretch the play from one sideline to the other and push up overloading the wide areas along with the forwards. By playing three central defenders, Wolves always managed to find depth while circulating the ball in buildup or recycling possession.
The back three would invite the pressure and drop deeper with Saïss and Boly playing in the inside corridors along the same line, and the captain Conor Coady dropping at least 15 metres deeper almost to the edge of his own penalty box. With Neves coming deep too between the left and right centre backs to build up play, the four players from behind for Wolves formed a staggered diamond. West Ham were unwilling to commit bodies to aggressively press Wolves so high as that would risk leaving spaces in their formation to exploit. Having this depth also allowed the wingbacks to be positioned high up alongside the forwards and maintain the width without needing to support the defence.
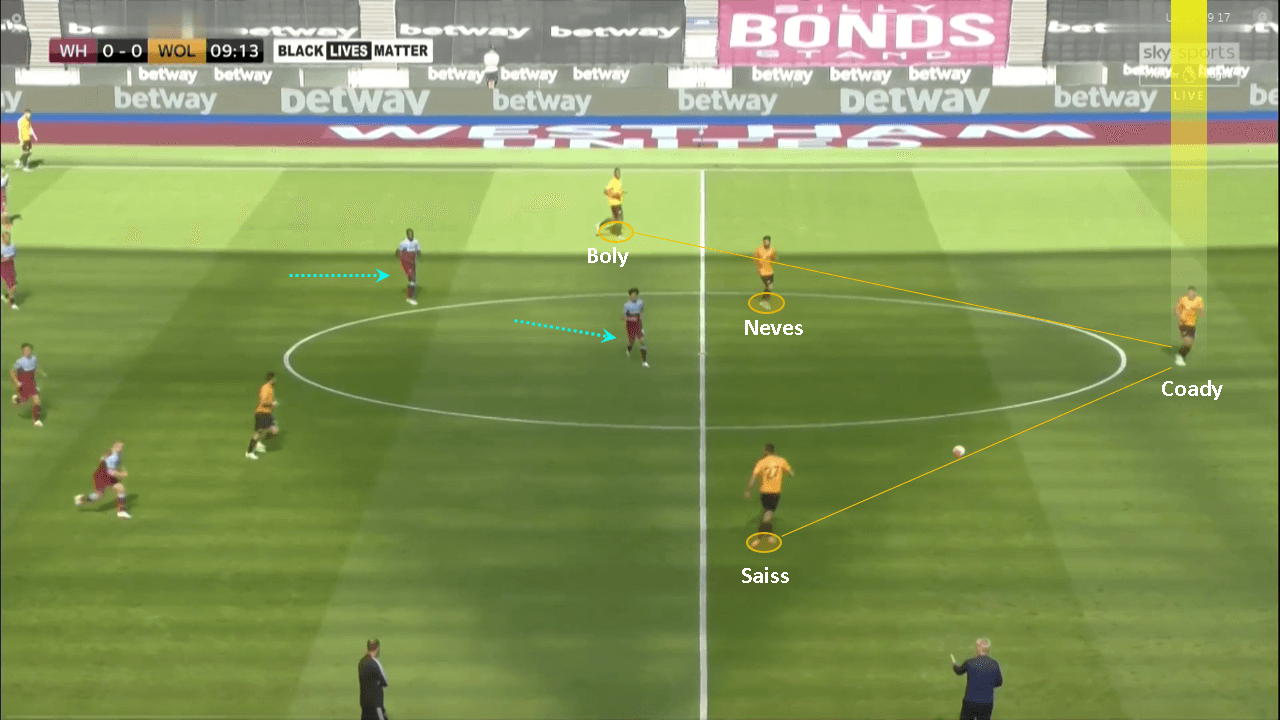
In this screenshot above we see the ball being played back and Wolverhampton recycling possession. Saïss and Boly are positioned along the half-spaces with Neves between them and the three are being pressed by Anderson and Antonio. We see Coady further deep whom they can play the ball to, to circulate possession. With the wing-backs providing width up ahead, Coady could easily play the diagonal balls to find them from deep and push the attack onto West Ham. According to wyscout’s report, Coady’s average pass length during the game was a staggering 30.4 metres which explains his tactical role during the game.
It is interesting to observe that the second-highest range of average pass length during the game was Rúben Neves with 24.2 metres. During the game, we often saw Neves slip into deeper pockets to find the forwards with the diagonal balls to switch play. His exceptional technical ability with the long-range passing was on full display as he delivered eight out of eight accurate long passes during the game. Having Neves and Coady deliver these accurate long-range passes from deep made it very difficult for West Ham to press the Wolves man-to-man from the front.
How did Wolves control the half-spaces
The defensive set up explained in the earlier section formed a good base for the advanced midfielders and forwards to thrive in. Neves dropping deep allowed Saïss and Boly to split wide apart and advance safely along the half-spaces. From further up the pitch we saw Moutinho and Dendoncker drop along the half spaces to form a free passing lane for the left and right central defenders to play the first pass to. If they were marked they could easily play Neves back as a third man and the play could be distributed out wide to the wingbacks or further up to Jota who often played in the hole.
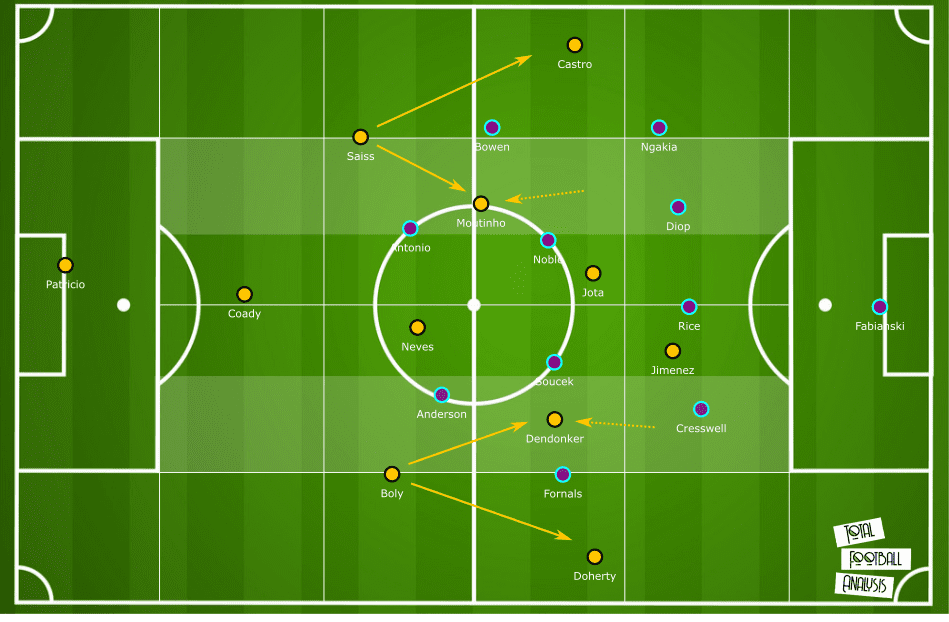
In the tactical scheme illustrated above, we see that with Coady as security from behind, the two central defenders Saïss and Boly are able to advance along the inner corridor and they always have two options, the wingbacks on the far lane or the attacking midfielders coming towards them to receive the pass in the half-spaces. Neves is positioned between them and never marked so the pass can always be played to Neves who can turn and look for a good diagonal pass to switch the play.
We also see Jota’s role in occupying a position in the hole in front of the defensive line of West Ham, with enough space to create plays. Jimenez, on the other hand, played further up whose duty was to push the line back and maintain the depth for the midfielders to operate.
Let’s look at this instance below where Jota receives a pass from deep. West Ham’s central defenders leave Jota in space and focus on holding the line, and this gives him time to lift his head up and decide which flank he can switch the ball to with the wingbacks advancing on either flank.
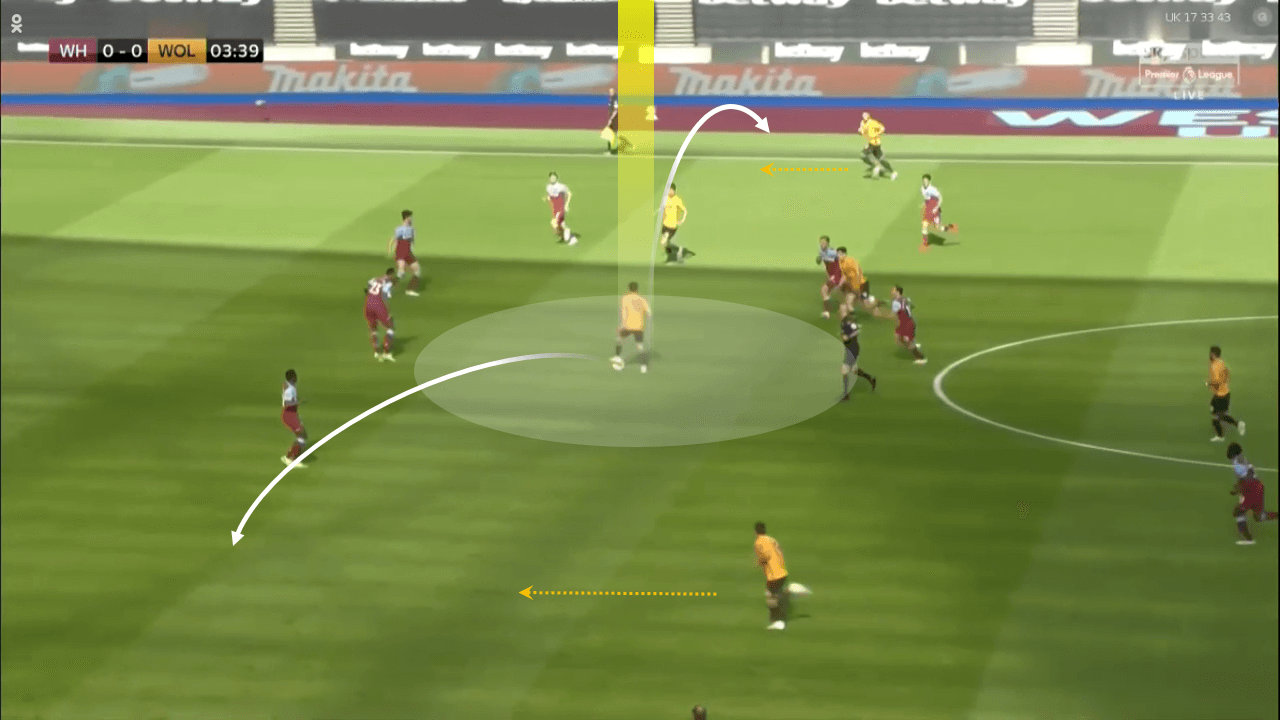
In another instance below we see how much space the defensive line of West Ham gives Jota, and he is able to recieve a pass from deep, turn and switch play to the wing back on the left.
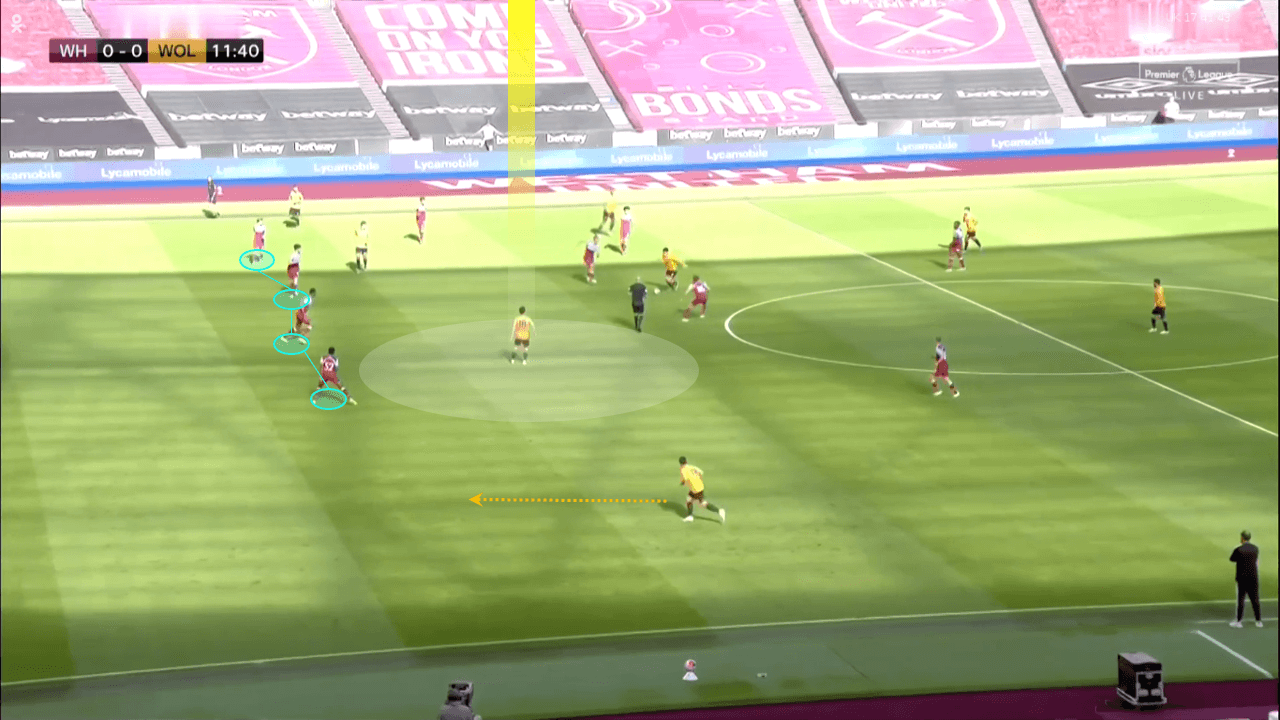
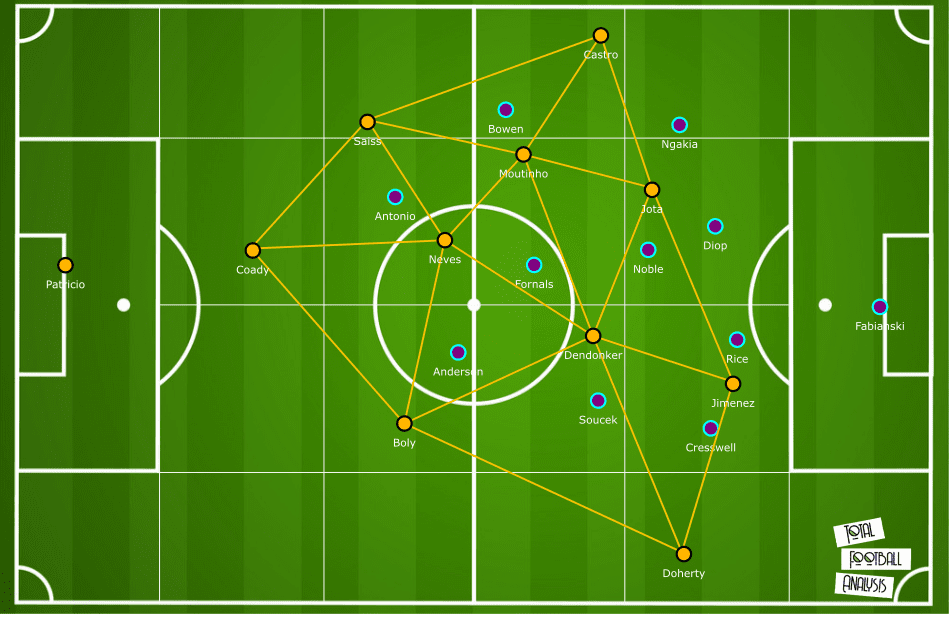
Thus, in Wolverhampton’s attacking organization we see that the players were always positioned on different lines. This helped them create numerous triangles in the build-up and open passing lanes to each other to play simple one-twos and move the ball forward with short passing. If the players were marked they could play the ball back to Neves or Coady who could switch the play with a long-range pass. Look at all the triangles that they successfully form from their positioning in this tactical scheme below.

Wolves tactic of overloading the opposite flank
A notable strategy that worked out effectively for Wolves was how they managed to create a situation of overload on the opposite flank using the two forwards and the wing-back. We already looked into how the wing-backs had the freedom to push up along the wide lanes and support the forwards.
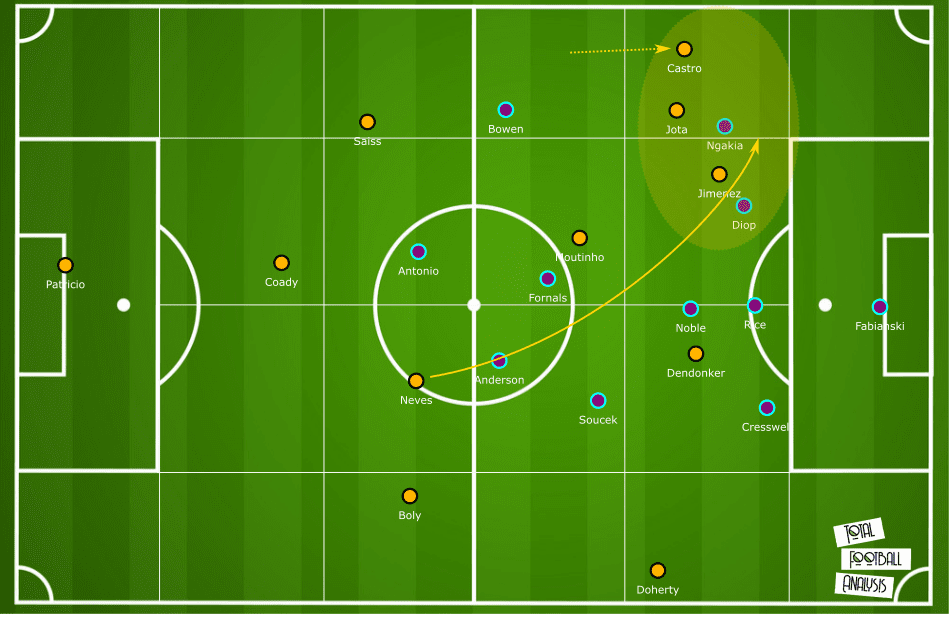
In this instance below, early on in the game we see the ball on the right side of the pitch with Neves. West Ham are keeping the defensive line organised and tight, while their midfielders are also on the side where the ball is, looking to apply pressure. On the opposite flank we see how the two forwards, Jota and Jimenez are positioned on the shoulder of West Ham’s right back.
Jimenez is occupying the space between the central defender and the fullback, while Jota is trying to sneak in on his blind side. We also see Moutinho just behind them who is completely unmarked and signalling for the diagonal pass to be played. This effectively puts a lot of pressure on the fullback as he is unsure which Wolves player to focus on.
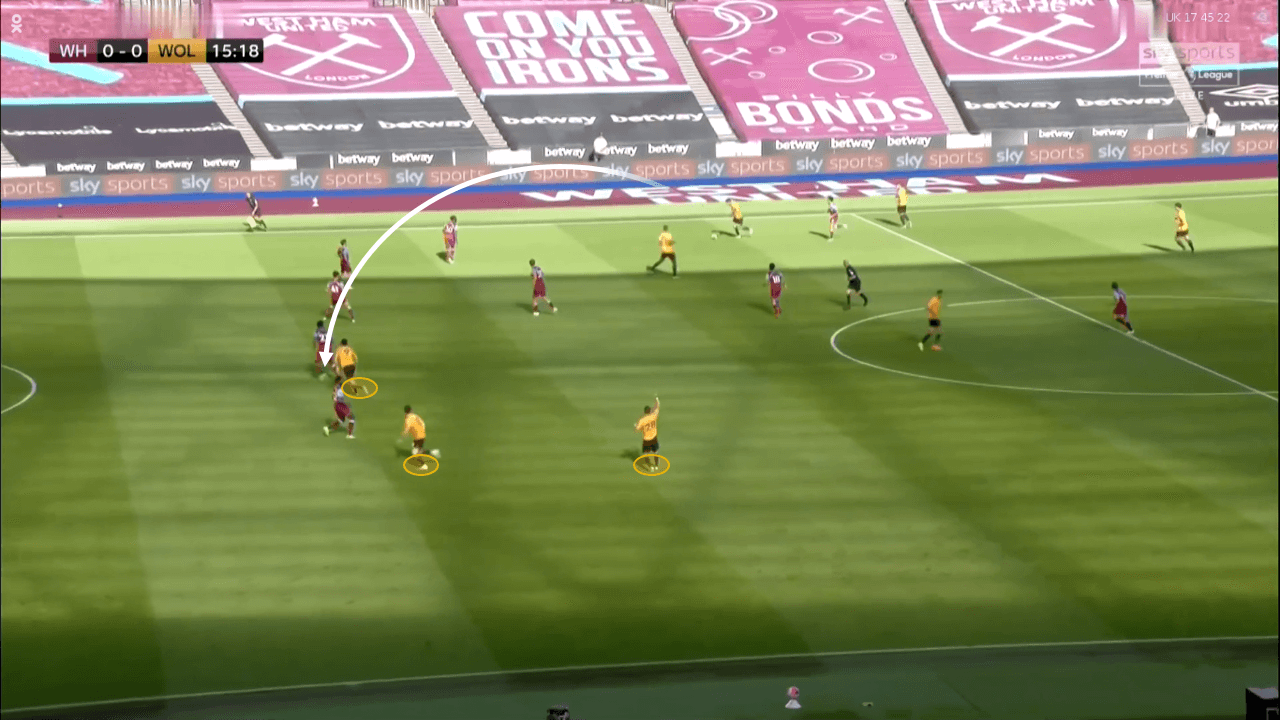
Let’s look at another similar situation below that created a shot opportunity for Wolves. This time we see the ball further deeper and more central. Once again we see Jota and Jimenez positioned on the shoulder of the right-back for West Ham.
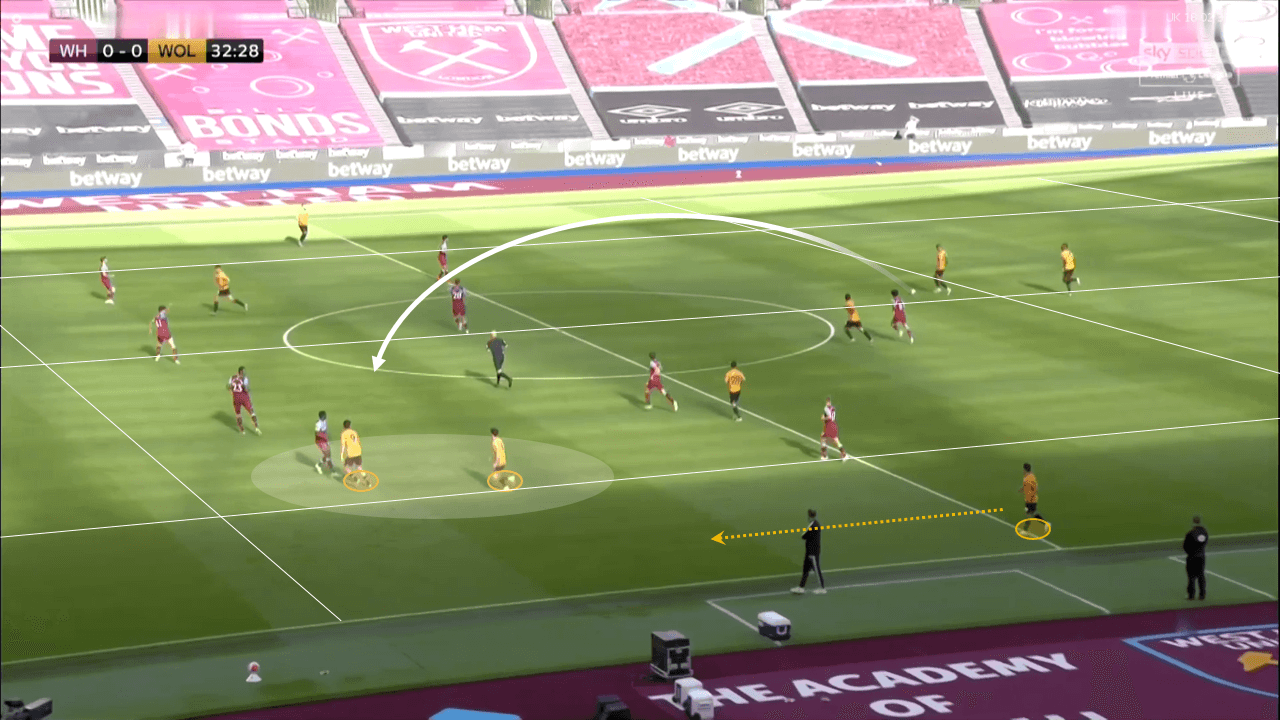
Jimenez is pinning him directly and Jota is prepared to sneak behind just off the shoulder. The position of the two forwards more laterally than centrally makes it very difficult for West Ham’s back four to set the line. In this case we see the wingback prepared to make a run down the left wing which would effectively create a 3v2 scenario after the long ball is played.
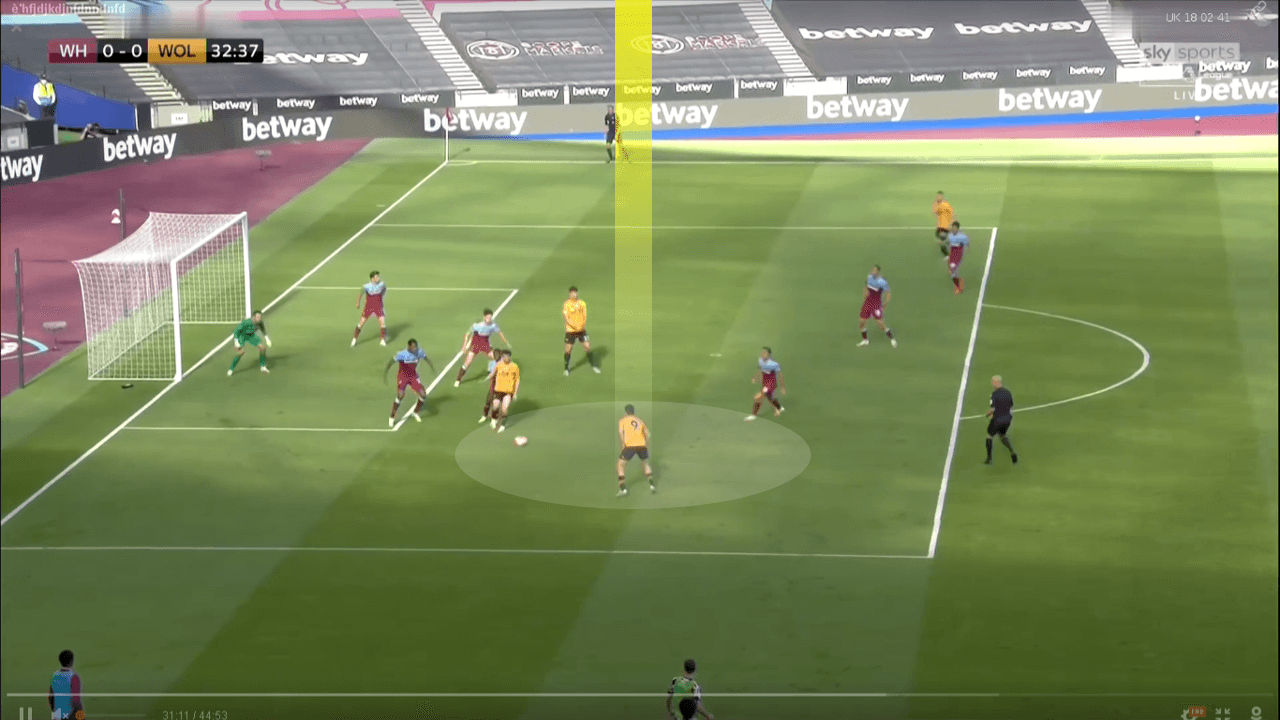
In the next frame, we see that Jota receives the ball and takes on the fullback, and Jimenez is positioned just behind him, free and unmarked, to be easily laid off a pass and take a shot on goal. In this case the shot was blocked by the central defenders who are covering, but we see how this tactic managed to exploit overloads in wide areas using the forwards.
West Ham’s attacking organisation
Although the hosts struggled to find their rhythm throughout the game with players adapting to rather new roles coming back from an unprecedented break in the season, they did manage to achieve some success early on with their creative players like Anderson and Fornals.
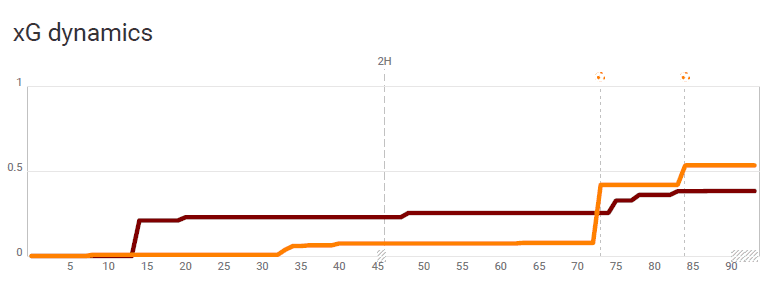
During the first half, West Ham had an xG figure of 0.23 while Wolves only had an xG of 0.07. Wolves’ tactics, albeit pretty to watch, failed to create clear opportunities during the first half and it was West Ham who looked more dangerous to find a goal on the break after winning possession.
Moyes had a direct strategy to find players like Antonio and Anderson from deep and wide areas. Antonio engaged in 11 aerial duels winning 45% of them and it was clear that West Ham looked to capitalise on the physical presence of Antonio as a target man to win the aerial balls and lay it off to the creative players like Anderson and Fornals, and Manuel Lanzini in the second half around him. In the tactical scheme below, we see Wolves sitting back in a 3-5-2 in their defensive phase and West Ham attacking with width provided by the full-backs.
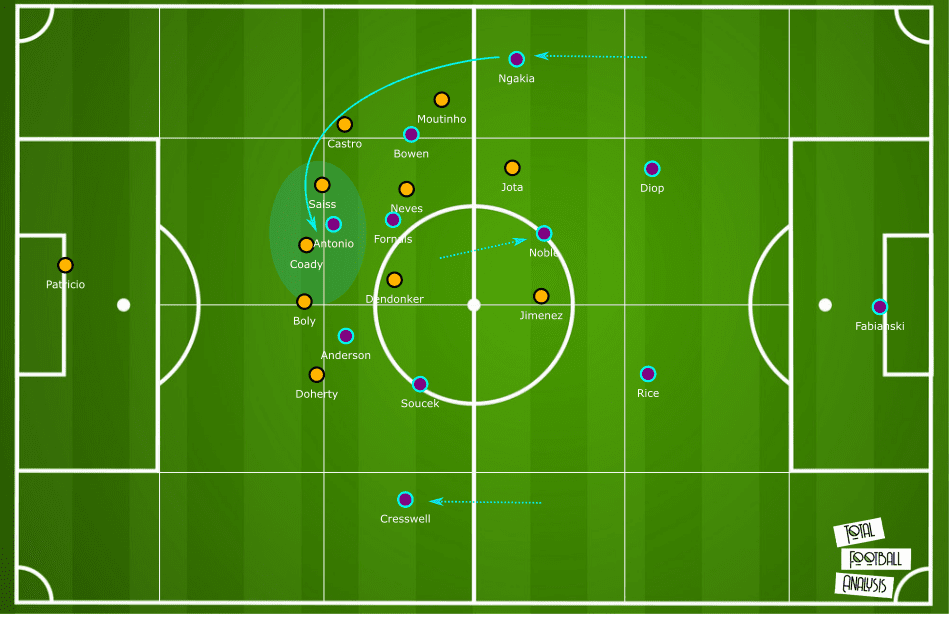
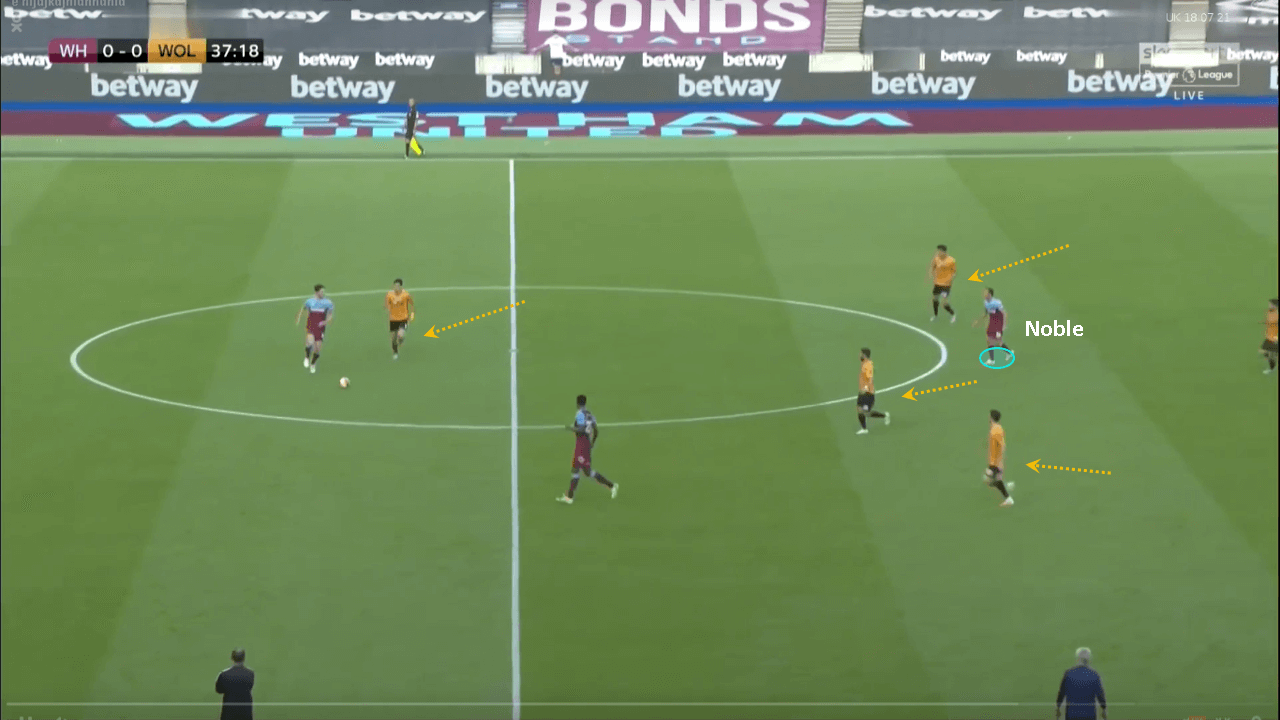
The goal was to find Antonio as the target man up front and the others around him would contest for the second balls. Mark Noble played as the holding midfielder who would drop deep to receive the ball, turn and distribute it. Fornals on the other hand looked to receive the ball between the lines and in space to quickly transition into attack with a threat centrally as we see in this instance below.
The biggest opportunity for West Ham came in the opening minutes of the first half as we can see in this instance below. Look at Noble in possession of the ball from a deep position alongside his central defenders. The wingbacks, Ngakia and Cresswell are positioned on the sidelines to stretch the width. Antonio is the furthest player up. We see Fornals making a run in behind. Noble manages to find Fornals with a perfectly weighted pass to set him up for a 1v1 scenario against Rui Patricio with a 0.21 xG, but he failed to convert the shot on target. Had West Ham scored early on, we could have seen the game played out differently.
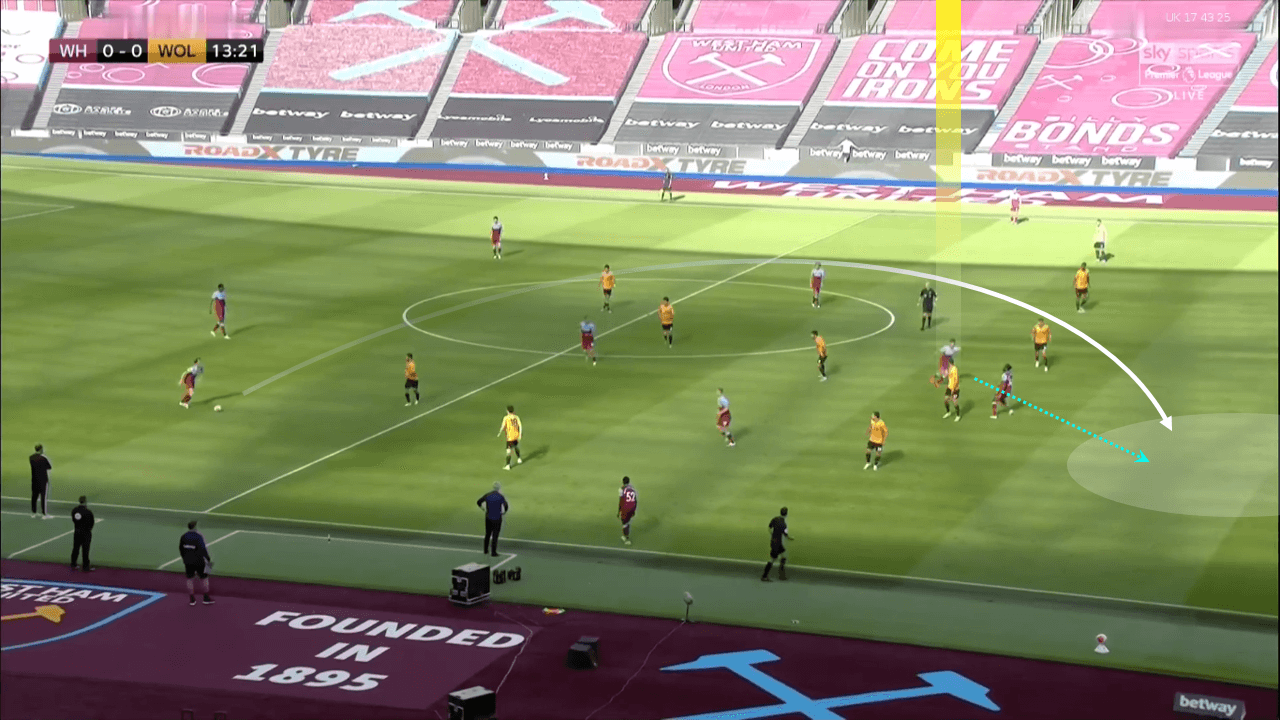
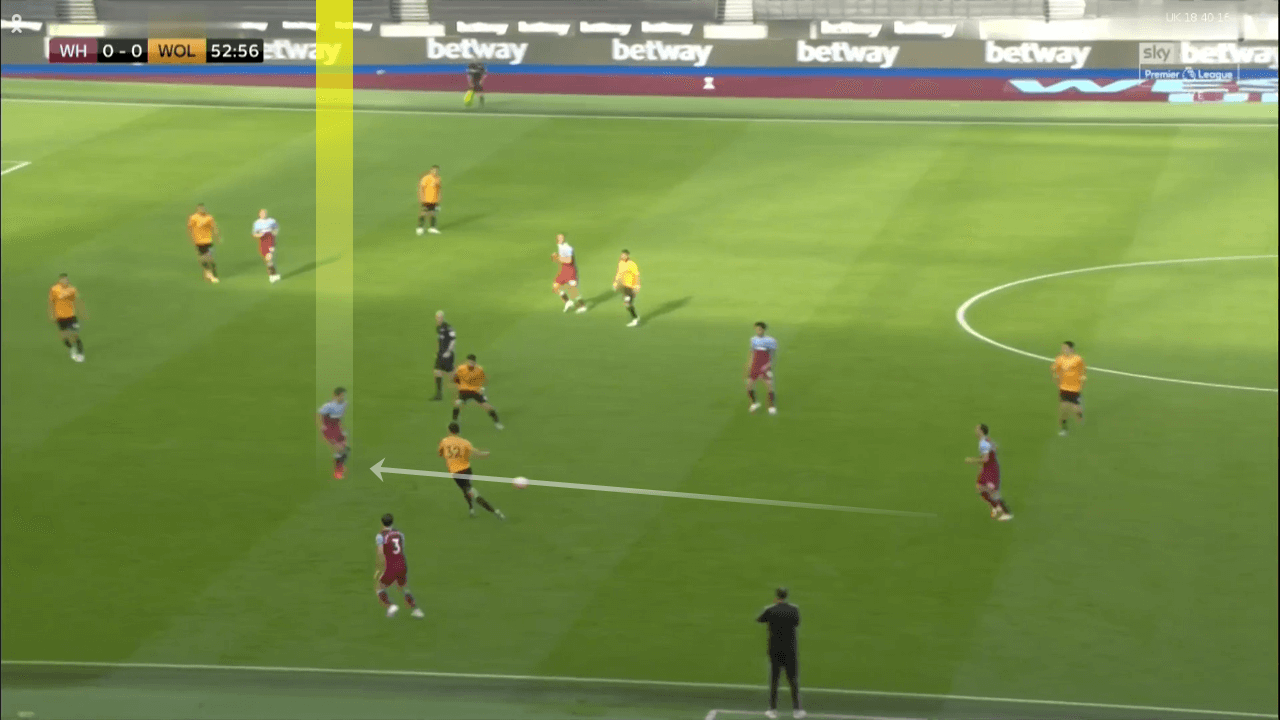
The defensive structure of Wolves involved controlling the central spaces with their forwards and midfielders forcing the play out wide where their wing-backs were present with the central defenders behind them to cover. By controlling the central areas effectively, Wolves made it very difficult for West Ham to build up as they denied the hosts a lot of options between the lines and forced them to go long.
In this screenshot above we see Rice in possession of the ball and he only has his centre half partner, Diop in the vicinity to play a pass. In the middle we see Dendoncker and Moutinho closing the passing lane to Noble, while Jota is prepared to press Diop. West Ham’s fullbacks are positioned high up and Rice is only left with two options – to either go long or to play the ball back to the keeper, Fabiański.
The impact of Adama Traoré
For those who watched the game, it is hard to deny how that Traoré was a game-changer that single handedly changed the outcome of the game for Wolves. Let us examine his impact during this game closely.
Tactically, the substitution of Traoré for central midfielder Dendoncker, and Pedro Neto for Diogo Jota changed Wolves formation from a 3-5-2 to a 3-4-3 with Jimenez playing as a traditional centre forward and Neto and Traoré operating on the wider areas. This sacrificed a presence in the midfield but added a lot more attacking threat on the flanks, especially on the right with Traoré and Doherty.
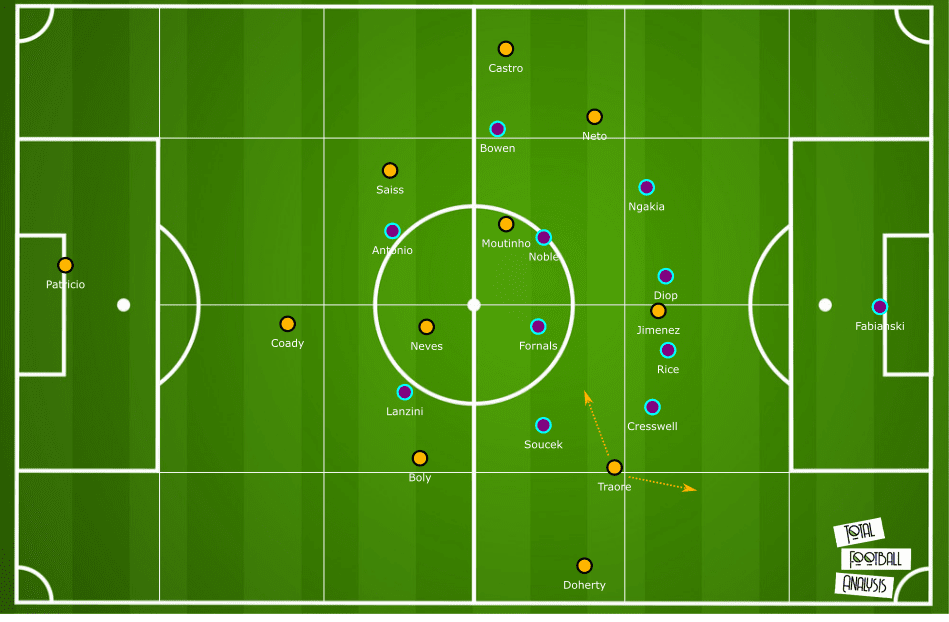
We also saw an increase in the number of duels won after Traoré was brought on, especially in areas higher up the pitch. It is interesting to see the correlation between the numbers of duels won to the goal-scoring opportunities created by Wolves during the game.
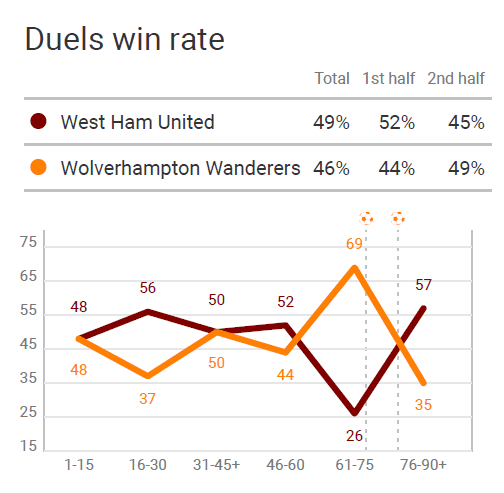
We see from this wyscout report graph, that in the in first half West Ham won more duels than Wolves and had a higher xG, but that reversed in the second half with the two goals coming in quick succession after their win rate peaked just 10 minutes after the hour mark.
Traoré had an xGChain of 0.81 and an xA of 0.34 during the game. The two biggest influences Traoré had with his substitution was the number of dribbles and the crosses by Wolverhampton. If we look at this map of dribbles from wyscout below, we see that Wolves had almost no dribbles on the right side as Noble did a good job of closing down Dendoncker and Doherty in the first half.
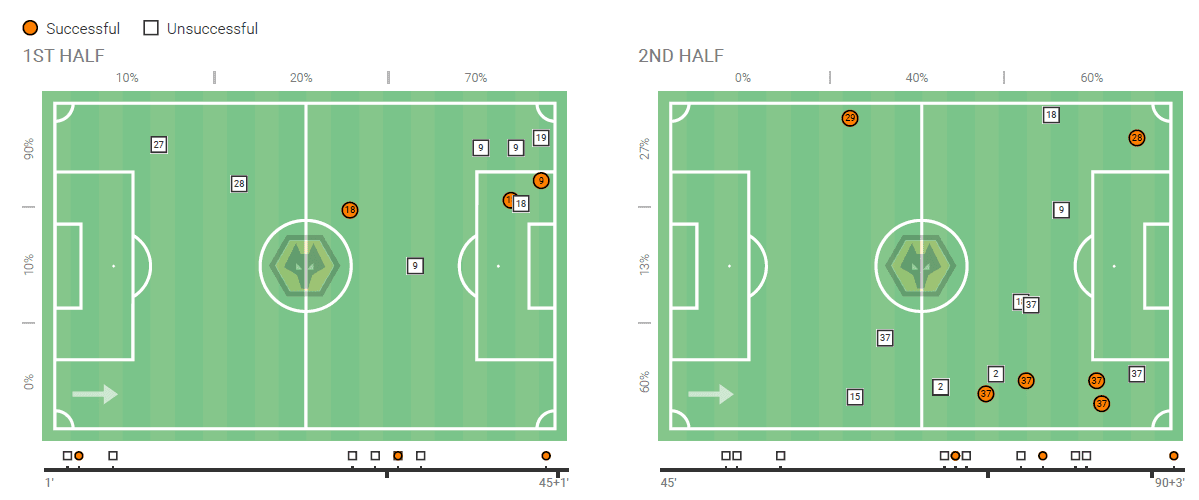
But after Traoré (#37) came on, he had four out of seven successful dribbles two of which resulted in crosses, one of the cross landing a perfect assist for Jimenez to score the first goal. Traoré is usually deployed as a wingback on the wide line for his physicality and dribbling ability, but in this game, we saw that he had a much freer role as an attacker with the freedom to drift inside to receive passes and create plays.
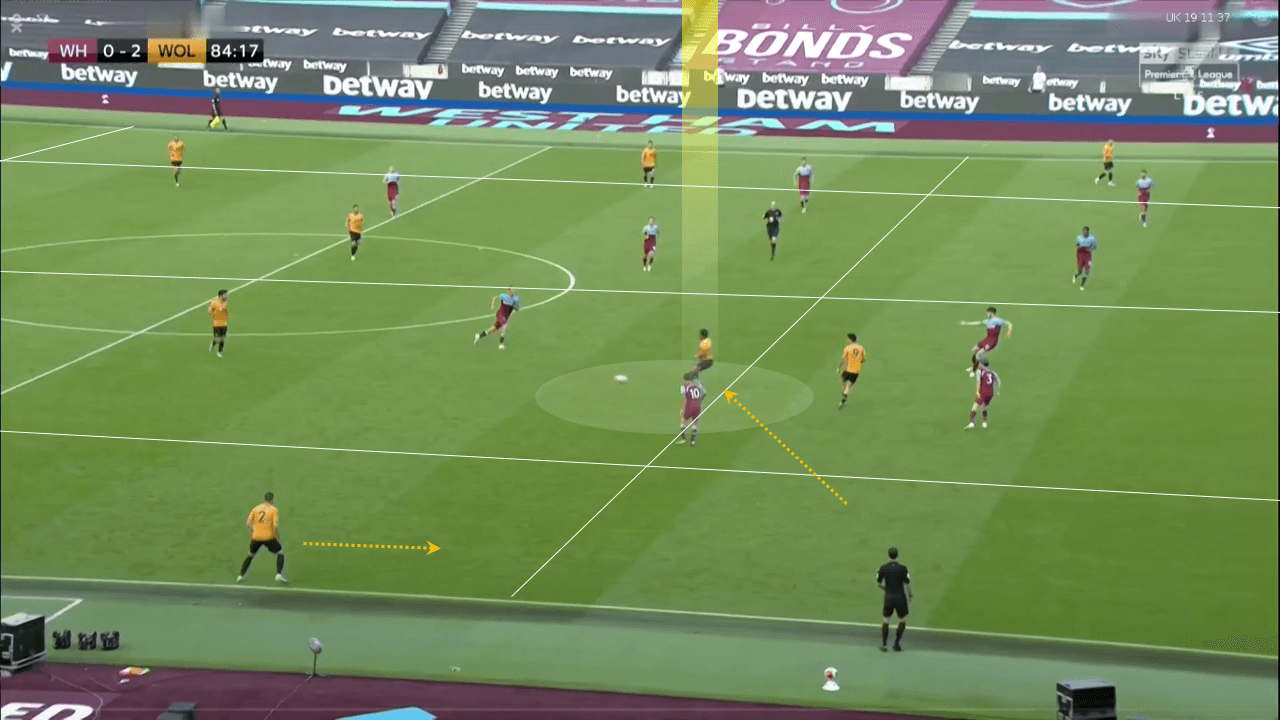
In the buildup to the second goal, we see how Traoré drops inside the right half-space to receive a pass from deep as Doherty makes an overlapping run on the wide lane. Notice Neto, who is still on the far side of the opposite flank and uninvolved in the action yet. Traoré then manages to successfully dribble past his marker and lay the ball off to Doherty who finds the unsuspecting Neto with another perfect cross, while the defenders are preoccupied with marking Jimenez who scoring earlier. This goal killed the game for West Ham and put Wolverhampton successfully in the lead.
Conclusion
Nuno Esprito Santos side looked far stronger and tactically sound against West Ham and deserved the win. Although Traoré made the big difference in the second half, Wolves had plenty of tricks up their tactical sleeve to trouble West Ham constantly. Wolverhampton are now tied with Manchester United standing sixth on points in the table.
West Ham struggled with many players playing out of position and will take a while to get back into their rhythm. However, Moyes is running out of time as the Hammers are now level with Bournemouth on points lurking dangerously close to the relegation zone.



Comments