Football returned in England’s top two flights seven days ago. Behind closed doors of course. How are you finding the artificial crowd noise? Seems a bit mad doesn’t it? On Wednesday 24th June, the artificial crowd at the Molineux were in full voice and were rewarded with a home win and three points for Wolverhampton Wanderers as they look to continue their charge towards the European places. Nuno Espírito Santo’s Wolves welcomed Eddie Howe’s Bournemouth. Both teams first match after the resumption ended as 2-0’s. With Wolves securing the win away at West Ham United, whereas Bournemouth slumped to a 2-0 home defeat to Crystal Palace.
In this tactical analysis, we will delve into the tactics that decided the match and provide an in-depth analysis of how Wolves wore Bournemouth down before seizing control of the match in the second half.
Lineups
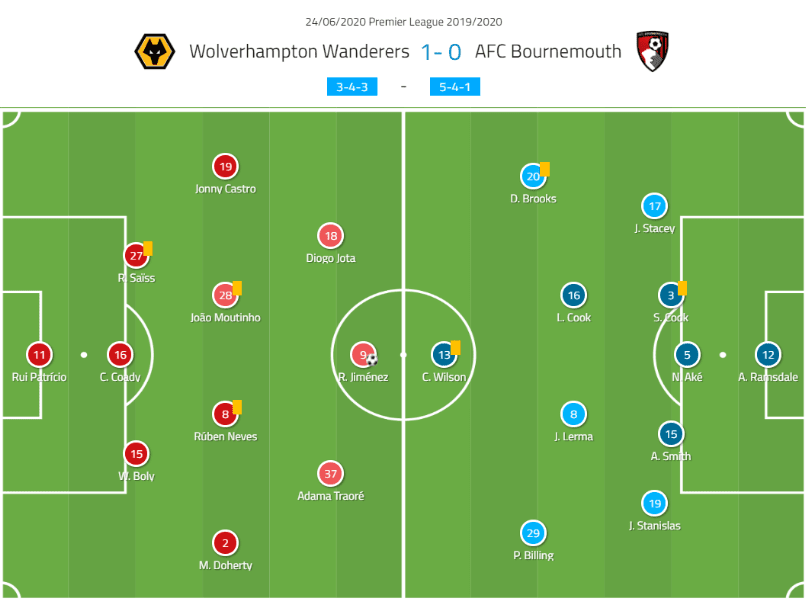
In a match that was crucial at opposite ends of the Premier League table, Wolves opted for their usual back 3 with captain Conor Coady flanked by Roman Saïss and Willy Boly, with Portuguese veteran goalkeeper Rui Patíicio in the sticks. Another two Portuguese players occupied the centre of the pitch with Rúben Neves supported by João Moutinho. Usual suspects appeared at wing-back with Irishman Matt Doherty on the right and Jonathan Castro (Jonny) on the left. The front three comprised of Diogo Jota, speed merchant Adama Traoré and the prolific Mexican Raúl Jimenez completing Wolves’ 3-4-3
Bournemouth lined-up on paper in a 5-4-1 that frequently became a 4-5-1 when Bournemouth looked to attack. Aaron Ramsdale lined-up behind a back five of Jack Stacey, Steve Cook, Nathan Aké, Adam Smith and Junior Stanislas doubled up with Smith as almost double left-backs with the task of preventing Traoré having an influence on proceedings. Tricky Welshman David Brooks and Phillip Billing provided the width in midfield and a robust combative midfield of Jefferson Lerma and Lewis Cook sat behind lone striker Callum Wilson. When Bournemouth had possession, they looked to push Stanislas further up and onto the left of midfield with Billing tucking inside to pack out the centre of midfield.

Wolves use of triangles out-wide in order to break lines
Bournemouth had arrived at the Molineux with a plan, they were to sit in a mid-block and look to restrict Wolves to playing on the flanks and across the back. In reply to this Wolves looked to build steadily across the very wide back three and looked to combine in triangles between three of the wing-back, centre-back, centre-midfielder and winger, with the aim of either feeding the ball into the feet of Jiménez or down the wing for Traoré or Jota to run onto.
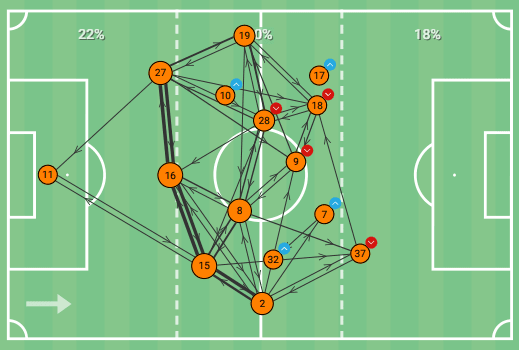
As we can see the thickest and therefore showing the most frequent passes are between the back three centre-backs and wing-backs with the next thickest being passes into one of Neves (8) or Moutinho (28). If we look at an example of this game. We can clearly see this triangle with Traoré as the outlet and the positioning of the other three.
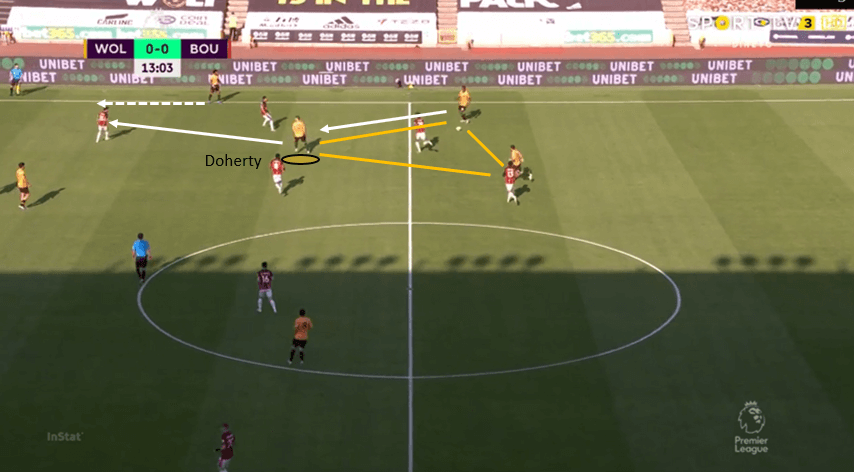
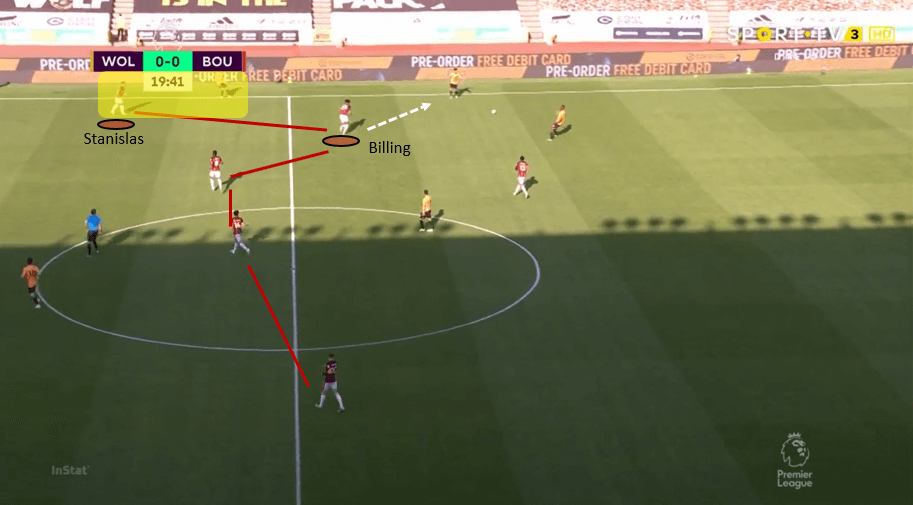
What prevented this from working was Bournemouth’s shape and tactics. The Cherries were incredibly compact and always looked to have numerical superiority when the ball went out wide. Whilst maintaining a solid mid-block that prevented Wolves from playing through the middle. In the first example, below we can see Bournemouth’s 4-5-1 shape across the midfield. Billing looks to press whilst Stanislas was tasked with marking Traoré as support to Smith at left-back.
Once the ball was played out-wide, Bournemouth would pack in tightly into a square shape with Wilson tucking in with the aim of denying Wolves any space to manoeuvre the ball through the lines. We can see this in the example below.
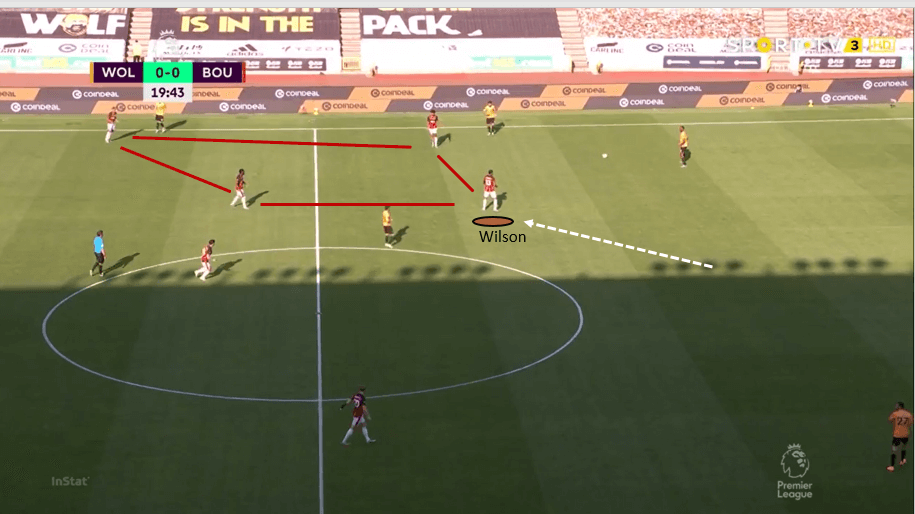
This square denied Wolves the space they needed out-wide and resulted in them often playing back and across to the other side where the same situation would happen again. Wolves were scrappy in the possession and struggled for the intensity required to beat Bournemouth’s shuffling compact unit.
Bournemouth looked to play direct and win second balls
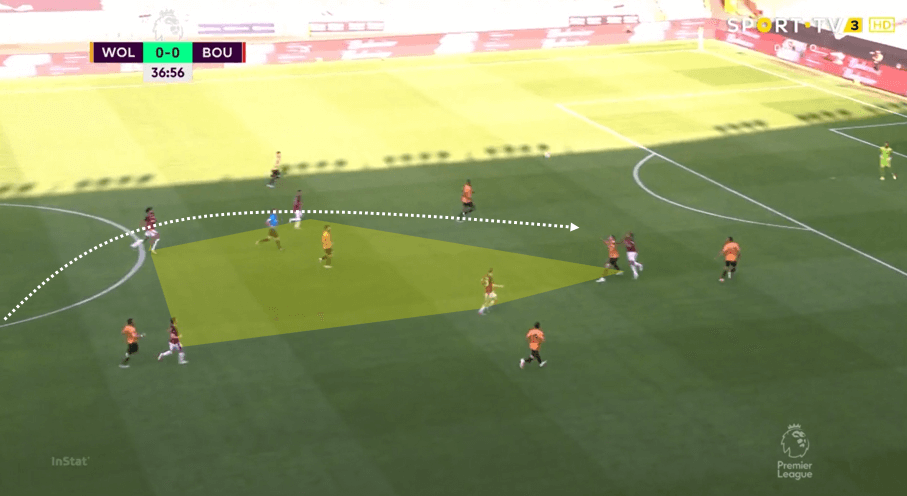
Throughout the first half, Bournemouth look to probe the left-hand side of Wolves’ defence. With a mixture of long balls and direct vertical passes. When going long to Wilson, they would overload the areas around the duel and look to win the second ball once the aerial duel had been contested. See below for an example.
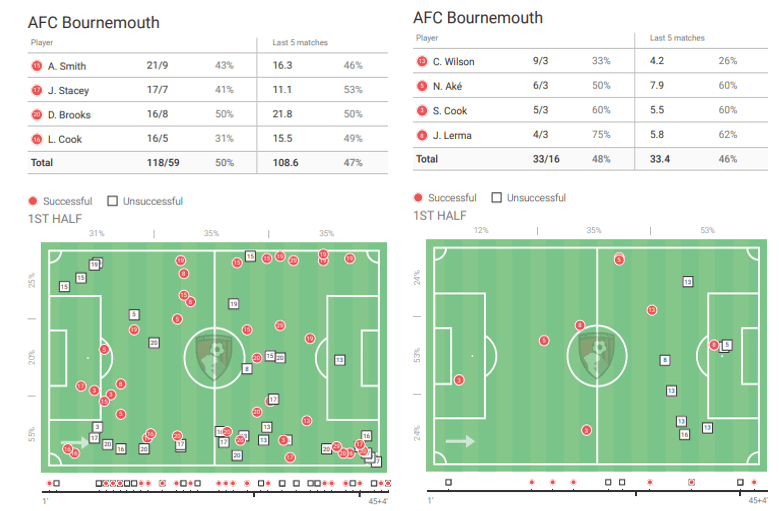
In the following image we can see that Bournemouth played most of their football down the flanks – with a particular focus of attacking down the right-hand side. We can see all of Bournemouth’s duels in the first half (ground duels on the left, and aerial duels on the right).
Hot and tiresome work without the ball
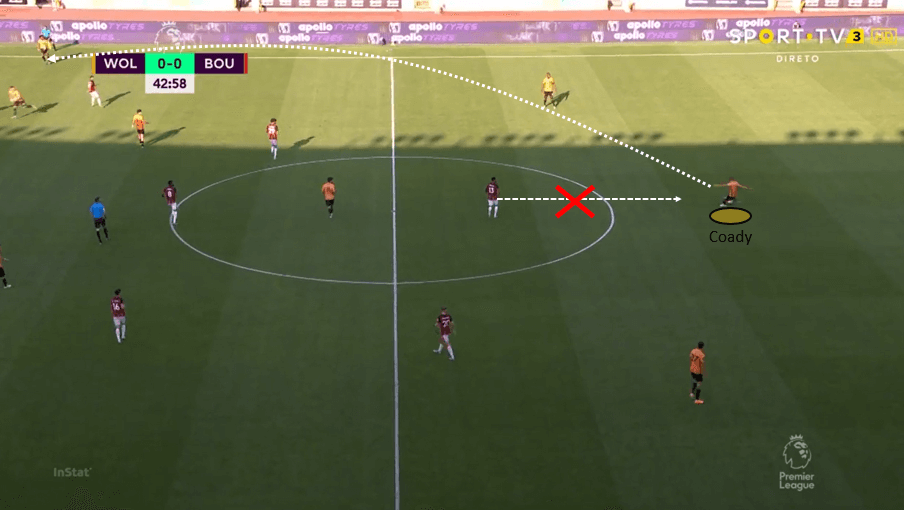
The closer the match got to half-time, the more enjoyment Wolves started to get, other than a brief 10-minute spell. Wolves had dominated possession and made Bournemouth chase the ball for large periods. Bournemouth’s tactics of being compact and shuffling over in response to switches in play from Wolves became delayed and it allowed certain player such as Coady and Neves to get on the ball deep and look for big switch passes, negating any compactness Bournemouth had.
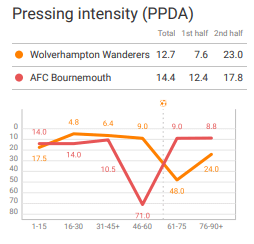
Late on in the half Bournemouth’s press started to drop off through tiredness and Wolves took full advantage. In the below image we see how there is a big drop-off in PPDA just after half-time from Bournemouth, due to the amount of running and sprinting they had to do in order to keep Wolves at bay. This onset of tiredness allowed the likes of Coady to start dictating play from deep with the extra time they had on the ball.
Here we see Wilson fail to apply pressure on Coady, who is allowed time and space to pick out the dangerous Traoré on the right-wing.
Reactions to Jiménez goal
The second half started just as the first had ended, Wolves dominated possession and looked to release Traoré in behind whenever they could. This action ultimately led to the first goal, with Traoré being played in behind before crossing for Jiménez to head home in the 60th minute just before the arranged drinks break.
Bournemouth made three substitutions during the drinks break. The introduction of Dominic Solanke gave Bournemouth some much-needed height up front and Harry Wilson brought quality delivery as well as some attacking flair. The final substitute was Arnaut Danjuma for Stanislas. These changes saw Bournemouth move to a 4-2-3-1 that became a 4-4-1-1 when out of possession, we can see this change below.
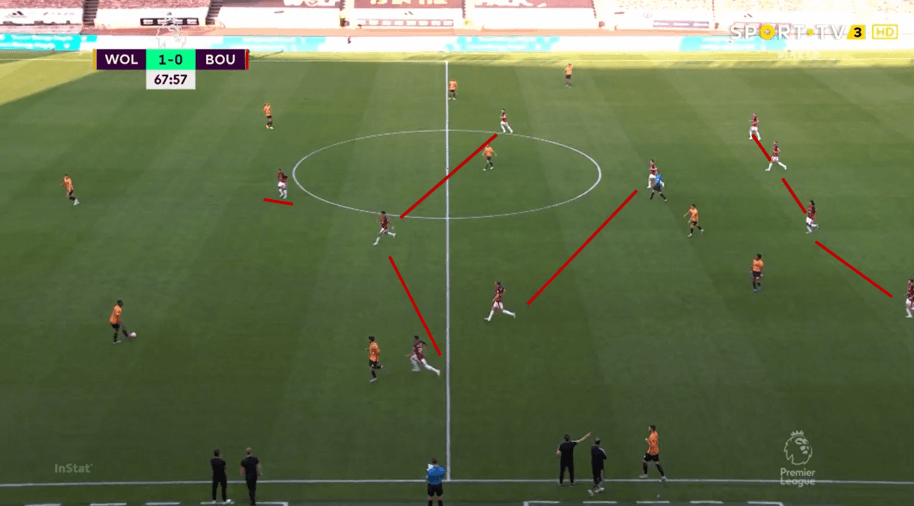
Given that Wolves were now leading and wanted to control the game, they made changes of their own with Traoré leaving the pitch to be replaced by Leander Dendonker. This signified a change in formation for Wolves as they looked to go man-for-man with Bournemouth’s central three with their own midfield three and changed to a 5-3-2 that became a 3-5-2 on the counter-attack. We can see the formation below (Although Doherty and Boly are just out of shot).
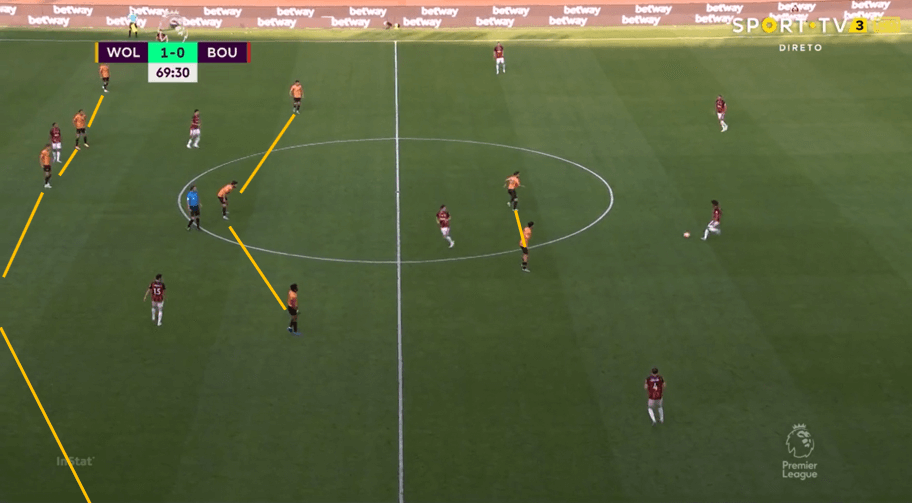
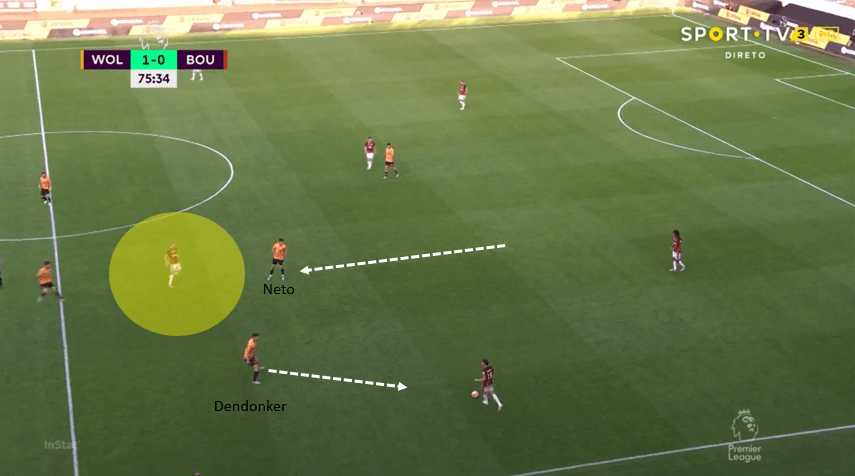
Wolves now looked to sit-back and invite Bournemouth in before hitting them on the break, a key reason why Wolves were able to prevent Bournemouth from creating any meaningful chances was down to the pressing rotation that they applied. In order to prevent Bournemouth from being able to play through the lines. One of the Wolves midfield three would go out to press the Bournemouth full-backs whilst one of the strikers dropped back to man-mark the free Bournemouth midfielder that had been vacated in order to press. This denied Bournemouth the opportunity to play easy passes that broke defensive lines and instead forced Bournemouth into simple mistakes that Wolves would look to capitalise on by hitting the Cherries on the counter-attack.
In the example below, we see Dendonker initiate the press that would typically be associated with a striker or winger, whilst Neto drops back in to mark the free Bournemouth player ensuring that Bournemouth had no easy passes into midfield.
Bournemouth’s last throw of the dice
In a last-ditch attempt to get back into the match, Bournemouth adopted a 4-1-2-3 formation with L. Cook sitting in front of the back four, allowing Dan Gosling to push up and become a second attacking midfielder. As seen below, the problem Bournemouth had was that the distance between L. Cook and the defenders and the attacking contingent was far too great. A consequence of this was that whenever Bournemouth’s attacks broke down centrally, the ball was picked up by Wolves player with space to drive into.
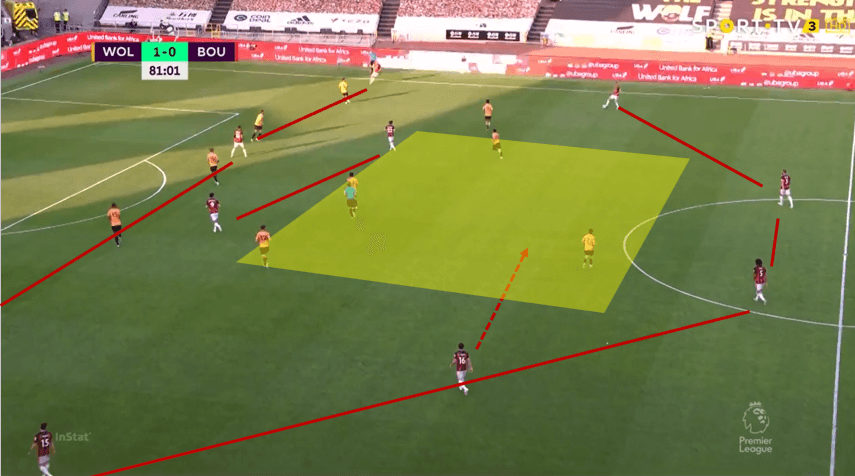
Wolves were sitting inside the Bournemouth attack inviting them to play the ball out-wide where they could then press and win the ball back. On occasions when Bournemouth did manage to get a cross into the penalty area. Wolves goalkeeper Patrício was on hand to claim the crosses and get Wolves moving on the counter-attack. If we look at the image below, which shows all of Bournemouth’s crosses. We can see only two the 11 crosses were successful, and zero in the second half.
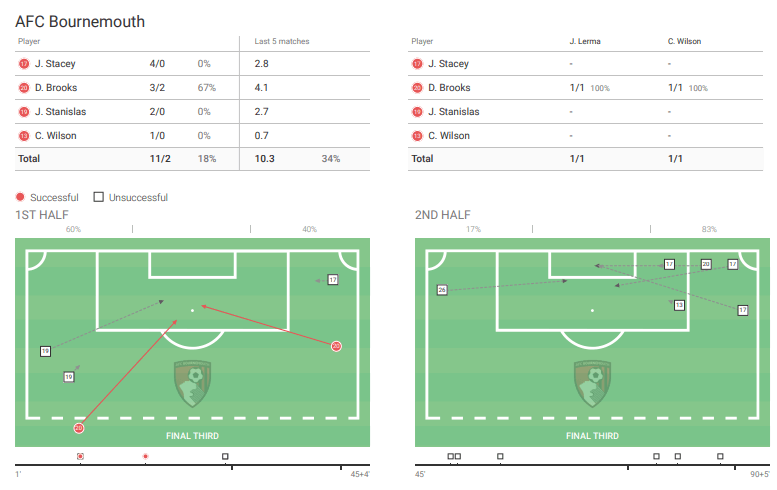
Bournemouth’s game-plan of getting the ball wide and crossing had not worked, and Wolves should have doubled their lead in the very last seconds.

Once again, the gap between Bournemouth’s lines is far too big. The attackers have tried to drive them up the pitch and the defence has not pushed up with the rest of the team and it leaves L. Cook stranded and having to cover a large area. This became increasingly more common throughout the second-half, the more Bournemouth tired, the more the gaps appeared and the more Wolves were able to exploit the spaces on the counter-attack.
Conclusion
A scrappy game that didn’t have many clear-cut chances, which is reflected by the matches xG of 1.19 (Wolves were responsible for 1.13). Bournemouth came with a game plan and started the match with intent and had some moments of success in the first-half but ultimately could not break through Wolves’ impenetrable defence. Wolves dominated possession for the large majority of the match until their goal, and then sat back and played on the counter as Bournemouth had tired from their high-intensity first-half in the early evening heat.
The win moves Wolves four points clear of 7th placed Tottenham Hotspur and level on points with Manchester United in 5th and with seven goals separating the two clubs on goal difference. Wolves have a Midlands derby to contend with next time out as they face Aston Villa at Villa Park. Things are looking bleak for Bournemouth. The Cherries drop into the relegation zone and are without a win in six matches and only seven points from a possible 33. Bournemouth host Newcastle United in their next fixture.



Comments