After five years in the Premier League Bournemouth’s time has come to an end. This has also now seen Eddie Howe leave the club. Howe’s assistant, Jason Tindall, has been confirmed as taking the reins from Howe, seeking immediate promotion from the EFL Championship. Whilst Bournemouth’s season was ultimately unsuccessful, the Cherries managed to be a productive side from set-pieces. Indeed, despite their 18th place finish, managed to score 15 times from set-pieces. They have often been credited with creating inventive, complex routines in search of separation from markers. Furthermore, it seems that Tindall himself took the lead on set-pieces, with Howe giving his No.2 credit in the media. In this set-piece analysis, I will use analysis to look at these situations in-depth.
In this tactical analysis of Bournemouth’s set-pieces I will analyse their offensive tactics from set-pieces, corners specifically, and see why they have had such a great deal of success.
Near-post overloads
There can be a variety of methods that can be employed in order to hopefully generate a goalscoring opportunity. These can include blockers or diversion runners. Another method, however, can be overloading an individual zone. This can therefore help achieve positional superiority, whether in the immediate area or an underloaded zone elsewhere after a potential ricochet due to congestion, or an intentional flick-on. Indeed, this tactic is something that Bournemouth opt to use on many occasions. The Cherries are also known to incorporate decoy runs into their routines, to maximise space.
The taller, more aerially dominant players are those that directly attack the initial delivery. They begin their movements from deeper areas, to try and gain dynamic superiority over zonal markers located at the near-post, though this can be offset by effective man-markers. Additionally, attacking the ball at such an area means the delivery possesses more pace than it would at the far-post. Therefore, less power is likely required by the attacker to direct it towards goal.
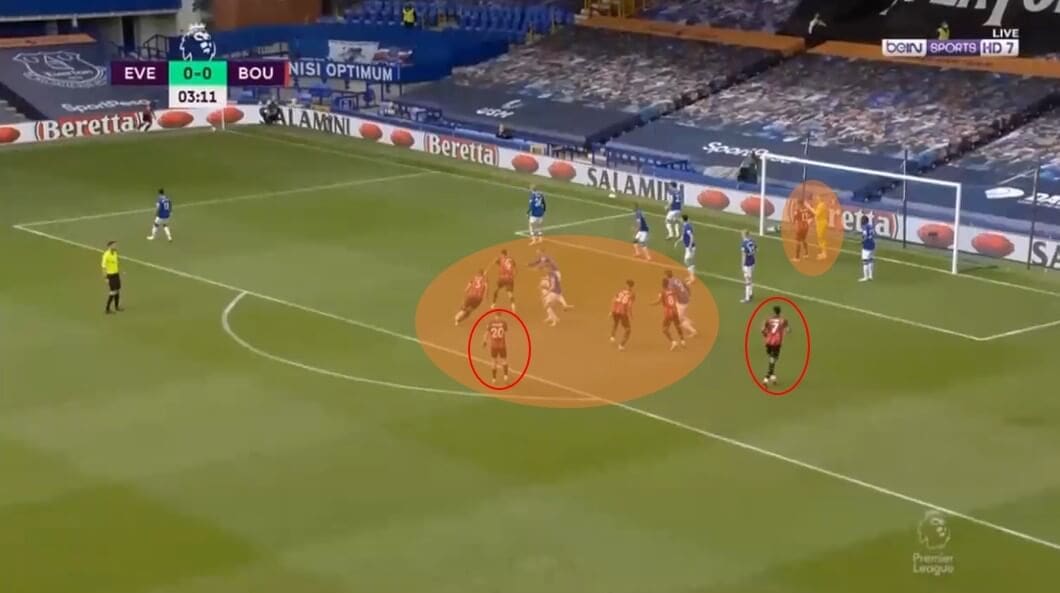
The example above illustrates their overarching structure. No.13 Callum Wilson positions himself close to Jordan Pickford. There is logic in this in that it can impede Pickford, and restrict him from accessing the initial delivery. However, Wilson must be wary of being offside in the second phase, and cannot attack the corner himself due to it being an out-swinger. This positioning is much more worthwhile for an in-swinger, as where Wilson lends itself better for the trajectory. Joshua King is located at the far post, unmarked, and available for a flick-on. The forward is also on the blindside on several Everton defenders. There is the quartet of players who are the main attackers, in that their task involves seeking separation for themselves or a teammate to shoot. David Brooks is also situated on the edge of the box, in order to hopefully sustain attacks.
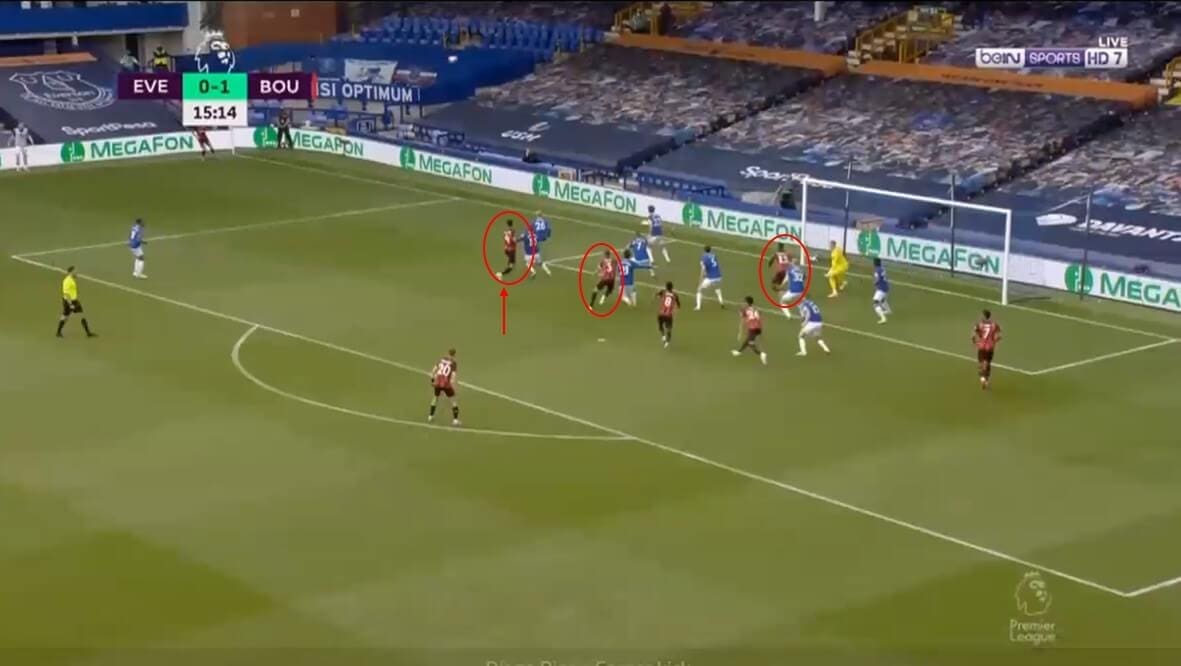
This next example shows attempts made to dismark at the near-post. Dominic Solanke (No.9) makes a slight forward movement. And because he is being man-marked this causes a minor amount of space to appear for Steve Cook to move into and exploit. We can also see Wilson attempting to impact play by moving in from the blindside.
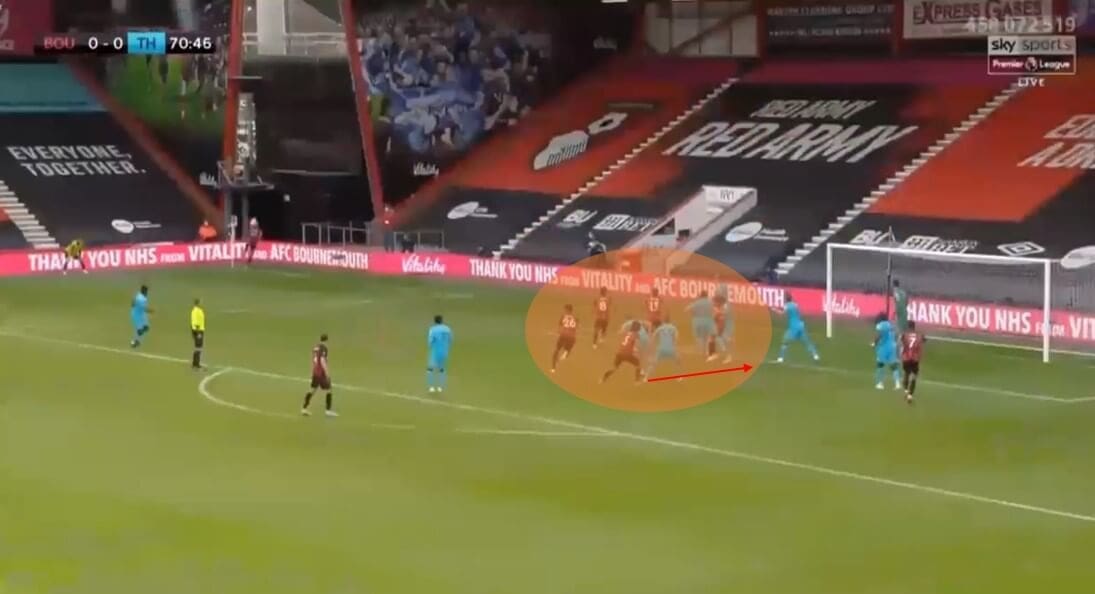
Here is a routine that is similar, but altered just slightly. Compared to the previous instance involving Everton and their defensive structure for corners, Tottenham’s is significantly different. What is visible is how there is less occupation in the near-post zone. Consequently, Bournemouth adapt their offensive structure to exploit the increased space left vacant. This consists of Wilson now moving into this aforementioned space, instead of disrupting the keeper’s movements. Moreover, the usual quartet are more focussed on this space, with the majority making runs towards it. Naturally, this attracts defenders towards the near-post, thus emptying alternative areas, like the centre and far-post. Nathan Aké makes a counter-movement to his teammates, moving into the centre where there is more space than usual to these circumstances – the delivery isn’t accurate enough, however.
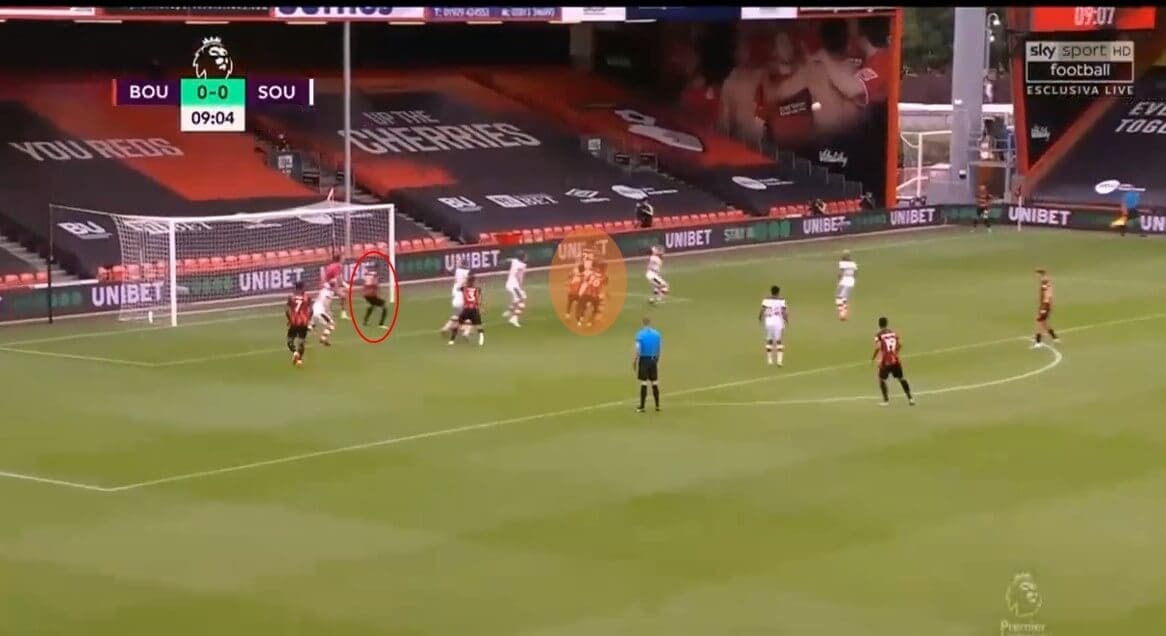
Here shows how Bournemouth orientate themselves with a pure in-swinging delivery and better occupation of near-post shown by Southampton. Wilson can influence play easier, with the flight of the ball in his direction. This time, instead of overloading space, Bournemouth opt to allocate players to a specific space. While utilising this method reduces space, superiority still has the potential to be attained. In general, chaos can ensue via ricochets thanks to the concentration, and there being an extra player on the edge of the box helps counter-pressing.
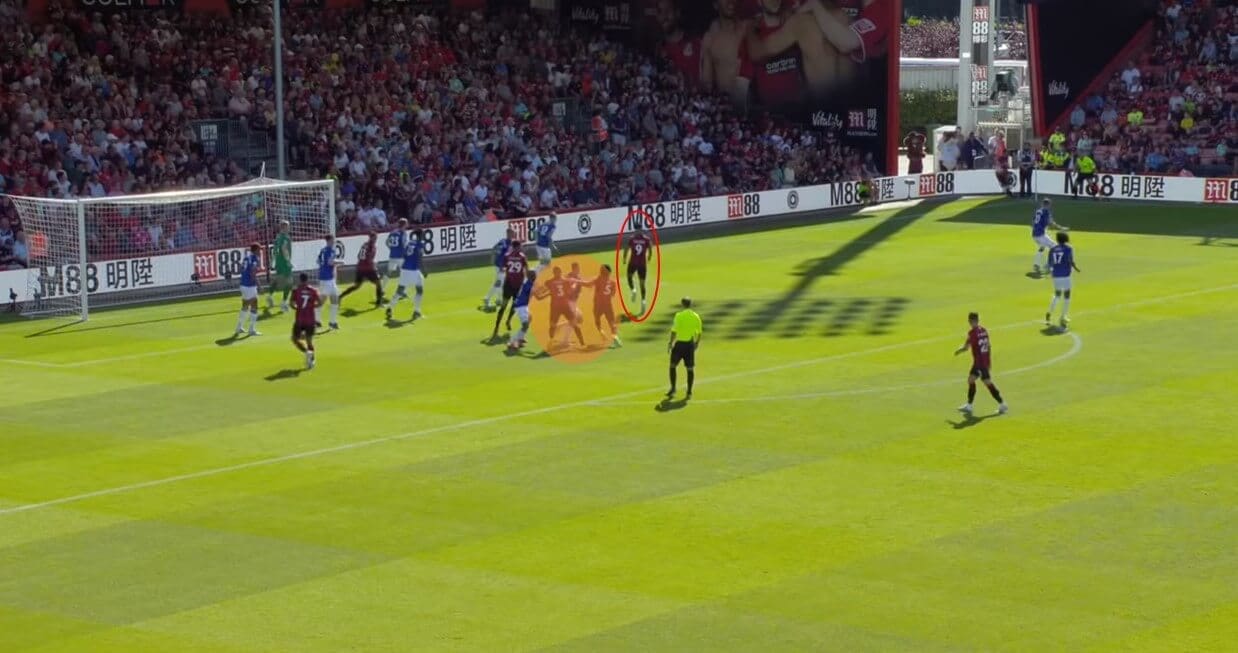
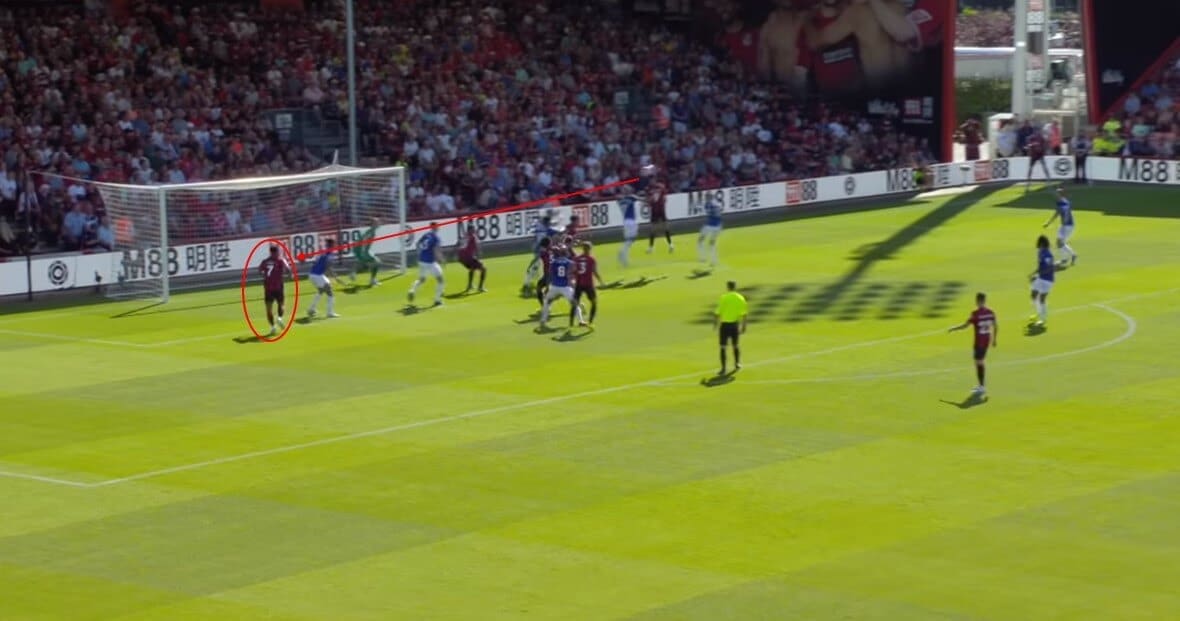
This final example portrays a goal materialises from this near-post tactic – in the exact way as the system is designed. Solanke is able move freely towards the near-post because Aké is occupying and blocking the man-markers. The former Liverpool man is consequently unchallenged to flick the ball on, in the direction of the back-post, where King is entering, with Everton defenders unaware of him, therefore allowing a simple goal.
Short corners
Bournemouth’s squad profile means they somewhat need to create chances in which there is less likelihood of a physical duel. Phillip Billing is their tallest player at 6’3”. The relative lack of height they possess, combined with their technical skill results in the Cherries utilising short corners often. From here, they can exploit disorganisation in the second phase – as well as their own disembarking efforts, such as blocking – and achieve a more optimal angle of delivery, so they can increase their accuracy. Bournemouth have several strategies, these can be 3v2 or 2v1, with the core aim of numerical/positional superiority.
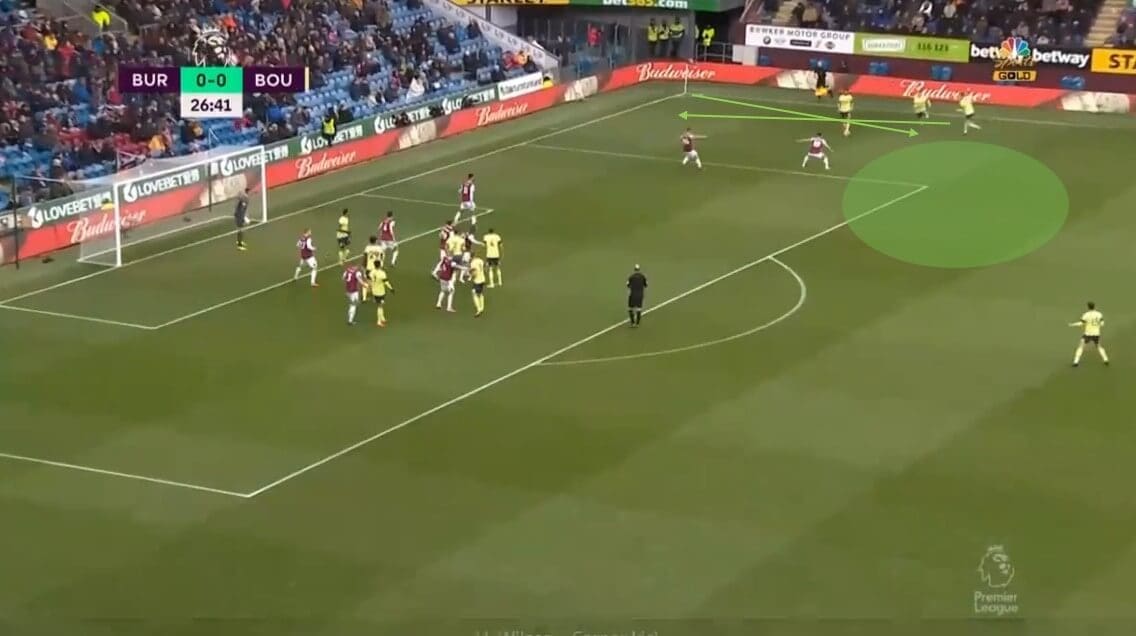
This example above, and then below, shows what they do with three men allocated to a short corner routine. The left-footed Harry Wilson initially passes short to Joshua King with the Liverpool loanee continuing his run on the outside of King. Meanwhile, another teammate makes a run on the outside of Wilson to occupy the left Burnley defender. This leaves the other Burnley player in a 2v1 against King and Wilson unable to nullify the situation. Subsequently, King can play Wilson in centrally where he can receive on his stronger foot due to his aforementioned run and either shoot or play a dangerous in-swinging cross. To improve this getting the two runners to curve their runs wider with a bigger arc would be helpful. For instance, Wilson would then have increased space and time, while King has an easier pass with less chance of an opposition defender interfering.
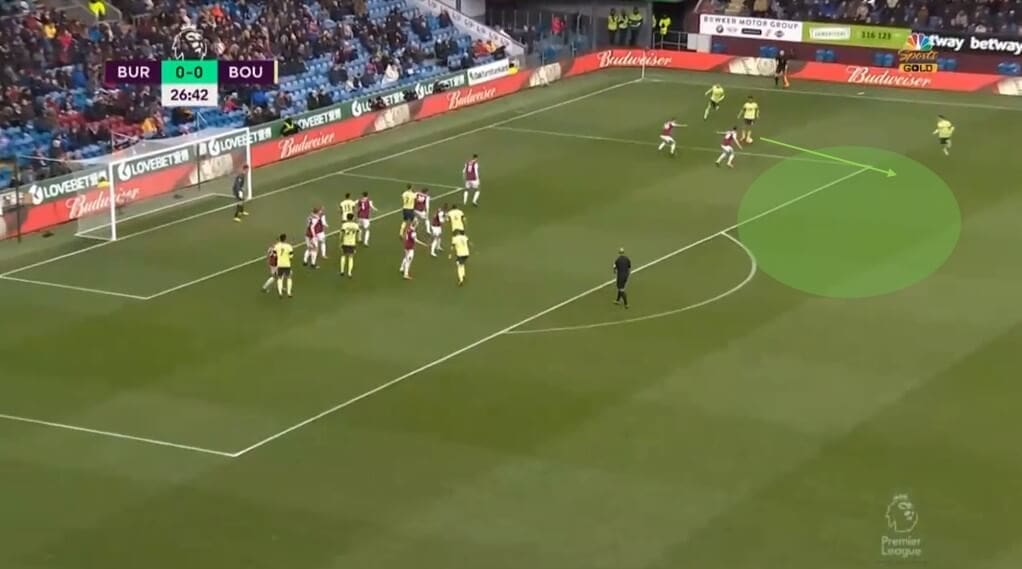
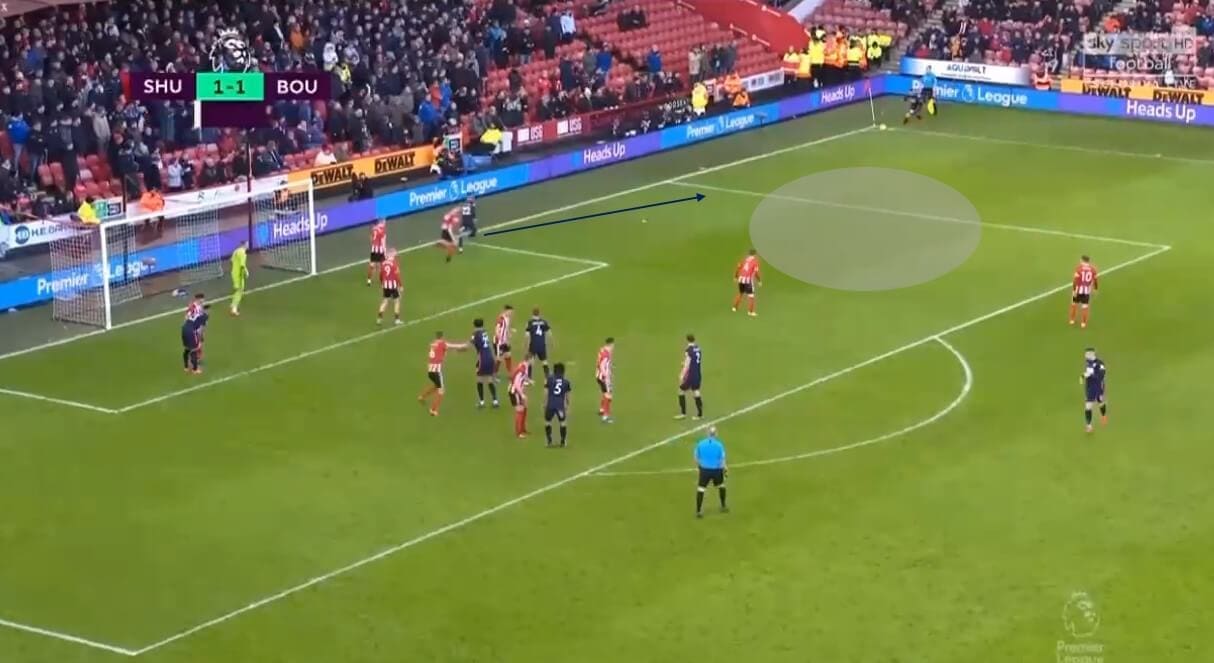
Here below the set-up is more disguised. No.22 H.Wilson is at first positioned close to the goalkeeper. However, he darts across parallel to the by-line and offers a clear, simple passing lane to the corner-taker Ryan Fraser. By doing he is taking an extra defender away from the danger zone. Moreover, his original position means on the return pass Fraser has more time, so the Scot can take a touch. This is also aided by Bournemouth emptying the space around Fraser.
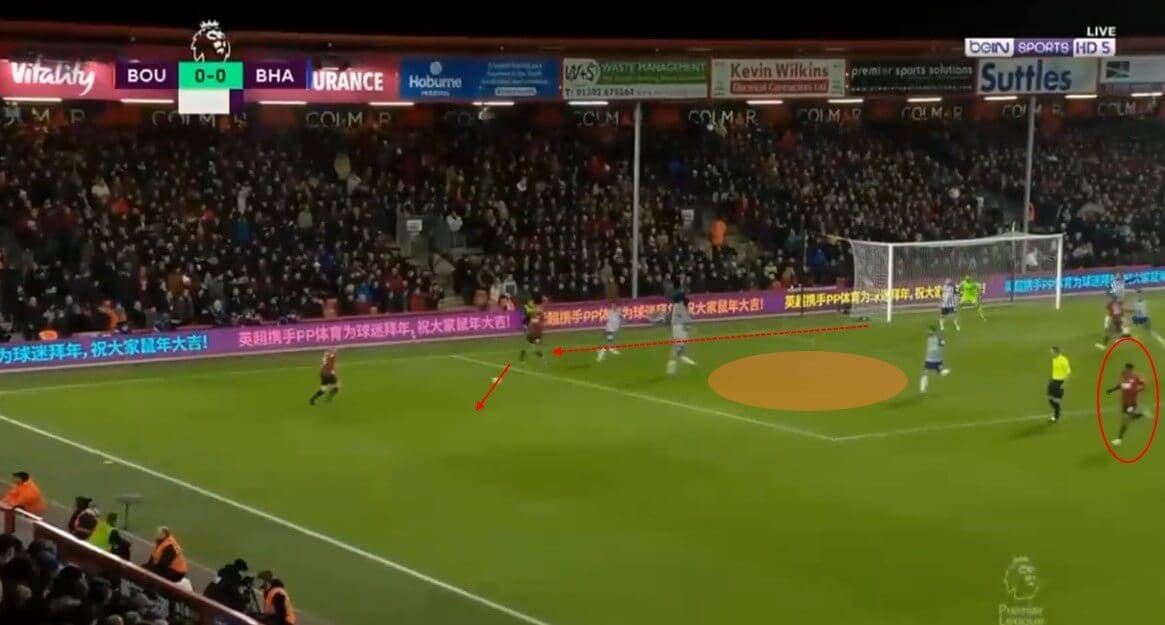
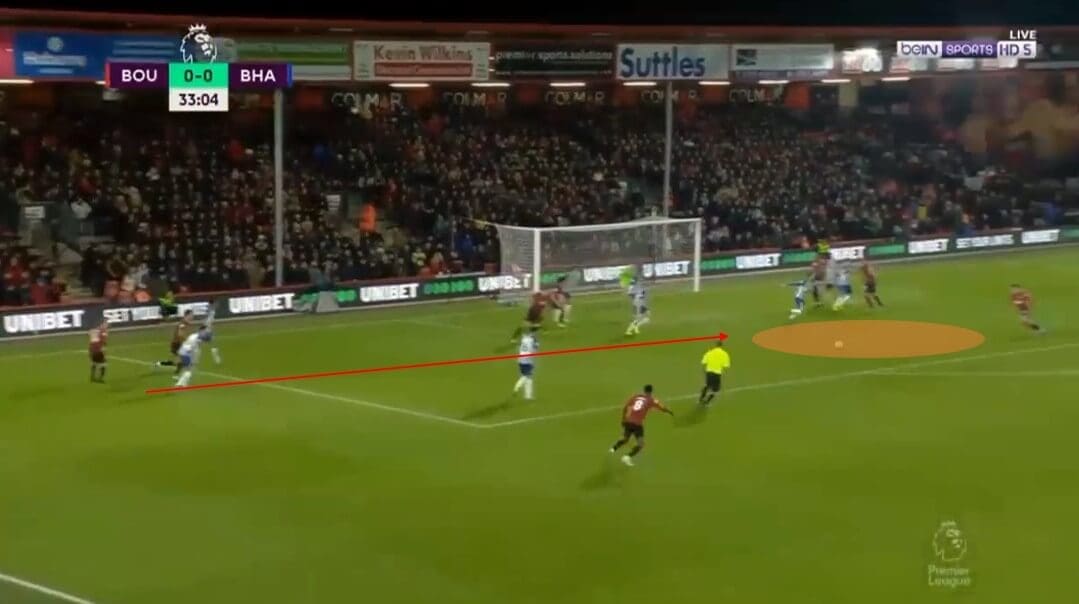
This next scenario resembles the previous one quite closely. The first image below shows Solanke arriving from deep once more, like H.Wilson previously. As a result, two Brighton players have left their positions in the penalty box, in order to maintain numerical equality. Jefferson Lerma plays a vital role here for this specific routine, even if it looks minor. His wider positioning attracts the third – and widest – Brighton player. Consequently, an open passing lane emerges – we can see this develop below. A pass is played into an optimal area, and met on by a Bournemouth player on the move. They are also Bournemouth players making runs towards goal, taking their markers with them and thus enlarging the space needed for a cut-back. Having blockers to prevent pressure being applied would also be beneficial.
Inventive routines
Bournemouth’s set-pieces have not only been effective, they have been complex in nature and often executed well, if not with the correct ideas.
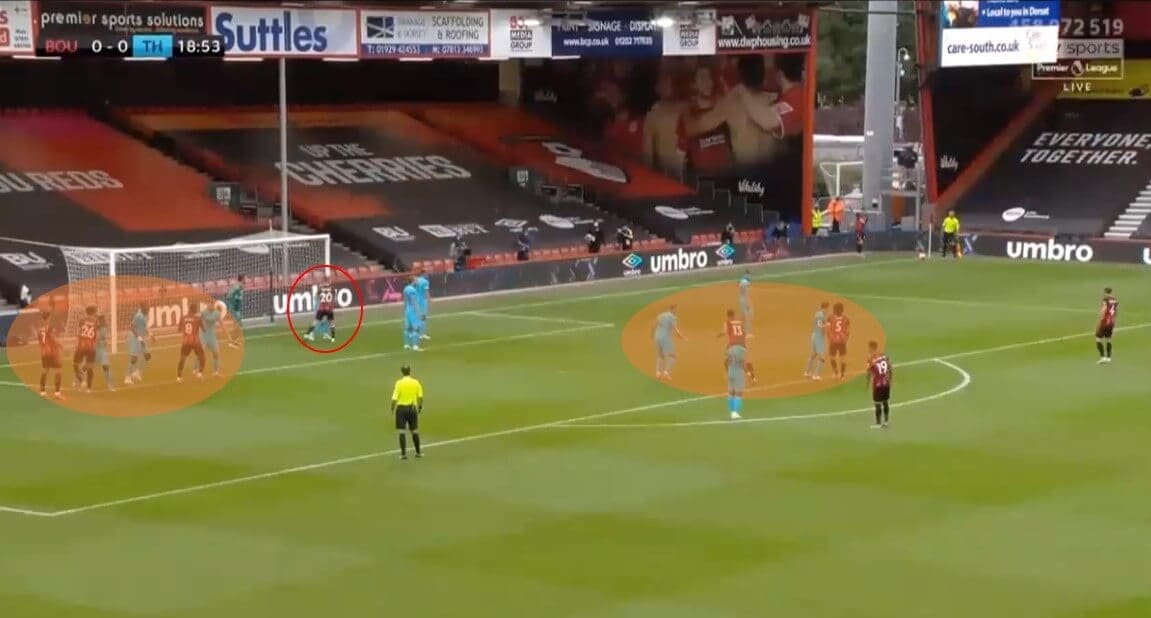
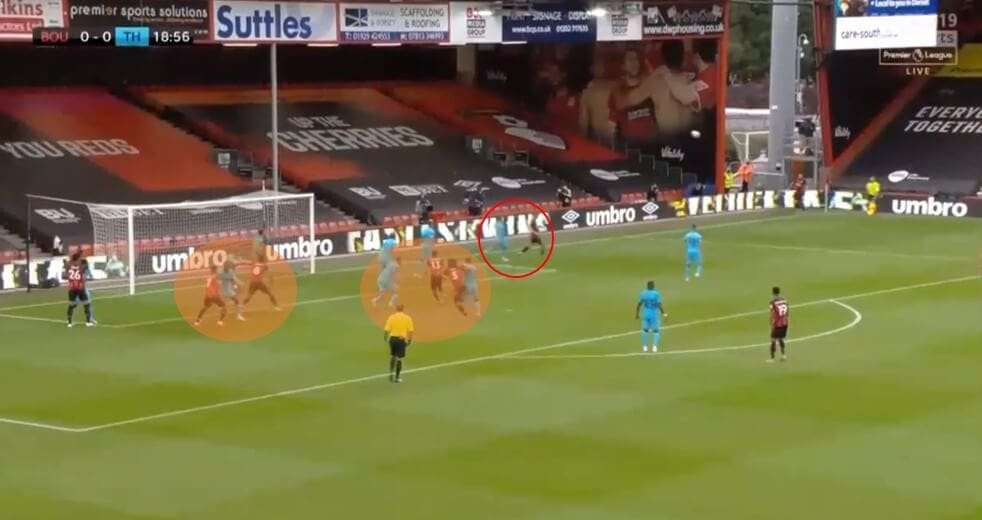
Here above we see an unusual offensive structure. Bournemouth leave the centre unoccupied, with there only being two Tottenham zonal markers there. This tactic involves underloading an area and then exploiting that space. As the corner is taken Brooks, who began close to the goal-line, moves towards the Rico delivering the ball. This drags his marker away from the goalmouth – the desired location, due to it being an in-swinger. Four attackers then attack this space. Aké and C.Wilson are best placed because they can garner the most momentum because of their movements starting deepest.
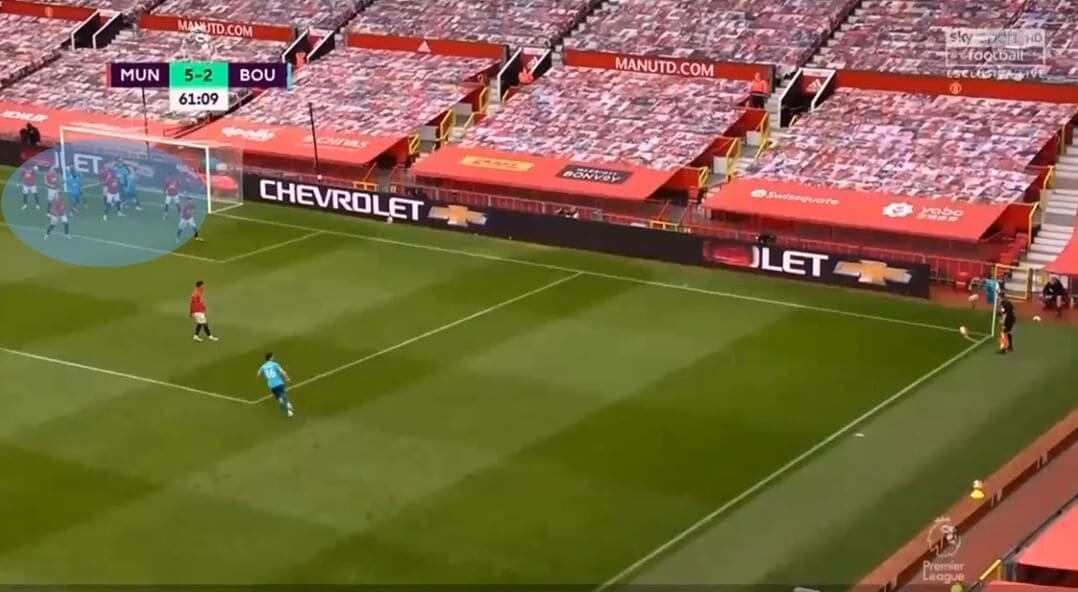
Here below is a much less complex tactic, but if executed appropriately can arguably be more effective due to its simplicity. Bournemouth choose to pack out the six-yard box with several of their players, resulting in Manchester United’s defenders having to follow them, thus congesting this area significantly. As such, this is only feasible because it’s an in-swinger. The delivery with the structure visible needs to be focussed on the back-post, as that is occupied and provides superior body-orientation. Less is required for a goal when using this method.
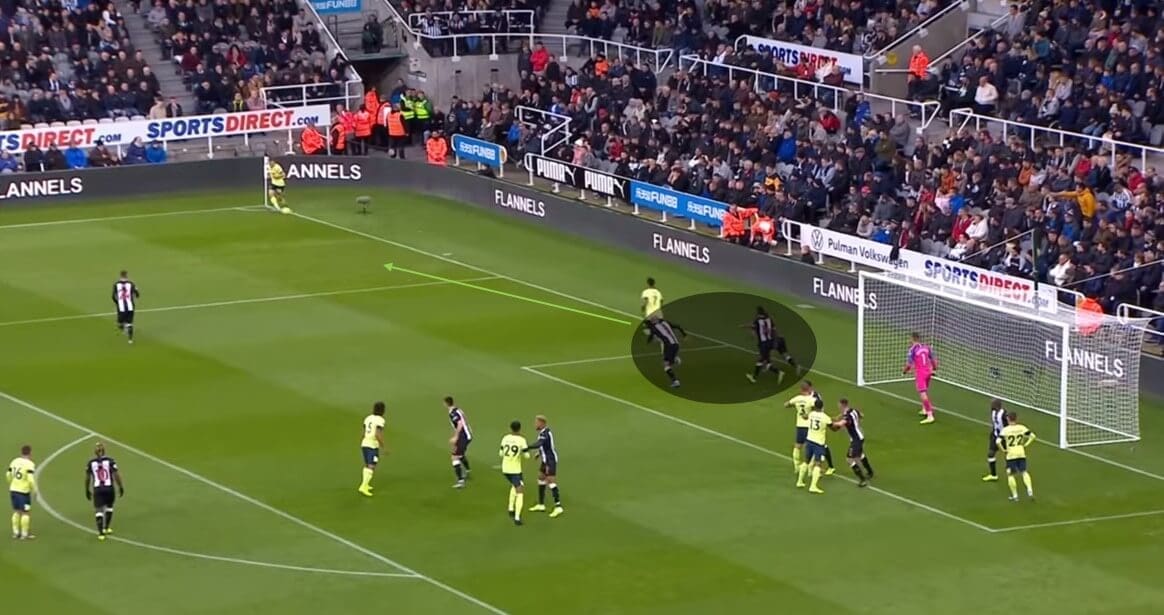
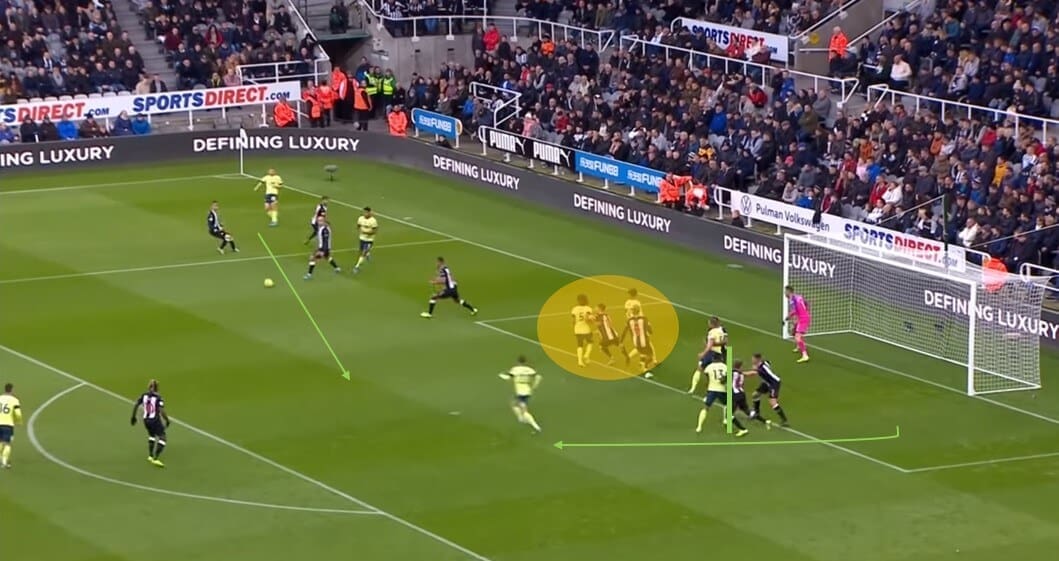
The final example is one comparable to the earlier Brighton one, but ends up in a goal this time. King moves out and over commits three players. At the same time Aké and Billing fill this space, releasing considerable space around the penalty spot. H.Wilson then makes a curved run into this space to receive, made possible by C.Wilson’s excellent blocking in which he stops two Newcastle defenders. This combination of blocking and depth gives H.Wilson lots of space to score.
Conclusion
This analysis has looked at some of the tactical nuances within Bournemouth’s offensive set-pieces. Their record is excellent in consideration of their eventual league position. With Tindall at the helm next season it will be interesting whether they can maintain it.


Comments