With every passing game, the presence of Liverpool seems to grow stronger. On the flip side, almost every historically “reliable” club continues to slip in form and that has created a battle near the fourth place.
Chelsea had an exhilarating start to the season – one that slowed down after the international break. However, with recent victories against Tottenham Spurs and Arsenal, it has boosted the Pensioner’s confidence as they looked to claim the fourth place as theirs.
Burnley, meanwhile, has had to contend with three straight losses that have left them too close to the relegation battles. In the past few seasons, Burnley has successfully come to Stamford Bridge and taken points away from the Blues. The Clarets looked to do the same in this exciting Premier League game.
In our tactical analysis, we provide you with the tactics of both Chelsea and Burnley. Additionally, we will provide in-depth analysis as to how and why Chelsea beat Burnley 3-0.
Lineups
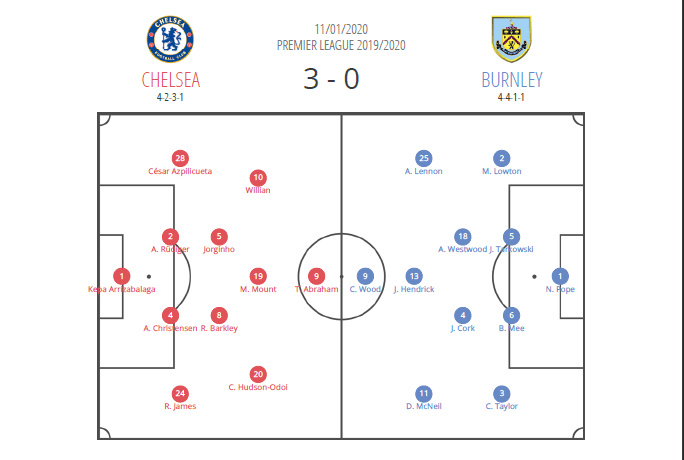
Chelsea manager Frank Lampard made two changes to the Blues side that drew 1-1 to Brighton & Hove Albion. N’golo Kanté sustained an injury that allowed the introduction of centre-midfielder Ross Barkley to take his place. In the front line, American Christian Pulisic also sustained an injury which allowed youngster Callum Hudson-Odoi to stake his place as the right-winger for Chelsea.
Burnley manager Sean Dyche made three changes to his side that lost 2-1 to Aston Villa. Right-back Phil Bardsley made way for Matthew Lowton. Wide midfielder Robert Brady was replaced by Aaron Lennon. Finally, in the forward line, Ashley Barnes sustained a groin injury which allowed Jeff Hendrick a place in the starting eleven.
Chelsea’s midfield helps them break Burnley’s low-block
One of the Blues’ strong points has been their midfield. Blessed with adequate amounts of physicality and technical precision, Chelsea’s midfield has made the Pensioners tick all season.
It is also where Chelsea has the most depth in the squad and, in this match, Lampard chose to utilize the depth against Burnley. With Kanté out and Mateo Kovačić on the bench, we saw a new midfield – one that hadn’t been tested.
The midfield trio consisted of Jorginho at the base with Englishmen Mason Mount and Ross Barkley accompanying the other two midfield positions. Going in the game, none had ideas as to how this trio would function.
One of Chelsea’s weaknesses this season has been their inability to break down stubborn, low-blocks. If there is any team in the Premier League that lives by that accord, it is Burnley. Dyche, over the years, has coached the Clarets to be tight defensively and leave no space.
With a new midfield set-up and a low-block, it seemed that Chelsea was rather underprepared to dissect the low-block.
However, Chelsea’s midfield proved to be significant in the Pensioner’s goals and style of play.
The first tactic in Chelsea’s midfield was the utilization of Barkley in a deeper role. Many assumed that Barkley – along with Mount – would be an attacking midfielder. However, Lampard utilized the Englishman in a deeper role alongside Jorginho.
However, Barkley didn’t play the whole match alongside Jorginho – much like Kovačić or Kante did. Instead, Barkley was instructed to get between Burnley’s lines and then drop down from those positions.
This movement was helpful in Chelsea constructing an attack because it created space in what were tight Burnley lines. When he would drop down, the Burnley defensive structure would be disrupted and as such, create space between their lines.
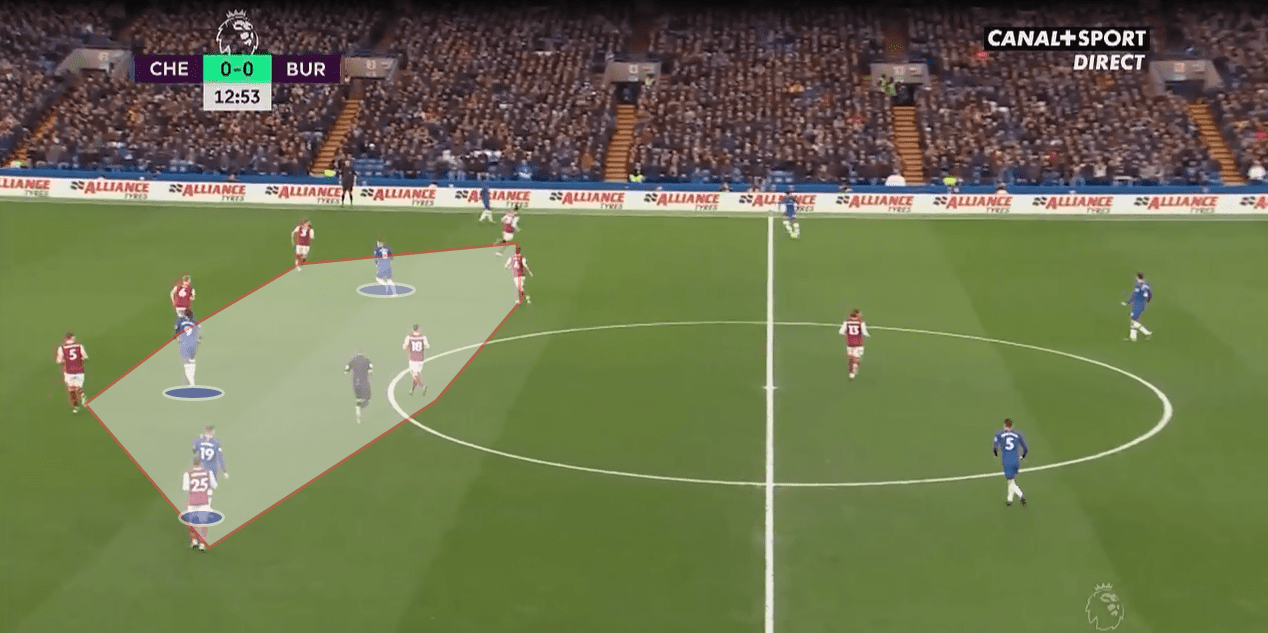
In this picture, we see Barkley – far right in blue – higher up with the other Chelsea attackers between Burnley’s lines. As of right now, Chelsea have no safe away of breaking the lines Dyche’s men have formed.
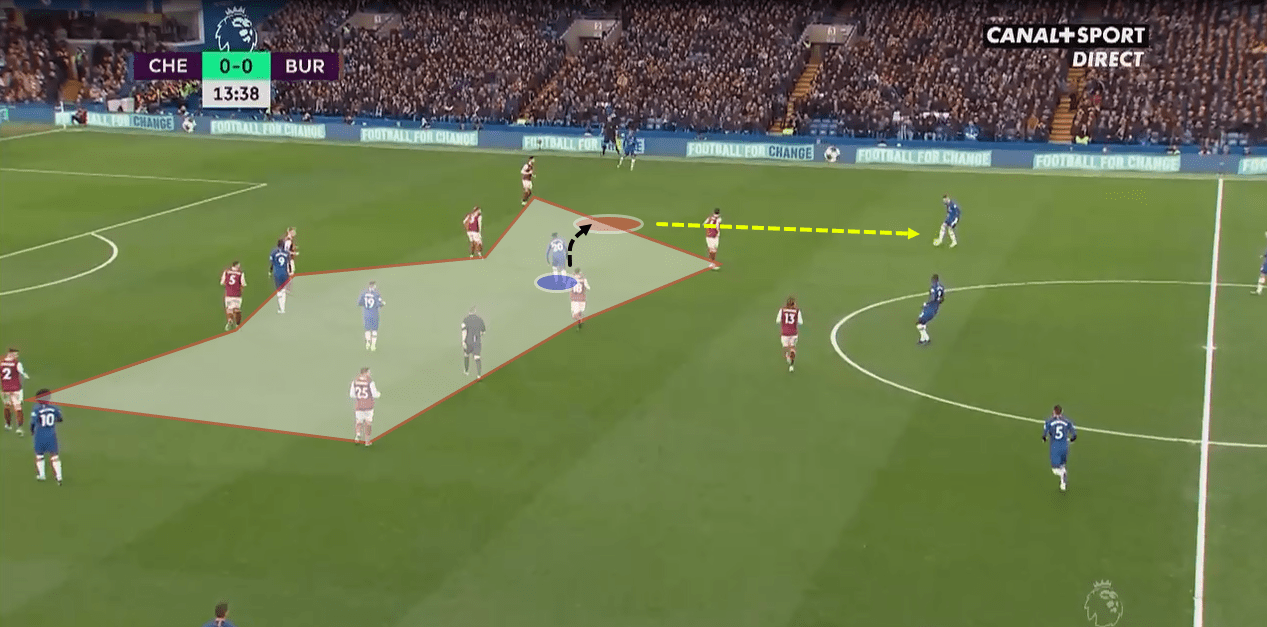
Now Barkley drops into the line with Jorginho. This vacates space between those lines and now Hudson-Odoi occupies that space and immediately warrants more scrutiny from the Clarets defence. This will, in turn, create space around the youngster and as such, Chelsea has broken the lines.
The two most common players to occupy the space left by Barkley were striker Tammy Abraham and right-winger Callum Hudson-Odoi.
While Abraham’s movements were important, it was when Hudson-Odoi moved into space where Burnley started feeling the impacts of Chelsea’s attack. The youngster has incredible talent and has the “X-Factor” many teams search for.
Hudson-Odoi’s talent also means that Burnley players were attracted to him more than they were to the likes of Willian or Mount. Hudson-Odoi’s dribbling qualities allowed Chelsea to repeatedly drive at Burnley’s midfield or defensive lines. This repeated incision had the effect of loosening the rigidity of Burnley’s lines. As such, Chelsea could create space as Burnley’s right-hand side was repeatedly being drawn into awkward positions.
Since Hudson-Odoi had come from a wide position to a more central position on the right, Burnley’s formation was not only contorted inside the lines but as a general shape. This inward contortion meant that the wing-space was vacant and waiting to fill it was Chelsea’s most creative full-back, Reece James.
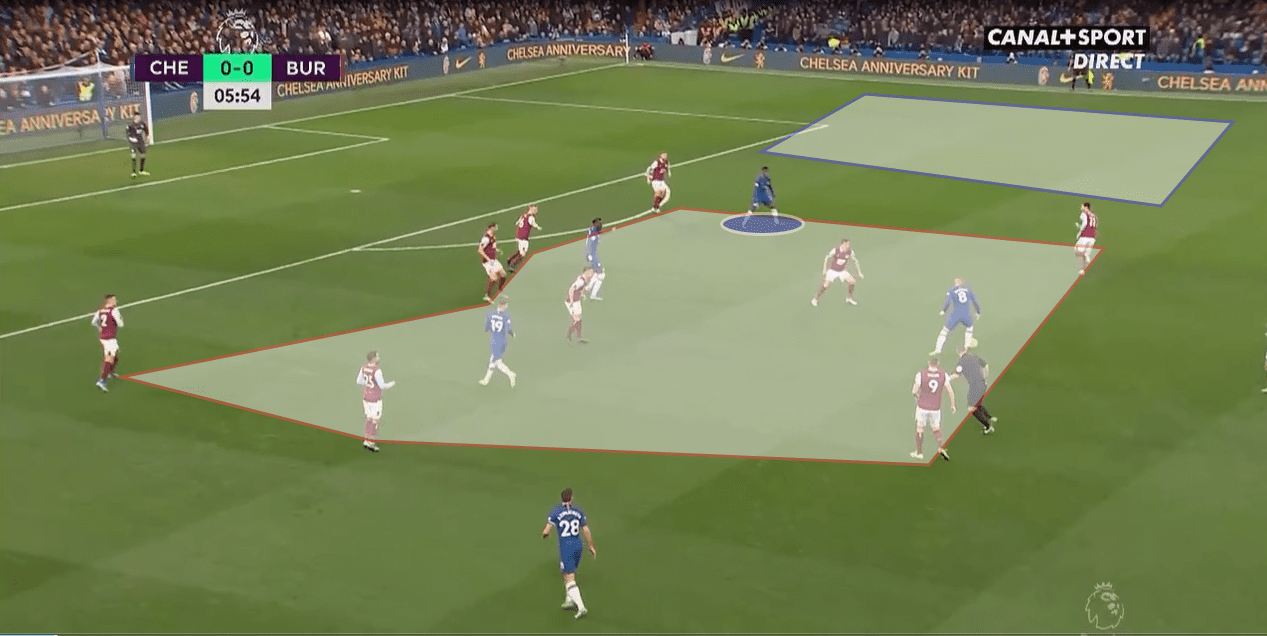
Here Barkley, the ‘8’, plays deeper while Hudson-Odoi sits narrow. This forces Burnley inwards which vacates space on the wings – as shown blue. Barkley can now play a lofted pass to an emerging James.
Himself a youngster, James added a wing-threat to Chelsea’s attack and made Burnley have to defend more and more.
Another way Chelsea utilized their midfield was via the interaction of the duo of Jorginho and Barkley. Most teams at this point recognize Jorginho as a central cog for Chelsea’s progression and build-up play.
Lampard recognizes this as well and as such, often used Jorginho as a decoy midfielder during the buildup.
When Chelsea started the build-up, Burnley would often press with two strikers at the top. The idea was for one forward to start a curved run on one side. This would force the Chelsea centre-backs to pass it to Jorginho. At this moment, Burnley’s midfield and their second forward would follow up on Chelsea’s midfield and make the build-up difficult.
However, Chelsea would use Jorginho as a decoy, deliberately passing out to him with the intention that he would not be doing most of the progression. With the attention on the Italian, Barkley would become free and, as Chelsea’s defence all have technical backgrounds, they would find Barkley.
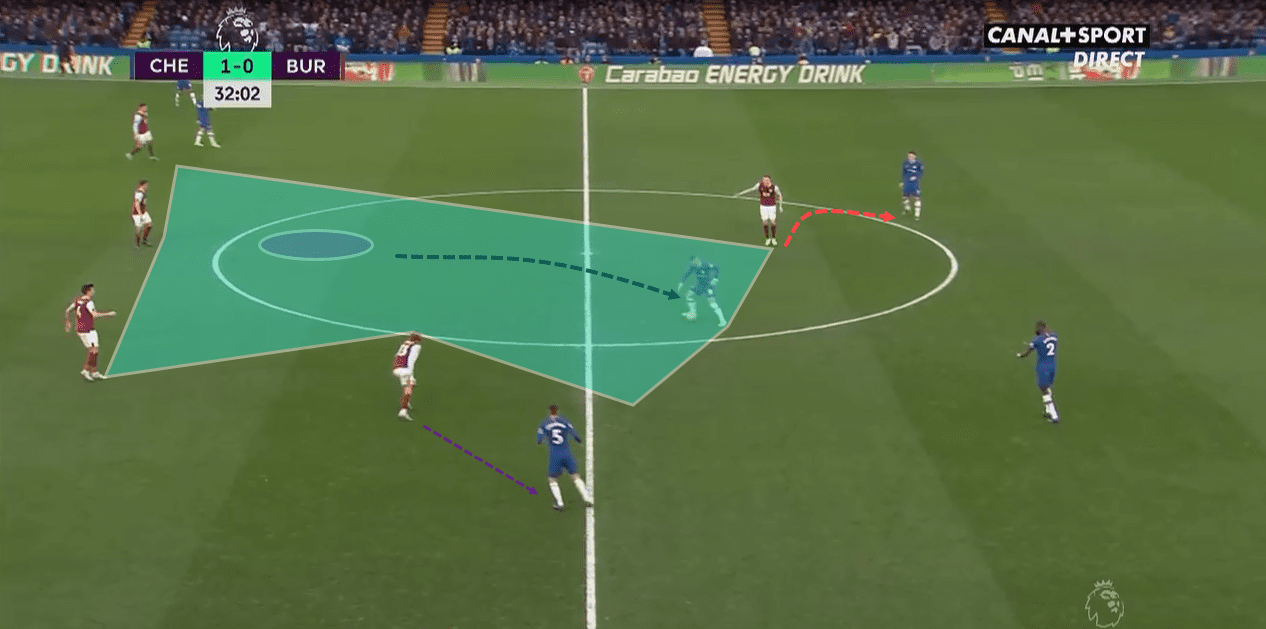
The first forward was making the curved run and is close to the Chelsea centre-backs. The second forward has been drawn to Jorginho and a considerable gap appears. Barkley leaves his higher positioning to collect the buildup and drive up.
This action of driving up will also result in the midfield deforming in order to take care of Barkley’s dribbling. This allows Chelsea to find space in the half-spaces as the midfield is only a three-man midfield.
In a way, Barkley resembled the early Kovacic-Jorginho partnership that Chelsea deployed earlier in the season. This time, Barkley played the role of Kovacic albeit with more direct intent.
Now with space and time, the Englishman could find vertical passes to further find Chelsea players in Burnley’s tightly camped defence.
While Chelsea’s attack in the first half was a bit stifled, recording an xG of 1.02, Chelsea’s main sources were a penalty and a header. However, the tactics from the midfield paid off in the second half.
While, in terms of xG, most of the xG came from the left-hand side, that statistic is a product of Chelsea’s play down the right-hand side in the midfield. When space was created, James and Hudson-Odoi did well to find accurate crosses – as in the case of Abraham’s headed goal – and players in space – as Hudson-Odoi did so effectively.
Burnley’s attacking threatens Chelsea but lacks cutting-edge
As good as Chelsea were in their midfield, there was always the threat of the Clarets dispossessing Chelsea in their buildup to the goal and launching a potentially devastating counter-attack.
Burnley’s defensive system was one that was suitable, and textbook, for their counter-attacking strategy. Lining up in a 5-4-1 in their own half, Burnley worked very hard to close down any spaces. They succeded for the large part in the first-half – containing Chelsea’s xG to almost zero in the first 25 minutes.
This defensive rigidity can also be seen through PPDA, a statistic that measures a team’s activeness. A higher number means a more passive approach – the team suffers more defensive actions. A lower number means a more active approach – the team is attacking more than they are defending.
Burnley’s average PPDA in the first half was 23.5 while their average PPDA in the second half was 28.4
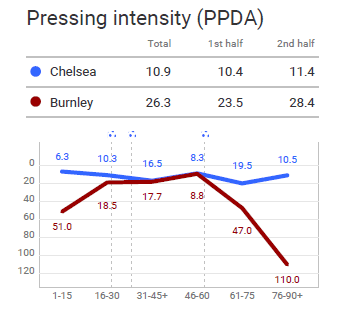
However, a closer analysis of PPDA shows Burnley’s PPDA becoming equal to Chelsea’s more active PPDA from minutes 16 to 60. This period coincides with Chelsea’s three goals and shows a Claret intent to attack Chelsea and win a goal.
The way the Clarets counter-attacked was via actively focusing on Chelsea’s attacking actions and looking to either force dispossession or pounce on a misplaced pass. Whenever they did get the opportunity, the midfield four would break out into certain positions as to link up with striker Chris Wood and to really shift Chelsea’s attack.
Hendrick would come out and stick close to Wood. This mirrors the striker-playmaker relationship seen elsewhere in counter-attacking systems and is effective because the two players who usually perform this role know each other well. As such, their passes and interplay are more destructive. A great example of this in play is Antonio Conte’s partnership with Romelu Lukaku and Lautaro Martinez.
The other three midfielders would follow in pursuit in attempts to balance out Chelsea’s defence coming back.
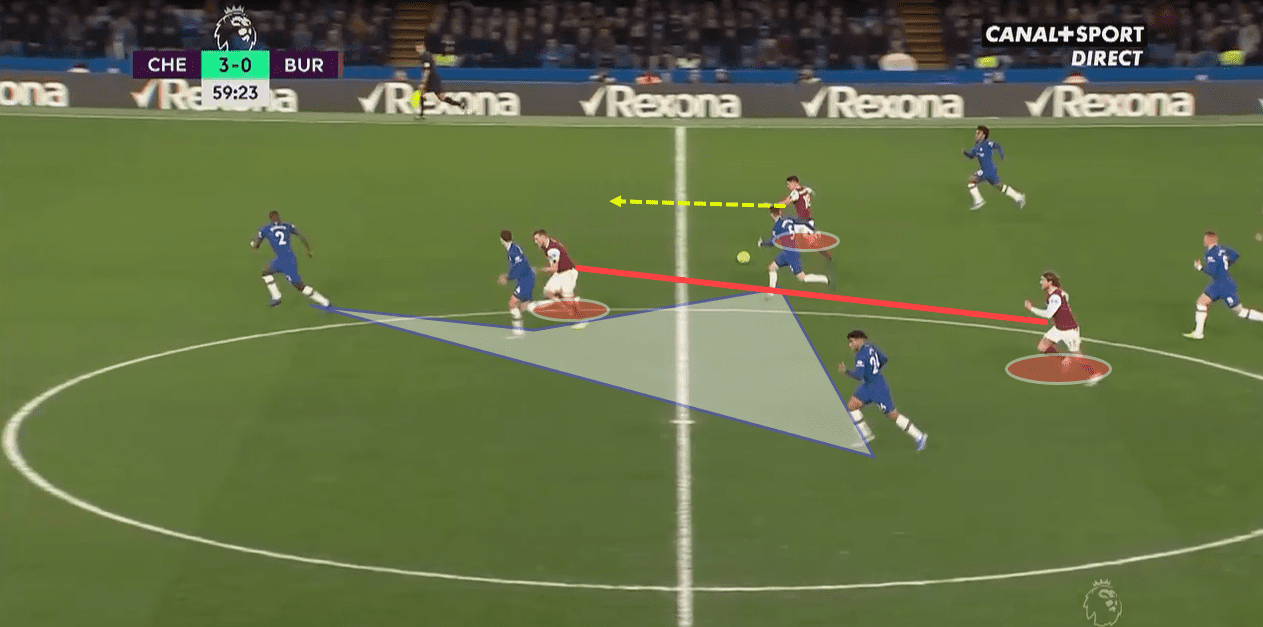
Here we see a common structure of Burnley in the counter-attack. Chelsea’s defence is awkwardly positioned and there is ample space on either side. The pairing of striker and playmaker can be seen with Wood in the thick of Chelsea defence and Hendrick following behind.
Another Burnley midfielder takes initiative and drives into space in order to create space for Wood and others to shoot.
Perhaps the most potent threat, however, for Burnley were their set-pieces. Burnley’s set-pieces are intricately crafted and allow the Clarets to pose big threats from simple free-kicks. Chelsea, on the other hand, are notorious this season from conceding from set-pieces. It has been one of their glaring weaknesses.
As such, Burnley looked to maximize their set-pieces knowing full well that possession was going to be hard to come by. In fact, 73% of Burnley’s xG came from shots crafted by the set-pieces.
Chelsea definitely rode their luck on them not conceding a goal. In the 18th minute, a clever routine led Burnley to a goal. Luckily, VAR came in and ruled it out offside. Had the goal gone in, Burnley’s defence would have become more restricted and we would have had a different game.
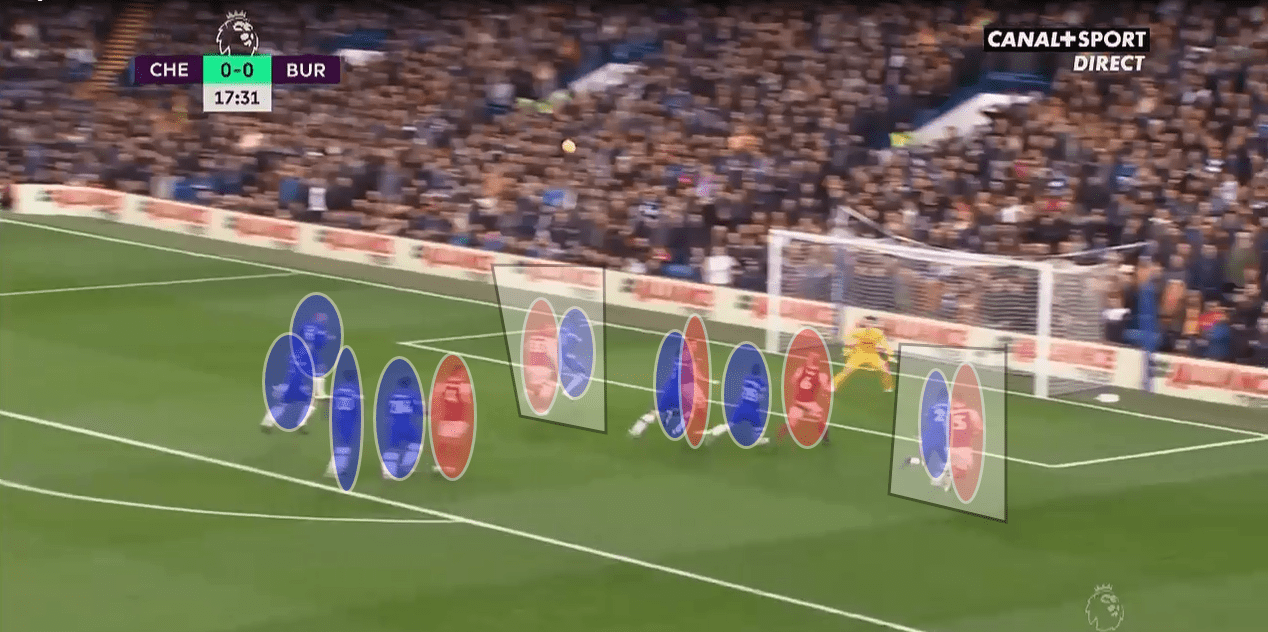
Burnley have a complicated set-up that has a simple principle: attack the posts.
They position one man behind the block of four Burnley players attacking in case some deflections occur.
As for the four attacking Burnley players, they have each paired up with a Chelsea defender. The pairs at the posts are distinctly separate from the pairs in the middle. The purpose is two-fold.
The first motive is to attack both posts in case of any deflections. The second purpose is to separate the Chelsea defenders so if any cross-field headers are made, the Blues’ defence can’t get to it.
The middle two pairs have been tasked to attack the ball and to head either to the opposite side. This pass from a header will switch the point of attack. Now, since the pairs at the posts are at a distance from the central pairs, neither the goalkeeper nor the defenders can do much. The only person that can stop it then is the Chelsea defender in that pair.
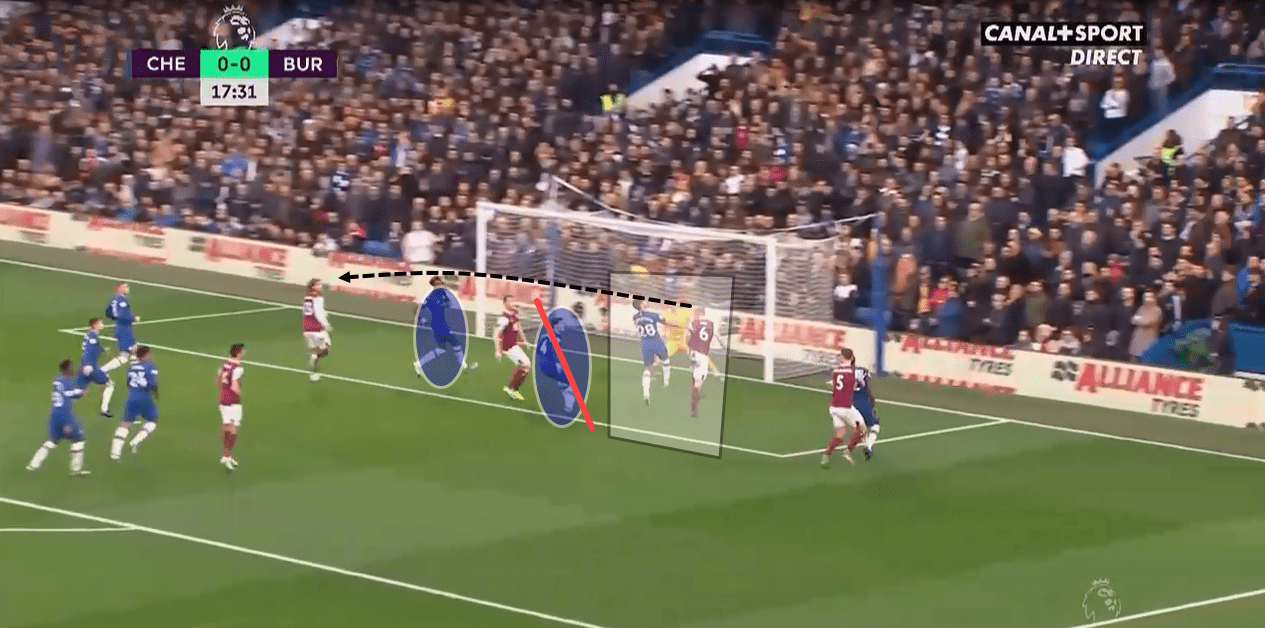
Here the Burnley player at the right-most end goes further down right. This isolates a Chelsea defender from the main action.
The Burnley player, shown in white and central, heads the ball to the opposite side. Now, the Chelsea defender with him and the nearby Blues defender can’t do anything as the ball is moving complete opposite to their momentum.
Here, striker Tammy Abraham has gotten too attracted to the ball, leaving the Burnley player free on the left-hand side.
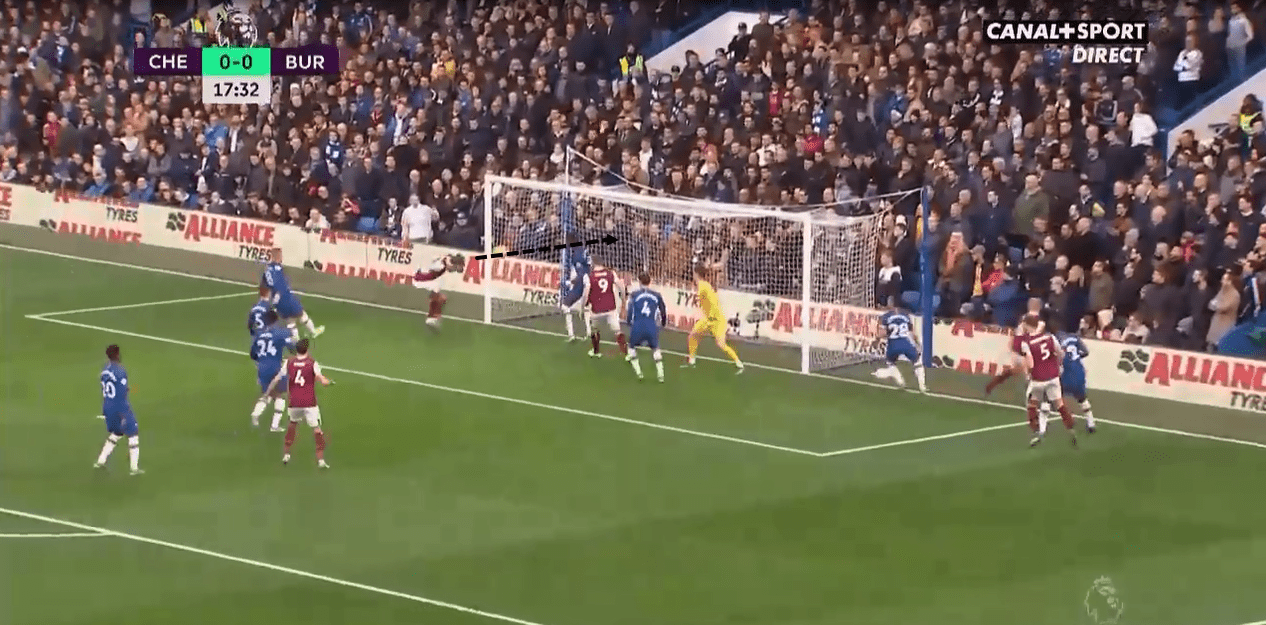
This is the end product after that hard work. The Burnley player has an open goal and a lot of time and space. Fortunately for the Blues, VAR rules this goal offside.
Similarly, Burnley came inches close to scoring another goal in the 35th minute following another clever corner-kick routine.
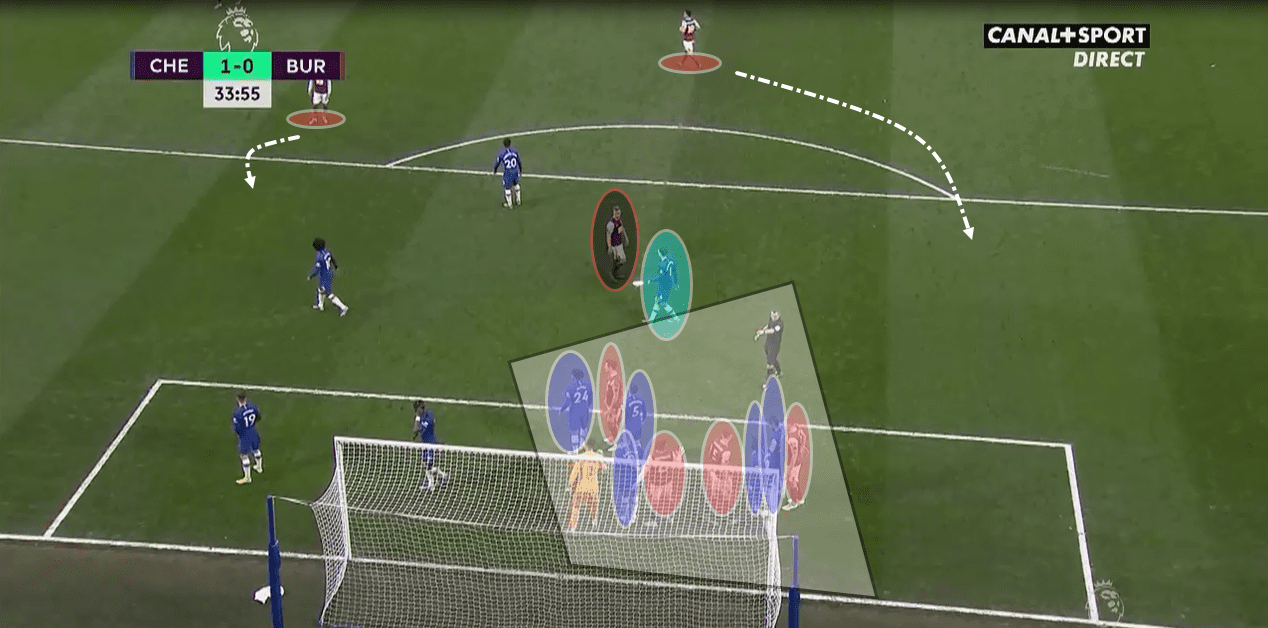
Here is yet another complicated Burnley set-up with the same principle as before: attack the posts.
Burnley crowd the area right adjacent to the Chelsea goalkeeper. Chelsea, in response, put five of their players making a 5v4 scenario. However, in this case, numerical superiority doesn’t matter as much. What matters is that Burnley have made it incredibly difficult for the Chelsea goalkeeper to come out and claim or punch a ball.
Farther from goal, Burnley have set their main goal threat – shown in red and black. Chelsea put a defender – shown in light blue – however, neither he or Chelsea have any idea about how important that Burnley player is going to be.
Further out, two Burnley players position themselves near the box. This allows two possibilities – a short corner with the left-most Burnley play or a cross that is essentially a pass to the Burnley player to the right.
With such overcrowding, Burnley can attack the penalty area more freely adding a greater threat.
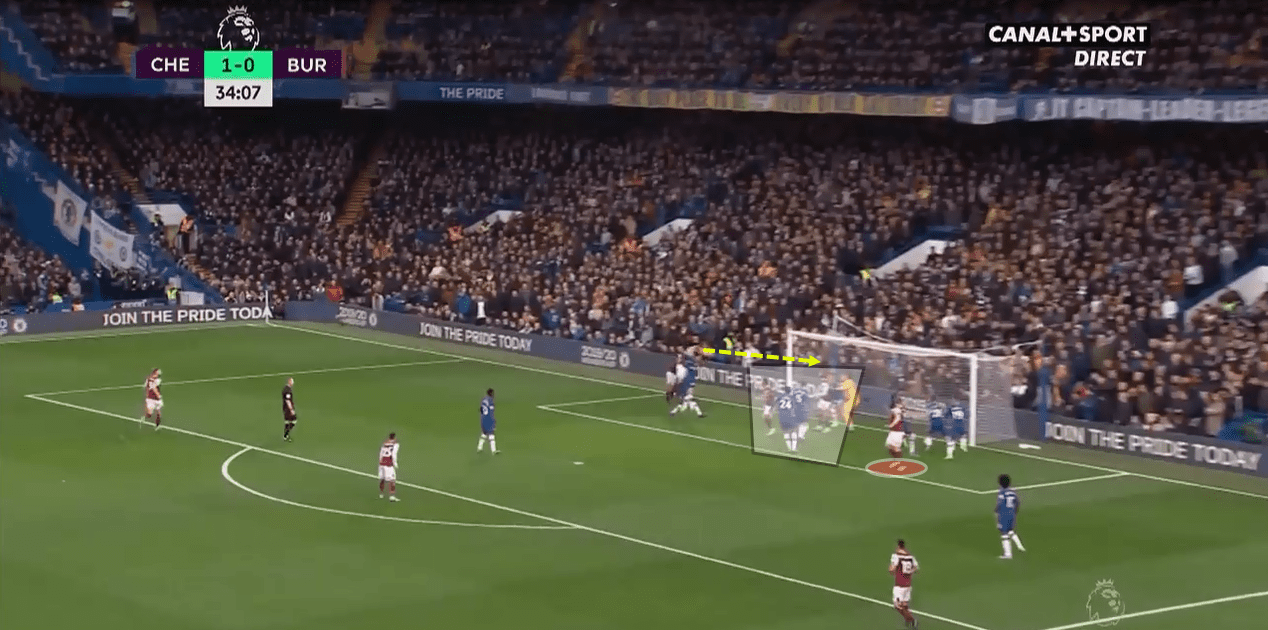
As the ball is whipped in, the Burnley crowd moves ever closer to the Chelsea goalkeeper making it hard for him to move.
The Burnley player at the penalty spot quickly makes a curved run to the back post. There a Burnley player stands there as a shield for the Burnley attacker – protecting him from any Chelsea defender.
Since the main attacker wasn’t picked up fast enough by the Chelsea defence, he can now head it into the goal. Thankfully, midfielder Barkley stands there to block the goal.
As a protection, Burnley position a player on the opposite side in case any deflections occur.
Burnley lacked that edge that would have propelled them past Chelsea and as a result, after the third goal from Chelsea, Burnley stopped attacking. Their PPDA went from 8.8 to 47.0 to a remarkable 111.0.
Reece James and Callum Hudson-Odoi connect strongly in attack
While this has been mentioned before, the relationship between Hudson-Odoi and James needs to be examined closely to see just how great they were for Chelsea’s attack.
James is the most different out of Chelsea’s fullbacks and for good reason. Unlike Marcos Alonso and Cesar Azpilicueta, James is faster and much better physically. Compared to all of the full-backs, he has the most creative vision and the technique to execute those passes.
A clear example of this was in the buildup to the penalty, James executes a pass with the outside of his foot to Willian, making the ball arrive in the direction of play.
All these great characteristics yield in James’ best ability: crossing. Making ten crosses in the game, James was always an outlet for attacks on the wing. Unlike Chelsea’s other full-backs, one can trust James to handle a 1v1 situation and deliver an accurate cross.
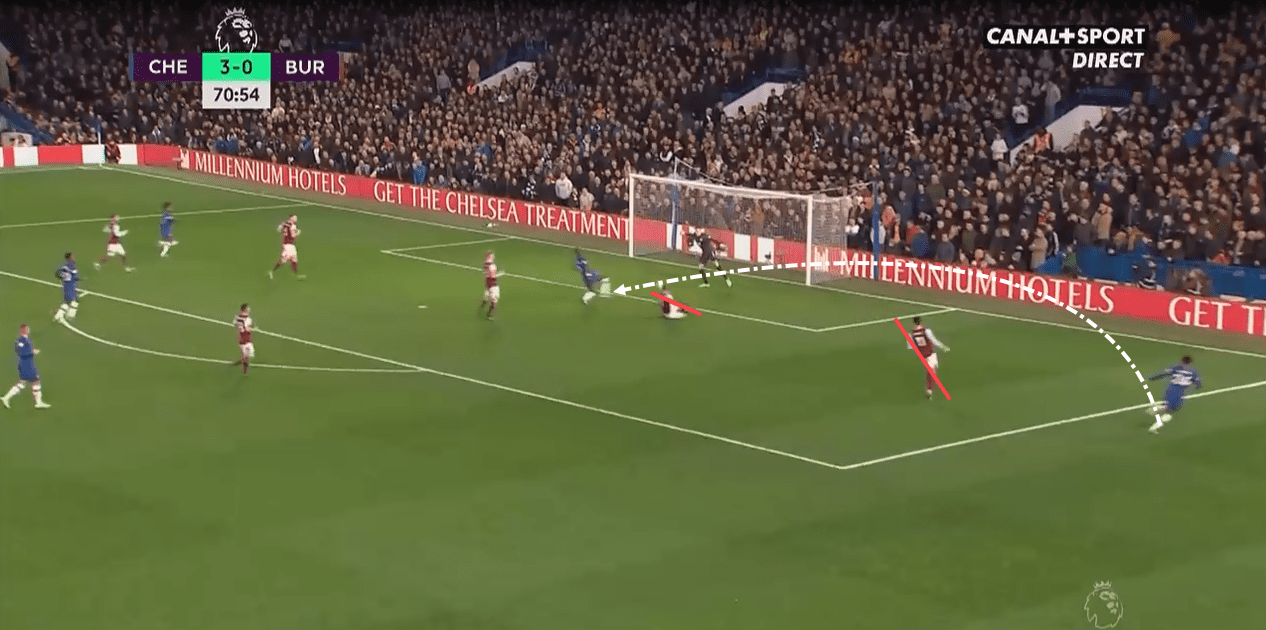
Here James puts in an inch-perfect cross to Abraham. The Chelsea striker just misses the touch or else Chelsea would have had four goals to the name.
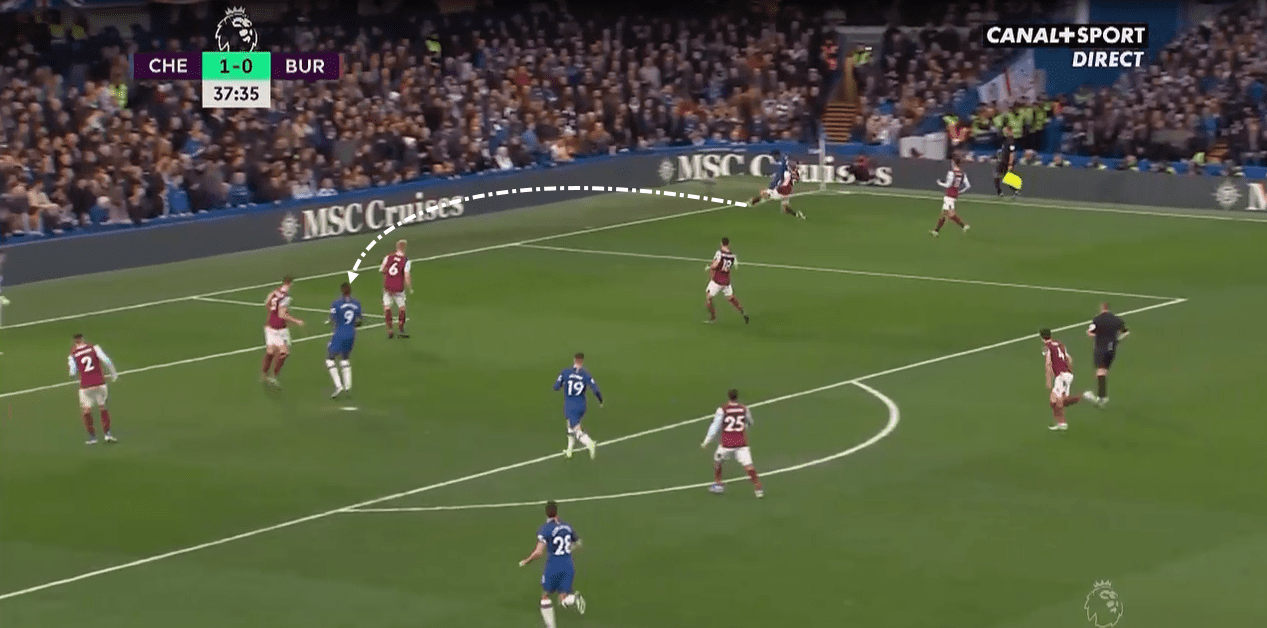
In another example, despite being intensely pressured by a Burnley player, James puts a perfect cross for Abraham to head it into for Chelsea’s second goal.
On the other side of the equation is Chelsea’s rising youngster Callum Hudson-Odoi. Skillful, fast, and a great technical mind, Hudson-Odoi adds creativity and incisive vision that Chelsea so desperately need.
In this game, both of them connected in unique ways.
As we’ve talked about it before, with Barkley dropping deep, Hudson-Odoi would come in narrow which would release James on the wing. As such, whenever Chelsea attacked and Hudson-Odoi had the ball, he would always look for the run of James.
Additionally, Hudson-Odoi and James always tried to link up play on the wings to draw Burnley’s defence to the wing. This would create space in the centre and allow a quick switch of play to have Chelsea breaking Burnley’s lines. In other scenarios, Hudson-Odoi and James chose to link up to exploit the wing as was the case in the second goal.
Hudson-Odoi’s incisive passing mixed with James pinpointed accuracy was a dangerous combination that threatened to result in more Chelsea goals.
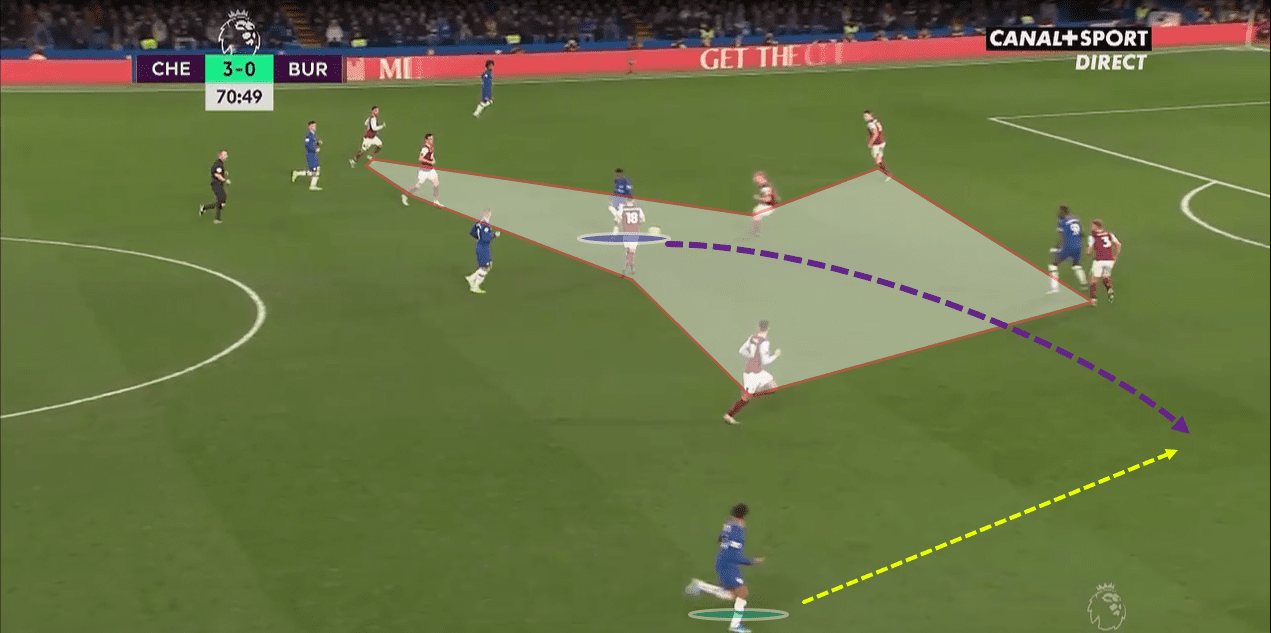
Here Hudson-Odoi, shown in blue, receives the ball and first-time plays a ball that splits the Burnley defence and opens up the wing space for the running James. Interactions like these an element of volatility and surprise in an attack.
Conclusion
Chelsea and Lampard will be with the game and the tactics they displayed. Attacking resolutely and slowly breaking a tough low-block will be a point of encouragement for the young Blues. With rivals Spurs losing to Liverpool and Arsenal drawing to Crystal Palace, Chelsea will be happy that there is a sizeable gap between fourth and fifth.
With Manchester United playing Liverpool next week, Chelsea has another opportunity to make the gap larger – setting them up for success when the tougher fixtures come later in the season.
Burnley and Dyche will be a bit stung. What clearly was a goal was ruled out and no doubt, the Clarets will be itching to go back to winning ways. With four straight defeats, Dyche’s men will have to work more as the season enters the crux of comebacks and shock defeats.


Comments