Before this match started, Sheffield United and Tottenham Hotspur were only separated by one point in the Premier League. Both teams had the same goal: secure three points and get closer to the European zone. Sheffield were looking for a resurrection, as they lost all three games since the restart; not to mention conceding eight goals in just eight days. Oppositely, Tottenham’s mood was on the rise. After drawn by Manchester United at home, they managed to win convincingly against city rival West Ham United just four days after.
This match turned out to be more dramatic than expected. Harry Kane’s controversially disallowed equaliser was the main reason for that. Furthermore, Kane even netted four times in this game, but only one was considered legal. From a tactical perspective, both managers put an interesting duel despite poor performance from some of Spurs players. Without further ado, this tactical analysis will inform you how the match unfolded.
Lineups
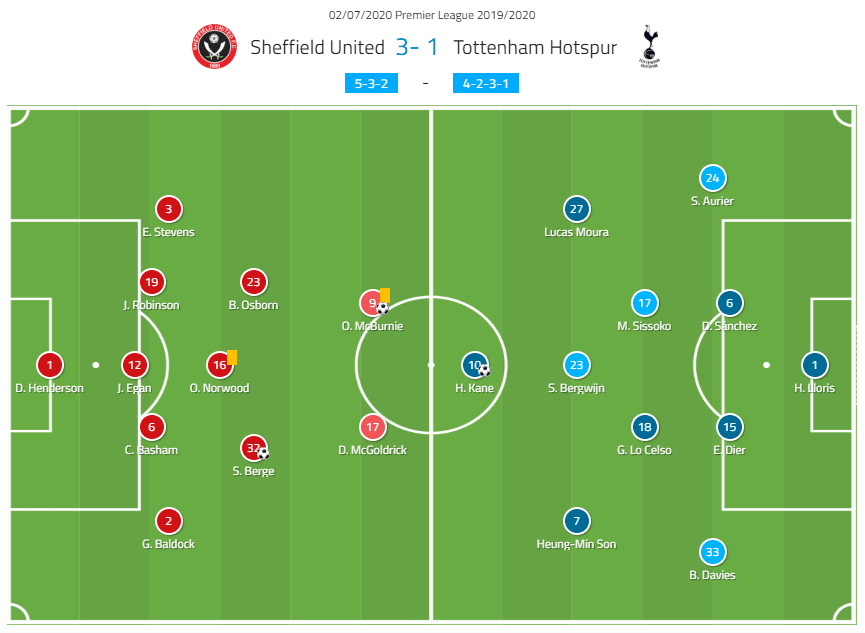
Chris Wilder chose the usual 5–3–2 for his team. Dean Henderson returned in between the sticks with the trio of Chris Basham, John Egan, and Jack Robinson in front of him. Winter recruit Sander Berge started in midfield alongside Oliver Norwood and Ben Osborn. The duo of Oliver McBurnie and David McGoldrick started upfront. Sheffield’s bench was filled with players like Lys Mousset and Kieron Freeman.
In the opposite side, José Mourinho opted for 4–2–3–1. The centre-back pairing of Dávinson Sánchez and Eric Dier was flanked by Serge Aurier and Ben Davies in the defensive line. Moving forward, the trio of Lucas Moura, Steven Bergwijn, and Son Heung-min provide attacking support for talisman Kane. Names like Jan Vertonghen, Erik Lamela, Dele Alli, and Tanguy Ndombélé had to start the game from the dugout.
4-2-3-1 on paper, 3-2-4-1 on practice
This analysis will start by taking a look at Spurs’ offensive tactics, particularly shape-wise. he visitors enjoyed possession for most of the time. It showed by their ball possession record that never went under 62% in both halves. When having the ball, Mourinho would set his team in a rather lopsided 3–2–4–1 fashion. The structure is as follows:
The first line was filled by the centre-backs and left-back Davies. By having three players at the back, Spurs would have a numerical advantage against Sheffield’ two frontmen. However, Davies’ positioning was rather wide instead of inside the half-space. This would enable him to move forward and make an overlapping run when needed.
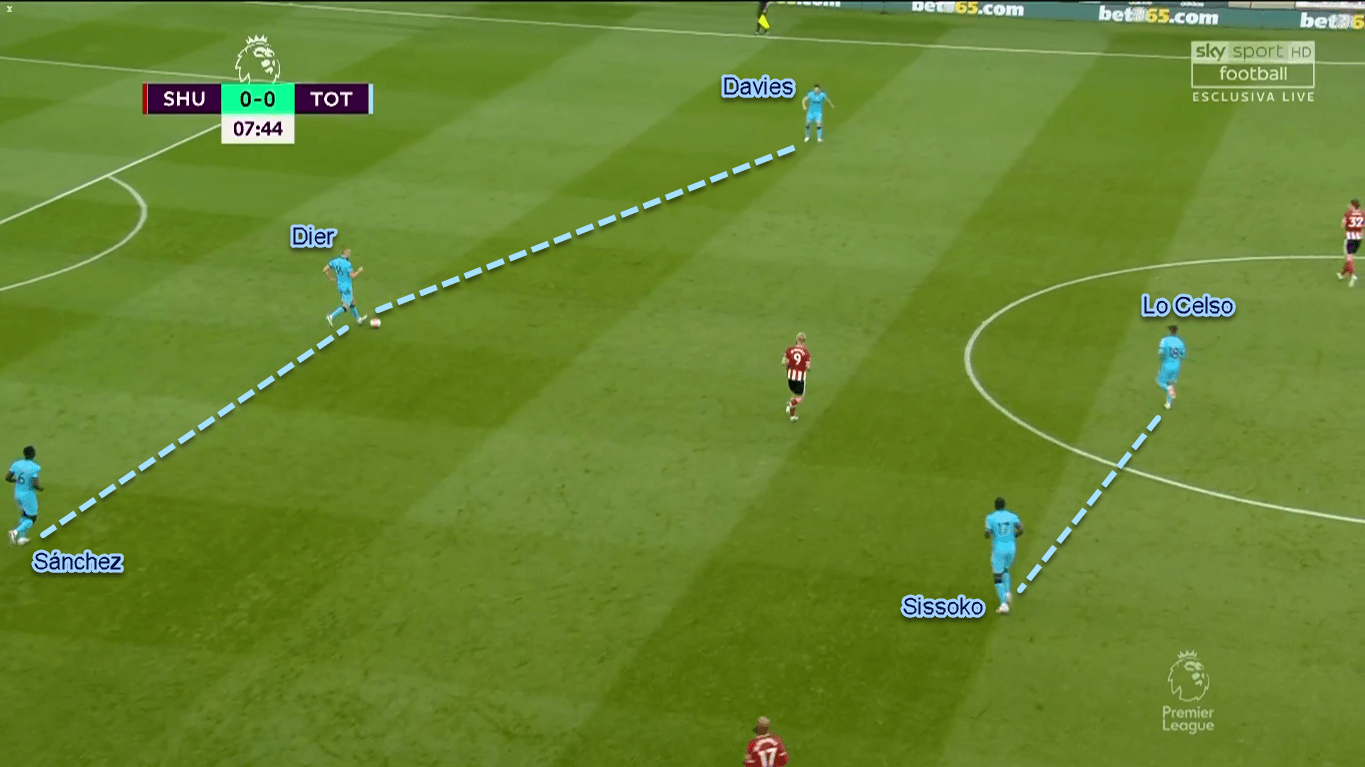
Contrast to the Welshman, Aurier was instructed to play more advanced. Sometimes it made him look alongside Moura, Bergwijn, and Son in the final third. Aurier was also tasked to provide width as well as sending crosses into the box from the right flank.
Due to the full-backs rather wide positioning, Mourinho tasked his attacking midfielders to tuck inside and play in close proximity to Kane. This narrow positioning would allow them to combine easier, especially in between the lines. However, there was a little exception to this. Since Davies was playing deep more often, sometimes the left flank can be occupied by Son. Even more, the Korean could also switch position with Bergwijn due to the Dutch’s natural role as a winger.
Sheffield’s various defensive approaches
As usual, Sheffield deployed a mid-block 5–3–2 rather than aggressively pressing to the opponents’ box from the first whistle. However, The Blades used two types of defensive pressing in this game. This happened probably because of The Lilywhites lopsided shape in their build-ups.
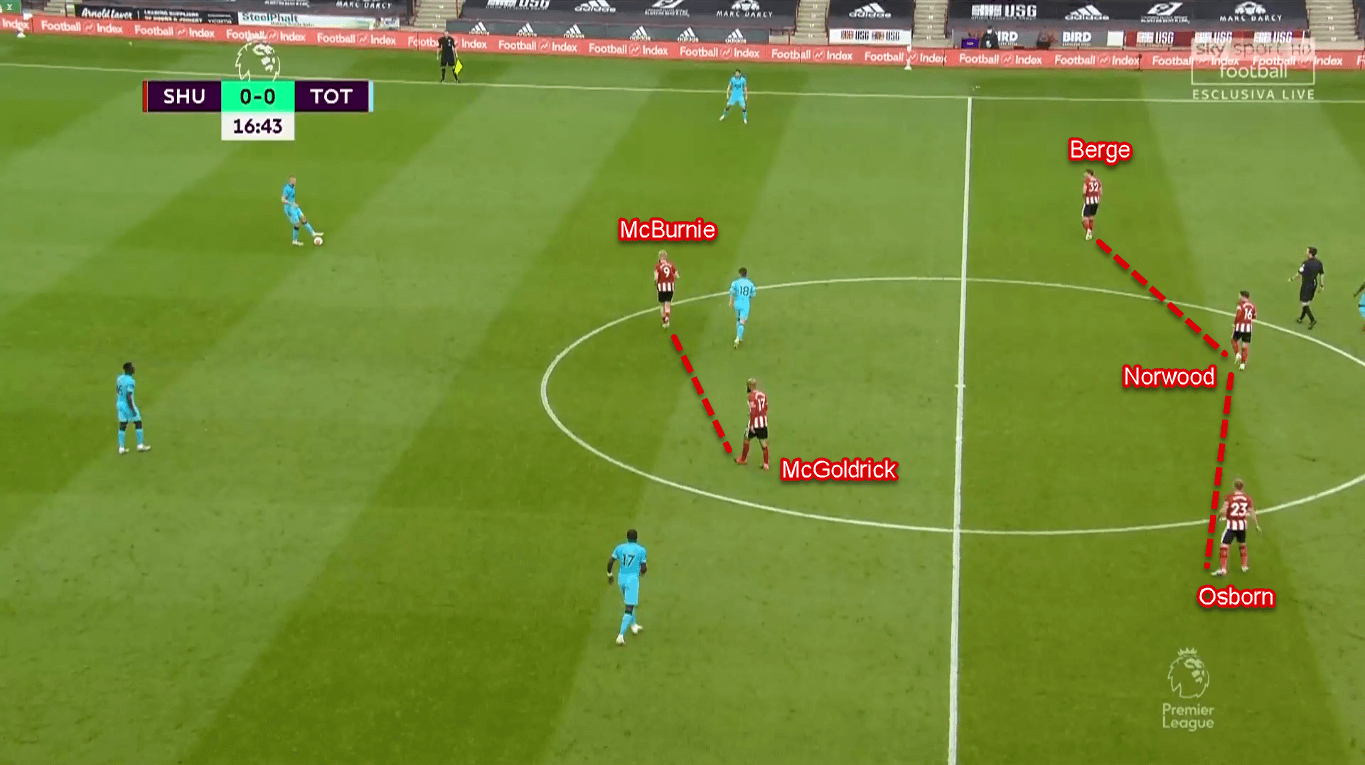
First, Wilder would ask the outside central-midfielder to press. This scheme mostly happened on Sheffield’s right flank since they had to face Davies there, who positioned more parallel with the centre-backs. The player tasked to press on Davies, of course, was Berge, the right central-midfielder.
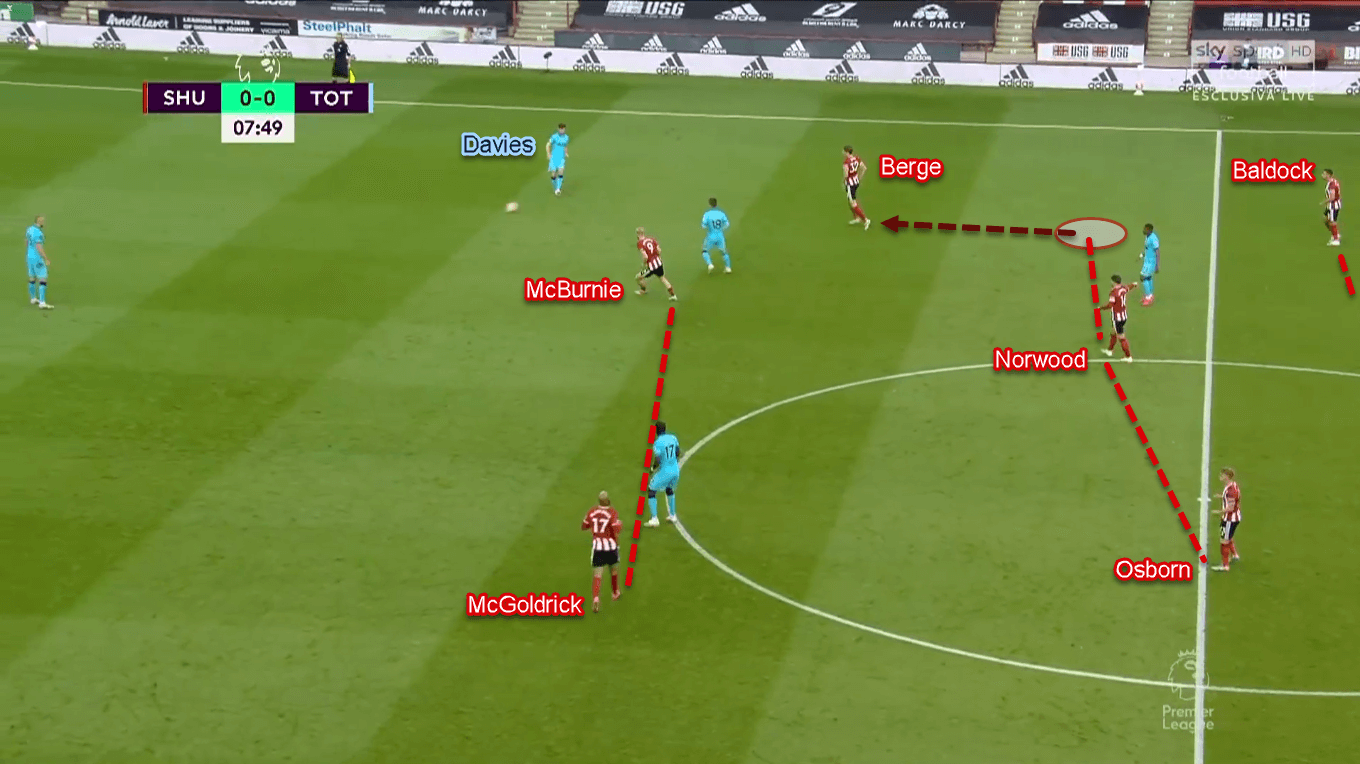
The pressing scheme wasn’t just that. Sometimes, defensive midfielder Norwood would also come up to press. By doing so, he would try to close down the nearest Spurs’ pivot and prevent Davies from playing the ball short. Behind Berge and Norwood, at least one defender would also step out aggressively from their position(s). However, this scheme has a particular issue. We will get back on this later.
The second pressing scheme was by using the wing-back to press. It means that the wing-back would step forward to press alongside the midfielders. In the process, Sheffield would seem to temporary shift to a 4–4–2 due to wing-back’s movement. This scheme mostly happened in their left flank due to Aurier’s more advanced positioning than Davies.
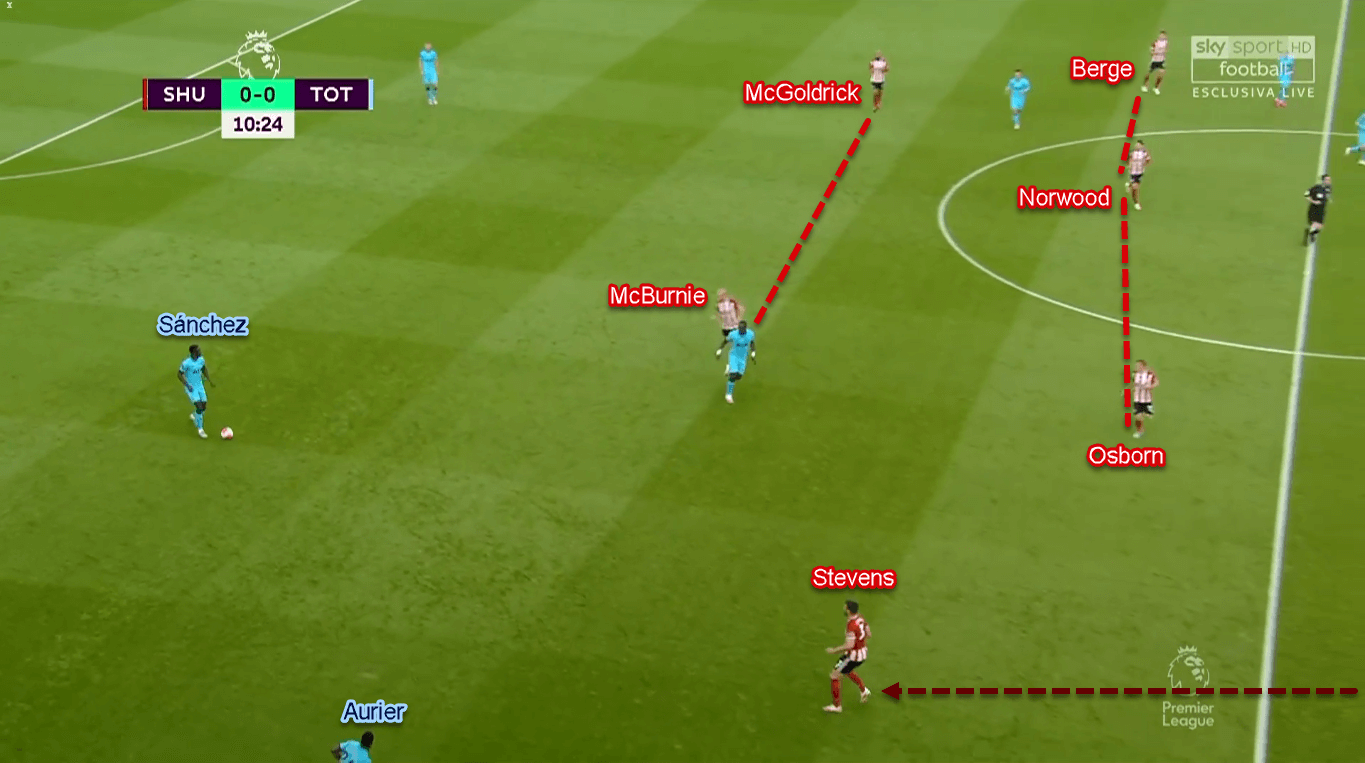
Despite the difference, both pressing schemes had a similarity. That being the main presser’s aggression to do their jobs. It means that they must press quickly — sometimes even before the Spurs flank player receive the ball — to limit the playing options for the visitors.
An issue in Sheffield’s defensive tactics
As we mentioned previously, there was a reoccurring issue in one of Sheffield’s pressing scheme. That being their first option: the central-midfielder press. In that particular pressing scheme, sometimes defensive midfielder Norwood would also step up from his position. The objective was to prevent Davies from accessing the nearby pivot for a diagonal passing option. However, the practice even opened a bigger defensive issue.
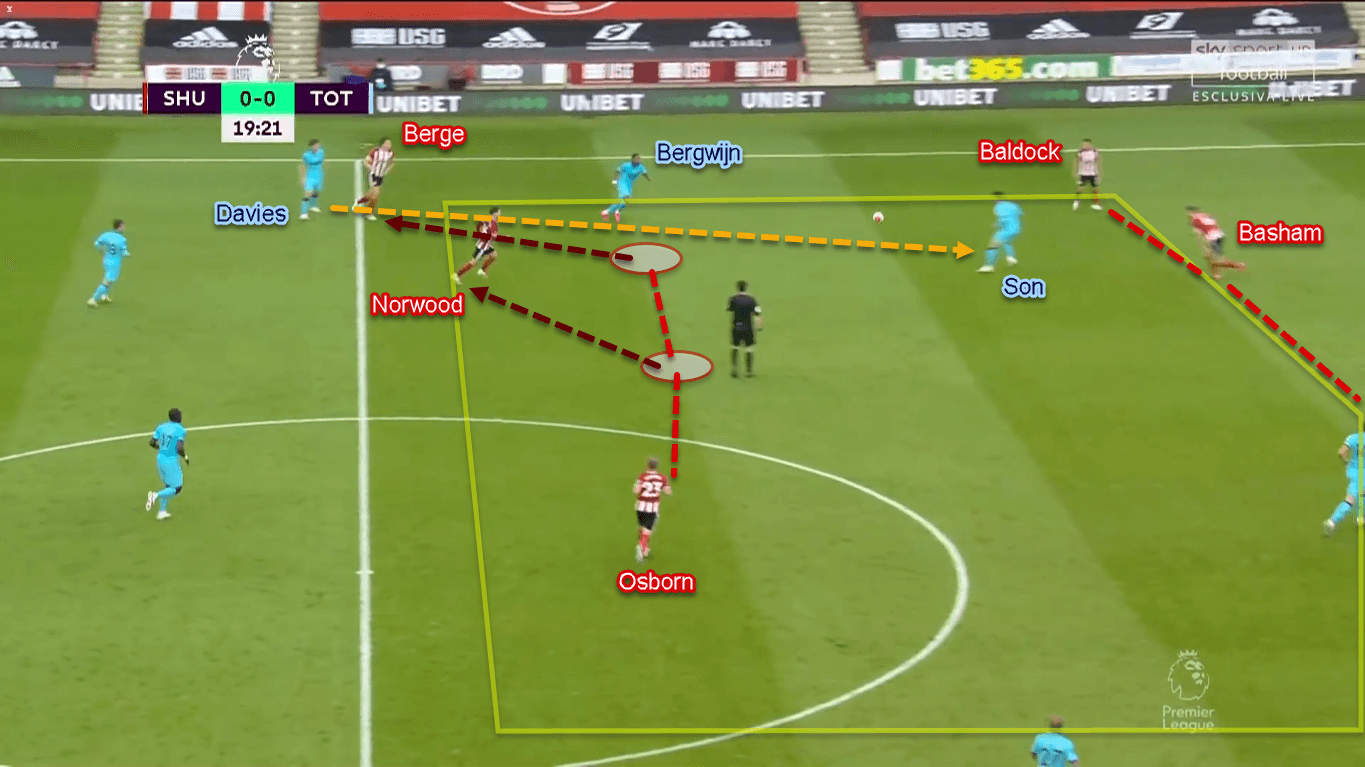
When stepping up to press, Norwood would most likely leave his area wide open. That means Sheffield would allow huge space in between the lines for the opponents’ narrow attackers. Spurs would try to exploit this by allowing up to two of their forwards to drop and receive a diagonal pass from Davies. If they succeed, the men in blue could either combine or drive forward with the ball.
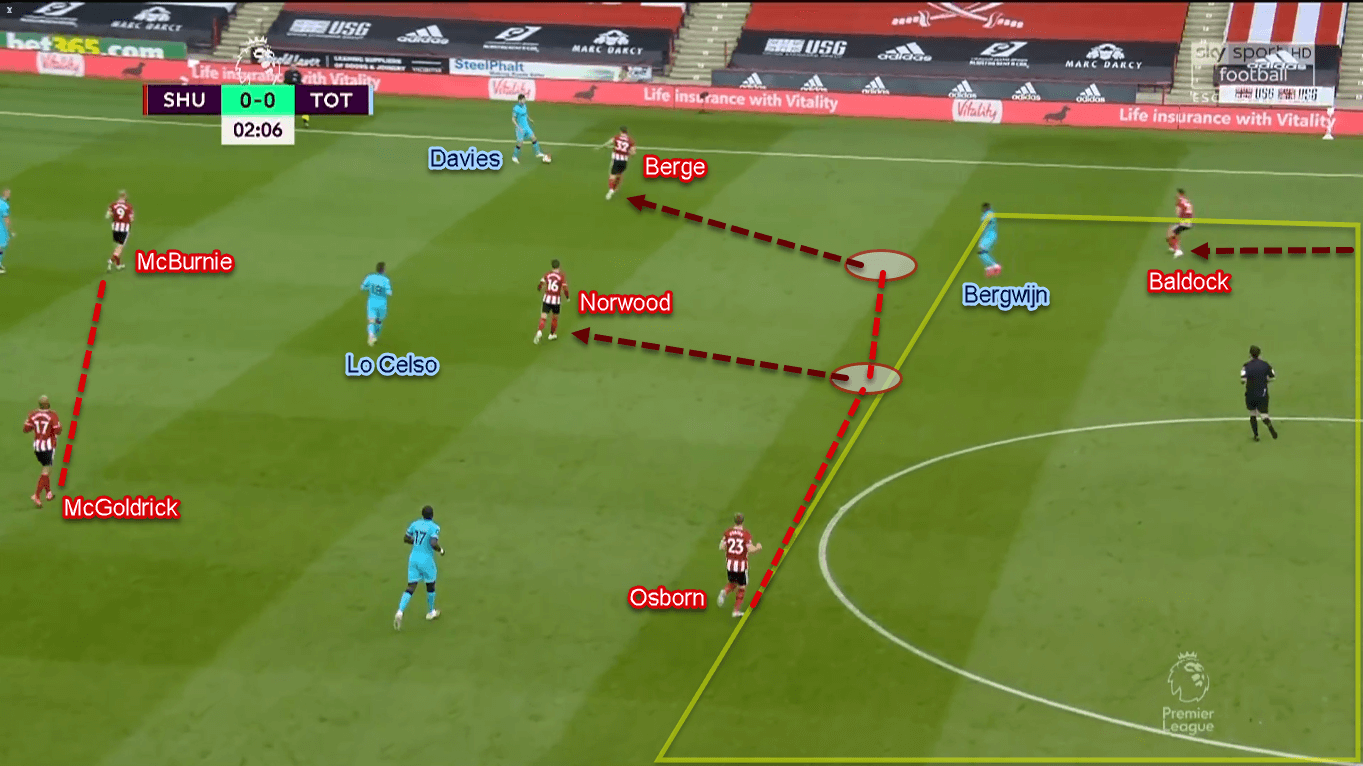
Sheffield responded by sending at least one player to close the gap, that mostly being the closest defender to Spurs’ dropping attacker. For example, the dropping attacker was the left-winger. Therefore, the one tasked to follow him was right wing-back George Baldock, as he played in a similar area to the particular opponent.
The Lilywhites’ attacking game and its issues (part one)
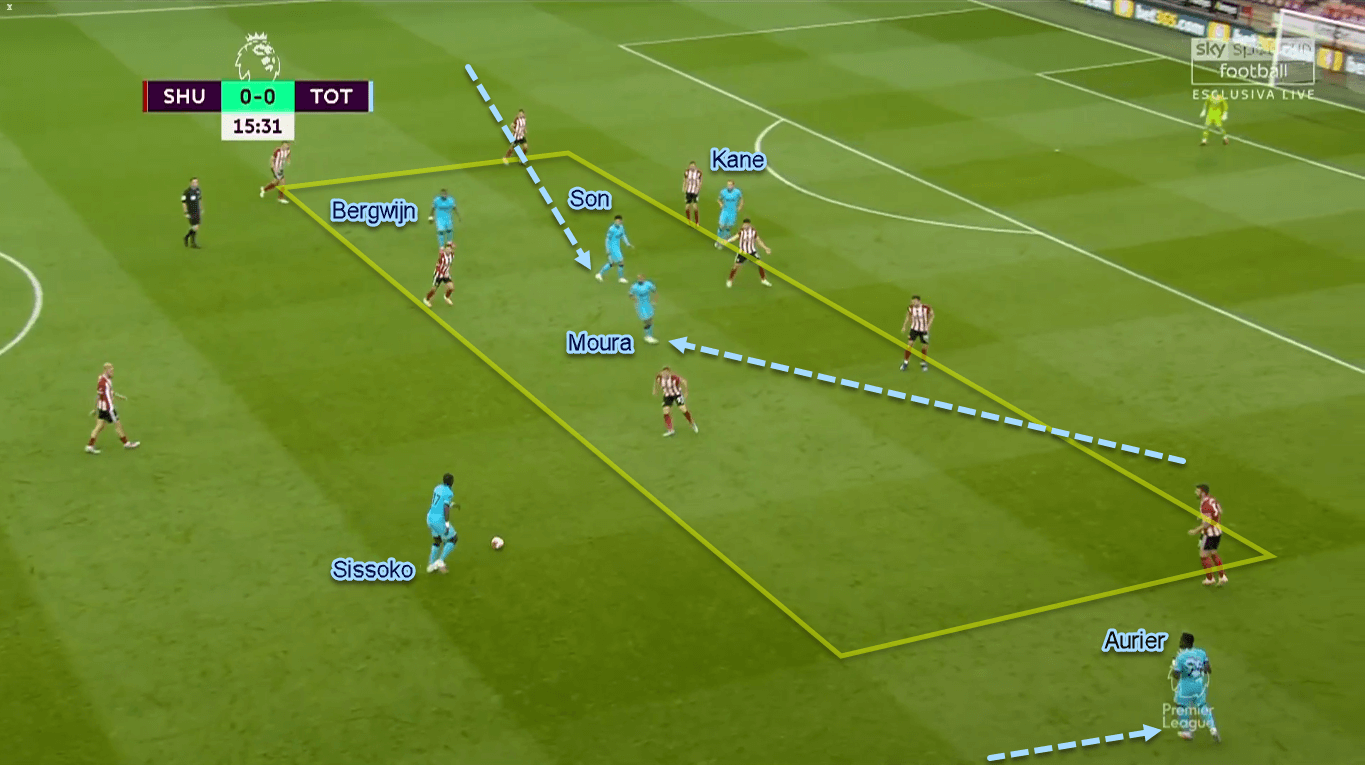
This analysis has mentioned Mourinho’s usage of narrow attackers. There were some options that Spurs used to utilise them. First, by allowing the narrow attackers to combine in between the lines. To do so, Mourinho would utilise either the full-backs or one of the midfielders to provide a vertical or diagonal pass for the attacking players.
With somewhat ample space in between the lines that Sheffield gave away at times, either Moura, Son, Bergwijn, and/or Kane could exploit that in various ways. Mostly they would make a short combination before one of them trying to drive his way into the box.
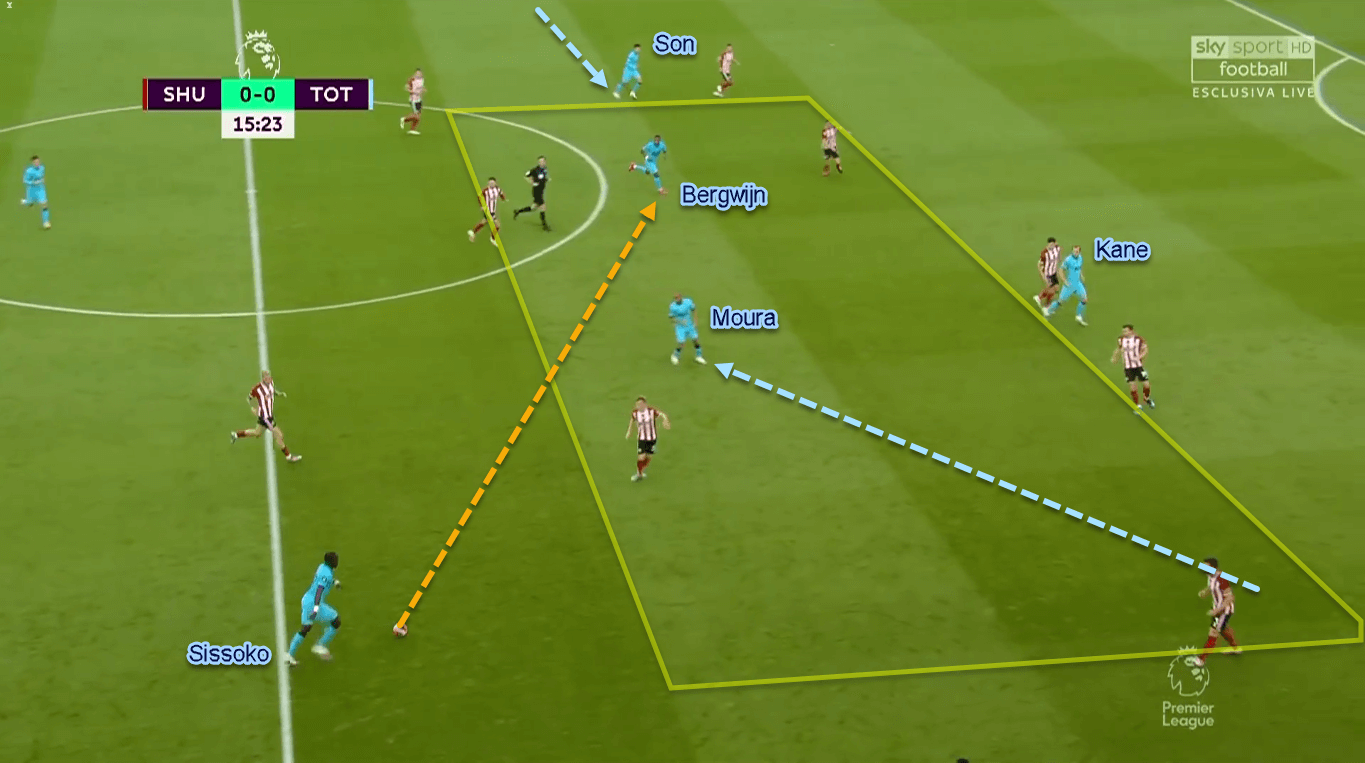
However, some issues prevented Spurs from exploiting the gap. First, the receiving player’s body orientation was bad for most of the times. It means the player would either face his own goal or face the touchline when receiving. This prevented him to make a forward combination, thus forced to make a return pass. Even worse, they could also limit their playing area when receiving, thus making Sheffield easier to win the ball back.
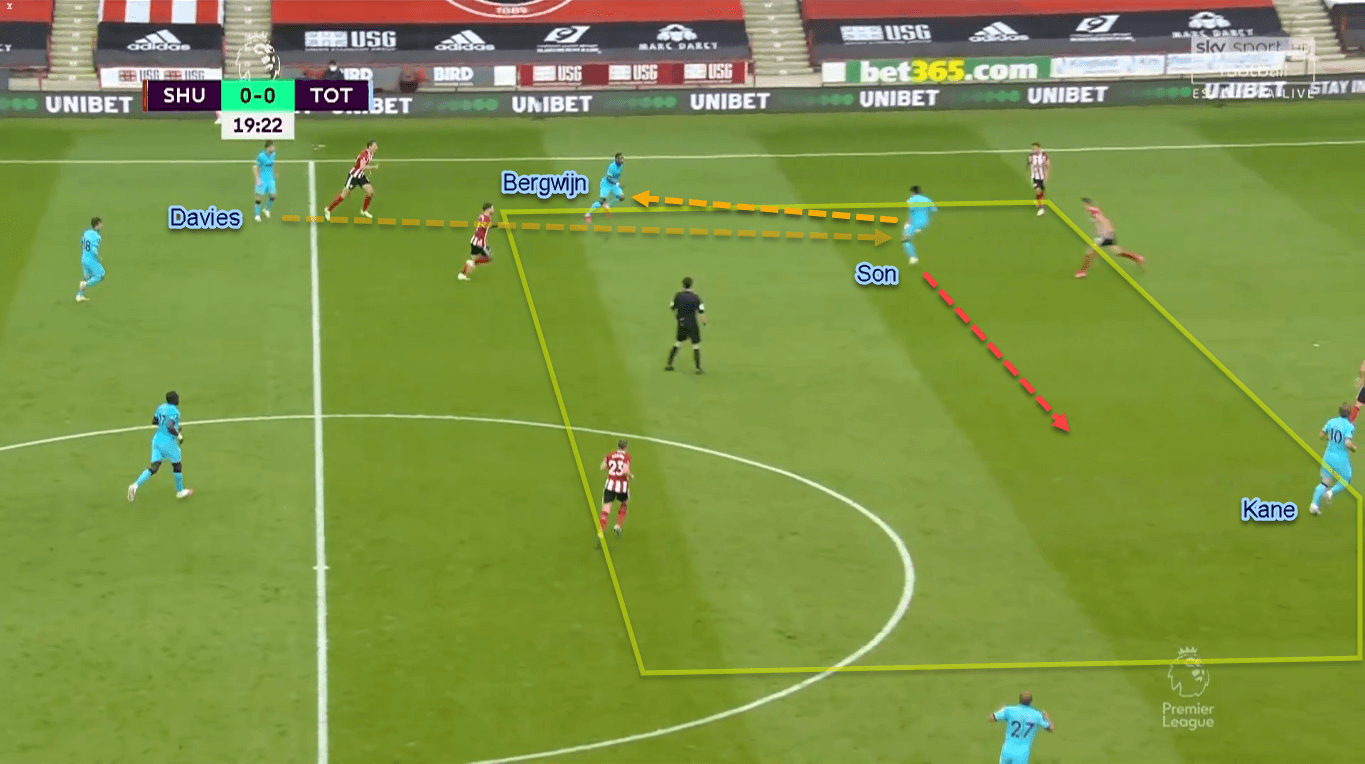
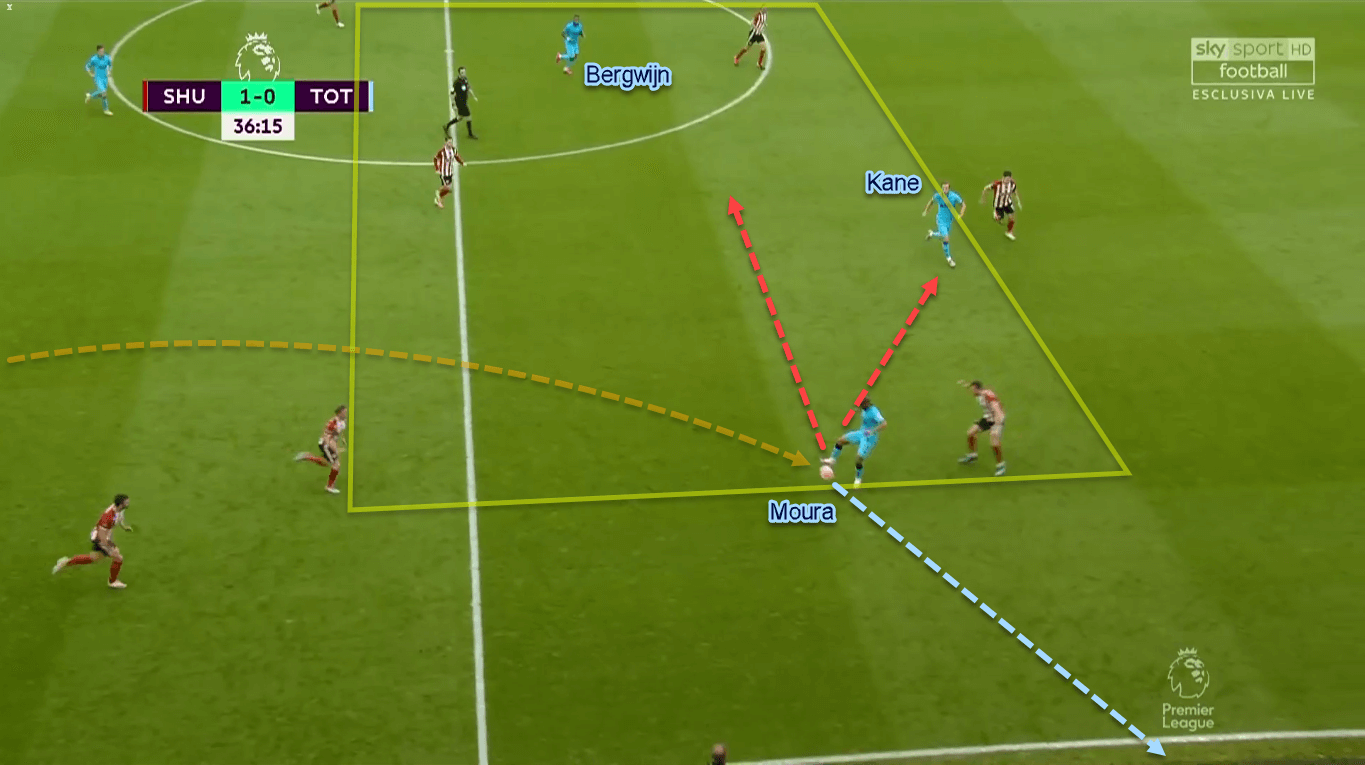
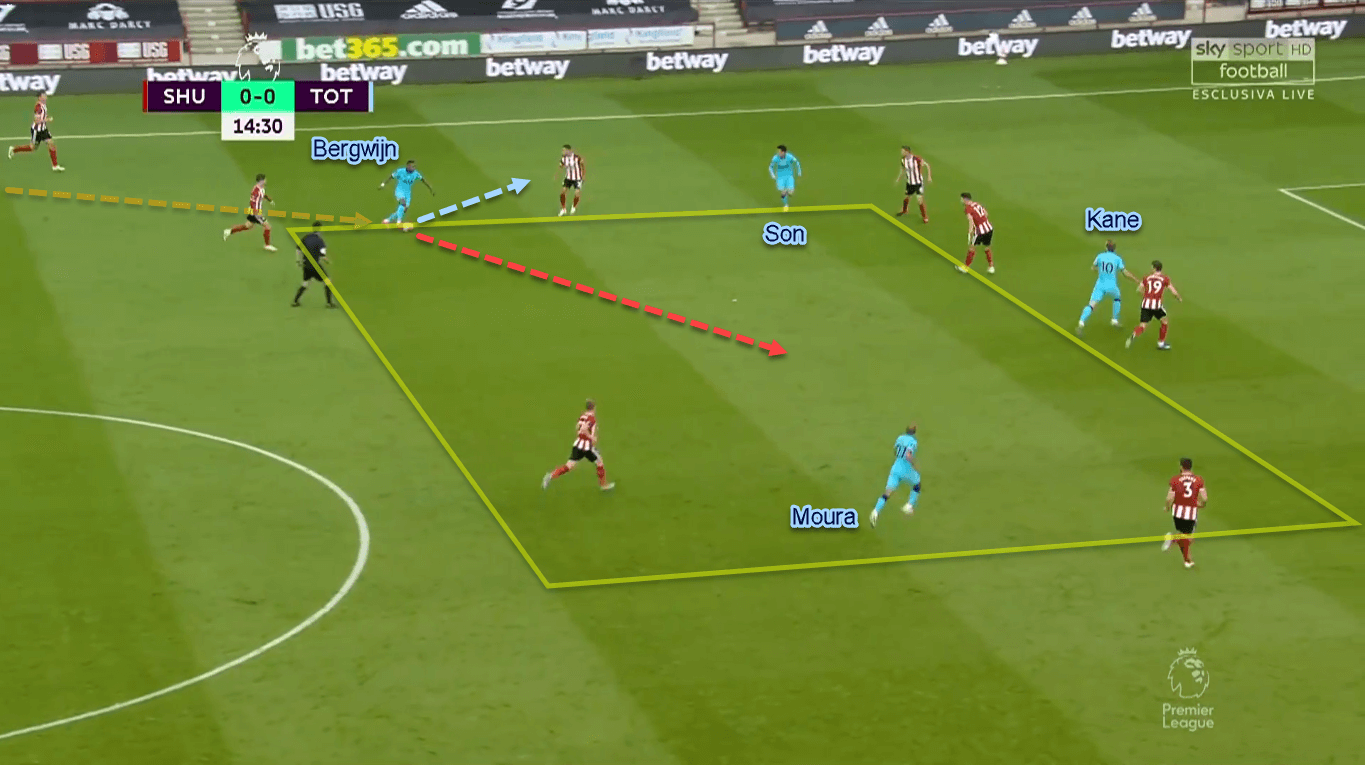
Secondly, there were some questionable decision-making from the attackers; most notably from Bergwijn. For example, the Dutch had huge space inside Sheffield’s defensive block to drive into, yet he chose to dribble the ball outside.
The Lilywhites’ attacking game and its issues (part two)
Another way Spurs tried to unblock Sheffield’s defensive department was by serving one of the attackers with a sharp pass in behind. The distributor — either Lo Celso or the centre-backs for most of the times — could alter their approach by using ground passes or lofted balls. Usually, the main target of such a pass was Kane, due to his goal-scoring ability and position as Spurs’ most-advanced player.
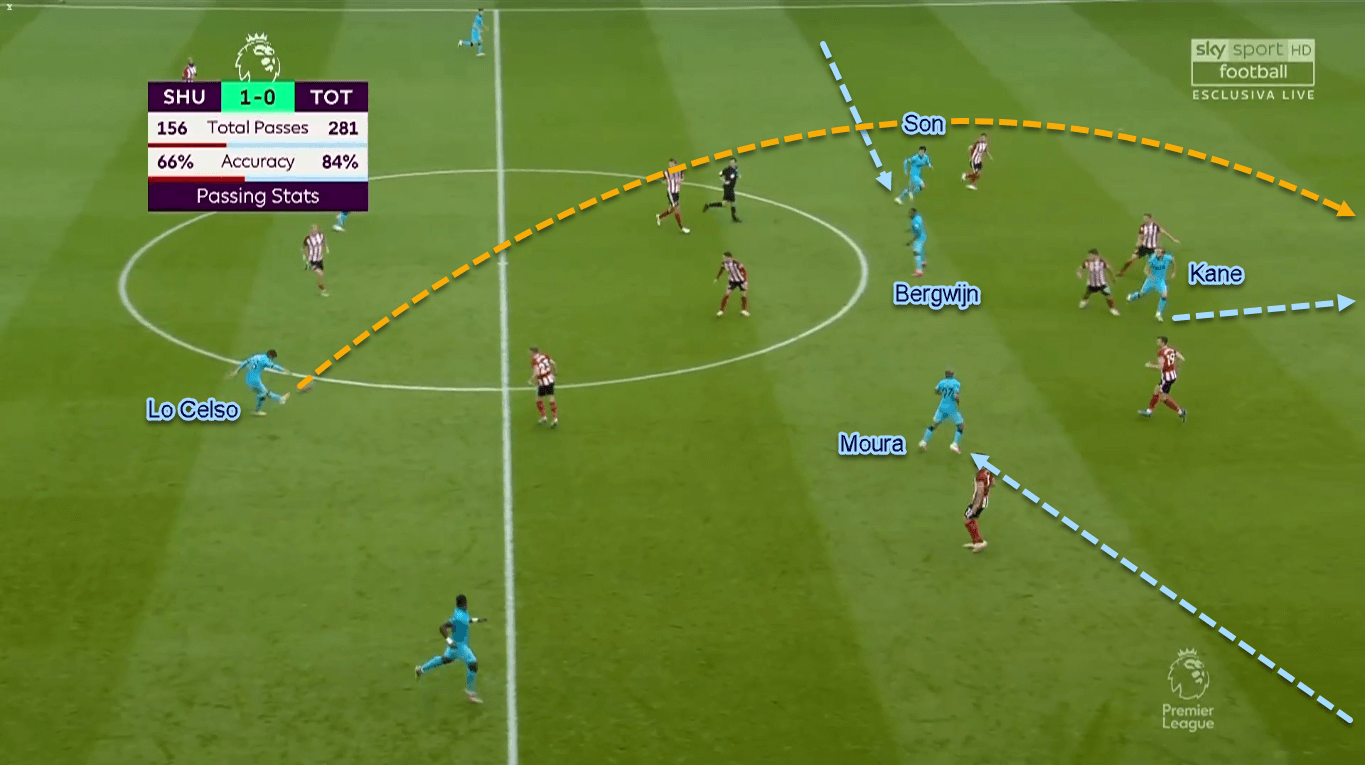
However, Spurs could also vary the approach by targeting one of the narrow attackers. With up to four attackers playing in close proximity, the visitors could confuse the backline on who to make the run. Even further, all four forwards have great bursts of speed to chase balls in behind whenever needed.
In this scheme, the main problem wasn’t on the attackers. Instead, the deeper players — who were tasked to distribute the ball — were the ones more responsible for this.
Direct approach from The Blades
As the statistics show, Sheffield had lesser ball possession with an average of 36%. This partly happened because they tended to play directly from Henderson to one of the forwards. If we look at the stats, Henderson finished the game with at least 17 passes to Spurs’ playing half. That’s equal to 70.83% of all his passing effort. Some may say this is because Spurs deployed a high-pressing scheme to prevent Sheffield from building their plays from the back. Yet, it wasn’t the case.
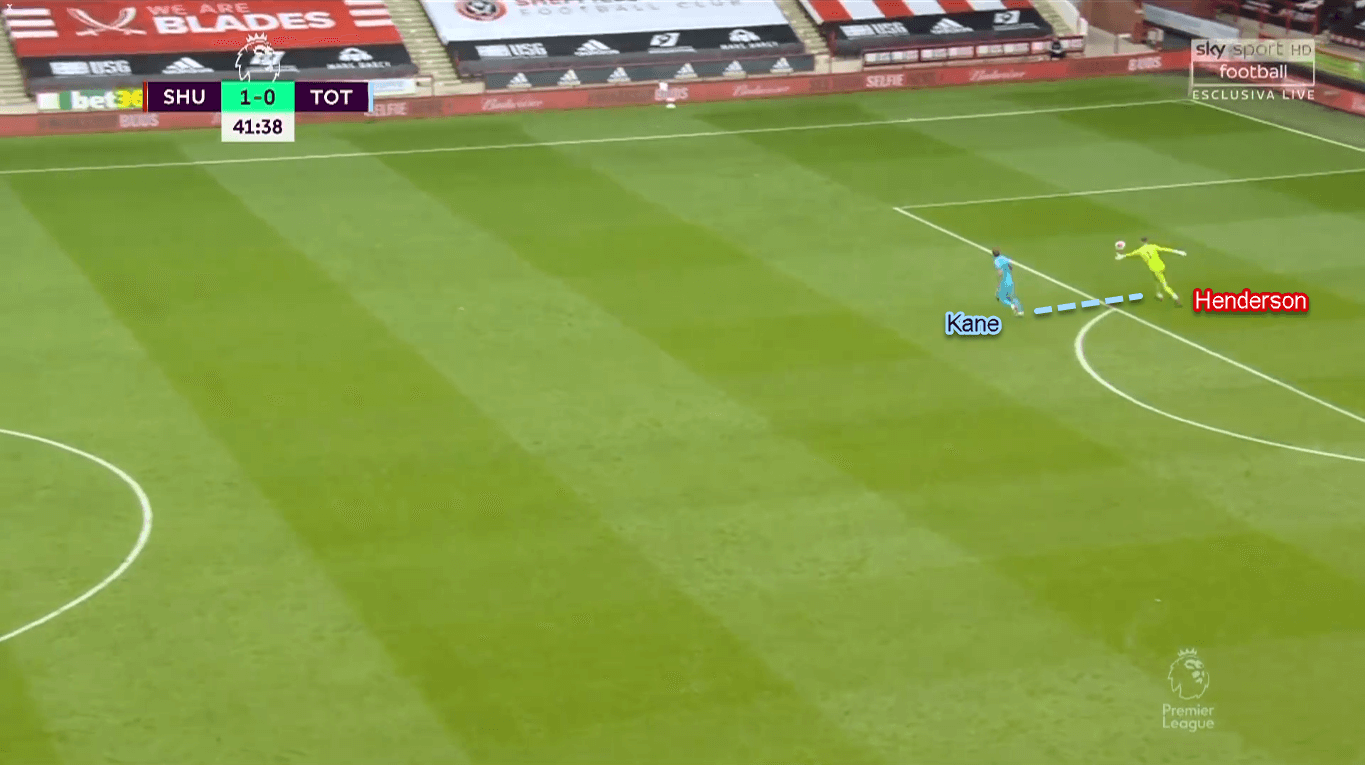
Spurs only tasked Kane in a one-man press against Henderson; which he did throughout the game. Indeed the targetman had a particular defensive task, but it seems that Henderson would keep playing long balls even if Kane gave no pressure whatsoever. That’s because the centre-backs never came nearby to offer themselves as a passing option for the goalkeeper.
The potential receivers of the direct approach were the forwards, mainly McBurnie. The statistics show that the Scot was engaged in 20 aerial duels with 60% winning rate. Apart from the forwards, Berge could also offer himself to win the aerial duel due to his height.
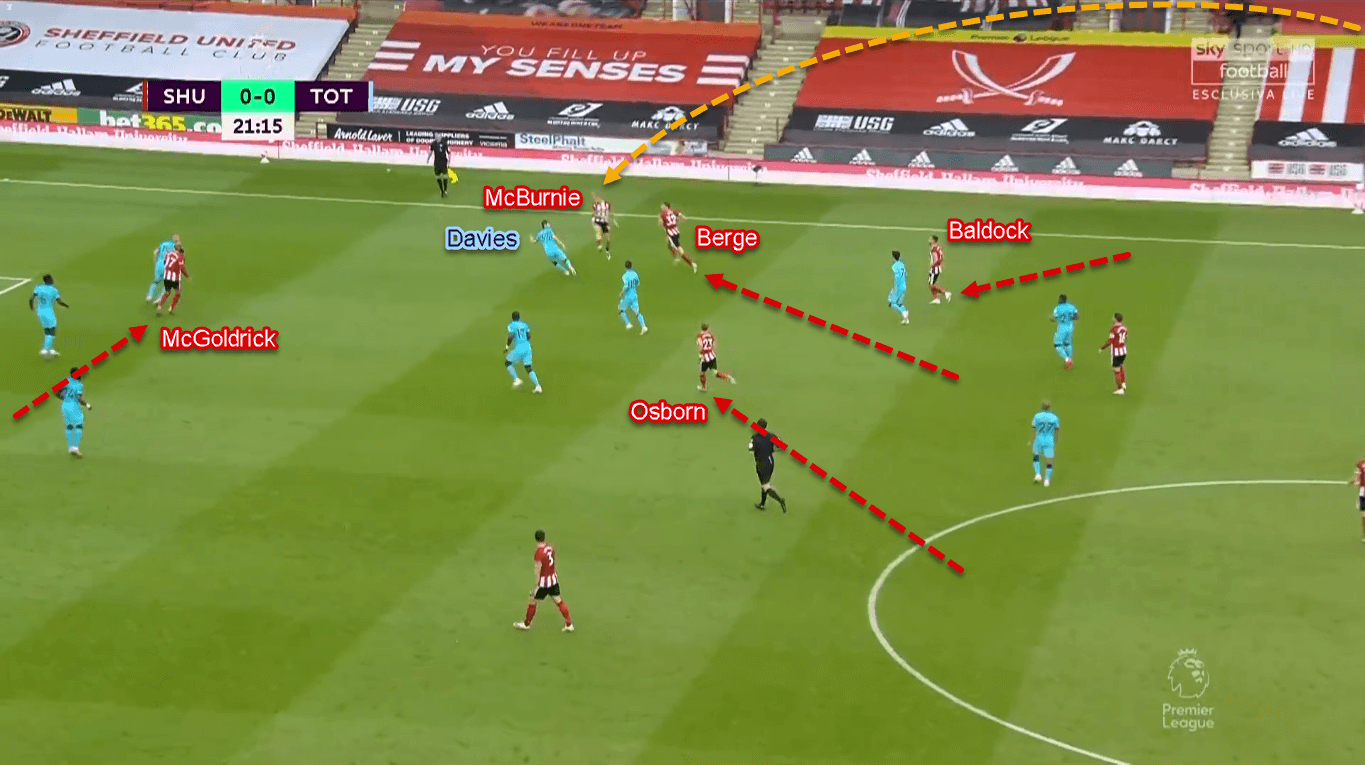
The receiver was not the only player involved in the aerial duels. Wilder also asked his forward partner and at least one of the midfielders to come nearby. Sometimes the ball-side wing-back could also be found in the process. The objective was to add more players to get the lay-off or win the second balls from the aerial duel.
Sheffield’s wing play and how Spurs responded (part one)
The home side also deployed their famous wing play in this game. In the process, they would try to overload the flank with up to four players. It consisted of the ball-side striker, wing-back, central-midfielder, and as usual, centre-back. With up to four players in the wide area, they would try to free one man in space, then allow him to send crosses into the box.
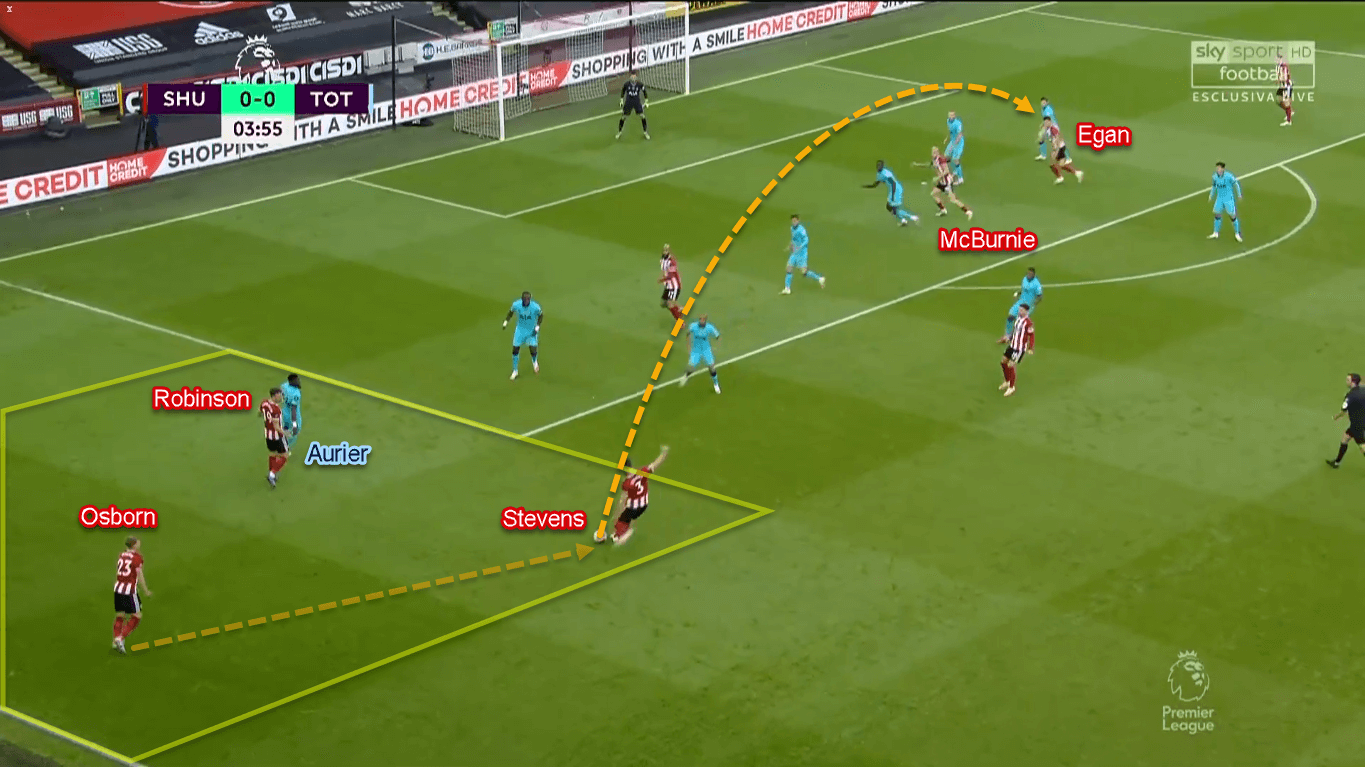
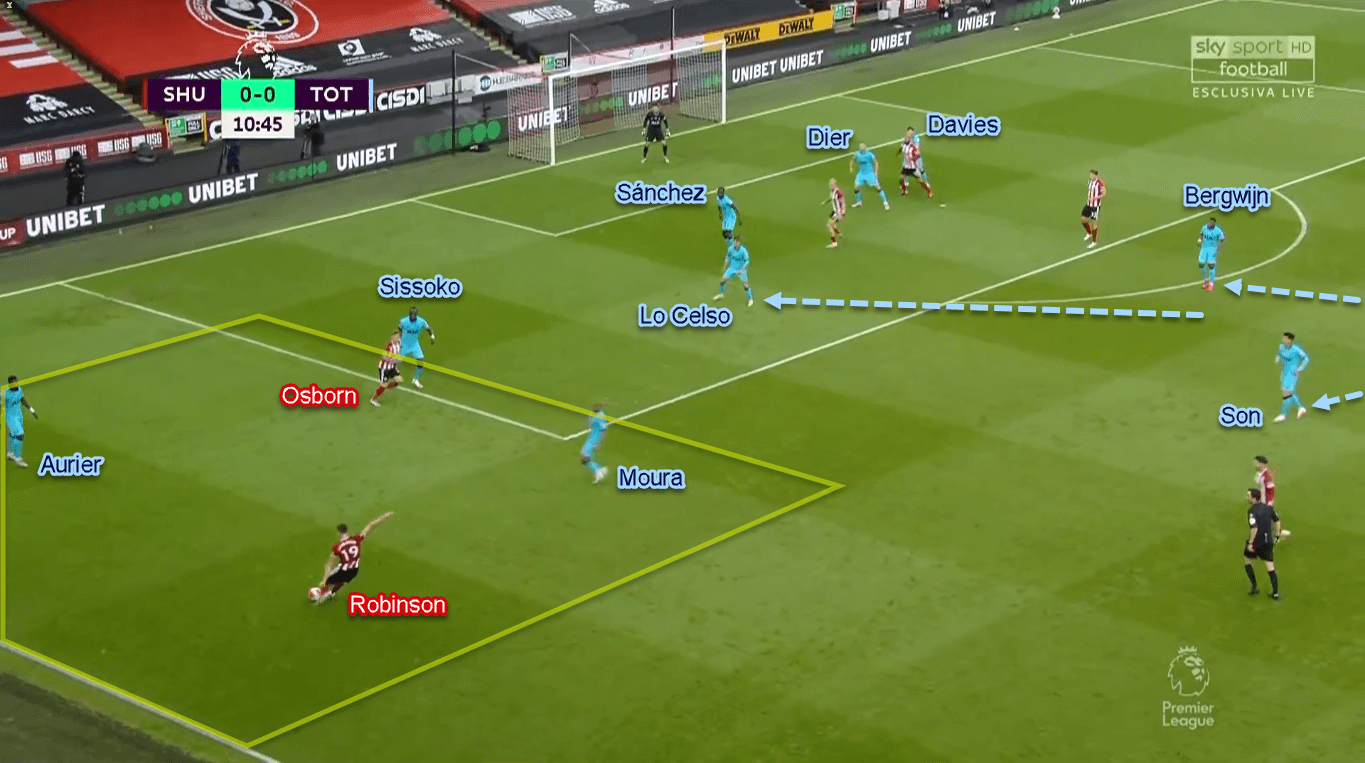
Tottenham interestingly responded this. Mainly, they would deploy the ball-side full-back, winger, and defensive midfielder to prevent Sheffield from overloading the flank. One interesting feature was their usage of the far-side defensive midfielder. Instead of tasking the nearby centre-back to join the press when needed, Mourinho instructed the far-side pivot instead.
In the process, Mourinho instructed the far-side defensive midfielder to come into the penalty box; even in parallel with the centre-backs. By doing so, Spurs would have their centre-backs stay close to each other at all time. This was important because Spurs need both quality and quantity inside the box against Sheffield’s crossing game.
Sheffield’s wing play and how Spurs responded (part two)
The space left by the far-side pivot then was filled by the retreating forwards. As the ball-side winger has joined the flank-press, the remaining two attacking midfielders had to drop and protect Zone 14. In contrast to them, Kane could stay forward and reserve his energy for transitions.
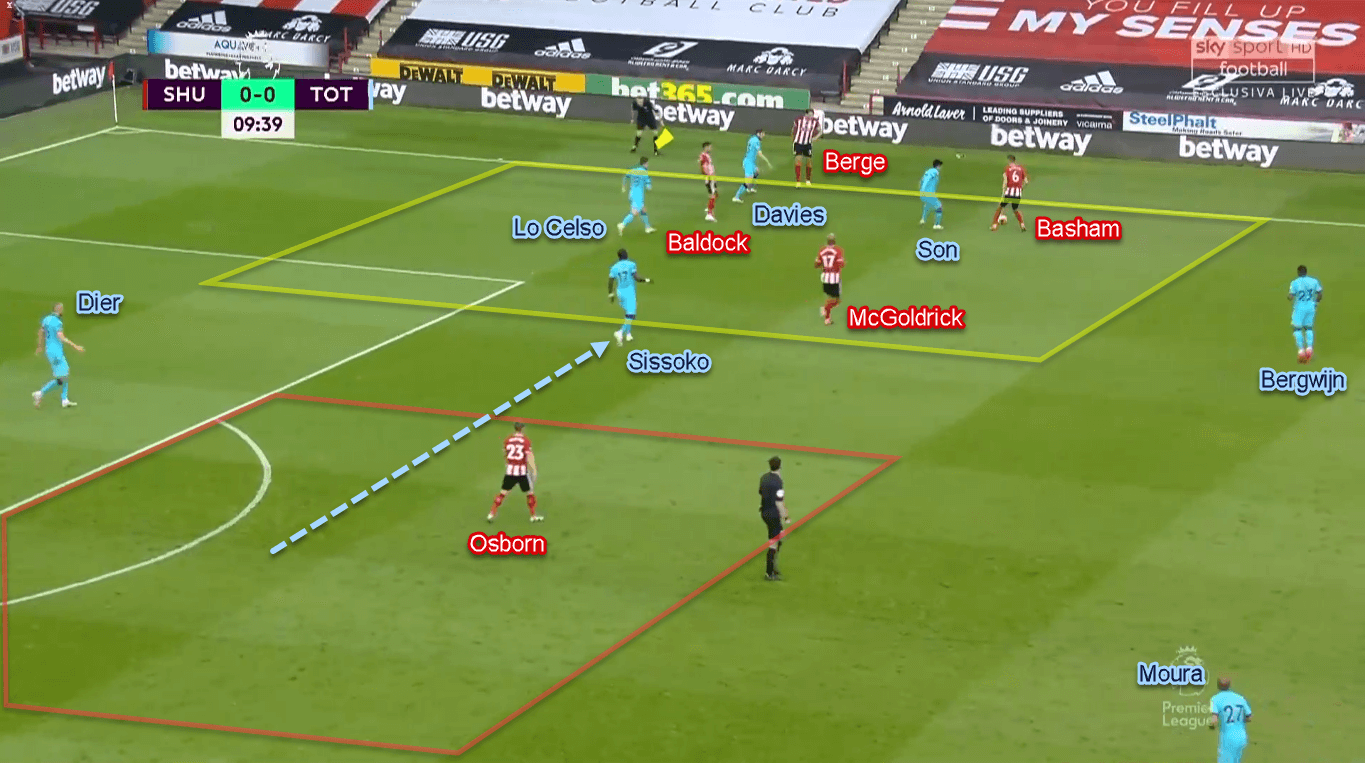
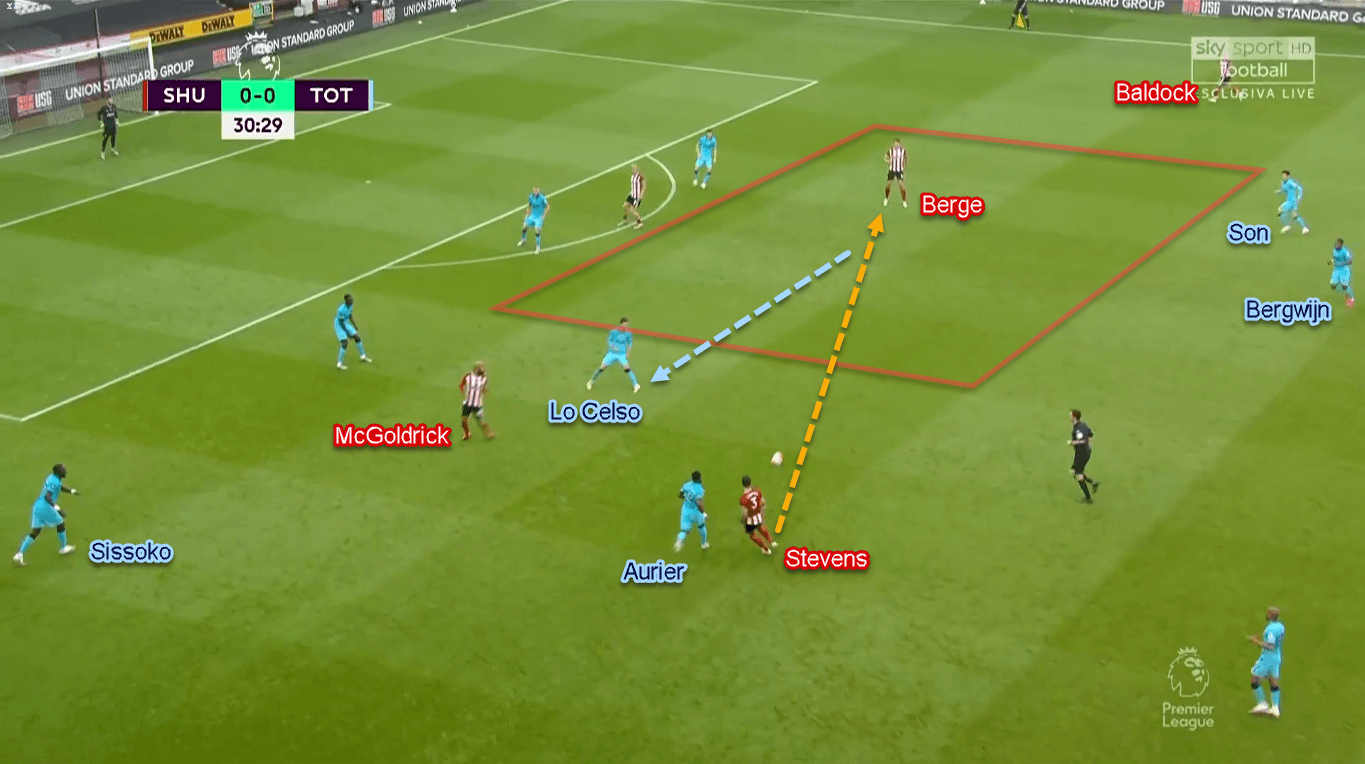
However, this was a risky defensive tactic. Mourinho needed to rely on his forwards’ collective diligence and defensive work-rate to protect the dangerous space. If they failed to do so, Sheffield would happily exploit this. In the process, the home side usually would use the far-side central-midfielder to be their outlet in the space. For a fact, Berge’s goal started by exploiting this particular problem.
Second-half adjustments
After the break, Sheffield dropped to a deeper 5–3–2. They could also be found in a somewhat lopsided 5–3–1–1 with substitute Mousset staying forward. By doing so, the Frenchman gave constant presence should his team needed to launch a quick counter-attack.
In the opposite side, Spurs made more variety of changes. Personnel-wise, Mourinho took off Bergwijn — who played below par — for Lamela just four minutes before the hour mark. In the last 20 minutes, Mourinho subbed Alli and Ndombélé for Sissoko and Aurier before taking Davies off for Vertonghen late in the game.
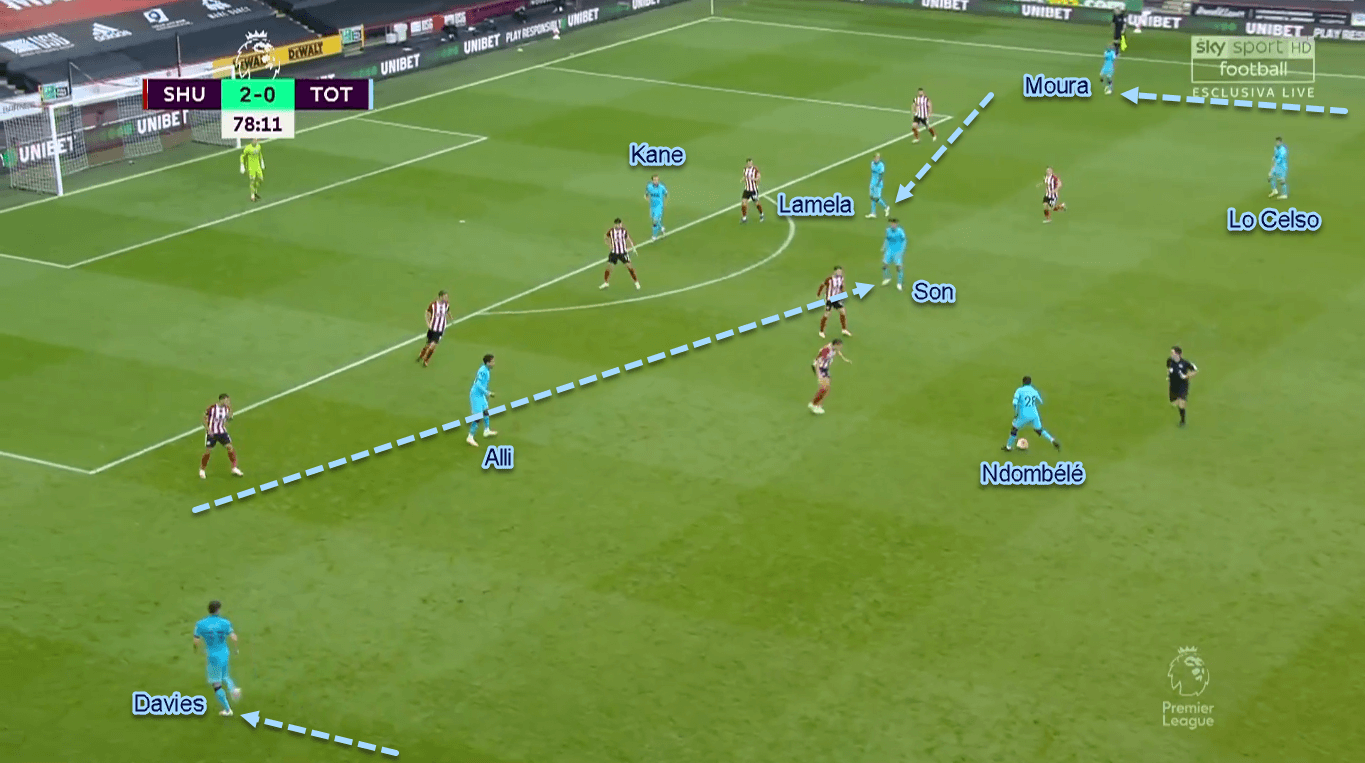
Tactic-wise, the away side went more aggressive. They moved to a 2–2–6-ish formation with permanent wing-backs in both flanks. In the process, Mourinho moved Moura to right wing-back position to add more attacking threat in that area.
In the second half, Mourinho asked his men to send crosses more often so they could reach the opponents’ penalty box quicker. If we look at the stats, Spurs only attempted eight crosses in the first half. They managed to make 15 efforts after the break.
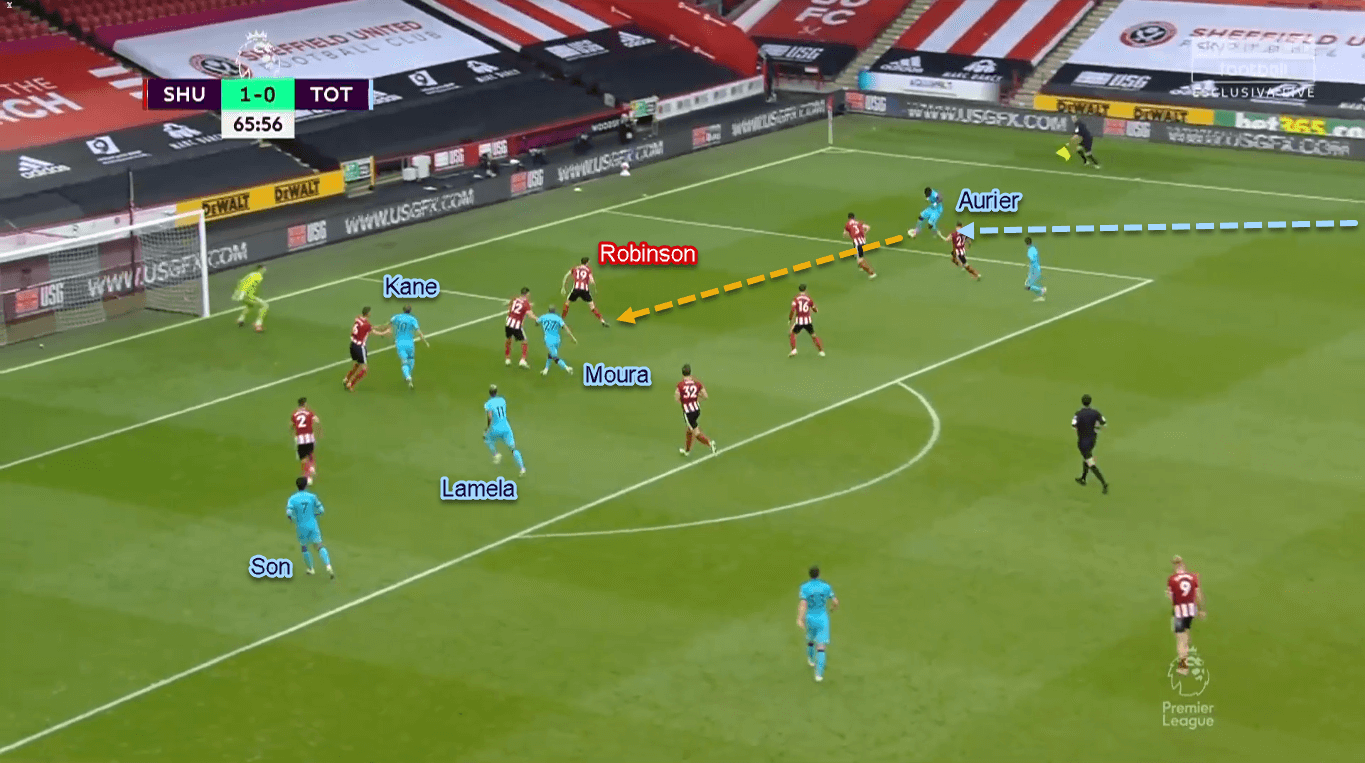
However, their crossing quantity and quality didn’t match. The Lilywhites were only able to make five (21.73%) successful crosses throughout the game. Even worse, full-backs Aurier and Davies combined for … zero accurate crosses from nine attempts. No wonder why Mourinho took both them off.
Conclusion
Some may say, Kane’s controversially disallowed first-half goal ruined the game. The statement makes some sense, but it seems that Tottenham had much bigger problems than that. Let’s start by their various offensive issues, which range from bad decision-making to lack of quality in distributions.
It doesn’t stop there. Big problems could also be found defensively. If we look again at Sheffield’s second-half goals, all started with shambolic defending. Sissoko didn’t even bother to chase Osborn and Stevens’ runs inside the box for Mousset’s goal. 15 minutes later, Sánchez allowed McBurnie to appear in front of him even before the cross was made in Sheffield’s third goal.
Tottenham still have to face Everton, Arsenal, and Leicester City in their last six matches. Lucky for them, all will be played in their beloved White Hart Lane. Can Mourinho pull a rabbit out of his hat in the upcoming weeks? Let’s wait and see.


Comments