After a 2-0 loss to Chelsea, Tottenham Hotspur‘s gap to the top four was increased to six points, making this match a must win to avoid the gap increasing to a potential nine points. Brighton and Hove Albion had not won since their unexpected win over Arsenal, with draws to Wolverhampton Wanderers and Crystal Palace and a loss at the hands of Sheffield United preceding their trip to Tottenham.
Since being appointed, José Mourinho has completely turned around Tottenham’s form, but with losses to Manchester United and Chelsea keeping the Lily Whites out of the UEFA Champions League places.
Graham Potter has completely revitalised Brighton’s style of play, but with recent results putting them just two points off of the relegation zone, the same gap that resulted in the sacking of former Tottenham player and coach Chris Hughton.
In this tactical analysis, I’ll take a look at the tactics that Mourinho used to outwit Graham Potter to help Tottenham Hotspur defeat Brighton and Hove Albion in the Premier League.
Lineups
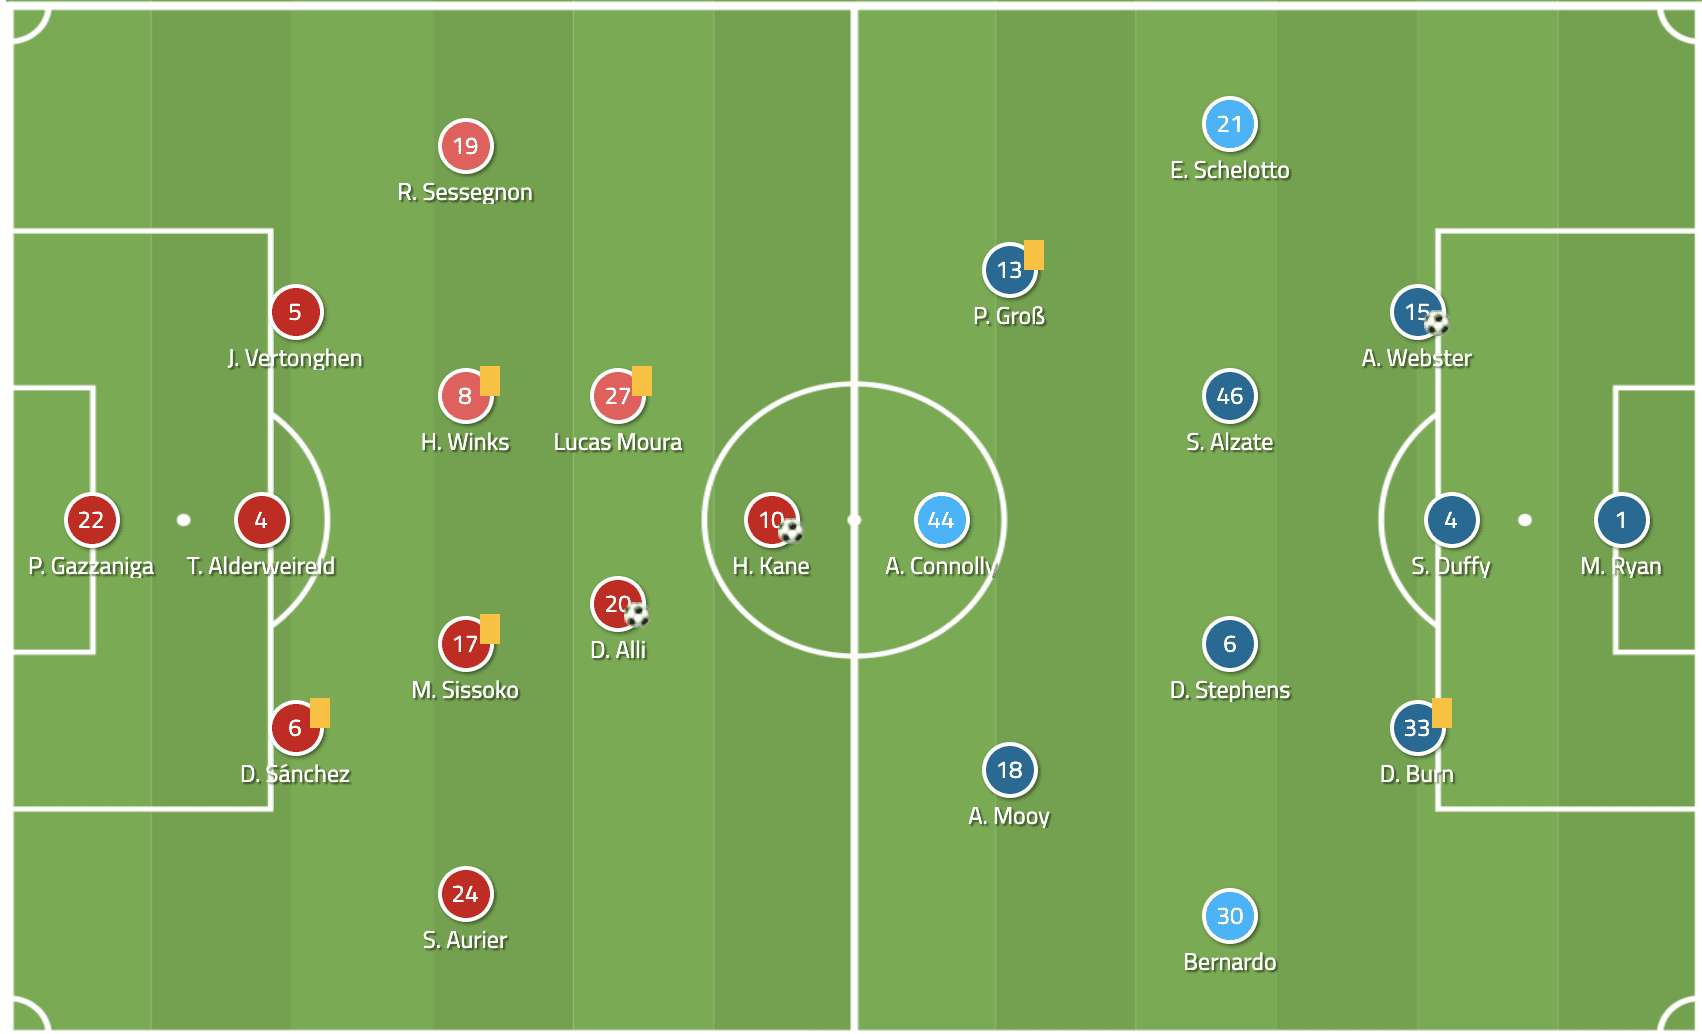
Mourinho strayed away from the 4-2-3-1 shape he’s been using so far during his tenure at Tottenham, this time choosing a 3-4-2-1, which could still emulate the 3-2-4-1 shape used in offensive organisation while providing additional defensive solidity by having Sessegnon in place of Son Heung-Min who was serving a suspension after receiving a straight red card against Chelsea. Paulo Gazzaniga deputised for the injured Hugo Lloris in goal, protected by a back 3/5 of Jan Vertonghen, Toby Alderweireld, Davinson Sánchez, Ryan Sessegnon, and Serge Aurier. Moussa Sissoko and Harry Winks started as a double pivot, while Dele Alli and Lucas Moura Played just in behind Harry Kane.
Potter fielded Brighton in a 3-4-2-1. Potter chose this formation to directly match up against Tottenham’s offensive formation. Potter chose to rotate his side heavily, looking to the important six-pointer against Bournemouth just two days later. Matthew Ryan played in goal behind a back 3/5 of Bernardo, Dan Burn, Shane Duffy, Adam Webster, and Ezequiel Schelotto.
Tottenham’s build-up
Through analysis, we could see Tottenham’s usual build-up shape since appointing Mourinho saw Vertonghen shift from left-back to left centre-back in a back three, with Aurier pushing high. Mourinho kept this, but with Vertonghen starting as the left centre-back rather than at left-back, with Sessegnon providing width in a much more conventional system with two recognised wing-backs.
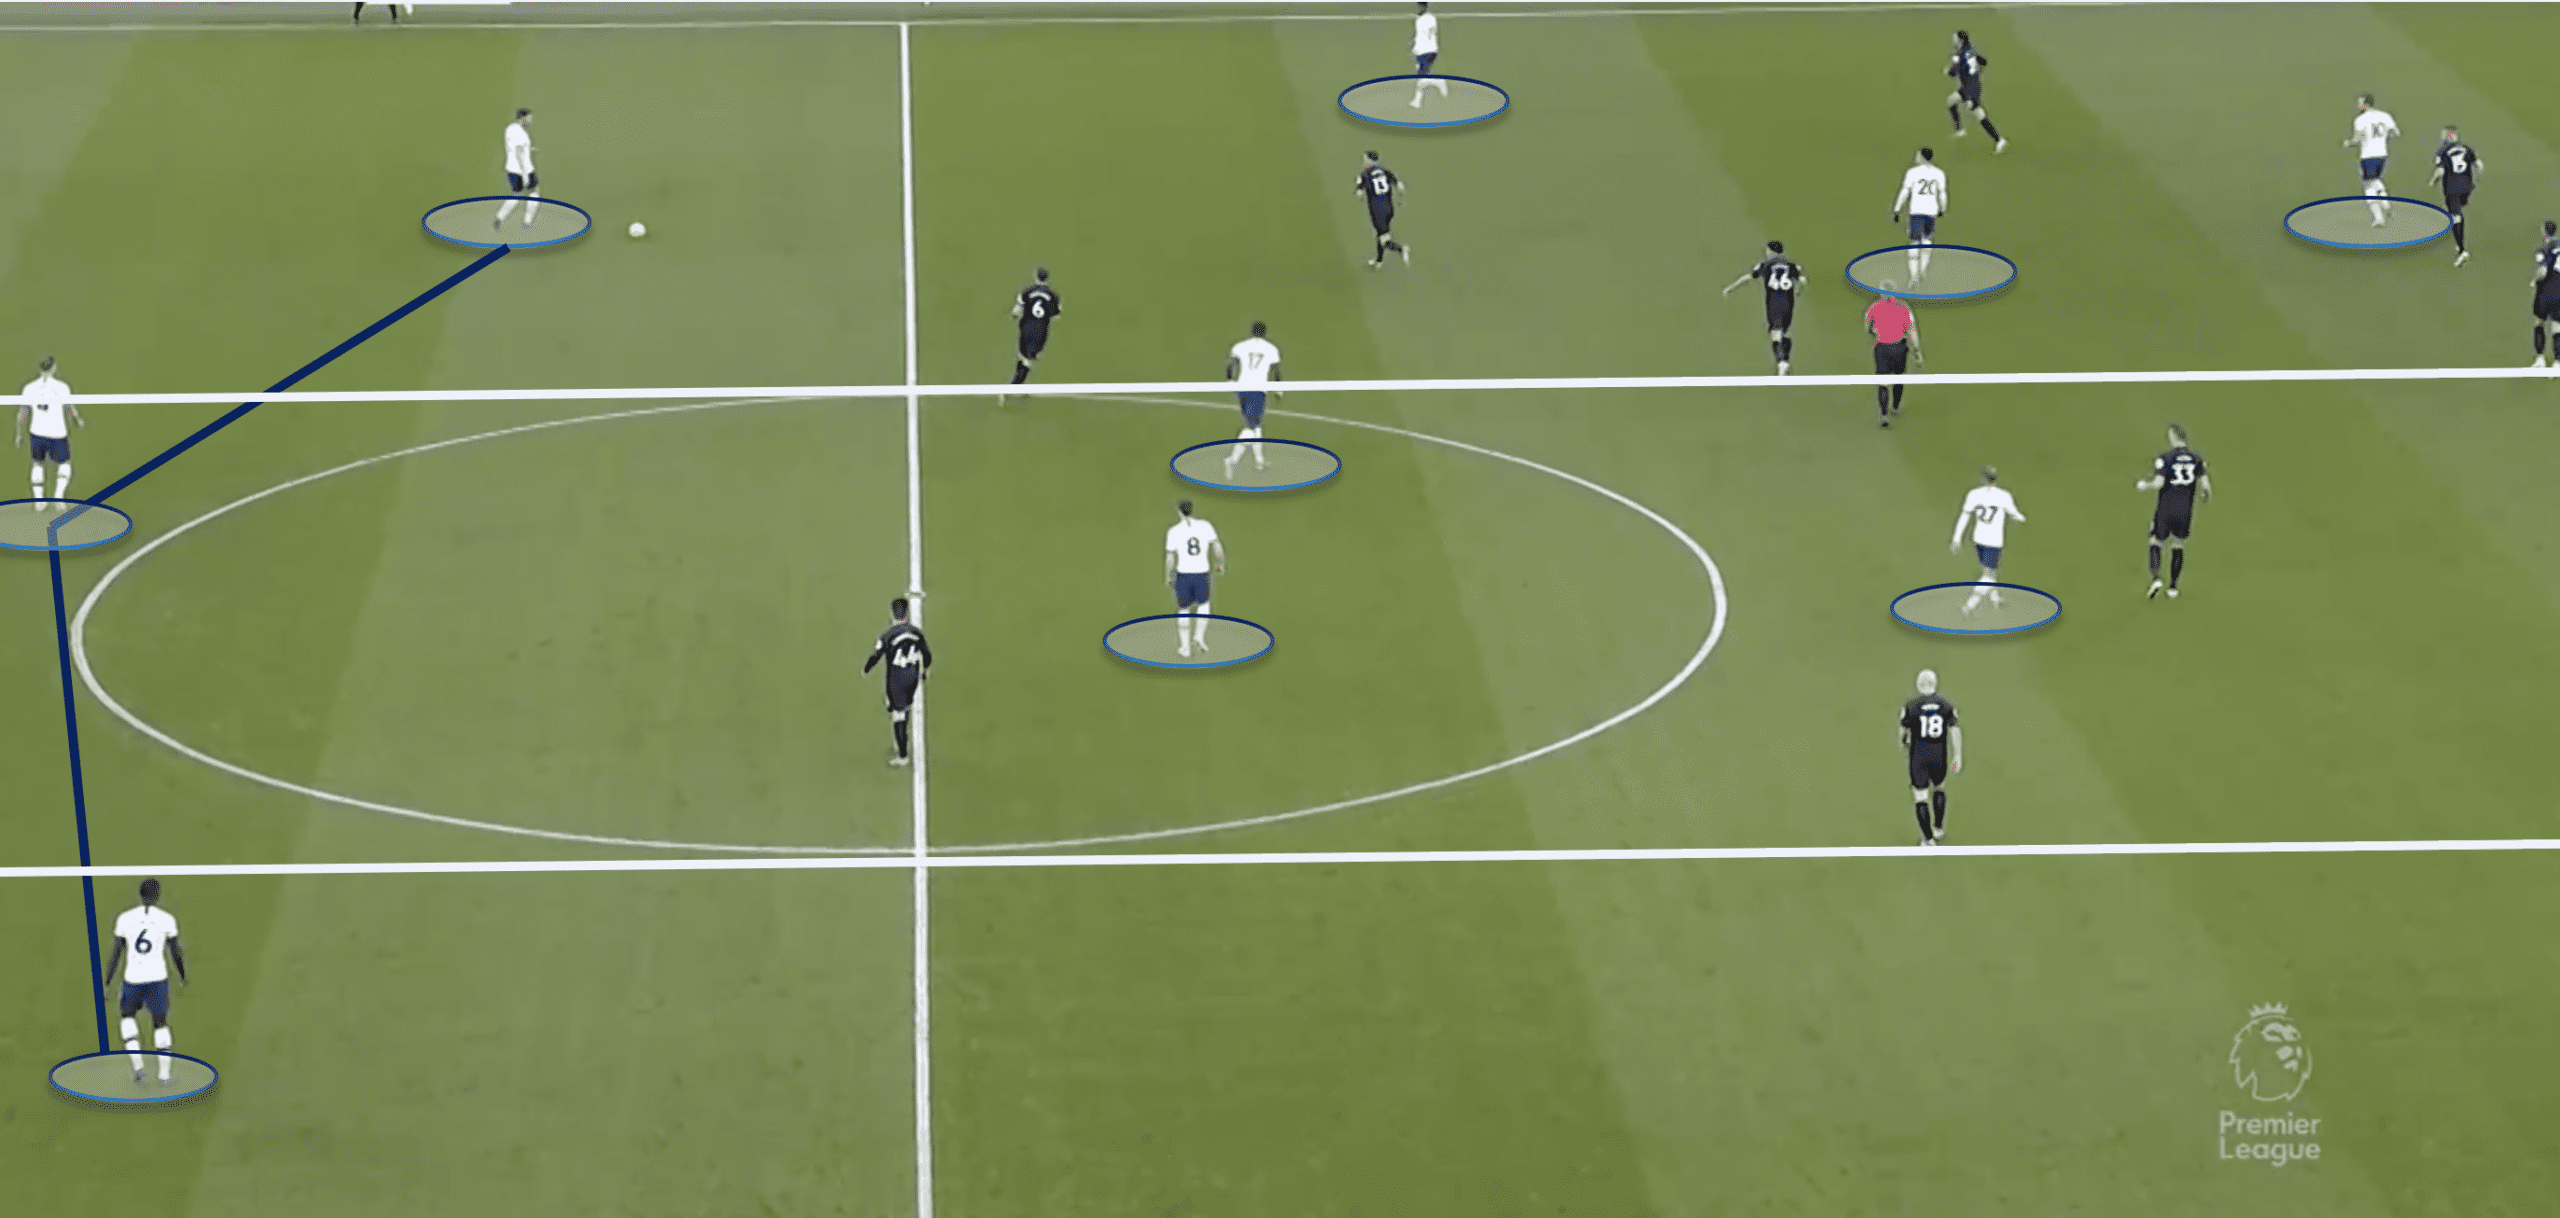
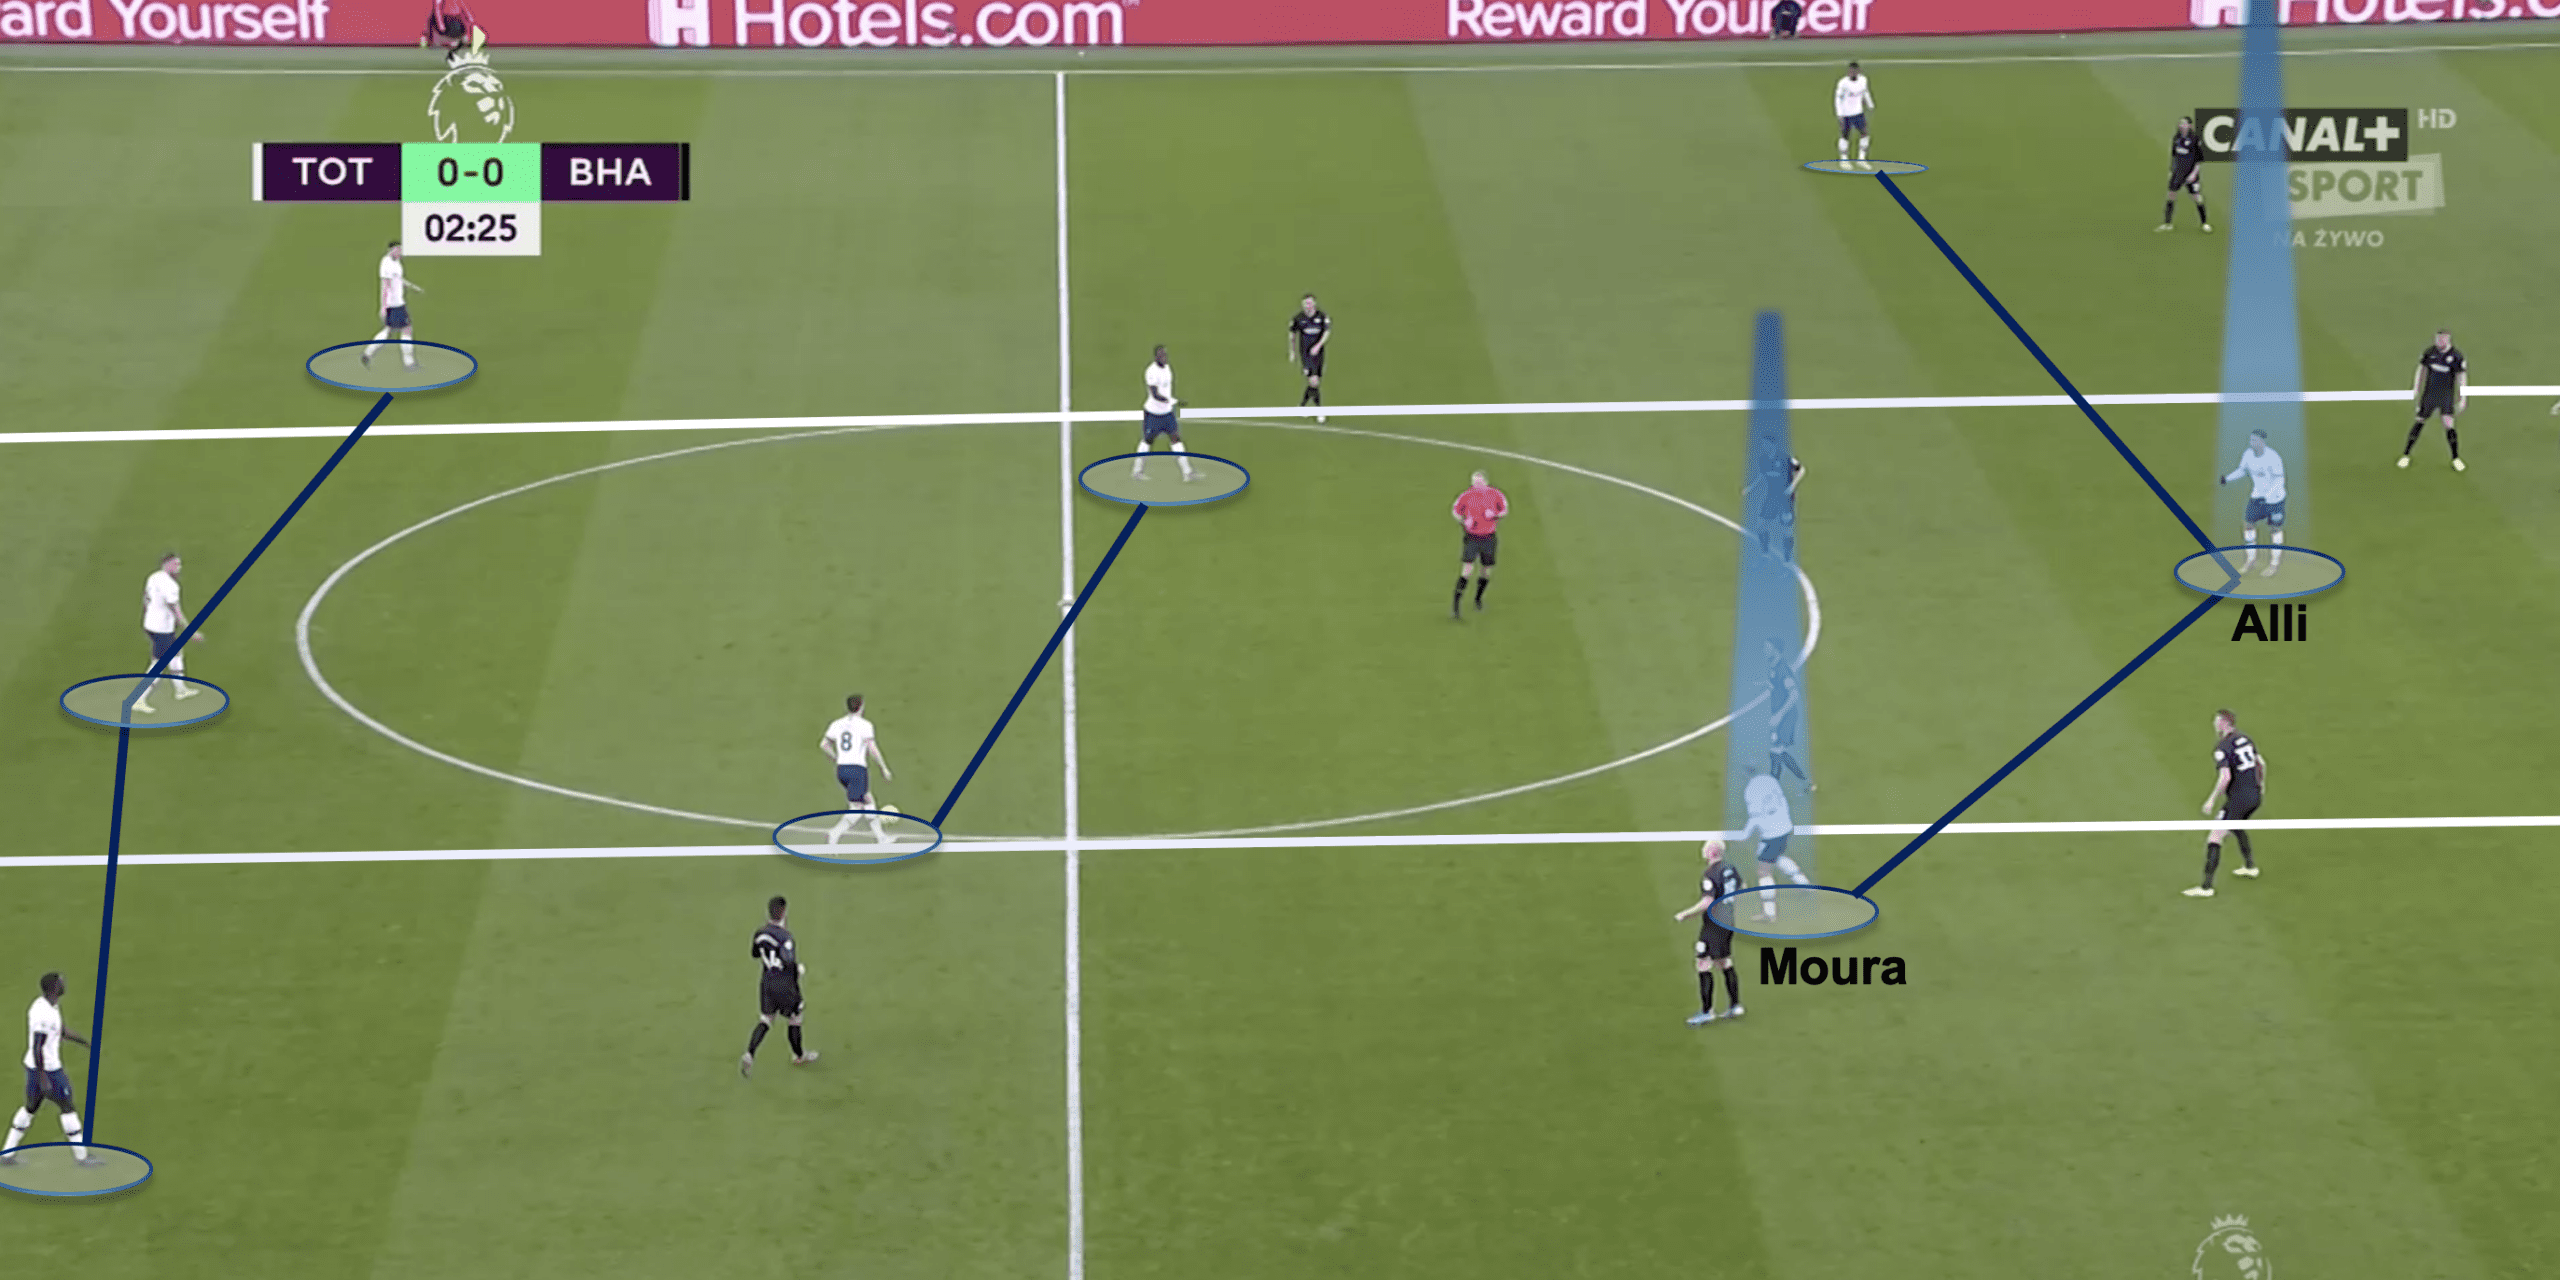
The two attacking midfielders (Alli and Moura) would position themselves in relation to the ball. When the ball was central they would be balanced, but when the ball was shifted wider the ballnear player would move to the halfspace on that side, while the ball far player would tuck in to the centre. Kane had a similar role when positioning himself, he would move to the ballnear halfspace when the ball was not central while staying central when the ball was. Kane’s movement caused problems for Brighton’s defensive structure as Aurier and Sessegnon always stayed wide, so if the defensive line shifted to follow Kane, it would leave them in space, and if Brighton wanted Bernardo or Schelotto to stay with Aurier and Sessegnon, it would create defensive gaps as Kane shifted across.
Tottenham’s defenders (particularly Alderweireld) are proficient at long passes, this, coupled with Sessegnon’s, Aurier’s and Kane’s ability to make movements behind defensive lines and blindside runs presented a considerable potential for danger. As the image below we can see how Alli shifts into the left halfspace when Vertonghen has the ball, while Moura tucks in centrally and Kane shifts in line with Alli.
In the below image we can see the inverse of the previously mentioned shape, this time with Alli shifting centrally and Moura moving to the ballnear halfspace.
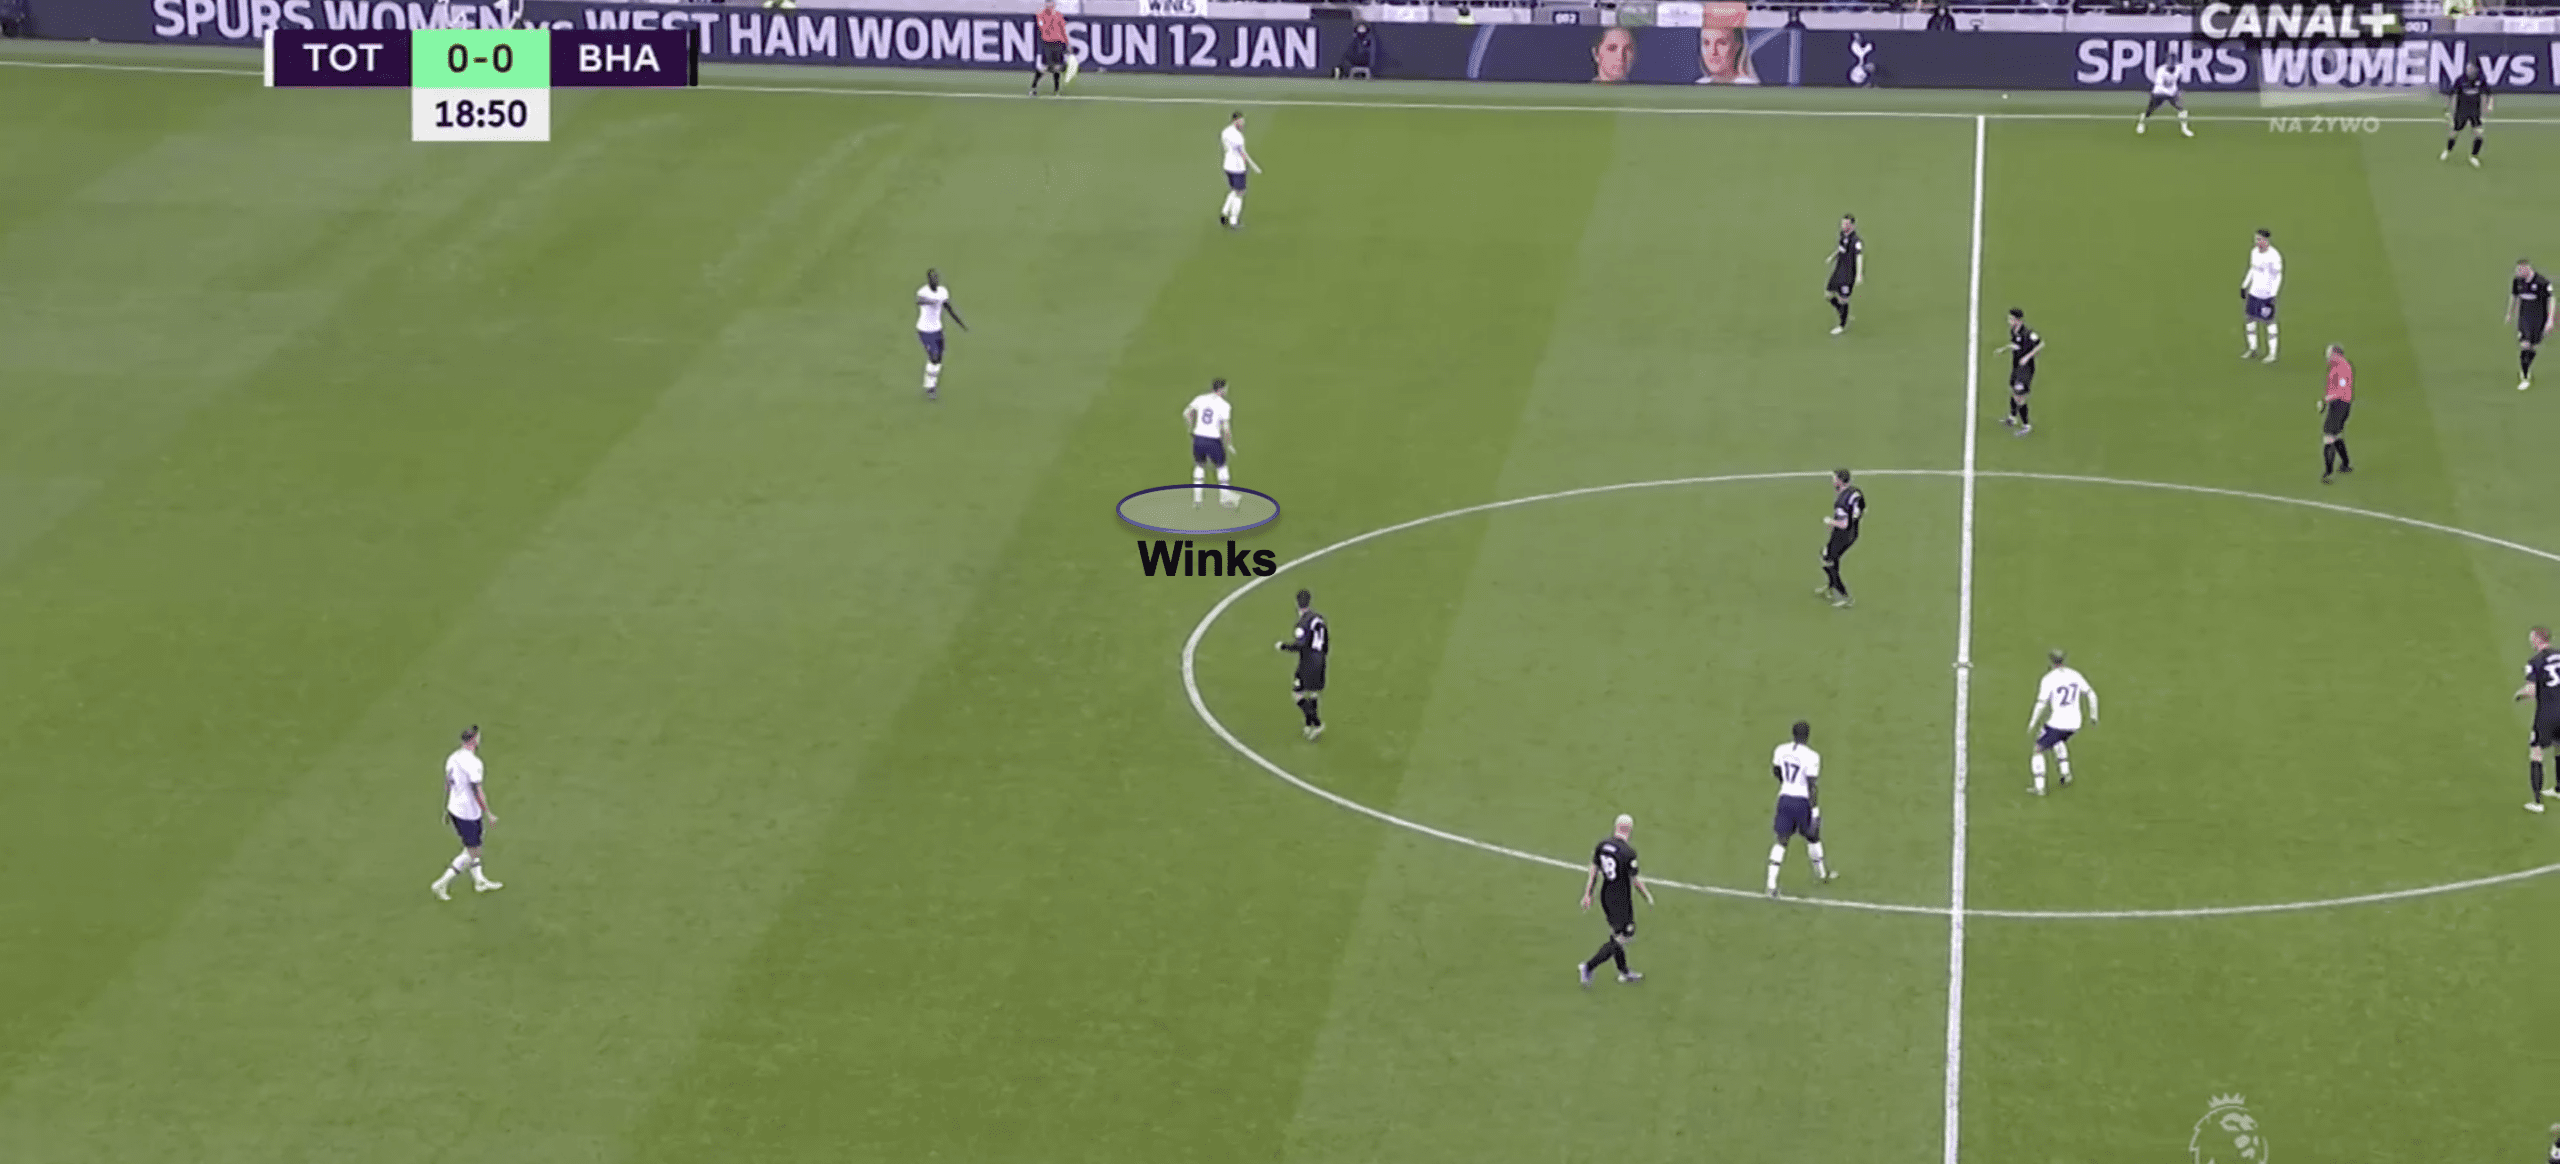
Although Winks and Sissoko played as a conventional double pivot, they had contrasting roles. Winks often dropped deeper than Sissoko to receive the ball as Winks is a more proficient passer than Sissoko. When the ball was in the right halfspace or right-wing while building up (usually with Sánchez) Sissoko would drop into the right-back position to create width.
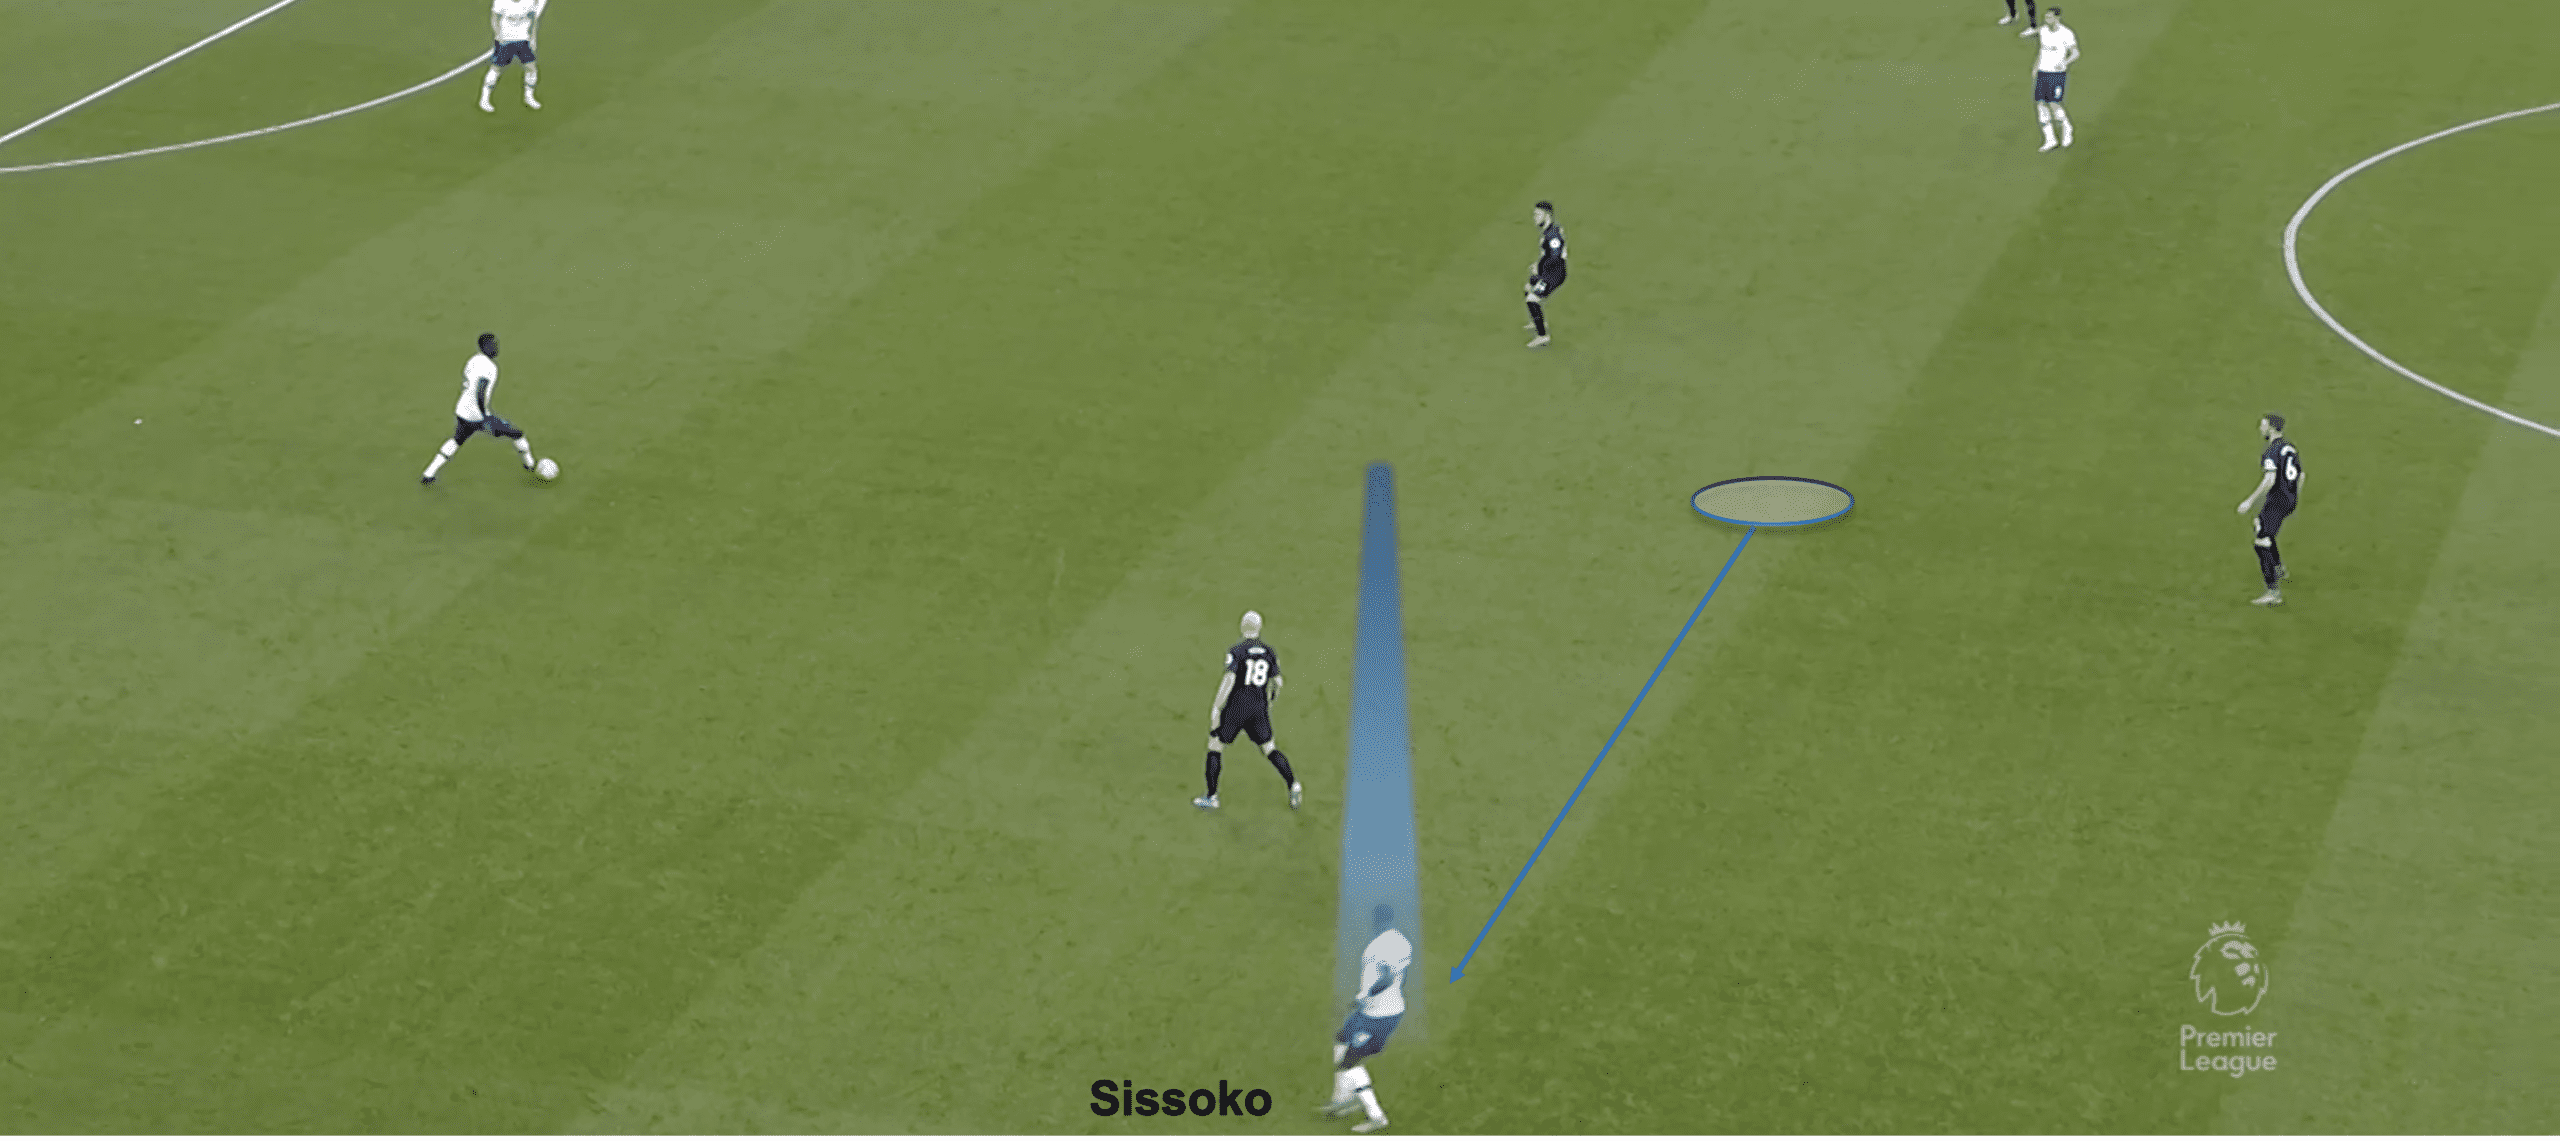
The above image shows how Sissoko would drift to the right-back position from central midfield.
Here we see how Winks would drop deeper than his midfield partner.
Set piece analysis of Brighton’s goal
Brighton took the lead in the 37th minute via a Webster goal from a set-piece, even though Brighton had a numerical disadvantage.
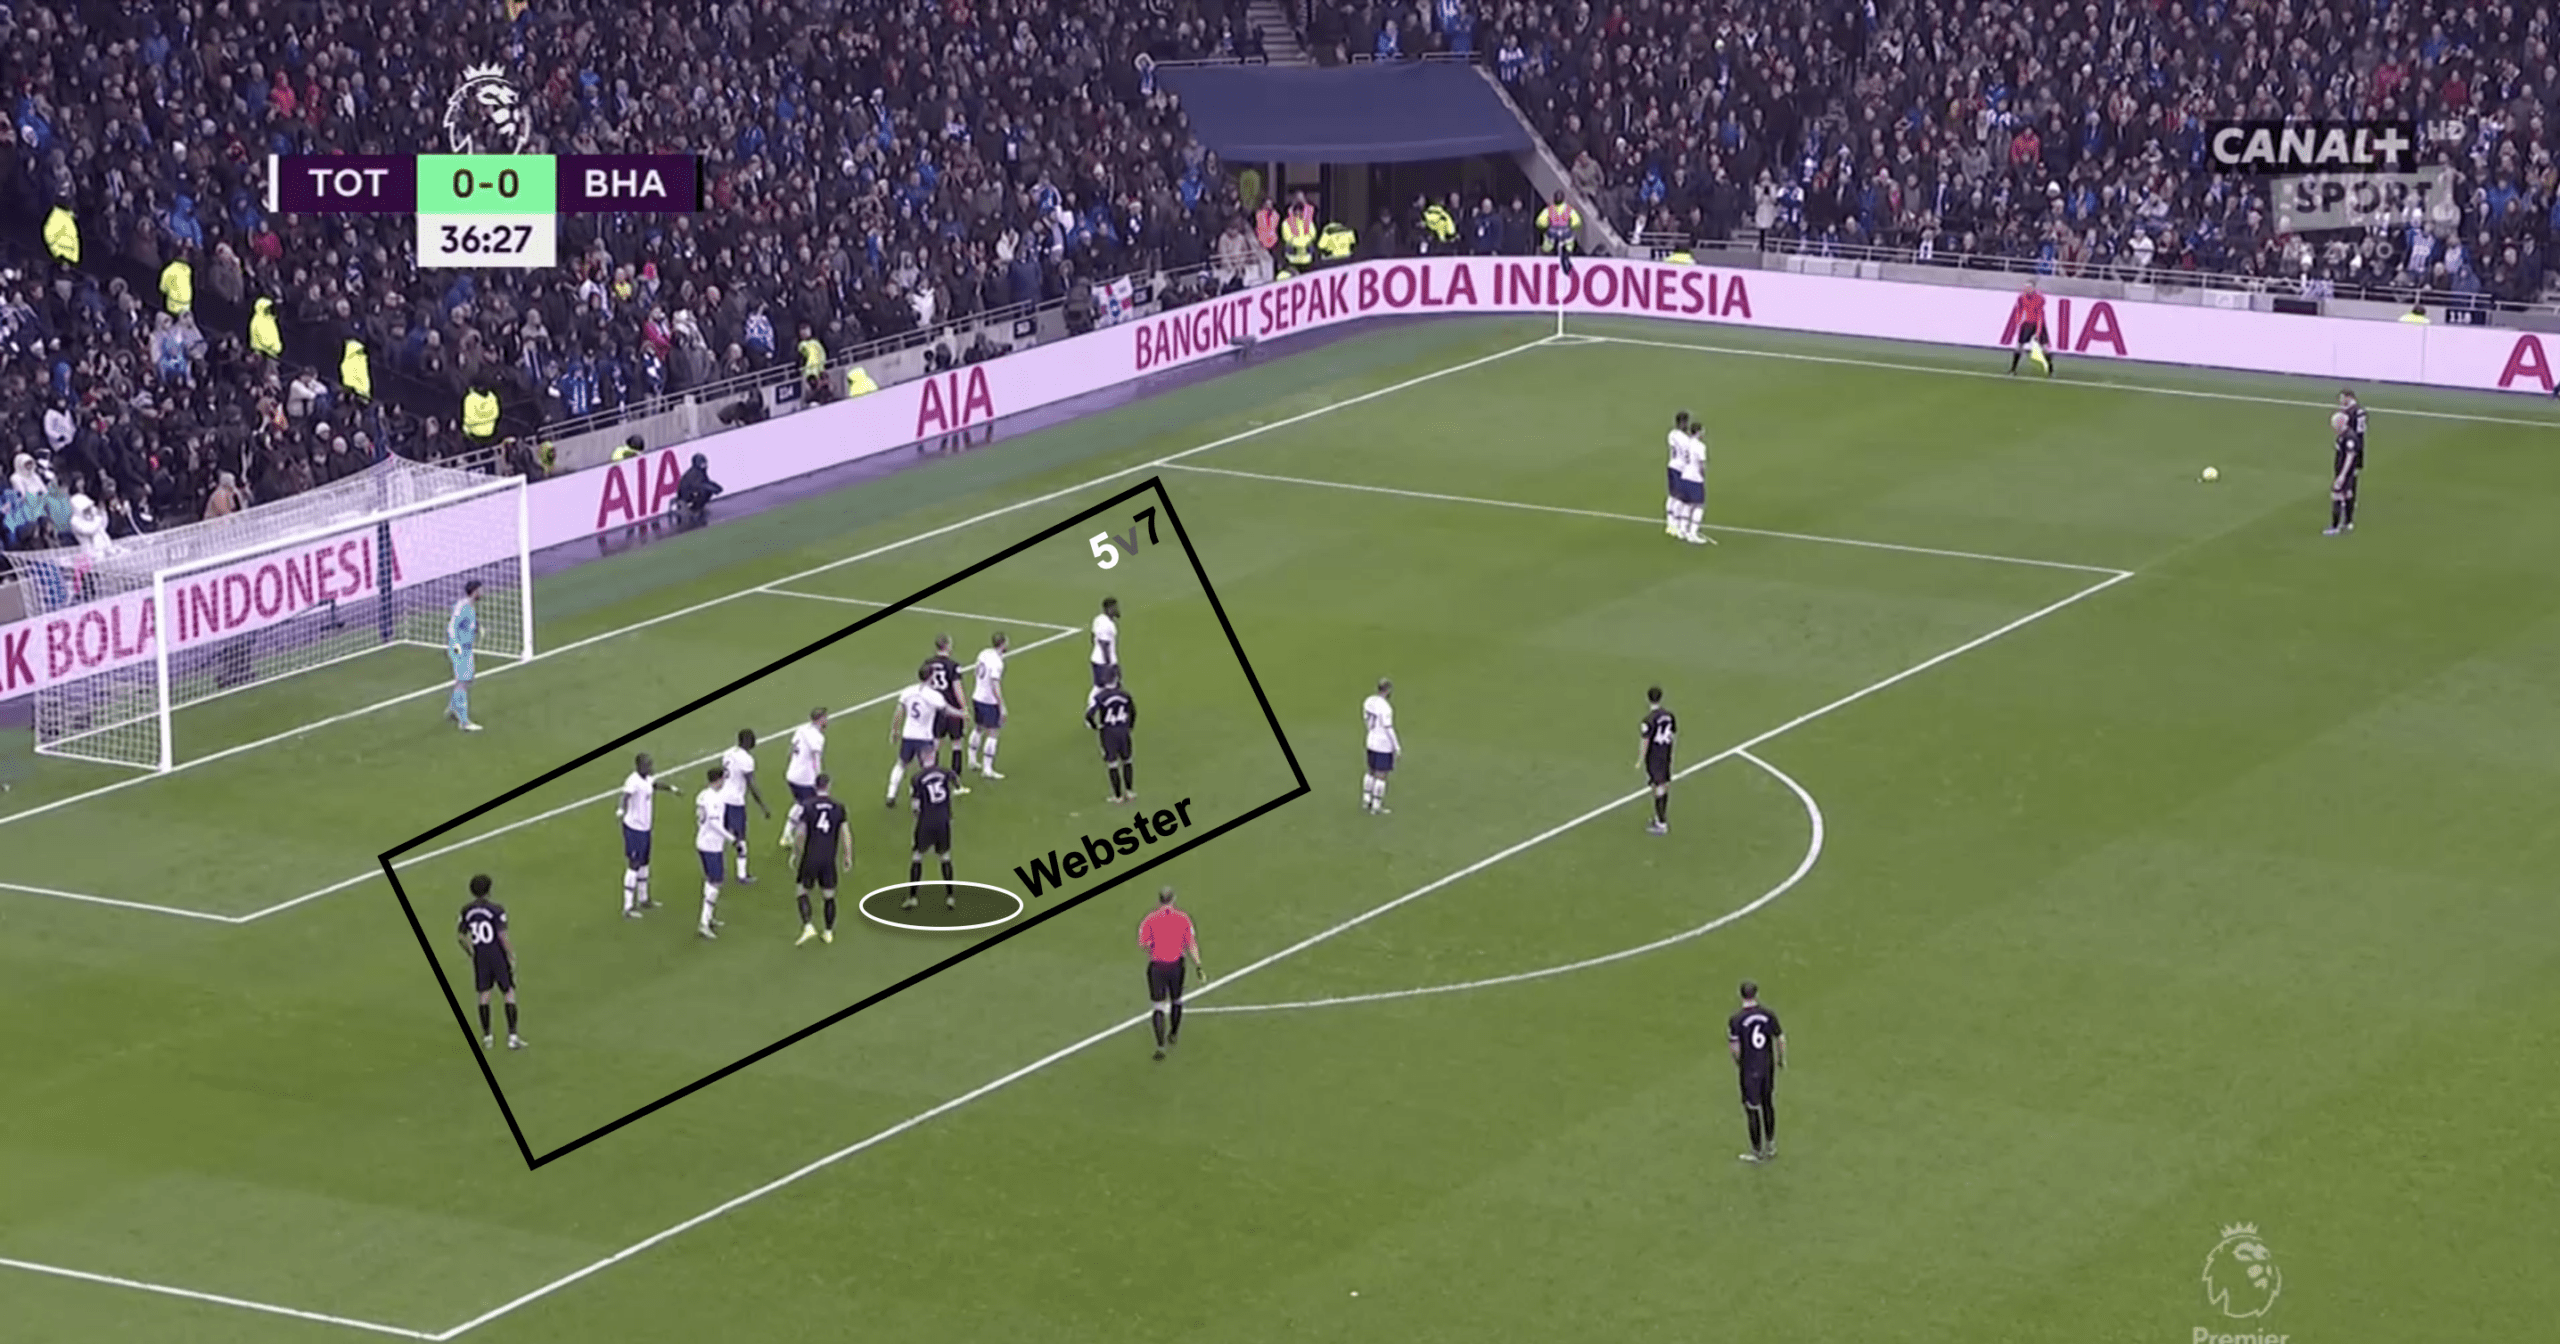
Duffy creates space for Webster by checking across Alli, before moving back to where he came from in two separate movements.
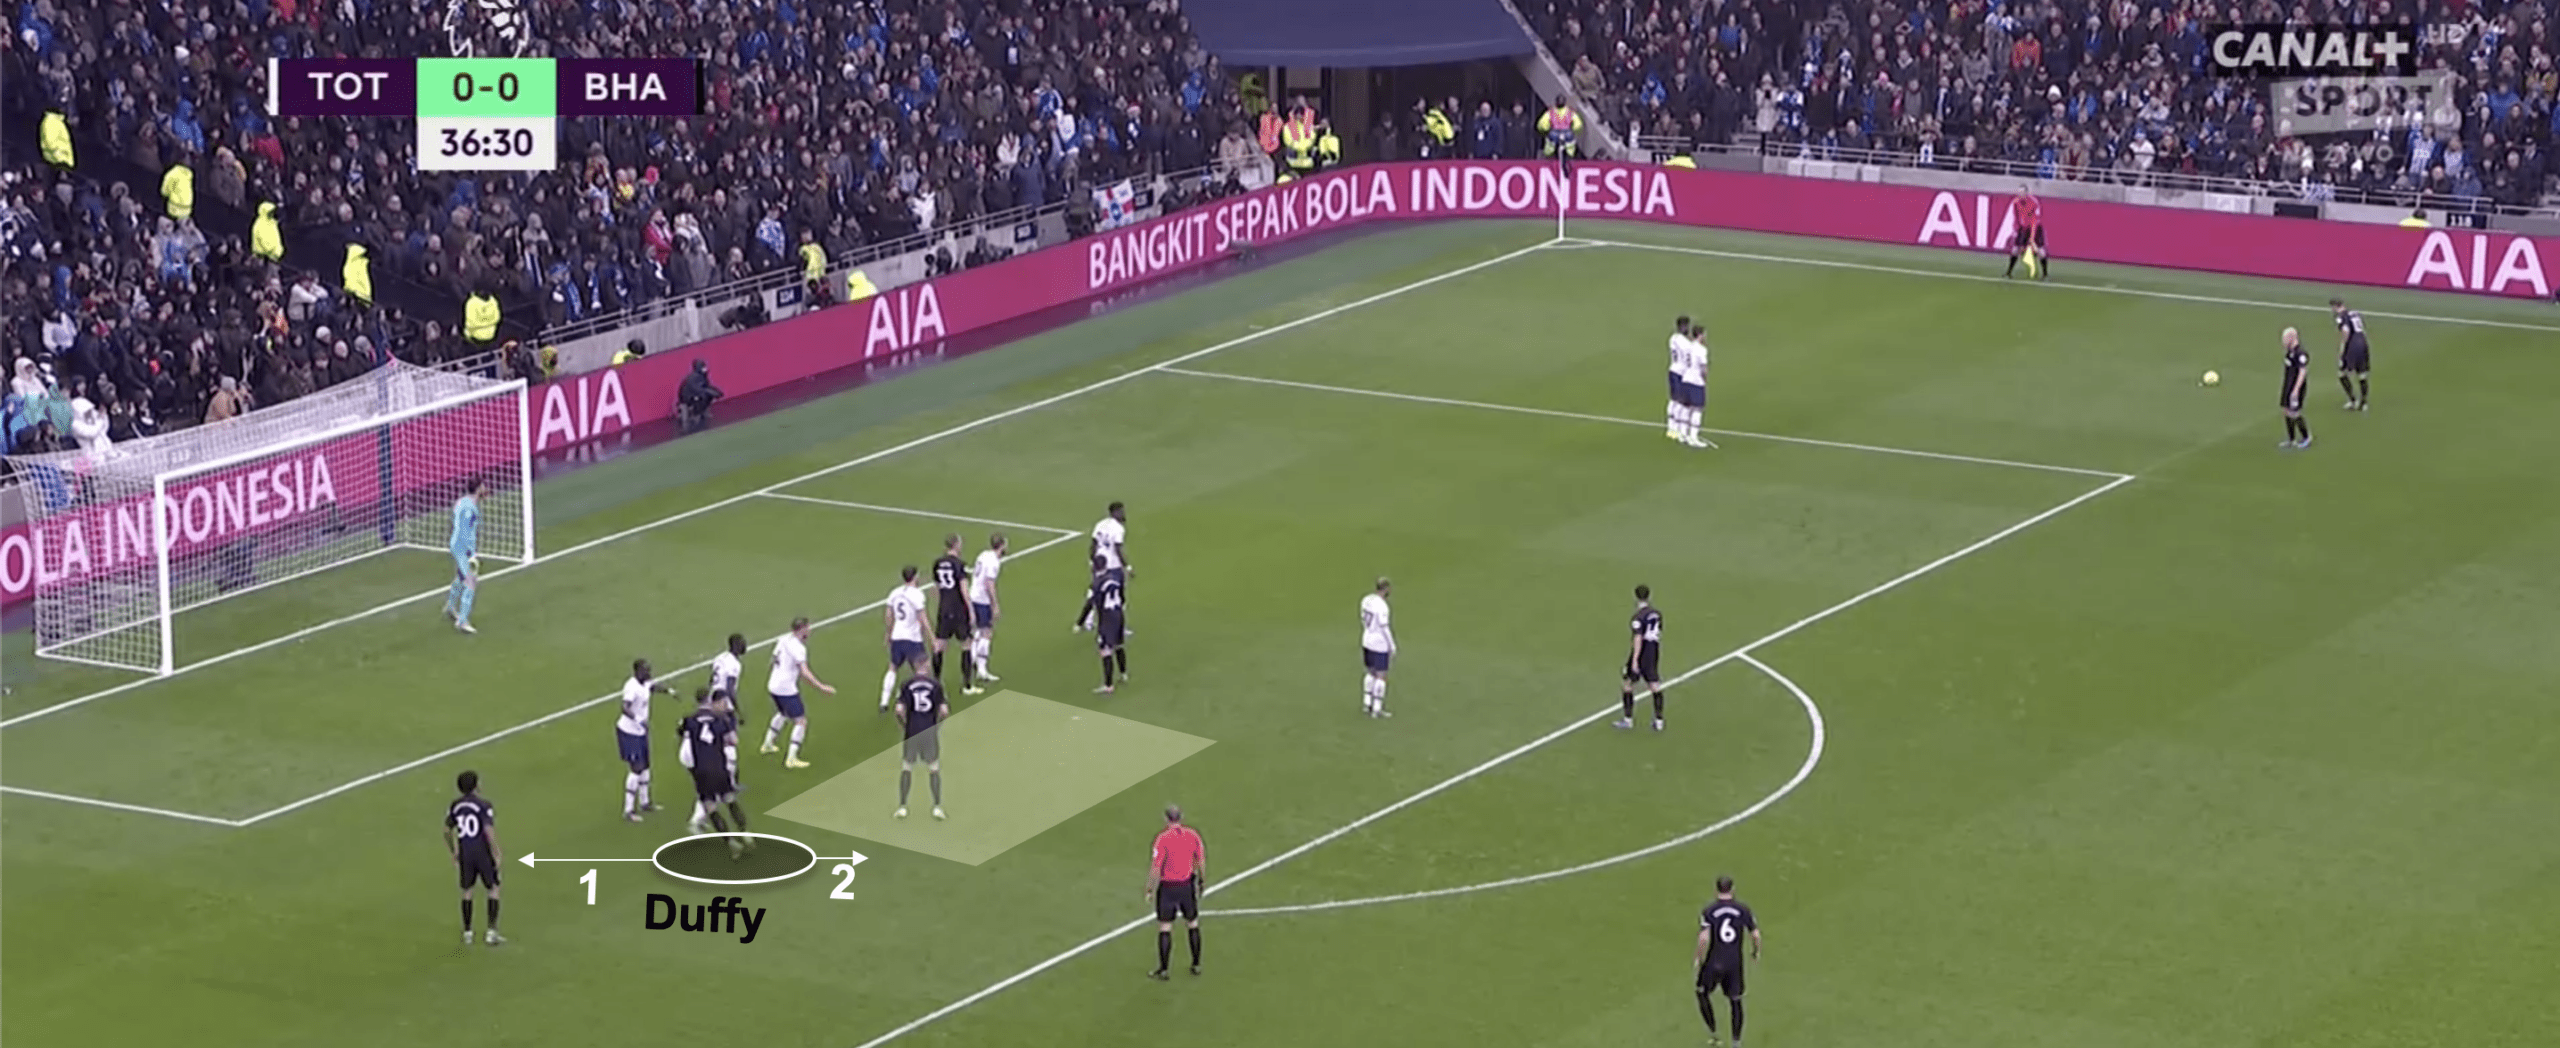
Now Duffy is in front of Alli, blocking him from challenging Webster, allowing him to make a free run at goal due to him being unmarked as a result of Tottenham’s zonal marking system in the area in which Webster occupies.
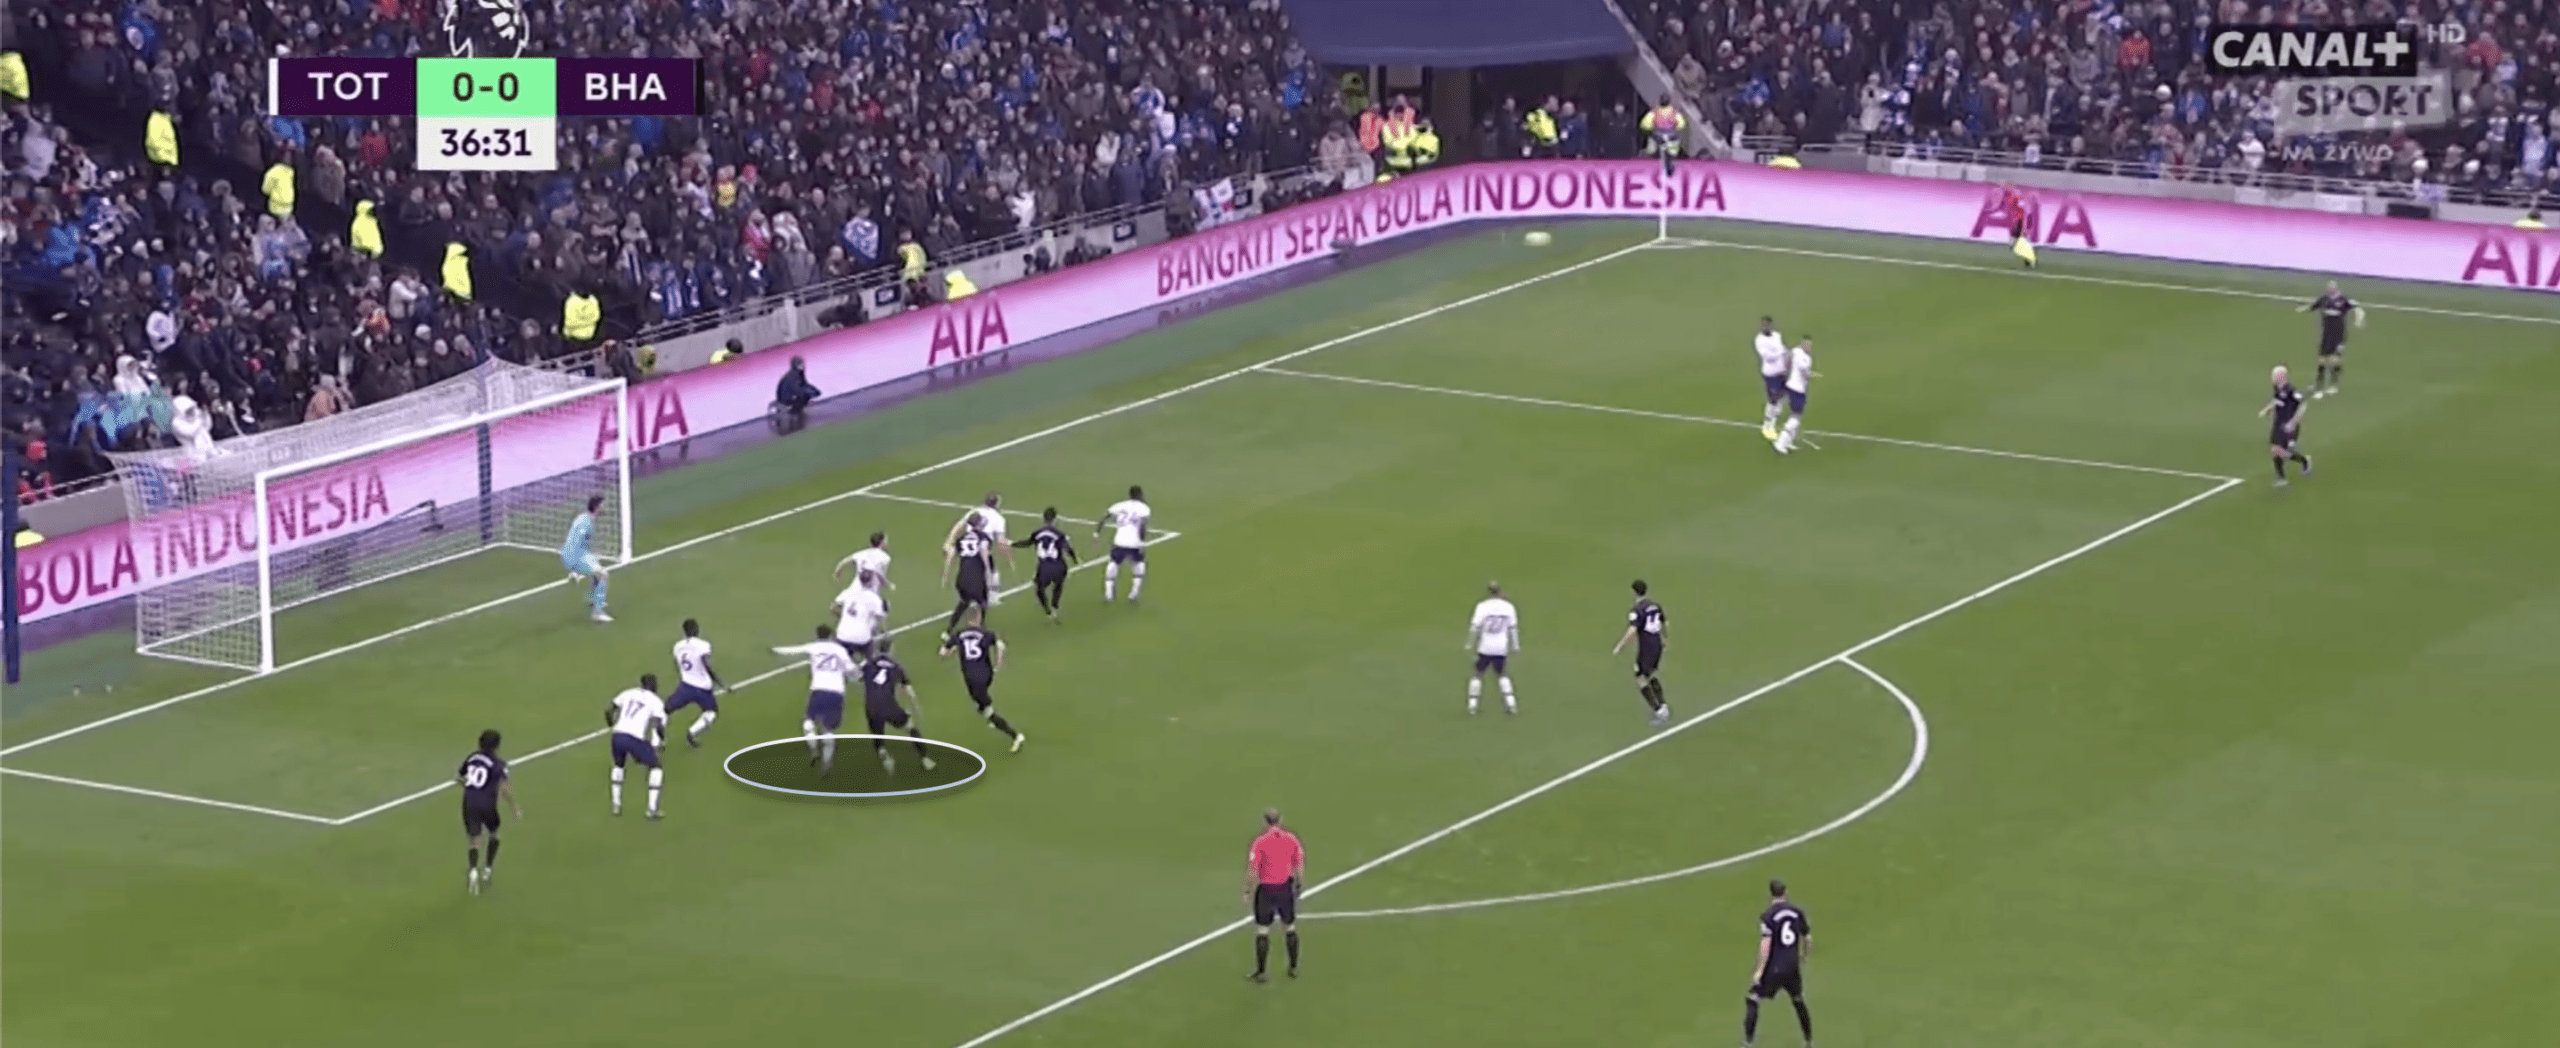
Finally, Webster beats Alderweireld in the air to win the header, giving Brighton the lead.
Mourinho’s use of substitutes
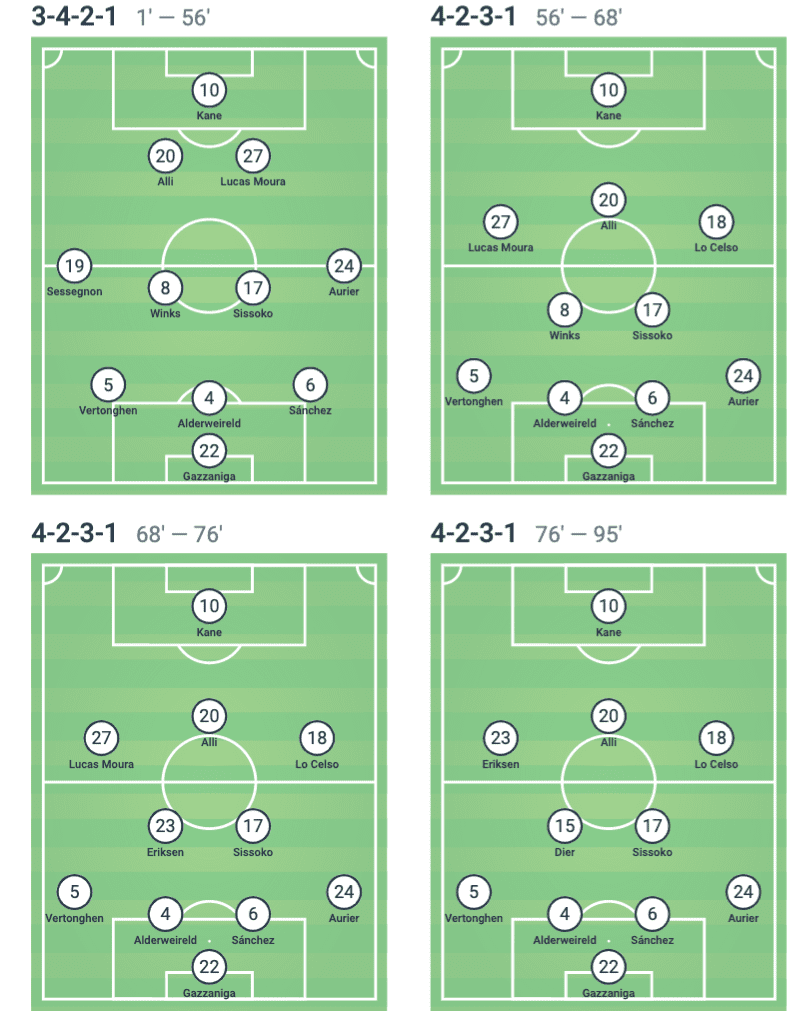
Tottenham made use of all three possible substitutes, with the first one coming in the 56th minute just after Kane equalised. Giovan Lo Celso was brought on in place of Sessegnon and Tottenham switched to a back four with Vertonghen moved to left-back and overlapping more often than he usually would rather than always tucking in. Lo Celso was almost used as a secondary striker.
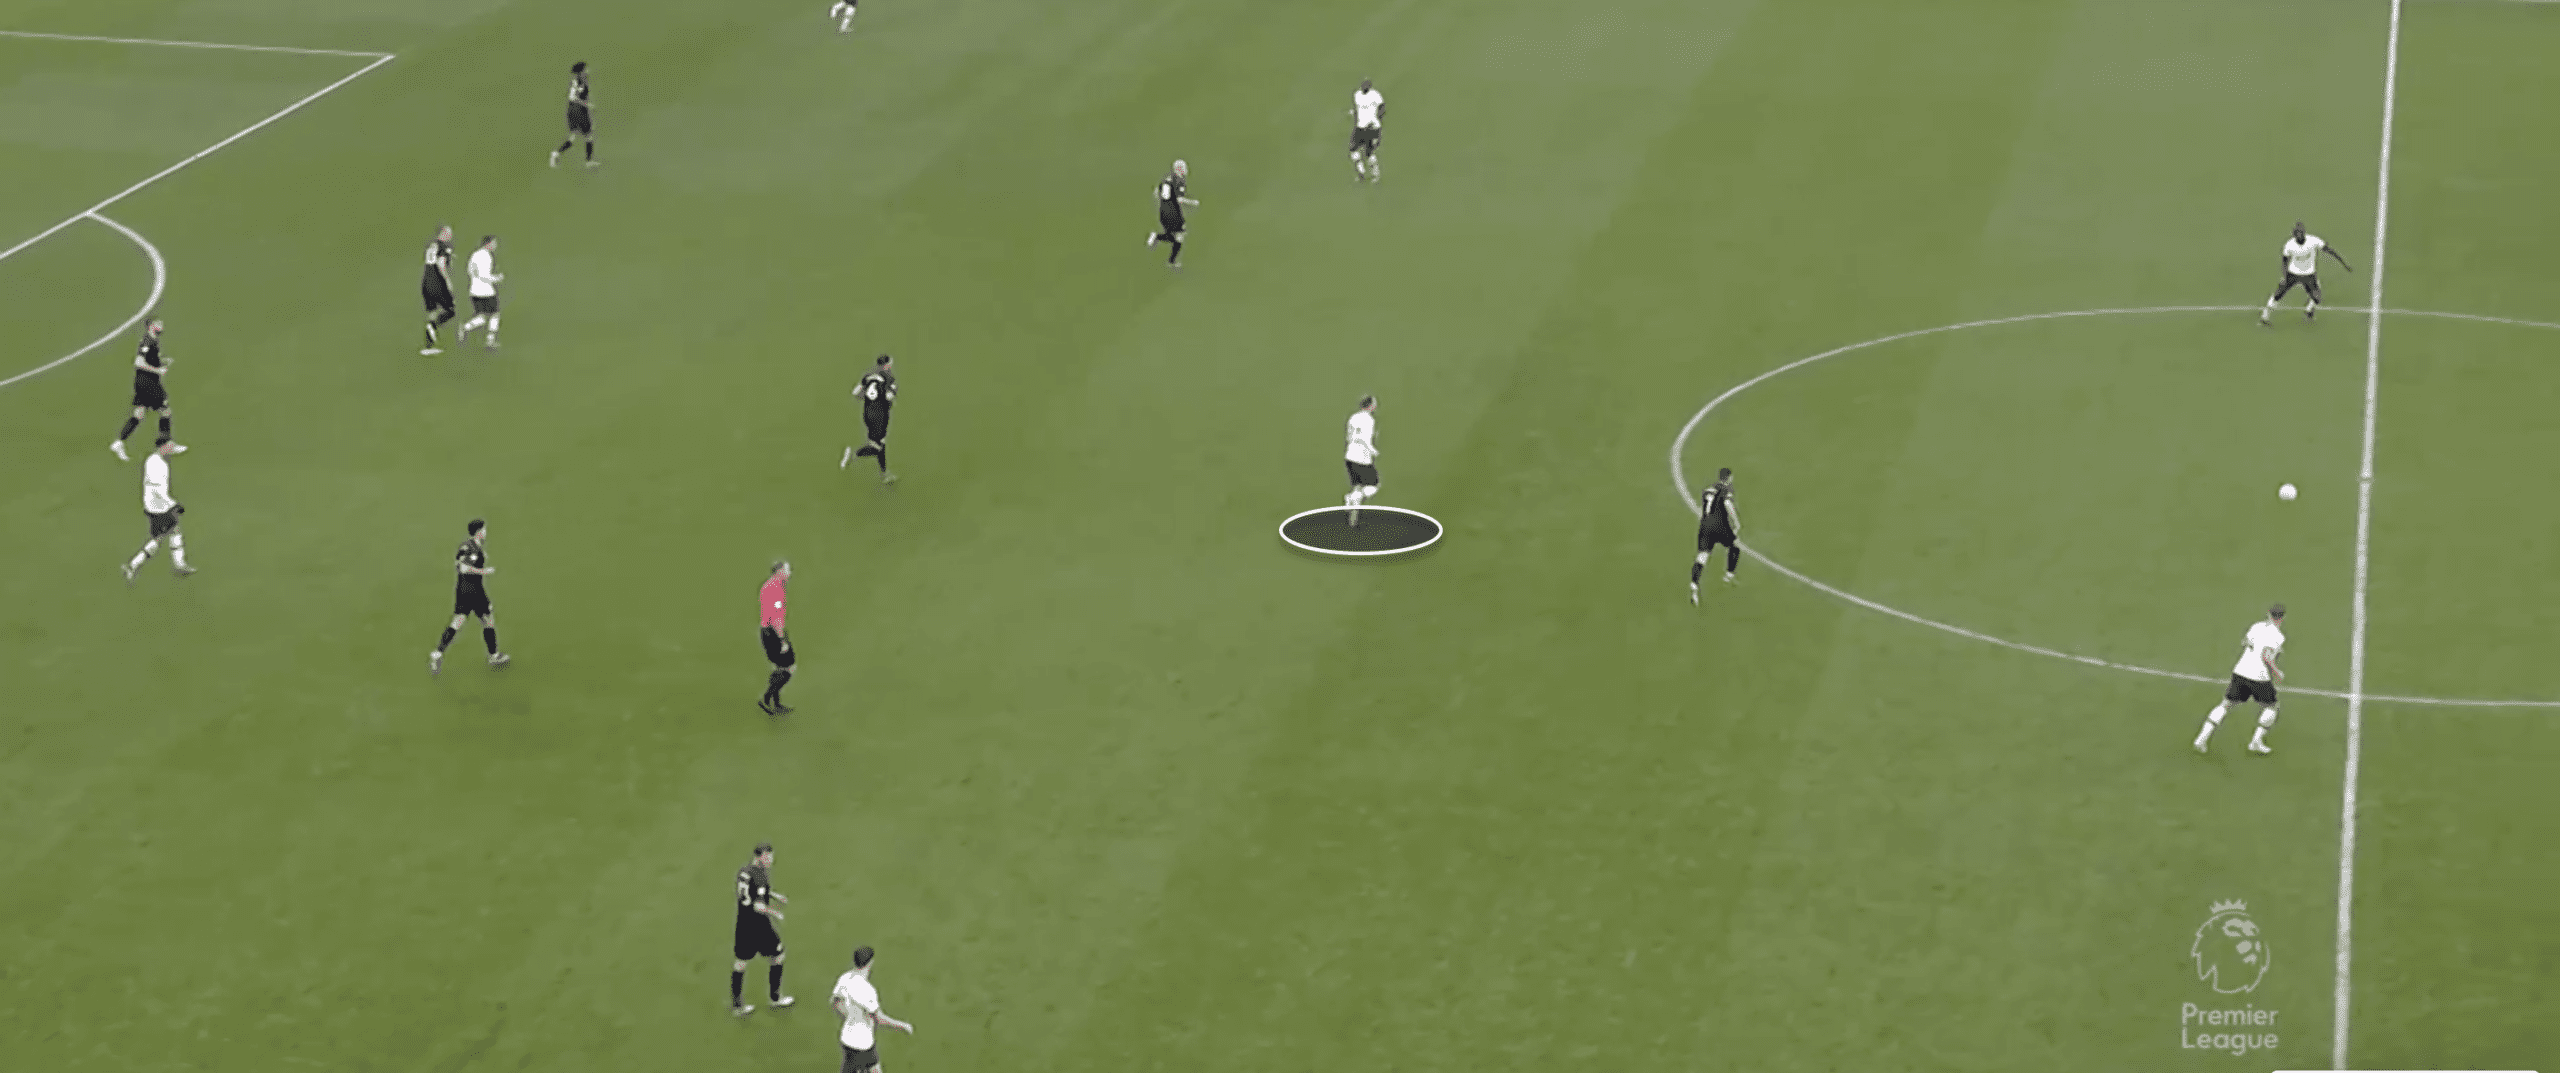
The second substitution was made in the 68th minute with Christian Eriksen coming on for Harry Winks. Eriksen wasn’t used in a traditional ‘number 10’ role, as he would look to receive the ball in between the lines, with very fluid movement when doing so. In the below image we can see Eriksen receiving the ball in between Brighton’s first and second lines.
The final substitute made was Eric Dier coming on for Moura in the 76th minute, this was after Tottenham had taken the lead, and was for defensive stability.
The below formation data from WyScout shows how Tottenham’s shape changed with substitutes.
Conclusion
Tottenham fans will be delighted to take home all three points, especially considering that Chelsea were beaten at home to Southampton, narrowing the gap between the two London rivals to just three points. Tottenham face bottom club, Norwich, next time out, with Mourinho’s men hoping to carry this momentum and put more pressure on Chelsea in the race for a top-four finish.
Graham Potter will be delighted with his side’s performance, even though he heavily rotated. They face Bournemouth next time out, who are level on points with the Seagulls, making their upcoming match one of, if not the most important match they’ve played all season.
If you love tactical analysis, then you’ll love the digital magazines from totalfootballanalysis.com – a guaranteed 100+ pages of pure tactical analysis covering topics from the Premier League, Serie A, La Liga, Bundesliga and many, many more. Buy your copy of the December issue for just ₤4.99 here


Comments