At the back of a historic win over Manchester City during the previous week, Leicester City were brimming with confidence as they welcomed West Ham United at the King Power stadium during the game week four of the 2020/21 Premier League season. The Foxes had made a rip-roaring start to the league campaign after scoring a staggering 12 goals in just three games, as they sat atop in the league table before this game.
The Hammers, on the other end, have had a seesaw start to the season. While the first two league games ended in defeats, the East London team netted nine times combined in the next two fixtures to secure consecutive wins. As the balance seemed to shift yet again during the midweek when they were grounded by a 4-1 defeat against Everton in the EFL cup, David Moyes’ side responded in style by springing a surprisingly dominating 3-0 away victory over the high-flying Leicester side. With this win, the away side continued their good form against stronger sides and ended Leicester’s four-game unbeaten run against them.
In this tactical analysis, we will analyse the tactics that were used by both the managers. We will also do an analysis of Leicester’s poor attacking and West Ham’s powerful defensive performances.
Lineups
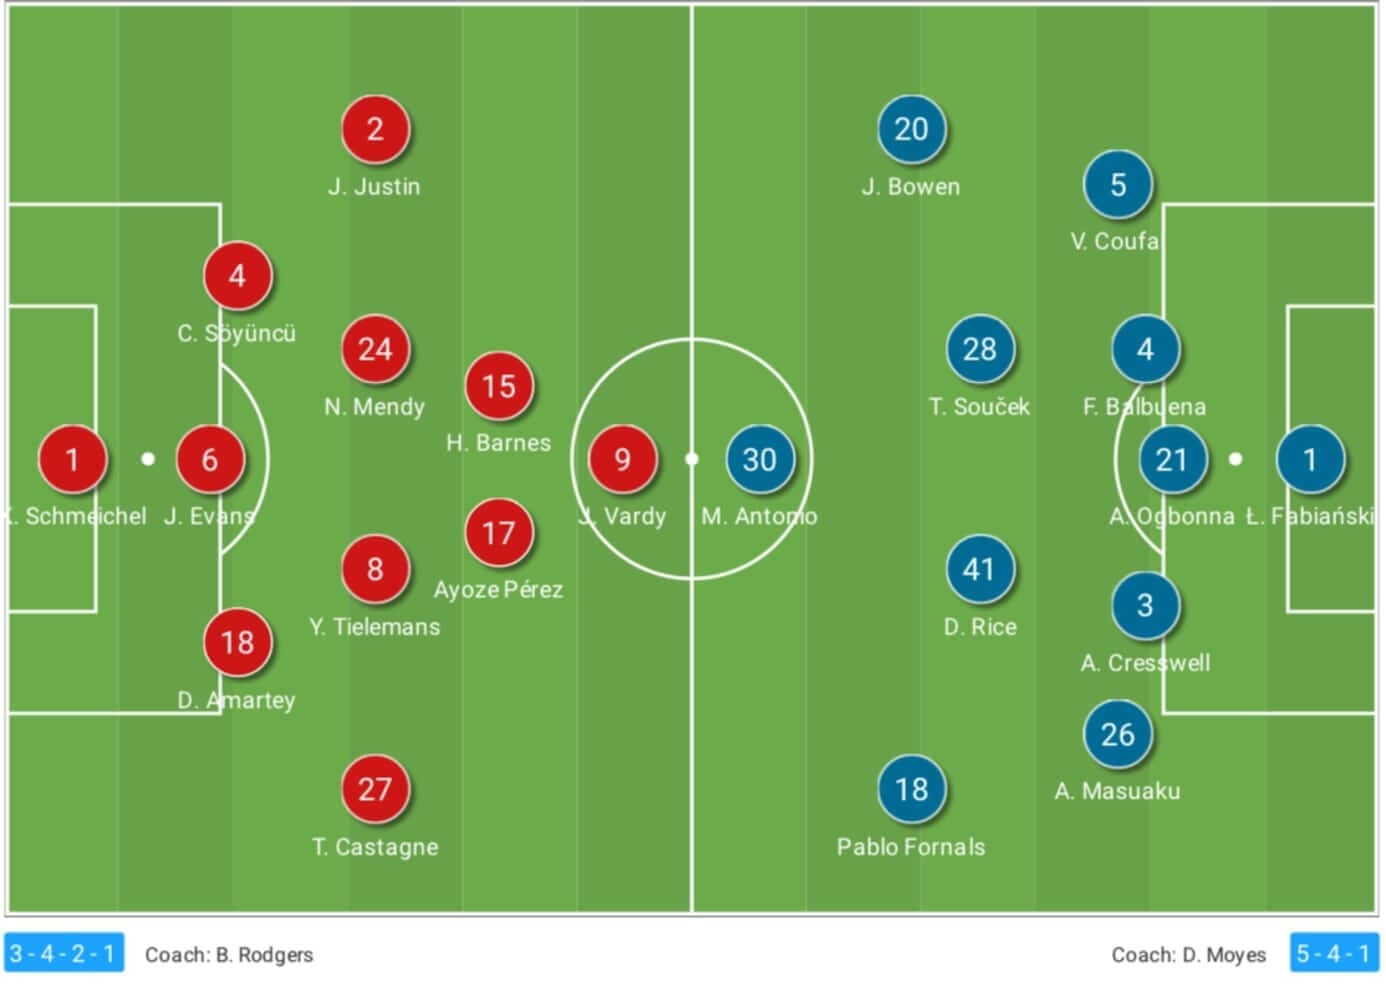
David Moyes expectedly stuck to the 5-4-1 formation that has improved the balance and performance of his West Ham side in the recent games. He too was forced to make one personnel change as Ryan Fredericks’ injury paved the way for the debut of the new £5.4m right-back Vladimír Coufal.
Leicester’s structure
Albeit the home side were lined up in a 3-4-2-1 formation on paper, their shape varied in different phases of the game. Starting with the build-up, Rodgers’ men had two different systems to use in the first phase. The most widely used system was the 3-4-3 where the wing-backs pushed into the midfield line and provided the width during the initial phase. As the ball progressed into the attacking third, they continued to provide width while pushing higher into the attacking line. This allowed Harvey Barnes and Pérez to play more centrally behind Jamie Vardy.
Another system in which the hosts built their attacks was 2-4-4 where Daniel Amartey pushed wide to the right-back position. This allowed Timothy Castagne to push higher on the right as James Justin stayed into the midfield line on the other side. As the attack progressed, Justin provided the width on the left to allow Branes to tuck inside and consequently create a 2-3-5 shape. As Castagne was used as a more attacking full-back than Justin, Leicester constructed 41% of their attacks from the right.
Moving into the final third, Pérez played very central as a number 10 and constantly dropped between the lines to make the final pass for Barnes and Vardy, who made runs beyond the opponent’s defensive line. Hence, the 2-1 forward shape on paper was 1-2 most of the time. Having said that, Barnes too dropped deep at times to main the 2-1 shape and expose the space between the lines or drag a West Ham defender out of his position consequently creating space in the visitor’s backline. Both the situations are exemplified by the following couple of images.
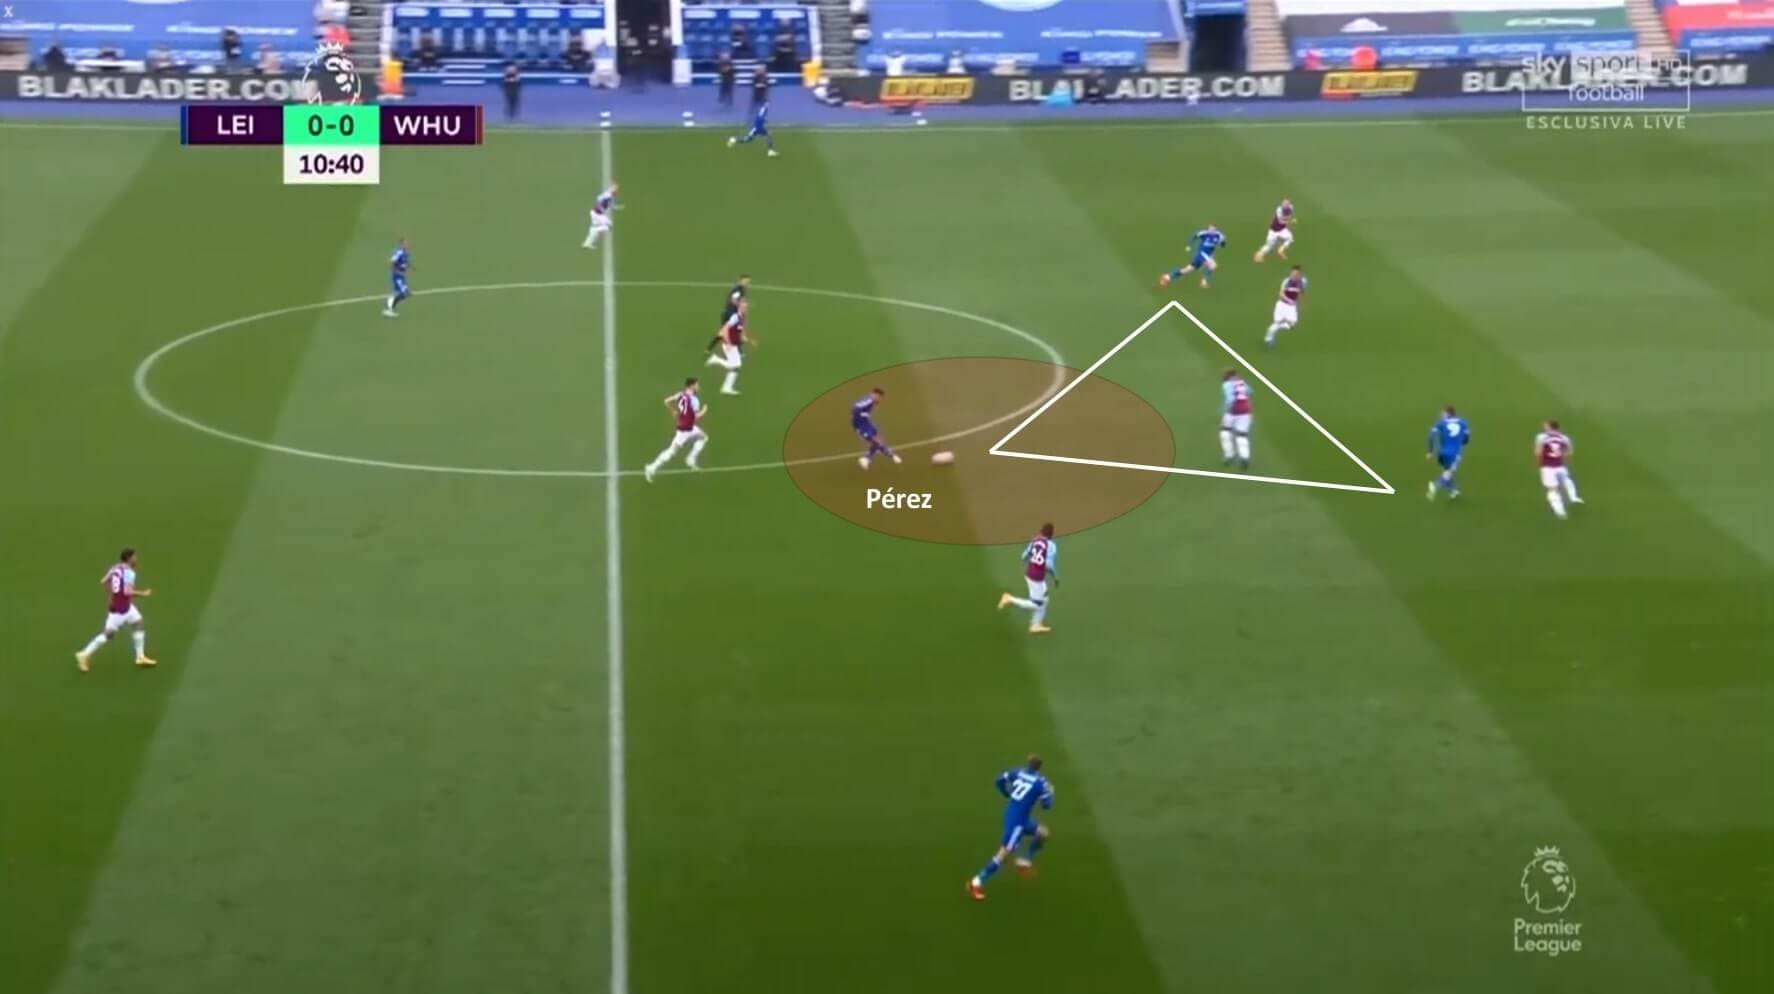
The above snapshot showcases the first instance where Pérez received the ball centrally between the lines during a Leicester counter-attack. Observe the runs that Barnes and Vardy are making beyond the West Ham backline formed the 1-2 shape between the front three.
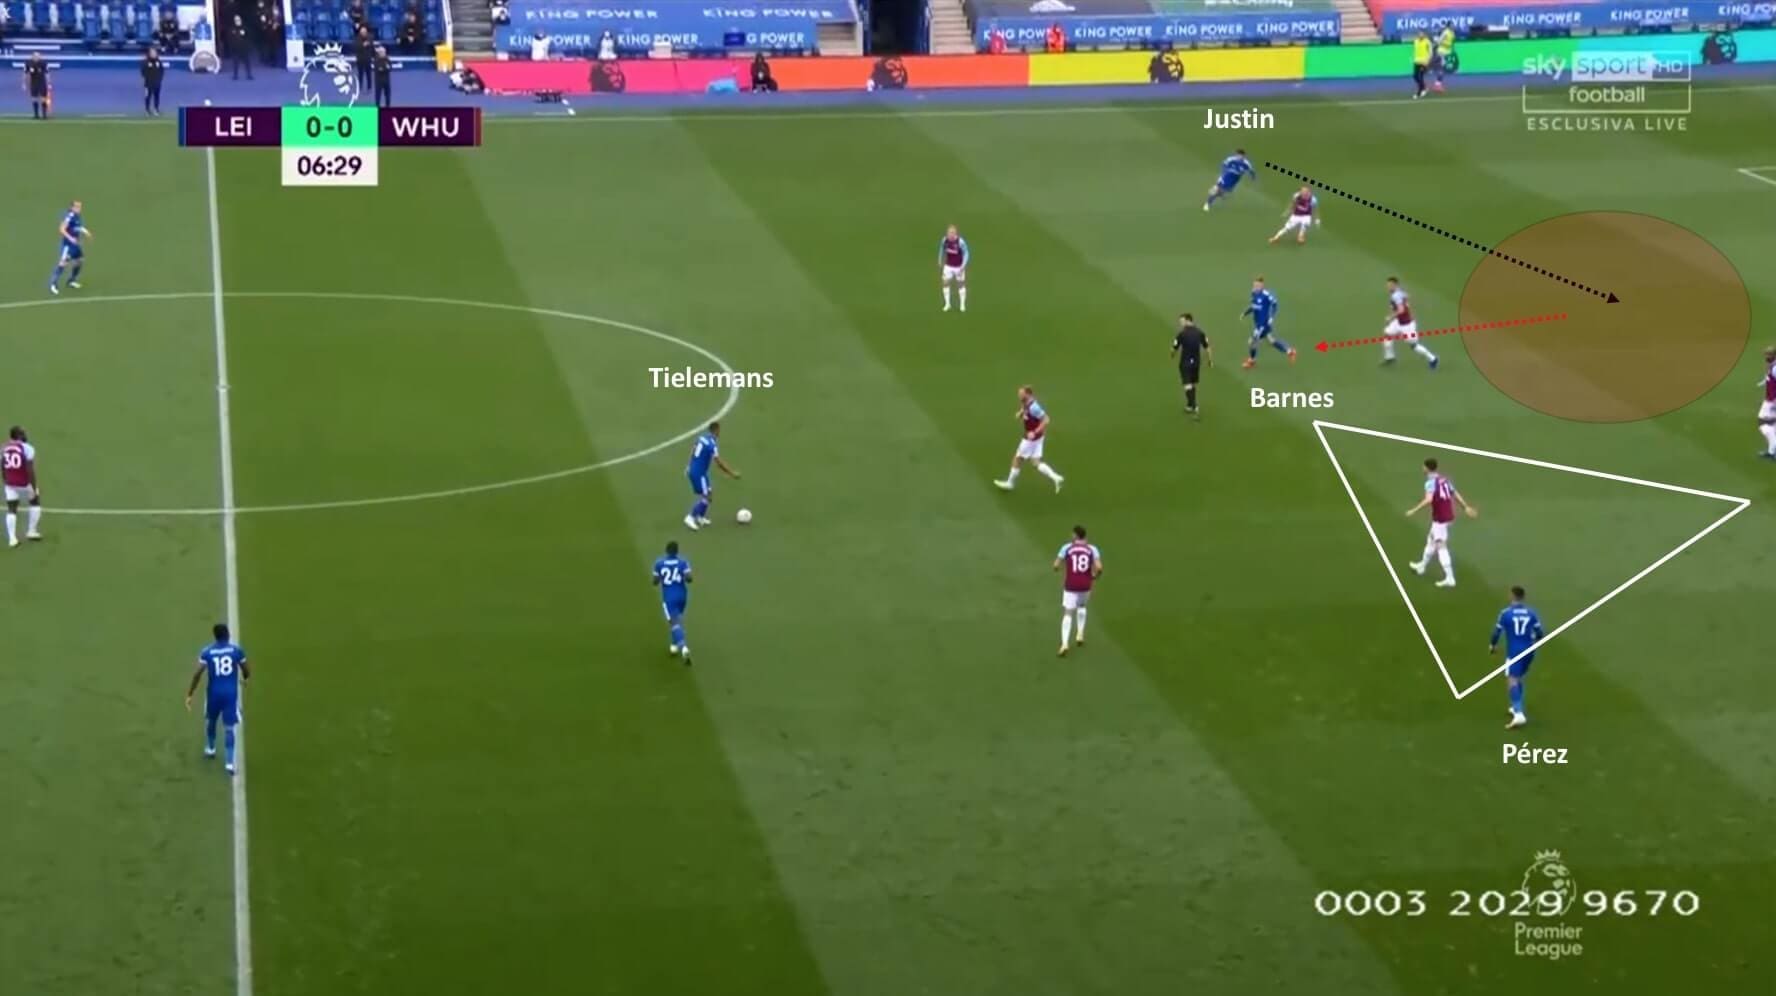
The above snapshot, which was taken minutes before the previous image, shows Barnes’ deep movement to create space in the final third, as mentioned previously. As the 22-year old dropped deep, he drew Fabián Balbuena out of his position to create a significant amount of gap between the West Ham defenders for Justin to make a run. Youri Tielemans attempted a long ball for the young full-back but it was too heavy as the ball went straight to Łukasz Fabiański.
Lacklustre Leicester in attack
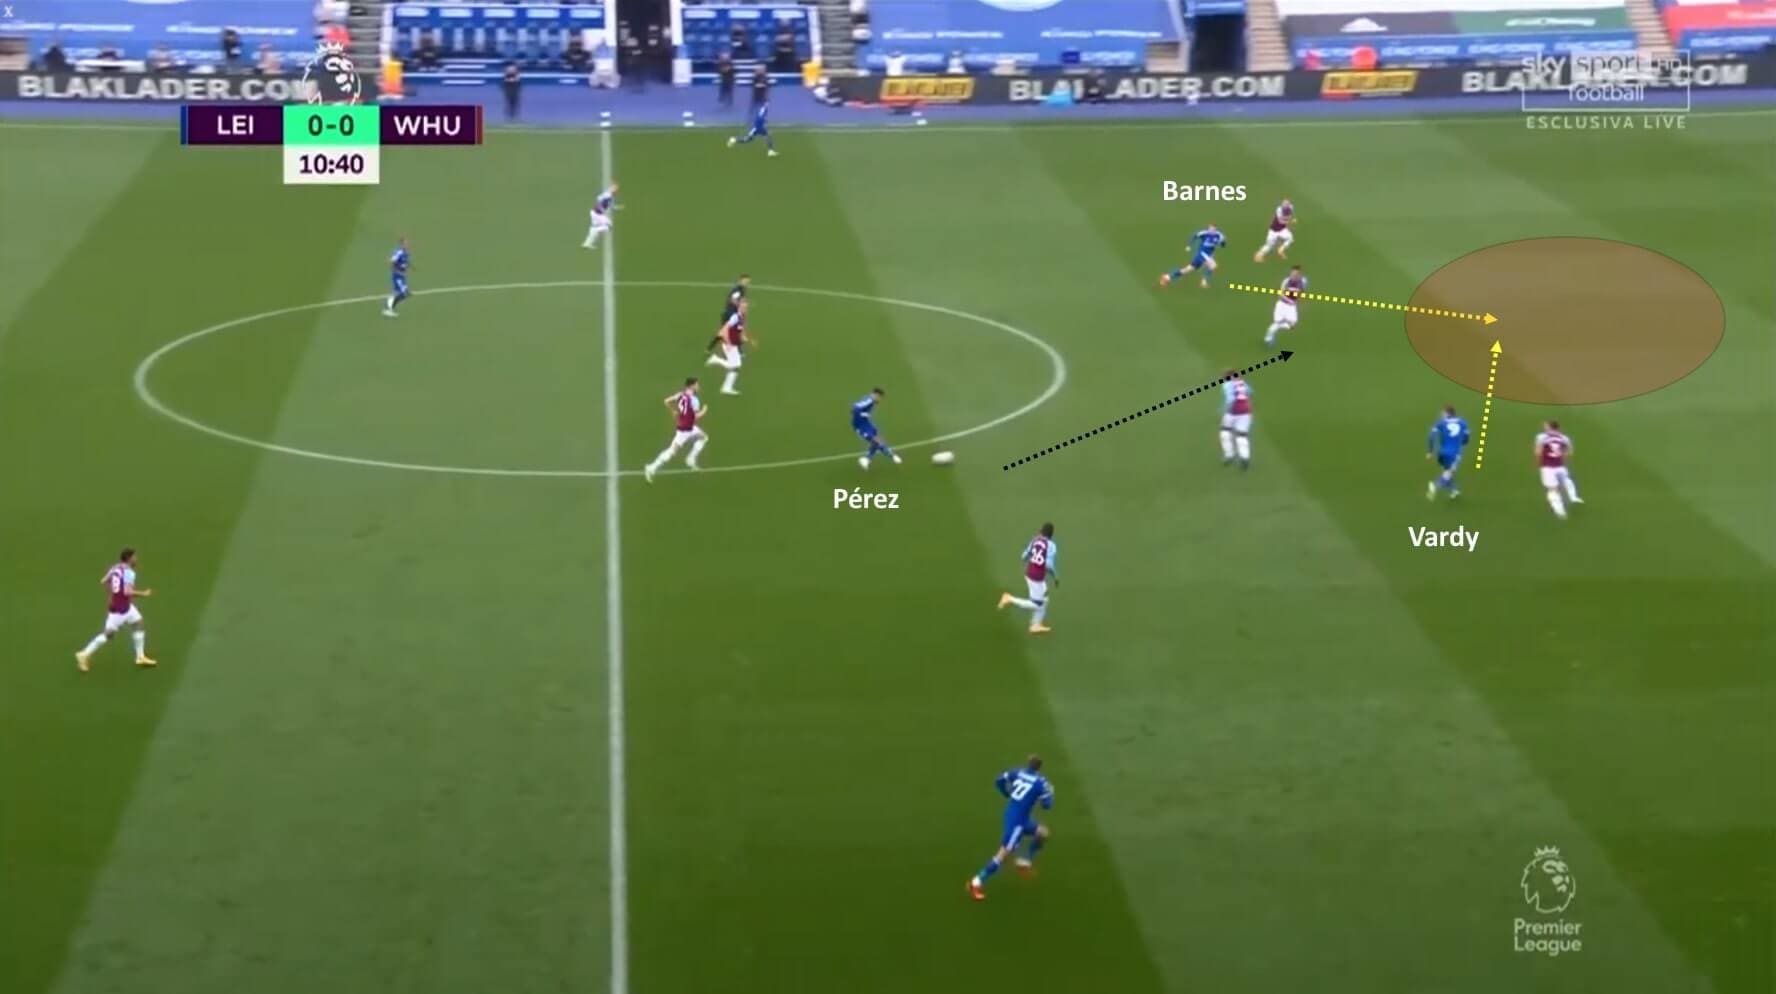
In the absence of a natural number 10, Rodgers deployed two inverted wingers, Barnes and Pérez, as the two number 10s, where the latter was responsible to provide balls for Vardy beyond the West Ham backline. However, it was evident that Leicester missed the services of Praet or Maddison in this game as the home side lacked the penetration in the final third. While Pérez was able to receive possession in spaces between the lines several times, the Spaniard’s execution in the final third was poor. The following figure shows one of its instances.
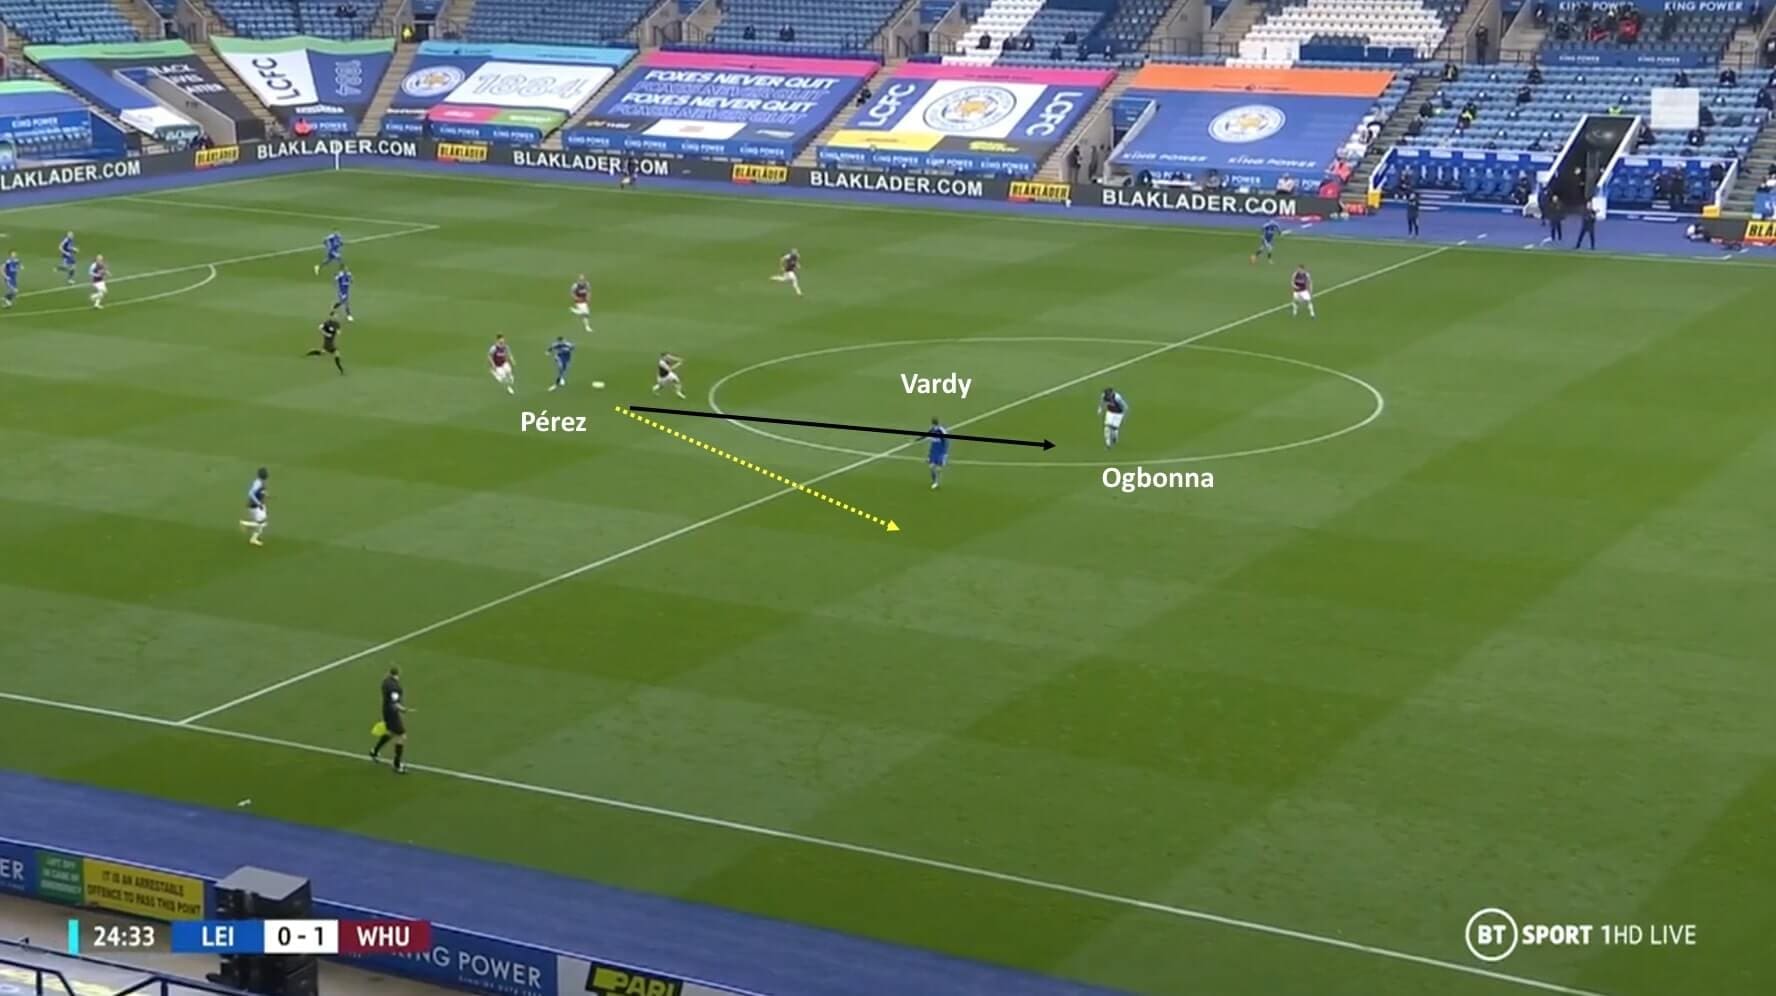
In the image shown above, Leicester were in a counter-attacking situation as Pérez is seen to attempt a pass to Vardy who was isolated one versus one against Angelo Ogbonna in acres of space beyond the opponent’s backline. Notice how the striker is moving away from Ogbonna as an outside pass into the half-space (yellow dotted line) would have easily taken him away and past the defender and into the box for a genuine goalscoring opportunity. However, instead of going wide with the pass, Pérez made a pass between Vardy and Ogbonna (black solid line). The inside pass allowed the defender to close the gap with the striker and eventually break down the attack.
The figure above shows another instance where Pérez once again found himself in space between the lines facing the goal. Vardy and Barnes were making runs beyond West Ham’s high defensive line. With the pace of the duo, all Pérez had to do was put the pass between the two centre-backs. However, the pass was too slow which Balbuena was able to intercept.
While the first example was a clear case of missing creative instinct and decision-making, the second one was about poor execution. Out of the 34 attacking third passes attempted by Barnes and Pérez combined, only five were successful passes inside the box.
West Ham defended narrowly in the centre, as we shall see more about it in the next section. Hence, it was pivotal for the home side to either make quick switches or generate intelligent off-the-ball movements to defy the compactness and create gaps within the opposition defence. However, the Foxes were too slow with the ball and lacked quick movements without the ball which significantly hampered their ball progression during the build-up.
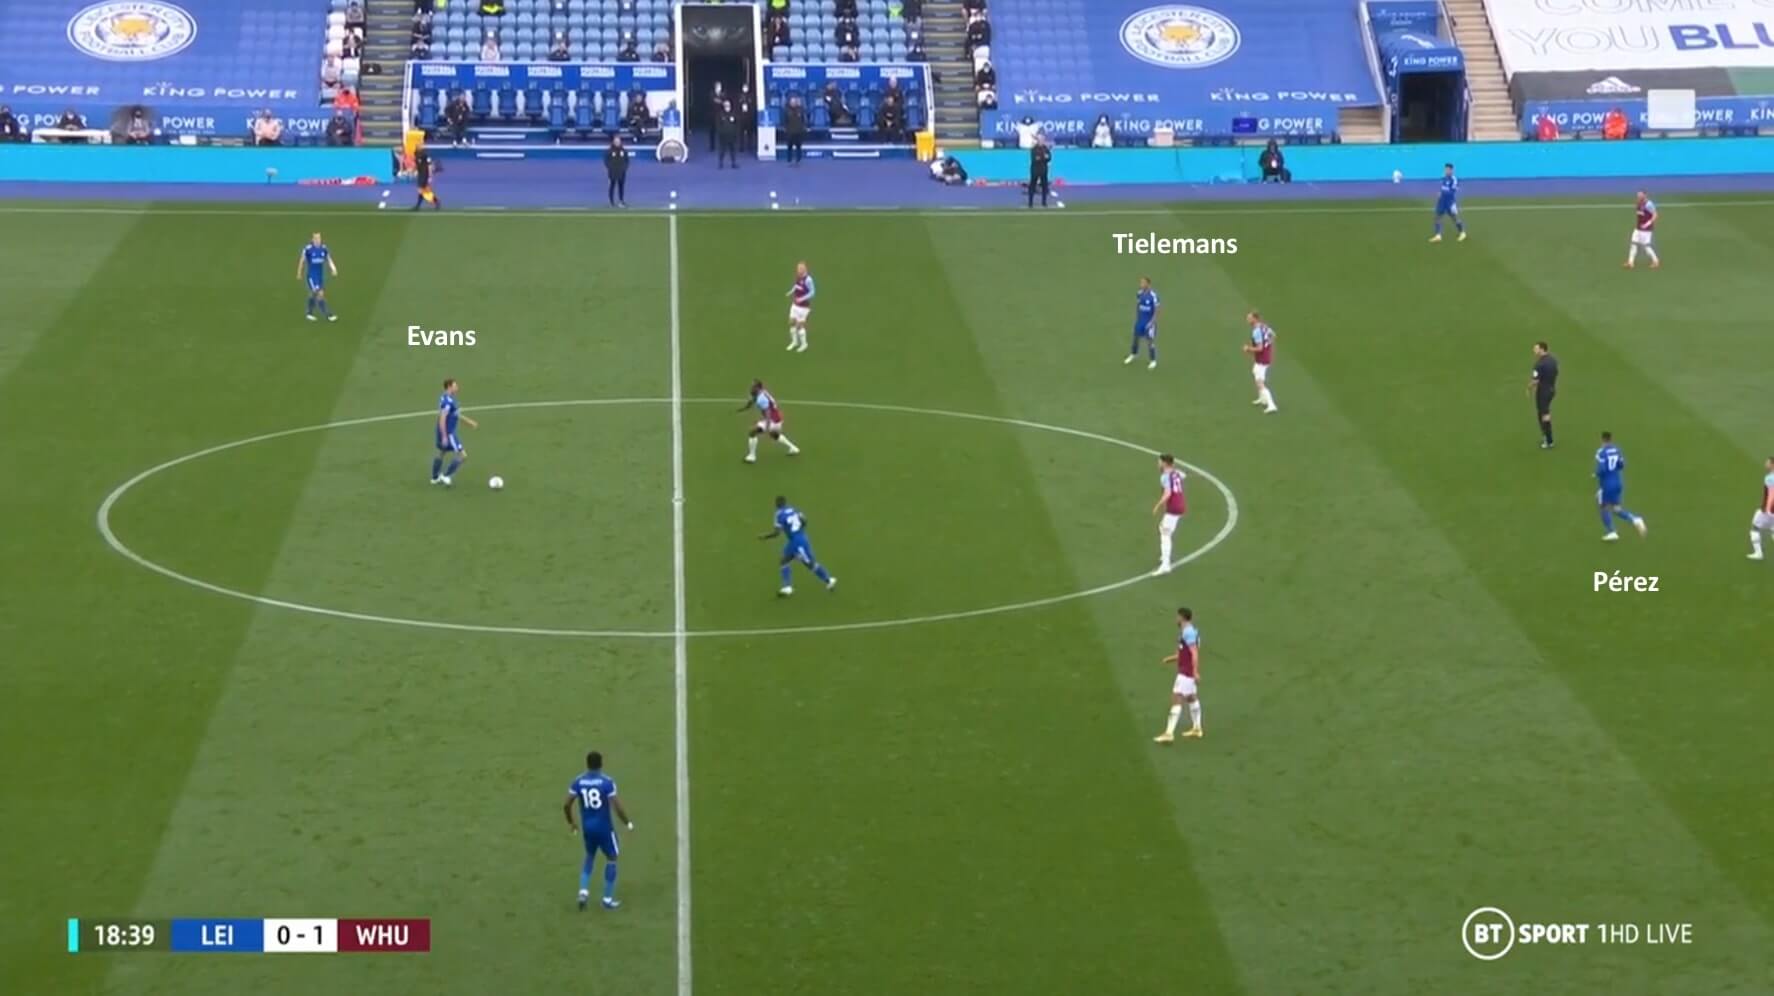
The figure above shows the lack of forward passing options that Evans has while he is on the ball. As West Ham had blocked the central passing lanes and marked the Leicester’s wing-backs tightly, the attacking players of the home side needed to make quick and intelligent movements to shuffle the defensive shape of the Hammers. However, Vardy has stayed up front, Barnes did not drop, Tielemans stayed static and Pérez was too slow with his movement.
West Ham’s defensive prowess
While poor final third execution in counter-attacks and lack of movements with and without the ball resulted in a toothless attacking display from the home side, as established in the previous section, West Ham’s defensive performance deserves huge credit.
Even though Moyes’ side did score three goals in the game, it was their defensive display which was particularly impressive considering that West Ham have conceded a plethora of goals in recent years. Indeed, assistant Alan Irvine could not have emphasized more about the importance of a clean sheet for his team.
Tactically, there were a lot of things that the away side did correctly at the back, starting with the pressing structure. West Ham is not a side that heavily relies on a high pressing system. However, there was a certain pressing trigger, especially during the Leicester build-up, where West Ham showed aggression in their press in order to force possession turnovers.
Leicester likes to circulate possession among the backline as they look to play out from the back. West Ham’s pressing trigger was released either during a back pass or a lateral pass from one wide central defender to the other. The objective of this pressing trigger was to push the Leicester backline deeper eventually forcing them to go long into the West Ham half where they can dominate the hosts aerially. The following couple of images shows an instance of it.
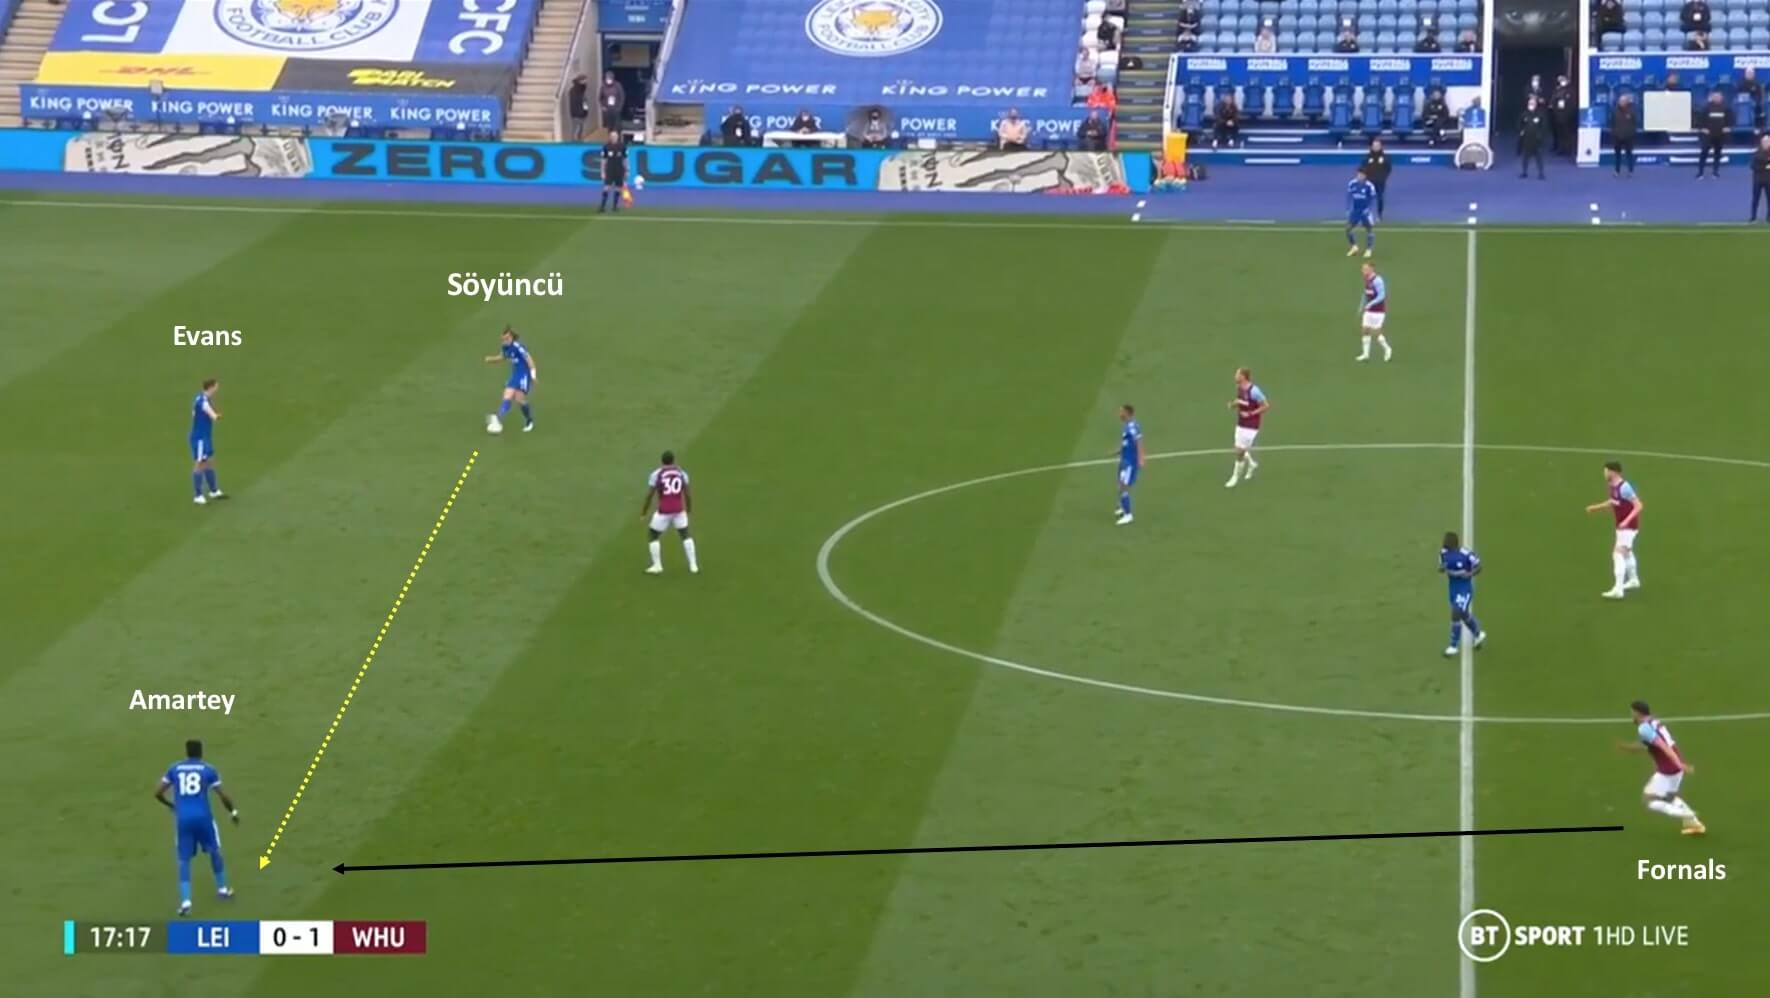
As soon as Çağlar Söyüncü attempted a lateral pass to Amartey, Pablo Fornals initiated the press as he started his run towards the Ghanaian. As the defender was forced to circulate the ball back to Jonny Evans, Michail Antonio started to press the ex-Manchester United defender which forced the latter to retreat the possession back to Söyüncü. As you can see in the following image, the Leicester backline has already been pushed deeper than above.
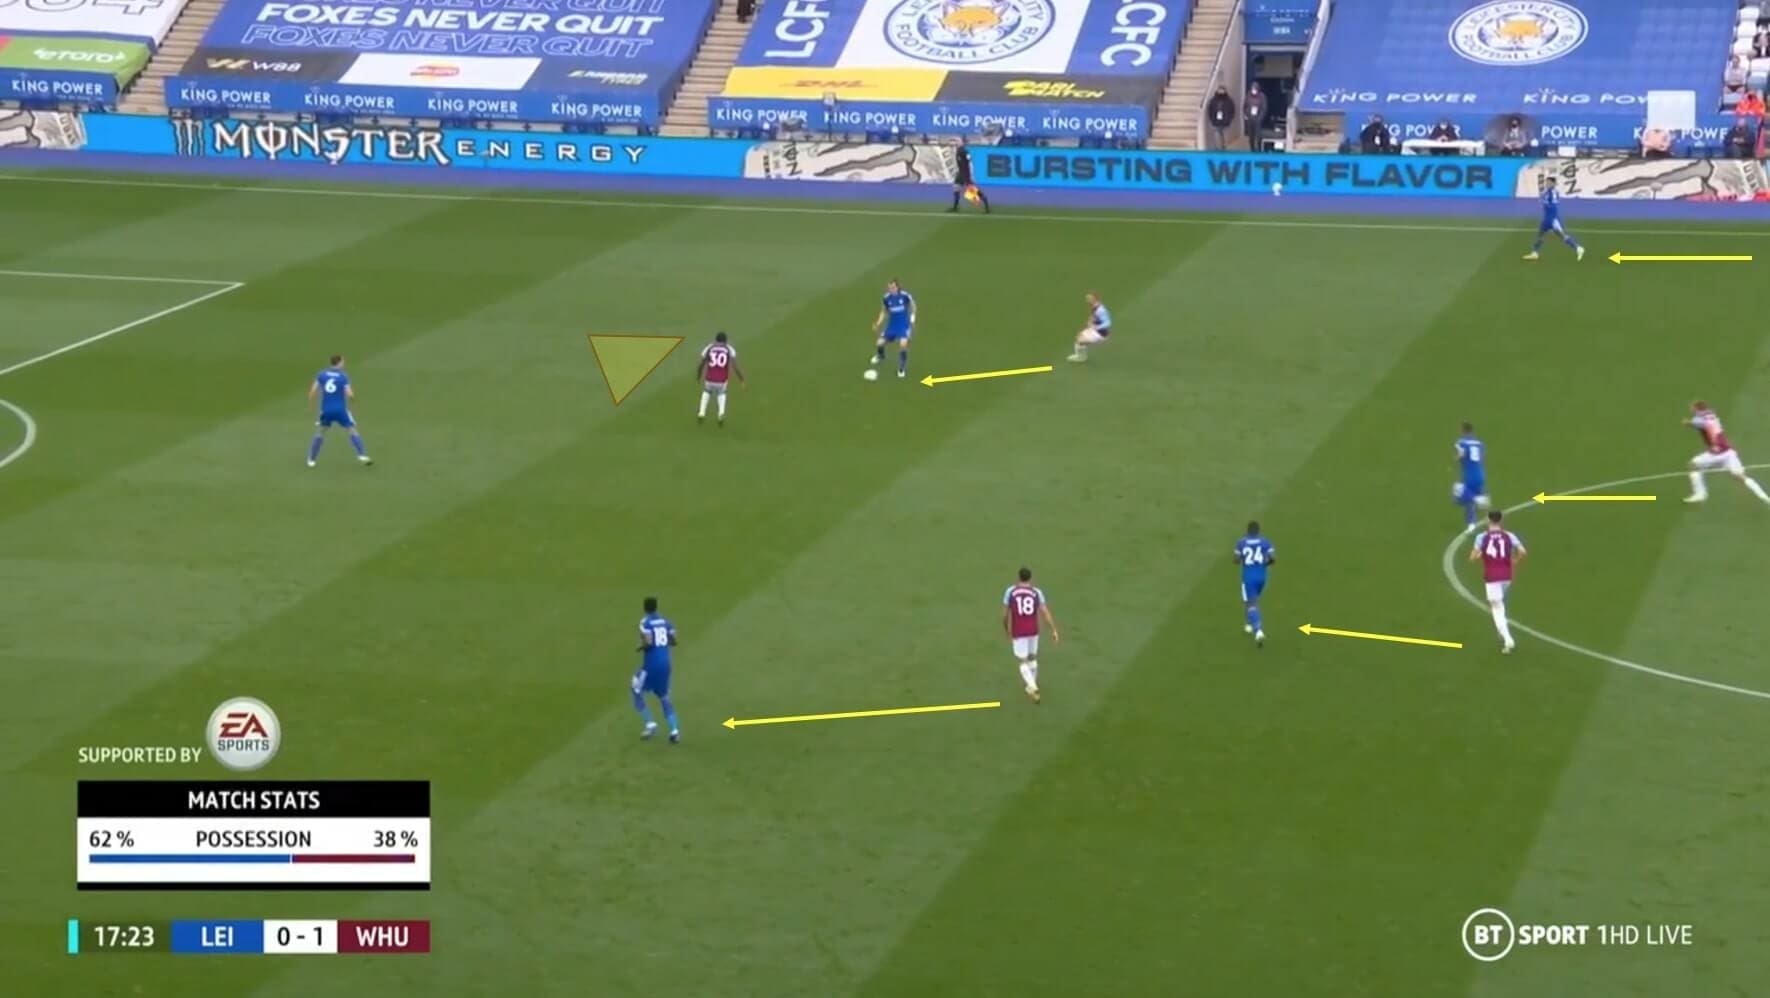
As the Turkish international received possession, West Ham’s pressing intensified as Jarrod Bowen attempted to put pressure on the man in possession. Moreover, Declan Rice (#41) and Tomáš Souček looked to close down passing lanes to the two pivots while Coufal (not in image) pushed forward towards Justin. Antonio had also closed the passing option to Evans. Hence, Söyüncü was forced to go long and the away side won possession in their own half.
In an event where Leicester were able to evade the initial press and progress the ball into the middle third, West Ham discontinued the press immediately and organised themselves into a medium 5-4-1 block as Souček and Bowen dropped into the midfield line. The defensive and the midfield line was horizontally and vertically compact.
The horizontal compactness made line-breaking passes from Leicester difficult forcing them to use the wider areas to make progression. The home side had the width provided by both the wing-backs. However, as the ball went wide, the ball-sided West Ham players made lateral movements towards the flank to create overload and congest the man in possession, as shown in the following figure.
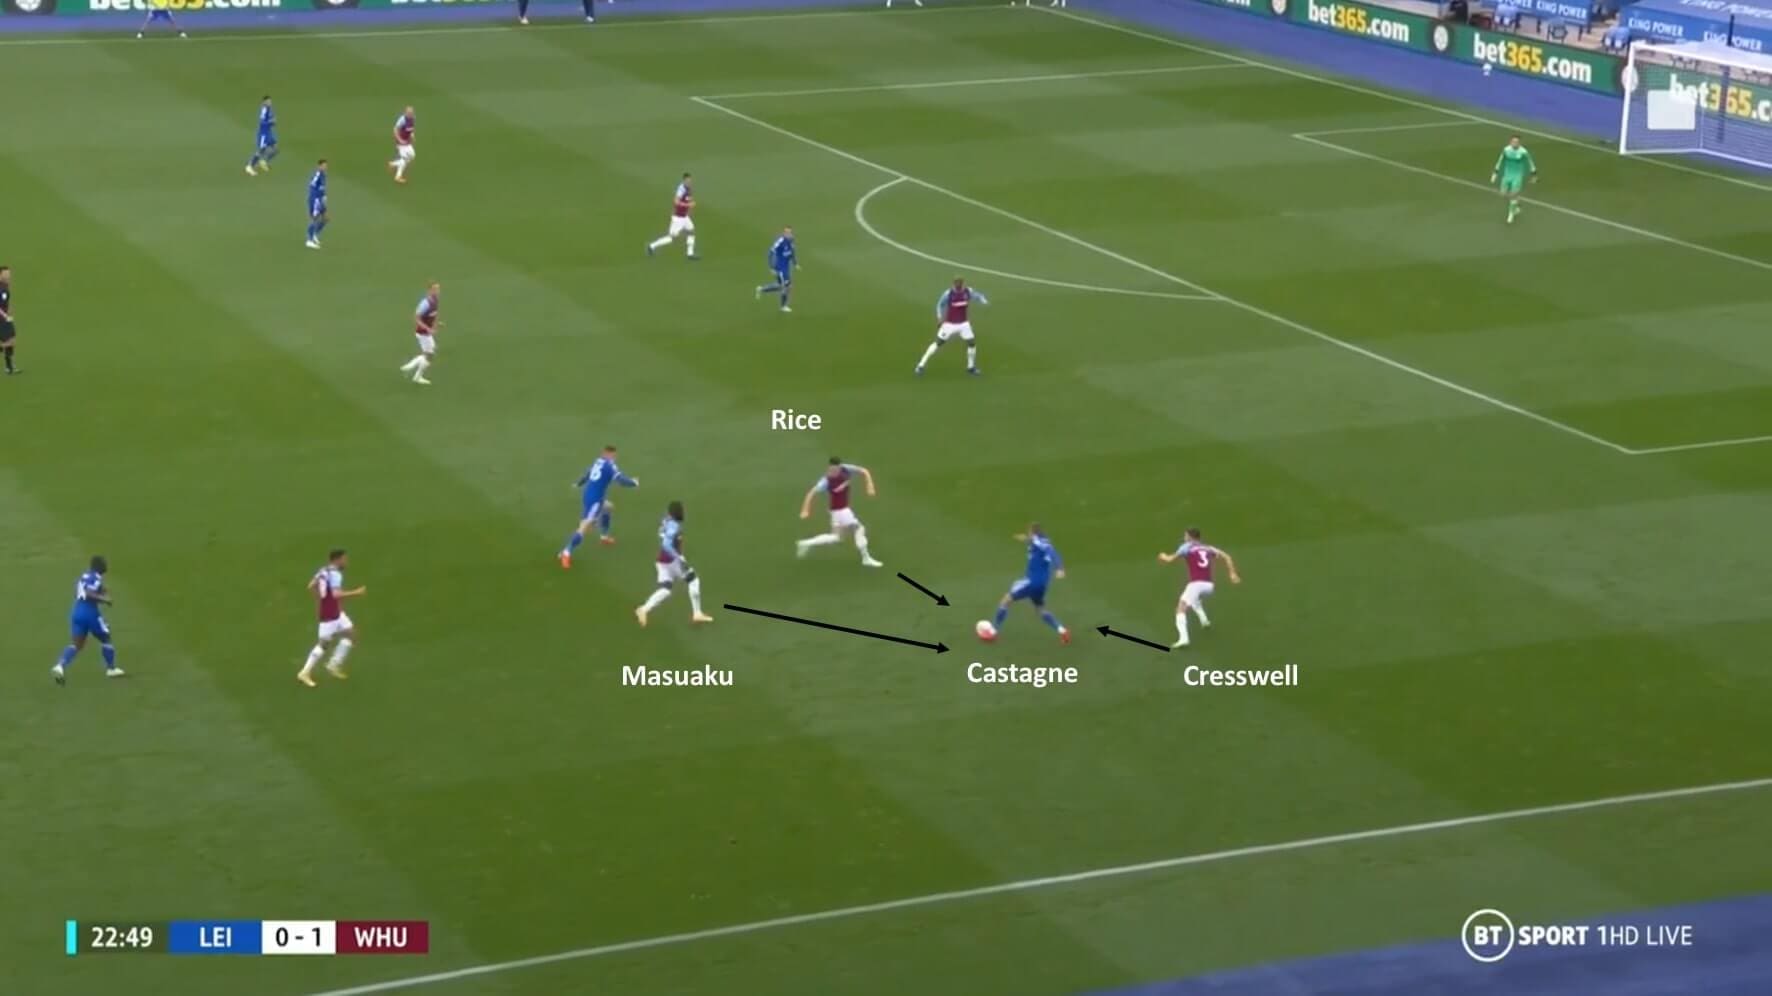
As Castagne received possession on the right outer channel, Rice, Aaron Cresswell, and Arthur Masuaku moved towards the wing-back. Notice that while Cresswell pressed Castagne, Rice and Masuaku obstructed the inside passing lane as the man in possession was devoid of options to progress the ball further.
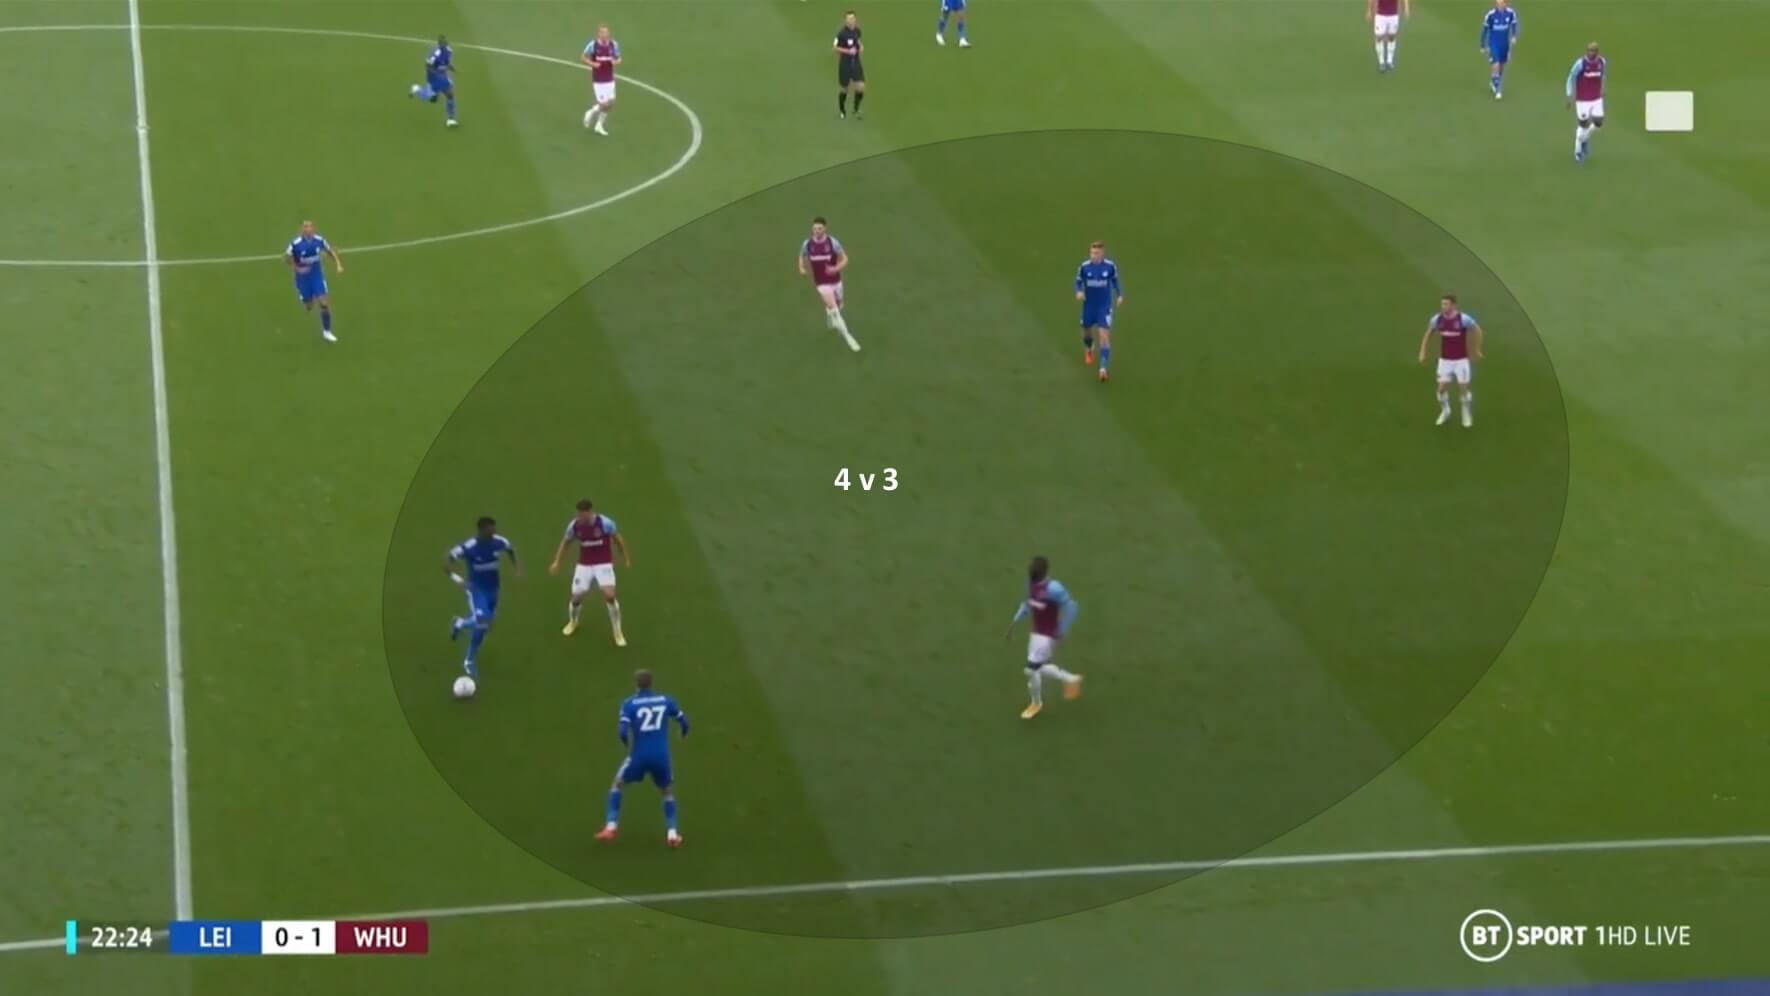
The above figure shows another instance where West Ham’s ball-sided players have created three-versus-four overloads in the middle third, once again obstructing vertical ball progression.
While the horizontal compactness forced Leicester to go wide, the vertical compactness denied spaces between the lines for the home side. As the distance between the defence and midfield lines of West Ham was reduced, it allowed central defenders to easily close down Leicester players between the lines. The following figure shows the vertical compactness and its significance.
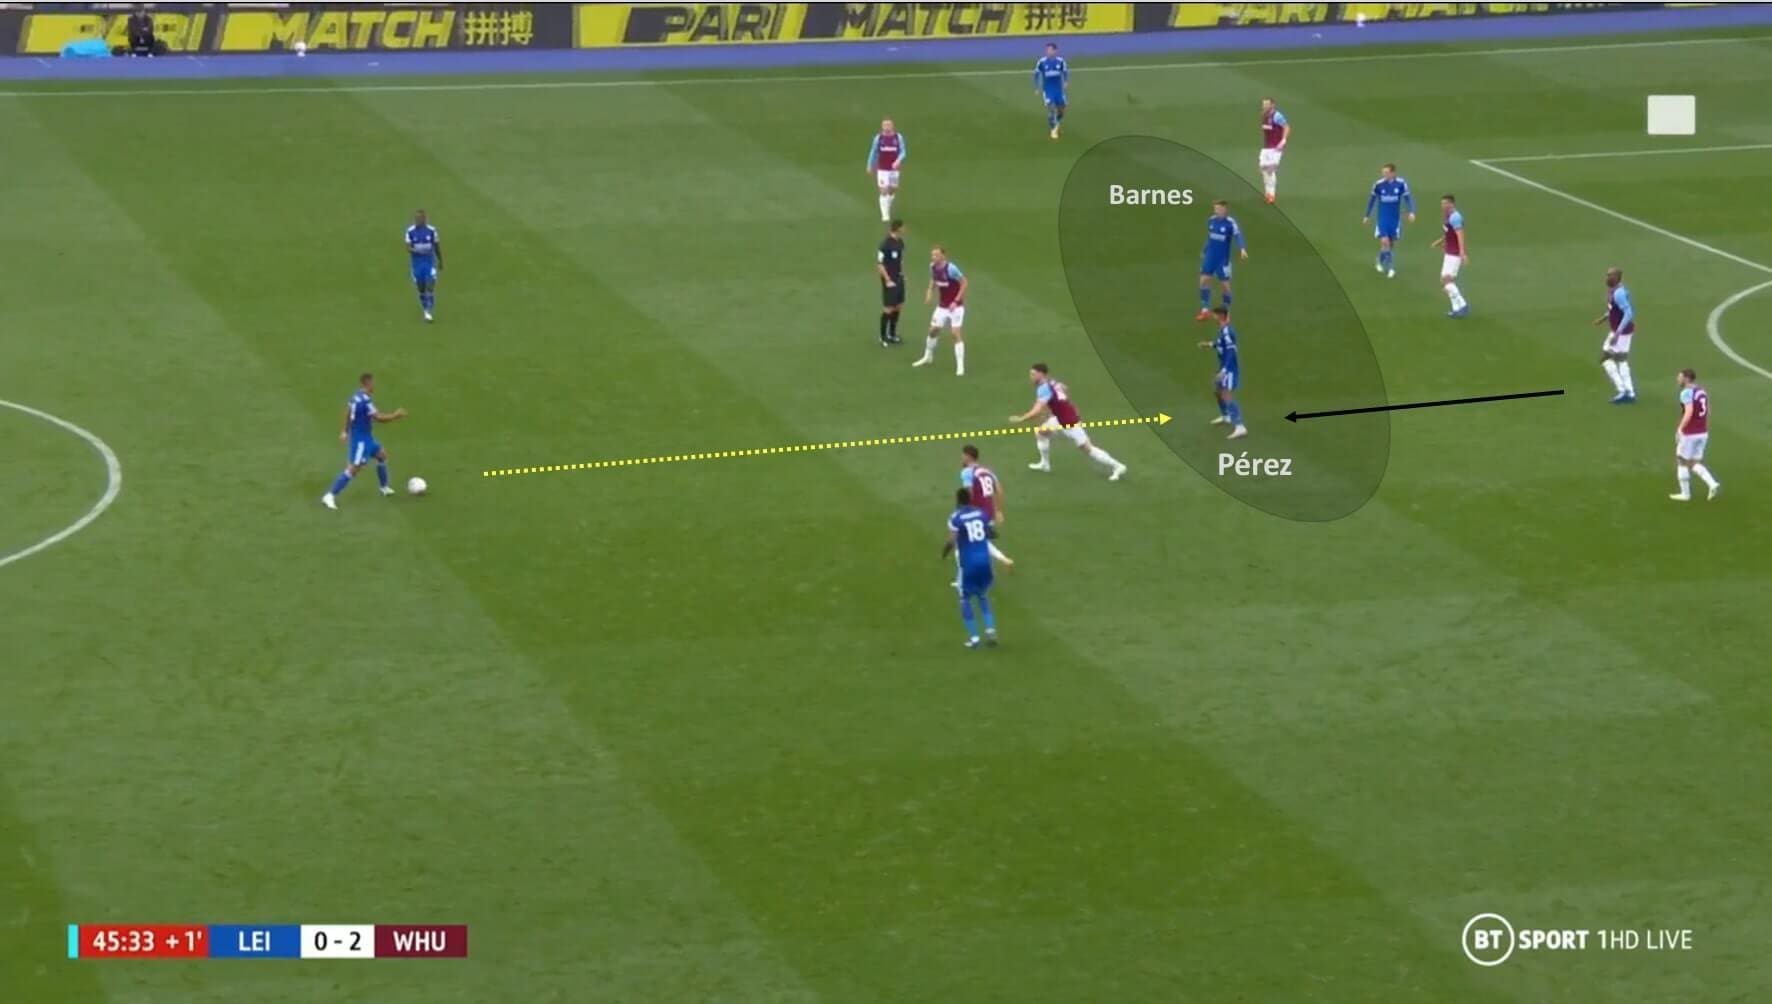
As you can see in the figure, Rice and Souček maintained a close distance which did not give easy passing access to Tielemans. Moreover, if a pass is successfully made to Barnes or Pérez, who had positioned themselves between the lines, one of the West Ham centre-backs could easily close down the recipient without allowing to make a turn. In case the distance between the midfield and defensive line would have been more, a centre-back wouldn’t have risked leaving his space as he would then had to cover a larger distance to close down. Consequently, it would have allowed Barnes or Pérez to make a turn and provide a ball beyond the backline for Vardy.
Leicester often likes to use the space between the opposition defence and midfield lines as we saw against Burnley. While the Foxes were successful in exposing those spaces against Sean Dyche’s side, West Ham showcased an assiduous defensive display to thwart the attacks from the hosts.
The defensive organisation from the visitors was imposing as the team who had scored 12 goals prior to this game had no shots on target. Moreover, the home side had less than 0.01 xG during the first half which indicates that the away side’s goal was hardly troubled.
Leicester got a taste of their own medicine
Leicester City had exposed the high defensive line of Manchester City with flashing counter-attacks in the previous game. The Foxes’ main idea was to sit in a 5-4-1 low block and hit the home side in transition by setting up Vardy beyond the backline. The former England international’s pace and quality hurt City at the back.
A week later, Moyes set his team up in a similar fashion against the Foxes. Leicester were naturally the more adventurous side out of the two as they enjoyed 69% of the possession. The hosts held a relatively high backline as they played out from the back.
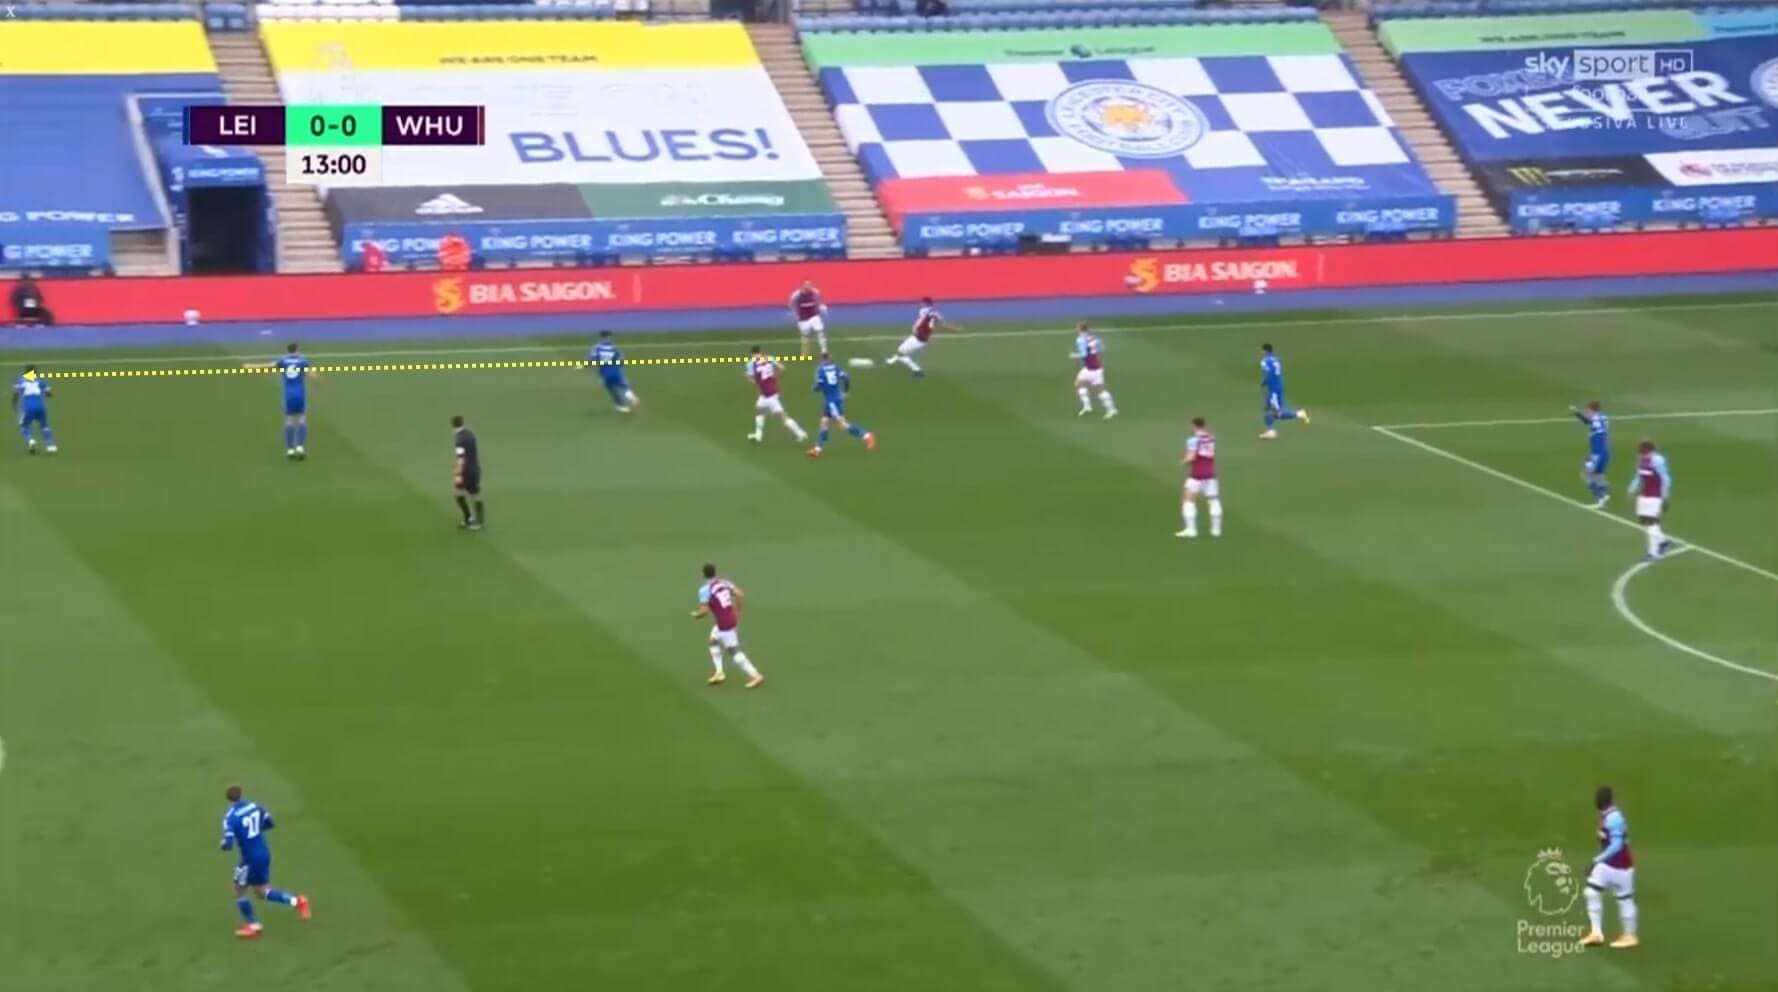
Antonio was Moyes’ target man who was tasked to create a menace in the opposition defence as the Hammers looked to go directly towards him every time they had the ball. Although the visitors did build their attacks from the back at times, they generally went for a more direct option from the deeper areas towards the striker. Even during the counter-attacks, Antonio was the primary option. The 30-year old was involved in 32 duels, more than any other player on the pitch. Moreover, 72% of the passes that the striker received was from the back six. These statistics explain his role as a target man.
The following figure shows an instance of West Ham’s directness towards Antonio while in possession. As the away side built up their play in the defensive half, Balbuena attempted to make a direct pass to Antonio, who is positioned in the Leicester half.
With being 2-0 down at the half-time, the onus was on Leicester to be more attacking, as they changed their shape to 4-2-3-1 to add an extra attacking player after Amartey’s injury ten minutes into the second half. The visitors dropped the block deeper and started to absorb the pressure and hit Leicester in transitions. While Bowen stayed in the midfield line off the ball, he was instructed to quickly push higher alongside Antonio as his side won possession. West Ham created a total of six counter-attacks to Leicester’s one. The following figure shows a counter-attack which led to the final goal for the visitors.
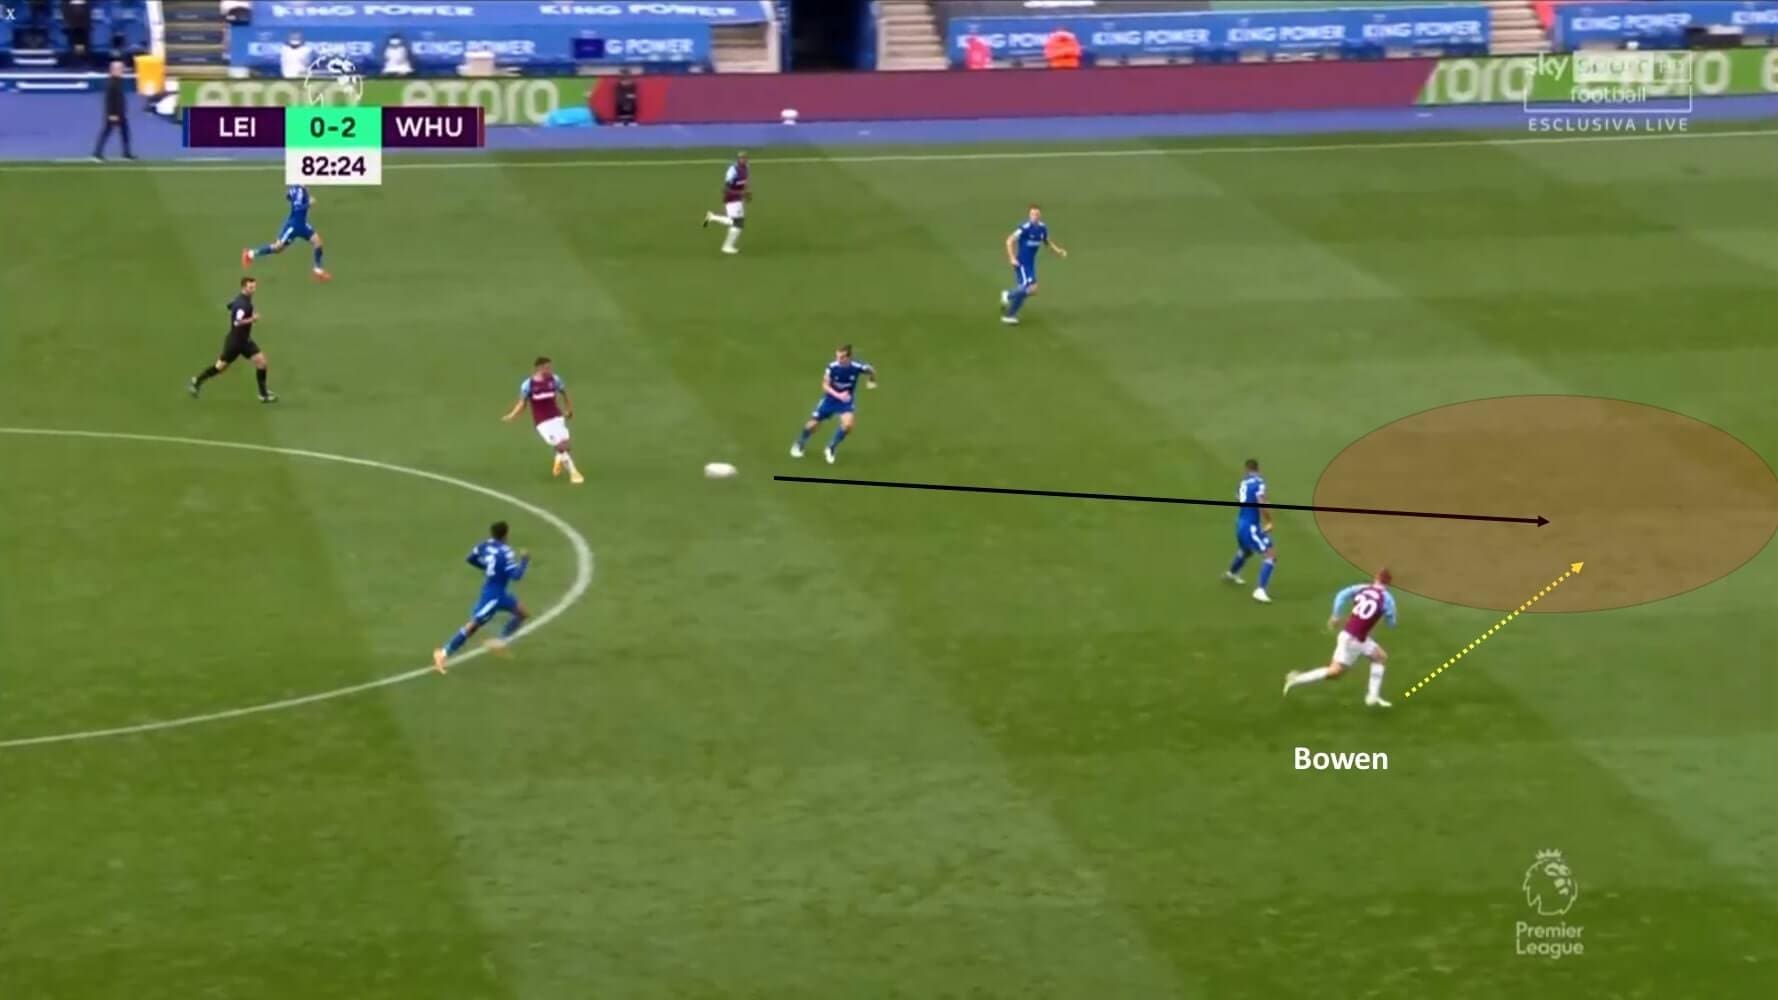
As the visitors won the ball in the defensive third, they carried the ball out from the centre as the two forwards made runs from outside the defensive line on either side. The pace of both the attackers meant that they went past the high back line of Leicester with ease and Bowen was through on goal with the pass to bury the one-versus-one chance.
Conclusion
While West Ham showcased a dominating performance, which deserved no less than the three points, Leicester’s performance screamed complacency. The international break would come as a huge sigh of relief for Rodgers as his key players will get time to recuperate. Hence, the manager will most likely have a full squad available against Aston Villa in two weeks. While this defeat would certainly create a stir in the dressing room, Rodgers will expect a strong response from his men against Villa before they embark on a difficult period where they will meet Arsenal, Leeds United, Wolves, and Liverpool in the subsequent fixtures.
On the other hand, this win would give West Ham much-needed confidence as their difficult run of games does not stop at the King Power. Tottenham, Manchester City, and Liverpool await the Hammers in the next three league fixtures and Moyes will hope that his team’s recent performances against top sides would give them a chance to get some vital points from these games.


Comments