Southampton and West Ham United are enjoying a great start to the Premier League in 2020/21. Both the teams were in the top half of the table, which many might have not predicted. Southampton have won hearts by playing an exhilarating brand of football whereas West Ham United continued their counter-attacking brand of football under David Moyes.
On Tuesday night, neither of the teams managed to break the deadlock with only 13 shots taken by both the teams combined. In this tactical analysis, we will analyse the tactics and intricacies of both the managers. This analysis will also focus on the missed opportunities for both the teams.
Line-ups
Ralph Hasenhüttl started with his tried and tested 4-4-2 with Danny Ings, the former Liverpool player, back into the starting line-up. The defence looked the same but the midfield and wing had one change each. Oriol Romeu and Moussa Djenepo were given the nod against West Ham United.
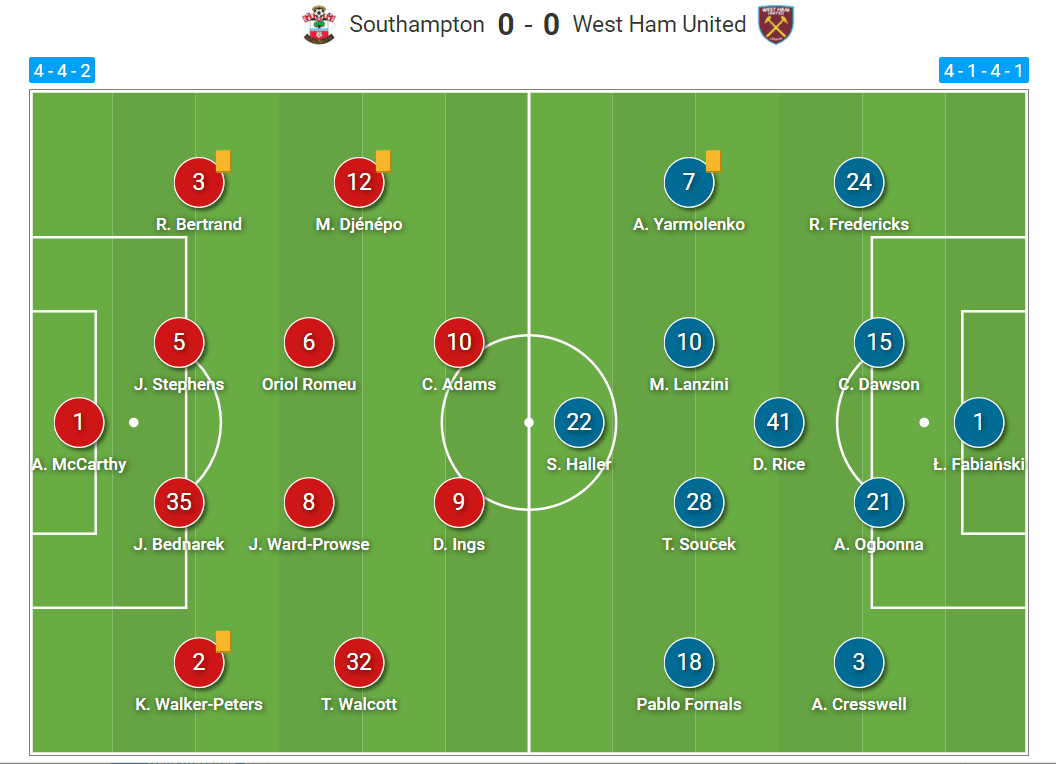
David Moyes has been shuffling between three-man backline and five-man backline throughout the season. Against Southampton, the Scotsman opted for a four-man backline as well as made a number of changes from his previous game against Brighton & Hove Albion. Pablo Fornals, Andriy Yarmolenko, Manuel Laznini, Ryan Fredericks, Craig Dawson were all given a start on Tuesday night.
West Ham’s press and Southampton’s build-up
West Ham pressed in a 4-1-4-1 man-oriented zonal marking (midblock). Man-oriented zonal marking is a mix of man-marking and zonal marking. Here, a player has to cover his own space as well as mark the opposition in his space, therefore, in this pressing method, the opponent player and the space around him is primary. The striker, Sébastien Haller, pressed the ball-carrier centre-back keeping the other centre-back in his cover shadow. The second line of press maintained their position while keeping a close distance between the opposition in their vicinity. Manuel Lanzini, and Tomáš Souček marked James Ward Prowse (JWP) and Romeu whoever was in their vicinity. The wingers marked the opposition full-backs and Declan Rice shielded the defence positioning himself in between the midfield and defensive lines.
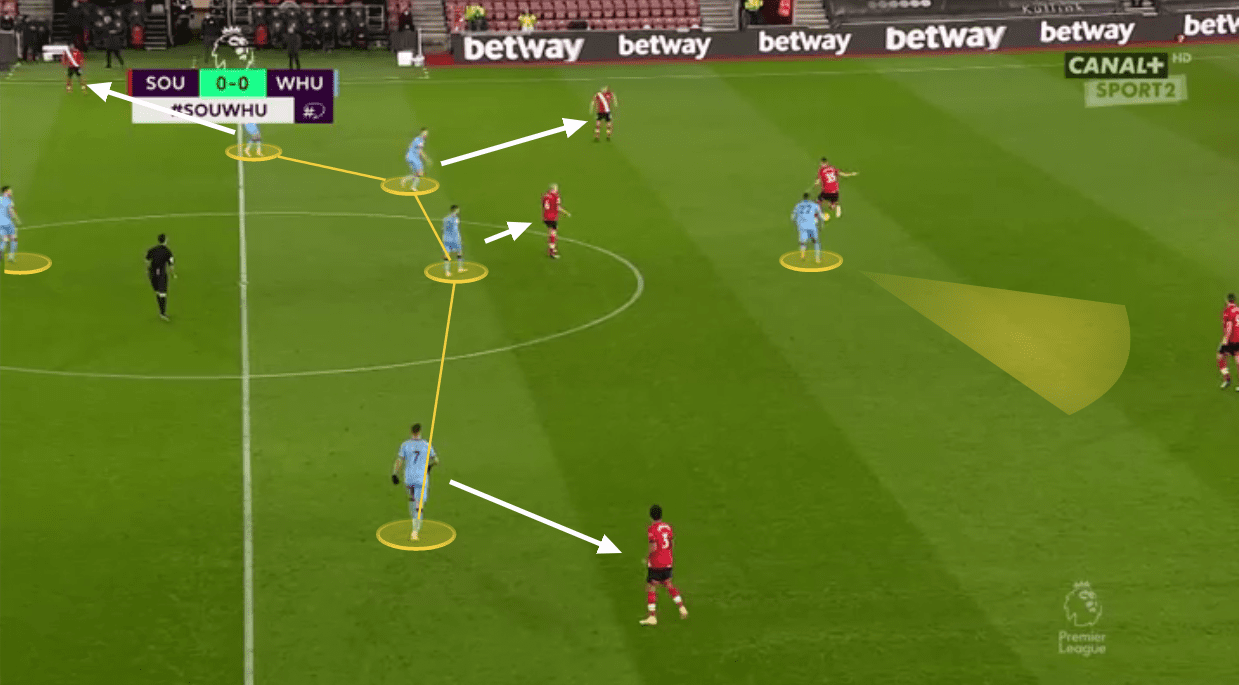
Southampton generally build-up with three-man backline with JWP dropping deeper and wider. When that happened, if the midfielder isn’t much towards the flanks, a West Ham midfielder close to him will press him, once he received the ball.
The three-man backline might look like a four-man backline sometimes due to Ryan Bertrand positioning himself deeper than his compatriot, Kyle Walker-Peters (KWP). With JWP dropping to the backline and KWP pushing higher, one of the strikers (generally Ings) drops deeper blindside of the second line of press and Theo Walcott inverts and positions in the other half space again just blindside of West Ham’s second line of press. With only the striker covering both the centre-backs, the Southampton gaffer also instructed his centre-backs to carry the ball whenever they got the opportunity.
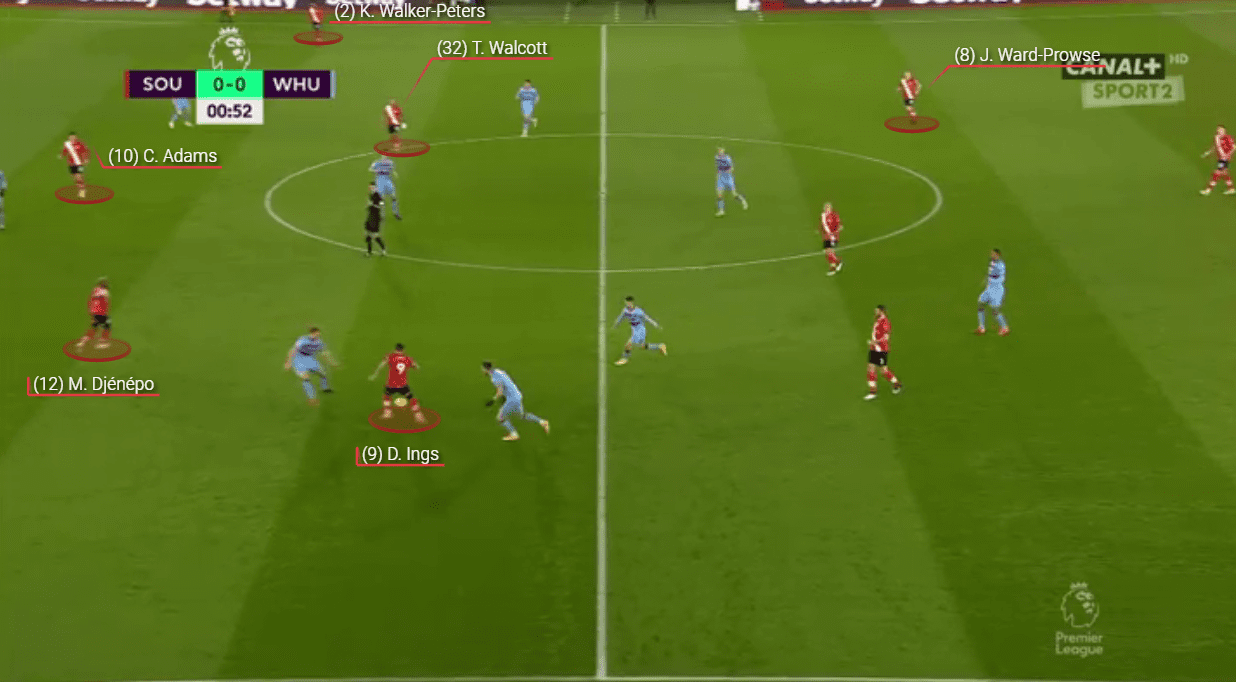
When Ings drop deep, Dejenepo either remains wide or inverts and maintains the height along with Che Adams.
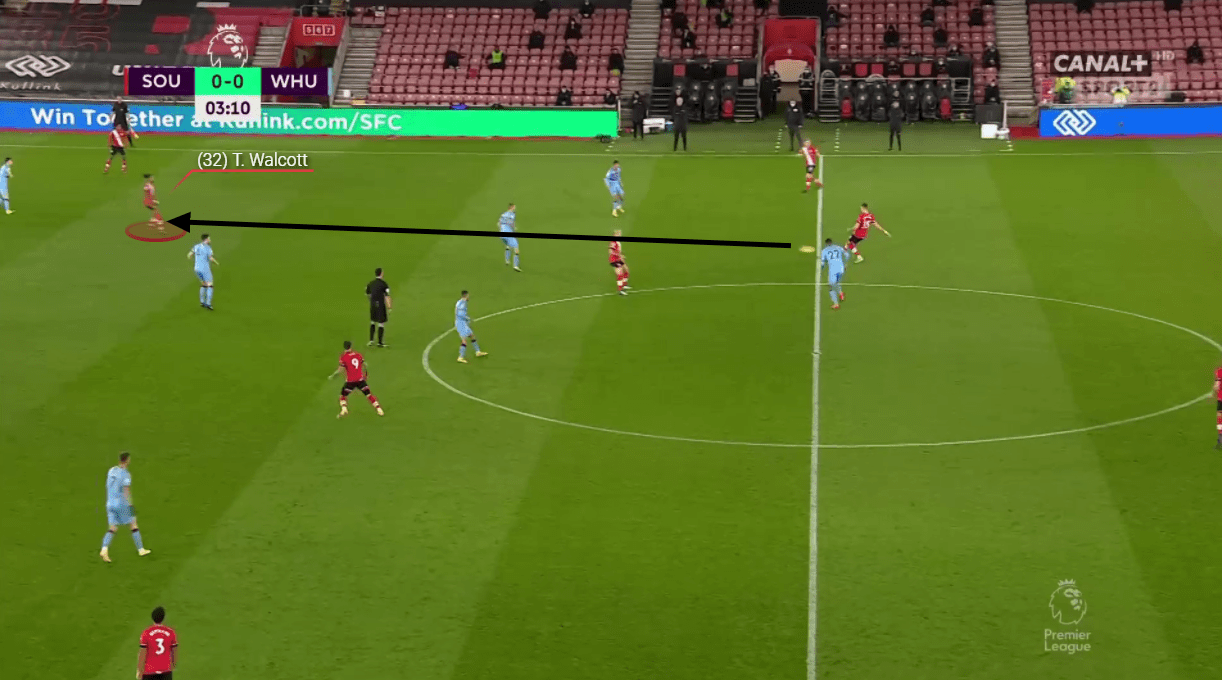
Here, you can see how Theo Walcott’s positioning has created an overload on Aaron Cresswell along with KWP. However, Rice was brilliant on the night and he would quickly cover the half space once Ings or Walcott received the ball.
This positioning of the attacking players opened a lot of different options for Southampton. If the deeper players found a direct passing lane to the striker facing the back of the goal, he could lay the ball to the attacking players in between the lines facing the goal.
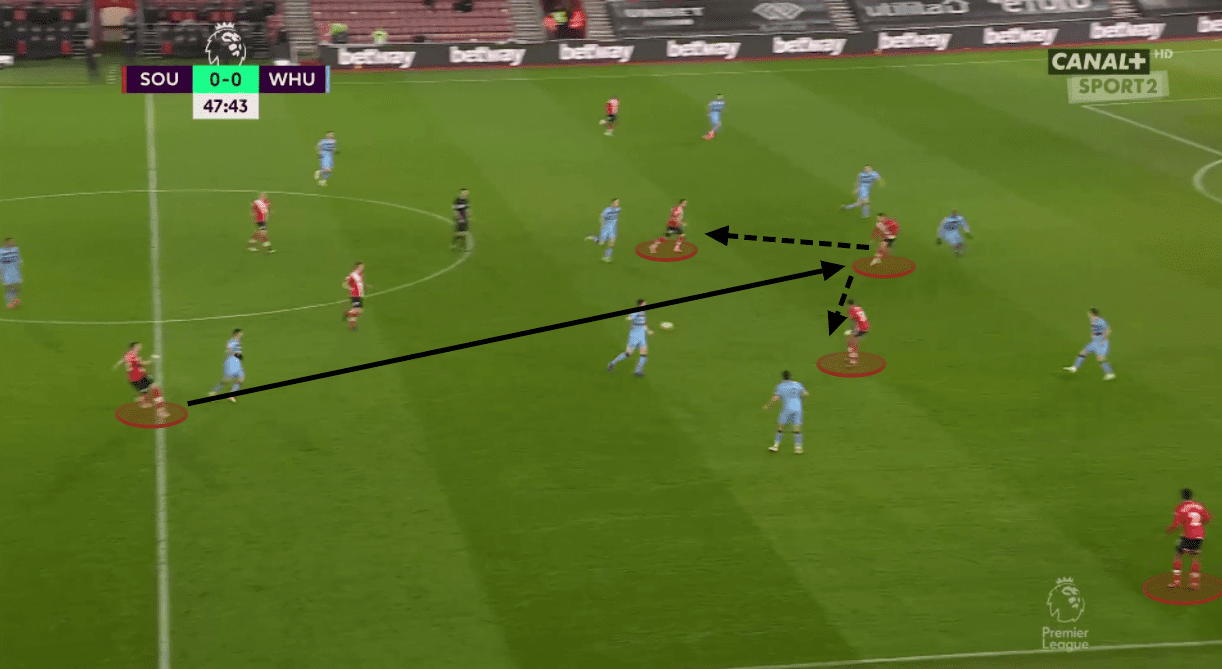
Southampton did manage to create such chances but their execution were poor on the night.
Theo Walcott was the main threat on the night positioning himself in the right half space. However, Ings too troubled the Irons. With the build-up on the right vertical half, his initial positioning would occasionally find himself in between the lines, unmarked, in the zone 14 too.
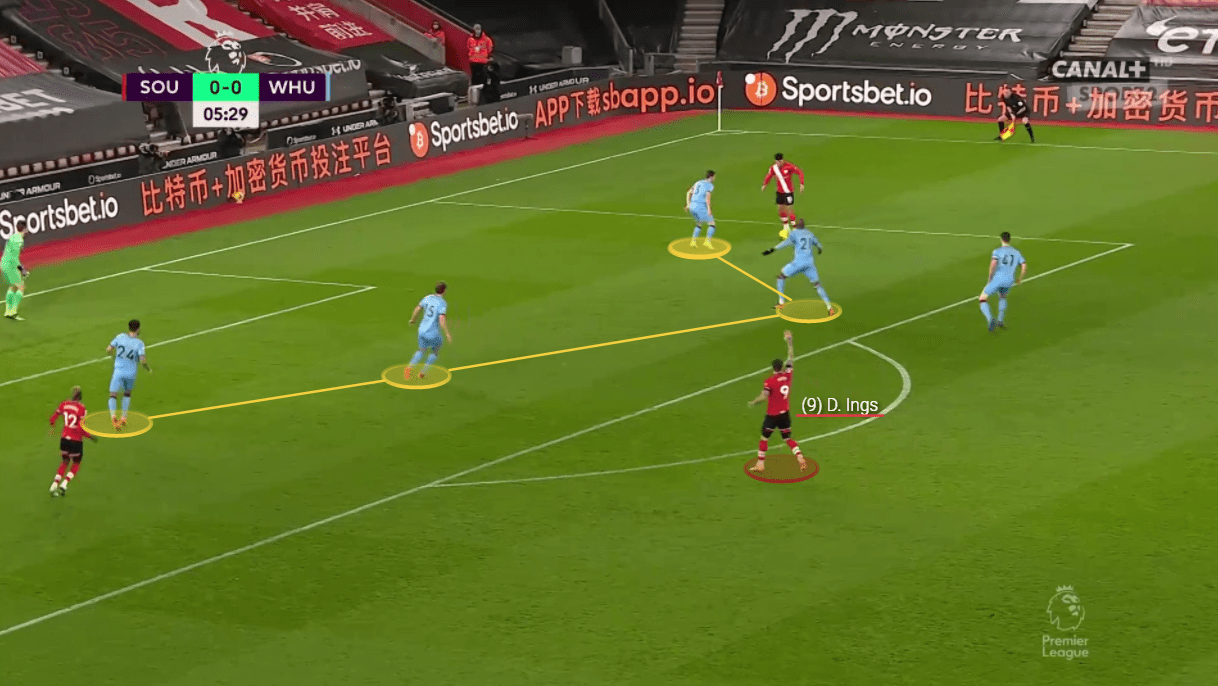
Ings did manage to score from this situation but Che Adams was judged to be offside in the build-up.
Southampton had various patterns in the build-up especially working with the attackers in both the half spaces…
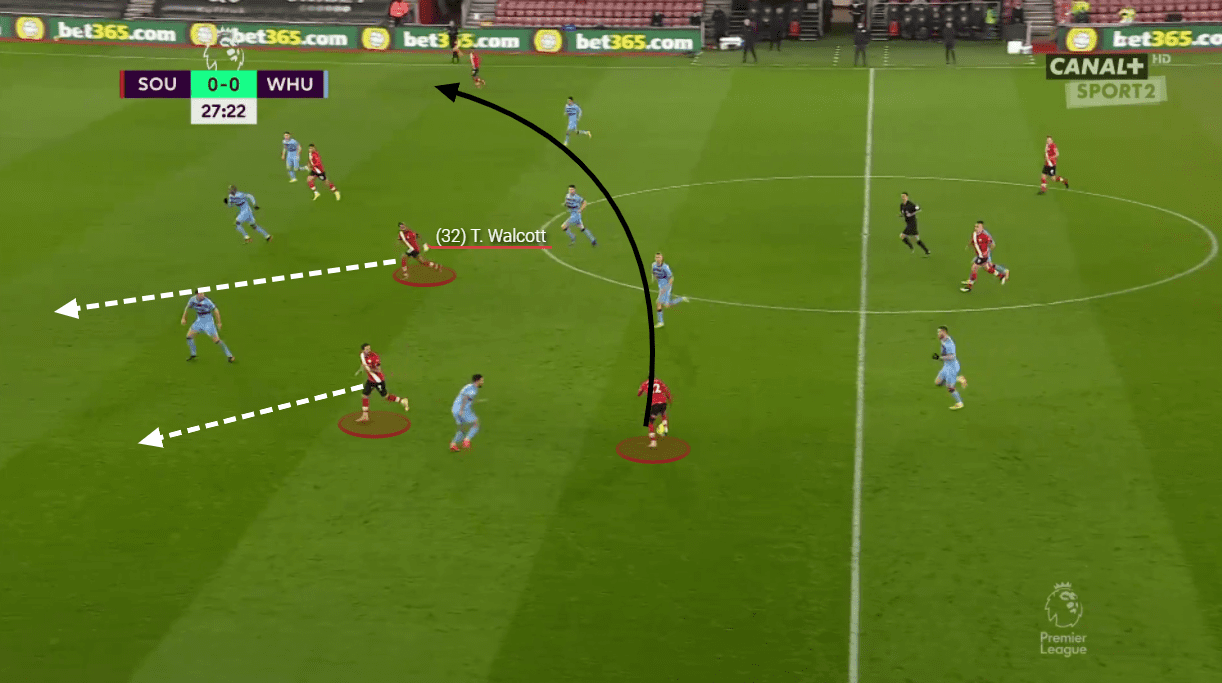
When the ball is played in one vertical half, the player in the half space of the other vertical half can also make runs. Here, Dejenepo had the ball. Since West Ham followed a man-oriented zonal marking, Fredericks moved up to press the winger. Ings tried to drag out the RCB wide for Walcott to exploit the space between the centre-backs with his marauding run. If you notice, Southampton with their structure have also managed to create a lot of space for the right-back, KWP. Djenepo opted for that option, however, his pass was poor, on this occasion and the Southampton attack lost all its venom.
Southampton’s press and West Ham’s build-up
Southampton pressed in a 4-4-2 midblock. The first line of press pressed the opposition centre-backs trying to keep the pivot, Declan Rice in their cover shadow. The second line of press pressed the West Ham full-backs and the midfielders.
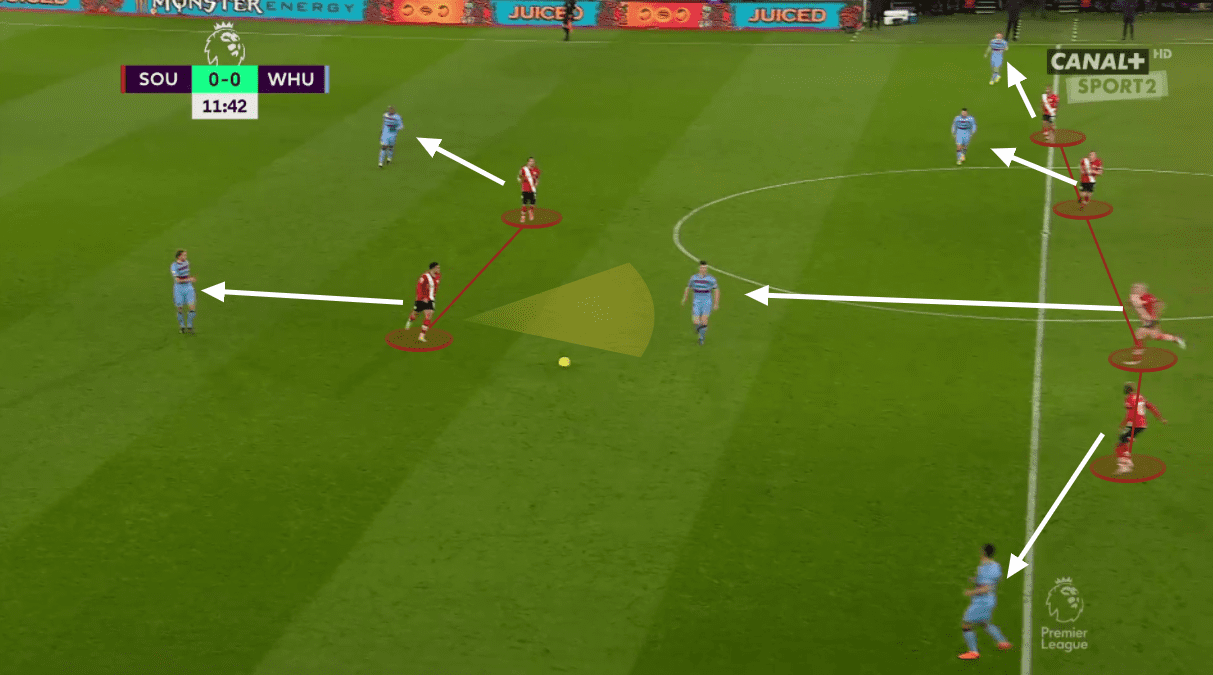
However, this press faced some difficulty. As you can see in the image below, Souček and Rice have created an overload on JWP.
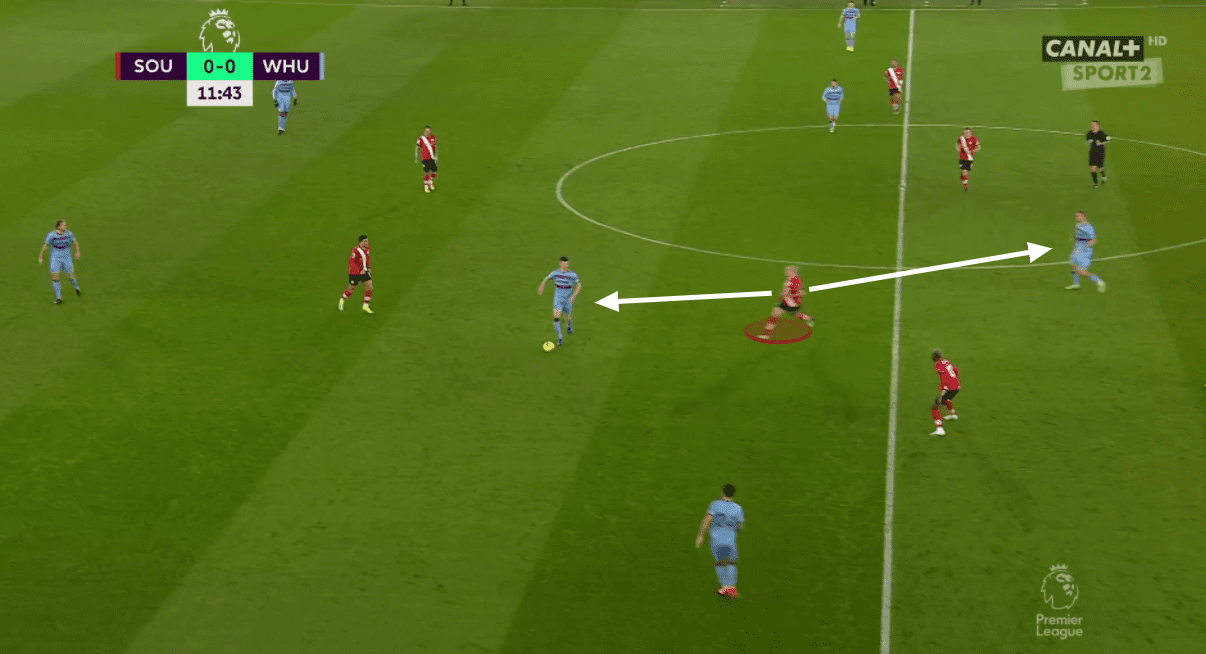
West Ham had a mere 34.67% possession. The Irons did not create many difficulties for the Saints with their build-up. However, the home team often faced overload in the middle of the park with JWP and Romeu marking Rice, Souček, and Lanzini.
Southampton’s pressing structure was interesting. The Saints normally pressed in a 4-4-2 man-oriented zonal marking trying to force the West Ham build-up towards the flank. Once the build-up was forced to the flank, Southampton would adopt a more space-oriented zonal marking structure with Djenepo tucked in almost to the midfield protecting the centre.
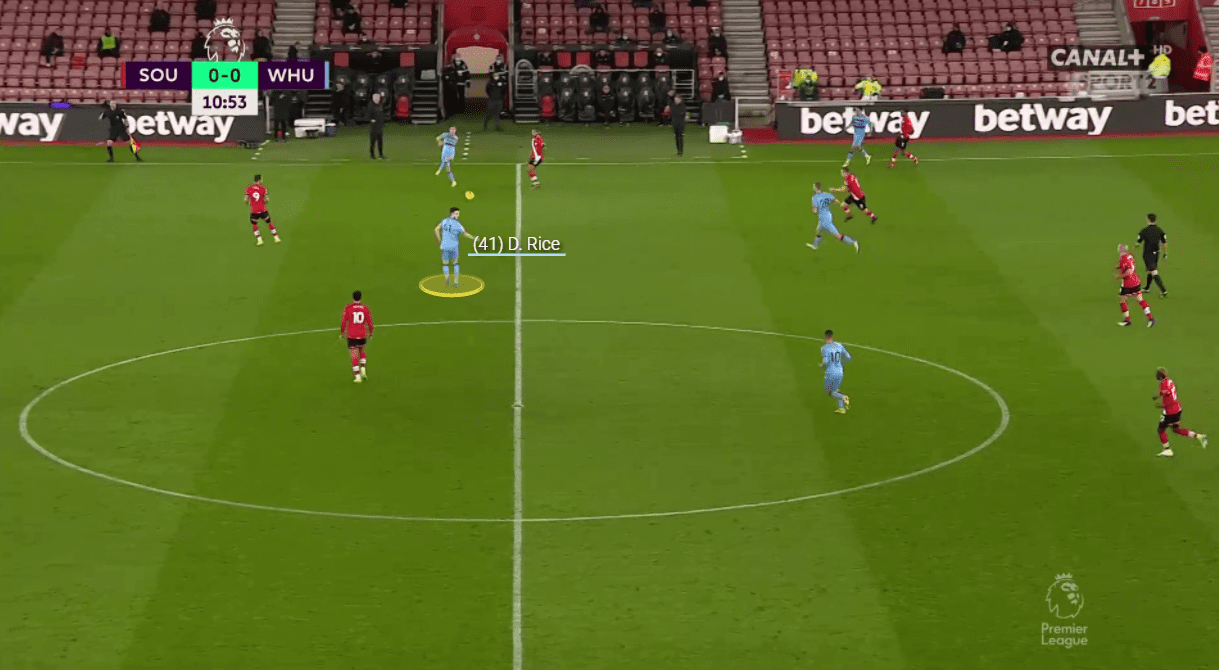
Here, again you can see Rice in an unmarked space. West Ham could have taken advantage of this situation by switching the channels with the help of the defensive midfielder but they failed to do. so.
Life after Saïd Benrahma
After Saïd Benrahma was subbed in, West Ham switched to a 4-4-1-1 with Benrahma just behind the striker. West Ham also started to press higher with the Algerian shifting to mark both the Southampton midfielders whoever was the close passing option for the deeper players. West Ham started to win more balls high up the pitch after the structure change.
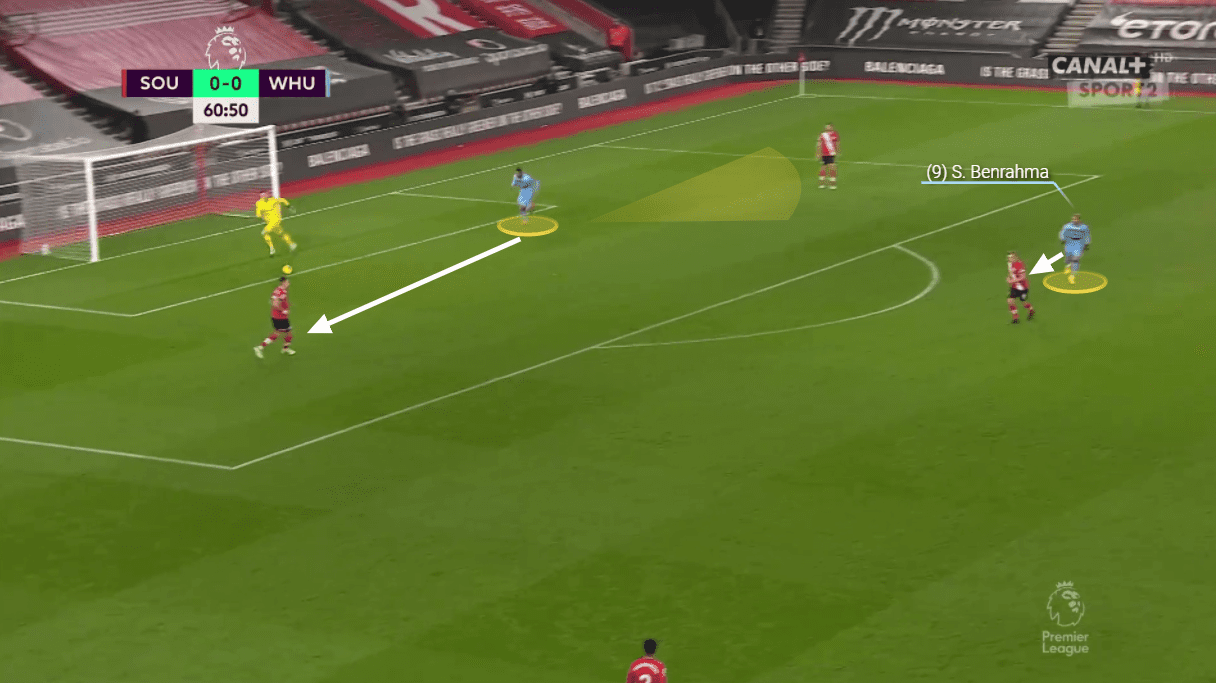
Even in their own half, West Ham pressed in a 4-4-1-1 with Benrahma marking the ball-near midfielder (Romeu here).
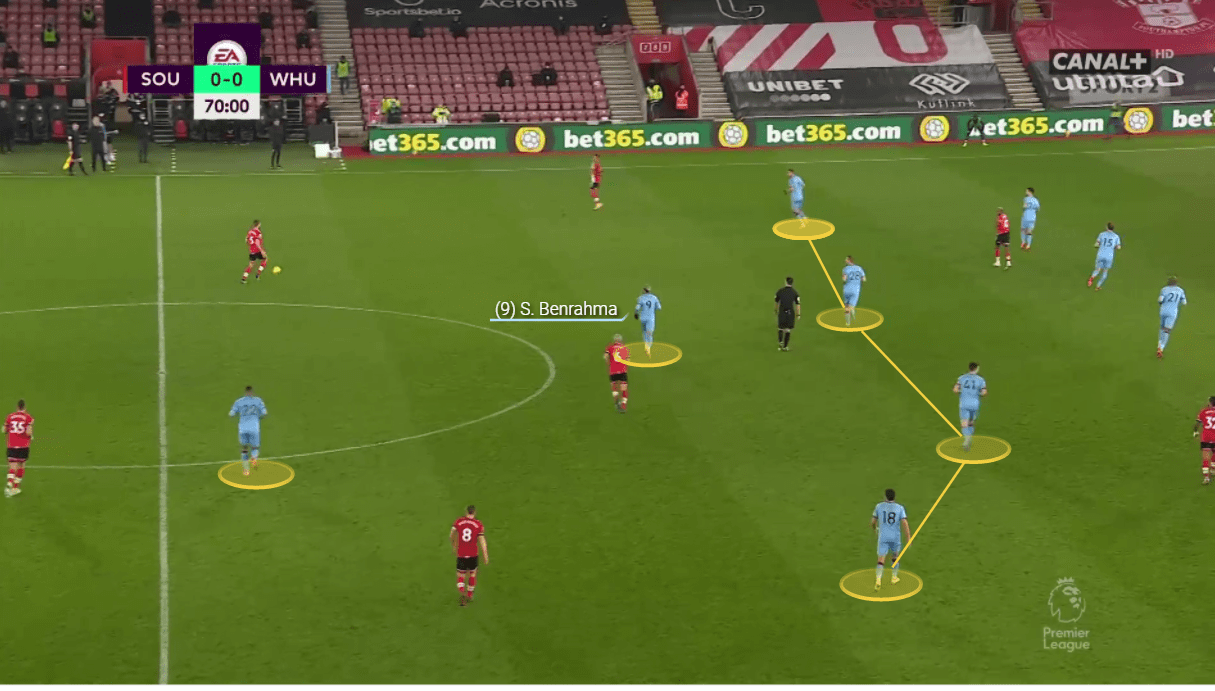
The reason Moyes changed his structure was because of utilising an extra player in counter-attacks in the last half an hour. Before Benrahma was subbed in, Haller was the only target during counter-attacks. After Benrahma, there were two options for the Irons up front.
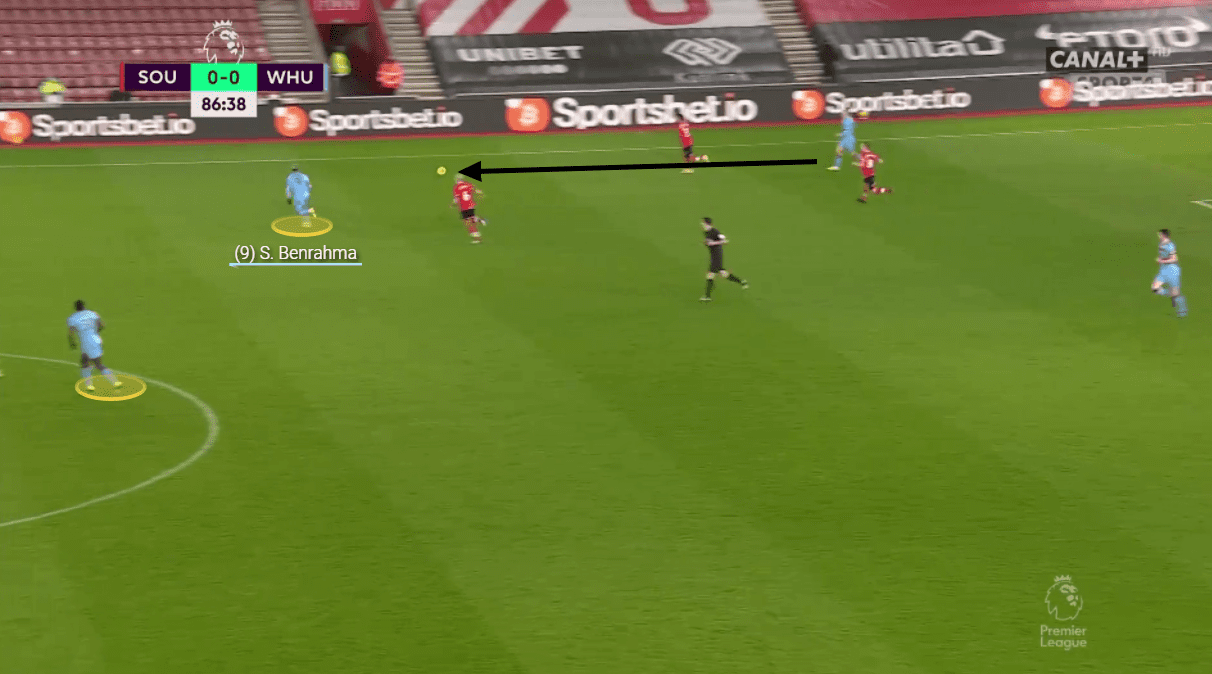
As you can see here, once West Ham won the ball, they quickly found an outlet in the form of the Algerian with a striker waiting for his services. However, Southampton stood true to their task and prevented all counter-attacks.
Conclusion
All in all, Southampton vs West ham produced a mere 1.29 xG, one of the lowest xG producing fixtures in this campaign. Southampton had various build-up plans but they failed to execute whereas West Ham looked to sit back and counter, the Irons too failed to execute.
Both the teams would be happy as they finish the year in the top half of the Premier League table.


Comments