This match determined which team could occupy the top of the table in the English Premier League. Eventually, this match ended with a 0-0 draw. Tottenham Hotspur successfully occupy the top of the table, followed by Liverpool. Chelsea rank third after this matchday.
In this tactical analysis, we shall dissect the offensive tactics of Chelsea and Tottenham Hotspur. In this analysis, we would also see how they prevented the opposition to create chances.
Lineups
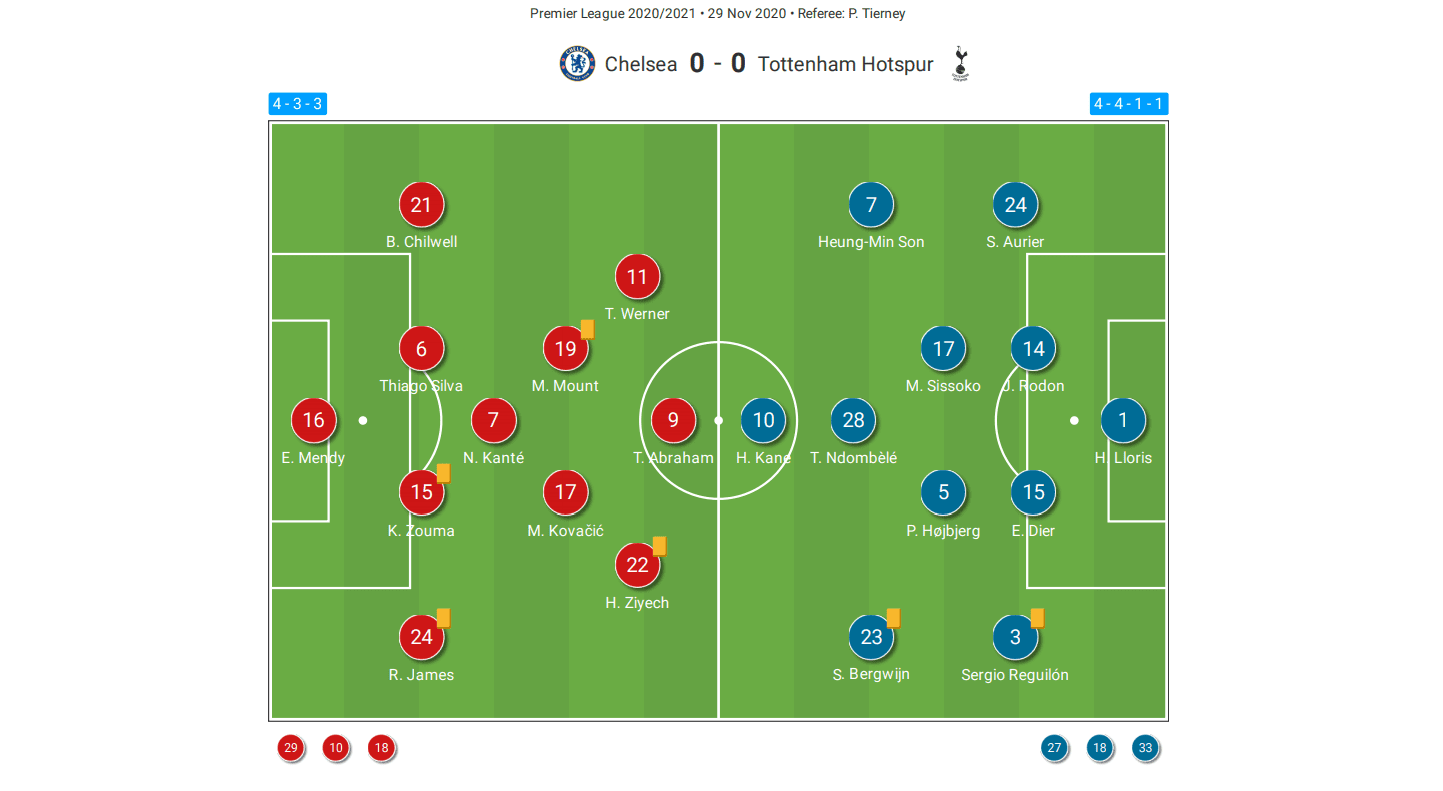
Chelsea: Edouard Mendy, Reece James, Kurt Zouma, Thiago Silva, Ben Chilwell, Mateo Kovačić, N’Golo Kanté, Mason Mount, Hakim Ziyech, Tamaraebi Abraham, Timo Werner
Tottenham Hotspur: Hugo Lloris, Serge Aurier, Joe Rodon, Eric Dier, Sergio Reguilón, Heung-Min Son, Mousa Sissoko, Pierre-Emile Højbjerg, Tanguy Ndombèlé, Steven Bergwijn, Harry Kane
How Chelsea created chances
Though both teams did not score goals in this match, Chelsea did score an offside goal. In this match, Chelsea had more shots (12-5) and shared more possession than Tottenham Hotspur (60%-40%). Thus, in the first section, we shall delve into how Chelsea created chances.
In this match, Chelsea deployed a 1-4-3-3 system. They mostly attacked down the flank in each stage of the attack, no matter it was forced to or they planned to. Thus, in the final passes stage, they mostly crossed to create shots. There were mostly two patterns in creating final passes. The most frequent and the easiest one would be to find target players James or Ziyech on the right flank, who would position themselves just a bit higher than the offensive third line and to cross early from deep. To create space on the crosser and improve the quality of crossing, a common pattern would be to find Ziyech on the outside, and he would position high to stretch the play vertically. As Hotspur’s defensive block moved along with him to the depth, the ball would be released to find the decent crosser James on the half-space who would have enough time and space to look up and aim the cross. Then James would release an in-swinging cross mostly to find Abraham in the box to combat for the first ball.
Though the in-swinging cross could find Abraham from time to time to finish a shot, it was not the most effective manner as Hotspur’s centre-backs Dier and Rodon were effective in defending crosses with their positioning and anticipation of the trajectory. In fact, the out-swinging cross released from Ziyech, who is left-footed, on the same side was more threatened when he aimed at the far post area to find the blindside/ weakside winger Werner. Werner on this occasion would time his run and make use of the blindside advantage to attack the space behind the defensive line, where he could possibly tap-in and attempt on goal unmarked.
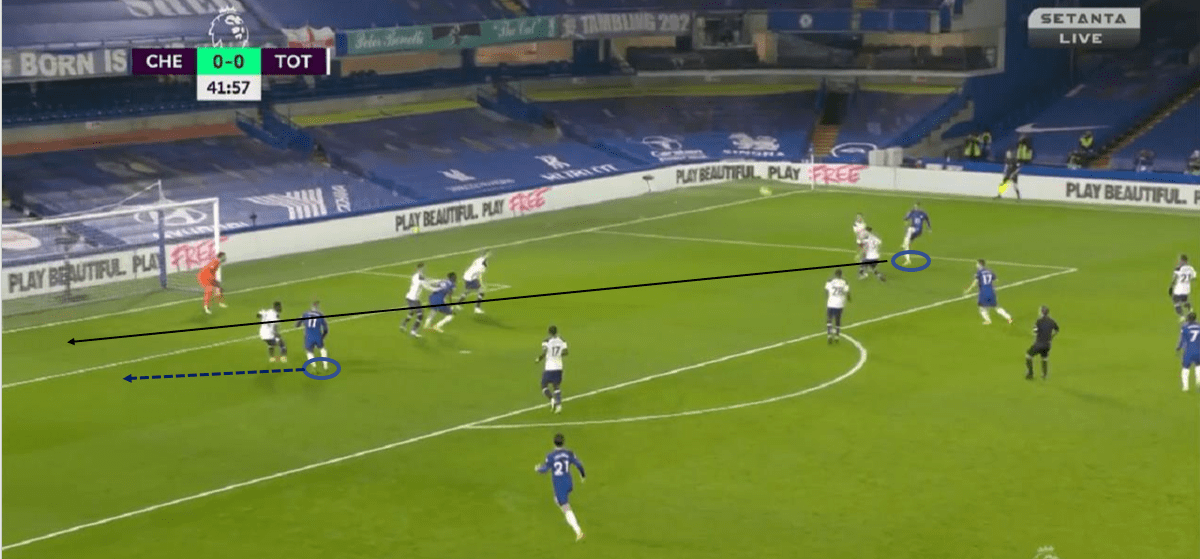
From the above image, we could spot that Ziyech possessed the ball on the half-space and utilised his left to cross. In this case, Werner was about to do an out-curved run to the far post area ready to attack goal latching onto the out-swinging cross. Hotspur’s right-back Aurier was not reactive enough to protect the far post, and Werner could easily run onto space, though the cross was a bit fast and heavy and Werner didn’t make an attempt on goal on this occasion.
On the left flank, the combination was a bit different as the mobile Mount was on this side. The common pattern of play on this flank would be that Mount ran in behind the defensive line to create space in the midfield area, as he dragged Hotspurs’ midfielder with him. Then the right-winger Werner would drop to the opening Mount created and manipulated the play with direct long shots or switching play to the right flank to find crosser. The latter occurred more as Chelsea desired to take advantage of the weak side opening in switching play.
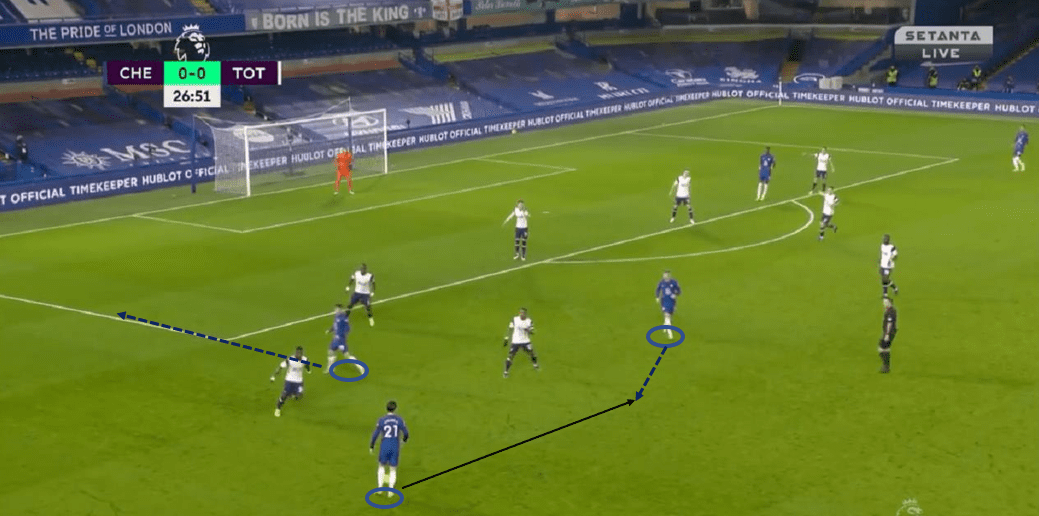
The above image manifests this pattern. Chilwell held the ball while Mount ran in behind the defensive line. This run created opening in zone 14 as he dragged his marker out of the central zone. Then Werner dropped from the front line to receive and turn in front of the opposition midfield line. Then he switched the play to the right, and a cross of high-quality was created later.
How Tottenham Hotspur created chances
Although Hotspur didn’t share much possession in this game, their positional attack under the 4-2-3-1 system was structural and unpredictable as they had many patterns in dealing with Chelsea’s defending. A most frequent one would be the dropping of the attacking midfielder Ndombèlé and the dropping of Kane. The pattern would be executed like this: the centre-back would find one inverted-winger, Song or Bergwijn on the half-space between lines. They would then pick Ndombèlé who was dropping in front of the opposition midfield line, who would later find Kane between lines. Kane’s turning and open body shape allowed him to quickly face forwards and give final passes. Thus Kane was actually a false nine in this match (or a real number ten), while Ndombèlé was an additional pivot to manipulate the play in facing forwards status, taking advantage of his ability in passing and playmaking.
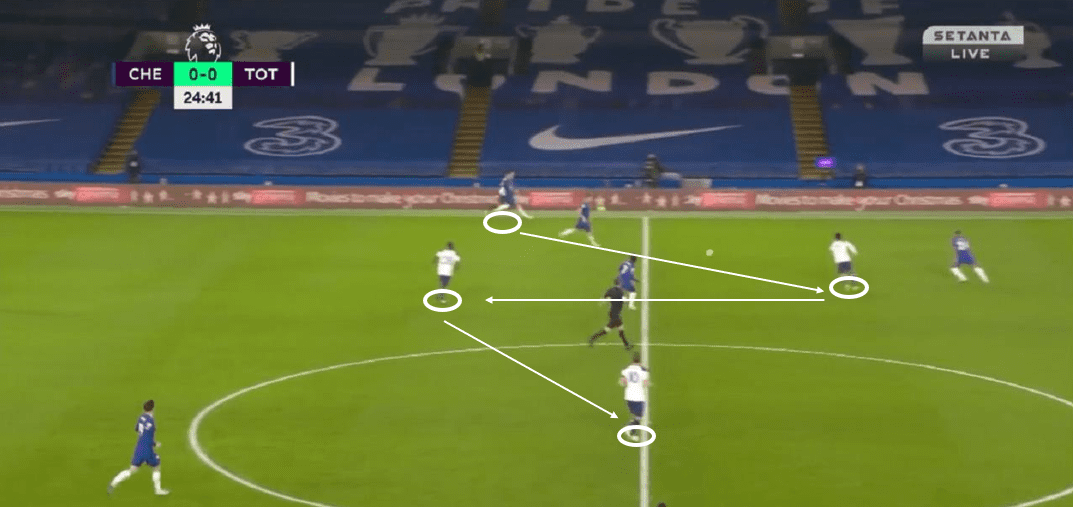
From the above example, we could clearly see the attacking players’ positioning and their duties. Son positioned between lines and received passes from the right-back. He then passed with one touch to find Ndombèlé who was facing forwards in front of the opposition midfield line. Then Ndombèlé picked Kane between lines who opened his body to receive. Kane got the ball, and runners like Son was cued to search for the space behind the defensive line, ready to receive from Kane, though on this occasion Kane couldn’t make a full turn as Chelsea’s players approaching fast. He could only pick right-back on the flank.
The above pattern occurred more in midfield penetration stage. Hotspurs would tend to use the centre more to penetrate the midfield and create final passes with Kane. However, sometimes Kane could not directly find pacey runners as Chelsea’s defending was also solid in this match. He could only pick players on the flank and utilised the width to give final passes. Hence, in this case, full-back were crucial in giving final passes.
In fact, in the flank attacking patterns in the offensive third, Hotspurs would develop the ball to the right flank to find Aurier more than the left. What Aurier could offer to the team was his driving the ball from the flank to the centre to find attacking midfielder or a cut-back player. Normally he would drive the ball inside to find Ndombèlé who could face the goal in zone 14. In this scenario, he could dribble, give final passes or shoot, and this set-up could maximise his talent and skills.
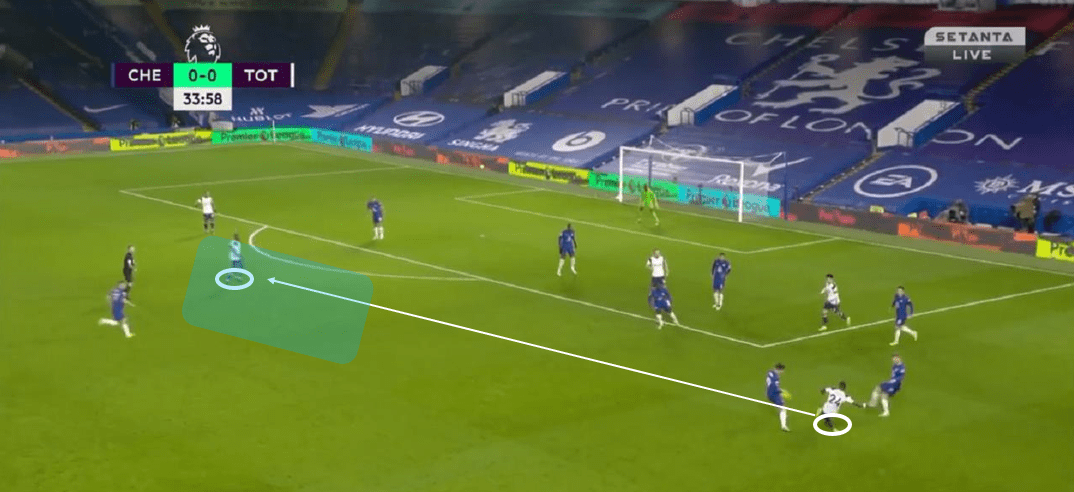
The above image showed us this pattern. Aurier possessed the ball on the right in the attacking third. A lot of Chelsea players committed to the ball and space in the centre was opened. Aurier then drove the ball to Ndombèlé who delayed his run into the zone 14. Ndombèlé then received the ball unmarked and give the final pass to Kane with one touch, though it was intercepted by Zouma.
How both teams defended to prevent the opposition to gain advantage
With a 0-0 draw, it was also worth discussing how both teams prevented the opposition to create chances. For Chelsea’s side, what they wanted to achieve was to cut off the link from Kane to other front players/runners. Therefore, as we’ve mentioned in the above section that Kane opened his body before receiving, Chelsea would let Kane receive the ball but without the permission of turning. Also, Chelsea would force Kane to go one side and then committed a lot of players on the same side to create numeral superiority, intending to win the ball.
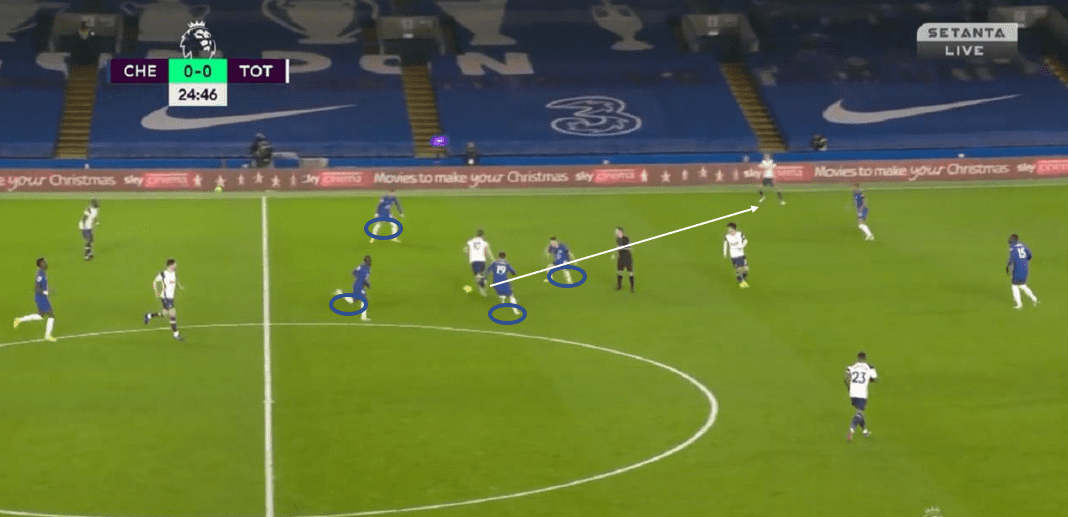
As you could see from the above image, following one of the examples from the above section, Kane received the ball with a side-on body shape. He found it difficult to turn as two opponents put direct pressure on him. Chelsea then succeeded in forcing the play to one side and created numeral advantage on this side. Hotspurs was forced to recycle possession to the back and initiate their attack from the back again.
For Hotspur’s side, they didn’t allow the opponent to use the centre to develop the play. Chelsea’s three midfielders were all marked by Hotspurs’ midfielders. Thus, Chelsea was forced to develop the play through the flank and utilised crossing as a resort to create chances. Nevertheless, Hotspur’s centre-backs were good at defending the crosses, so they neutralised Chelsea’s intent to create chances through crosses.
Conclusion
After this draw, Tottenham Hotspur is at the top of the table in the Premier League, with Liverpool ranking the second. We shall expect to see if Tottenham Hotspur form could continue and if they could actually win a title this season.


Comments