Arsenal have been one of the surprise packages in the Premier League this season, inserting themselves as title challengers after finishing fifth last time out.
Mikel Arteta has changed the general perception of himself as a manager by transforming the Gunners into a winning machine that currently sits in first place. However, there have been doubters all season about whether or not Arsenal can maintain their impressive form, and those doubts have been amplified over the last two fixtures.
Most recently, Arsenal let a 2-0 lead slip away from them as they drew to London rivals West Ham United – history repeating itself there after Arteta’s side suffered the same fate at Anfield a week earlier. Has doubt or a lack of confidence plagued Arsenal? Have they struggled with game management in these high-pressure moments? This tactical analysis will look to uncover the tactics that allowed Arsenal to go 2-0 up against the Hammers, as well as look at their demise too. There will also be an analysis of their collapse against Liverpool to see if it shares any similarities with West Ham’s comeback.
Lineups
David Moyes returned to a 4-3-3 shape after deploying a 4-4-2 away at Fulham in the previous Premier League fixture, where they snatched a 1-0 win. Angelo Ogbonna returned to the starting lineup to partner Kurt Zouma in the heart of defence – the only change in defence from an otherwise unchanged back four from the Fulham game. Lucas Paquetá joined the midfield trio after missing out on making an appearance at Craven Cottage. Danny Ings lost his place as Michail Antonio took the role of central striker with Jared Bowen and Saíd Benrahma operating from the wings.
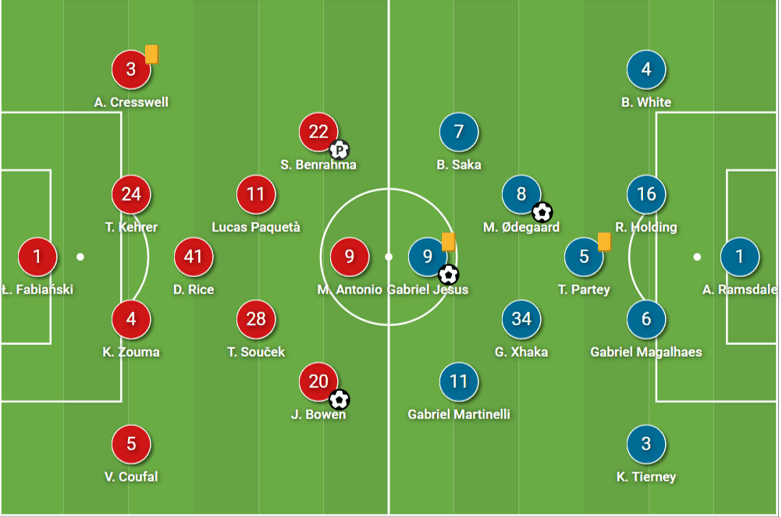
Arsenal deployed their usual 4-3-3 with just one change at the back that saw Kieran Tierney replace Oleksandr Zinchenko at left-back. Thomas Partey operated as the deepest of the midfield three in an unchanged engine room, while the front three, led by Gabriel Jesus, also saw no changes to the side that drew to Liverpool.
West Ham’s high press
From the get-go, Moyes sent his men out with the instruction of giving Arsenal next to no time on the ball, especially when the visitors had possession with their defenders and looked to build a possession phase. The Hammers would utilise their front three in applying the initial pressure with good intensity, while the midfielders provided support from appropriate positions. This first segment will provide insight into how the hosts did this in different areas of the pitch.
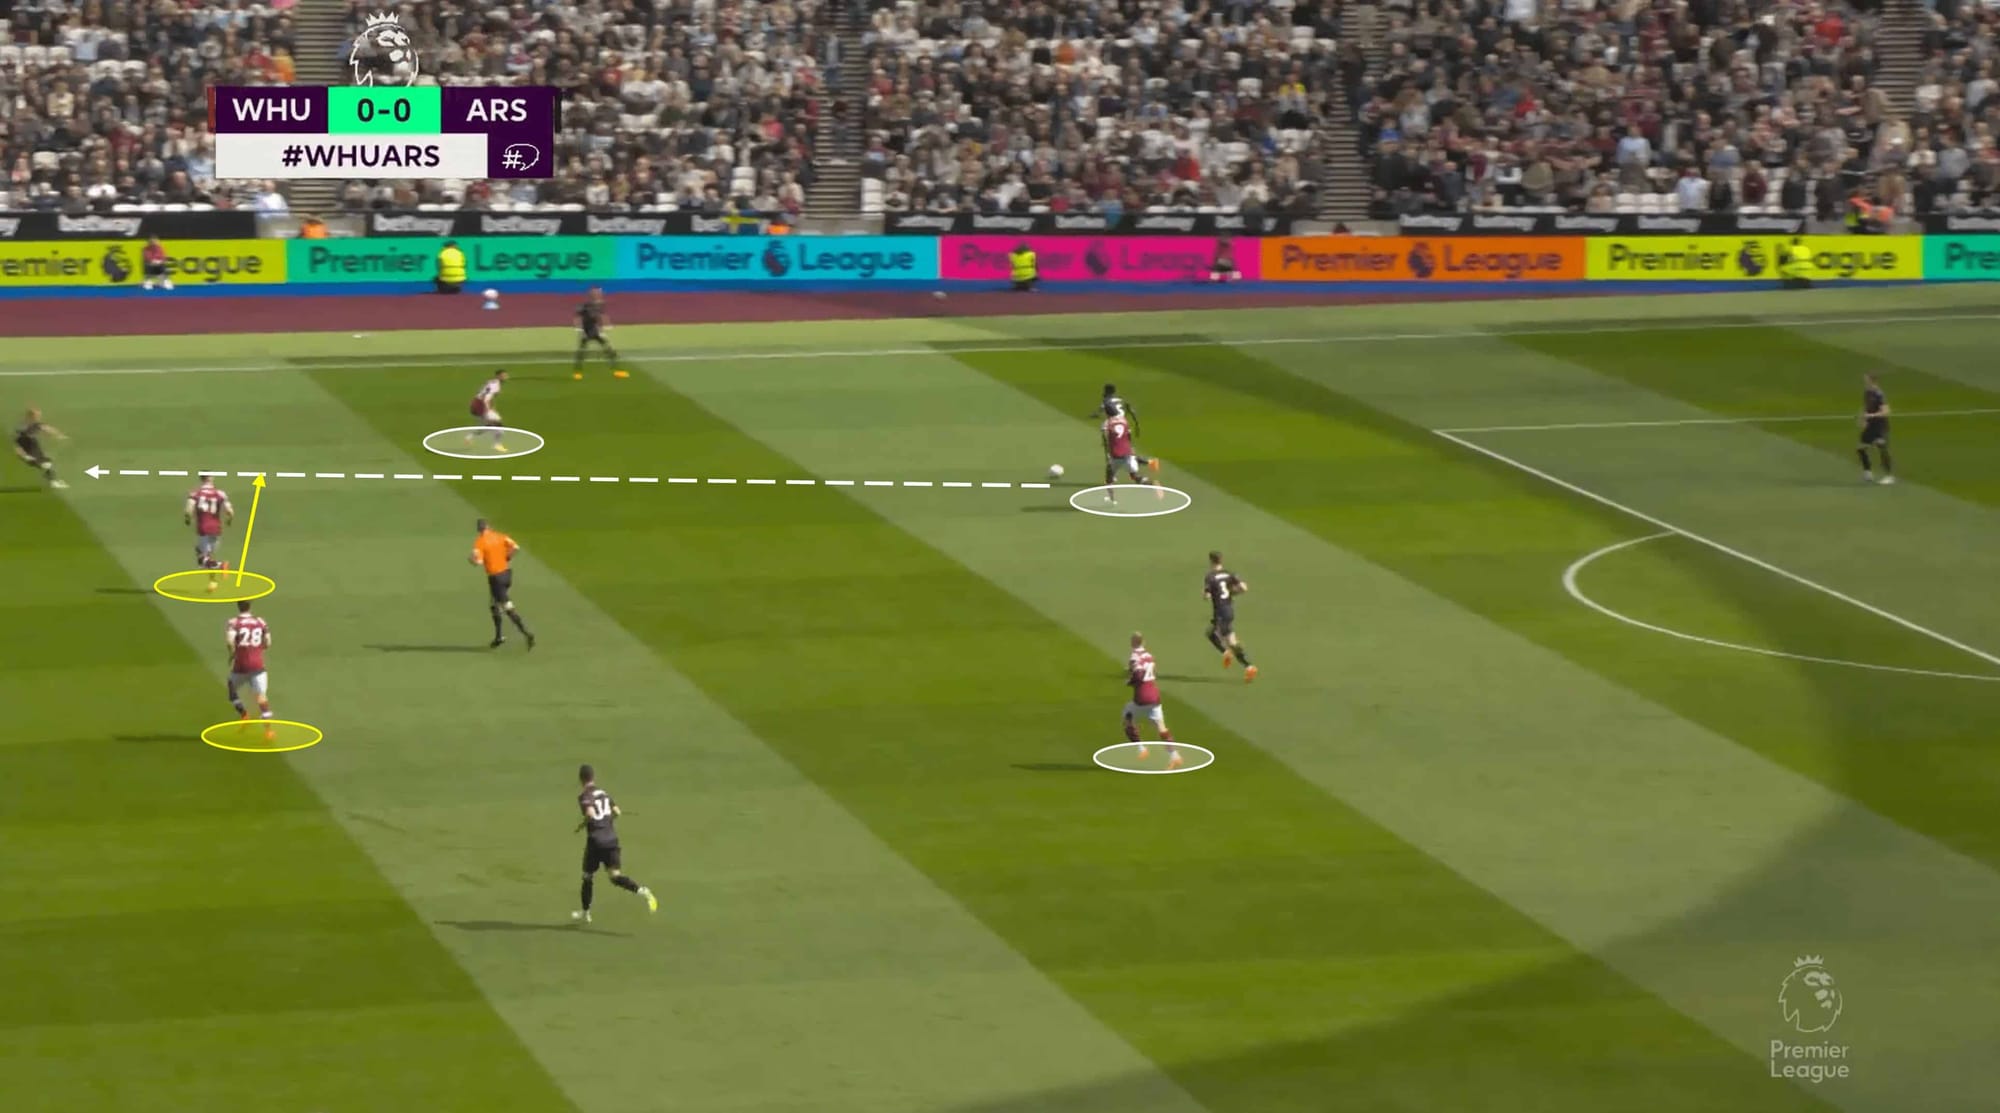
This shape out of possession is something we’d see often from West Ham as they looked to unsettle their London rivals. Antonio would be tasked with leading the press from central areas, with both wingers often positioned narrower than they would be in possession. Behind them, the midfield unit, or part of it, would push higher up in anticipation of Arsenal’s next move. Take the example above: as Arsenal looked to move forward with a cutting pass through the centre, Declan Rice showed good reactions to move across and intercept the pass and take possession back for his side.
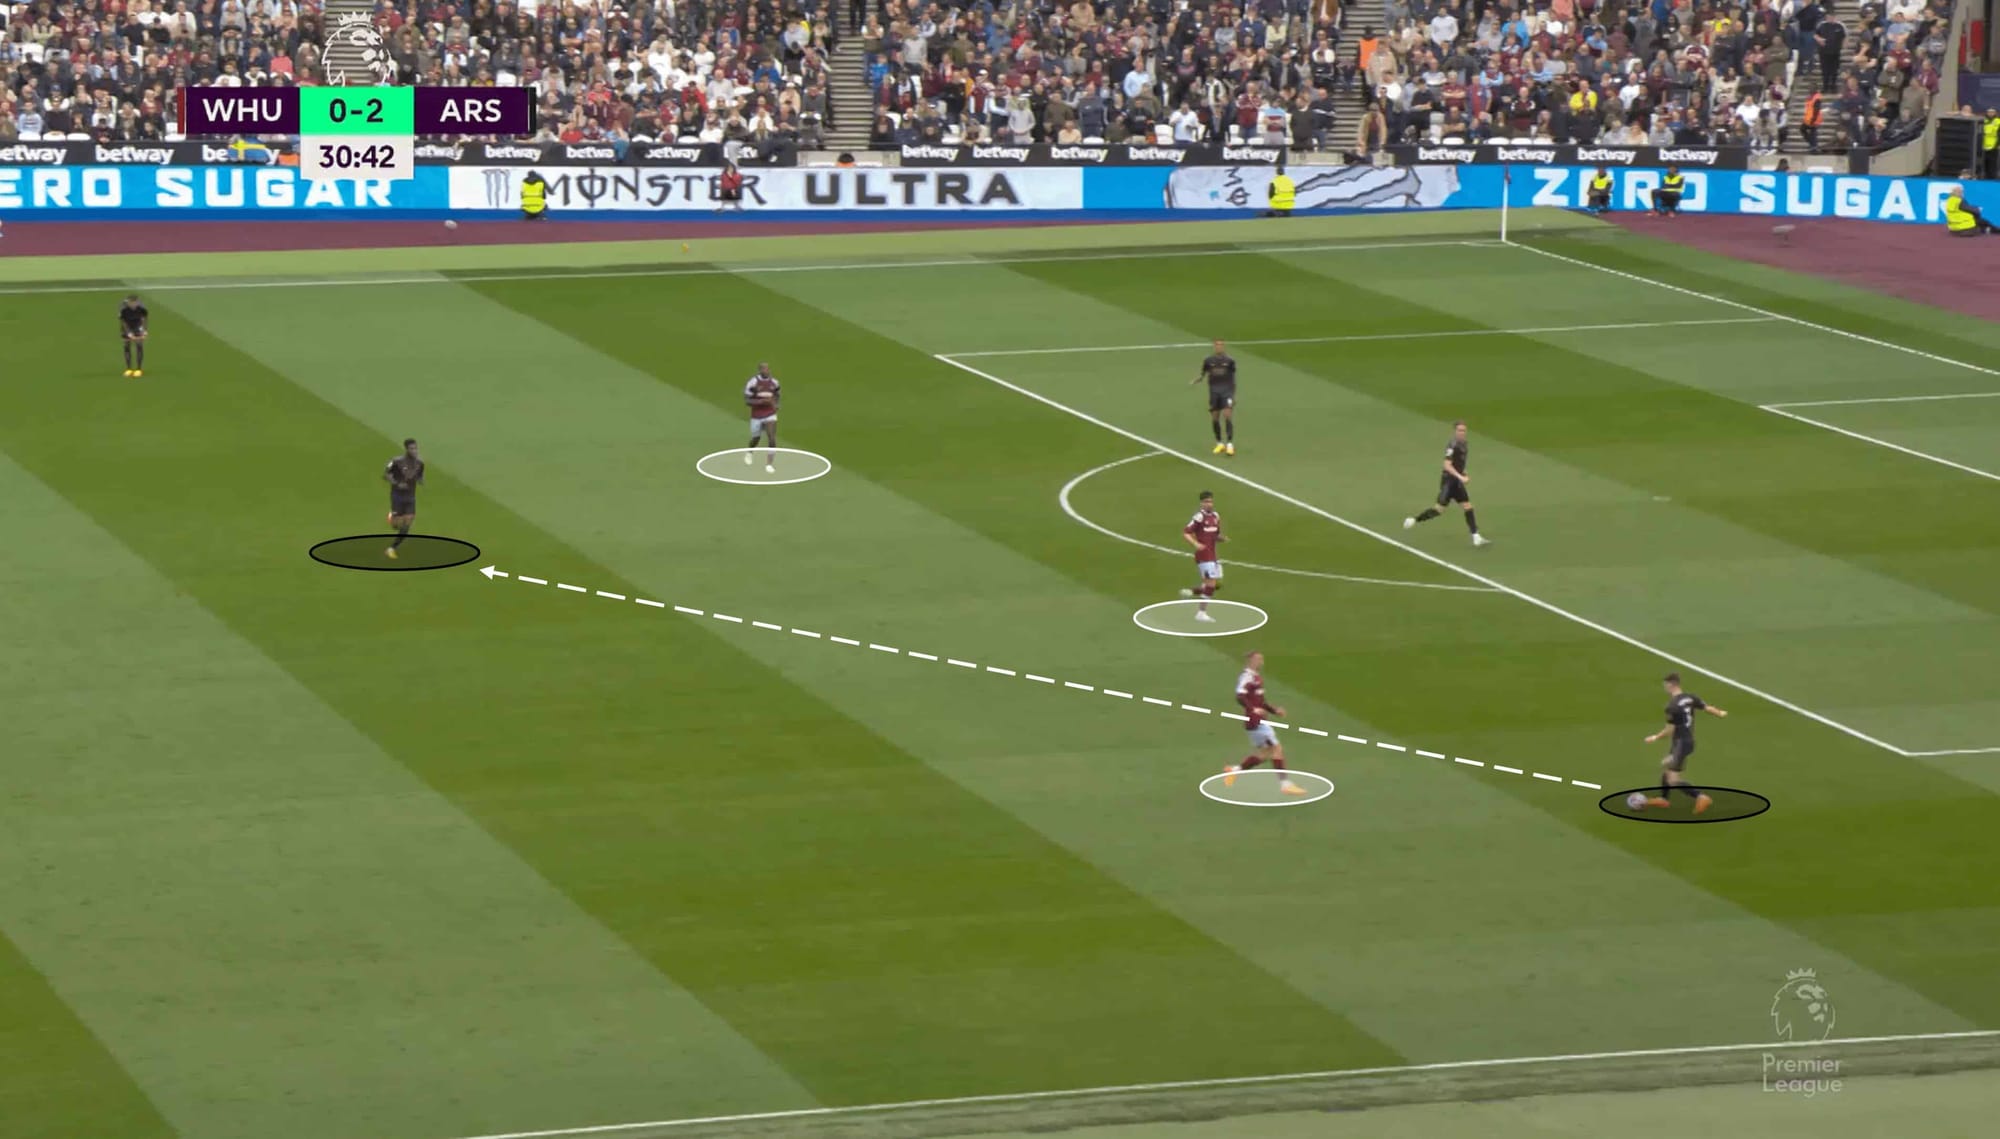
This example is one where there could be an argument for complacency in the Arsenal ranks as they look to beat the Hammers press. The front three are involved in the press as per the previous analysis, but as we can see, once the ball reaches an Arsenal full-back, the corresponding West Ham winger applies pressure. Tierney looked to play his team out of danger with a pass that initially looked safe, but was actually the catalyst in West Ham’s comeback…
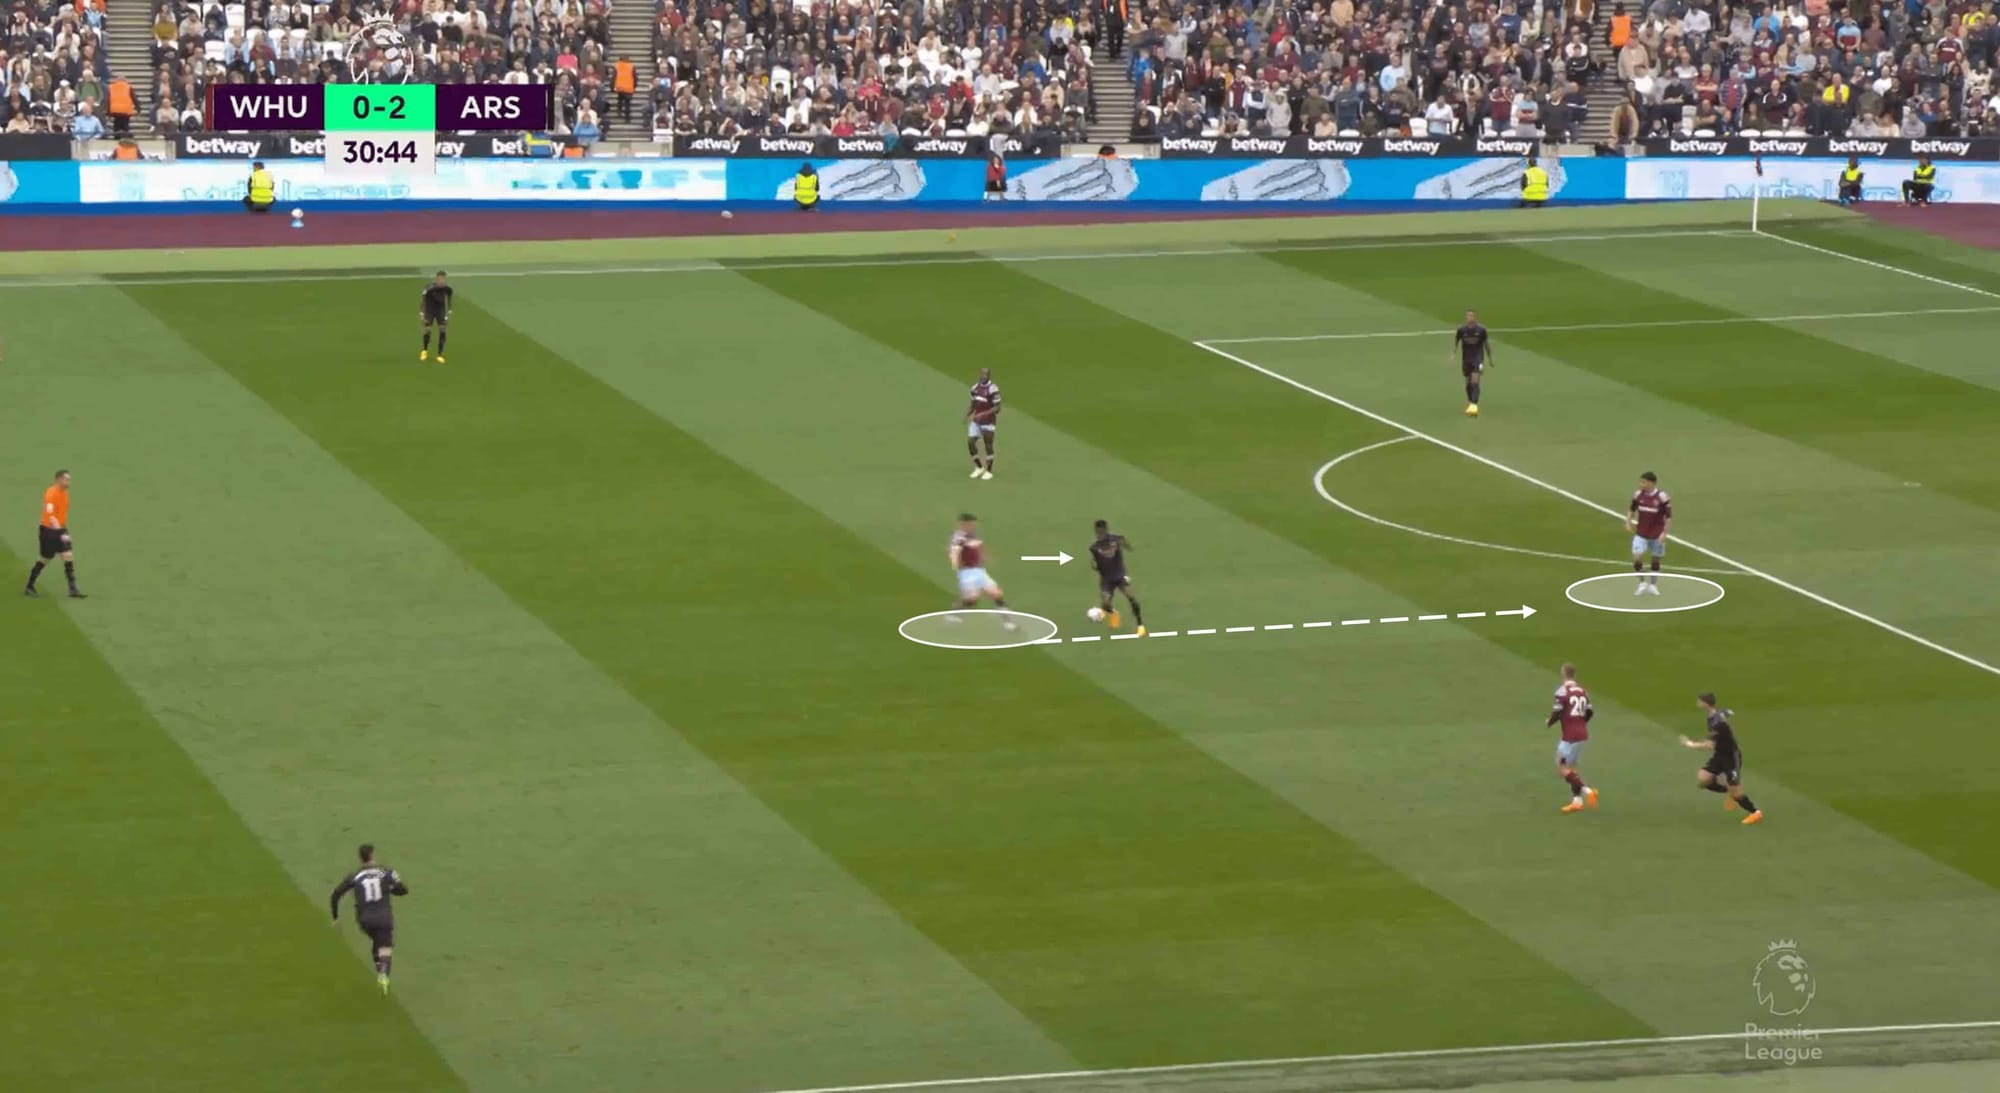
Rice bursts forward from his deeper position to pile the pressure on Partey, who receives the ball without scanning and is therefore unprepared for any challenge thrown his way by Rice. Poor from Partey? Yes. But questions should also be aimed at Tierney – could he not see that Rice was approaching when he played the ball into the middle? It’s difficult to tell at the angle we have available, but if he could see the England international incoming, then the pass to Partey was a suicidal one.
Rice deserves credit for his defensive work high up the pitch, though – he follows it up by moving the ball forward to Benrahma who wins his team a penalty. He then dispatches the spot kick to begin the comeback.
Arsenal playing through the thirds
Arteta has re-established a tactical identity at the Emirates which harks back to his playing days under Arsene Wenger. Possession-based phases of play that are easy on the eye as they look to build through the thirds are key to Arteta’s tactics. We should all have seen this coming from the Spaniard – he played under Wenger who made this philosophy look effortless for years and was part of Pep Guardiola’s backroom staff at Manchester City previously, so it’s safe to say he’s had some strong mentors in the past!
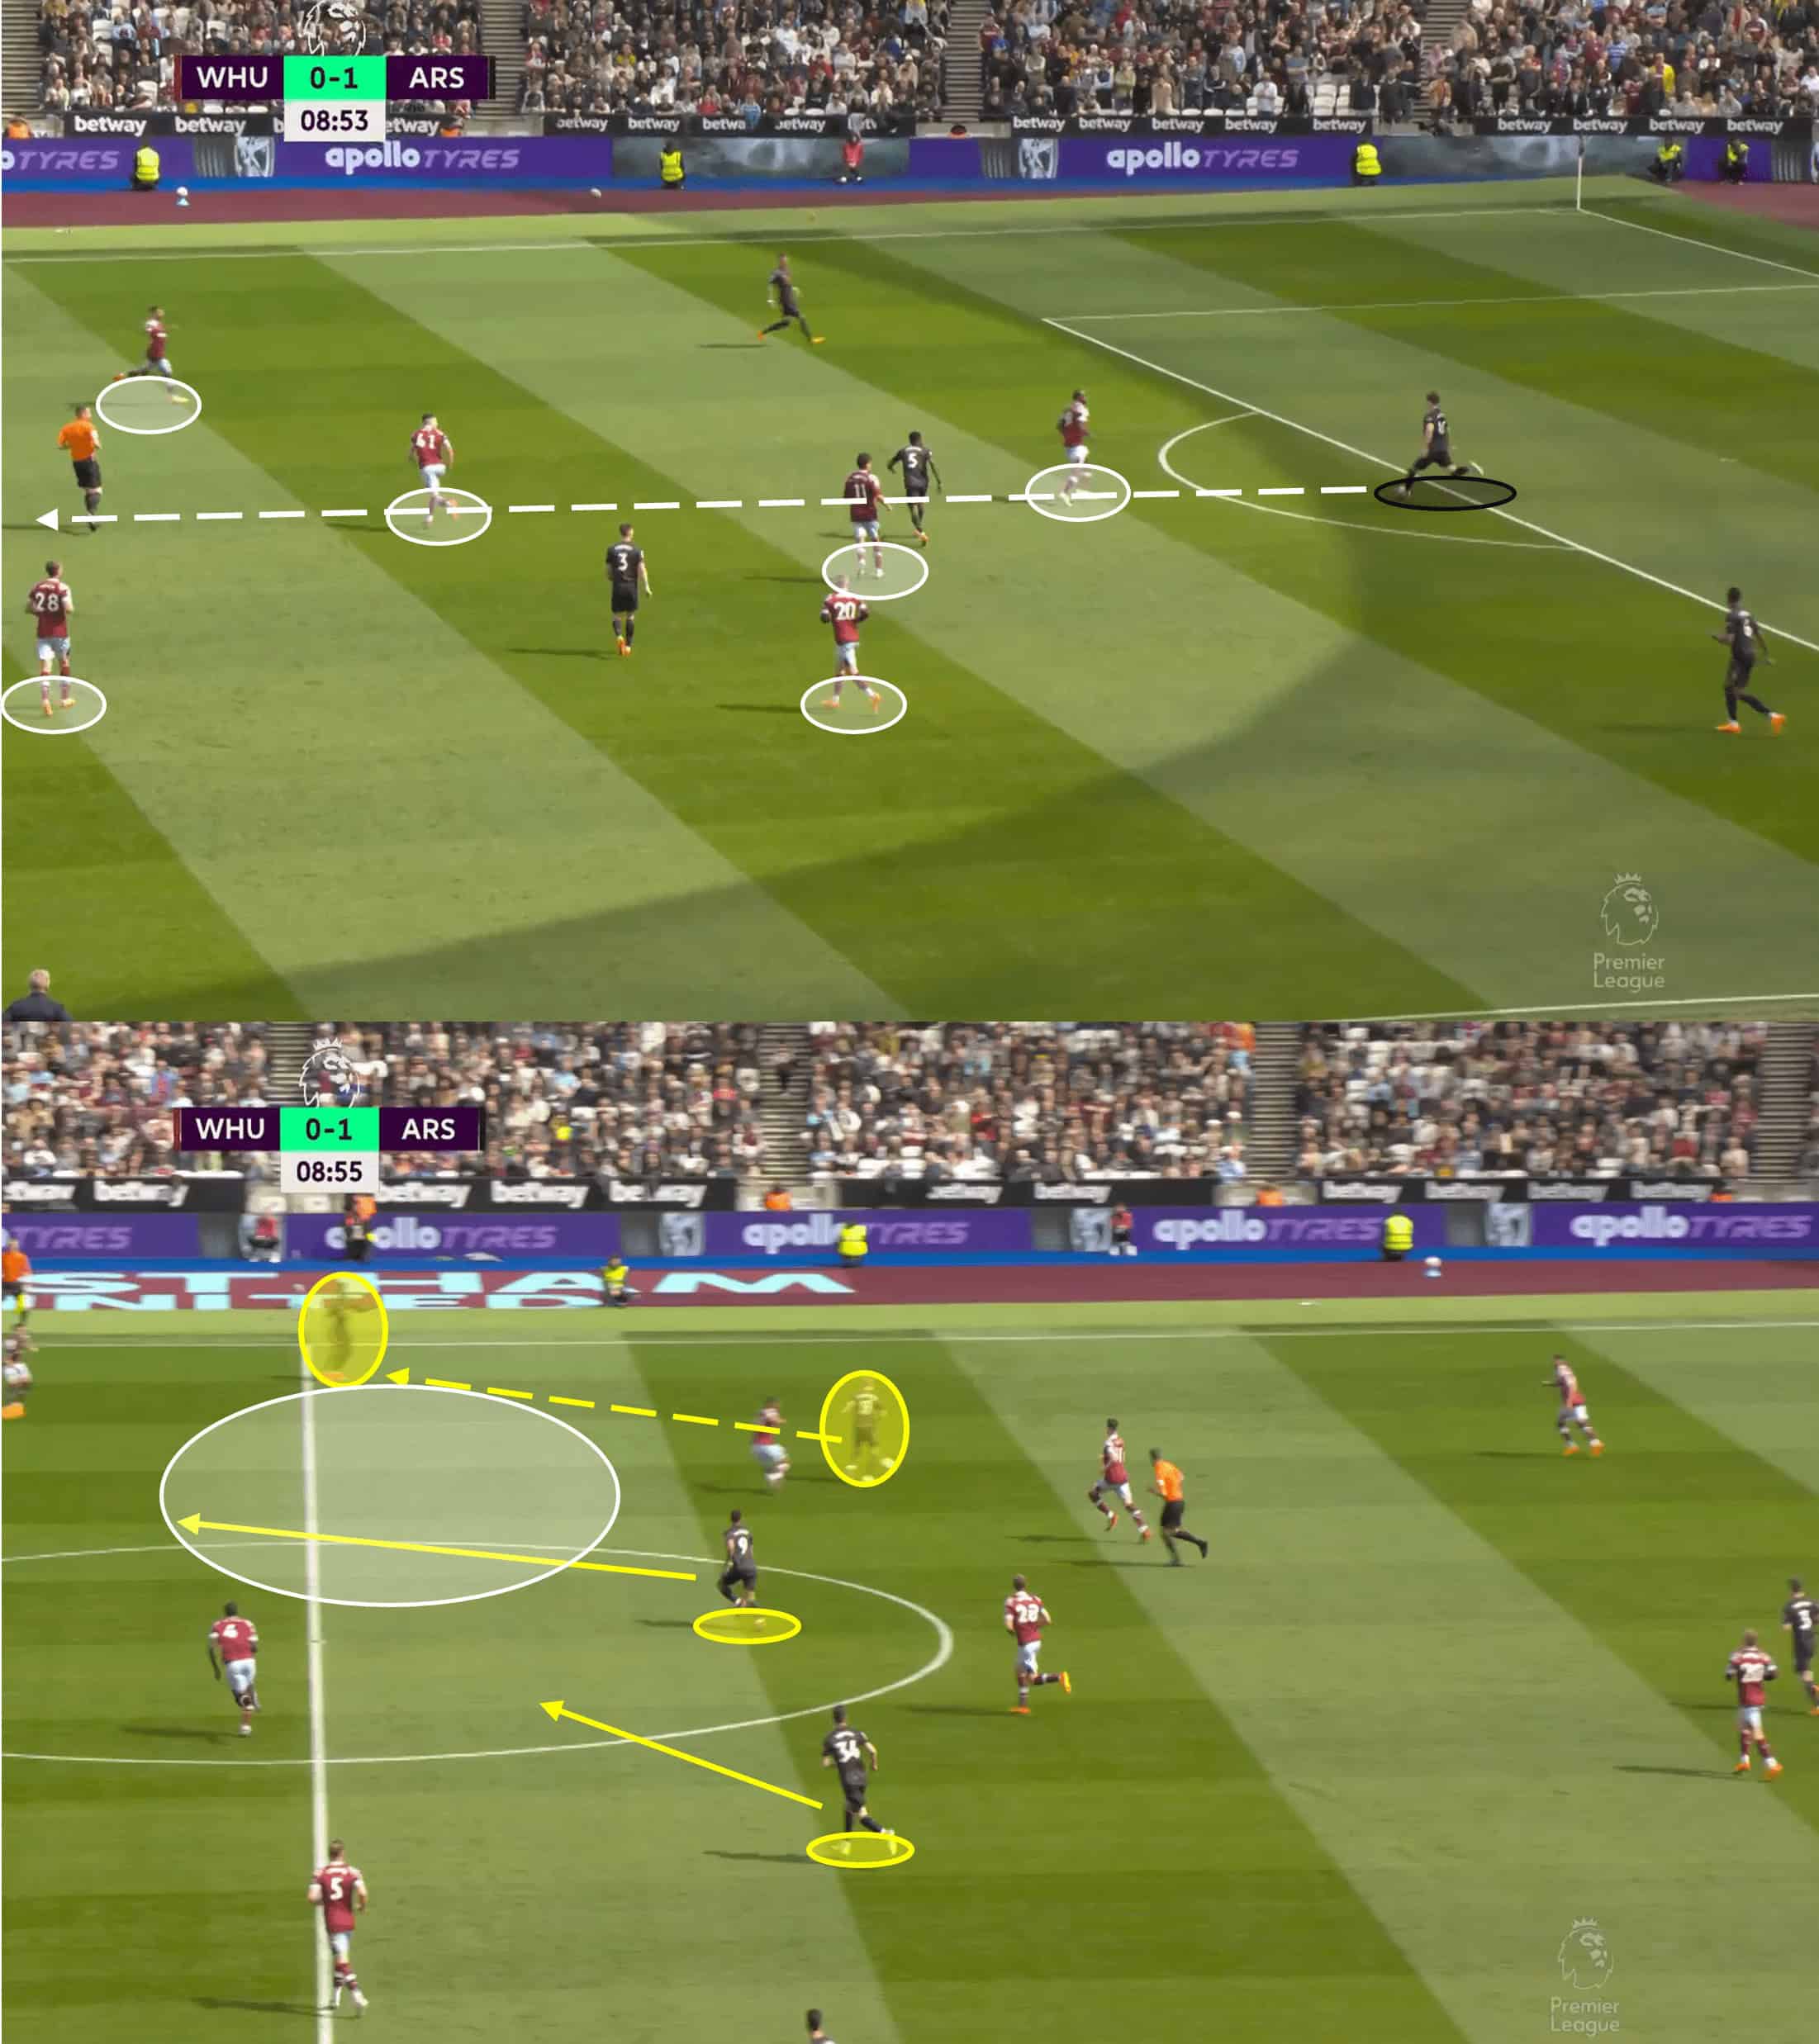
Pressing in the way West Ham did deserves credit, sure, but it’s important to remember where they are in the league and in turn, where their opponents are as well – at some point, Arsenal’s quality was going to prevail, and we saw a few moments of that, allowing them to beat the press.
The analysis image above captures that nicely – the Hammers have a high presence in Arsenal’s half as they look to force a turnover, but this was a bold move from Moyes. Perhaps it was done to gain a quick response to Arsenal’s early goal, but hindsight is a wonderful thing, and it shows us that Arsenal just had too much quality and confidence at this moment. A snapping pass from Rob Holding carves through the West Ham set up, into his midfield teammate. Arsenal went on to build effective possession higher up the pitch and ultimately grabbed their second goal at the end of it.
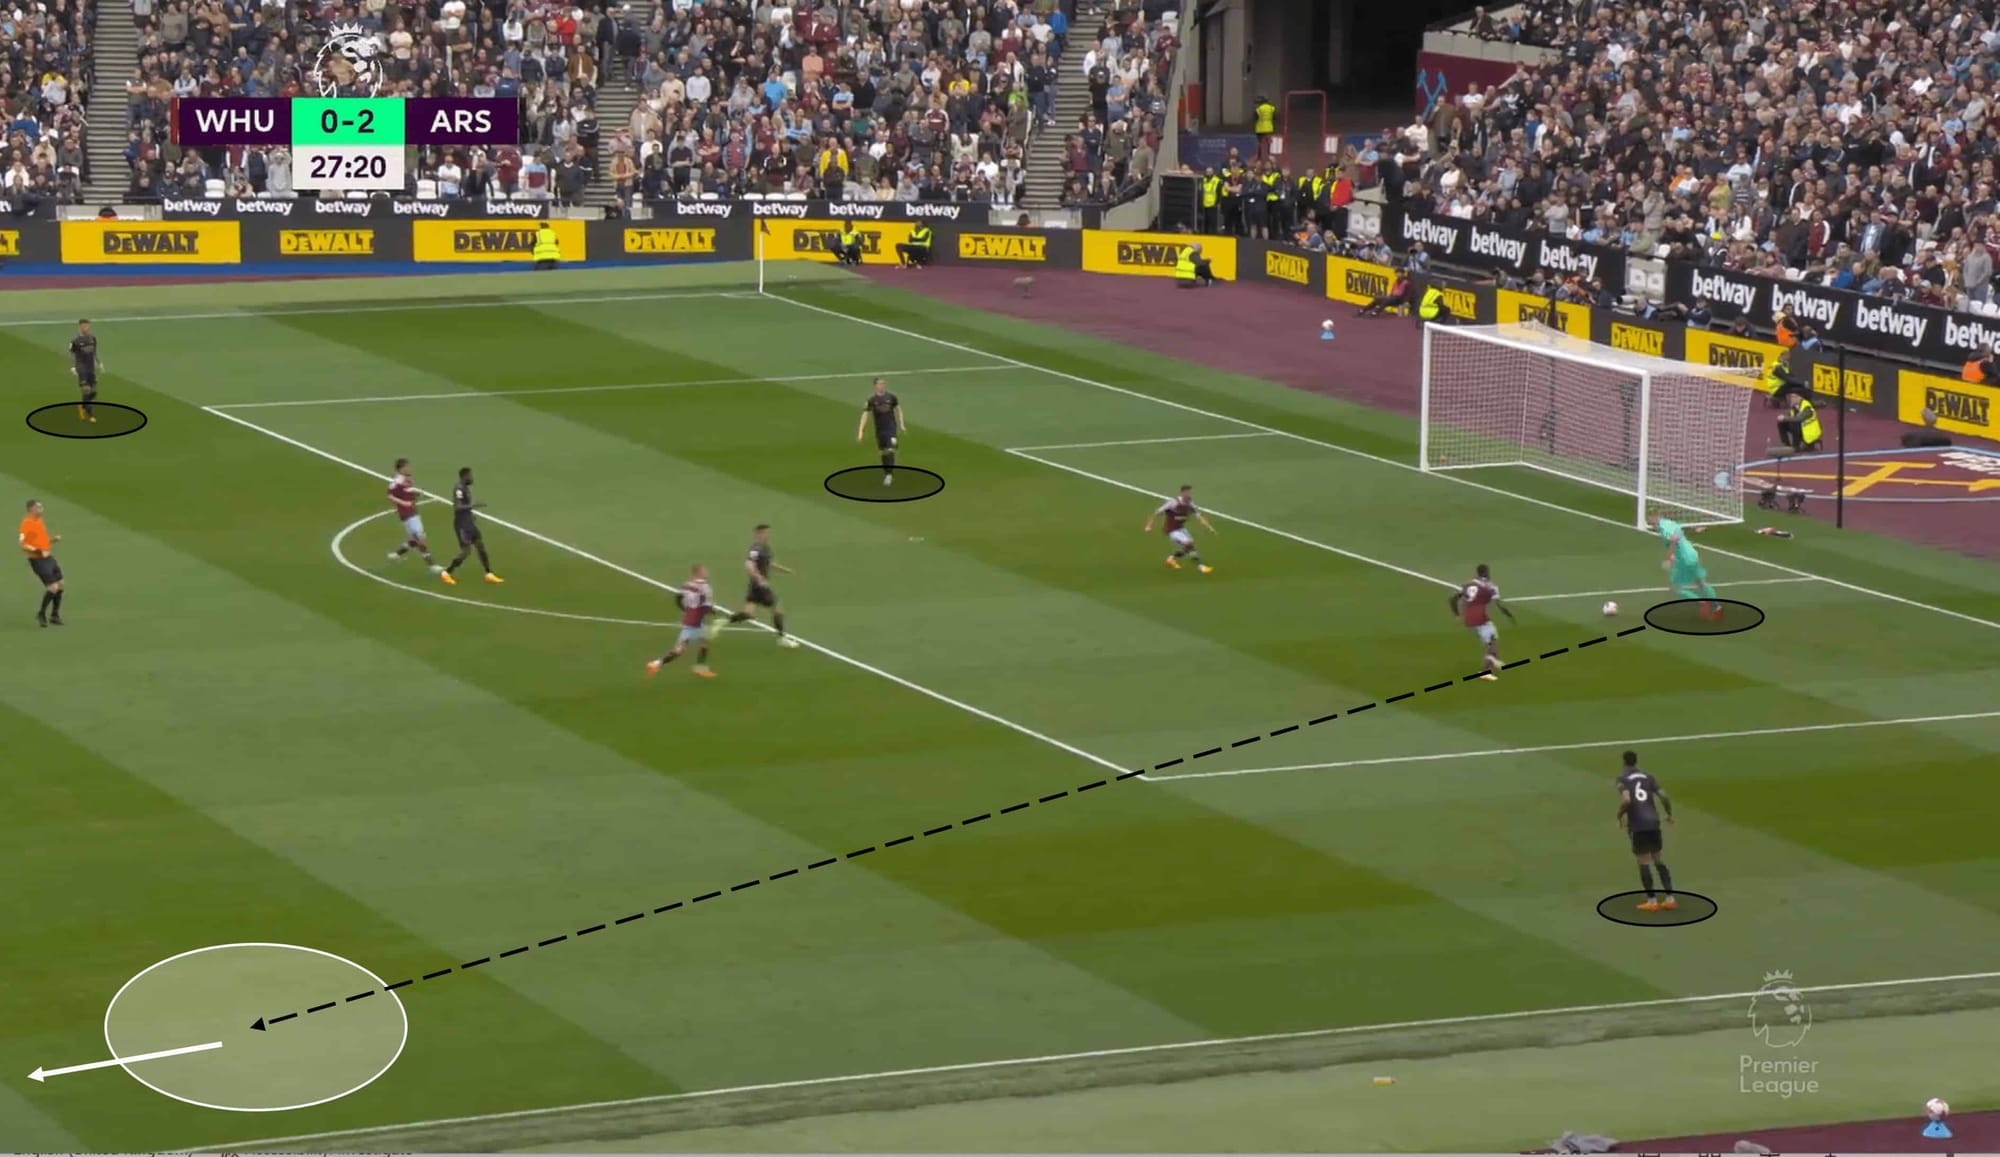
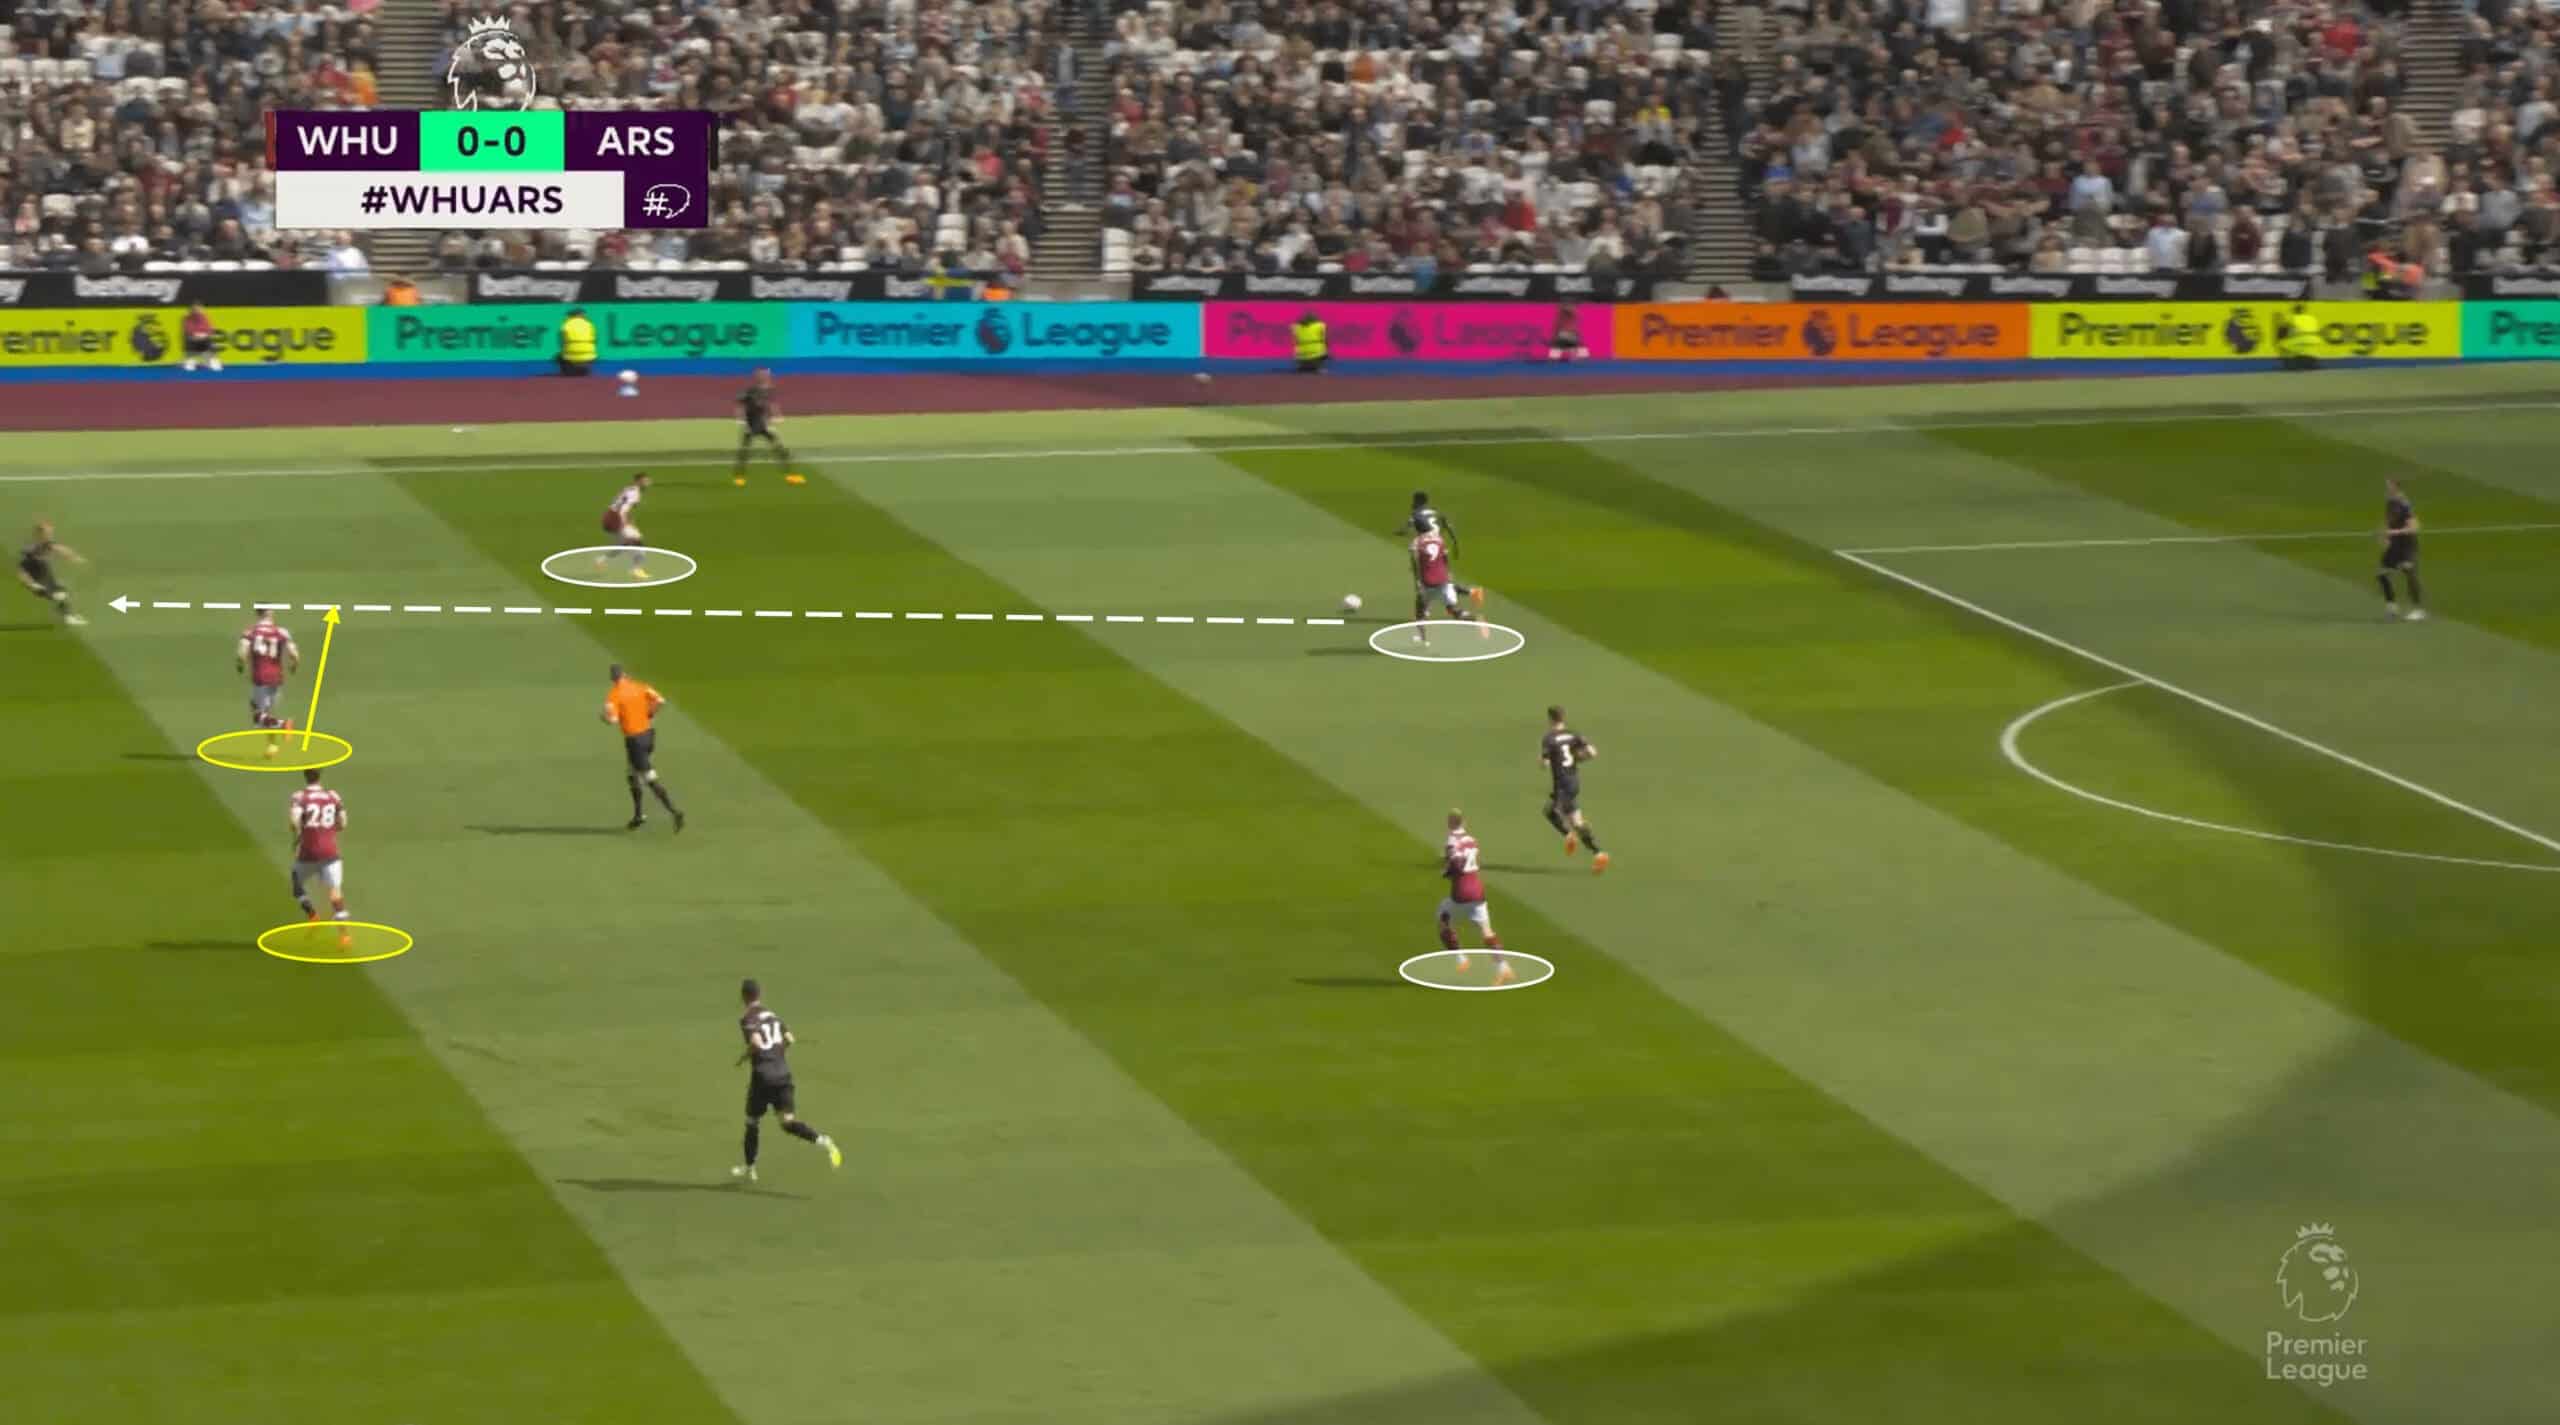
Playing out from the back is something that Arteta holds close to his heart, and his players seem to be buying into that. They have shown, collectively, though, that they have to explore alternative options than simply going the route of the goalkeeper to centre-back to full-back to midfield with short passes, especially when they’re under pressure. On numerous occasions, when the Hammers would step up their pursuit of the ball, Ramsdale would look to play a lofted pass over the initial opposition press, into an area that was often occupied by the full-back on that side. While West Ham would sometimes show good signs of recovery, these passes from deep in their own half demonstrated that Arsenal pay attention to the small details in training.
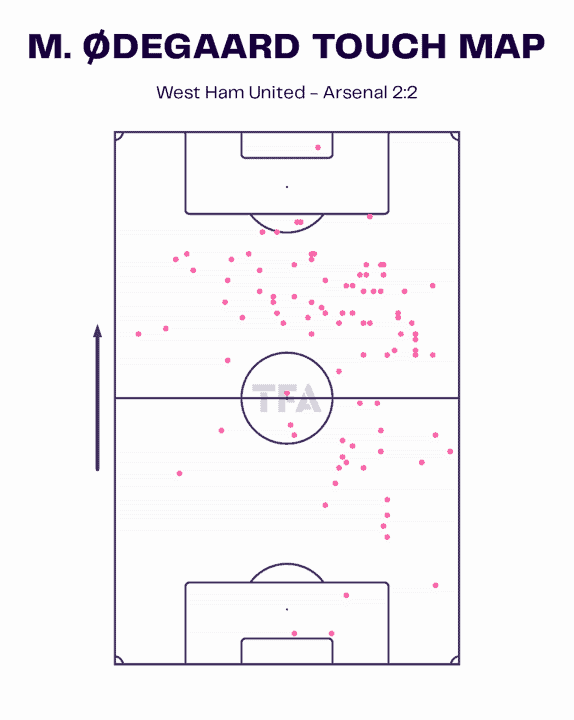
Martin Ødegaard has earned plenty of plaudits this season for his creative influence on this Arsenal team, and the former Real Madrid youngster seems to be maturing and developing as the season goes on. While he is a natural playmaker in higher areas of the pitch, he is also starting to come into his own when undertaking the playmaker role in deeper regions, dropping to either receive the ball from his GK/CB or to simply create space for a teammate.
His touch map from above shows us that while he is still the most active in the final third just before the box, he is putting the work in to get involved in deeper areas too.
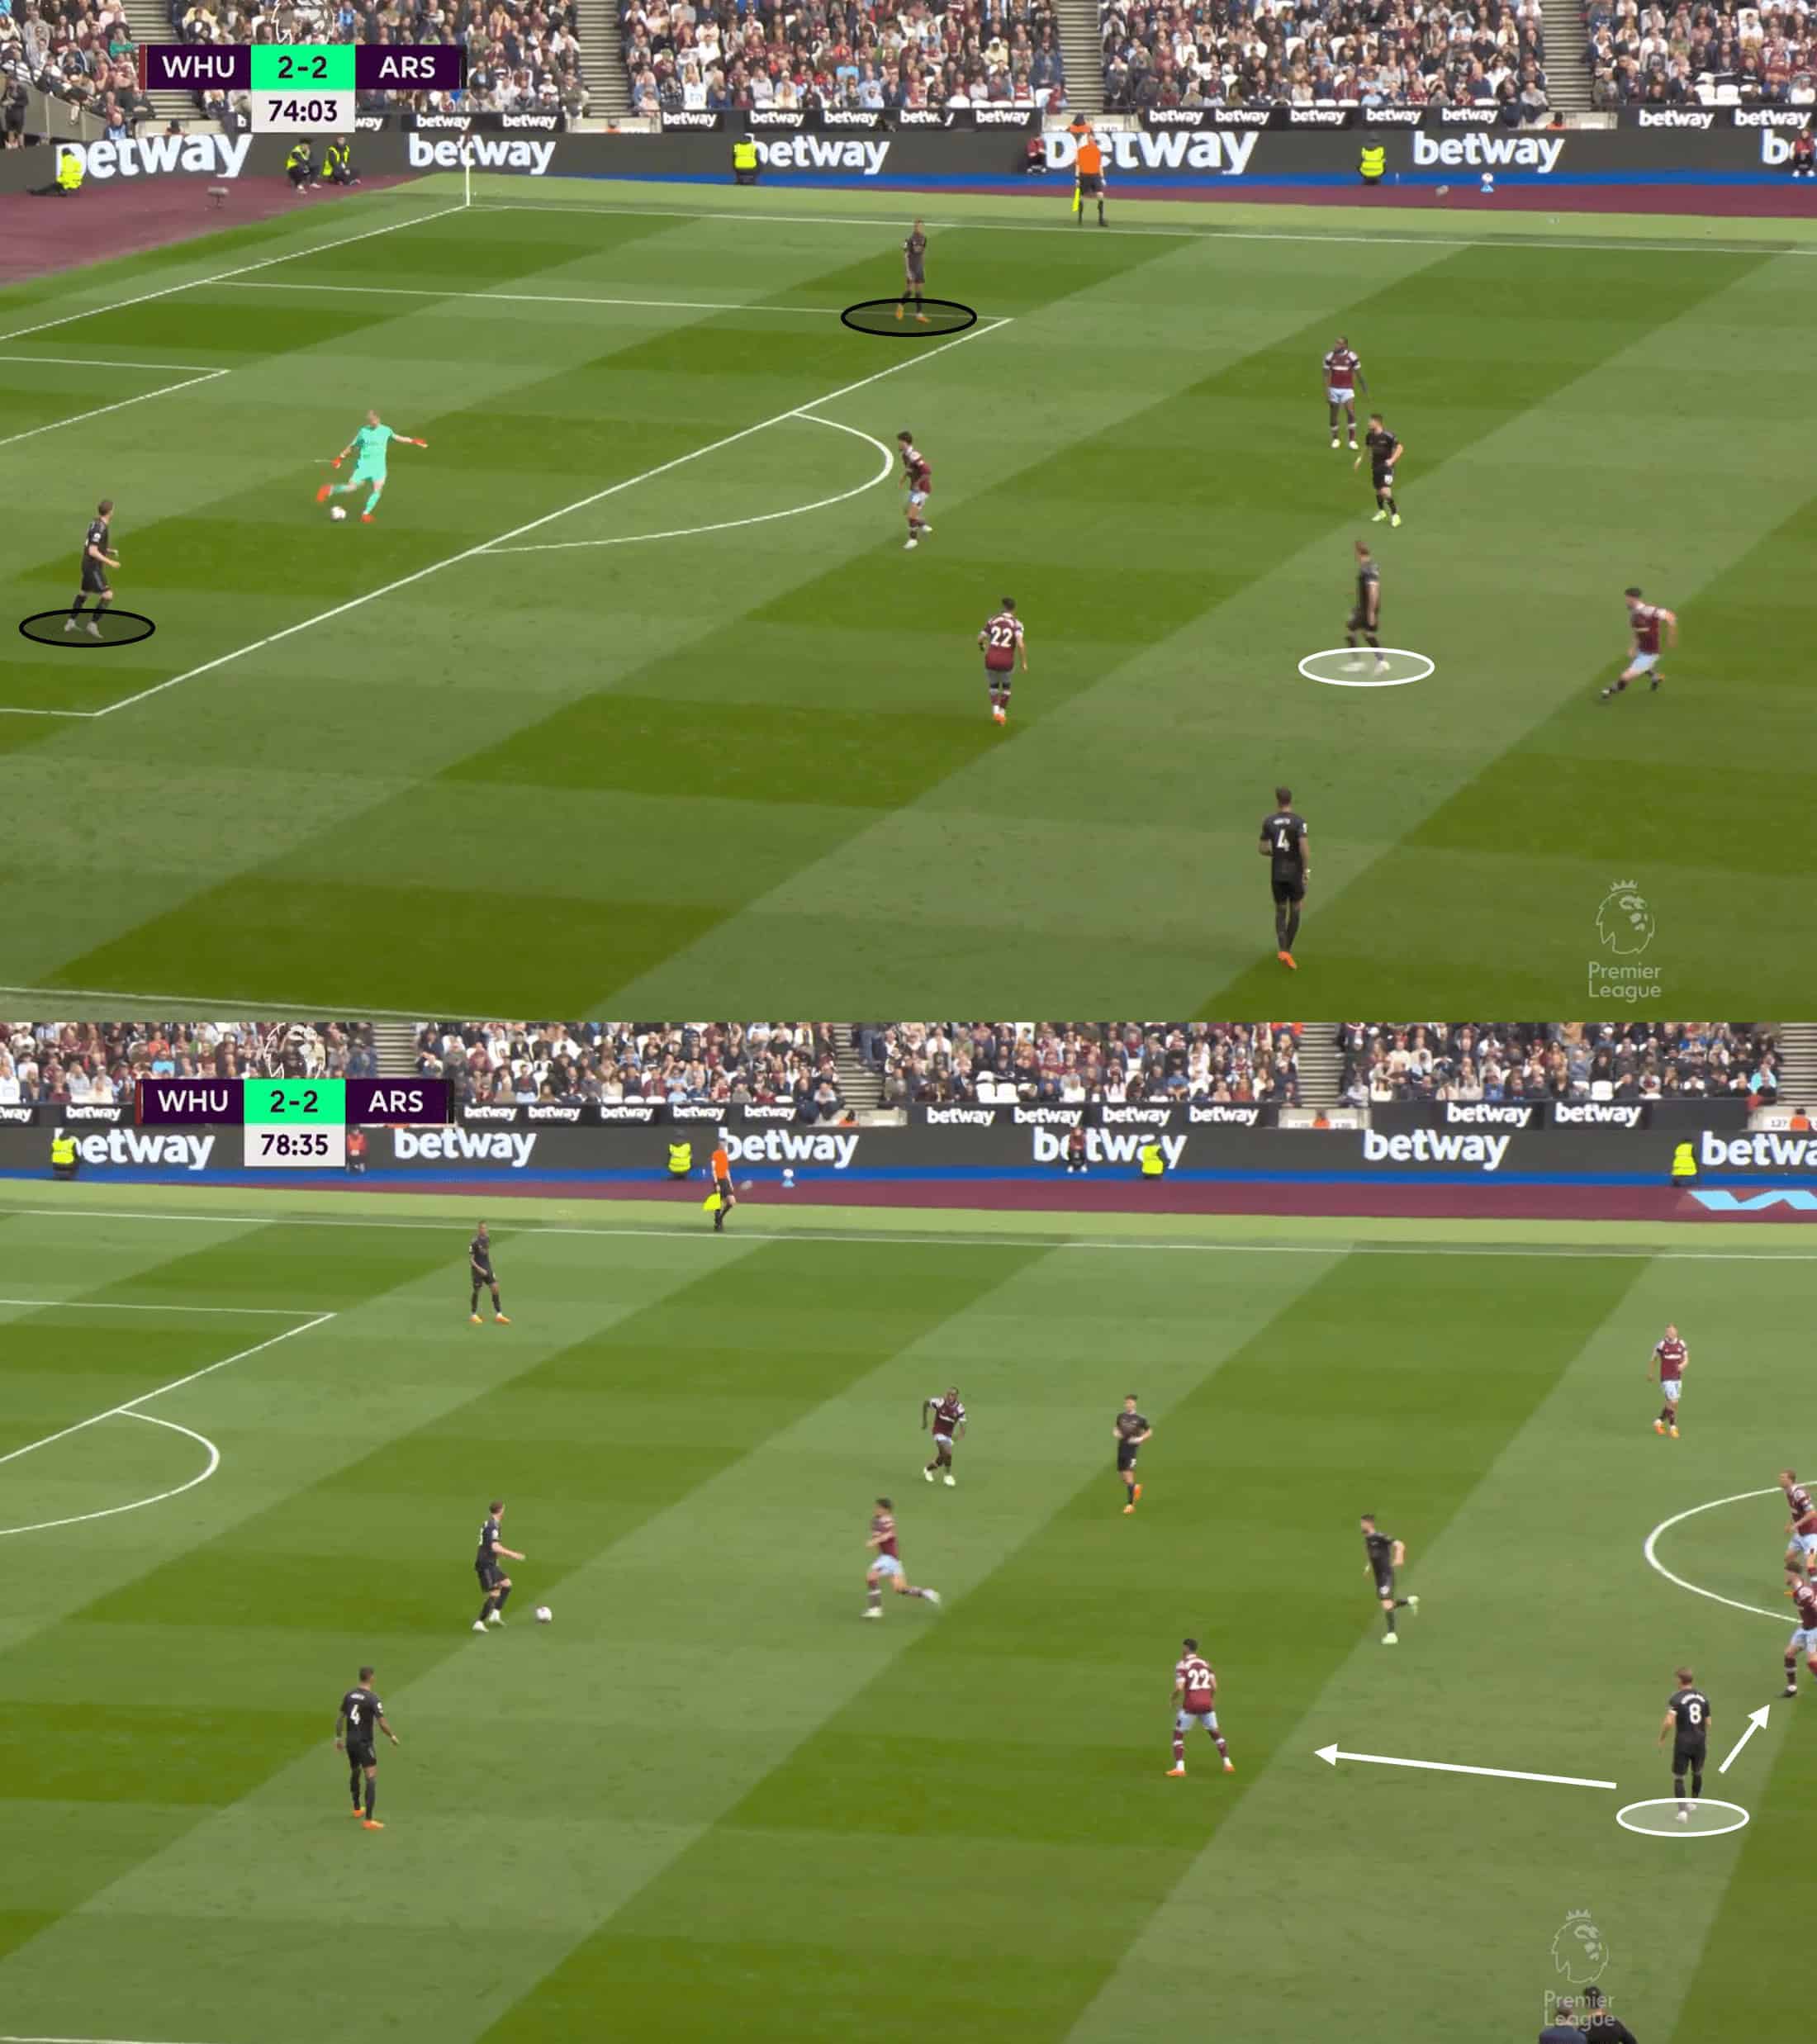
These images give us an example of where we may see the Norwegian midfielder crop up in relation to the role discussed above. He will sometimes remain central, where he could then bring his wide teammates into play should he receive the ball. However, as the bottom image shows, he also likes to drift into a pocket of space in the deeper midfield regions, doing his best to avoid opposition marking. His positioning in these areas has improved and he will only continue to become more and more important to Arteta’s side.
Gunners’ off-the-ball reactions prove costly
Playing attractive football and scoring goals when things are going your way is one thing, but pulling through with a victory despite immense opposition and circumstantial pressure is a whole other game. This past week or so in particular, the media has zoomed in on whether Arsenal are champion-material – do they have what it takes to complete a run-in amid a title race? Their last two results suggest that they are having difficulty, but as this section of analysis explains, tactical errors are rarely to blame in these times, and it usually comes down to various psychological traits like focus.
While there may be some tactical question marks in both the West Ham and Liverpool games, they shared very little similarity, if any (when it comes to why Arsenal threw 2-0 leads away in both games), but there was a pattern in terms of individual and unit lapses out of possession.
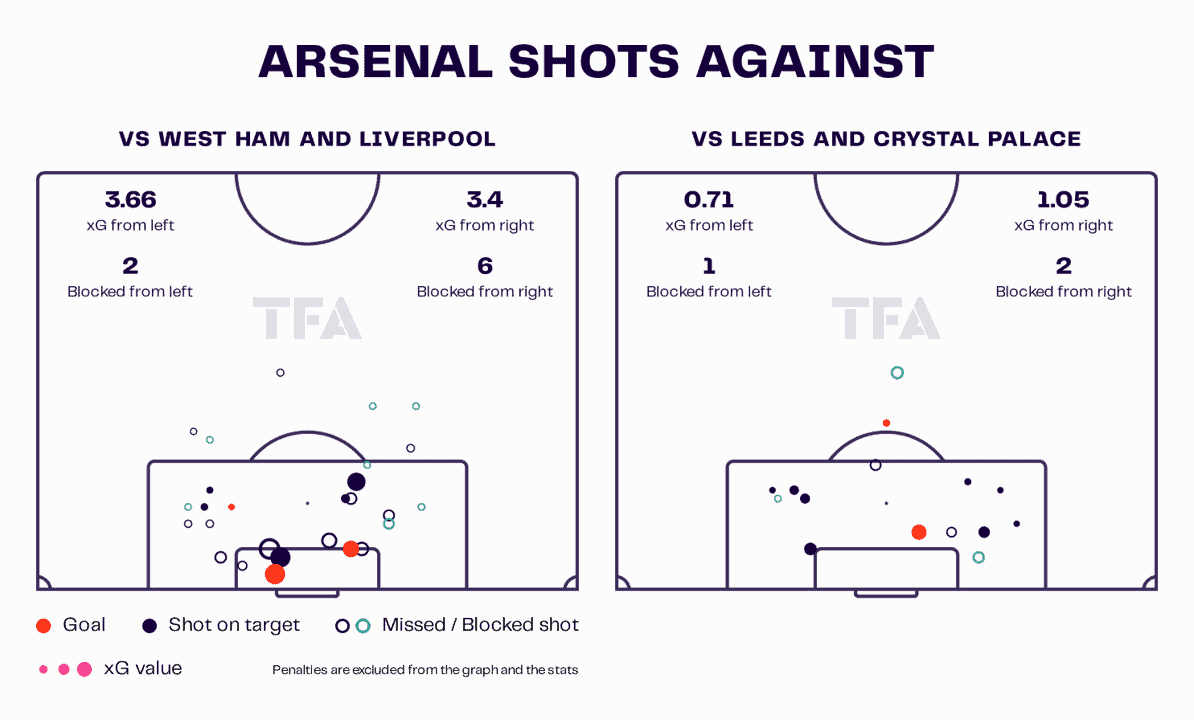
We start by looking at Arsenal’s defensive record over the last four games, in two parts. The visual on the left shows us the combined defensive input of Arsenal when it comes to shots & xG faced in their recent fixtures against West Ham and Liverpool, while the visual on the right shows us how they did in the same areas but in the two games prior to Liverpool – vs Leeds and Crystal Palace.
Instantly, we can see that there was more danger in Arsenal’s box against Liverpool and West Ham than in the other two games – both from an xG perspective as well as looking at the number of total shows faced. So what was the point of viewing these numbers? Well, it is important to highlight that prior to the Liverpool game, Arsenal’s overall form and performance was still intact and there was no talk of them slipping up in the title race. Essentially, the results against Liverpool and West Ham, and the nature of them, could serve as a turning point in the title race.
Many have dubbed the Liverpool 2-2 Arsenal fixture as the best game of the season. A fixture that always has intensity and entertaining moments, a high-pressure match. And with that high pressure, comes the heightened risk of making mistakes, or total collapse. Arsenal’s squad is a talented one, but one that lacks experience, both in terms of age and in terms of competing in a title race, and we see that start to play a part against Liverpool in the form of individual errors.
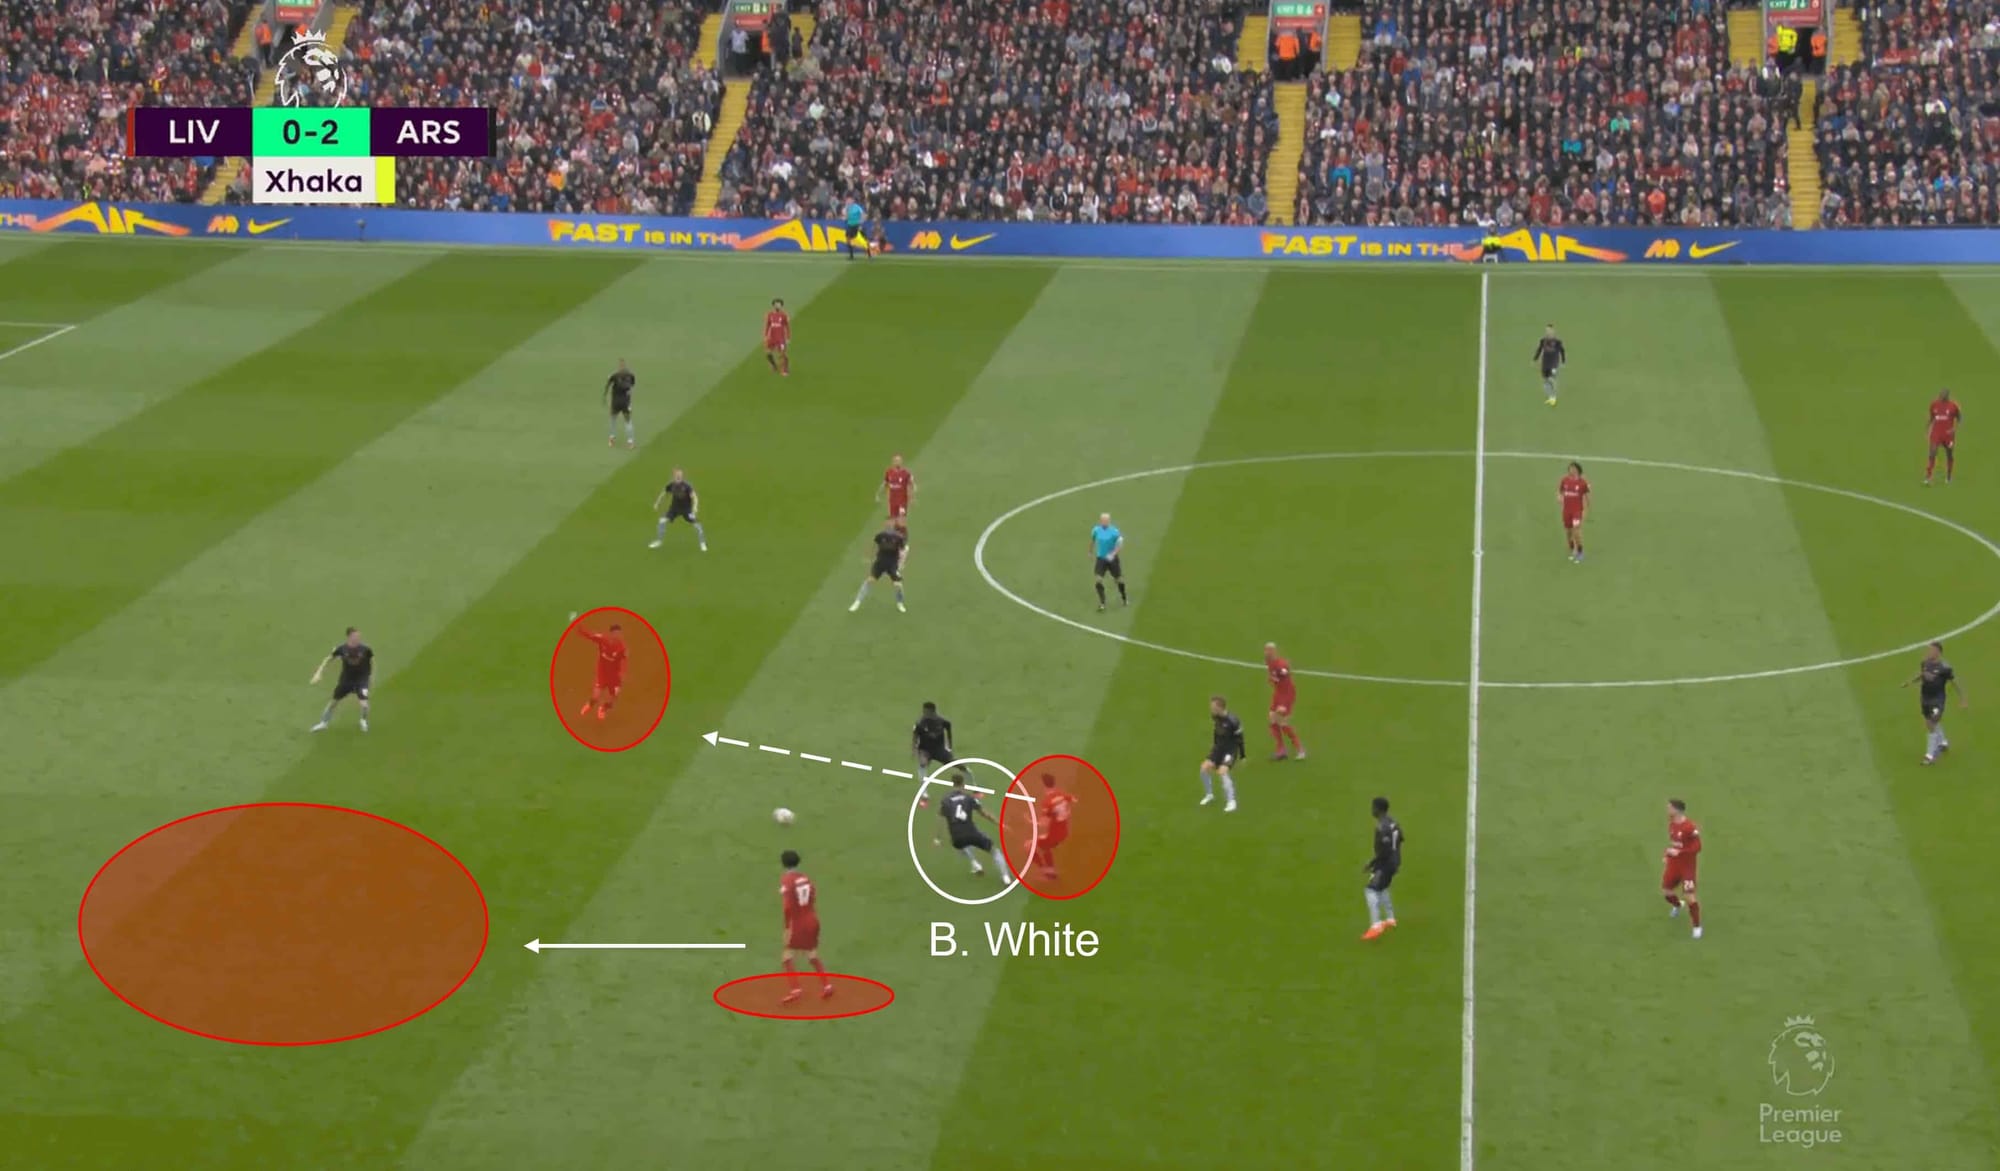
Liverpool’s first of two goals was a result of some excellent attacking play, both as a unit and certain individuals, Curtis Jones for example, but there are also defensive elements that helped them immensely. There have been questions about Trent Alexander-Arnold’s defensive ability for some time now, but it was his RB counterpart Ben White who provided the Reds with a golden opportunity as he left his post in a crucial moment.
White pushed higher and more central to try and press Jota, but this should really have been a midfielder’s task, as White’s absence opened up a world of space for Jones, and Cody Gakpo wasted no time in utilising that element.
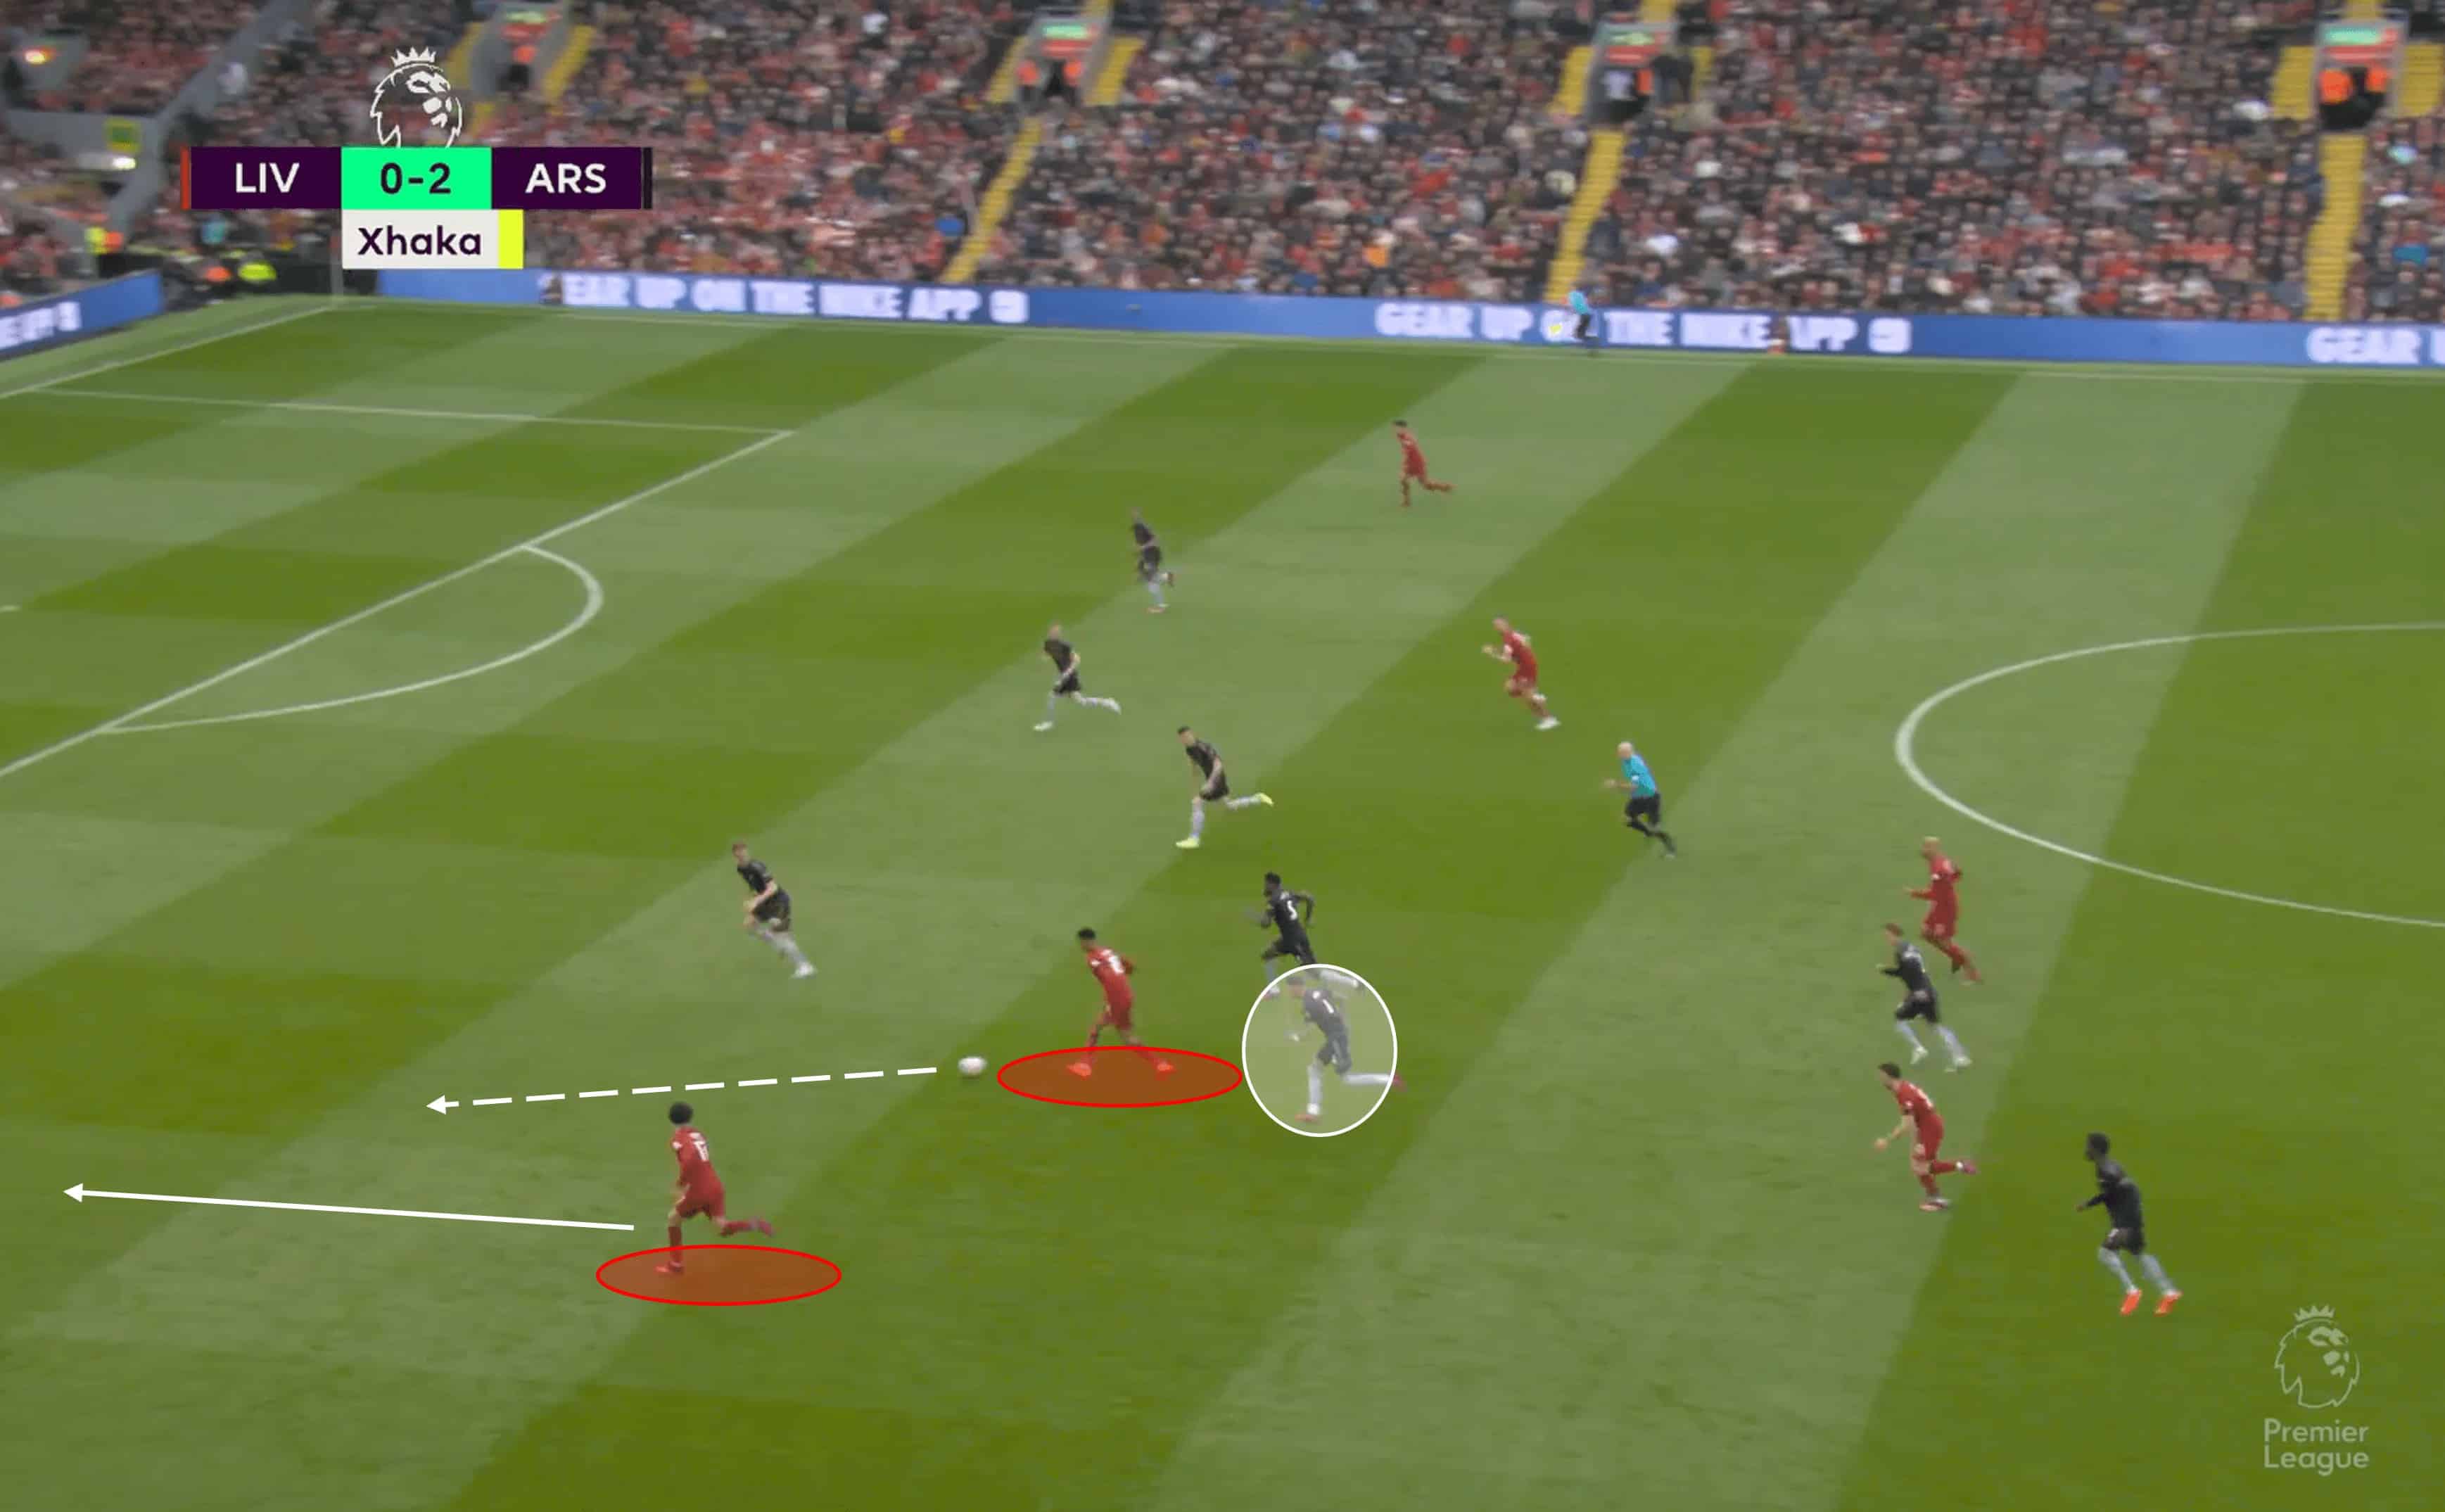
This image shows us just how dangerous White’s move was to his own team. Arsenal lost the midfield battle, but just imagine how much easier it would have been to defend if White was stood in line with his back four – he would effectively eliminate Curtis Jones’ potential to get involved in this move. Nevertheless, Jones receives the ball from Gakpo, with White trying to claw his way back, but the Liverpool academy product ends up driving into the box before playing a vital role in the first goal of the comeback.
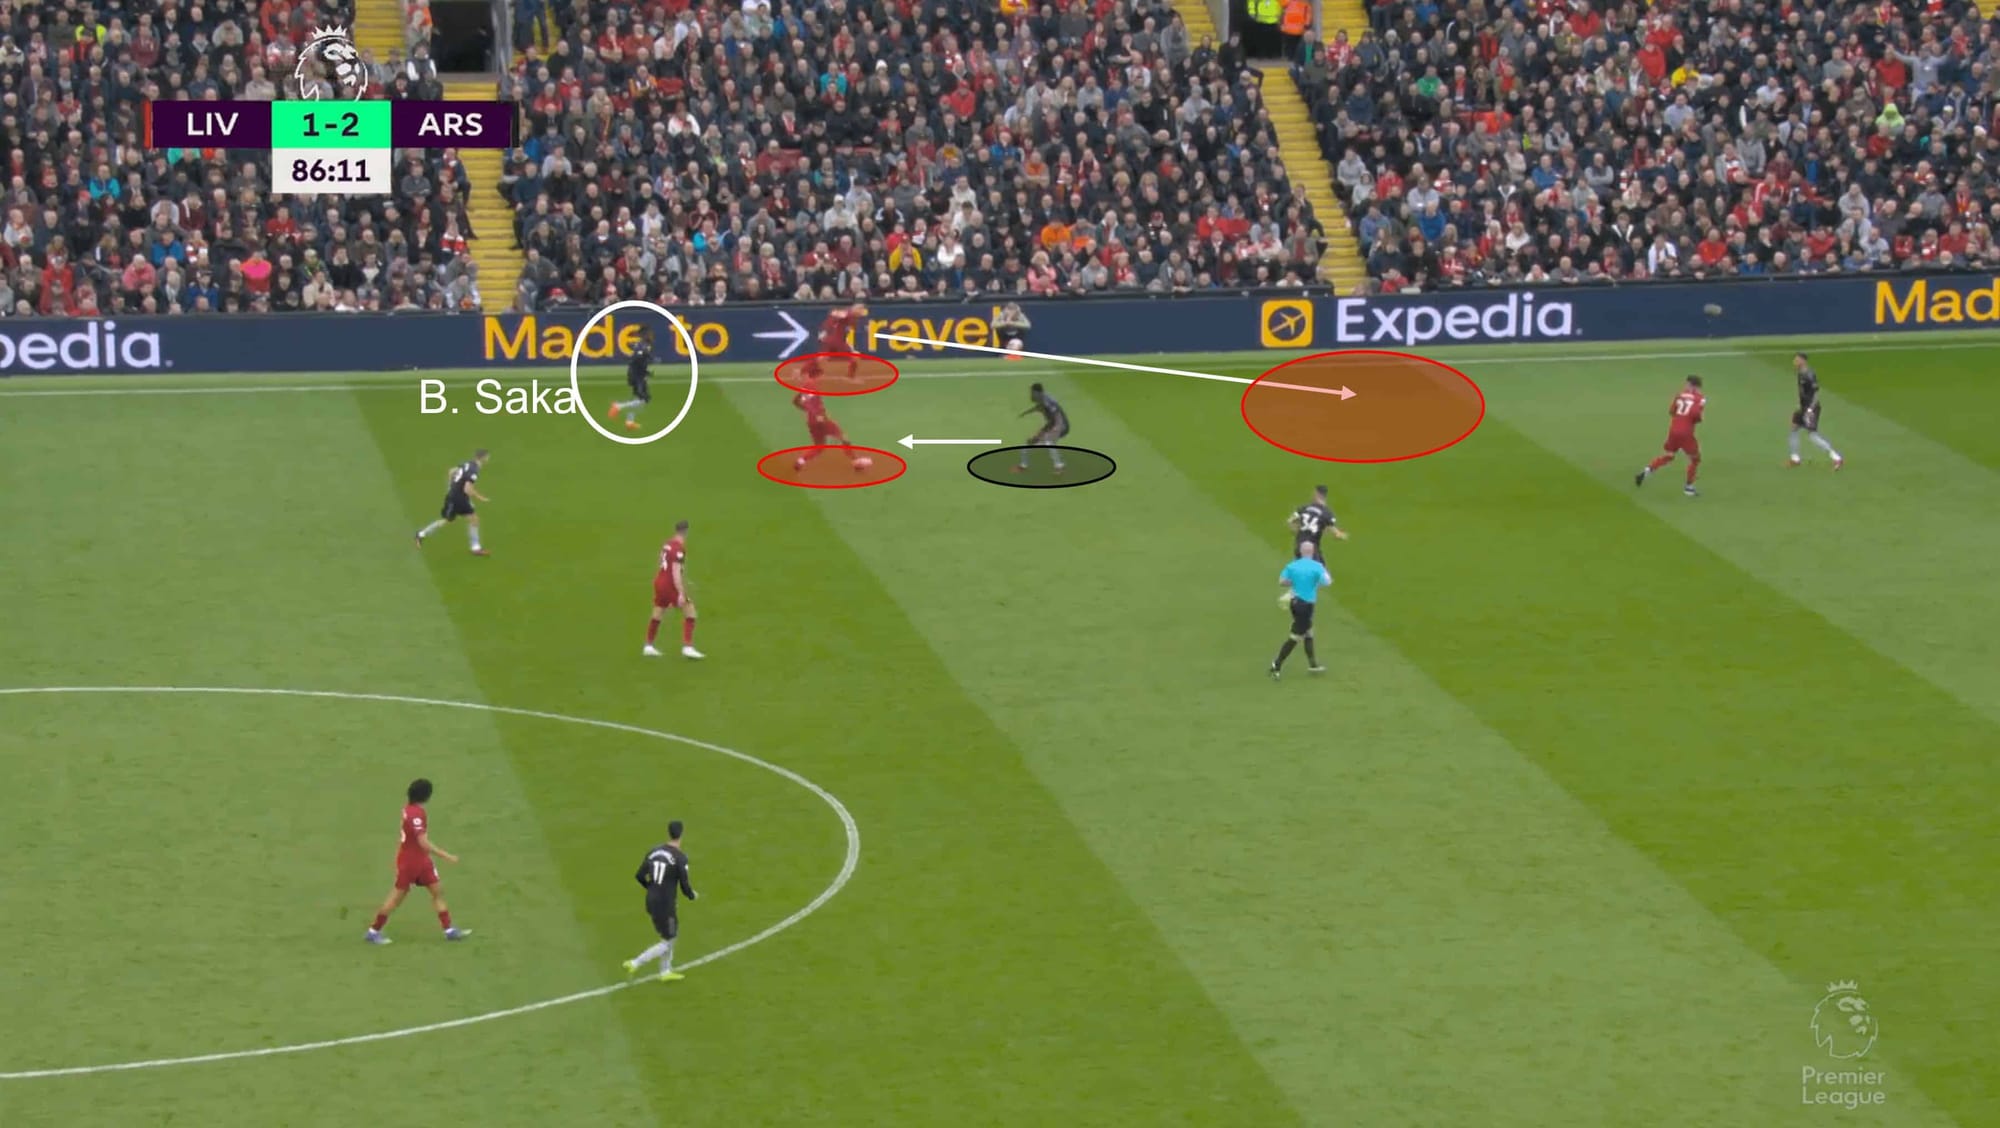
It is always frustrating to see a player not put the work in to help their team out, and that is essentially what we saw from Saka in the build-up to Liverpool’s second goal. He simply jogs back with zero urgency, leaving Partey in a difficult 2v1 defensive situation which allows Liverpool to easily break into the space on the left flank. Robertson carries the ball down the flank before playing a pass that plays an important part in getting the ball towards the other flank.
While there is a lot of football played between this moment above and Firmino’s back post header later in the move, Saka could have stopped or at least limited Liverpool’s move by simply putting the work in and helping Partey.
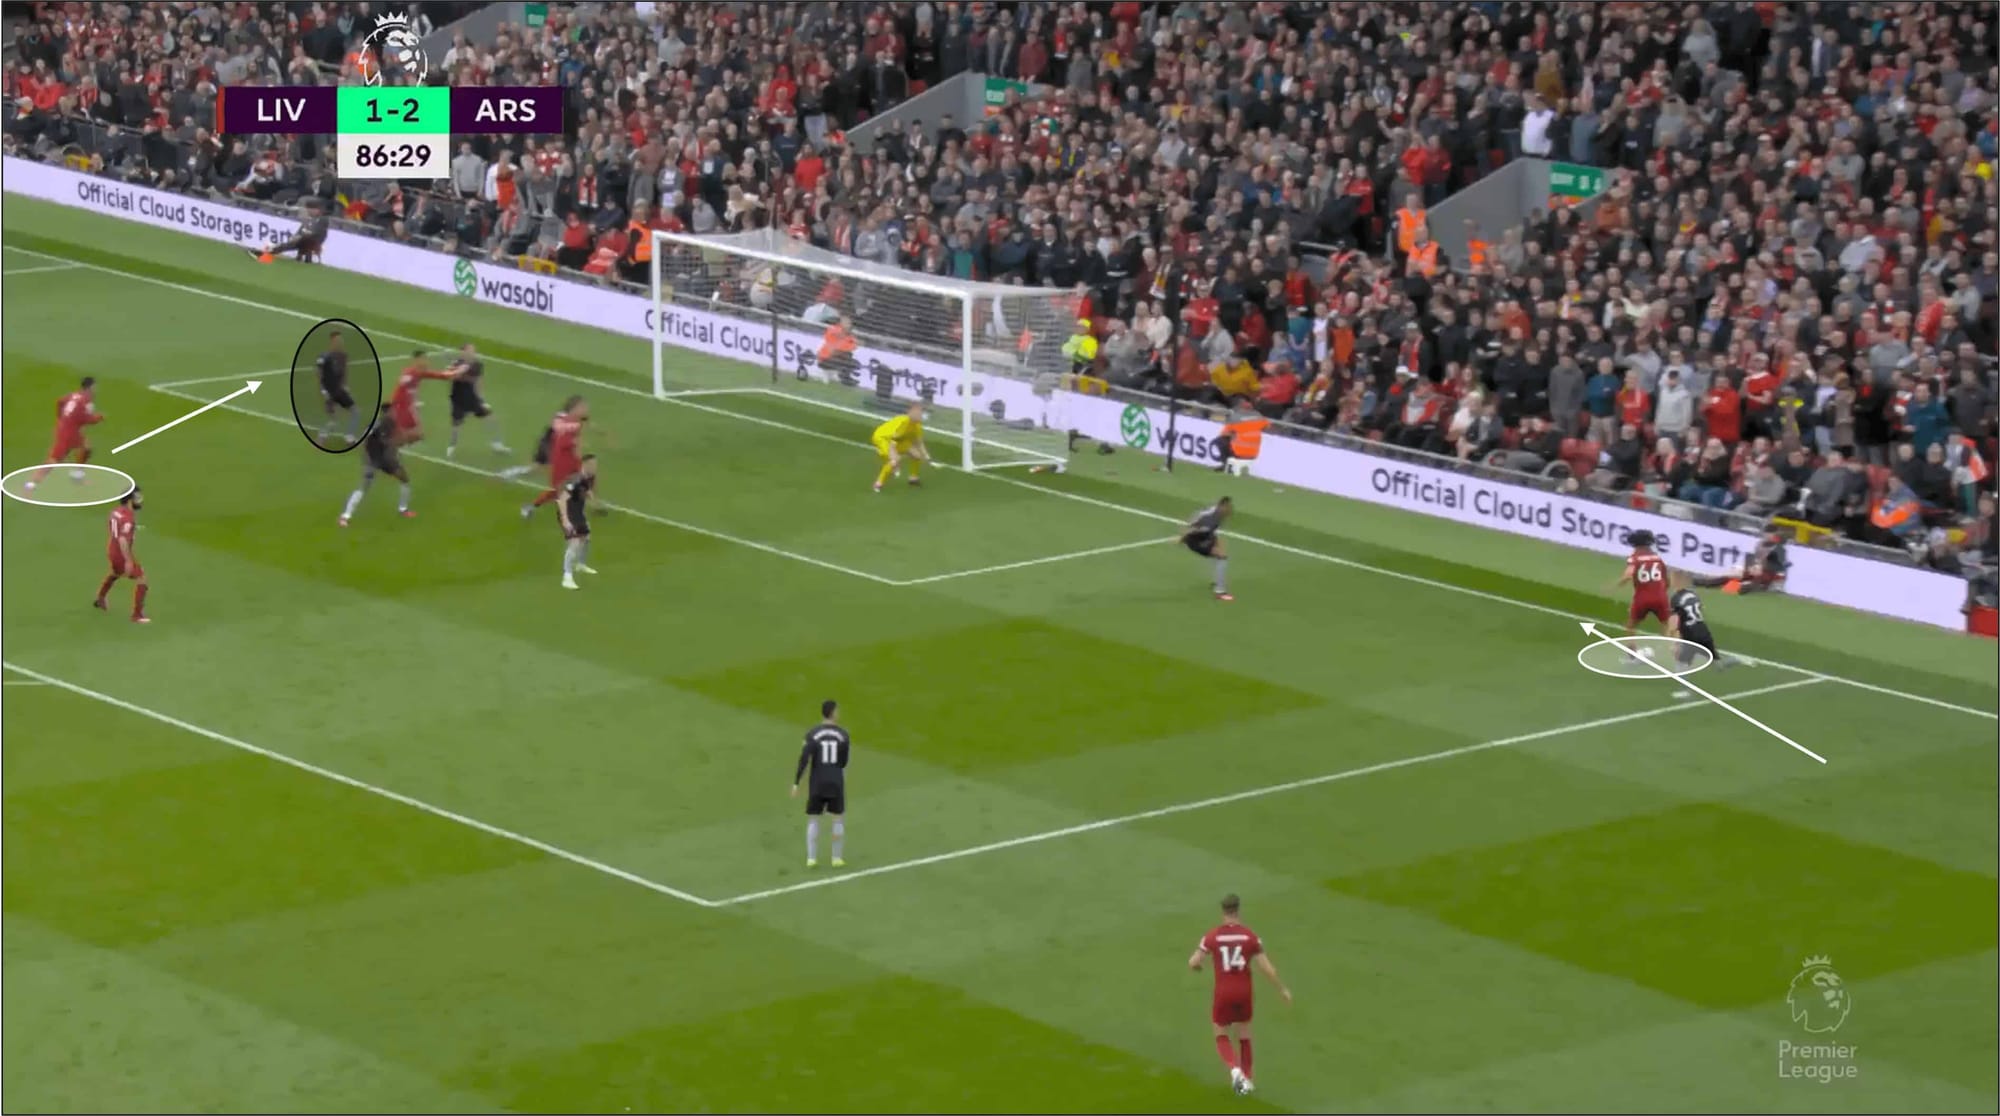
As mentioned, there was a lot of football played in this Liverpool build-up. While it was particularly a slow one, Arsenal had more than enough time to regroup and organise their defence, which should have equipped them to deal with the cross that handed Liverpool their equaliser. Some brilliant solo work from Trent to get to the byline (questions about the defending), but Firmino almost looked to target Ben White at the back post in anticipation of TAA’s cross. White (and Arsenal as a defensive collective) had the time to pick up the red shirts and match them in a duel, but Firmino got the better of White when the ball came in.
Why is it relevant to look at these moments of collapse from Arsenal against Liverpool? Well, winning football matches, and by extension, league titles, is a result of every individual consistently doing their jobs and at elite level football, the slightest lapse in quality or concentration will be punished – this just seemed to happen an unhealthy amount of times across the two games and at the end of the season, Arteta may well look back at these two games in particular as the turning points.
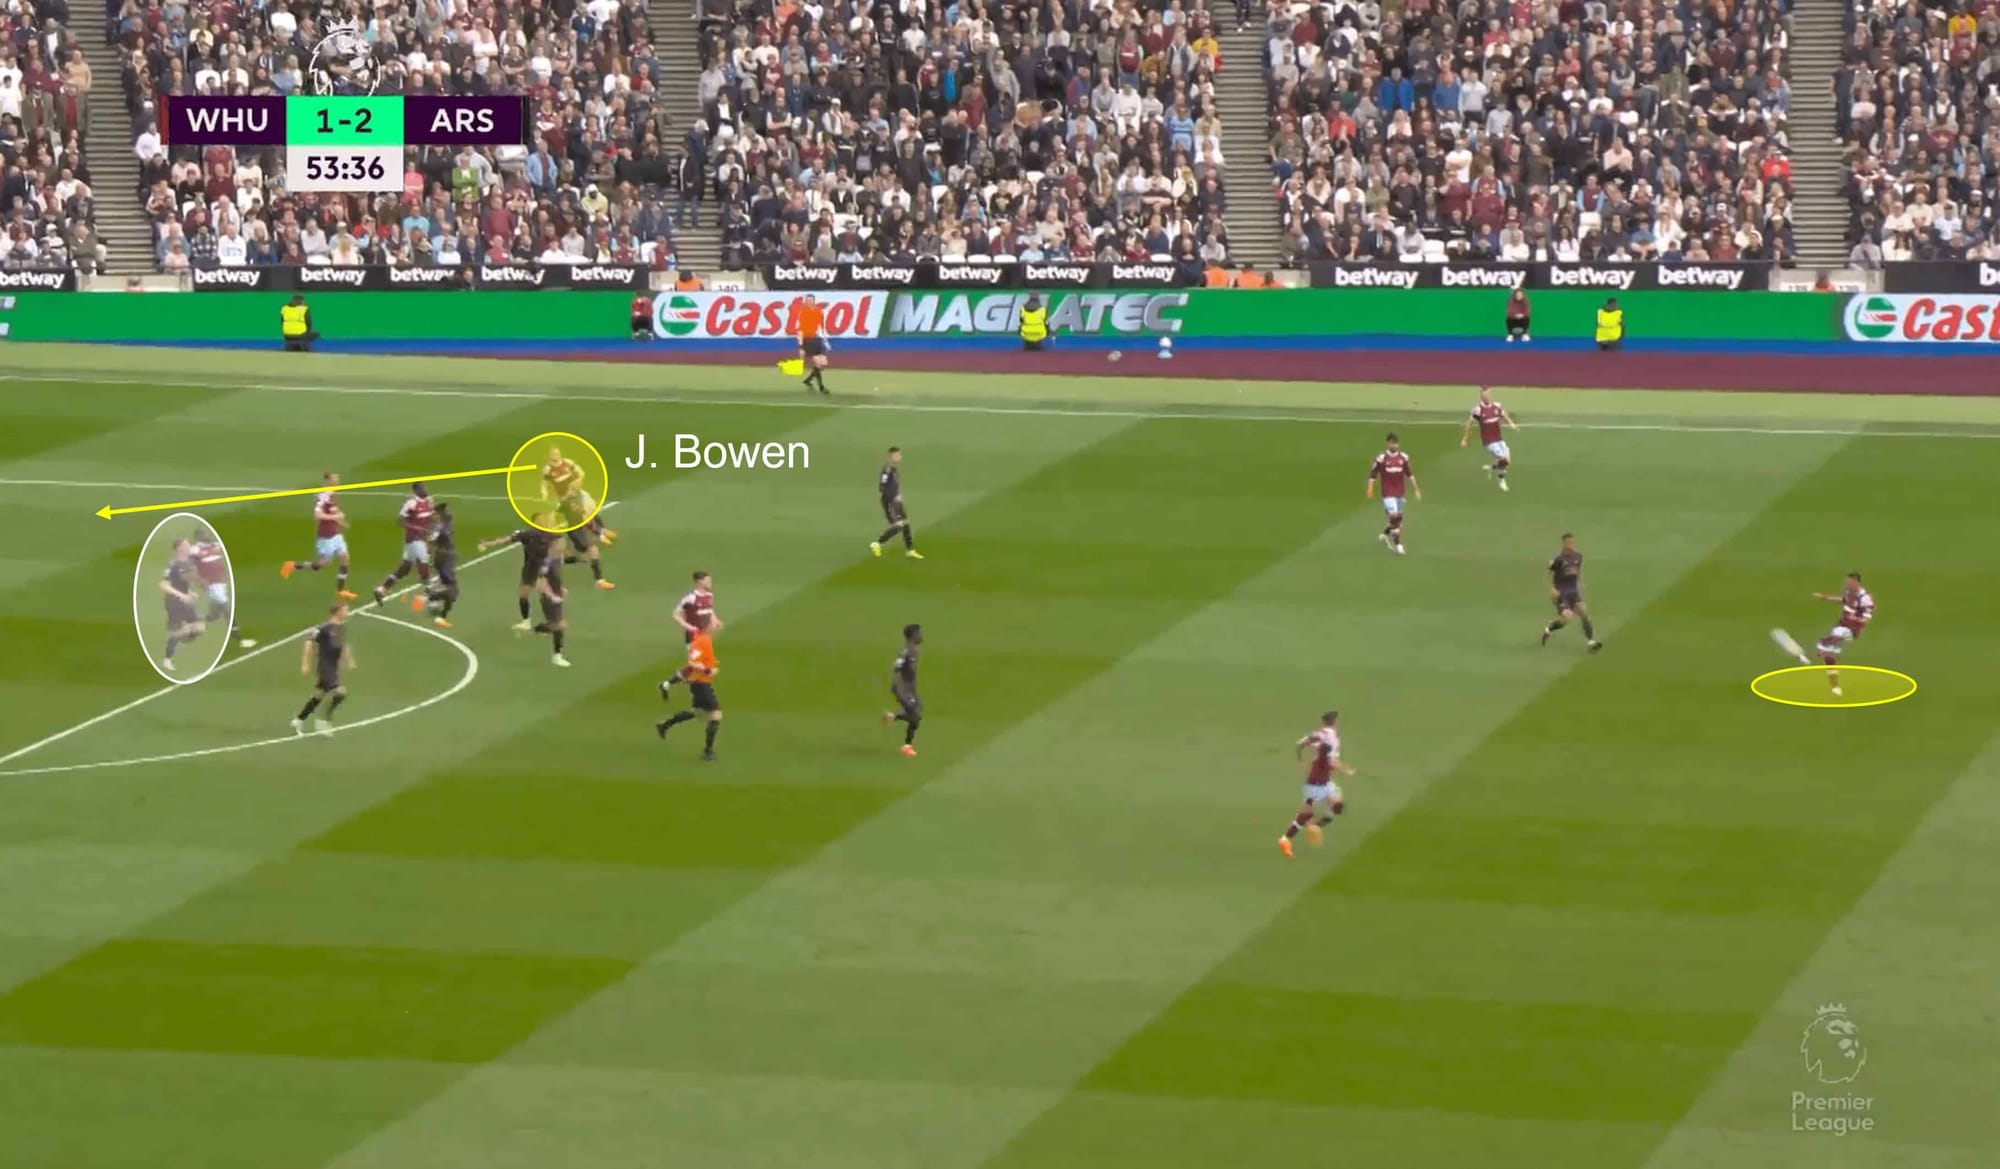
A lack of overall defensive organisation was cited in the previous analysis image, and the same curse struck Arsenal against West Ham when they failed to push out of their box effectively after clearing a long throw-in. For clarity, the highlighted Arsenal shirt is being worn by Rob Holding, and he is the one playing Jarrod Bowen onside as the ball is launched back into the danger zone. But he isn’t the only one to blame – Arsenal’s shape in general lacks direction and structure. They may well have struggled to defend this one even if Holding was higher up.
Not forgetting the example we covered as part of the West Ham press segment as well. While that was a good example of a high press from Moyes’ team, it still holds Arsenal errors, both technically and mentally and the penalty and goal that followed were certainly avoidable.
Conclusion
The nation seems to be split on who they want to win the league when it comes to fans of clubs other than Arsenal and Manchester City, but many seem to think that City will finish the strongest and claim yet another trophy. While the last two games have set the alarm bells off in the Arsenal camp, let’s not forget they are still top of the table as we come towards the end of the campaign.
They aren’t experiencing total collapse just yet, but they certainly need to address the issues from those two games and fix them before they face Guardiola’s side next week – a game that has the potential to decide the league should Arsenal win.



Comments