After a rocky start to life under Roberto De Zerbi, Brighton & Hove Albion have turned a corner and came into Sunday’s welcome of Aston Villa on a three-game winning run.
The Seagulls have been a great fit for De Zerbi, the Italian national.
Although he struggled earlier, going winless in his first five games, he has found his groove at Brighton, going to win in his subsequent matches against Chelsea, Arsenal, and Wolves.
Now he has the illumination he was due and went into the weekend’s game against Unai Emery, the new head coach of Aston Villa.
Unai Emery, in contrast, had only managed two matches, both of which were against Manchester United, a team that had been struggling to maintain consistency under Erik ten Hag.
Emery had a fantastic debut game, defeating the Red Devils 3-1 at home.
Erik ten Hag prevailed by a score of 4-2 in the next match at Old Trafford.
Emery did not have as much time at Aston Villa as De Zerbi who seemed to have settled at his new club.
Two of the newest managers in the Premier League faced off this weekend.
This tactical analysis will show how Unai Emery won his momentum-building game against De Zerbi.
It will be an analysis, looking into all the tactics used by both managers in the game.
Brighton Lineups
De Zerbi has been discovering his ideal formation.
In this match, he went with 4-2-3-1, trying to stabilise the centre of the pitch.
Robert Sanchez, his trusted man started between the posts.
Levi Colwill the youngster, after his display against Arsenal, earned the start ahead of Adam Webster.
He was assisted by Lewis Dunk, the captain of the team.
Pascal Groß, often used as a midfielder started as a right-back, and Pervis Estupiñán started as the left-back.
Alexis Mac Allister and Moises Caicedo were the double pivots for De Zerbi’s side.
Although Leandro Trossard had featured as a striker previously under the manager, he started on the left wing.
Adam Lallana has often been used by De Zerbi in the attacking midfield after his takeover.
In this fixture, he sided with Solly March on the right and Trossard on the left.
Danny Welbeck started as the centre-forward, and his form has been excellent in recent times.
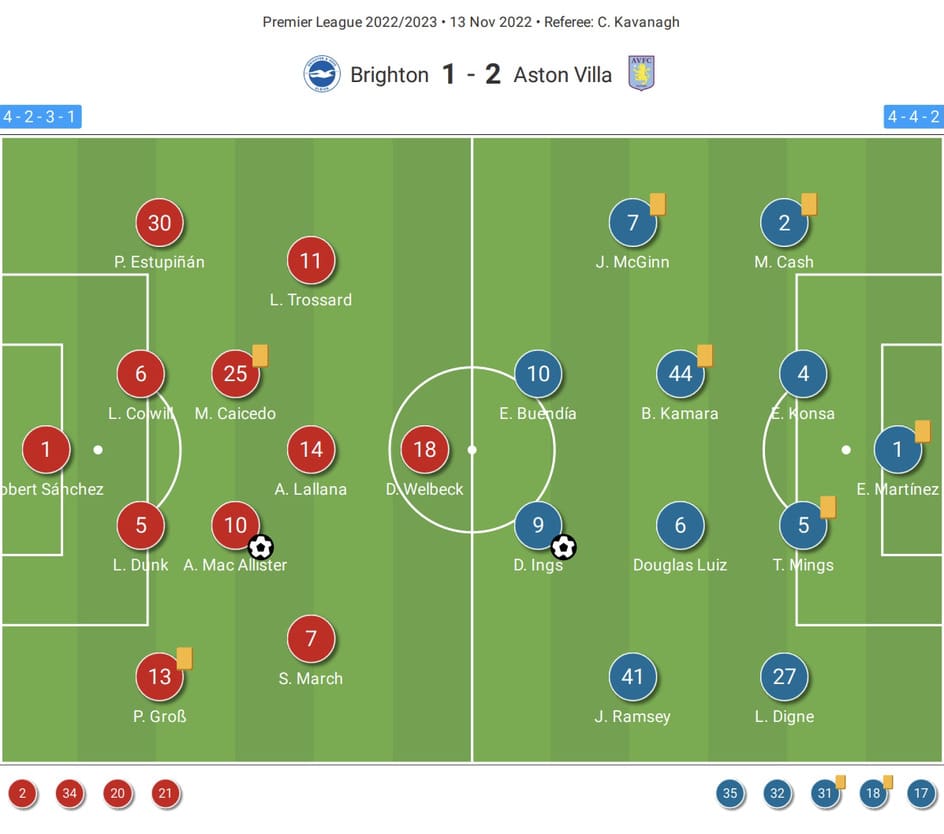
De Zerbi made minimal changes to his eleven from the winning team against the Wolves.
Welbeck was replaced for Kaoru Mitoma and Colwill for Webster.
Unai Emery went with 4-4-2 which he had been using since arriving at Villa Park. Coming away from home, he went with Emiliano Martinez at the back.
Tyrone Mings and Ezri Konsa partnered in the central defence with Matty Cash and Lucas Digne as the full-backs.
Douglas Luiz and Boubacar Kamara formed the central midfield with the team captain John Mcginn on the left and Jacob Ramsey on the right.
Danny Ings has been favoured in the absence of Ollie Watkins.
Emiliano Buendìa has been Emery’s go-to player starting beside Ings, playing as a number ’10’.
Pressing
Pressing contributed to the clearest chances out of both teams.
Both sides switched to a different structure to press and win the ball.
Pressing has been the only distinguishing factor in English football that had provided several goals.
The Seagulls’ early start gave the home crowd plenty to cheer about as the game got underway.
To join the pressing, they switched to a 4-4-2 formation with Lallana and Welbeck paired up.
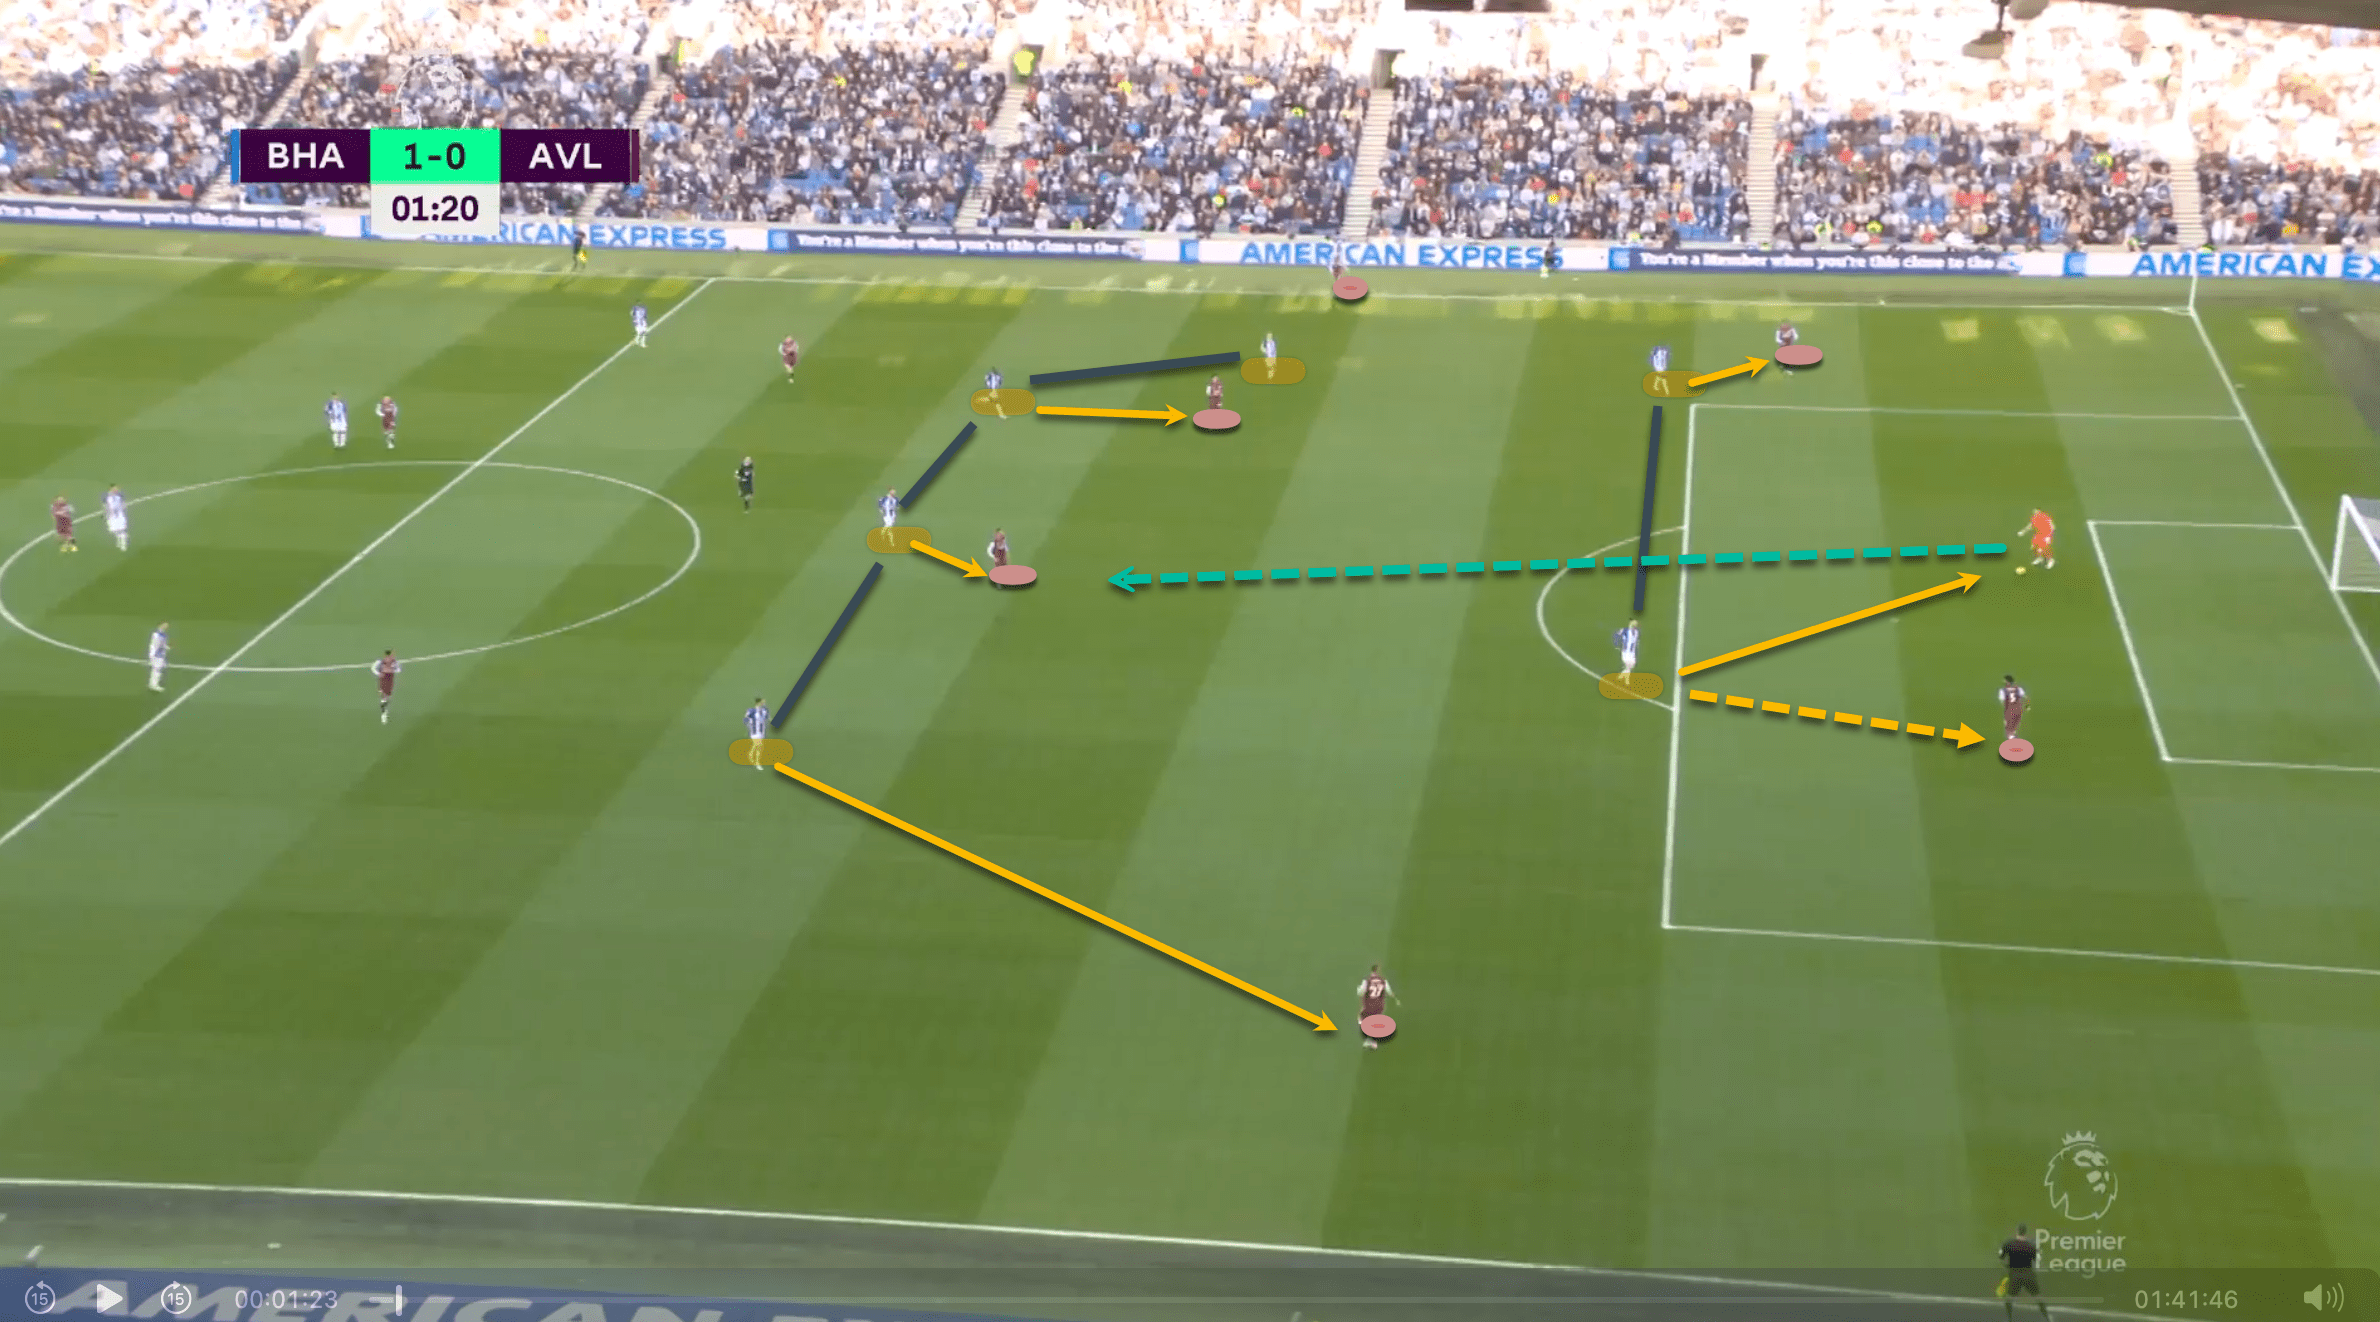
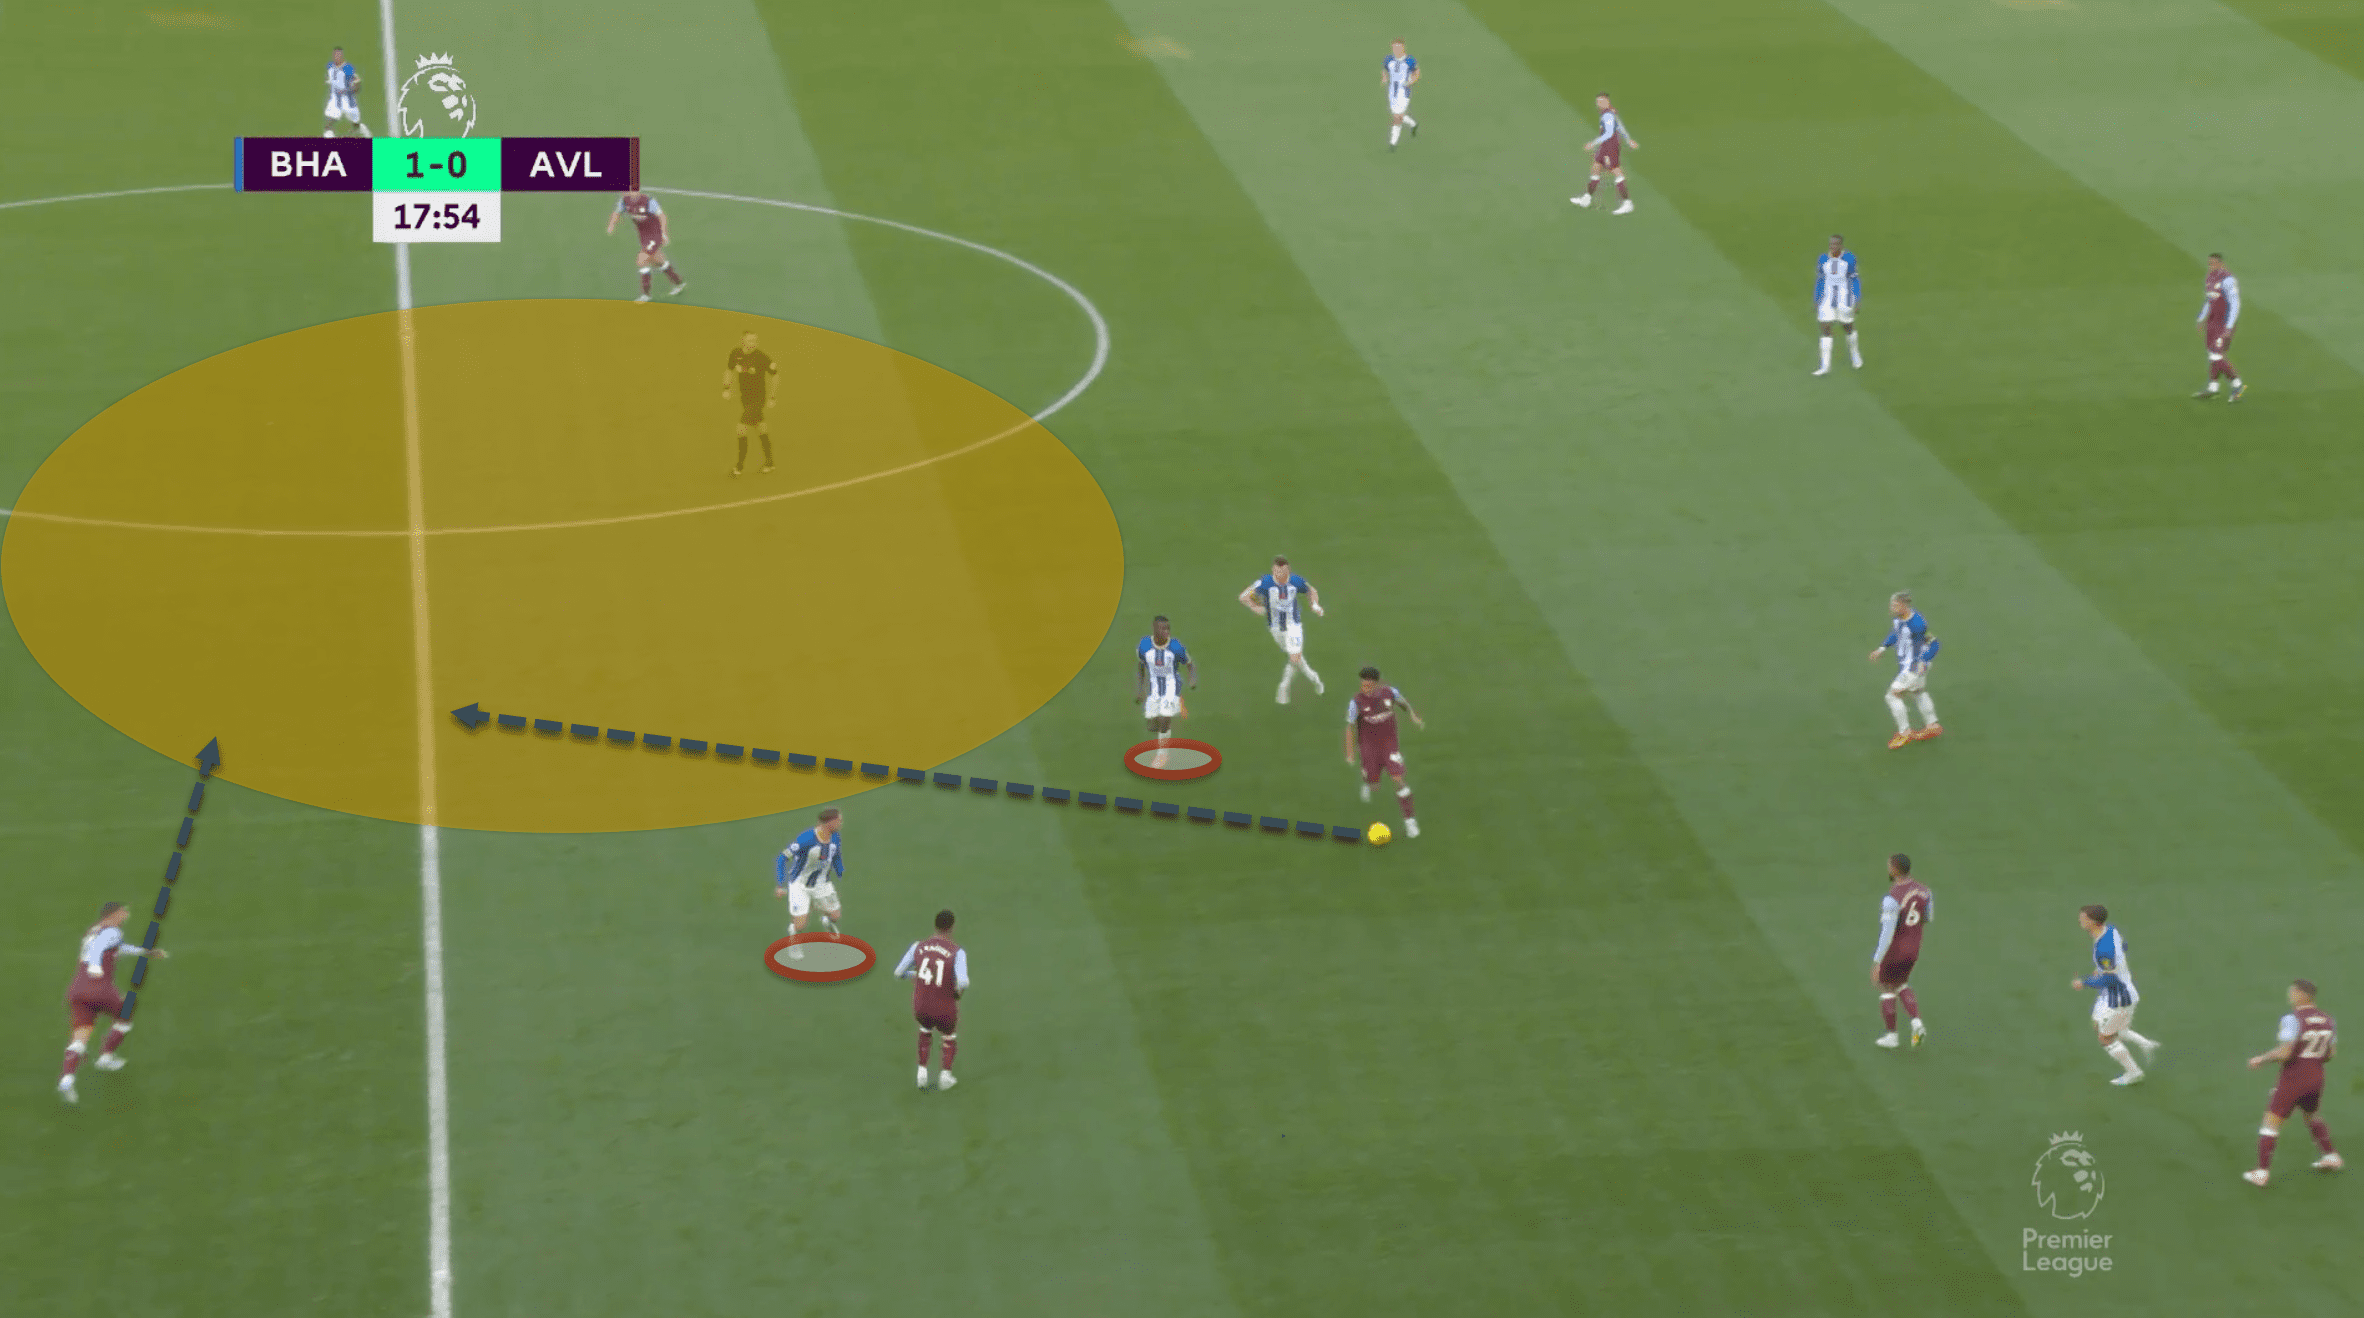
While the goalkeeper had the ball in the image above, Lallana makes a move to eliminate the centre-back’s passing option.
When Martinez saw March was going to mark Digne, he immediately chose Luiz in front of him.
As he made a tackle to reduce the space, Mac Allister smashed the ball into the goal to take the lead right away.
In this case, the pass made to Luiz is shown by an imagined line in a distinct colour.
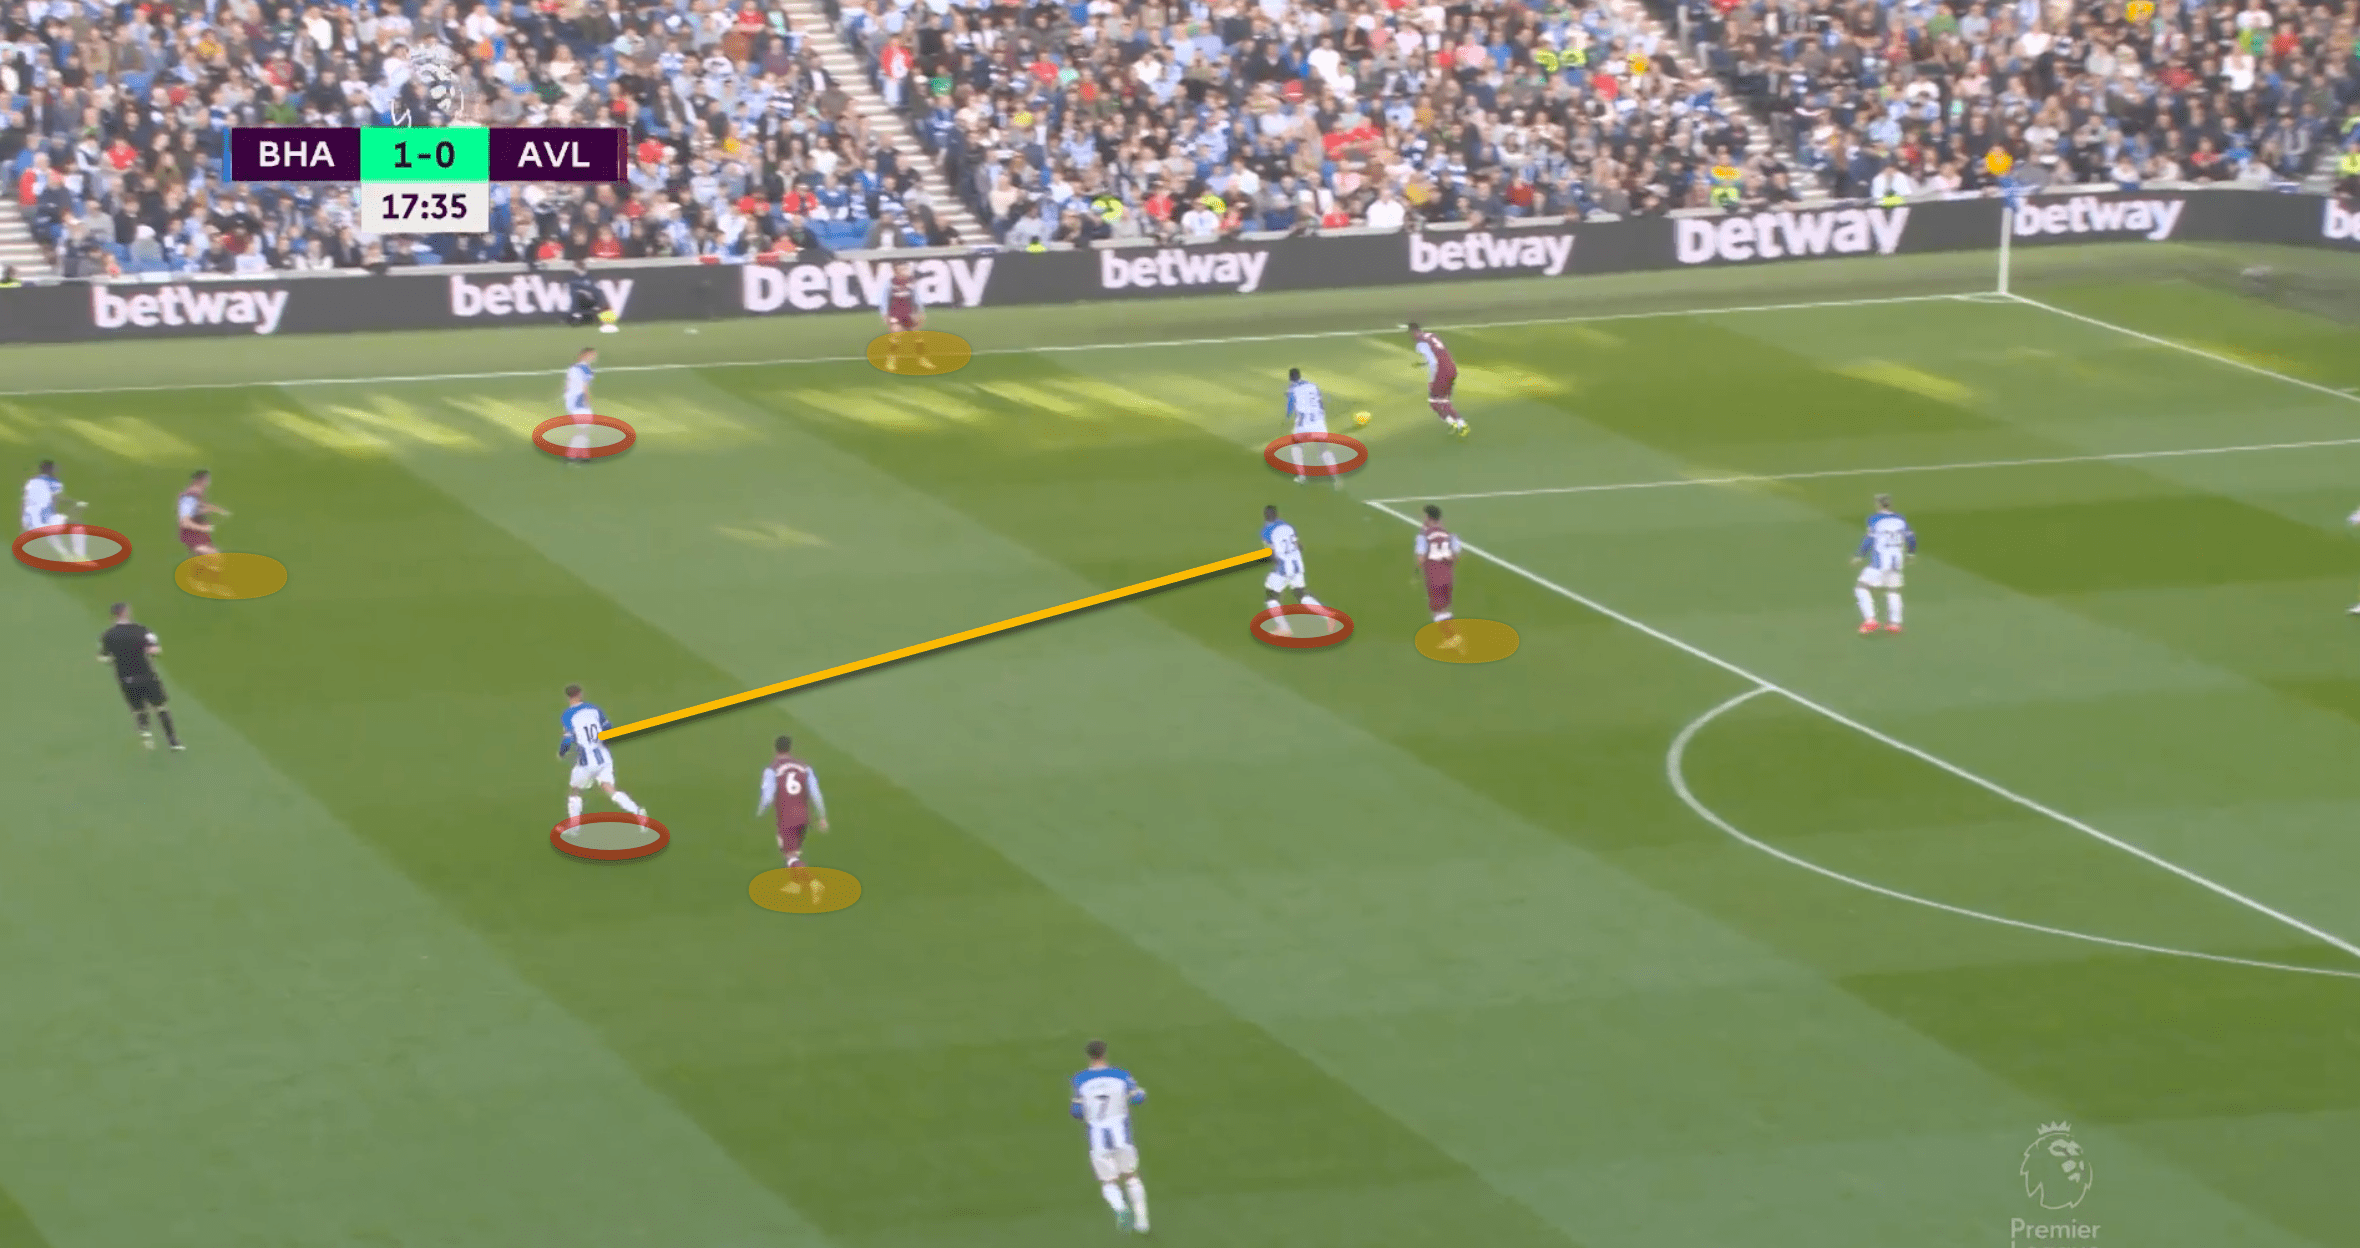
Depending on the circumstance, Caicedo and Mac Allister would trade markers.
Their ability to advance and mark demonstrated De Zerbi’s desire for his pivots to push effectively.
According to the example above, each of them was up or down based on their markers.
This provided them with the freedom to push periodically and also left openings in the centre that the Villa occasionally looked like they would take advantage of.
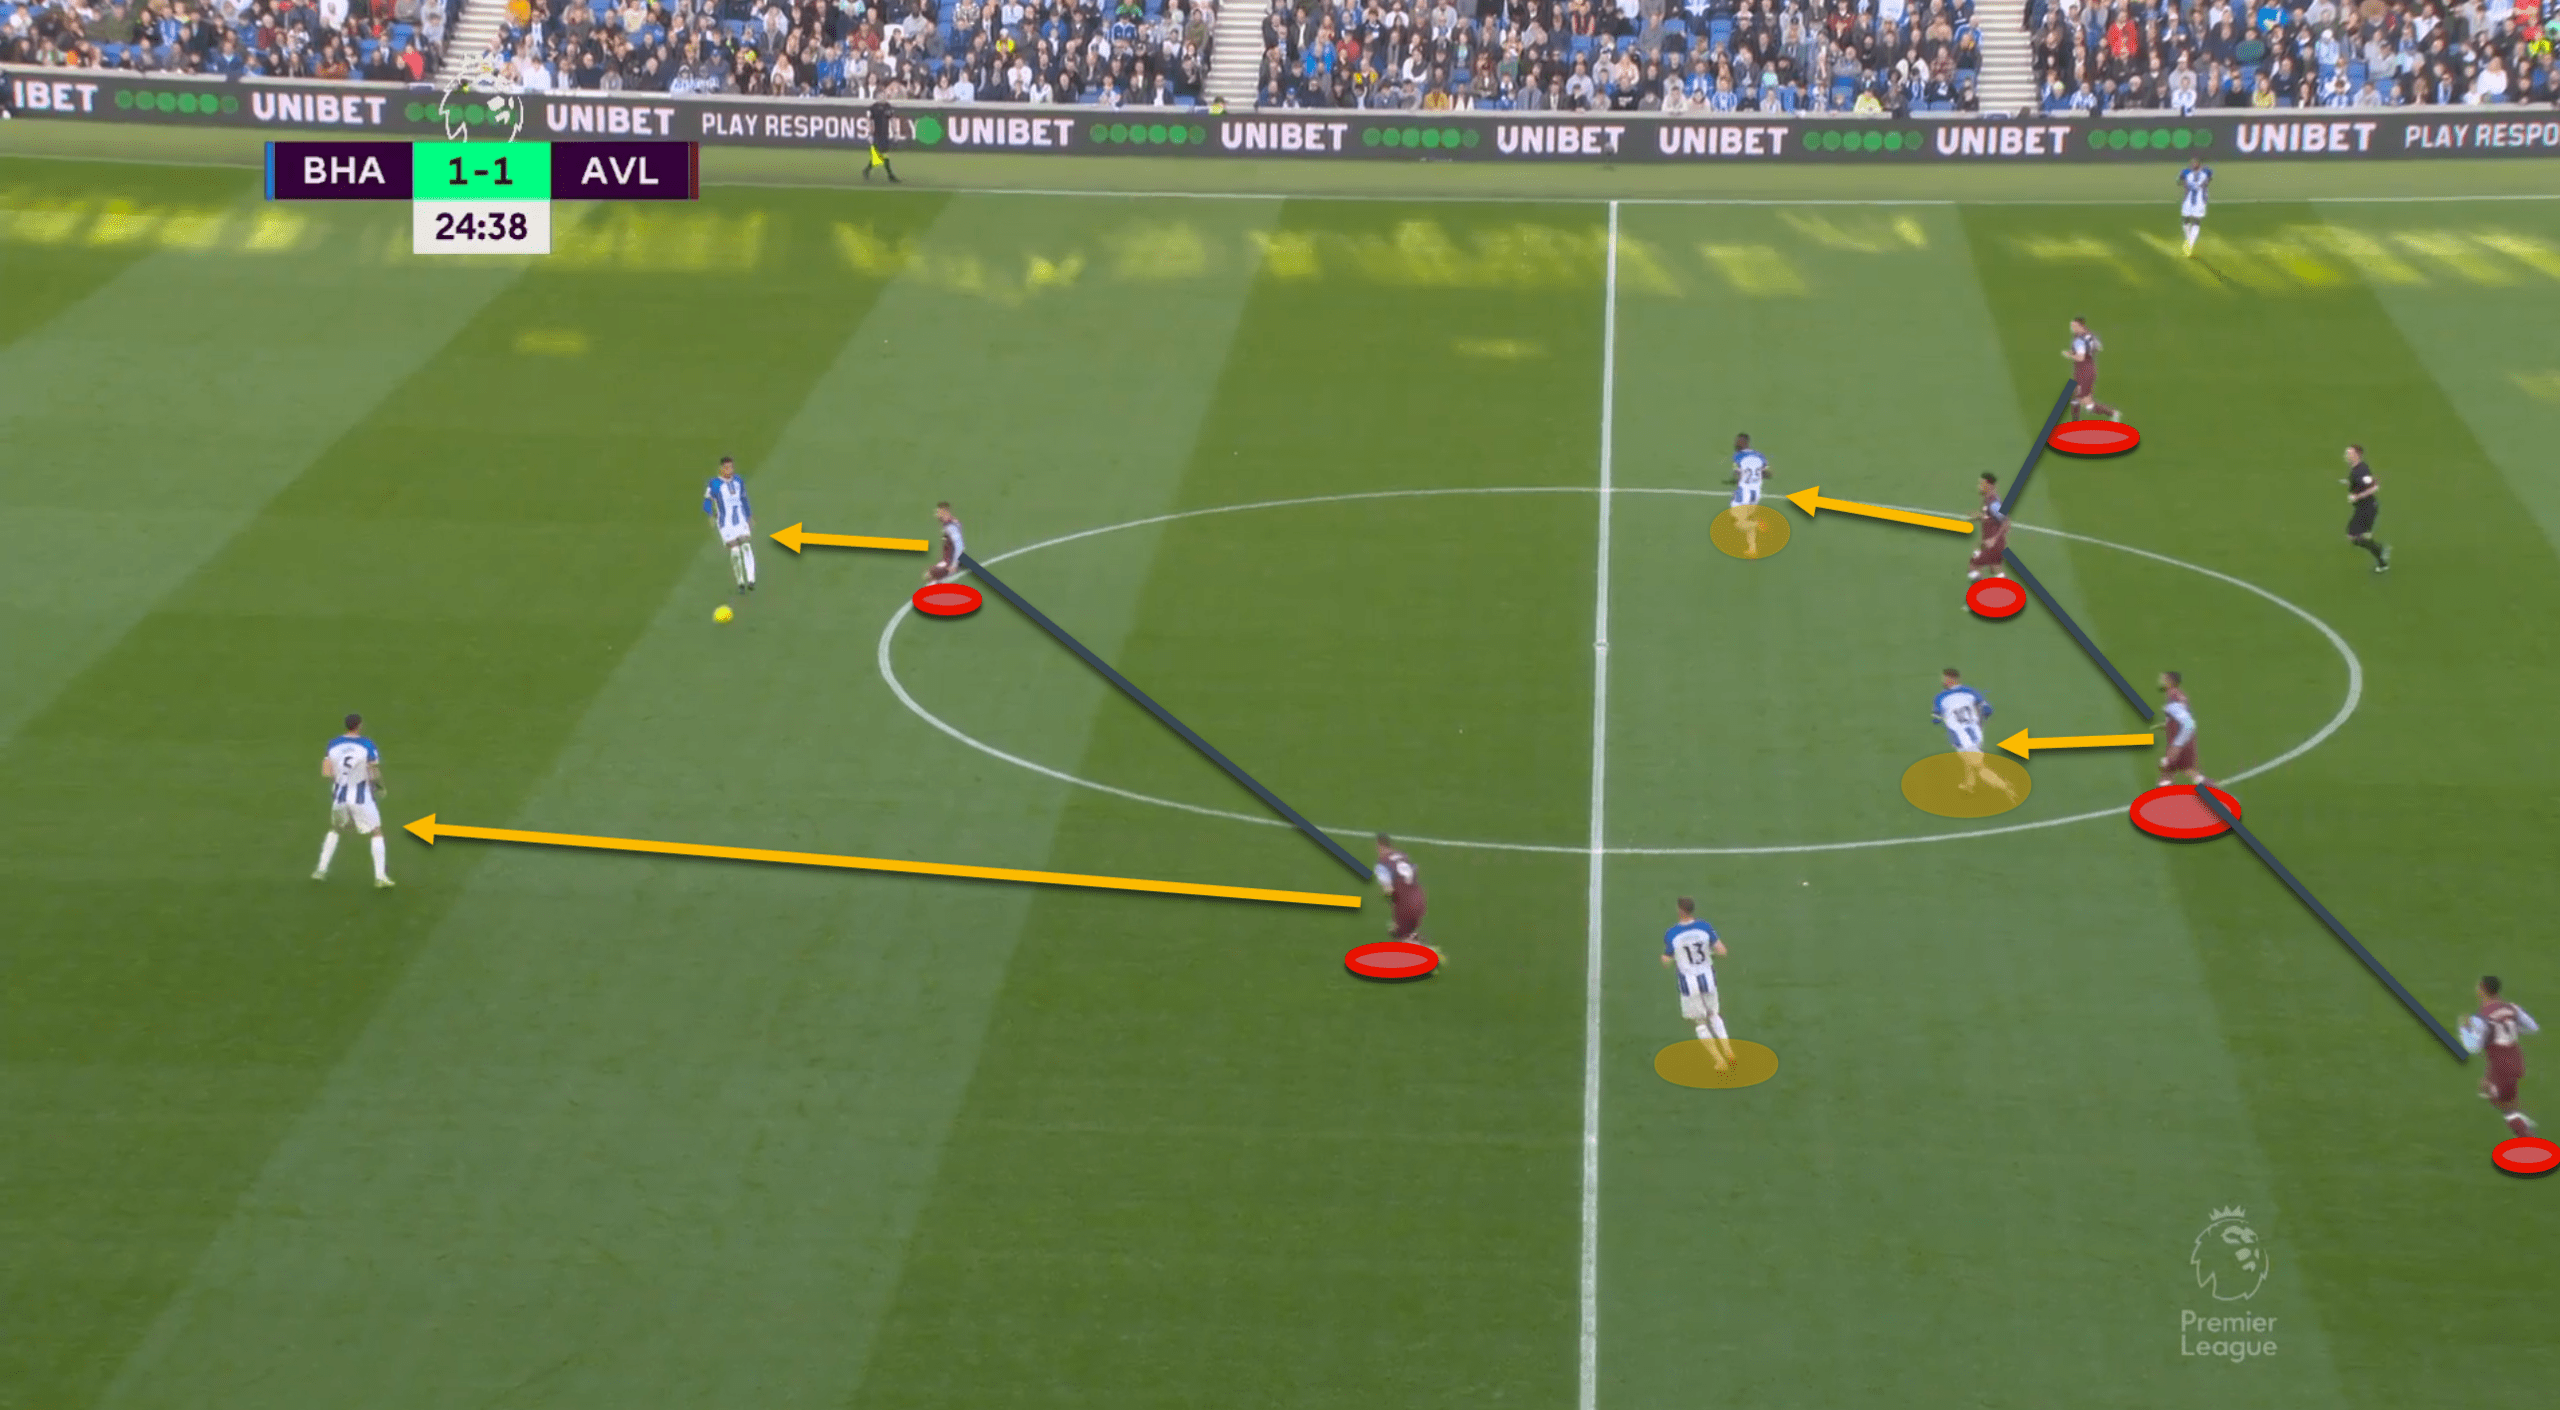
Emery made it quite apparent that the defensive midfielders were not used to control the game.
The centre may very possibly be dominated by Mac Allister and Caicedo.
As shown in the shot above, Kamara and Luiz were standing high above them, marking them to block off playmaking avenues.
Caicedo and Mac Allister were not permitted to glance up before they could pose a danger, they were only given enough room to make first passes.
Brighton was forced to build from the back but was unable to get through the middle.
In the image above, Luiz puts himself in front of Ramsey to mark Mac Allister.
Buendia takes care to shorten the distance between himself and Colwill and eliminate the passing line to Caicedo.
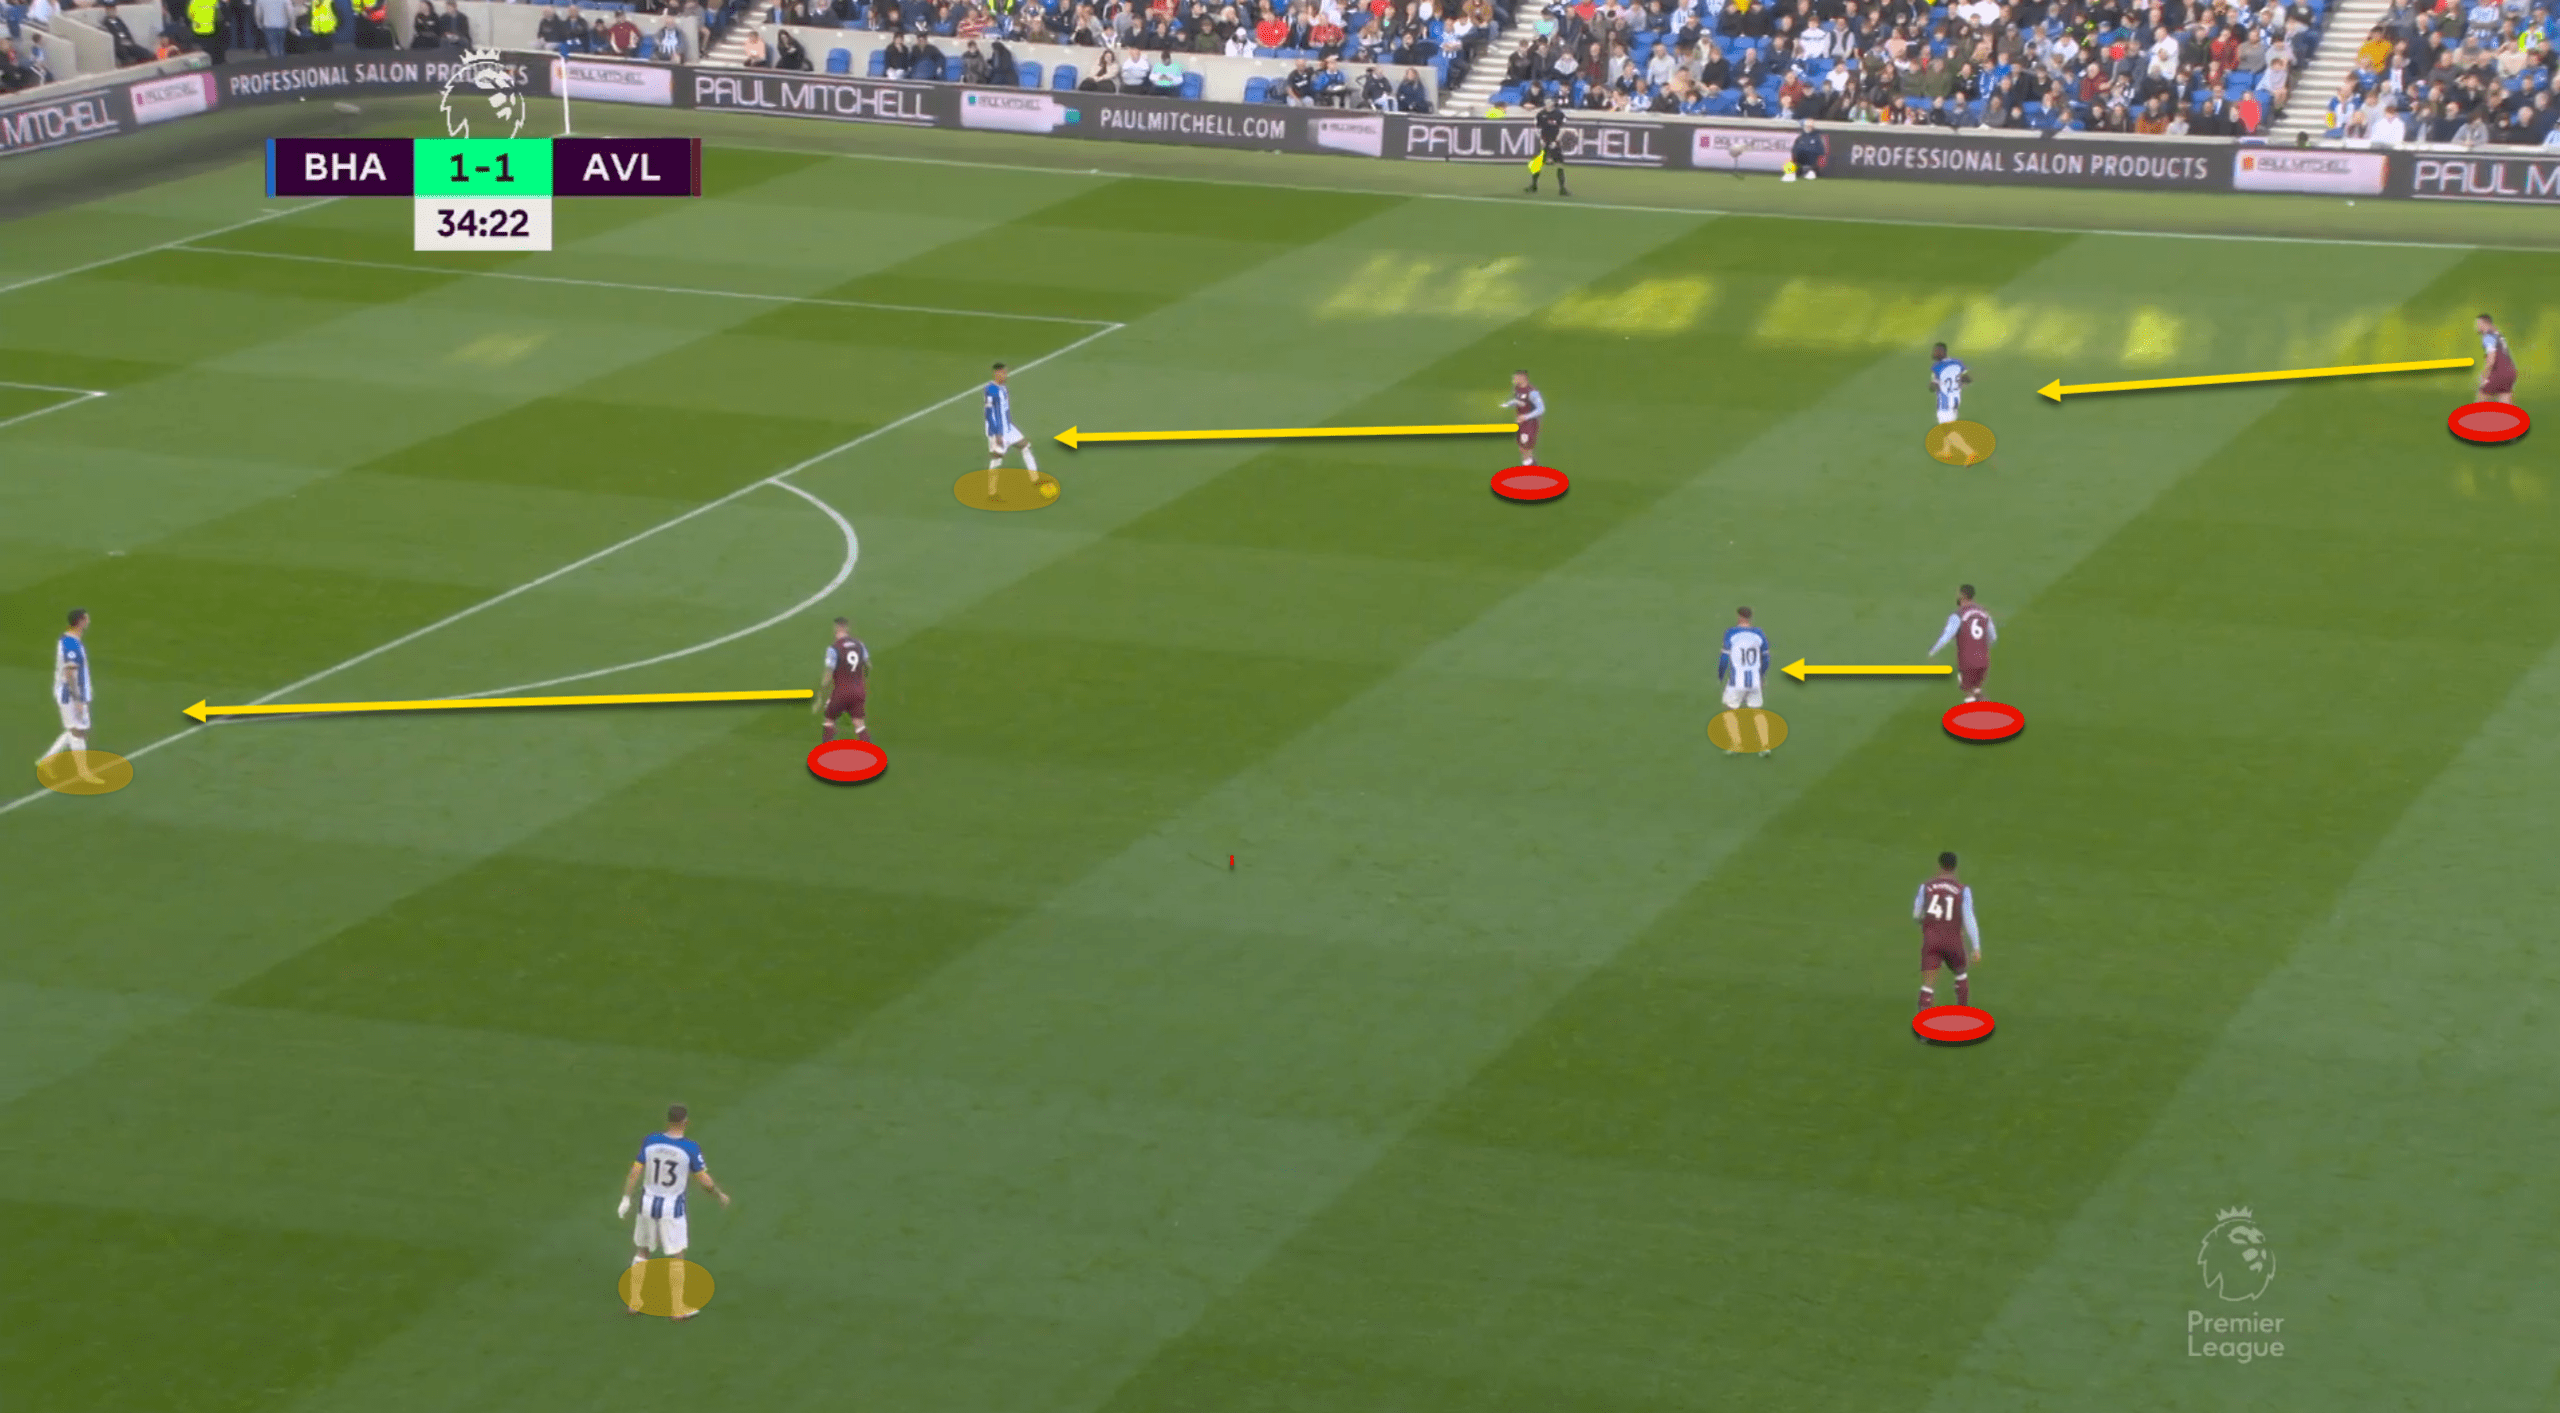
Enciso would drop down to make the play when the team was having trouble advancing from the back, and Kamara was monitoring him while Luiz was doing the same.
Emery’s strategy to stop the midfield’s activities undoubtedly paid off handsomely.
The Villa players executed the strategy flawlessly.
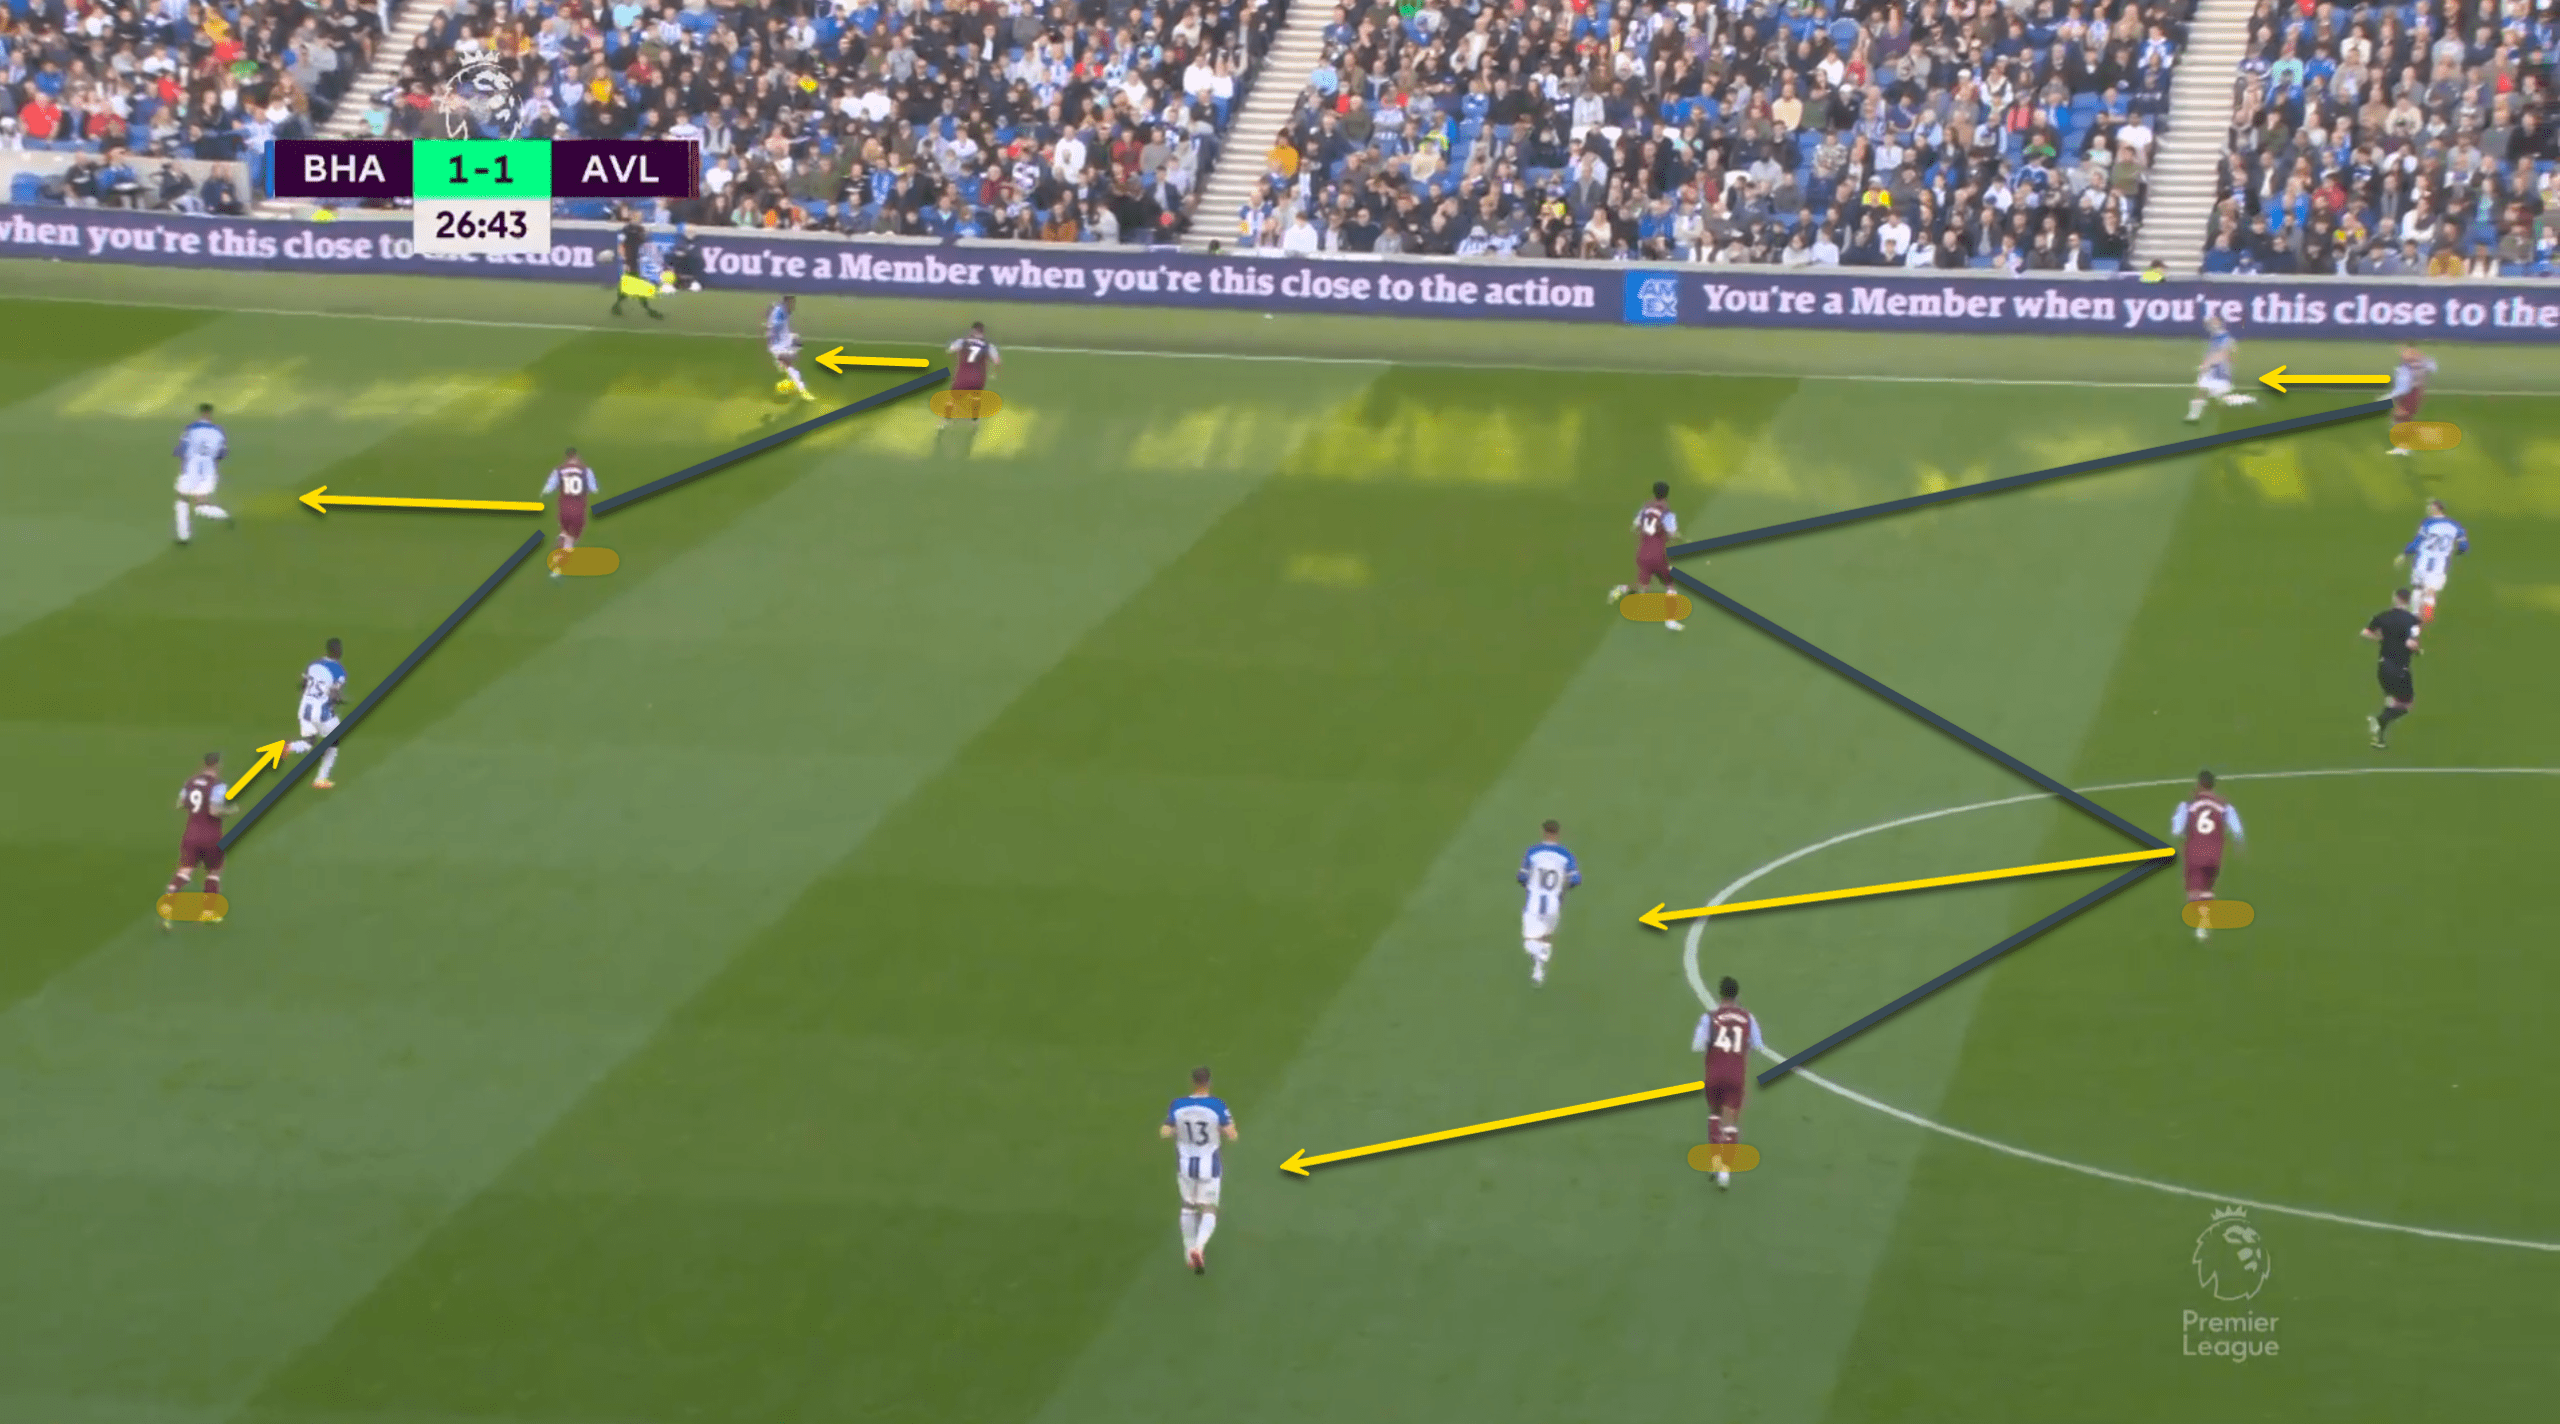
Sometimes Villa would switch to a 3-4-3 formation, with Cash moving up to the midfield line to mark Trossard and McGinn pressing high up.
Kamara, who is positioned behind McGinn in the image above, would block Julio Enciso’s potential passing route when Lallana was hurt and replaced in the fifth minute.
Following a fantastic move by Villa, Buendìa met a cross from Cash and struck the post.
Brighton was keen to launch a counterattack following that.
After the assault, it seemed like only Buendia was eager to counter-press, but Luiz waited calmly to press Mac Allister as soon as he received the ball.
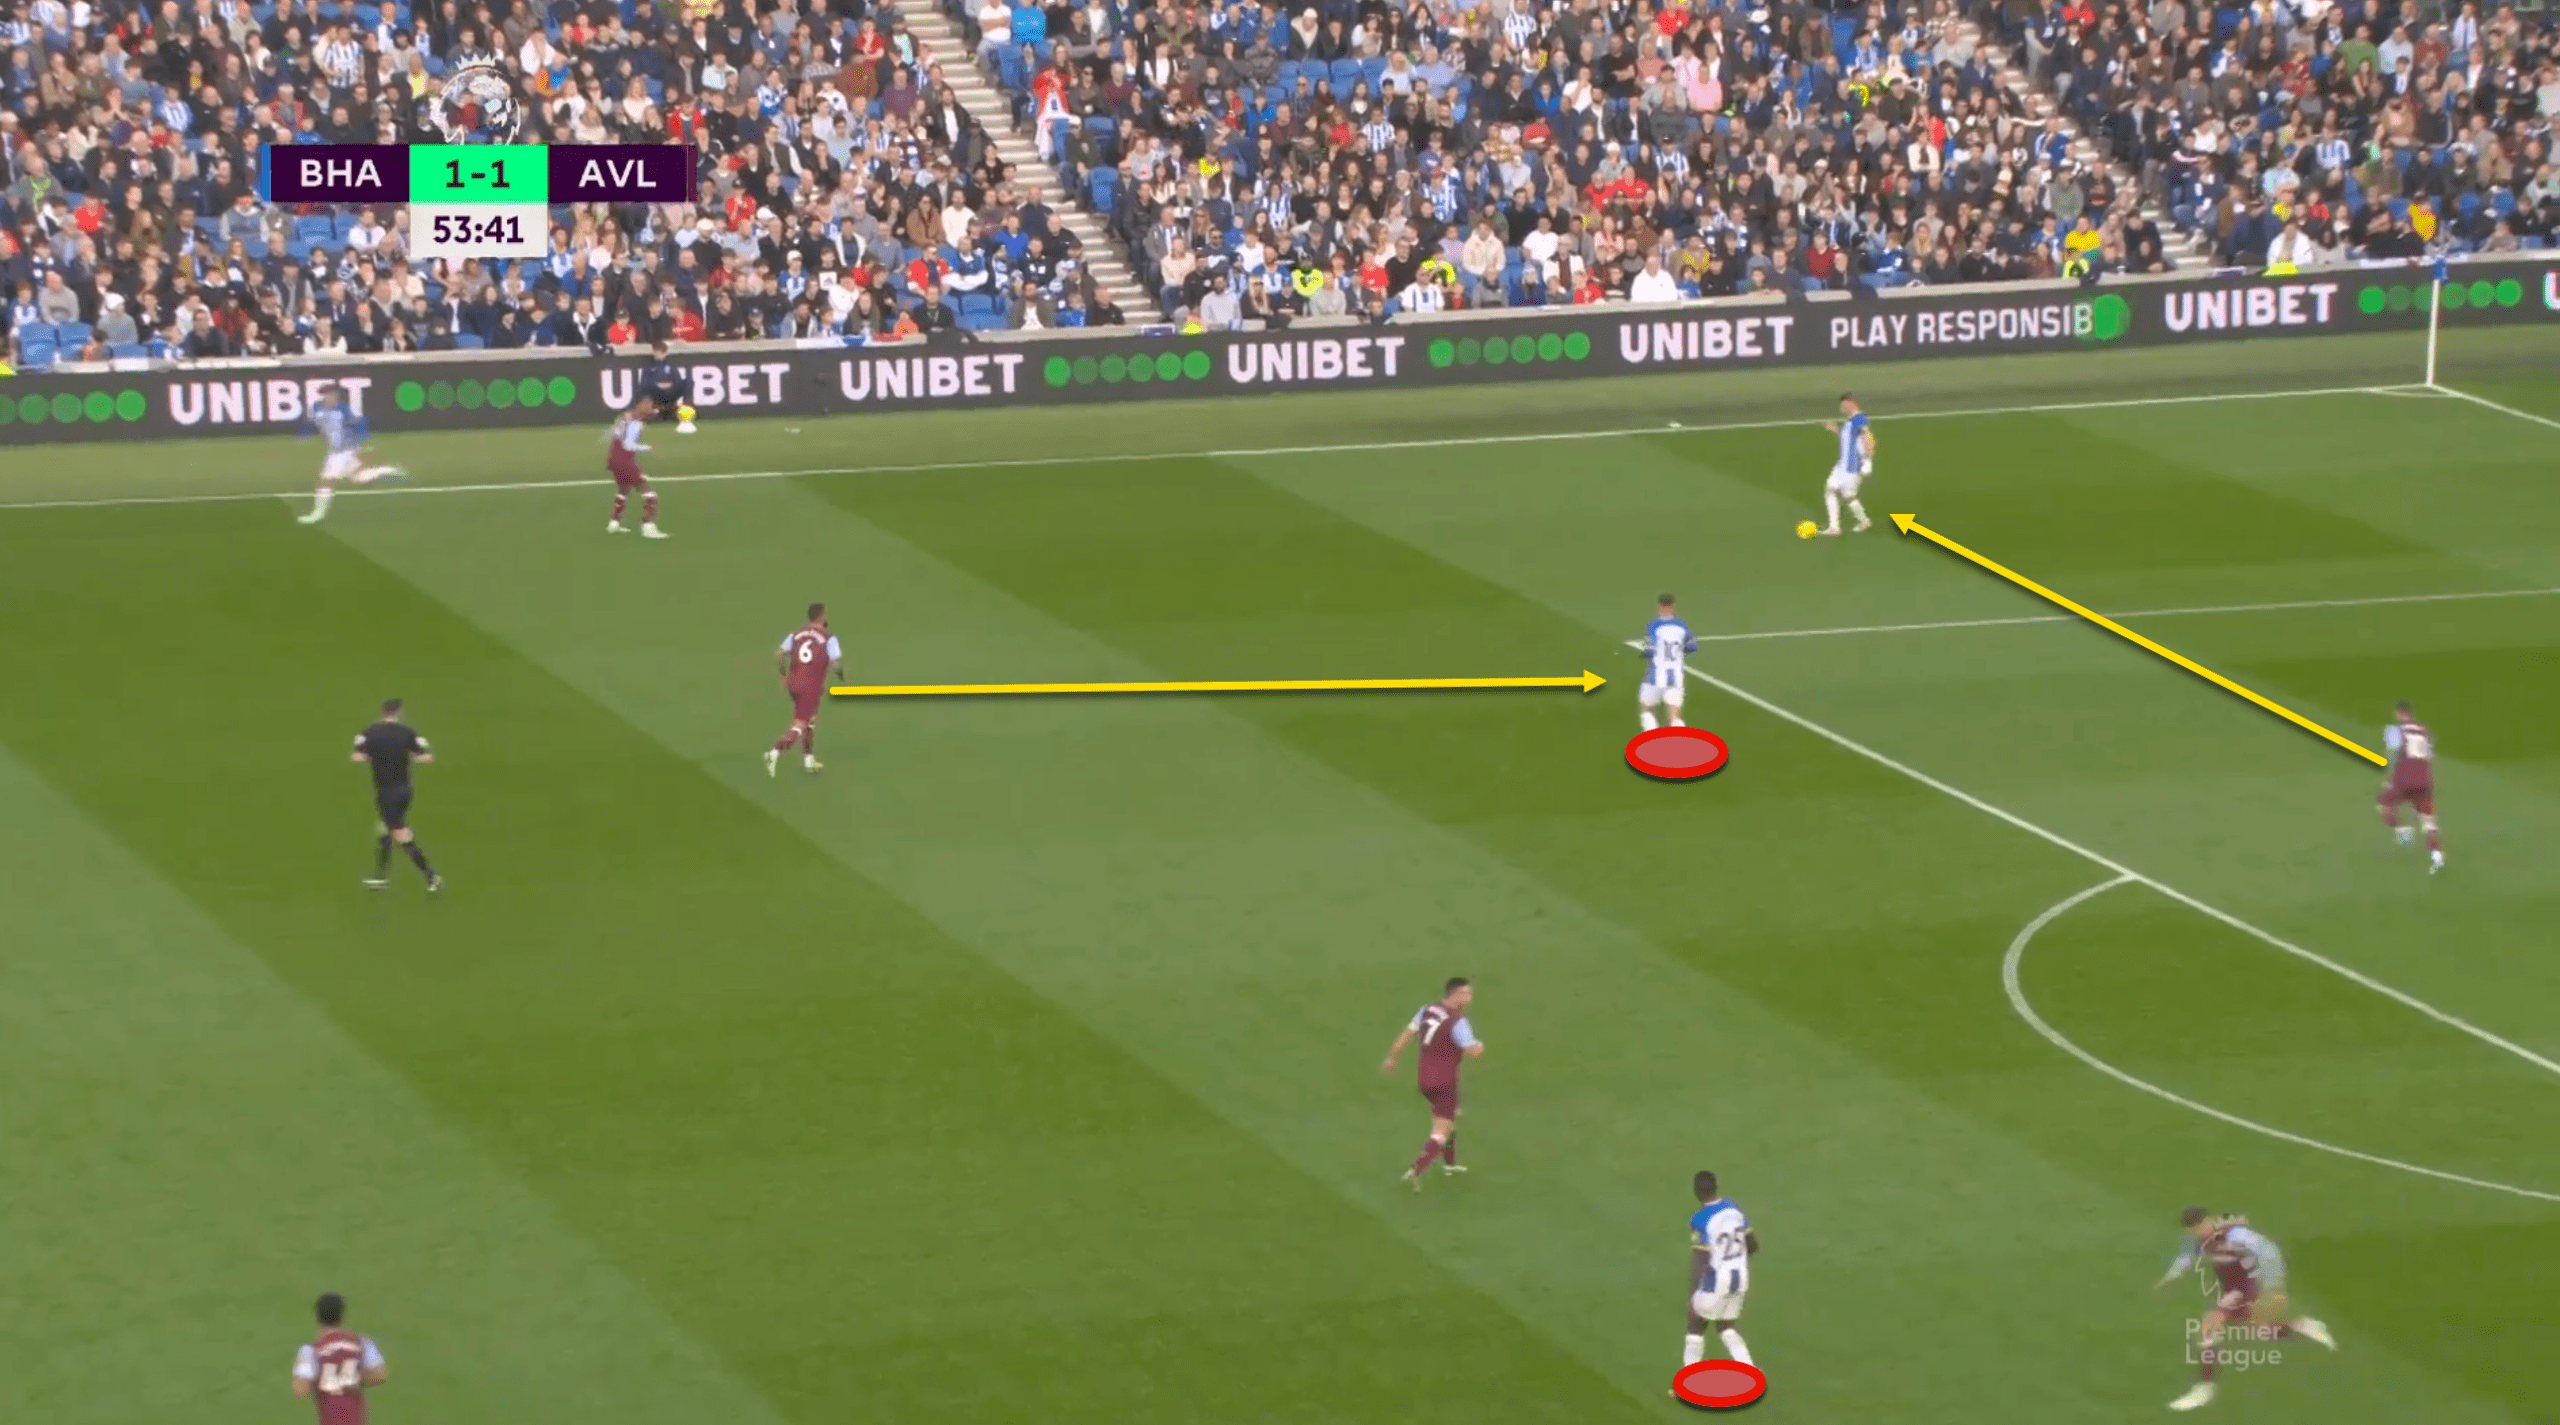
The circumstances were completely contrary to Brighton’s opening goal.
Luiz was responsible for allowing Mac Allister to score.
This time, Ings gave the team the lead after Luiz amazingly won the ball just outside the penalty area.
There was undoubtedly conflict in the middle.
The task was to implement strategies to cut off combinations in the centre for both sides.
Luiz and Kamara went up against Caicedo and Mac Allister immediately.
The versatility of the Villans
The versatility of Emery’s men was incomparable.
The players knew when and how to adapt to a given situation.
Although it was quite a difficult task, some players stood out in the process as we take a closer look at them.
McGinn’s ability to play a variety of positions surely favoured Emery and his plans.
In the below picture, he positioned himself below to offer Luiz a chance to go forward and combine with Ings who had dropped in this situation.
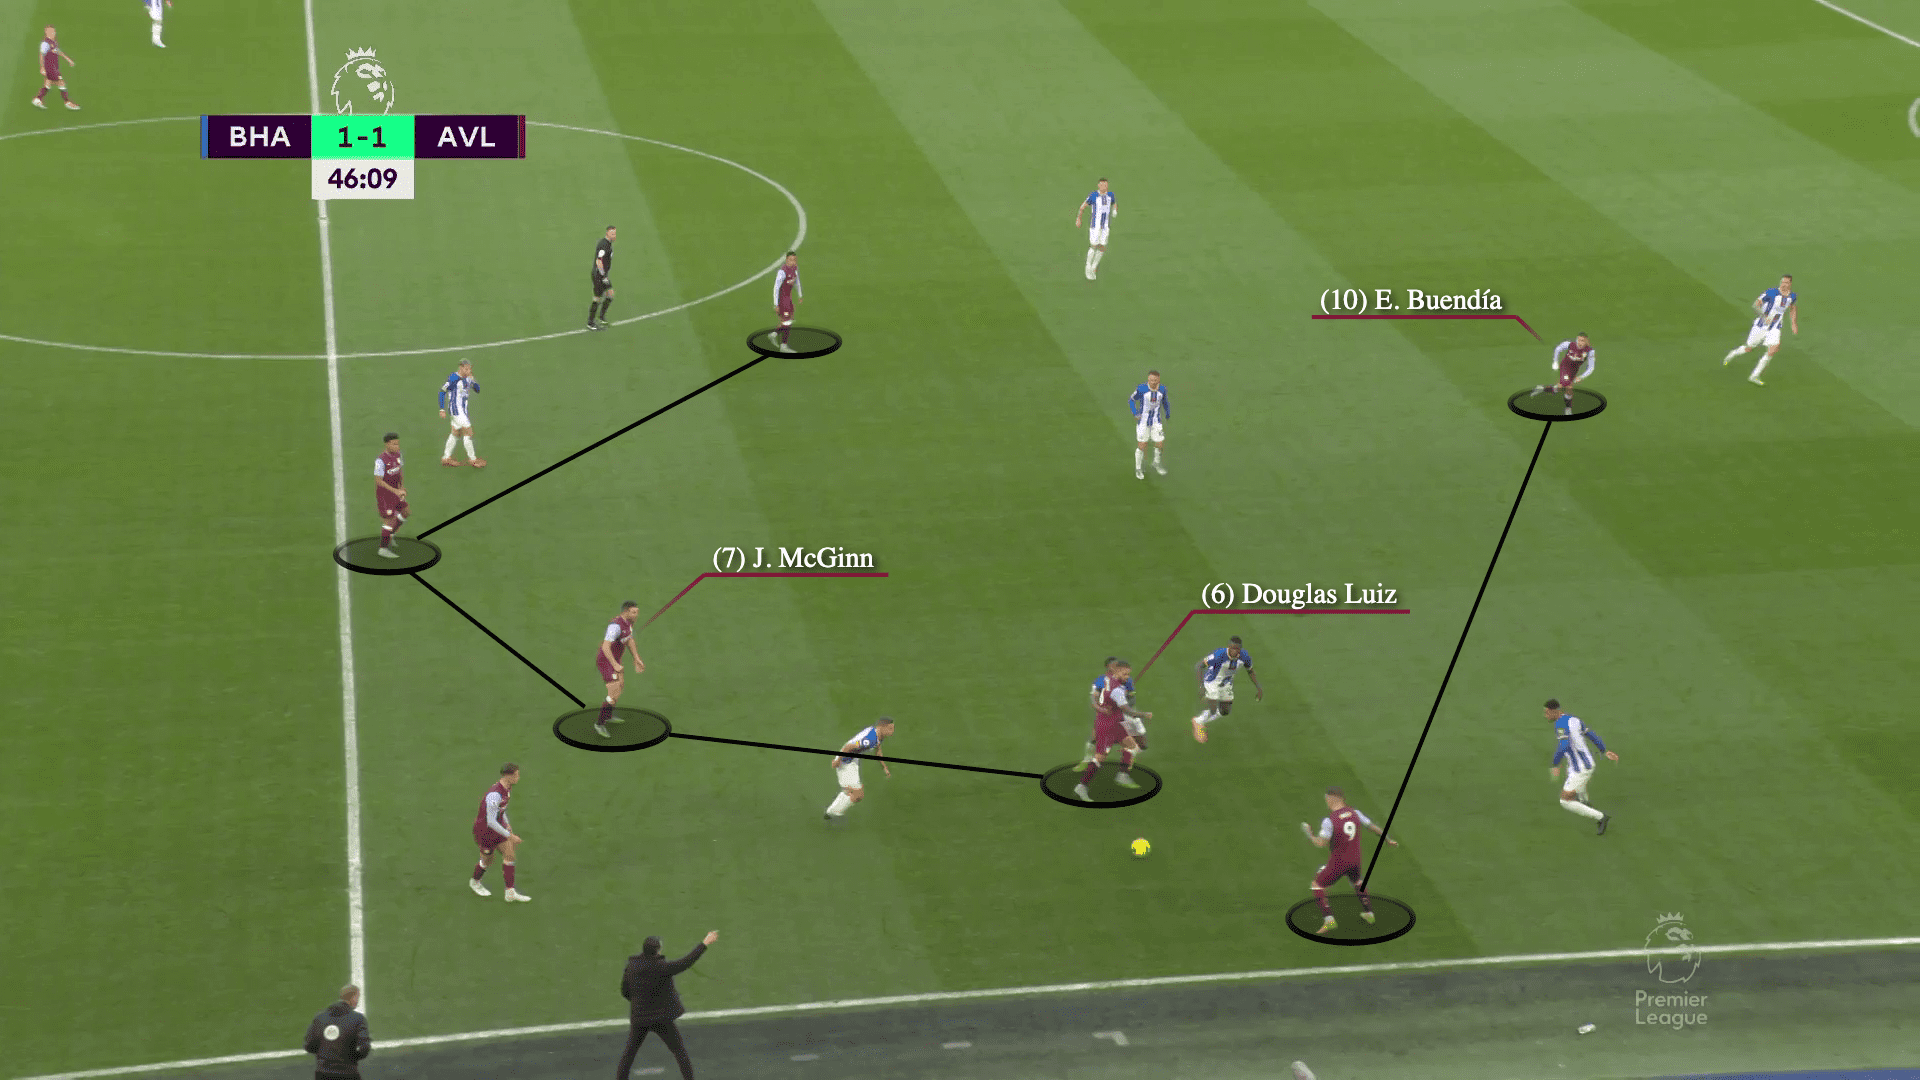
The amazing placement was demonstrated by both Ings and Buendìa who alternated between dropping down and supporting the midfield.
Aston Villa had flexibility because of this rotation in the final third.
Despite having to play with Kamara, Luiz pushed to the front, displacing Caicedo, and giving McGinn room to play in Brighton’s half.
Here is a picture that explains the change in position.
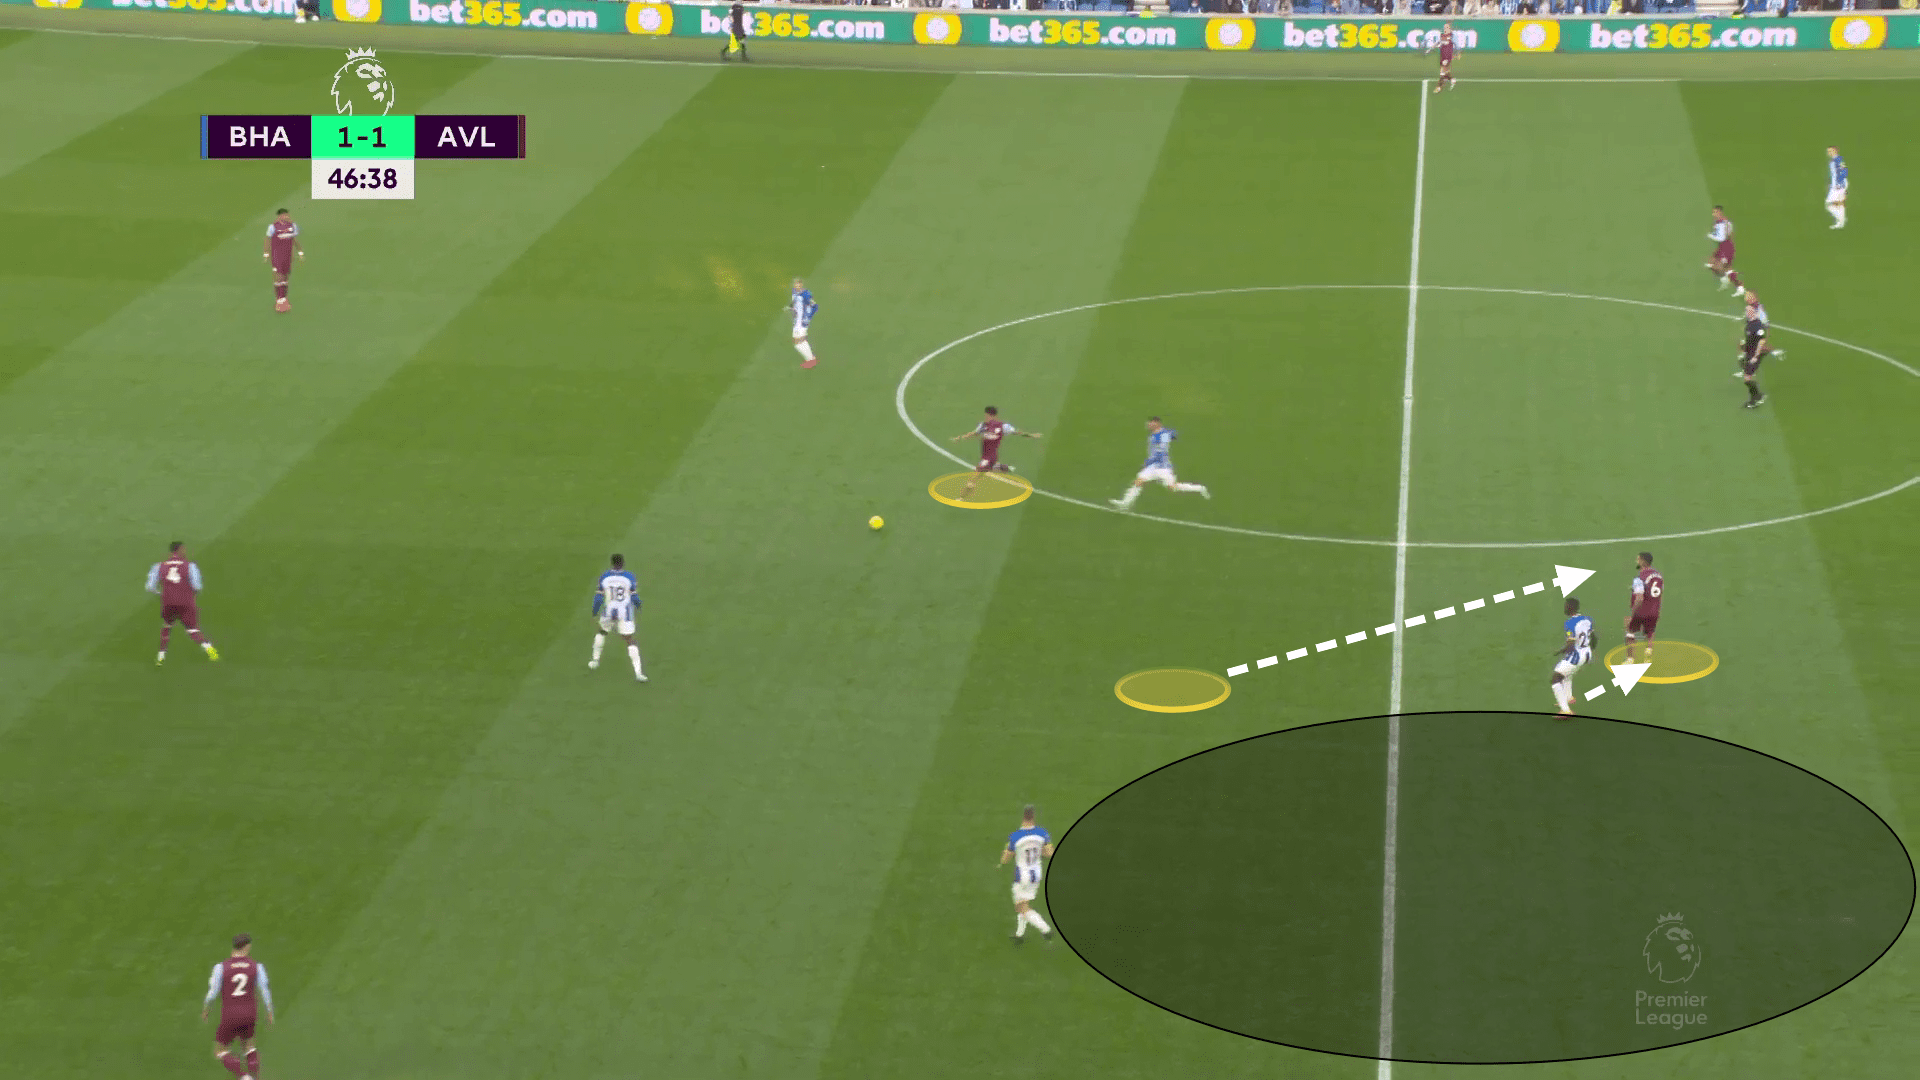
Kamara was capable of making accurate first-time passes to the front.
Villa was able to create simple pass combinations up front with plenty of room ahead thanks to this.
By doing so, Luiz would have the assistance of the midfielders to push up after losing control of the ball.
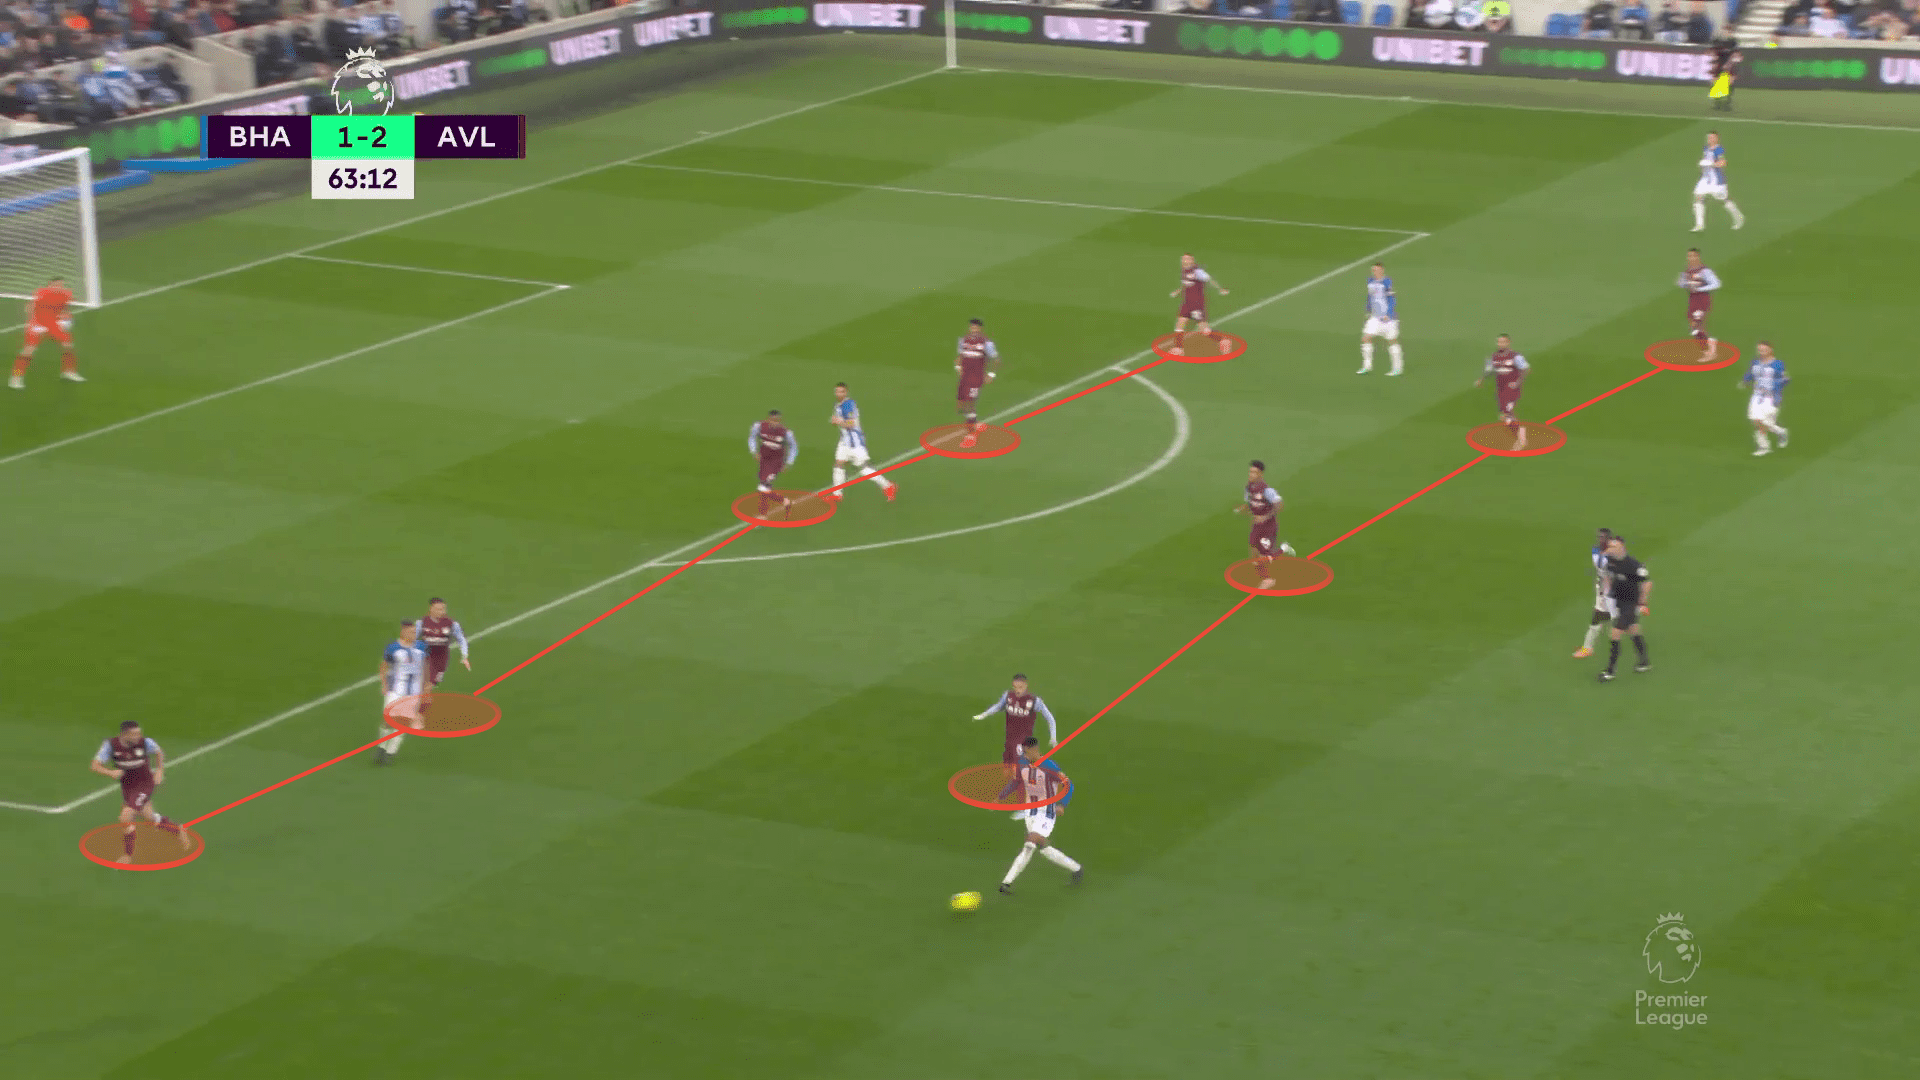
To defend Brighton’s approaching attacks after scoring a goal, McGinn can be seen moving to the right-back position in the picture above.
This demonstrated Emery’s desire to defend with all of his players while keeping a victory to advance in the league.
In the second half, Villa often set up a 5-4-1 formation to effectively defend away from home.
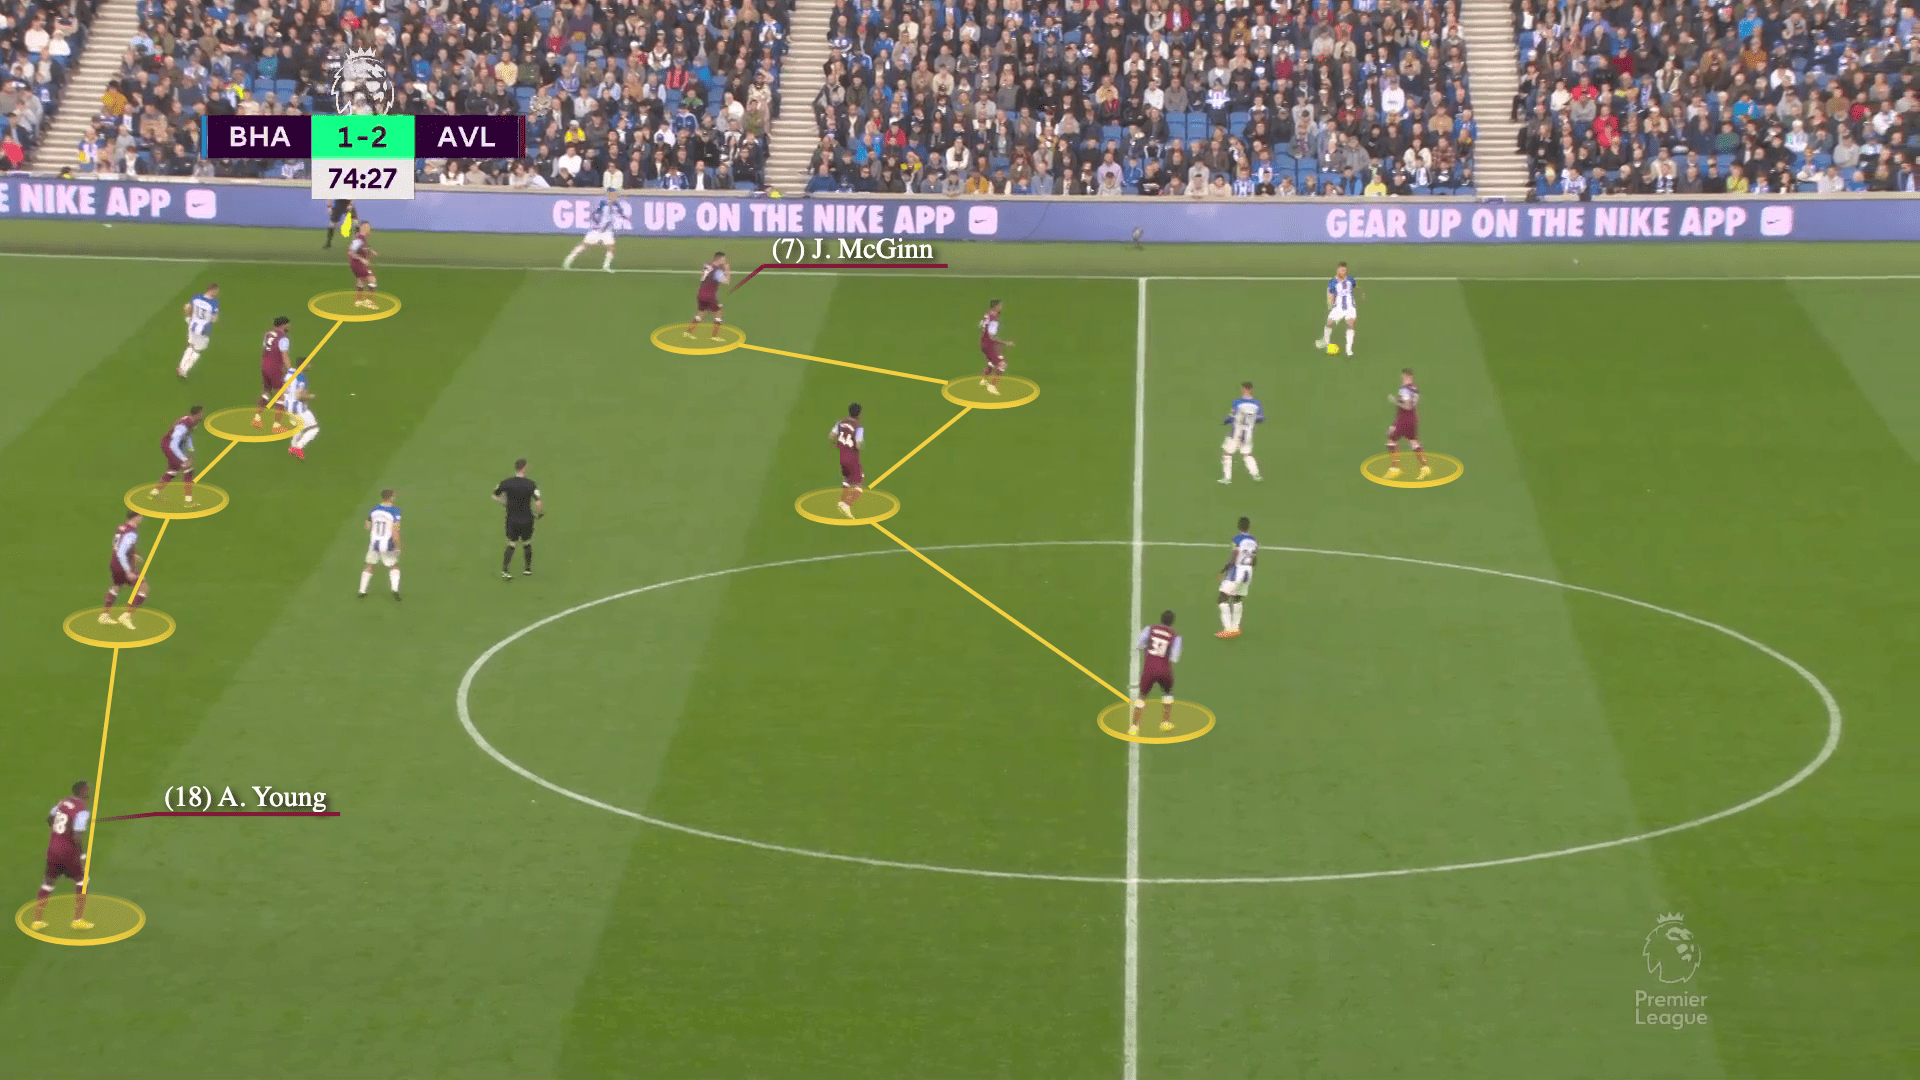
Ashley Young played on his preferred right side of the field after the changes.
McGinn moved to the left, positioning himself over to the left back.
McGinn would defend next to Digne on the left side of Young and ran up to attack the flanks in the event of a counterattack, while Young moved to the middle of the field.
These players made it easier for Emery’s strategies to succeed.
Because of the players’ subtle adaptability, their defensive and offensive strategies were always successful.
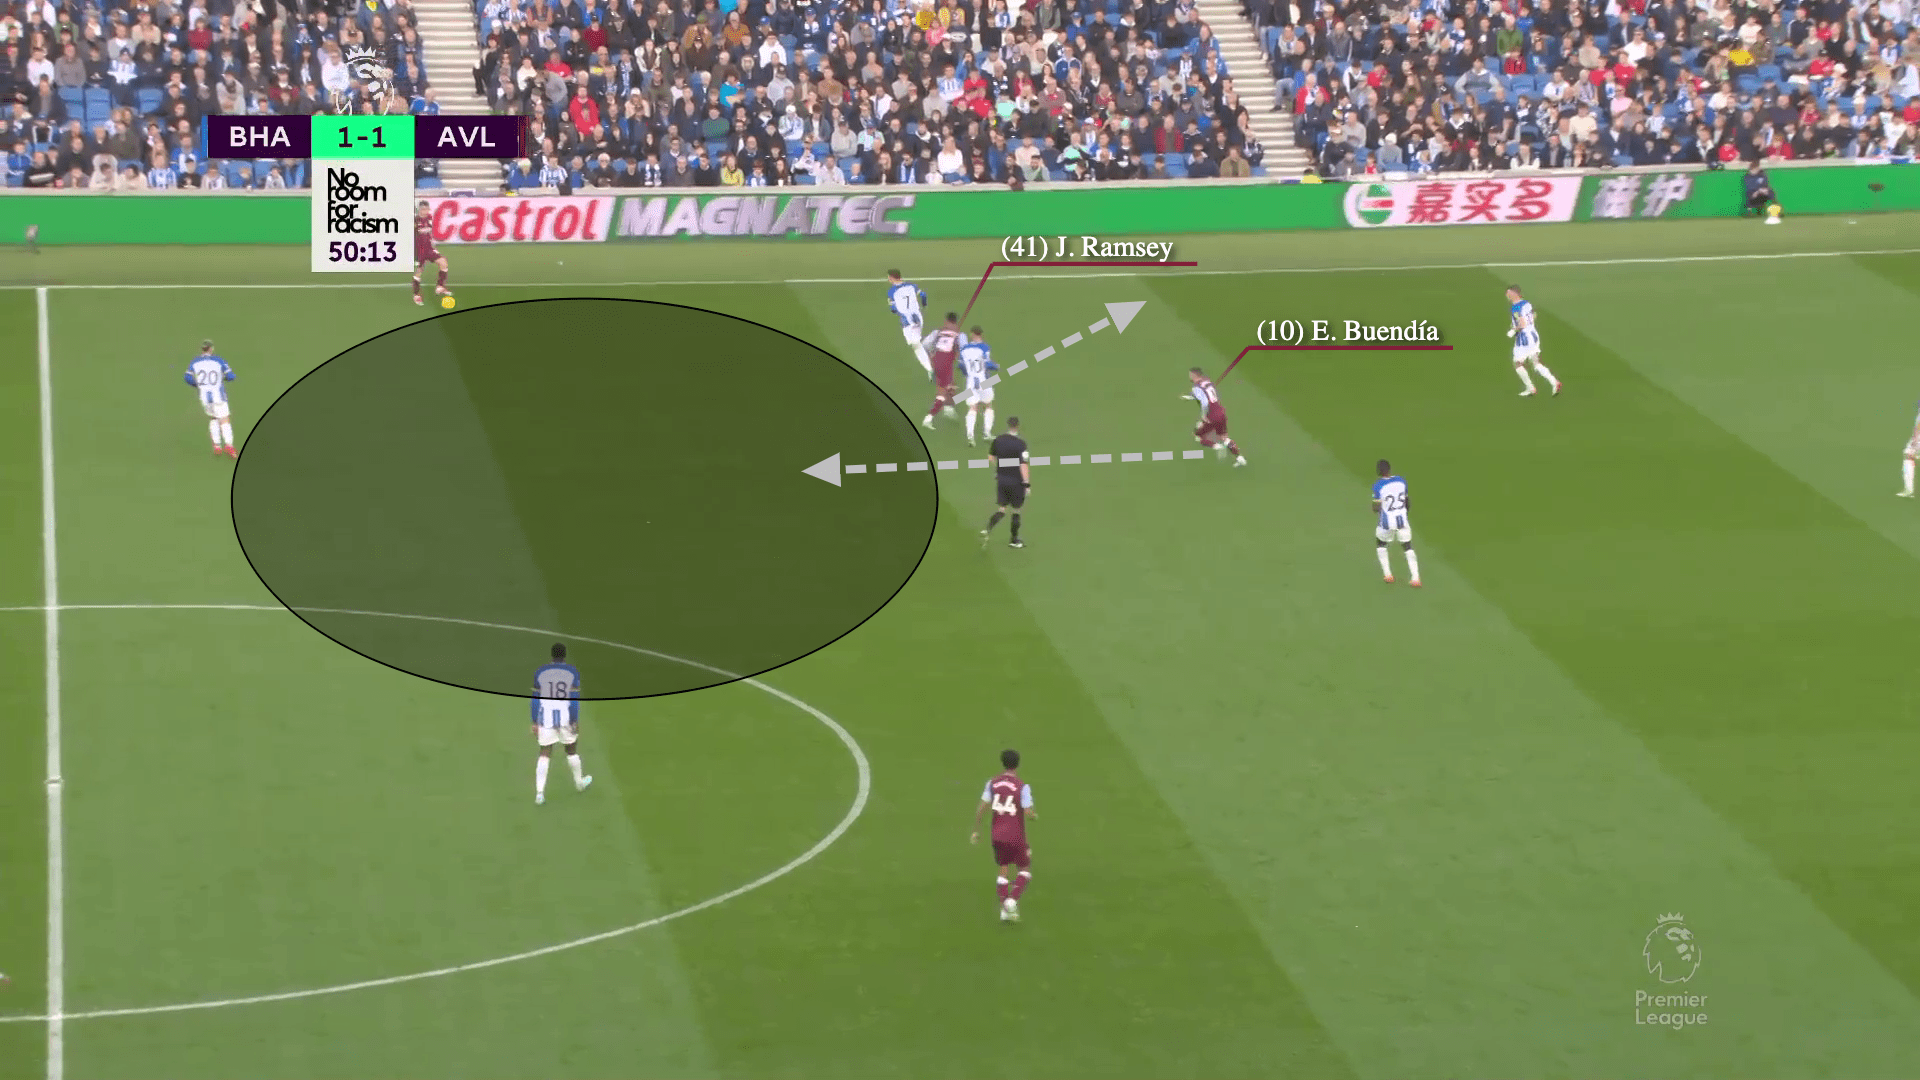
Buendìa is seen stepping into midfield in the picture above to combine with the midfielders.
In the meantime, assuming Buendia was well-marked, Ramsey gives Digne a passing option.
As can be seen, Buendìa took advantage of the gap between Mac Allister and Caicedo to weaken the stability of the pivots.
Emery made superb use of Buendia to disrupt the defensive chain and provide several opportunities in the final third.
He was essential in making the passes that created scoring chances in the final third.
He was unable to score or assist, but he still demonstrates that he can be deadly.

By using the space behind them, Buendìa was able to shatter De Zerbi’s belief in the pivoting midfielders.
Buendìa’s important actions, which he carried out consistently throughout the game, are seen in another example in the picture above.
In the example above, Buendìa received the pass from Kamara, who could retain the ball in tight spaces.
The objective was to keep the ball in play until a run through the centre was made.
His ability to assess the area before receiving the ball enabled him to make a solid first touch in an open area.
Conclusion
Brighton made several individual mistakes, which caused the disintegration of their organisation.
Pressing hard created gaps that Aston Villa could exploit.
Brighton had a lot of ball possession, but it was impossible to get through Aston Villa’s defence.
Emery has been at ease with the team’s collective adaptability.
They looked dangerous throughout the attacks and were adept at defending in a variety of scenarios.
Despite a few problems, they were not visible in the game as they were subtly incorporated.
Emery has managed to establish his takeover and is already beginning to construct for his comfort.

Comments