This past weekend in the Premier League has been one of the more interesting in recent memory.
Cardiff City shutout a promising Leicester side, Wolves ran out 3-1 winners at Wembley, and Liverpool trounced Arsenal to maintain distance between their rivals atop the table. Burnley’s 2-0 win over West Ham wasn’t the most surprising score of the late-December fixtures, but it certainly juxtaposed itself to the previous four months’ results. How exactly did Burnley – eyeing relegation – defeat Manuel Pelligrini’s ambitious London side?
Tactical Preface
Manuel Pellegrini’s West Ham United visited Turf Moor in phenomenal form. After a loss to Manchester City in November, the Chilean has taken his side on a run of five wins in six. West Ham’s good squad depth allows Pellegrini to utilize a variety of different starting elevens; after a 2-1 win in Southampton, Mark Noble came in to replace Pedro Obiang while Marco Arnautovic’s return from injury saw Grady Diangana relegated to the bench.
West Ham set up in a 4-4-2 with utility man Michail Antonio at right-back. Antonio and, to an extent, Aaron Cresswell are attack-minded full-backs, meaning they often push up high. This can be a great asset, but on Sunday it was a factor in the Hammers’ downfall. Declan Rice and Noble formed a double-pivot in midfield to cover Angelo Ogbanna and Issa Diop. Up top, Lucas Pérez and Arnautovic struggled to assert themselves.
Burnley have not looked like their usual selves this season. Their form is in sharp contrast to that of West Ham: a 1-0 win over Brighton on December 8th was their only point in seven and their first win since September. Sean Dyche opted to drop Joe Hart for Tom Heaton after the Englishman conceded five against Everton. A defensive re-work was in the cards as Burnley switched from a five-man defence to a traditional 4-4-2.
Chris Wood replaced Sam Vokes up top, which in hindsight was a masterstroke of a move by Dyche. Ashley Barnes and Wood combined to terrorize West Ham’s defence, while midfielders Ashley Westwood and Dwight McNeil produced spectacular performances.
The two 4-4-2s clashed at the Turf Moor and, on paper, were relatively well-matched. But statistics don’t always take into account how strong Burnley’s tactical execution is. By halftime, West Ham were truly down for the count at 2-0. While Pellegrini’s defence did a bad job in dealing with the home side’s attacks, it was Burnley’s strikers who stole the show.
Wood and Barnes: Burnley’s dynamic duo
New Zealand striker Chris Wood will be remembered for his goal on 15 minutes, but he and his strike partner contributed so much more than that. Barnes and Wood combined to make 6 key passes and 82 ball touches (Pérez and Arnautovic made one and had 49 touches). Dyche knew exactly how to get his strikers involved and it seriously hurt West Ham’s game plans.
A lot of Burnley’s passing actions involve launching the ball forward. Whether it be from Heaton, the defenders, or even midfield, the aim is almost always to find Barnes or Wood in space. The strikers are so good at finding pockets of space in front of or behind the backline.
Burnley don’t keep much of the ball (43% on average and on the day) but they keep it when and where it matters. When Barnes comes deep to receive a long ball from James Tarkowski, teammates around him know to prepare for what’s next. For Wood, this often means making a run in behind. For Burnley’s midfield four, this means finding other pockets of space to receive a third-man pass.
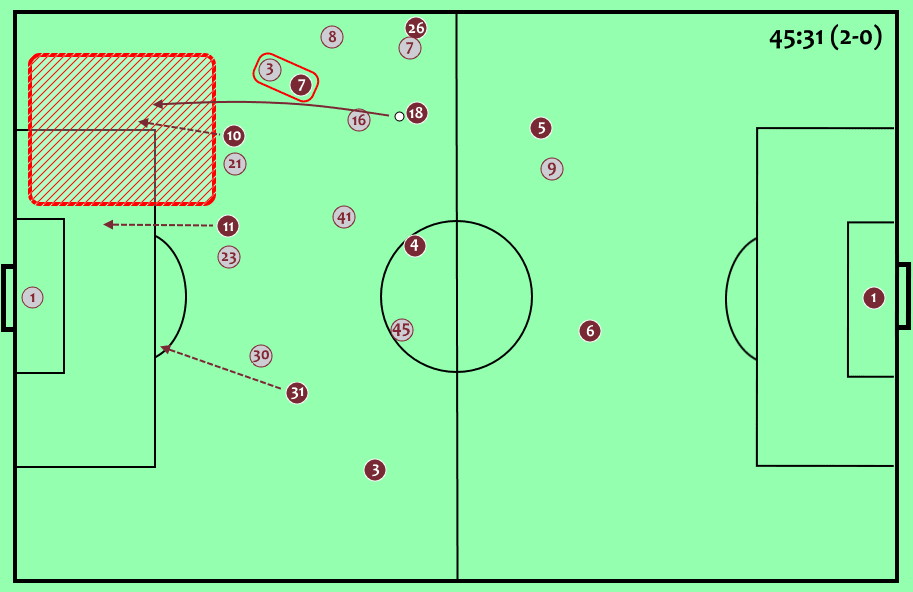
Where Burnley’s strikers really hurt West Ham was their runs in behind. With full-backs Cresswell and Antonio pushed up higher, Wood and Barnes were often able to isolate themselves against the centre-backs. Diop and Ogbonna struggled greatly to deal with these movements.
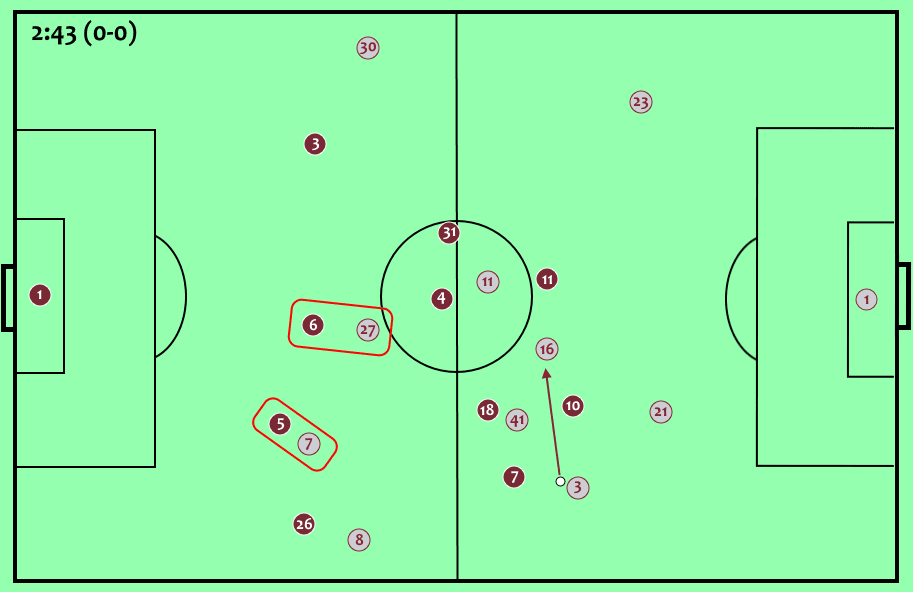
Many of Burnley’s balls in behind weren’t immediately threatening. They instead were delivered either as aerial balls to be headed down or long balls in the half-spaces. In the example above, Ashley Barnes had space to run onto Westwood’s pass because Cresswell (3) was marking Johan Gudmundsson. Ogbonna’s late reaction gave Barnes time to cross into the box where Burnley players were making delayed runs. Note also how Burnley’s back four remains structured and not prone to a counter-attack.
West Ham’s poor defence
Much of Burnley’s success in creating chances stemmed from their sharp movement and passing. But scoring is a two-way street: West Ham’s dull defending factored in as well. The full-backs were not able to intervene with balls into the box. The centre-backs – Issa Diop especially – were too slow to react to runs in behind.
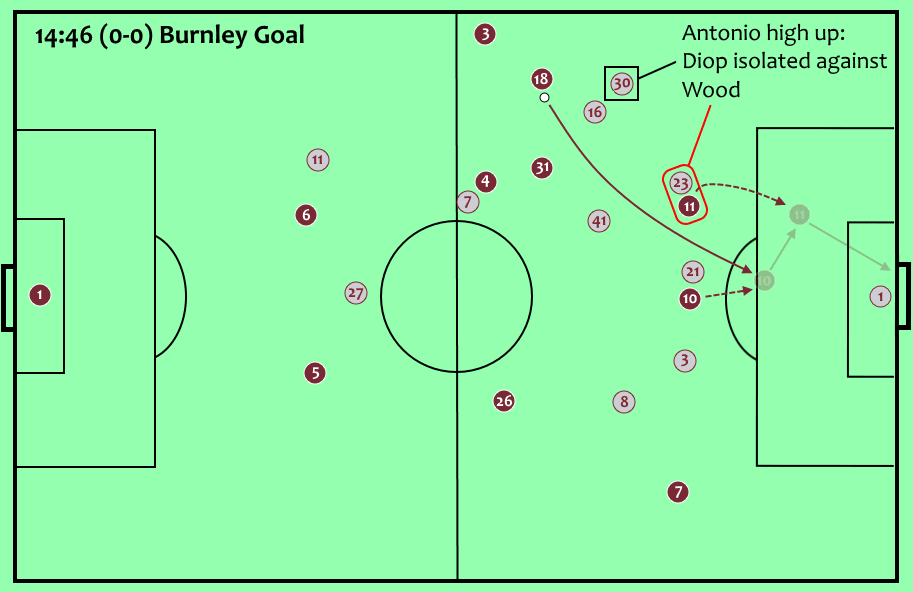
The most relevant example of West Ham’s bad defending came on 15 minutes. Burnley scored their first goal of the match when Barnes headed a cross down to Wood, who took his time to fire past Lukasz Fabianski. Barnes’ height and athleticism saw him able to get around Ogbonna and win the ball. Diop’s reaction to the initial ball was slow and Wood timed his run to stay onside.
Diop’s mistake may have been less noticeable had he played with a more defensive right-back. But Antonio is an attack-minded player: his five dribbles were the most of any on the day. He was committed high up the pitch, meaning Wood had only Diop to free himself from. Hindsight is 20/20, but Pellegrini should have picked a more well-structured defence.
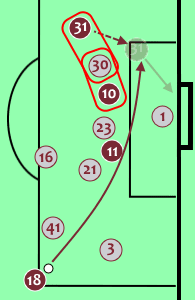
Burnley’s second goal also came from a cross into the box. Westwood won the ball just outside the box after Ogbonna’s poor clearance and immediately looked to whip the ball into the far post area. Once again, West Ham’s defence was poorly positioned. Antonio was forced to mark two players and McNeil snuck in behind to score the 2-0.
Burnley win the midfield battle
Poor defending was the main reason West Ham conceded two against an out-of-form Burnley. However, Burnley were able to create so many chances because West Ham simply could not. It was extremely difficult for the Hammers to advance the ball in the centre of the field.
With no creative presence in midfield, Pellegrini was looking for the wingers and strikers to carry that burden. Felipe Anderson and Robert Snodgrass were too isolated on the wings to make much of an impact. As said before, Arnautovic and Pérez were not sharp enough to find good areas to receive the ball.
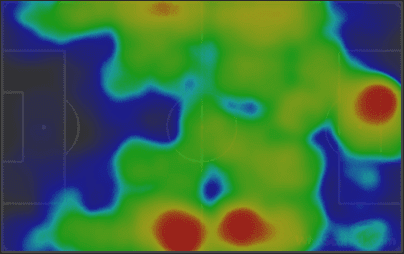
One positive aspect of having attacking full-backs is their contribution going forward. Antonio (95) and Cresswell (82) had more touches than any other West Ham player. This heat map shows exactly how reliant Pellegrini’s side was on playing through the flanks. Unfortunately for the away side, the other eight outfield players struggled to link play and create chances.
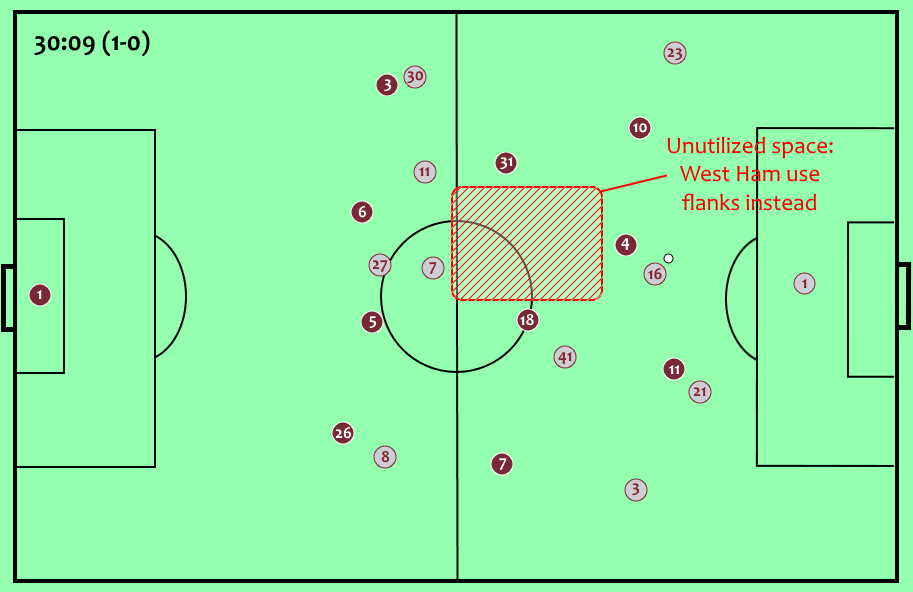
The midfield block of Burnley played a huge role in forcing the visitors away from dangerous areas. West Ham were allowed space to pass between their deeper players but any further advance was difficult. Gudmundsson and McNeil squeezed tight to Jack Cork and Westwood to restrict passing lanes.
Other teams may have found a way to bypass this 4-4-2 structure by adding a creative midfielder. Since West Ham weren’t able to successfully bring their strikers into play like Burnley were a switch to include an extra midfielder would have added a passing option to pass through the defence instead of around.
Conclusion
West Ham’s visit to Turf Moor was, on paper, a favourable match-up for away side. But Sean Dyche’s relegation candidates looked their old selves for 90 minutes and completely outclassed Pellegrini’s men. The smart movement and skill of Chris Wood and Ashley Barnes terrorized the Hammers’ poor defence. The visitors’ lack of midfield presence made it even more difficult to create and stop scoring chances.
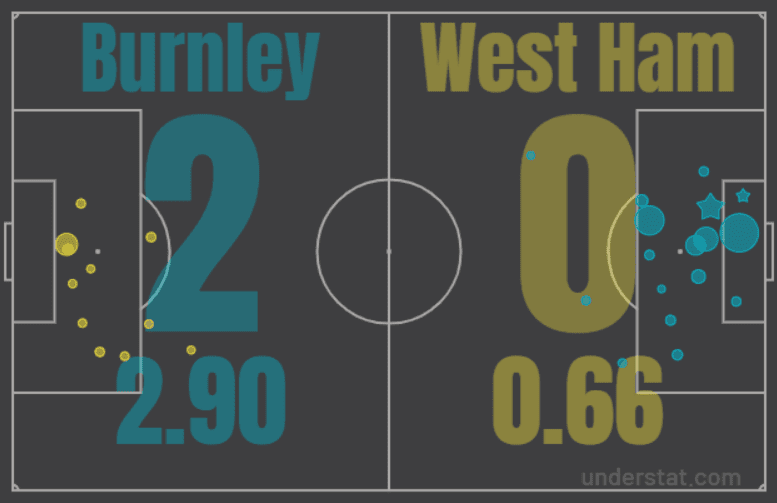
Of course, Burnley very well could have played like this without managing to finish scoring chances. But the expected goals plot seen above shows the sheer volume of opportunities the home side had. Burnley’s 2.74 expected points represents a performance worthy of a win.
Burnley should not be a team bothered by relegation come May based on Sunday’s evidence. Sean Dyche has built a well-drilled, smart team over the past couple of years and they executed their game plan last weekend. West Ham have been recovering with Manuel Pellegrini at the helm, but glaring holes remain in his squad.
If Burnley can start turning performances into results, expect them to recover to last season’s standards in no time. If West Ham don’t address pressing issues (Samir Nasri is a start), a respectable mid-table finish could become another relegation scare.
Player and team statistics gathered on WhoScored.com. Expected goals and points statistics gathered on Understat.com.
If you love tactical analysis, then you’ll love the digital magazines from totalfootballanalysis.com – a guaranteed 100+ pages of pure tactical analysis covering topics from the Premier League, Serie A, La Liga, Bundesliga and many, many more. Get your copy of the FIRST of two December issues for just ₤4.99 here, or the SECOND of the December issues with an annual membership right here.



Comments