Gaël Kakuta’s career came full circle when he made his loan move back to RC Lens from Amiens SC this past summer. The 29-year-old first joined Lens in 1999 when he was just 8 years old and remained there until 2007 when he made his well-documented move to Premier League side Chelsea.
In England, he never really found his feet and after that, his career experienced quite a bit of turbulence as he has played for as many as 12 different clubs but after moving back to the country of his birth, France, last year when he joined Amiens, he began to remind people of the player who first caught the attention of the London giants and that form has only improved this term following his return to the club where he has spent more time than any other in his life, Lens.
At present, Kakuta is the sixth-highest goalscorer in Ligue 1, with four to his name from an xG (expected goals) of 3.18. He has also provided one league assist this term while generating an impressive xA (expected assists) of 2.12 – the sixth-highest in the league – helping newly-promoted Lens to take 13 points from their first seven games of the 2020/21 campaign.
In this tactical analysis piece, in the form of a scout report, we’re going to determine just how and why Kakuta has been so effective for Les Sang et Or this term. We’ll look at his role within Franck Haise’s tactics and provide tactical analysis of how the 49-year-old coach’s tactics have helped Kakuta to be one of the stars of France’s top tier for the beginning of the season.
Kakuta’s positioning
Haise sets his Lens up in a 3-4-1-2 shape and Kakuta is the ‘1’ in that system. He plays as a ‘10,’ occupying the space between the midfield line of four and the two centre forwards.
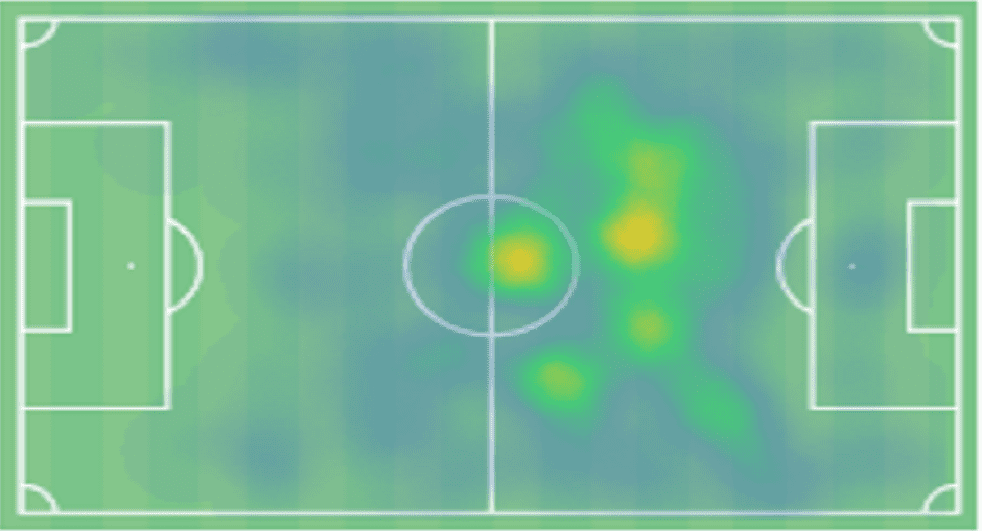
This heatmap is Kakuta’s heatmap for the 2020/21 campaign thus far and this gives us an indication of the positions in which he spends the majority of his time during a given game.
As you might expect, it’s clear that this central position in between the centre circle and the opposition’s penalty area – zone 14 – is the area of the pitch that is coloured the most here, indicating that this is where he spends most of his time, however, this heat map also backs up the point that he enjoys quite a lot of freedom to roam from this position and drift into wider positions.
He likes to spend time in the central area and is good at finding space in this position, however, if there is more space elsewhere, such as either the left or right half-space, he is happy to move into those positions too. He does go as far as the wings on occasions, particularly the right-wing from where he likes to cut inside onto his favoured left foot, however, as this heatmap shows, he occupies central positions far more often.
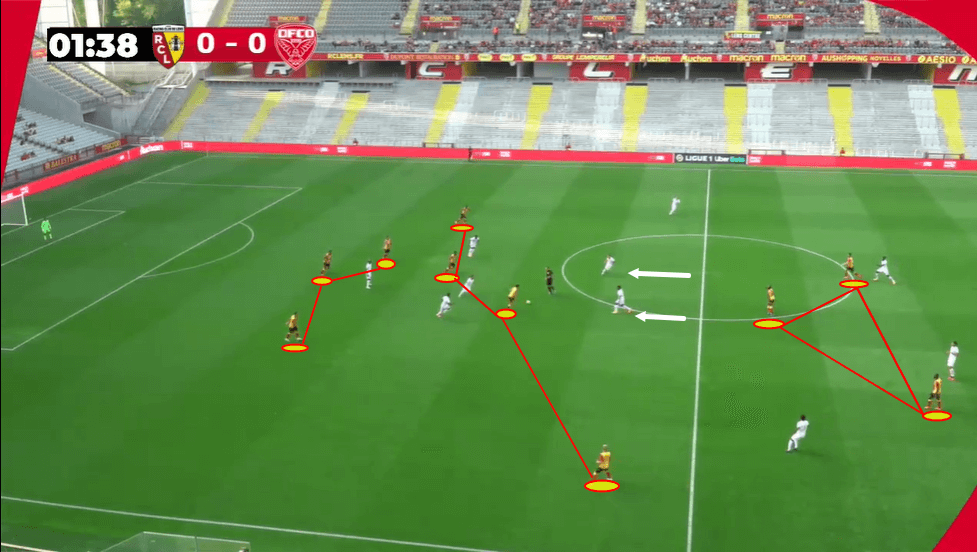
This image provides us with a clear shot of Lens’ 3-4-1-2 shape, as marked out, with Les Sang et Or building out from the back past Dijon FCO’s 4-2-3-1 defensive shape.
We can see Kakuta positioned just behind his side’s two strikers here, and in between Dijon’s midfield and defensive lines. Here, we can see both of Dijon’s central midfielders pushing up and applying pressure to one of Lens’ central midfielders but as both of them push up and Dijon’s two centre-backs are occupied by both of Lens’ centre forwards, this creates a large amount of space for Kakuta who gets onto the end of his teammates’ pass.
It’s dangerous to give the ex-Democratic Republic of the Congo international this much space, due to just how dangerous and creative he is on the ball but he is good at finding this kind of space, while Lens’ tactics are also set up to help him find space like this and that is a major reason why he has either scored or assisted half of Lens’ Ligue 1 goals so far this term.
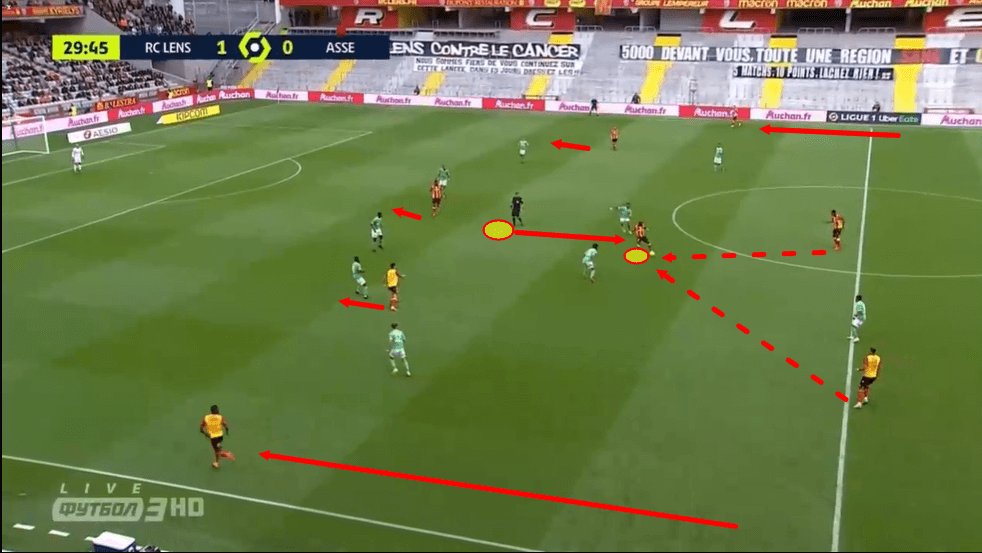
Sometimes, the opposition defends this central zone in which Kakuta likes to find space a bit more tightly than Dijon did in the previous passage of play and the image above shows us an example of how Saint-Étienne set up to prevent Lens from easily playing the ball out from the back into this area in their recent league clash.
We can see how both of Saint-Étienne’s central midfielders were a bit more passive than Dijon’s were in the previous image and this allowed them to effectively block off passing lanes from these two Lens players positioned deep in the image above, into zone 14.
We can see five Lens players running in behind as they build-up here, which gives us an idea of the threat that they could pose Saint-Étienne if allowed to play the ball into the creative nucleus of their side just behind those runners.
Due to the positioning of these midfielders, Kakuta drops slightly deeper, placing himself in front of these midfielders to try and get on the ball during the build-up, which he does. However, it is still difficult for him to turn and beat the two Saint-Étienne midfielders positioned just behind him, so while this gives us an example of his willingness to get on the ball and how he alters his position in a slightly different scenario to the ideal one presented previously, this doesn’t necessarily show us an example of the 29-year-old operating in the optimal position for him.
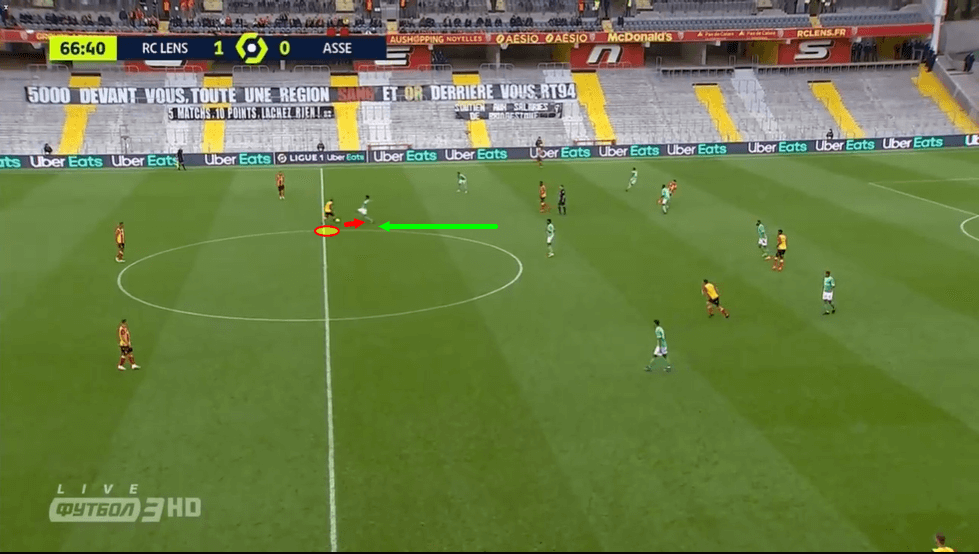
He is less effective in these deeper areas and one of the main reasons for this is that he takes more risks than might be necessary, at times, in deep positions, which allow opposition players to dispossess him and potentially spring a dangerous counter-attack. We can see an example of this in the image above.
Here, Kakuta dropped deep to help his side to progress the ball during the build-up but a pacey opposition player was right on his shoulder and managed to dispossess him. This has happened on a few occasions this season and is a notable weakness to his game. Sometimes he doesn’t scan enough in deep areas, particularly when pacey players press him from behind.
Additionally, Kakuta likes to try and beat players on his own, instead of using his teammates, even in deep positions and when this backfires it can be dangerous.
This may tell us that closing off space in between the midfield and defensive lines, thus forcing Kakuta deep may be the best way of potentially exploiting him.
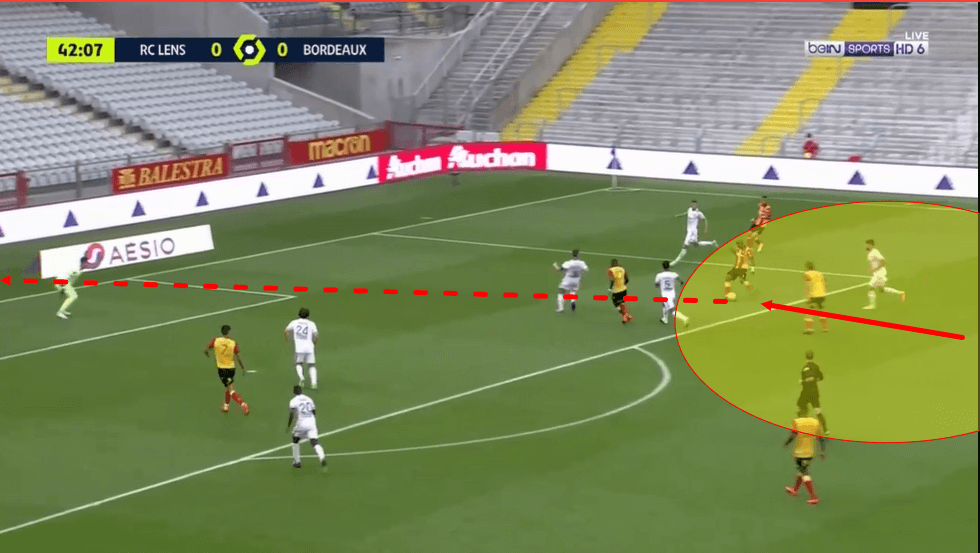
In this next image, we can see Kakuta lining up a shot from just inside the box on the right-hand side. The playmaker likes to get into this position, in particular when either taking on a shot or playing a cross.
This position allows him to cut inside onto his stronger left foot and decide between the best option of either making a shot attempt or playing a cross.
The area highlighted in this image is generally the kind of zone in which Kakuta will perform either a shot or a cross. He can sometimes pop up on the left-wing, where an out-swinging cross is far more likely but he much prefers to get into this position on the right side of the pitch.
Additionally, he doesn’t always carry the ball into the box. This season, he has actually taken an average of just 1.68 touches per game inside of the penalty area, which tells us that he doesn’t often venture into very advanced areas of the pitch and prefers to operate from just outside of the penalty area, occasionally drifting just inside of the box.
Kakuta’s Dribbling and passing
Kakuta’s dribbling ability is undoubtedly his primary asset. One of the main reasons he has been such a quality playmaker this term is that Lens have succeeded in getting him into positions from where he can exploit this quality on the ball frequently.
He has completed a relatively high number of dribbles per 90 in Ligue 1 this term – 4.71 – the third-highest number of dribbles per 90 that have been completed by any Lens player in the league this season, while he has also completed more in total than the two Lens players to have made more than him per 90.
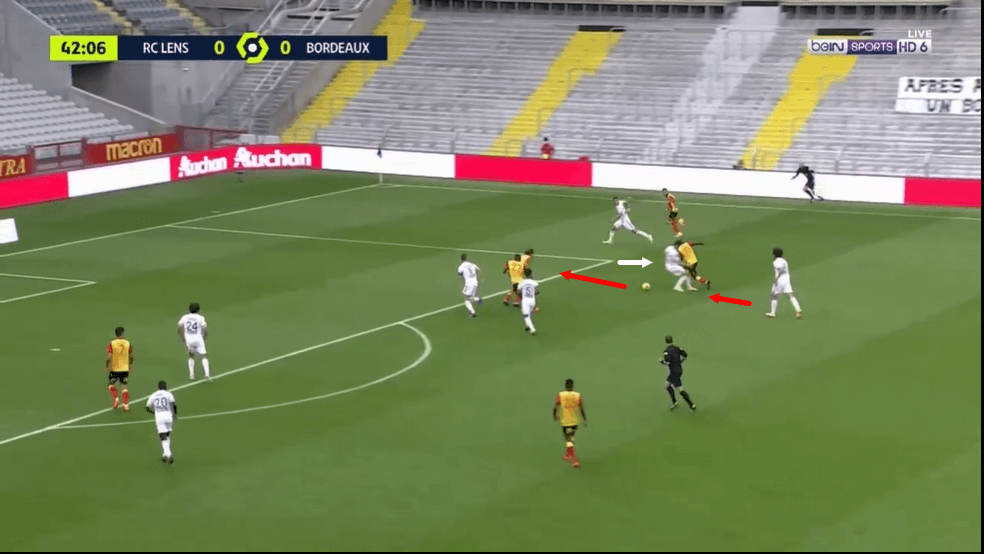
The last image in the previous section showed us Kakuta lining up a shot from just inside the right-hand corner of the box and this image above shows the attacker in the process of completing the dribble that got him into that position.
Here, we can see that Kakuta got on the ball in the right half-space and then attracted one opposition player out of their defensive line, in an attempt to close the dribbler down.
Kakuta, though, is very good in 1v1 dribbling situations. This kind of scenario is one in which he does very well and as he gets around this player who attempted to close him down, he can then move into the gap that he left behind him in the defensive line, from where Kakuta then gets his shot off.
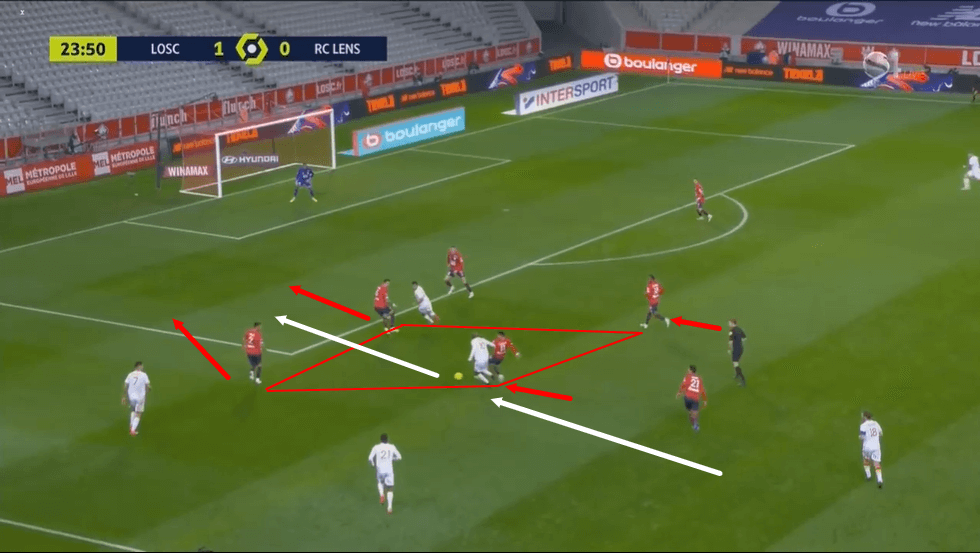
So, the previous piece of analysis helps us make our point that the 29-year-old is generally very difficult to defend against 1v1 but he is also quite good versus multiple opponents in tight spaces, as this next piece of analysis will show.
Just prior to the image above being taken, the Lens playmaker carried the ball past midfielder Benjamin André, who is the furthest Lille player from his own goal in this image above.
As he carried the ball forwards, Kakuta finds himself in this ‘box’ shown above, made up of four opposition players. Though one player is very close and actively challenging for the ball, he does well to ride that challenge and carry the ball onward into the penalty box.
In these types of situations, Kakuta is particularly dangerous once he picks up some speed, due to how quick his feet are and how quickly he can turn and change direction while dribbling. This makes him dangerous to tackle and difficult to dispossess.
He is also still good at finding space within this tight area and that makes it difficult for the opposition players surrounding him to tackle him. This can result in the player enjoying just enough space to push on forward or play a dangerous pass.
However, while he is great in tight spaces like this, it is, ultimately, much easier to defend against him by gathering numbers around him like this than it is to defend against him 1v1, where his chances of beating the defending player tend to be quite strong.
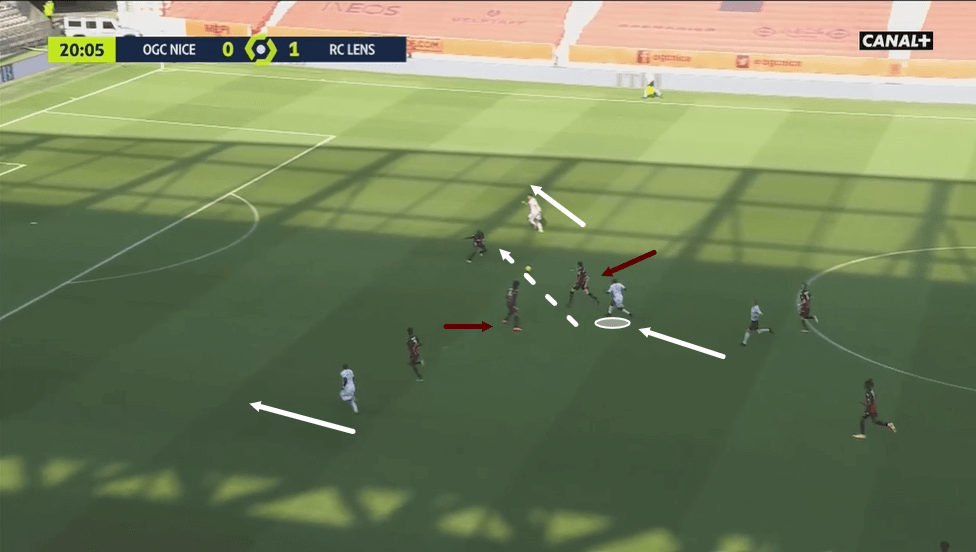
The image above shows us a typical example of how Kakuta operates when in possession of the ball, in space, inside of zone 14. We can see that as he carries the ball forward, he attracts pressure from multiple opposition players to this central area, as they likely want to avoid defending against him 1v1.
From central positions, Kakuta generally has at least two runners ahead of him, in the form of the slightly wider-positioned centre forwards. He frequently opts for a through ball to one of these players or potentially an overlapping wing-back, hence why he has played a total of 17 through passes in the league this term – the third-highest number of through passes played in France’s top tier.
These players often enjoy an increased amount of space slightly wide of the centre of the pitch thanks to Kakuta’s dribbling attracting opposition players more centrally.
On this particular occasion, the 29-year-old’s pass was intercepted but this does still provide us with a clear example of how he creates dangerous situations and he has capitalised on plenty of them this season, as the numbers suggest.
Kakuta’s defensive contribution
Lens’ tactics off the ball have proven quite effective this season and Kakuta has played a significant role within their press.
Lens’ PPDA, at present, is the sixth-lowest (11.44) in Ligue 1, which backs up the point that they lean more towards the aggressive side of things with regard to Ligue 1 teams out of possession.
Furthermore, they have engaged in an average of 64.38 defensive duels per 90 this season while Kakuta, individually, has engaged in 8.92 defensive duels per 90 – the third-most defensive duels that any Lens player has engaged in, on average, this term and this is largely due to the important role that he plays within his side’s press.
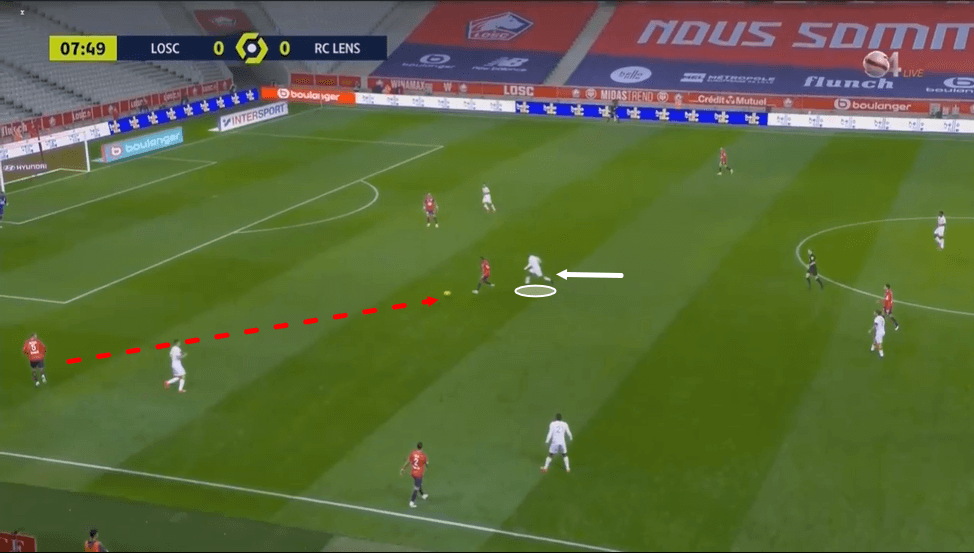
Lens press high in their 3-4-1-2 shape and Kakuta tends to play a particularly aggressive role within this press. In the image above, we can see him charging down Lille midfielder Renato Sanches as he prepares to collect the ball just in front of his side’s two centre-backs here.
Kakuta has been very effective at marking central, holding midfielders out of the game during the build-up, in particular, due to his positioning within his side’s press, as this image shows. However, his central positioning also allows him to help other teammates apply pressure if there is a greater threat elsewhere and he tends to cover plenty of ground off the ball if needed to, often shifting out as far as the wing to help his side in their pressing efforts.
Kakuta’s positioning has combined with his solid defensive work-rate to make him quite effective in his role this term and his alertness has also played an important role here. He is good at spotting danger and closing down players and/or passing lanes to give his side the best possible chance of winning the ball back high up the pitch to spring a dangerous counter-attack.
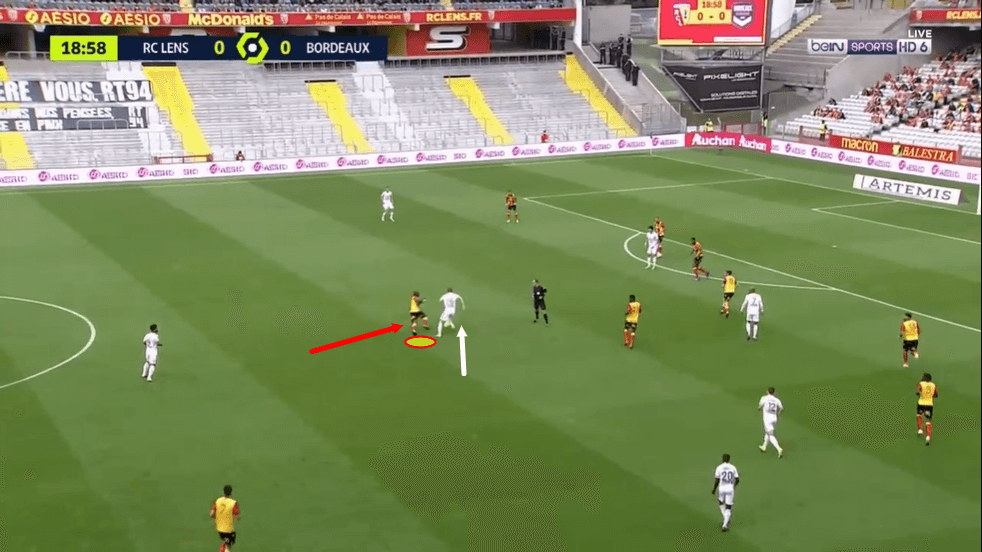
Additionally, it isn’t unusual to see Kakuta dropping deep into his own half to help his side when the opposition are at a more advanced stage of their attack and his side are defending deeper.
His pace and his work ethic are both frequently on display in these scenarios and he is effective at charging down opposition players from behind, as we can see above, which often leads to him winning the ball back for his side in deeper positions too.
Conclusion
To conclude this tactical analysis piece, Kakuta thrives in the central role he plays within Lens’ tactics. He enjoys plenty of freedom in this role and is good at finding and exploiting space in between the lines both centrally and in the half-spaces.
He is less effective on the ball in deep areas, which may be the main weakness to his game as he can end up in these areas on occasion, so that is one part of his game that could potentially be exploited.
However, in the opposition half of the pitch, he has shown to be a very difficult man to defend against and he tends to enjoy plenty of time on the ball there thanks to how Haise’s tactics have managed to get the best out of him.



Comments