Two weeks ago, our tactical theory article on the relationship between the #9 and #10 hit the website.
Initially, this was supposed to be a stand-alone article.
After watching some of Europe’s best pairings, it was clear this wasn’t possible.
A second instalment was needed.
And that’s where we find ourselves today.
This tactical theory piece continues our investigation of the relationship between the modern #9 and #10.
As the role has evolved, the game has produced unique relationships fitting the key qualities of the players in those positions into a cohesive joint venture.
Moving through this week’s tactical analysis, we’ll start with combination play and pinning the opposition’s backline to create space between the lines.
Turning to Manchester City, we’ll look at an example of how a creative #10 can play off of a target man and poacher, interpreting the role of the #9 as more fixed than fluid.
Finally, we’ll turn to positional rotations in more fluid #9 and #10 partnerships.
Between the two articles, the objective is to differentiate ways to incorporate interactions between a #9 and #10 within one’s own environment.
Combination Play and pinning to create BTLs
One of the key concepts to cover in this piece is how the #9 and #10 can coordinate their starting positions and movements to impact the organisation of the opposition’s lines.
These are instances in which the two players are not directly involved in ball progression, but more so creating space to play into higher up the pitch.
Essentially, they’re creating better attacking conditions for their teammates.
Once their teammates can play forward, that’s when our two focus positions come alive.
The examples we’ve chosen here offer one look that starts with more space between the lines while the second focuses on a more vertically compact opponent.
We turn to Chelsea for our first example.
High up the pitch, Cole Palmer and Nicolas Jackson are occupying three Everton defenders.
Looking at the Everton backline, their body shape shows that they are concerned with a ball played in behind and are conceding some ground to the Chelsea attackers.
As Palmer and Jackson continue to push forward, the gap between Everton’s backline and midfielders expands.
That creates space to play forward into Palmer.
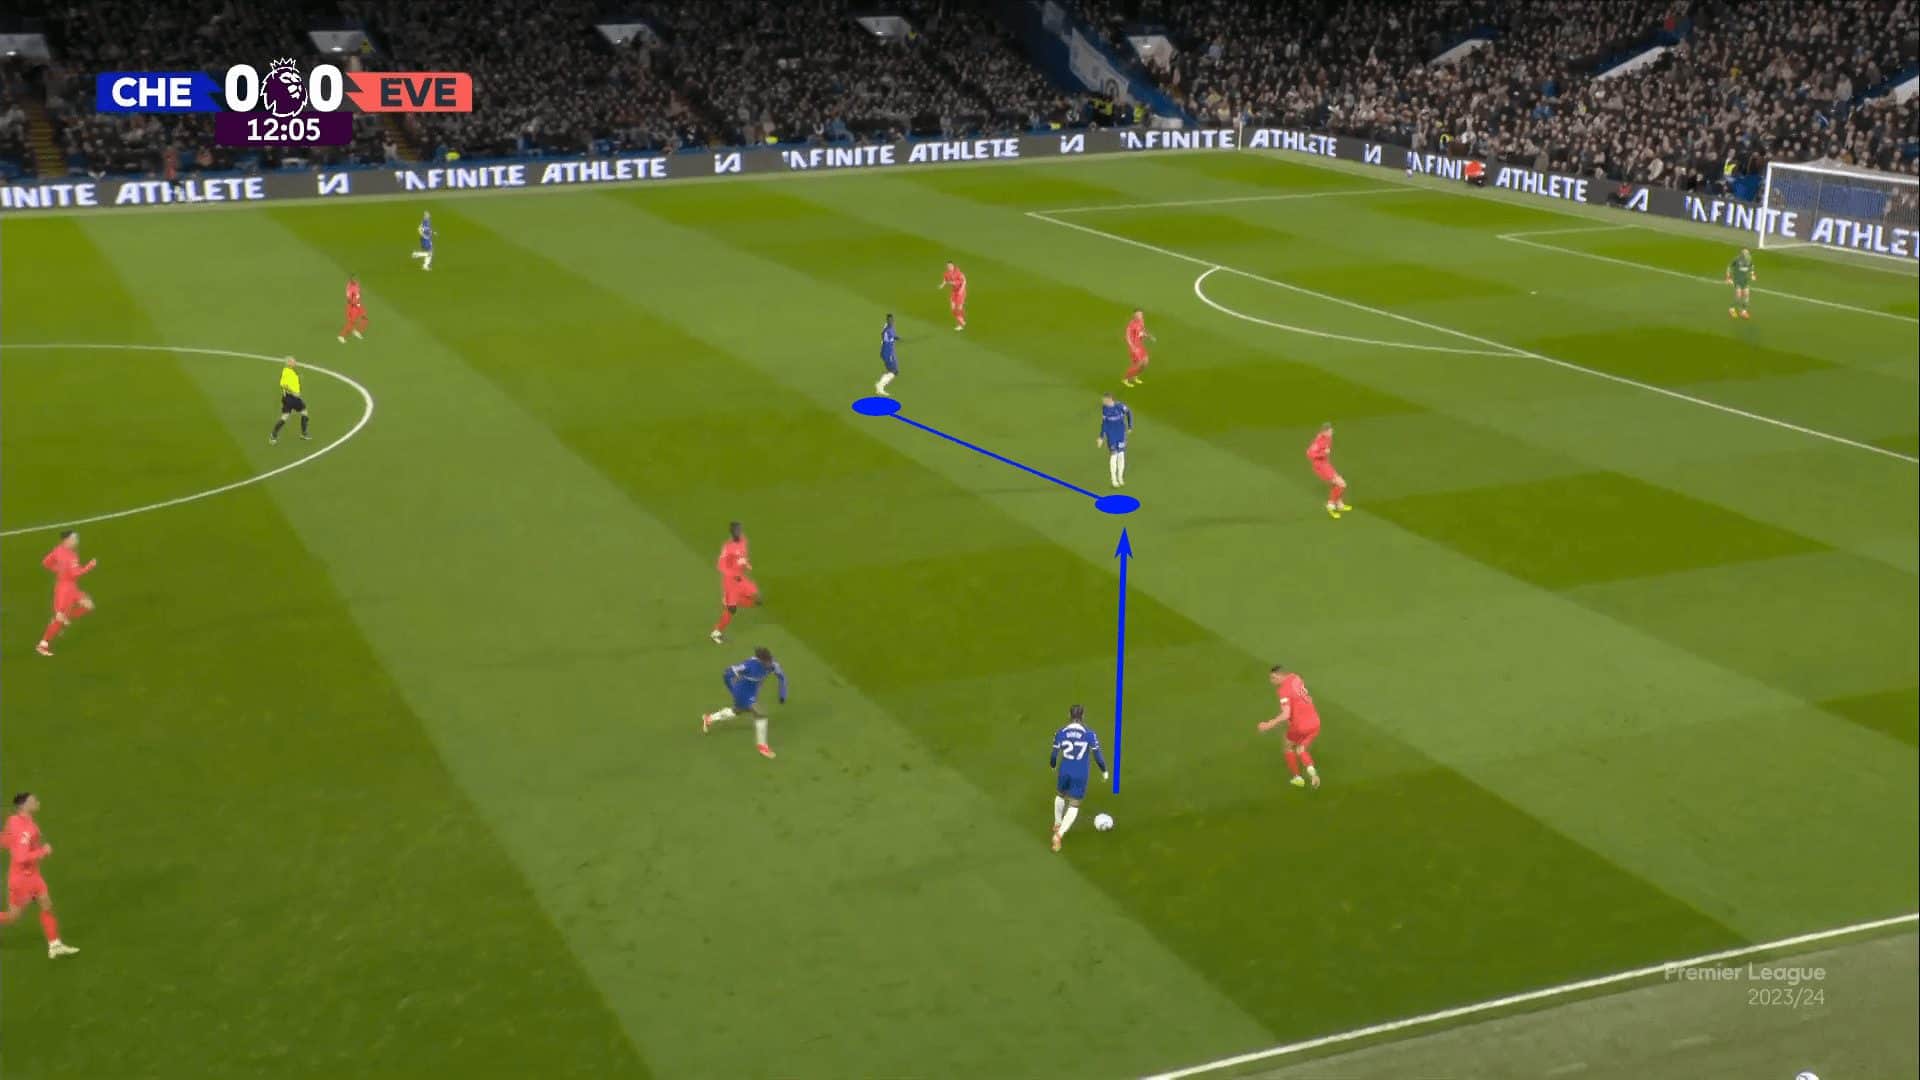
Once the ball goes into Palmer, that’s where the socio-affective superiority comes into play.
With Palmer on the ball facing forward, Jackson offers a run forward into the same vertical line as his teammate.
Seeing that Palmer needs an immediate option, Jackson adapts his run to offer a short pass in front of the opposition’s backline.

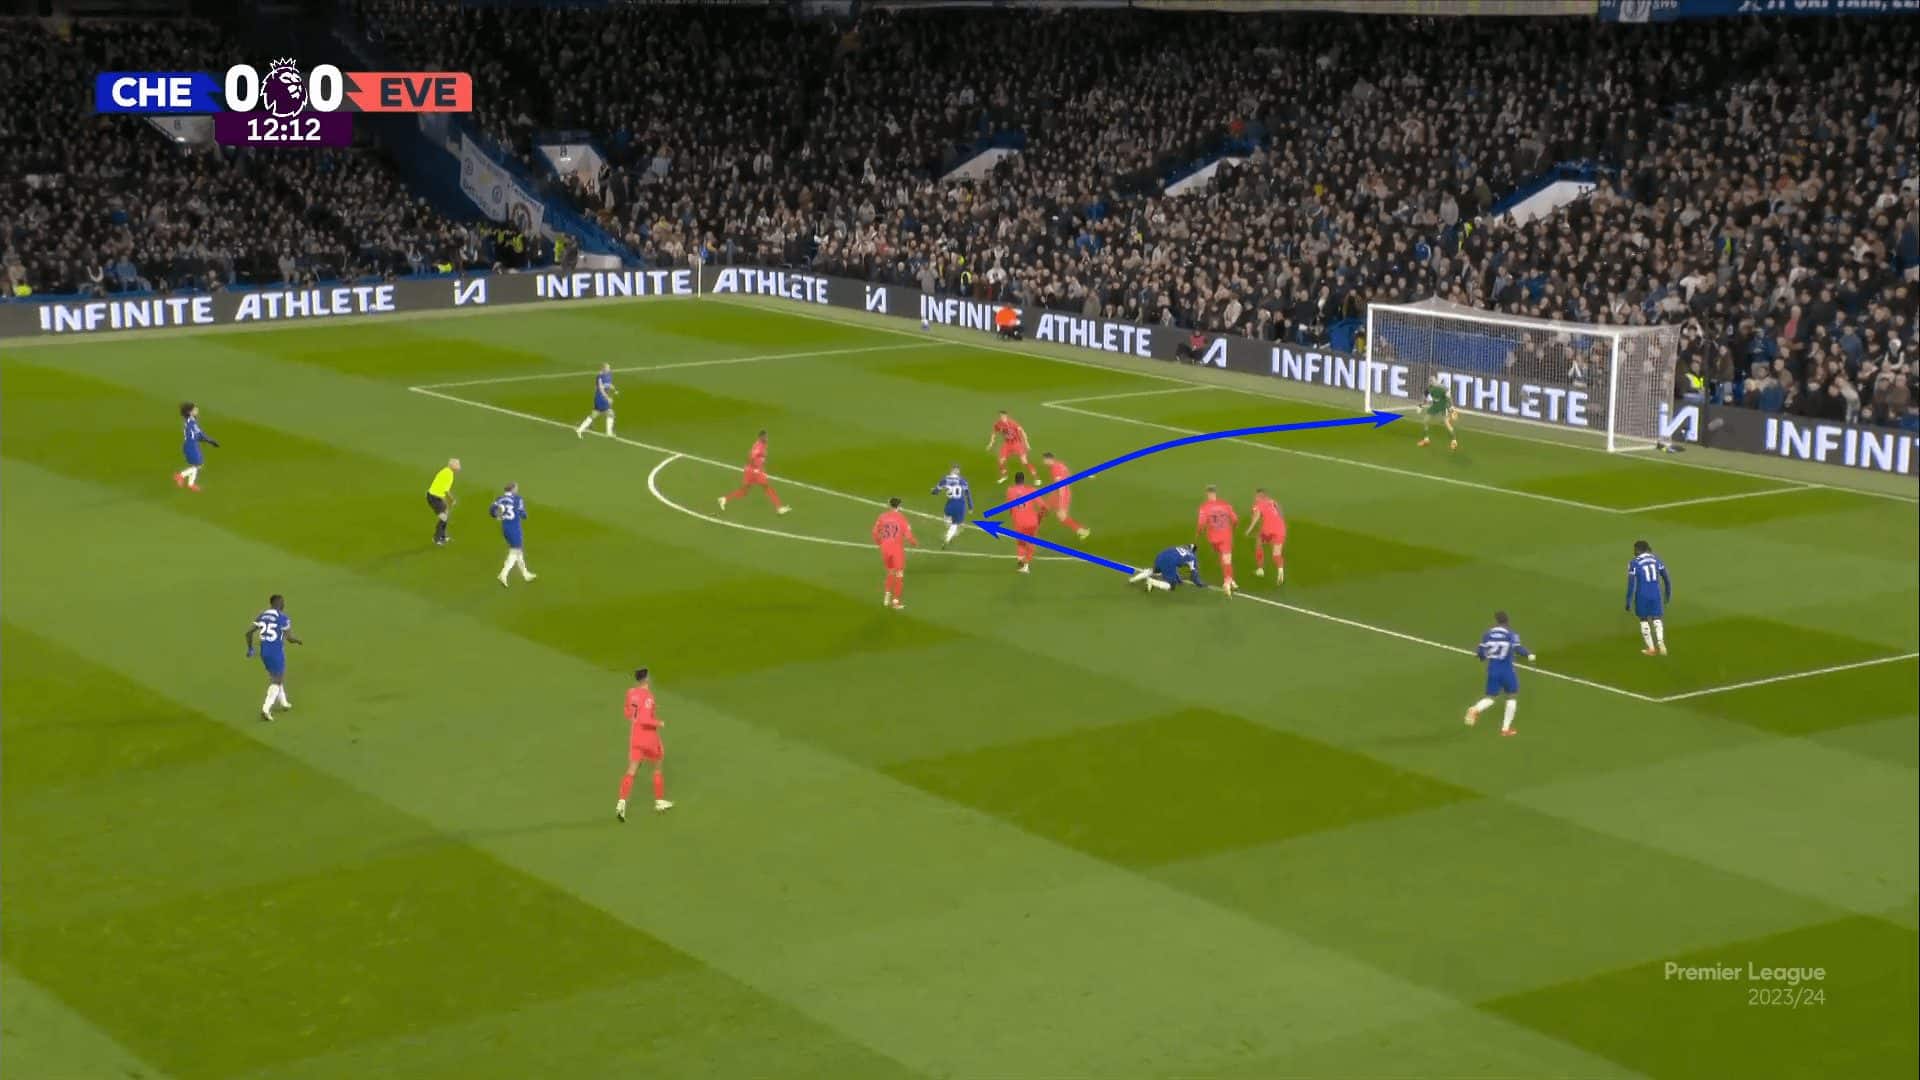
The #9 does well to receive the ball, hold off the opponent and allow the sequence to develop.
Jackson’s movement essentially creates a small space positional rotation, allowing Palmer to receive a return pass in the area Jackson initially occupied, then provide an extraordinary finish en route to Chelsea’s big win.
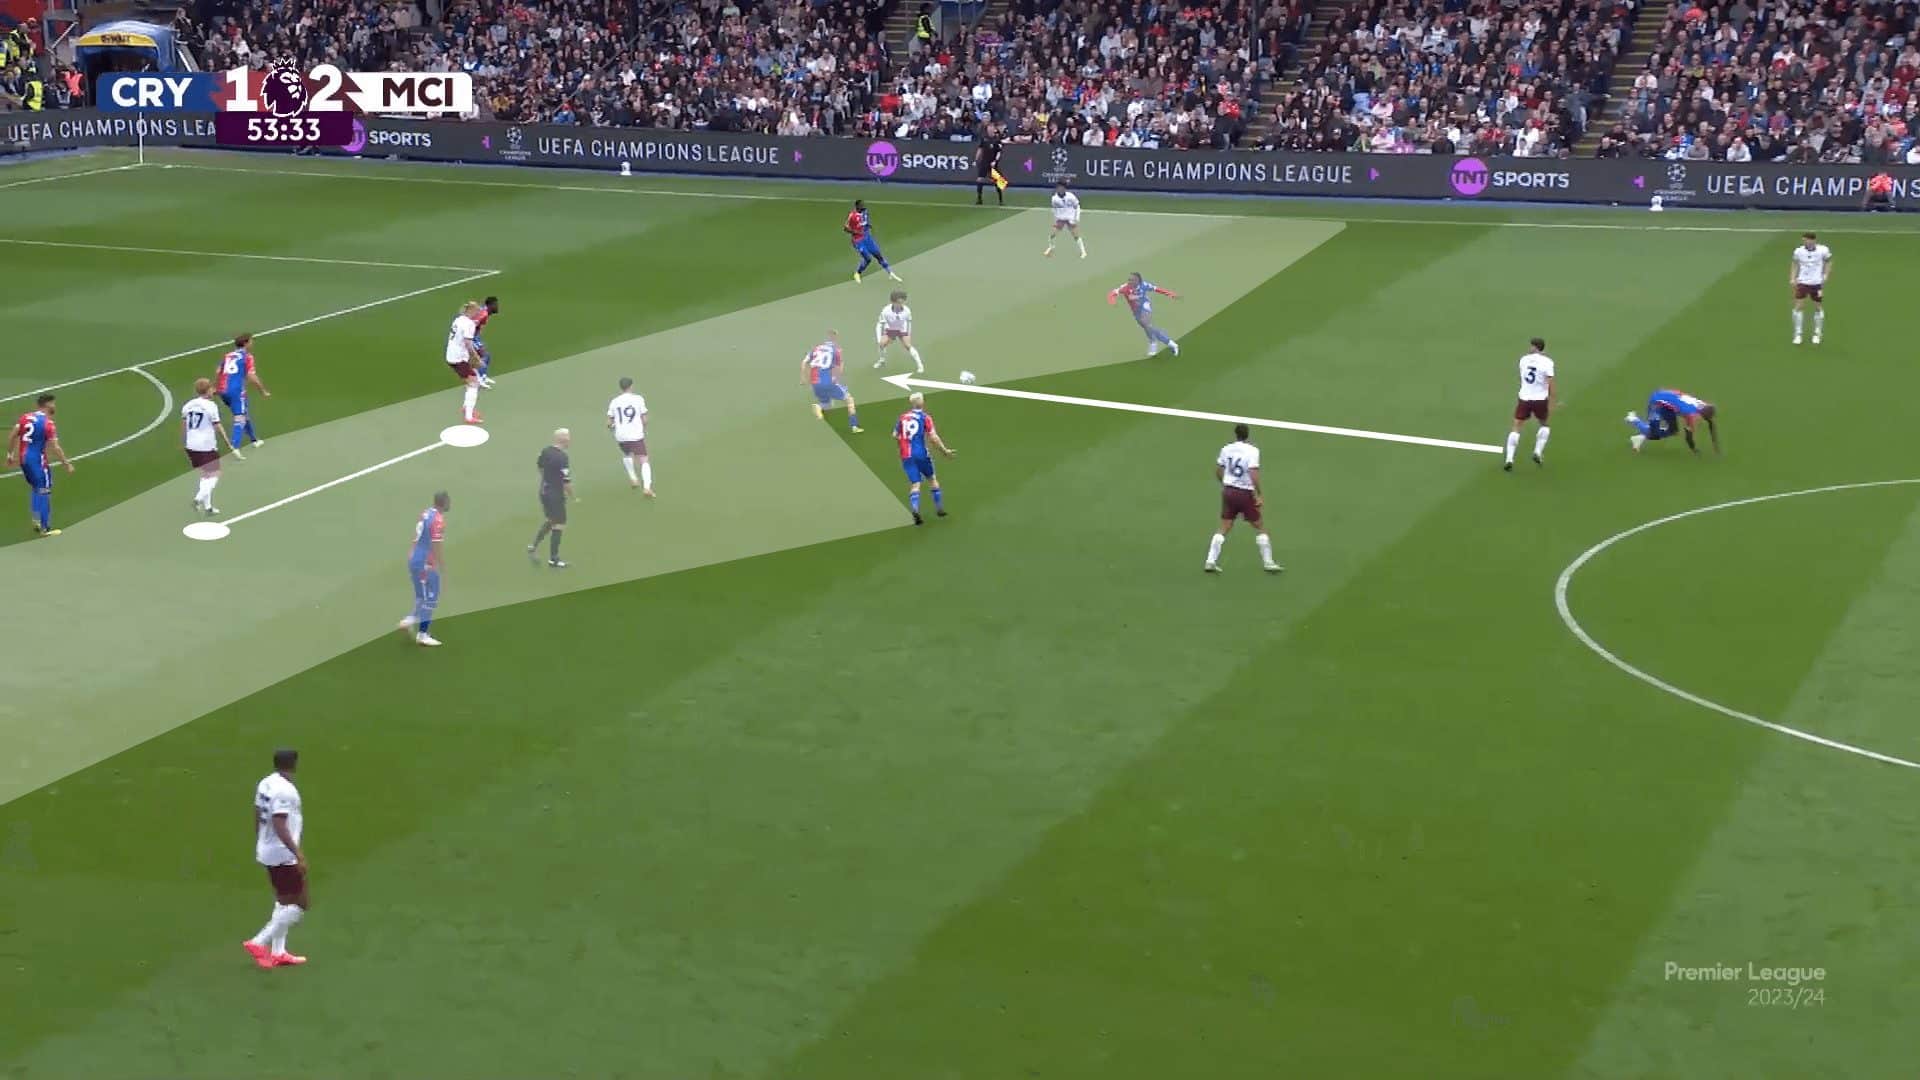
While Chelsea had ample space between the lines, Manchester City came across a different setup against Crystal Palace.
The London side was very compact, both horizontally and vertically.
This is especially the case with their vertical compaction, leaving little more than 6 m between the two lines.
City had a complicated problem to solve, but they managed it brilliantly.
Notice how closely our highlighted players, Erling Haaland and Kevin De Bruyne, position themselves, occupying three defenders in the central channel.
City has one width provider on each side of the pitch, stretching the Palace backline.
That creates a pocket in the right half-space for Rico Lewis to receive and face forward, signalling a tempo shift to quickly attack the box.
There’s a bit of fortune in this play.
As the ball is played in the air across the 18, Haaland gets a deflection that redirects the pass into De Bruyne.
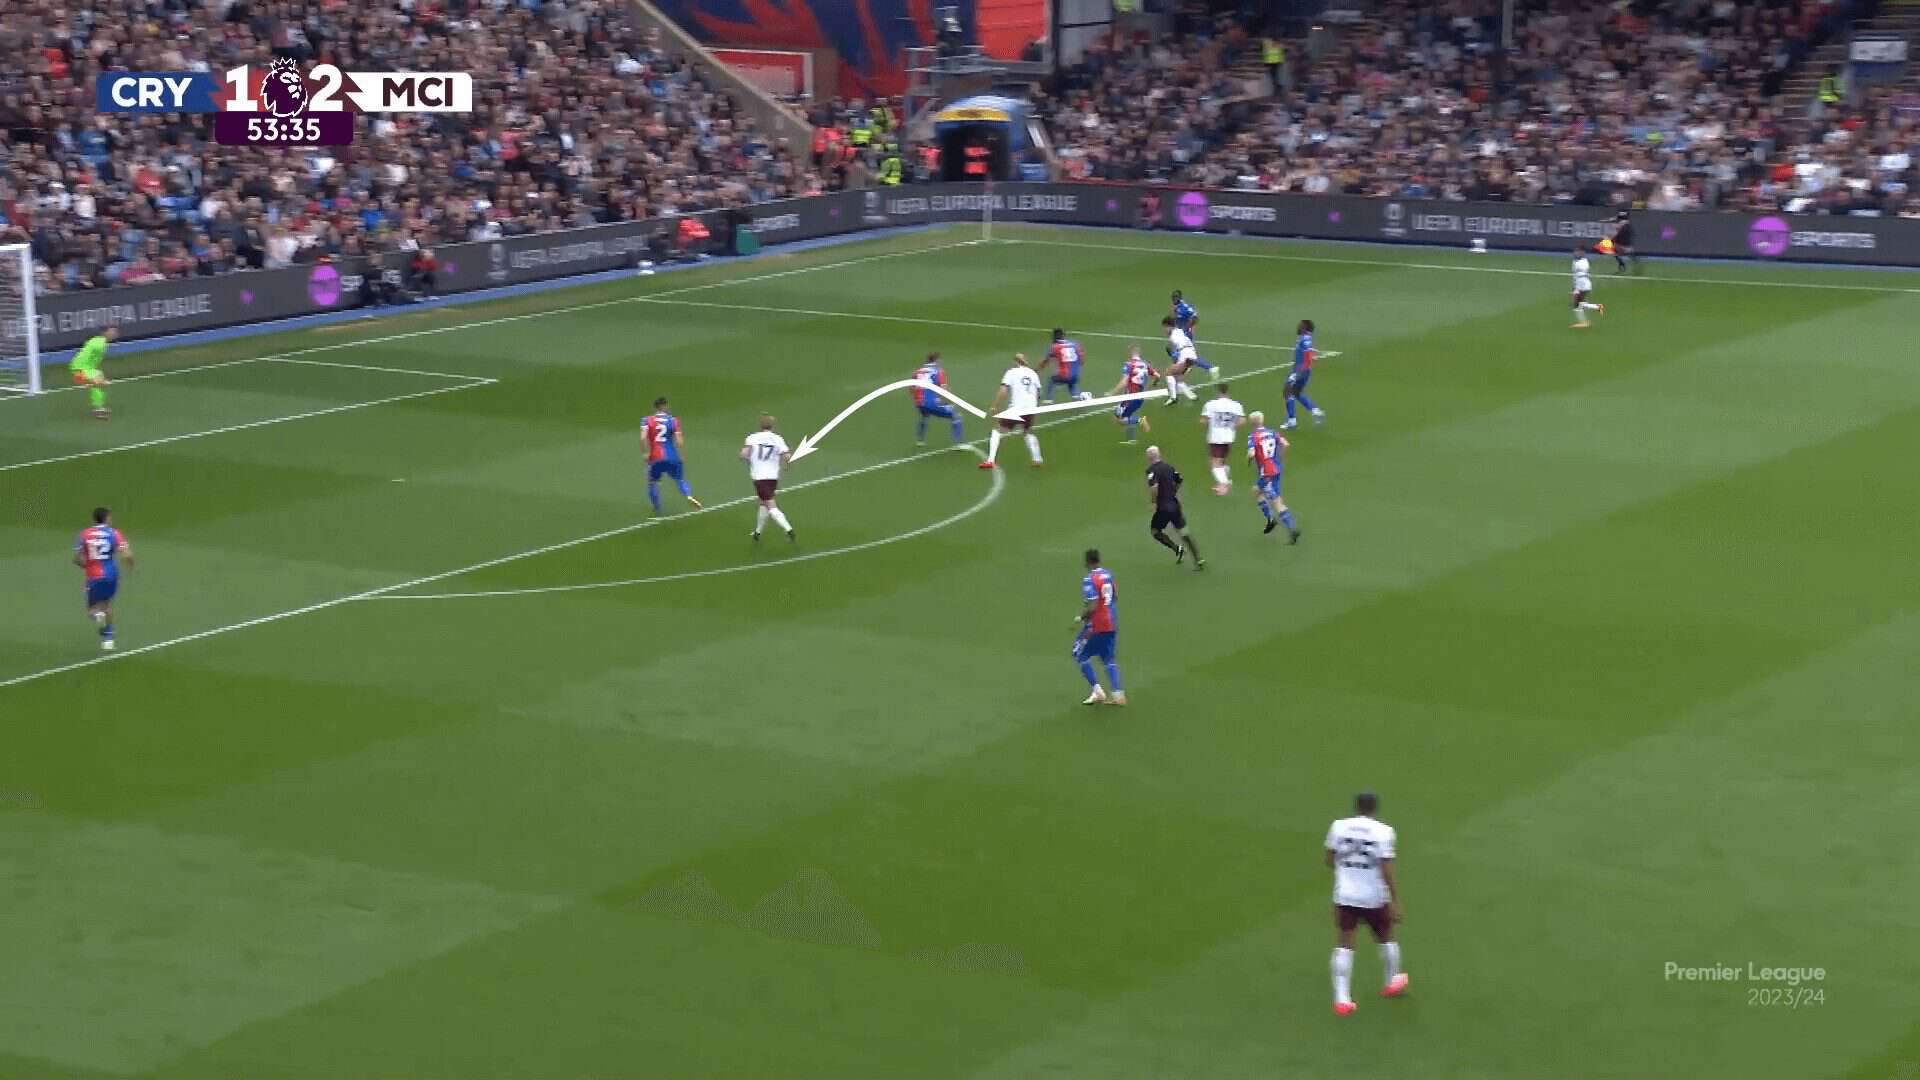
This is where the relationship between the two players and their exceptional awareness, decision-making, and processing speed come into play.
The Belgian heads the ball forward, taking the force out of it, to play Haaland into the box.
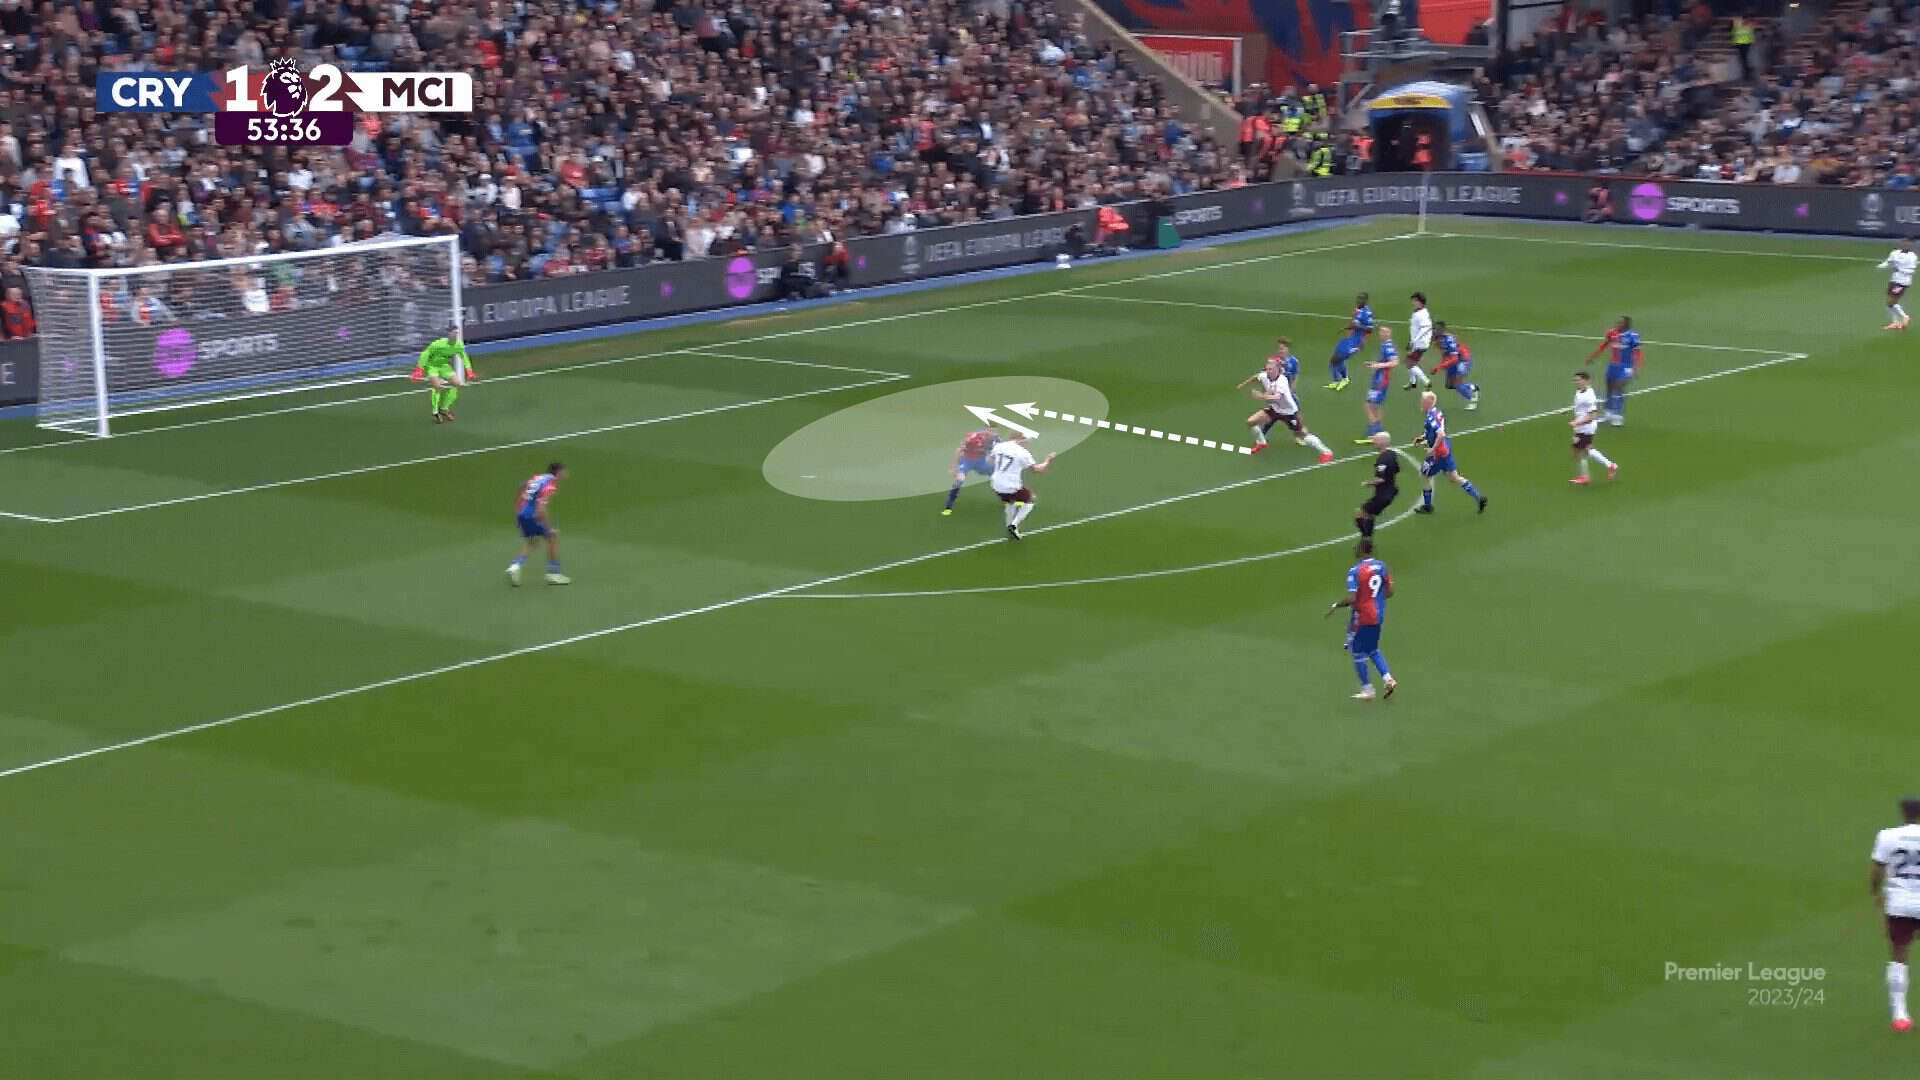
The two narrowly missed the connection here, forcing Haaland to pick up the loose ball closer to the end line, but it does end with a Julián Álvarez shot and corner kick.
Even though the sequence narrowly misses that direct goal-scoring opportunity between De Bruyne and Haaland, the effectiveness of the two players’ starting points and their occupation of the backline greatly benefited the progression into the box.
With Palace defending deep and narrowly, the #9 and #10 did their part to make the opposition’s backline more narrow, limiting their coverage of that right half-space.
That’s the path forward.
That’s the foundation leading to the moment that pushes City’s attack into the box.
Playing off a Fixed 9
Let’s stick with Manchester City.
With the combination they enjoy, it’s difficult to find a better example of the #9 and #10 relationship.
Upon joining City, Haaland’s role shifted from a more complete #9 to a target man and poacher.
Based on the results, it’s impossible to critique Pep Guardiola’s decision as it has produced a Champions League title and has the club within reach of back-to-back EPL titles.
Haaland is most needed in the box in quality goal-scoring positions.
That is the priority and the way his talents are put to use at City, building back from that end objective.
His position is more fixed than a #9 in the style of Harry Kane or Karim Benzema.
The job is to score and to ensure that he’s in position for that final movement and finish in the box.
That leads to a more fixed, central role within Manchester City’s attacking tactics.
Remaining centrally, he typically helps the team by occupying two centre-backs.
If he can manipulate their positioning, he is creating space for his partner in crime, De Bruyne.
With Haaland in more of a fixed vertical line or channel, De Bruyne has the freedom to find pockets of space.
Whereas Haaland’s positioning is more fixed, the Belgian’s is very fluid.
With the Norwegian keeping his movement within the width of the box, De Bruyne can offer a variety of options to his teammates, be it with positioning between the lines, a run in behind or creating an overload.
In the example below, he drifts from City’s right half space to their left.
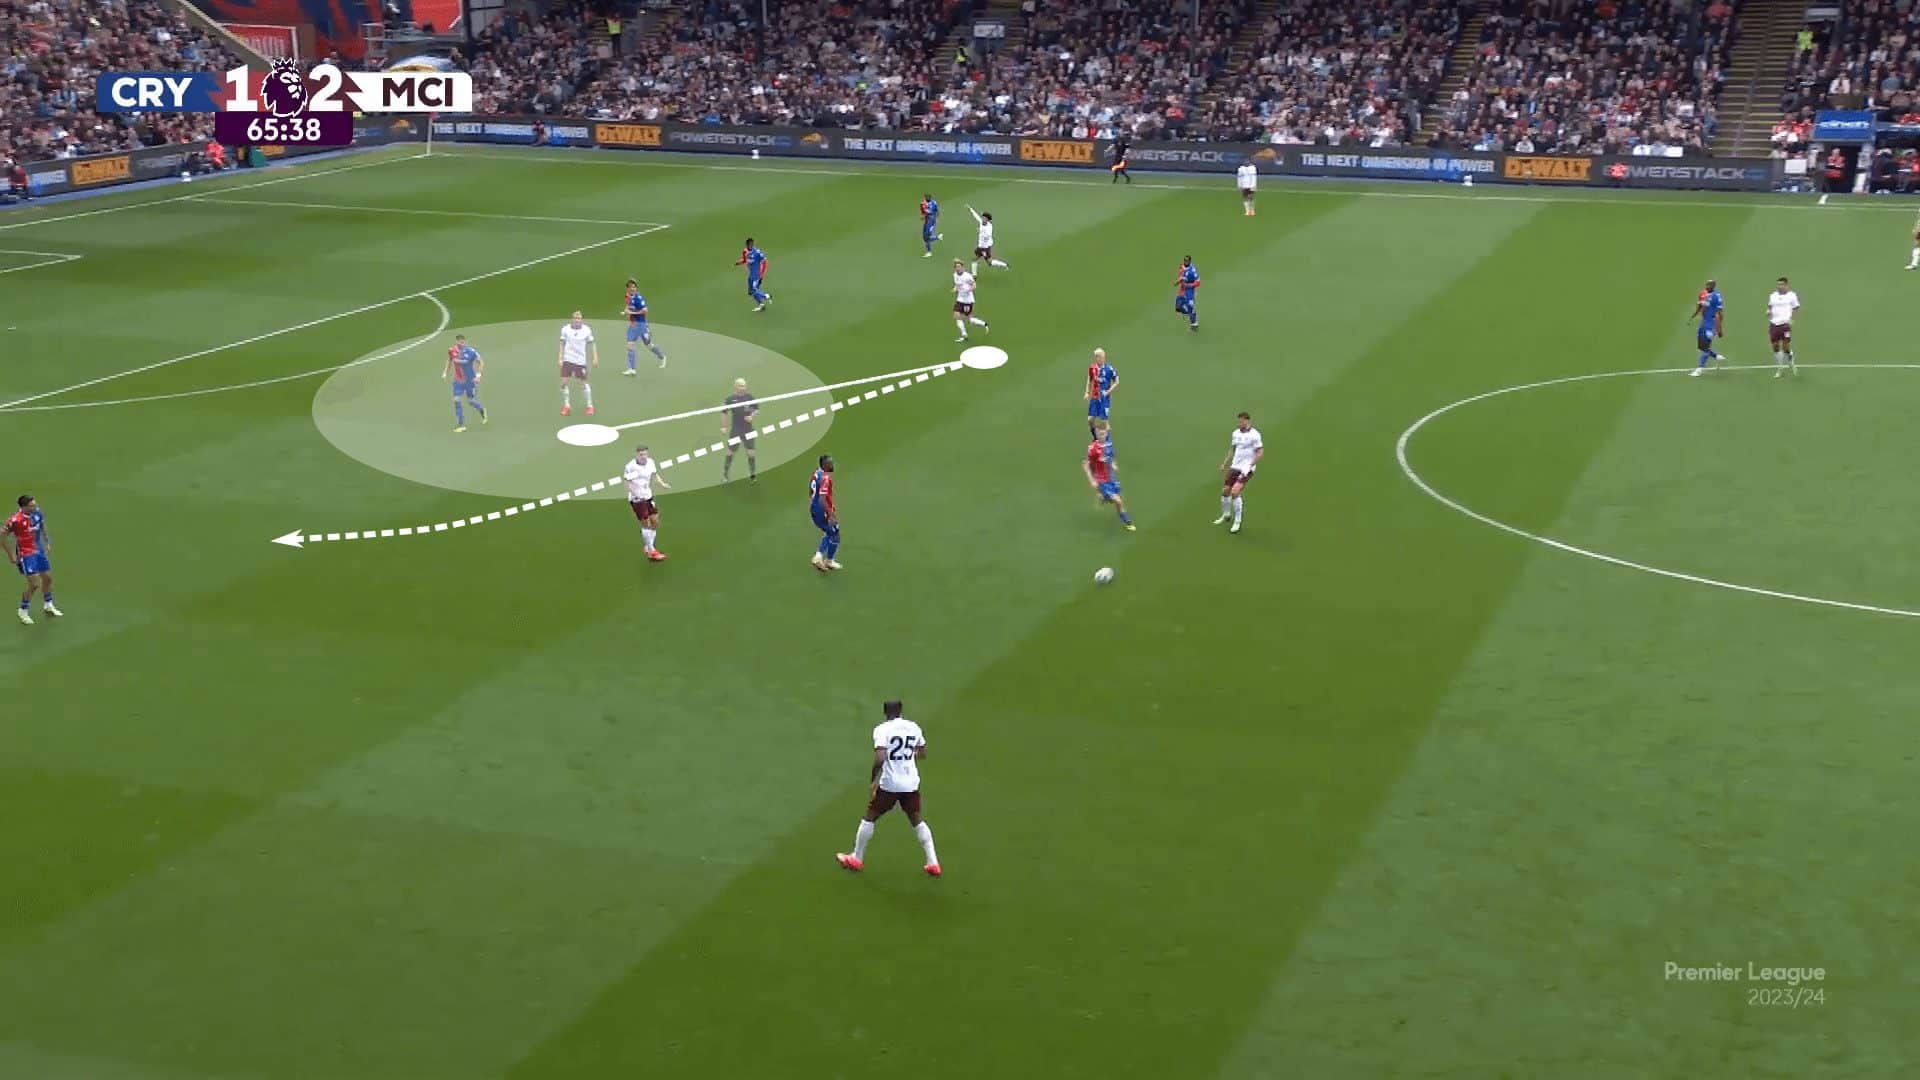
Once Jack Grealish gets on the ball in the left wing, De Bruyne offers a run behind the backline.
The Belgian’s reaction to receiving the pass would seem to indicate that Grealish cutting inside on his right foot, perhaps taking a shot, was the likeliest outcome.
However, the Englishman finds De Bruyne, slipping him behind the Palace backline.
Notice Haaland’s movement pattern relative to De Bruyne.
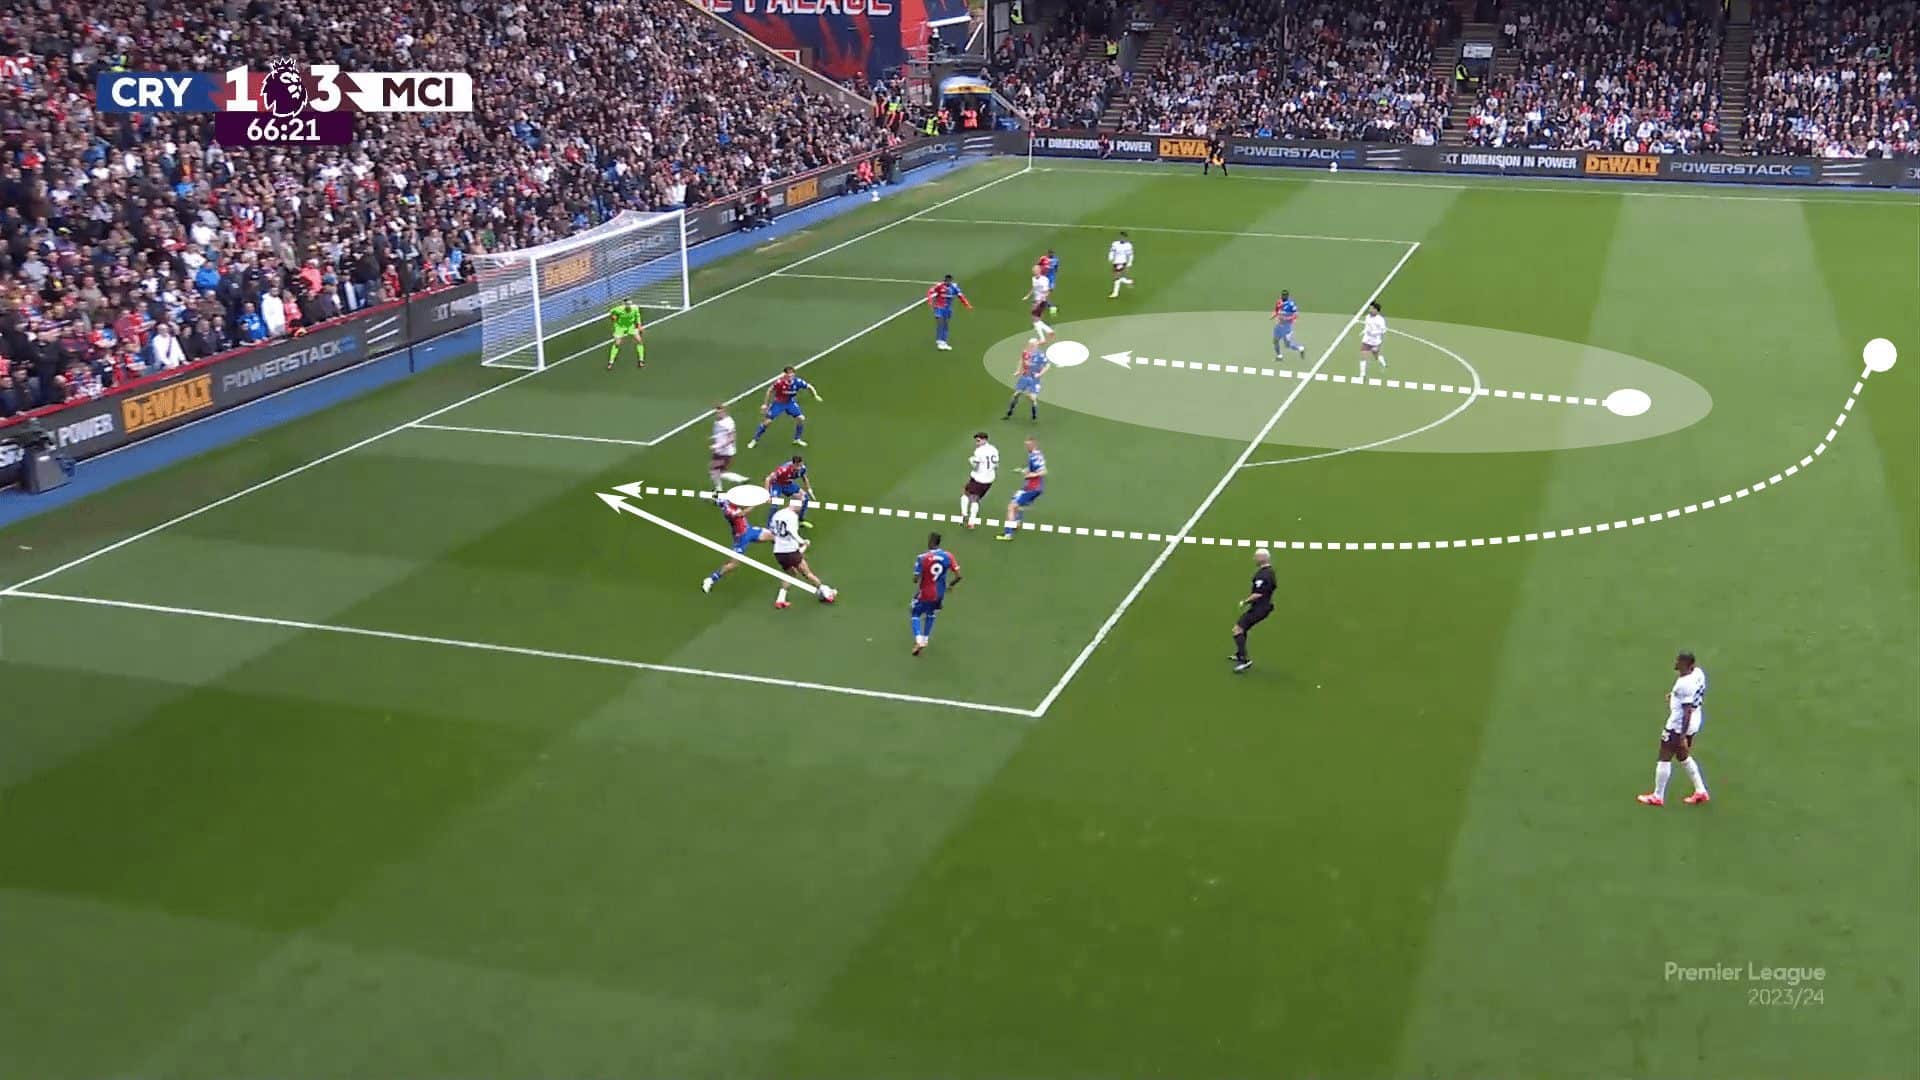
As the Belgian plays the pull-back to the top of the six, it’s that special link between these world-class players that signals the Norwegian’s movement in front of the centrally positioned defender.
He latches on to the pass and adds to the Manchester City lead.
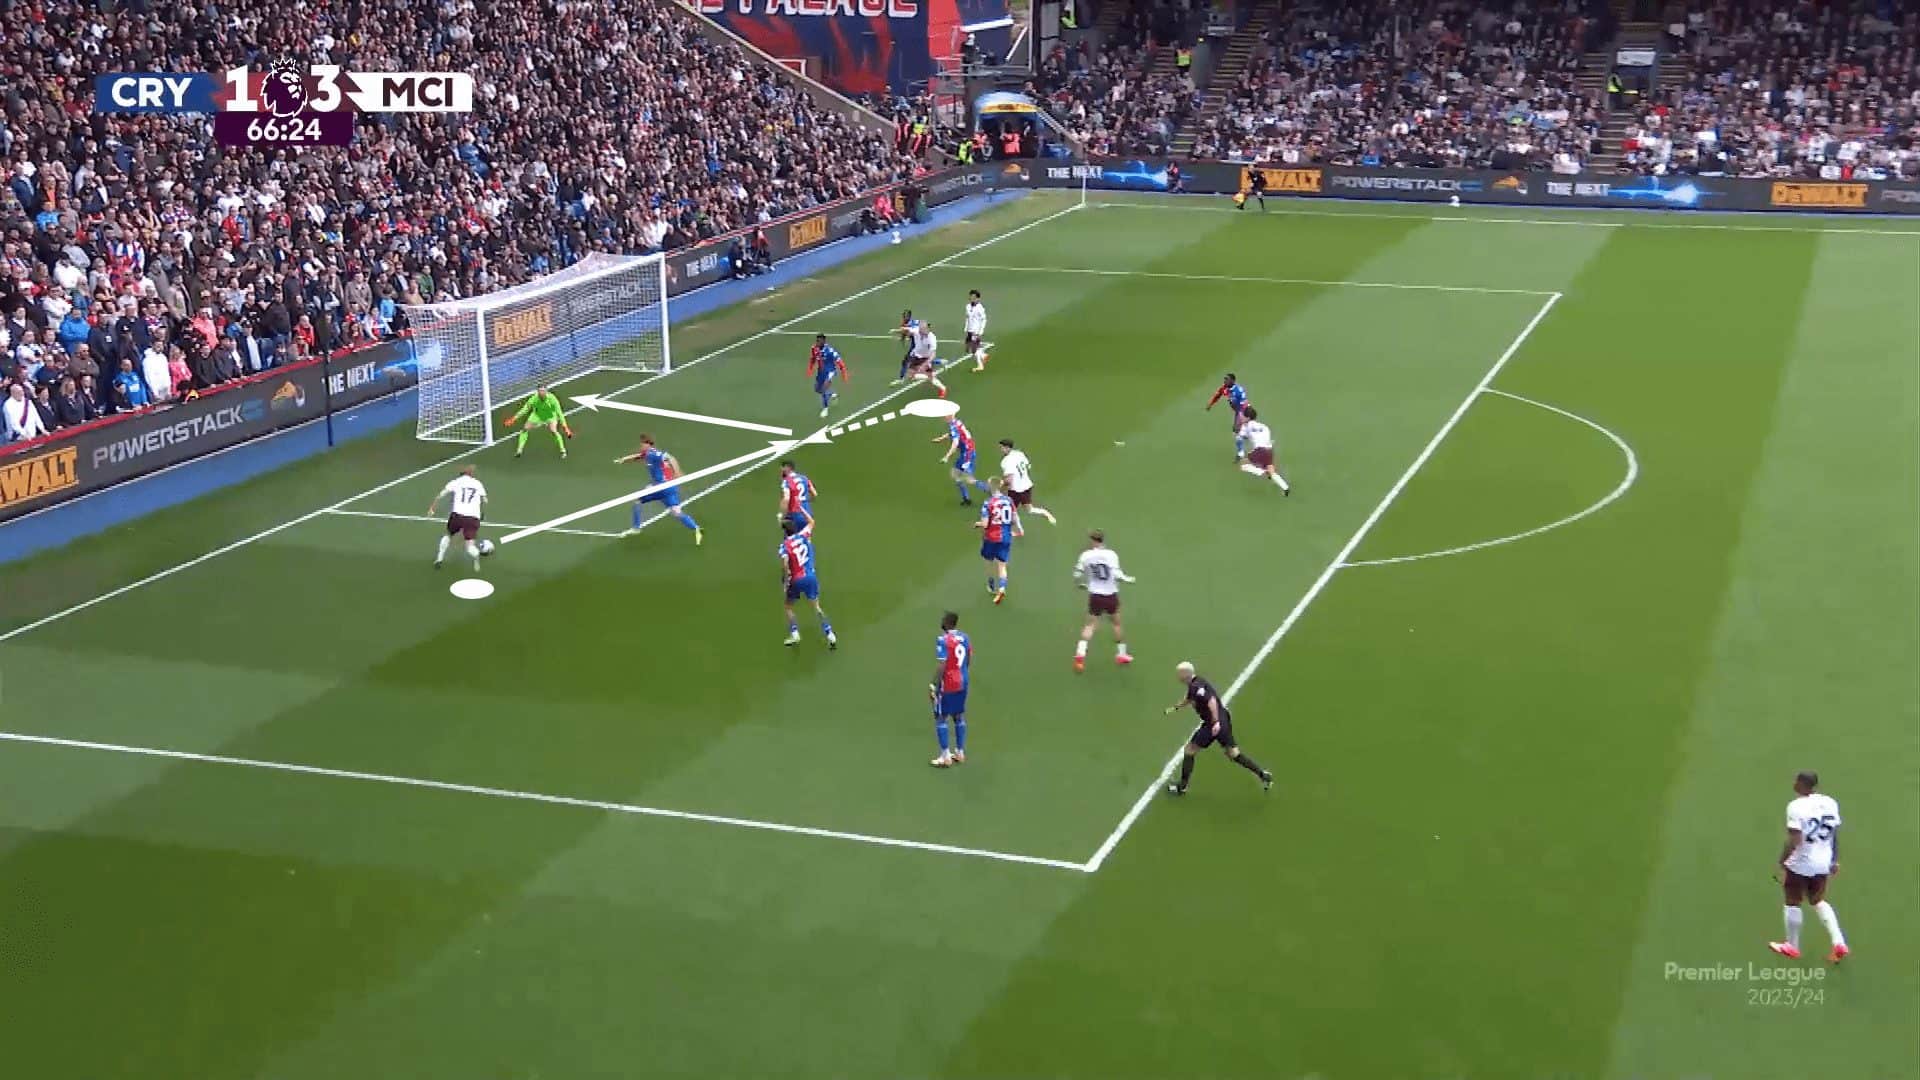
For the fixed player, the goal early on in the attacking sequence is to occupy defenders and create space for teammates underneath.
Analysis of this sequence shows us that the creative #10 is then tasked with identifying pockets of space that benefit both him and the team.
Once he can run into those spaces, he can positively impact play while on the ball.
The cooperative efforts of the two players shows the importance of playing off of a fixed player and the freedom it creates a special talent with De Bruyne’s qualities.
That favour is returned in the box as the #9 directs his attention to finishing off attacking sequences.
Positional Switches
If Manchester City does not claim another Premier League title this year, it will be because Arsenal have ended their reign.
During the first analysis on the relationship between the #9 and #10, the London side proved to be one of the more fascinating case studies.
We looked specifically at matches in which Kai Havertz was positioned in a #10 role alongside Martin Ødegaard.
That left Gabriel Jesus up top.
The fluidity of their rotations and the threat of both Jesus and Havertz in the box was incredible.
While Ødegaard does not have pure #9 qualities, the way he operates in a #10 or #8 roll accentuates the playmaking abilities of his teammates.
He can offer a run behind the backline, take up a central position to occupy defenders or, higher up the pitch, get into the box and offer a target.
He’s dynamic.
Havertz is different in that he has more qualities that align with the #9, but is also highly effective as a #10.
Meanwhile, Jesus can drop between the lines, link play or a host of other actions more closely associated with a #9.
The wide range in player skill sets allows Arsenal to produce positional rotations to keep opponents unbalanced.
In this sequence, we see Ødegaard offering a run behind the line and Jesus playing off of him, moving into the shaded area between the lines.
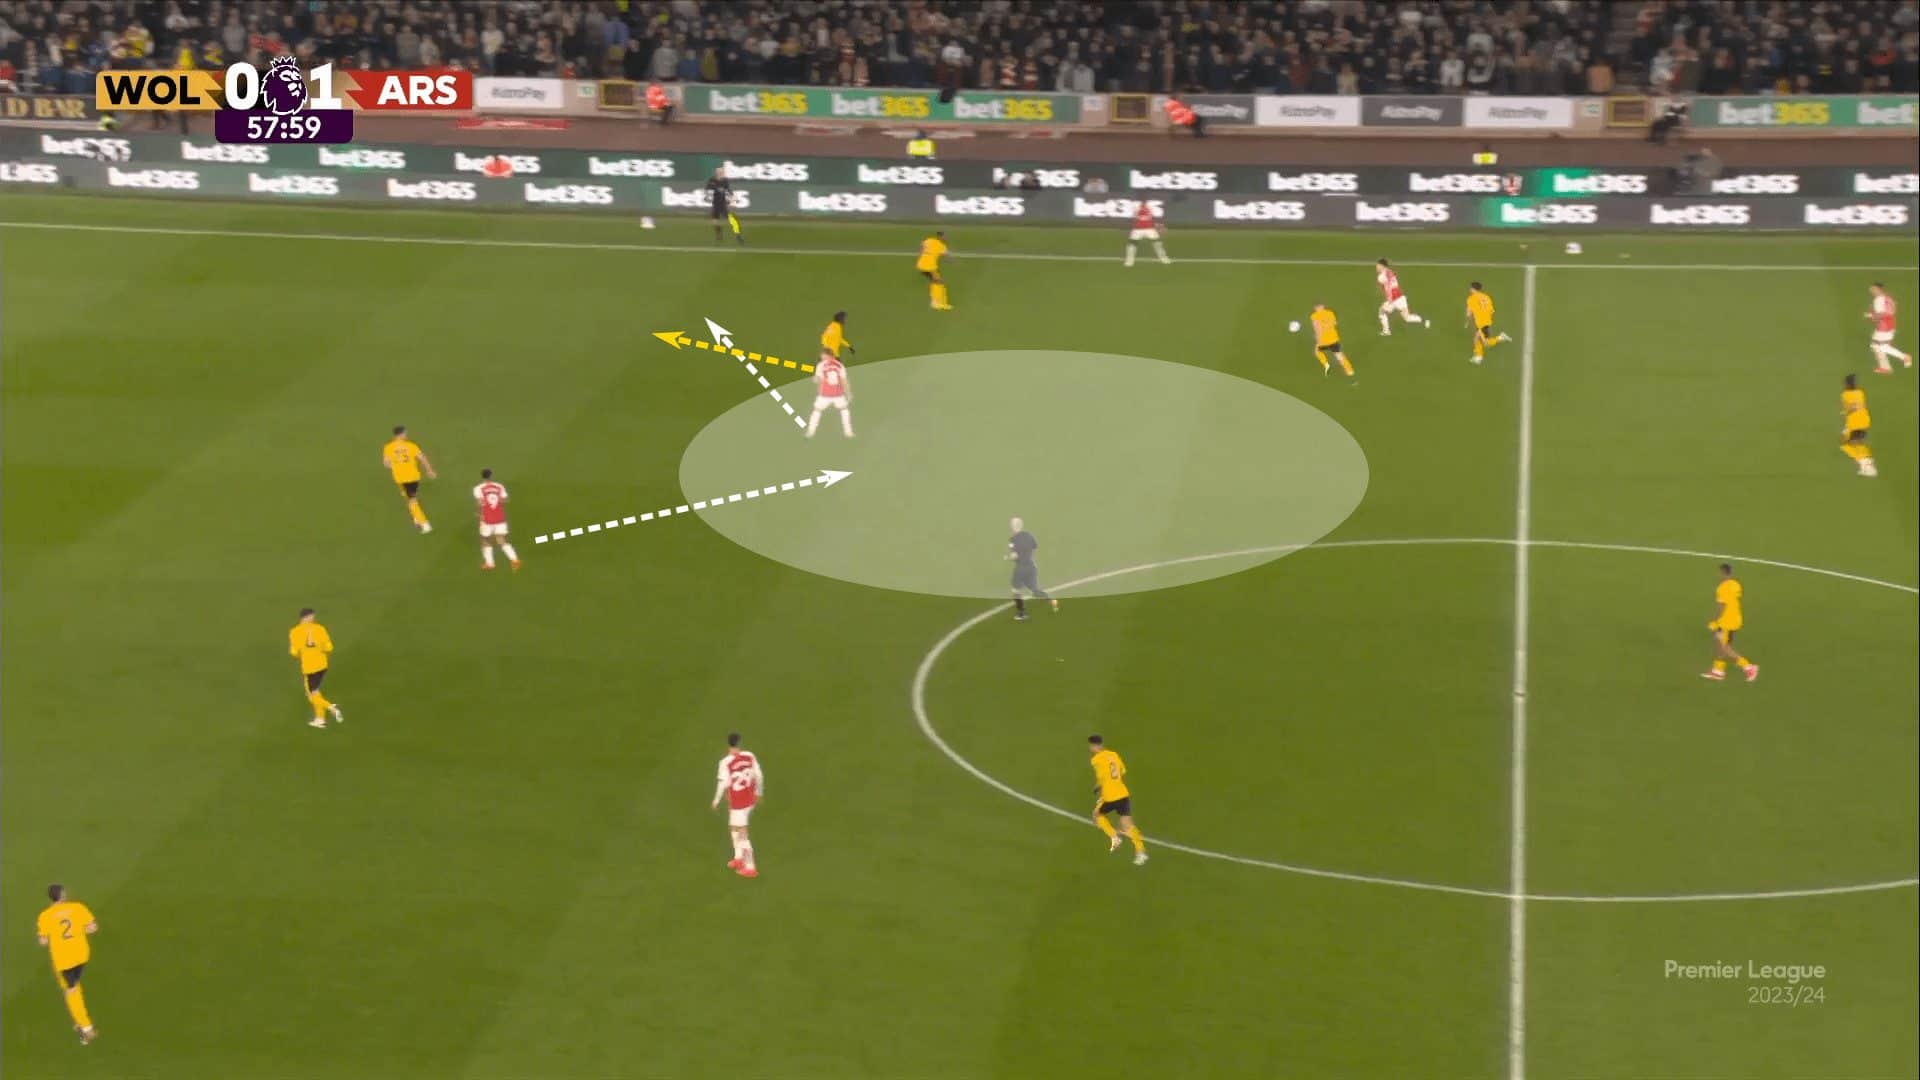
As Ødegaard becomes the highest player in Arsenal’s attacking shape, he receives the pass and sets it to Jesus, who is beneath him in support.
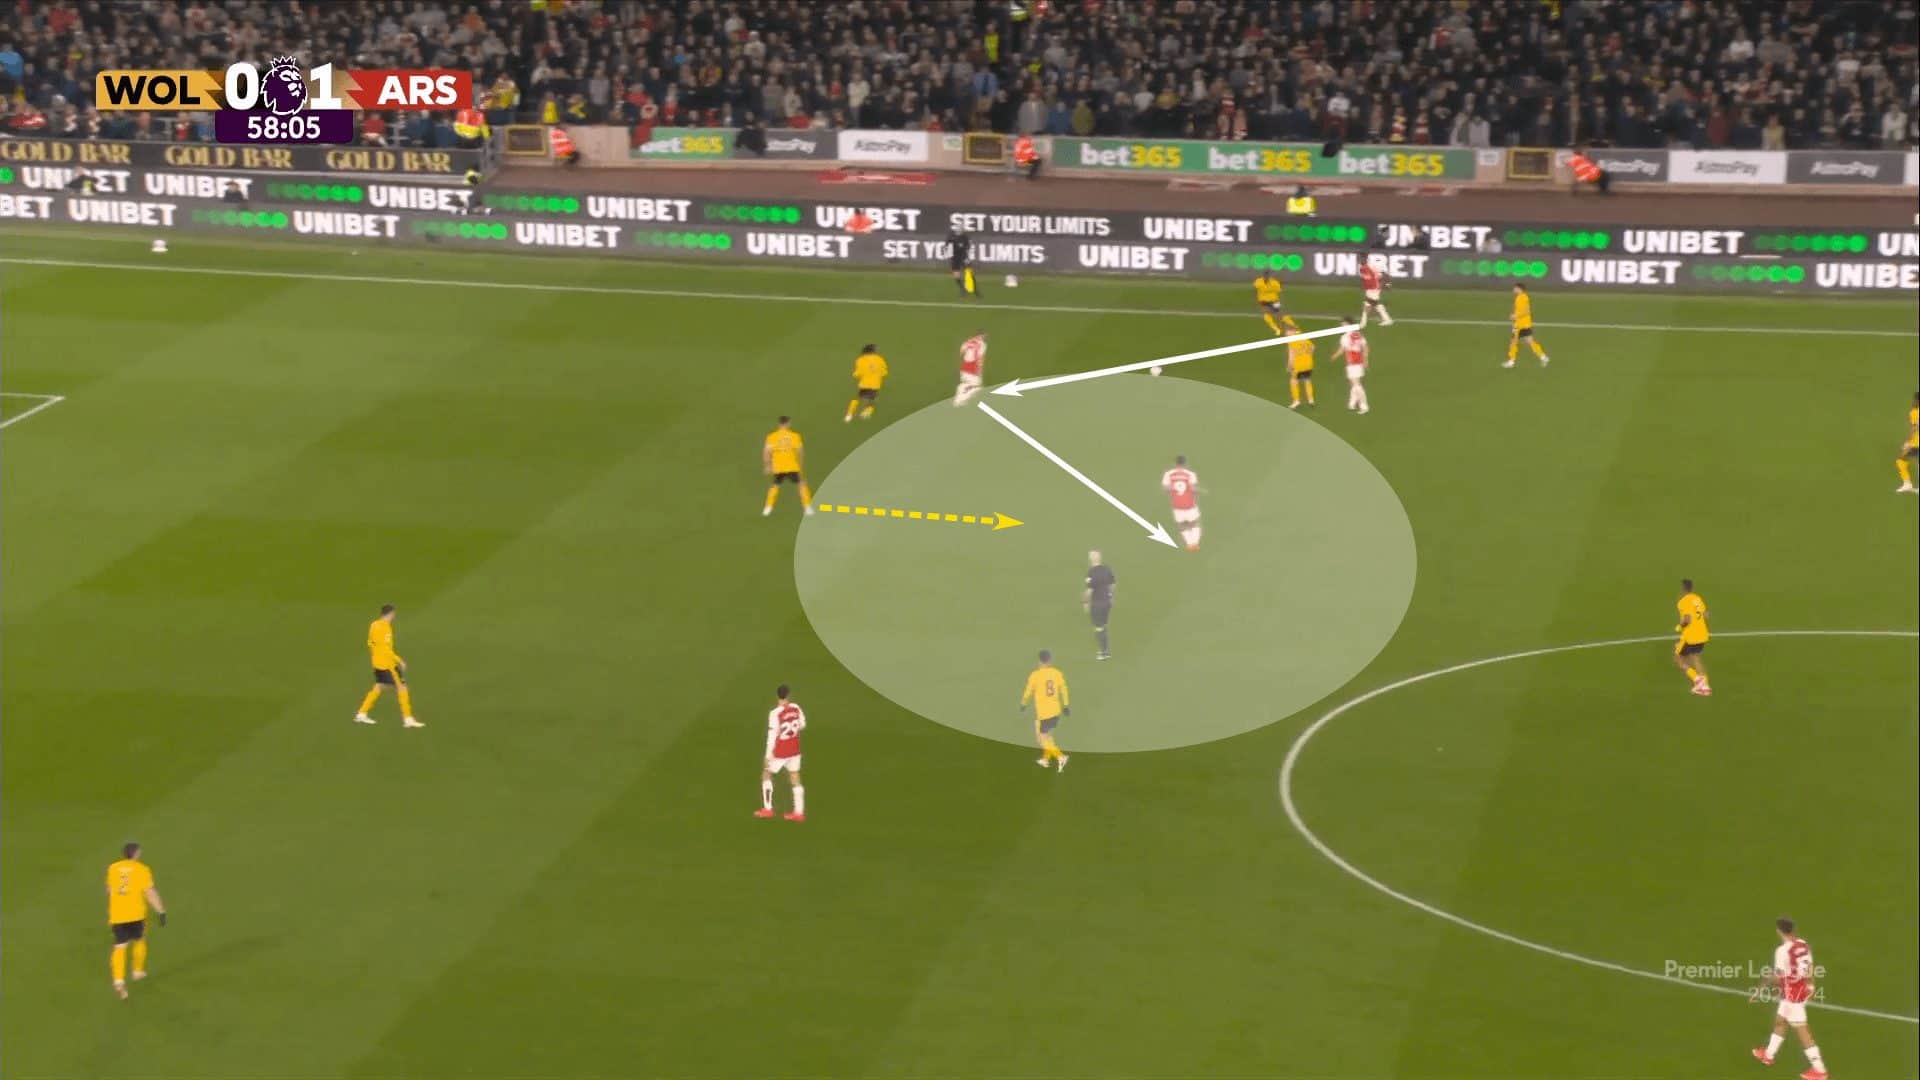
Notice that as the pass is played into Jesus, the Wolves centre-back steps forward to apply pressure.
He doesn’t want Jesus dribbling at him with runners in support.
As the centre-back steps up, Ødegaard is quick to offer a run into the space vacated by the opponent.
While Arsenal doesn’t complete the pass, the way they set up the sequence was one of the most insightful interactions between a #9 and #10 that we encountered while researching this article.
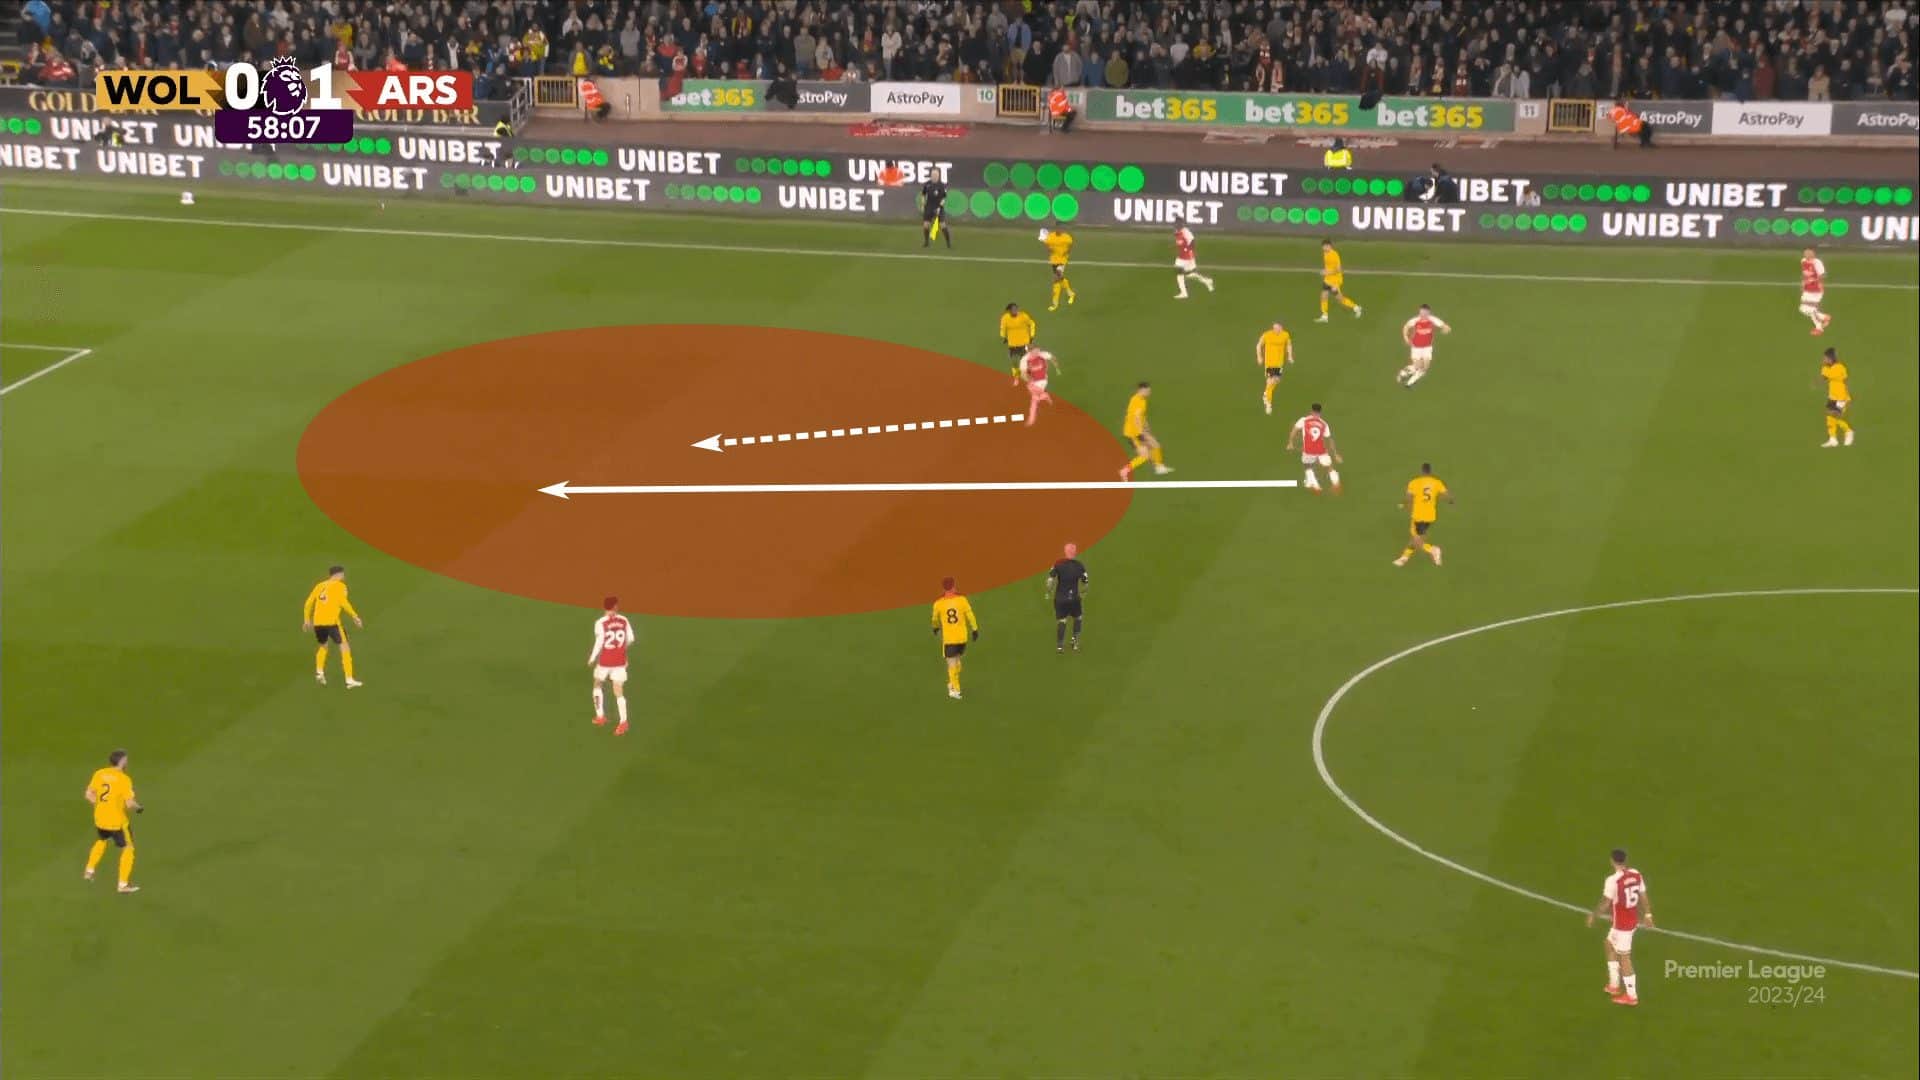
It also provides an example of how a double #10 can relate to a #9.
We’ve touched upon occupying the backline at several points in this tactical analysis.
Notice the positioning of Havertz.
While Ødegaard and Jesus are exchanging height on the right side of the pitch, the German is occupying a centre-back and midfielder in that central channel.
His static positioning commits the Wolves players to the central channel, limiting the support they can offer near the ball.
Conclusion
In addition to occupying the backline, one of the more resounding themes was how fixed positional profiles or limited movement for the player offering height, can help a team’s progression.
Not everyone has to be involved at all times.
Sometimes, a player’s job is to simply command the opponent’s attention and limit their ability to slide in support of a teammate or keep their defensive shape compact, be it vertically or horizontally.
Sometimes, the threat of a second or third attacker in a dangerous position, such as high and central, is enough to disconnect the opposition’s shape.
When that disconnect occurs, spaces open up in the areas immediately surrounding that fixed player.
The relationship between #9 and #10 is evolving.
As we’ve seen in this tactical theory piece, the dynamic is certainly tailored to the team’s needs and the individuals’ specific talents, but there are general principles underlying the relationship that maximise its impact.
That was our objective in this two-part series.
If you haven’t read the first tactical analysis article, certainly have a look.
The two are tightly connected and build out a deeper understanding of the relationship between the #9 and the modern #10.


Comments