The relationship between a #9 and #10 is a fascinating one.
While the modern game has largely moved on from a #10 operating as a free player, the connection between a team’s highest attacking midfielder and their striker is still pivotal to their success. The role of the #10 may not be the same as it was 30 years ago, but it isn’t extinct. It has merely evolved. Over the course of the evolutionary process, managers have found ways to keep some of the more desirable positional traits of the #10 while enhancing the connection between him and the #9.
That’s the topic of this tactical theory piece. Looking at some of the game’s top #9 and #10 pairings, this analysis is designed to extract ideas from that relationship and how the two players maintain a relationship of mutual benefit. To keep the focus of this analysis narrow, we’re looking at teams that play with a front three or lone striker with a #10 playing underneath.
This is the first of two articles on the topic. We tried to keep it to one, but there were too many worthwhile examples. Plus, one of the two most important aspects of the game is scoring goals, the other being not conceding them. Since the #9 and #10 are heavily involved when their team score, we’ll dig deep into the relationship with the follow-up analysis in a couple of weeks. For now, let’s get started with a very basic aspect of the relationship, starting with how they occupy the backline.
Occupying the backline
A team’s listed formation will often conceal their attacking and defending intent. Arsenal Is a perfect example. The team sheet may list a 4-3-3, but that listing certainly doesn’t pass the eye test. Ultimately, they are just numbers that give a basic structure, not necessarily a definitive listing of how a team will defend or attack.
Within a 4-3-3, a team’s attacking shape could easily become a 2-4-4, 3-4-3 or a 3-2-5. Mikel Arteta’s positional play has created a unique problem for opponents by dropping Kai Havertz into midfield alongside Martin Ødegaard. Havertz gives Arsenal an extraordinary amount of flexibility. He has the qualities to play as a #10 but is also capable of playing alongside Gabriel Jesus to give Arsenal two high central players. His movement gives Ødegaard the freedom to push into that highest line of the attack or drop into midfield as he sees fit. That 3-2-5 could easily be listed as a 3-2-4+1 with Ødegaard operating in a free role.
When Ødegaard is free to move about the pitch, it’s common to see him either drop deep to direct the attack from outside of the press, slide into the wings to create a wide overload, or push high and centrally to give Arsenal an overload. In the picture below, he joins Jesus and Havertz high and centrally as Arsenal looks to progress from the build-out.
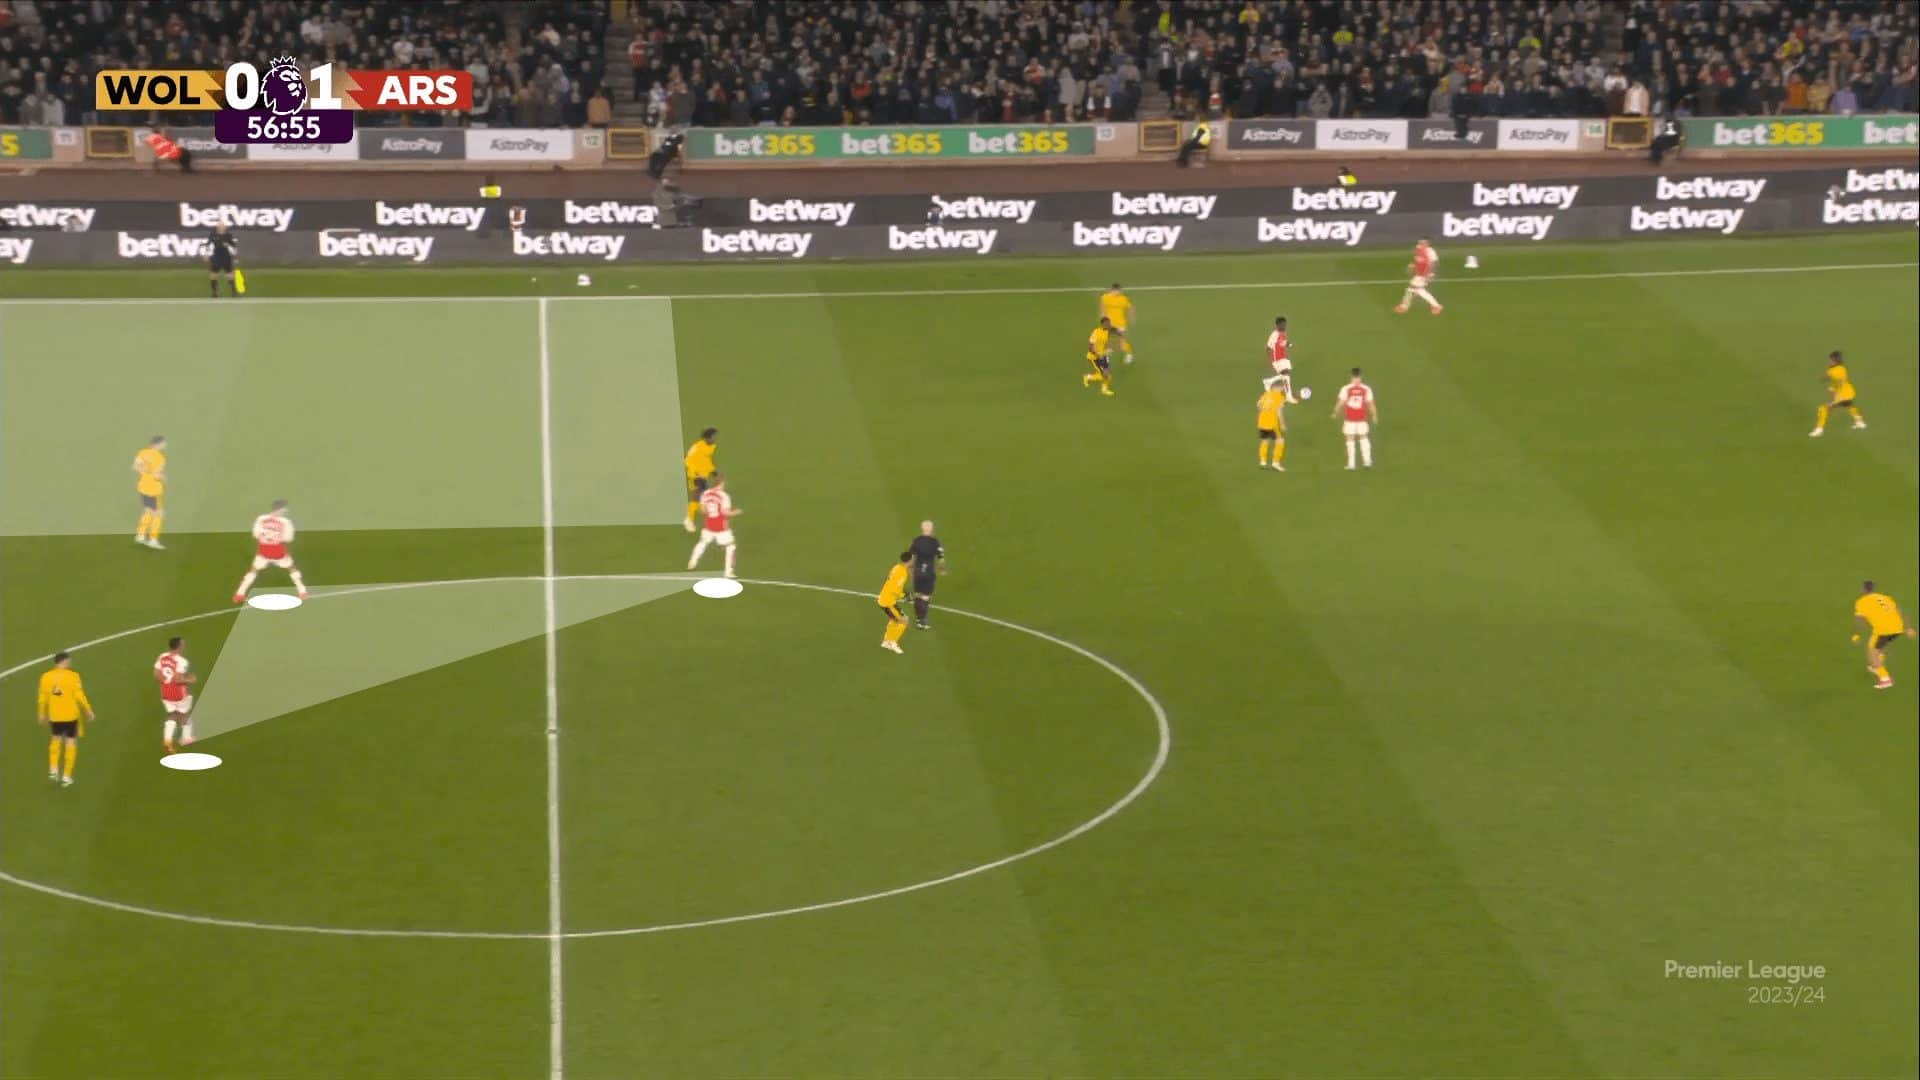
The tight central positions of Havertz and Jesus give Ødegaard the freedom to move his mark before darting into the wings to latch onto a forward pass.
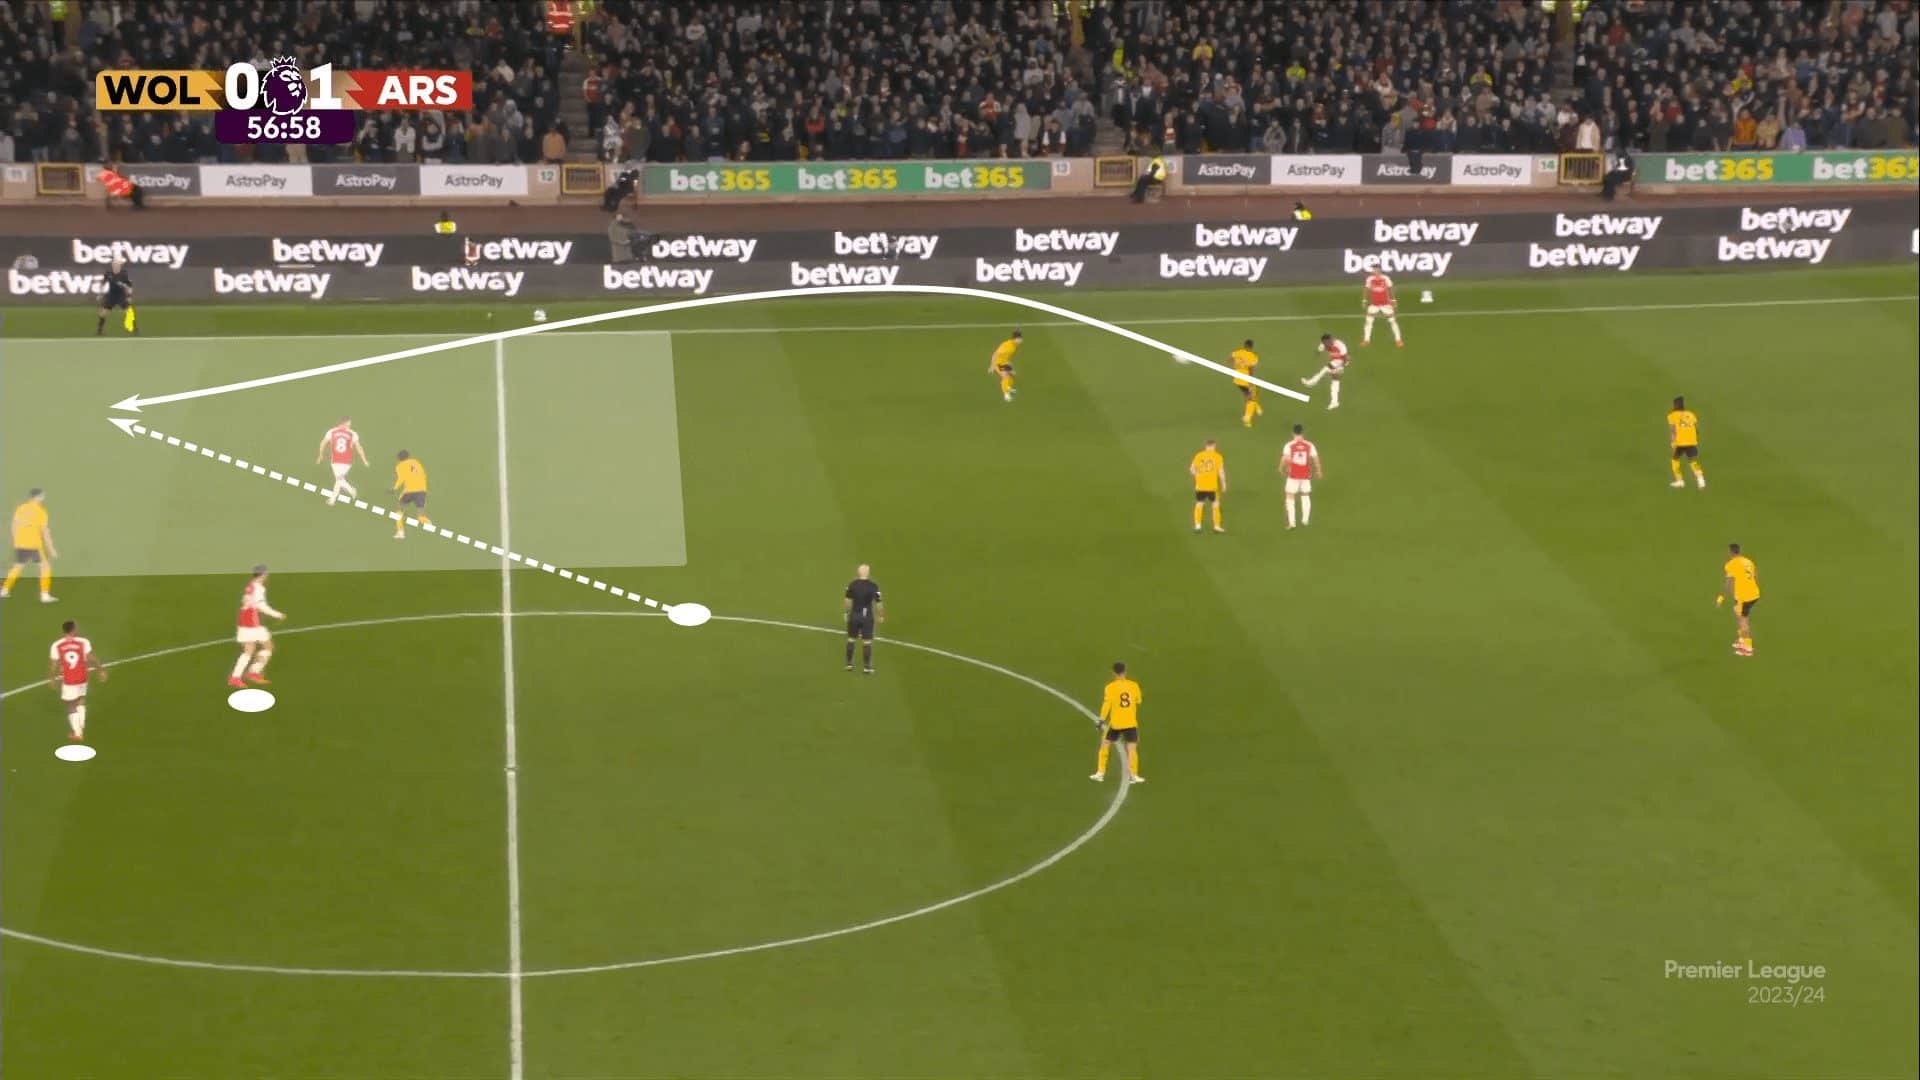
With a team like Arsenal, we can look at the interactions of either Ødegaard or Havertz with Jesus. Ødegaard’s movement patterns are typically the more fluid of the three, but Havertz is equally likely to move high and centrally as Jesus is to drop into midfield. It’s a nightmare of fluid movement for opponents.
And this is where the relation of the three, a #9 and two #10s, is so pivotal. Between those three players, it’s common to see one or two of the players stretching the depth of the opponent’s backline while the third exploits the space created underneath. Whichever player is able to receive between the lines, if he can receive the ball and face forward, he’s the one leading the charge to the opposition’s box while the other two continue to offer a threat in behind and stretch the opponent’s backline. By driving them back, they create more space for their teammate to carry the ball into.
Higher up the pitch, the objective remains the same; the #9 and #10 want to occupy as many members of the opposition’s backline as possible and stretch them vertically to create space for teammates to attack.
Bayern Munich offers an excellent example through Müller and Harry Kane, giving us an example of a #9 and single #10. Much like Havertz, Müller essentially plays the role of a second striker. Notice the positioning of the two players. Each is playing off the wide shoulder of their respective centre-backs. They’re not quite splitting the 2/4 and 3/5 gaps, but their positioning forces all four members of Lazio’s backline to stay tightly connected centrally.
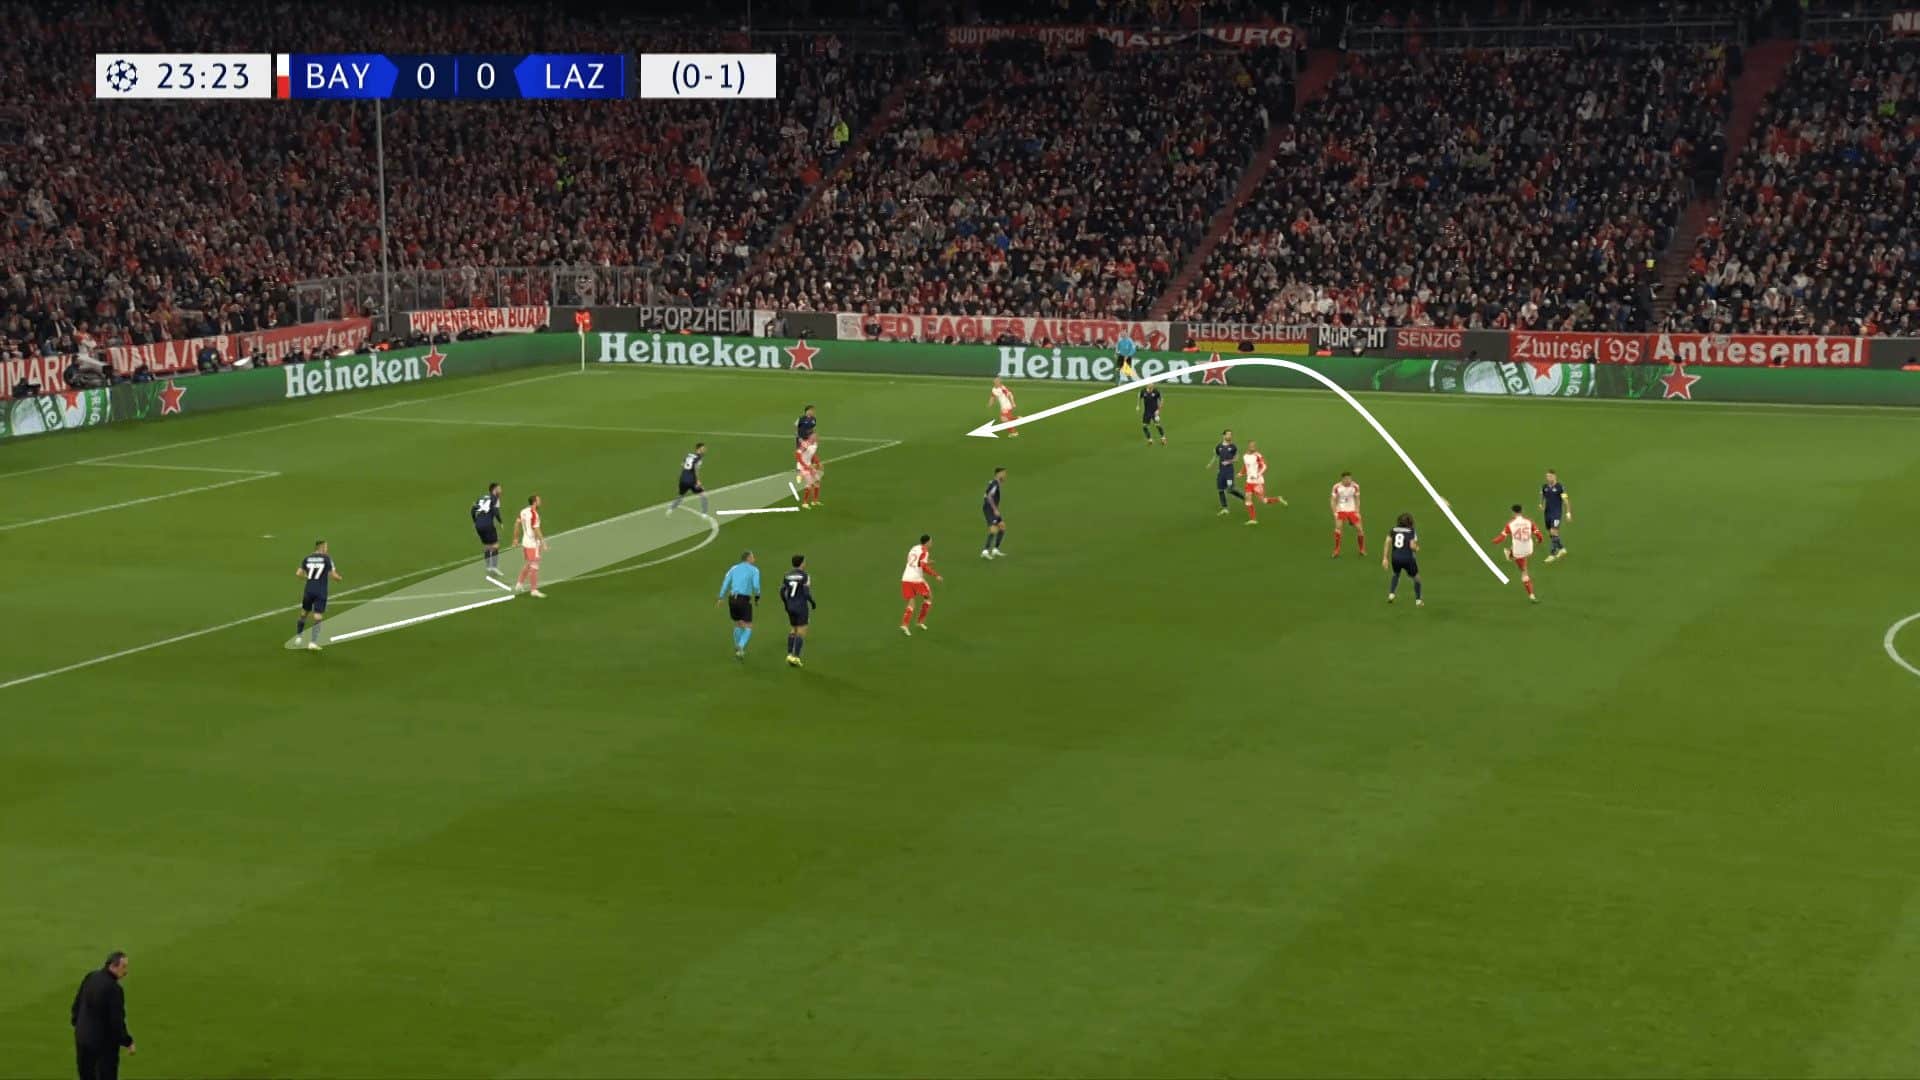
That high central occupation forced the Serie A side to become narrower than they would have liked. As Lazio became unbalanced centrally, Bayern progressed through the wings.
Serge Gnabry receives out wide and takes a first touch that attacks the box. As he enters the box, the backline retreats to stay in line with the ball, giving Müller the freedom to tailor his run to the space available.
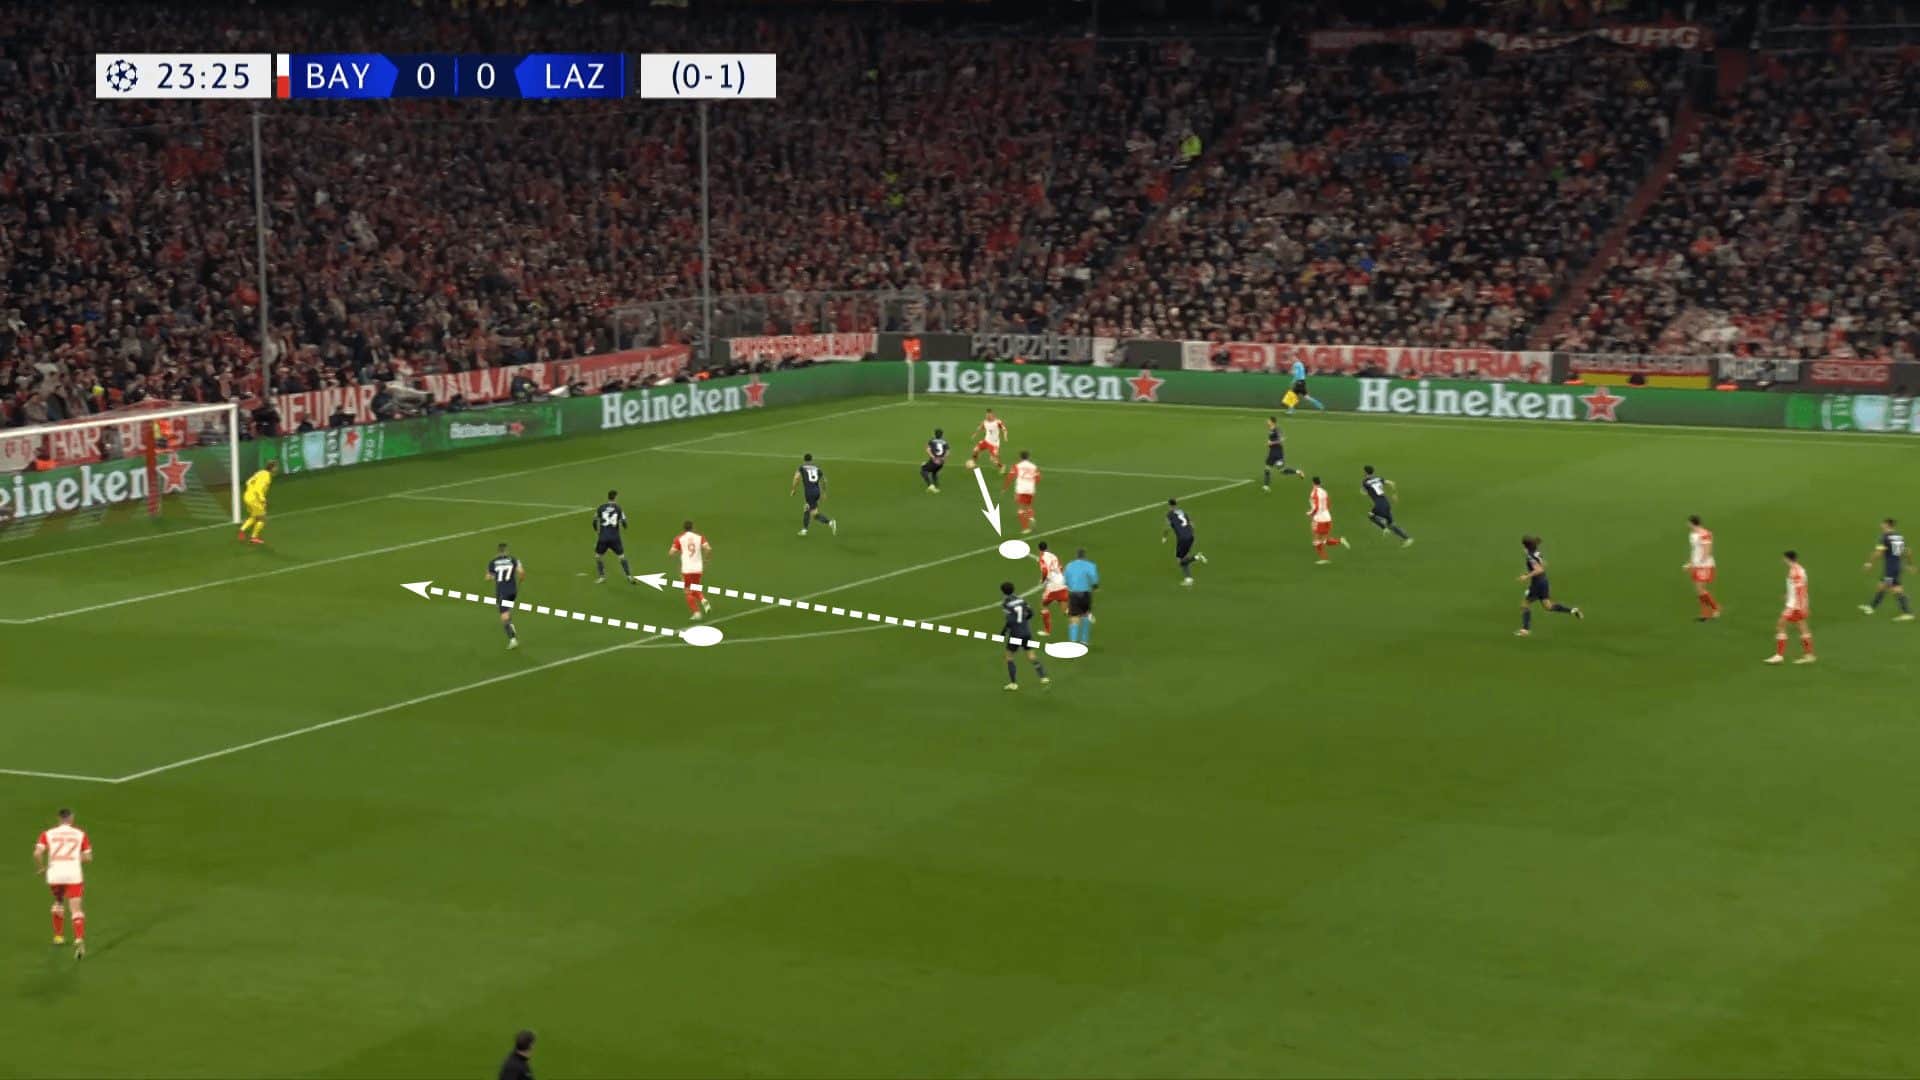
Jamal Musiala joins them with his run into the box. He receives the pass from Müller, the Raumdeuter, but his shot is blocked. Even though the shot wasn’t put on frame, this is still an excellent example of how the #9 and #10 can operate as two central forwards to occupy the opposition’s backline.
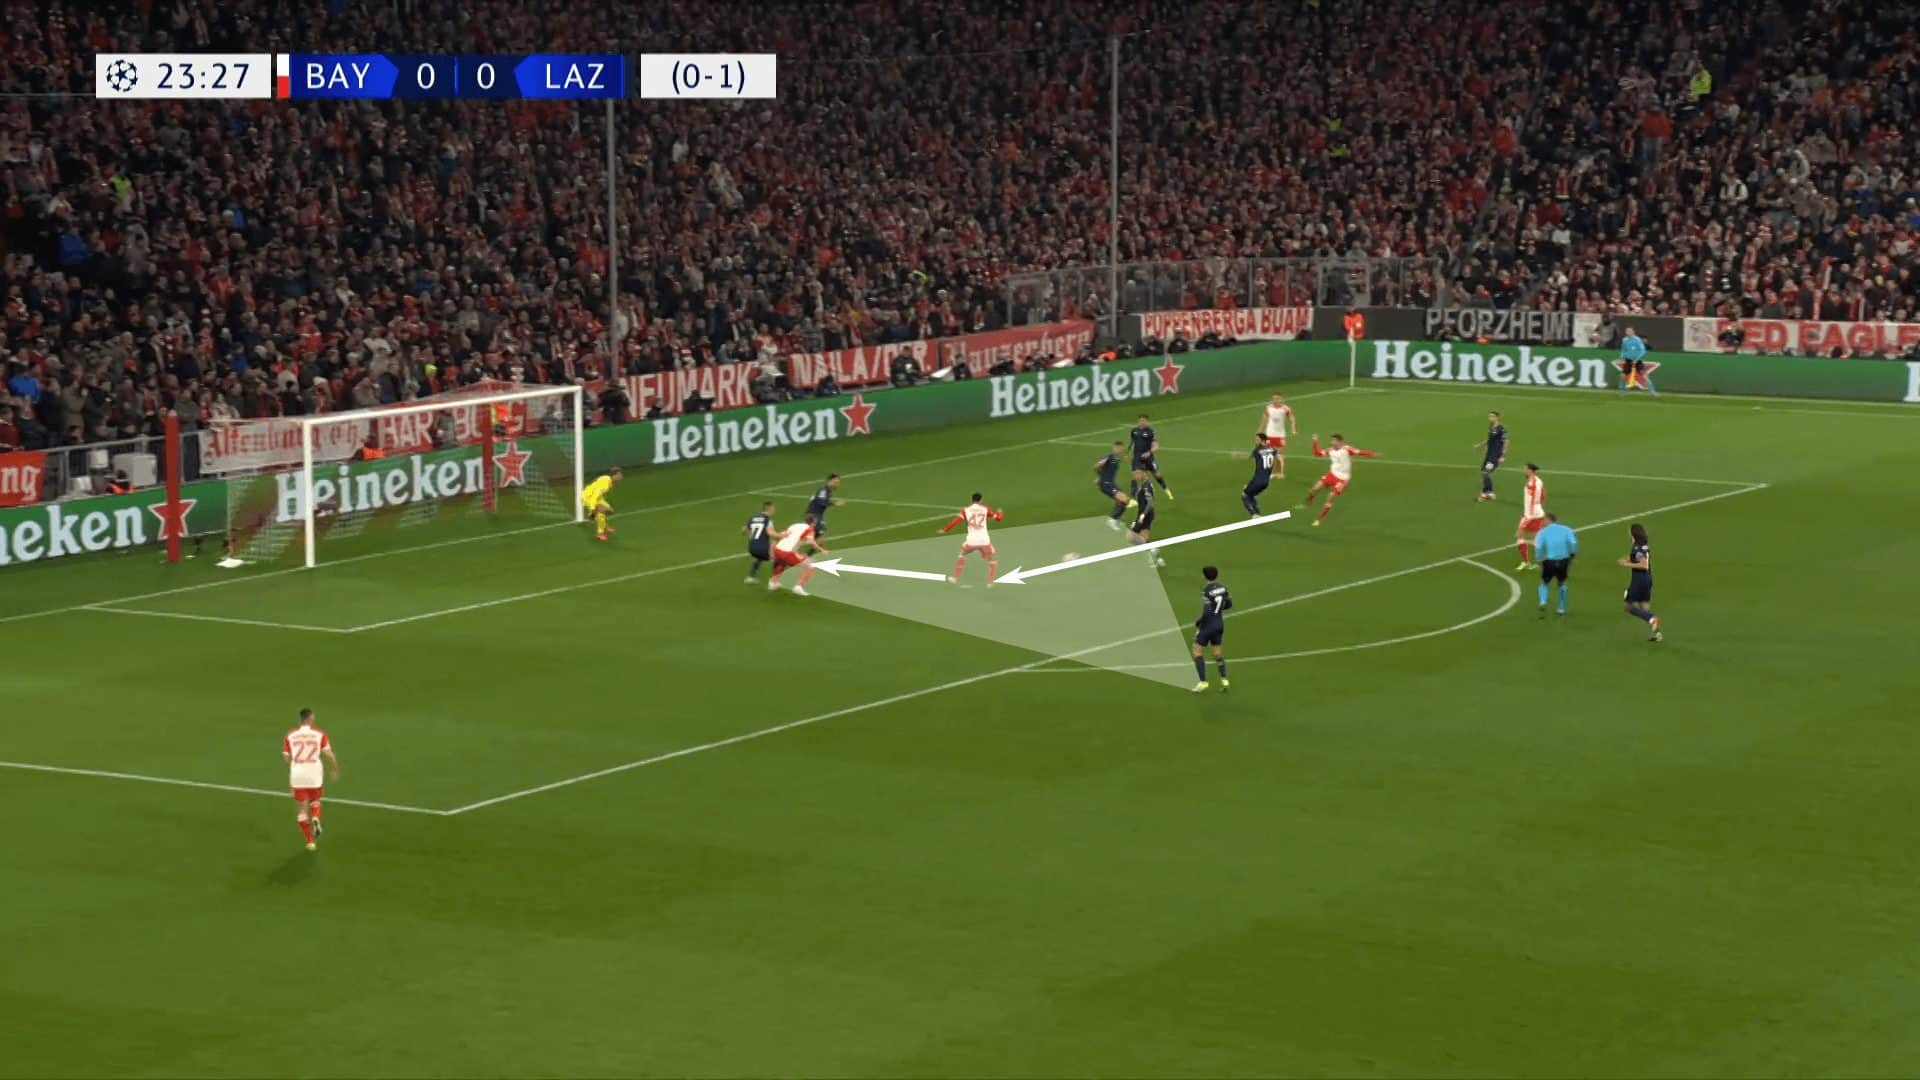
One advantage is that their positioning pins opponents, creating space and opportunities for teammates, especially as the team looks to progress the ball. Secondly, they have numbers high and central to attack the box. Finally, as was seen in the Arsenal example, the connection of those high central players creates opportunities for fluid rotations that are difficult to track.
Arsenal and Bayern are equally at ease with two or three players pushing into high central positions. For the Germans, either Jamal Musiala or Leon Goretzka can push into that highest line to establish a high central overload.
With the examples presented, we at least have a view of how a #10 can play as a second striker or how two #10s in a three-man midfield can create a three-man rotation that disorients the opposition.
Coordinated efforts to stretch the backline and create for each other
Building off of the first section, we’ll keep the same starting point: the #10 playing off of the #9 as a second striker in that highest line. Whereas the first section showed how the #9 and #10 can coordinate their positioning and movements for the benefit of those around them or even use a high central overload to pop into spaces within the press, this section is focused on stretching the opposition.
To set the scene, we’ll look at examples where the #9 and #10 start high and centrally, coordinating their movements to attack the space behind the backline. They then play off of each other as they attack the goal. The common cue that the players are looking for is a teammate on the ball in a forward-facing body orientation with time and space to play forward.
That’s exactly how this example from Borussia Dortmund is set up. With the centre-back on the ball driving forward, we can see the #9, Niclas Füllkrug, and his #10, Julian Brandt, together on the far left side of the image, situated inside the midfield circle. As Nico Schlotterbeck drives forward, his body orientation is facing directly ahead, meaning the ball over the top to Füllkrug is the easier of the two. That cues his #9 to run him behind while Brandt stays.
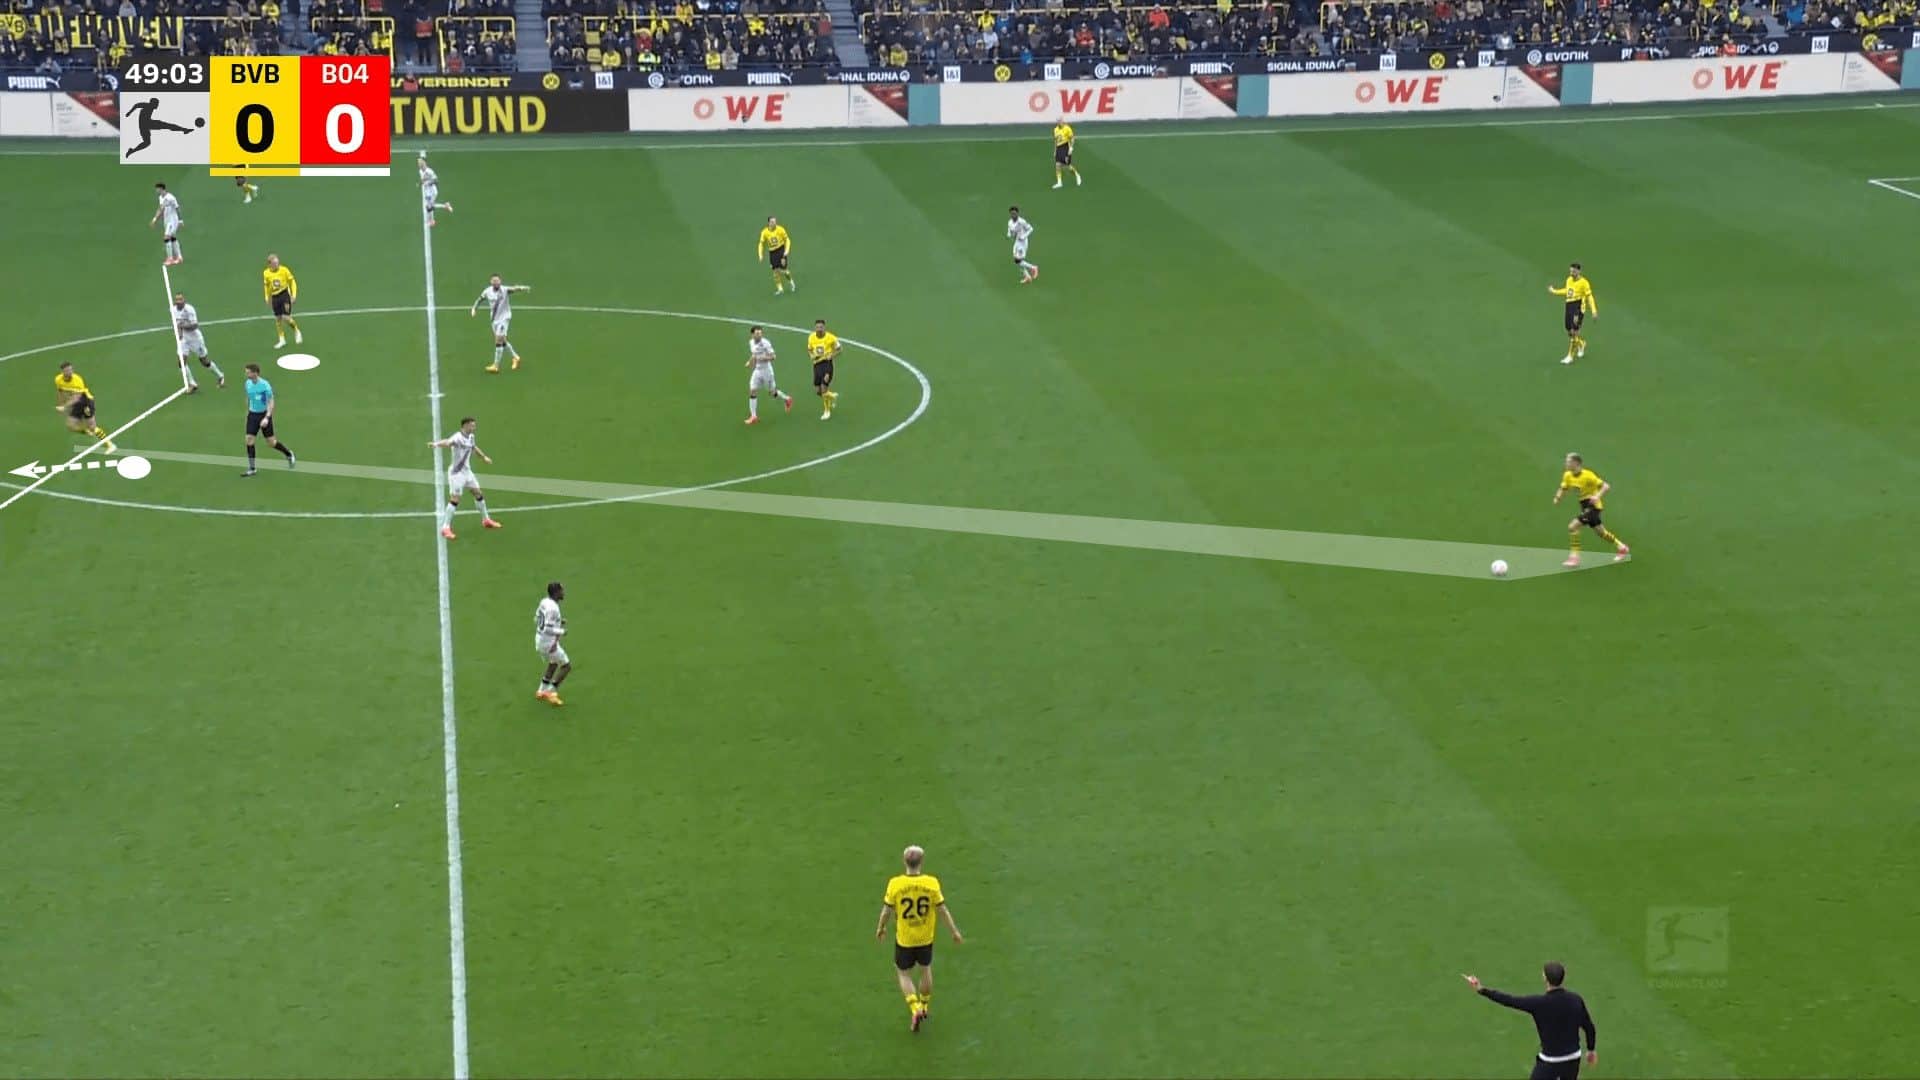
But the first pass isn’t played forward. Even though Füllkrug does not get the ball, what he has done is draw the Bayer Leverkusen backline 6 m deeper. Since Schlotterbeck still has time to carry the ball forward, he takes a touch inside, opening his body orientation to the right side of the pitch. As the centre-back approaches the ball, Brandt sees his turn to offer a run in behind.
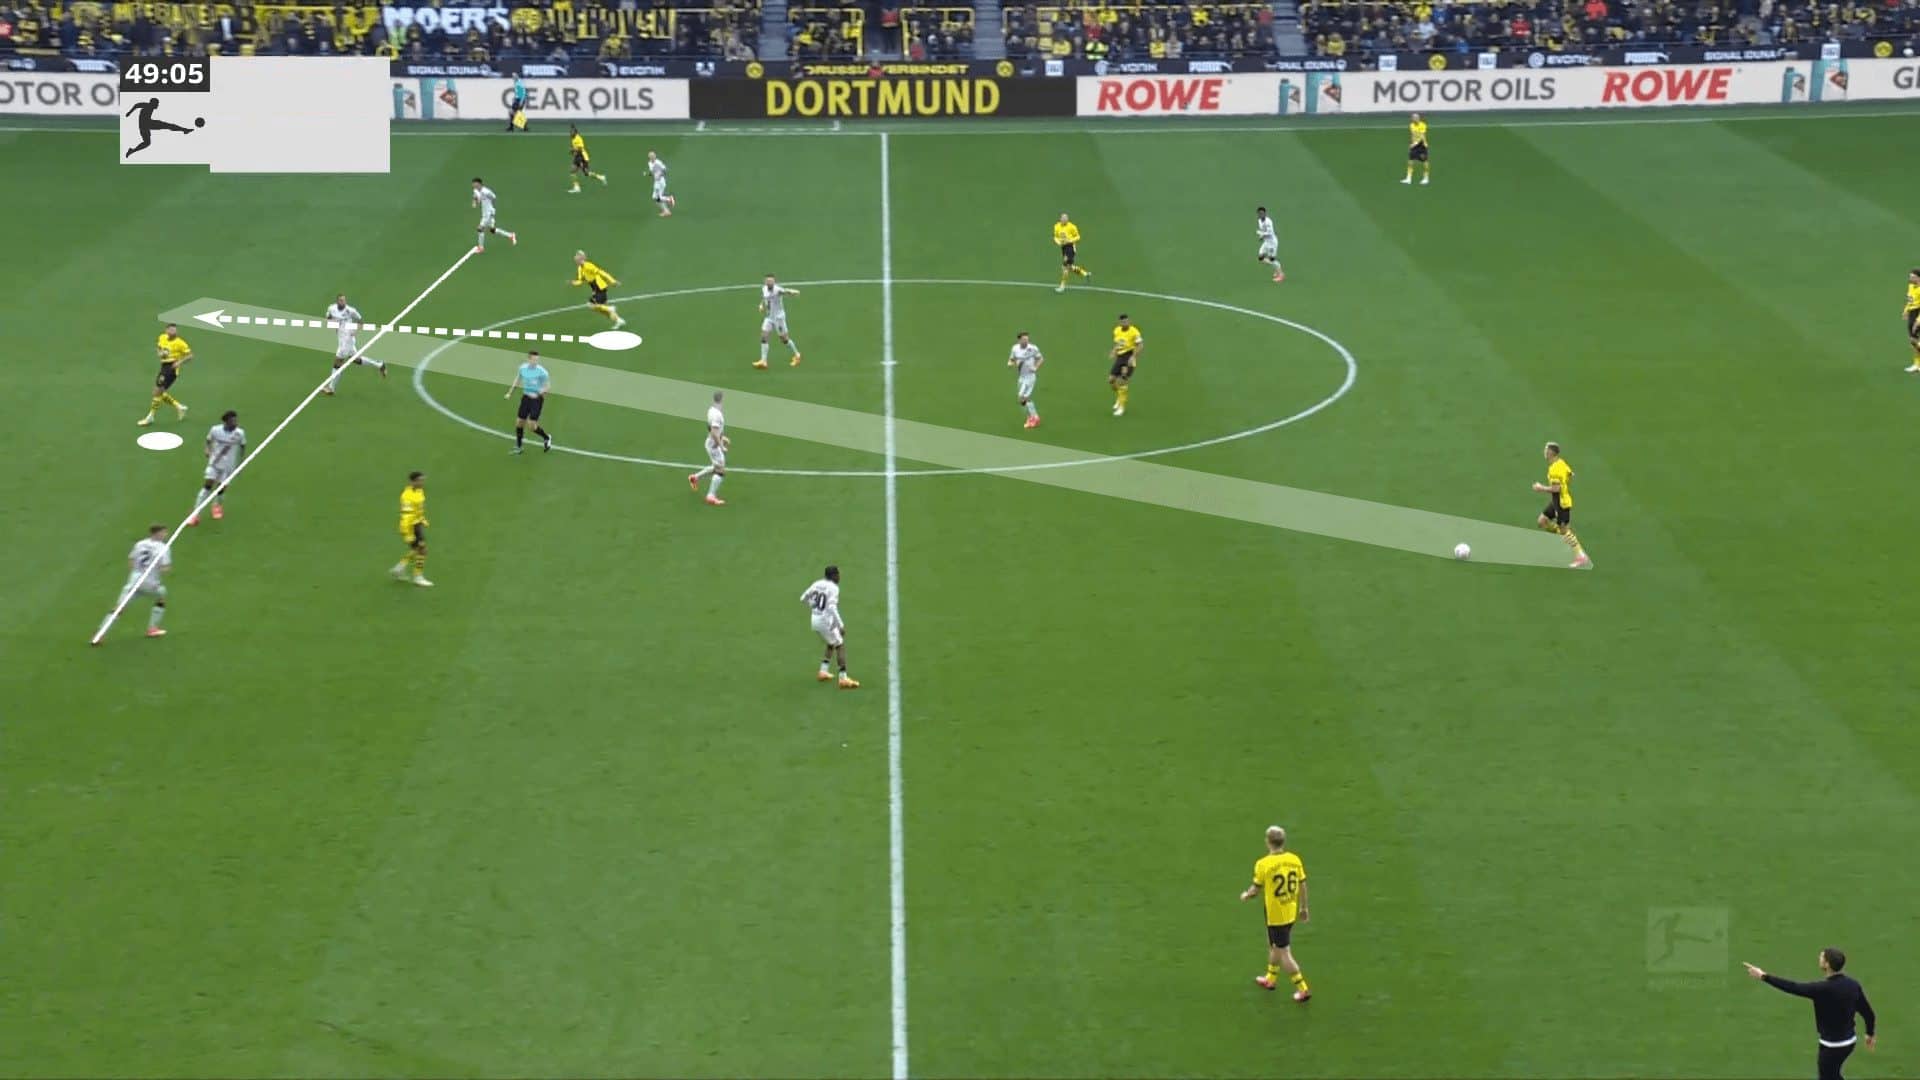
That pass isn’t played, either. But look at that backline. They’ve dropped another seven or 8 m, and Schlotterbeck is still carrying the ball forward. His next touch takes him wider again, cueing another run from Füllkrug.
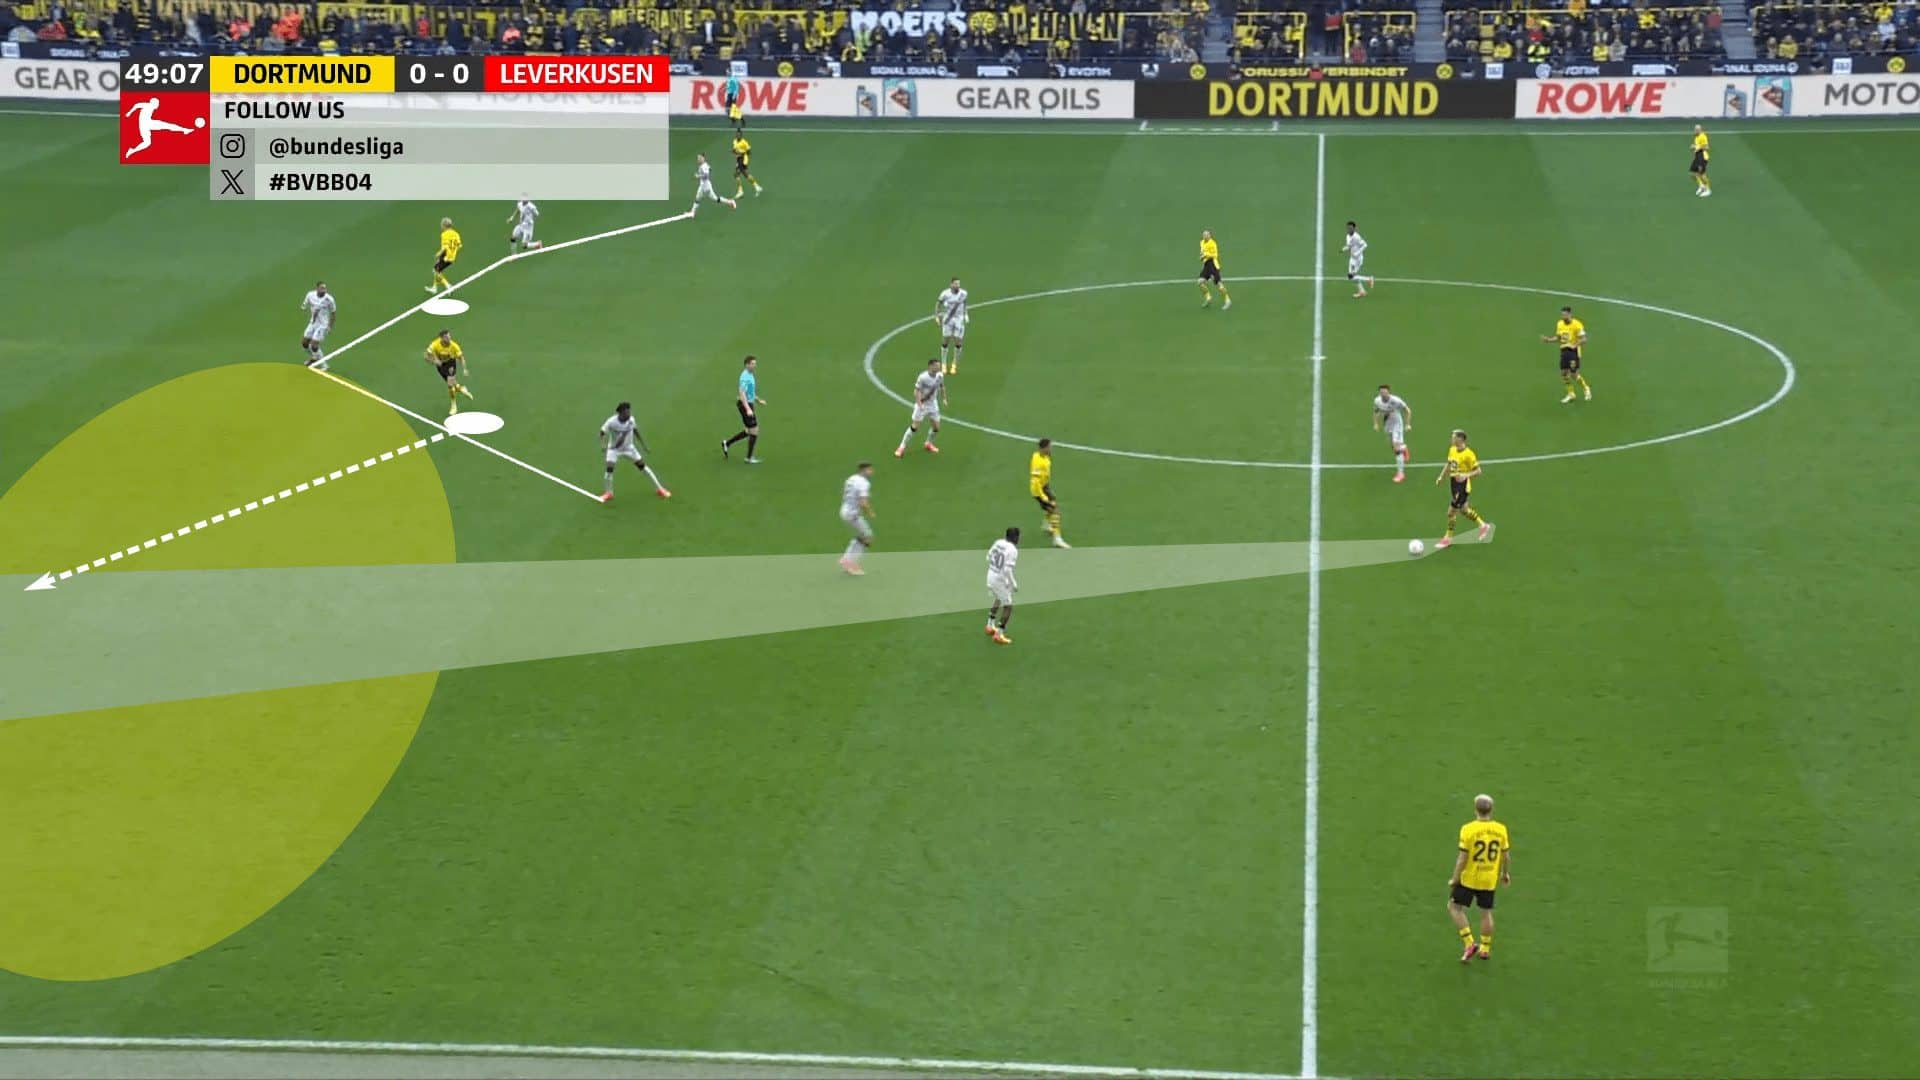
This time, the run is rewarded with a pass. With their high central position and coordinated movements to stretch the opposition’s backline, the two Dortmund attackers disorganised one of the top-performing backlines in the game.
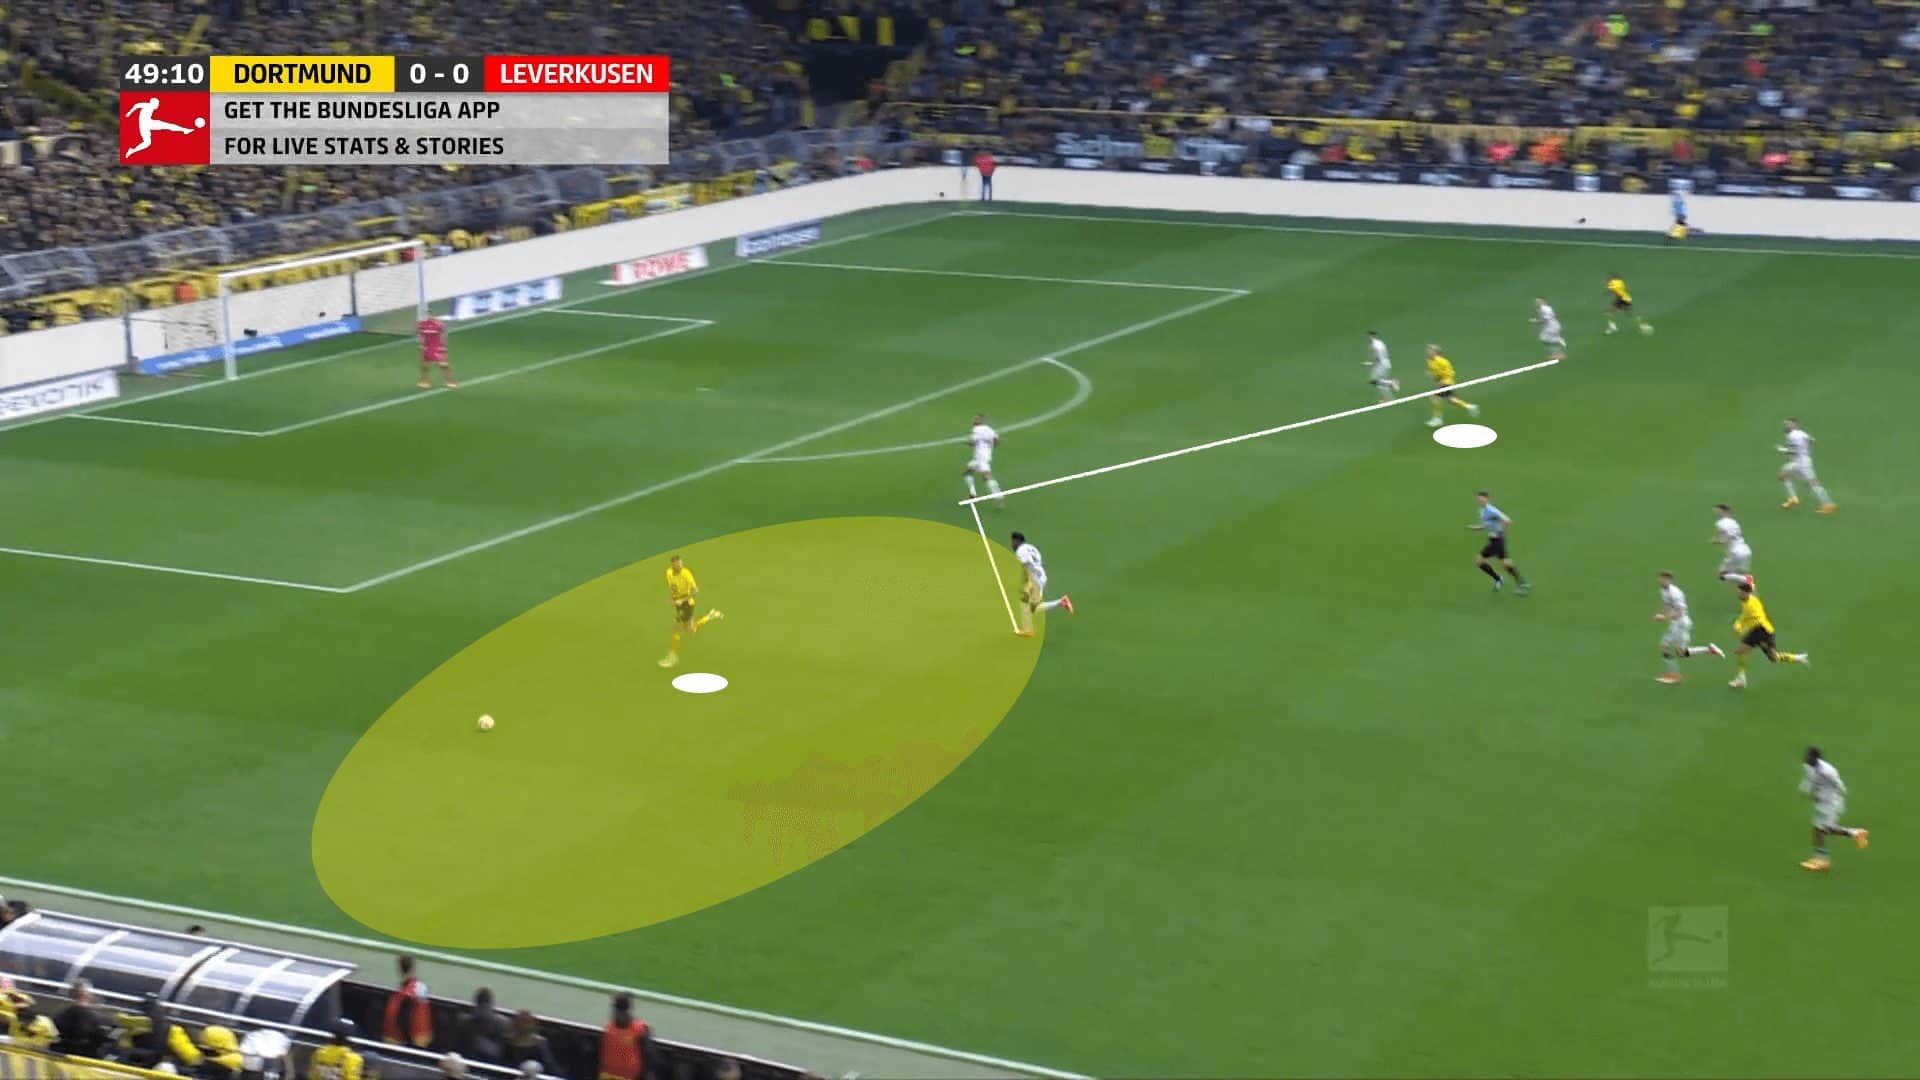
Understanding who should run and where they should go is critical. Both players did well reading the centre-back’s body orientation and understanding which player was best suited to latch on to a pass over the top. Another critical factor here is the players’ willingness to offer the run behind the backline. The continuous runs stretched the Bayer Leverkusen backline, increasing the distances between their lines. The end result was the disorganisation of the backline and space to get behind them through the wings.
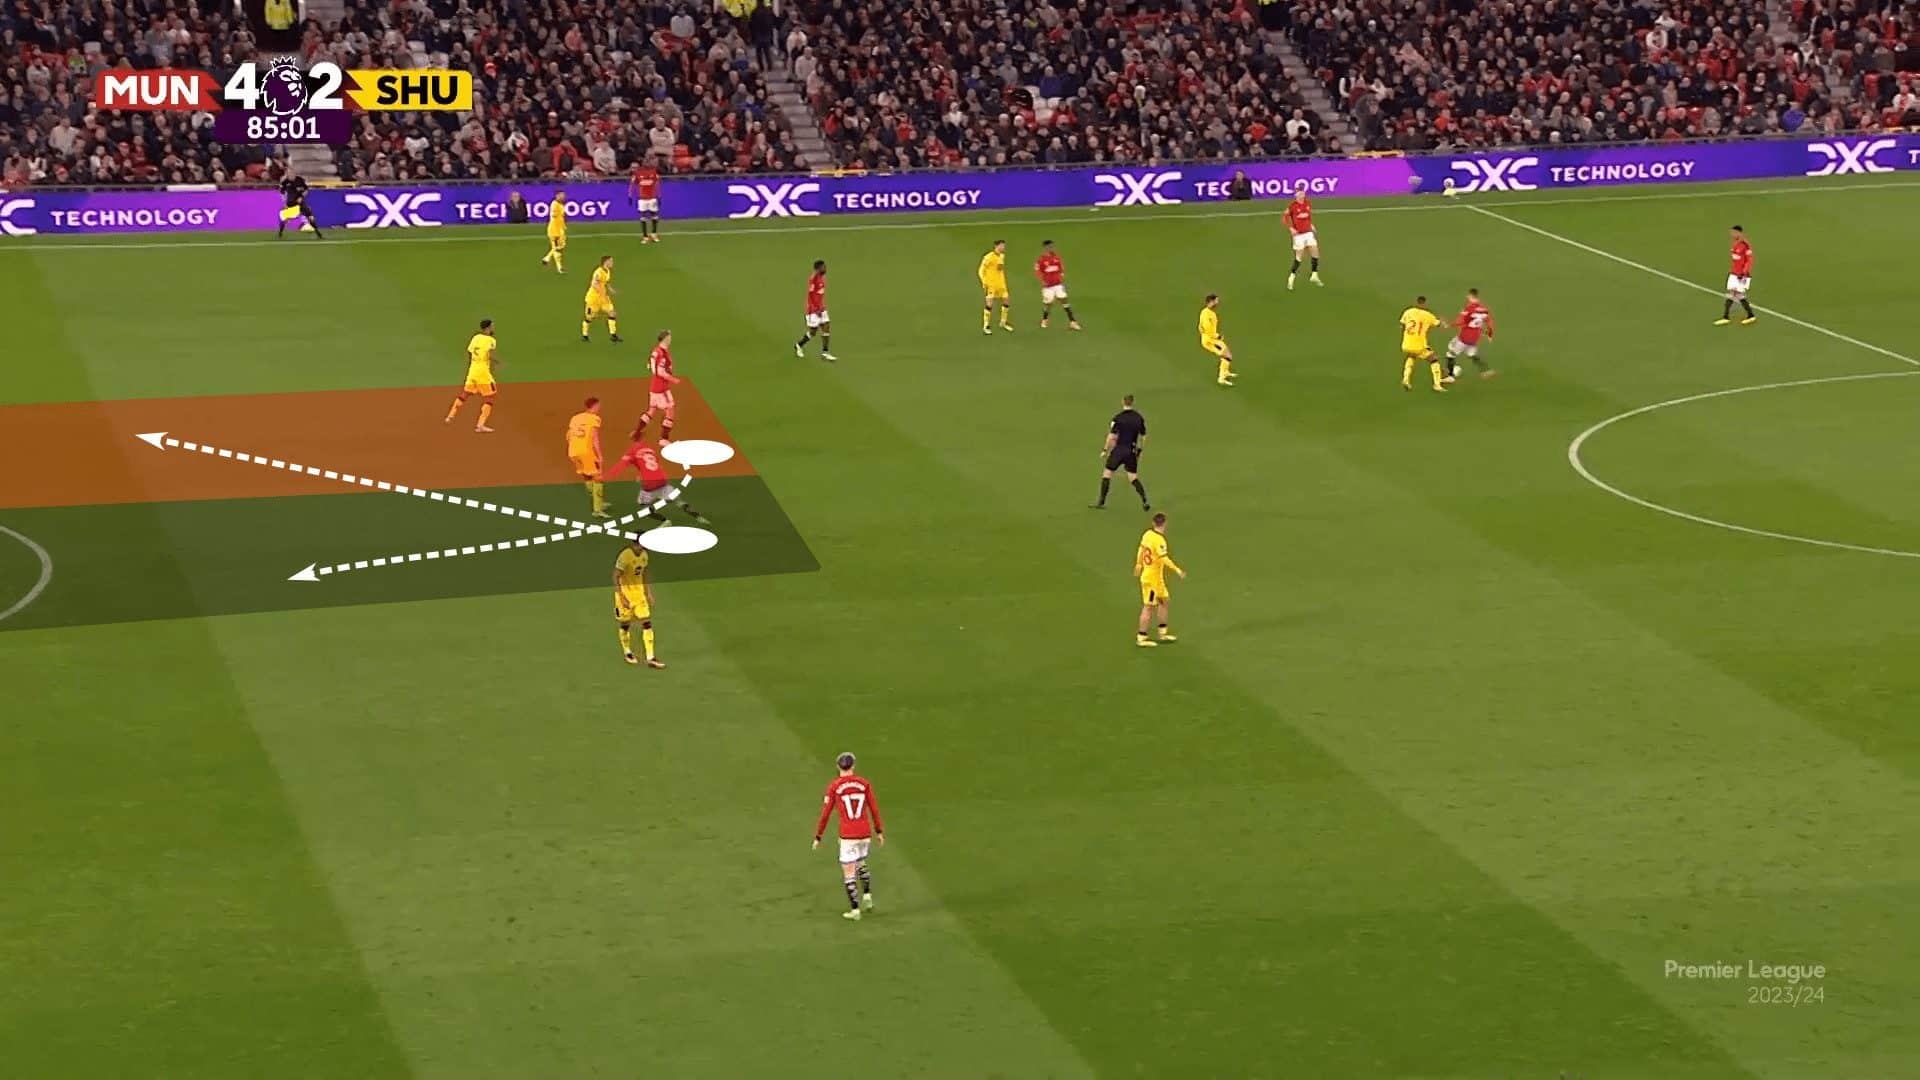
Let’s take that example to the next level. Turning our attention to Manchester United, we have Bruno Fernandes and Rasmus Højlund occupying high and central positions. They’re very well connected and are set up in a 1:1 with the Sheffield United centre-backs. As Højlund drops, Fernandes takes the cue to run behind him.

The two essentially switch positions. Højlund comes to the very centre of the pitch while Fernandes is offset to the right. Fernandes did manage to latch on to the ball over the top and played a brilliant pass into Højlund. His sliding shot went past Wes Foderingham and gave Manchester United their insurance goal.
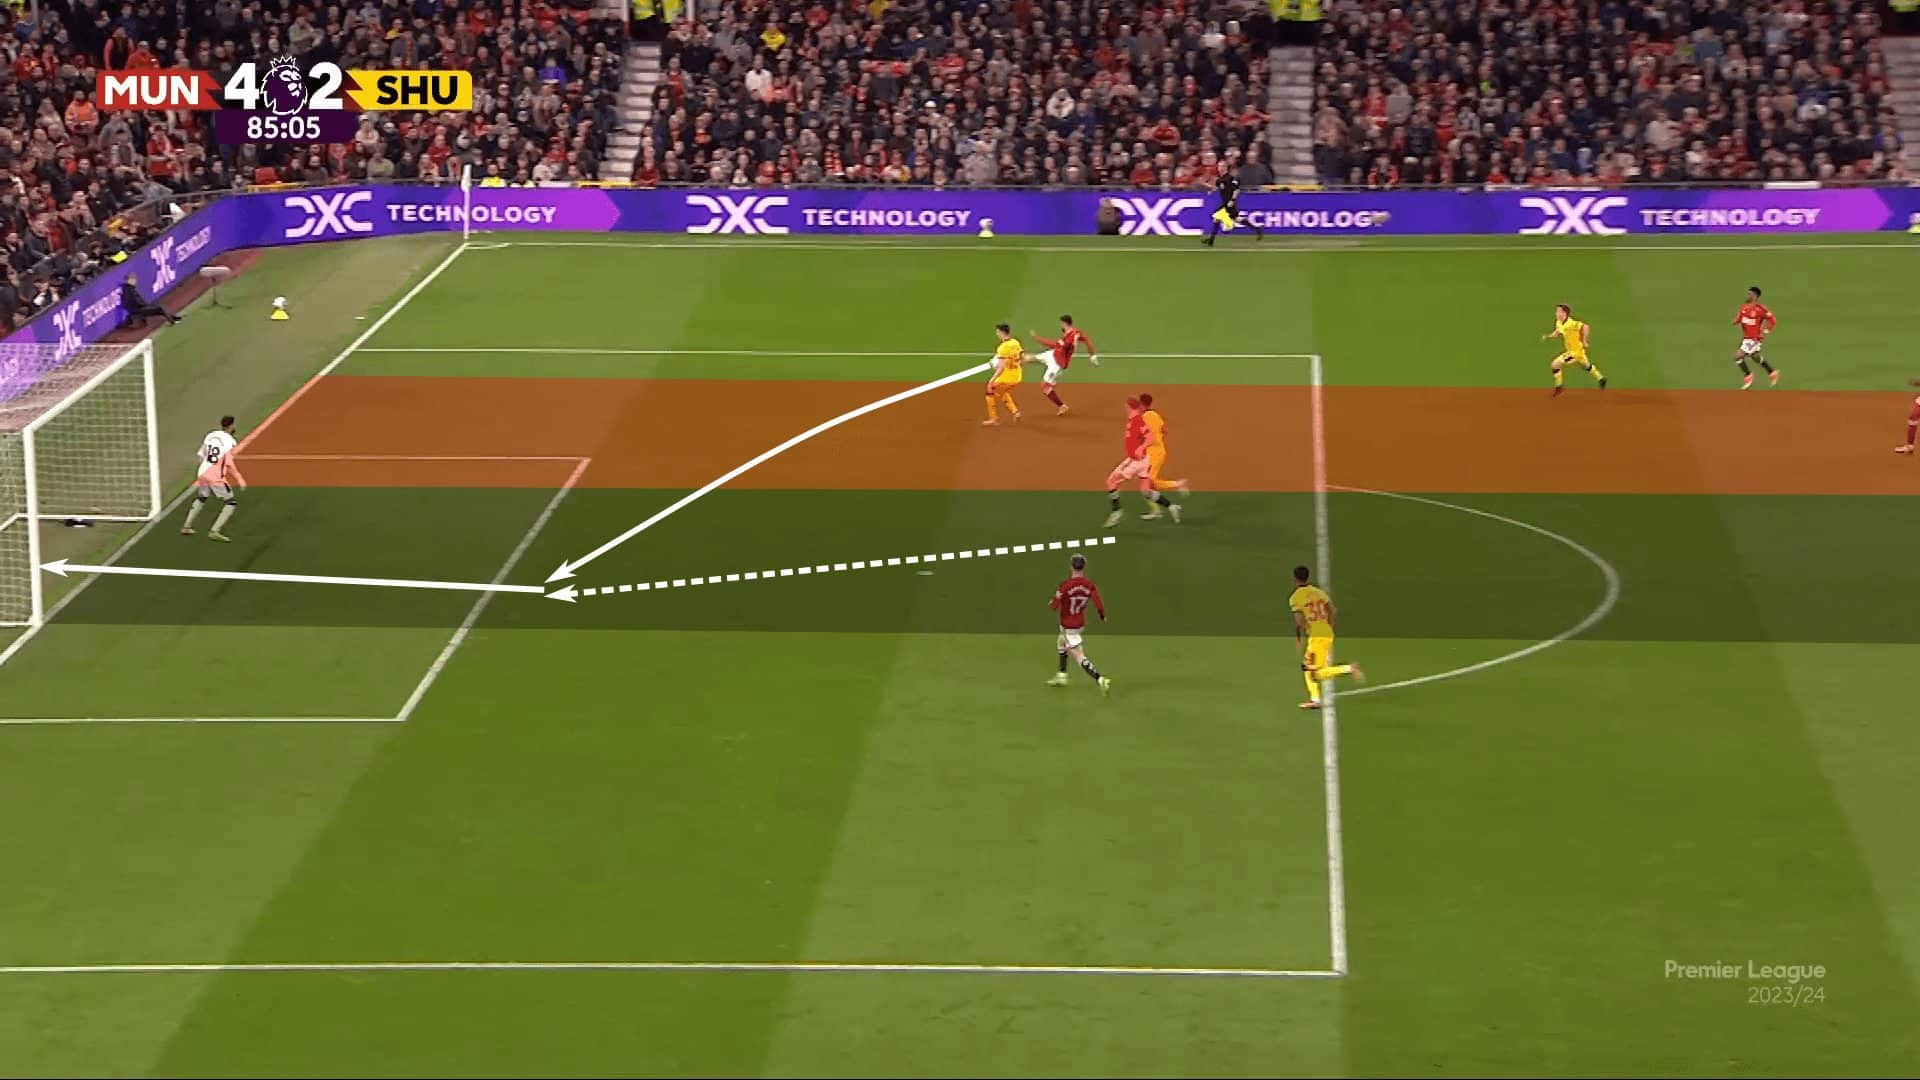
The beauty of this example is how tightly connected the #9 and #10 were from start to finish. They started tightly connected with their high and central positions, then finished the playoff by linking up for the goal.
Additionally, it was such a simple, coordinated movement between the two. They essentially just exchanged the width of their positioning. Once the ball was played over the top, Højlund understood that he needed to offer an option to goal, and Fernandes intuited that his teammate would be there. That sums up the socio-effective superiority perfectly.
Connection and separation
Thus far, our #9s and #10s have stayed close to each other and typically on the same line. We did have the Arsenal example, where the double #10s spurred rotations with players dropping between the lines, particularly Ødegaard, but in all cases, the #9 and #10 have been in close connection in the highest line. They’ve also typically positioned themselves centrally.
Let’s look at another aspect of the relationship. It’s time to head to Lisbon for a look at how Benfica uses the #10, Rafa Silva, in relation to their #9, typically Arthur Cabral. Rafa Silva offers an electric presence on the pitch. He has the skill set to operate as your typical #10, but with his blazing pace, he’s also a player that Benfica relies on heavily to stretch the opposition’s lines. Cabral, meanwhile, is more of a stronghold-up player.
Rafa picks his pockets of space well and does so with a great deal of tactical freedom. He has artistic license to search out areas of the pitch that offer him the best opportunities to positively impact Benfica’s attacking tactics.
He can play side-by-side with his #9 if that best suits the team, but he also does well to maintain that connection by offering support underneath. In the example below, as the pass is played forward, he drifts in front of Cabral.
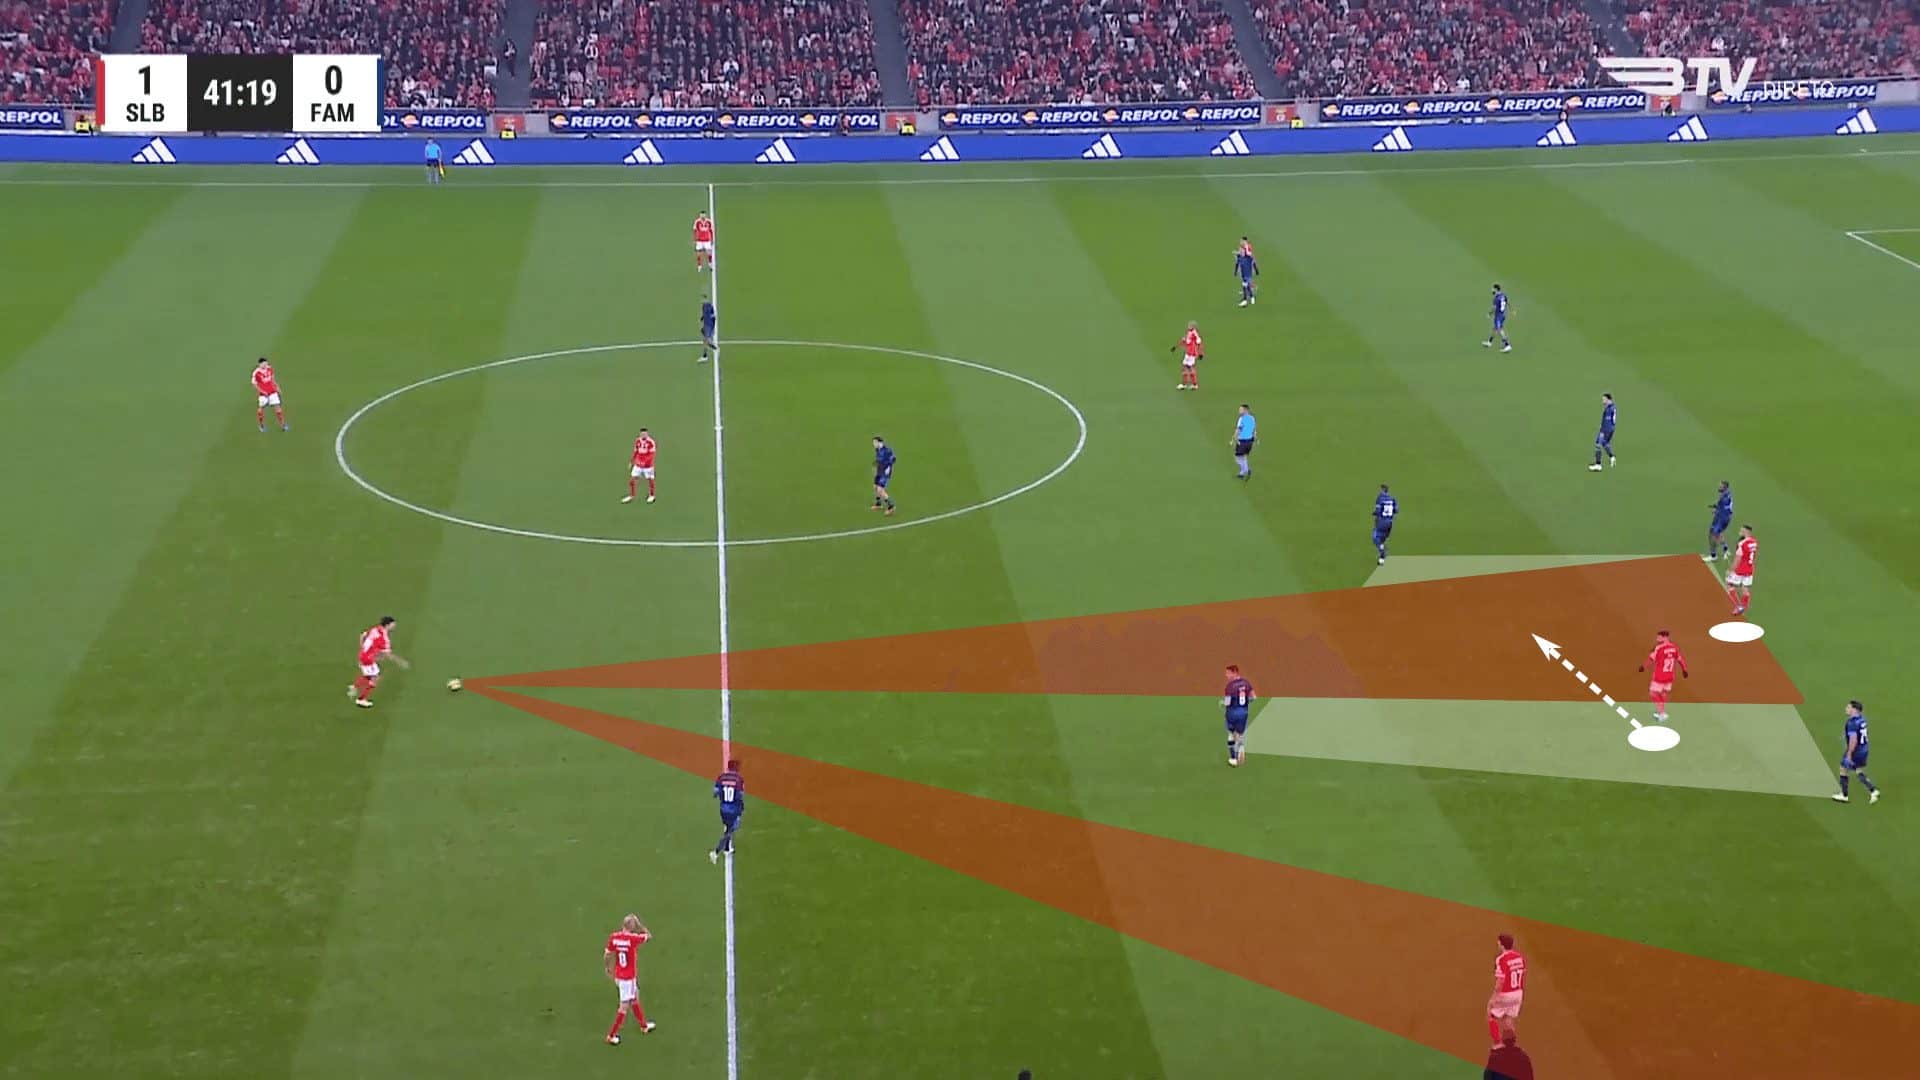
There’s a little bit of an oddity here, given that if Cabral received the pass, he could set into Silva’s to play him into a forward-facing position. One small detail from the image above is that Rafa is directing Tomás Araújo to play the ball wide to João Neves. Ultimately, our analysis should read his movement as a misdirection to pull the Famalicão defence centrally, enabling the pass into the wings.
When the ball does arrive at Rafa’s feet, he’s quick to find João Mário, who attempts a through pass to Tiago Gouveia through the left half-space, resulting in a corner kick.
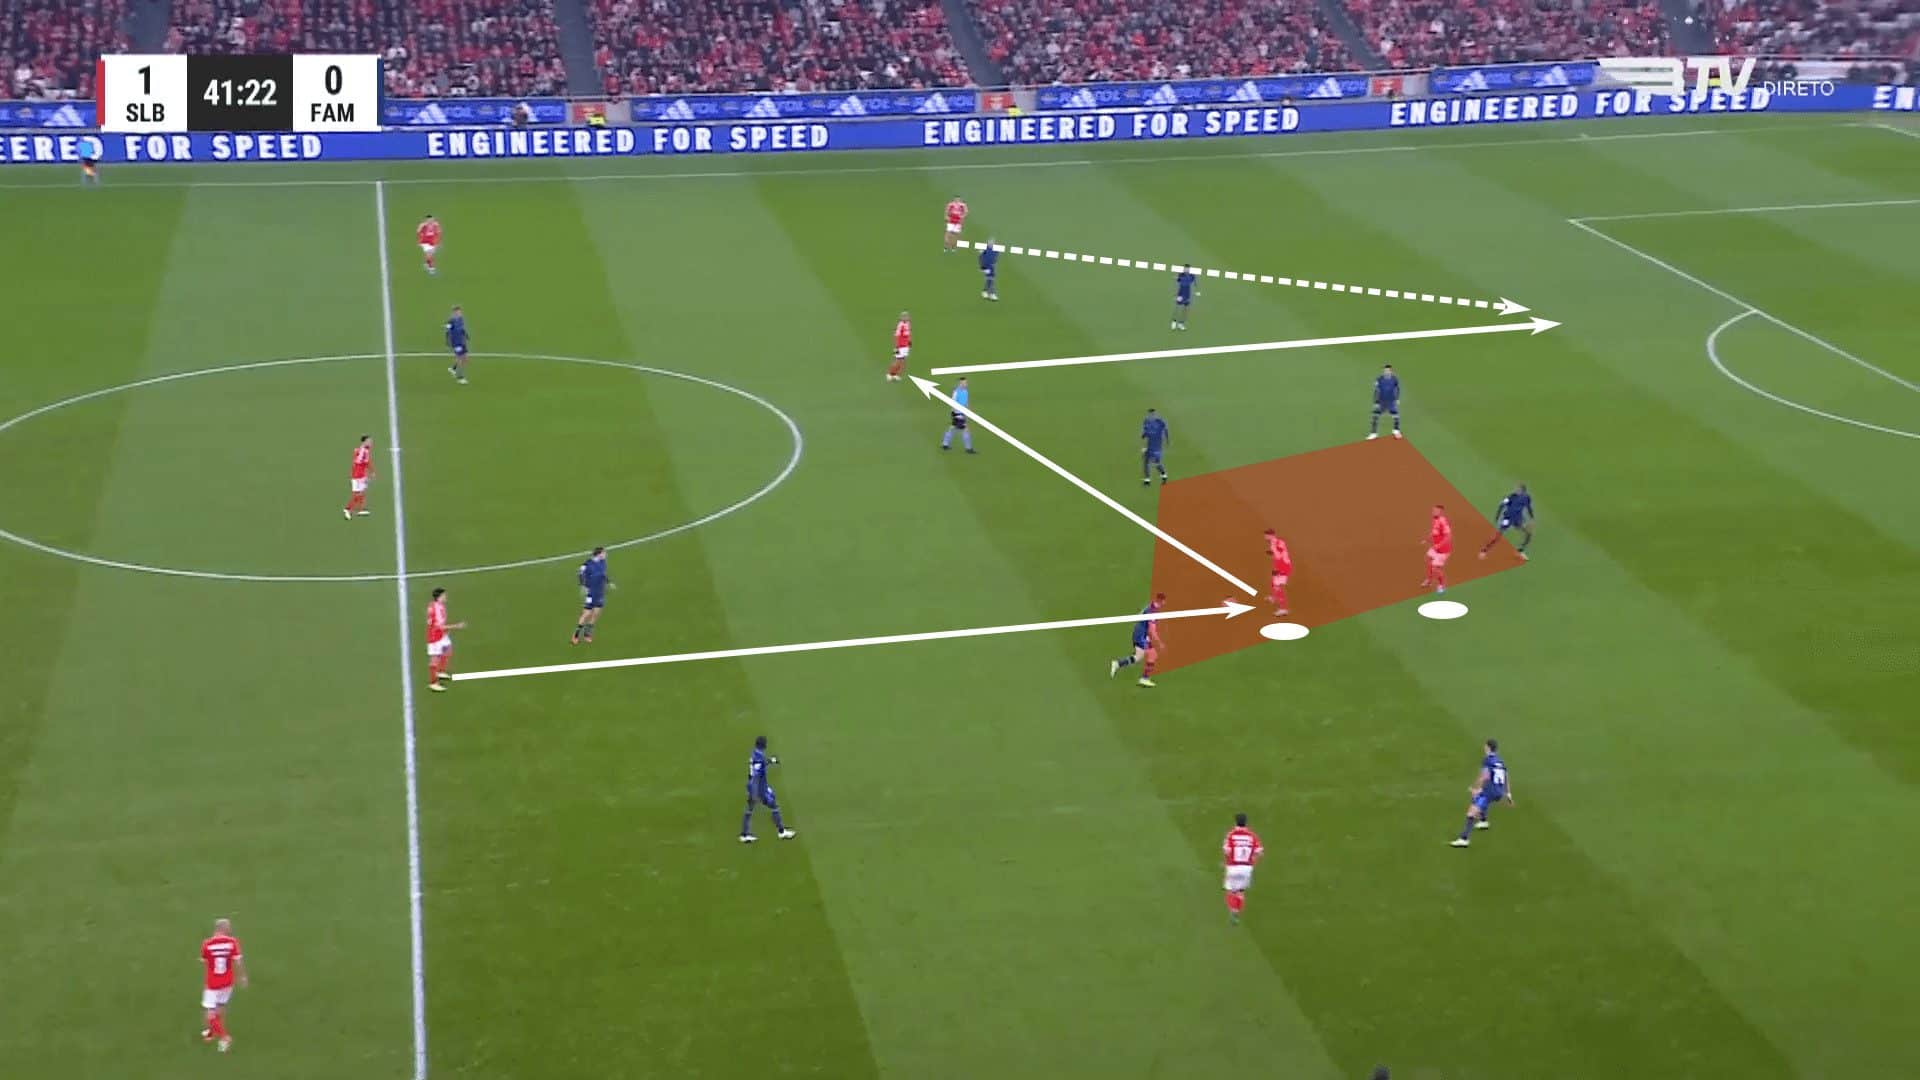
Those connections between the #9 and the #10 aren’t strictly side by side. If the #9 is stretching the opposition’s lines, as Cabral did here, it opens up space for the #10 to move underneath the striker. Whether the initial pass is played into the #9 and set back to the #10 or played directly into the #10, they can present an immediate threat to the opposition. In this example, Famalicão closes that space well, freeing João Mário centrally. If Rafa can get on the ball in a forward-facing position with limited opposition, there’s also an opportunity to set up a 2v1 with his striker.
To this point, our tactical theory piece has focused on the close connectivity of the #9 and #10. While the attacking midfielder will not spend his entire match in close connection to the #9, we have some excellent examples of the two playing off of each other.
Let’s turn this tactical analysis into another form of connectivity. We’ve already discussed the #9 and #10 occupying all four members of the opposition’s backline. In the previous examples, the two players were closely connected, often creating space for their teams to attack through the wings.
For Benfica, we also have a case of collaborative starting positions with both Rafa and Cabral in the half spaces, the former on the right and the latter on the left. Instead of a close connection, this is almost a case of creating isolation. By taking up wider starting positions, Rafa can isolate himself against one Famalicão defender and use his pace to get behind the backline. That’s exactly what happens here.
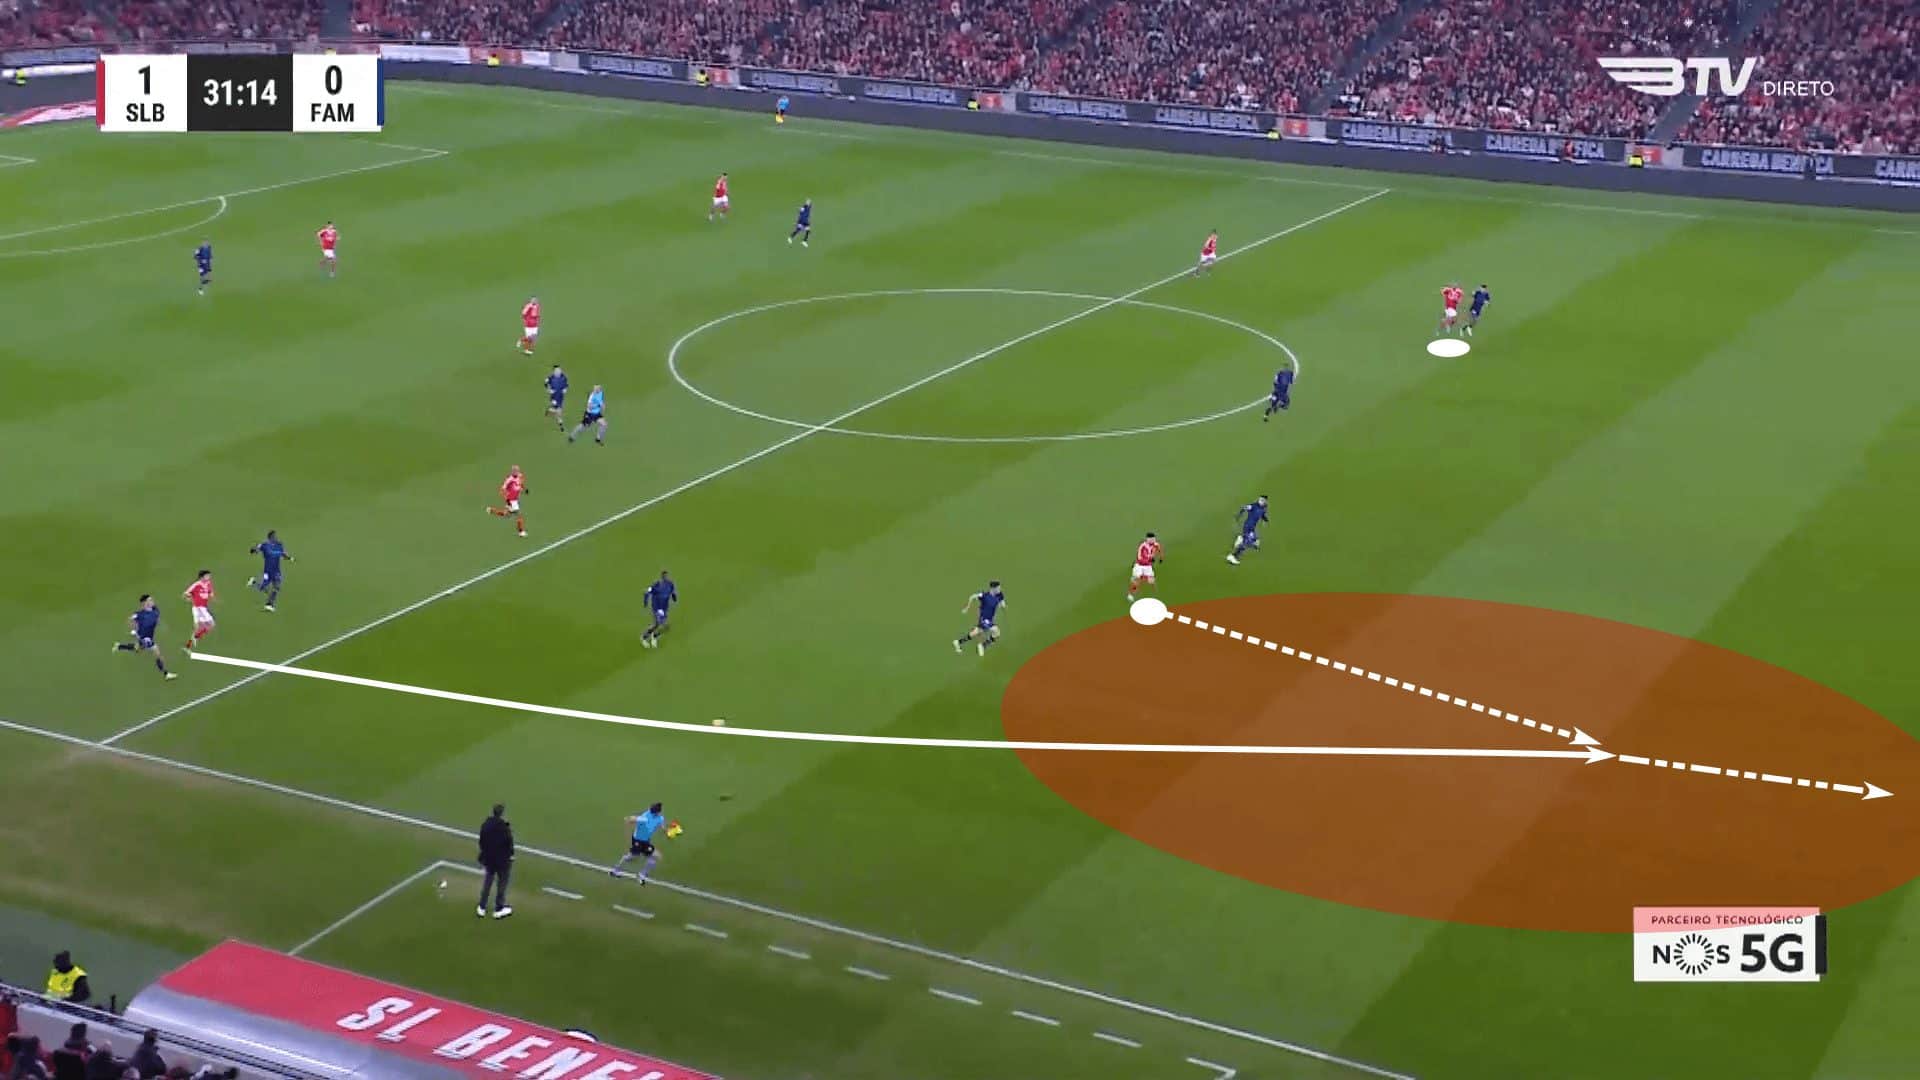
As Rafa latches onto the pass, he’s able to attack the box and position himself for a cutback. There’s only one defender in his path. Just as Rafa benefited from isolation as the pass behind the backline was played, so has Cabral benefited from a 1v1 matchup in his approach to the box. With Famalicão forced to commit numbers to Rafa, it’s their right-back who must account for the Benfica striker, but he doesn’t respond quickly enough and is beaten to the spot, leading to a Benfica goal.
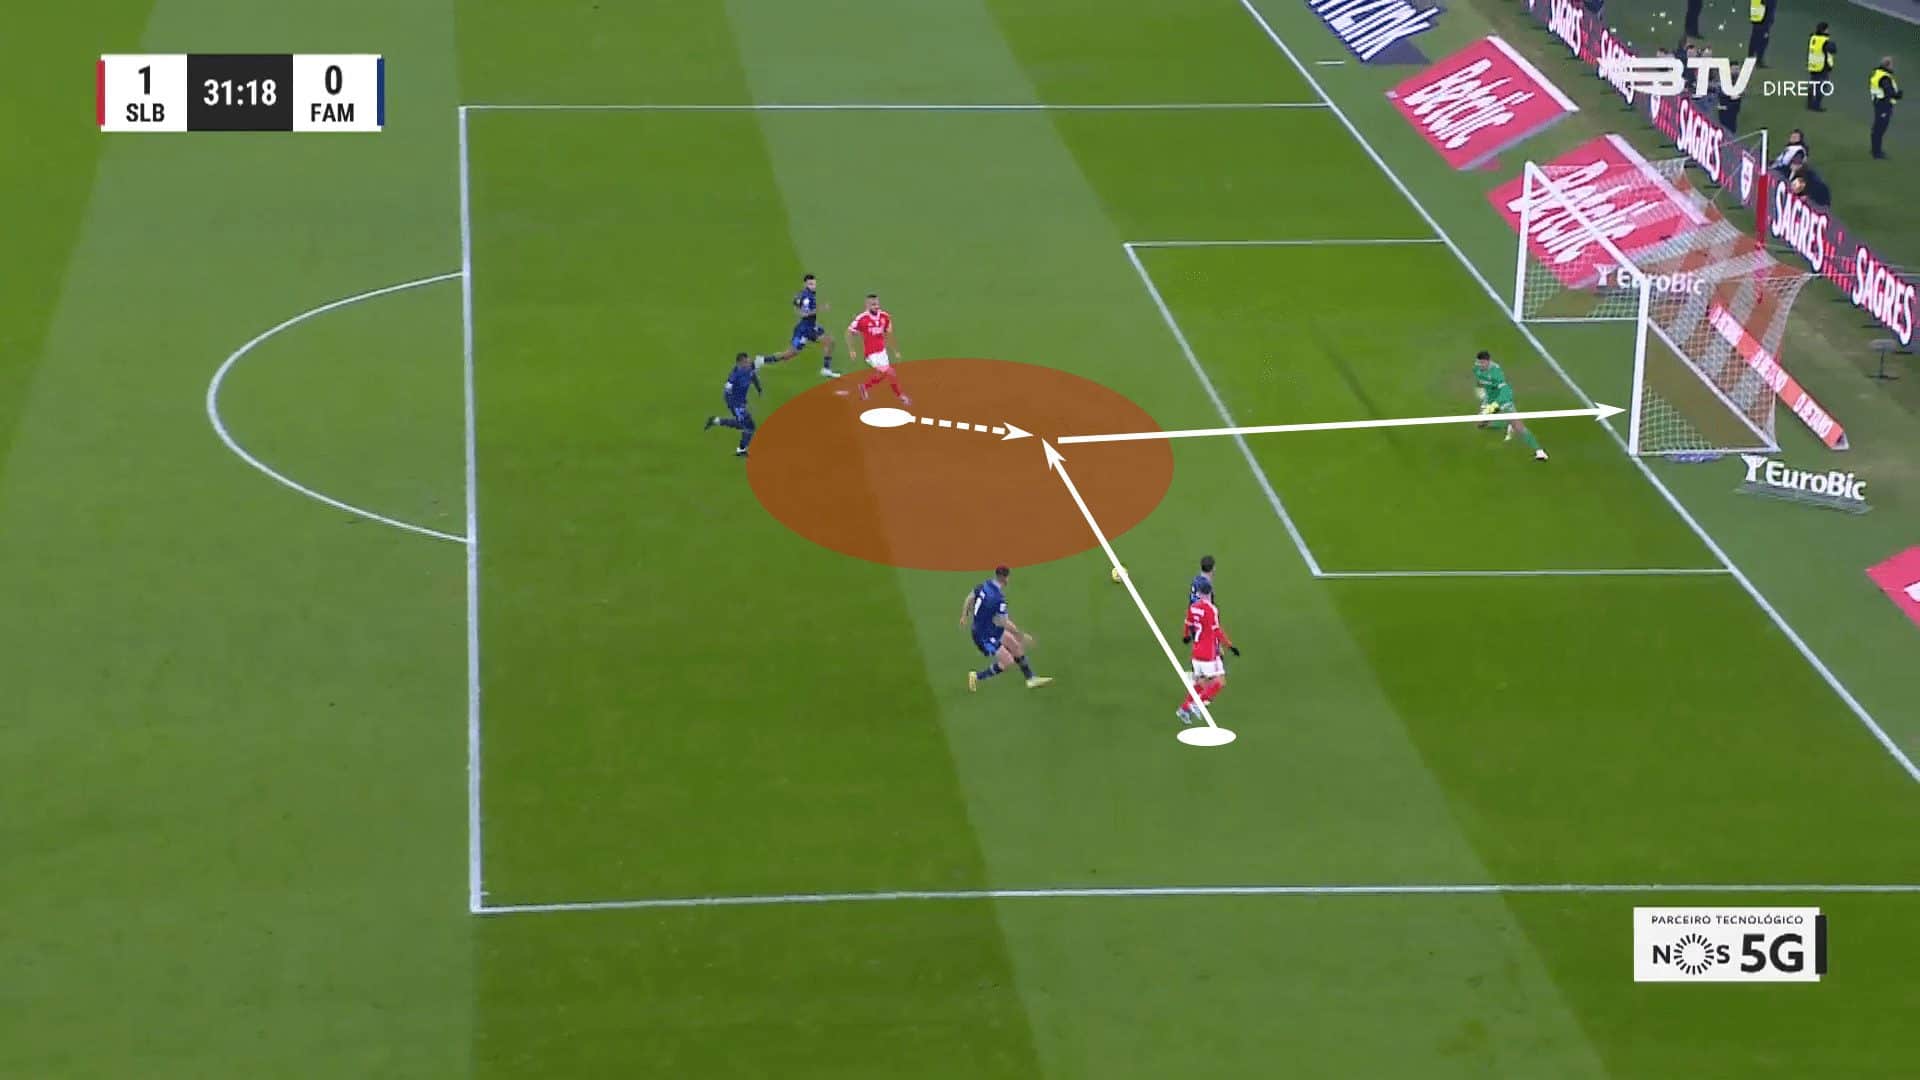
This is a distinct example in that the purpose of their positioning was to exploit Rafa’s qualitative superiority through a 1v1. Even though that’s the means of attacking the box, Cabral shows a good understanding that his partner will eventually need him to finish off the play. That starting position in the left half-space gets Cabral free of the Famalicão right centre-back and ahead of the right-back. It’s the perfect position for a goal-hungry #9.
The relationship between the #9 and the #10 is often a close one in the final third or as a team looks to play into its target man, but this is an excellent example of how the relationship between the two can create space for the more dynamic of the two players.
Conclusion
Choosing which sequences to use in this tactical theory piece was incredibly difficult.
The #10 position looked dead not long ago, but there is an evolution in the way this new breed of attacking midfielders is used. Rather than a free player, we’re seeing players who fit the bill of a second striker fitting the mould.
With the #10 playing in close connection with the #9, the relationship between the two players is too big for a single analysis. A second tactical analysis is necessary. In two weeks’ time, we’ll dig deeper into the relationship of the #9 and #10, continuing to examine the interactions of the game’s best pairings.



Comments