This weekend, Rotherham welcomed the Championship leaders Leeds United. Since Leeds had suffered some defeats lately it was crucial for them to get back on track and put some ground between them and Norwich. However, winning in Rotherham is not as easy as it looks given their strong home record.
Only Brentford, West Bromwich and Hull City have been able to leave with three points. Also, Rotherham were desperate to win due to their position hovering over the relegation zone. All that said, this tactical analysis is going to reveal the major factors behind Leeds’ victory.
Team News
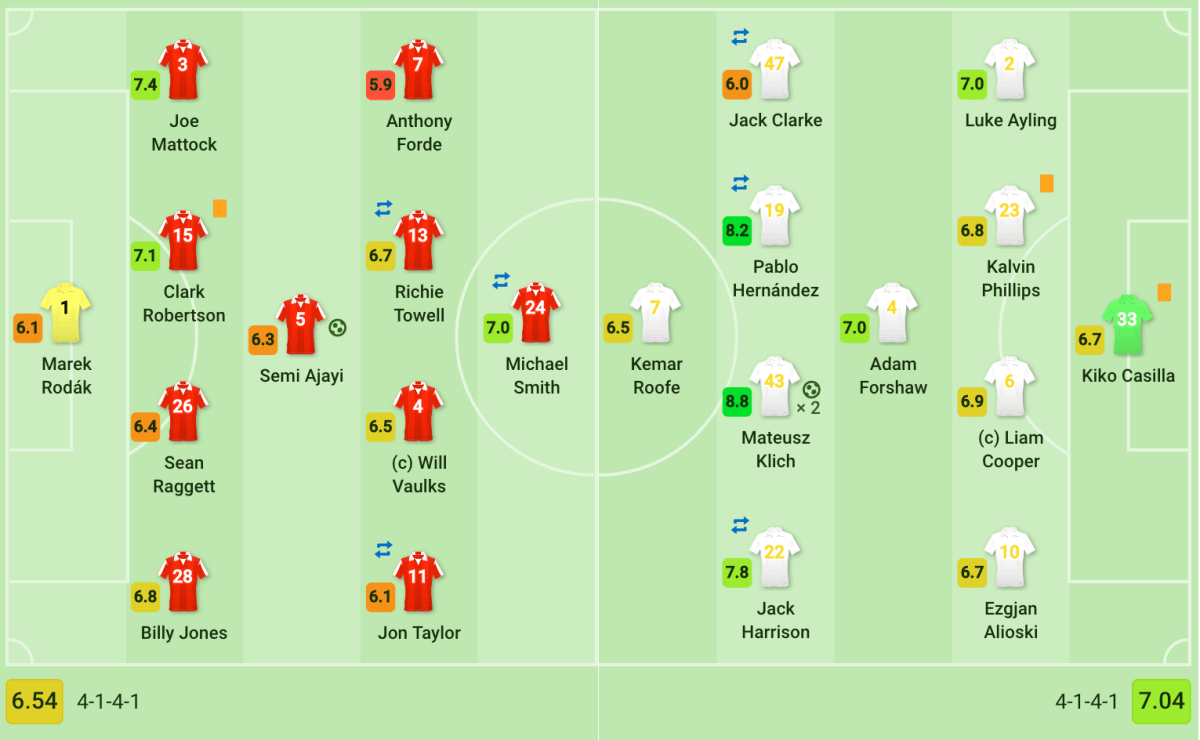
The biggest change in relation to lineups was definitely the debut of ex-Real Madrid goalkeeper Kiko Casilla for Leeds. Furthermore, both sides chose to employ a 4-1-4-1 formation. In possession Bielsa’s men adopted something of a 2-3-2-3 shape as Alioski and Ayling pushed higher. Also, their wingers were tasked with creating combinations or sometimes running behind the opponent’s last line.
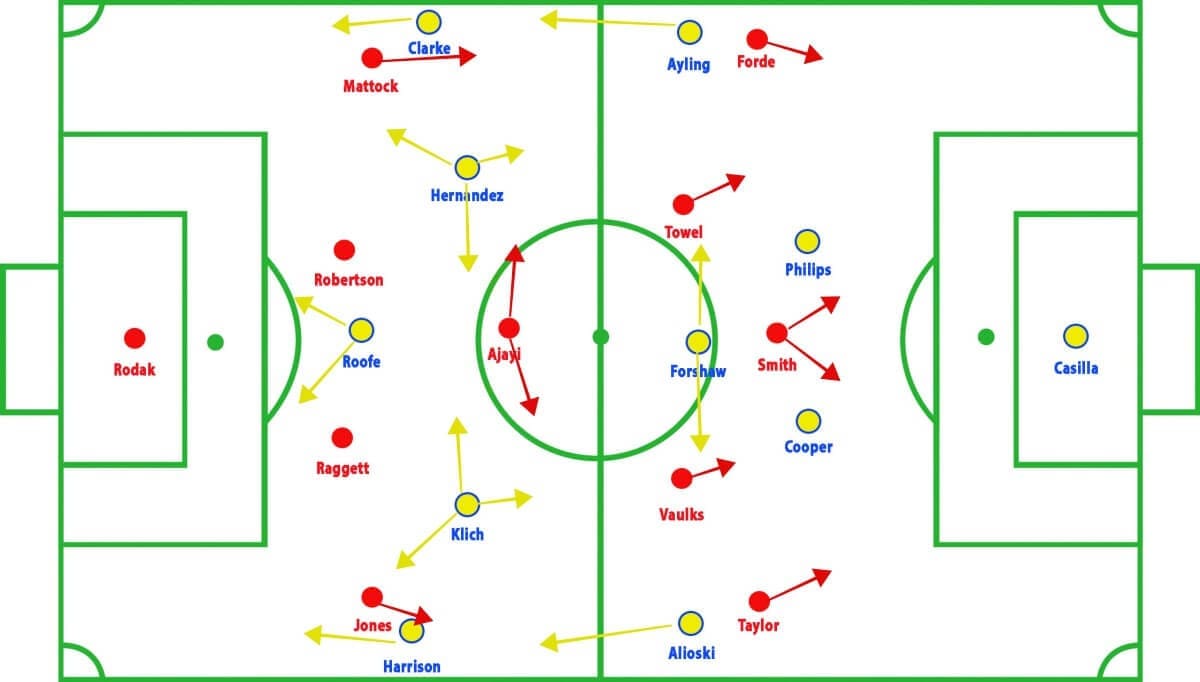
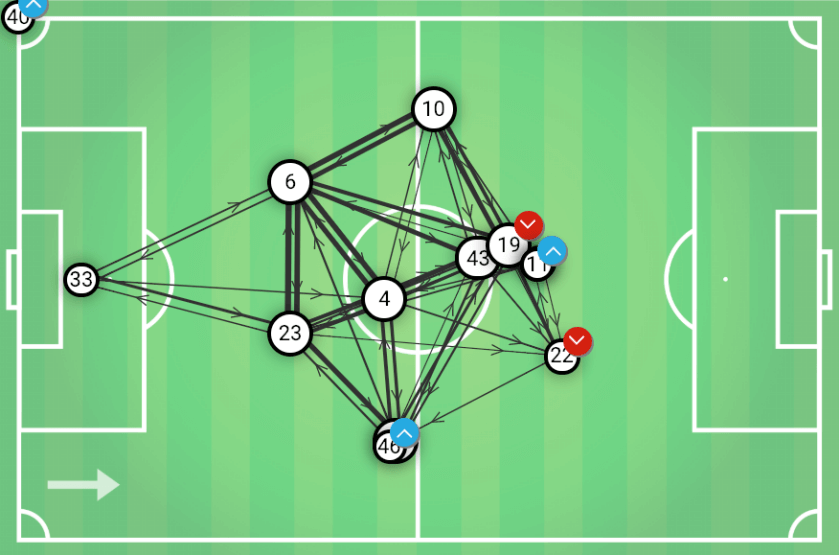
Hernandez and Klich had interesting rols since they often changed position with each other. They played in the half-spaces between the lines but sometimes dropped deeper in the half-space to help circulation. Therefore, they featured in a flexible way. In the middle, Forshaw had a major role as the pass map shows.
Intense opening minutes
At the beginning of the game a direct manner prevailed as both sides attempted to play direct vertical balls towards the front players in attack. As a result the game was characterised by transition play. Neither teams held possession for long time, with quick changes more prominent instead.
After a few minutes, Leeds were able to create longer possession phases against Rotherham’s mid-block. The visitors were able to pass from one side to the other through their back line without hindrance, since Smith focused on protecting the central passing lanes. However, the away team clearly struggled against Rotherham’s midfield press.
Space creation in the half-spaces
Leeds did not attempt to break through the middle since their opponents packed the centre. They rather looked to play on the wings through combinations between the respective winger, full-back and attacking-midfielder. Now, see some of these patterns.
First of all, Leeds often used wide wingers and high full-backs to attract the opposition players. Because of this, Rotherham’s full-backs marked Harrison and Clarke while the wingers, Taylor and Forde, had to move deeper to track the respective full-backs.
This caused more space around the half-spaces for Leeds, hence they attempted to progress there instead. This also created a 3v2 numerical superiority for Rotherham in the middle.
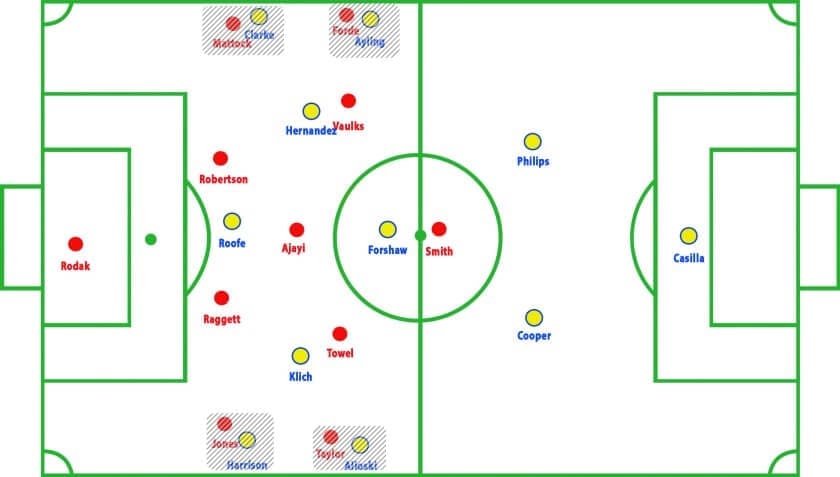
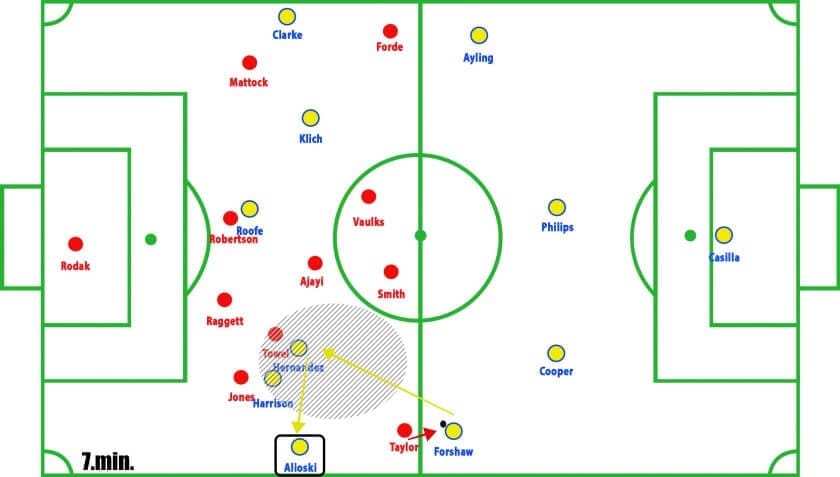
However, Forshaw sometimes moved wide in order to allow the full-back to move higher and still have a player in the half-space who could carry the ball. This dragged Taylor out which created room in the half-space in between Taylor and Ajayi. Since Towel and Jones were man-marking, Leeds were able to exploit this situation. First, Hernandez dropped into the open space to lay the ball off towards the open full-back (Alioski) close to the touchline.
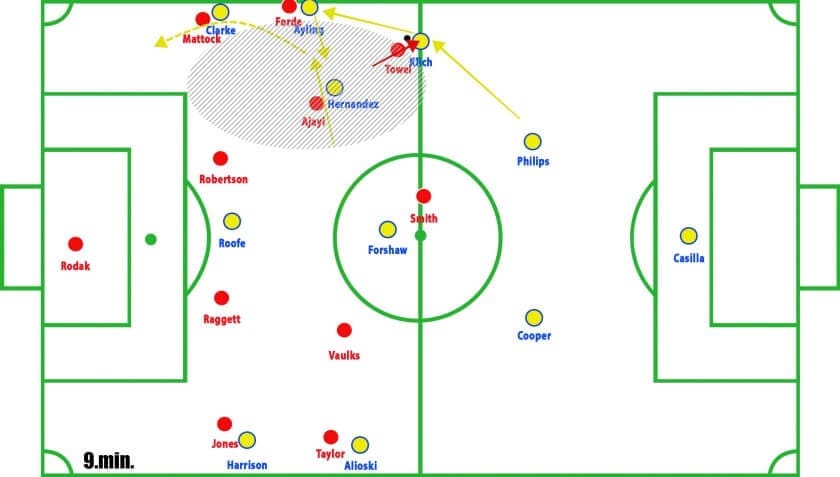
A similar situation occurred on the right side but this time Klich dropped deep to the half-space to receive the ball. This dragged Towel out which created room in the half-space. Ayling played the ball towards Hernandez who moved across the pitch to create an extra man and escape the attentions of Ajayi. He then used air balls to pass behind Rotherham’s last line. Nevertheless, the home side were able to handle the situation and avoid the flaw in their defensive structure being exploited.
Goal kicks
In goal kick situations Rotherham stayed high in order to press, with the wingers pressing the opposition centre-backs. Consequently, Smith could stay central and cover the opponent’s midfielders. Usually, Vaulks or Towel joined Smith, like in the example below.
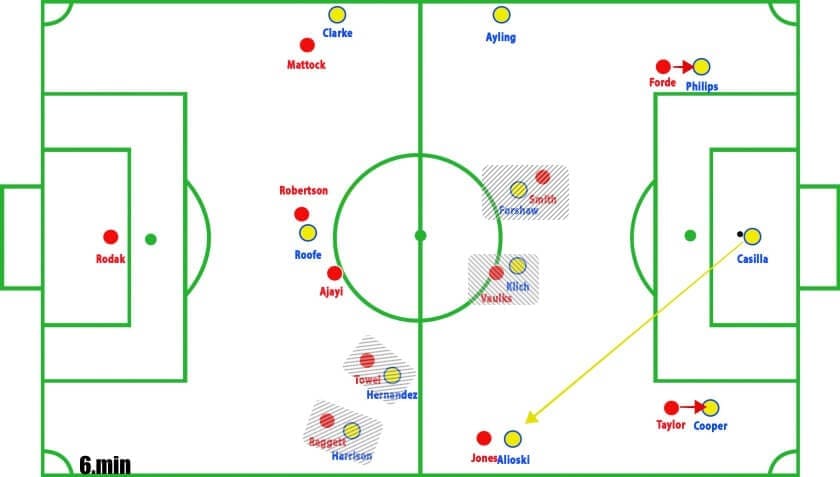
Right full-back Jones stepped up to press the opposition full-back. This left centre-back Raggett having to cover Harrison, the opposing winger.
Counter-pressing
Both sides had an aggressive response to losing the ball. For example, Leeds tried to rush the ball-carrier and surround him.
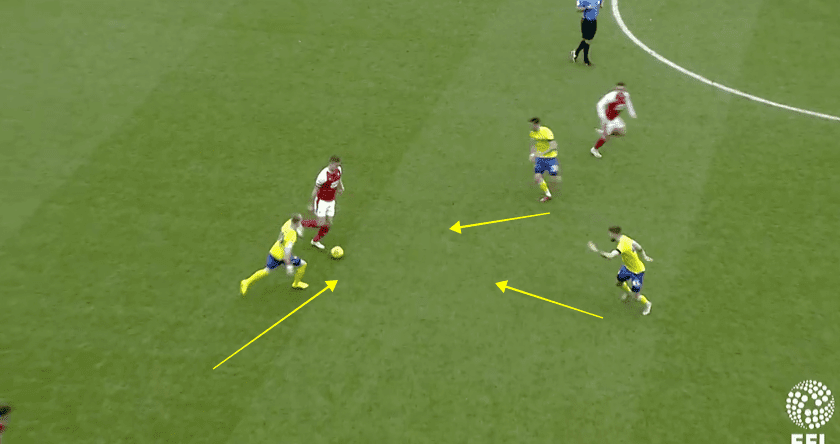
Rotherham were more likely to press with one player and position close to the opponents with the rest of the team and then close on the ball-carrier.
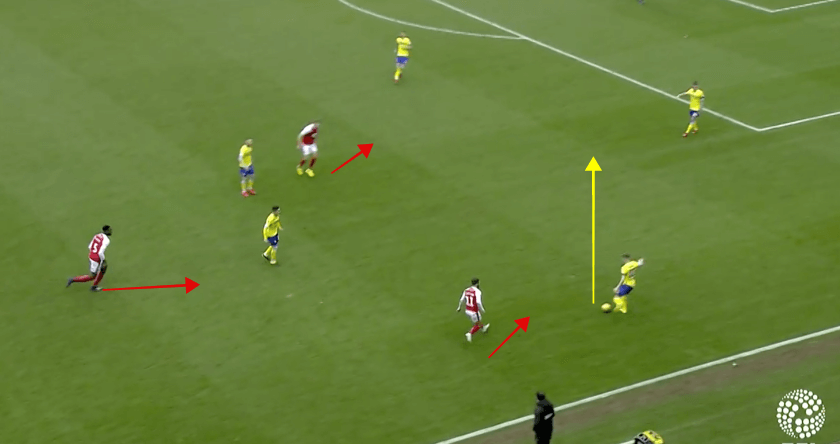
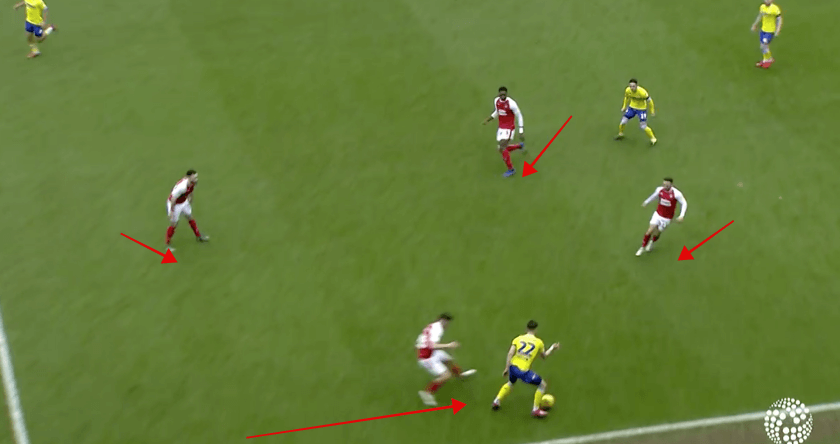
The home side were able to be compact around the ball and prevent passes to further players. They thus managed to force Leeds to turn back instead of counter-attacking. Rotherham also created a few dangerous opportunities by winning the ball back and turning quickly towards goal.
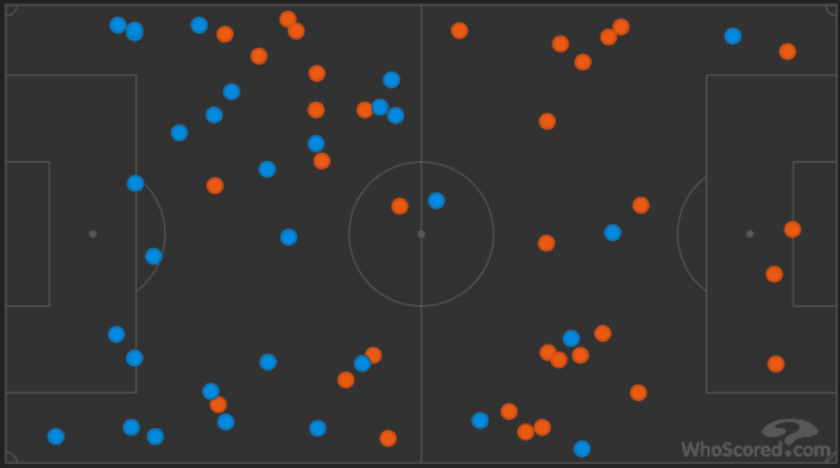
This image shows the lost balls in this match. Interestingly, despite the high number of lost balls for Rotherham (orange) in the opponent’s half, they were able to prevent Leeds from taking advantage of these situations.
Second half
After the break, Tyler Roberts was introduced to the game in place of Clarke. This meant Leeds switched to a 4-2-3-1 formation where Klich dropped back alongside Forshaw to form a double pivot but with the freedom to move forward.
In addition to those adjustments, Harrison moved to the right wing while Hernandez and Alioski occupied the left. The plan was to overload the left wing and exploit the passing lanes towards Roberts who often moved outwards, or create combinations which could disorganise Rotherham’s defence.

This led to more dangerous attacks, to help them exploit and penetrate the home side’s defensive shape. However, they still struggled to create scoring chances, although their first goal occurred from a slightly lucky situation.
Conclusion
All in all, Rotherham’s decent performance could have become valuable points on another day. However, in the second half they were mentally and physically drained. This, paired with Leeds’ sharp attacks, bore fruit for the visitors at the very end of the game. Thus Bielsa’s men were able to save the situation and ended on top, despite their clear struggles in creating scoring chances.
If you love tactical analysis, then you’ll love the digital magazines from totalfootballanalysis.com – a guaranteed 100+ pages of pure tactical analysis covering topics from the Premier League, Serie A, La Liga, Bundesliga and many, many more. Buy your copy of the January issue for just ₤4.99 here, or even better sign up for a ₤50 annual membership (12 monthly issues plus the annual review) right here.


Comments