With the 2019/20 Scottish Premiership campaign now over and with the new date for the start of the 2020/21 season set, each of the clubs will be looking back and evaluating their team’s performance, focusing on areas to improve upon/work on before the start of the new season. The main focus for many is always the title race and this season, Celtic and Rangers fought valiantly before Rangers were unable to gain points in crucial games as Celtic opened a 13 point gap and won the title.
As part of a match analysis series, we will look back into these crucial games, specifically dissecting Rangers’ league losses in the 2019/20 campaign and evaluating the areas that enable teams to overcome The Gers. The first match analysis piece analysed Rangers’ loss to Celtic, this then leads us onto analysing the next crucial game which resulted in a 2-1 loss to Kilmarnock in February. In this tactical analysis, we will look at the tactics of both teams, and discuss how Kilmarnock stopped Rangers as The Gers came away with a poor result from Rugby Park.
Lineups
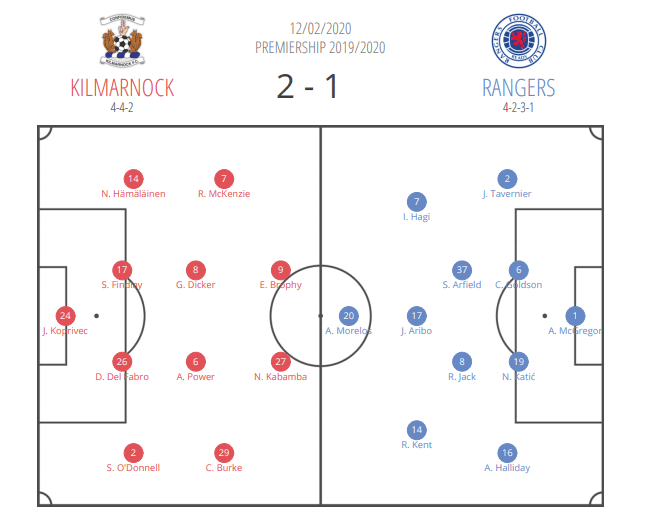
Since their return from the winter break, Kilmarnock had won two and lost two coming into this game. Alex Dyer’s side was in good form as their two wins came back to back which gave them confidence coming into this game against Rangers at home.
Kilmarnock set up in a 4-4-2 formation with Dyer making just one change to his team that beat Hearts 3-2 the previous week. This change was enforced as Laurenţiu Brănescu got sent off against the Jam Tarts and so was replaced by Jan Koprivec in goal, while the rest of the team were unchanged in a bid to keep up this winning streak.
Rangers came back after the winter break with mixed results, winning three, drawing one and losing to bottom of the table Hearts. The Gers came into this game against Kilmarnock by getting a narrow 2-1 win over Hibernian at Ibrox. Gerrard looked to change things up in a bid to improve his side’s performances as he went from his usual 4-3-3 to set his side up in a 4-2-3-1 formation for this game.
The Rangers manager also made personnel changes, making three additions to his side with left-back Borna Barišić and centre-back George Edmundson being replaced by Andy Halliday and Nikola Katić. Gerrard’s last change saw Ryan Jack being re-established in the starting lineup as Steven Davis made way for the Scotland international midfielder.
Kilmarnock’s rigid defensive setup
Rangers play a very possession-based style under Gerrard and if we look back at the two games before this game, the Gers averaged over 70% possession in both games and so there was no indication of this changing coming into the game against Kilmarnock. As a result, Dyer’s side would expect to spend large periods without the ball and so he smartly concentrated on his sides’ shape out of possession, setting up in a well organised 4-4-2 medium block.
Kilmarnock’s well organised defensive shape showed shades of the influence from previous manager Steve Clarke as Dyer spent time as his assistant. Clarke was able to get the better of Gerrard’s side last season and Dyer provided similar tactics to try to overturn Rangers. Killie was quite passive and was happy for the Rangers to play the ball around the backline but they had a great strategy so Rangers could not progress any further by shutting off any forward passing options.
This strategy by Kilmarnock was made up of a couple of elements to ensure Rangers were not able to progress the ball through the lines, the first being that the two Killie strikers dropped back onto Rangers double-pivot and man-mark them tightly so they could not receive the ball and dictate play. We see this perfectly in the image below as the two Rangers midfielders Scott Arfield and Ryan Jack are being man-marked by the two Killie strikers and so they do not receive the ball and Rangers must look to progress the ball forward through another avenue.
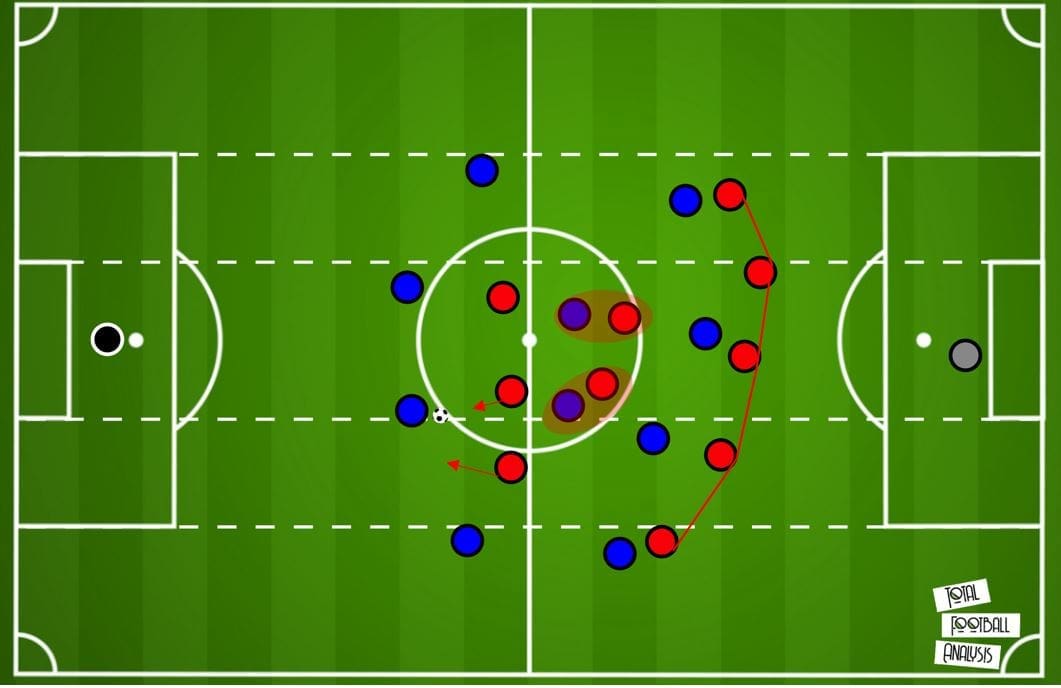
Kilmarnock were also happy for the Rangers’ full-backs to receive the ball around the defensive third, as we see through Halliday in possession above. This, however, was by design as the Killie wingers engaged the Rangers full-backs in a passive manner so they could block any forward passes and cut off any options in the centre by tucking in slightly and positioning their bodies so any potential passing options in middle were in their cover shadows, as we see in the move below.
Halliday has received the ball and looks to progress out from the defensive third but Kilmarnock right-winger Chris Burke does well to cut off any forward passing options with Joe Aribo in the centre in his cover shadow. With no options ahead of him, this forces the left-back to play the ball backwards and so Kilmarnock can then reset into the well organised defensive structure once more.
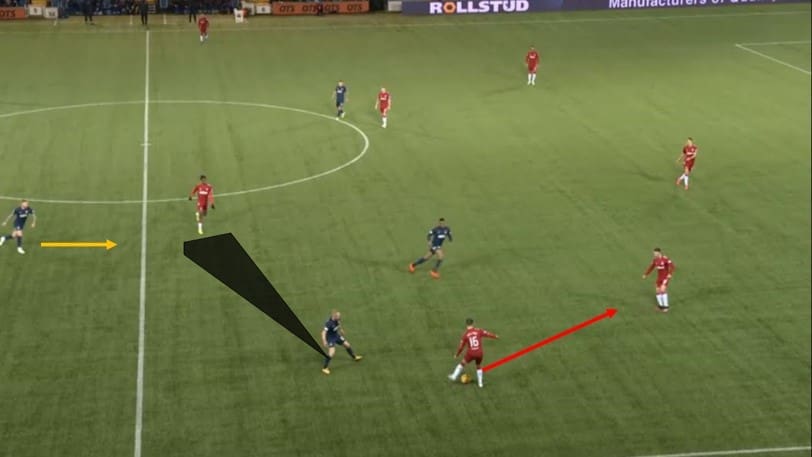
Kilmarnock’s setup made it difficult for Rangers to break their first line of pressure and although Killie’s strikers and wingers ensured this was the case, it was also influenced by their teammates behind them as they provided cover, which we see above. Burke does well to keep Aribo in his cover shadow but if the ball does somehow make it to Aribo, the Kilmarnock central midfielder Alan Power is ready to press the Rangers midfielder from behind, protecting the central area. Also out of view, the right-back, Stephen O’ Donnell is tightly man-marking left-winger Ryan Kent down the left, backing up Burke’s efforts.
While the Kilmarnock first line of pressure was passive, behind them, if Rangers were able to break this first line, Killie employed a more aggressive press in the middle and final third to knock Gerrard’s team out of any rhythm and stop them exploiting them in advanced positions. Kilmarnock’s physical aggressive press did well in protecting the central areas by winning the ball back, or if not successful, they would resort to tactical fouling in this area in order to halt Rangers’ progress.

We see this in the image above as Arfield is on the ball and Kent makes an intelligent move inside centrally off his wing and behind Kilmarnock’s two strikers, breaking the first line of pressure. However, he is not afforded any time when he eventually receives the pass as he is pressed aggressively from behind. First by Power and then his partner in midfield Gary Dicker who supports from behind to win the ball back and clear it out for a throw-in so Kilmarnock can again get back in their defensive shape and further frustrate Gerrard’s side.
Rangers ferocious on the counter-attack
Rangers were certainly frustrated by Kilmarnock’s defensive setup and were unable to break down the first line, as mentioned in the previous point, but Gerrard’s side did not make it difficult enough for Kilmarnock to halt their efforts as they lacked any tempo in their play. The Gers were very slow and methodically in their play which made it comfortable for Kilmarnock and ensured Rangers spent their time playing the ball around their backline with little penetration or threat.
When Gerrard’s side played more direct and with a bit more tempo, they were able to break the first line of pressure and find a player free behind this line in space. However, they failed to recognise on numerous occasions the space they were afforded at times and did not take advantage of this space in which they could have potentially exploited Kilmarnock.
We can see this on this certain occasion in the move below as Arfield has got away from his man-marker and is in space to receive the ball behind the first line of pressure. James Tavernier accesses Arfield, bypassing the line, however, the midfielder does not scan effectively over his shoulder before receiving the ball, otherwise he would have recognised the midfield line not pressing him from behind, and therefore he is in acres of space.
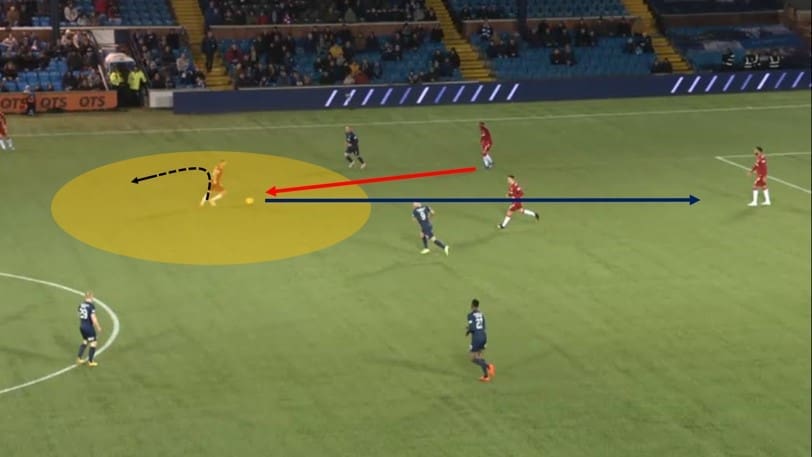
Instead of turning on the ball and progressing the ball and exploiting the space, he makes the wrong decision by playing the first time pass backwards to Goldson even when Tavernier is so adamantly gesturing for him to move forward and attack the space. Rangers kept missing their opportunities to advance the ball forward when these situations occurred and so Kilmarnock’s defensive structure was not opened up as a result.
With Kilmarnock stopping and winning the ball back in Rangers half, they forced a lot of set-piece opportunities for themselves in the first 45 minutes. Kilmarnock had a few corners but also had set-piece opportunities through long throw-ins as Killie committed more bodies forward. Kilmarnock’s defensive shape was altered and with this comes more space for Rangers to exploit on the transition. Gerrard’s side in these situations sensed the opportunity to attack this space and was very quick and direct in their play to take advantage of Kilmarnock being out of shape.
Rangers were extremely dangerous on the counter-attack and we can see this in the move below. Kilmarnock have a throw-in on the right and they moved more players forward in the box for O’ Donnell’s long throw-in. Rangers defend the long throw-in very well and win the ball back in their own box and so the counter-attack is on as there is space ahead for them to exploit.
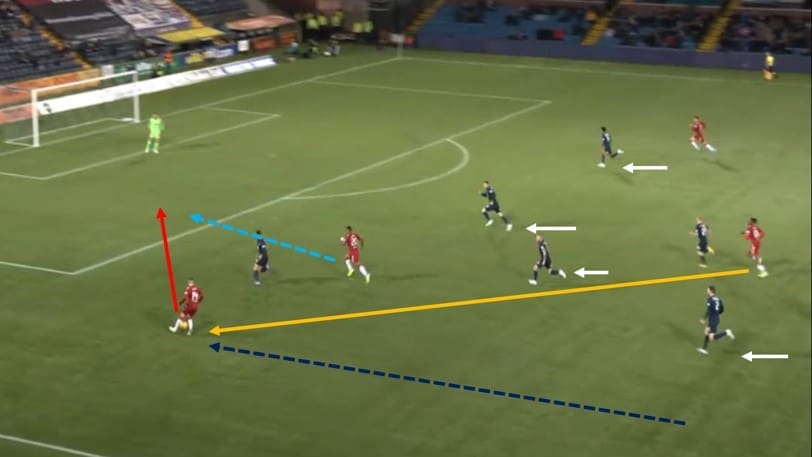
Rangers are extremely dangerous and direct in transition as Aribo quickly receives the ball play out from the Rangers box and he plays it out to the left to Kent driving forward in space. Kent then plays a through ball in behind to Morelos. In the space of just under 10 seconds, The Gers took the ball from their own box up to the Kilmarnock area, making a goal scoring opportunity. If it weren’t for Stuart Findley who does extremely well to get back to recover defensively and block Morelos’ shot, it would have certainly have led to a goal. However, from the resulting corner Rangers score the first goal of the game. Rangers were a real threat in these situations and after the goal, they played with more tempo and controlled the game before halftime.
Kilmarnock’s aggressive second-half approach
After the break, Kilmarnock went from the slightly passive approach which worked to frustrate Rangers, as shown in the analysis above, only with Dyer’s side now being a goal down, to a more aggressive press to win the ball back higher and create opportunities to get a goal and get back into the game. This approach certainly surprised Gerrard’s side as they pinned his side back and put them under more pressure.
Dyer instructed his two strikers to stop man-marking Rangers’ double pivot pairing and aggressively press the Rangers backline supported by their wingers to force mistakes in advanced areas of the pitch. We see this difference in approach from Kilmarnock below, as both Killie strikers have pushed up and are pressing the two Rangers centre-backs with The Gers keeper has the ball at his feet with no short passing options.
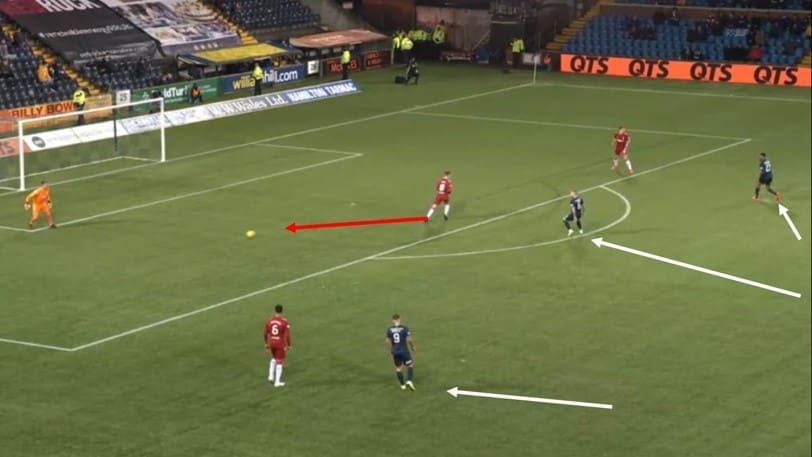
Jack drops back to aid Rangers’ build-up play but as he receives the ball from Allan McGregor in goal, he is pressed aggressively by Power from behind, forcing him to play the ball back to his keeper. McGregor has no other choice but to go long over the press, trying to pick out a forward but he is also under pressure, making it difficult to distribute the ball out to a teammate.
The long direct balls usually were sent up to Morelos who was isolated in the forward line. The whole of the Rangers midfield looked to support the backline by dropping deep to try play through the press which created a huge disconnect between them and Morelos and so he had little support. We can see the problem below as Rangers are under pressure and so hit a long ball to Morelos but the rest of the team are too deep and are not able to support Morelos who is outnumbered.
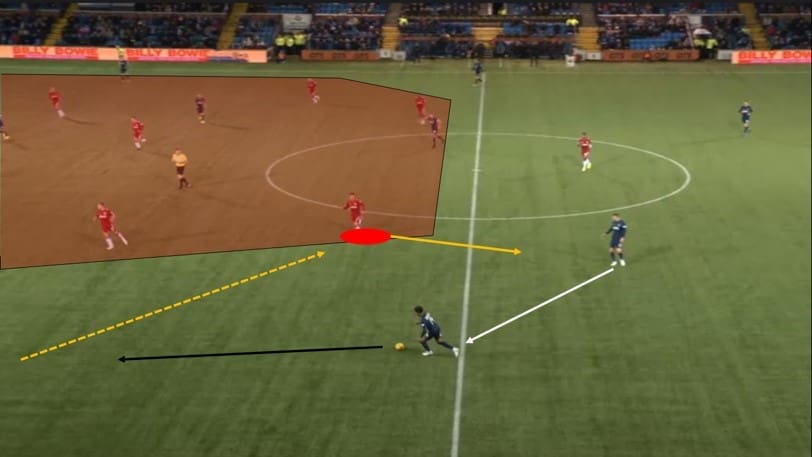
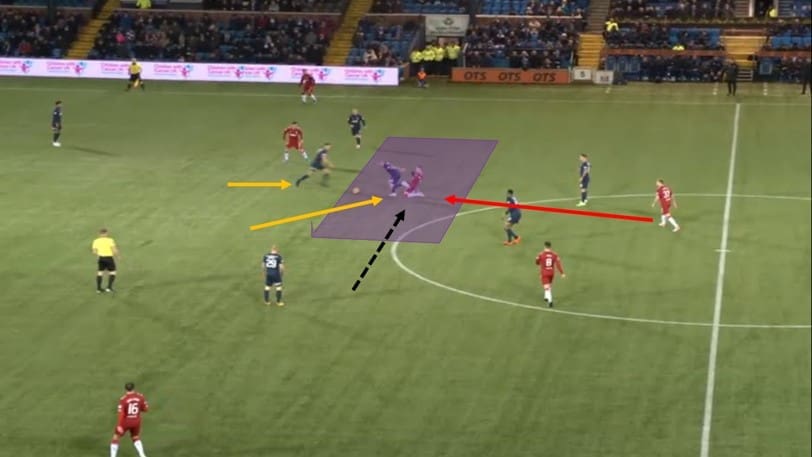
Another problem is that in an attempt to support Morelos, Ianis Hagi kept vacating his right-wing position moving inward in order to bridge the distance to his striker. His decision making was poor, and although he had the right intentions, he was far too deep to make up this distance in time to win the second ball off his striker. To make up for his error of judgment, he tried to press Kilmarnock centre-back Findley but by leaving his initial position he has left Kilmarnock left-back free and so the centre-back has an easy passing option to access, bypassing the Romanian winger.
The Kilmarnock left-back is free and can attack the space left by Hagi as a result of his actions. This creates a 2v1 in favour of Killie on their left-hand side. By Kilmarnock being able to attack down the left so freely, Rangers were under pressure defensively and coupled with the fact they were positioned so deep, they found it hard to get out of their own half. This pressure from Dyer’s side resulted in an equaliser and Kilmarnock had the confidence from there to eventually win the game in the end.
Conclusion
Kilmarnock did extremely well to keep Rangers in non-threatening areas of the pitch in the first half through an effective and well organised defensive structure by shutting off central areas and any forward passing options very well. Gerrard’s side made it easy for Killie early on as they did not break the first line of pressure often enough since they lacked more direct quick tempo play to progress the ball through the lines. As the game went on and gameplay became more broken through set-pieces, Rangers exploited the space and were very dangerous on the break.
Kilmarnock’s new aggressive tactics put Rangers under pressure in the second half which resulted in a very fortuitous equaliser. Gerrard will feel his side should have been out of sight before their goal at that point as Rangers missed two big chances, one from Morelos which went agonisingly close as his shot hit off the crossbar. Morelos also had a goal ruled out after Kilmarnock’s equaliser but Dyer’s side prevailed and took advantage of Rangers switching off at the back to grab a late goal.
Kilmarnock was once again a torn in Gerrard’s side’s bid to reduce the gap to Celtic which gave their rivals an advantage as they took one step closer to clinching a UEFA Champions League berth and the title. This leads us to the onto reviewing the last game in this match analysis series in which we will analyse Rangers’ loss to Hamilton later this week.

Comments