Last Sunday, we had another Old Firm Derby as Celtic faced Rangers for the fifth time this season – and they should be very familiar with each other now. It is almost like an “end game” for Giovanni van Bronckhorst because his side sit second in the table with a six-point margin to the top – his side should have given everything to fight for the win. However, the drama script did not offer any surprising elements as we saw Ange Postecoglou’s Celtic dominate in this fixture again.
This tactical analysis will give a careful look at their positional system and explains how they made Rangers suffer.
Lineups
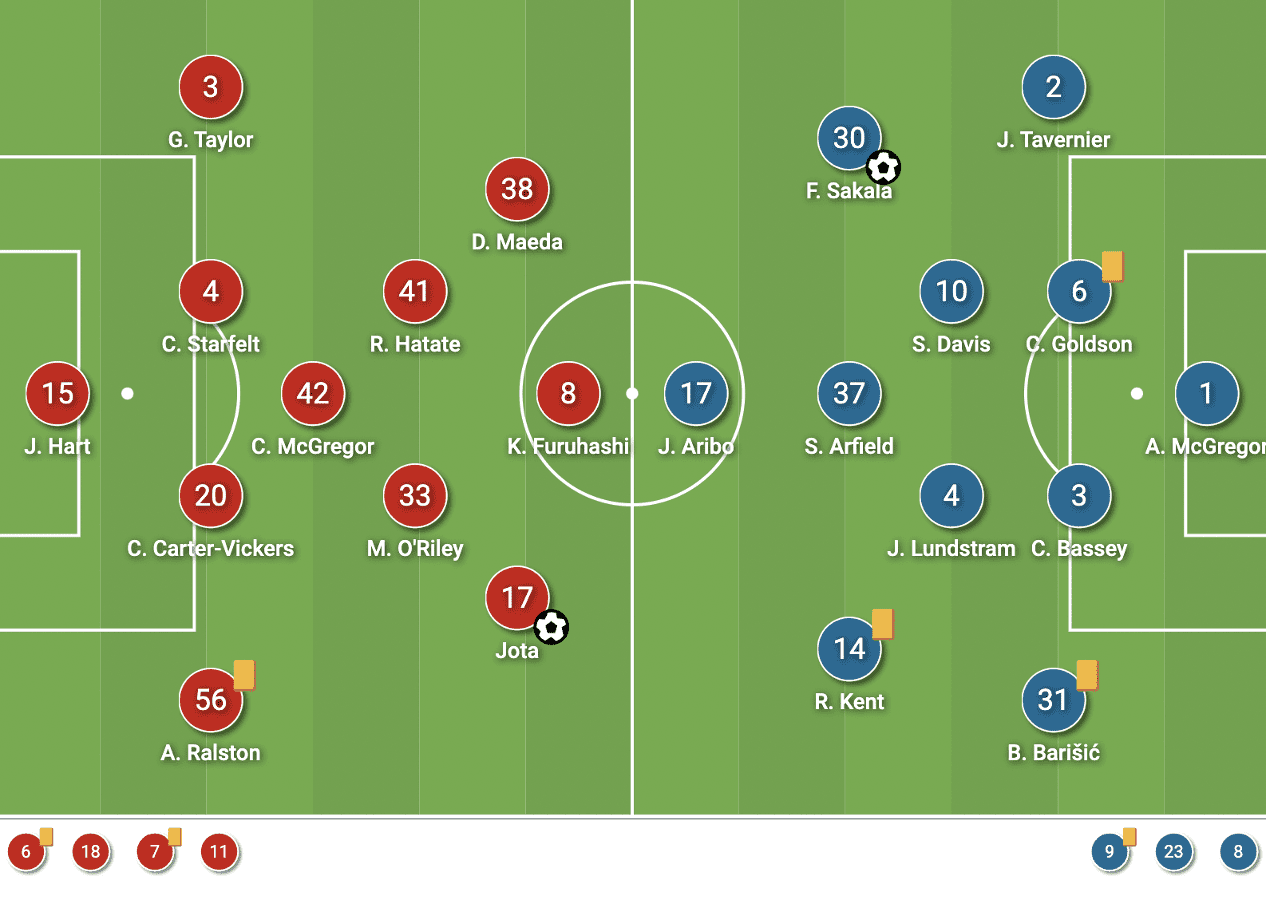
Celtic played with a 4-1-2-3 formation as usual, which was the exact same eleven that beat Ross County one week ago. Postecoglou had a clear preference in the midfield trio now as that was formed by Callum McGregor, Reo Hatate, and Matt O’Riley. He was willing to start the more experienced players such as James McCarthy and Tom Rogic on the bench.
Rangers had their worries on Thursday as they had to face RB Leipzig again in the UEFA Europa League semi-final, but as we have explained the situation, they could not give up this game because it was unacceptable to hand Celtic the trophy like this. But van Bronckhorst still had to make some changes as some players could not play three days a game, so the likes of Ryan Jack, Glen Camara, and Scott Wright did not start the game, but that should be a lineup being well-prepared for the derby as well.
Rangers struggled to press
However, a bit disappointingly, Rangers only started the first five mins with great intensity without the ball. They were able to force the opponents to kick the ball away in some post-set-play or throw-in situations, but for the large part of the first half, especially after 15 mins, they could not have a good sequence to keep the ball to create anything. Part of the reason, of course, is about how they behaved without possession, because if you don’t have the ball, how can you harm the opposition?
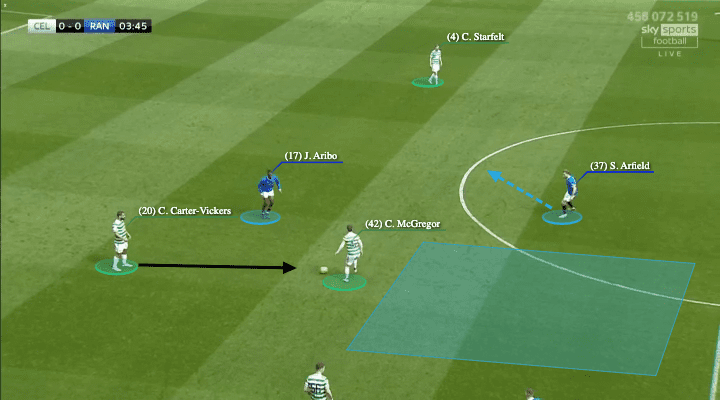
The struggle for Rangers was their 4-2-3-1 shape, it was pretty strict, and each player was given their man-marking duties according. For example, to cope with the flexible full-backs of Celtic, their wingers were adjusting their positions based on these two players so they were not joining the press in the centre. That means Joe Aribo and Scott Arfield were without help in most of the cases.
Therefore, it became quite simple for Celtic’s 2-1 shape that included the centre-backs and 6 to use the 3v2 overload to play out from the back. They always had one more player than the opponents in the construction so they could advance to the second phase. Since Aribo did not have enough intensity to press multiple players, included in the above image, and when Arfield was baiting for the pass to centre-back, it became very easy for McGregor to turn and access the blue zone, eliminating the two Rangers players in this screenshot.
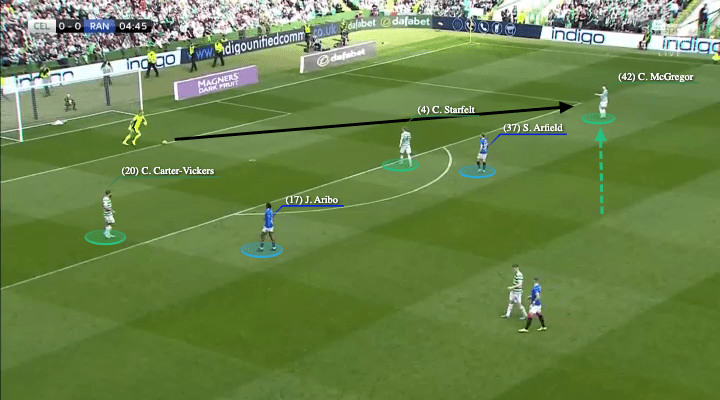
The second scenario was a variation from the explained “3v2” superiority, or you can even see that as a 4v2 if Joe Hart was perceived as a part of the build-up. The fact was that, when Aribo and Arfield were setting a block in higher areas, they did not have the intensity to close the ball or to force the opposition to play. Without the pressure, it was not difficult for Celtic to find a free player.
Here, on this occasion, as Aribo and Arfield oriented themselves to both centre-backs, McGregor became free and he dropped as the third player in the horizontal chain to receive. You may wonder – where was the Rangers winger? But he was missing as we explained in the above analysis, as he was not collaborating in the press centrally.
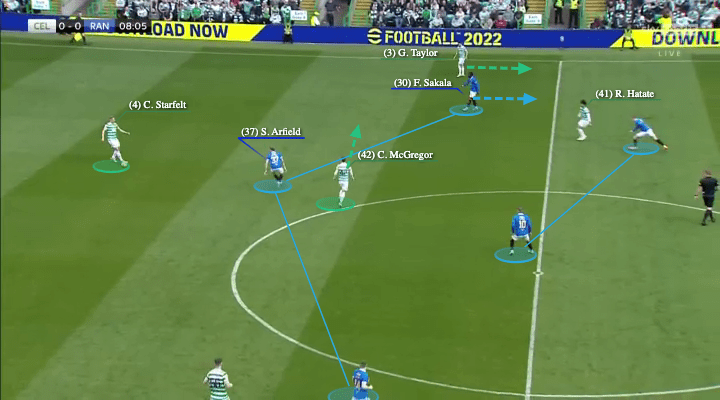
The above situation would further clarify on Ranger winger’s duty, because of the man-oriented marking to a larger extent, more or less they were manipulated by the full-backs, and therefore the spaces were opened up. Here, you could see when Greg Talyor moved forward, Fashion Sakala was forced to drop, and then Arfield was isolated as a result. Then, the spacing around Ranger 10 was exposed as McGregor was able to move on the blindside to receive. Arfield was unable to close both Carl Starfelt and McGregor at the same time, so Celtic simply find the 6 via this blindside move and they went out again.
The Rangers defensive midfielders were unable to jump as the two Celtic 8 were occupying them in higher spaces. For example, John Lundstram was the defensive midfielder in that vertical chain but he could not leave Hatate to press McGregor.
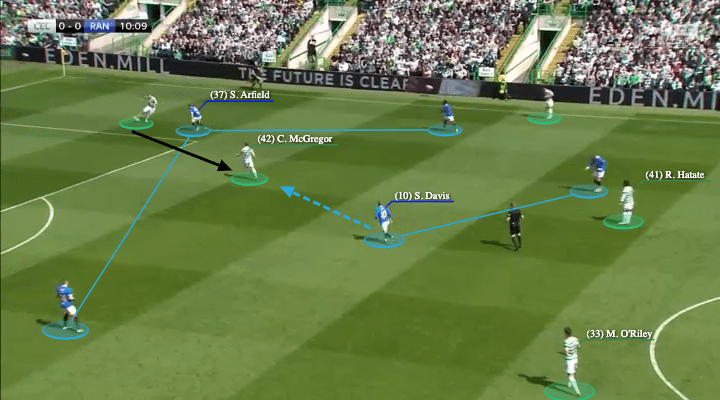
As the game developed, Rangers looked like they got the solution to cope with that build-up, as they were willing to move Steven Davis out from position to press as the additional player, so it became a 3v3 in the centre as he closed McGregor above, even though Arfield was closing Starfelt.
Then, the question became “how could Celtic reach the spaces between the lines”, as Davis jumped, now O’Riley was free in without marking.
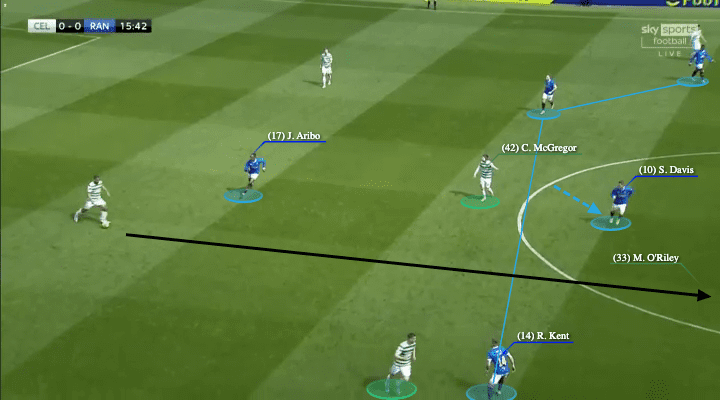
In the previous situation, Starfelt did not recognize O’Riley and there was no angle to find him. Sometimes they were still messing up the timing to break the lines and they could be too rushed to do so. But when Celtic were patient enough to move the ball, they moved the opponents, and spaces were opened for a better condition to progress the attack.
For example, the above situation was Celtic exploiting Davis’ position after he went out to press. As Aribo was unable to keep the intensity to press both centre-backs, especially from a lateral angle to force the pass, it was easier for Cameron Carter-Vickers as he got time and more space to play. Also, as Ryan Kent was focusing on the full-back, Rangers was unable to close that gap in half-space as the Celtic 8 would wait for the ball there.
Also, very important, you must see the body orientation of Anthony Ralston, knowing that he recognized this pass as a trigger to move forward.
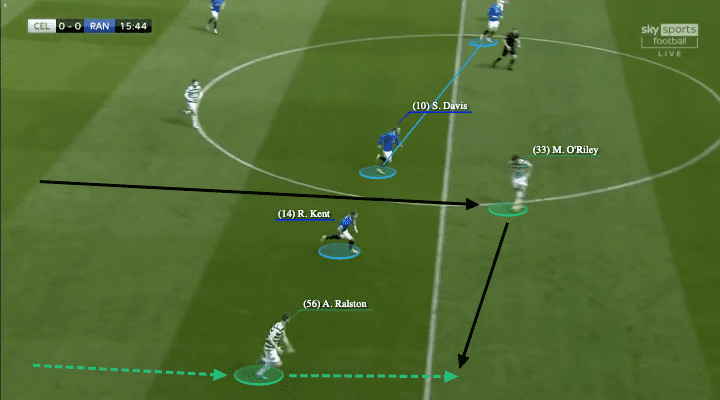
Ralston moved forward because of one of the fundamental tactics of Postecoglou was creating the third man. At the moment of the receiver got the ball behind the line, he should be given one, or even two lay-off options around, the full-backs played a big part in it.
Here, when O’Riley received, when he opened the angle to pass outside since Ralston moved in advance, he was already in the position to support and that must be attributed to the hard work on the training pitch.
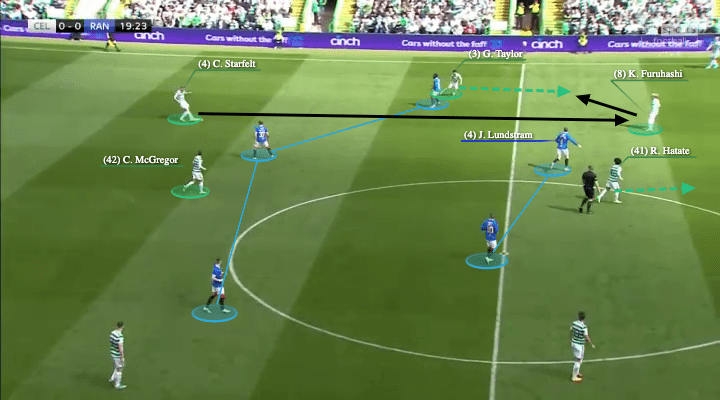
The previous example was not a coincidence, and not specific on the right side, as this screenshot above also showed the same situation on the left side.
This time, Davis did not move out of position, but Celtic had good presence behind their midfield. On the left side, Kyogo Furuhashi dropped out as a false-9 to receive quite often, he could create an overload and collaborate with Hatate to mess up the Rangers’ defence.
As McGregor’s central position fixed Arfield, Starfelt was able to play the forward pass. And again, the point we want to show is the timing of the full-back’s move, as well as his body angle, he knew that was a trigger to go forward and so Taylor could be in position, with the right orientation to be the third man when Furuhashi released him. If you wanted to focus on the “vertical third man”, in fact, there was more than one option offered to Furuhashi as Hatate was doing the exact same in the centre, which you could tell from his body angle.
Strong left side
From the 5th to 15th mins, Celtic had possession but they were unable to play the final passes. When they could not connect with the likes of Furuhashi, Jota, or Daizen Maeda, it was difficult to generate a threat. But when Rangers fell into a deeper block and became more passive without the ball, the door was opened for Celtic as Postecoglou’s side was really good on the left side channel.
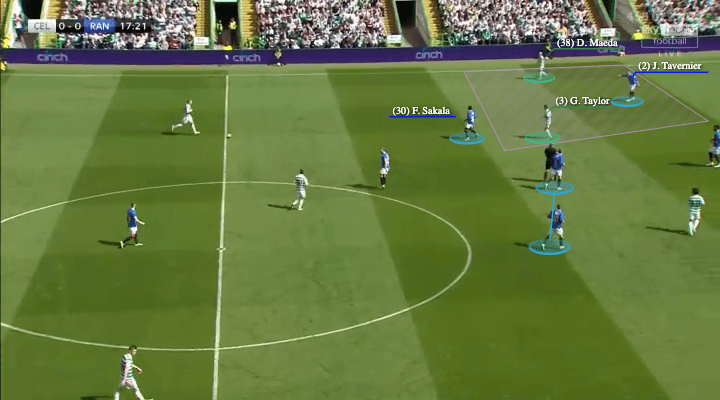
The key tactic of Celtic was their crazy 2v1 overload on James Tavernier. Pay attention to the situation “purple zone” in the above image, that was something that kept happening and Rangers were unable to solve. Despite it can be attributed to several moves and coming in different forms, the result was always to end up in the above dilemma for the Rangers right-back.
In this example, as Taylor moved in, he forced Sakala to stay inside given the defensive instructions we explained. Then, the wide winger was able to receive in the wide spaces because that diagonal passing channel was opened.
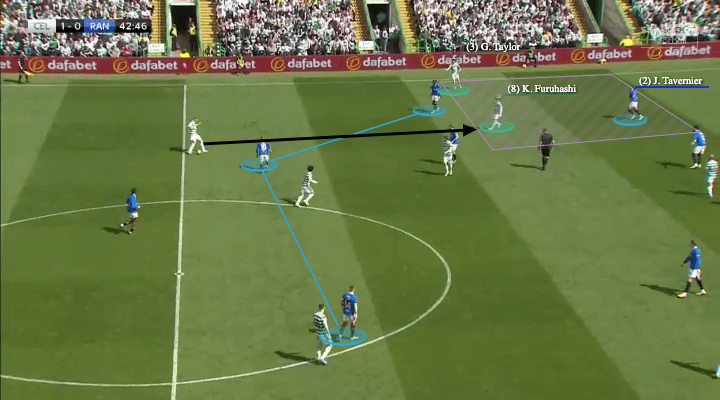
The above scenario was another situation, in a different form as the two Celtic players in the purple zones were Furuhashi and Taylor, but the effect was the same. When that happened, Rangers did not know how to close that space down unless the centre-back jumping out to press, but Sakala was not doing enough to adjust his positions to parallel with Taylor – this always added burden to Tavernier and you could not blame him too much, he was defending two players all the time!
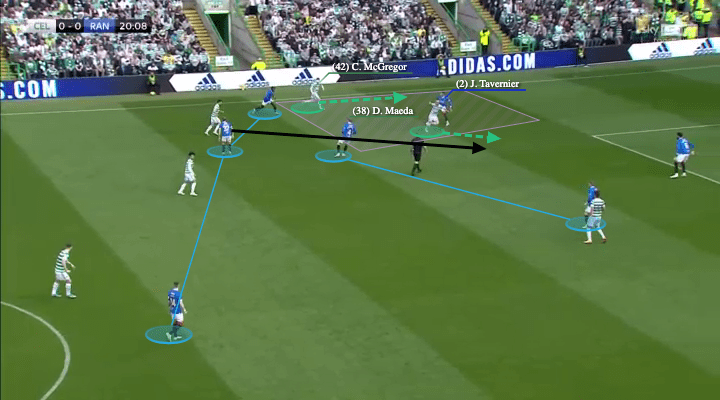
Rangers really messed up in these situations and actually, the goal could be attributed to that 2v1 on the right-back as well. This was not from a centre-back’s pass. Instead, it came from a situation in which the Rangers failed to develop anything in TDA, then, it became a Celtic attack again as they won the ball very close to the final third.
But the element was the same, as McGregor dashed forward to create that 2v1 overload in the purple zone. Again, Tavernier had a difficult time when that happened because he did not know who to mark – the body angle will be off in such a case. Hence, Maeda was able to receive in half-spaces and takes on the centre-back, then it was the quality of players. You could blame Borna Barišić for this goal but that also came from the structural issues as well.
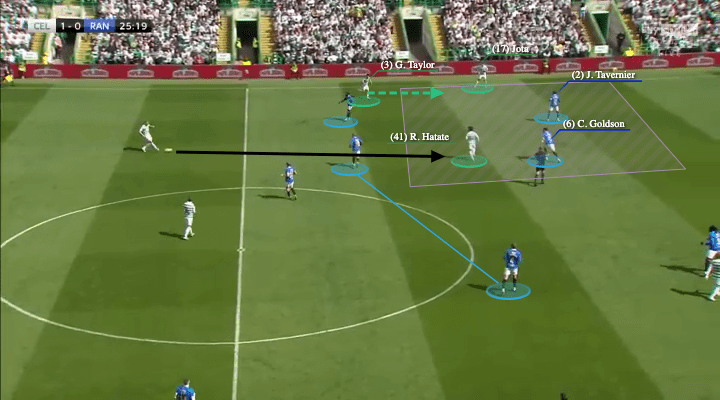
On a few occasions, Rangers intended to close that space with the centre-back stepping forward, as Connor Goldson did in the above image to narrow Hatate’s space. It became a 2v2 so Tavernier could deal with the winger outside.
However, it became a problem when the Rangers winger did not do their job. For example, here, Sakala did not lower his position to in parallel zone with Taylor, so when Celtic broke the lines, Hatate could use Taylor as the third man and again it turned out to be a numerical deficit for Celtic even though Goldson stepped up higher.
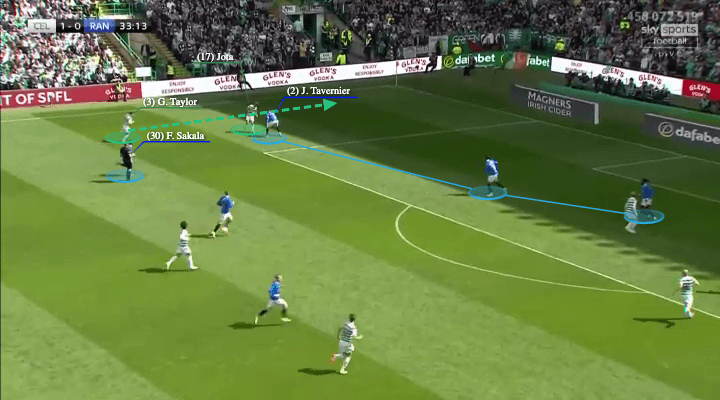
But sometimes it was just very sloppy and weak efforts from the players. For example, it was not that tactical in the above screenshot, as Taylor simply overlapped in the touchline. However, Rangers wide players were not communicating effectively in those situations as Sakala and Tavernier were both in the inside corridor, they did not know the task was to block Jota’s angle, track the runner, or what. But very easily, you could see Sakala might simply track Taylor to help his right-back, but there was no intention for that, and Tavernier was isolated again.
Rangers took the second half
Despite the explained tactics worked well in the first half, we did not see much from Celtic as Rangers pushed them back after the break. van Bronckhorst’s side had more intensity, and changed the way of pressing a bit as they dropped the idea of “using the winger to mark the full-back”. Hence, you could see Kent would move in and press the opponents more often from the outside, while the Rangers midfielders were responsible for the full-backs if Celtic broke them outside. Also, with the ball, Rangers were better with Jack to bring others in plays with his midfield movements, and there were also good situations where they could score more, but they were denied by the post, for example, Sakala’s effort. It remained 1-1 at the end of the game and we felt this was a fair reflection, both teams played well in 45 mins and let the other play more in the other 45.
Conclusion
It was always fascinating to watch Postecoglou’s team. Some described that as a Man City but if you watched the team closely, they were a bit different because of the rotations they’ve got, and the difference in the use of the holding midfielder. We have to give credit to Postecoglou who built a strong side and now there were only a few games await, if they kept the standard, they could be the champion of the Scottish Premiership and return to the UEFA Champions League next season!


Comments