This game of Serie A, saw Roma host Parma on 8th July 2020. Roma resumed their campaign after league restart with a 2-1 win over Sampdoria, while Parma’s first game after the restart ended in a 1-1 draw away to Torino. Since their respective restarts, both teams have lost three games on the trot and are looking to end their run of poor results with a win. The reverse fixture, played back in November 2019, went to Parma, 2-1, as they beat Roma. Roma have all but lost hopes of Champions League qualification, but a win for them would give them a chance to qualify for the Europa league, while for Parma it would mean to consolidate their mid-table position. This tactical analysis brings to light the tactics and plays that both the teams applied in the game.
The fixture was another 2-1 result, this time going to Roma who came back from behind to beat Parma. Roma were arguably the better team throughout the game, playing some slick attacking football and great off the ball movement. If it were not for some poor finishing, Roma could have won by a greater margin. Parma were always the second best team on the pitch on the day, but had their chances too. While their first was a fair penalty, there was another late in the second half that should have been given too. But it was just not their day- an average performance coupled with a poor refereeing decision summed up their 2-1 defeat. This analysis aims to highlight a few of the tactics deployed by both teams in the game.
Line-ups
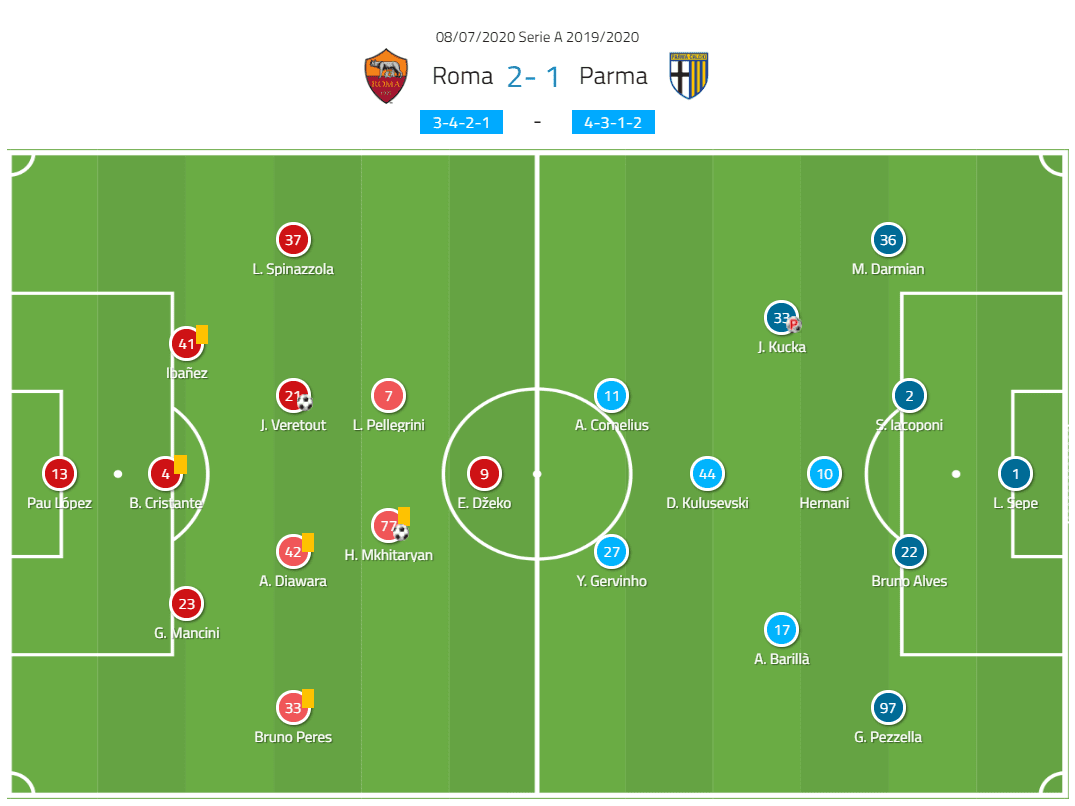
Paulo Fonseca set his game tactics in a hardly used 3-4-2-1 (< 7%), as they have largely played with a 4-2-3-1 (~81%). Pau López started in goal with a back three of Roger Ibañez, Bryan Cristante and Gianluca Mancini. Jordan Veretout and Amadou Diawara played in the midfield along with Leonardo Spinazzola and Bruno Peres as wing-backs. Henrikh Mkhitaryan and Lorenzo Pellegrini took up playmaking positions behind sole striker Edin Džeko.
Roberto D’Aversa set his game tactics in a 4-3-1-2 (almost a 4-3-3), which he has favoured for most game (73%). Luigi Sepe started in goal with a back four of Giuseppe Pezzella, Bruno Alves, Simone Iacoponi and Matteo Darmian. Antonino Barillà, Hernani and Juraj Kucka started in a midfield three with Dejan Kulusevski taking up an advanced playmaking role ahead them. Gervinho and Andreas Cornelius played in front of Kulusevski as the two strikers.
Parma: what’s your position?
In this section of the analysis, we take a look at the defensive shape(s) Parma took up, when they were off-the-ball. The use of shape(s) in plural is key, as we saw them in a bit of a disarray for a few minutes of the game. Parma setup in three defensive shapes in a matter of minutes, with neither working for them. It’s hardly plausible that this was a deliberate plan from their game tactics, as they looked confused about their positions in that moment. They setup with a varying backline (3/4) in all of the defensive shapes. The positions that the midfield and attack had to take up when they’re off-the-ball were also haphazard. Wrong shape and positions meant that the Roma players had a lot of room to play the ball, and move freely themselves, without much pressure from the Parma defence.
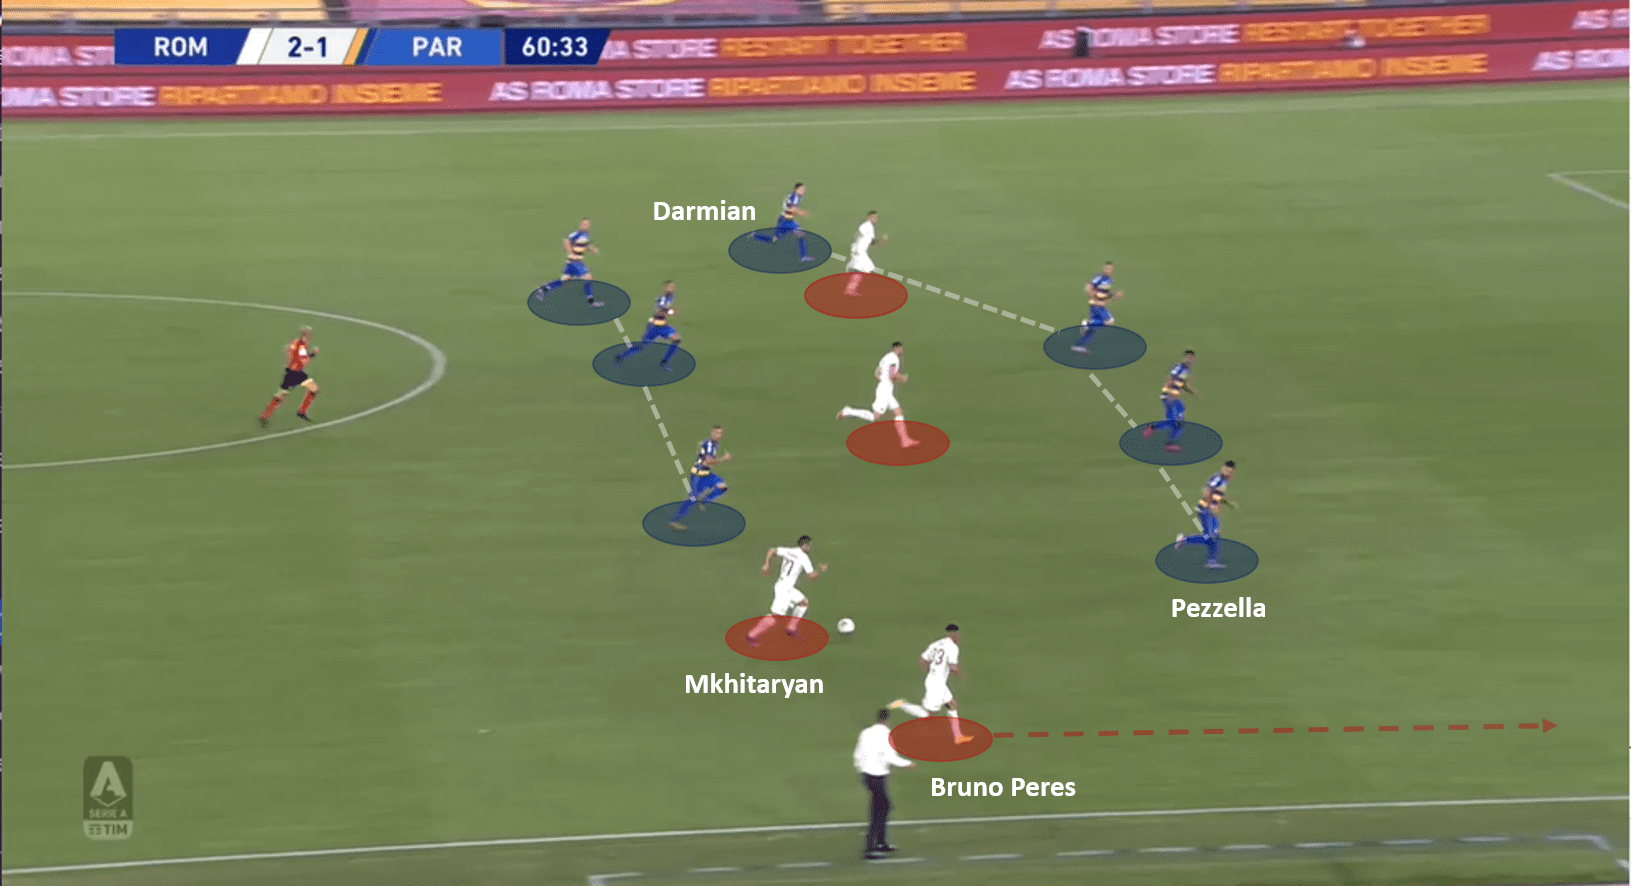
Below is an instance from the 61st minute, when Parma were set up in a defensive 4 (nearly) defensively. The team shape in this case seems like a 4-3-2-1, which is a slight variation of their standard shape of 4-2-3-1 when out of possession. While there’s not much in the shape itself, Parma miss out on covering all the lines. While on one flank, we have Darmian on is rushing back to his defensive duties having over committed to the attack, the other flank has an ill positioned Pezzella. The particularly narrow positioning opens up space for Bruno Peres to run into, thereby allowing Mkhitaryan the option of an overloading wing-back.
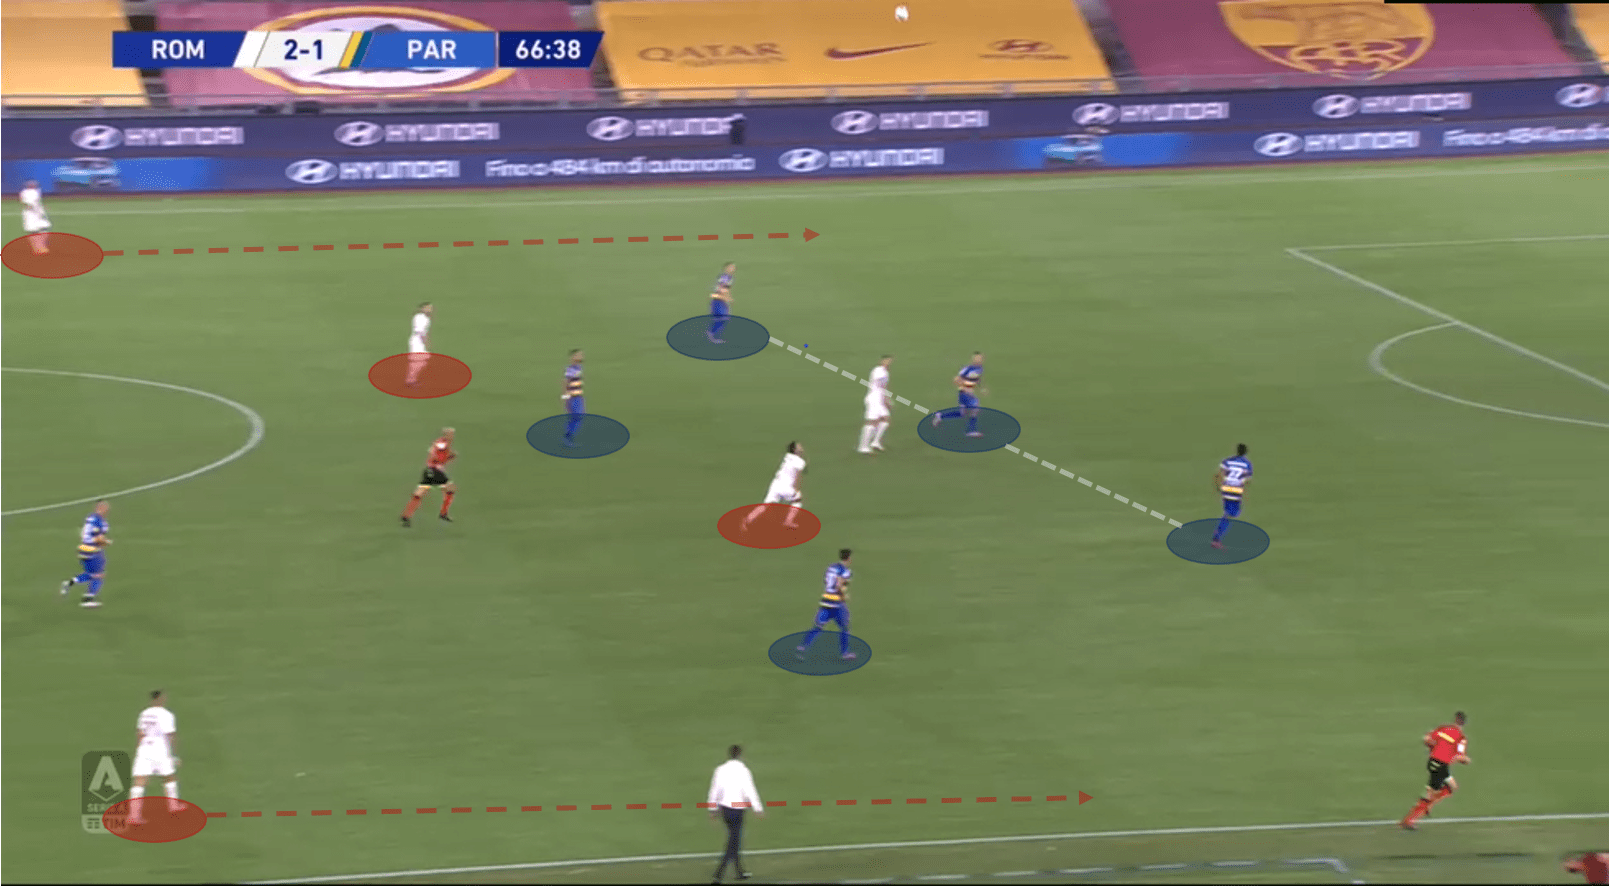
Below is an instance from our analysis in the 67th minute, which shows Parma set up in a back three when off-the-ball. Why this didn’t work? There’s really not much to dig into, to find a reason why this was a bad move. A narrow back three meant that an already wide playing Roma with a 3-4-2-1, had more room to move on the flanks. The Parma midfield setup narrowly to halt play from the centre, but Roma were free to maraud forward from the flanks. And they did.
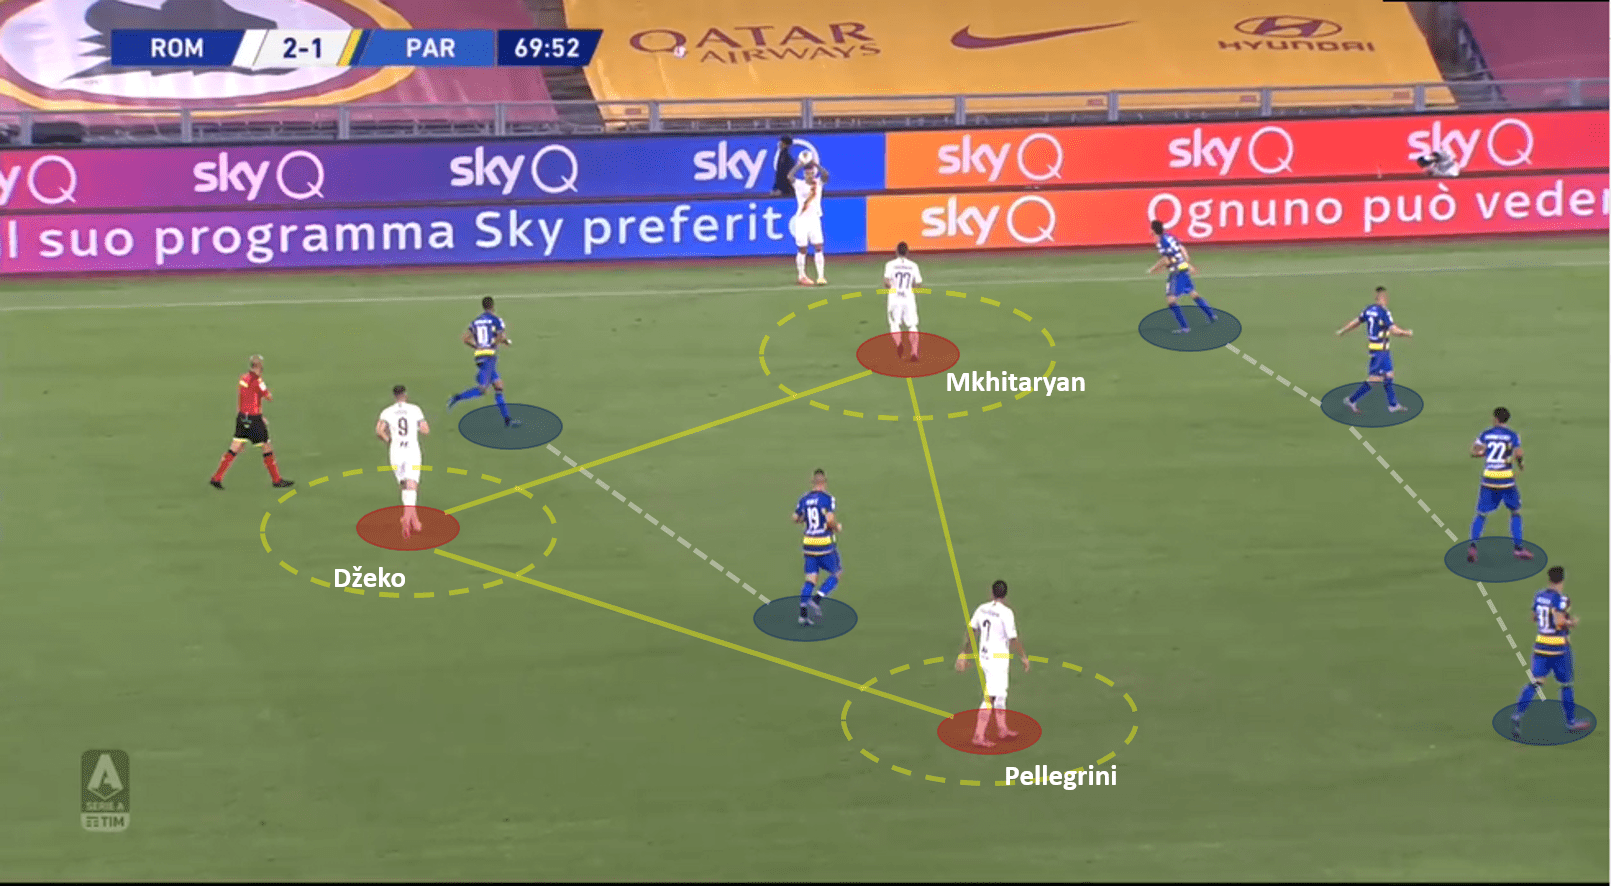
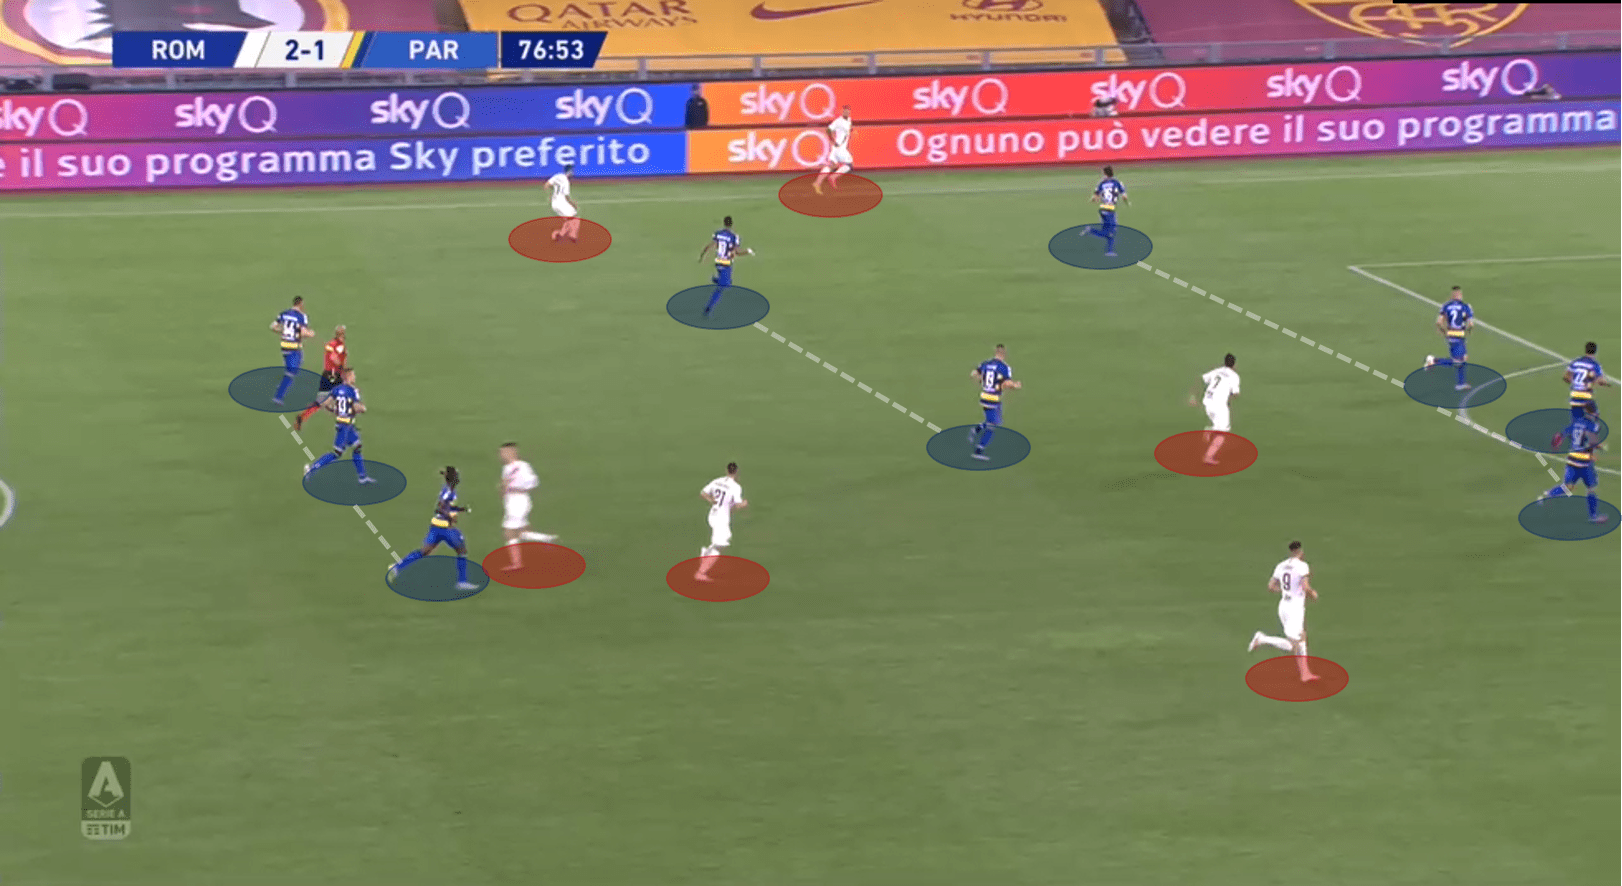
Another such instance in the analysis, is from minute 70. Parma are defensively set up with a back four, and two midfielders to choke the middle. Again, not much wrong with the shape but the positioning was poor again. In the frame, there’s 6 Parma players, and 3 Roma players. And all three Roma players still have clear passages to pass the ball to each other (marked in a triangle). Additionally, none of the three players who could receive the thrown in for Roma, were under any kind of pressure from the Parma players.
And finally, back to their true defensive tactics shape, back in the 77th minute: 4-2-3-1. A very confusing 18 minutes for Parma that.
Roma: a tale of two flanks
On multiple occasions we saw Roma crowd the midfield and draw the Parma players in the centre as a result. As soon as they came in, Roma passed the ball out to the flanks. It seemed like a part of the game tactics that the flanks will be a key outlet to create chances. Both Diawara and Veretout were a menace in the centre while driving forward and pressing, but quickly passed the ball out wide to Bruno Peres or Spinazzola when the opportunity arose. This worked for Roma in two ways:
- The more obvious way – overload the flanks and then put in crosses for the attacking contingent of Roma to convert.
- The more tactical way – By driving the ball wide, they would stretch out the narrow defensive shape of Parma. This stretch created gaps in the defensive lines for Veretout, Mkhitaryan and Pellegrini to operate and barge into.
Below are a couple of such instances that this tactical analysis covers.
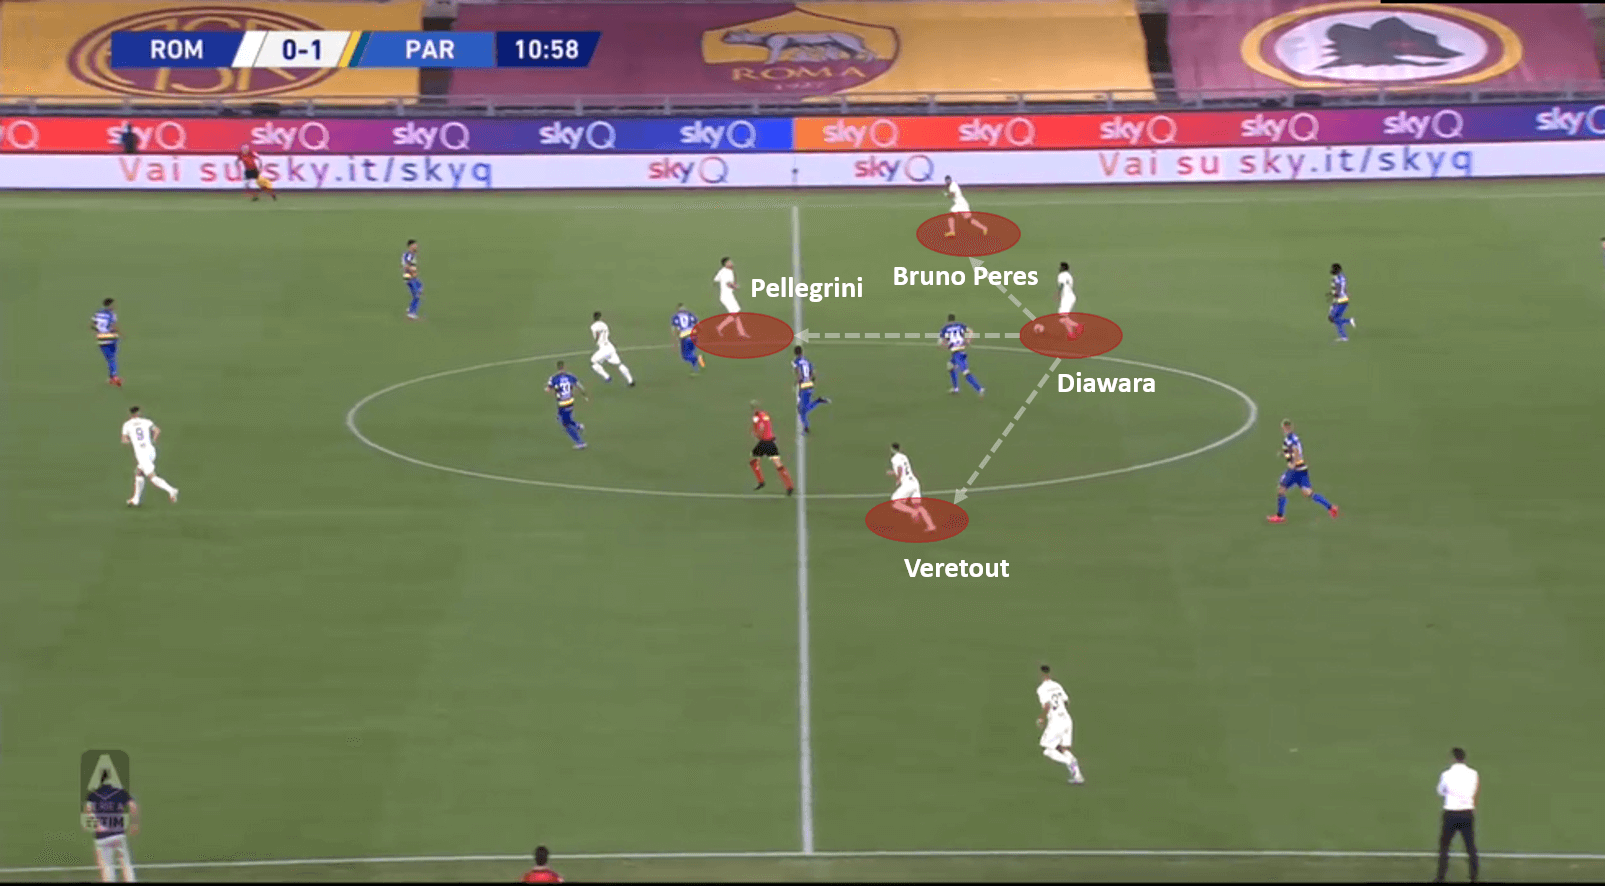
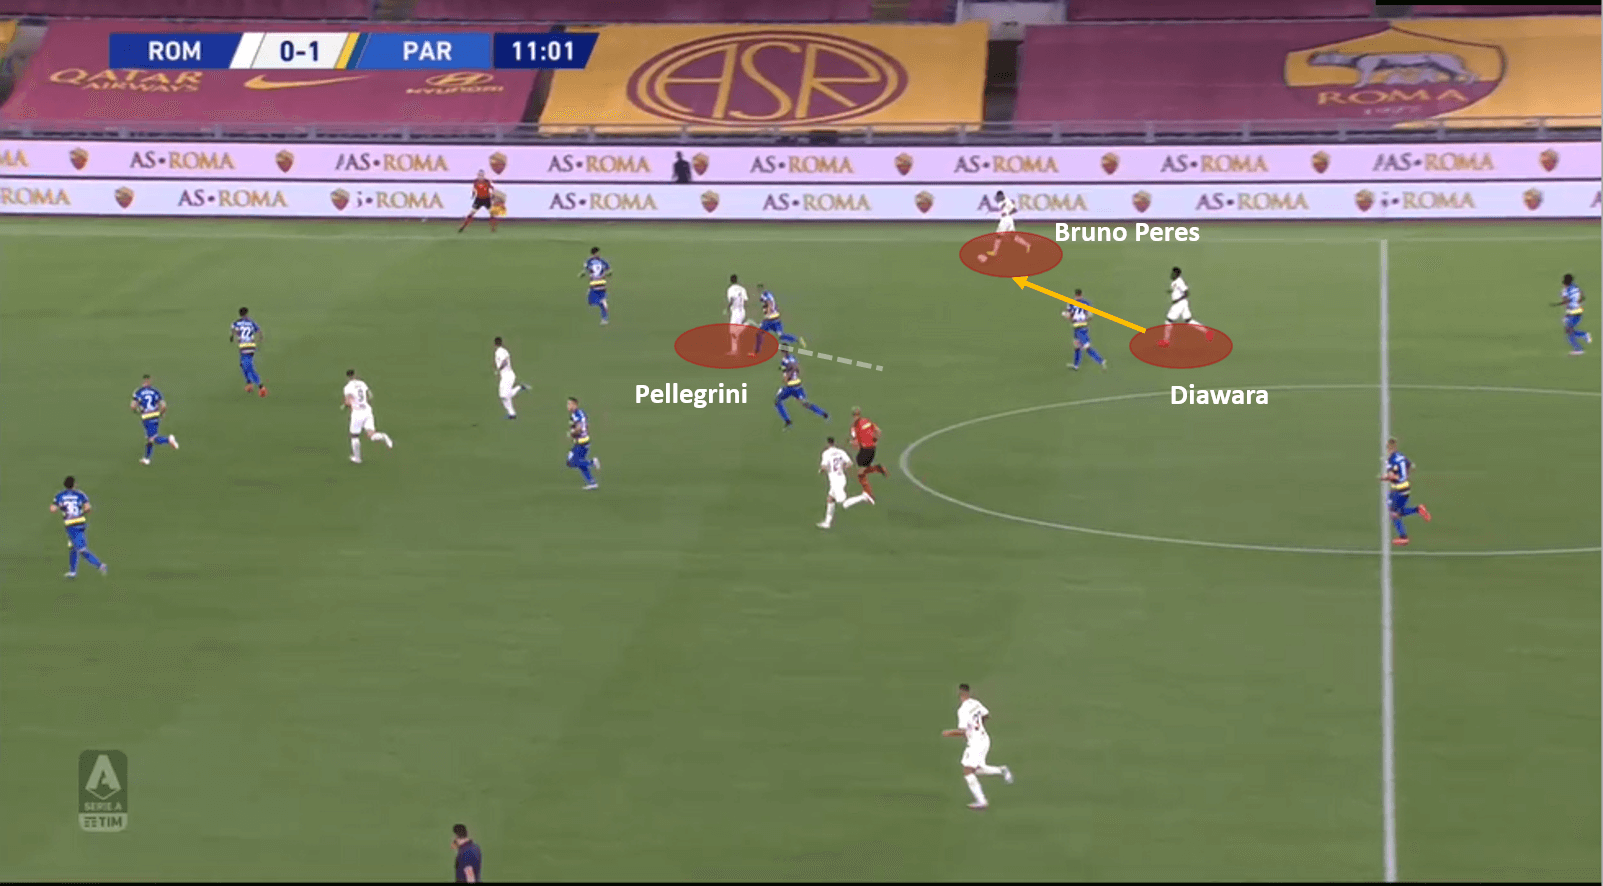
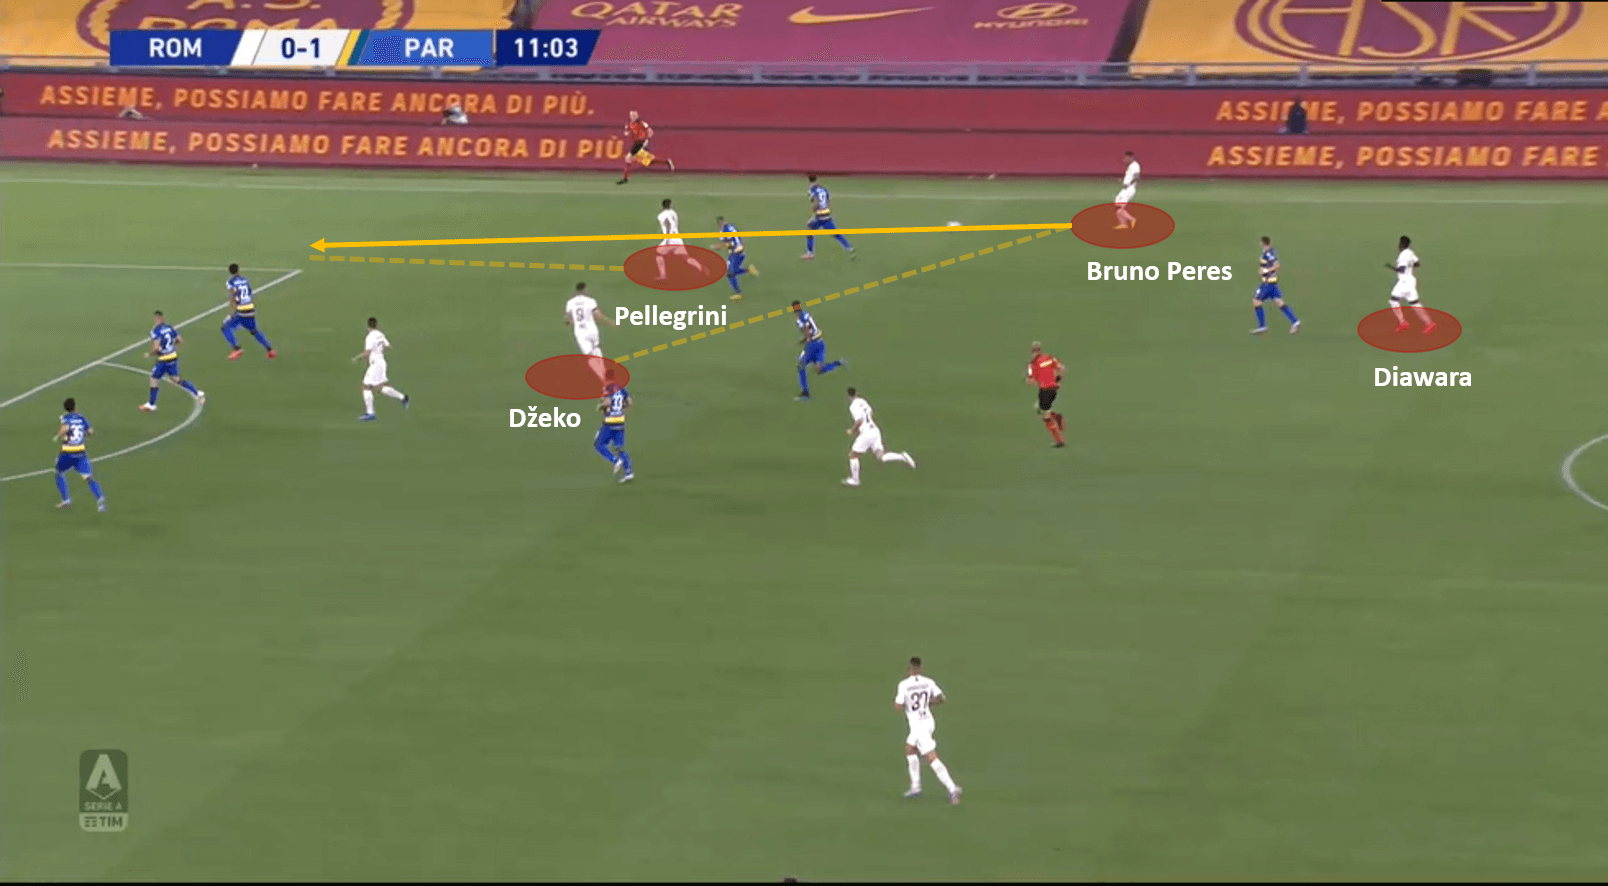
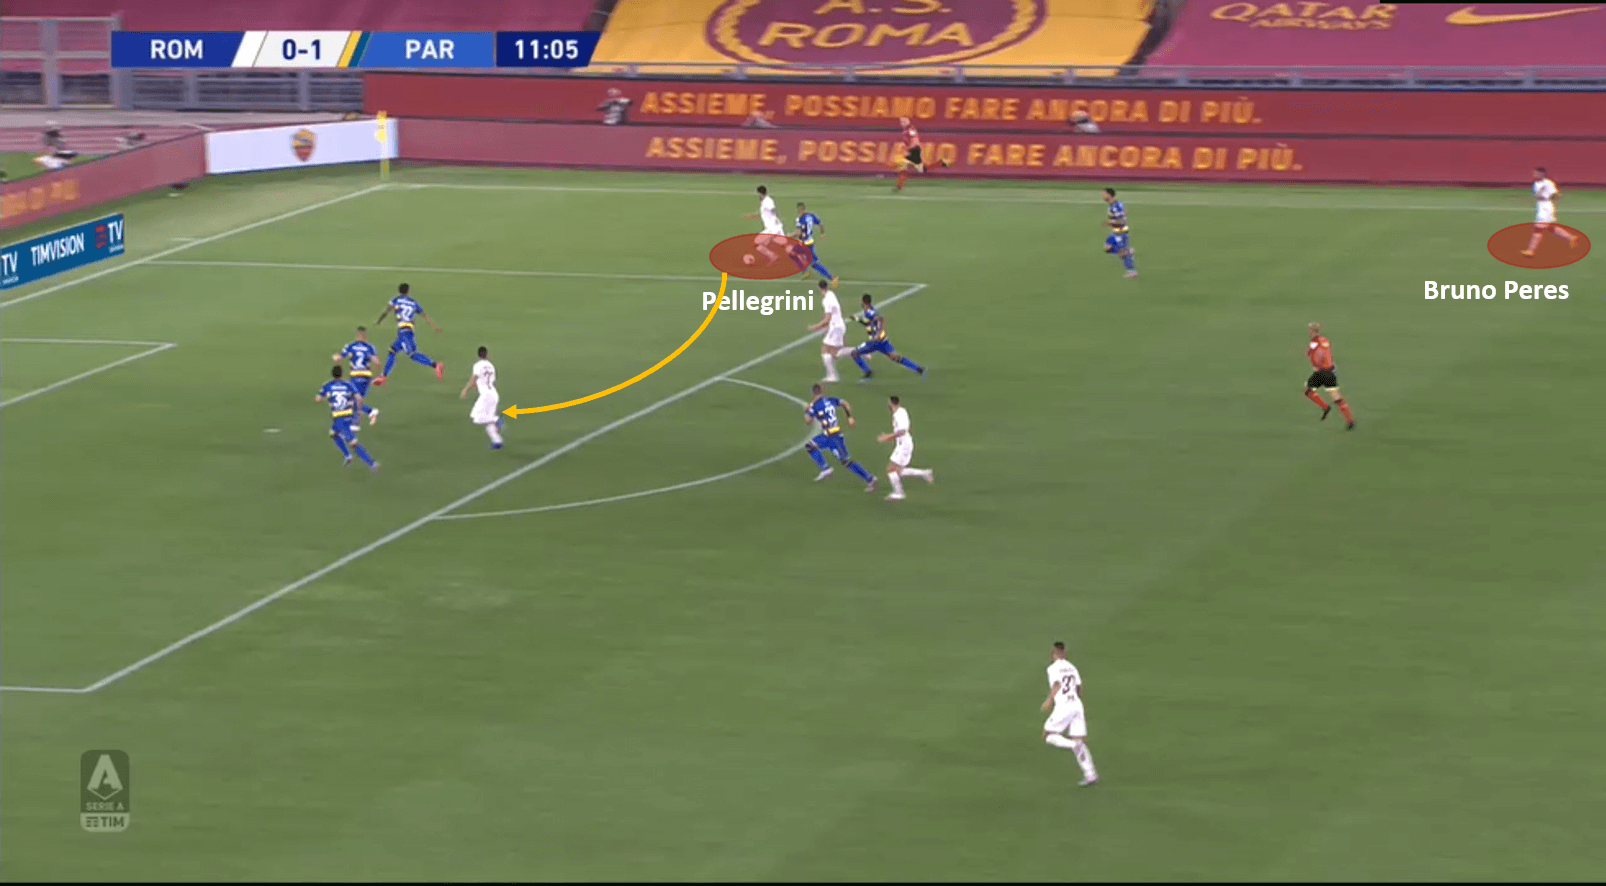
In the previous section of this tactical analysis, we took a look at how Parma’s narrow defensive shape meant they were unable to shut the flanks for Roma. Roma took complete advantage of the fact and exploited the flanks to full effect. The first instance in the analysis is depicted by images below. Diawara receives the ball in Roma’s half and has three options to play the ball. Two towards the centre, either to Pellegrini or Veretout; and one to the overlapping Bruno Peres. In order to exploit Parma’s narrow shape, Diawara puts the ball wide to Peres. This does both the above mentioned points, puts the ball into the flanks and stretches the narrow shape of Parma for Pellegrini to exploit. Peres has two further options himself, one to pass the ball inside towards Džeko and the other to pass it into space on the flank for Pellegrini to run into. Again, keeping in view the objective to exploit the flanks, Peres moves the ball into space on the flank for Pellegrini to pick up. Pellegrini cuts in between the defense, then picks up the loose ball and puts a failed attempt into the box. While the tactics worked, the final product let them down.
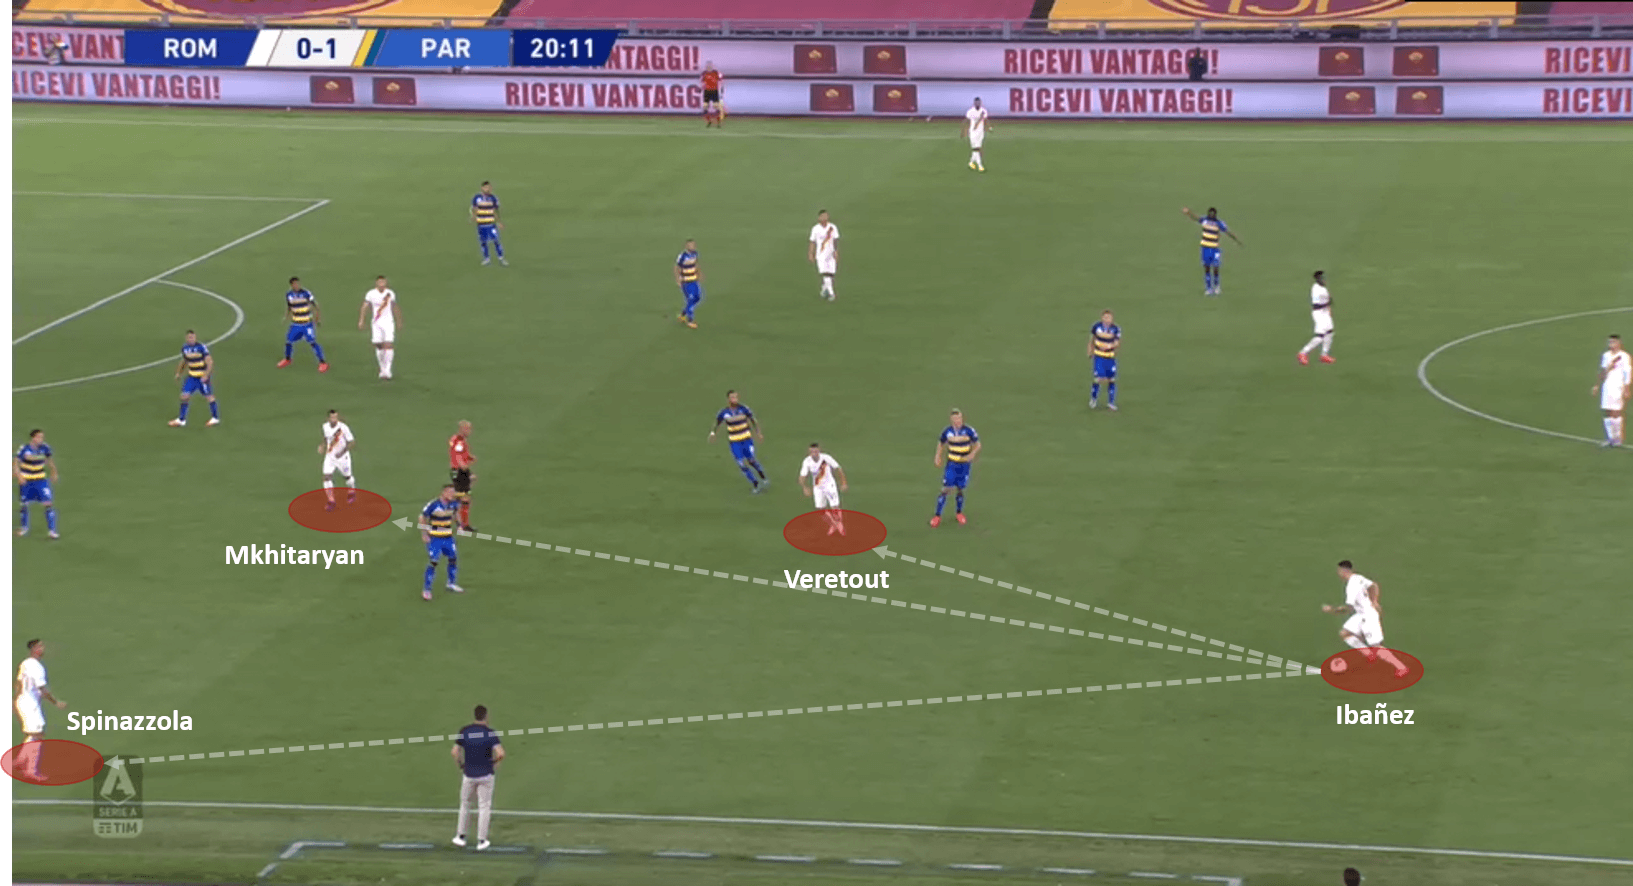
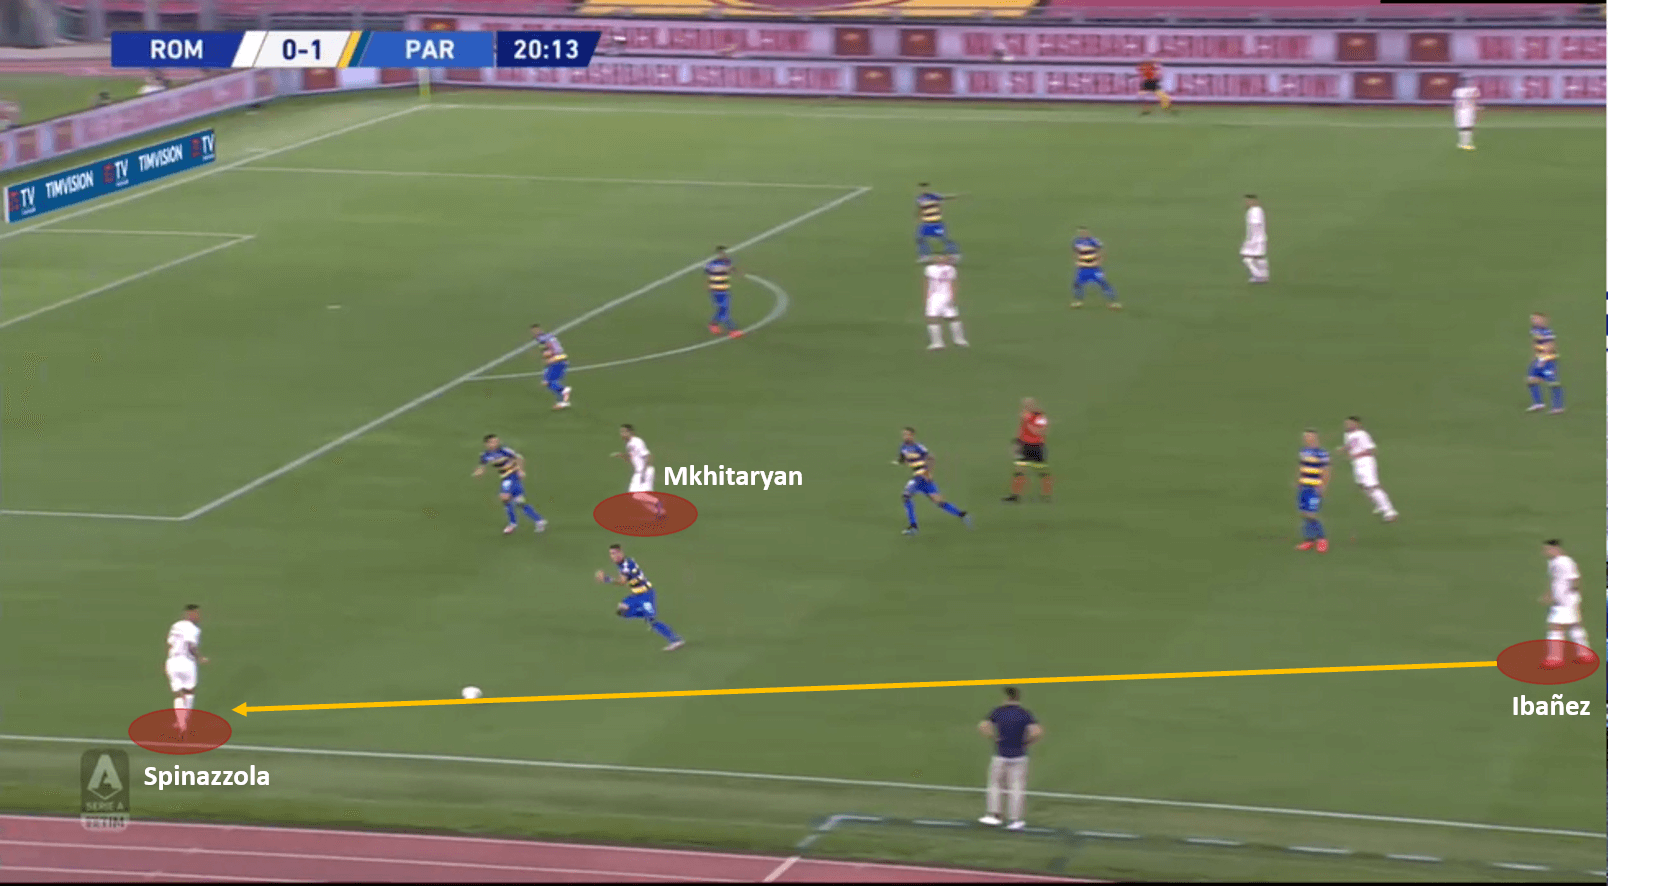
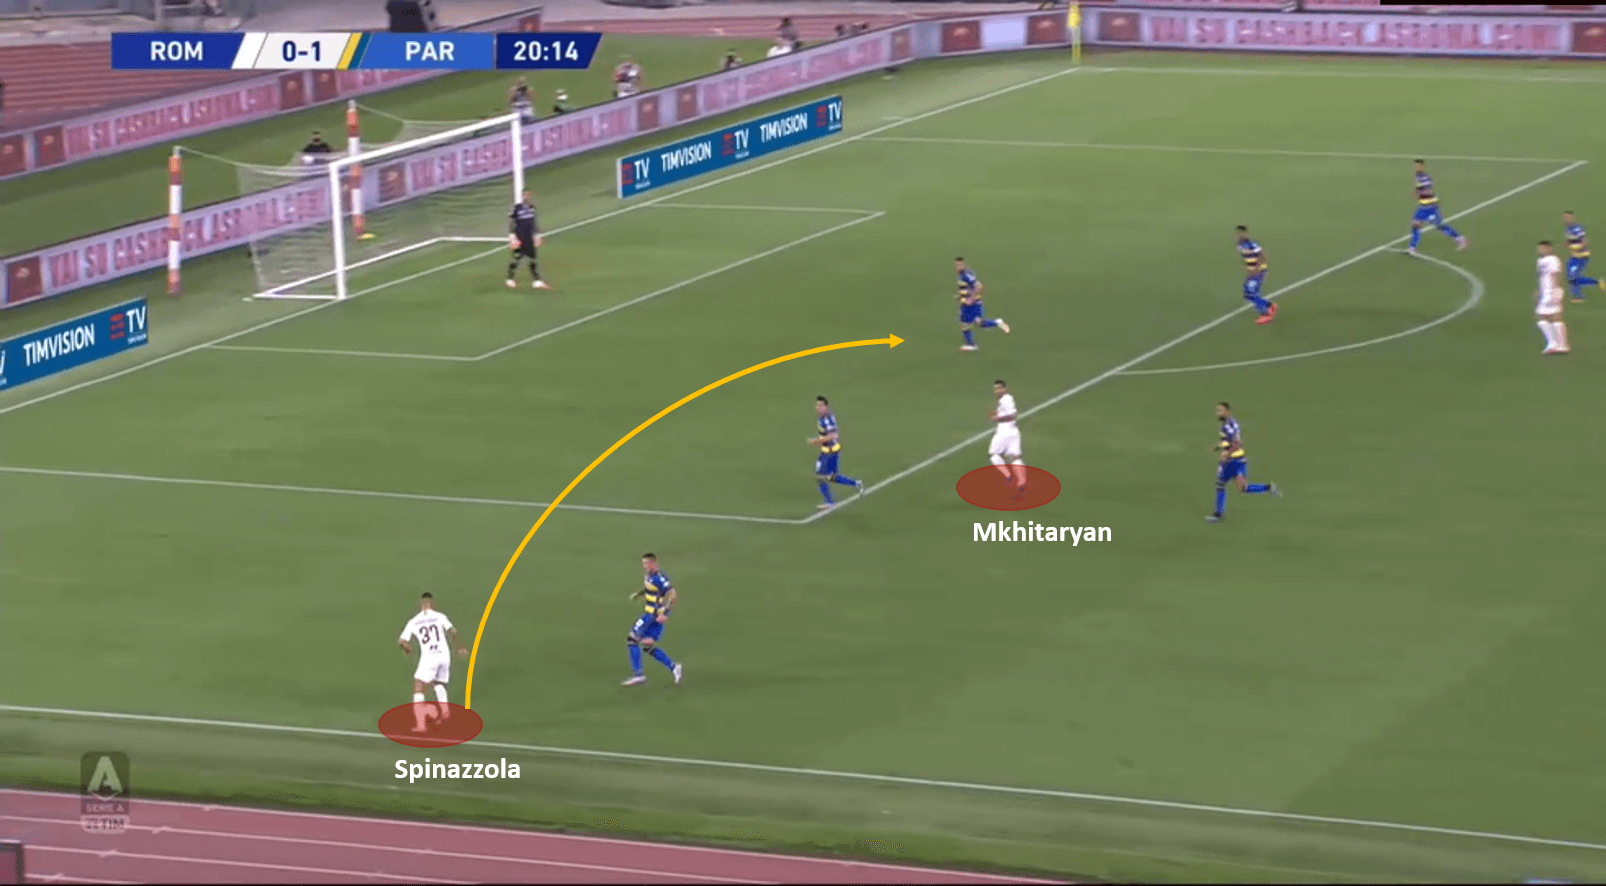
Another similar instance where we saw Roma deliberately play the ball out wide was on the left flank. Ibañez has at least three options to pass the ball, two central options towards Mkhitaryan and Veretout; and one towards Spinazzola. The safest of the lot being a pass to Veretout who was just a few feet away. Yet Ibañez decides to play the ball to the flanks to Spinazzola. The pass in itself wasn’t very difficult, but the intent spoke volumes. It yet again demonstrated Roma’s tactics of exploiting the flanks against Parma. Spinazzola was ready to receive the ball right up the pitch almost like a wide attacking forward, and played it into the box. While the tactics worked, the final product again under-delivered. Below are images that depict the instance.
Above are only two instances, but the game witnessed multiple such instances across 90 minutes. Below are some numbers which highlight the analysis further. A simple comparison of numbers shows how reliant Roma’s tactics were on the wing-backs as compared to those of Parma. Peres and Spinazzola, in terms of purely attacking metrics, fare miles better than Darmian and Pezzella. The below table highlights some of the key attacking contributions made by the wing-backs:
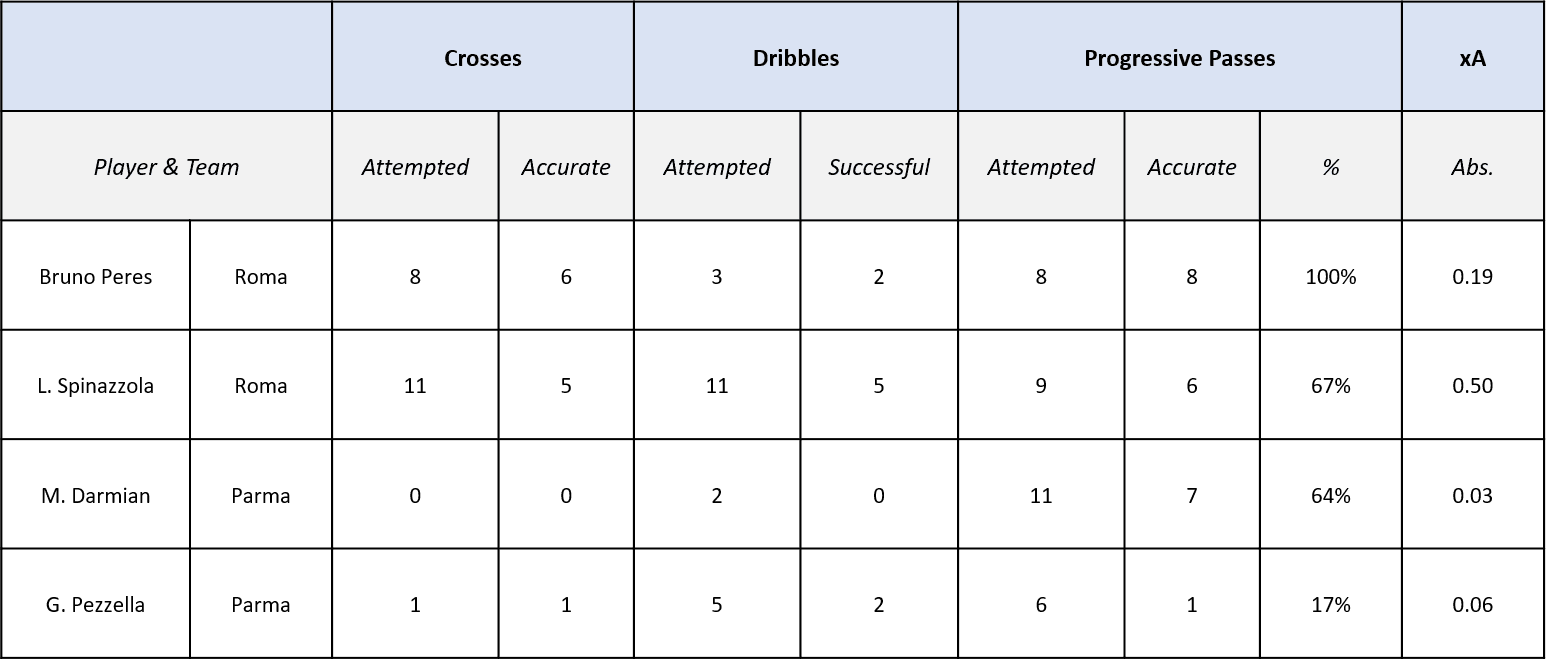
When you compare the xA of the two Roma wing-backs to their teammates, the stats looks even more impressive. Ex- Juventus man Spinazzola has got the highest xA in the team i.e. 0.50 which is greater than his counterparts – Mkhitaryan (0.23), Pellegrini (0.04) and Veretout (0.26).
What the Press?!
While the quality of football displayed by both teams certainly had a gulf of difference, one particular aspect of it glaringly stood out. The quality and intensity of pressing on display by both teams, was in such stark difference. While Roma chased down every single ball in the game, Parma were happy to let the opponent player carry the ball to them. It wasn’t just lost balls that Roma were chasing, but even balls in possession of Parma were being chased down. They seemed like a pack of hungry wolves each time they pressed the opposition. Parma on the other hand were happy to hold their position, retreat a little bit and wait for the ball to come to them. This has been a character of this Parma side – sit deep, maintain compact narrow shape, prevent through ball, win the ball back in own third and initiate a quick counter-attack by exploiting the space behind the opposing high press team. This analysis is further backed by the fact that among all goals scored from counter-attacks this season, Parma have scored the most (10). However, their poor coverage of the flanks meant that although they maintained good narrow shape centrally, Roma’s constant bombardment from the wings troubled them structurally. Below are some PPDA stats for both teams which highlight the pressing tactics further. PPDA is the number of passes allowed by a team before they make a defensive action. It is a widely accepted accurate indication of the pressing intensity of a team. The more the number of passes allowed before making a defensive action, the higher the PPDA. The higher the PPDA, the lower the pressing intensity. In other words, PPDA is inversely proportional to the passing intensity.
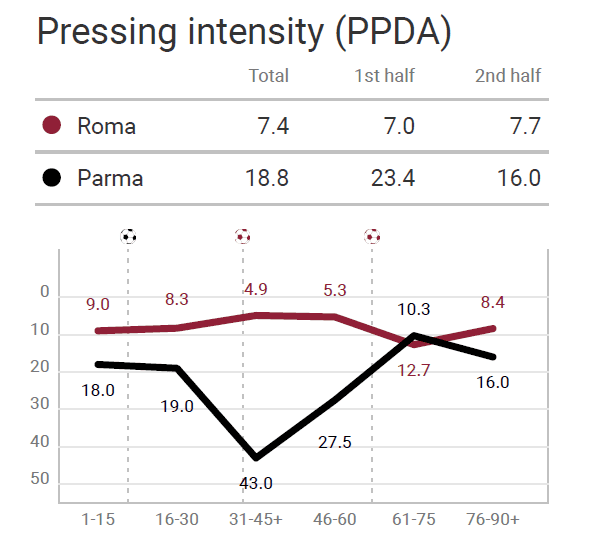
Roma show incredible hunger in winning the ball back, averaging a PPDA of 7.4 as compared to Parma’s 18.8. To further the analysis, we look at an instance where Parma’s pressing character cost them dearly.
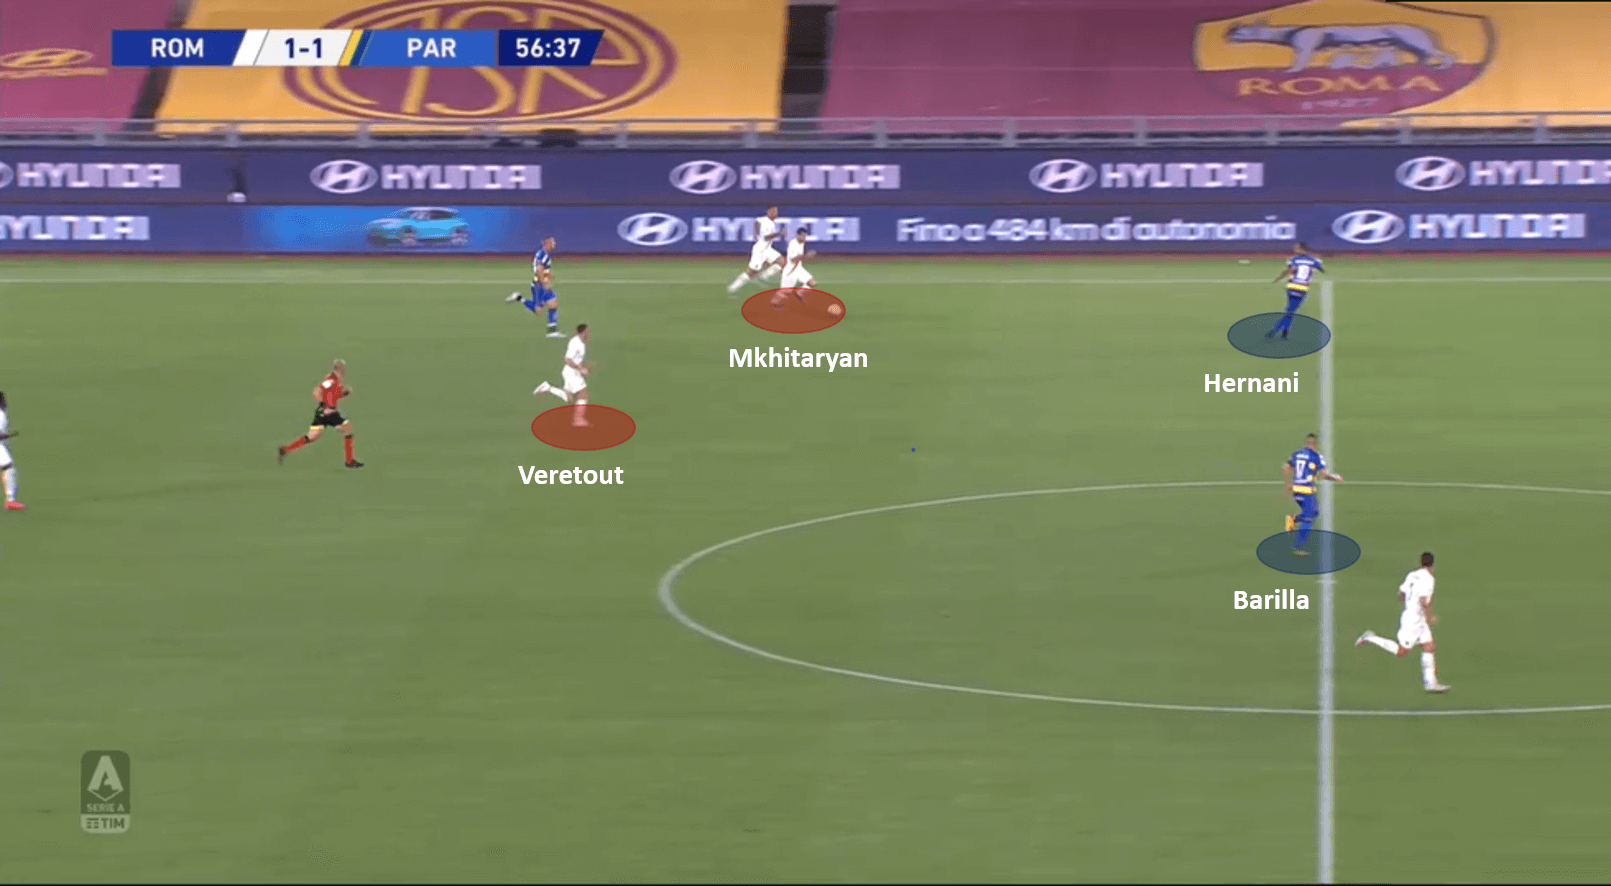
Mkhitaryan wins the ball in Roma’s own third, and rages forward from the left flank. He covers a distance of at least 40 meters before he encounters any real press from Parma. Hernani and Barilla are both spotted retreating into their third in order to maintain a compact shape. Mkhitaryan cuts inside a loose running Barilla and passes the ball to Veretout who has no Parma resistance whatsoever. Veretout takes a couple of steps, lines up a shot and unleashes a beauty. Goal. This instance encapsulates all of the points discussed in this tactical analysis – Parma’s poor flank coverage helps Mkhitaryan dart in with the ball, low press helps Mkhitaryan take his time to pass the ball to Veretout and poor positioning/press helps Veretout take the shot. Below is the incident in images.
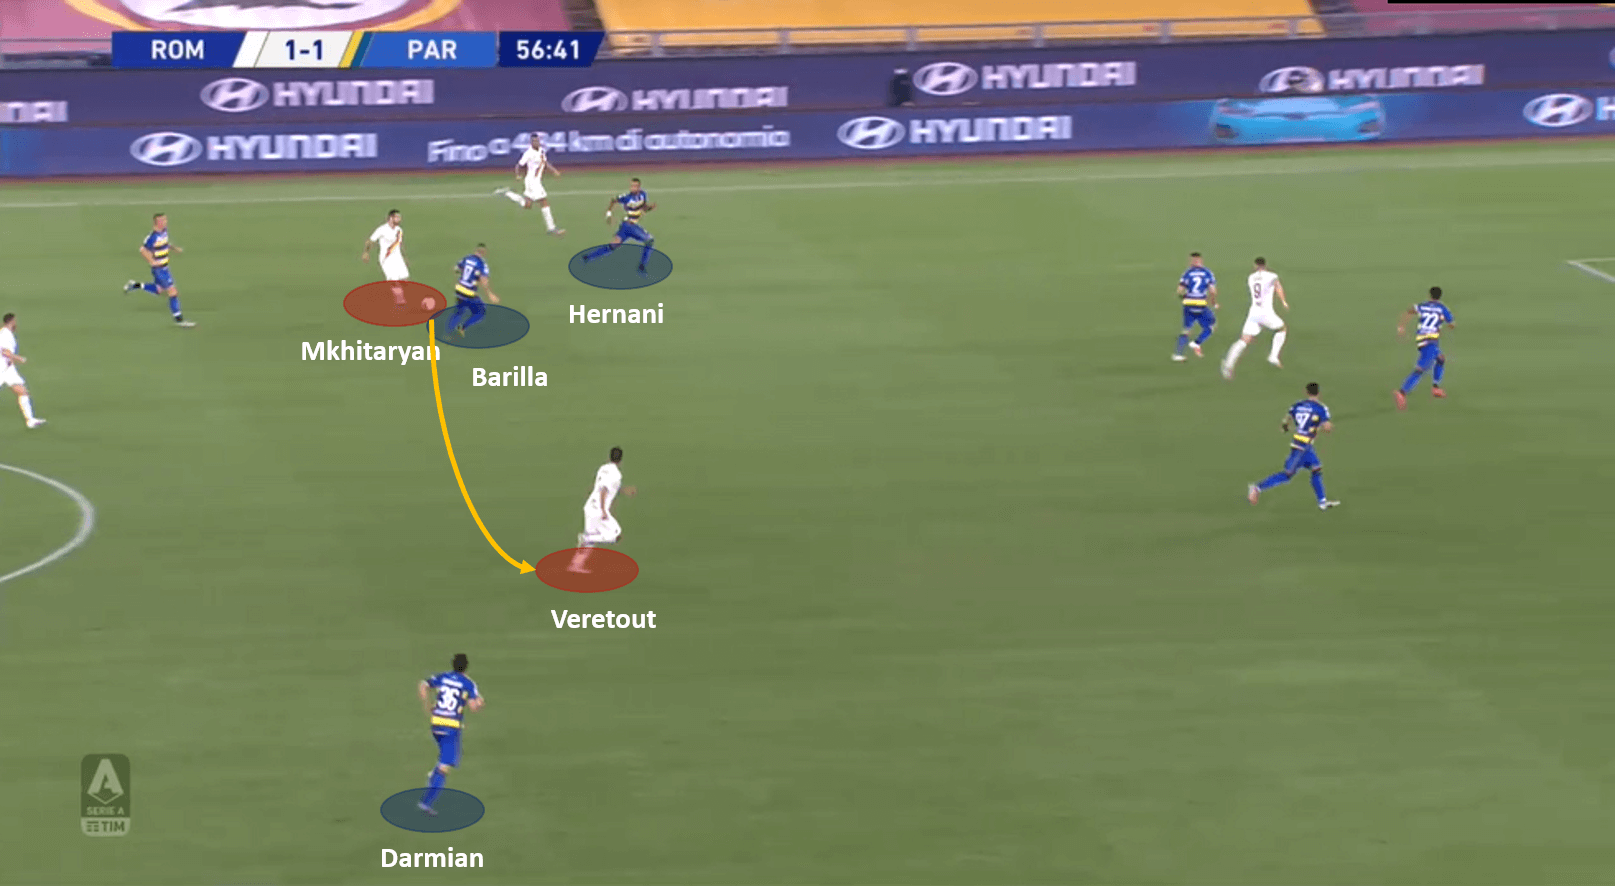
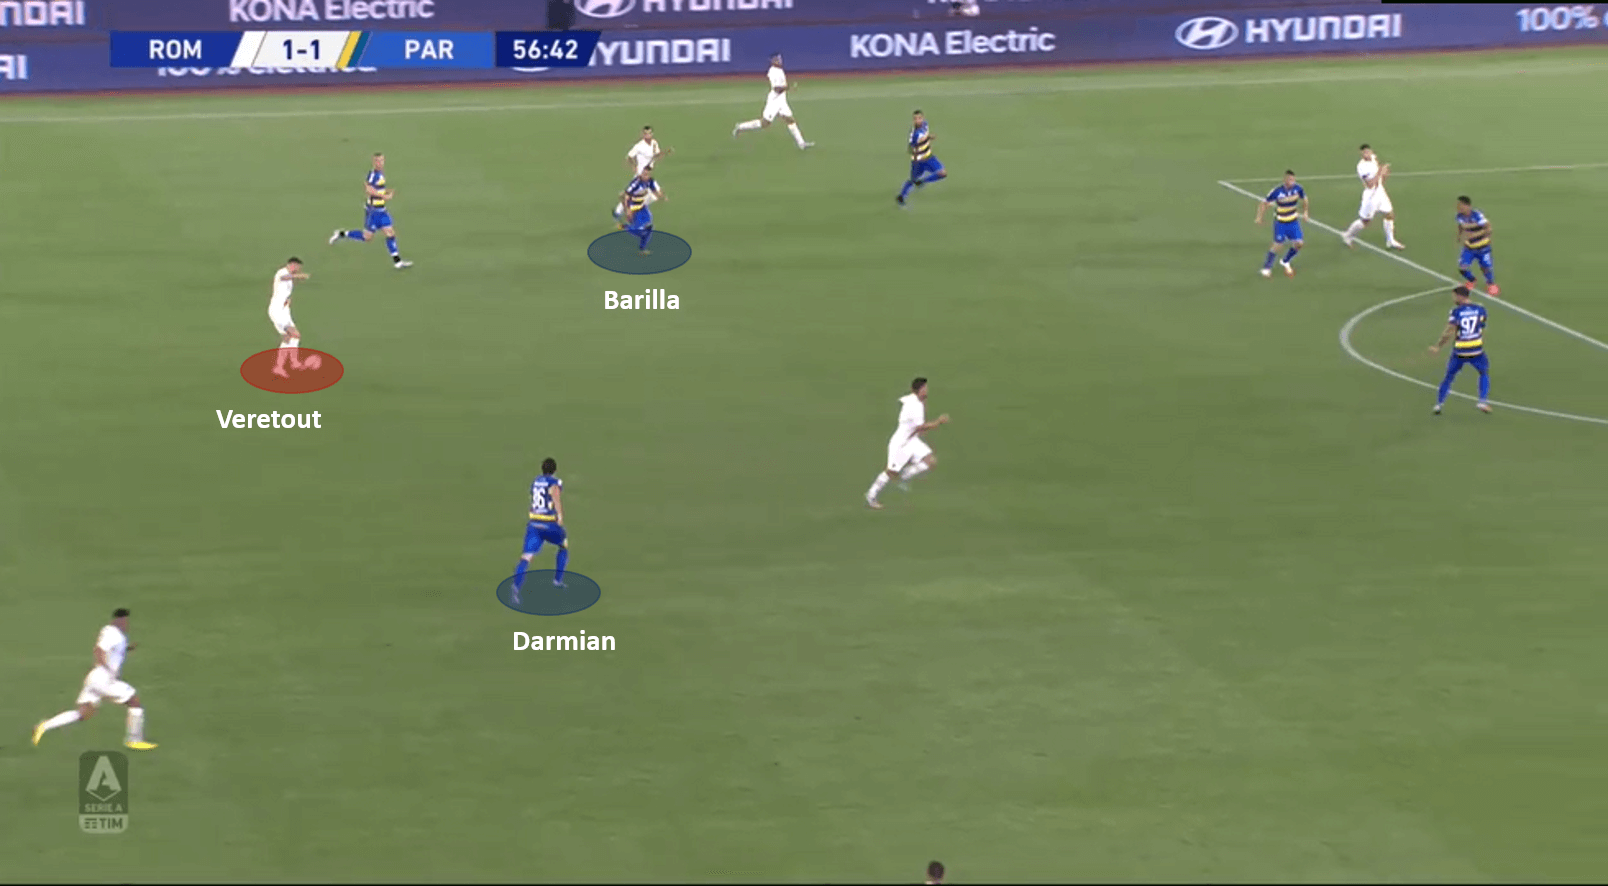
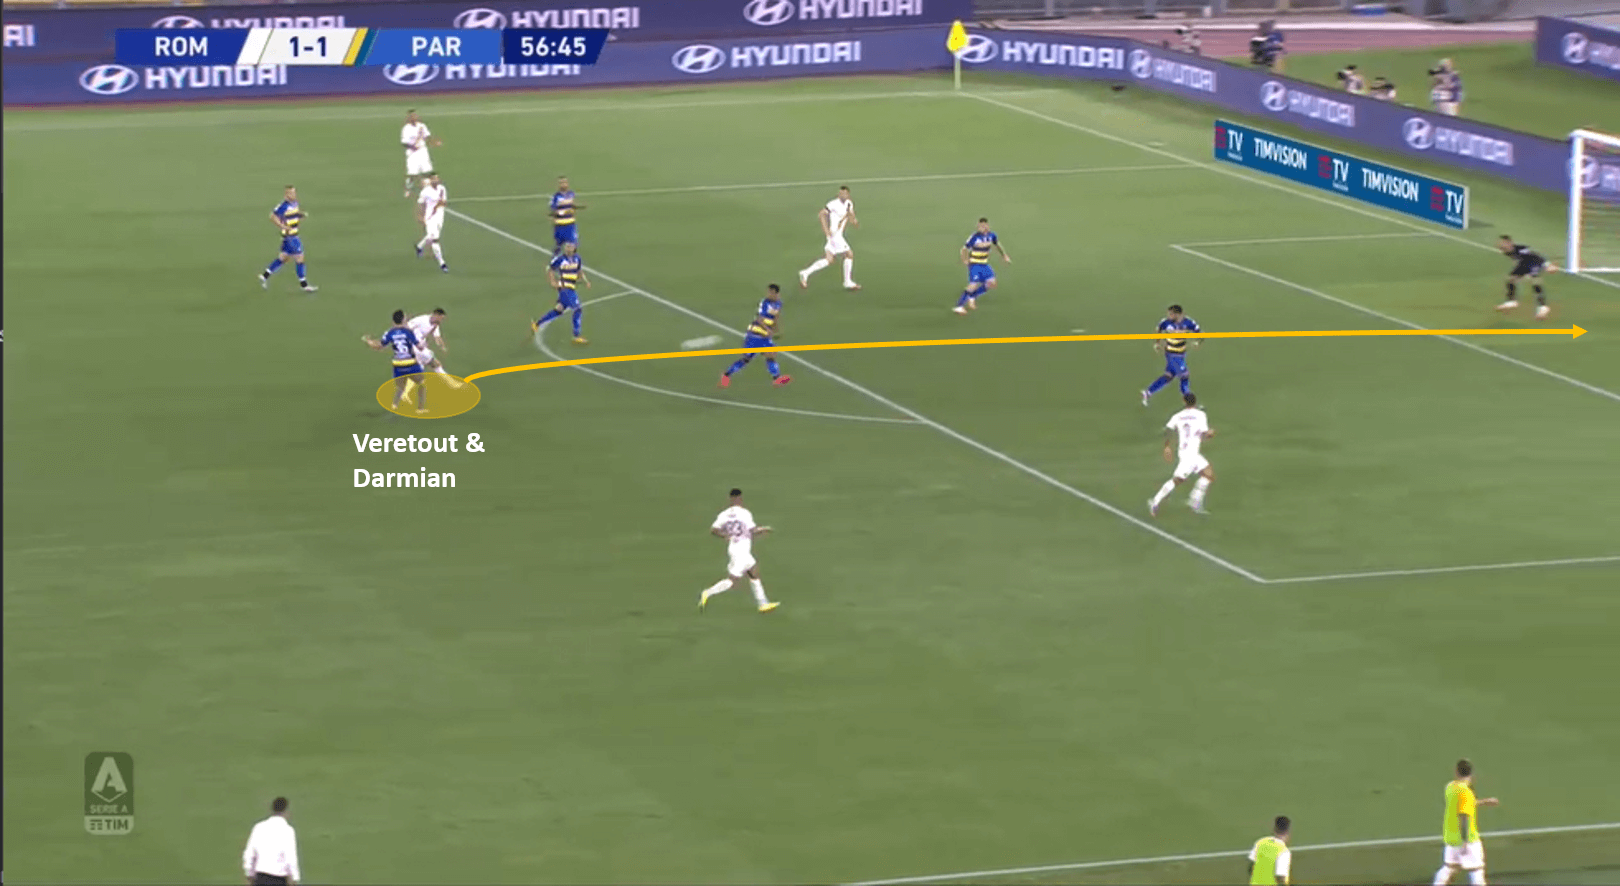
The above instance is a key highlighter of the press on display from Parma. The entire game could be broken into similar instances, but none more costlier than the one mentioned in the above analysis.
Conclusion
Roma ended their losing streak of three games with the win against Parma, while Parma now make it four losses in a row. Roma deservedly took all three points on the day. Parma were distinctly average, and beaten fair and square in intensity and out thought in tactics. However, the game wasn’t without flaws for Roma as well. They created a multitude of chances but failed to convert them. If it were not for a howler refereeing decision, Parma would have had a second penalty late in the game, and possibly an equaliser. Fonseca’s gamble of a back three paid off, while D’Aversa will have some thinking to do if he wants to get back to winning ways. The tactical analysis does throw some light on the tactics used in the game by both the teams and the events leading up to this result. However, no tactical analysis will be able to fully explain the decisions behind the positioning and tactics errors that cost Parma.


Comments