During 2019, Shonan Bellmare maintained their J1 League status by the skin of their teeth. Having finished in the relegation playoff spot, Bellmare faced the J2 League’s Tokushima Vortis in the playoff game.
Having gone a goal behind, an equaliser from Temma Matsuda proved to be the Hiratsuka club’s salvation as the match finished 1-1. As league rules dictate that the J2 League side must be victorious to achieve promotion, Bellmare retained their top-flight status.
So this term, it is likely that Bin Ukishima will be hoping that his side fares better after he was promoted from being the side’s assistant manager to manager in the latter stages of last season.
While a 3-2 defeat in the opening game of the 2020 J1 League season against fellow strugglers last term Urawa Red Diamonds was not ideal, there were certainly green shoots at the Shonan BMW Stadium Hiratsuka.
This tactical analysis will highlight three key features and a weakness of Shonan Bellmare’s tactics in their first game of the season before the league’s suspension. The scout report will also use analysis to explain how those tactics could be key this season.
Wide and expansive play
During their opening game of the season against Urawa Reds, Ukishima’s side looked to play as wide and expansive as possible where they could. This was predominantly done through the roles of the two wide midfielders in their 3-5-2 system – Toichi Suzuki and Hirokazu Ishihara. When the home side was in possession, the two players would stretch the pitch as wide as possible by hugging the touchlines.
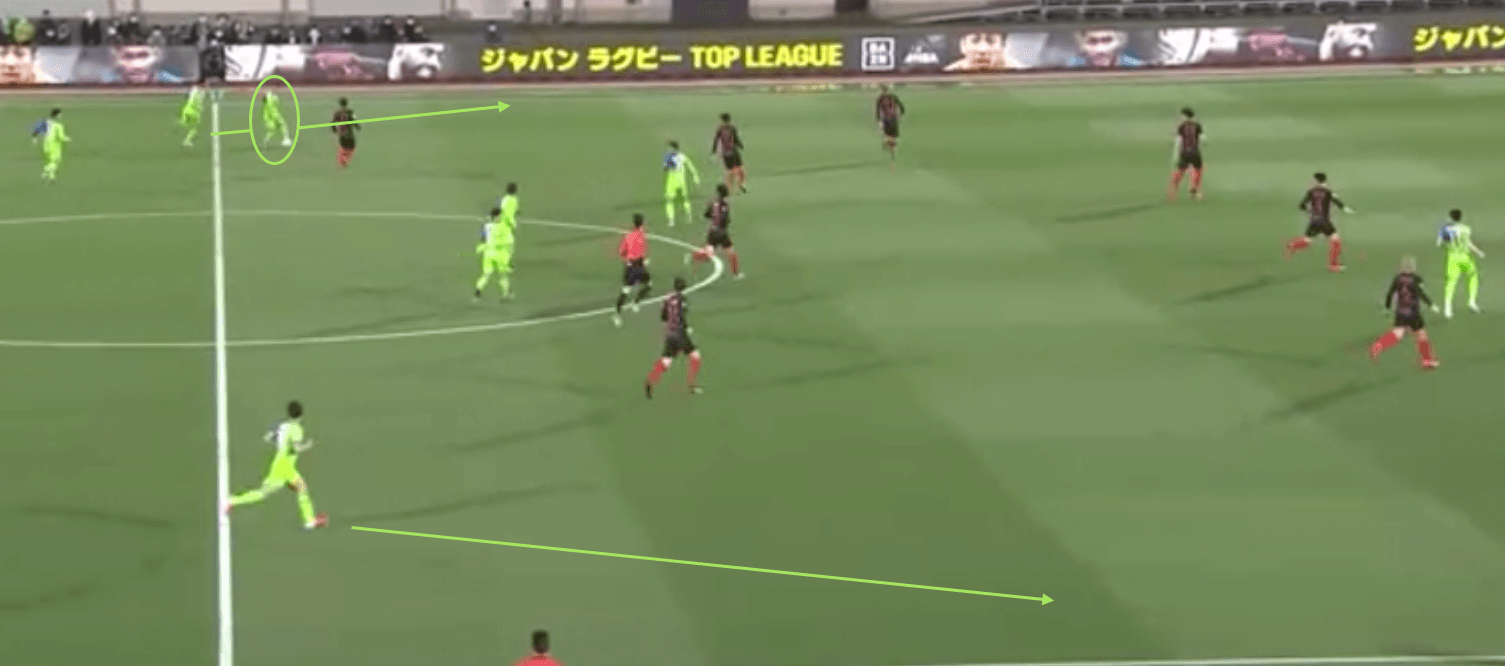
As can be seen in this annotation, with Shonan Bellmare in possession early in the game, both Suzuki and Ishihara look to get as wide as possible quickly. Despite the ball being on the left-hand side of the pitch, Ishihara still moves to hug the touchline on the right-hand side. With the three central midfield players in the 3-5-2 system, the width of their play allowed Bellmare to stretch the Urawa club’s midfield.
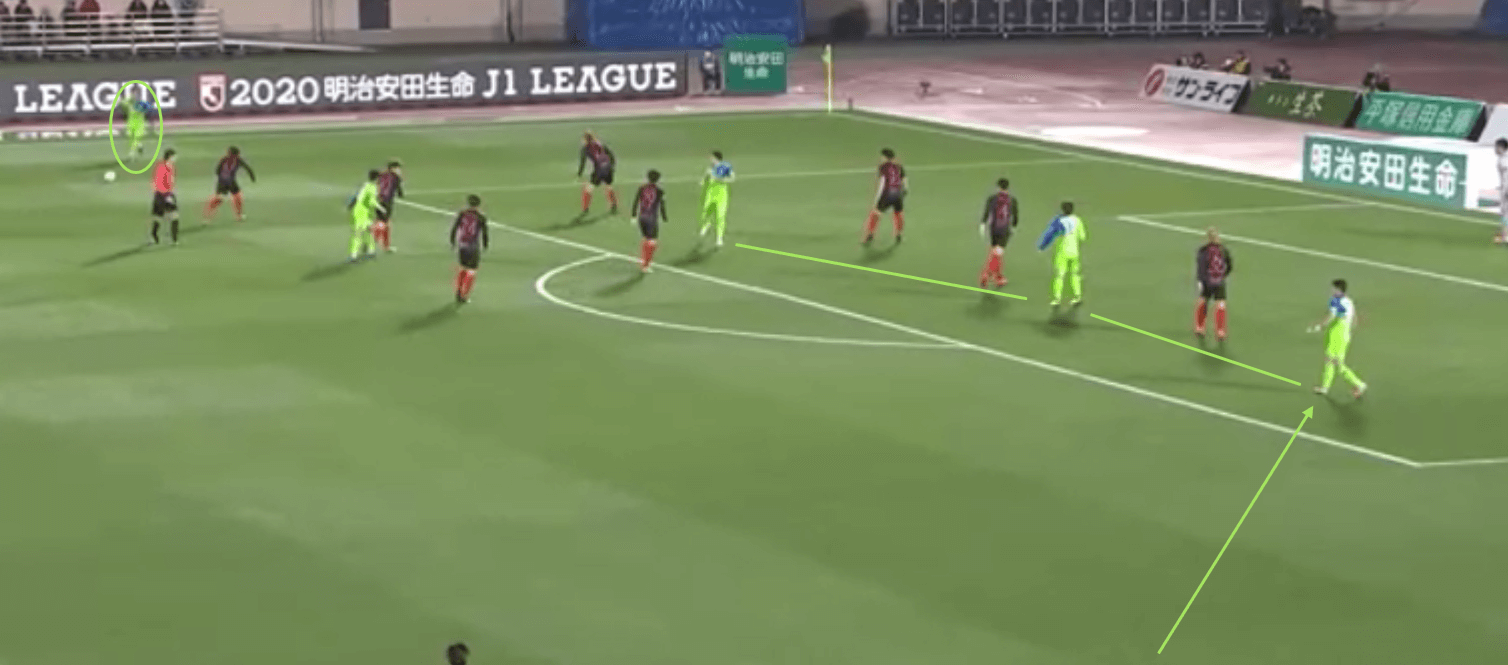
As can be seen in this annotation taken seconds before the home side opens the scoring against Urawa Reds, one of the wide midfielders would come slightly narrower when in the final third. When either Suzuki or Ishihara would have possession wide on their flank, the wide midfielder on the opposite side of the pitch would drift narrower into the half-space, to create a front three with the two strikers.
Against Urawa Reds, this tactic led to Ukishima’s side to enjoy a respectable 47% crossing accuracy from 17 crosses, compared to the away side’s 29% cross accuracy. The tactic also allowed Bellmare to be expansive in their play and was a key factor in the side boasting 414 completed passes compared with the Red Devils’ 291. Coupled with attacking intelligence – which will be discussed next – the tactic proved potent.
Finding gaps in between defensive lines
As just stated, Shonan Bellmare’s tactic of playing wide and expansive proved deadly when coupled with attacking intelligence. The movement of the two strikers and tucked-in wide midfielder when possession was out wide allowed those attackers to find key areas of space in between defensive lines. Both the home side’s goals in the opening game of the season showed evidence of these coming to fruition.
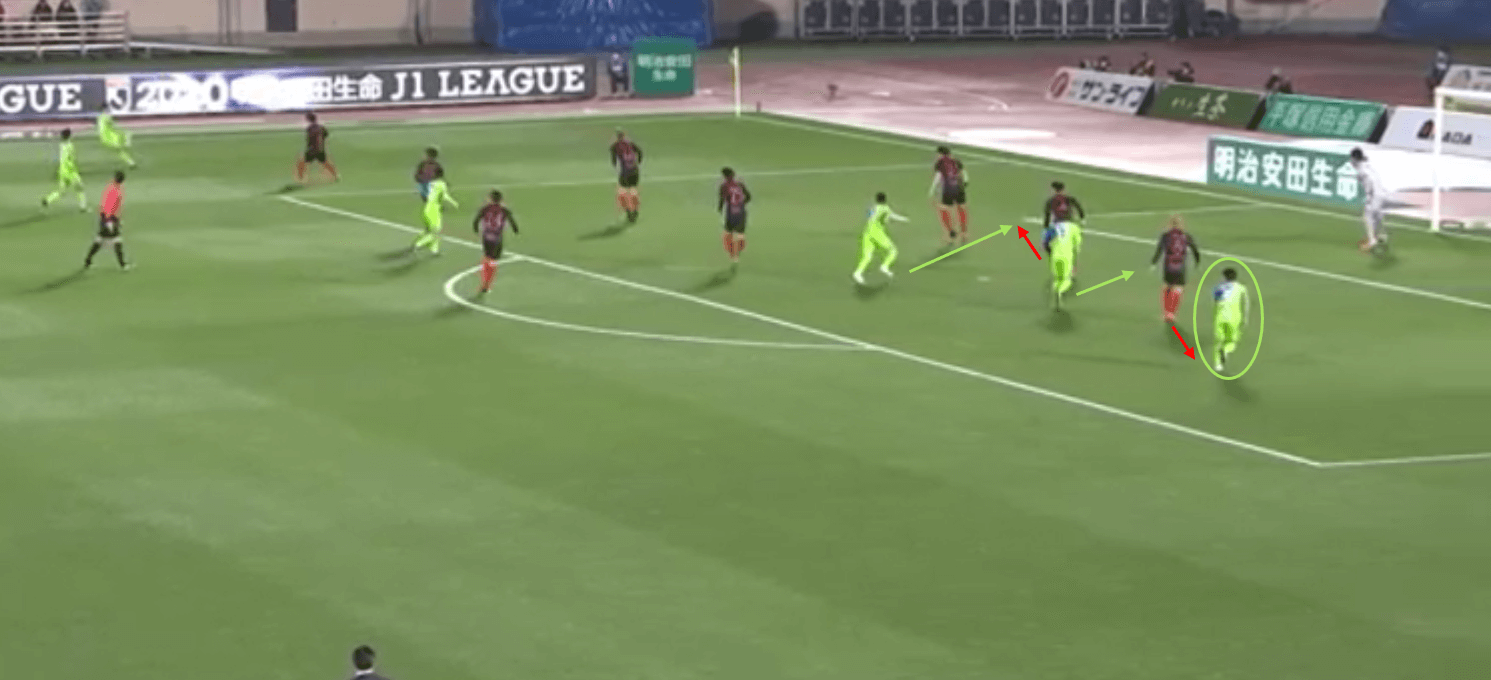
As can be seen here, with Suzuki out wide near the touchline and whipping in a cross, the attackers’ intelligent movement comes to the fore. As the nearest to the ball, Tarik Elyounoussi makes a darting run between the two central defenders and drags Daisuke Suzuki across the face of goal. Ishihara then loiters behind Ryosuke Yamanaka to maintain his attention and space opens up for Naoki Ishihara to head the ball past Shusaku Nishikawa.

A similar pattern of play was seen in Shonan Bellmare’s second goal of the game, with the ball again being crossed in from the left flank. Here, midfielder Naoki Yamada has joined the attack and the other attacker’s run across the face of goal drags the centre-back across again. Yamanaka is again concerned with the positioning of Ishihara and the pinpoint cross of Suzuki falls to Yamada to finish.
While it could be argued that Ukishima simply looked to take advantage of a lack of longitudinal compactness in Urawa Reds’ defence, this could be a recurring tactic seen across the 2020 season for Bellmare. With Suzuki’s crossing ability and the side’s intelligent movement from the attackers, this pattern of play could be recreated throughout the season.
Out of possession structure
While Shonan Bellmare’s starting formation was 3-5-2 against Urawa Reds, any starting formation will very often look different depending on whether the side is in or out of possession. So, when in possession, Bellmare did line up in their 3-5-2 structure with the wide midfielders as wide as possible. However, when out of possession the side transitioned into a 5-3-2.
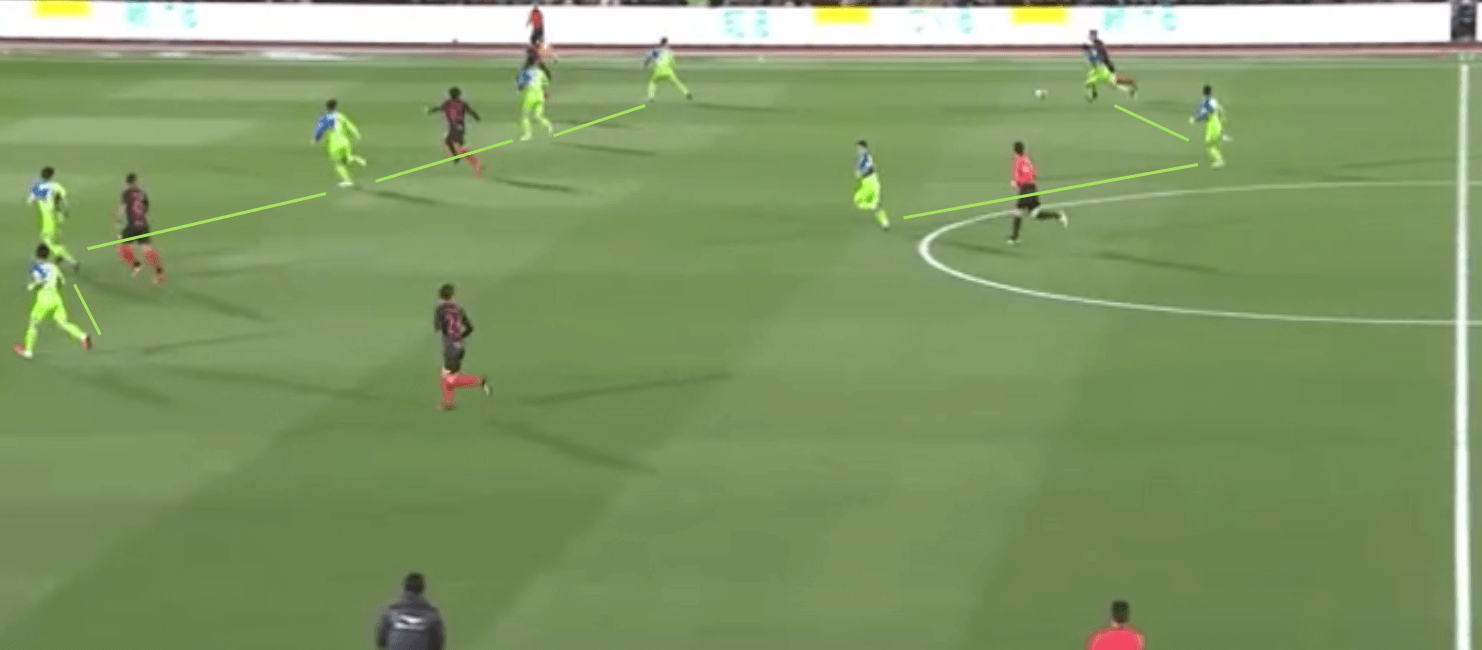
As can be seen here, the defensive line of five and the midfield line of three can be seen. The 3-5-2 formation lends itself to this out of possession shape perfectly, as the two wide midfielders must simply position themselves deeper and act like a wing-back.
When Shonan Bellmare were effective in their transition, the five-back formation worked well as it helped the backline remain more solid. That led to this defensive line boasting an impressive 69% of defensive duels won when the structure was executed well. However, this tactic which improved stability also led to a weakness.
Slow to transition
When transitioning between an in-possession and out-of-possession structure, the change should be as quick as possible – almost instantaneous. However, due to the fact that Bellmare’s wide midfielders were looking to be as wide and expansive as possible, transitioning into the five-back formation proved difficult when Urawa Reds looked to counterattack with speed.

Here, the Red Devils have won possession back in their half and with Shonan Bellmare in their in-possession shape, the away side launched a quick and direct counterattack. Kazuki Oiwa is out of position in the left side of the three centre-backs and Ishihara is still trailing back from an advanced position, meanwhile, Suzuki is nowhere to be seen.
The captain, Takuya Okamoto, is able to recover the situation well in this instance and intercepts the long ball forward. However, Shonan Bellmare were an unlucky bounce away from a two-versus-two situation in which the home side would have struggled.
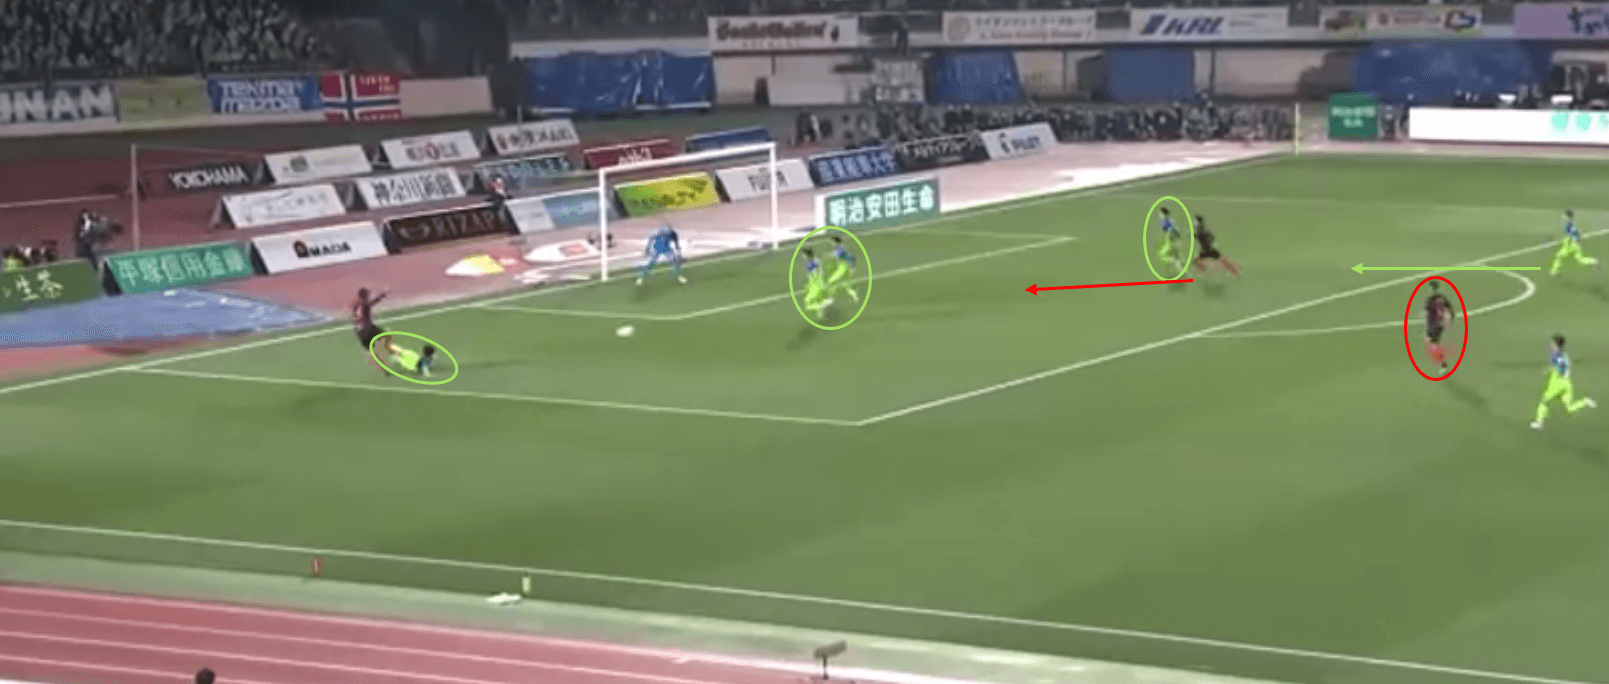
Here, the result of a quick counterattack can be seen just seconds before Urawa Reds levelled the scored in the first half. A long ball forward down the left has found Koya Yuruki and from an advanced position, Ishihara can do little to get back and stop his cross. Okamoto and Keisuke Saka lose all sense of positioning as they bunch close together, Oiwa is blindsided by the run of Shinzo Koroki and Suzuki is again nowhere near.
The counterattack ends with Koroki effortlessly pulling the Red Devils level in the tie as the Shonan Bellmare defence failed to react quickly enough to a counterattack. As can be seen on the edge of the box, there was still an unmarked Urawa Reds player should the ball have been cleared also.
Over 2020, this is an area which Shonan Bellmare must improve if they are not to suffer a similar season to last term. Ukishima will have to work on his side’s speed on the transition to prevent Bellmare being susceptible to counterattacks, as it may be an area which J1 League sides look to exploit this season.
Conclusion
As stated in this analysis, Shonan Bellmare find some of their attacking nous through their wide and expansive play coupled with the intelligent movement of their forwards. The J1 League side then find their defensive stability through their out-of-possession shape which provides a relatively solid backline of five defenders.
However, their speed on the transition is far too slow when moving back into their out-of-possession shape, although perhaps that is a trade-off for Ukishima where he gains attacking potency but loses something in defensive stability.
While the second-half penalty miss of Elyounoussi changed the game, their susceptibility to counterattacks proved costly against a side which should have been beatable going off their 14th-place finish last season.
This tactical analysis has highlighted three of Shonan Bellmare’s key tactics and raised a possible weakness of the side. The scout report has also used analysis to explain what effect these tactics and weakness may have over the remainder of the season.



Comments