The Championship table is incredibly close, and there is plenty still to play for as we enter the home stretch of the 2023/24 campaign.
The race for the playoffs and automatic promotion both promise excitement, but it’s the bottom half of the table that guarantees a few twists and turns in the remaining 13/14 fixtures.
The battle for survival is ridiculously close, with just nine points separating 23rd and 12th.
As the season closes, we could have an absolute thriller on our hands.
Unfortunately for Rotherham United fans, the Millers’ fate is practically sealed, barring a miraculous run of form – the club currently has 19 points and will need to produce more than that tally to have any chance of staying up; we’re talking title-challenger form in the remaining games.
Elsewhere,
a cluster of clubs, including Stoke City, are trying to escape relegation to EFL League One.
Prior to their 2-0 win over Middlesbrough over the weekend, reports circulated that a defeat could result in the sacking of manager Steven Schumacher.
The Potters are currently sat in 22nd place, occupying the final relegation spot.
Stoke’s defensive record, especially compared to their relegation rivals, is one of promise (48 goals conceded in 35 games).
In fact, their record is better than, or on par with, some clubs chasing the play-offs.
What lets them down more often than not is their attacking output
. They have scored just 33 goals—only Sheffield Wednesday and Rotherham have managed fewer.
What a time to be alive if you’re a supporter of a South Yorkshire club, eh?!
A key part of Steven
Schumacher’s tactics at Stoke City this season has been the tendency to press and be generally aggressive out of possession—the data supportsthis notion.
This scout report will provide a tactical analysis of Stoke’s pressing tactics,
identifying key strengths and weaknesses. It will also analyzetheir disappointing attacking performance this season.
Steven Schumacher Tactics – Midfield protecting the back line
Deploying tactics that demand a high intensity in several areas of the pitch requires a tactical balance in the sense that you can’t just have all of your players chasing aimlessly and endlessly – you need that positional protection in case the initial press is ineffective/the opponent reaches higher areas of the pitch.
The midfield unit plays an important role here. Understanding individual tasks and positions is critical to success, and one little slip-up can be costly.
Stoke City Defensive Territory Map
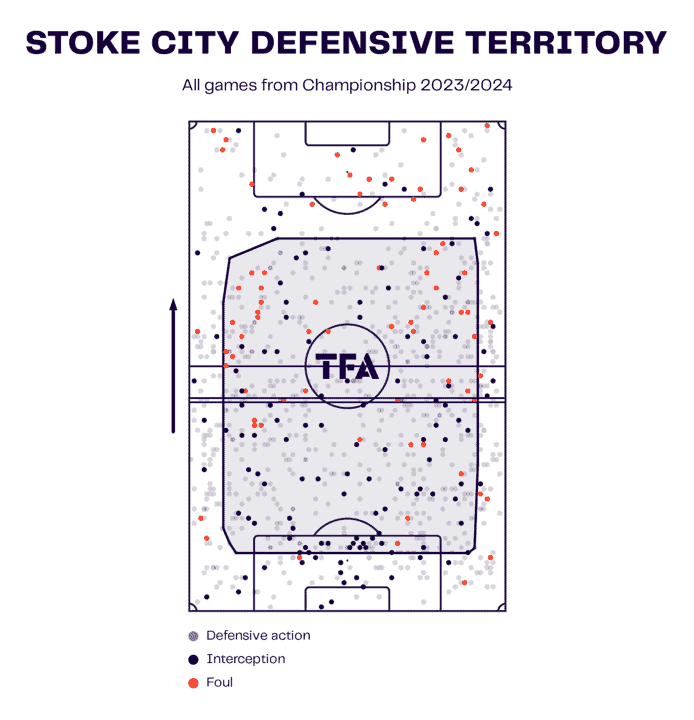
When we say Stoke are a high-pressing team, they are, but they also act with caution and structure, as we will see from the match examples soon.
The visual above gives us a good idea of how the Potters operate off the ball. They take a highly active approach in midfield areas.
Stoke makes 91.2 ball recoveries per 90, so unlocking the ability to be more potent in transitions could be critical to their survival bid.
As you can see, Stoke tends to commit many fouls in the opposition half, usually when they execute their unit press.
They average 11.14 fouls per 90, the seventh-highest rate in the Championship, an indication of their aggression off the ball.
Schumacher’s side does deserve some credit for their discipline in their own half, though, conceding a small number of fouls in and around the box.

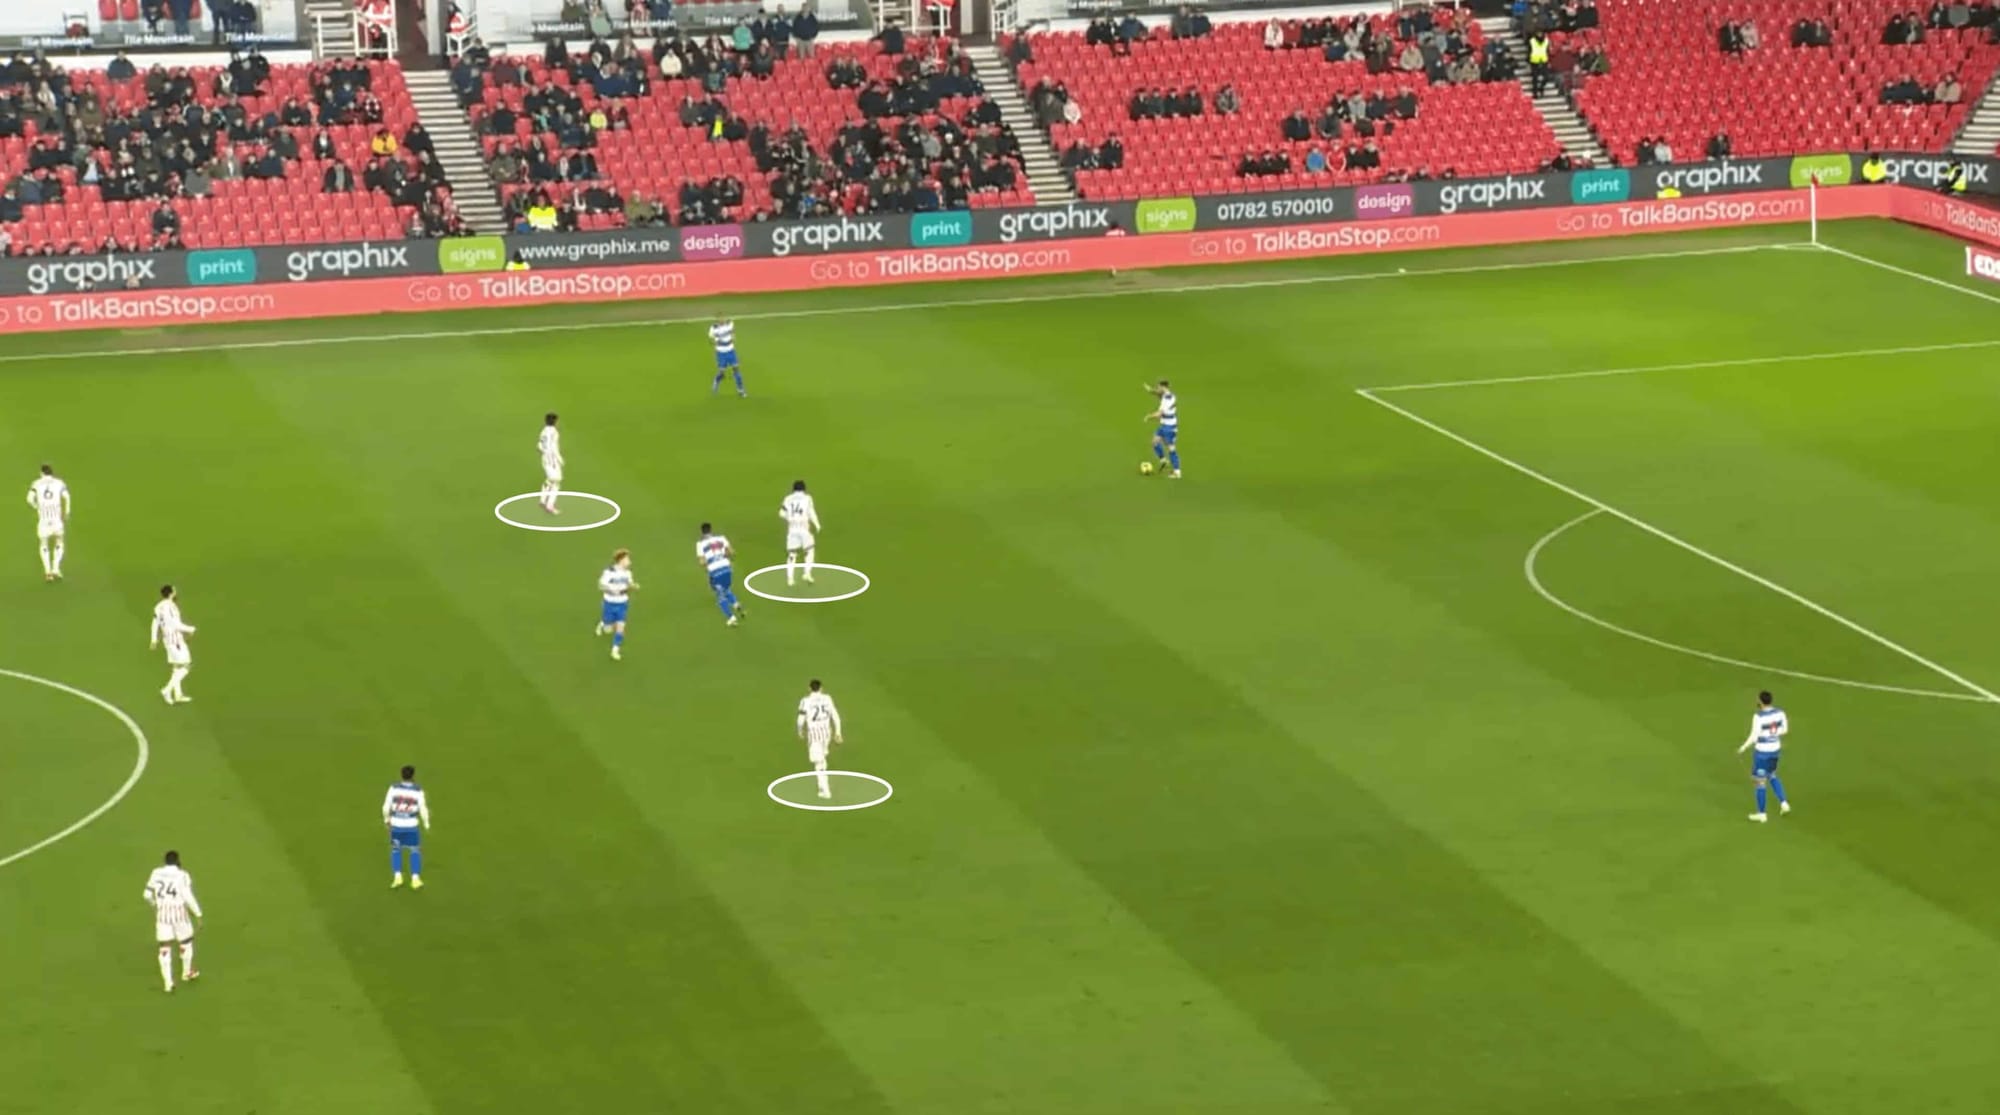
This image gives us some insight into the activity in central midfield when the opposition looks to build.
Now, it is worth mentioning that Stoke likes to switch between formations from time to time—while they use 4-2-3-1 more often than not, they’ve been known to use 4-3-3 or even 3-4-2-1 recently, with the latter in use in the above example.
As QPR look to build down the right flank, Stoke’s back five takes up a relatively high line in close proximity to two highlighted deeper midfielders, who are tasked with keeping danger out of that zone.
Stoke’s aim was to squeeze the opposition in wide areas to cause a possession turnover, which would provide the chance to execute a counterattack down the channels.
Stoke’s presence is well-spread, with good unit and individual positioning. Both the centre and close-by options are marked up, giving QPR very little to work with.
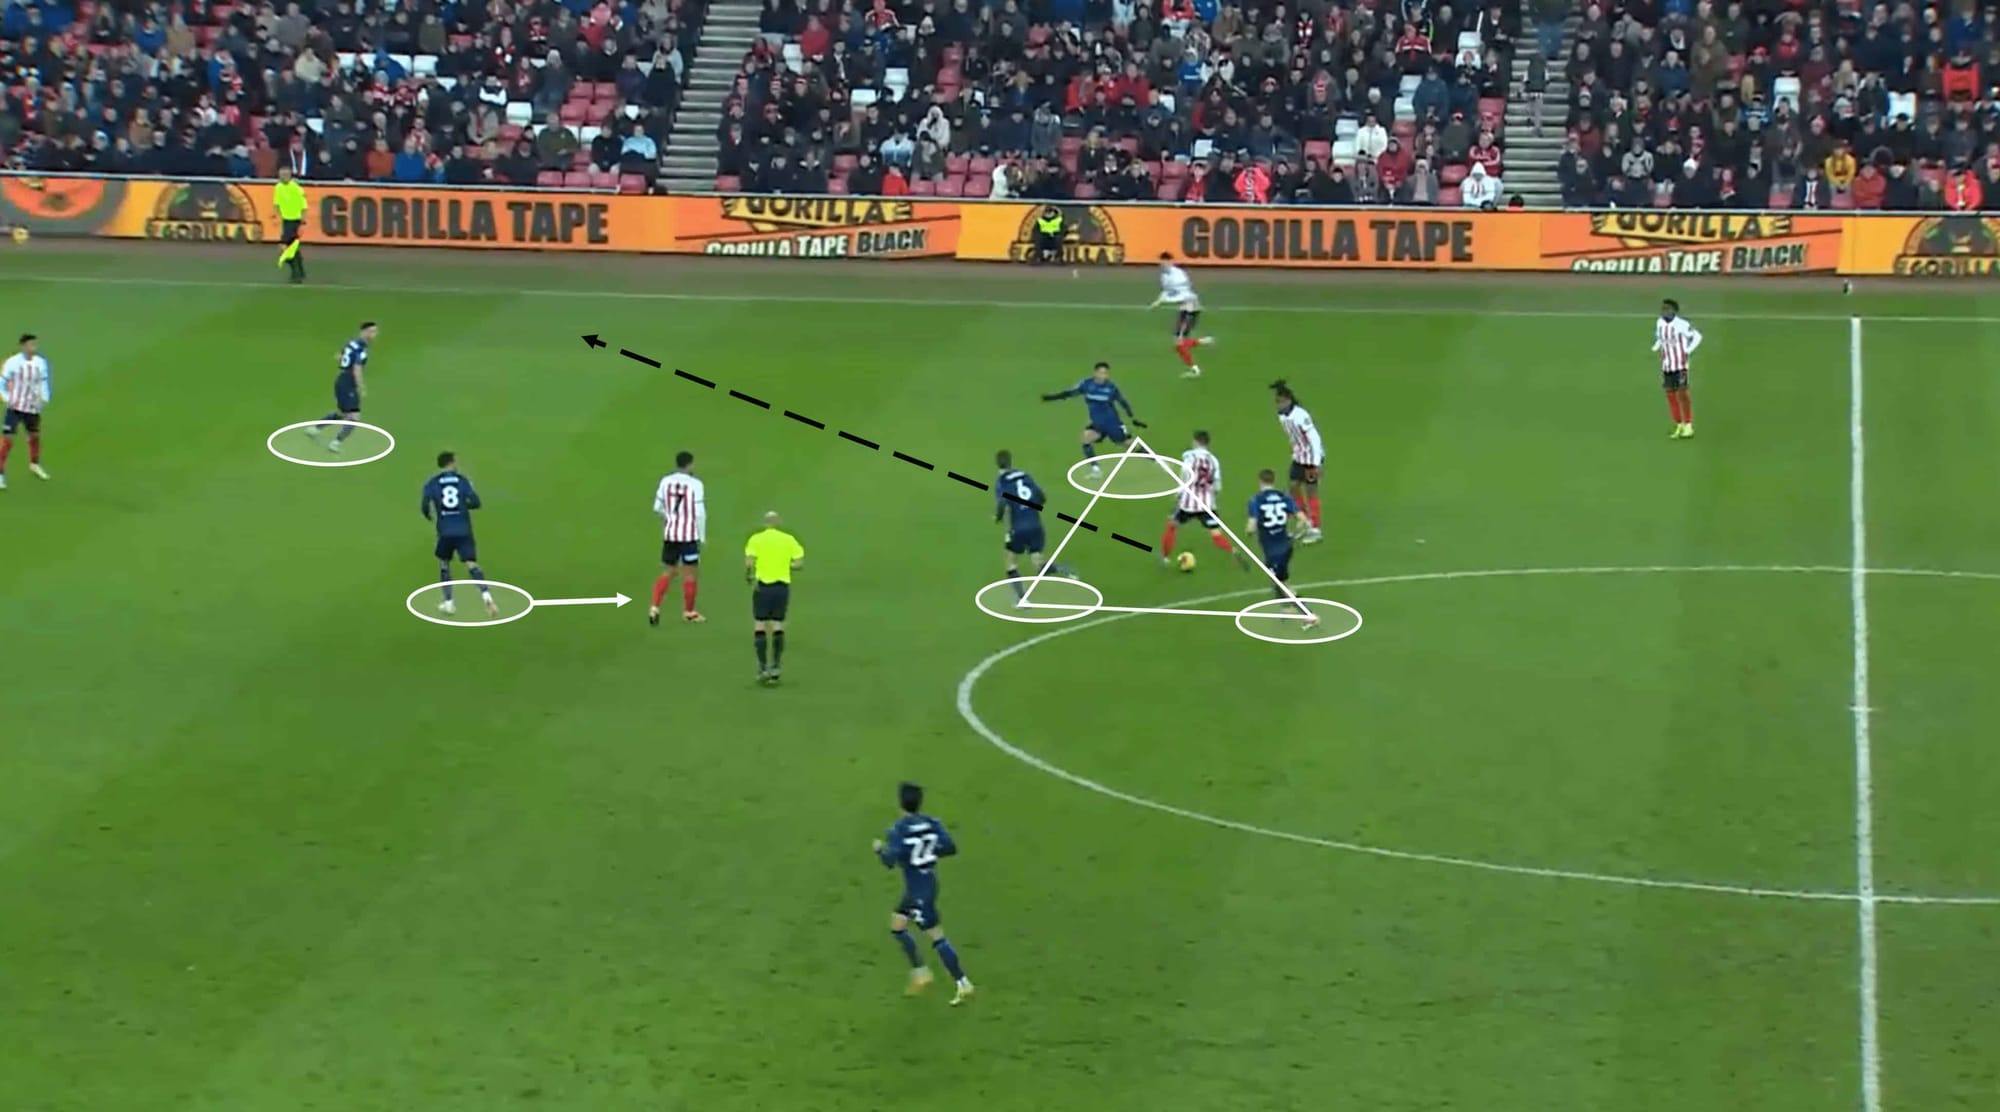
Focus, awareness, and a good tactical understanding are essential for the midfielders to be successful defensively, with timing and reactions also playing an important role.
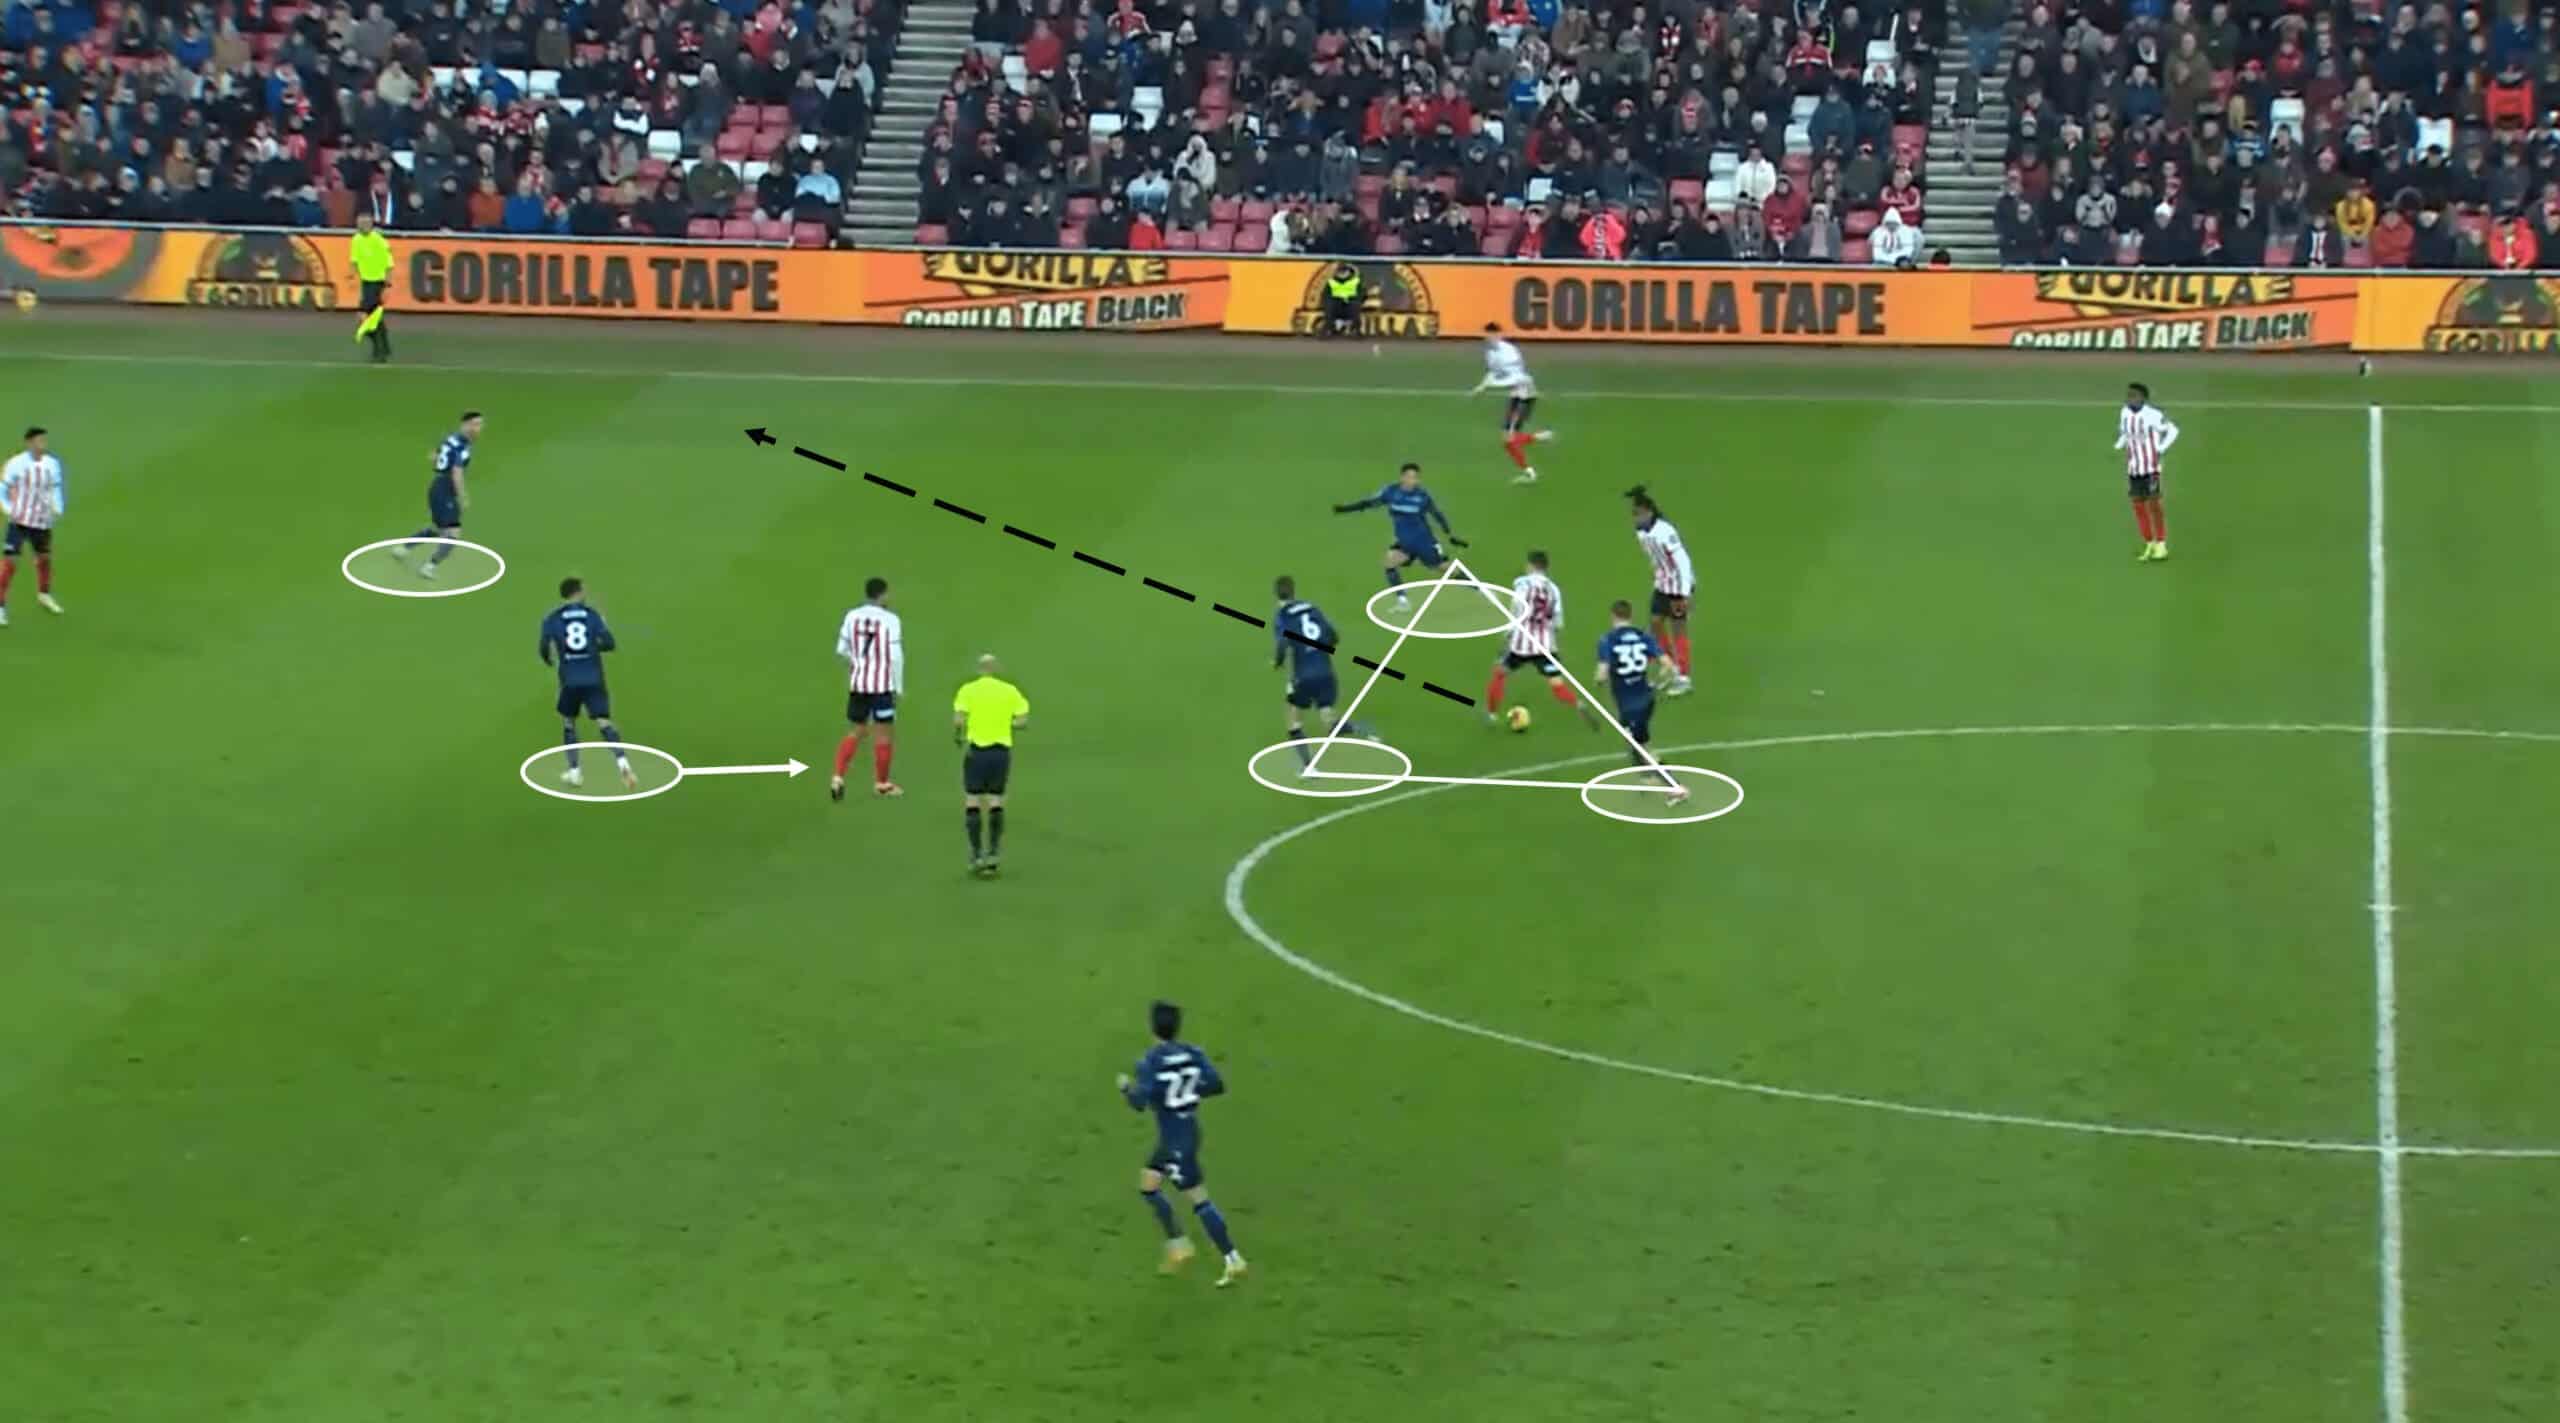
This example showcases both the strengths and weaknesses of Stoke’s defending in central midfield.
Beginning with the positives, the way the central three (highlighted in the triangle) look to flood the centre shows good tactical continuity.
With players approaching from all angles, their pressing rush the Sunderland man into a quick pass—a pass aimed at the arriving right-back.
But thanks to the earlier pressure and a momentary lack of technical quality on Sunderland’s end, the pass does not reach the RB.
Behind the higher three pressing the ball, which includes the CF, there is more of a defensive presence in that central area, with a potentially dangerous opposition passing option being marked well.
The weaknesses lie within the timing of the press on the ball.
While the CF displayed a good work rate and desire to return quickly when he realised the potential danger, the two midfielders with him could have reacted quicker in shutting the opponent down or marking him.
The pass from the Sunderland man had every possibility of reaching its target.
Still, a stronger defensive display in this moment from the Sunderland midfield would have made it impossible altogether.
Steven Schumacher high press
The stats indicate a high-energy and high-intensity approach from Stoke off the ball.
They are looking to be proactive in their approach as they like to press high and time their engagement right.
As we mentioned previously, their defensive record is currently in a very respectable state, suggesting that their off-the-ball tactics are working from a defensive perspective.
Stoke City High Regains Map

Steven Schumacher has the Championship’s seventh-youngest squad, with an average age of 25.1 years.
It’s possible that this injection of youth plays a vital role in Stoke’s energetic and aggressive tactics.
We touched upon the data acting as evidence around Stoke’s pressing tactics – their PPDA of 9.22 is the lowest in the league, meaning they engage the ball and close it down quicker/more often than any other team.
Their challenge intensity rate currently
stands at 6.1, which is the second-highest in the division—further proof that they like to get to the ball as quickly as possible.
The visual above gives you additional context about the whereabouts of Stoke’s pressing work.
When we say that Stoke looks to time their press and act with structure, this image nicely captures that.
The highlighted three for Stoke become narrow, again blocking off the opponent’s possibility of playing through the middle, and their midfield teammates step up to add to the pressure and further limit the opponent’s passing options in those areas.
If they play a different formation, this compact and initially reserved shape transfers over.
Aiming to strike at the right time, Stoke uses their opponent’s next move to influence their press. If the ball goes out to the left back, the left winger presses the ball, with the CF dropping in to cover his teammate’s original position.
If that first pass goes across the backline or back to the keeper, the opponent is met with a similar level of aggression and clever positioning from the midfield.

This image is similar to the last but provides a more detailed breakdown of how Stoke likes to continue pushing as long as the opponent has the ball in their own defensive third, with individual roles becoming more prominent.
Stoke likes to commit their CF as the primary presser in many situations, with the midfield unit providing backup.
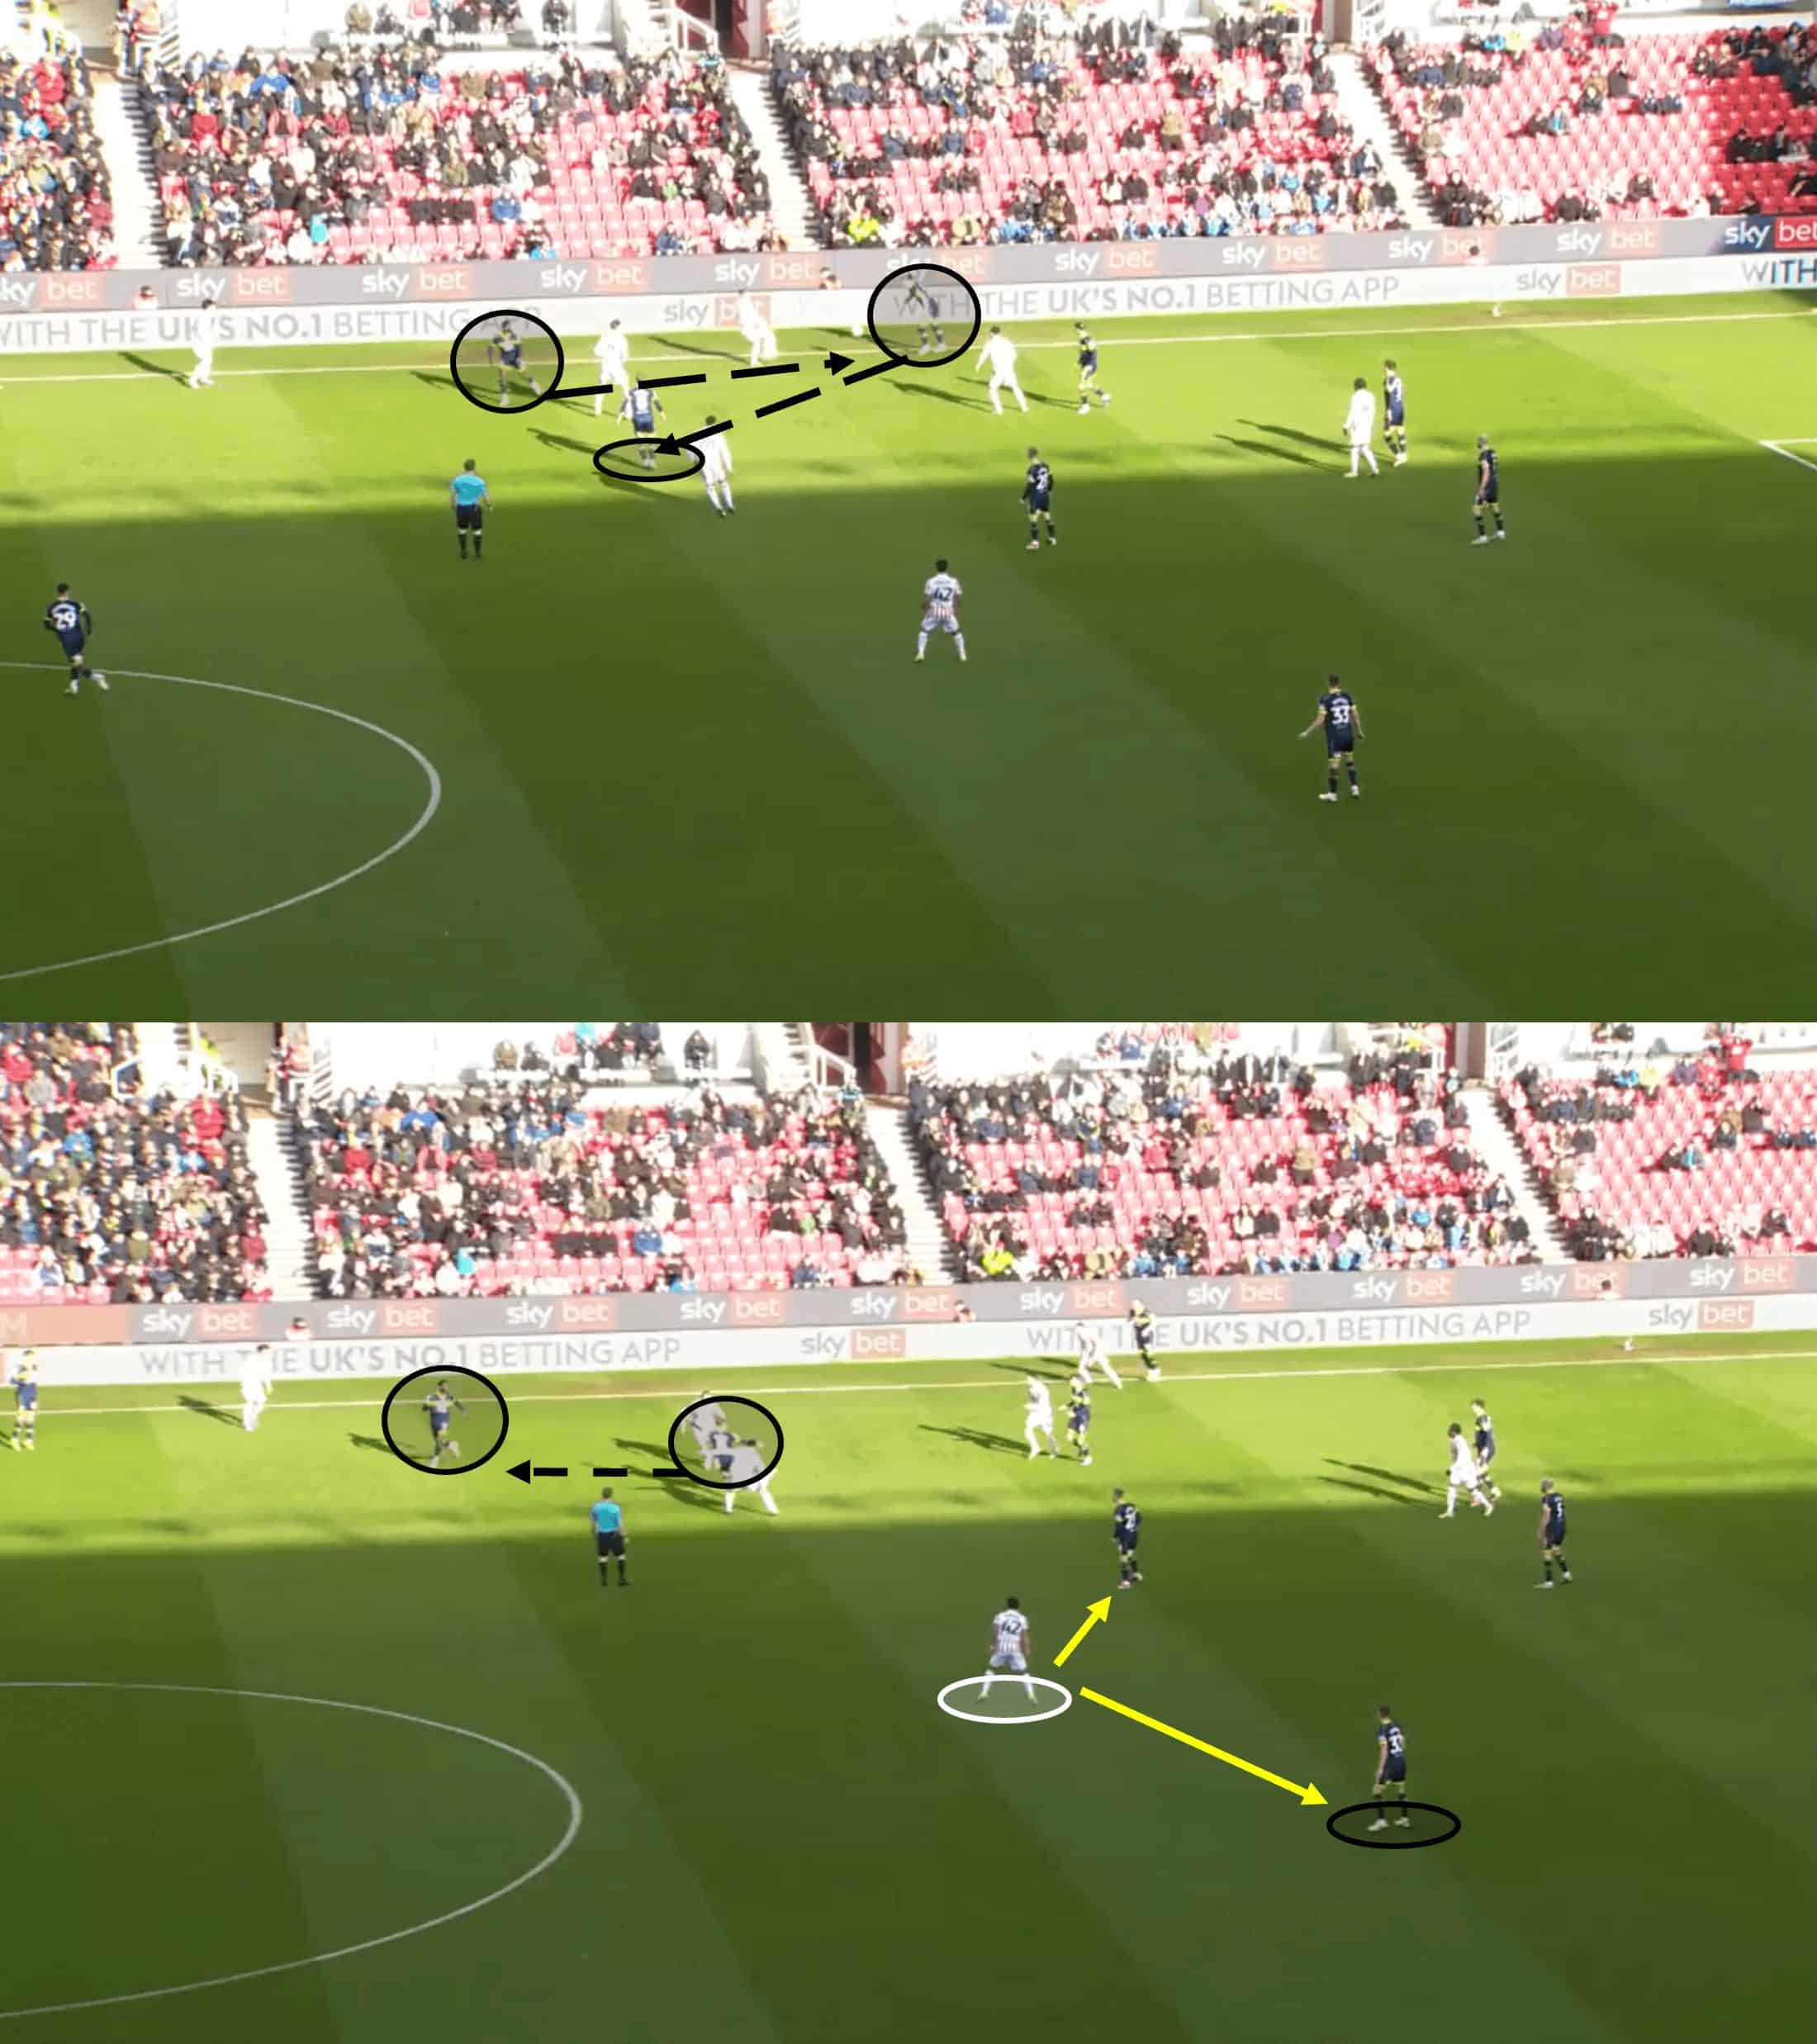
As any team who likes to utilise a high-intensity approach knows, these tactics come with their own risk.
One small fault or missed detail can prove costly, and Stoke are no exception.
Another late reaction to mark the opposition player who receives the ball just infield, followed by a failure to mark the next recipient, and all of a sudden, Stoke’s midfield has been bypassed.
When you play a high press, if it is not done right, you can be hurt that quickly.
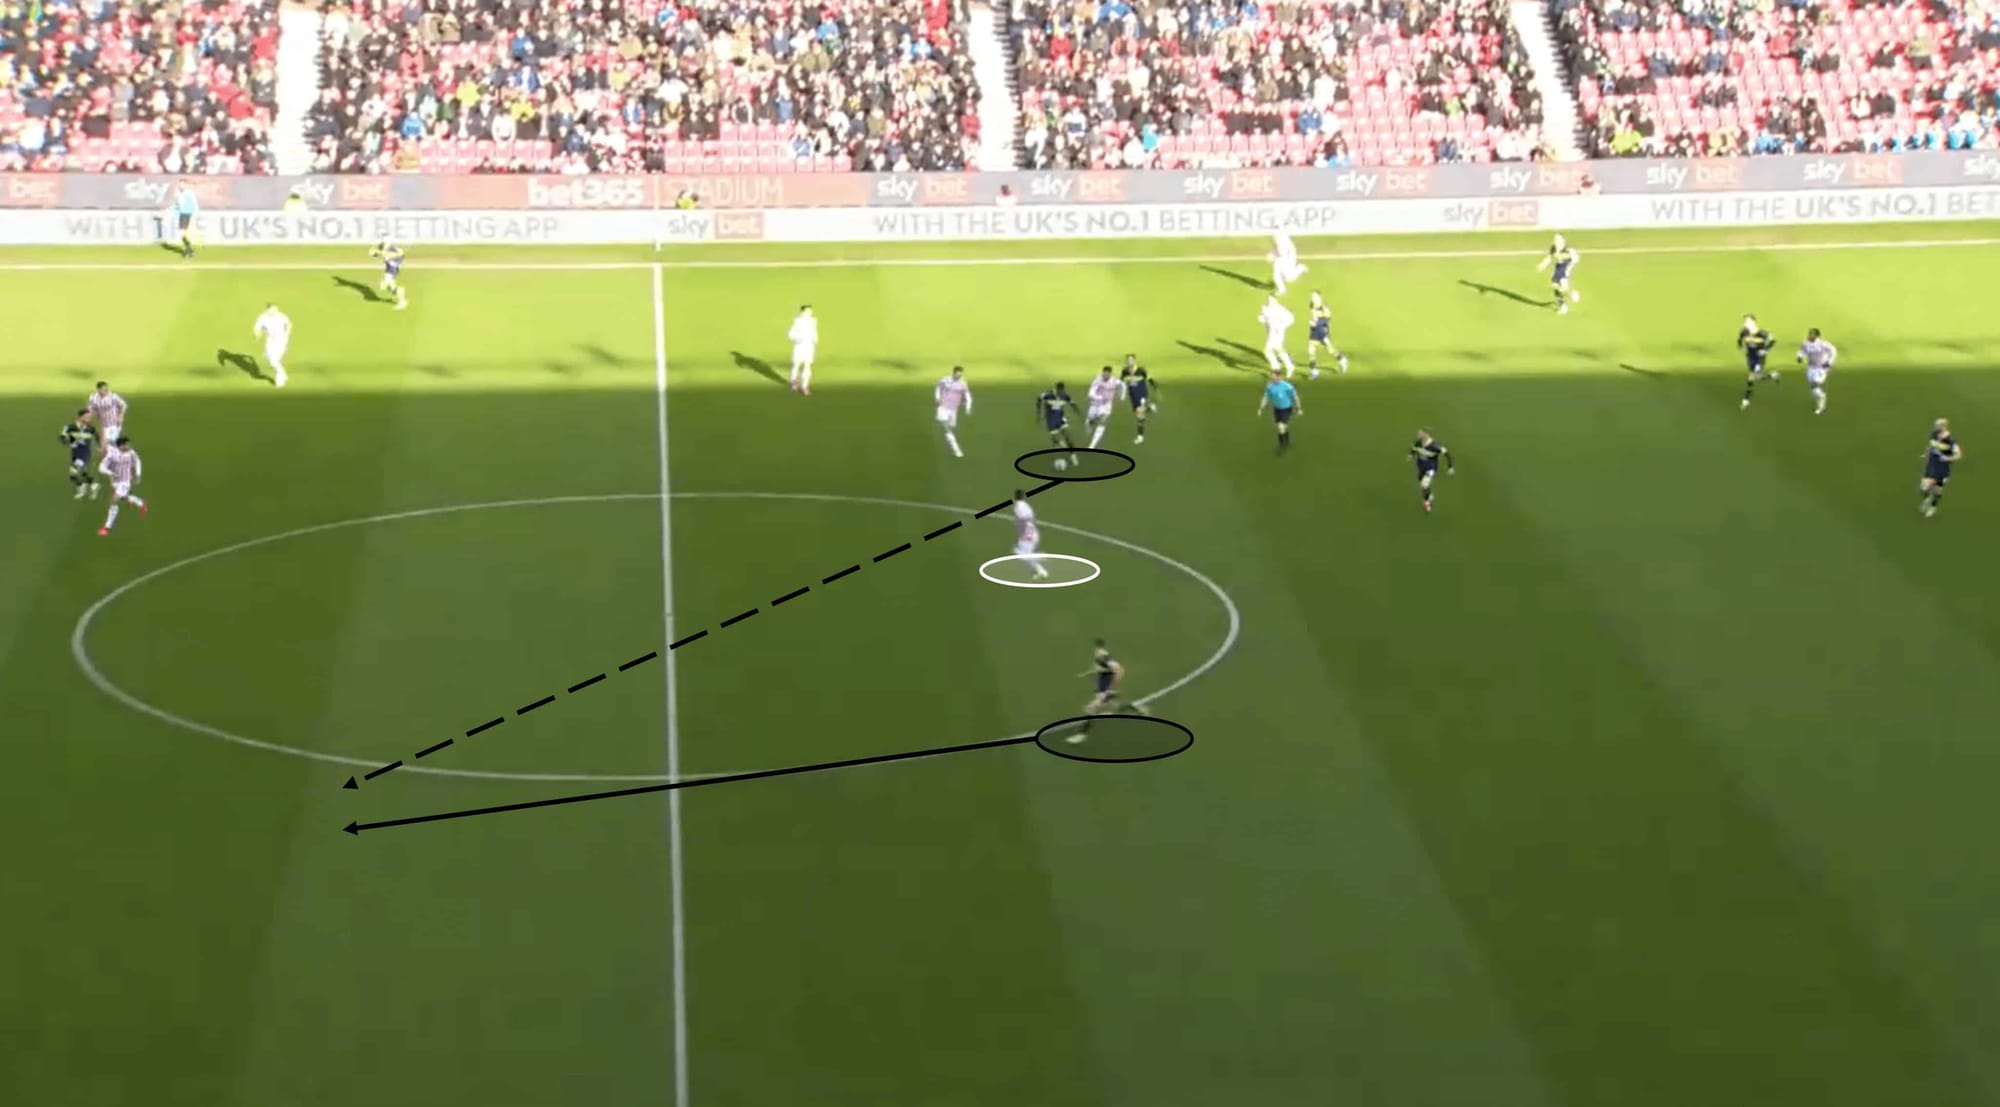
With the backline initially compact and high up, there are bound to be spaces to exploit once that initial press has been conquered, and Stoke found themselves scrambling in this particular case.
Admiral work was done by the opponent to dribble free of pressure from a Potters shirt before finding the right pass for his teammate into space in the open left channel, but again, it comes down to Stoke’s lack of attention in key moments.
This isn’t a regular occurrence for Stoke, but when you’re in the midst of a chaotic relegation battle, these things certainly matter.
Failing to capitalise in attack
Stoke City’s attacking record is the most significant contributor to their current league positioning, but why have they struggled?
A mixture of factors come into play, from a lack of options after a long ball forward to individual expensive mistakes.
Their in-possession work has some positive aspects, but their overall attacking game is not very good right now.
Flashes of quality have been present in Stoke’s attacking play, particularly in recent weeks, but consistency and overall end product are still lacking.
As we try to break it down on an individual level, we start by looking at some key metrics for their full-backs and wing-backs.
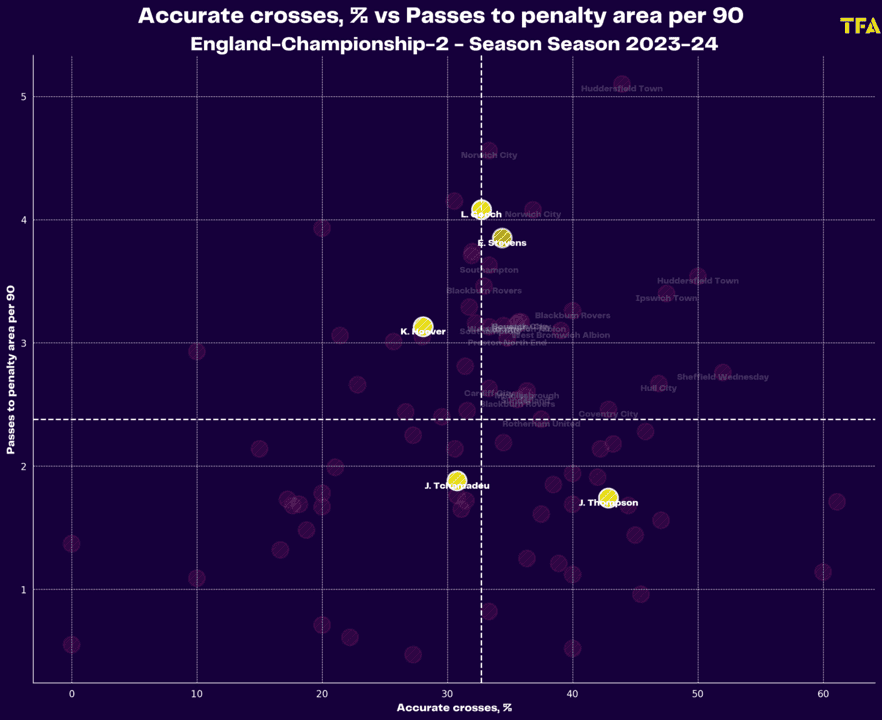
The graph above shows us how they perform in terms of cross accuracy and passes into the box per 90 in comparison to other FB/WBs in the Championship.
As we see, they have a couple of individuals with a strong average for passes into the final third, but the
cross-accuracy is nothing ground-breaking—apart from Jordan Thompson, who offers a strong accuracy rate of 45.2%—his attempt average is only 2.25, though.
So, what do we take away from this graph?
In a nutshell, Stoke is struggling to consistently incorporate its full-backs into build-up play and dangerous attacks, apart from Lynden Gooch and Enda Stevens, who both offer high attempt rates for passes into the box.
An overall lack of consistency, but not precisely enough to pin a large share of the blame on.
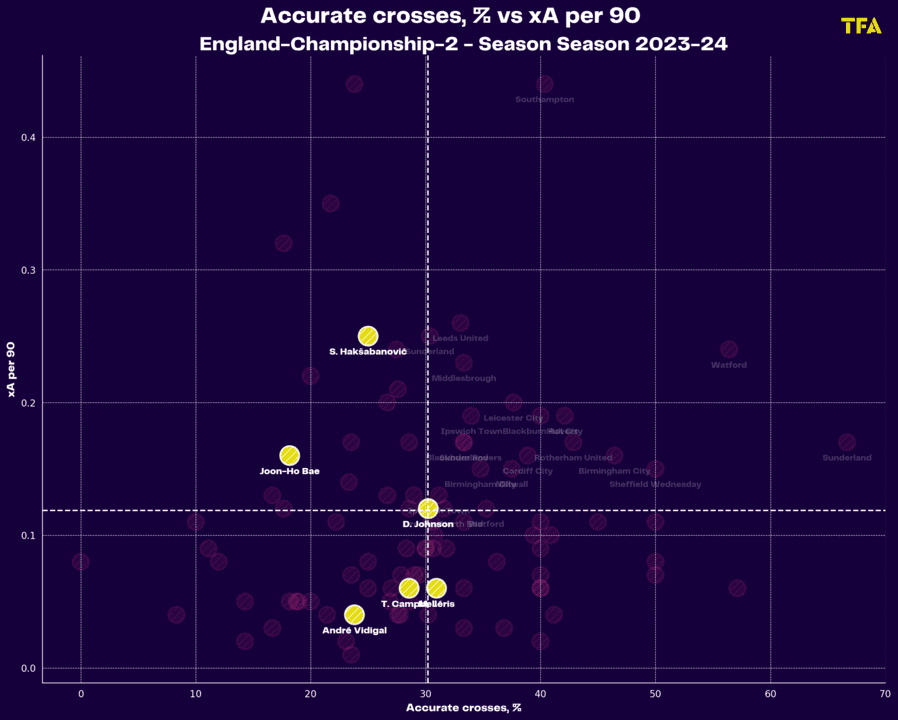
We continue the data analysis by examining the crossing accuracy and xA rates of Stoke’s wingers and attacking midfielders.
Interestingly, for how direct they can be, most of their wingers/AMFs struggle to be effective crossers consistently, and the two with the highest xA of the select positions both have a less-than-desirable cross-accuracy rate.
Joon-Ho Bae and Sead Hakšabanović both demonstrate good technical quality in flashes, with the latter having one of the best xA per 90 records of all wingers/AMFs in the Championship.

Keeping the scope on midfield influence in build-up play, while they can produce small moments of quality in those early phases, or in transitions, there is often disappointment in the form of poor decision-making or poor pass execution into the CF – the image above shows the first of the two.
With the ball in a promising wide position, there is a clear opportunity to play inside, with that player then having the opportunity to either drive toward the box or create a 3v2 overload on that right flank.
However, that pass was never made, and instead, the initial Stoke man looks to complete a 1v1 duel tight to the touchline and only gets so far before being halted.
Decisions in these phases of play, no matter how big or small, can have a huge impact on attacking opportunities.
We’ve looked at the chance creation data for the full-backs and the wingers, and while there was little to shout about, the overall performance was average.
What seems to be a bigger problem for Stoke in terms of getting the ball forward is how they build from the back.
46.62 long passes per 90 is the fourth-highest average in the Championship, so clearly, they want to be a direct team.
Their central defenders appear to lack the technical quality, so that could be a factor behind those tactics.
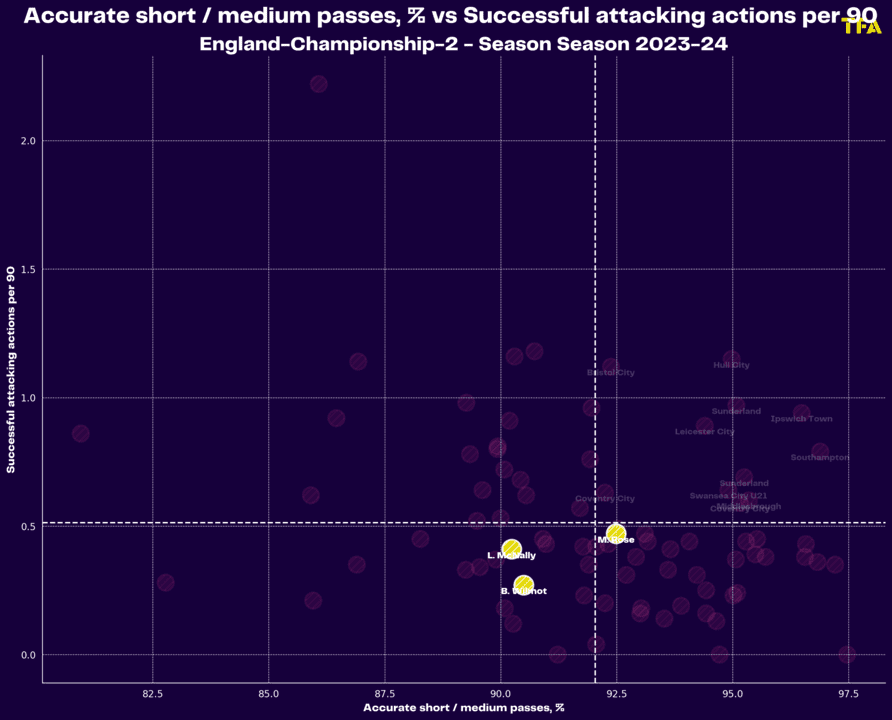
Regardless, there are times when the CBs cannot simply go long and have to attempt a pass into a midfield or a short/medium pass into the frontline, but, as we can see from the graph above, they don’t find success often enough.
This applies to accuracy with short/medium passes and overall attacking actions, meaning they are giving the ball away far too often.
Possession loss is something all too familiar to Stoke this season – 104.66 ball losses per 90 is the division’s second-worst rate and tells you a lot about Stoke’s attacking problems.
Of all the data we’ve included here, this certainly wouldn’t be Schumacher’s favourite record.
Obviously, the CBs are not the only ones responsible for such consistent possession loss, but there are far too many occasions when they lose the ball when they simply should not struggle.
Whether it’s technical quality, low confidence, or a combination of the two, it’s certainly hurting Schumacher’s attacking prospects.
Conclusion
The results of Stoke City under Steven Schumacher style of play are quite the mixed bag right now.
This is a highly aggressive team that shows some good defensive unit work, with a strong defensive record to prove it.
Simultaneously, a direct team that struggles to find consistent form in the final third, who, despite a high rate of ball recoveries thanks to their off-the-ball aggression, struggle to fully capitalise in attacking transitions on a consistent basis.
Figuring out small tweaks and finding another gear in attack will make or break Stoke’s survival bid.
They will need to continue their positive defensive work, but their off-the-ball work is not without its areas for concern.
Still, they have far more significant problems in the attacking department.



Comments