“It’s one of the more difficult to score from, but we see it as a set-play situation we can set up and control as much as possible.”
That was Thomas Frank’s press conference message regarding kick-offs after a 3-1 defeat to Tottenham.
That defeat marked back-to-back EPL matches with a first-minute goal.
They would go on to do it a third time against West Ham the following week, then follow that up with a second-minute goal against Wolves.
Speaking to Vavel, Frank said, “First and foremost, it is not a coincidence. It’s not like we just roll it back and kick it forward; we maybe roll it back and maybe kick it forward, or maybe we do something, but there are clear roles for everyone involved. The way we capitalised in the end is fantastic but also a bit of margin going our way.”
There’s more than luck in these Brentford kick-offs.
Ultimately, there’s a set-piece design that facilitates early chances on goal.
In this tactical theory piece, we’ll look at the concepts underlying Brentford’s successful kick-offs under Thomas Frank’s coaching style.
Rather than
examining the routines one at a time, our tactical analysis examinesthe principles of kick-offs through their stages.
First, this analysis will look at different ways to organise the team from the onset, then move to progression through a forward pass into target areas.
Progression is the middle ground before the final pass that attacks the box.
Assessing the set pieces in stages will give an idea of the possibilities and different objectives as kick-offs are diagramed on the tactics board.
Organising The Kick-Off
The organisation of the kick-offs is the critical starting ground.
As Frank said, each player has a particular role to play.
Their starting position plays a critical factor in each player’s ability to fulfil their duties.
Even from the starting positions, we can see different setups and intentions under Thomas Frank’s style of play.
Two of the first questions to address are “What is the desired target area?” and “Does it benefit the team to take a symmetric or asymmetric physical approach?”
In the images below, a red-shaded area indicates the targeted zone.
That helps us relate the starting positions of the players to their end goal.
Looking at this Brentford kick-off against West Ham, pairs flank the kick-off circle with two additional players on either side approximately 5 m off the midfield line.
At the back, Brentford keeps three.
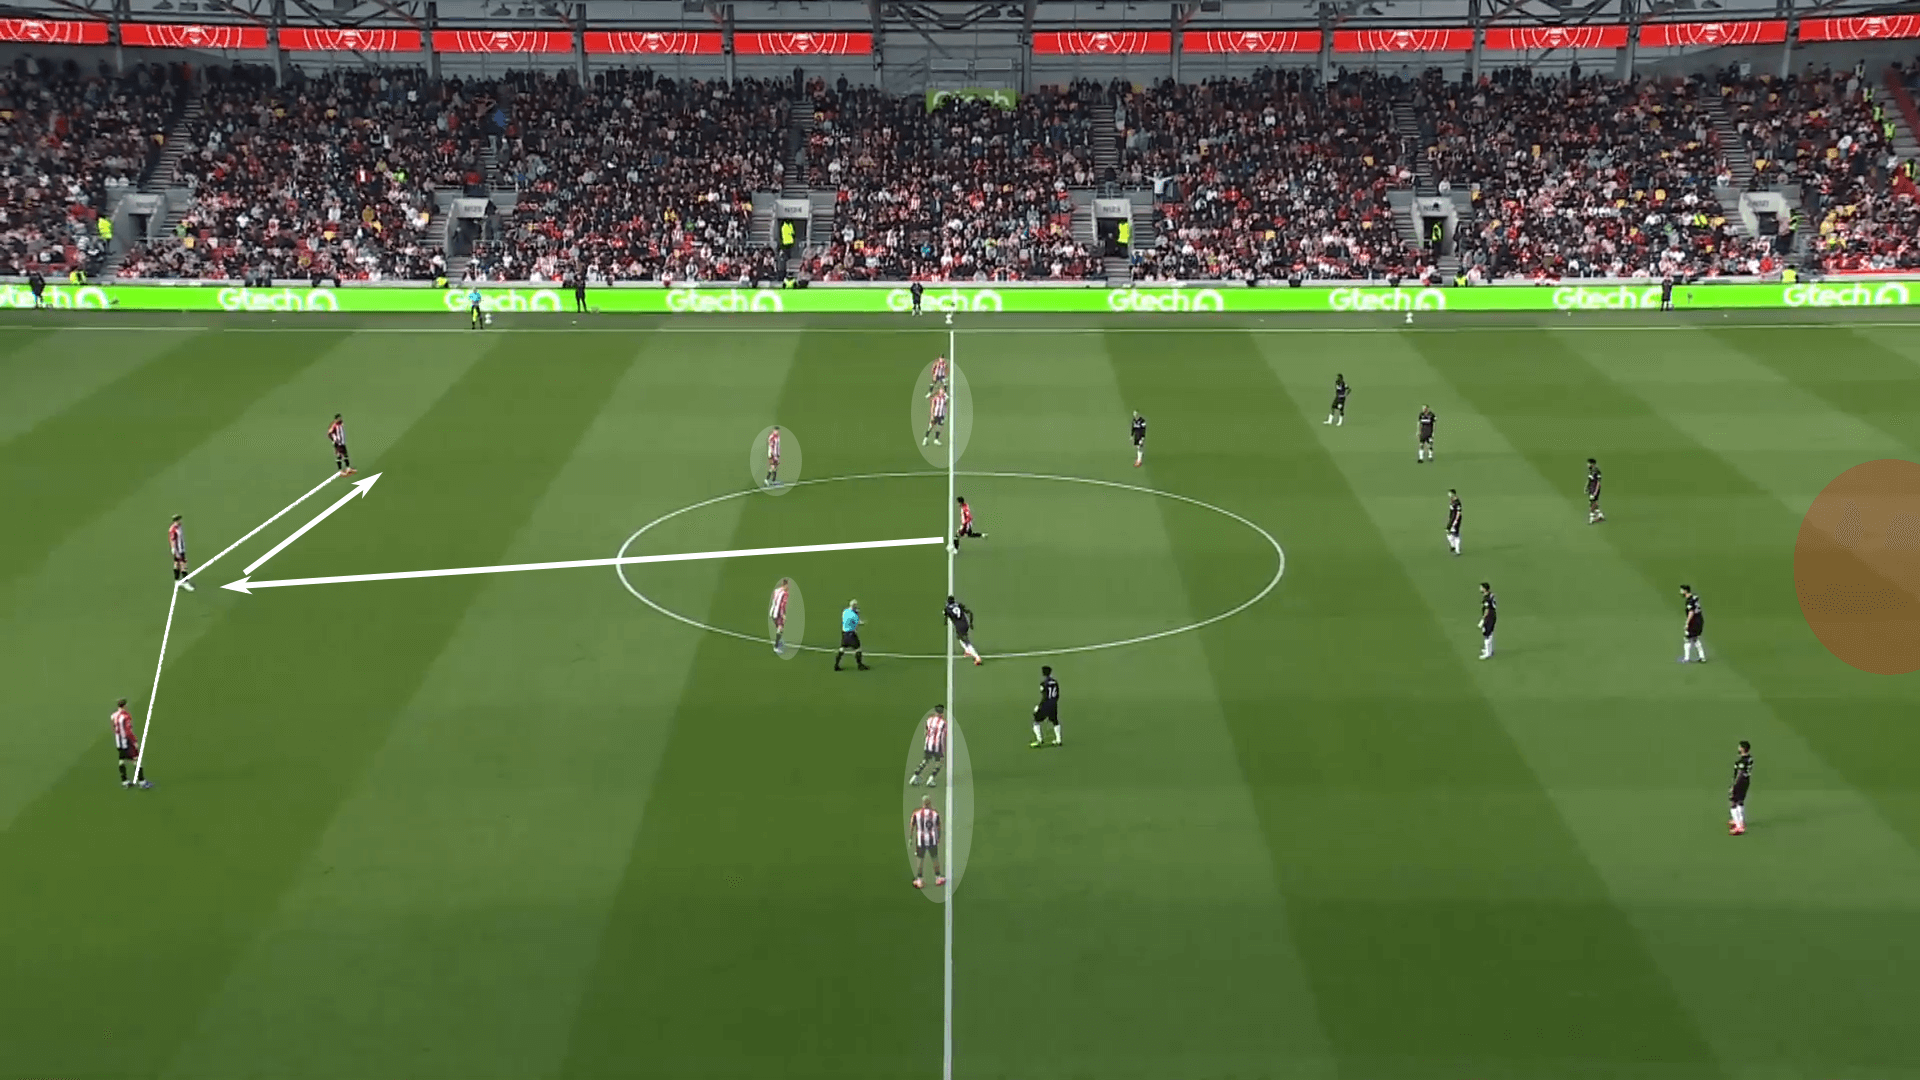
In response, West Ham is forced to cover more ground.
While the first two lines are vertically compact, they have to prepare for Brentford to play across the full width of the pitch.
Given that Brentford is targeting the central channel, West Ham is at least prepared to move numbers into the target area to contest for the first and second balls.
Against Tottenham, Brentford took a different approach.
Offset to the right, the away side prepared to play into Kristoffer Ajer, the 1.98 m Norwegian, in the right half-space.
This asymmetric approach is designed to play into the target and create a net around him to win the second ball.
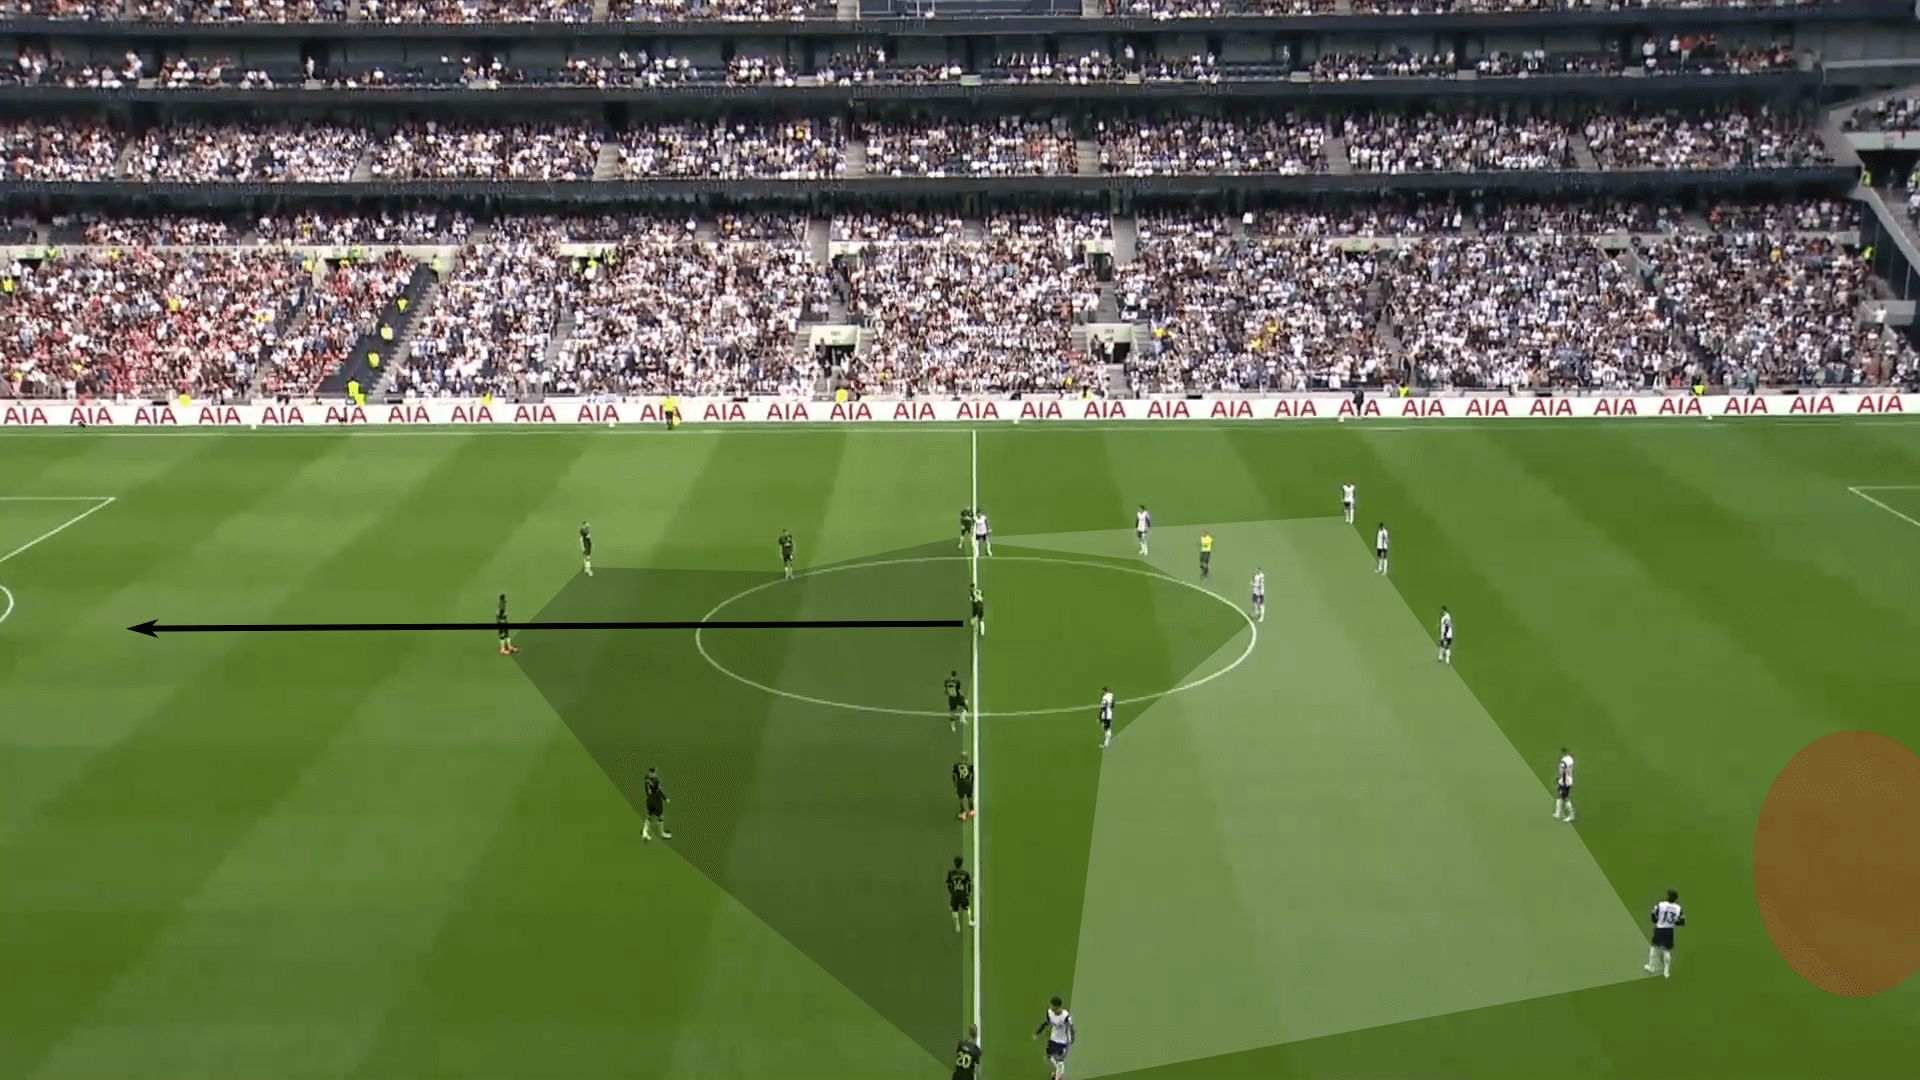
Interestingly, Spurs do not initially overcompensate with numbers to their left.
This is more a battle of an asymmetric attack against a more symmetric defensive setup.
While they have enough players to cover the target and second-ball options, remaining defensive help must come from more central positions.
From Brentford’s perspective, this increases their chance of claiming the first and second ball.
Against Manchester City, we saw a confrontation between two asymmetric sides.
Each team was prepared to commit numbers to the target area to fight for the first and second ball.
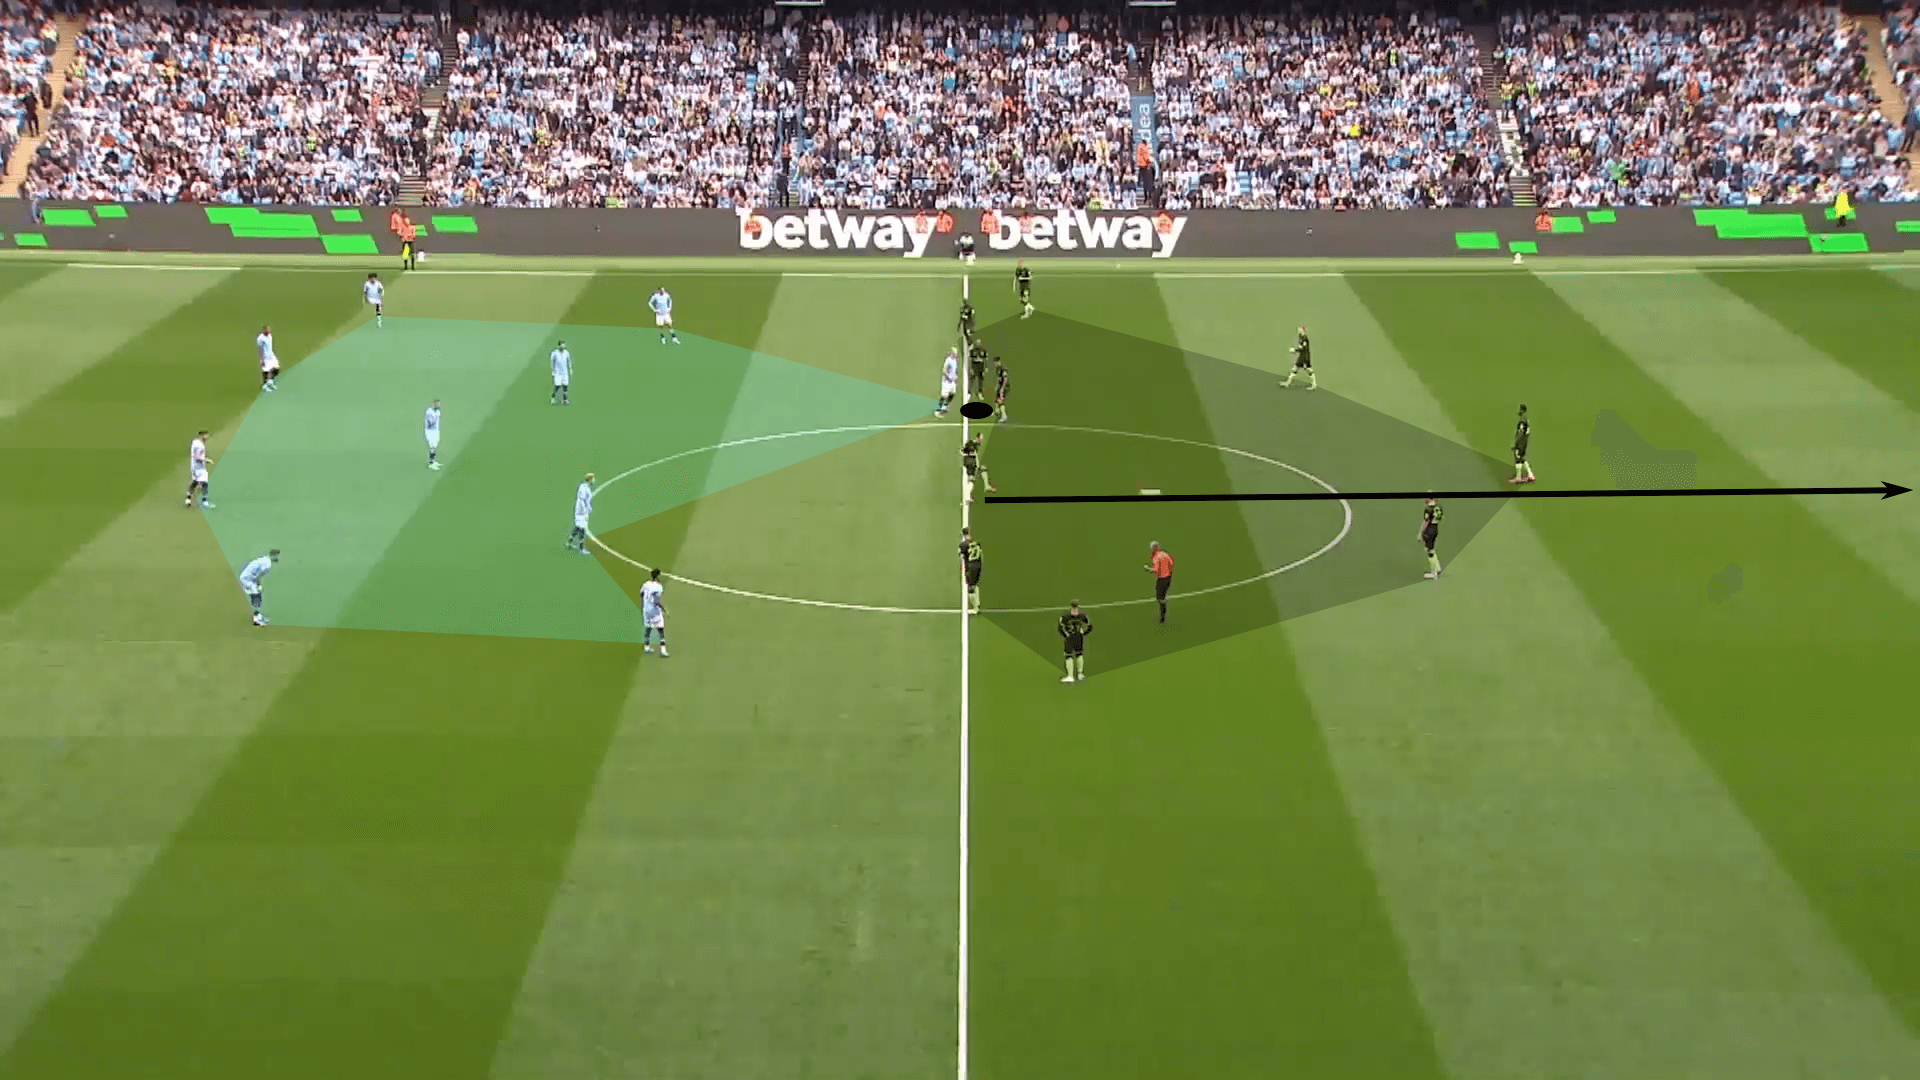
While this does complicate Brentford’s ability to win the first and second ball, one advantage for the attacking side is the sheer chaos created by so many numbers in such a tight space.
With both teams collapsing on the ball, the second attackers have very little reaction time to deal with it, and Manchester City has little available to play out of Brentford’s pressure.
Frank mentioned that set pieces from kick-offs require some luck.
Under Thomas Frank’s tactics, building in chaos is a way to create an environment for that lucky bounce or two.
Finally, there’s the vital role of the blockers.
Notice that in each of these kick-offs, the first pass is played a minimum of 20 m.
In most cases, Brentford will play to the goalkeeper.
Last season, Vincent Kompany’s Burnley scored one of the quickest goals in EPL history by playing deep to the goalkeeper.
As the ball is played back, notice the starting positions of the Burnley players.
Four on the left give a clear target, one on the right forces the opponent to respond with some degree of balance, and four central players who are not on the ball have obvious blocking responsibilities.
The two shaded players highlight the critical first steps in a clean service.
The two players just outside of the midfield circle must run with the opposition to prevent them from sprinting forward.
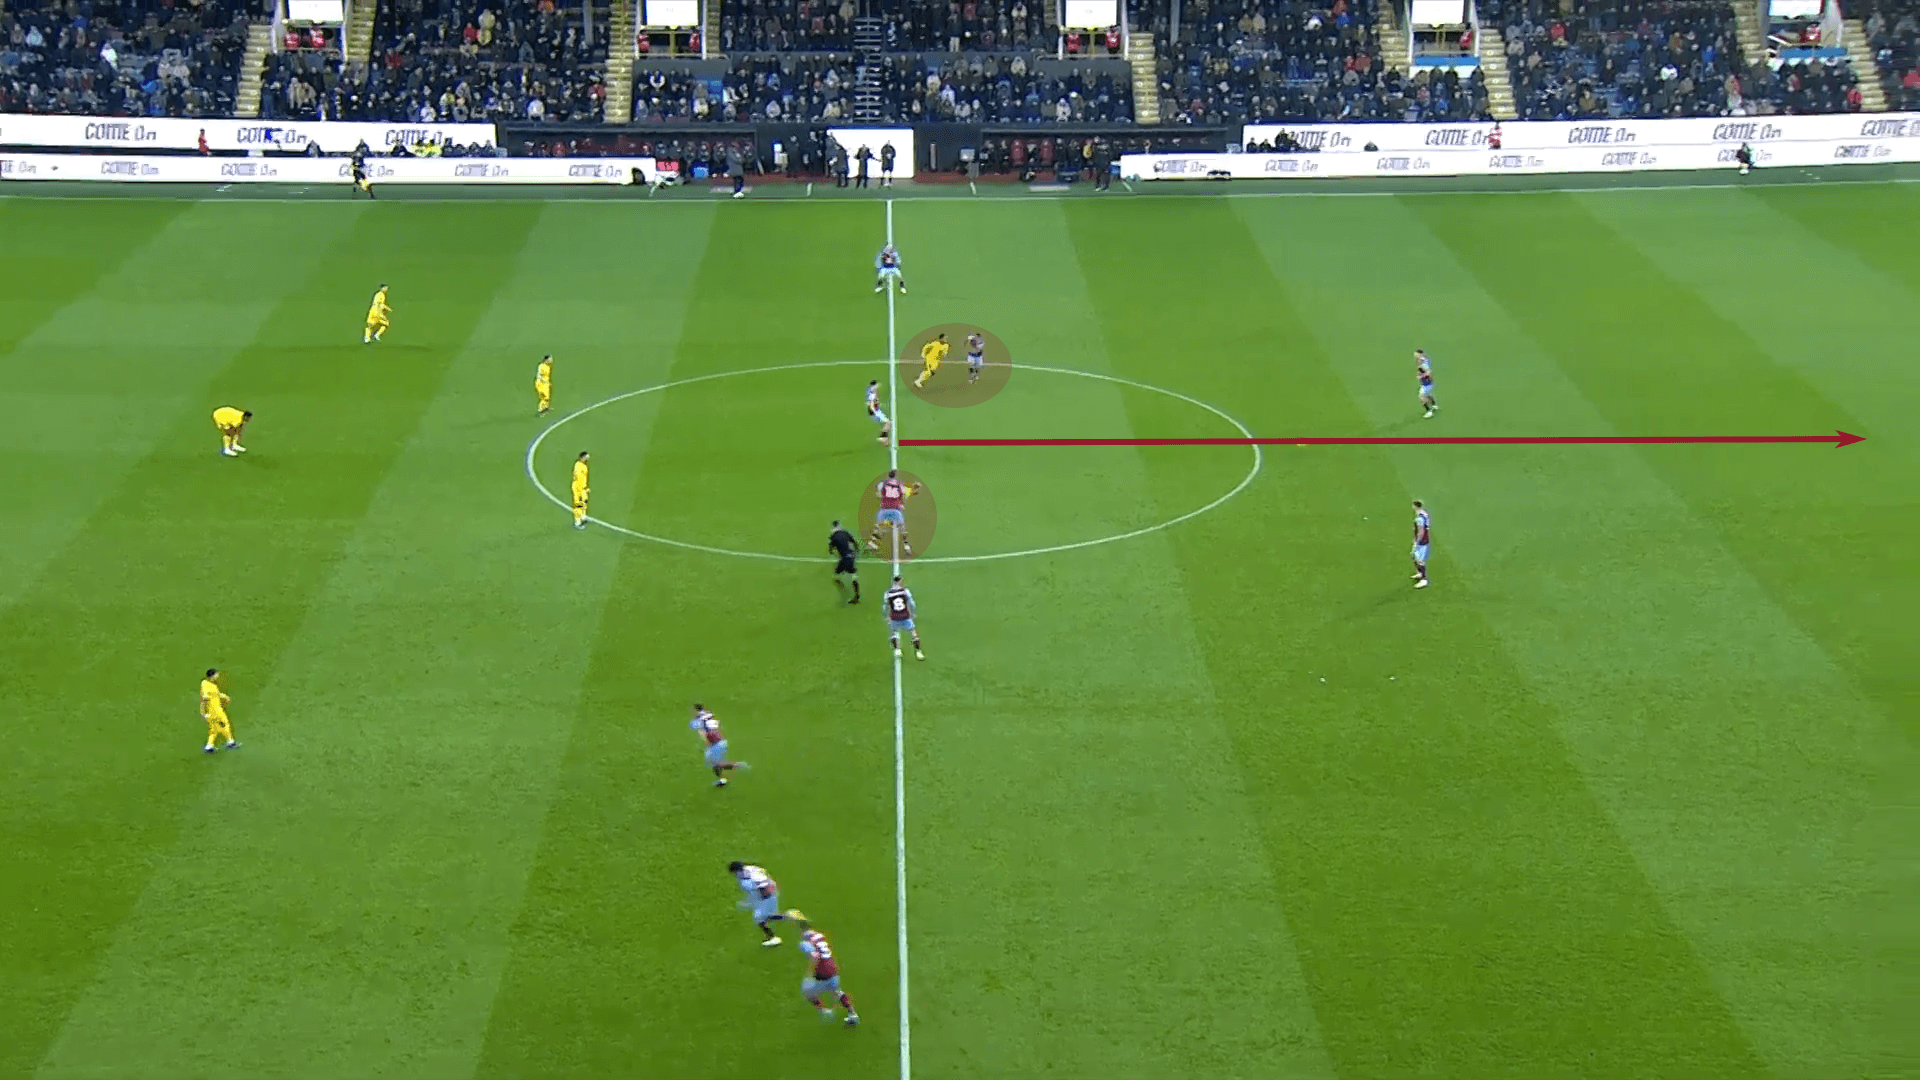
If those two get beat, there are two additional players in support to slow down the oncoming defenders.
The goal of those interior players is to block the path to the ball, which creates more time for the server.
Everyone has a role in this set-piece and must connect to their starting positions and responsibilities within the team setup.
Playing Off The Target & Creating A Net
With the kick-off organisation in place, let’s move to the next piece of the equation: the service into the target player and how his teammates support him.
With the long pass forward, it’s important to note that there is more to it than just fighting for the first and second ball as a means of getting into the final third.
After all, just getting to the final third isn’t the objective.
The desired end is to create a goalscoring opportunity.
Securing possession in the opposition’s defensive third is just the second step in the process.
Once the ball is played forward, the kick-off team must first claim it and then have a path to play forward.
Sticking with the Burnley goal against Sheffield United, see the space afforded to the goalkeeper, James Trafford, and the clear target area.
As Trafford serves the ball, the team moves in position to support the target player and claim the second ball.
Their spacing is as critical as Jay Rodriguez’s; the target man needs to win the first ball.
He needs to keep the second ball within that shaded area to give his teammates a chance to claim it.
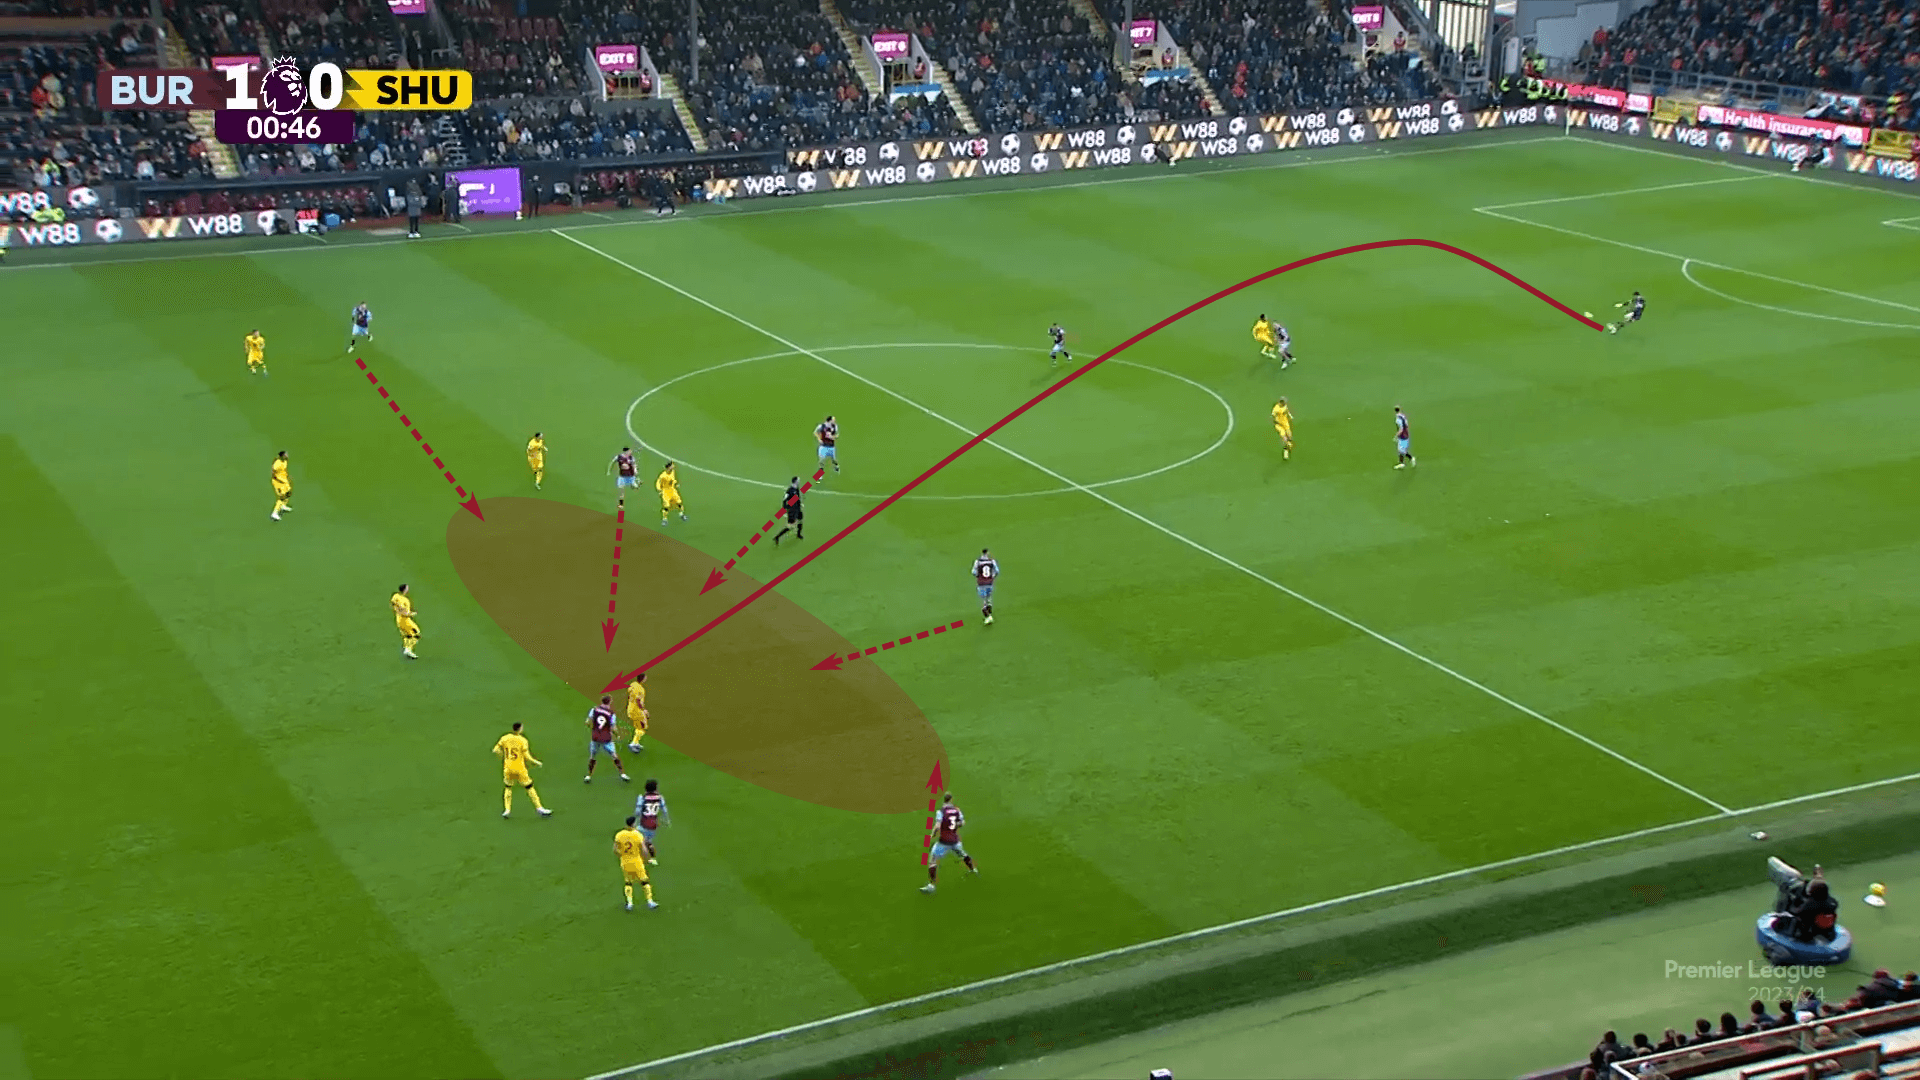
Once the ball is won, there’s a bit of fortune here as the first attacker, Zeki Amdouni, gets a couple of favourable bounces and beats two defenders on the dribble before playing wide.
That shaded area represents the net created by the Burnley players, increasing their odds of winning the second ball and retaining possession.
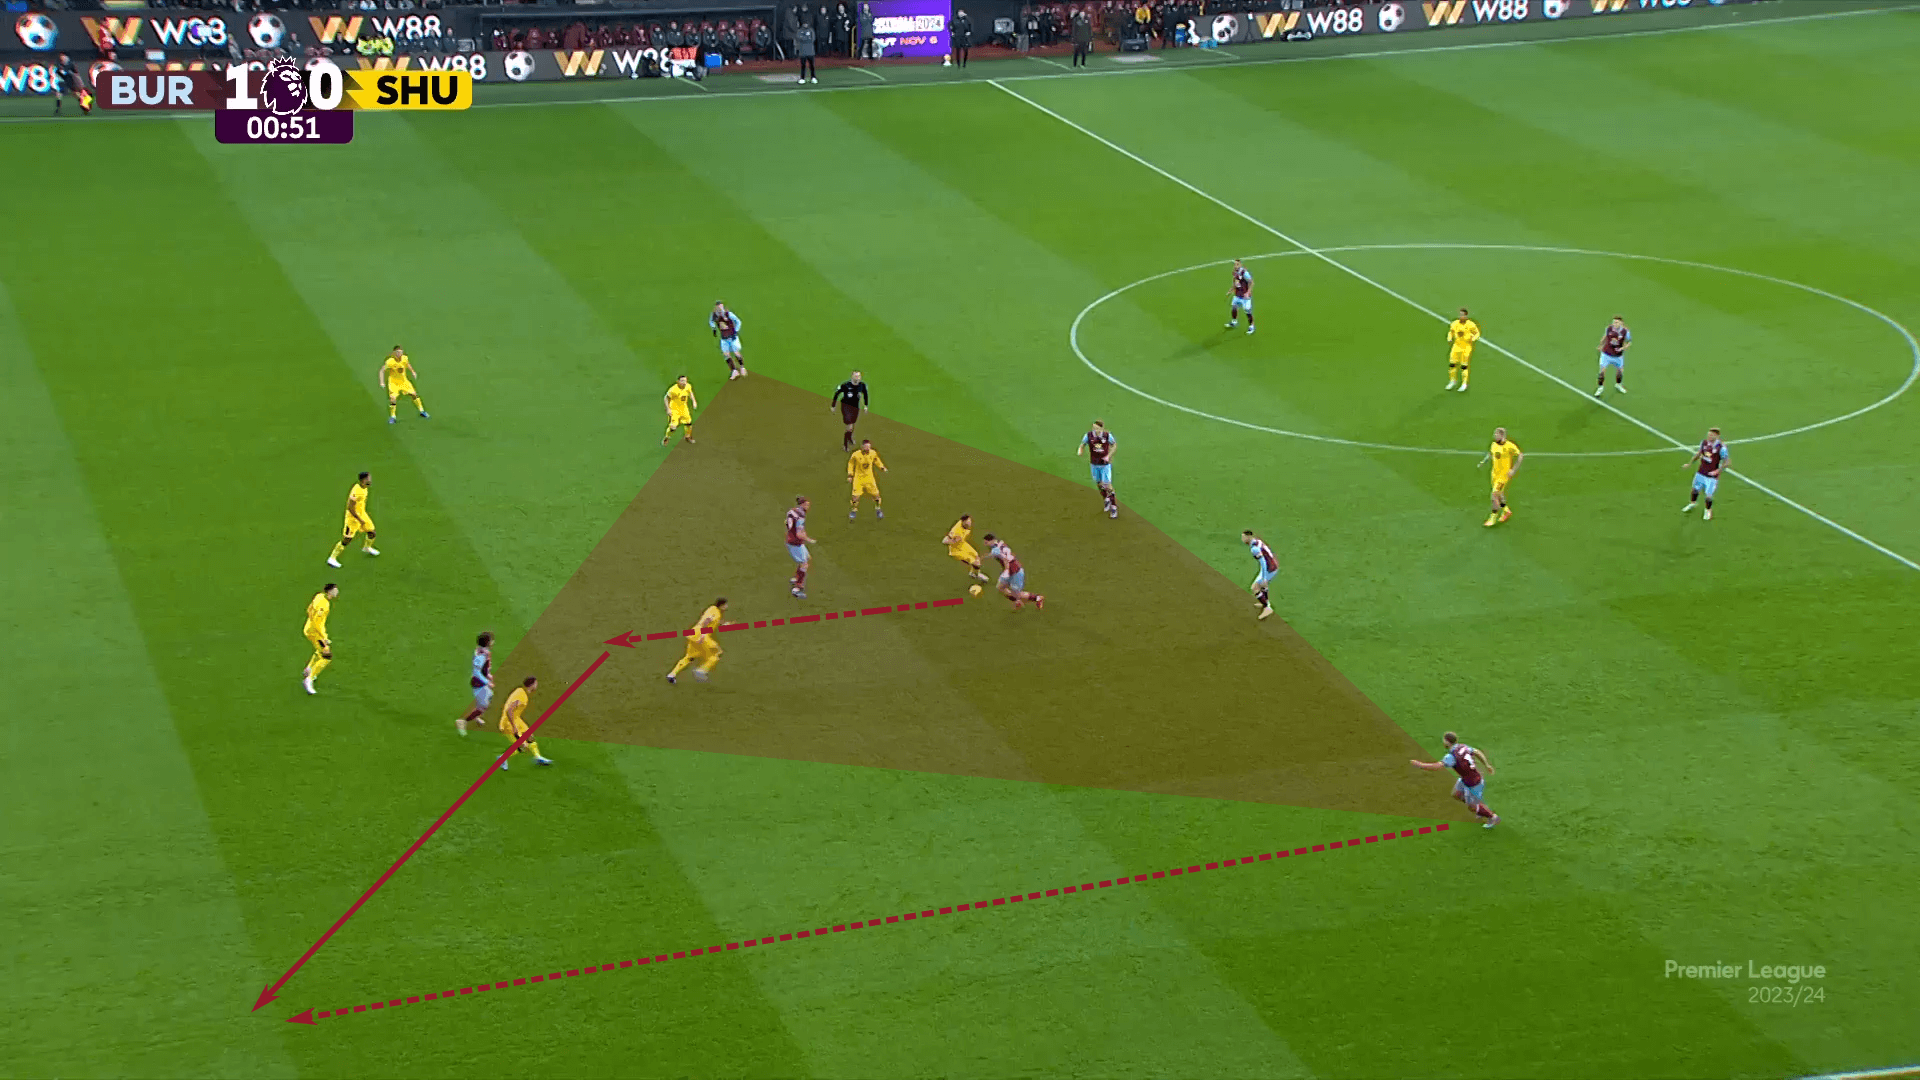
If there’s one other point to mention, it’s the movement of the winger, Charlie Taylor, who initially tucks in to operate within that net and then pushes high and wide to offer an outlet.
In the previous section, we mentioned the importance of creating your own luck.
That’s precisely what Brentford did against Manchester City.
Once the first ball was headed, İlkay Gündoğan was unable to bring the ball down.
As it bounced within the net, Brentford was able to claim it and quickly push forward.
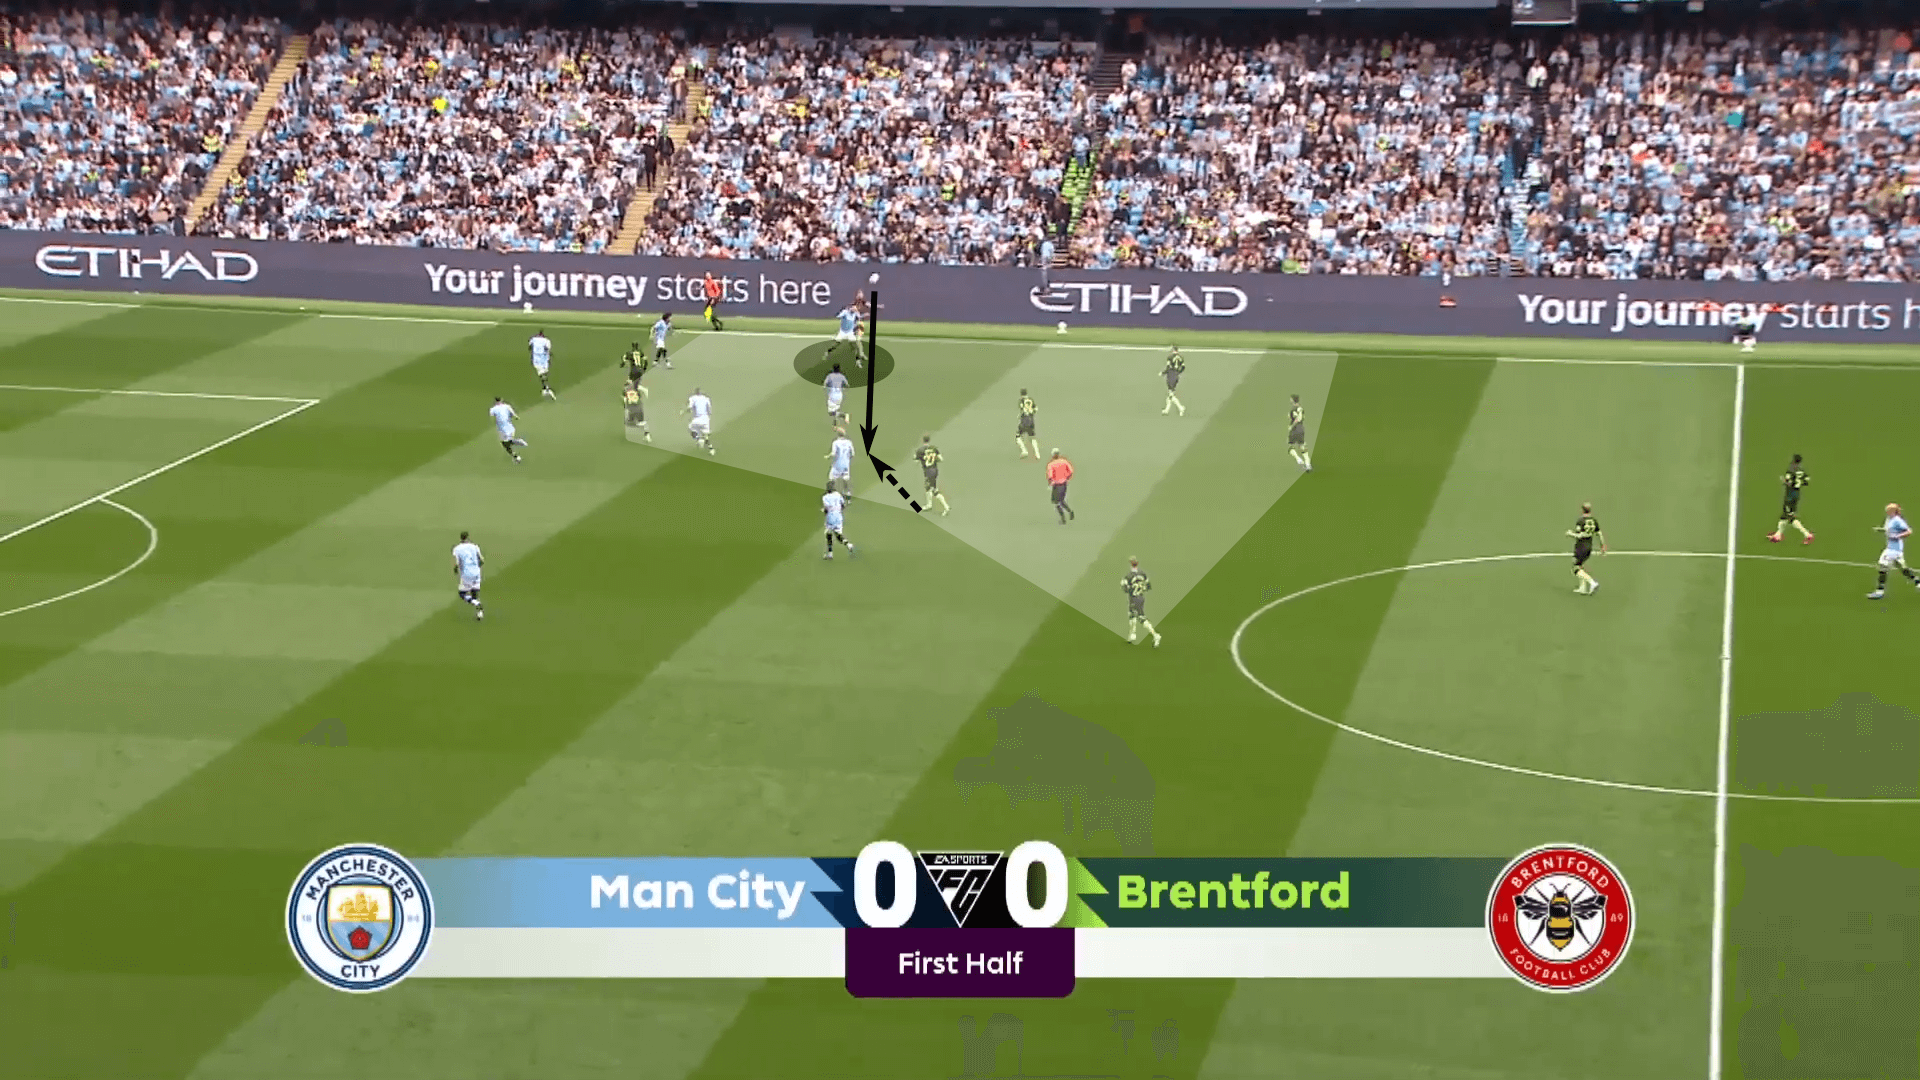
When the second ball is not initially won, the net also gives the kick-off team a clear counter-pressing network.
Their rest defence puts them in a position to quickly close space and recover the ball, as they did here against Tottenham.
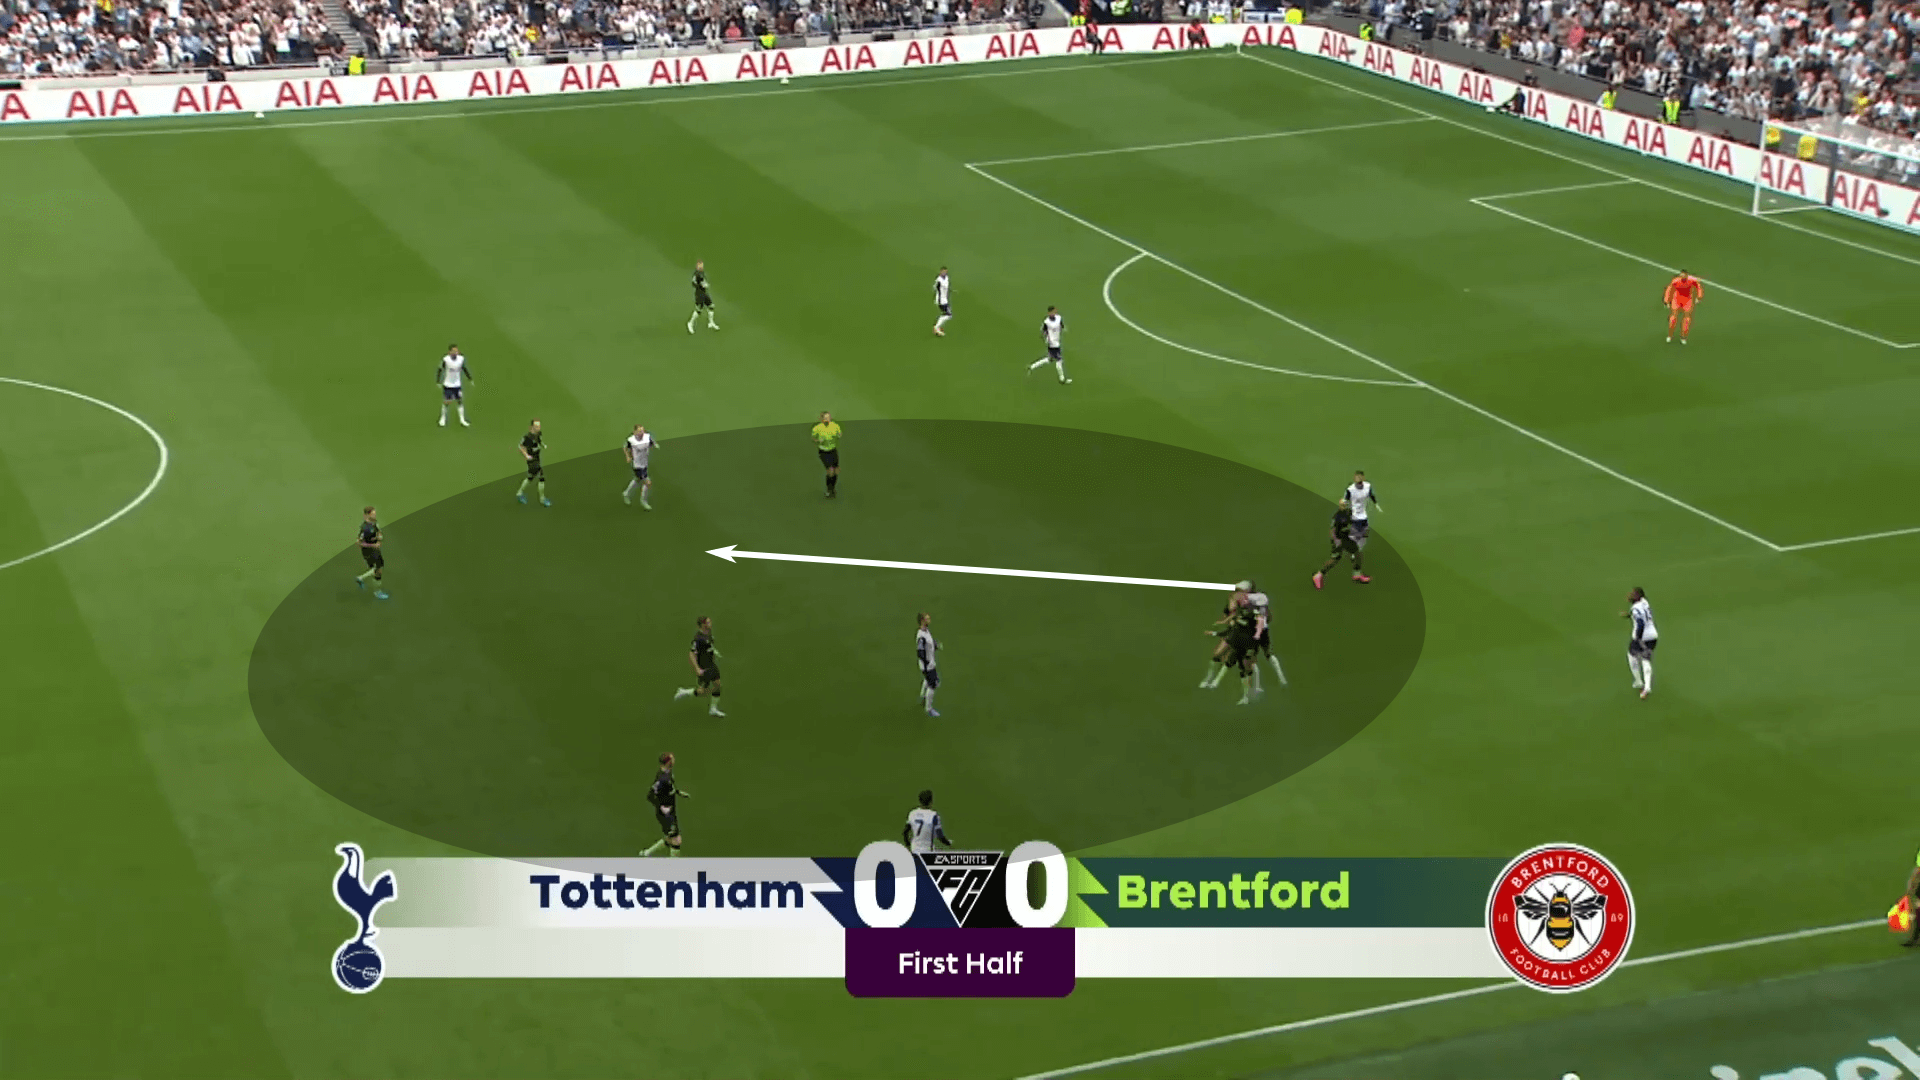
As the players converge on the ball, quickly condensing the net, they’re able to poke the ball free, recover it and then drive forward.
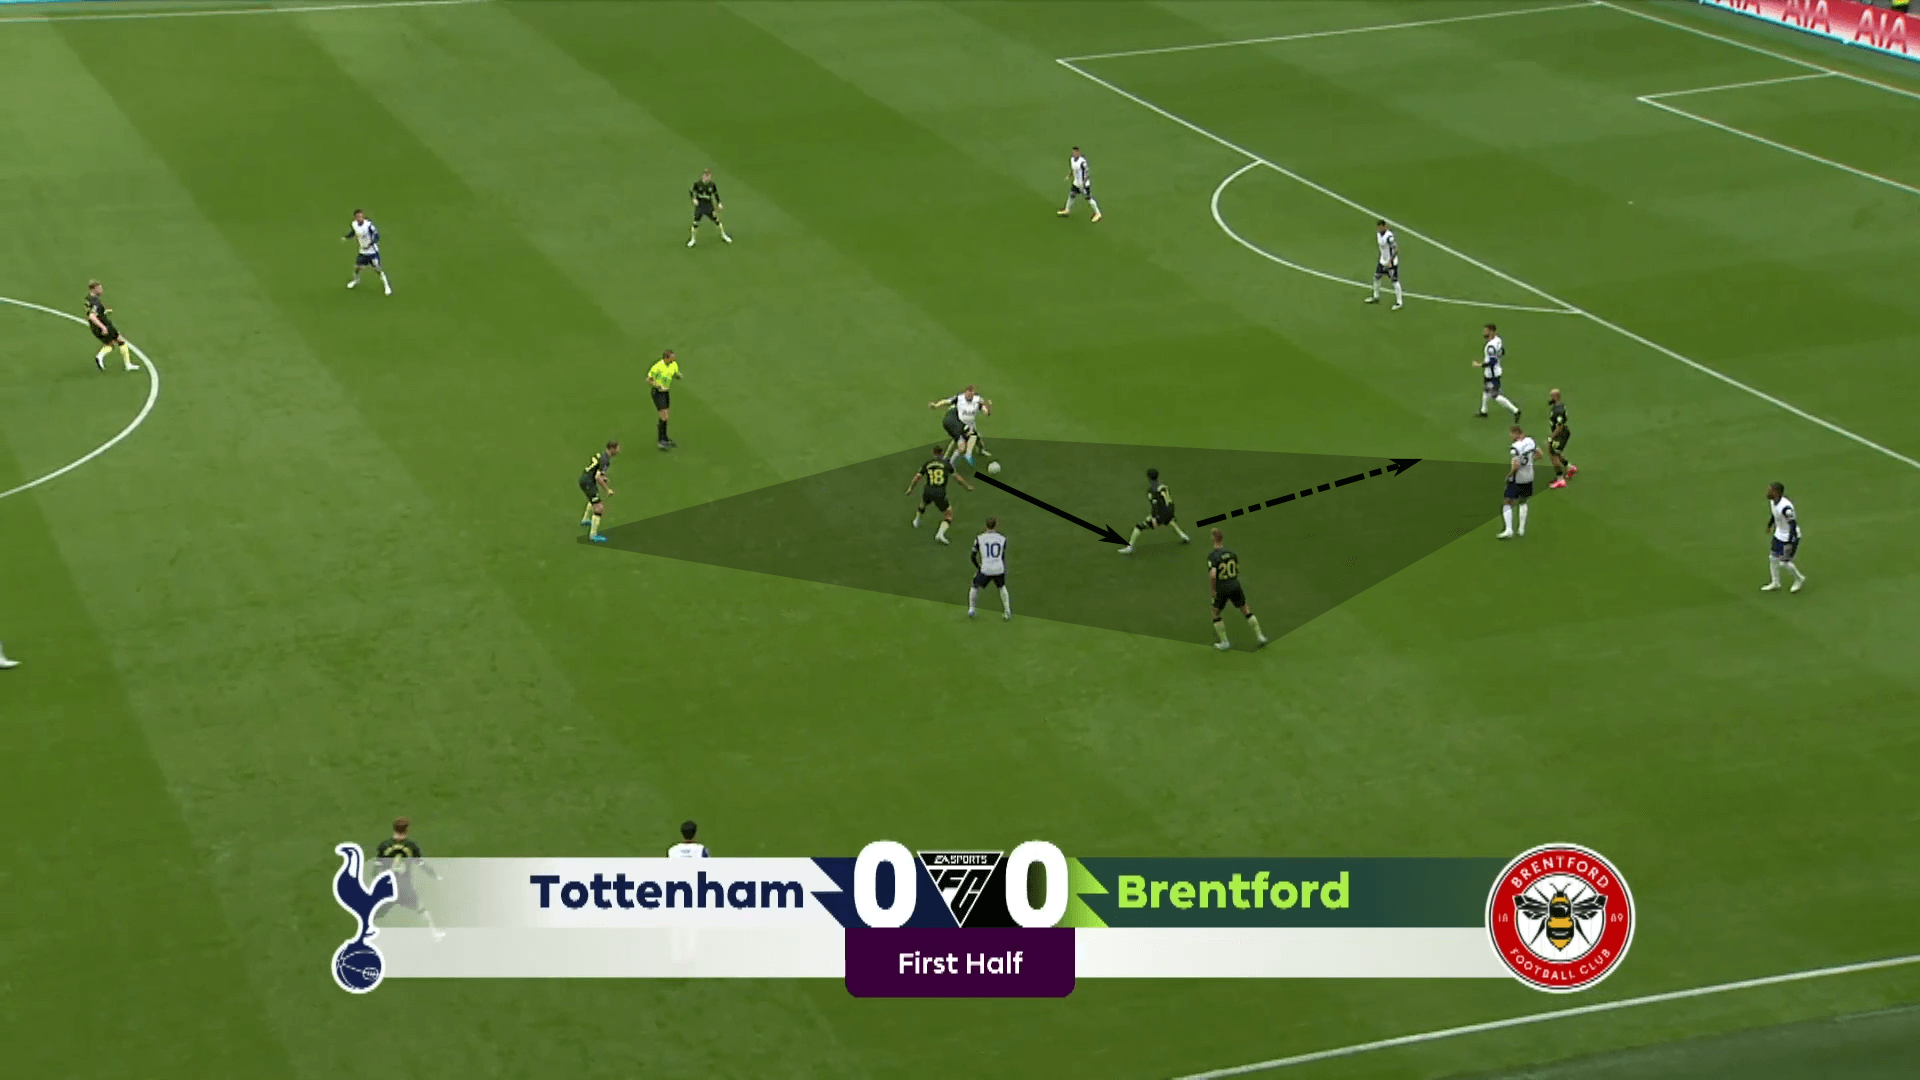
Even though the initial second ball was lost, the numbers near the ball enabled them to recover it quickly.
You’ll also remember that Tottenham had a more symmetric organisation off the kick-off.
Ultimately, that played in Brentford’s favour, allowing them to quickly get numbers near the ball and overwhelm the heavily outnumbered Spurs players.
Against West Ham, there is an excellent example of an adaptation after a lost first ball that clears the net.
As West Ham heads the ball forward, Brentford’s two deeper players are able to claim the second ball.
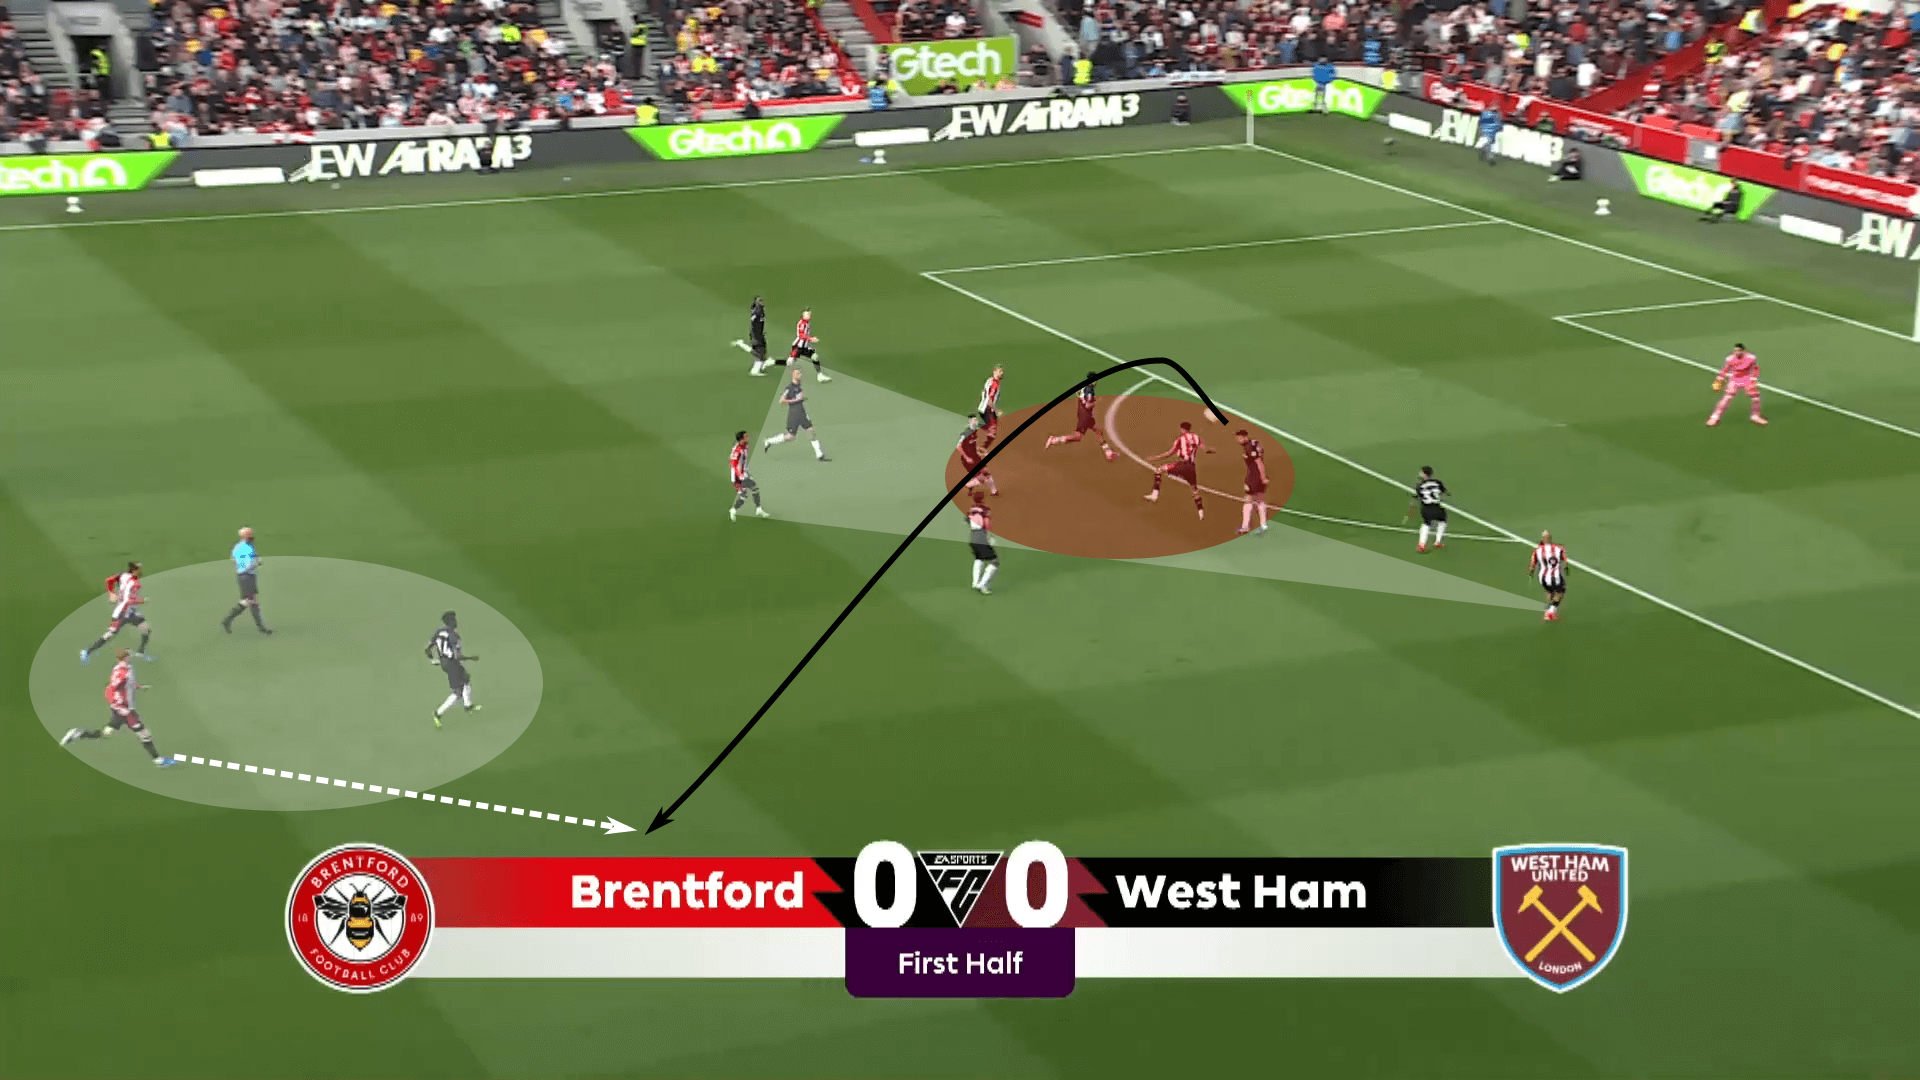
The recovery comes far from the target zone, which forces Brentford to play back from the second ball.
But this is where we see an essential principle of kick-offs: getting the ball forward quickly.
With numbers committed high up the field, the kick-off team is well-equipped to continue fighting for any balls played forward and put the opposition under duress.
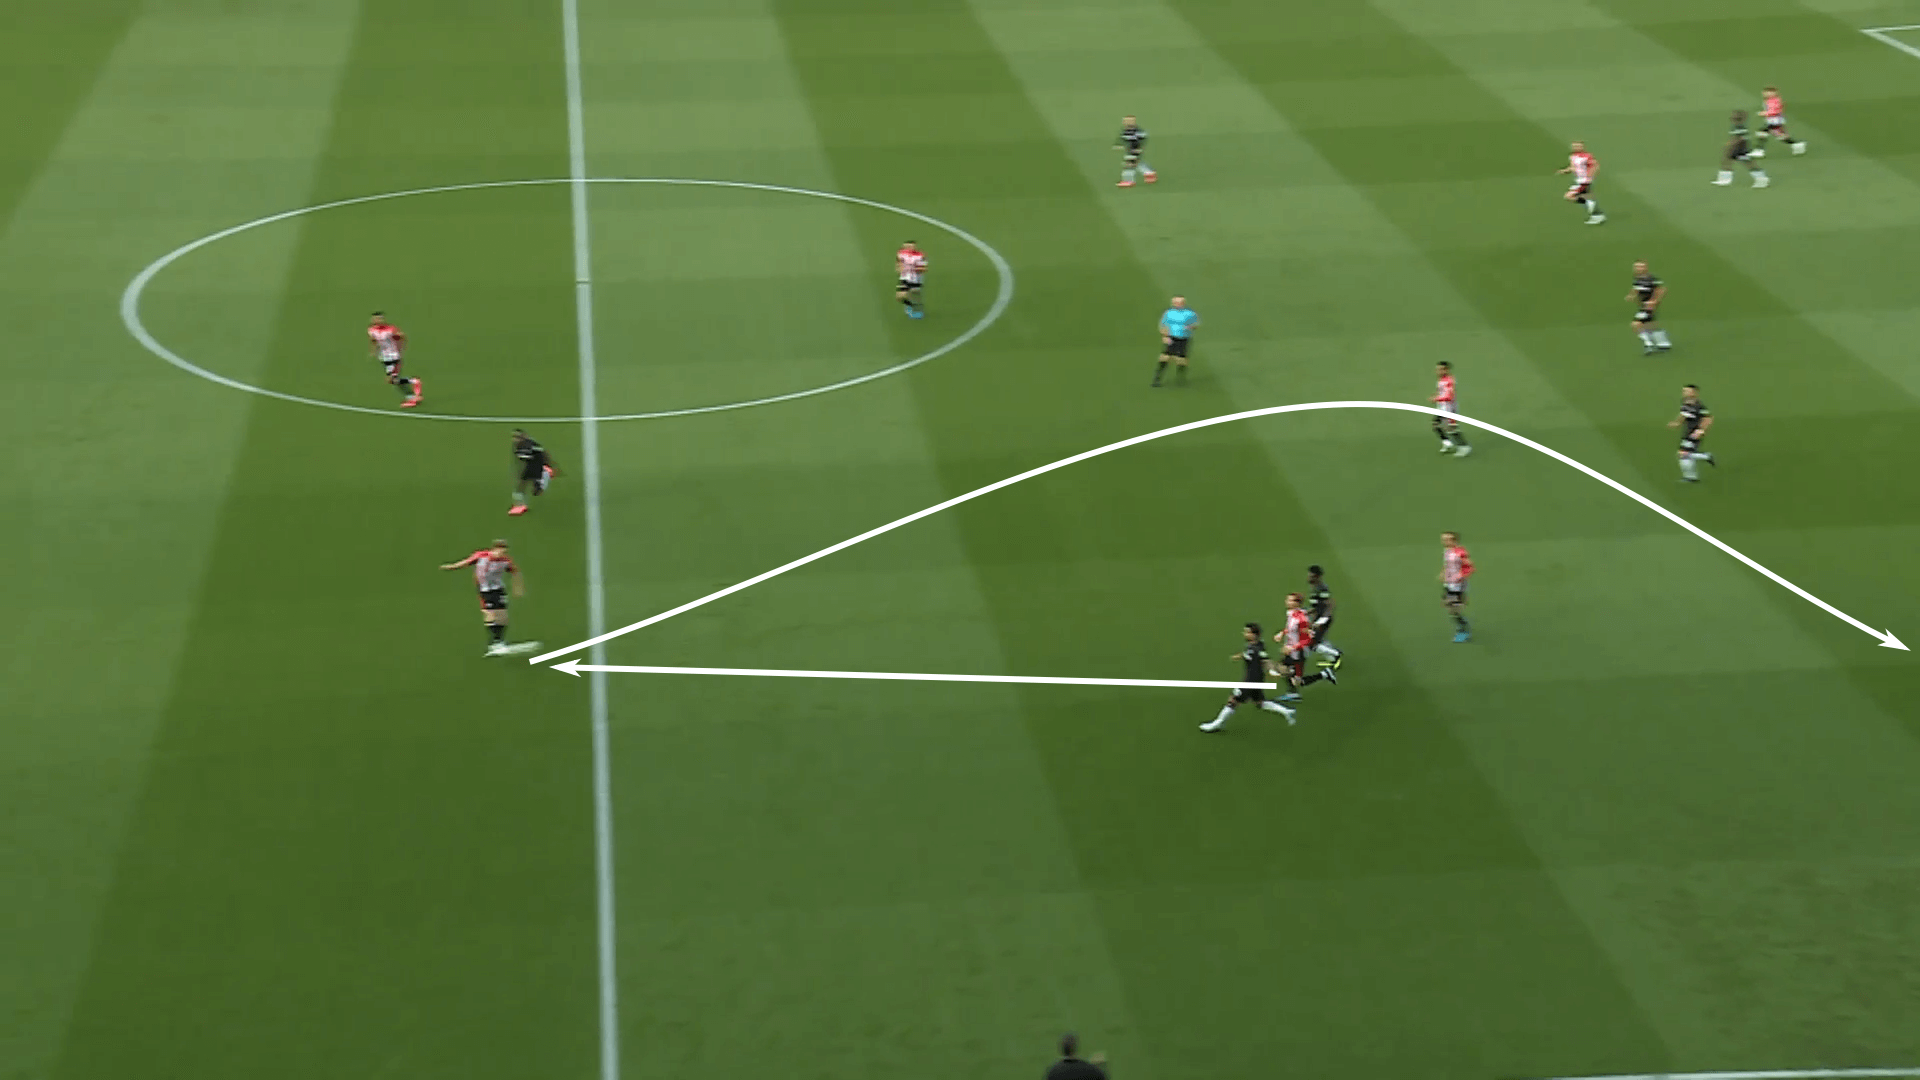
By keeping a high attacking tempo and trusting the numbers in front of the ball, Brentford was able to keep the attack going despite the delayed final third entry.
Key elements to a successful kick-off are creating a net around the target man and being prepared to fight for the first and second balls.
Even if the ball is initially lost, having numbers close enough to recover it and continue pushing the attack forward is that vital middle step.
With so many numbers high up the pitch and the opponent often lacking the structure to do anything other than clear the ball away from the target area, the kick-off team must continue driving numbers forward and engaging.
They typically have a numeric and positional superiority, so quickly using those advantages is key.
Attacking The Box
To quickly recap, we’ve seen Brentford and Burnley determine how they will attack their opponents.
We’ve also seen how their structure helps them claim first and second balls.
The final piece of the equation is the ball into the box.
We’ll start with the Burnley goal, as it really is the most simple and streamlined of the chosen routines.
After beating a couple of players on the dribble and playing wide, they were in a position to serve with what amounts to a 2v2 in the box.
We can see that Sheffield United has three players near the ball but no one in a position to contest the service.
There’s a fourth player 10 m behind them that the service has to clear and two additional players near the top of the box who are essentially out of the play if the service is decent.
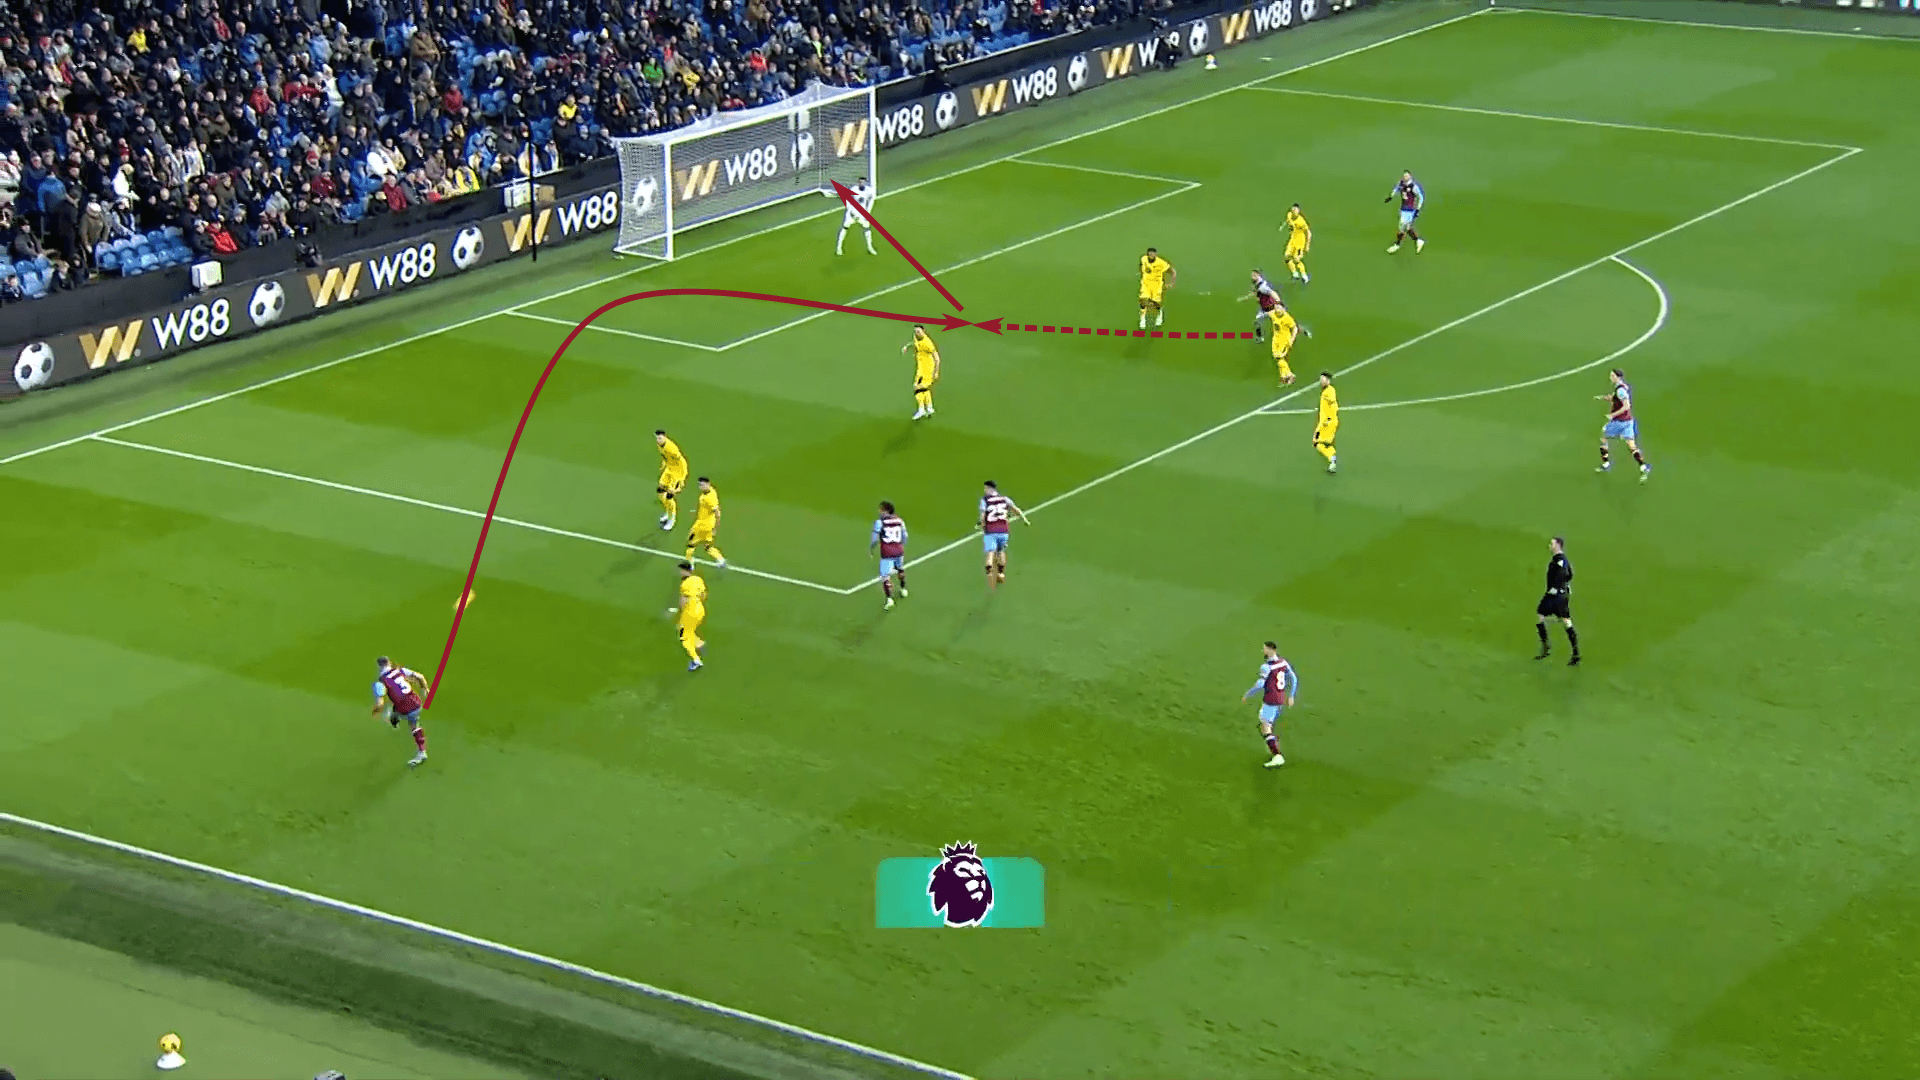
The ball into the box is a good one, played just in front of the near post offender.
The forward’s run comes from the defender’s blind side.
He beats him to the ball, providing a glancing header to the far post.
A simple box attack.
Against Tottenham, another step was necessary.
The first ball intended to attack the box was overhit and took Brentford wide of the box.
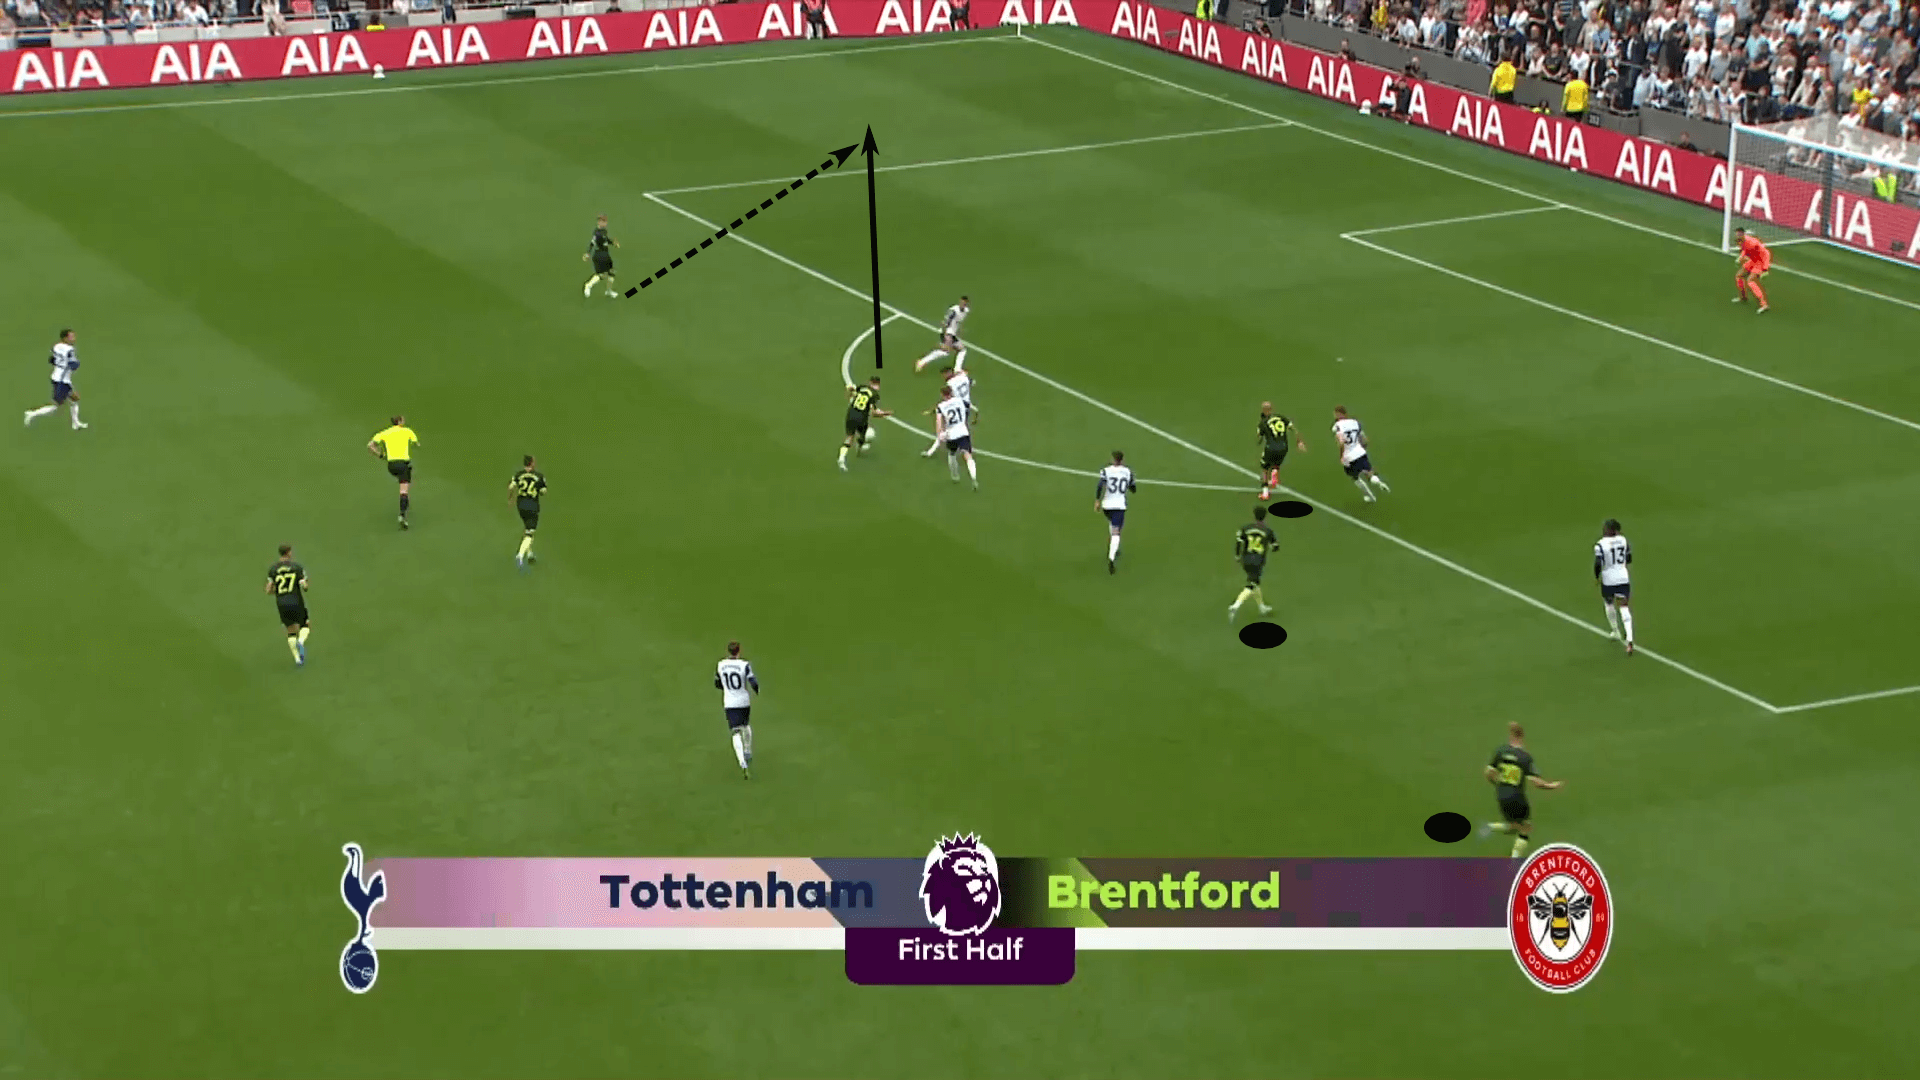
However, they turned a mishit into a positive.
With Spurs still scrambling to gain a foothold in the run of play, the Brentford players on the right side of the pitch prepared their movements into the box.
In this case, Tottenham has three players wide to defend two screening crosses at the near post from 12 to 14 m out and just two to defend against three Brentford players in the box.
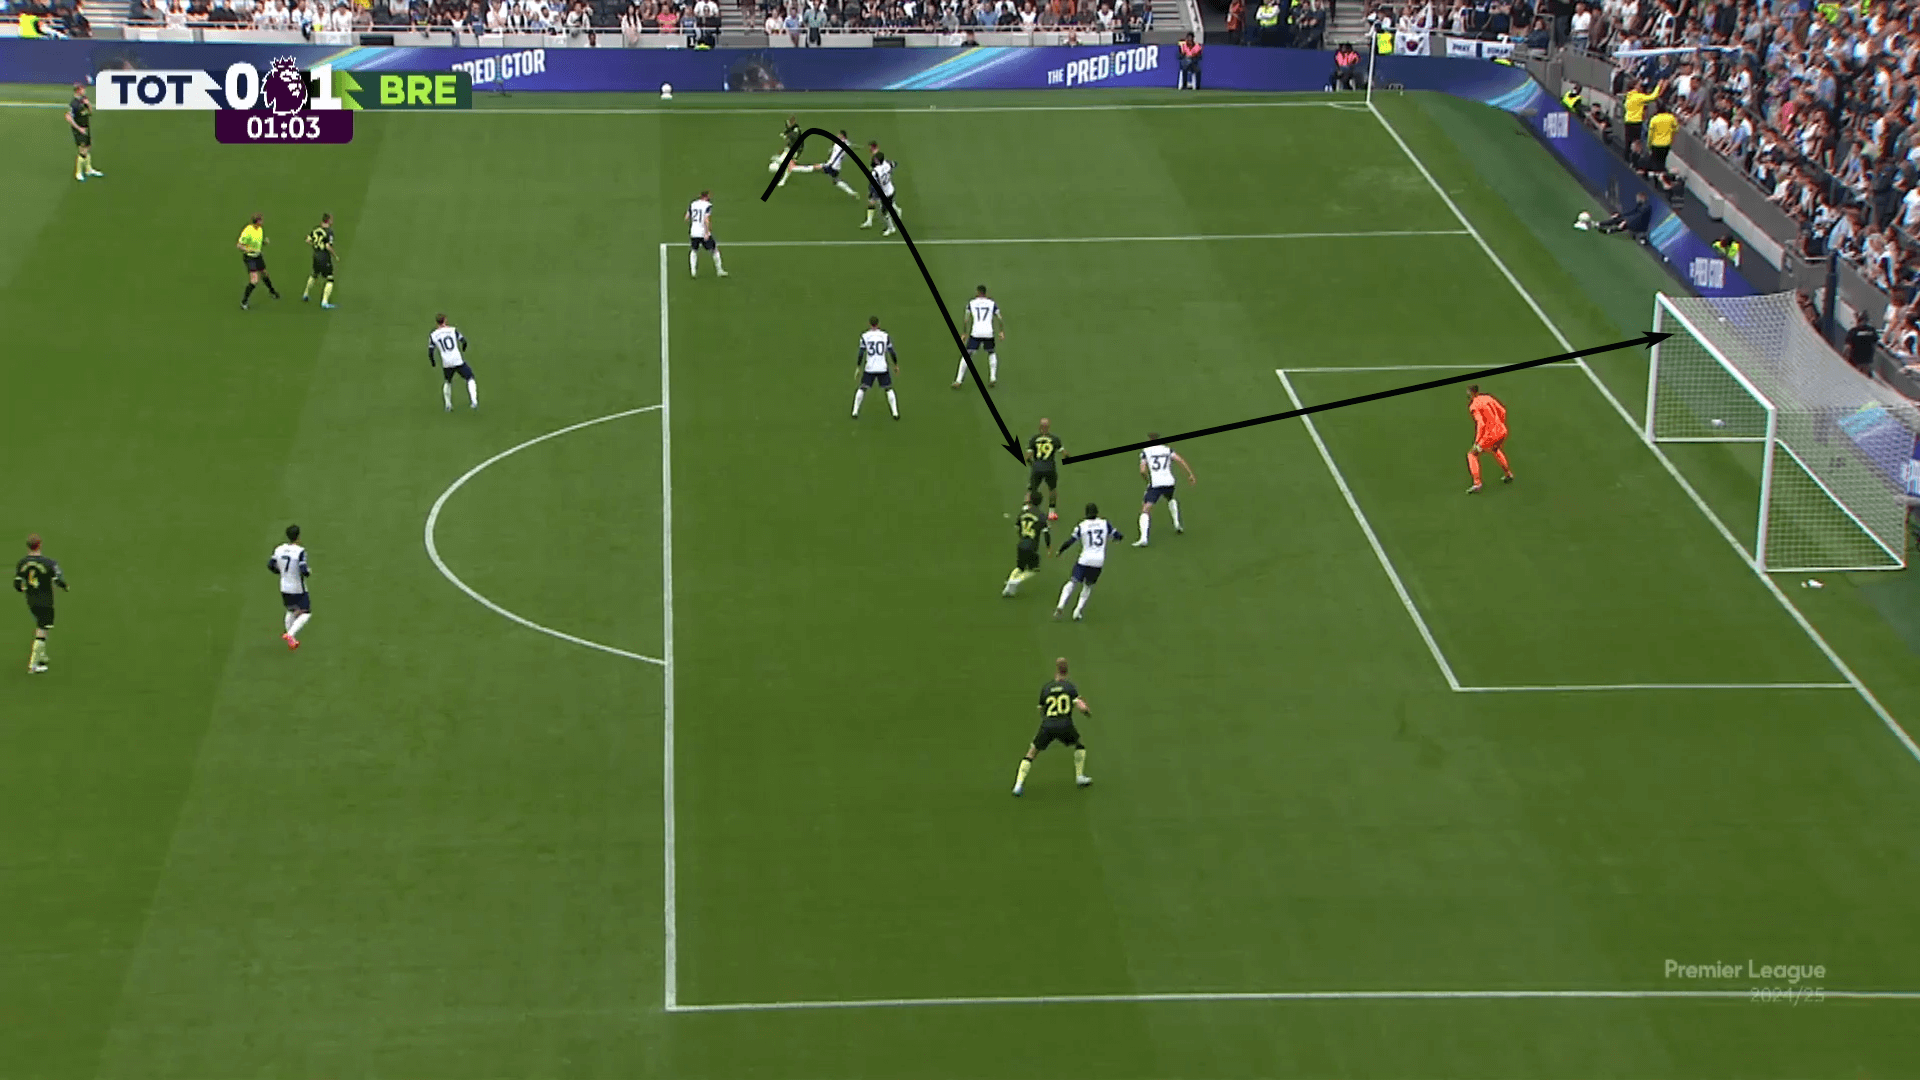
The cross led to a brilliant volley by Bryan Mbeumo, tucking it in the top corner.
Maybe not how the script was written, but a fantastic finish capped off a successful set piece from a kick-off.
Coming back to the theme of creating your own luck, we have Brentford’s goal against City.
Initially, City looks well prepared to defend the cross.
They are 3v3 and have help arriving into the box.
One thing to notice in this early, far post service is the defending of Kyle Walker.
As the ball is served, he is still looking at his mark and is unaware that the cross has been played.
That gives his opponent a head start.
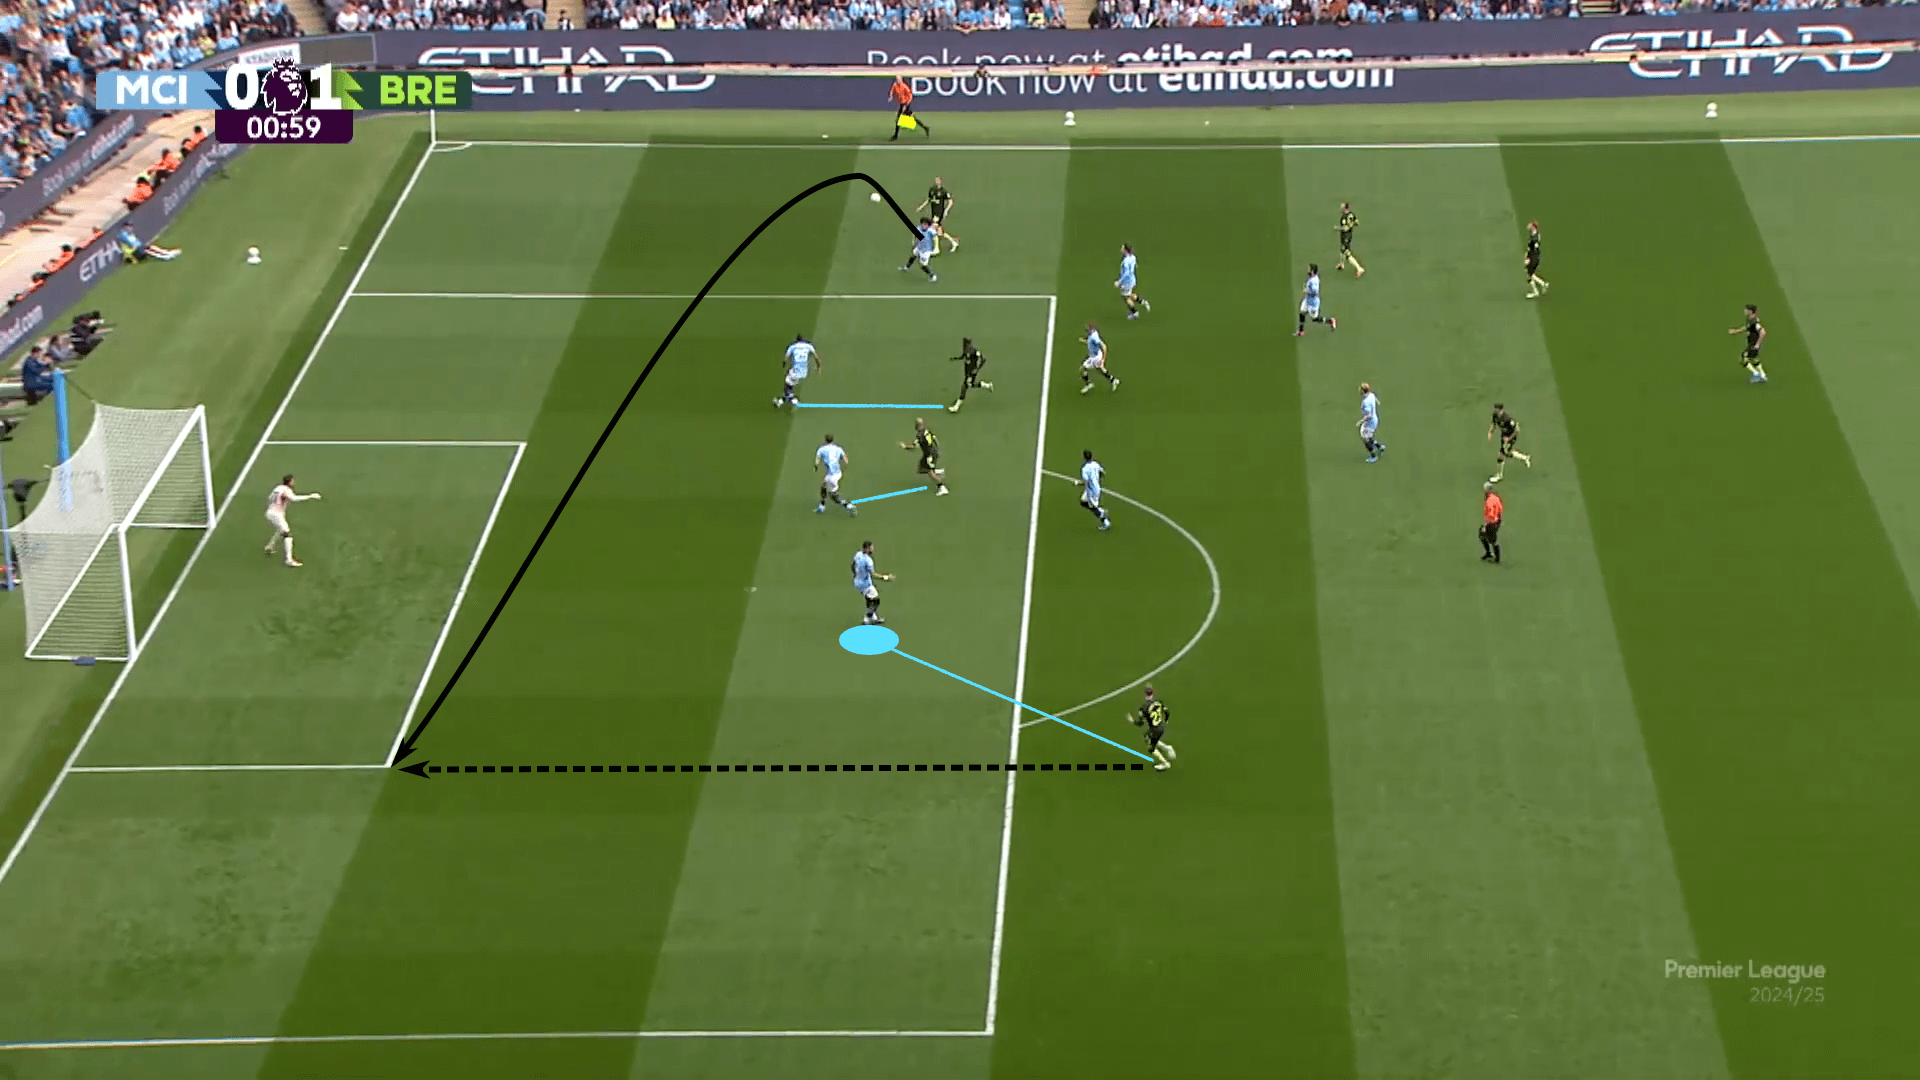
Keane Lewis-Potter easily wins the first ball and heads it across the goal.
A miscommunication between Ederson and John Stones leads to the ball popping up directly into the path of Yoane Wissa for a goal.
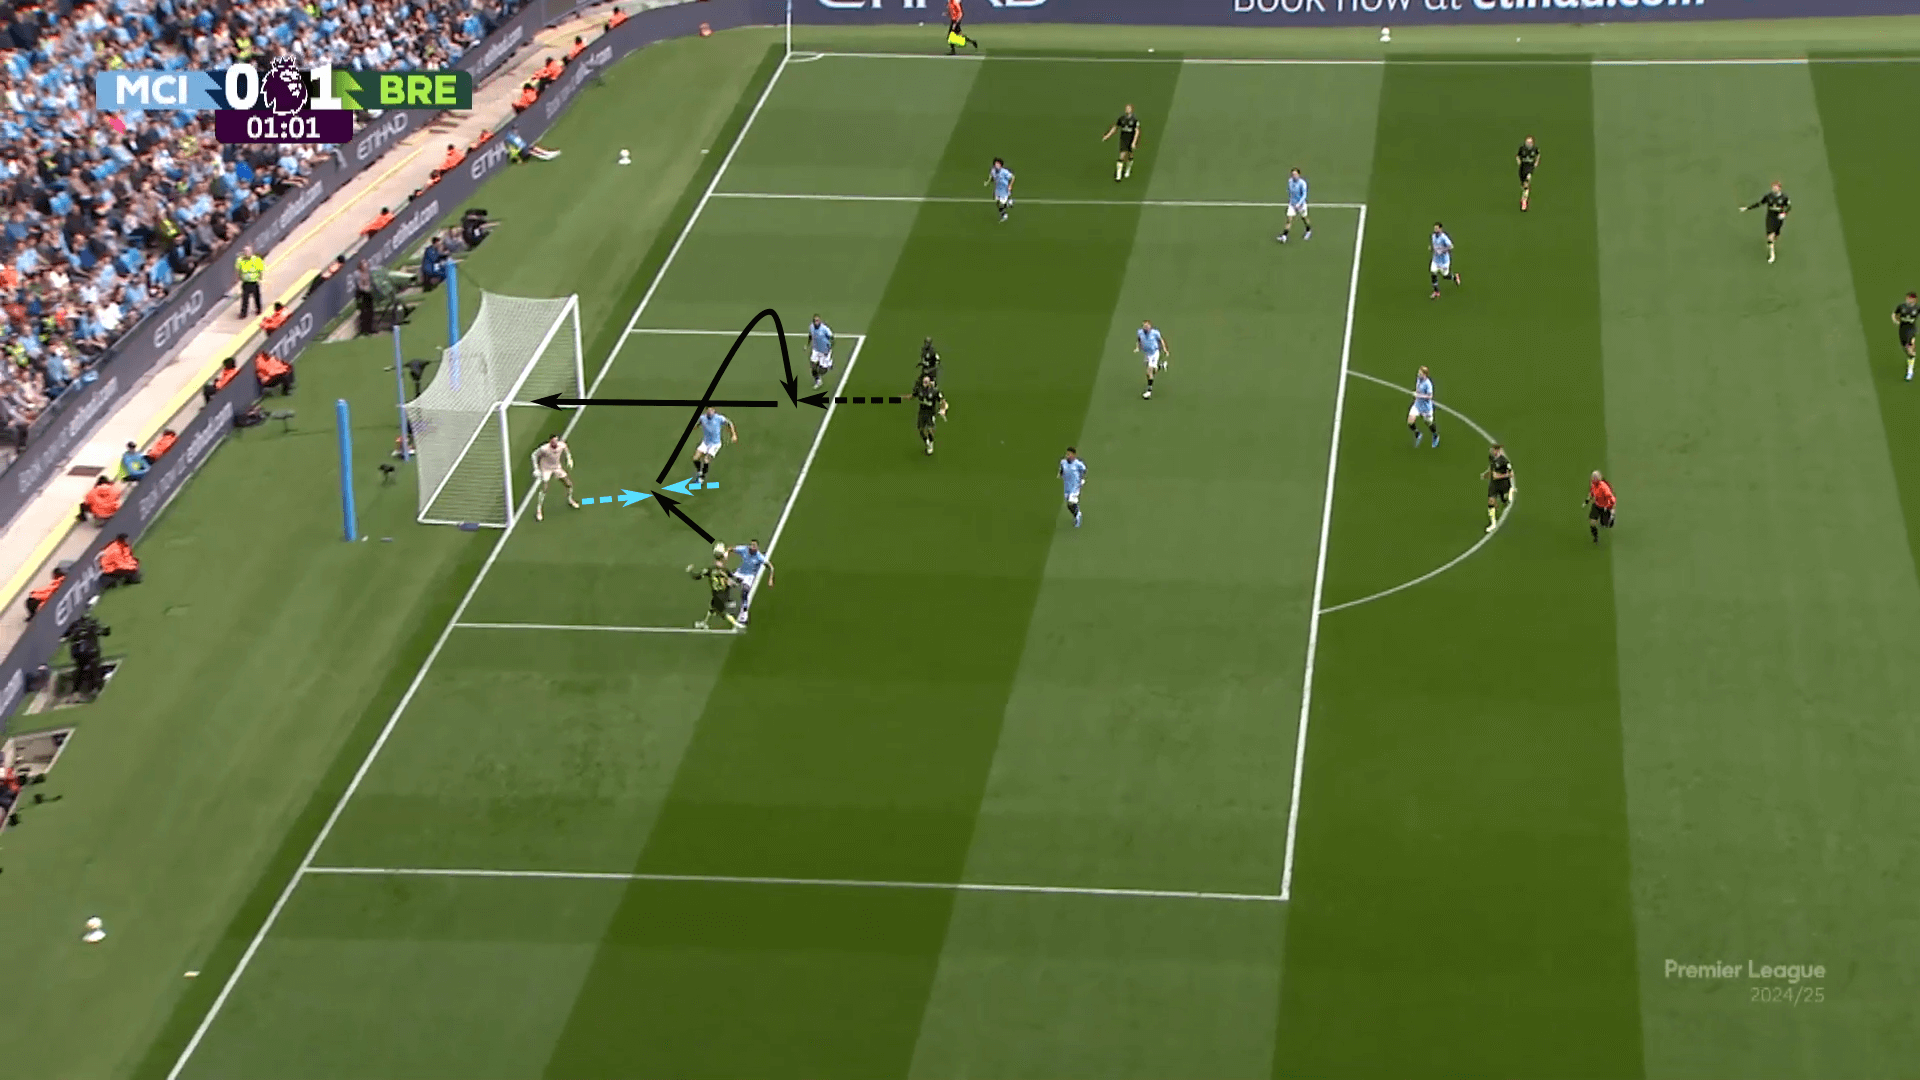
Again, not the scripted ending to the sequence, but the tempo of the attack and Brentford’s relentless forward movement put the highly organised Manchester City players in a chaotic environment.
The constant need for reaction and adaptation led to miscommunication and error at the back.
Speaking of improvisation, the West Ham goal gives us an example of adaptation.
In the last section, we had the recovery running back to their own goal and negative pass, and then the ball forward.
Once they played forward, they were able to dribble through the right wing and serve the ball from the end line.
Had the ball reached the centre of the box, West Ham would have been well-suited to deal with the service.
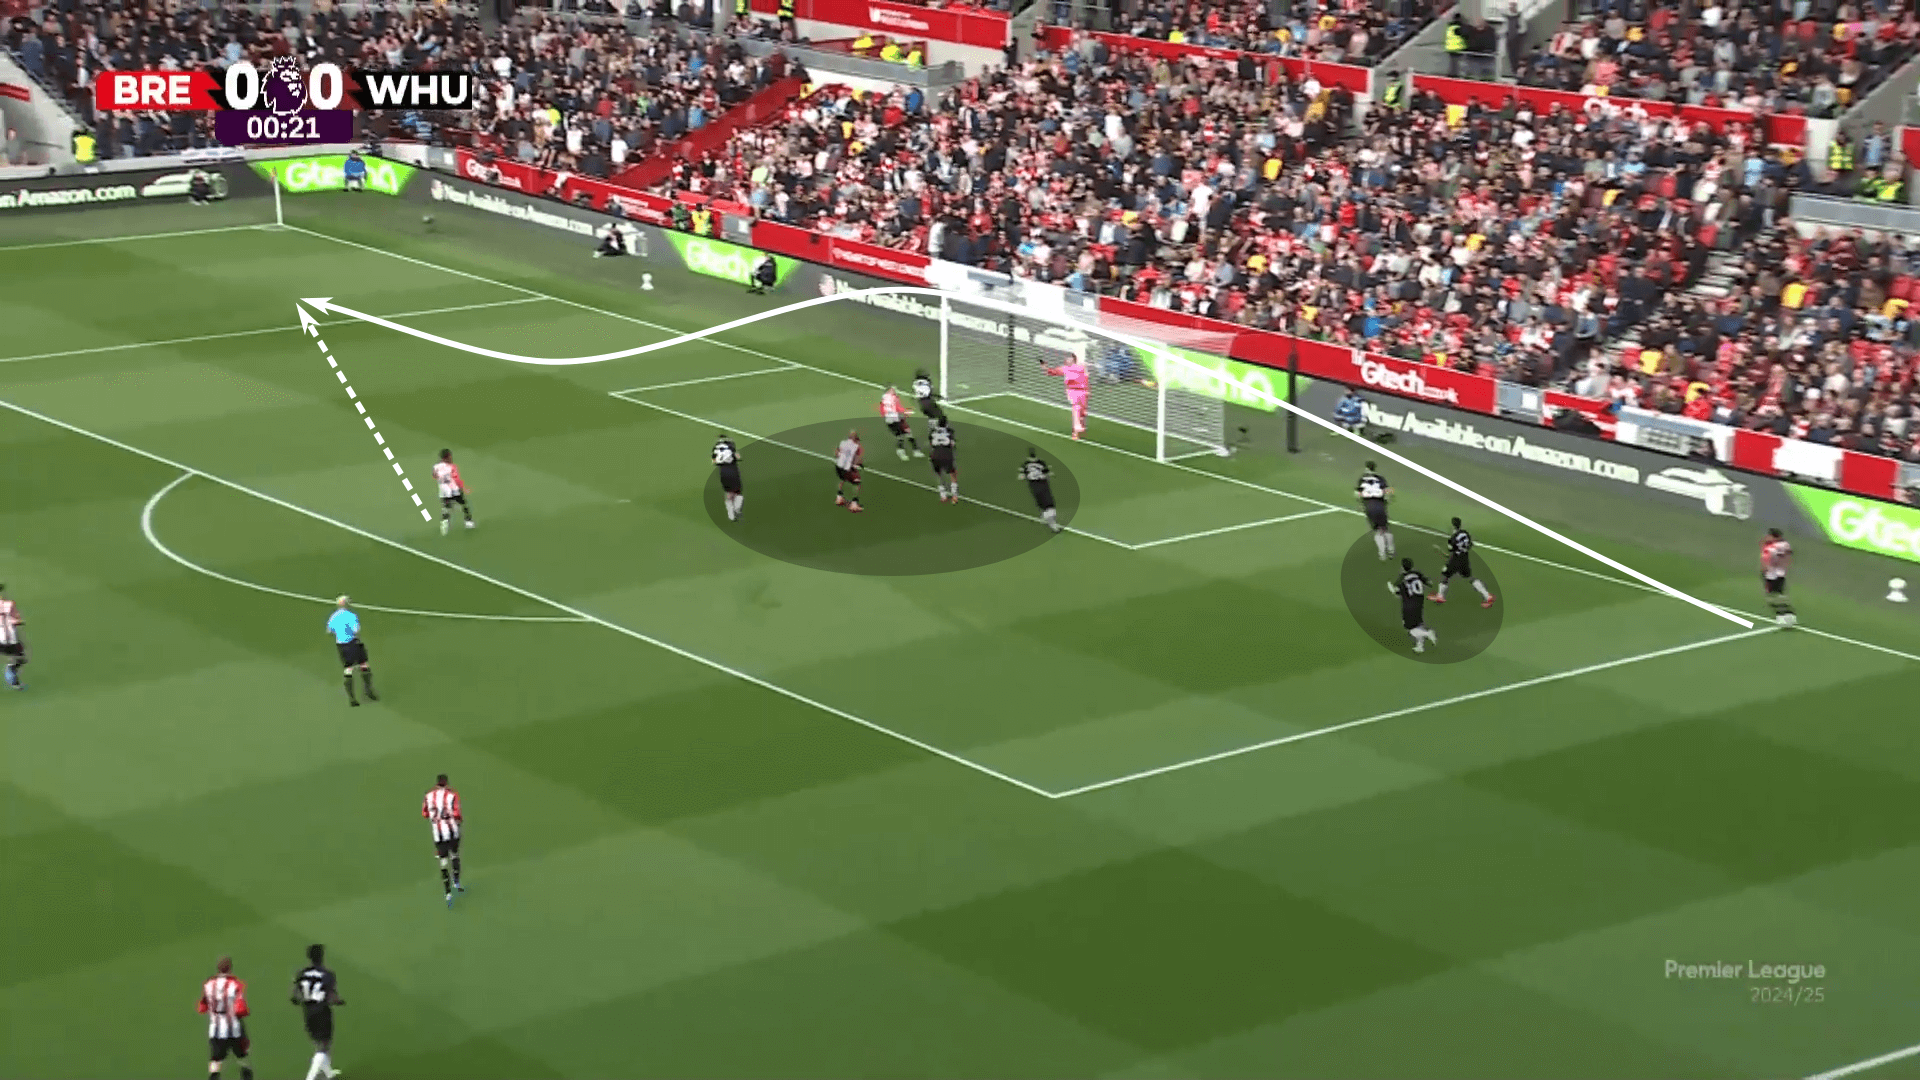
Instead, it’s overhead and forces Brentford to race into the left wing to recover it.
As West Ham quickly shifts their lines to the right, Brentford moves two players to the left and enters a serving situation.
As the West Ham lines shift ballside, gaps emerge.
Remember, the initial target here was central.
The West Ham block has already moved centrally, then to the left, dropped deep and now is sliding to their right.
That’s a lot of movement in a set-piece situation to remain organised.
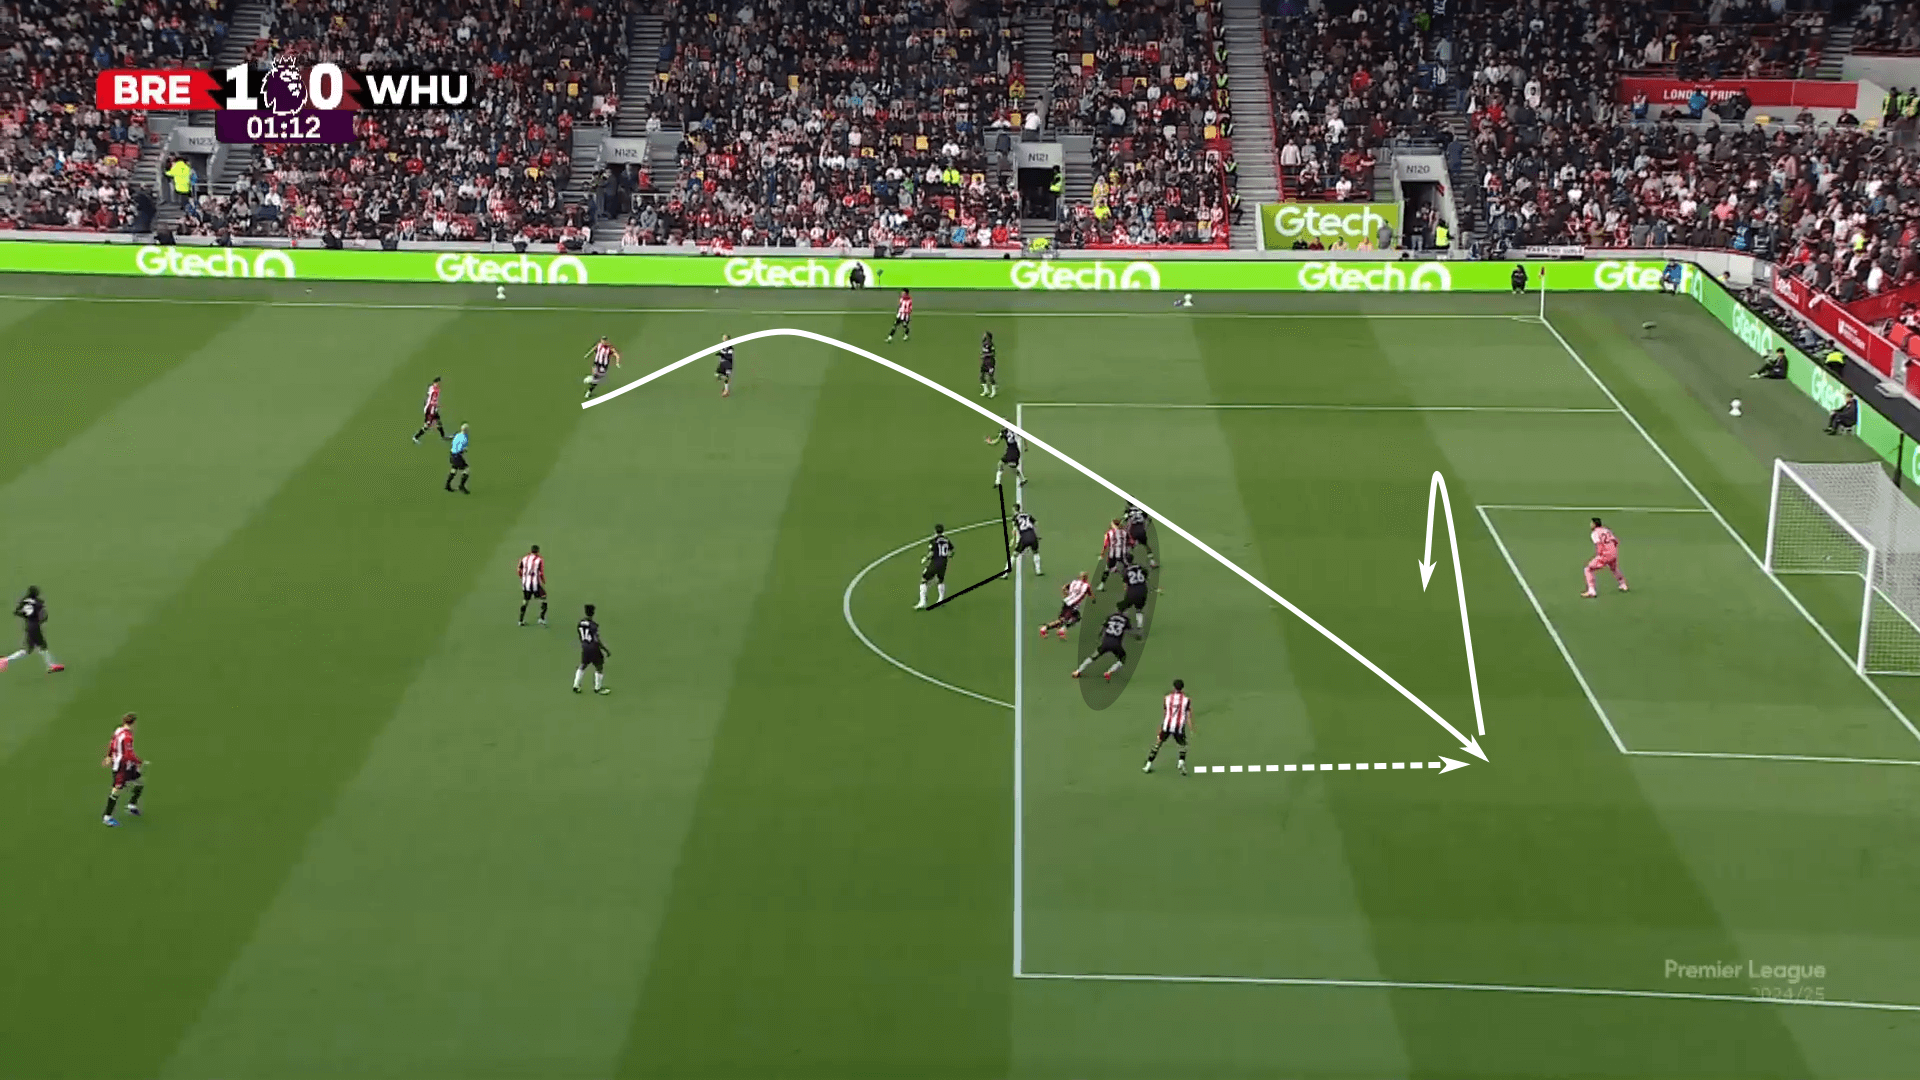
That’s when the far post opens up.
The early cross finds the far post target who hits centrally.
But we still don’t have our goal.
As the ball is put back centrally, it’s headed forward but not cleared.
Brentford wins the next aerial duel and heads back to Mbeumo for another world-class volley.
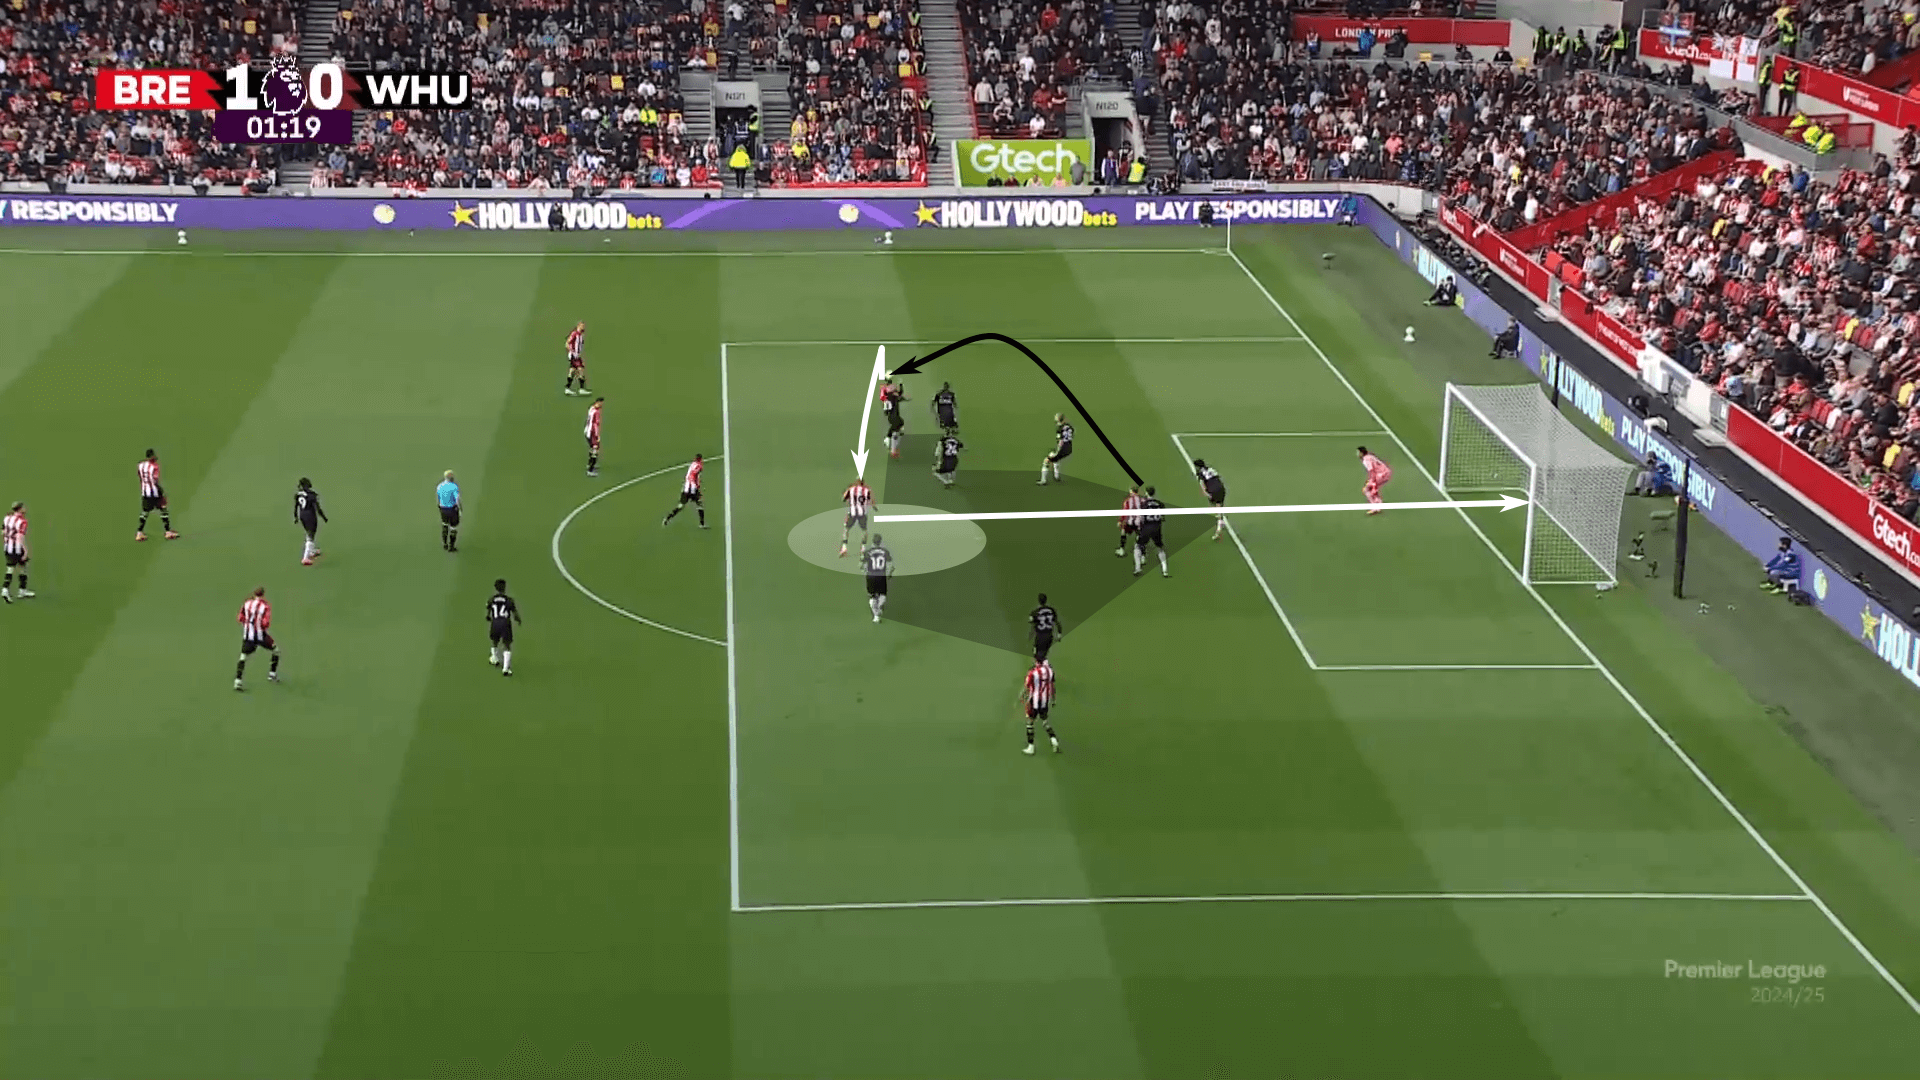
One definitive conclusion is that Mbeumo must tirelessly train his volleying.
Other points are that the early cross is invaluable when kick-offs are treated as set pieces, a high tempo prevents the opponent from fully settling into their shape, and a net around the target increases the odds of winning the second ball.
Bonus – Bournemouth’s Goal Vs Arsenal
Alright, one quick sequence that didn’t fit into the previous sections.
This one comes courtesy of Bournemouth against Arsenal and is the second-fastest goal in EPL history, at 9.11 seconds.
The organisation and progression phases go hand-in-hand.
Bournemouth overloads on their left and draws Arsenal to that side.
As the kick-off is taken, Alex Scott darts inside and plays the ball to Dango Ouattara, who carries the ball to the edge of the box.
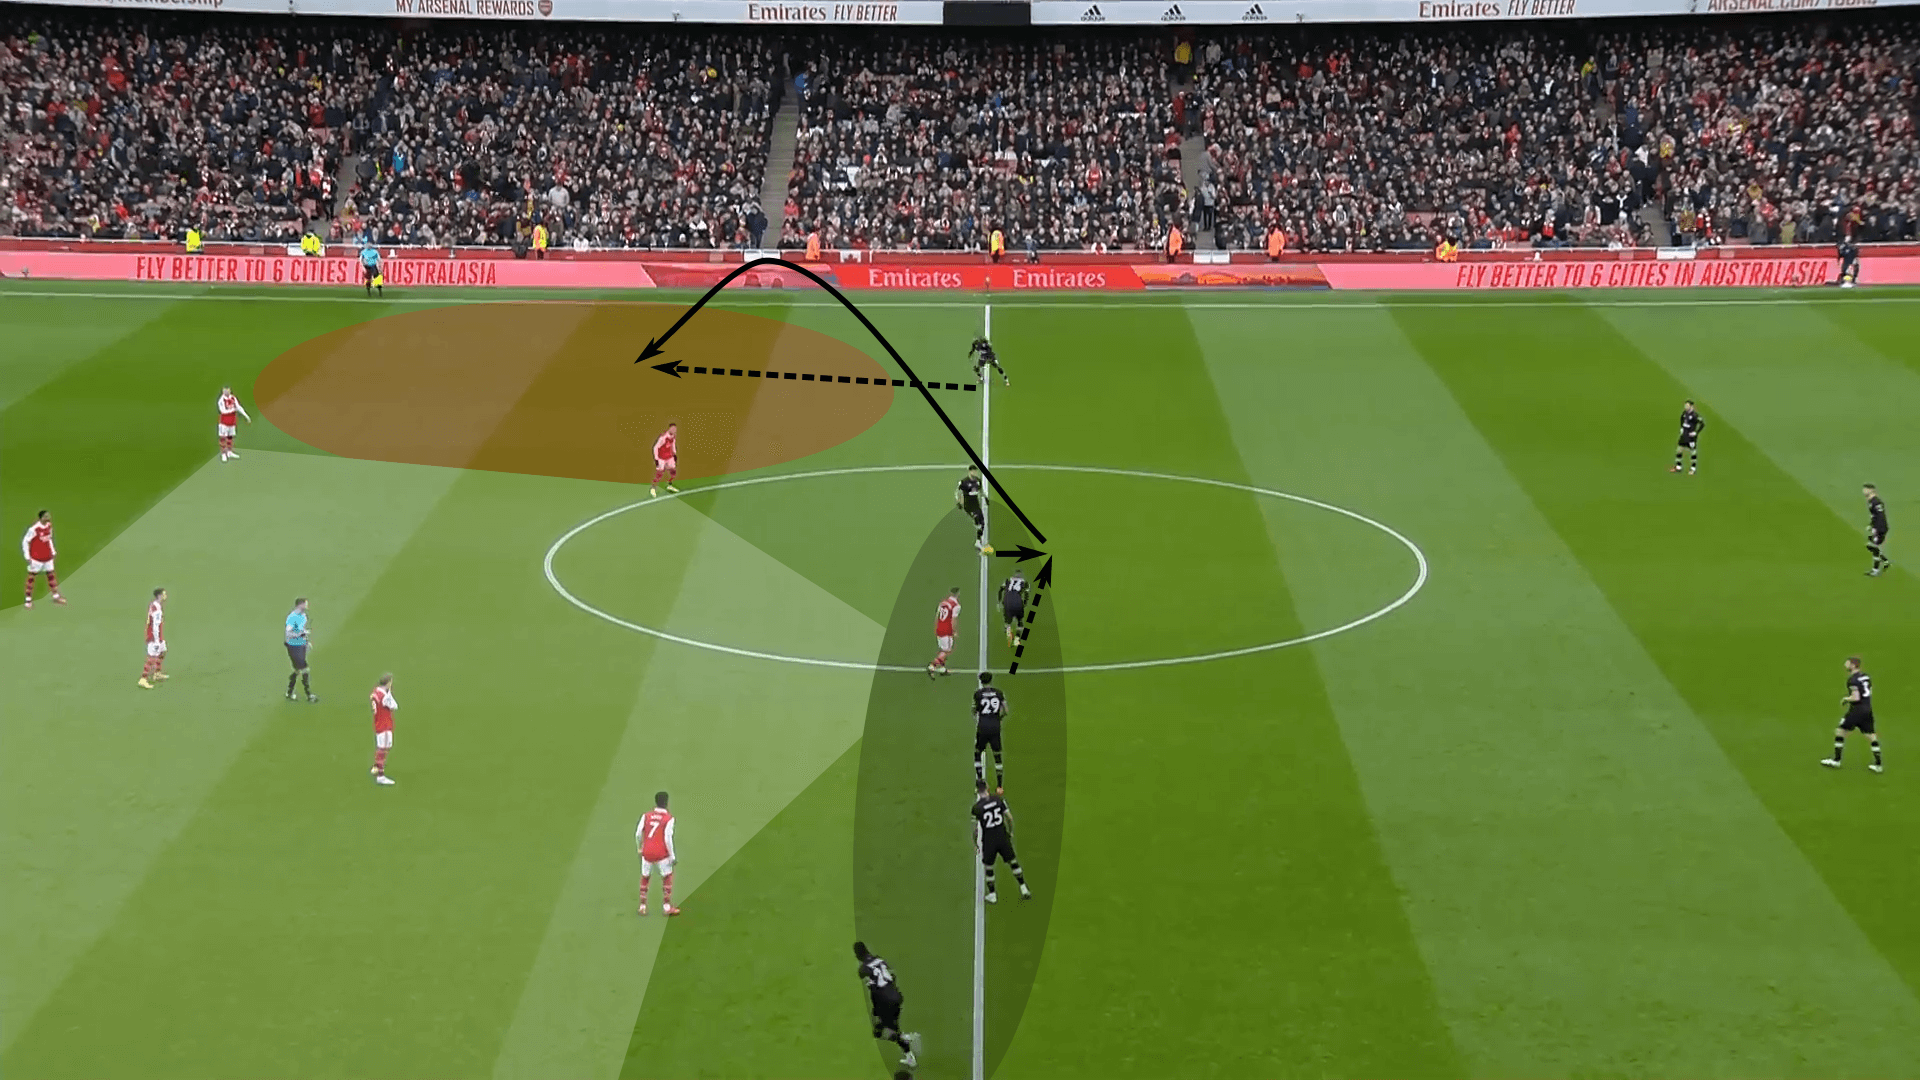
The early cross caught the surprised backline off-guard and skipped past two defenders.
Philip Billing was the beneficiary of Arsenal’s poor defensive work, slotting the shot home for a 10th-second goal.
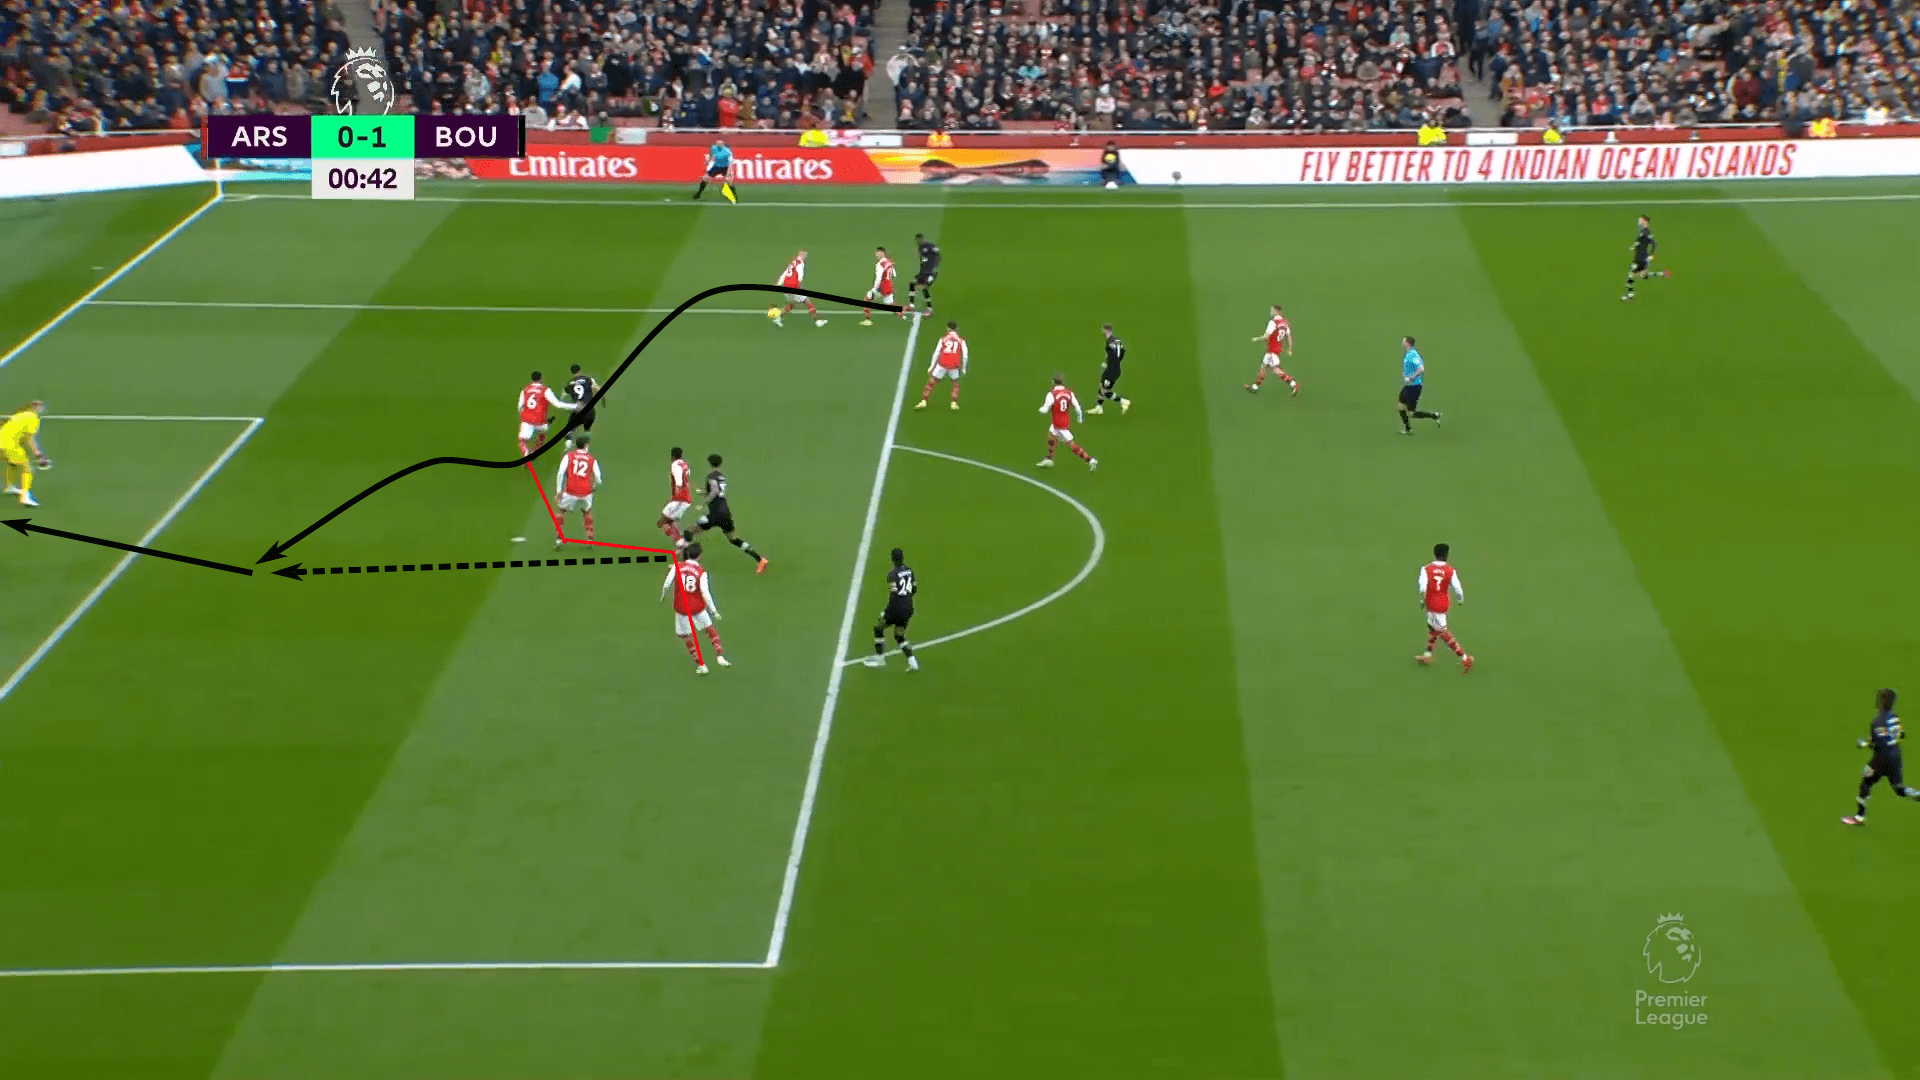
The setup served as a decoy and left Arsenal behind the play as Bournemouth raced towards goal.
The tempo of the attack and early ball in were the daggers.
Conclusion
From the organisation and ball progression to the service into the box, the kick-off team must do many things to create a goalscoring opportunity.
Everyone has a role, whether as a server, target man, member of the net, or blocker.
These responsibilities must facilitate an up-tempo attack that immediately puts the opposition under duress and limits their opportunities to clear danger and organise.
When those pieces come together, these low-probability set pieces can produce moments of magic.
It’s a Moneyball mindset at its finest, finding an inefficiency and exploiting it.



Comments