There is no single best formation in football. Each has its strengths and weaknesses and coaches need to be flexible enough to recognise when and in what context to use a specific one.
This tactical analysis will give you the attacking tactics of the 4-2-3-1 system. We will use tactical theory to explain some of the basic concepts and structures behind it and then through further analysis recognise what patterns make it so effective in the first place.
Connections & relationships in a 4-2-3-1
The 4-2-3-1 formation is popular for numerous reasons. Coaches like Pep Guardiola, Rafa Benitez and José Mourinho are still famous for utilising it almost perfectly. Even though it was more popular in the years gone by, the modern coaches are also coming back to revisit the tactical concepts that made the teams of the ‘00s and ‘10s so successful.
Of course, the structure itself is a variation of both the 4-4-2 and the 4-3-3 but can also be a continuation of a 4-1-4-1 and the 4-5-1 systems. The reason for its popularity is mainly in the flexible approach it offers, giving the team balance in both defence and attack.
Below, you can see a passing grid we’ve created to show you how the 4-2-3-1 lends itself well to positional football. Coaches have used it differently over the years but the main goal is to create superiorities across the pitch.
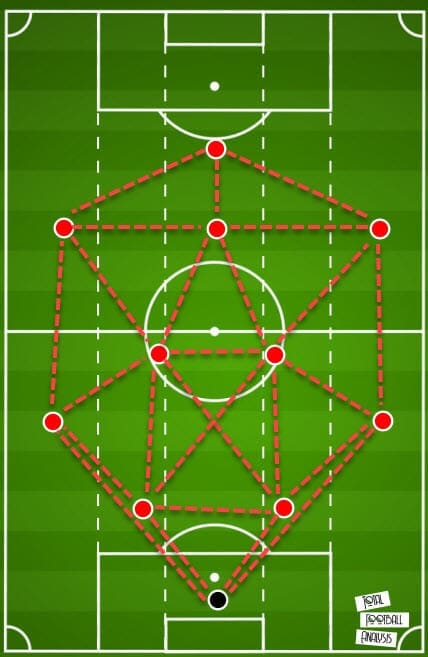
Notice how every player has multiple connections and passing channels to exploit when on the ball. The movement is also crucial here, of course, so the success of the structure will depend on the creativity of specific player roles.
Still, with the possibility of easily positioning at least two, or more often three, players in every zone of the pitch, the 4-2-3-1 is a great system for overloads. Ball progression is helped by the creation of triangles and we can see this particular formation adheres to those possession principles perfectly.
A similar thing happens once the play is shifted to the final third. There, the 4-2-3-1 will often transition to 2-4-3-1 but it’s much more fluid and complex than just numbers on a sheet. Once again, the key is the connections it creates in a multi-layered structure.
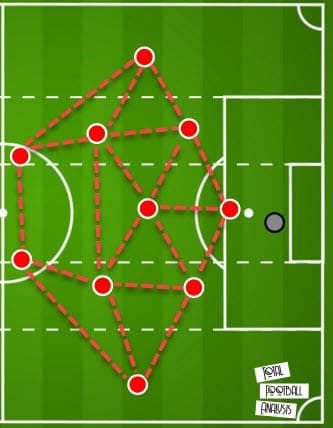
The passing network will change, however, depending on the personnel and the type of individual player roles used on the pitch. The no.10 is, however, one of the most important pieces of the jigsaw as he has the freedom to roam and create overloads in different areas of the final third.
We will touch upon the numerical superiority the 4-2-3-1 easily establishes later on in this tactical analysis piece. But speaking of player roles, as much as it depends on the coach’s preferences, this structure does require certain player profiles for it to be effective.
Below, we have briefly outlined the responsibilities of each of the squad members. Note, however, that with some of them, this is a representation of multiple options rather than all the tasks they have in every game.
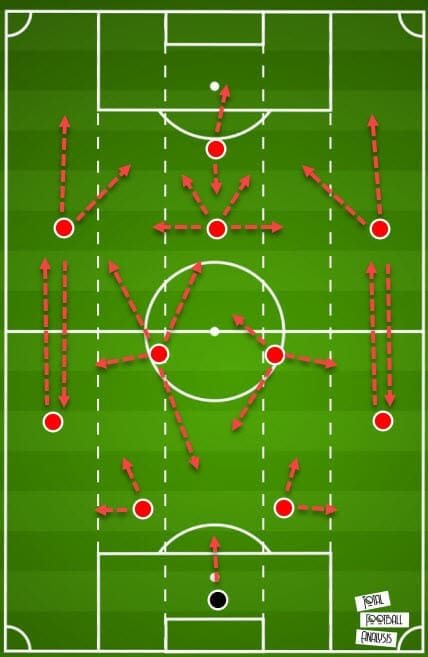
This tactical theory won’t go in-depth with player roles and responsibilities apart from the double-pivot and the no.10 as this aspect can heavily depend on both the coach’s tactics and the personnel available. But still, we are interested in the general patterns and relationships the 4-2-3-1 creates on the pitch.
We’ve already touched upon the grid that lends itself nicely to creating triangles and passing angles so let’s explore that a bit further. Everything starts with the build-up phase, and this is where this particular system’s strengths are perhaps most visible.
Below is a graphical representation of said relationship that was modelled after Luca Bertolini’s pattern when describing player connections on the pitch.
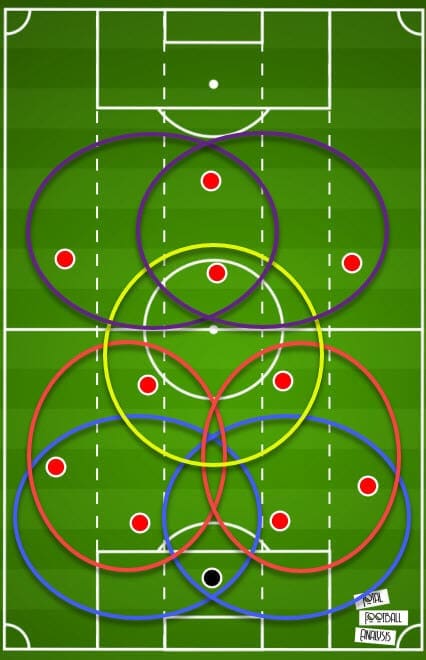
Bertolini also distinguishes between the relationships the players form in different phases of play, meaning that this graph changes as the team swaps between the attacking and build-up structures. What you can see up here is indeed the latter phase, which is what we’ll deal with now.
There are four main combinations that allow for positional play when building from the back. The first one is between the goalkeeper and his respective centre-back and full-back on either side of the pitch. This is the basic setup with possession-based teams.
As the ball moves into higher zones, the centre-back and full-back will start combining with one of the pivots on each side. Of course, there are possible variations to this approach such as, for example, when the team faces a high press and the other midfielder shifts over to ensure numerical superiority.
The third triangular connection consists of the three midfielders, including the double-pivot and the no10. This is where the play is starting to move into the danger zone and the feet of the most creative pieces of the squad.
Finally, we have the advanced midfielder’s relationship with one of the wingers and the centre-forward. As he is most often the freest player in the final third, he has the licence to roam and combine on either flank.
Now that we have outlined some of the key principles and relationship of the 4-2-3-1’s attacking tactics, this tactical analysis will move onto dissecting specific principles that make the structure so potent.
Width & overloads
We have already pointed out how this formation is excellent at creating overloads across the pitch. With two central midfielders providing support for the backline, this ensures numerical superiority in the first phase of build-up.
The two pivots combine with both centre-backs and full-backs to enable the smooth progression of the ball. However, the 4-2-3-1 formation is best at creating overloads in the half-space, which is often the very area most teams want to control, both inside their half and the opposition’s.
Let’s observe two examples of half-space overloads in both scenarios. Firstly, in the build-up phase. Naturally, with possession-based teams who aim to advance through positional rotations, the centre-backs will spread out at each occupy their respective half-space.
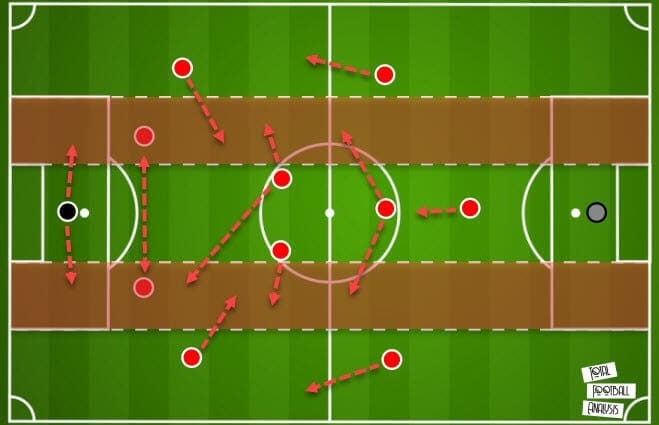
Interestingly, in case the team in question is playing with a sweeper-keeper who’s good on the ball, he too can participate in this phase of attack. The full-backs can stay wide but there is also an option for them to invert into the half-space too as they are joined by one or two central-midfielders as well.
Note, once again, that the movement you see in the graph above doesn’t necessarily happen all at once within the same attacking action. Sometimes, it isn’t necessary for all the players who participate in the build-up phase to overload the same area of the pitch. There must be an outlet unmarked that the ball can be transitioned too once the overload is complete.
In our case above, we can see the wingers staying wide but dropping deeper to potentially receive the pass from the congested first third of the pitch. Once the ball is in the final third, the same principles apply. The half-space can be overloaded easily because of the free role the no.10 has and the double-pivot who stays just ahead of the centre-backs.
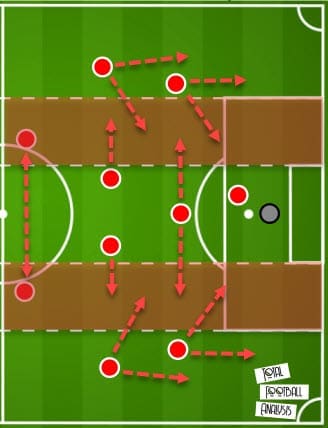
Again, we see the centre-backs spread out and on their respective sides and the pivots do the same thing. They can drift wide to cover for the full-backs if they are overlapping or simply drift to create numerical superiority in the half-space, as discussed.
As you can see, there are two main options here for the wingers and the full-backs. Generally speaking, a natural winger will hug the touchline while an inverted winger will cut in centrally. The same is true for the full-backs and the relationship between the two roles will depend on the type of player you have in each position.
In a 4-2-3-1’s attacking tactics, however, this plays a huge role. Let’s explore both scenarios with some graphs down below.
First, we’ll tackle the inverted winger/overlapping full-back combination. This seems to be the more popular version in today’s football. The idea, once again, is rather simple – the wingers will cut inside and advance through the half-space, occupying the zone 14 alongside the centre-forward.
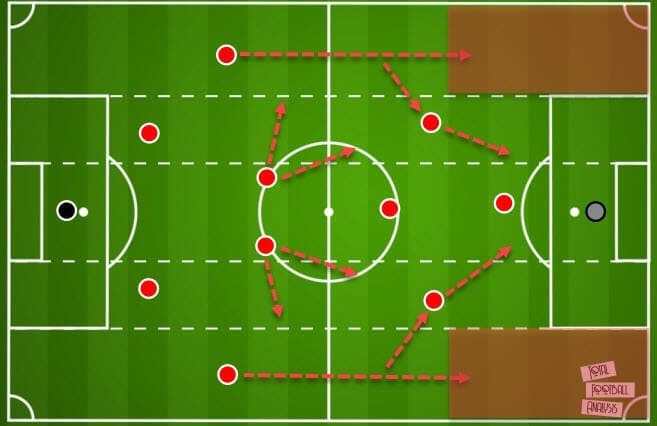
This is often the primary source of width in a 4-2-3-1 formation but how do different coaches achieve it depends on their individual approach. The goal is to create space on the flanks so that the full-backs can be ejected behind the opposition’s backline.
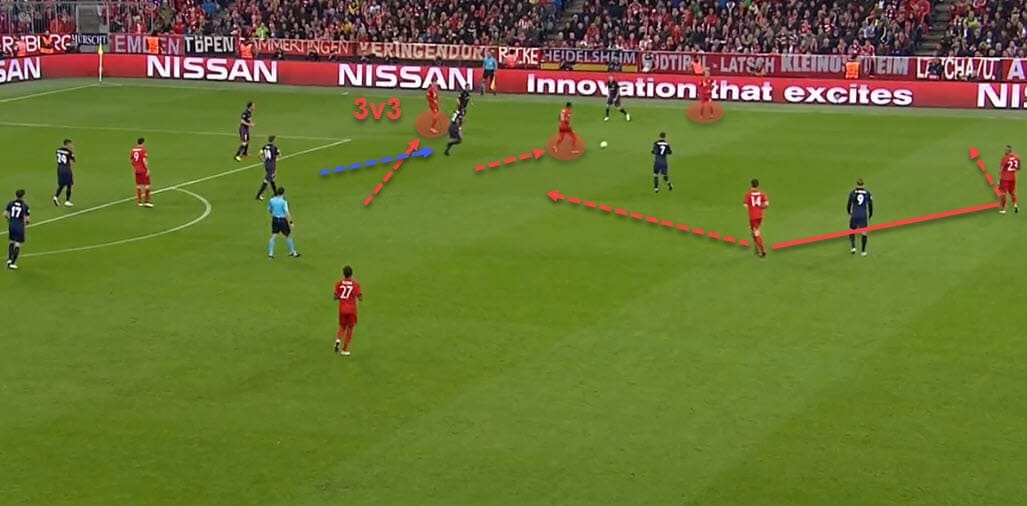
Guardiola’s Bayern Munich, for example, worked exclusively with inverted wingers and they ensured the full-backs were unmarked by overloading the centre of the pitch instead, inviting all the pressure inward.
Here’s an example against Atlético Madrid back in the day. You can see how narrow the Rojiblancos are defending and it’s all the result of Bayern congesting the central areas and attracting their attention.
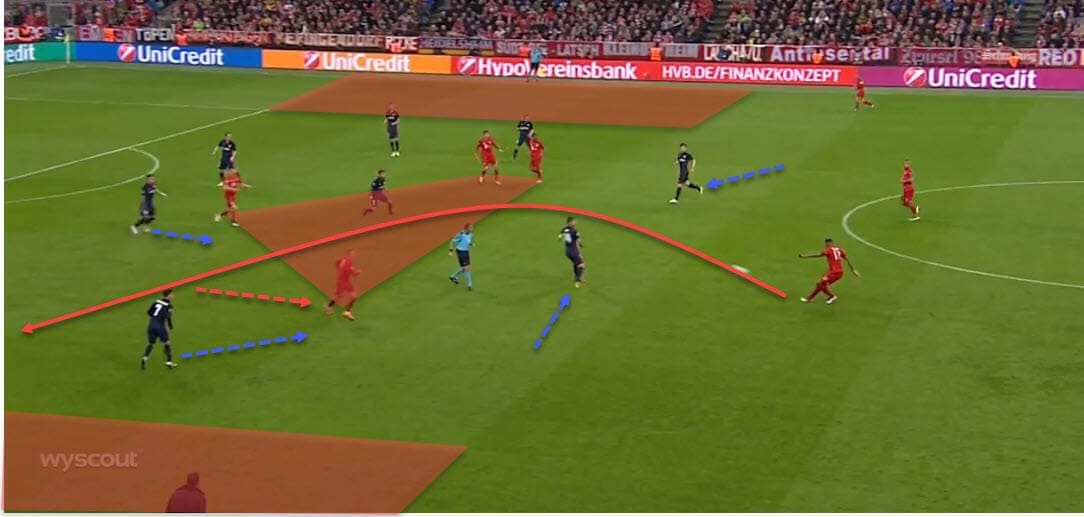
At the same time, with Jérôme Boateng on the ball, the full-backs are bursting forward and can exploit the completely free flanks. Both David Alaba (on the left, off-screen) and Philipp Lahm are already in a position to receive the ball in a full sprint and run in-behind the defensive line of the Madrid team.
This ‘overload the centre and release the wing’ is a common pattern in 4-2-3-1’s attacking tactics, although it can work the other way around as well. Guardiola, for example, knew how to balance the two even though he preferred the former move.
Another example from the same match can be seen below and this time, Thomas Müller, the no.10, shifts over to the right side to overload the wing together with the full-back and the winger.
Apart from potentially creating a numerically superior position out wide, it also forces the opposition to react. Atlético immediately have to shift another defender towards that area to stop Bayern from progressing but that opens up space centrally and around zone 14.
Also notice the movement of the double-pivot, in this case, Arturo Vidal and Xabi Alonso. One moves forward towards the opening that was just created while the other stays deeper and potentially shifts out wide. This opens a safer passing channel in case the ball needs to go backwards and also provides cover.
The alternative option for width, however, is inverting the full-backs or keeping them deeper so the wingers can hug the touchline, as can be seen below.
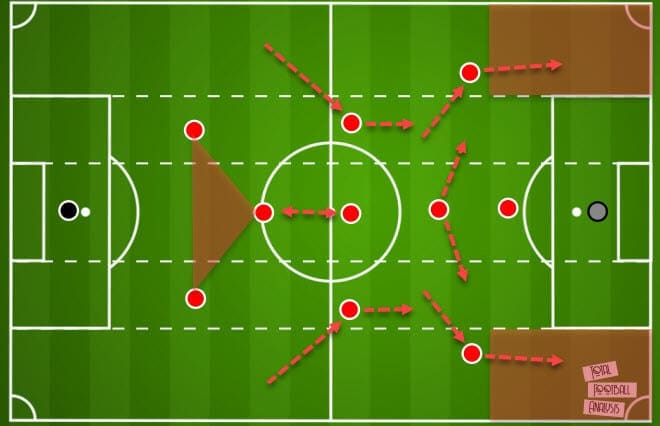
Again, one pivot will then stay deeper to support the centre-back duo while the other moves up the pitch and looks to combine with his advanced teammates. With the inverted full-backs, it’s also an option to help combat numerical inferiority in the centre, once again trying to attract the opposition inward.
But the main point to be taken from this is the freedom of the no.10 to move across the final third in search of these overloads. Our final example looks at a similar setup with Spain’s national team with Sergio Busquets accompanying Alonso in the double-pivot.
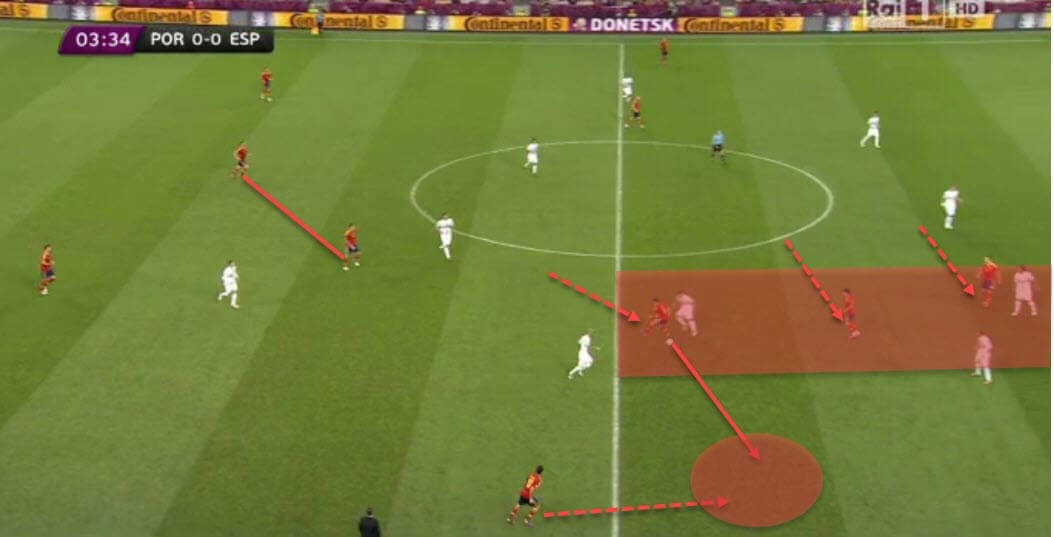
This time, however, we’ll look at the build-up play higher up the pitch. Notice the half-space overload Spain are creating in the image above. This staggered positioning in that area attracts Portugal’s defenders, leaving the flank open for Álvaro Arbeola to exploit.
It only takes a cheeky flick by Xavi Hernández to transition the ball into the open space and Spain can successfully advance up the pitch.
The double-pivot and the no.10
The final part of this tactical analysis will delve a bit deeper into the different roles and responsibilities of the two most interesting and unique positions in the 4-2-3-1 system – the double-pivot and the no.10 role.
Both are specific to the formation as not many other structures utilise it as much or at all. We’ll finish the tactical theory piece by taking a look at how some of the modern coaches like Frank Lampard, Ronald Koeman and Mikel Arteta set-up their players in those roles.
First, however, we have to explain their responsibilities in more detail. A part of this was already covered in the first section of the analysis but now we’ll delve deeper into it. Starting with the double-pivot, the main characteristic of this structure is the difference in roles between the two midfielders.
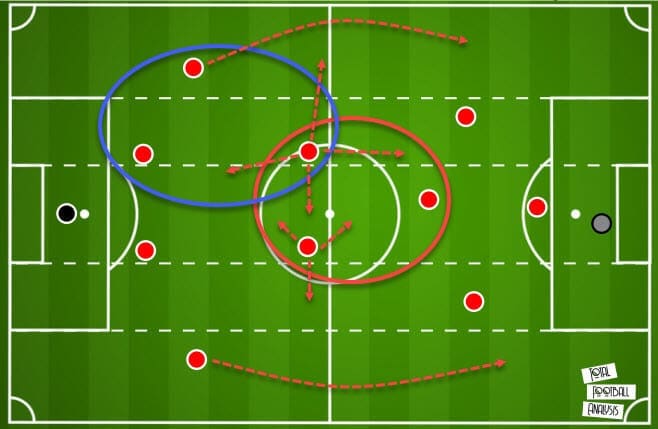
Above, you can see a graph that shows us both players with the arrows depicting the subtle differences in their movement and actions. One is the more defensive player while the other has the licence both to drop deeper to progress play and burst forward, offering support to the attacking line.
Following Bertolini’s model once again, the circles represent the main build-up relationships the pivots form on the pitch. Their main tasks are both defensive and offensive. Defensively, they offer the rest-defence in the final third and often slot wide if the full-backs are highly aggressive.
Offensively, ball-progression and attacking support are key. The latter, usually, for just one of the two, often the left pivot. You can see this relationship below at Chelsea as Jorginho drops to the backline to create numerical superiority against Sevilla.
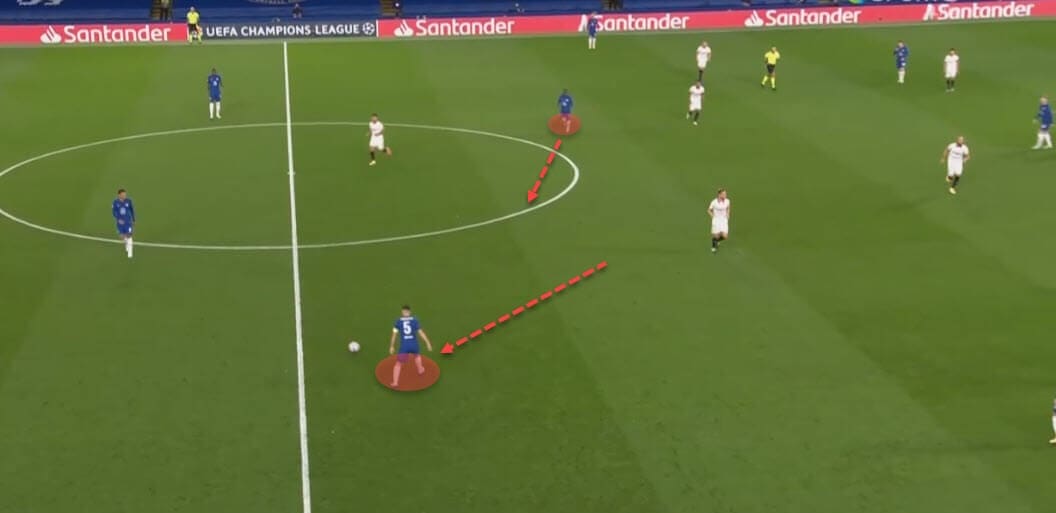
On the other hand, N’Golo Kanté stays higher as support and moves to open another passing channel. Interestingly, it’s often the player who’s better on the ball and moving with the ball that drops deeper and then progresses higher while in possession.
A similar setup is used at Barcelona, for example, where Frenkie de Jong and Sergio Busquets often combine. Even though the former is the one to drop deeper and into the backline, he is also the one that progresses the ball and moves up with it into advanced areas.
You can see such an example below. Here, both pivots are deep because of the high Sevilla press but it’s De Jong who gets to combine with his full-back and no.10 to bypass the press and actually move with the ball as opposed to progressing through passing.
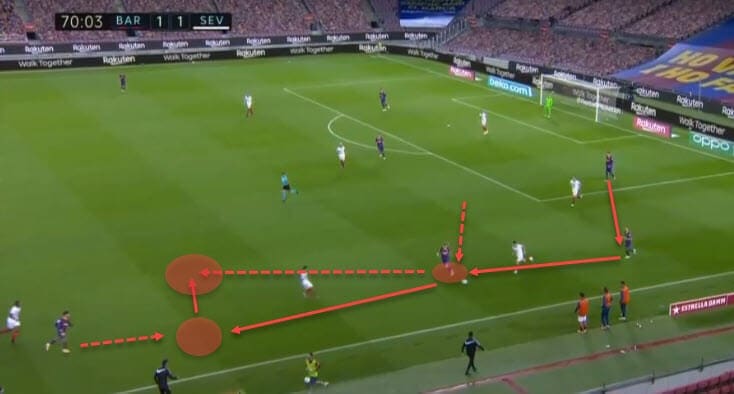
The above example is also a very good introduction to the other role this tactical theory will analyse and that’s the advanced midfielder or the no.10. In a 4-2-3-1, he is often the most creative player in the squad and also the one with the most freedom.
We have already discussed his role of creating overloads but now, we’ll take a look at how that might translate onto the pitch. As the most creative and thus among the most dangerous players in the team, he can be tasked to both be a second-striker or just an advanced creator, interchanging positions with other players and roaming the final third.
Below is a graphic that shows us a general approach on the flanks with the advanced midfielder joining the wings to create an overload on the opposition’s defenders.
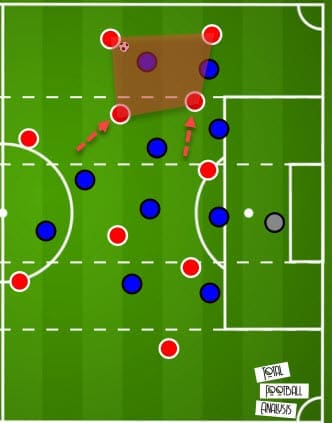
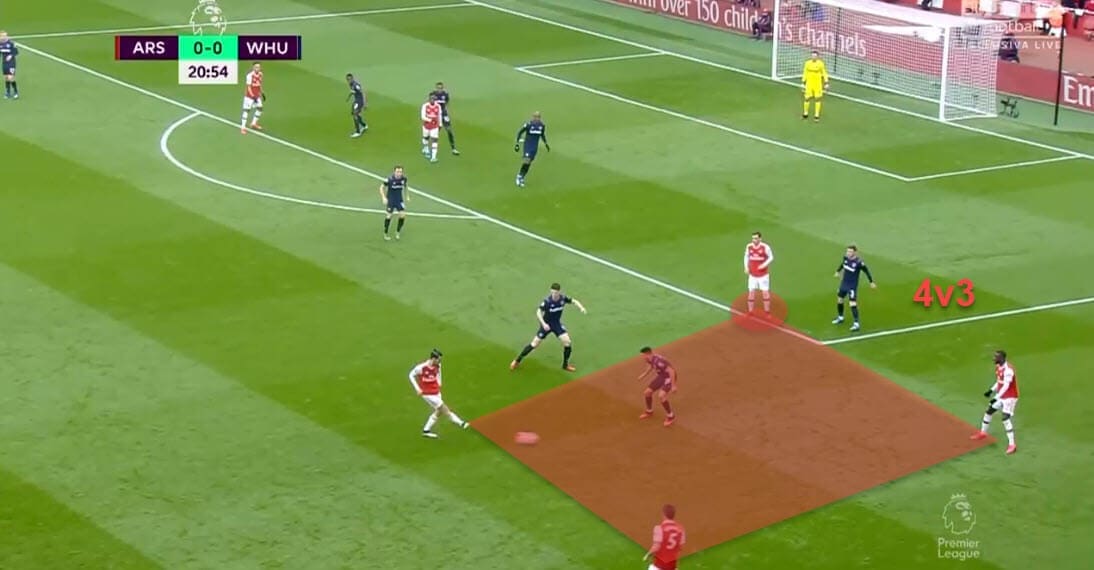
Once again, this will depend from coach to coach but these are the key characteristics the no.10 gives to a team. For instance, Arteta used the double-pivot and the advanced midfielder combination during the spell Arsenal were deployed in a 4-2-3-1.
Now, of course, he prefers the 3-4-3 but it is interesting to revisit his view of the formation. In the following example, you can actually see Mesut Özil drift wide to the right side of the pitch to create an overload we mentioned earlier in the tactical analysis.
Going back to Chelsea and Lampard again, we see a similar pattern in their tactics. Kai Havertz, the newcomer, will often assume this role and his movement across the final third is in a similarly free role.
The youngster will drift wide to create overloads, similarly to Özil in the previous example. However, here with Havertz especially, we can see him make runs in-behind the defensive line. The whole sequence below is interesting because it shows us the tasks of the role quite well.
Firstly, Havertz goes wide and is positioned in the half-space, overloading it and opening a new passing channel. In the end, Chelsea go wide and this is a cue for him to start his run into the box.
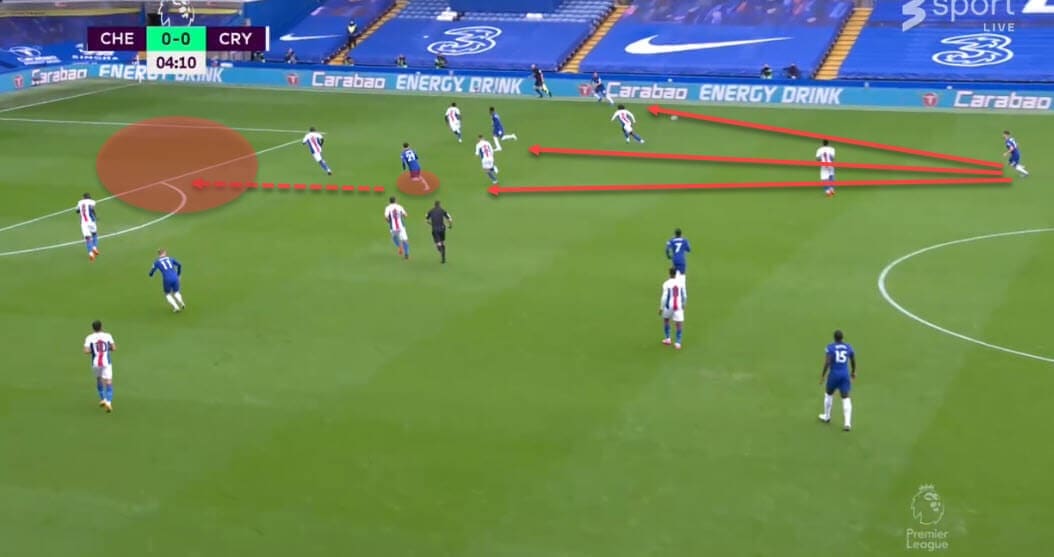
Essentially, the no.10 has to offer support, help create passing channels and overloads, be an inside or outside option for the wingers and be comfortable playing between the lines. It sounds like a lot but that’s because that role is essential to the attacking tactics of the 4-2-3-1 structure.
Conclusion
As we’ve mentioned earlier in this tactical analysis, no formation is perfect but there is a reason why the 4-2-3-1 is making a comeback of sorts and plenty of top European teams are gravitating back towards it.
Of course, the defensive structure of this system is quite interesting as well and we might cover that next time. Stay tuned.


Comments