Deriving from the German word “Halbraum,” half-space is the vertical zone between the central and wide areas. It has entered the football lexicon and become a widely used term for what was once referred to as the “inside channel.” It is an area of the pitch not quite as crowded as the central area and not as far from the goal as the wide area, making it a key zone from which to create goalscoring opportunities.
As will be analyzed in this tactical theory, it is an area that is very hard for defenders to mark in and allows the receiving player to play in multiple directions. The half-space is often targeted by the likes of Pep Guardiola’s Manchester City, Mikel Arteta’s Arsenal and Brendan Rodgers’s Celtic in the attacking phase. Examples of tactics from Rodger’s double-winning team will be provided in this tactical analysis. This analysis also offers coaches examples of how they can implement these tactics into their training sessions. A crossing and finishing exercise, a small-sided game and patterns of play are included. These are designed to enhance penalty box entries and goalscoring opportunities from this zone.

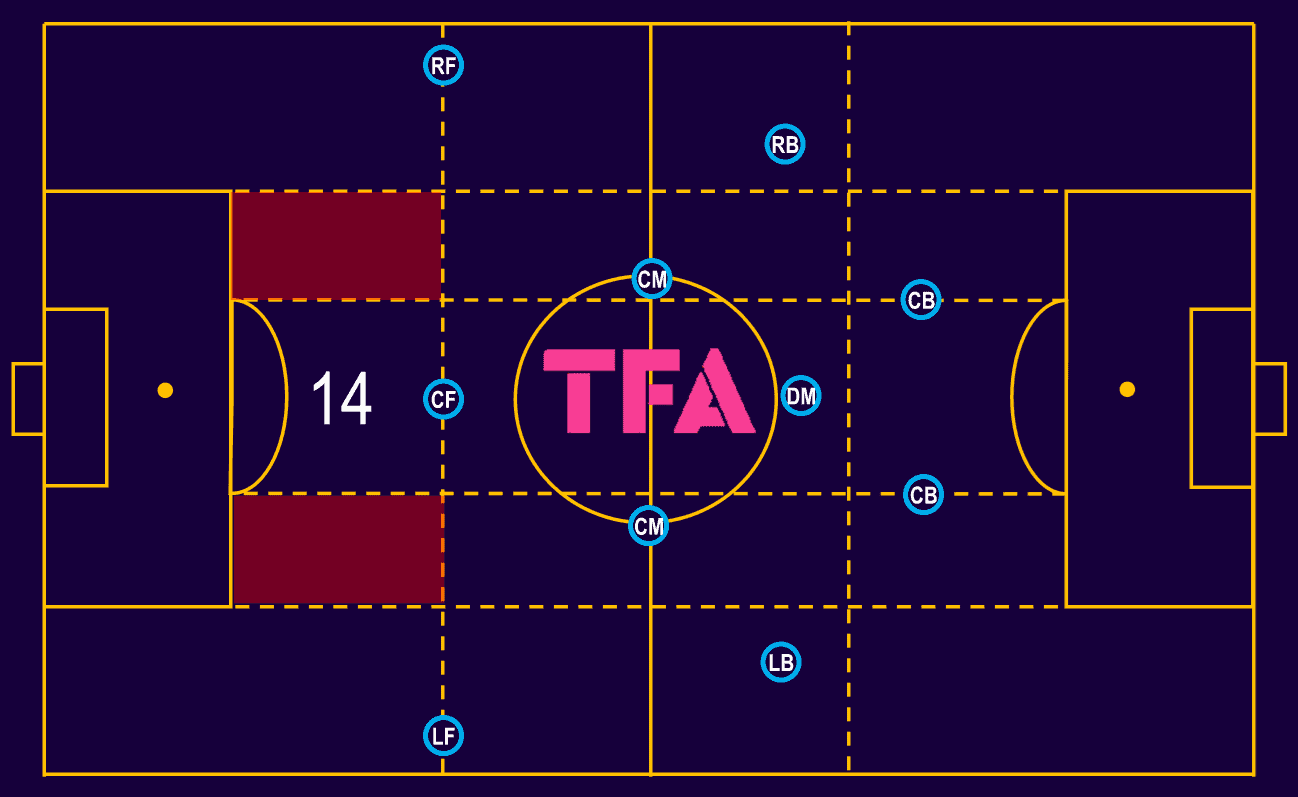
This analysis will focus on movements in the half-space in the final third just outside the 18-yard box, highlighted in red in the tactical diagram, on either side of zone 14. This tactical theory will be based on teams using a 4-3-3 formation. The focus of the analysis is on the movements and combinations that allow players to receive the ball here, in between the lines, and create penalty box entries.
Winger receiving in the half-space
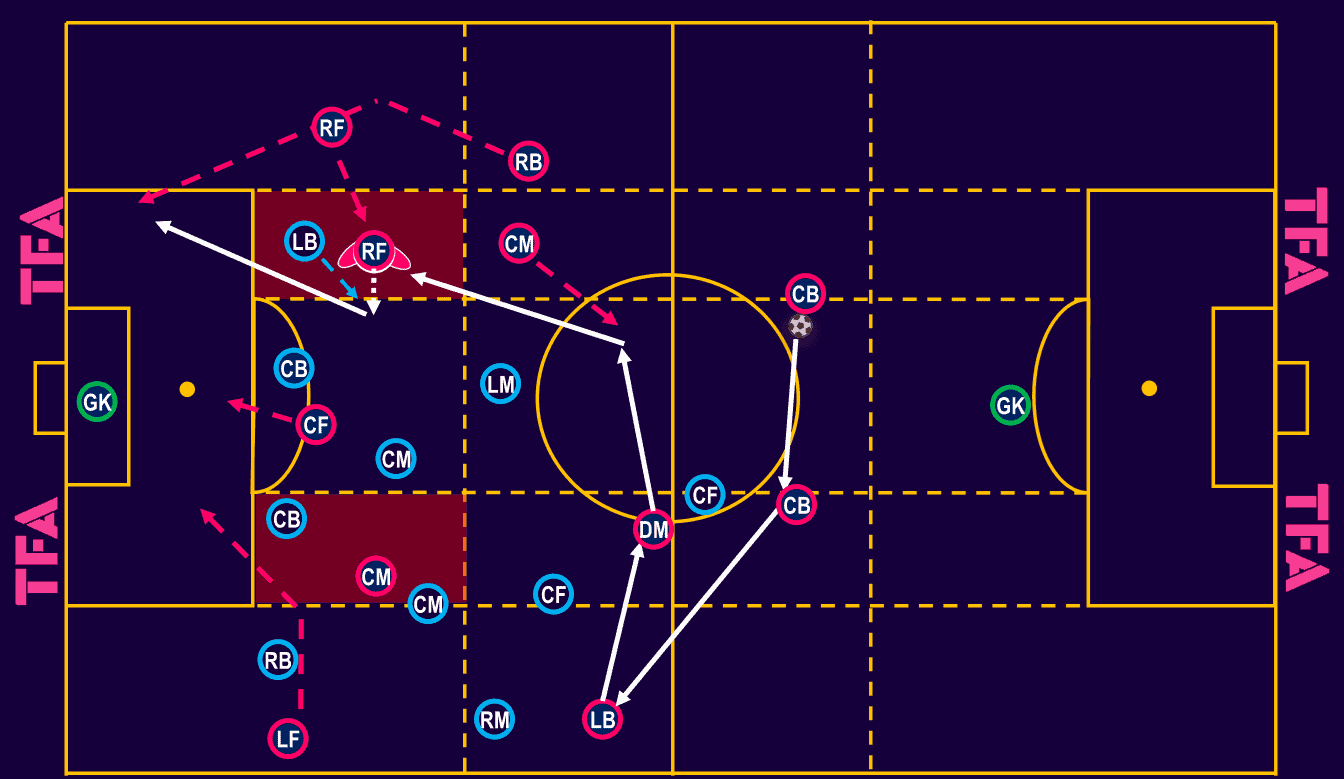
The above tactical diagram shows an example of how a winger can move inside to the half-space and become much more dangerous. Receiving the ball here gives the winger many more options. The area is not as constrained as the wide area, close to the touchline, which gives players a range of only 180°. Receiving in wider areas is easier to press against and, with fewer options, makes a player’s next action far more predictable.
Typically, creating enough space for the above movements to take place would require a switch of play. As can be seen on the tactical diagram, before the switch, the blue team can comfortably crowd out the ball near half-space. When the ball is moved to the opposite side, their full-back is then exposed and left in a difficult situation.
Ideally, the pass into the winger should be played inside to force the winger to have their hips facing in the pitch. This allows the attacker to see more of the pitch and makes it far more difficult for the full-back to defend against. Once the ball has been received, the winger has many options. As shown, if the full-back jumps, an overlapping full-back can be played in. The striker can come short to combine or make a run in behind to be slid in. The winger could cross to the back area or take on a shot themselves.
Crossing and finishing exercise
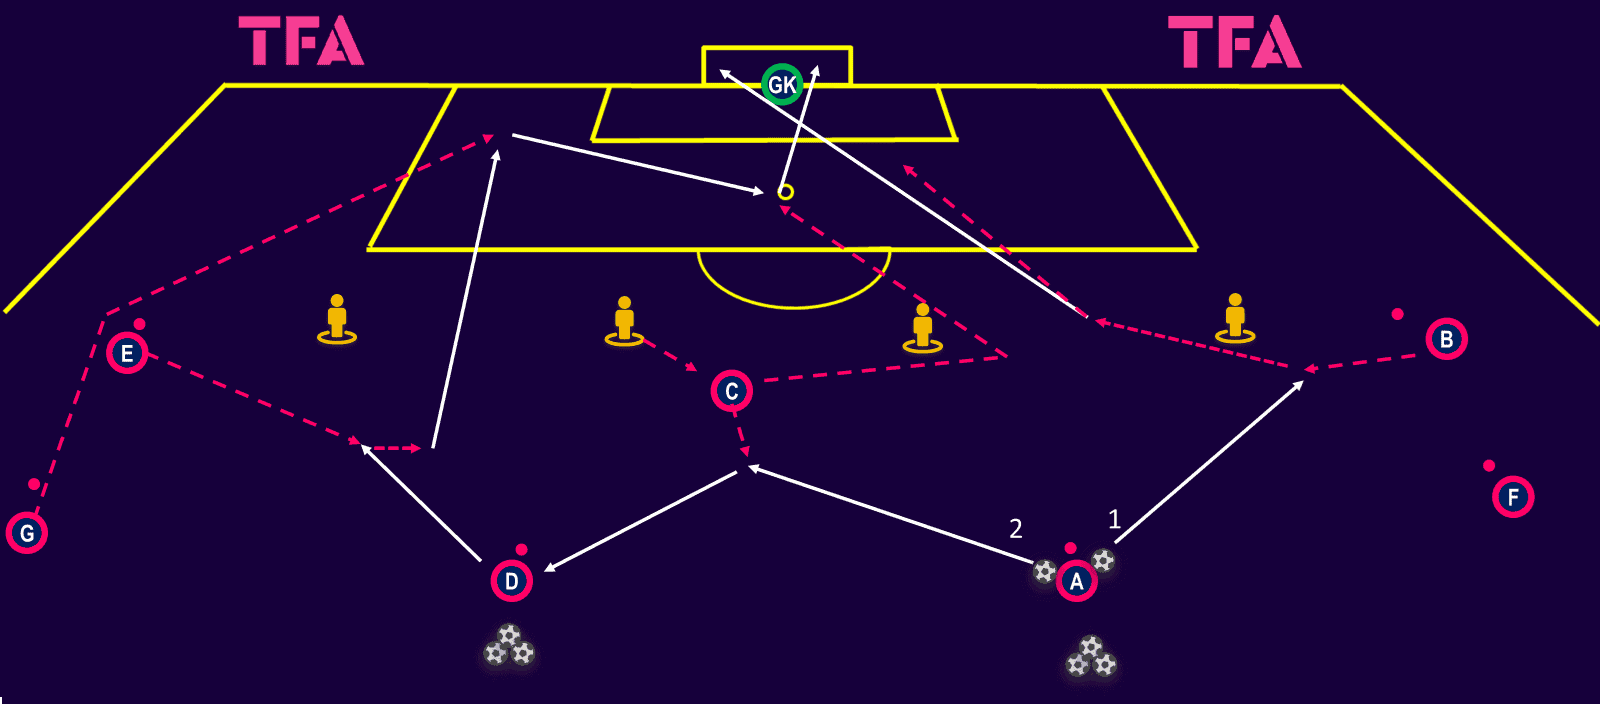
This crossing and finishing exercise allows players to work on the movements outlined above. The exercise begins with player ‘A’, who represents a central midfielder, playing a pass in front of the wide mannequin, representing the opposition’s full-back, for their winger to run onto. The winger, ‘B’, takes a touch inside the pitch and shoots at goal. The winger then continues their movement into the box to be available for the second ball in play.
The second ball is introduced as soon as ‘A’ has passed into ‘B’. As quickly as possible, ‘A’ plays a second pass to the striker, who then bounces it out to the other midfielder. That midfielder plays a similar pass as the first one into the opposite winger. This pass is the trigger for player ‘G’, representing a left-back, to make an overlapping run. The winger takes a touch inside the pitch before playing the left-back deep into the box. The striker, who should have spun and moved away from the ball after playing the bounce pass, plus the ball-far winger who has just shot, should be in the box to attack the cutback. The drill is then repeated, starting on the opposite side.
Central midfielders receiving in the half-space
Central midfielders’ ability to receive in the half-spaces is a key component of a modern, possession-based team. By receiving in this area, midfielders can play in almost all directions. If the central midfielder were to receive in the central zone whilst still dangerous, they would be in a far more crowded position. As the next few images will highlight, a central midfielder receiving here gives plenty of passing options for penalty box entries as well as opportunities to shoot directly at goal.
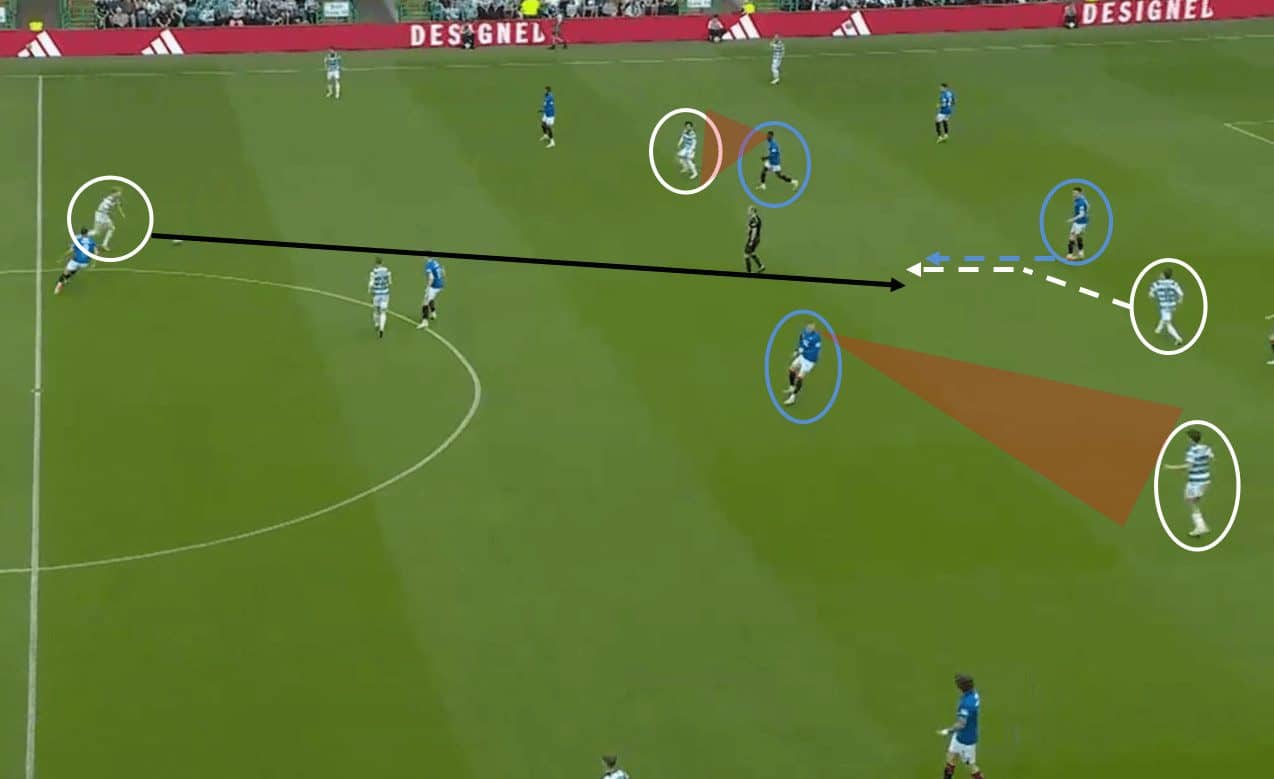
The above image, from the last old firm league game of the season, shows the importance of central midfielders occupying the half-spaces during the build-up phase. Here, against Rangers’ 4-4-2 low block, the positioning of midfielders Matt O’Riley and Kyogo has given the two Rangers midfielders a dilemma—to position themselves to prevent Celtics midfielders from receiving the ball or to protect the central area. By choosing the former, they have opened a passing lane for Celtics striker Reo Hatate.
Centre-back Liam Scales dribbled past the opposition’s first line of pressure and played an angled pass into his striker. Hatate, due to his body shape and quick change of direction, is able to allow the ball to run across him whilst protecting it from the centre-back. Now facing O’Riley, Hatate bounces the ball to his central midfielder. The Danish playmaker now has the ball in the half-space, almost unopposed, with several options at his disposal.
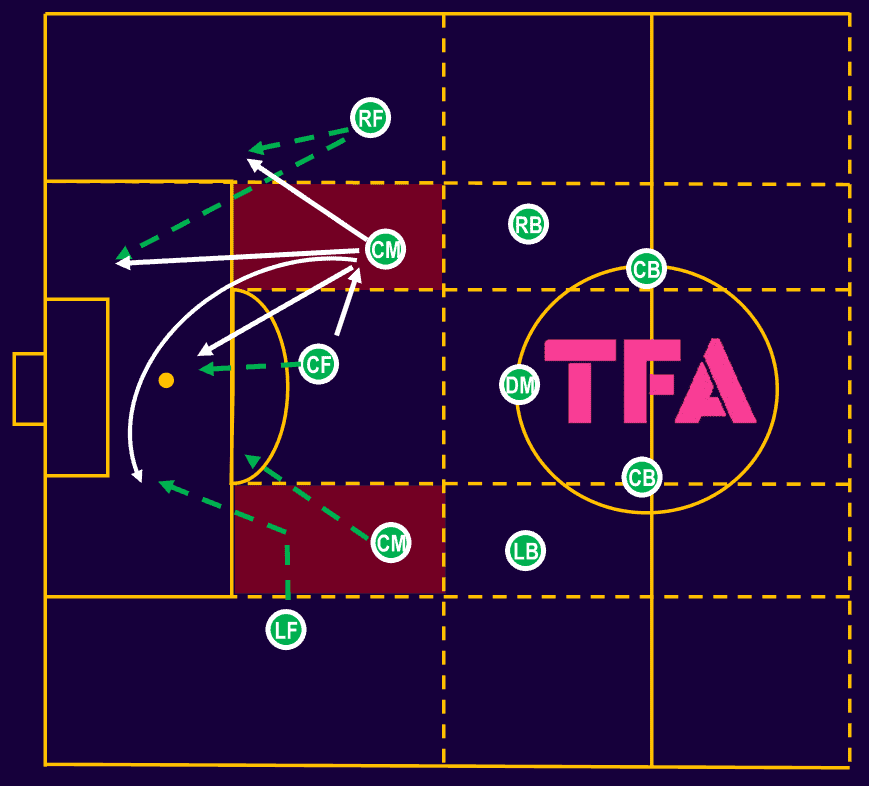
The above tactical diagram depicts a similar scenario to which O’Riley found himself in, and highlights several of the options he has available. From here, a midfielder can comfortably cross to the back post area or slide in his striker or winger. O’Riley elected to pass to his winger, James Forrest, on the outside of Rangers’ back four. This allowed Forrest to take on the full-back one-on-one before delivering a cutback.
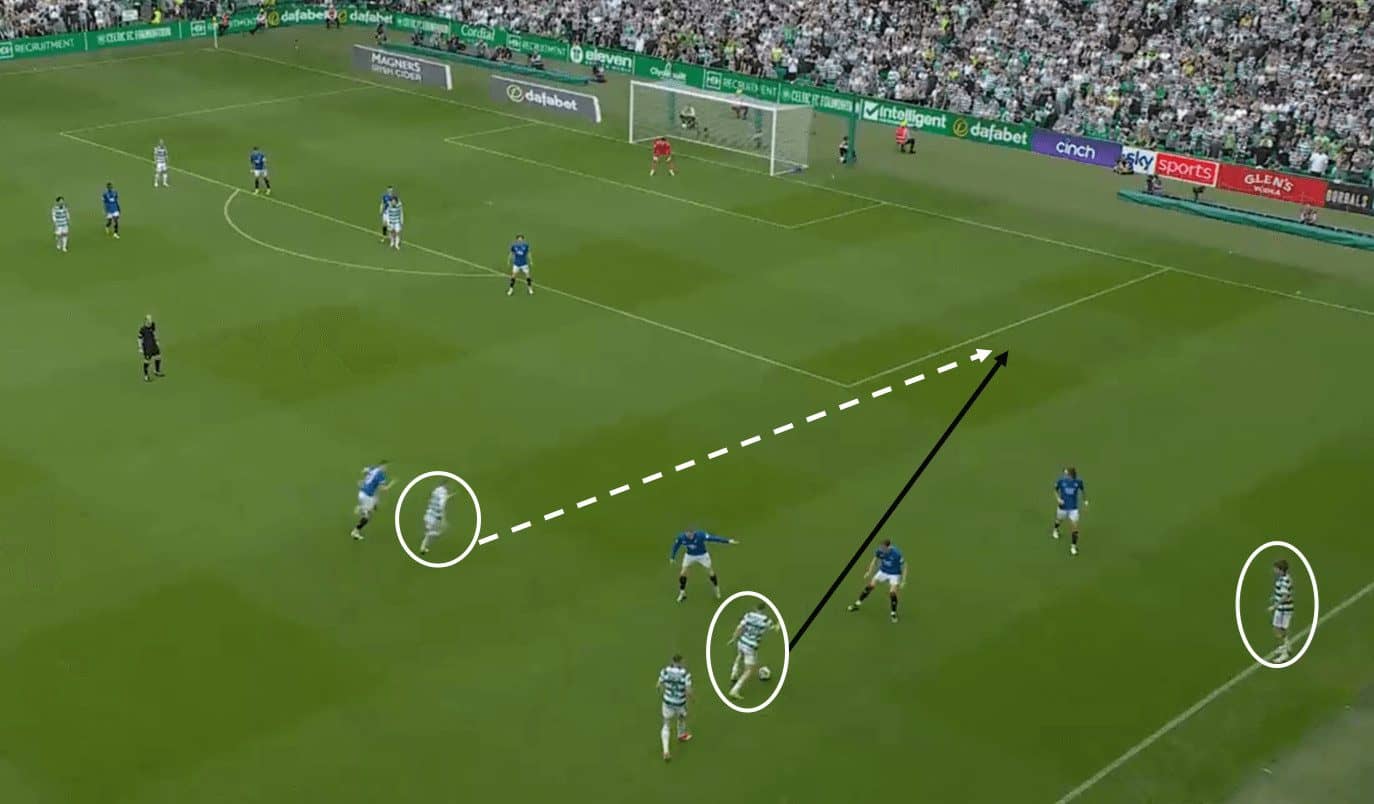
This image, from the same Glasgow derby, is a good example of how Celtic target the half-space and the dynamism of their play. Here, O’Riley has rotated to find himself as a right winger. Callum McGregor, seeing the gap that has been created by Celtic overloading the wide area, makes a run in the half-space in behind Ranger’s backline. Forrest plays the ball for McGregor to run onto.
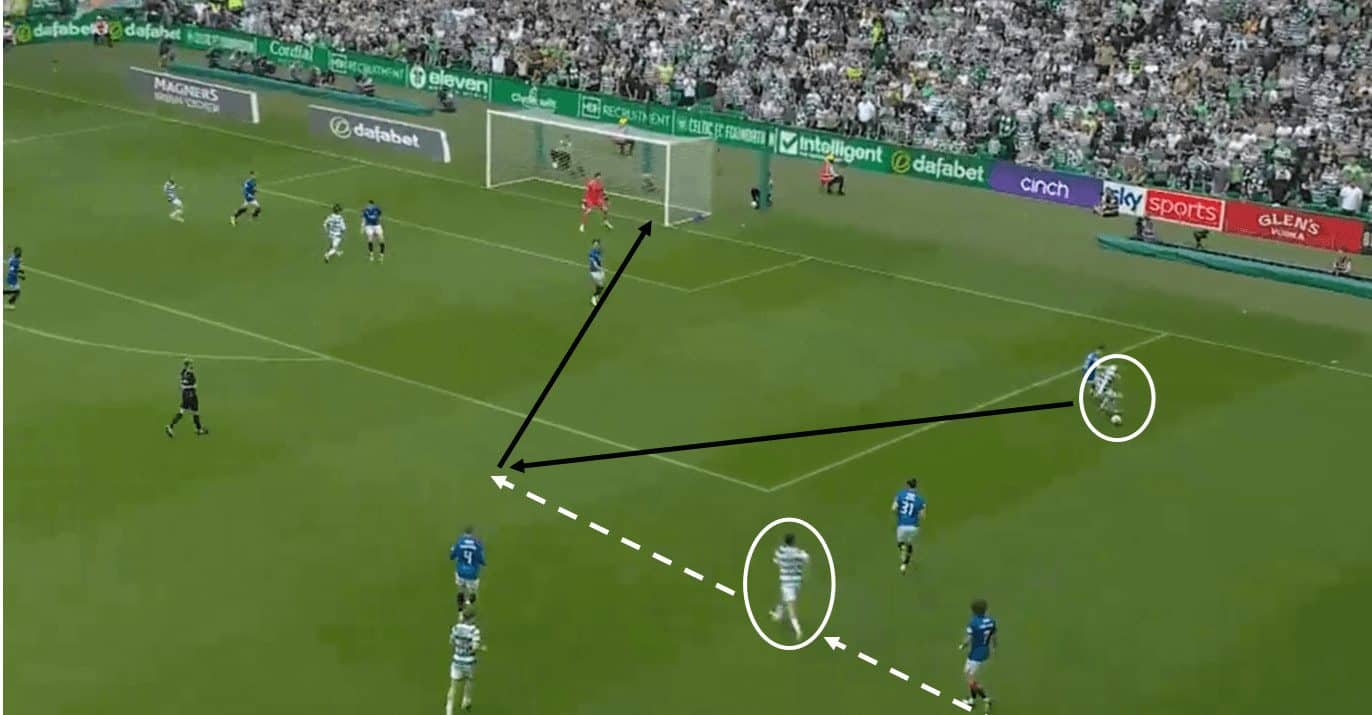
As soon as the ball is played forward, O’Riley sprints off the touchline and into the half-space. McGregor pirouettes to find O’Riley unmarked. Again, from this position, O’Riley’s options are bountiful. He chooses to strike at goal on this occasion, putting Celtic 1-0 up.
Improving central midfielders in the half-space
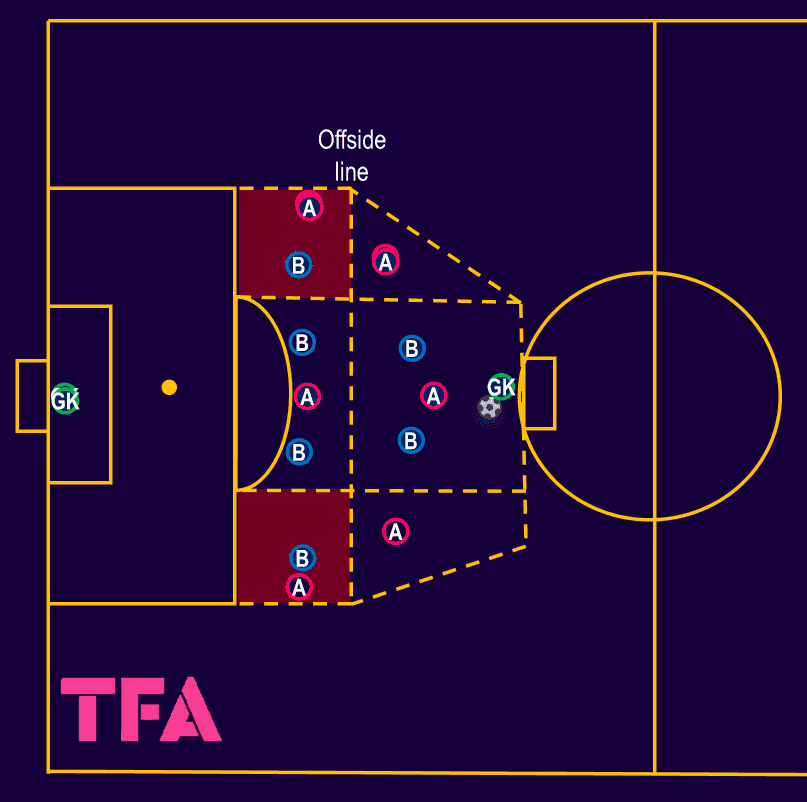
This small-sided game is designed to work on players being as comfortable as O’Riley in the half-spaces whilst being pressured by live opposition. Two teams of seven (six outfield players plus a goalkeeper) are created. The working team, shown as pink, are set up in a 3-3 formation, representing their midfield and forwards. The opposition is set up in a 4-2 to mimic attacking against a back four and two central midfielders. The pitch is condensed to create the conditions for the maximum number of attacks coming via the half-space.
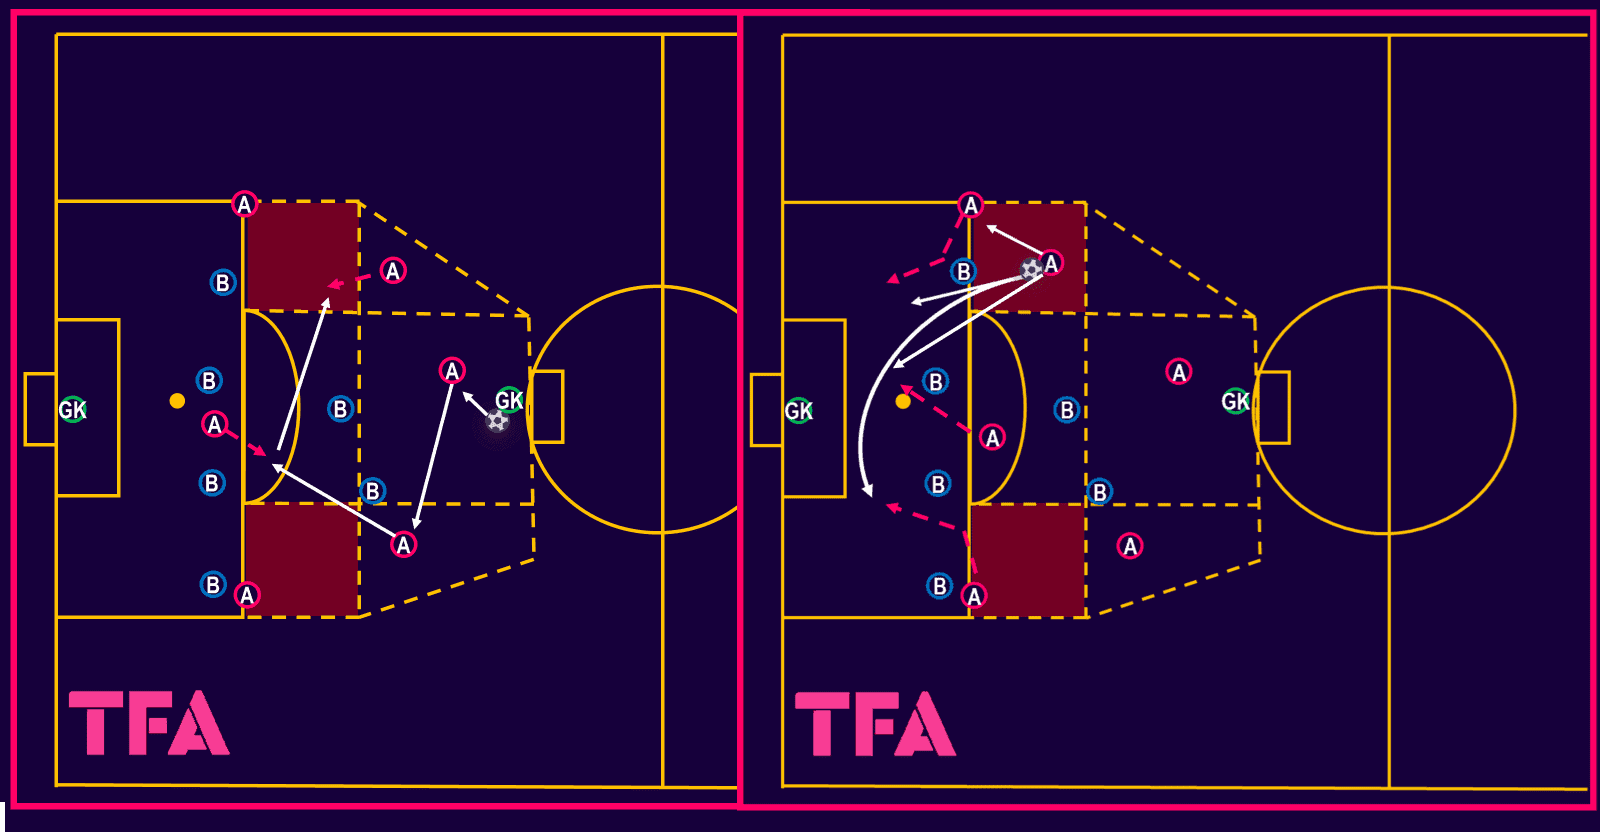
The rules of the game closely follow those of a real game, with players being free to move from zone to zone. Players should, however, be encouraged to take up game-realistic positions. The wingers should start high and wide to pin and stretch the back four. The central midfielders should make runs to receive in the half-spaces as much as possible. For the attacking team, to encourage combinations in the half-spaces, any goal that is scored after no more than two touches once the ball has left the red zone counts double.
The ball being received in these red zones by the central midfielders should be a trigger for certain movements to be made. The midfielders should be aware of their teammates’ positioning before receiving the ball and be primed to play any of the four options highlighted above.
Half-space patterns of play
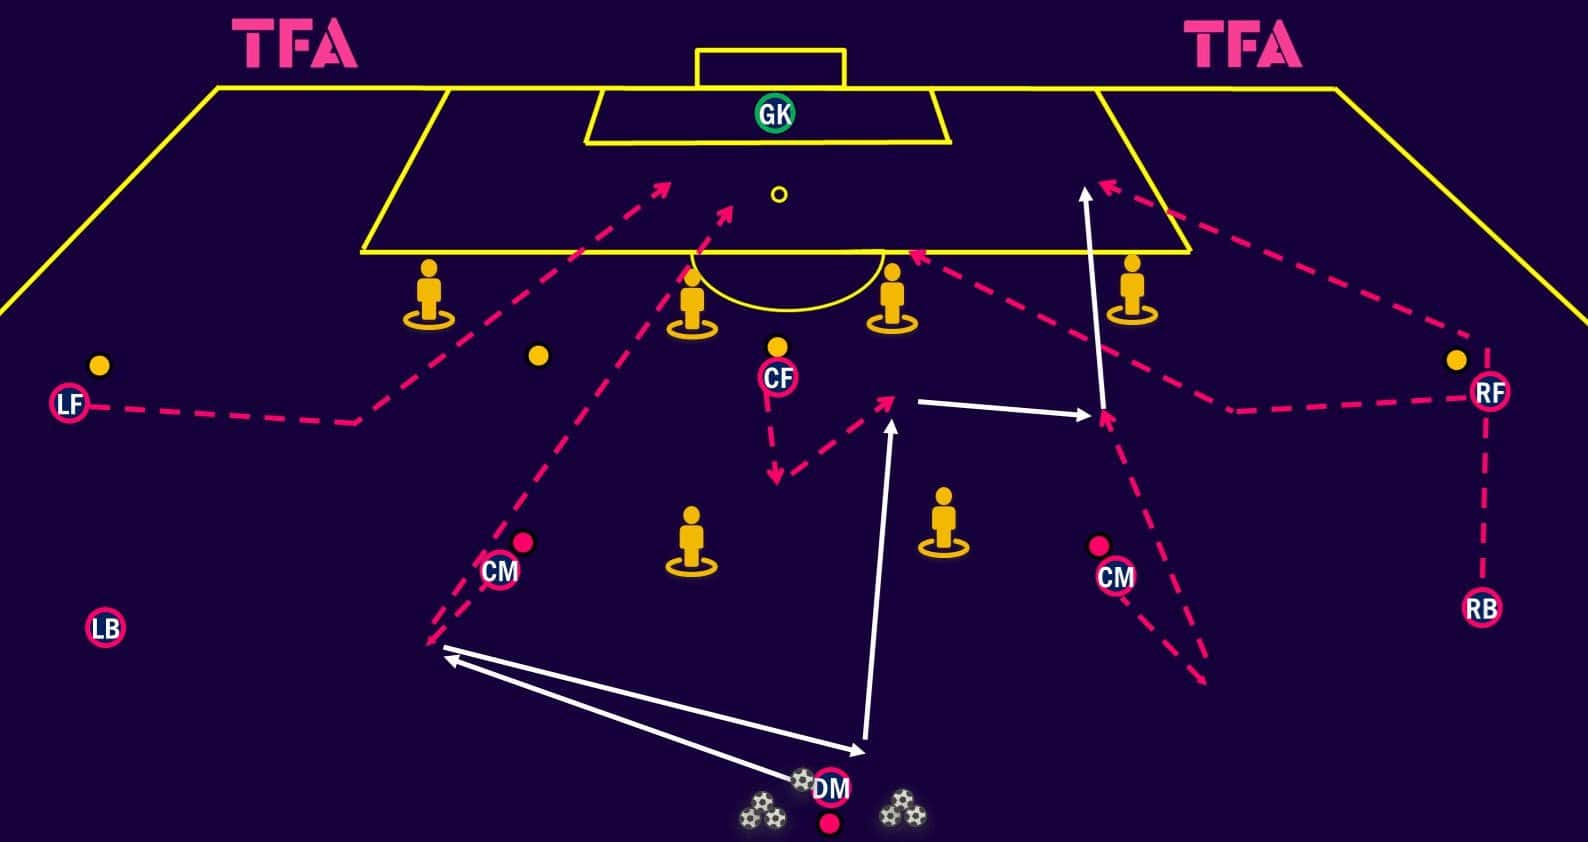
The above example of a pattern of play involving the central midfielders receiving in the half-space is based on how Celtic created an opportunity against Rangers. The ball starts with the defensive midfielder, who plays into one of the central midfielders, who are positioned wide among the opposition’s midfielders (mannequins). The ball is then bounced back to the defensive midfielder, the midfielder’s positioning and movement should spread the opposition’s midfield to allow a pass into the striker. When the striker receives, the ball is bounced to the opposite central midfielder. In the example given, it is an overlapping full-back who then receives the ball in the box. The midfielder should be provided with additional options, playing a one-two with the striker or crossing to the back area for example.
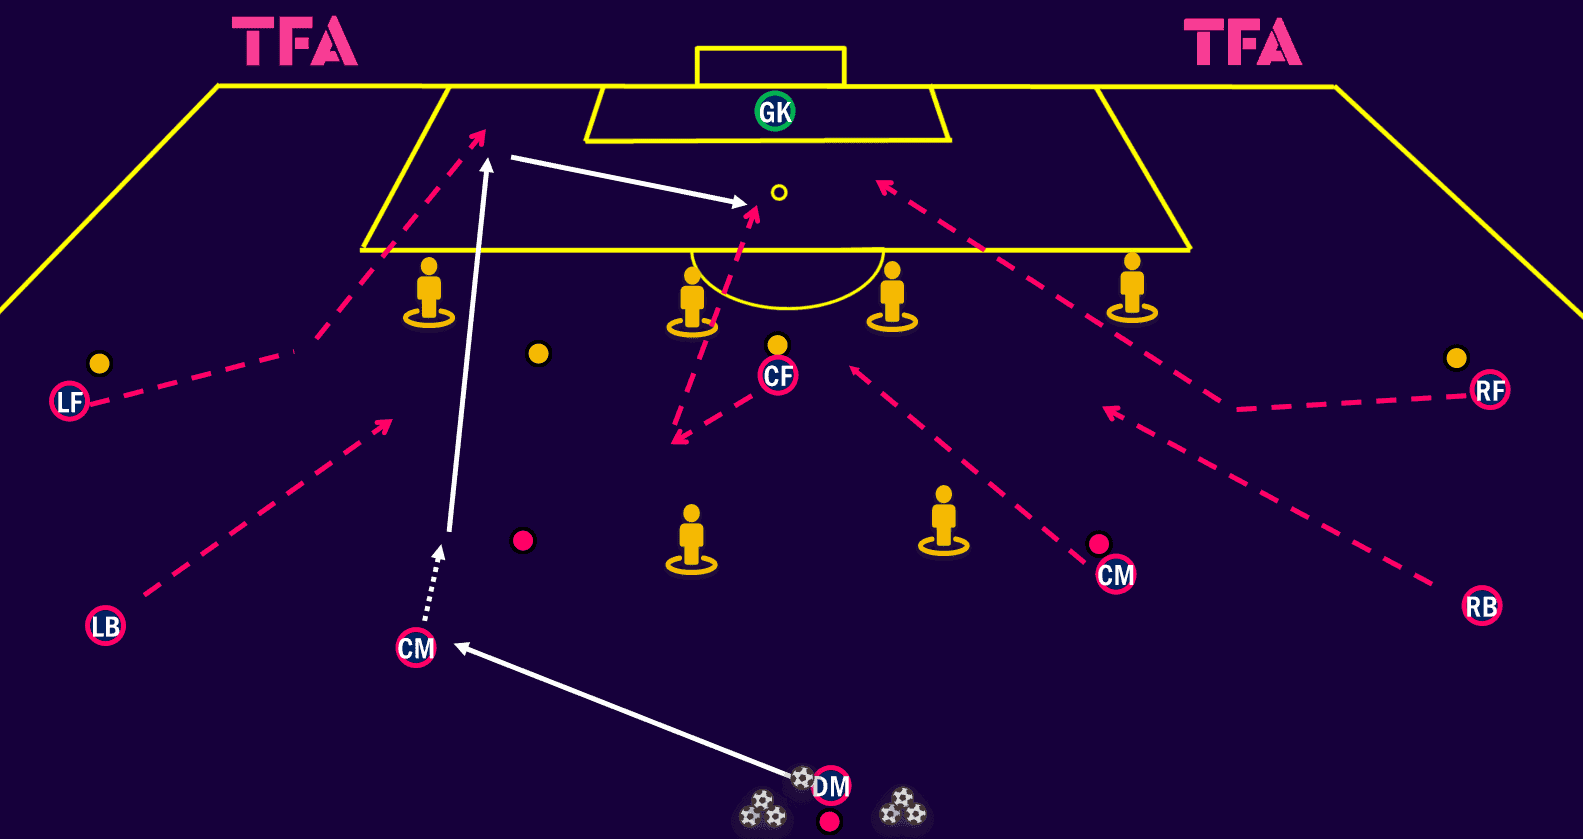
This setup can be adapted to account for teams remaining compact and screening the central forward. In this instance, one option is for the receiving midfielder to attack the space before sliding through their wide forward.
Conclusion
The half-space represents a critical area on the pitch for creating goalscoring opportunities. This tactical analysis has illustrated how top teams, like Rodgers’s Celtic, exploit this space to their advantage. Vital to making the most out of the half-spaces is the timing of the runs into it. Once the ball has entered these areas, it should be an automatic trigger for runs to be made into the box. If the timing is correct, these situations can become almost undefendable.



Comments