This tactical analysis focuses on the movements of top-performing strikers in the moments before their final goalscoring action from various types of crosses.
Instead of focusing on their involvement in build-up play, this tactical theory analyses how forwards can create space for themselves in front of the goal to attack crosses.
The movements of the Scottish Premiership's top scorer Sam Dalby, Chris Wood of Premier League highflyers Nottingham Forest, and Celtic's Kyogo Furuhashi are analysed.
Small-sided, game-like exercises that allow strikers to practice these tactics are provided with this tactical theory.
Attacking Low, Half-Space Crosses
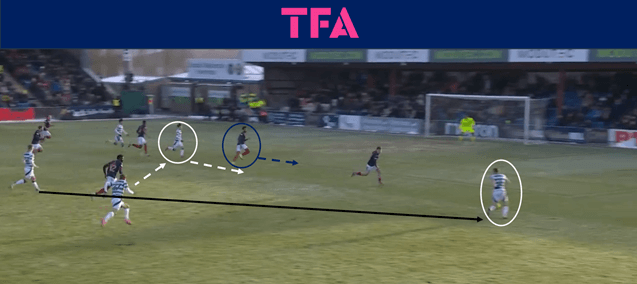
This move shows the intelligence of Celtic's Kyogo, who attacked a low, half-space cross to open the scoring against Ross County.
Kyōgo initially moved away from the ball as it was switched wide to his right-back, Alistair Johnston.
However, with the nearest Ross County defender tracking Kyogo’s movement well and positioning himself centrally to defend the cross, Brendan Rodgers' talisman then performs a double movement to move the defender.
The first movement of the double run is designed to take the defender towards the front area.
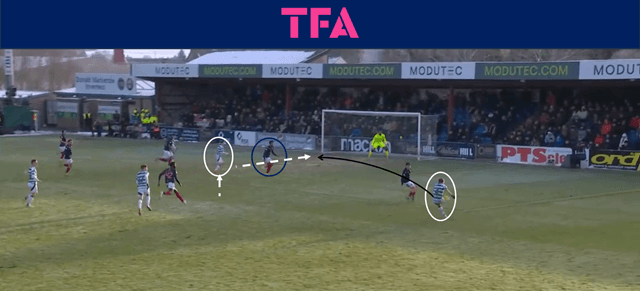
With the defender now outside the width of the post, Kyogo reverses his movement and runs on the defender's blindside.
The moment Kyogo chooses to make his last movement is just as Johnston is about to deliver the cross.
With the defender watching the ball, he is unable to see Kyogo moving off the back of him.
The whip and pace of Johnston’s cross is perfectly weighted to take the first defender out and provide Kyogo with a clear shot at goal.
Attacking High, Half-Space Crosses
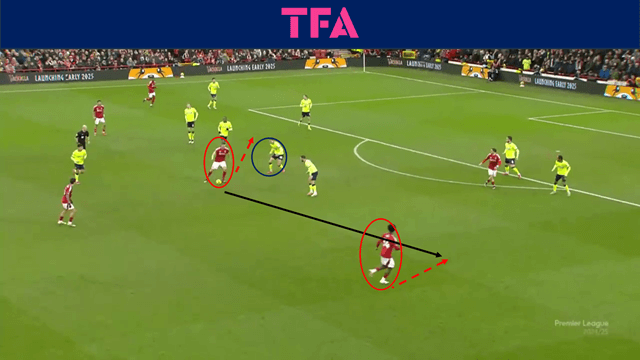
Nottingham Forrest’s Chris Wood mirrored Kyōgo's movements with this headed goal against Southampton.
In this example, Wood himself falls to the right half-space before making his initial movement in the opposite direction.
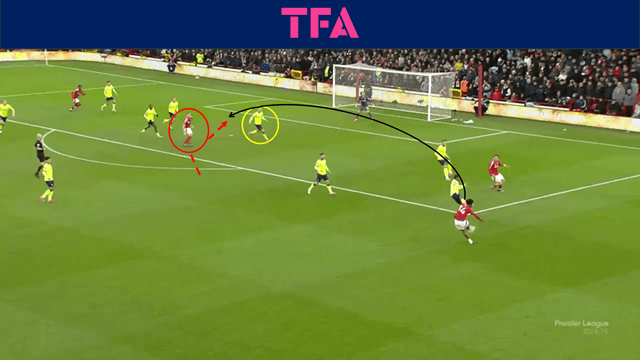
Wood begins his double movement by running across the closest central defender to drag him to the front area.

Then, just as the ball is to be crossed, and with the defenders' eyes fixated on the ball, Wood abruptly changes direction and runs into the space he has created between the two centre-backs.
Wood attacks the cross, guiding the ball to the far bottom corner.
Attacking Cut-Backs
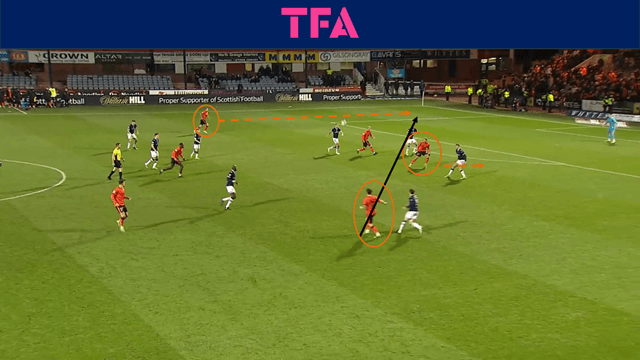
Often, forward players have synchronised movements to create space for one another when attacking the box to receive a cut-back.
This example of striker Sam Dalby, playing for his in-form loan club Dundee United, shows how a striker’s individual movement can allow them to get on the end of a cut-back.
The above image is from United's recent 2-1 victory over city rivals Dundee FC.
It shows the ball having just been switched deep into United’s final third for their left winger to run onto.
As with Kyōgo and Wood, Dalby instinctively moves slightly away from the ball when he sees it being switched to the far side.
Dolby does this by throwing his right shoulder so he spins while he is keeping his eye on the ball.
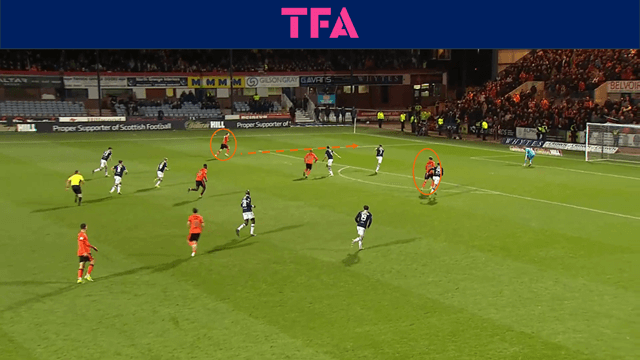
This slight movement takes the striker across the path of the opposition centre-back.
By placing himself between the goal and the defender and the deep switch of play, making offside not an issue, Dalby has already put the defender in an almost unrecoverable situation.

With the ball cut back, Dalby can slow down his run, shield the ball from his marker, and guide it into the net.
Importantly, Dalby does not make his run past the front post and, therefore, does not narrow his angle of the goal.
With the goalkeeper having to cover his near post due to the proximity of the ball, Dalby has almost an entire goal to aim at.
Headed Cut-Back

Dalby leads the goalscoring charts and is the league's top scorer for headed goals, with five this season.
This goal against Motherwell shows why the striker is so effective in front of the goal with his head.
Similarly to his previously analysed goal against Dundee, Dalby moves away from the ball and stays on the ball-far side of the box as the ball is played to one side.
Dalby remains there right until the moment the cross is going to be delivered.

The forward waits patiently on the blindside of his marker until his winger gets beyond his direct opponent.
Just as the ball is to be crossed, the frontman darts across his mark, who has little time to react to the movement, and leaps onto the cross.
Dalby uses his athletic attributes to attack the ball, but his sharp movement means he is under no physical pressure when the ball is headed into the net.
Continuous Crossing & Finishing Game

This crossing and finishing game is designed to give maximal crossing repetitions in a short amount of time whilst giving coaches the opportunity to embed certain movements and principles that they want from their strikers.
The game can be played in an area with a length of between 20 and 25 yards
Four crossing players are positioned on the side of the box, with two teams lined up in pairs beside each goal.
The exercise starts with a ball being played, either by a coach or the goalkeeper, into either one of the two crossers closest to the far goal.
The first pair make runs towards the far goal to get on the end of the cross.
After attacking a cross, the two forwards join the lines beside the goal they have just shot towards, and the exercise is repeated in the opposite direction.

The attacking players should be encouraged to make their initial runs, as the ball is travelling to the crosser, away from the ball.
This movement not only helps them be on the blindside of the defender but also gives them a better body orientation to connect with the ball.
Suppose the crosser delays the delivery by, for example, taking an additional touch, similar to Kyōgo and Wood’ double movement.
In that case, the ball-near striker should be coached to move towards the front area before cutting back to attack the ball centrally.
At the moment the ball is delivered, the forwards should be positioned between the posts to give them the best chance of scoring possible.
Crossing & Finishing Zone Game

This small-sided condition game, designed to encourage forwards to work on attacking crosses, has four crossing players occupying four zones in the wide areas.
The middle area is split into three zones.
Defenders cannot progress outside their defensive zone, and midfielders are only allowed to leave the middle, one at a time, when they are joining the striker to attack crosses.
The striker can drop into the middle to create an overload and help switch the ball into crossing areas.
In this example, two centre-backs, two attacking midfielders, and one striker represent a team playing in a 4-3-3 formation (with the defensive midfielder removed).
The number of players in the middle zone can be adapted to suit the formation used in games.
The conditions of the game are simple, with goals that have to come from crosses.
A cross can be delivered only when the ball has been switched from one wide area to the other via the central zone.

As shown in the first tactical diagram, the players in the wide area can all be neutral, providing greater opportunities for both the number of crosses and the different types of crosses.
Alternatively, this can be adapted or progressed to having one player from each team on each side of the pitch (shown above).

Depending on the level of player working with them, the crosses can be unopposed, i.e. no defending player is allowed in the wide areas or freely opposed, where the defenders can press the crosser.
The defenders' ability to apply pressure to the cross enhances the striker's decision-making.
For example, the striker must decide when the cross is likely to be delivered based on the opposition's pressure.
It also enhances decision-making and different movements, as the ball can be returned to the neutral player in a deeper position.

Players shooting from inside the 18-yard box within the width of the goal significantly increase their shot's xG.
Constraints can be placed in practice games to instil this habit of getting between the posts for crosses.
The red box, shown in the tactical diagram, can be used to represent the area in which the striker is allowed to score from.
The coach decides whether all players must be within this area for their goal to count or just their central forward.
A three-second rule can be introduced to limit the time the striker is allowed in this finishing zone, making it harder for the mark and encouraging late, darting runs into the goal area.
Similar to the “three second rule” used in basketball, this constraint can encourage sharp movements from the striker in front of goal and make the forward more aware of their positioning at all times.
Conclusion
In crowded penalty boxes, strikers must be able to create by creating separaseparating
Moving away from the ball in the buildup to a cross is a vital first step that immediately makes it difficult for defending players to both track a striker's movement and keep an eye on the ball.
The forward should then manipulate where the defender is positioned just as the cross is about to be delivered.
This can be done by double movements and last second runs to attack crosses.
These runs, made close to the goal and between the posts, significantly increase the chances of a cross resulting in a goal.
Coaches can embed these tactical principles through crossing and finishing games, like those shown above, and by adding constraints to where their strikers can score from during practices.




Comments