A common tactic of teams when pressing is to force the opposition to one side of the pitch before trapping them in that area. This can be an effective tactic, which creates a defensive overload to help regain the ball. However, it also leaves teams exposed on the opposite, or ‘weak’, side of the pitch. Efficiently switching the point of attack can be an important tactic in overcoming this form of press. It can be used to isolate opposition full-backs and punish teams when they are imbalanced.
Switching the point of attack can be defined as moving the ball from one lateral zone to another. For this analysis, the focus will be on attacks that begin in one wide area and finish in the opposite wide area. This tactical theory will first provide an analysis of the tactics teams have used to switch the point of attack. This tactical analysis includes examples of the effectiveness of switches of play from Ange Postecoglou‘s Tottenham in their recent Premier League match against Newcastle. It also contains examples of how coaches can implement these tactics.
Switching against a mid-block
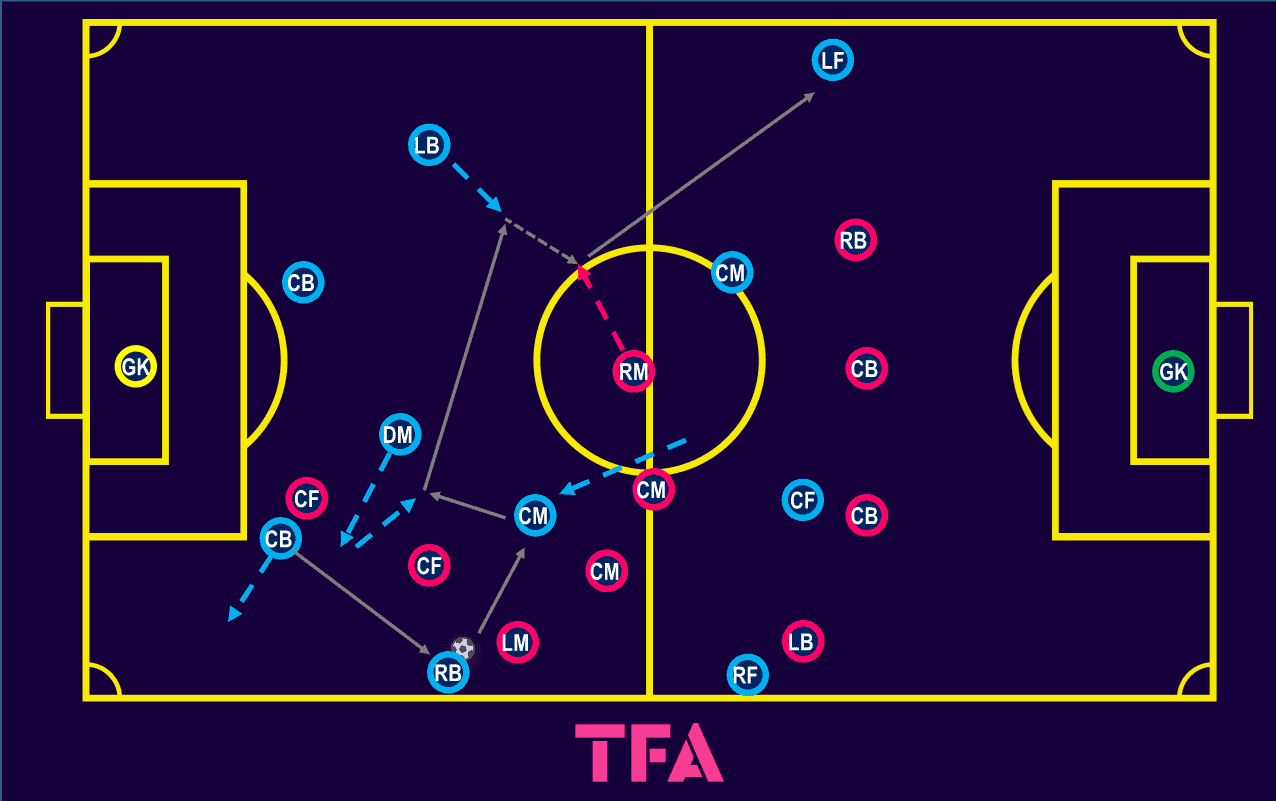
The above tactical diagram shows an example scenario of how to switch the point of attack against a 4-4-2 mid-block. Here, the defending team (pink) has attempted to suffocate the attacking team (blue) on one side of the pitch. By initially being patient and staying away from the ball, the blue team’s midfield has created pockets to run into.
The ball being played into the right-back triggers the two ball-near midfielders to make their runs and create a triangle around the ball. The centre-back, who played the pass into the right-back, helps create space for the triangle by immediately dropping off after playing the pass. The right-back, receiving the ball facing inside the pitch, plays the next pass with the first or second touch. This gives the opposition little time to react and allows the midfielder to receive on the move, making the midfielder impossible to pick up.
By electing to play with the more advanced midfielder, the ball can be bounced backwards, allowing the defensive midfielder to swing the ball to the opposite full-back. When the left-back receives the ball, the first action should be to take a diagonal touch towards the opposition’s widest midfielder.
The opposition’s preference in this scenario would almost certainly be to drop diagonally whilst keeping their shape. Once set up securely and the opposition cannot play forward, they would then squeeze the in-possession team on the opposite side of the pitch. Taking a diagonal touch inside the pitch, the left-back pins the widest midfielder, making it difficult for the team to shift over entirely. This can lead to the defending team’s full-back being exposed one-on-one against the wide forward.
Positional Discipline
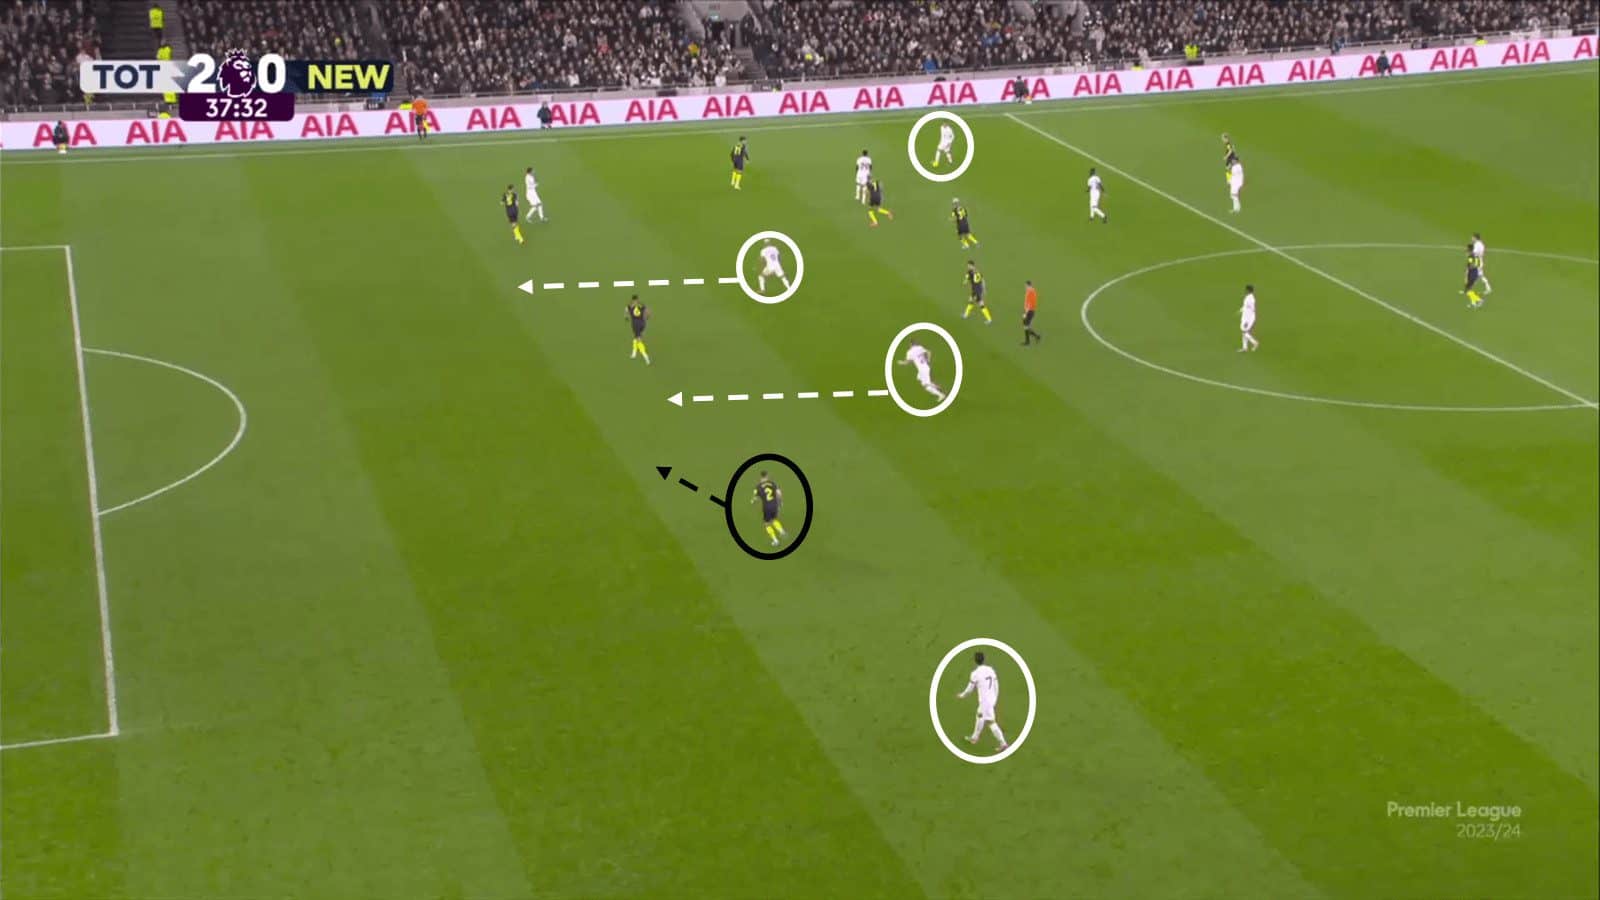
Spur’s first two goals in their recent match against Newcastle came from very similar scenarios as the previous tactical diagram details. As the above image shows, Newcastle overloaded the ball side of the pitch. Spurs played short passes in a triangle in the wide area before switching the play to their wide-forward, Son Heung-min. For the first goal, the ball reached Son via several passes through midfield. For the second, shown above, Son received a long diagonal pass.
Son’s positional discipline in holding his width is the key for this attack to work. If he were to be positioned any narrower, Newcastle’s left-back, Kieran Trippier, could offer cover to his centre-back and mark Son. What also helps Son out is his teammate’s runs in behind. The runs force Trippier to narrow, giving Son even more space.
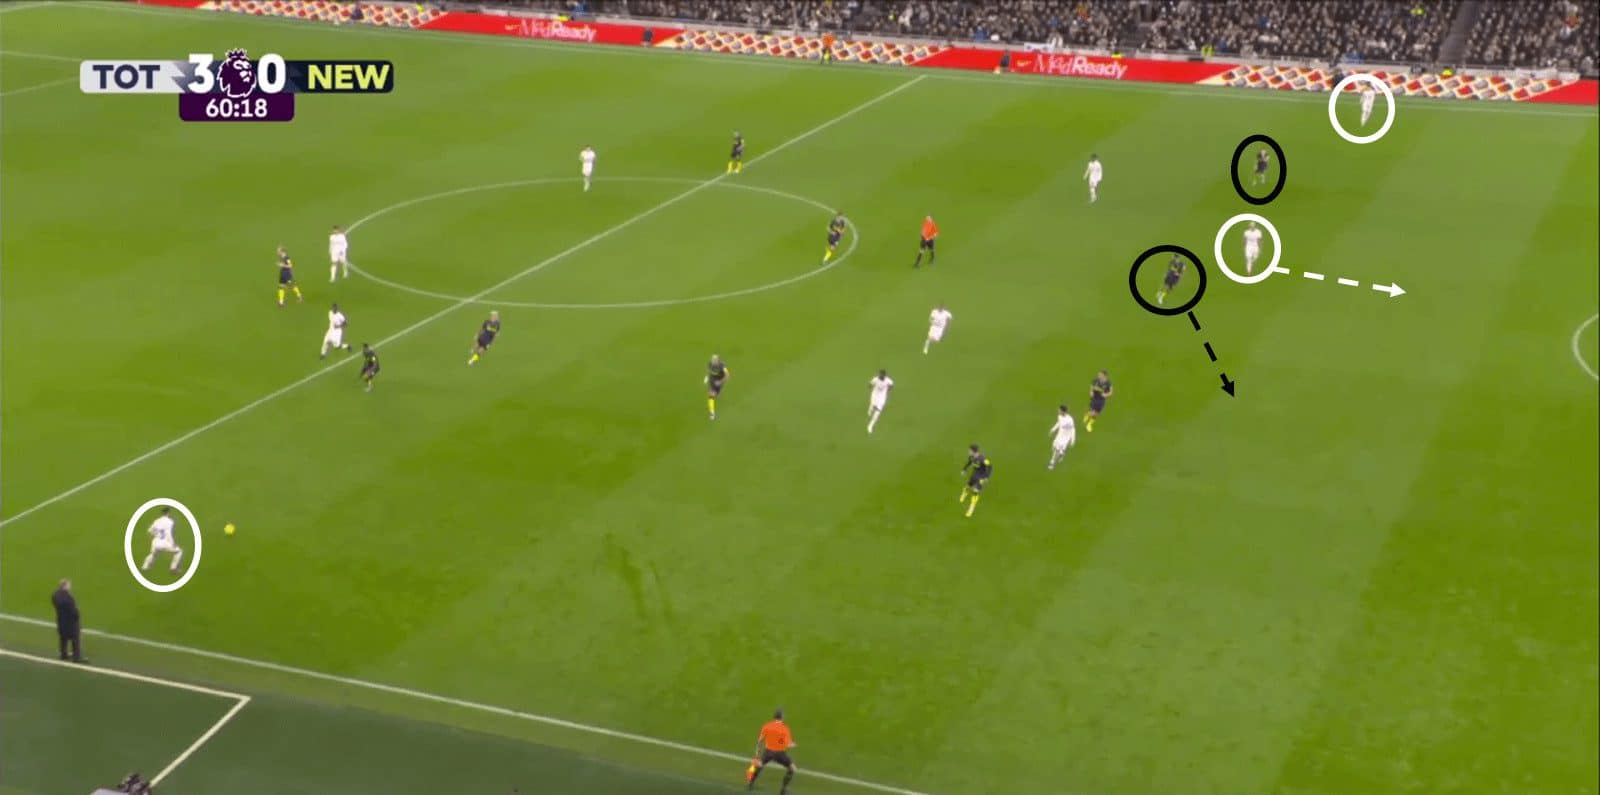
Son is also, without touching the ball, instrumental in Spurs’ third goal. Wary of how the first two goals were conceded, the former Atletico Madrid player overcompensates for Son’s presence. This allows Richarlison to drift into the space between Trippier and the Newcastle centre-back and receive the diagonal cross from his left-back.
Passing Sequence
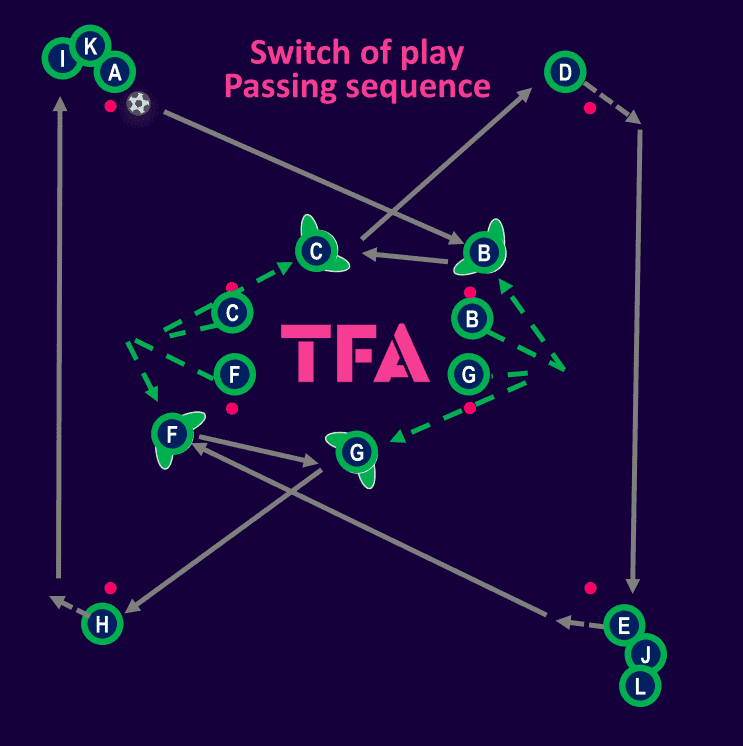
This passing exercise works on switching the point of attack via two central midfielders or two narrow forwards. The sequence can be incorporated as part of the warm-up, leading to the finishing exercise shown in the next section.
The ball starts with player ‘A’, who passes to B, who represents the ball-far ‘6’ or centre forward. B makes a double movement, backtracking away and then dashing towards the ball to meet it. B then lays the ball off to C, who has also made a double movement to create space centrally. C runs onto the ball and switches to D.
Player ‘D’ receives with an open body shape, taking a touch around the outside of the cone. Depending on the coach’s preference, D either plays a pass with his second touch or attacks the space before giving the ball to E. The sequence then repeats itself on the opposite side of the box. Each player follows their pass.
Coaches should emphasise the importance of double movements to create space. To be able to receive and play the next pass without turning or taking extra touches, the players’ body orientation should also be highlighted. This, along with clean, quality passing, allows the ball to be switched as efficiently as possible.
Passing sequence with attacking phase
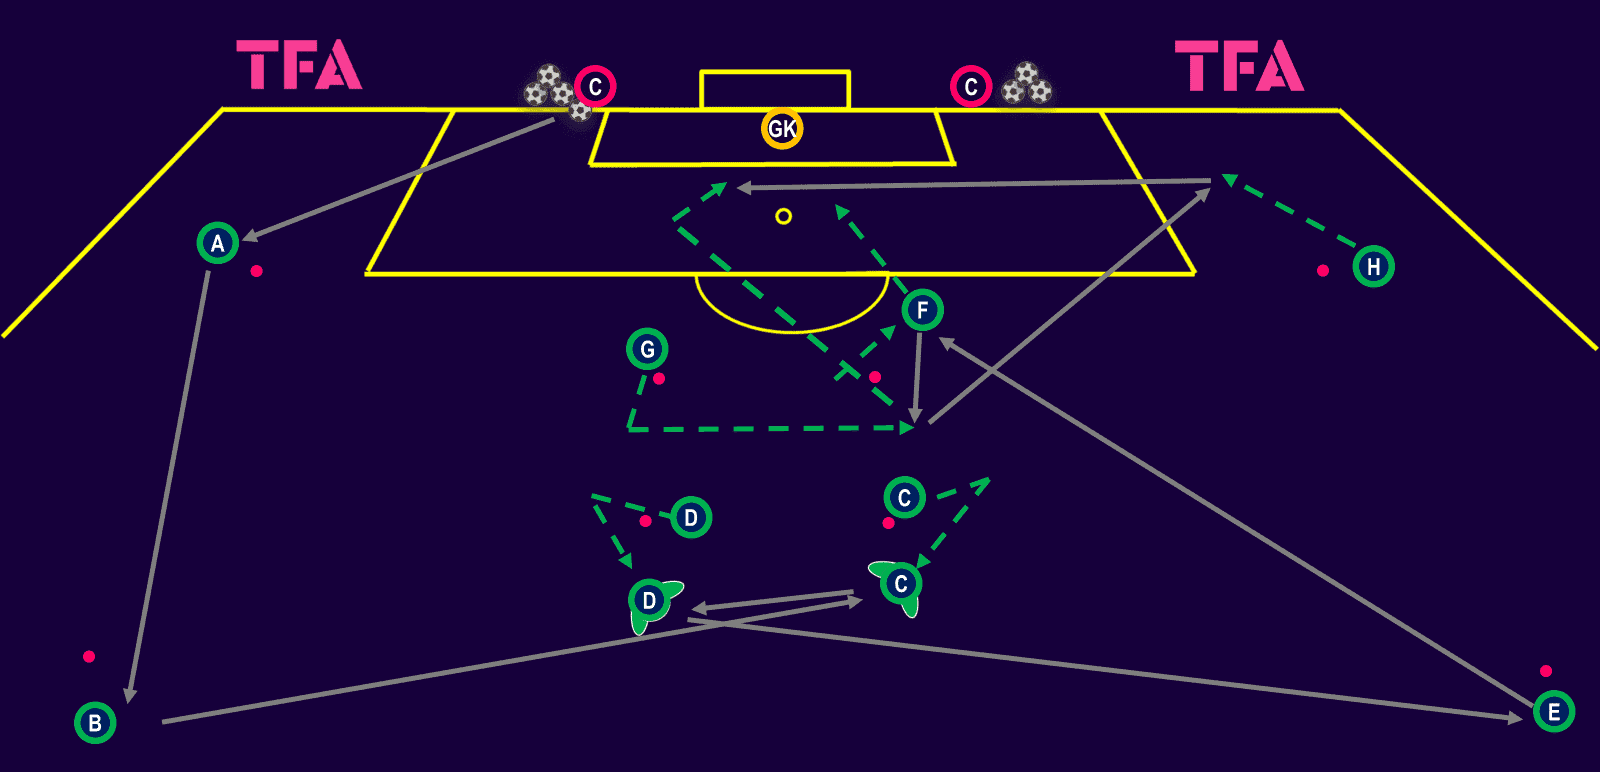
This finishing sequence can be added as a progression from the previous passing drill or as a stand-alone attacking exercise. The same player and ball movements as the previous exercise are used. The two ‘6s’ combine to switch the play from players B and E, who both represent full-backs. When player E receives, the full-back can attack the space created from the switch of play or play directly into the ball near forward. The ball near forwards again combine to either set up a crossing opportunity for ‘H’ (shown above) or to complete a second switch of play back to ‘A’.
The play starts with a coach, or spare goalkeeper, passing into ‘A’, who passes to ‘B’ and so on. The exercise can also start on the other side, with player ‘H’ and the ball being switched to the opposite wide area. At the conclusion of the pattern, each player follows their initial pass to complete the rotation of the drill.
This framework has many options for passing sequences and player rotations that can progress the drill. An example of an adaption, specific for switching the play, can be for player ‘D’ to play into the wide forward. To execute this, ‘D’ must make a run that accommodates receiving the ball facing side-on. This enables ‘D’ to see the wide forward and play a first-time, right-footed pass.
As with the passing sequence, coaches should emphasise speed of play to catch the opposition out when they are imbalanced.
Switch of play rondo
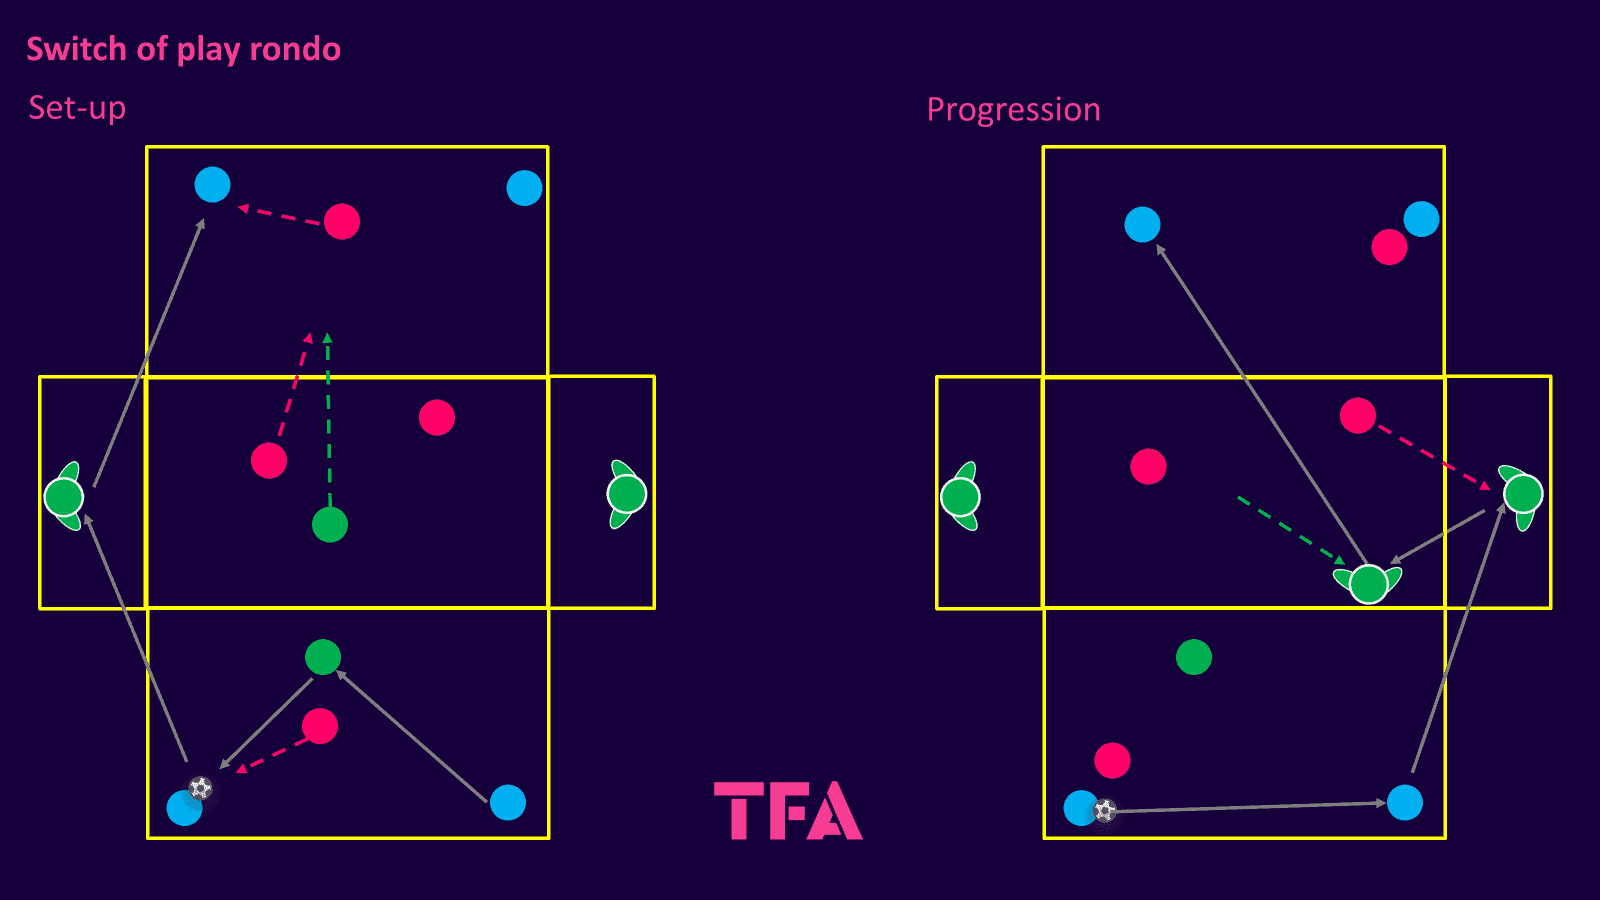
During the build-up phase, a key component for teams is often to draw teams to one side before swinging the ball and escaping out the other side. This rondo is designed to replicate their ‘6’ dropping in to receive from a centre-back before the ball is switched to the full-back on the far side.
This rondo is made up of three teams of four players. The in-possession players, shown as blue and green, work as one team. The blue team is split in half, with two players in the top box and two in the bottom box. The green players are also divided in half, with two players in the side boxes, representing full-backs, and two in the middle box playing as ‘6’s’. The defenders (pinks) have one player permanently in each of the end boxes and two in the middle.
The exercise aims to work on switches of play in a much-condensed area and to develop players’ ability to recognise the triggers of when to play forward. The in-possession teams must connect a certain number of passes, before passing to a wide player, who then progresses the ball to the opposite box.
When the ball enters the opposite box, the two in-possession players and the defending player in the box become active. One ‘6’ can then drop in to create a three against one. It is up to the coach’s discretion if the defending team are allowed to track the ‘6’. The coach may prefer to have the midfielders protect the space in midfield rather than jump with their mark.
The wide players are initially unopposed but must switch the ball within two touches. The progression for the rondo is for the defending team to be able to press the wide players. If the wide player is prevented from playing the ball forward, the ball can now be bounced back into the square it came from or into the central ‘6’.
Once the ball has been played to one full-back, if it comes back, they have two options. They can quickly switch to the other side if the opposite full-back is open. Alternatively, if the defending team has become stretched, they can play a line-breaking pass through the middle box.
This now means that the attacking team has more decisions to make and must be more aware of the defenders’ positioning. They must decide whether they should continue circulating the ball, switch it or play a line-breaking pass through the middle.
Each team defends for a pre-determined amount of time or a certain number of turnovers. If desired, a more transitional element can be added by having the dispossessed team immediately become the pressing team.
11 Vs 11 zone game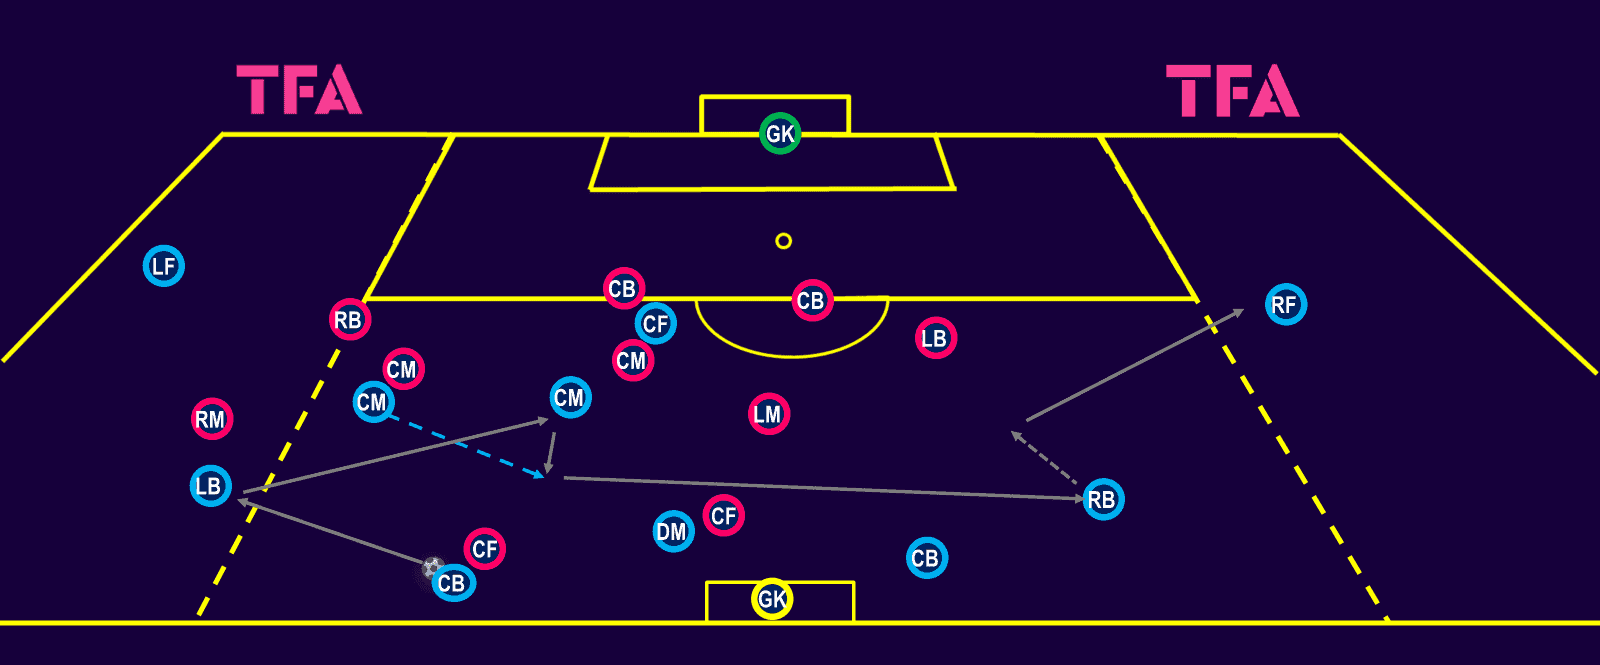
This 11 Vs 11 (or reduced numbers) conditioned game is laid out with the pitch split into three lateral zones. Depending on the coach’s preference, the area’s length can be adapted anywhere from half to full field. The game closely mimics a standard match and has a simple premise. When attacking, the ball must enter one wide area and be switched to the other before a goal can be scored.
The exercise encourages the habit of attracting the opposition to one side of the pitch. The team then plays out of this area and attacks down the opposite side, where they should create an overload. Specific patterns, such as those included in this analysis, should be attempted by the attacking team, which should have clear patterns of play. Once the ball has been switched, the attacking players should again have clear objectives. For example, the full-backs driving diagonally inside with the ball to make it difficult for the opposition to shift (shown above).
If defending players begin to adapt and set themselves up to deny the switch specifically, players can be allowed to attack centrally. To keep encouraging switches of play, additional points for a goal coming from an attack entering both wide areas can be added.
Conclusion
Switches of play can be a great way to exploit imbalanced teams. Teams with good wide players, especially those dominant in one-on-one situations, can use switches of play to isolate their wide forwards with the opposition’s full-back. This tactic requires positional discipline, usually from the ball far forward to work. Even without the wide player receiving the ball, the threat of playing into a skilful winger can be enough to open up more space centrally.


Comments