This season’s Premier League has seen a reemergence of crosses being used to create goalscoring opportunities by the top teams in the division. Manchester City are joint-fourth for headed goals with 12. Arsenal tops the goals from crosses table with 16. Since Mikel Arteta’s arrival halfway through the 2019/20 season, Arsenal have more than tripled their return from headed goals. Set-plays, of course, play a big role in these stats. However, the majority of the 28-headed goals the title contenders have combined for have come from open play.
Despite both being revered for their intricate combination play, both Manchester City and Arsenal are above the league average for crosses per 90. The league, as a whole, has seen an increase in the average number of headed goals in each of the previous three seasons. Crossing is clearly still an integral part of top-level modern football.
This tactical analysis aims to highlight the importance of crossing and analyses the tactics of the Premier League’s top two, as well as other teams, when crossing. Their off-the-ball movements and styles of delivery will be analysed in this tactical theory. This analysis will also include examples of crossing and finishing exercises will also be included to help coaches implement these tactics.
The hung cross
The first style of delivering this tactical theory that will be analysed is the hung cross. This style of cross is delivered with less pace than a whipped ball and hangs longer in the air, allowing players to attack it. It is often used to feed taller players who have a height advantage over their direct opponent. City and Arsenal have used the height of the likes of Erling Haaland (6ft5) and Kai Havertz (6ft4) to their advantage with this type of delivery. Another way these teams utilise this delivery is by dragging defenders to the front area before dinking the ball over them. City and Arsenal have scored from this delivery several times this season.
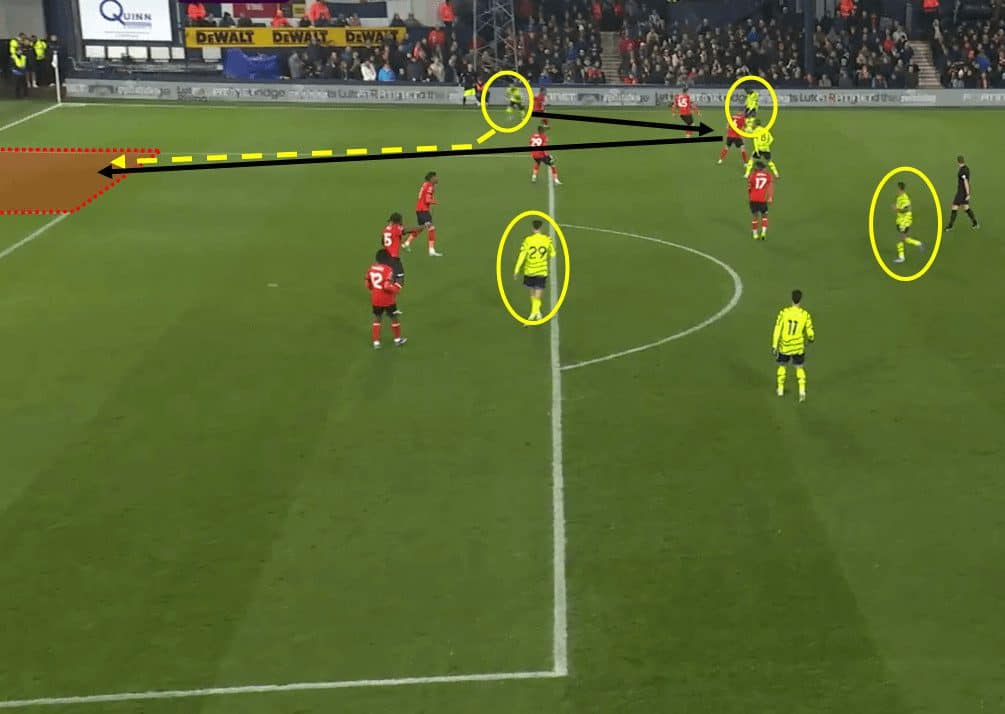
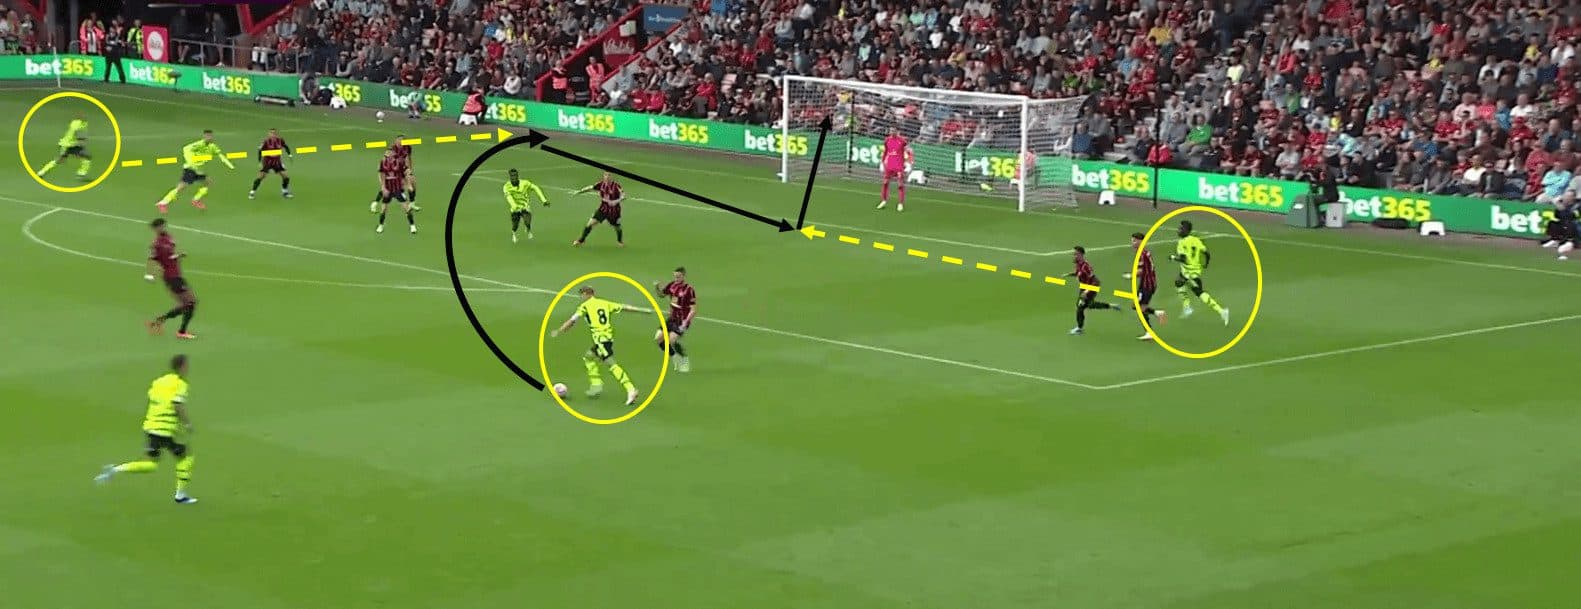
An important and common tactic Arsenal use to get themselves into a crossing position is for the wide player to play a one-two with a teammate occupying the half-space just outside the box. On this occasion, in their December win over Luton, it is Ben White who is going to deliver the cross. Having driven forward with the ball, he lays it backwards before making a slightly angled run inside the pitch. By running across the backline, White keeps himself onside before darting onto the through ball. In these scenarios, Arsenal aim their passes beyond the 6-yard line inside the 18-yard box (red box in picture).
At this point, Arsenal only have #29 Havert inside the penalty area. Jesus, the eventual scorer, is circled outside the box, closest to the referee.
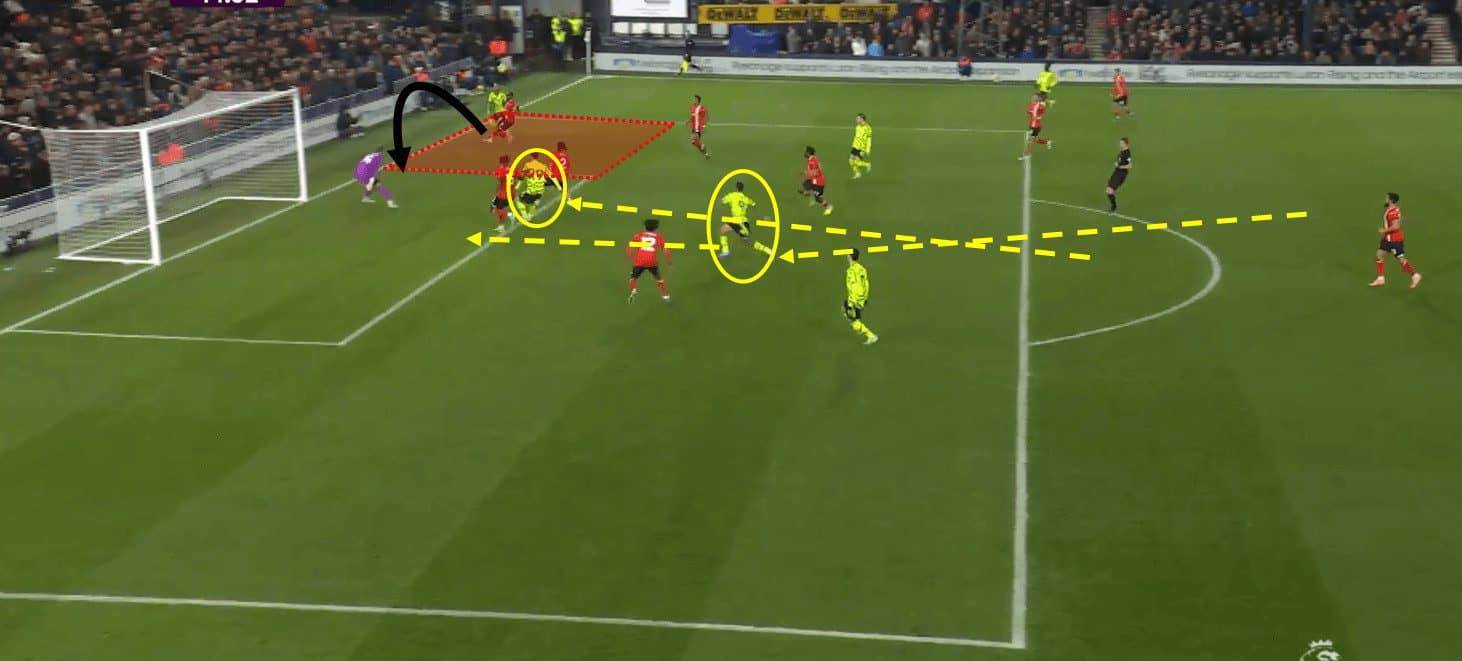
As White darts beyond the back line to meet the ball, #29 Kai Havertz makes a front-post run between the centre-backs, dragging the two defenders to the front area. The goalkeeper, defending against the ball being cut back to the front-post area, must also get close to his near post. #11 Gabriel Martinelli, vitally, hangs back behind the penalty spot instead of attacking the 6-yard box.
The movement of Havertz and the awareness of Martinelli allow Jesus to make a run between the ball-far centre-back and the right-back. Had Martinelli run towards the goal, the right-back would have, first of all, a better chance of seeing Jesus’ late run and, secondly, have been able to pick up both players simultaneously—White, first time, chips the ball to the back area, over the goalkeeper and defenders. The ball hangs in the air for Jesus to leap and head into a half-empty net.
Arsenal scored in almost identical fashion more recently against Brentford.

Manchester City scored in very similar circumstances in their 3-0 demolition of Manchester United back in October. In the build-up, the ball was played from City’s right to their left forward Jack Grealish. As soon as the ball began travelling to Grealish, Haaland moved away from the ball towards the back post area, showing no interest in linking up with his winger. Grealish took his first touch towards the United right-back, pinning him and allowing Bernardo Silva (circled) to make an overlapping run. Grealish then played in his teammate to the same assist zone that Arsenal target.
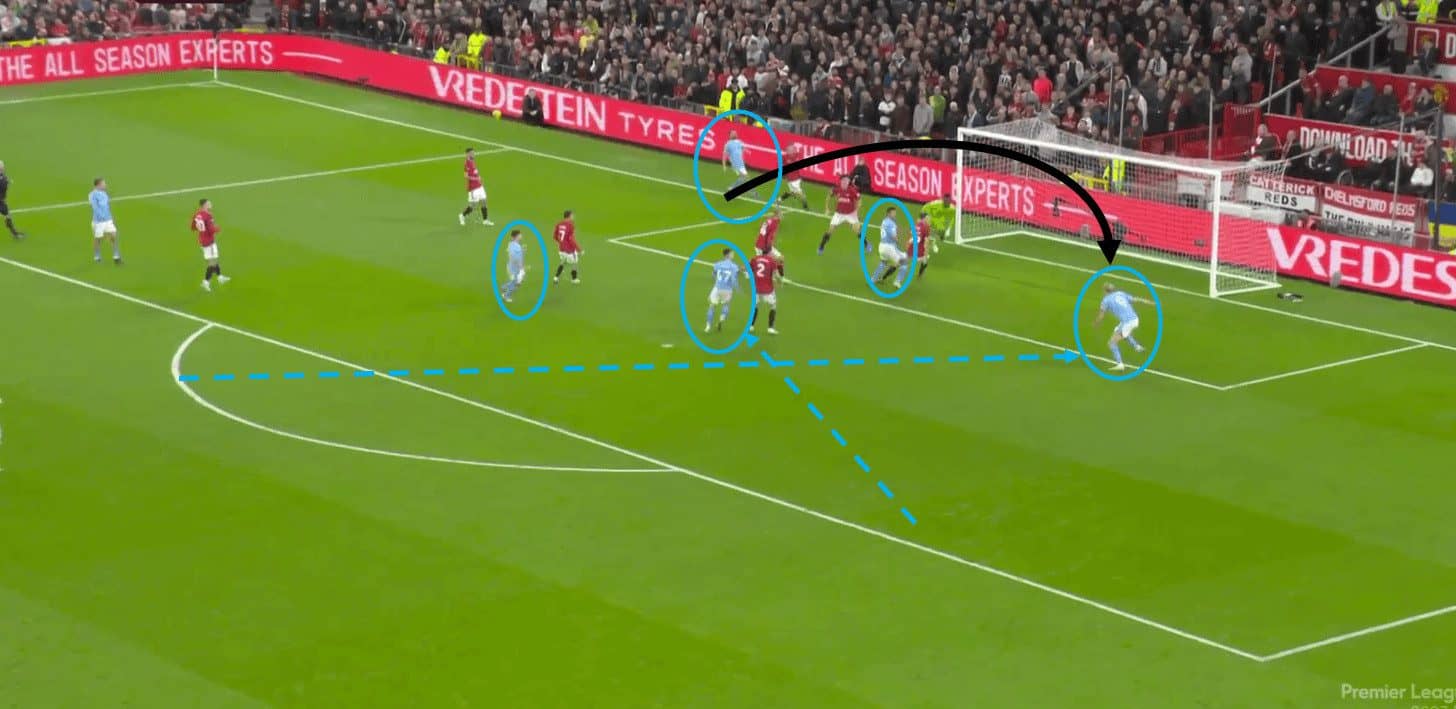
As Haaland drifted towards the back area, just as Silva was receiving in the assist zone, Phil Foden darted across him into the front half of the second 6-yard box. This dragged United’s left-back across the goal, and with Rodri occupying the centre-backs at the front post, Haaland was left alone. Silva then hung the ball up for the striker to attack in the air. However simple Haaland’s run was, and with a little help from his teammates, he found himself unmarked on the 6-yard line with an open goal to aim at.
The whipped delivery
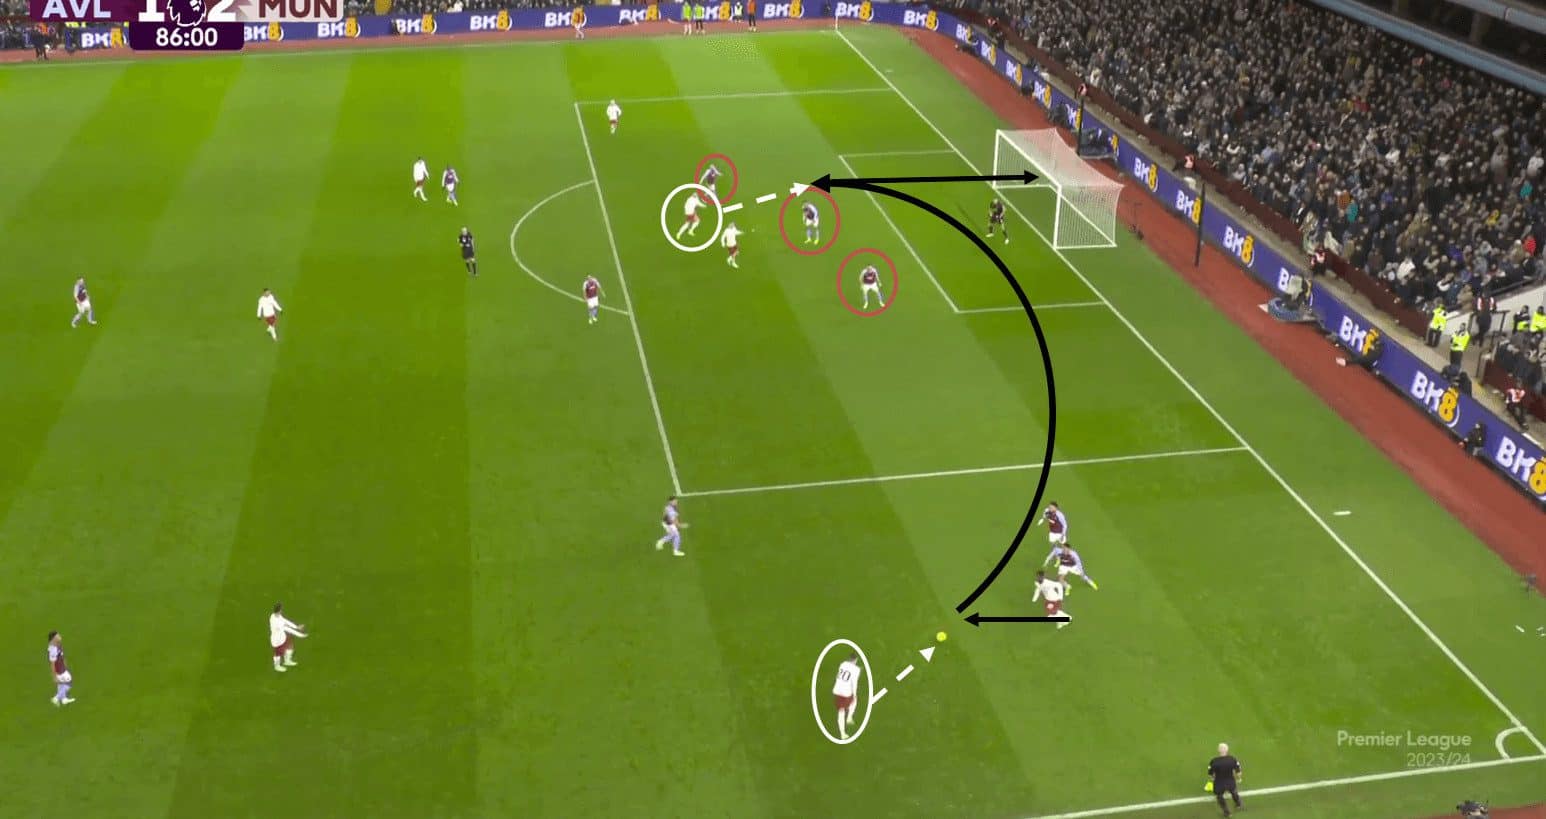
This example, from Manchester United’s 2-1 win at Aston Villa, shows the effectiveness of quick, whipped deliveries into the box.
United manage to score despite the centre-backs being fairly well set up, covering the width of the second 6-yard box. The ball-near centre-back is primed to clear any front post deliveries, although he could possibly be closer to in line with his near post. The more central centre-back has a forward-facing body shape, allowing him to see the ball and the United players in the box. The right-back has tucked in and should be able to track any movements made by Scott McTominay (circled).
What catches them out is #20 Diogo Dalot playing the ball first time as it is laid back to him. The superb accuracy, just over the ball-far centre-back’s head, and the power of the cross are, of course, vital. However, it is the first-time hit that gives the defenders no time to read and react to the situation. They are frozen in place, allowing McTominay to run almost on top of them to head into the net.
The half-space cross
The above image shows two examples from two different games where Arsenal crossed from the half-space, just outside the box, to create two goals. This is an area Arsenal constantly work the ball into. In both examples, it is the directness of Saka, taking his first touch towards the left-back, which creates this space. The opposition’s nearest midfielder drops to cover his left-back due to the threat of Saka taking him on one-on-one. This creates the space for either a midfielder or inverted full-back to receive the ball in the half-space.
Crossing practice
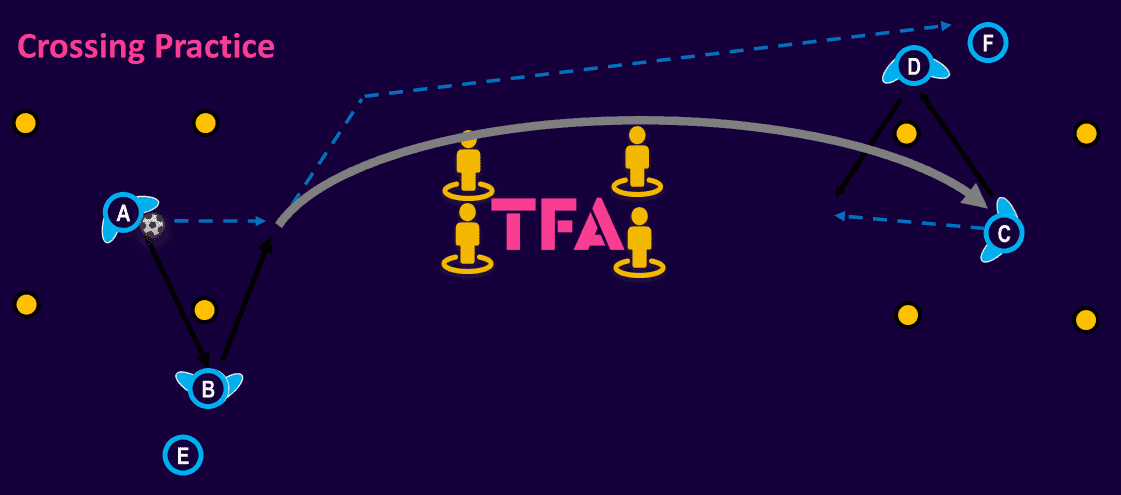
These practice exercises are designed to develop players’ crossing ability from wide areas, the assist zone, and the half-space. The first exercise is designed to work on each crossing technique and can be incorporated as part of the warm-up.
The team should be split into groups of between six and eight players, with those players being split evenly between two boxes. The exercise starts with player ‘A’ playing a one-two with player ‘B’ before playing a pass, or “cross” over the mannequins and into the opposite box. Player ‘B’ takes ‘A’s place, with player ‘A’ running to the opposite box. Player ‘C’ should receive the ball in the air and play a one-two with ‘D’ before crossing over the mannequins. ‘C’ runs to the opposite box and is replaced by ‘D’ with the sequence continuously repeating.
Players should be given a specific method of crossing the ball, such as a fast, whipped ball or a slower, hung delivery. Coaches can also expand the area and incorporate dribbling into the sequence to allow players to practice crossing on the move.
Crossing and finishing – hung cross

This crossing and finishing exercise attempts to incorporate the three styles of delivery previously analysed, beginning with a hung delivery. The sequence begins with player ‘B’ making a movement to receive the ball. Player ‘A’ misses out ‘B’ and plays into ‘C’s feet. Player ‘B’ then spins to play a one-two with ‘C’ whilst ‘A’ makes a run into the box.
‘C’ then plays in ‘A’ into the assist zone. As soon as ‘C’ releases the ball, ‘C’ makes a run to the back area. Player ‘D’ runs across ‘C’ and attacks the front area with ‘B’. These two runs are designed to drag the defenders and goalkeeper towards the front post. This allows ‘C’ to attack the cross, which should be hung up in the back half of the goal, missing out ‘B’ and ‘D’.
Crossing and finishing – whipped delivery

As soon as the previous play concludes, the three forwards (‘B’,’C’ and ‘D’) should make their way back “onside”, reaching at least the line of mannequins. Their onside runs should also be made angling away from the next ball, which will be delivered from the left. Player ‘A’ moves into the wide area to receive the third ball.
As the forwards have escaped the box, ‘E’ should play a firm, on-the-ground pass to ‘F’. ‘F’ should take a diagonal touch through the gates to set themselves up to cross the ball with their next touch. The ball should be delivered with as much pace as possible to the middle of the 6-yard line, with the forwards making aggressive runs to get on the end of it.
Crossing and finishing – half-space cross

The final pattern of the sequence has ‘A’ receiving from ‘G’ and setting the ball back to allow ‘G’ to cross the ball first time towards the back 6-yard box. As the ball is played wide, the forwards should, again, be making their way out of the box. As the ball is set back, this is the trigger for “E’ to make a late, blindside run into the box. ‘E’ should receive an aerial cross and put the ball back across the goal towards one of the now onrushing forwards.
The training session can then progress to a conditioned game that encourages crossing.
Conclusion
Crossing is experiencing somewhat of a resurgence at the top level of the game. It is not only that the likes of Manchester City and Arsenal have increased their number of goals from crosses, but that they have recruited players that appear to have been signed for that very reason. More known for their intricate passing and build-up play, these teams have scored important goals this season from crosses. This tactical analysis gives just three of many different crossing styles, techniques and movements. Coaches looking to implement these tactics can use the provided exercises to enhance their players’ crossing abilities.


Comments