Up until around 20 years ago the 4-4-2 was favoured by the majority of managers, including one of the greatest to ever manage, Sir Alex Ferguson. It remains in use today as a suitable shape to form a compact block, exhibited in the tactics used by managers such as Diego Simeone and Sean Dyche. They opt for this formation as it is able to prevent teams from progressing centrally, where they are most dangerous, with its central box consisting of two strikers and two central midfielders, flanked by two wide midfielders able to both tuck in and press wide.
In this piece of tactical theory, I will be discussing what the main weaknesses of the 4-4-2 set-up in a mid/low block are, and how a team can go about exploiting them. This analysis will essentially act as a step-by-step thought process as to how you can create a tactical set-up if the opponents’ defensive structure is known.
How to beat the first line of the 4-4-2 block
One key aspect of the 4-4-2 is that it contains two strikers which are able to both press the opposition centre-backs and block off central passing lanes, allowing the wide midfielders to stay deep and support the fullbacks. For a team looking to build-up from the back against a 4-4-2, the obvious solution is to use a three at the back system. What the three central defenders provide is 3v2 numerical superiority over the opposition’s two strikers. This is important defensively, as it provides sufficient cover on defensive transition, allowing the rest of the team to play in more advanced areas as their first thought doesn’t need to be to provide defensive cover. But, more importantly within the context of breaking down the block, a three-at-the-back system is ideal for creating chances against a two-striker system.
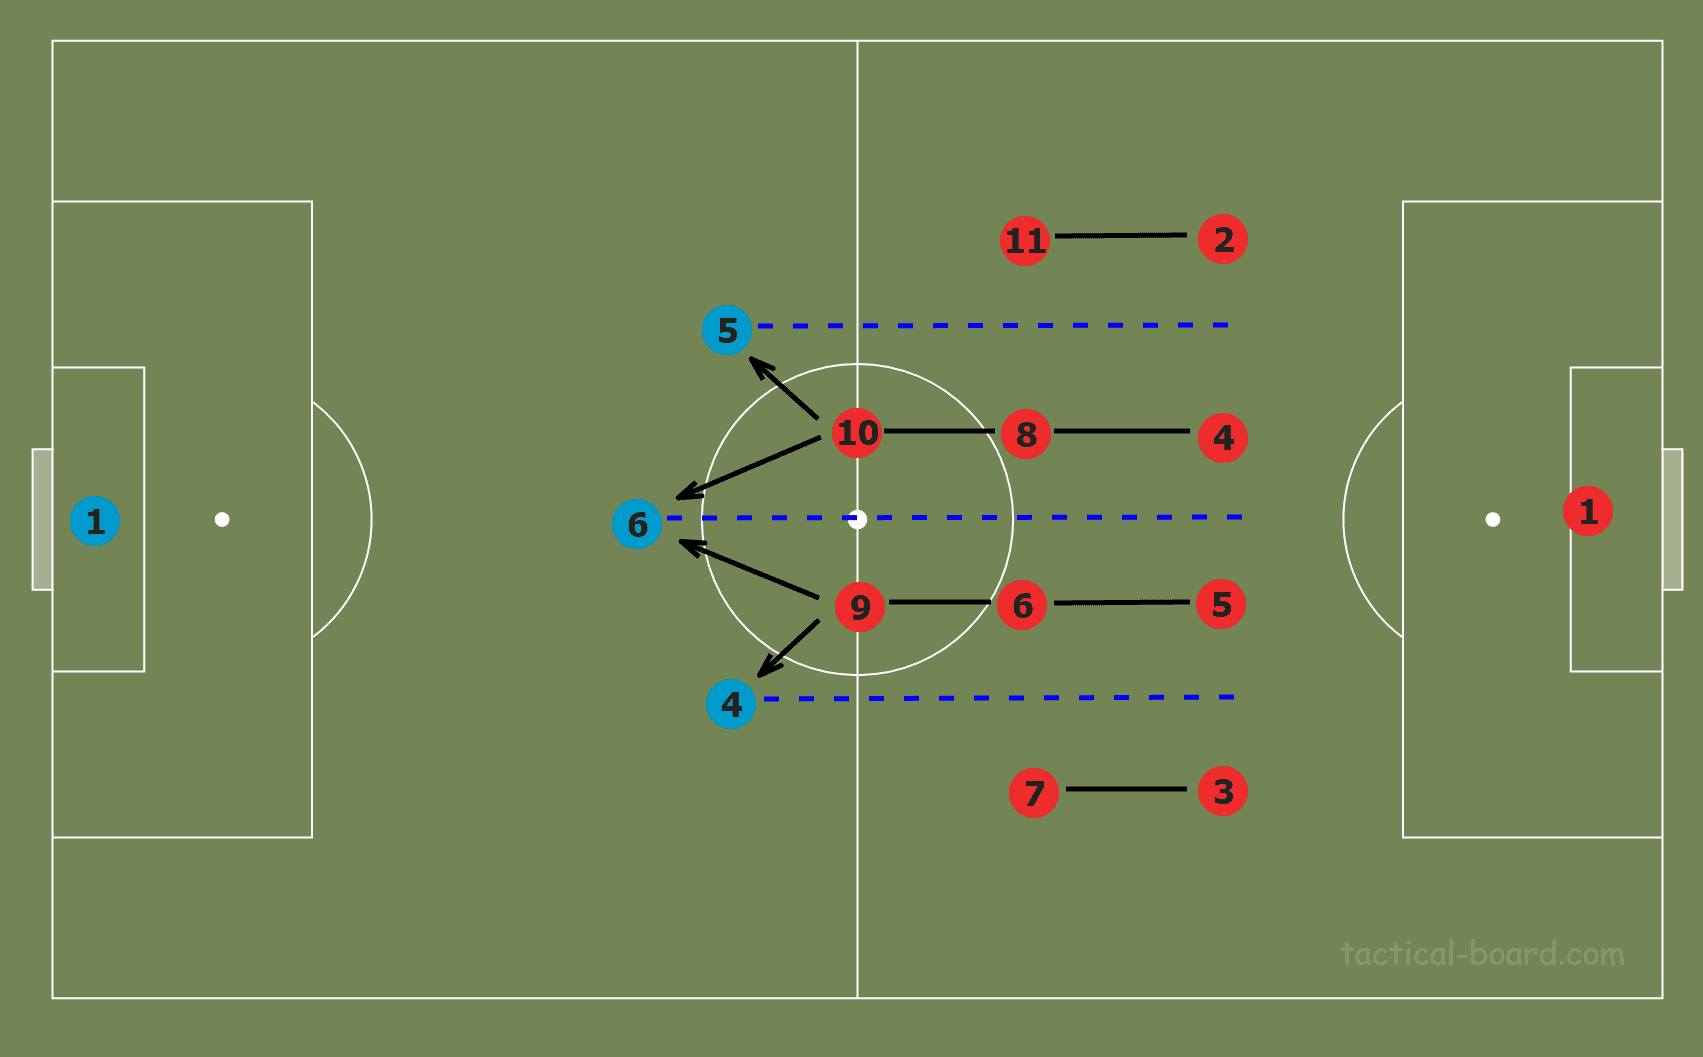
Firstly, the three centre-backs can naturally line-up in the gaps between the vertical lines of the 4-4-2 structure. As a consequence, the strikers are forced to press each centre-back at an angle, rather than straight on. This is less effective at blocking central passing lanes since the forwards are pressing at a diagonal and are therefore leaving open the vertical passing lane.
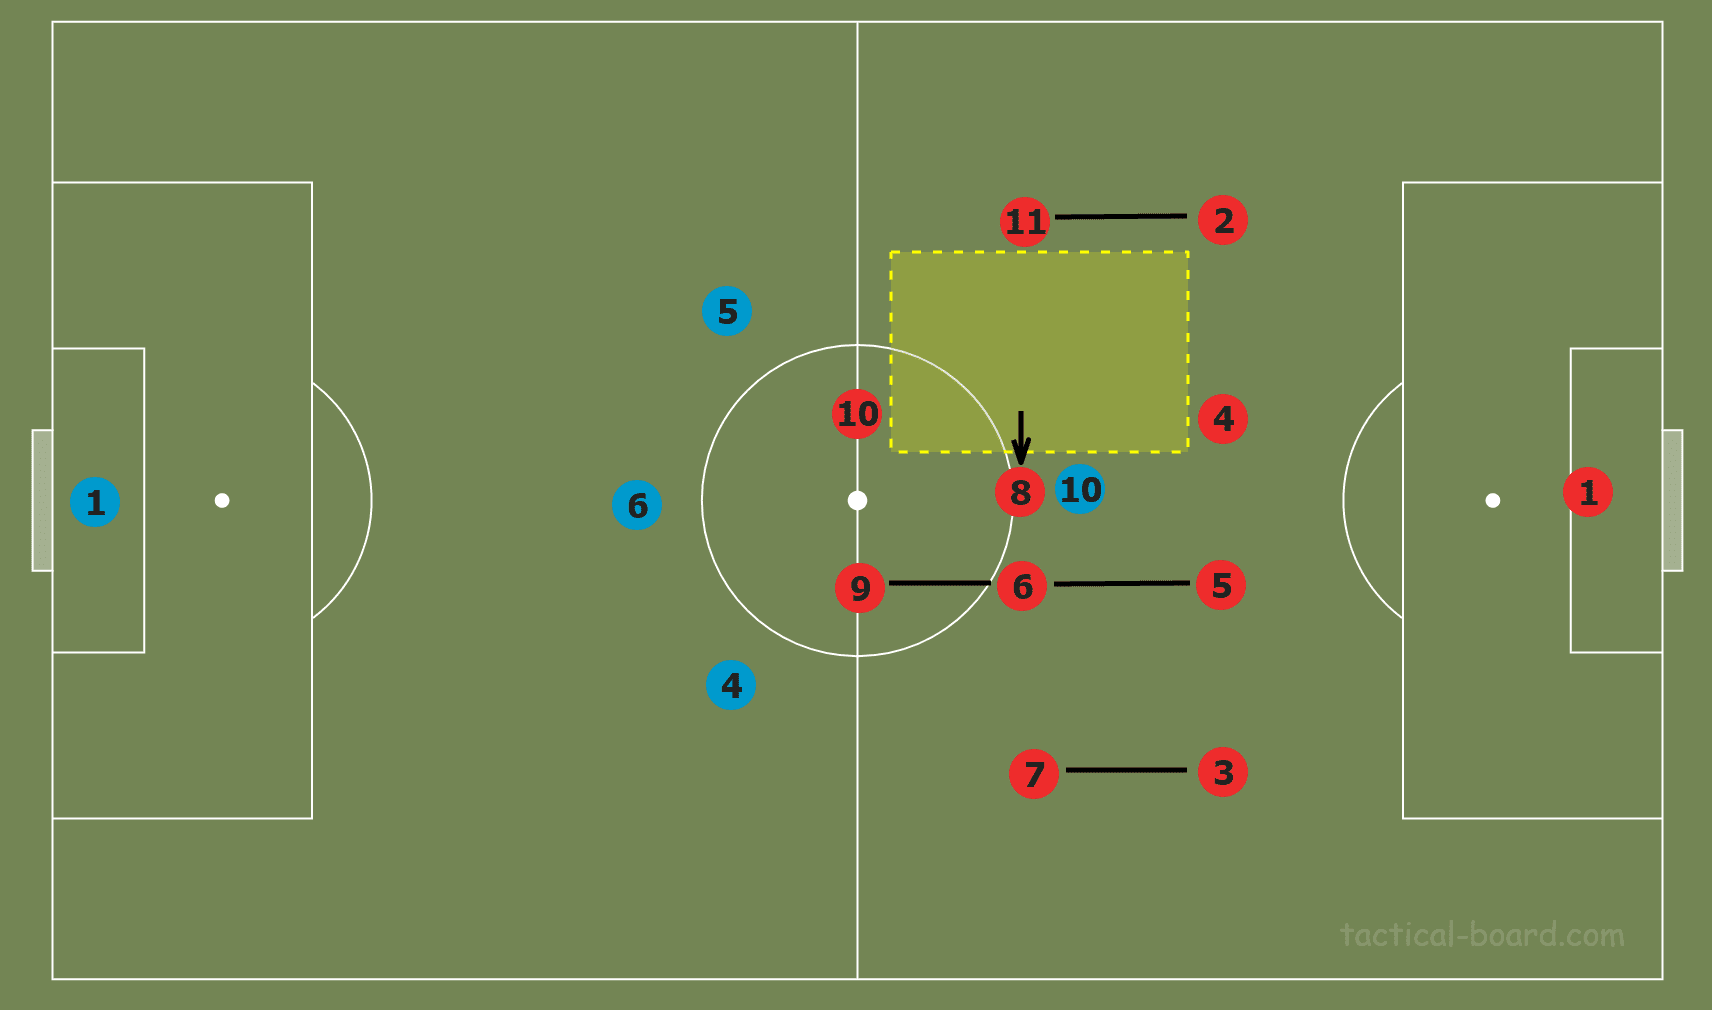
Here, we see one of the midfielders being forced to step out of the rigid structure in order to block the central passing lane from the number six to the number 10, creating space in the vacated area. This is an example of how using a back three can immediately create space without any use of rotations.
The key benefit, however, of the 3v2 superiority in the first phase of build-up is that, at any given time, one of the centre-backs will always be free.
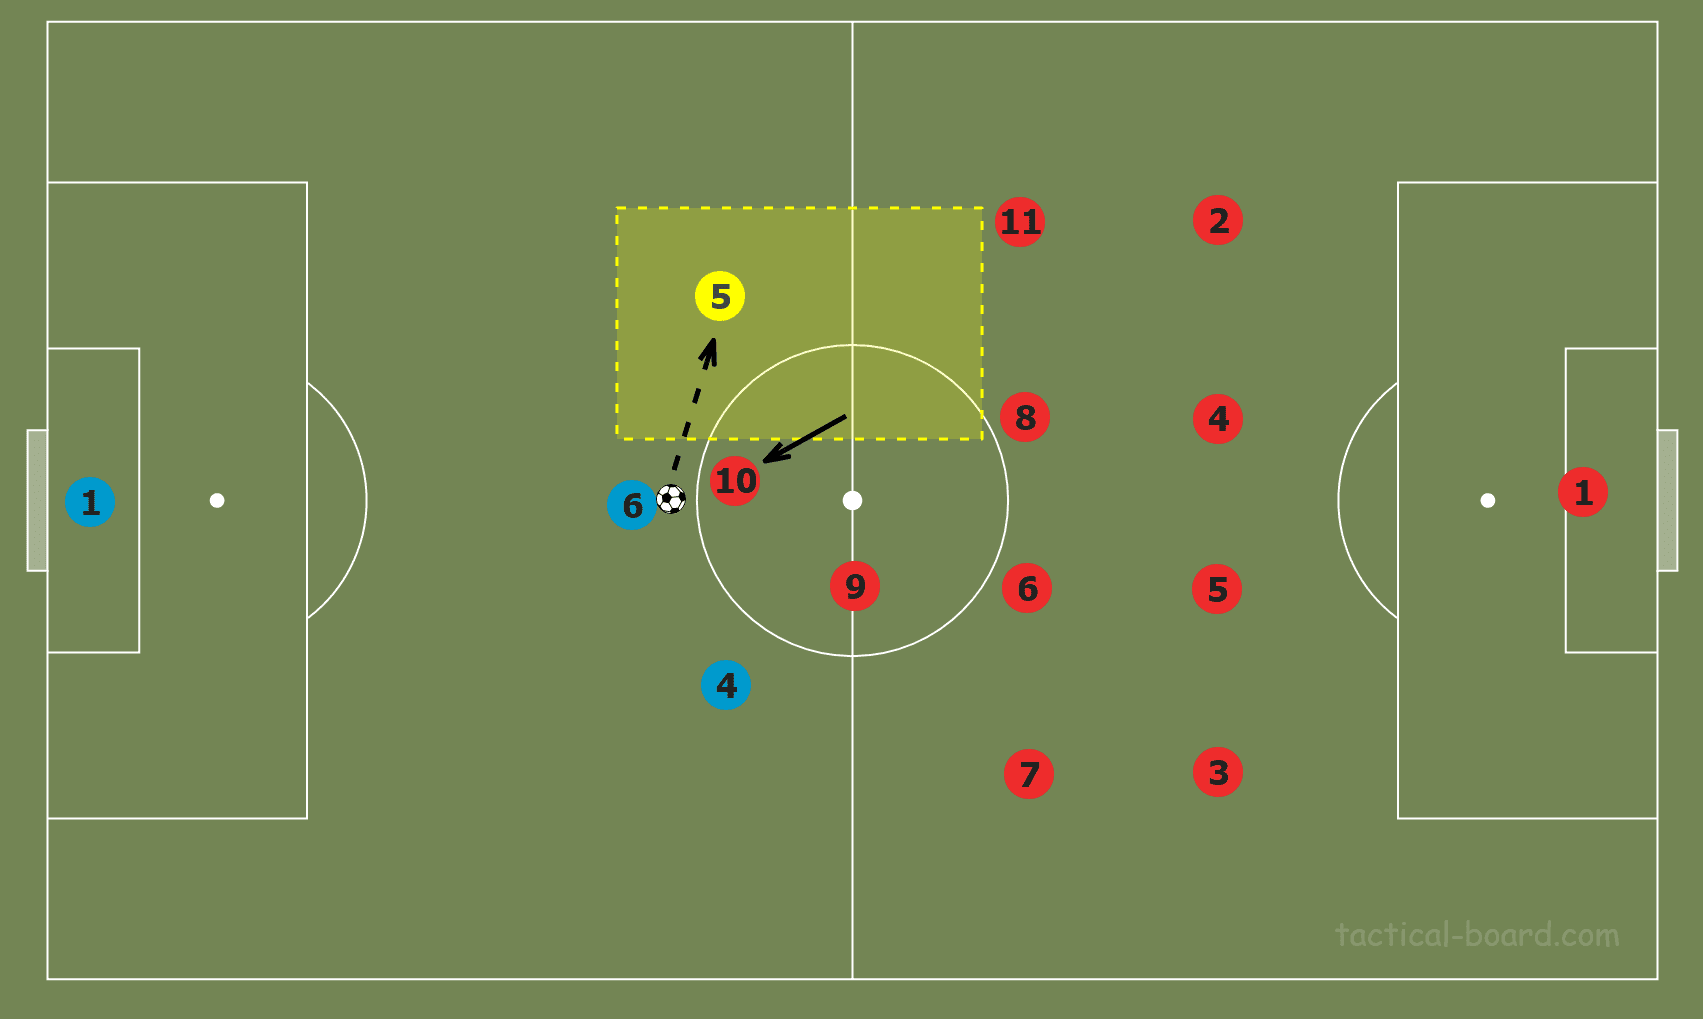
Let’s say that the central centre-back is in possession of the ball. To free up one of the wide centre-backs, the central centre-back must carry the ball forwards until either of the two strikers is forced to press. This simple concept, engaging a player to leave space elsewhere, is one of the fundamentals in the process of creating the ‘free man’. The striker will naturally press from the centre in order to block central passing lanes and prevent the central centre-back from carrying the ball further up the pitch. As we can see in the graphic above, the centre-back on the side of the striker that pressed is now free to receive the pass. This pattern can be repeated every time we begin building up from the back in order to find the free centre-back.
Now, let’s look at some real examples of this in action.
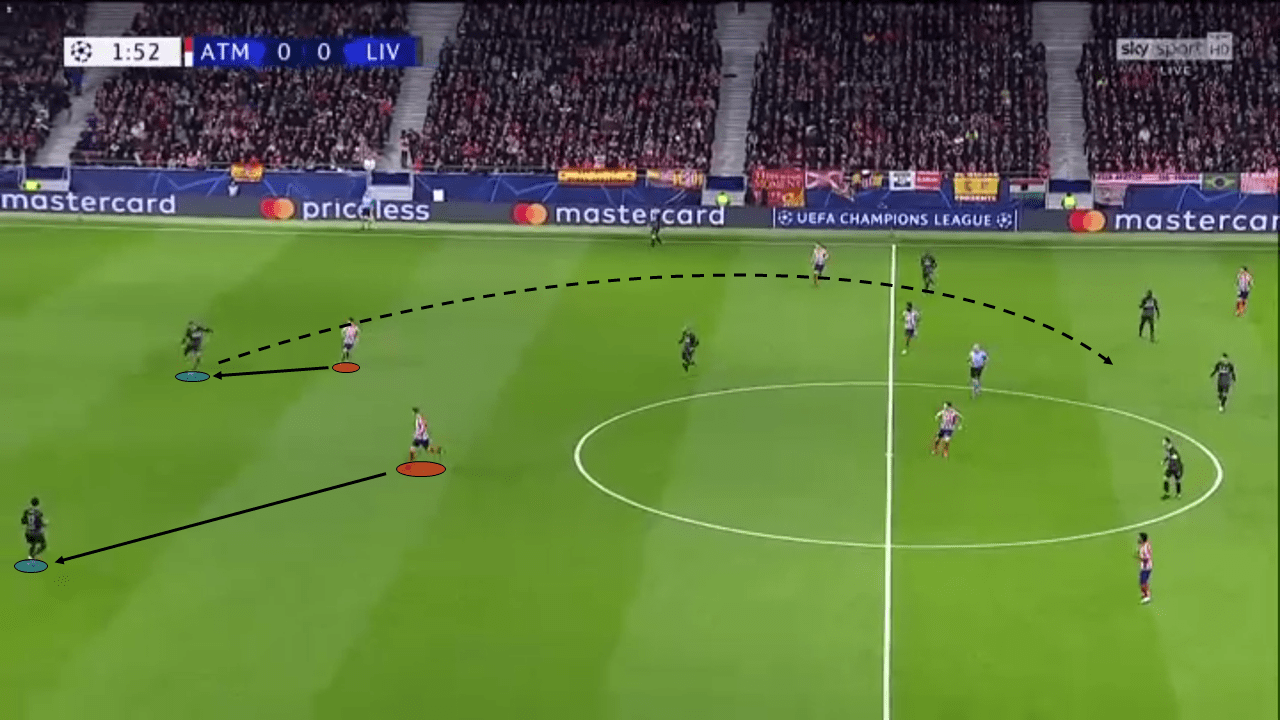
Here we see Liverpool building up with a back four against Simeone’s 4-4-2. The two Atlético Madrid strikers are able to press both centre-backs man-for-man whilst blocking central passing options, forcing Virgil van Dijk to go long.
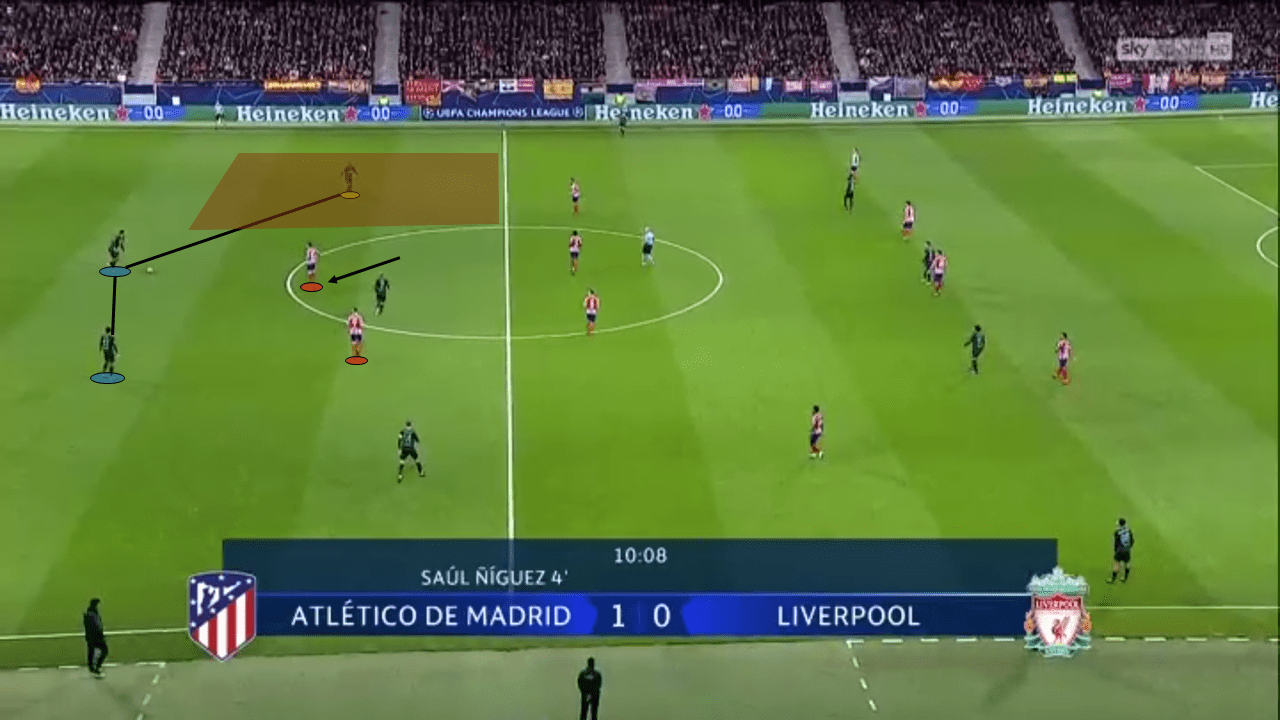
However, in this example we see that Liverpool’s tactics involve Wijnaldum dropping to form a back three. Atlético’s right-sided striker steps across to press the centre-back while blocking the central passing lanes, freeing up Wijnaldum on the side of the striker who moved to the centre.
How to create wide overloads against the 4-4-2
As mentioned earlier in this piece of tactical theory, the 4-4-2’s main advantage is that it can block central progression by maintaining numerical superiority in this area. This is due to its box that it creates formed of the two central midfielders and two strikers, with the two wide midfielders also able to tuck in for additional lateral compactness. However, structurally speaking, the 4-4-2 has no horizontal line of five, unlike the majority of formations that can be used to create a compact mid/low block. The result of this is that the 4-4-2 is particularly vulnerable to being overloaded in wide areas, since, strictly speaking, it only contains one wide midfielder and one fullback to cover each flank.
To exploit this as effectively as possible, we want to prevent both the ball-near central midfielder and centre-back from being able to shift over and support the fullback and wide midfielder when they are defending the wide zones.
How can we do this? Let’s return to the scenario where we have managed to get one of the wide centre-backs free on the ball.
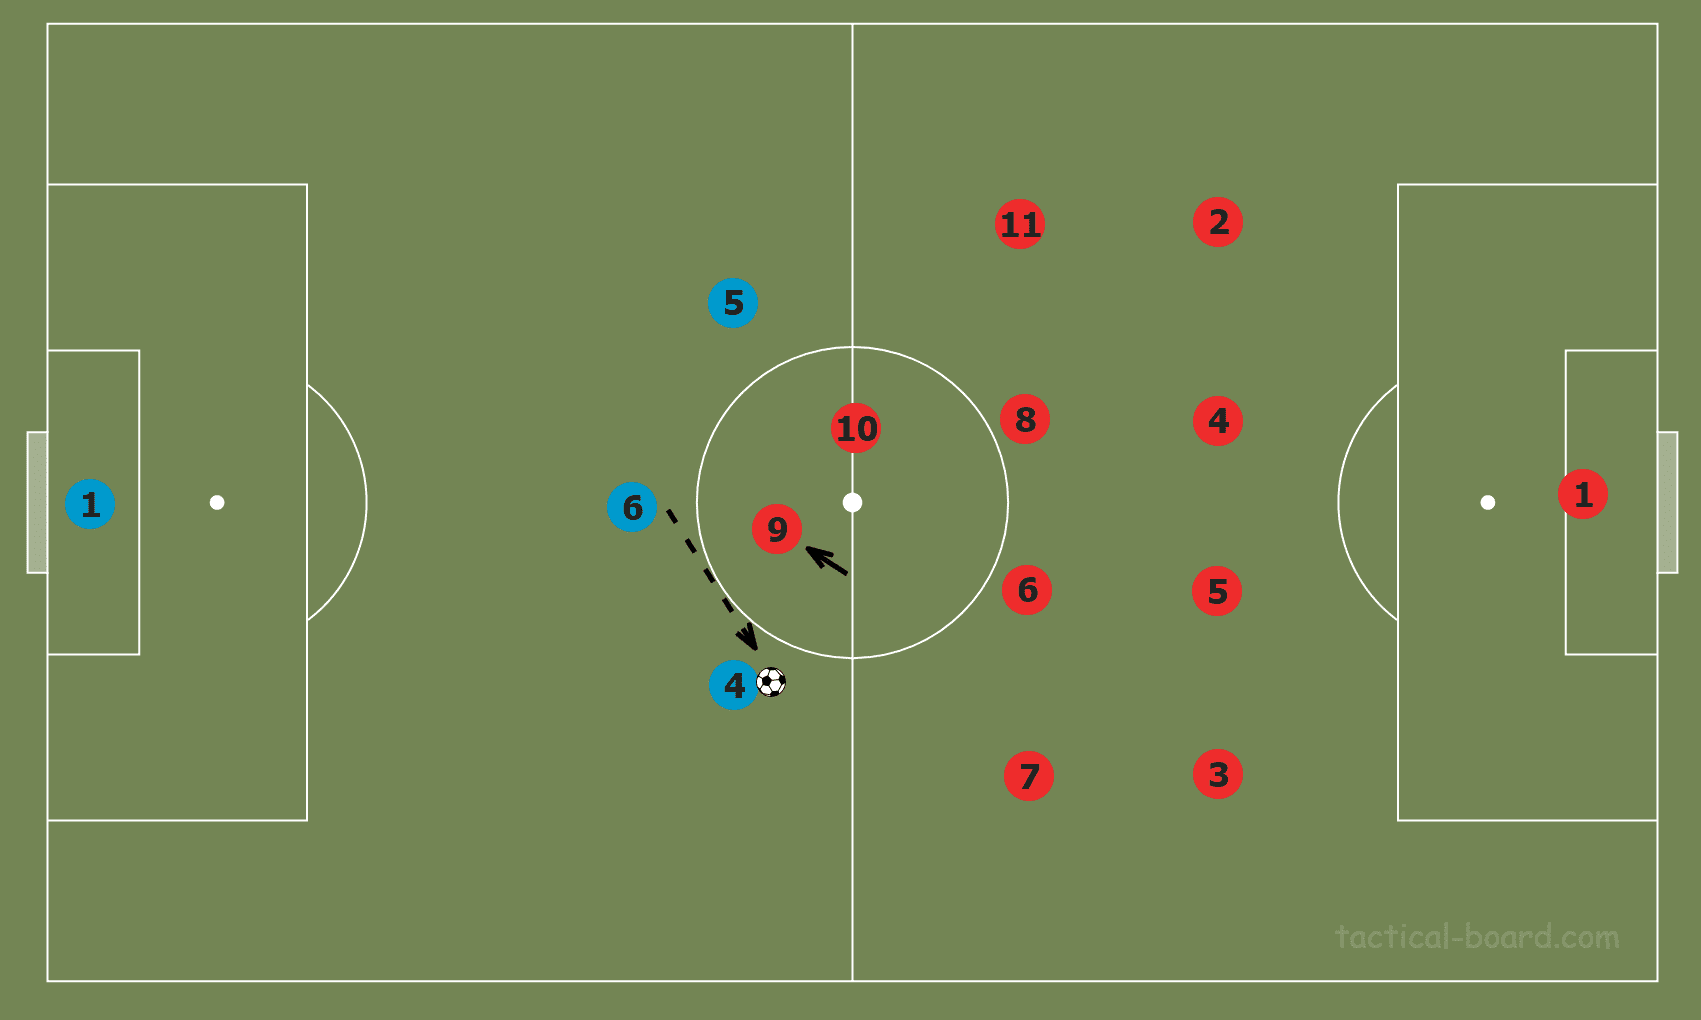
This time, the number nine has stepped across to press the central centre-back, leaving number four open to receive the pass in space from number six.
We have already played around the outside of the first line of the block by getting the ball out to the wide centre-back who is the ‘free man’. So, to isolate the opposition left-back and left midfielder to enable us to create an overload, we need to prevent both the ball-near centre-back and central midfielder from shifting over to support them. To do so, we can ‘pin’ the centre-back and central midfielder, bearing in mind to use as few players as possible to achieve this.
Let’s begin by pinning the centre-back. To pin the ball-near centre-back, the logical choice is to place a striker next to them, but how does this stop the ball-near centre-back from shifting across?

As demonstrated above, we can see that by placing a striker on the centre-back, the centre-back can no longer leave this position to support the opposition in the wide area without leaving a large space right in front of their goal for the striker to exploit.
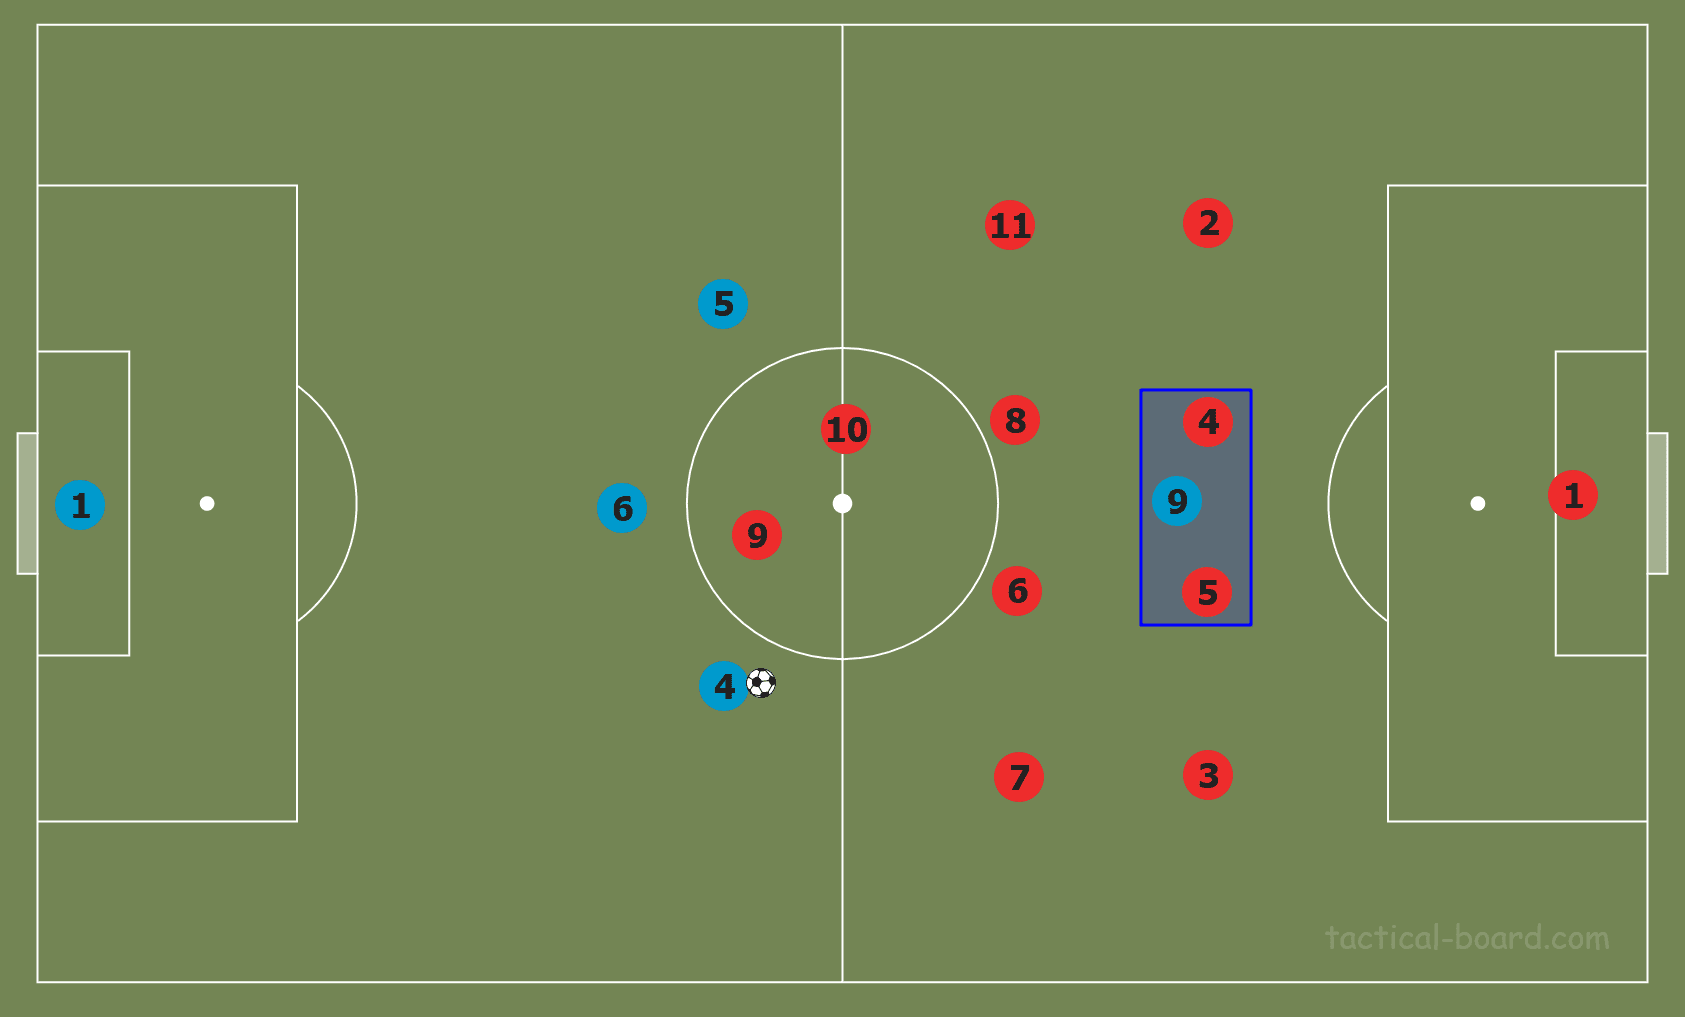
In fact, we only need one striker to pin both centre-backs, going back to the idea of using as few players as possible. The above graphic shows the result of this tactical decision.
Finally, we must pin the ball-near central midfielder, number six.
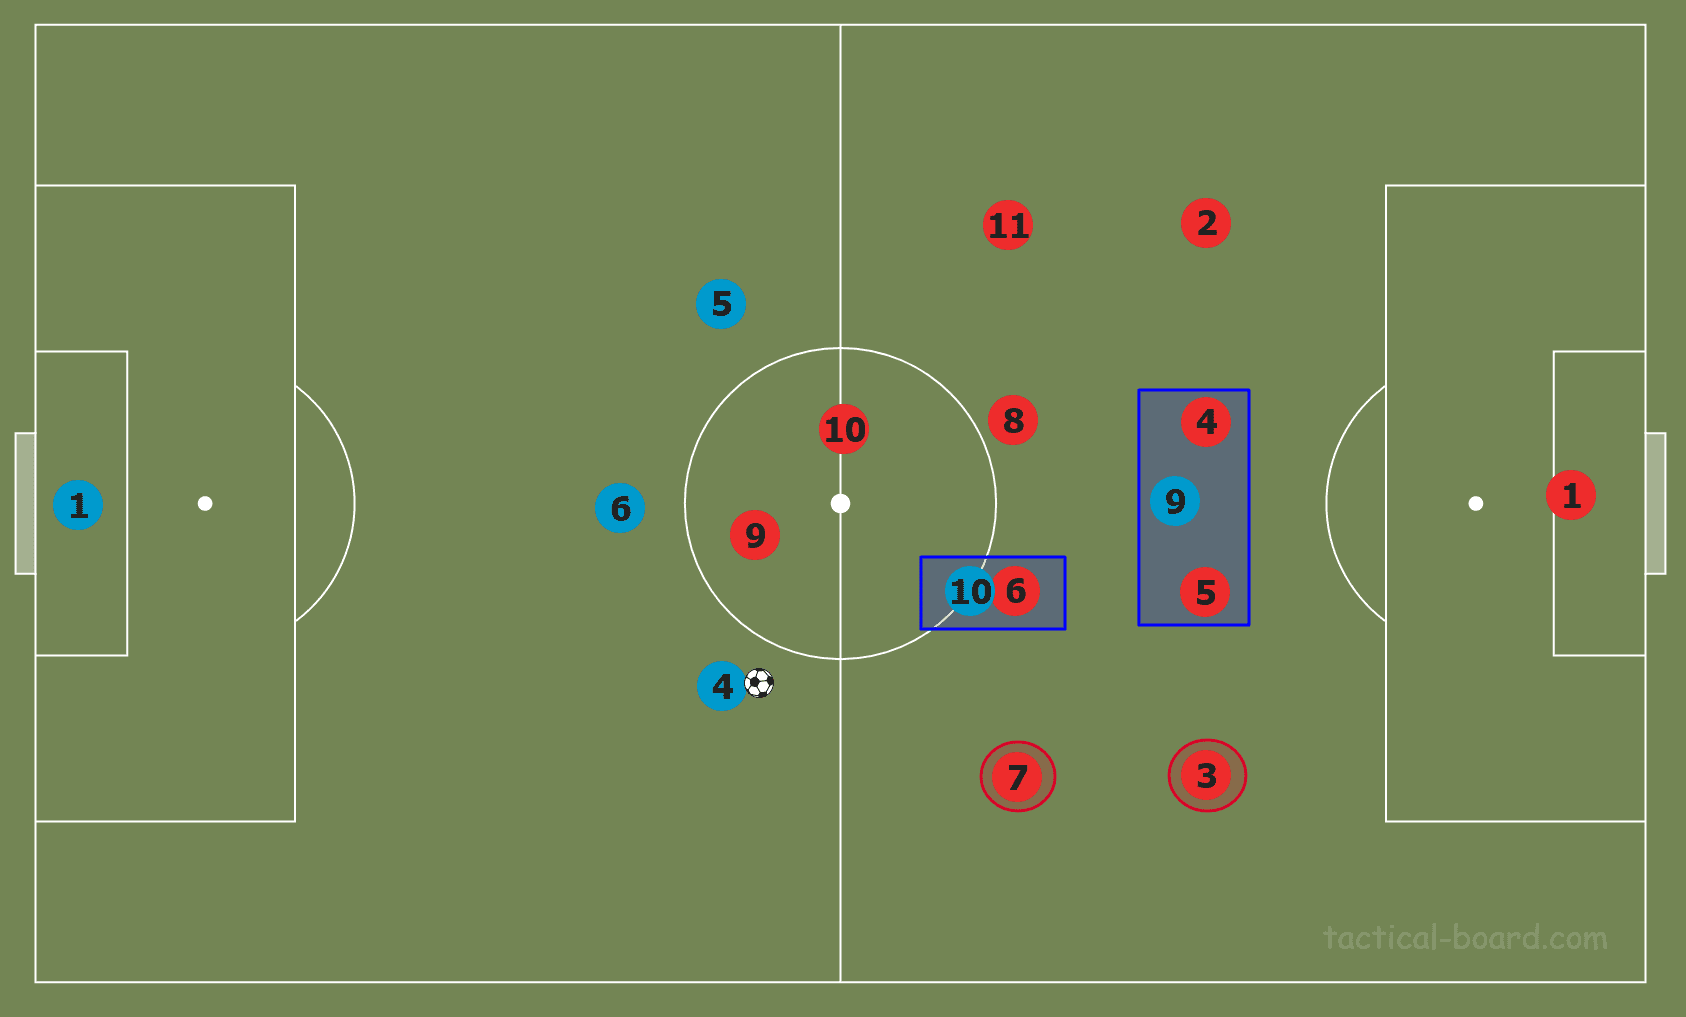
To pin number six, the best option is to place a midfielder of our own on them. Using the same concept of ‘pinning’, number six is now also not able to come across to support the fullback and wide midfielder, as doing so would leave space for a pass into our number ten in the centre of the pitch. The graphic above displays how the fullback and wide midfielder are now isolated as a result of the two tactical decisions that we have just made. What we have achieved by doing this is that we have given the opposition no opportunity to try and bring over extra players from the centre of the pitch to compensate for their formation’s weakness in the wide areas.
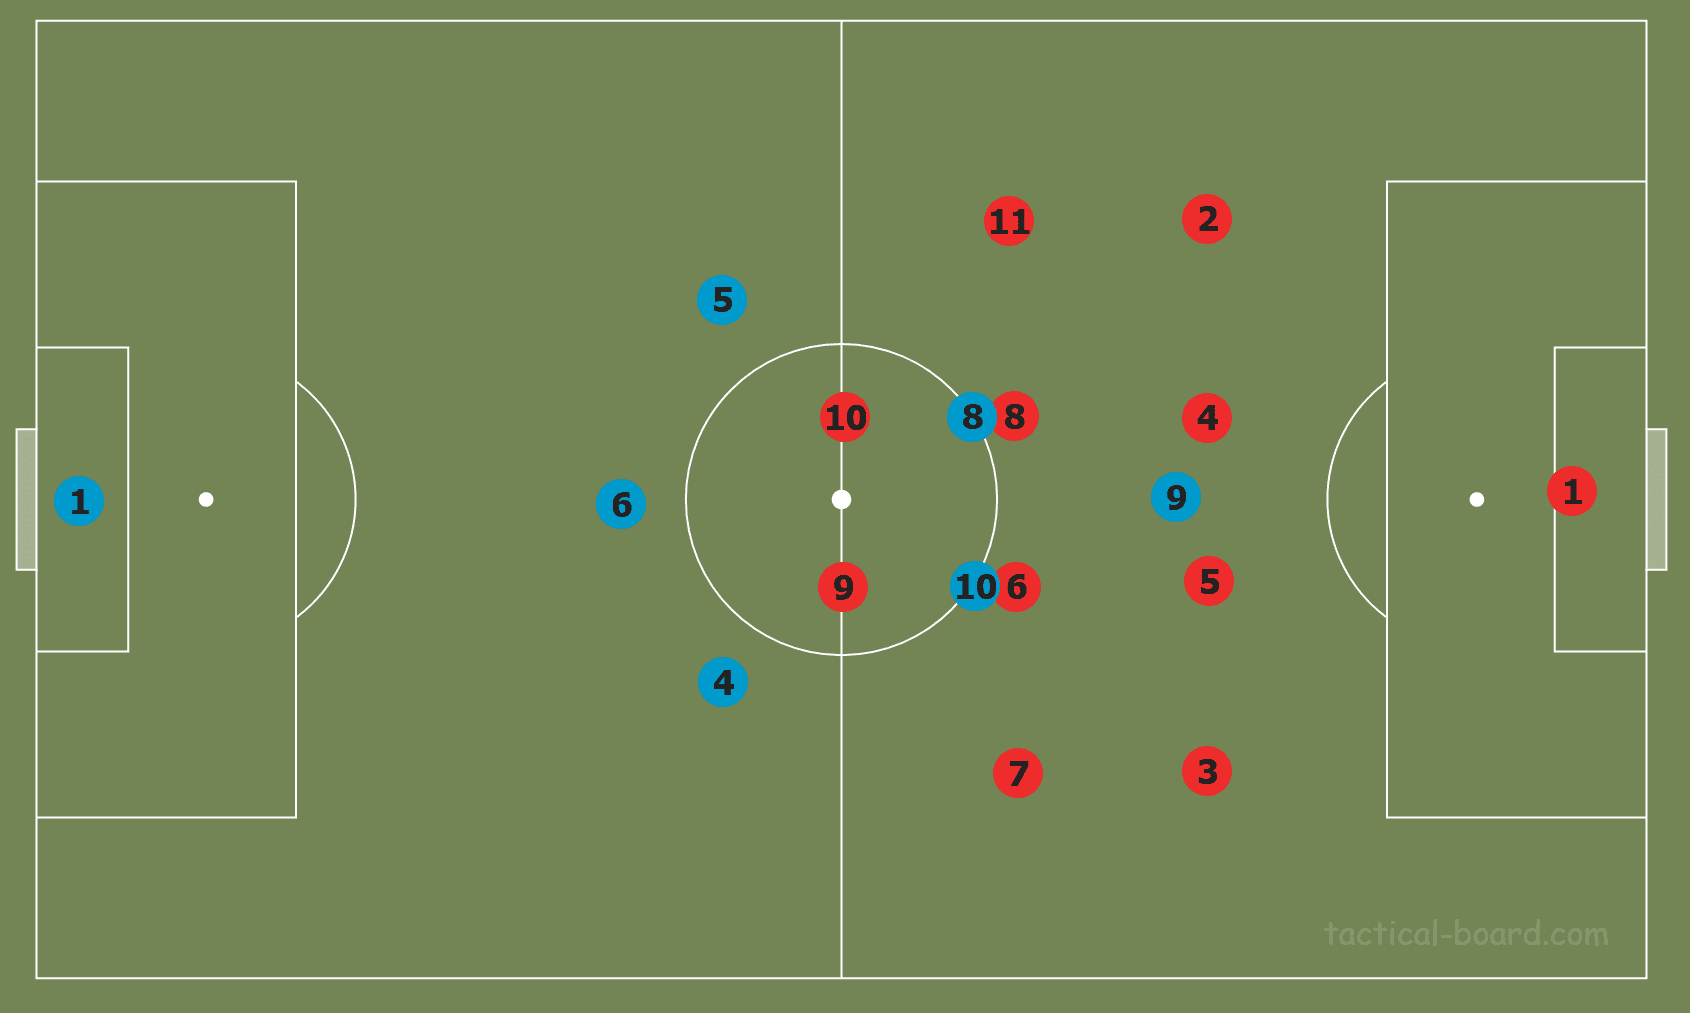
If we mirror this onto the other half of the pitch, as shown above, we have now used up six of our possible 10 outfield players: a back three, a midfield two, and a striker. This leaves us with four players; two for each flank.
Since a back three isn’t enough to cover the width of the pitch when set up in our defensive structure, we will need a pair of wingbacks to make it a back five out of possession. These wingbacks are ideal for creating our width in our attacking structure, so we want them to be placed as wide as possible. For our last two players we will want to use two wide forwards that sit in their respective inside channels, as we currently have no one occupying these areas further up the pitch.
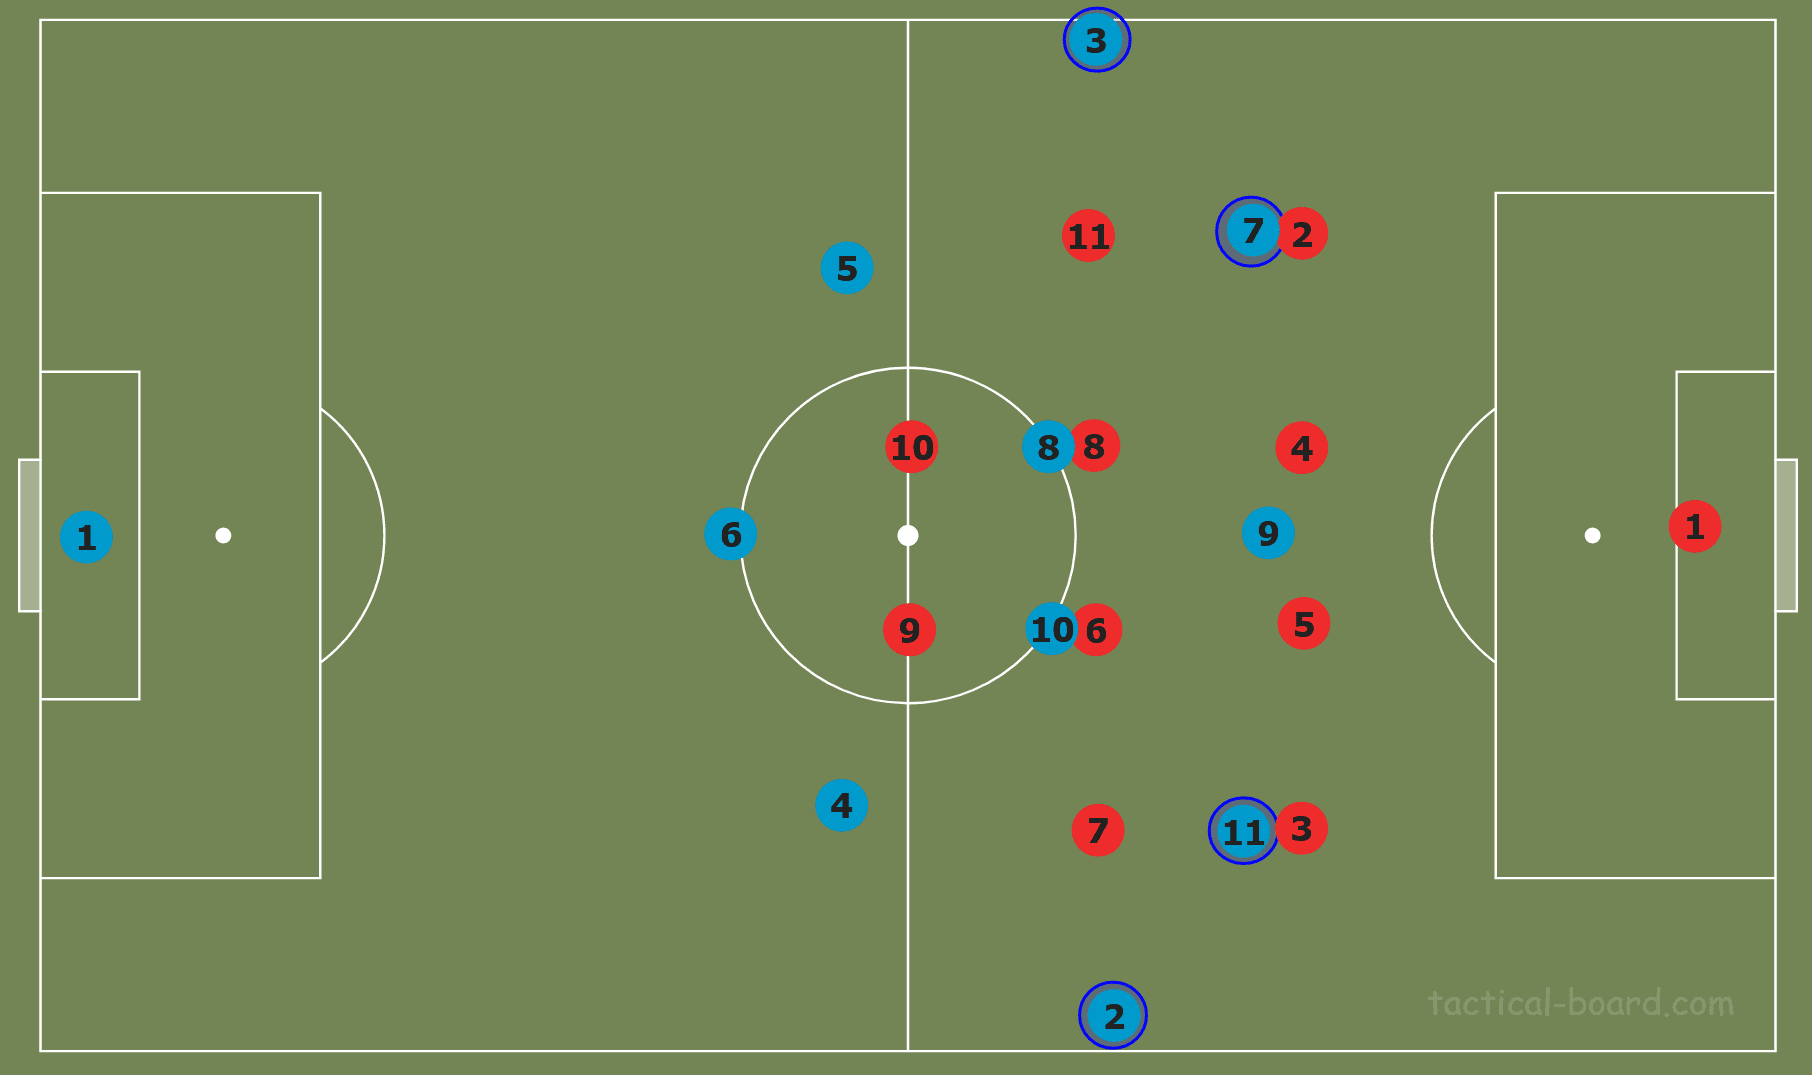
What we can now see is that we have created a 3-4-3 system, as exhibited above, with the four new additions all highlighted.
Now that we have the opposition’s central players pinned and our players are in their general attacking structure, we need to refocus our attention towards the wide areas, which we are looking to exploit.
Let’s once again return to our scenario with the wide centre-back in possession.
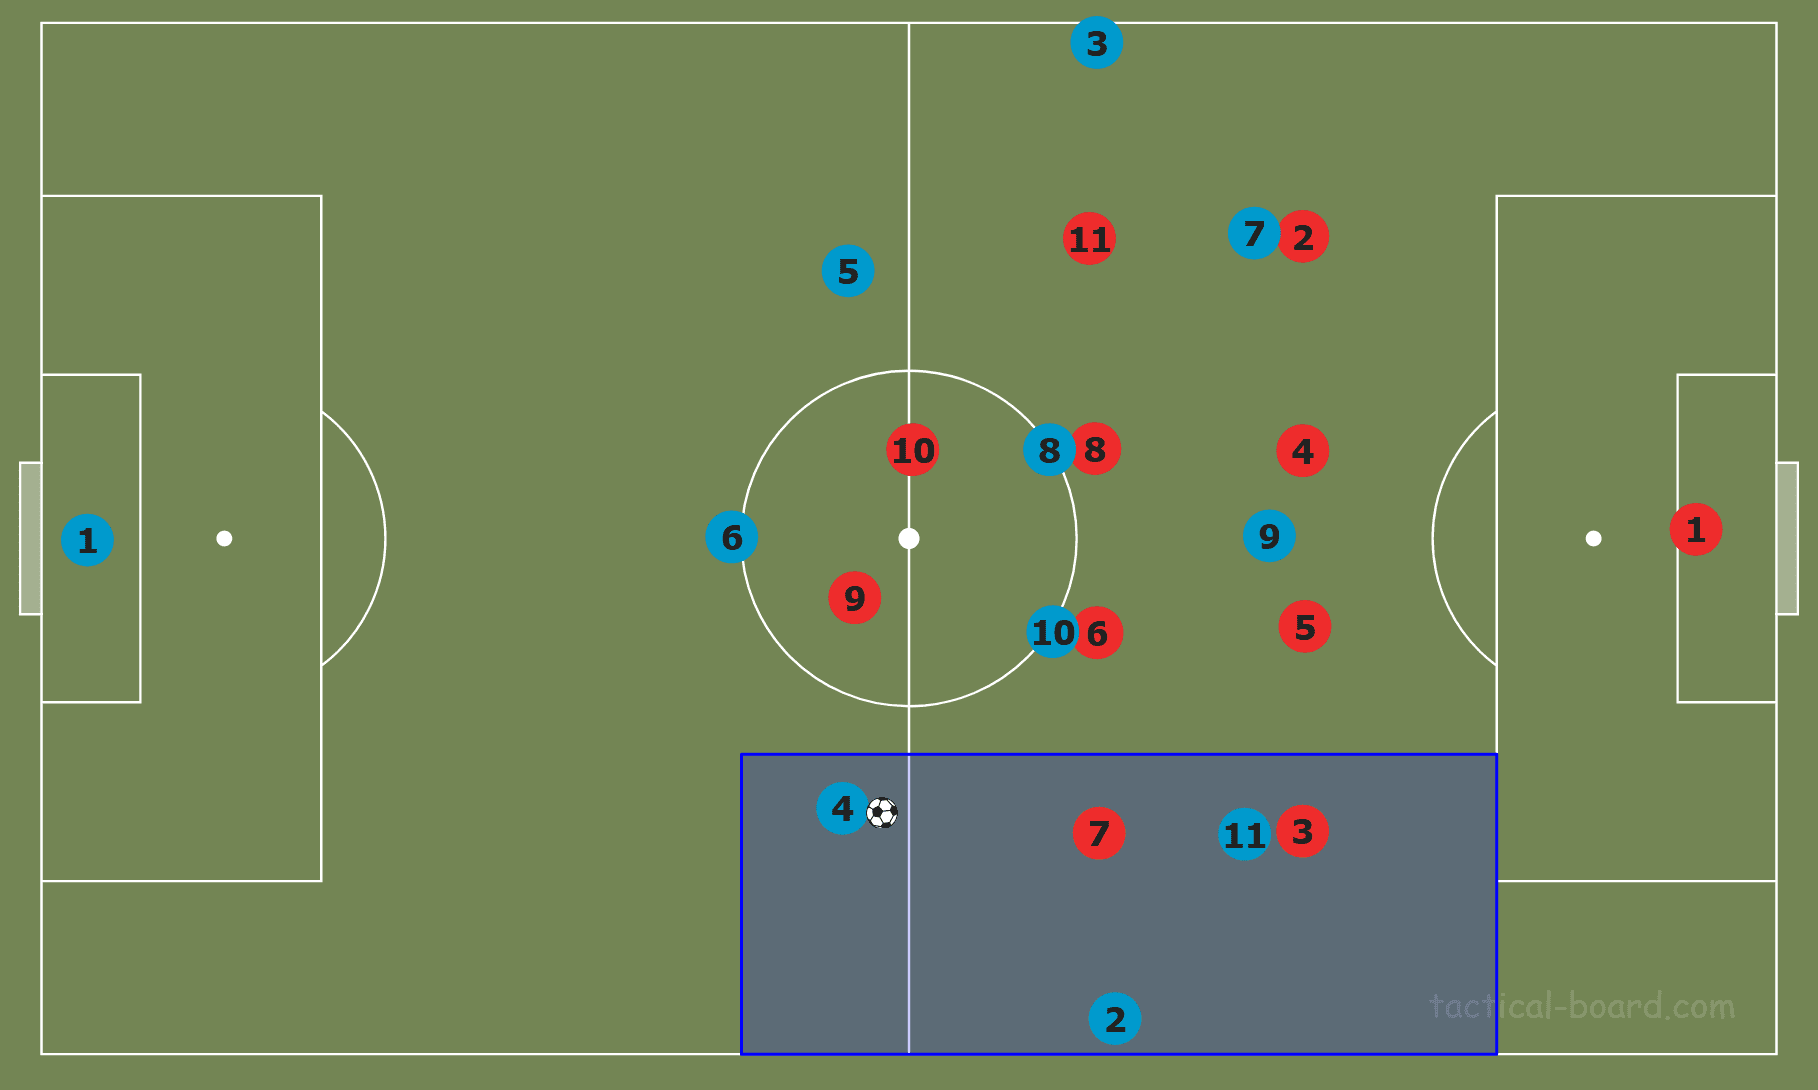
The graphic above displays that we have managed to create a wide overload using the centre-back who is free, as we now have a 3v2 against the opposition wide midfielder and fullback. Furthermore, thanks to our ‘pinning’ technique that we used earlier, none of the opposition’s central players can shift across to balance the numbers.
Now we must think about how we can take advantage of this favourable 3v2 position.
How to exploit the wide overloads
We have discussed how we have managed to construct a situation using tactics that exploit a significant weakness in the opposition’s defensive structure, so now we must talk about how we can take advantage of this position and actually manufacture goalscoring chances.
The first method of getting in behind the opposition backline is as follows.
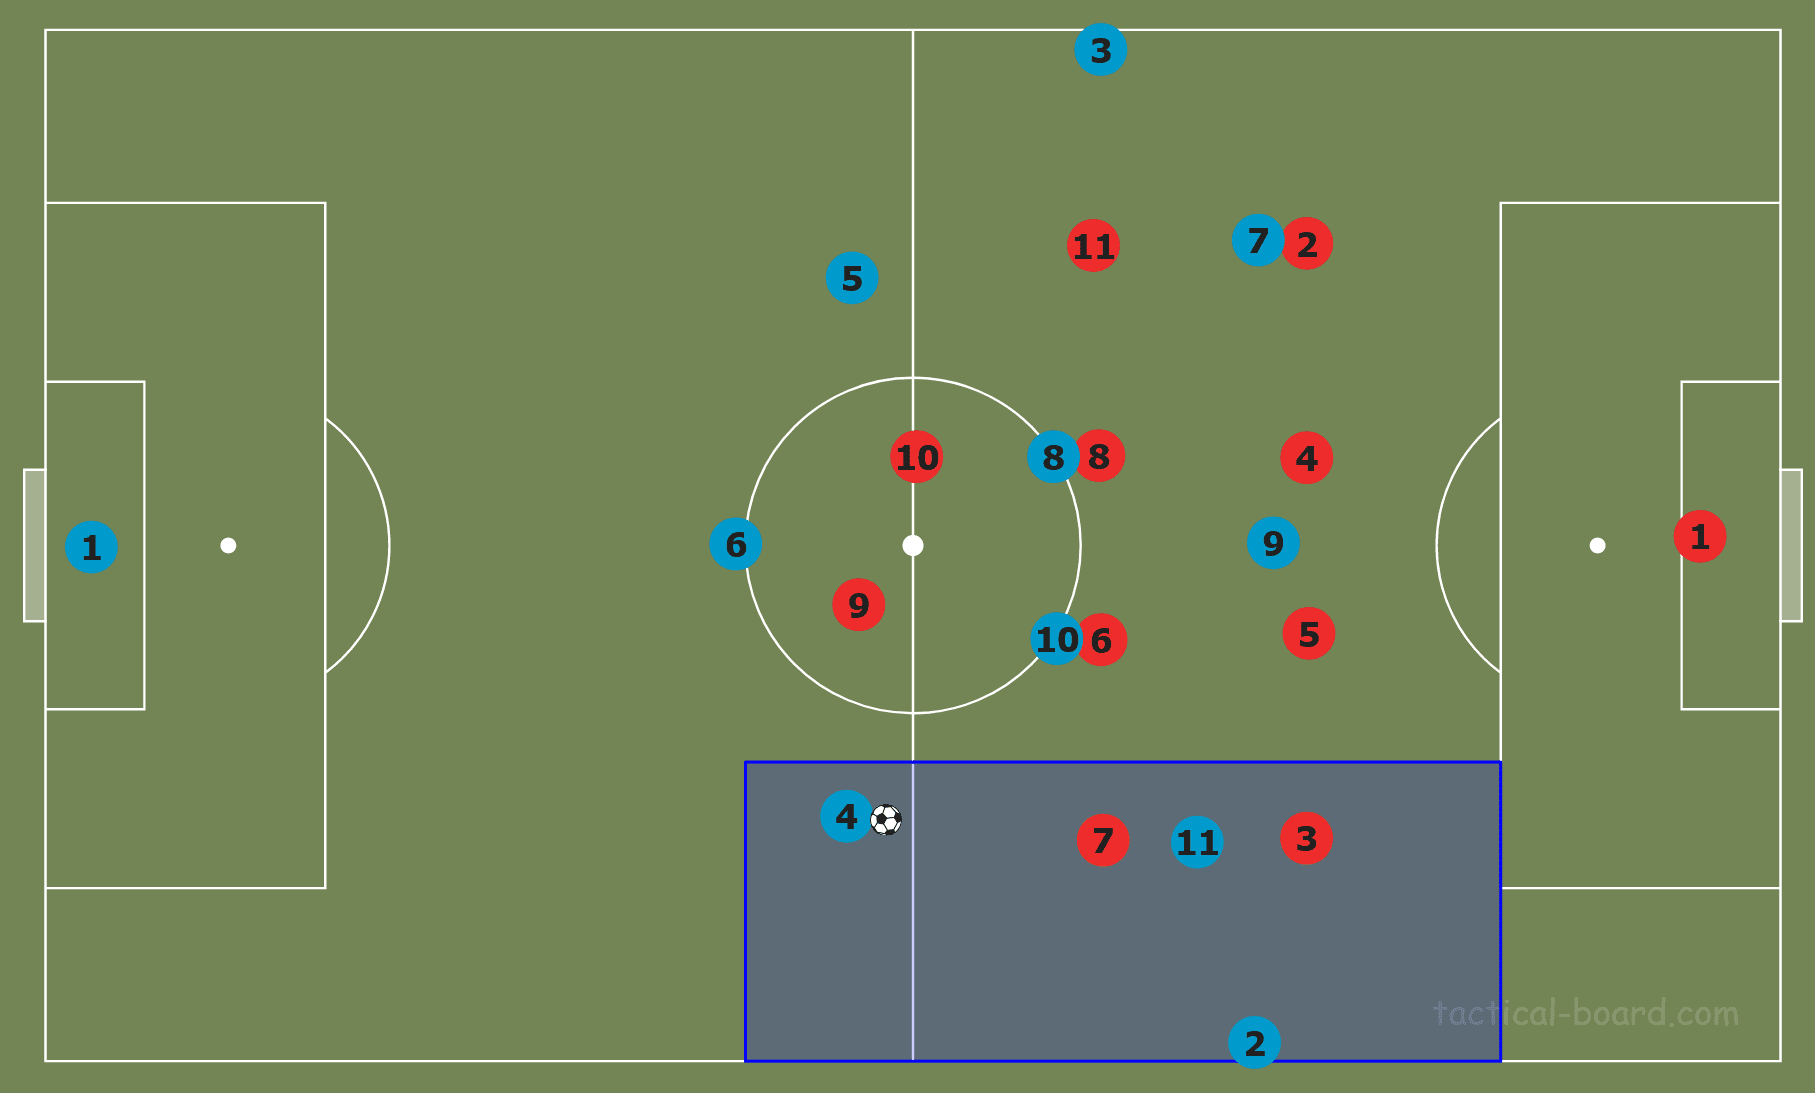
The above graphic demonstrates how we want our wing-back and wide forward to be positioned in this pattern of play. The wing-back should be high, almost level with the opposition fullback. The reason for this is that we want the fullback to be pinned in position. This action pins the fullback since, if they step forward, the centre-back can easily play a pass over the top of the fullback into the space behind the defensive line. What pinning the fullback allows us to do is to have the wide forward drop between the lines without being followed. Therefore, the opposition wide midfielder has no choice but to block the passing lane to the wide forward to prevent them from receiving in space.
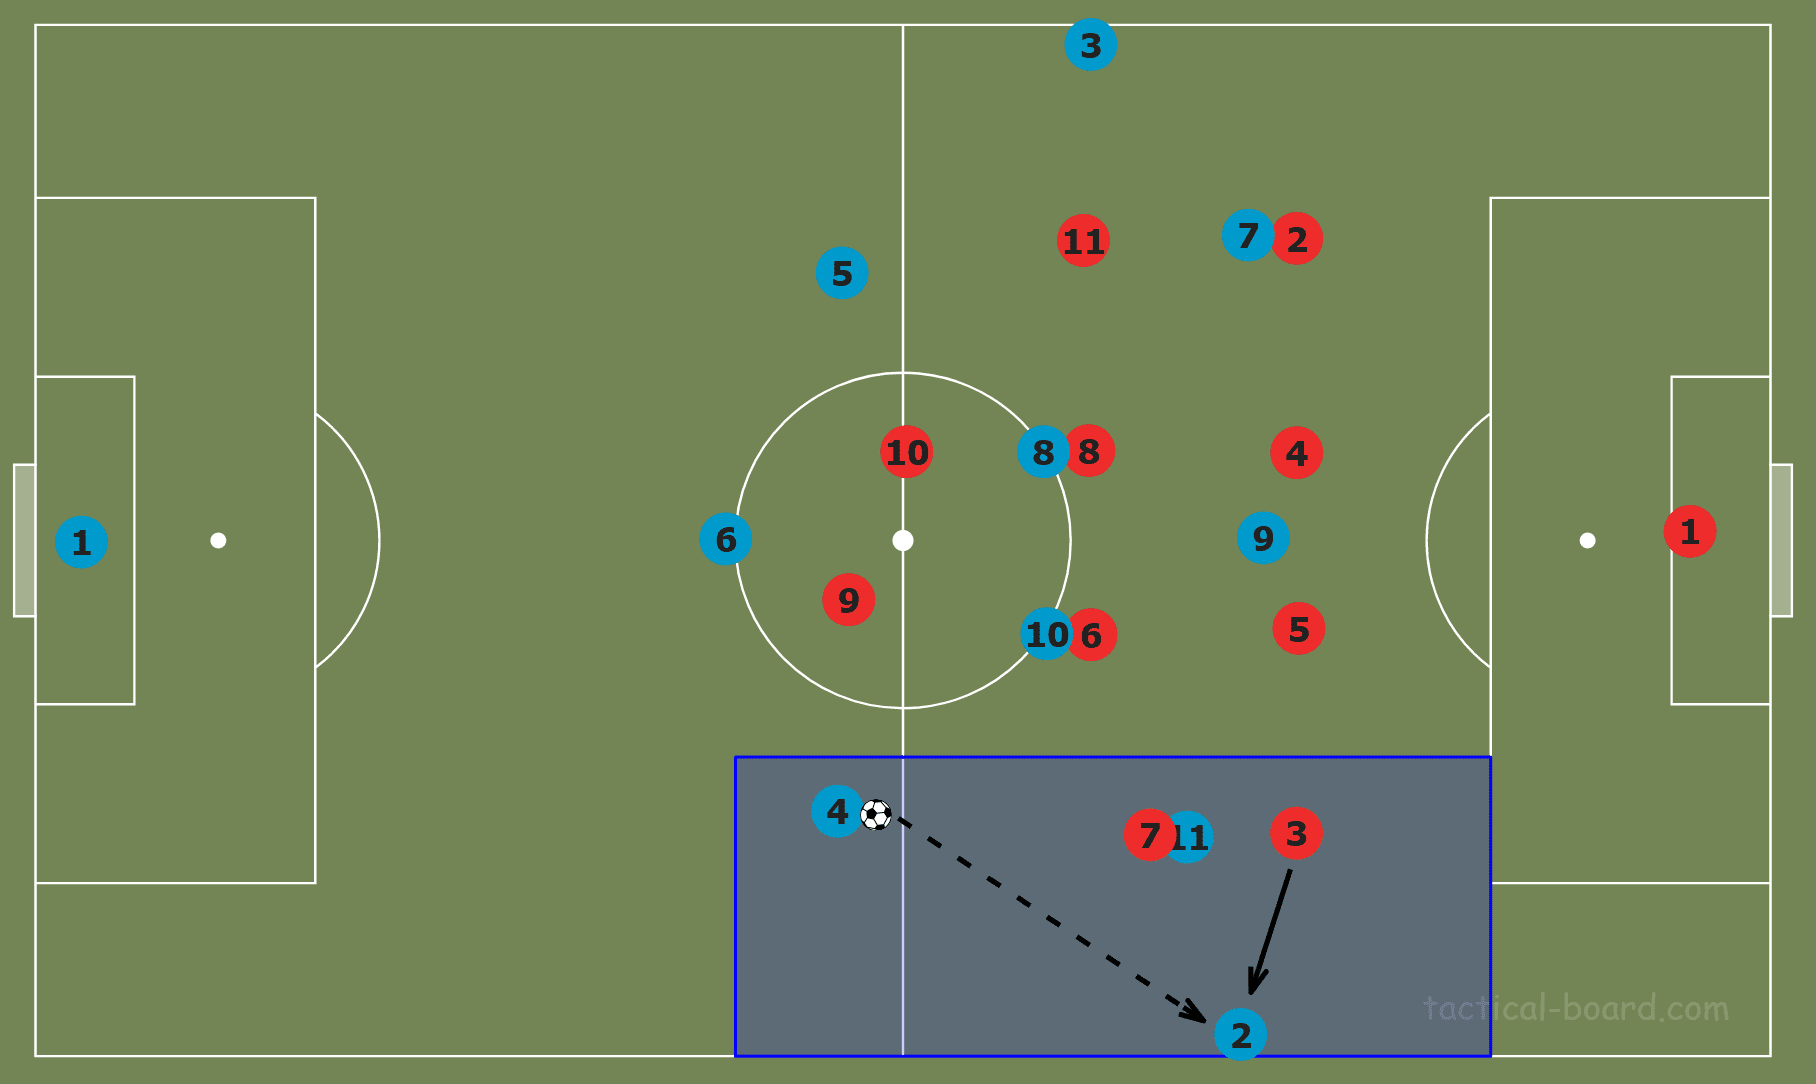
If the centre-back plays a pass from his current deep position, the wide midfielder will be able to stay tight on the wide forward and a pass to the wing-back would result in a 2v2 situation as shown above. The wide forward’s run in behind the fullback would then be able to be tracked by the wide midfielder since the wide midfielder is focussed on staying tight to the wide forward, so likely wouldn’t lead to a real opportunity.
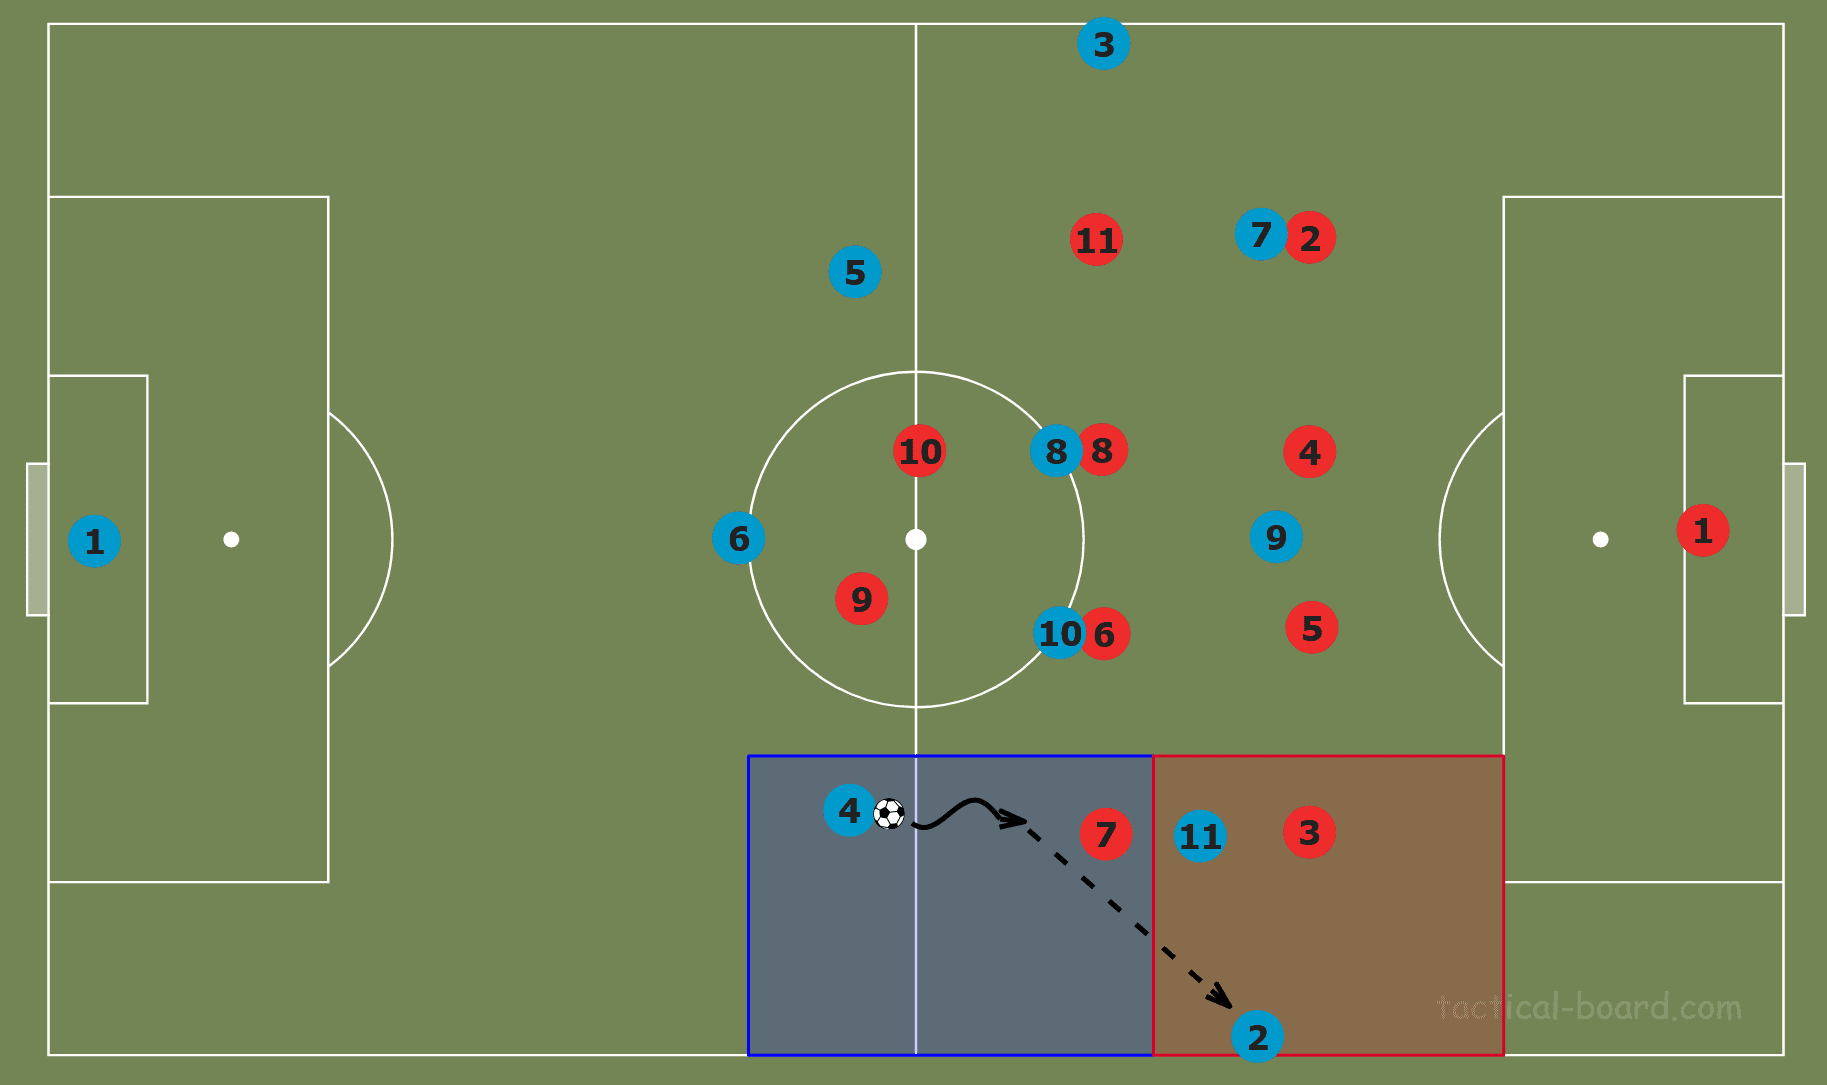
To avoid this, the centre-back must carry the ball forward in order to engage the wide midfielder, forcing them to step forward, leaving number 11 free. As we can see in the graphic above, if the centre-back waits to play the pass once the wide midfielder is engaged, we will have a 2v1 on the fullback.
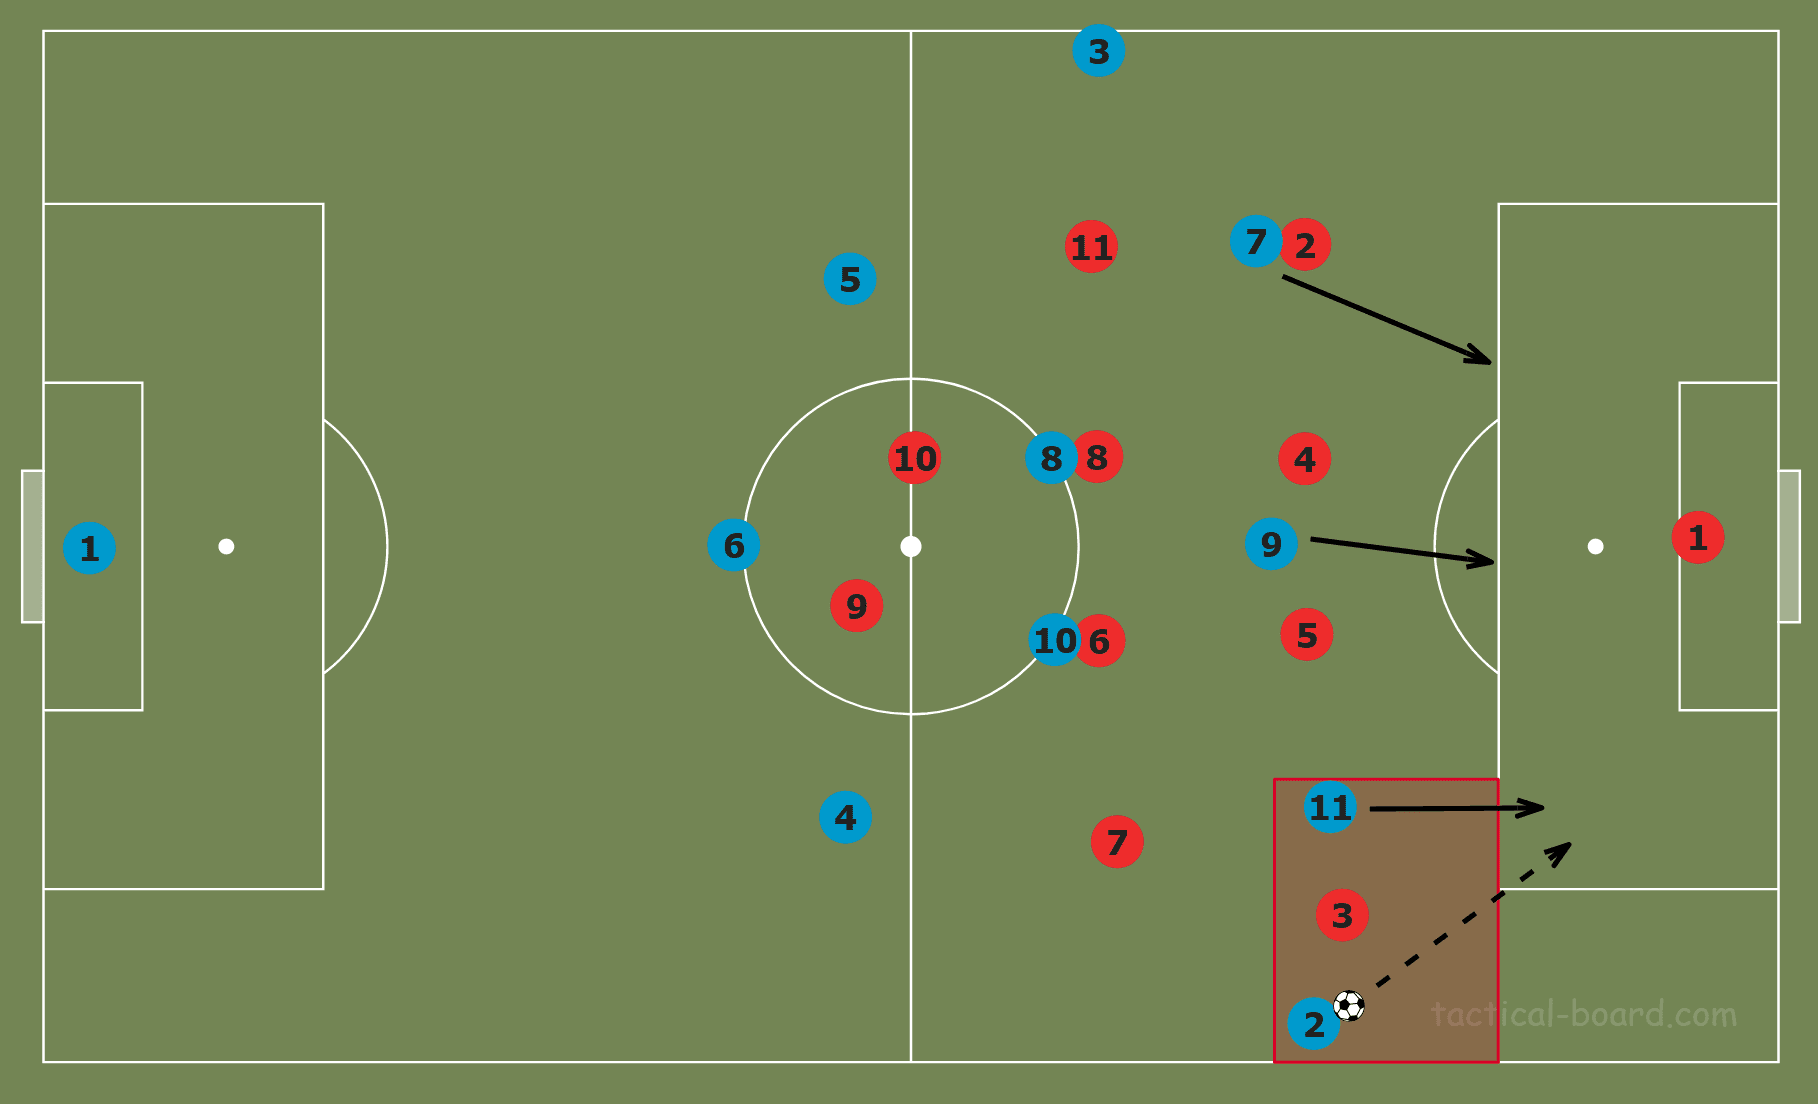
Above is an example of how we could take advantage of this mini 2v1 overload. Here, our wide forward makes a run in behind the fullback in the inside channel, with support in central areas to get on the end of a cross or a cut-back.
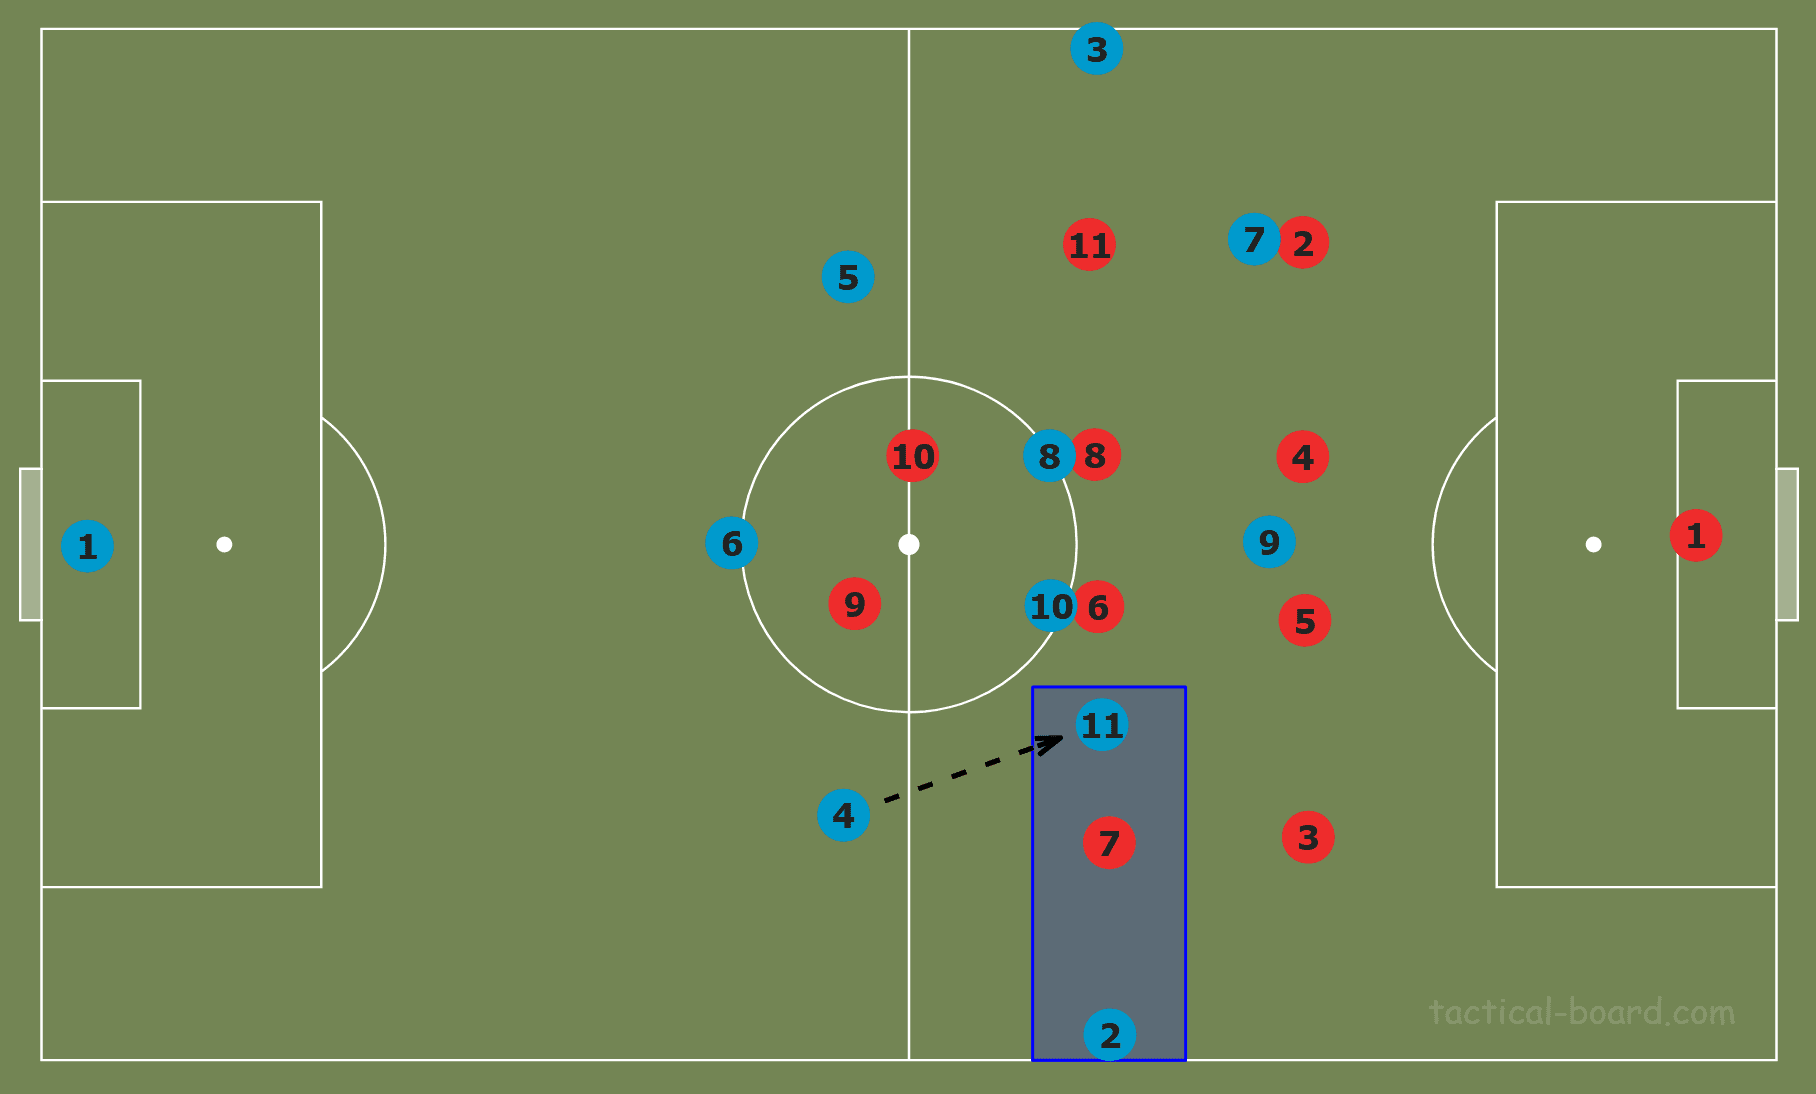
An additional pattern that could be played to exploit the wide overload could be performed with the players positioned as shown above. The opposition fullback is unlikely to step out to our wing-back, again to prevent a ball being played by our centre-back directly into the space in behind. To create space in the inside channel for the wide forward to drop into and create a 2v1 overload on the wide midfielder, our number 10 could drag the opponent’s number six centrally. From here, the number 11 would be able to run at the defence to either shoot or play a through-pass into either the wing-back or striker.

An example of this pattern being used against a 4-4-2 is from the first leg between Tottenham Hotspur and RB Leipzig in the last 16 of the UEFA Champions League. Leipzig have managed to free the centre-back on the ball who has carried the ball forward to increase the passing angles between his two passing options, thus decreasing the chance of interception. Tottenham’s left-back is pinned by the wing-back, while Leipzig’s wide forward has dropped into the inside channel on the inside of Tottenham’s wide midfielder. The wide midfielder can’t cut out both options on his own, so Leipzig are comfortably able to progress the ball into Tottenham’s final third.
The final method that I will discuss of progressing the ball once a wide centre-back is free on the ball is using up-back-through combinations.
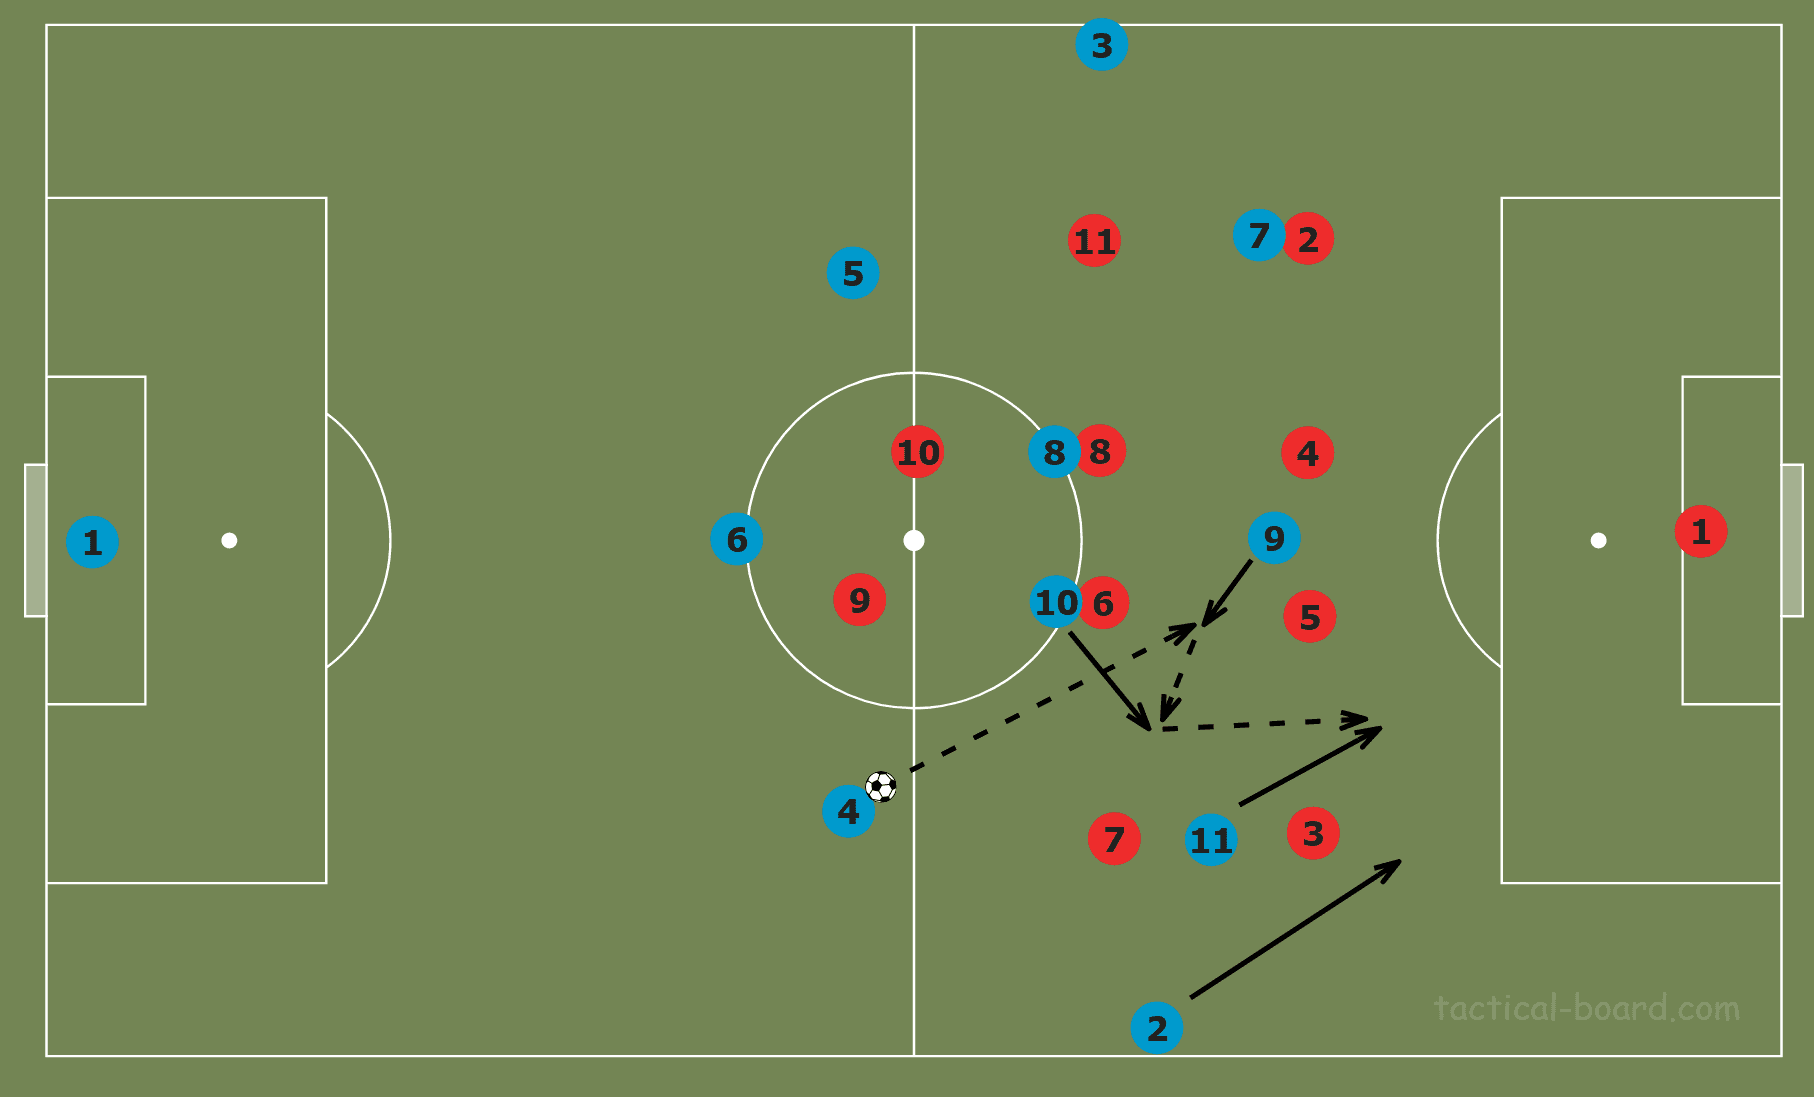
Above shows the set of passes and movements required to complete this pattern of play. The first movement that triggers this is the striker dropping slightly to receive a pass from the centre-back. It is likely the number nine could be followed by a centre-back, so as soon as they receive the ball a lay-off pass should be played. Immediately after the initial pass from the centre-back is played, the number 10 here should look to move into the inside channel where there is space to receive the lay-off pass. This quick movement from the number 10 should allow them to get ahead of their marker, number six, to receive in a pocket of space. Meanwhile, both the wide forward and the wing-back should be making direct runs in behind the opposition backline. This is to take advantage of the 2v1 against the fullback in this position, meaning at least one of the two runners will be open to receive a pass from the number 10.

Above is an example of Leipzig using an up-back-through combination in the same pattern as was just explained. Here, the striker drops to receive a direct ball from the outside centre-back. This triggers the ball-near central midfielder to make a lateral movement to receive the lay-off in space in the inside channel. He then has two passing options: the wide forward running inside the fullback, and the wing-back running outside the fullback. In this instance, they created a good opportunity from the edge of the box which forced a save from the goalkeeper.
Conclusion
To conclude this tactical analysis, we can see that the initial step that needs to be taken when forming the attacking structure against a 4-4-2 block should be to use a back three. It is then vital to maximise this overload by using it to free up either of the outside centre-backs. What this then allows the team in possession to do is to create wide overloads that exploit the key weakness of the 4-4-2 structure, the lack of a horizontal line of five players, with the assistance of the concept of ‘pinning’ which we examined in detail. These wide overloads can then be used in a variety of ways, as discussed, to get in behind the defensive line and create clear opportunities.




Comments