When analysing attacking play, many talk about the width and depth provided. However, it is also important to position players between the opposition lines, especially between midfield and defence as this has a direct impact on the defensive behaviour of the opposition defenders. And the overall aim when building an attack will always be to get behind the opposition defence since this is the best foundation for high-value scoring opportunities.
There are different ways and concepts of occupying the space in front of the opposition defence. And this tactical analysis will examine the different strategies of Julian Nagelsmann’s RB Leipzig and Pep Guardiola’s Manchester City.
For reasons of simplicity, we will use the term “red zone“ for the space between the opposition midfield and defence in the following tactical analysis.
The importance of occupying the red zone
As most teams cover their attacks with at least one additional player at the back, they also lack one player in attack, meaning they have a numerical inferiority. The defending teams have the numerical advantage, can shift in a ball-oriented manner, cover all passing lanes, and press the ball-carrier.
Therefore, one of the most important things during the attacking phase is to force the opposition players to make decisions. The ideal way to do that is to force them to make a wrong decision – one that opens up an opportunity to penetrate, or even to score. By positioning players between the lines, one can force the opponents to make decisions. Should a defender step out or a midfielder drop back? Defending attackers between the lines correctly is difficult and requires good communication. And since one can create promising opportunities from the area in front of the back line, occupying this space during the attack is important. In the following image, RB Leipzig occupy the red zone with three players against Borussia Dortmund, while the back line is pinned back by one attacker.
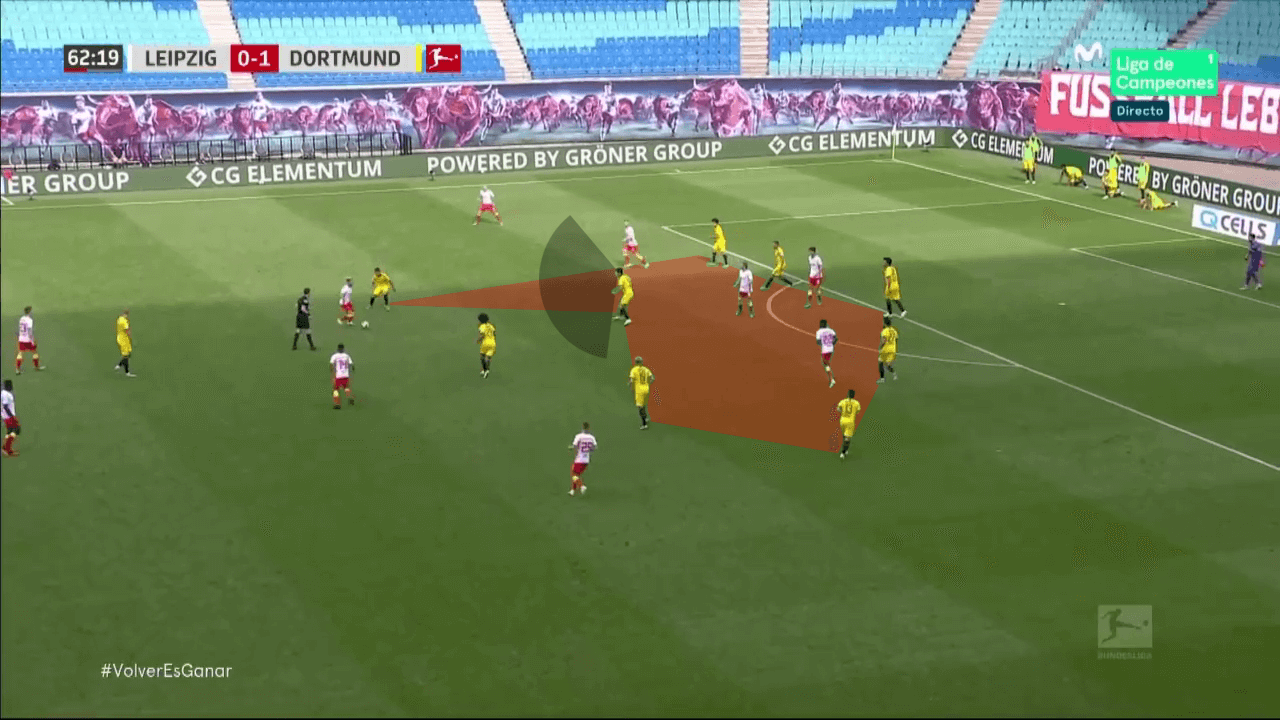
Moreover, being positioned between the lines is always connected with the advantage of being behind an opponent and therewith out of the field of view. As one can see in the image above, Dortmund’s defensive midfielder cannot see the exact positioning of Leipzig’s red zone players. In general, that makes it hard for midfielders to defend players positioned in the red zone.
As a positive side effect, having players positioned in the red zone provides a better structure for an effective counter-pressing than a U-shape without players between the lines. From the red zone, it is possible to press both opposition midfielders and defenders within a relatively short distance.
Throughout this tactical theory piece, we will mainly look at the red zone occupation during positional attacks and how to use it to penetrate the opposition block. Additionally, the space between defensive line and midfield obviously also poses a huge potential when it comes to crosses and shooting positions.
Overloading the red zone
Besides the different ways of positioning players within the red zone that we will discuss later on, there are also differences in the number of players positioned inside it. Whereas some teams rather position their attacking players on the last line with just one player dropping into the red zone at a time, teams that use rotations during the attacking phase often overload
the red zone.
In the following example, Nagelsmann’s Leipzig provide three options within the red zone. That gives the ball-carrier different opportunities to overplay the midfield line. The opposition can only cover all of these options by staying narrow which creates space out wide.
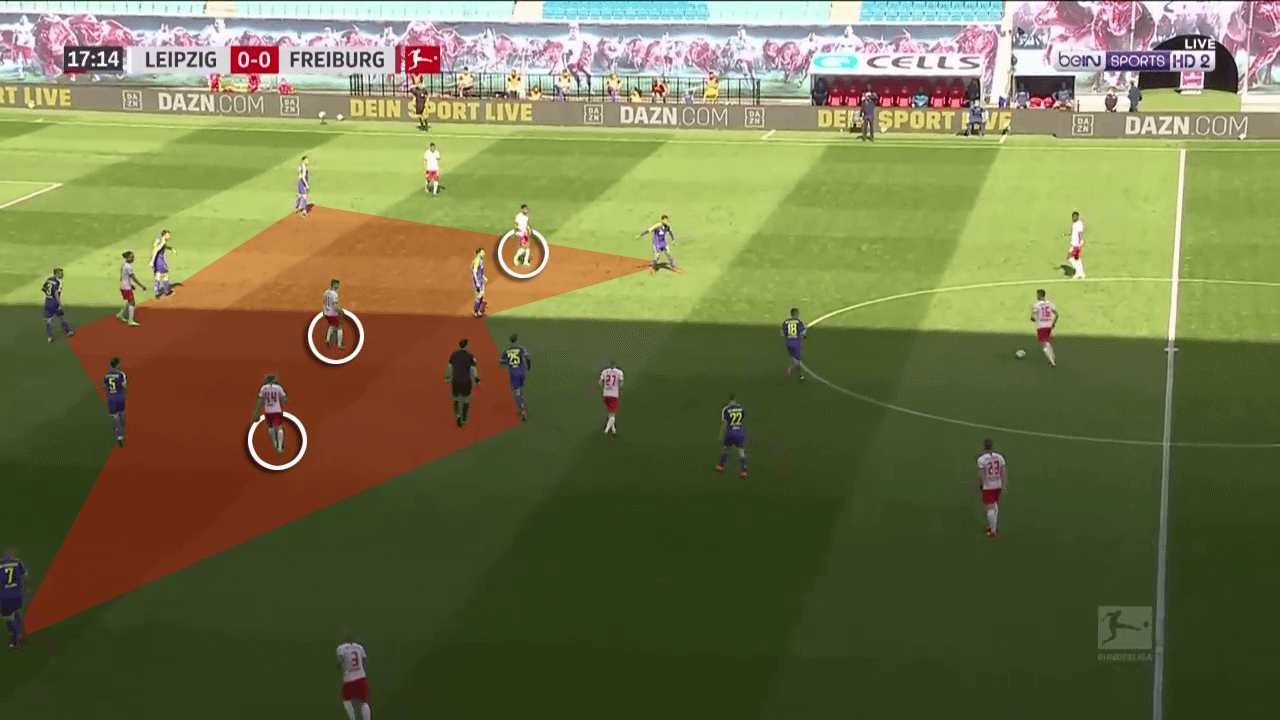
Moreover, an overload in the red zone will pull the opposition midfielders backwards as they are aware of the danger behind their back. As a consequence, the central defenders and the deep pivot(s) are offered more space that they can use to progress up the pitch. Below, Leipzig’s build-up player can carry the ball up the pitch with the next midfielder pinned back by two red zone players.
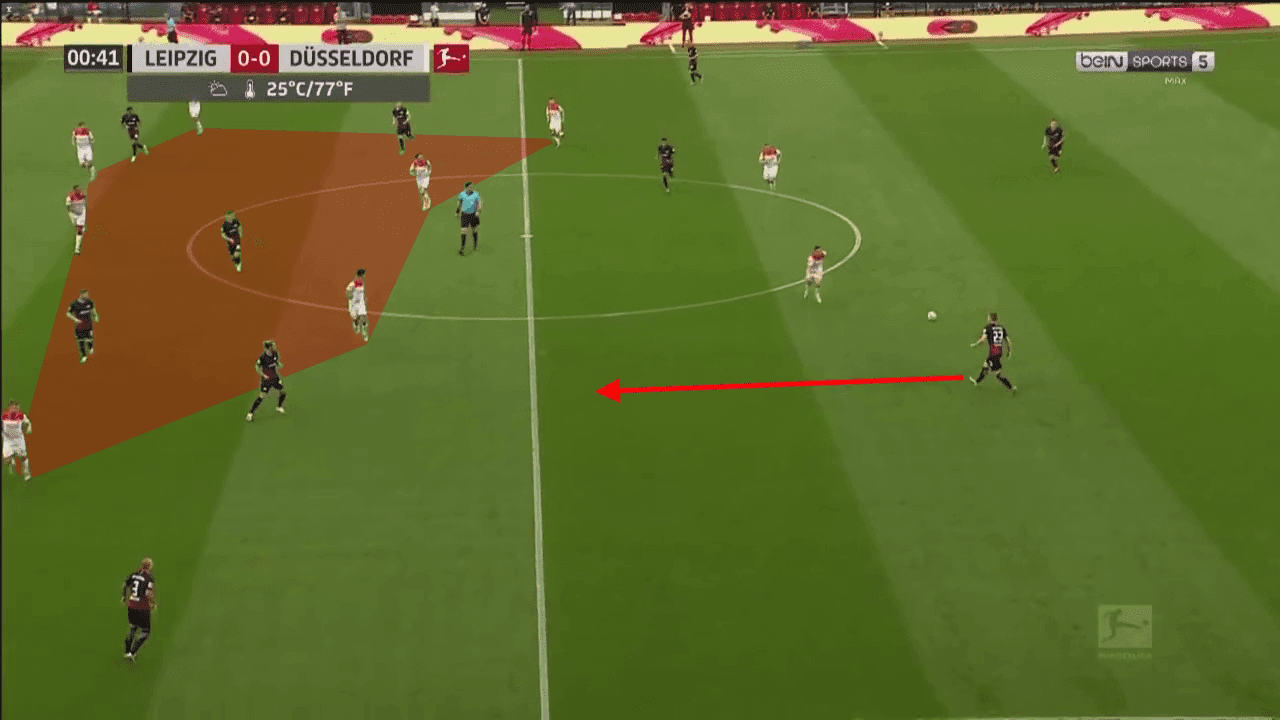
Moreover, the distance for the opposition midfielders to cover is big when they are pinned back. This does not only enable the build-up players space, but also more time on the ball.
Dynamic occupation with counter-movements
As said before, sides that overload the red zone often use rotational movements. Therefore, their approach is dynamic and it often includes counter-movements. That way, the teams can ensure that all different lines are occupied all the time. When an attacker would drop into the red zone, for instance, a midfielder would make a forward run.
Furthermore, it is also possible that deep midfielders move into the red zone while an attacking midfielder drops deeper. The scenario below even shows Leipzig’s nominal left-back making a run into the red zone and receiving the ball.
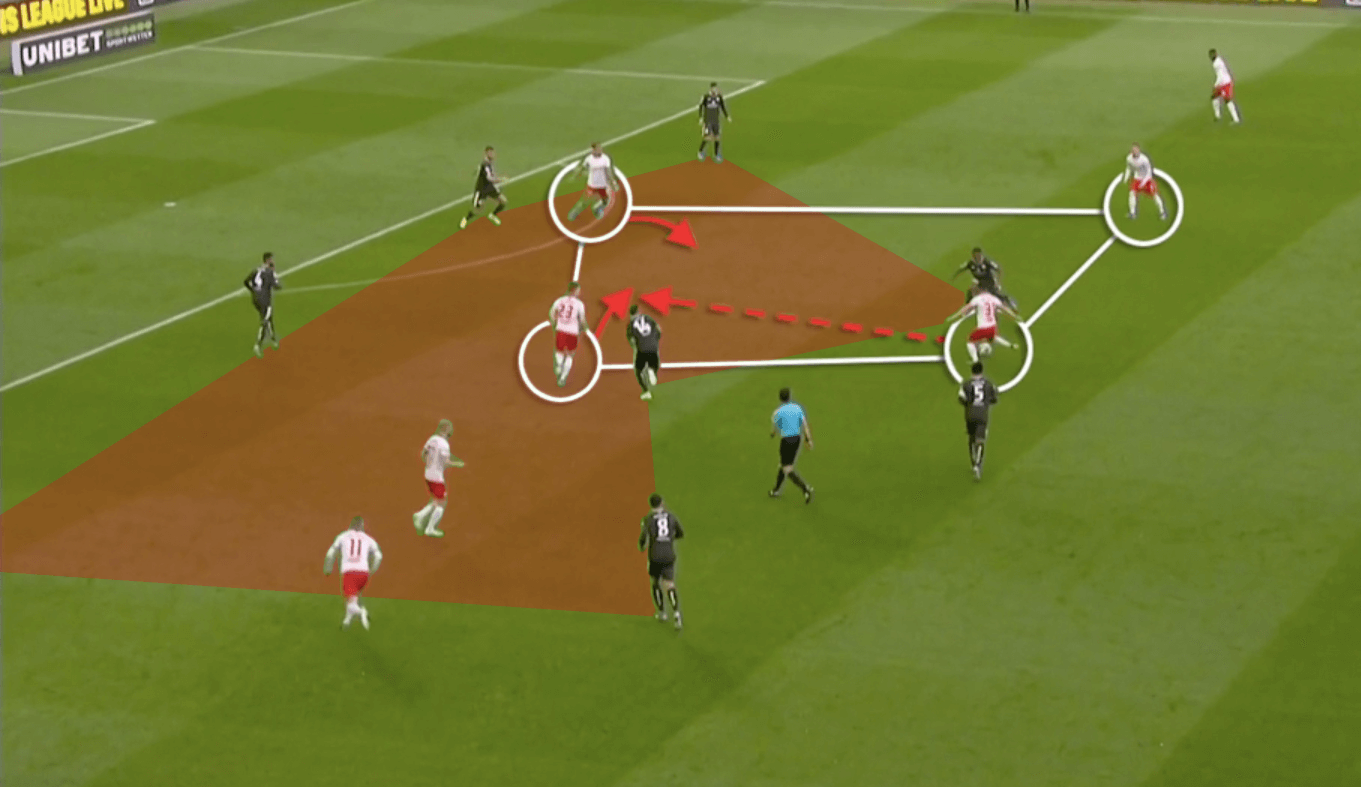
RB Leipzig coach Julian Nagelsmann likes his players to interchange positions and roam freely through the red zone. His RB Leipzig dynamically occupy the red zone with diagonal runs into space. And from the red zone, their midfielders and attackers can also start threatening with forward runs aiming at receiving the ball behind the defence.
An advantage of this concept is that the opposition defenders will constantly have to watch the players in the red zone and adjust their positioning as the movements are highly dynamic. Due to that, red zone players can also take advantage of the dynamism, receive the ball while already moving forward, and they can benefit from defenders adjusting their body shape too late.
Nevertheless, the dynamism can also lead to chaos. When there is a lack of communication, two players might occupy the same area, while open space is unoccupied. As a result, in the worst case scenario, the attacking team is missing a valuable passing option.
Constant occupation through positional play
Another way of occupying the red zone is to position the advanced midfielders just behind the gaps of the opposition midfield line. A famous example for this strategy is Pep Guardiola’s positional play and his 4-3-3 tactics at Manchester City. Although their attacking structure varies as they like to form a 3-2-5 or 2-3-5, there will nearly always be two players within the half-spaces occupying the red zone. The following image displays Manchester City’s offensive shape with their two advanced midfielders within the red zone.
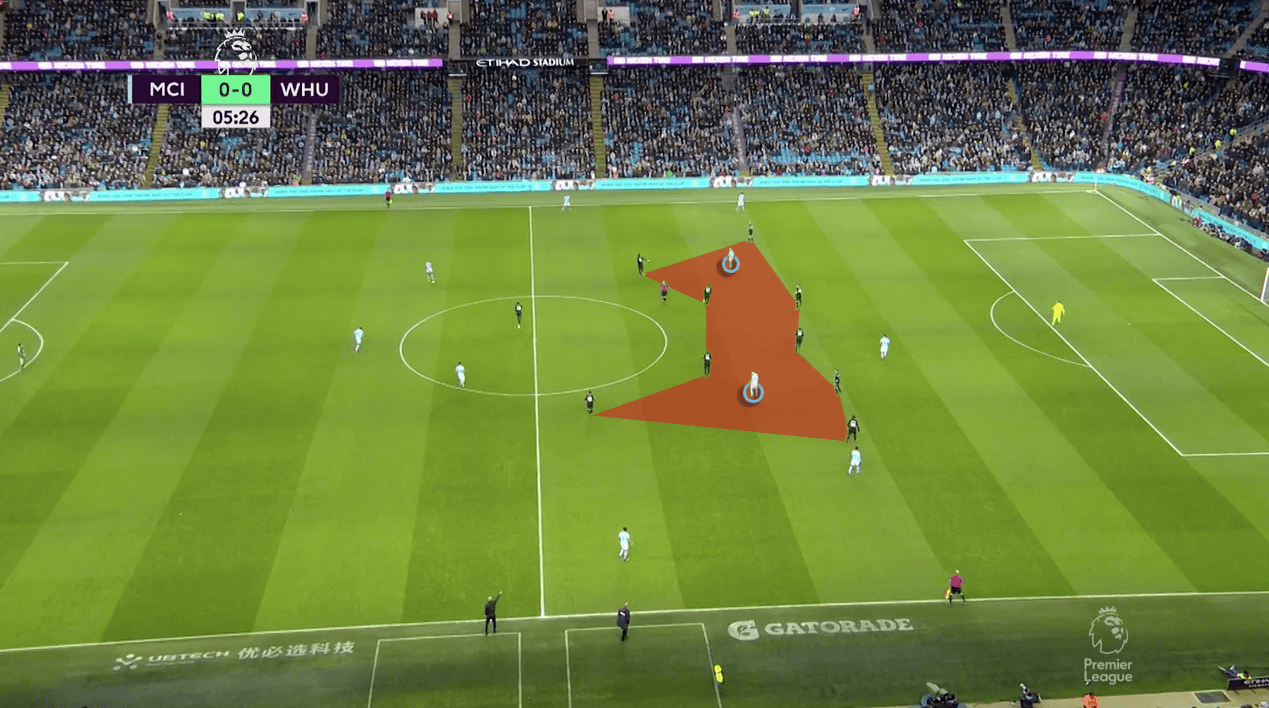
A clear advantage of a rather static red zone occupation is that there is a constant option provided whereas rotations create moments when the position is unoccupied. One can see how their red zone players are positioned not only between the lines but also between the wide defender and central defender and the wide midfielder and central midfielder. That way, they can affect the positioning of four opponents. This can lead to space out wide or open up a passing lane directly through the central channel.
Moreover, if they are positioned close to the opposition midfield line, they are further away from the defenders and can therefore turn more easily. The defenders, on the other hand, will have a larger distance to cover if they step out which allows the ball-receiver time on the ball to overplay the defender. In addition to that, being in such a position also improves the angle towards the ball-carrier and therewith enables line-breaking passes more often.
By holding their positions, the advanced midfielders can become a threatening passing option once the opposition midfield line starts shifting. Without much movement, they can become available with a simple change of the angle of attack. Last but not least, their positioning is more precise. Since they do not arrive in the red zone with pace they can continuously adjust their positioning to the position of the ball, the teammates and the opponents.
Conclusion
All in all, red zone occupation is important as it enables line-breaking passes and allows for a good counter-pressing structure. But there is no right or wrong in terms of how to occupy the red zone and all strategies have their advantages and disadvantages.
For the dynamic approach, despite a possible advantage of dynamism, one will have to make sure to “control the chaos“ that can appear due to the attacking movements. Contrary to that, the more static occupation of the red zone allows for a clear structure at all times, but it is necessary to find the right time for a change of rhythm in order to play into the red zone and threaten the opposition defence.




Comments