Overloading to isolate is a tactical concept that is utilised by many coaches, including the likes of Pep Guardiola with Manchester City of the Premier League and Erik ten Hag with Ajax. The basis of this technique is to overload one side of the pitch in order to drag the majority of the opposition to that side, thereby opening up space on the opposite side of the pitch. This tactical analysis piece of tactical theory will explain why overloading to isolate is such a popular strategy to use in possession, and how teams use certain tactics to be able to perform it.
The importance of the positioning of the players in the overload
The first key point to discuss in this technique is setting up the actual overload. The objective of the players in possession on the overloaded side is to occupy as many opposition players as possible to create the maximum amount of space on the opposite side by dragging opponents over. Therefore, we must discuss the most effective ways of doing so.
Let’s take a look at some scenarios.
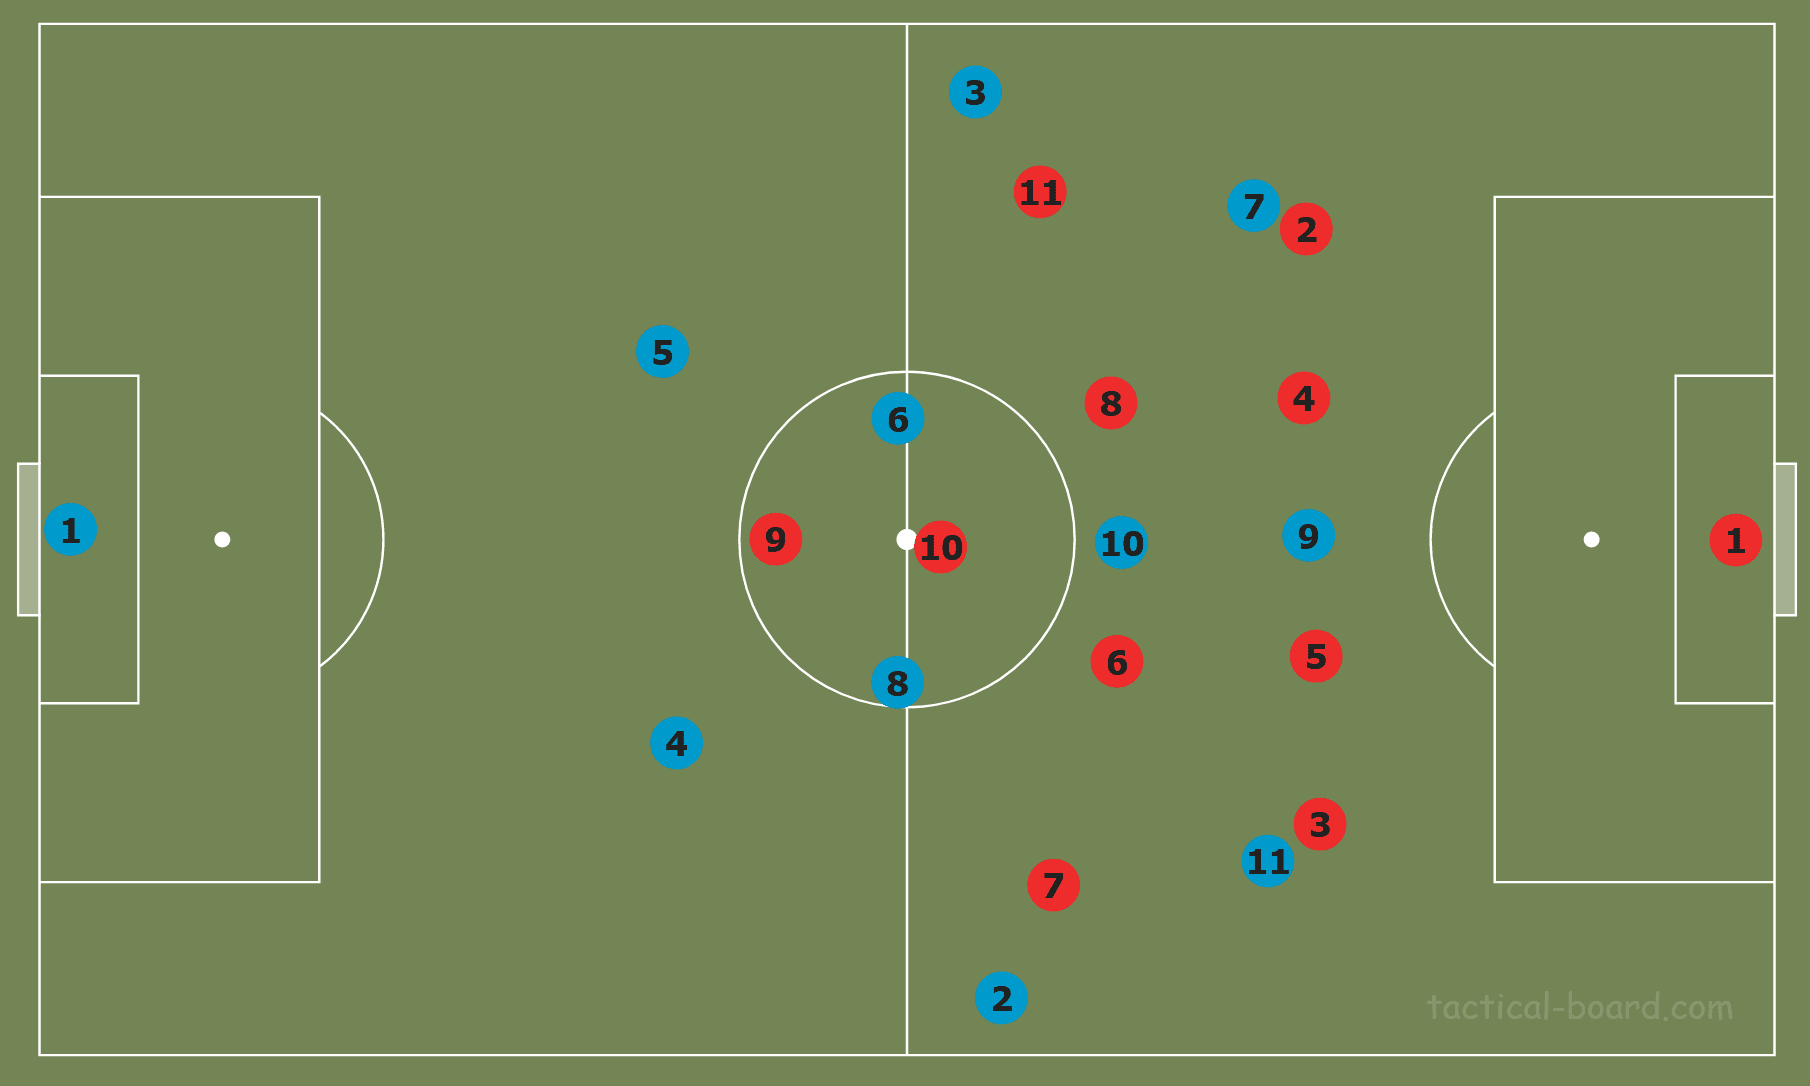
In the above example, we, the blue team, are lined up in a 4-2-3-1 system in possession. The red team, the opposition, are also lined up in a 4-2-3-1 structure, which looks more like a 4-4-1-1 out of possession as shown. The 4-2-3-1 is a common environment to allow the use of the concept of overloading to isolate since it has a ‘number 10’. The benefit of this player is that they are free to shift to either side of the pitch in possession to help create an overload.
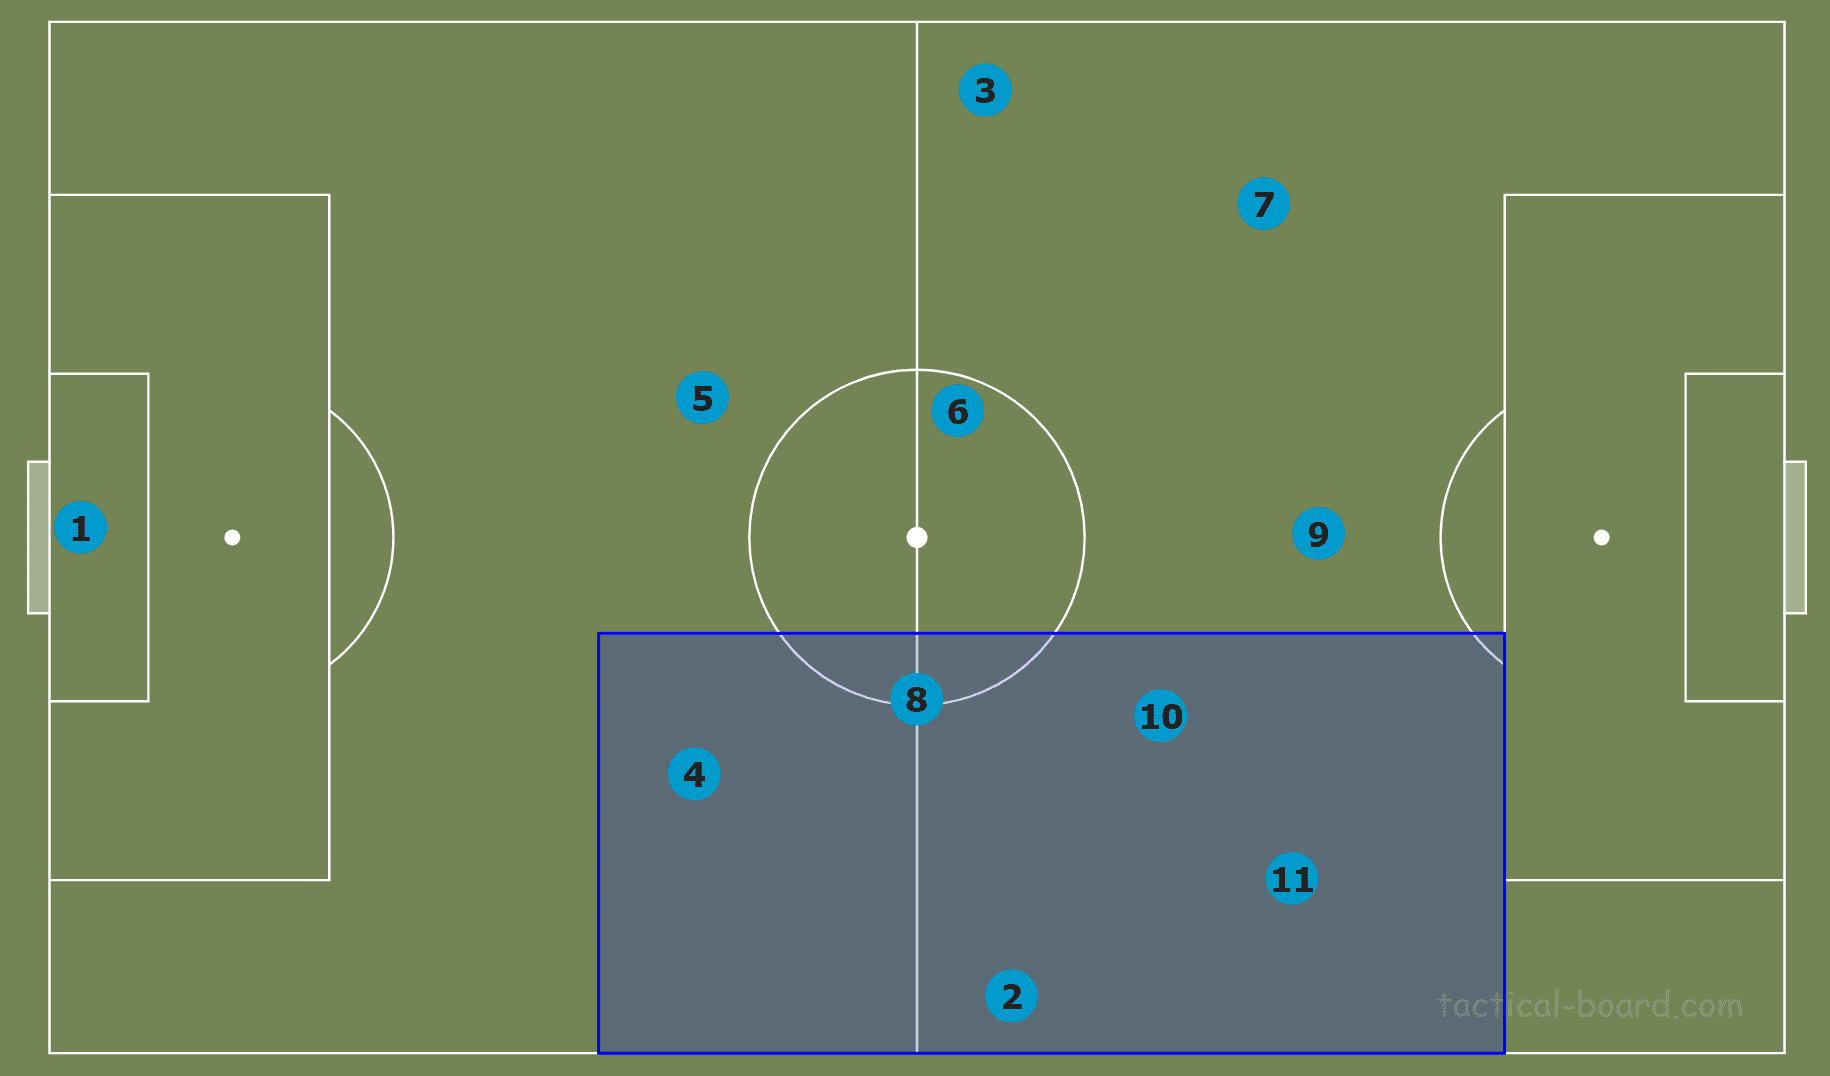
Here we can see how we can create a five-person overload on one side of the pitch by the 10 simply shifting across.
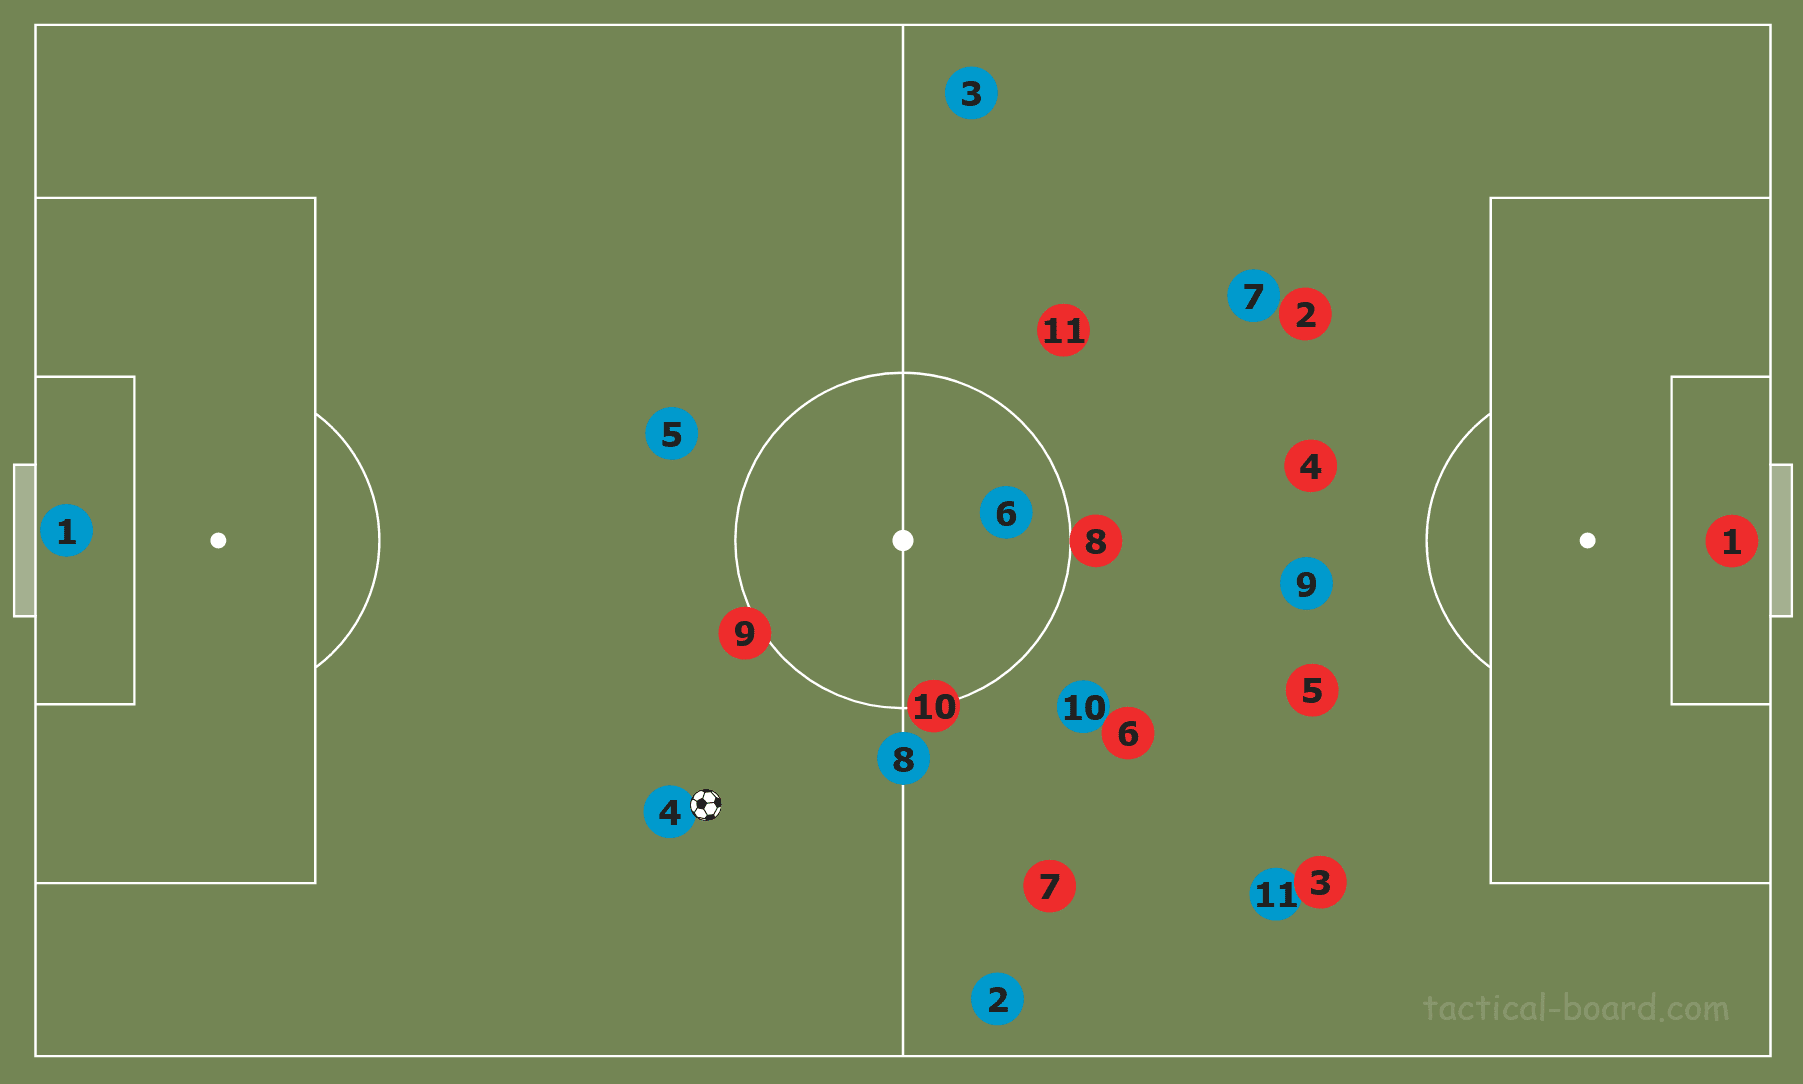
This would be the most likely reaction from the opponent, which involves the ball-near pivot shifting across to cover the number 10. Whilst the opponent’s block has been forced to shift over, there isn’t a significant enough increase in space on the opposite flank for us to exploit.
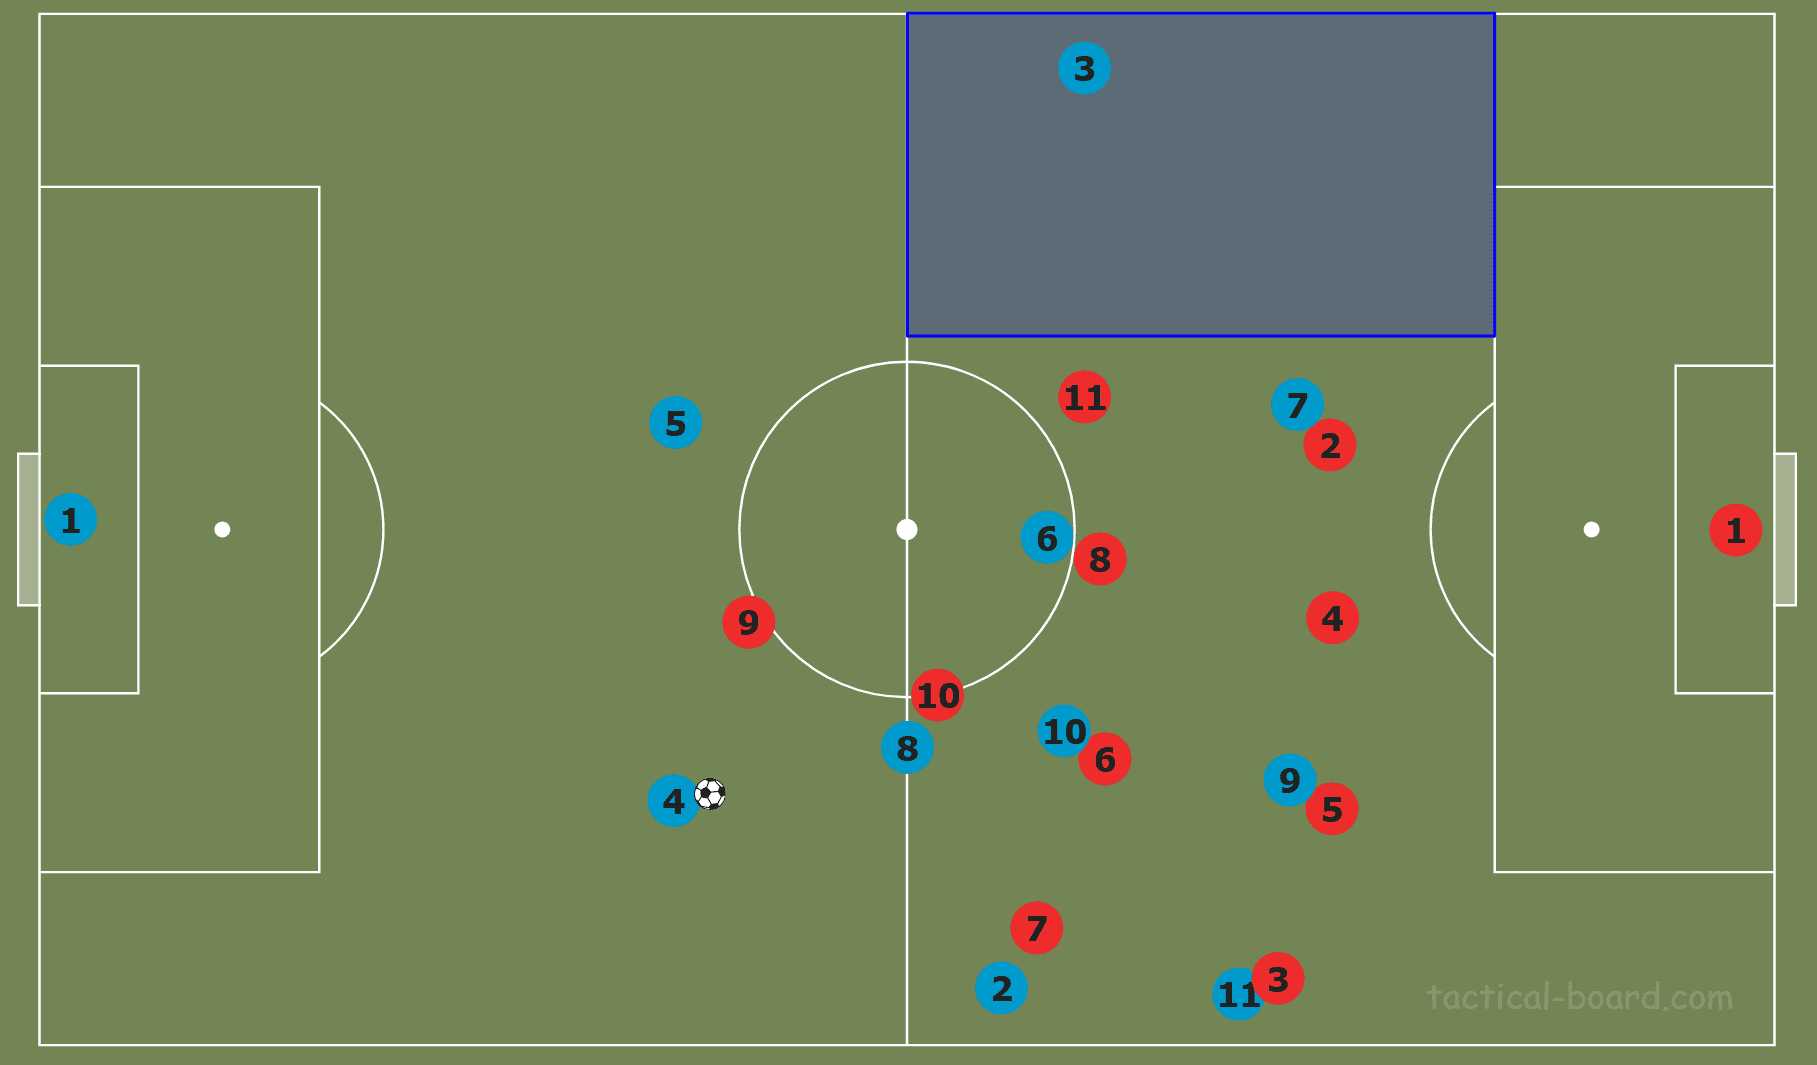
To create more space on the opposite flank, our striker (number nine), can drift to the side of the pitch that we are overloading. The effect of this is that it forces the opposition’s defensive line to be pulled towards the ball-near flank. We can now see how we can potentially start creating a 2v1 overload on the fullback on the far side, with our wide forward positioned narrow and our fullback staying high and wide.
In order to occupy as many opposition defenders as we can on the ball-near side, we must ensure that the spacing between our players in the overload is as efficient as we can make it.
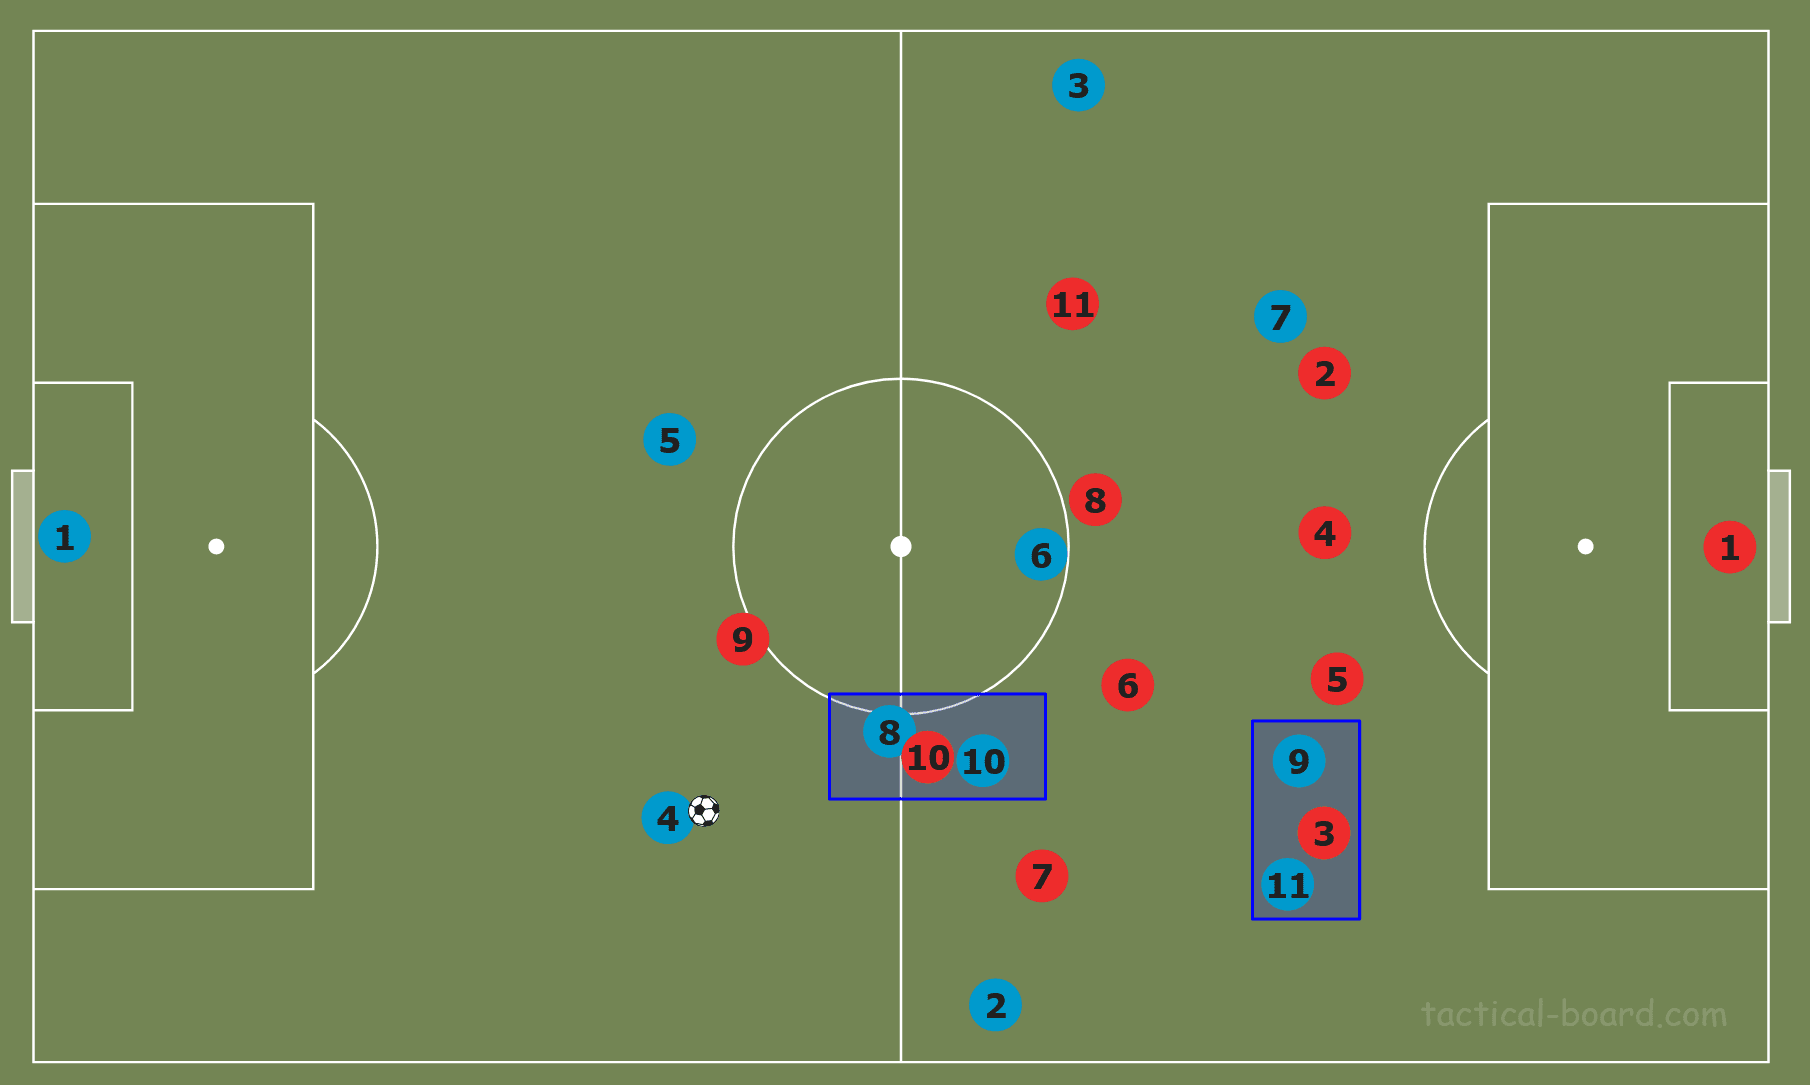
In the graphic above, there are two clear examples of poor positioning. Both our eight and 10 are positioned near to each other. This enables the opponent’s number 10 to mark both players at the same time. The same situation occurs with our number nine and 11 on the opposition left-back. Since the full-back can mark both players, the defensive line can remain central. Were the number 11 to move wider, the full-back would be forced to follow, shifting the defensive line to one side of the pitch.
One further key aspect of this overload that we are creating is that we need our players here to be able to maintain possession of the ball in order to engage the opposition and allow time for them to be drawn to one side of the pitch. To do so, we want each player in the overload to have as many passing options as possible. To achieve this, we don’t want several players in the same horizontal or vertical line of the pitch, as this will limit the number of passing lanes available to each player.

The above graphic exhibits an example of bad positioning. Here, there are four players in the same horizontal line.
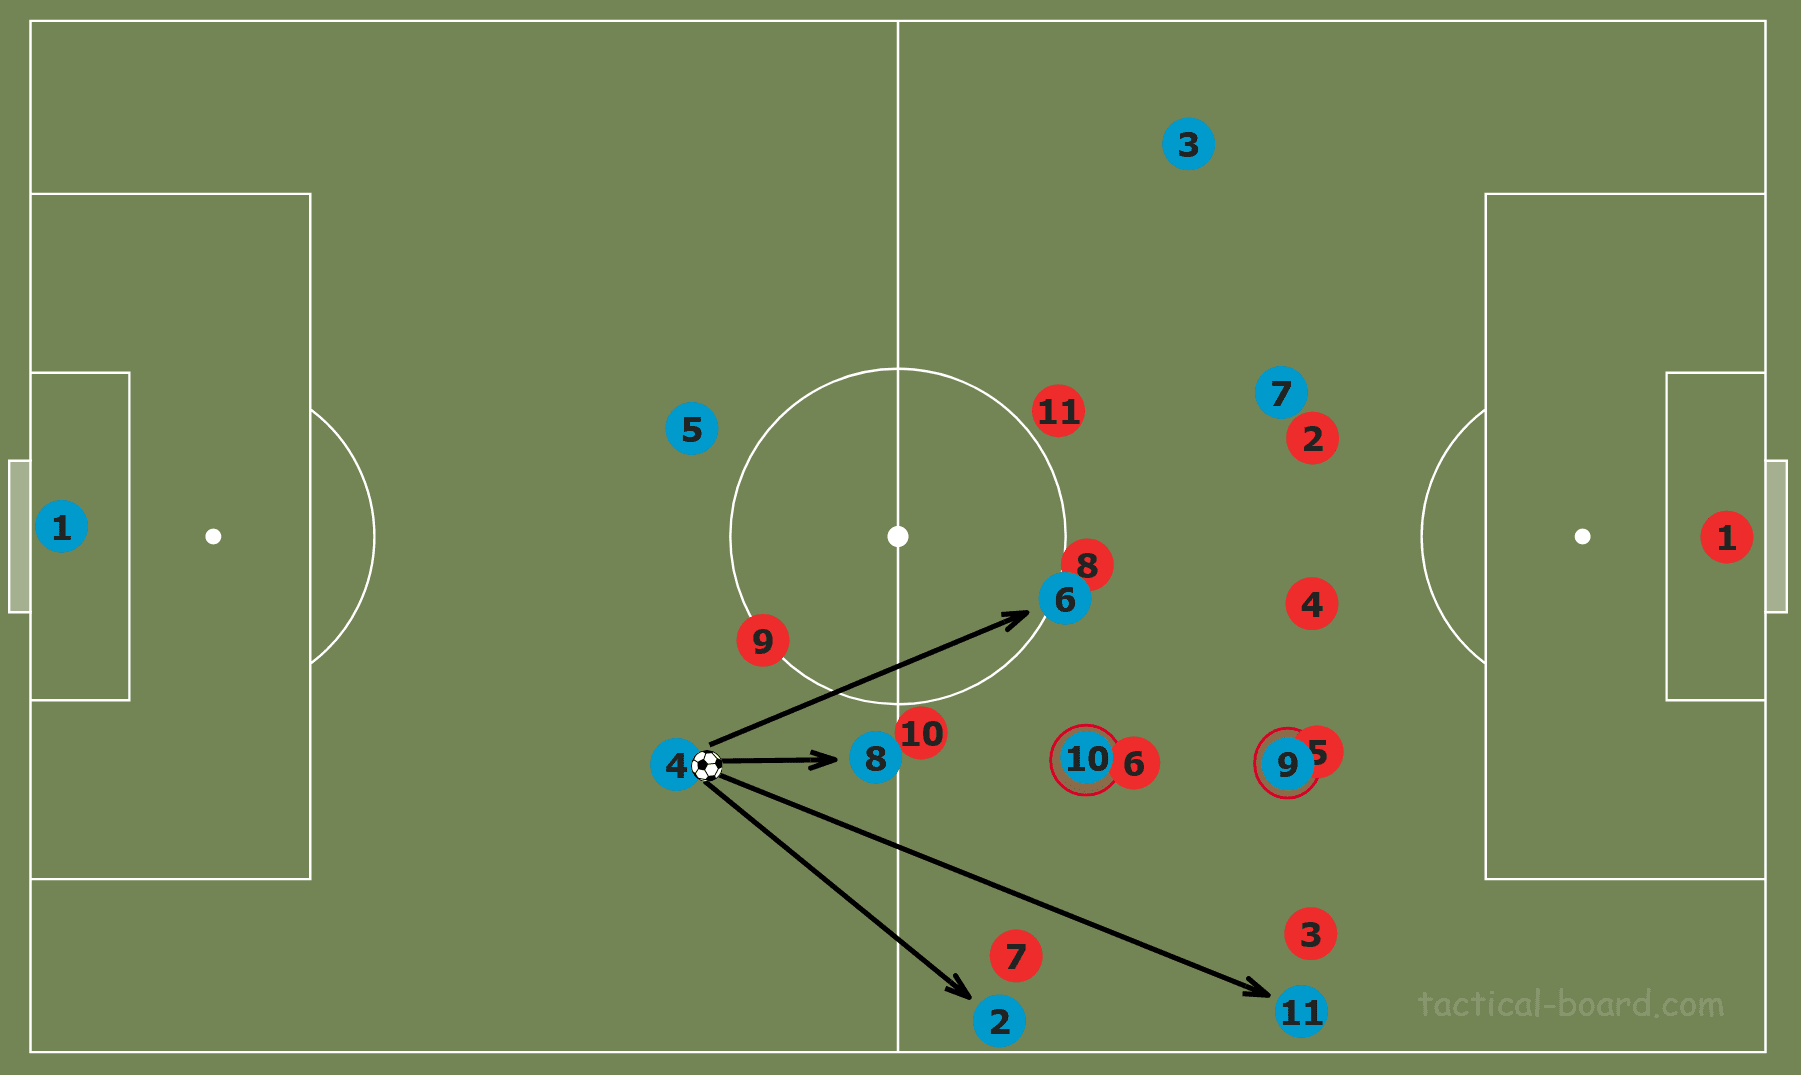
As we can see here, numbers nine and 10 cannot be played to from number four as they are positioned directly behind number eight. This makes it much easier for the opposition to block off passing lanes, thereby increasing their chances of intercepting a pass.
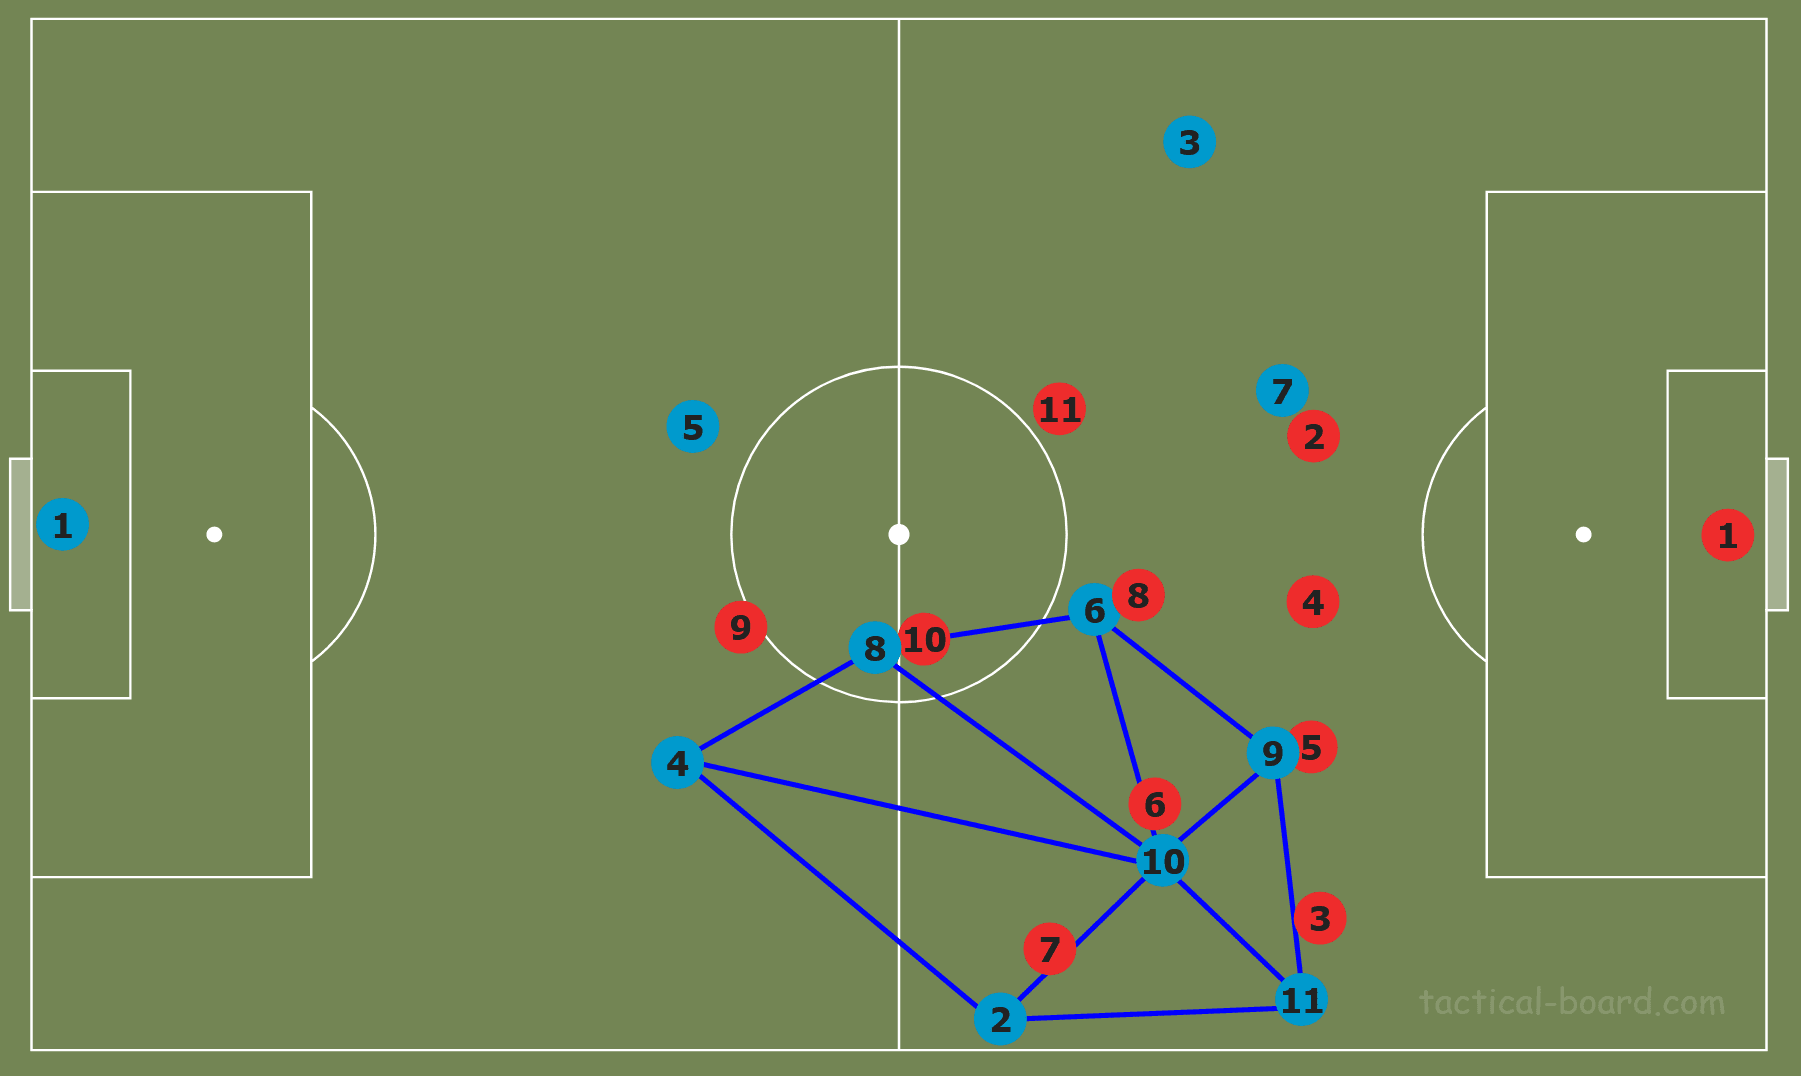
In contrast with the previous example, this is a good example of positioning that will enable the team in possession to keep the ball. Here, there are no more than two players in the same horizontal or vertical line, maximising the number of passing options available to each player. As a result, several triangles and diamonds have formed, an indicator that the positioning will allow for effective ball circulation.
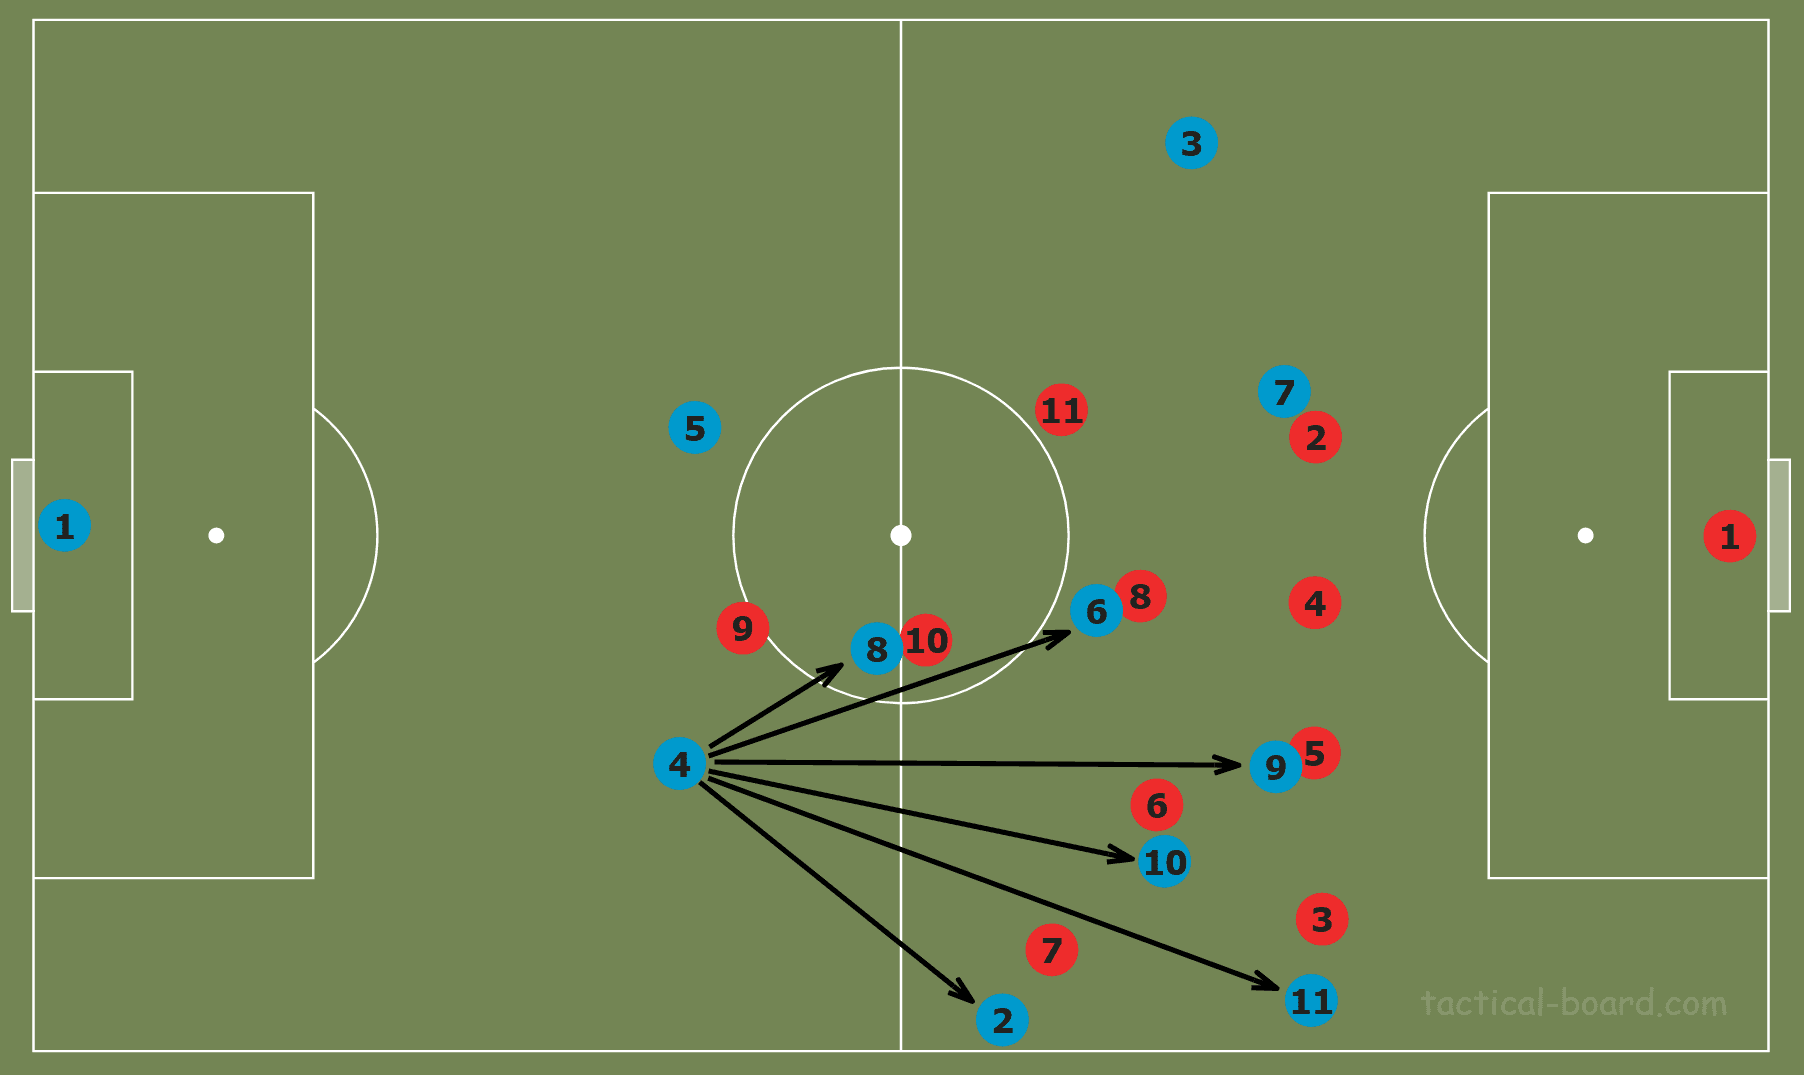
If we take the same player as we did before, number four, we can see that they now have access to potential passing lanes to all players in this area of the pitch. This will be much harder for the opposition to close down.
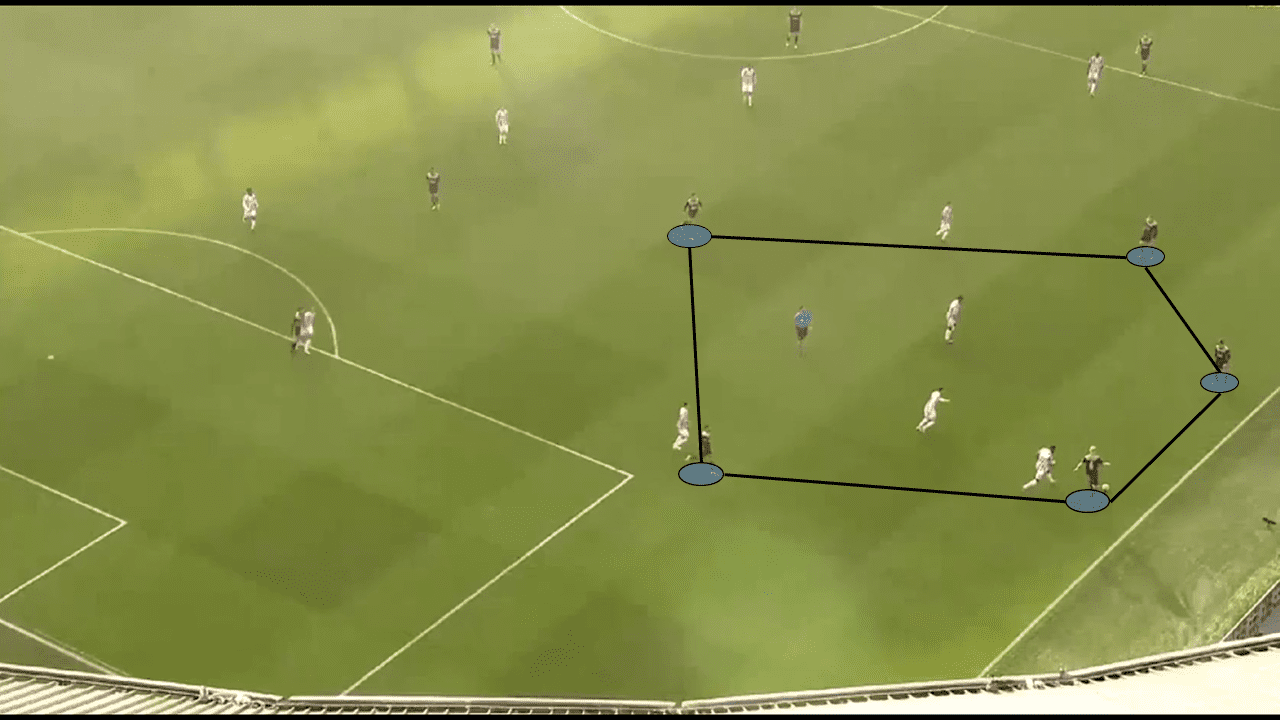
The example above demonstrates Ten Hag’s Ajax team creating an overload on one side of the pitch. Ajax have essentially created a five-player rondo and therefore all have access to one another. This allows them to keep the ball in this area of the pitch, drawing opposition defenders towards them.
The positioning of the players in the underloaded zone
Now we have discussed how we can best draw the opposition to one side to create space on the other, we must focus on how to exploit the space we have created on the side of the pitch that we have underloaded. Again, the positioning of our players is vital.
It might be tempting to simply instruct the players to switch the ball directly from one flank to the other. However, one direct pass that travels through the air can be slower than two or even three passes across the ground. While a pass is travelling in the air, the opposition will have time to shift over and close down the space on the opposite side. But if we play the ball along the ground, the ball will travel quicker, allowing us to take advantage of the space we have created.
In most circumstances, either two or three players will be involved on the underloaded side of the pitch.
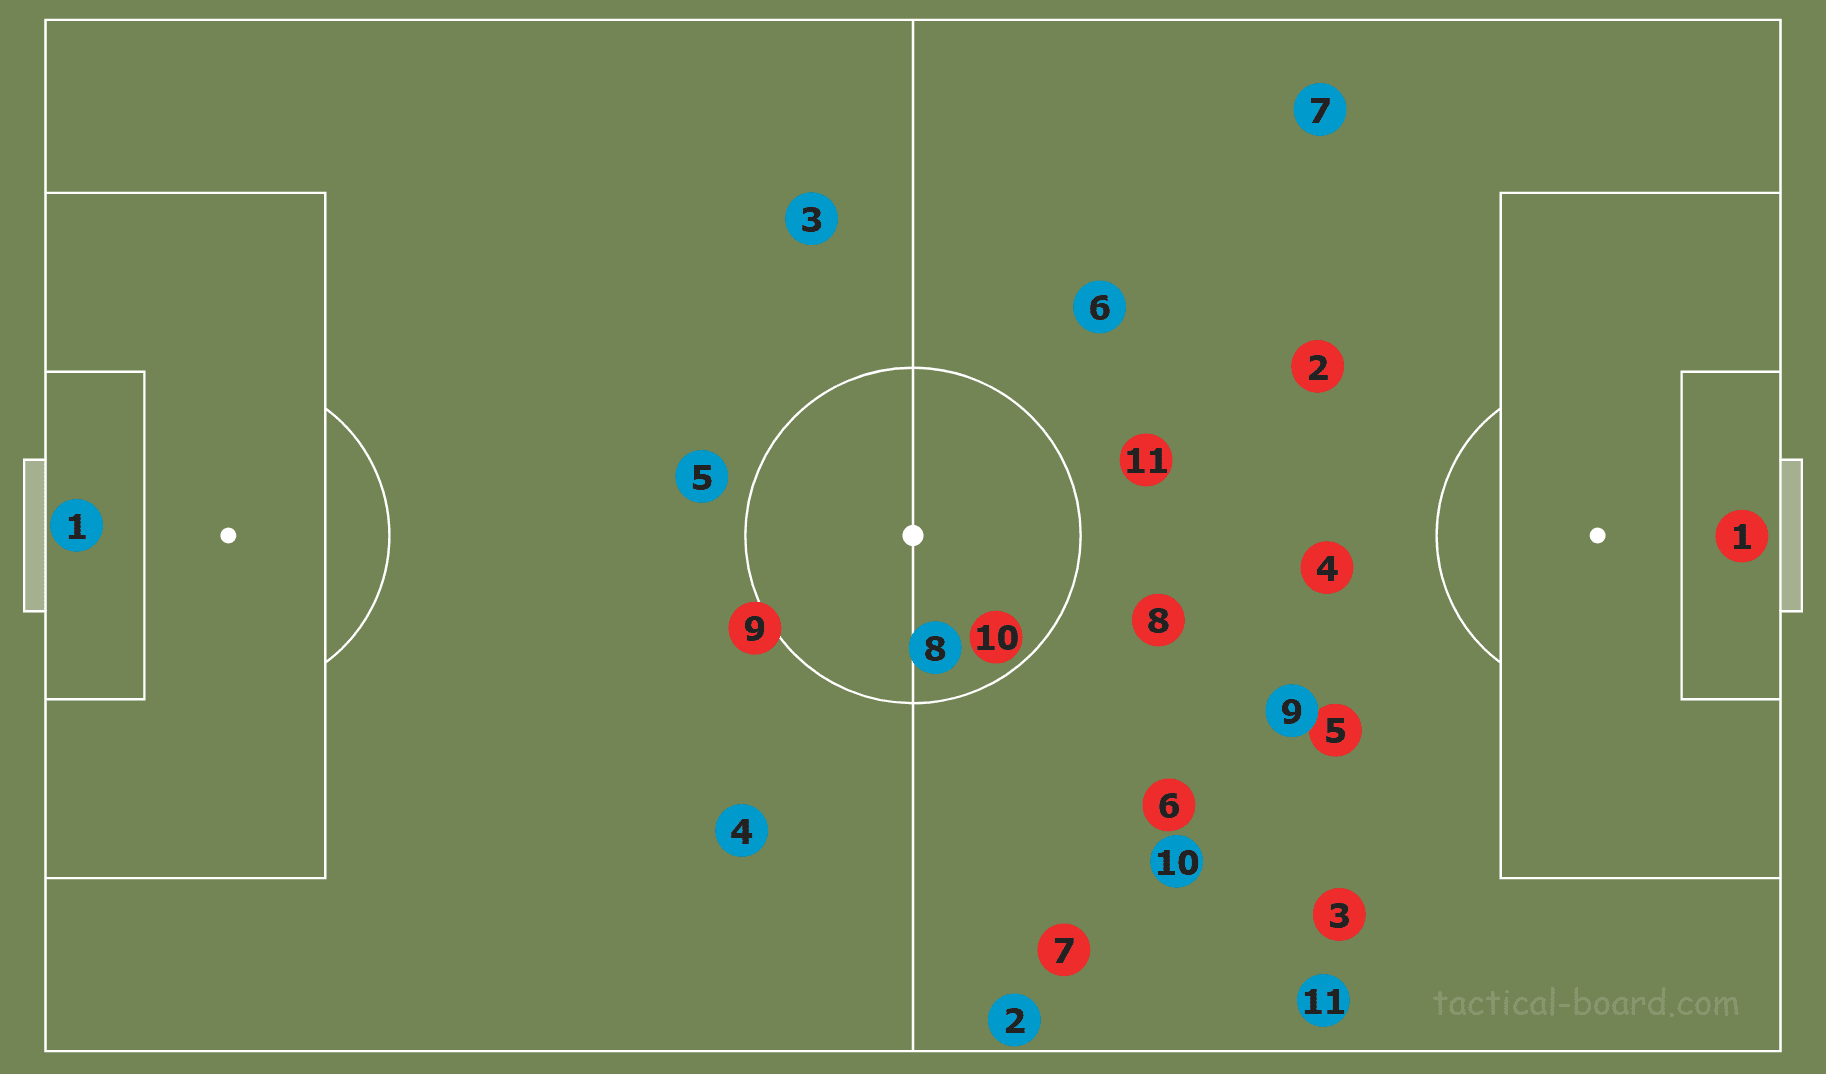
The graphic above displays effective positioning with two players in advanced areas on the far side of the pitch. Number six is positioned deeper in the inside channel and is therefore able to receive a pass in space as they are in front of the fullback. This situation will ideally involve a pass from the inside channel of the overloaded side to the inside channel of the underloaded side. Once the six has received in space, they can play a pass through to the number seven who will be isolated against the fullback if they are positioned high and wide as shown above, exactly where you want your players with the ability to beat defenders 1v1 to be: this is where the “isolate” part comes in to play. Usually when a wide player receives the ball, not only will they have the fullback to deal with, but other defenders nearby can support the fullback and create a 1v2 against the wide forward. However, the method of overloading to isolate enables attackers to get into 1v1 situations since the rest of the defenders have been moved to one side, and as a result, the distance needed to be covered to help support the fullback is too great.
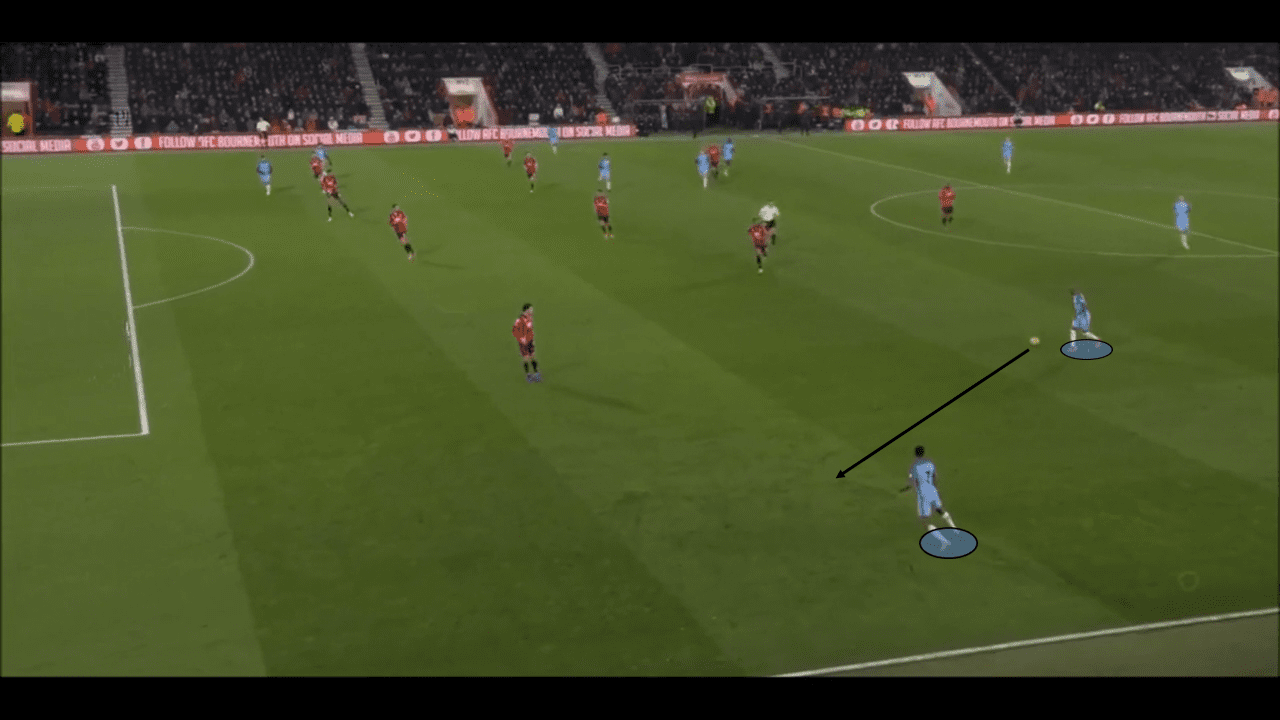
Here, Fernandinho receives deep in the inside channel and is able to play a pass through to Raheem Sterling.
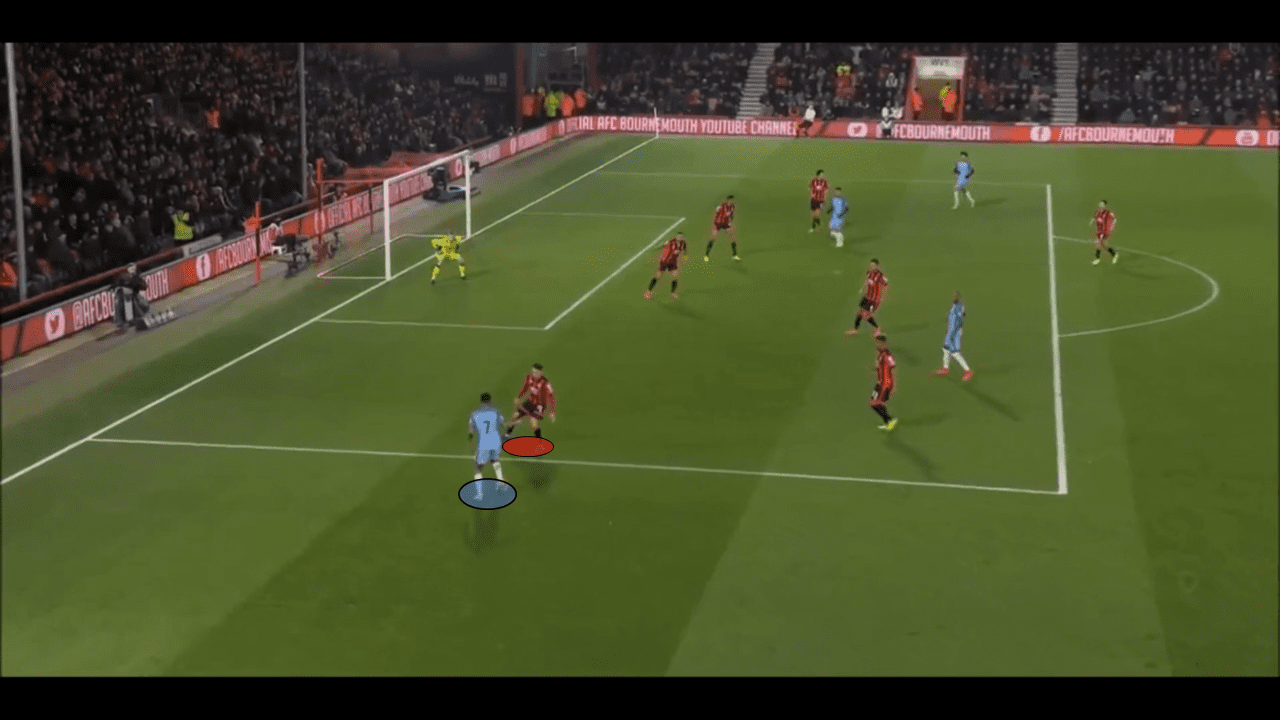
Sterling is now isolated 1v1 against Bournemouth’s right-back. He manages to beat him on the outside and drill the ball into the box which is poked into the goal by a fellow Manchester City attacker.
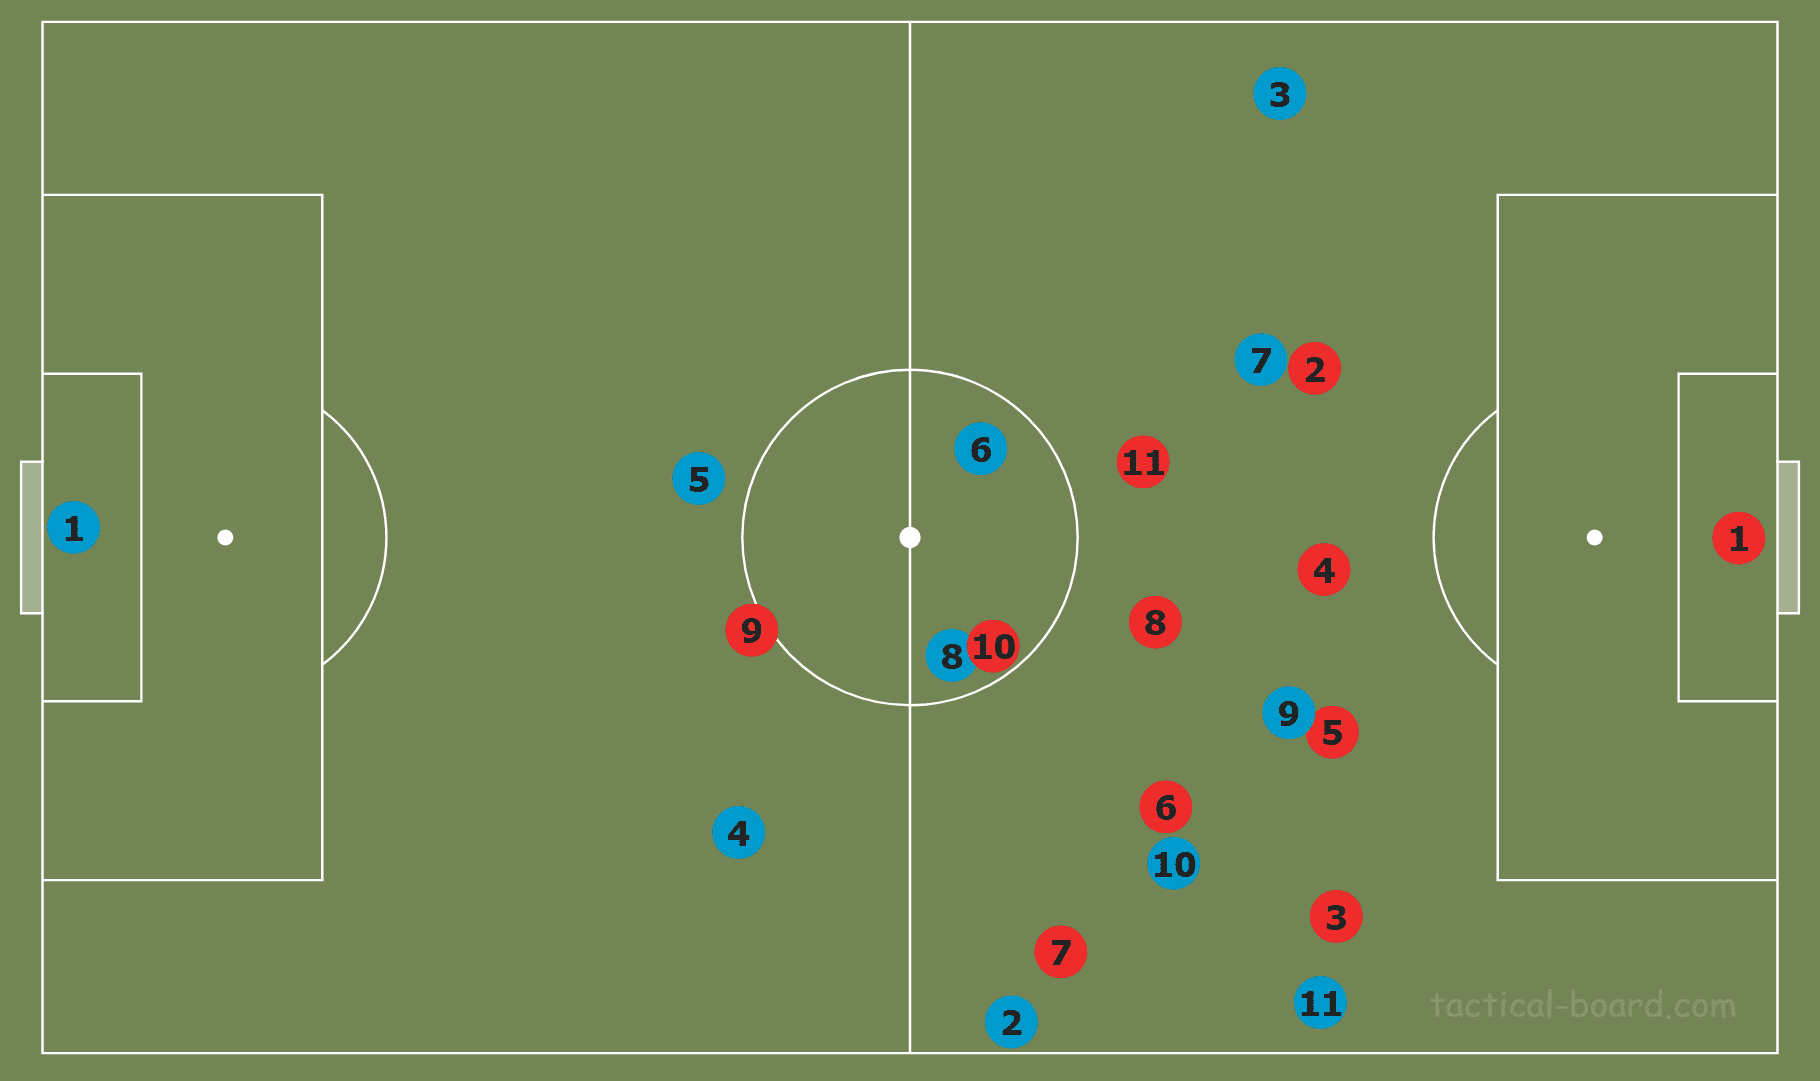
This graphic demonstrates effective positioning when there are three players on the underloaded side. One player, here, the number six, stays deep and relatively central. The wide forward drifts narrow into the inside channel, freeing up the fullback on the overlap. The isolation that takes place here is again against the opposition fullback, but this time, they are isolated 1v2, not just 1v1. Therefore, with three players on the underloaded side, we can create a free man since we will have a 2v1 on the opposition fullback. To achieve this scenario, the overload must be very effective in order to draw the opposition over whilst still leaving three players for the team in possession to be positioned on the underloaded side. We can use the techniques we discussed earlier in this tactical analysis to draw the opposition to one side with as few players as possible.
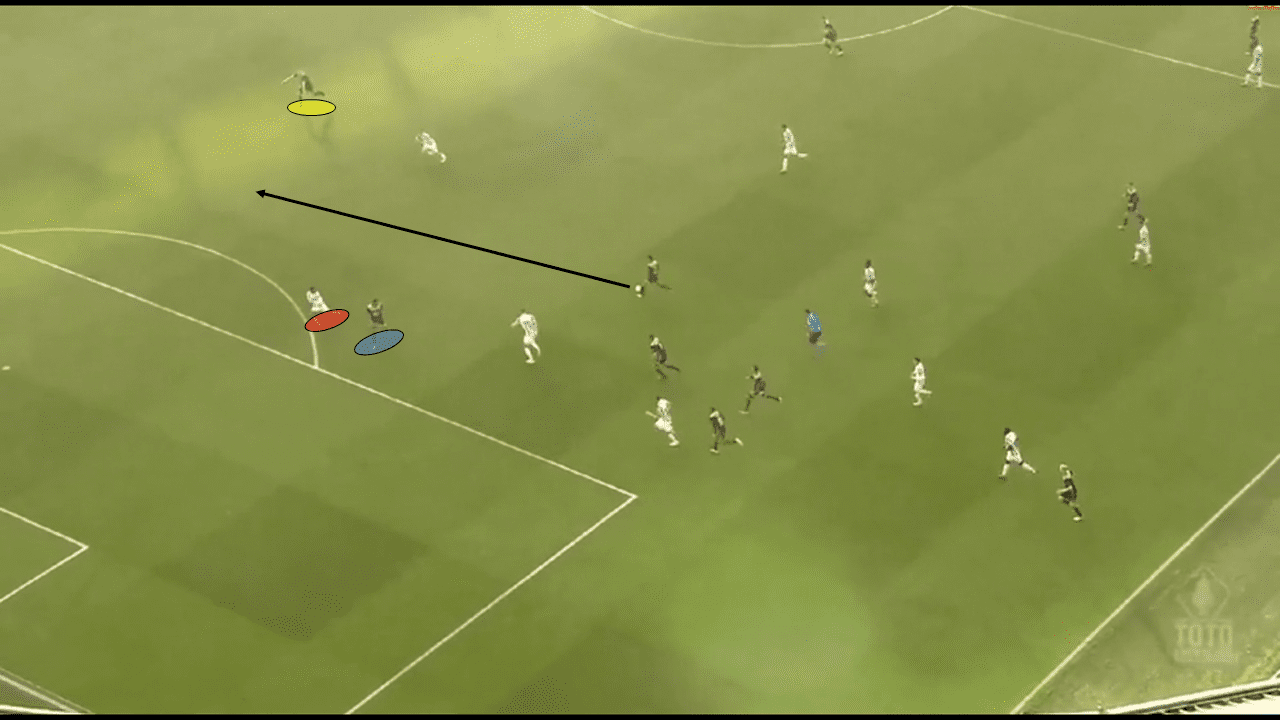
We see Ajax utilise this pattern of positioning in the above scenario. The wide forward drags the full-back central, opening space for the free man to receive in on the overlap.
Conclusion
To conclude, this analysis has demonstrated the importance of effective positioning when carrying out the concept of overloading to isolate, and how it can be a valuable tool for teams to create chances. The main advantage is that the attackers arrive in the final third in space, and are therefore able to frequently create good goalscoring opportunities.


Comments