“It’s like everything in football – and life. You need to look, you need to think, you need to move, you need to find space, you need to help others. It’s very simple in the end.” These were the words of the late and legendary Johan Cruyff who talked at length about the core elements of football.
Constantly searching for and exploiting space is the fundamental aspect of this sport and it can often determine a team’s success on the pitch. But occupying a space of value is not as easy as it may seem at first. After all, not only do we have to be able to identify such an area that holds great strategic importance but also have to be able to exploit it successfully.
For that reason, this tactical analysis will present a tactical theory on space occupation & creation, aiming to identify areas of value and give you examples of how to exploit them. The analysis will delve into specific in-game examples as well as using tactics boards for more general overviews of the topic.
As such, we will explore the main principles and importance of width, depth, height and achieving superiorities across the pitch. It is important to note that the aspects of space occupation & creation are inevitably intertwined and one doesn’t go without the other. With that in mind, this tactical analysis will also deal with the meta concepts that need to be understood and implemented so that either can be achieved.
Identifying the space of high value and then occupying it is a prevalent topic on all levels of football but is also very complex. It is therefore important to note this analysis will give you a basic framework on how to achieve that but is by no means a comprehensive guide to all imaginable ways to do it.
With that out of the way, let’s dive into the first crucial aspect of space occupation & creation.
Verticality & the Y-axis
In football, occupying the centre is often the most important thing you can do in a game. The centre channel is crucial because it’s closer to the goal than the flanks and offers the players more manoeuvrability, better field of vision and ultimately clearer advancing options. This is why our first concept in this tactical analysis will be that of the Y-axis or rather achieving verticality through depth and height on the pitch.
Ensuring you have both in your team is key to creating space because height and depth help in stretching the opposition vertically. Next is a tactics board depicting the main principles of height and depth and how they can affect the opposition team.
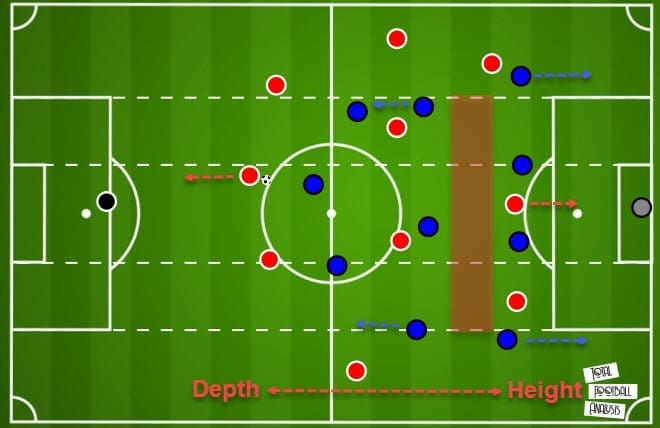
The backline in this example creates depth while the forward line is the height of the team. Achieving both stretches the opposition vertically, creating space in between the lines for the attacking players to position themselves in. And it’s that space between the lines that is a high-value area in itself. So why is that?
Firstly, occupying the space between the lines puts the defenders into a decisional crisis. The backline doesn’t know whether to engage the players in front of them but risk leaving space behind their backs or stay within their structure but leave their opposition unmarked in an area of interest. But space between the lines offers much more than just that.
Since players are positioned behind the opponent, it also means they’re out of their field of vision. You cannot defend what you cannot see and the backline which can see the players is in a decision crisis at the same time. This puts the defending team in a very difficult situation. And while this tactical theory piece will focus on the attacking phase, space between the lines also has defensive value as it ensures an easier transition to counter-pressing, given the easy access the players will have to two of the opposition’s lines.
It is, however, important to note that the areas that will open up will also largely depend on the opposition you’re facing. A team that implements a low and compact block will not offer you the same space a high-pressing team would. But the principles of height, depth and verticality remain regardless of the opposition. Some of the most potent ways to exploit space through such principles are simple balls in-behind the opposition’s defensive line, movement manipulation to create and then use the space and the idea of dynamic space occupation.
Starting with the first principle, this is very potent when the opposition has been invited to raise their defensive line by reacting to your team’s depth on the field.
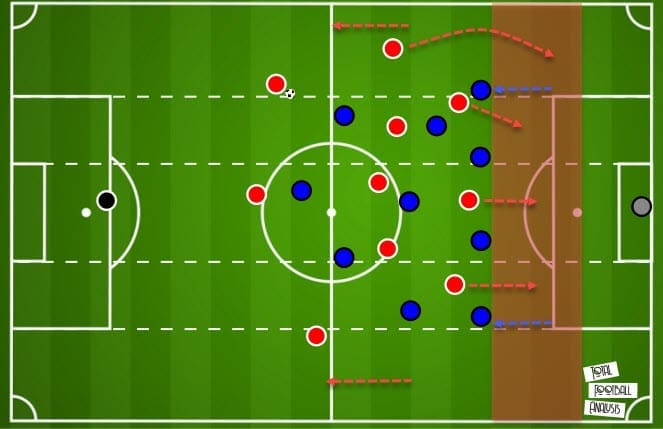
Here is a general example of such a scenario where the space behind is created by maintaining depth. The red team has managed to attract the blue team’s defensive block and is rewarded with more space behind their backs. But attracting the block doesn’t mean you have to play over it as that also creates space to play through it as well.
A good example would be Chelsea inviting Atlético Madrid out of their block in their latest Champions League clash. Thomas Tuchel is a very positional coach who puts a lot of emphasis on proper space occupation & creation. And it’s their solitary goal against Diego Simeone’s troops that was a byproduct of using proper depth to draw the opposition out and then advance through their less compact structure to score.
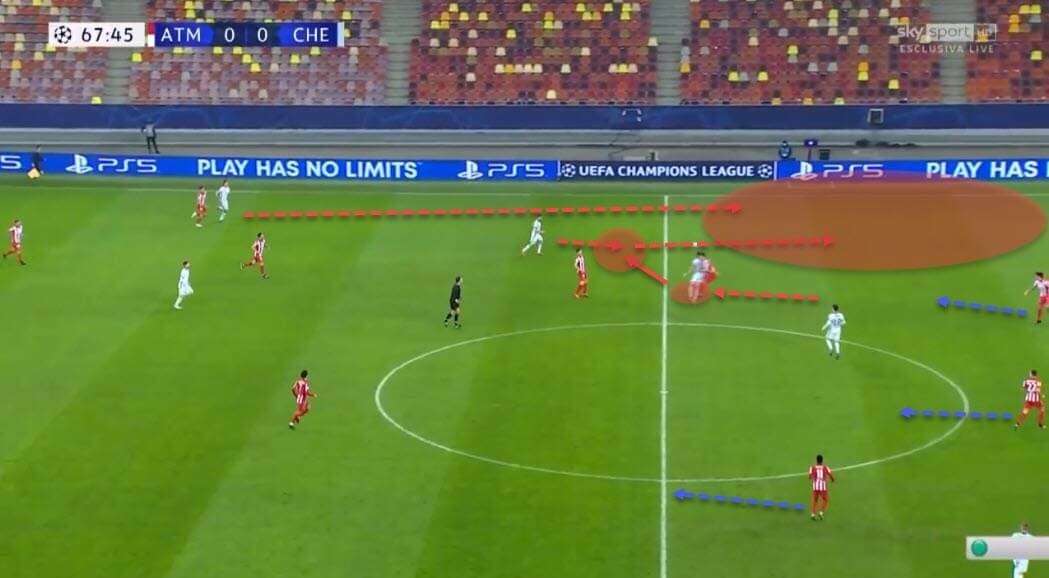
But we have to remember the opposite movement can also be used to one’s advantage. A striker can generate space by running into a certain area to drag away his markers. But while his primary role is to run to meet a pass from a teammate, he needs to be able to recognise when he’s required to move so that space can be created for someone else to receive the ball.
This is where the aspect of dynamic space occupation comes into play. The basic premise behind this is constant movement to arrive into a high-value space where you can receive the ball. Julian Nagelsmann, for example, is someone who’s a big fan of such movement and his dynamic space occupation is based on opposite runs of his players.
If my forward is running in-behind then maybe my winger will cut inside into the space between the lines. Or maybe a midfielder will drop so that the other can take a position in an advanced area. There are plenty of combinations but let’s look at one example next.
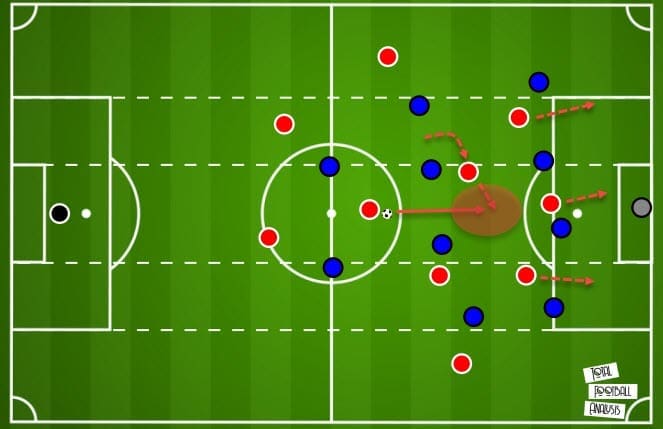
With the red team’s second line dropping deeper and occupying their counterparts, one other midfielder can burst into the space between the lines. This is also made easier by the fact the whole attacking line is making a run forward, offering height to the attack. Again, this is an example of how a team can occupy a high-value area by coordinated and dynamic movement and verticality.
Speaking of coordinated movement, some of which we’ve already seen earlier in this tactical analysis, this is a very powerful tool in space creation. This is also where dragging the markers comes into play. Often, players move to create space for themselves and sometimes to create space for others.
This can be a midfielder moving out of the way and pulling a player to open a new channel towards the striker for his teammate. Or it could be a striker dropping deeper to drag a defender out of position and create space behind for his wingers or interiors to exploit. Dragging markers is indeed at the core of space occupation and according to Javier Fernandez and Luke Bornn’s research in ‘Wide Open Spaces: A statistical technique for measuring space creation in professional soccer’, we can differentiate between active and passive space occupation.
The former includes a player moving at running speed to earn the space or rather, exploit it by identifying and running into it. The latter, however, would be a player walking or jogging into a space that was previously created by his teammate(s). With that in mind, our next example shows a striker dropping deeper and dragging the defender to then allow his winger to make use of the newfound space.
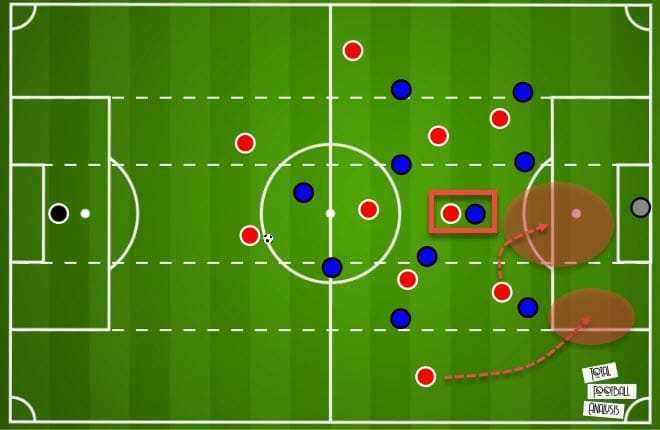
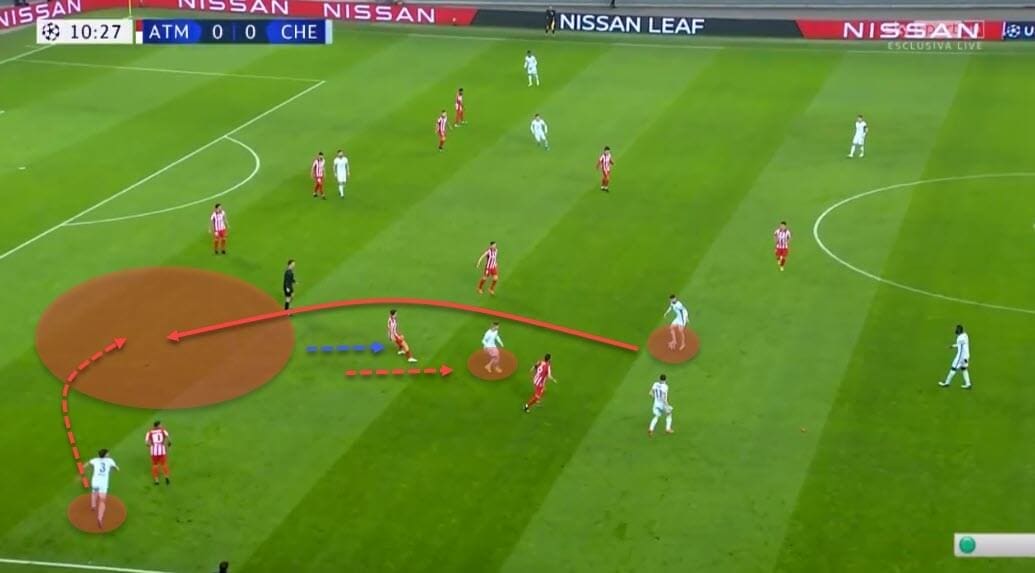
This is achieving verticality and creating space by dragging the markers. You can see here that both the winger and the overlapping full-back can make use of that movement manipulation. Once again we come back to Tuchel’s Chelsea for a concrete example of such movement.
Timo Werner drops deeper, dragging the defender away and creating space for Marcos Alonso to exploit. In this particular sequence, the Blues end up not taking the opportunity but this image still gives us a good example of how this could be used to good effect.
The final concept that makes use of height, depth and verticality we’ll mention in this tactical theory piece are the third-man runs. Just like dynamic space occupation, third-man runs rely on coordinated movement and proper space occupation to access and exploit it. The main idea behind this principle is to get the ball to a player who is unavailable at first but still occupies a high-value area on the pitch.
As the name suggests, it usually involves three players and the aim is to get the ball from player 1 to player 3 via player 2. Often, player 3 is the one to make the necessary adjustments to ensure his availability but it’s the cooperation between all of them that brings the results.
You can see an example of that principle in the following image. Here the red team is trying to play out of the blue team’s pressure and eject their wide player into space.
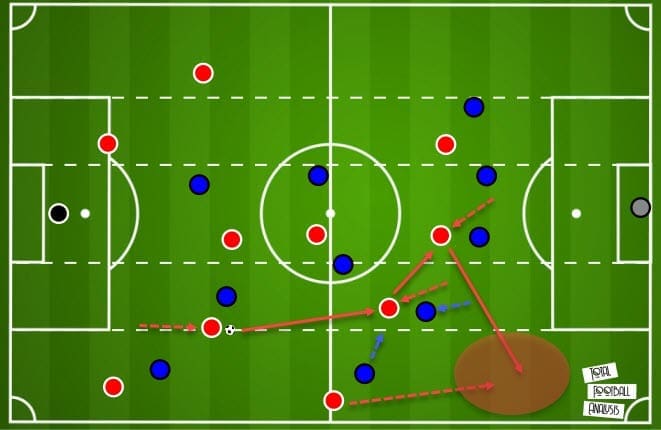
However, initially, that player is well covered and the opposition set to block their advances. The ball-carrier first runs with the ball as one forward drops to receive from deep. His movement attracts the attention of two defenders who try to collapse but leave space available elsewhere. Finally, the striker also drops for a lay-off and quickly deploys the ball out wide for the third man to receive.
This concept is important because it utilises almost all of the tactics mentioned beforehand in this tactical analysis – dragging markers to create space, using verticality, depth and height in attack and positioning between the lines.
The importance of width
Our second and equally important aspect of space occupation & creation in this tactical analysis is width. Width is usually provided by either the full-backs or the wingers but that is not exclusively true for every team nor does it fit every team’s tactics. But every team needs to get width from somewhere as that helps them stretch the opposition horizontally and in turn, open access to the half-spaces and the possibility of line-breaking passes.
This is crucial for creating space and the following image will help us explain some of the main principles behind it.
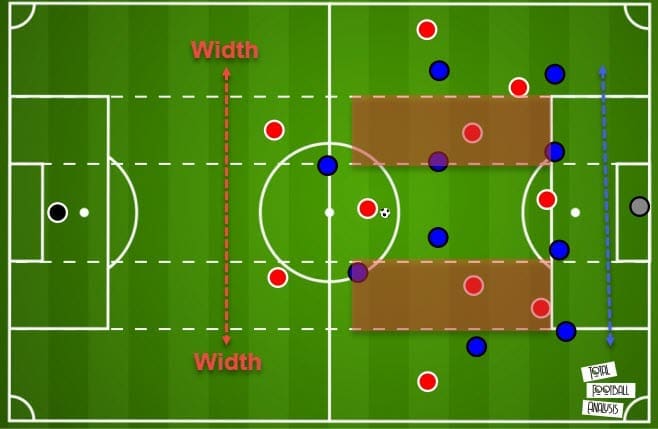
You can see how the pitch is stretched horizontally through the red team’s full-backs and wingers to some extent. By keeping the two centre-backs wide and in their respective half-spaces, we also ensure easier progression through proper space occupation. But half-spaces are what’s so key in this regard.
Notice how by shifting wider, the centre-backs create an angle through which they can easily pass the ball to the pivot who has dropped deeper to assist the build-up. The same thing can be said for him as well. With the pitch stretched horizontally and his teammates positioned in the half-spaces, it gives them a good angle to receive the ball between the lines, which we’ve already emphasised as a key area to occupy. Let’s examine those two scenarios a bit more.
First, we’ll see how stretching the pitch horizontally helps occupy the half-spaces and then receive the ball there.
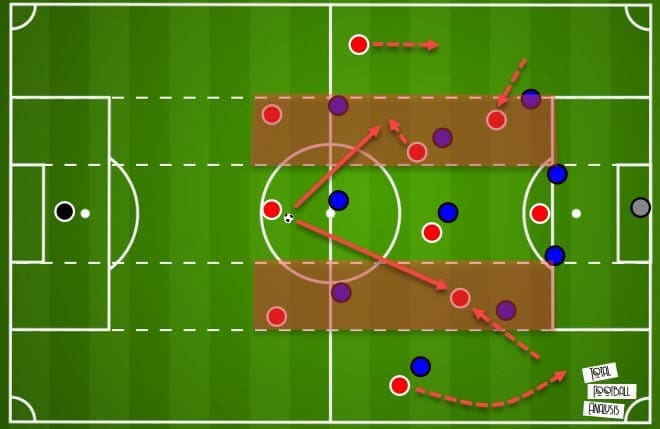
In this scenario, the pivot has dropped between the centre-backs to help stretch the pitch and the opposition. The full-backs are also keeping their width which does the same for the blue team’s second line of defence. The opposition may choose to stay compact and that would protect the centre a bit more but comes with a cost we’ll explore a bit later in this tactical theory piece.
With the opposition stretched horizontally, space starts appearing in-between their lines and the other two midfielders can occupy them to give the ball-carrier a better passing angle. Notice that a forward pass would be extremely difficult as the defenders will always aim to keep your players in their cover-shadow. However, by occupying the half-spaces and giving the pivot the right angle, progression is much easier to achieve.
Similarly, next, you can see how passing from the half-space and the wider areas also boosts the build-up phase.
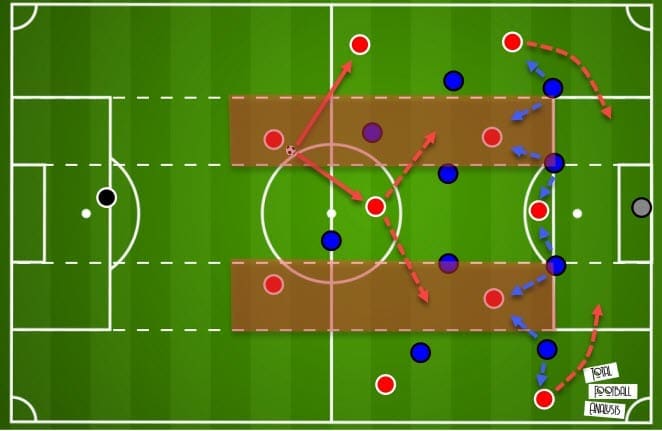
Even though the opposition is not as stretched as it was in the previous graph, again, the ball-carrier has a much easier job finding his teammate in an advanced area. This is also where the full-backs can also be a good option if the opposition decides to stay more compact. Again, we see an example of a decisional crisis higher up the pitch with the no.8s occupying the space between the lines.
But width is often best utilised in cohesion with depth and height. When combined, it enables the attacking team to easily occupy strategic areas across the pitch and create space for themselves. One such advantage of utilising both is ensuring zone 14 is less crowded and players can be positioned there.
As we’ve mentioned earlier in this tactical theory piece, the centre is generally viewed as the most important area on the pitch. For that reason, having it occupied at all times has its clear advantages.
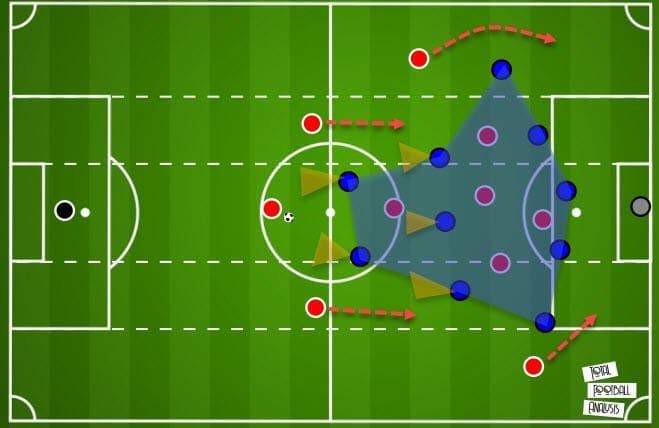
You can see a more general setup with the main effects of the aforementioned principles in this example. The attacking team has successfully stretched the opposition and deployed multiple players in the area between the lines. The centre-backs are pinned by a striker while the full-backs are in a decisional crisis due to their markers’ positioning.
Notice how the other two lines of the blue team don’t have the red teams’ advanced players in their field of vision. This forces them to stay compact to shut down any channels leading to them but also leaves space elsewhere to be exploited. That’s exactly how occupying space in one area can often create space in the other, which is something we’ve touched upon already in this tactical analysis.
With the opposition opting to stay compact, there is space available for all the wide players, including the centre-backs, to receive and run with the ball. At the same time, the centre is well occupied and this, in turn, means it’s easier to get more bodies into the box. The ball can then go wide and back towards the centre where the red team has enough players to threaten the opposition’s goal.
Creating overloads & superiorities
The final part of this tactical analysis will focus on creating overloads and superiorities across the pitch to generate space. As we’ve mentioned earlier, occupying specific areas will always free up other areas. This means that overloads can serve a dual purpose – either you deliberately overload one side of the pitch to isolate your key player on the other or you aim to progress through the overloaded side by making use of your superiority.
And which area you decide to overload largely depends on the team’s general tactics. Cross-heavy teams, for example, will aim to overload the central zones to free up the flank from which they can cross the ball. The central overload then guarantees them enough bodies in the danger area as well as the possibility to have their playmakers free on the sides.
On the other hand, teams like Pep Guardiola’s Manchester City or Borussia Dortmund have a clear preference of overloading the half-spaces. This eases their access to the box as the half-spaces offer a strategic advantage, which was already discussed earlier in this tactical analysis.
So deciding which area to overload varies from team to team but we’ll focus on some of the main ones here. We’ll take a look at overloading the pivot area to ease progression through numerical superiority, overloading the centre to free up the wings, overloading the half-spaces to advance the play and overloading one flank to isolate the other.
Let’s start with the first one, which is achieving numerical superiority in the first phase of build-up to create and access space higher up the pitch.
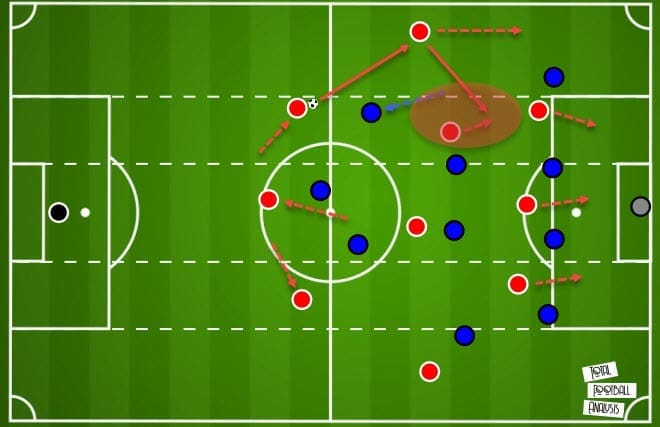
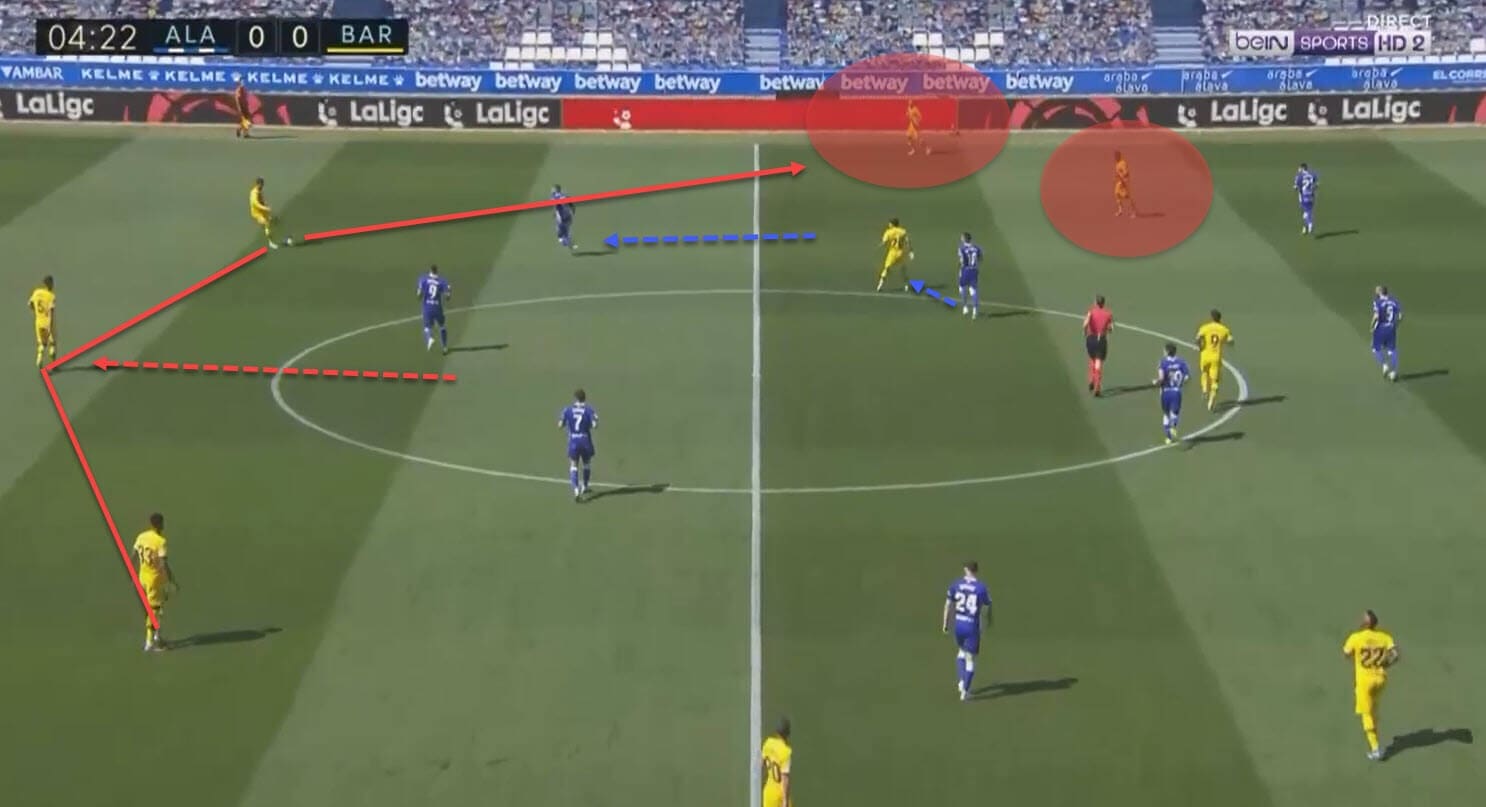
In this scenario, the pivot has dropped between the centre-backs to create a 3v2 situation. This results in a couple of key takeaways. Firstly, it’s easing the progression as the front two of the opposition cannot cover enough ground to successfully stop the attack. Secondly, as the result of the first point, the opposition now have to engage their second line to combat their numerical inferiority.
This, however, means the player from the second line is now leaving space behind his back that can be exploited. Once again, by occupying (overloading) one area (space), the team can create space in other areas. A simple shuffle towards the full-back and then back in again enables progression and offers multiple different avenues to explore just by ensuring numerical superiority in the first phase of the build-up.
Heavy positional teams often use these tactics to advance play. We can see Barcelona do the same thing in the following example against Deportivo Alavés. Three in the back to force the opposition’s second line to engage and then a sequence of out-in to progress.
But as we’ve mentioned earlier in this tactical theory piece, the area you wish to overload largely depends on the team’s overall tactics. Overloading the centre will inevitably have a different effect than overloading the wings and not every team will always benefit from both. Let’s see what a central overload can generally help achieve.
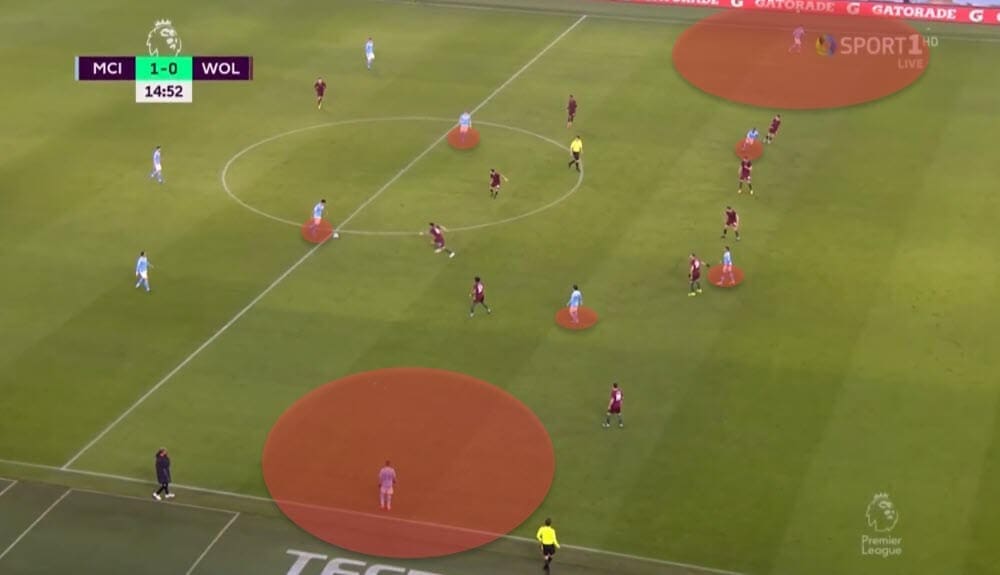
The next example looks at an attacking team facing a very compact block that aims to shut down central progression. However, the red squad is deliberately letting the opponent do that by overloading the central area and zone 14. This forces the defenders to turtle up to shut down channels but it also leaves the flanks wide open.
Usually, these tactics are deployed by teams who want to keep their key playmakers out of the crowded areas to be able to send passes into the box.
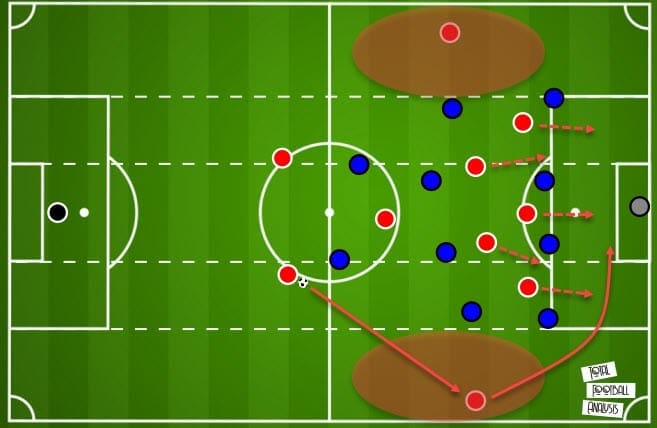
It is also something cross-heavy teams will do but also not entirely exclusive to them. For instance, we’ve seen Manchester City do the same thing against Wolverhampton Wanderers and Guardiola is known for utilising those tactics to good effect.
The next aspect we’ll discuss is overloading the half-space. This tactical analysis has already covered the advantages the half-space offers but overloading it eases progression and box entry for the attacking teams. Before getting into specific examples, let’s look at a more general setup of when this can be used.
The following image shows us different solutions overloading the half-space can offer to the attacking team. The centre-back has the ball and is looking to break opposition lines to advance the play.
Due to the team keeping their width through the full-backs, the blue team is stretched horizontally, offering the chance for line-breaking passes from the player in possession. But it’s what happens higher up that’s also crucial.
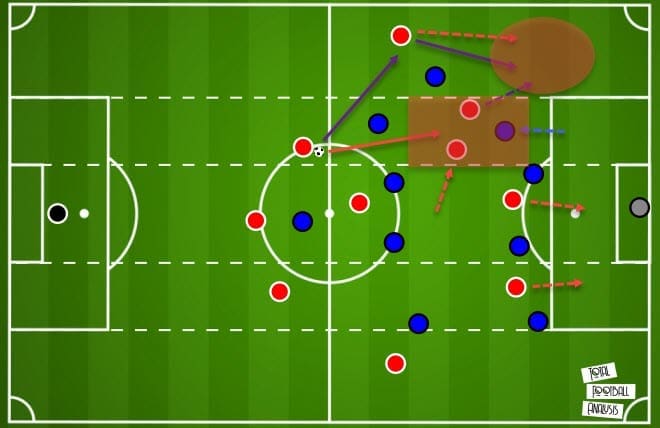
One of the midfielders shifts over to overload the half-space together with a dropping winger, making it impossible for the defender to cover both players at the same time. However, there is another way to approach this situation and it’s highlighted in purple on the tactics board.
The half-space overload also puts other defenders into a decisional crisis so the wide defender who was supposed to track the full-back is not fully committed as he sees his teammate get overloaded. But that also opens up the possibility to go straight from the backline into the full-back and then deploy the pass into the open space that was created by the winger’s movement.
Let’s look at a similar but still different in-game example next. Once more it’s Manchester City overloading the half-space to progress the play against West Ham United’s block.
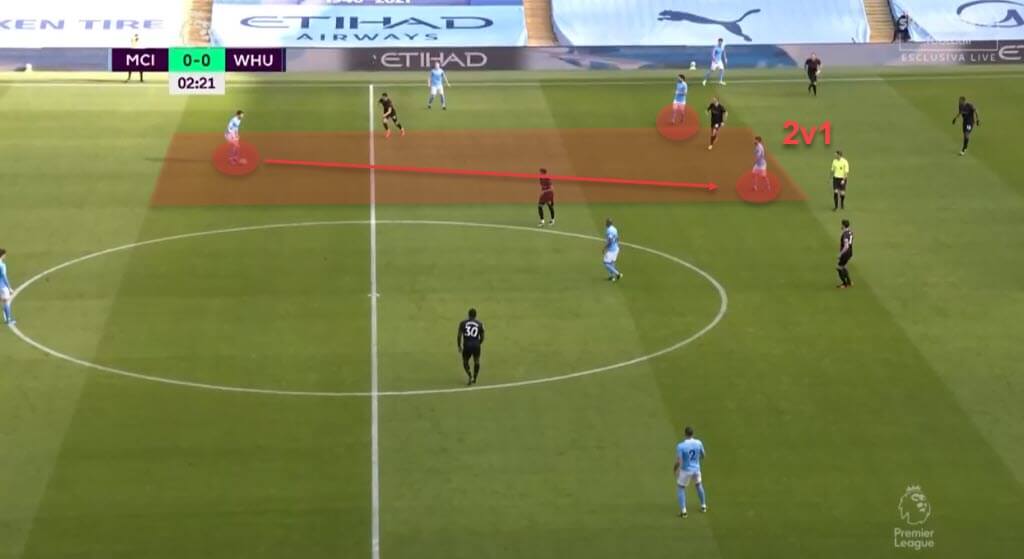
This image also shows us the benefit of having a centre-back utilise the width of the pitch and deploying passes from the half-space. The positioning gives him a better angle to find his teammates in an advanced area of the pitch and by overloading (occupying) it, Manchester City not only create but also successfully exploit space. It’s an example that covers most of what this tactical analysis is about as it shows multiple principles in one while also proving how interconnected they all are.
Another team or rather coach who does this well is Marcelo Bielsa at Leeds United. Even though they were defeated by Aston Villa in their Premier League clash, the Whites still showcased some of the main principles of space occupation & creation.
Our next image shows a variation of a third-man principle, utilising verticality to access a high-value area of the pitch which was occupied and overloaded at the same time.
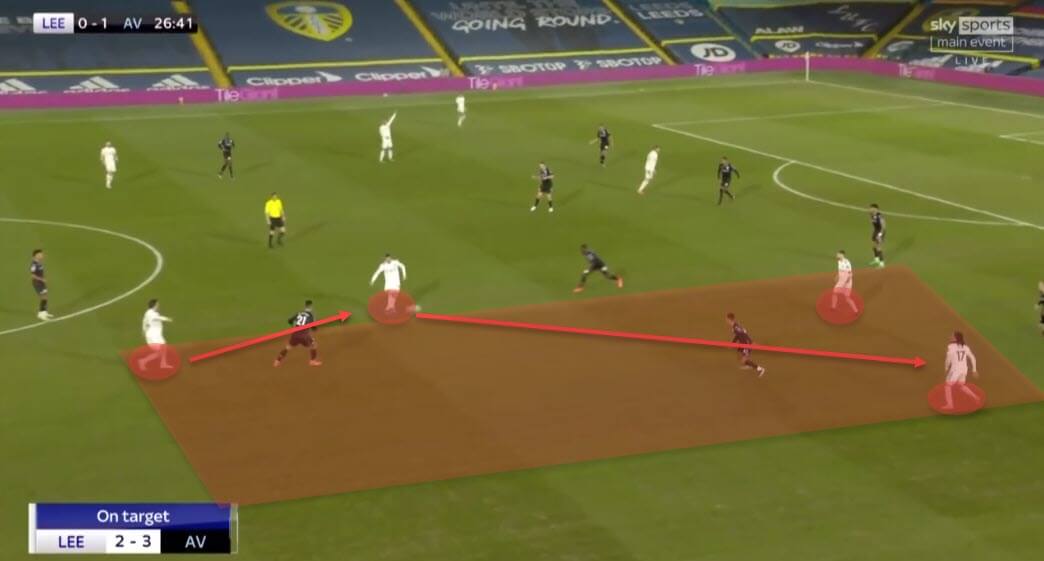
Even though it seems impossible to access the target in the half-space at first, a combination of coordinated movement, dynamic space occupation, verticality and achieving superiority gets Leeds into a promising situation to advance the play.
Again, it’s not just a single principle offering results but rather a combination of multiple facets of space occupation & creation that Bielsa, among others, insists on. The final principle we’ll touch upon are the overload to isolate tactics.
In essence, this is a strategy to overload the flank to free up other areas of the pitch, namely the opposite wing. Most teams do this to isolate their danger man with a single opposition defender, counting to achieve qualitative superiority in the process.
The next tactics board offers a more general overview of this principle.
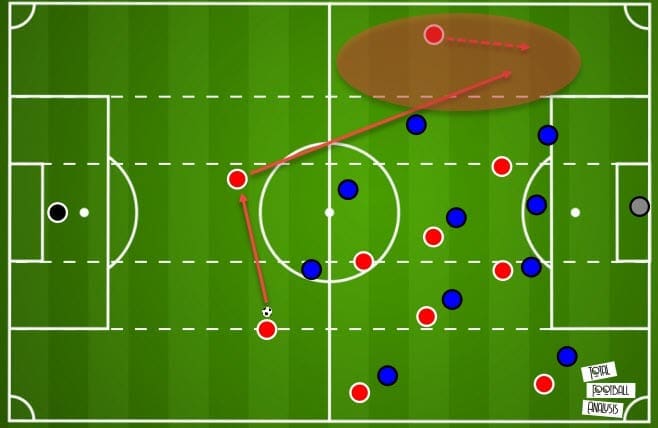
You can see how the red team has decided to overload the right side of the pitch, attracting a lot of defenders there as a result. But, at the same time, that isolates the other flank that can be exploited with a quick switch of sides. This requires fast ball circulation and proper space occupation on both ends. If the players on the overloaded side are not positioned correctly, the switch to the opposite end might not even be possible.
If multiple red team’s players can easily be marked by a single opposition defender, then the overload is likely to fail. The goal is to engage as many defenders as possible and at the same time, give the ball-carrier multiple channels to exploit before making the switch. Notice how there are no more than two red team players occupying the same horizontal or vertical line, making it that much difficult to completely mark them.
So what about the underloaded side then? There, it is paramount our key player is isolated and occupying the space high and wide so that he’s as far away from the overload as possible. However, while it may be tempting to make the switch through a single lofted ball, we have to remember that long and lofted balls travel slower than short ground passes. For that reason, it’s advantageous to include at least one more player in the switch, as is the case in our example.
The next image shows Leeds United in a similar situation. The right side is overloaded while the left is mostly unmarked. But instead of going directly towards the far-side player, Bielsa’s men complete the switch in two shorter moves.
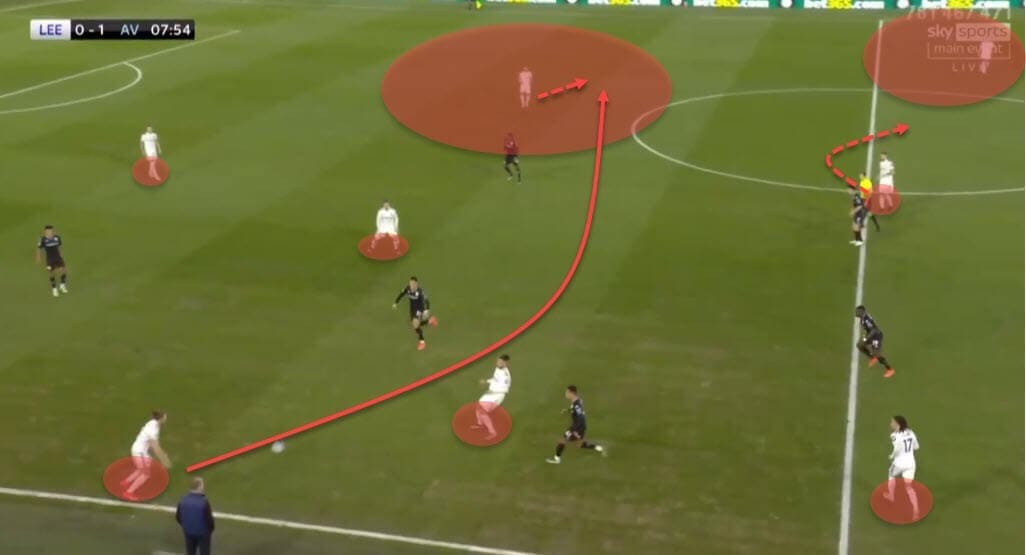
Note, however, while the first ball was a pass travelling in the air, it was a much closer distance so it was still successful.
Final remarks
This tactical analysis only scratches the surface of space occupation & creation but has hopefully shed some light on the main principles and tactics behind this key aspect of football. The team that controls the space, controls the game and similarly, the way you exploit it will inevitably impact how successful you end up being.



Comments