Do you love attacking in a three-back system?
How about defending in a 4-4-2 with those impenetrable blocks of four?
What if we could blend the two approaches, giving our side the security of a three-back system in possession while harnessing the structure of the traditional 4-4-2 out of possession?
Finding that balance is the topic of this tactical theory article.
With rest defence structures, seeing many teams opt for a 3-2 at the back, our goal is to identify how teams can transition from a 3-5-2 when in possession to a 4-4-2 out of possession.
We don’t want to get hung up on the numbers, so this analysis starts with reasons for using those specific systems and some of the principles of play we hope to put into practice.
Knowing why we have chosen these systems and how we look to use their advantages to attack or defend specific spaces, we’ll turn our attention to attacking and defensive transitions, specifically the moments that force our team to move from one formation to the other.
We’ll discuss positional responsibilities and then offer a couple of exercises to train these ideas.
Why use 3-5-2 in attack and 4-4-2 in defence?
For this first section, let’s start with some of the benefits of a 3-5-2 when in possession and a 4-4-2 out of possession.
One of the clear benefits of a 3-5-2 in possession is the structure it gives to a team’s rest defence.
We have many examples of teams using a 3-2 at the back when in possession, the most popular of which is Pep Guardiola’s Manchester City.
With a 3-2-5 rest defence, the team’s attacking shape is narrow at the back while maximising width higher up the pitch.
That allows a team to both stretch the opponent’s backline and often requires additional support at the back.
And this is where the 3-5-2 offers flexibility.
It can take on a flat shape in midfield or a layered approach, which may look like a 3-4-1-2 in terms of positional representation, giving the attacking central midfielder freedom to join the highest line of attack, overloading that high, central area.
He or one of his teammates may also drop in between the lines as gaps emerge.
The setup complicates the opposing team’s defensive setup and is designed to limit the success of the opposition’s attacking transitions.
An additional benefit is that it allows the in-possession team to dominate centrally while having free players in the wings.
Yellow is our focus group in this tactical theory article.
Below, yellow’s occupation of the central channel and the general narrowness of the eight field players between the wings require the opponent to become unbalanced centrally, leaving the wide outlets available.
Now, this is assuming the opponent plays some variation of four at the back and three in central midfield.
The space available does change based on the opposition’s setup, but we’ll stick with this opposition structure for the analysis.
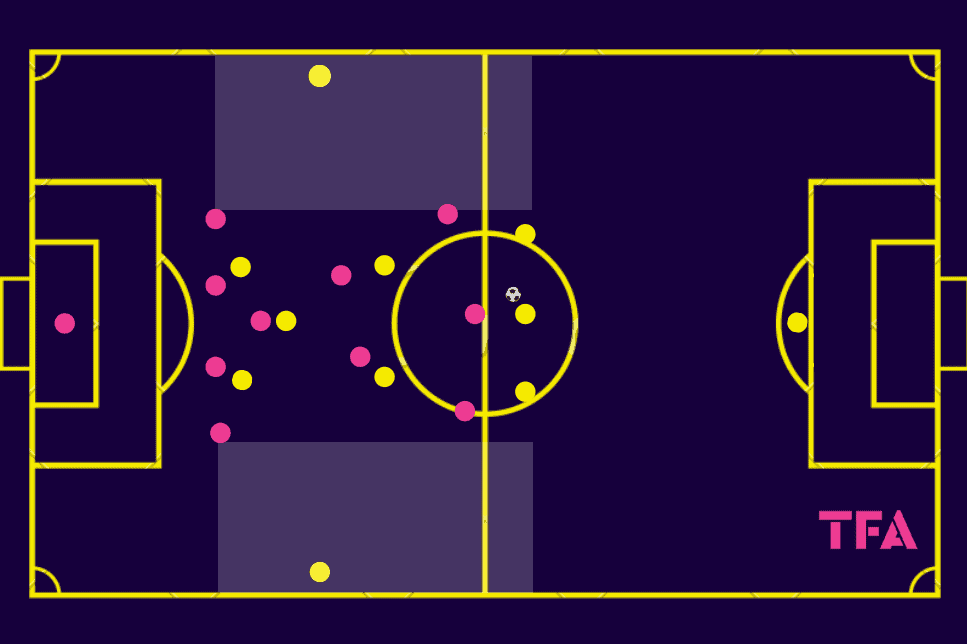
Within the 3-5-2, the central attacking midfielder can join the front line to give the in-possession team a 3-4-3 structure.
That allows the attacking team to compress the width of the opposition’s backline and leaves their holding midfielder without a clear assignment.
He will typically defend the space between his backline and the attacking midfielders, but the positioning of yellow’s three highest players limits his vision and allows the three yellows to drop into space between the lines.
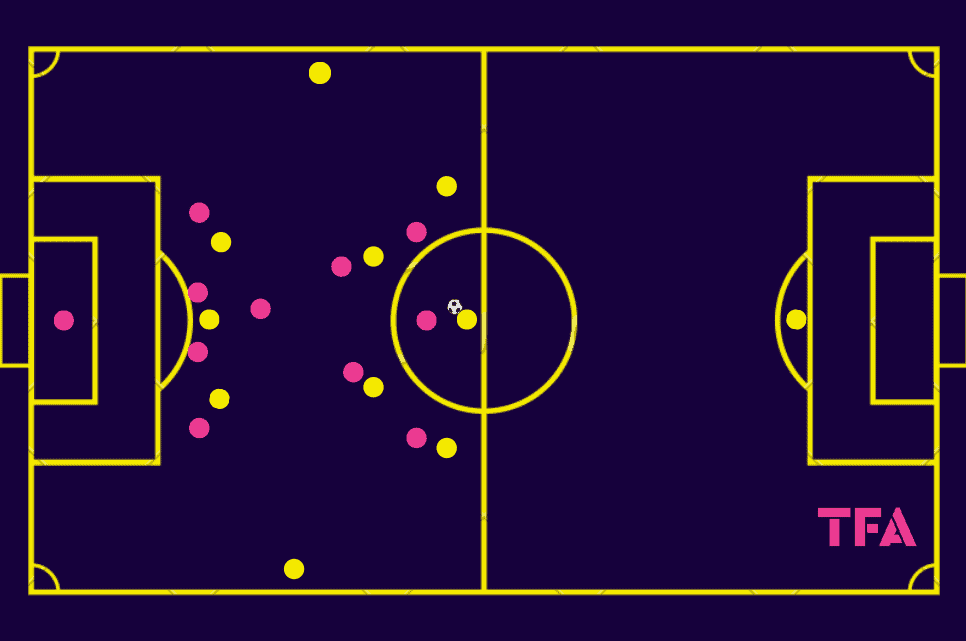
That flexibility of the #10 extends to his relationship with the midfielders as well.
If the double pivot is man-marked, they can push higher up the pitch, dragging their defenders with them.
That creates space for the attacking midfielder, or even one of the two forwards, to switch places with the pivots and help progress the attack.
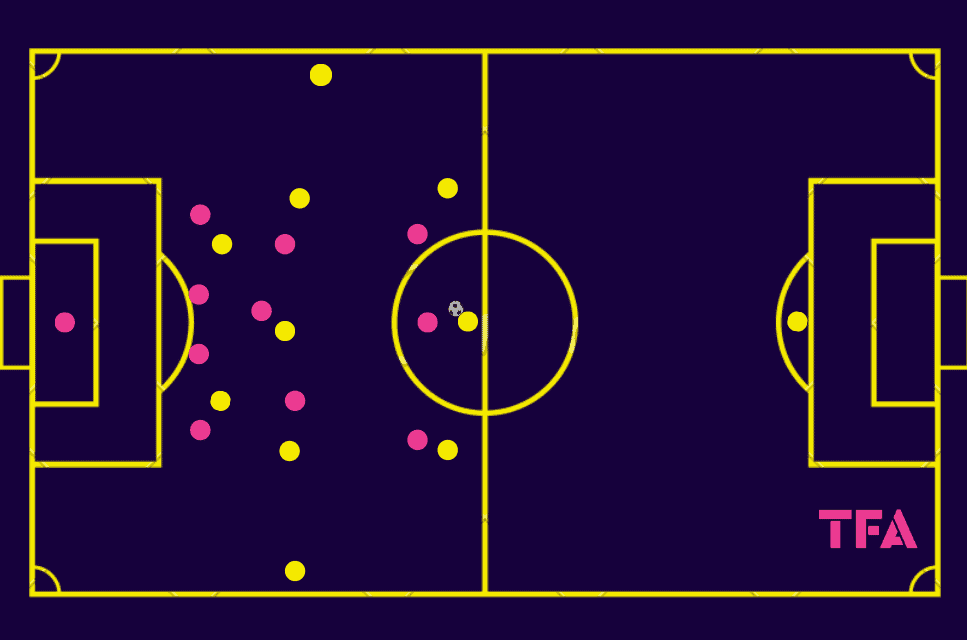
This is a very basic introduction to the benefits of a 3-5-2 when in possession (we haven’t even addressed the wide centrebacks pushing into midfield), but let it suffice for now.
Turning our attention to the 4-4-2 out of possession, we are assuming a narrow midfield four.
That complicates the opponent’s ability to play centrally.
The wings are given, but the presence of the wide midfielders allows our yellow team to quickly move into the wings once play is funnelled there.
From the onset, the two forwards apply pressure on the centrebacks and goalkeeper, encouraging the pink team to play into the wings, which is where we transition from press to pressure.
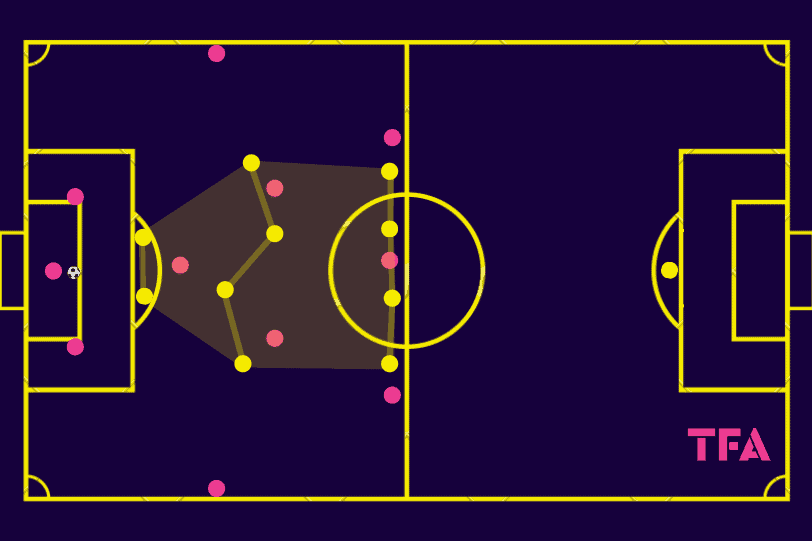
We know that our wide midfielders can get to the wings quickly, so the top concern in our sessions is training the rest of the midfield to quickly account for the opposition’s three central players, especially the ball-near attacking midfielder.
The last image outlined some of the objectives of a 4-4-2 in a high press.
The image below focuses on a mid-block.
As the opponent has the ball near midfield, we are again trying to funnel them into specific spaces of the pitch before increasing our defensive intensity.
Similarly to the high press, we want to make it difficult to play centrally.
The yellows are very compact, both horizontally and vertically.
In terms of vertical compactness, there’s a little space between the lines, which means that the space available is behind the backline and in the wings.
Yellow must be on their guard to balls played over the top, but the objective is to funnel the opponent into the wings and simply shift our already compact press out wide.
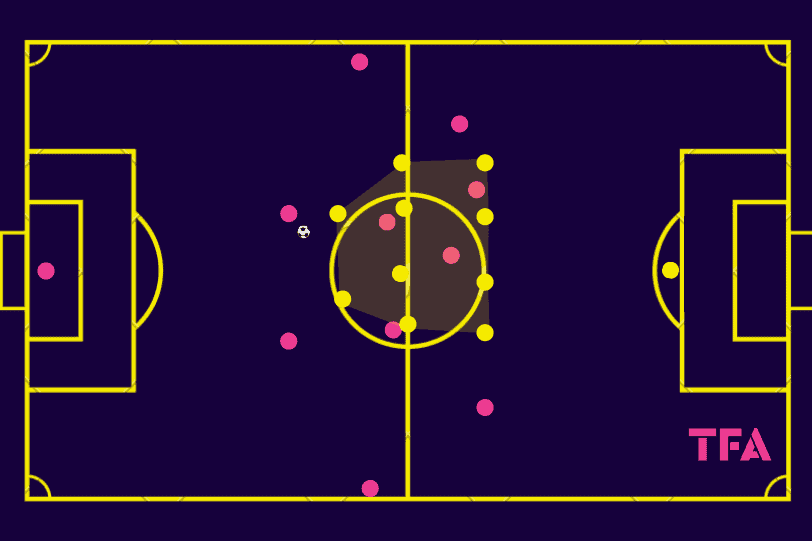
Limiting the vertical spaces between the lines does present an opportunity to play over the top, but our primary aim is to deny space between the lines.
We don’t want the opponent receiving in that space and driving in our backline.
Training the backline and goalkeeper to deal with balls over the top, especially anticipating when that may happen, becomes an area of focus during our training sessions.
Dictating the terms of the game through defence is our ultimate objective.
Positioning the players in a 4-4-2 to limit the time centrebacks have to play forward and place constraints on the opponent’s central options are subprinciples of our defensive tactics.
The team shape is simply in service to those objectives.
How to transition between the two formations
So here’s where we are.
We have some base objectives laid out for our 3-5-2 in-possession structure, as well as our 4-4-2 out-of-possession shape.
Now we come to the heart of the issue…how do we transition from one to the other and vice versa?
The obvious complication is determining who joins the backline to make it a group of four rather than three.
But let’s not start with the who of this conundrum.
Let’s start with the game itself.
While we can’t account for every scenario, we can create situations to convey the analysis behind this particular set of tactics.
Let’s start with that transition from attacking shape to defensive structure.
In the scenario below, pink has just recovered the ball.
Yellow counterpresses to prevent pink from playing forward right away, buying time for the team as a whole to recover their positions.
The right midfielder remains high because, of the two wingers, he is closer to the ball.
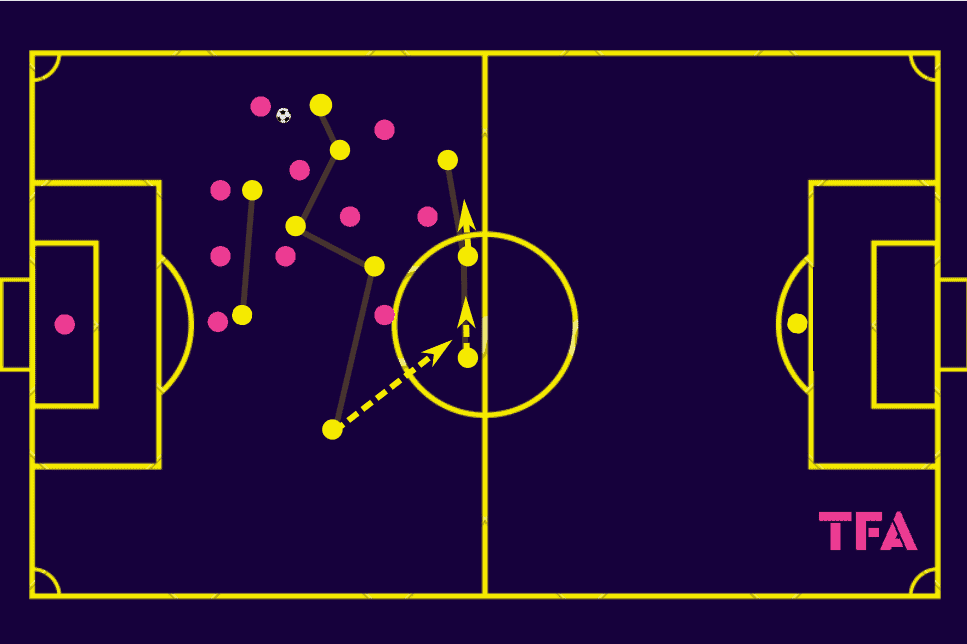
As the right midfielder engaged in the counterpress, the left midfielder moves into the backline.
As the back three shifts to their right, the left-midfielder simply takes the positional responsibilities of a left-back in the 4-4-2 structure.
Meanwhile, even if the counterpress is broken or pink plays negatively to reset possession, the right midfielder remains in the second line, his functional role.
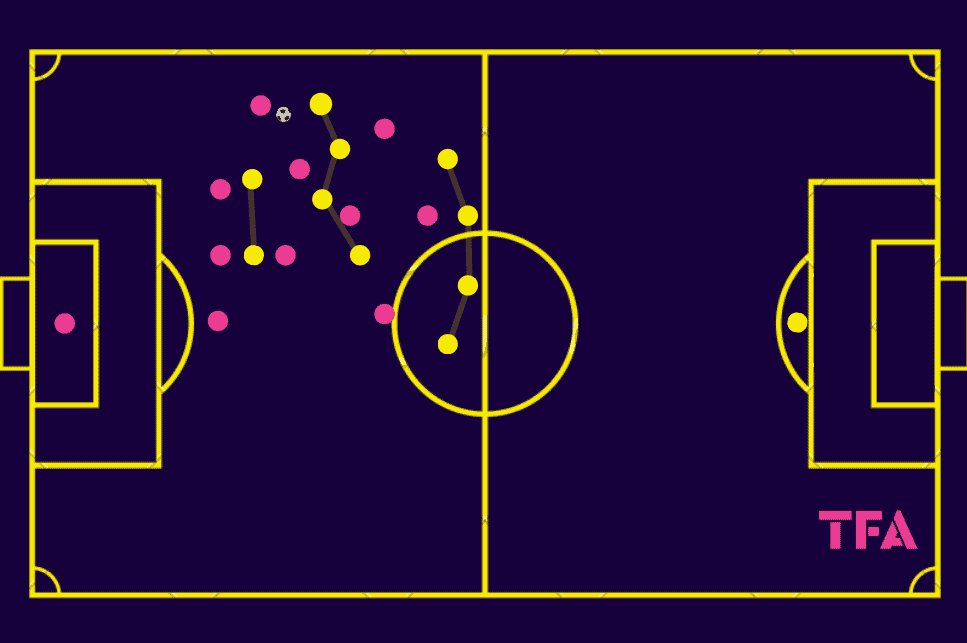
When communicating the defensive transition responsibilities to the players, the forwards have a straightforward role.
Nothing changes for them.
In midfield, there’s the option to play with a flat line or to add some layering based on the qualities of the opposition, as well as your own personnel.
At least initially, if the #10 does tend to play higher than his #6 and #8, the initial response in transition may be for the #10 to take away the opposition #6.
As the two pivots slide near the ball, they take away forward passes through the near half space and central channel.
There is some adjustment for the backline as well.
While the central player of the back 3 is always a centreback, both in attack and when defending, there is some need for adaptation from the two wide centrebacks.
This is where players like Sergio Ramos in his prime years at Real Madrid, Barcelona‘s Jules Koundé and Ronald Araújo, as well as AC Milan’s Théo Hernandez, fit the positional profile to serve as either centrebacks or outside-backs.
It’s a particular type of player who would excel in this role.
With the understanding of how the 3-5-2 attacking setup transitions into a 4-4-2 out-of-possession, let’s turn our attention to the attacking transition.
In this example, yellow’s high press managed to funnel pinks out wide.
Yellow then applied pressure in the wings and recovered an errant pass in the right half-space.
They play several passes centrally to retain possession and break the initial counterpress.
As they circulate the ball and move towards a greater assurance of keeping possession, yellow’s left midfielders can push forward into the left half-space.
His positioning is wide enough to get outside of the opposition’s press but narrow enough to offer a high-percentage pass into him.
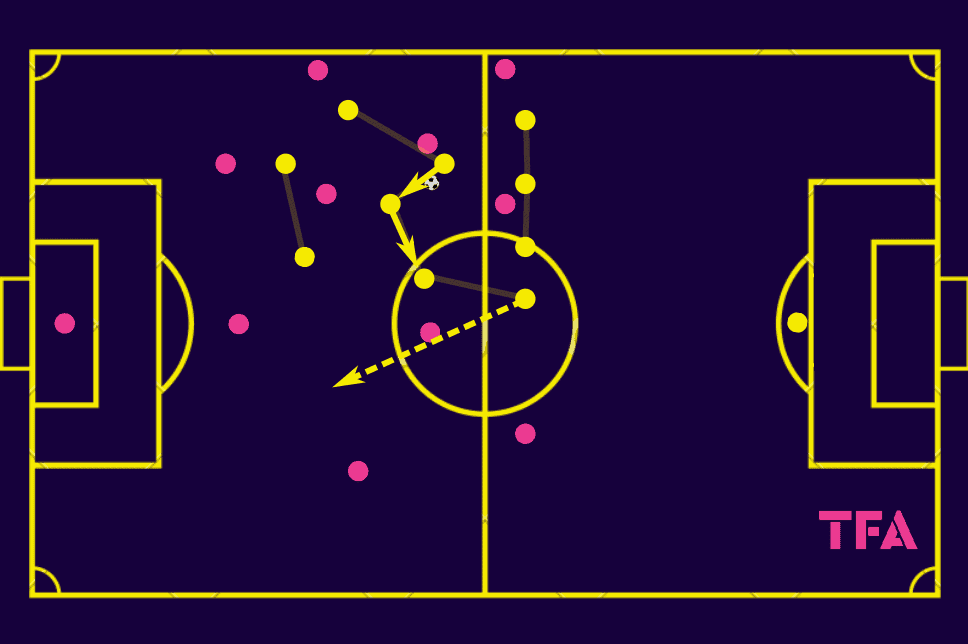
As that pass is played into yellow’s left midfielder, the team’s attacking shape takes form.
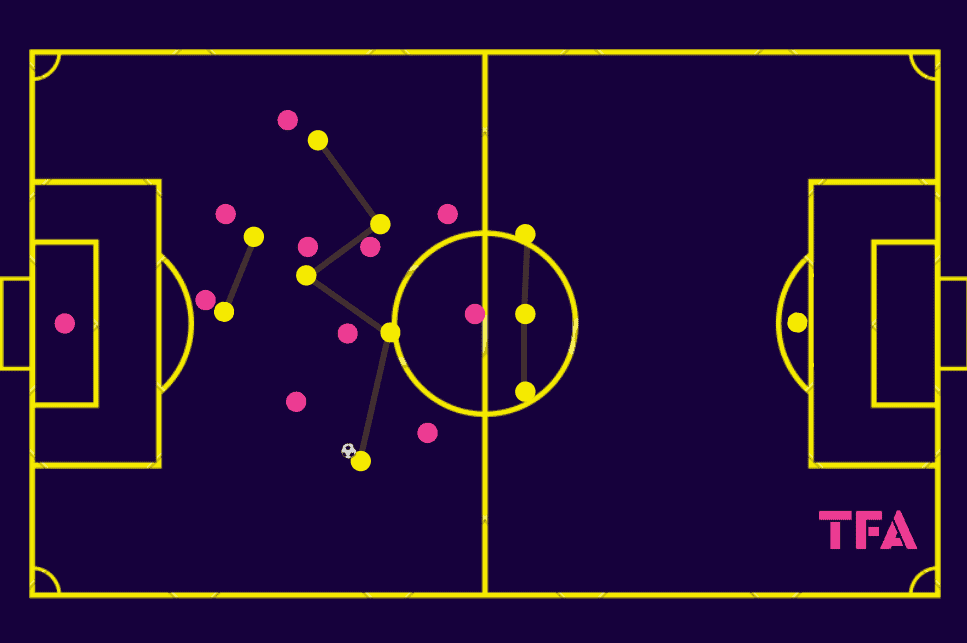
Even if yellow simply played backward to secure possession and buy time for their attacking shape to emerge, the player transitioning from outside-back to wide midfielder must show good decision-making as to when he takes that space.
It’s too late, and his team must resign themselves to attacking against a structured opponent.
Too soon, which is the greater danger, and he leaves the backline exposed in the space he just vacated.
Training the timing of his movement forward is vital.
Training transitions to and from a 3-5-2 and 4-4-2
Let’s get to training this fluid change of systems.
It’s not only a matter of training the movement from one formation to the other.
More importantly, it’s to help the players understand the principles behind the change and how to execute their positional roles.
While we can still train in and out of possession patterns, these exercises are more specifically designed to help players with the transition from one to the other and vice versa.
The goal is to help them understand how actions on the pitch direct their movements.
We want to train these cues and improve their efficiency through training.
Our first exercise is a 6v6 game.
Yellows are the focus group, while pinks are the opponents.
The size of this area is adaptable to your team’s age and ability.
The default sizing for this training area is a 25-yard square centrally with eight-yard wide zones in the wing and an end zone at the bottom of the image that runs eight yards deep.
Within the 6v6 setup, yellows play a 4-2, and the pink setup is a 3-3.
We want to simulate a back four for the yellows while springing one of their two outside-backs forward into the wings.
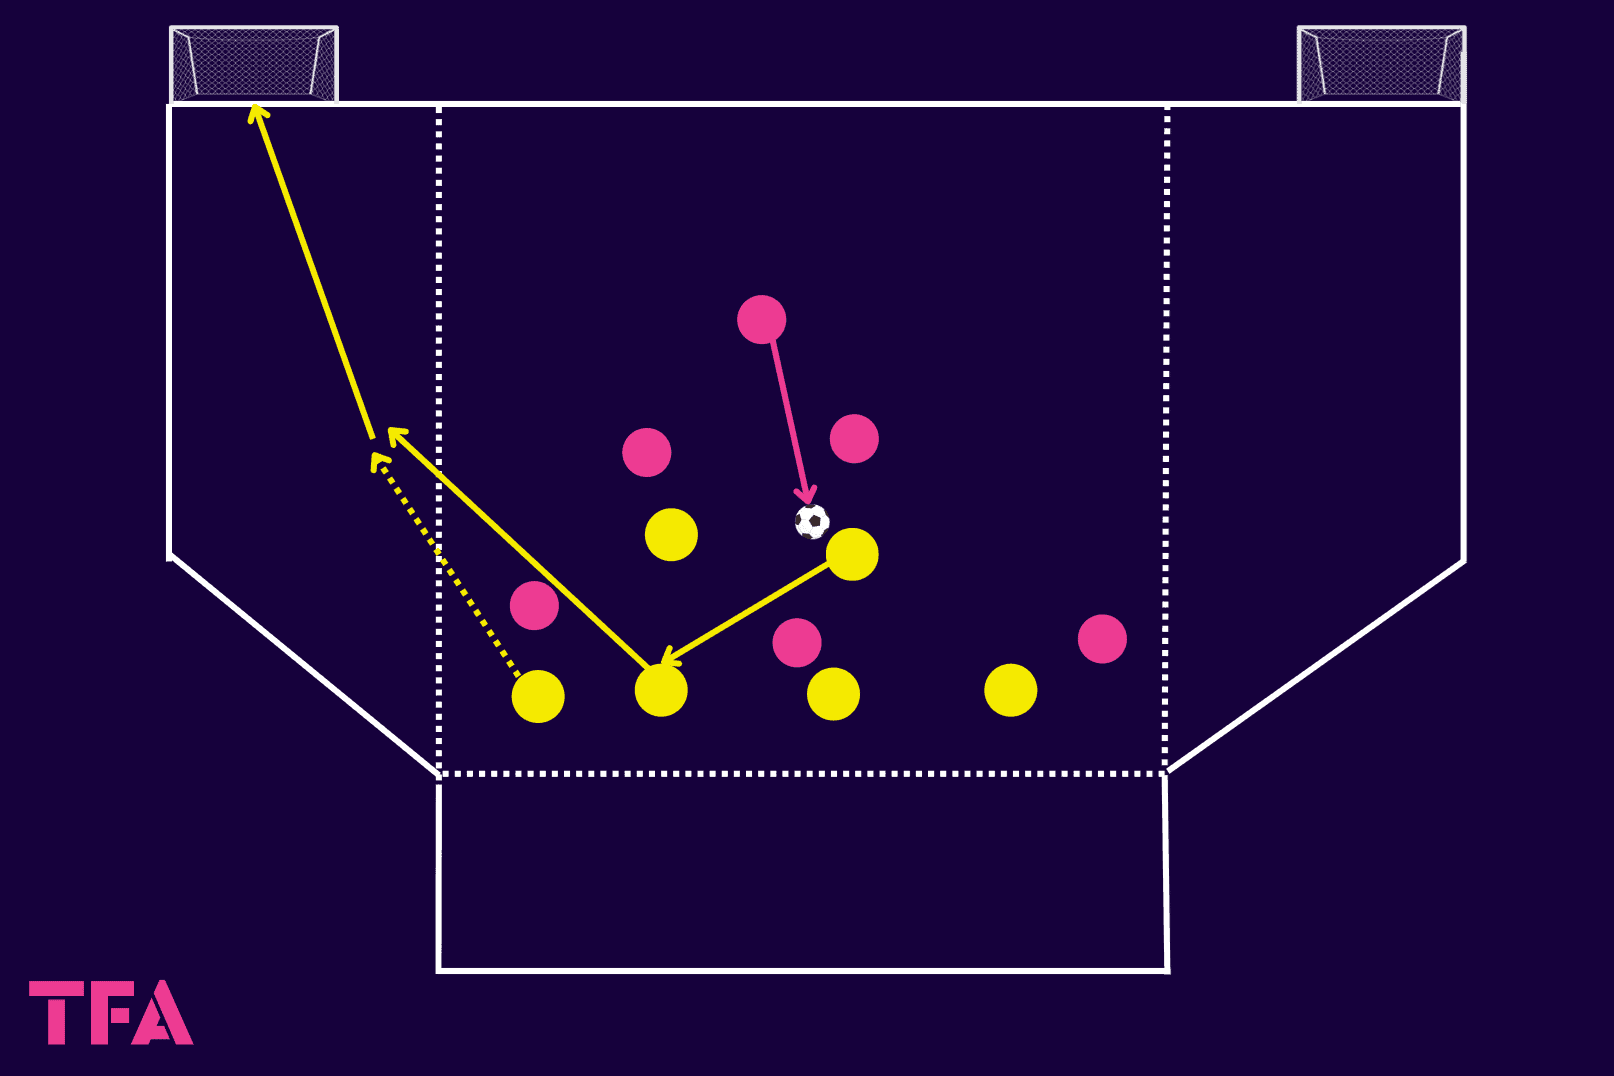
The central square is the main playing area.
When pink is in possession, they score a point by passing the ball to a teammate.
In the end zone at the bottom of the image, the offside rule applies, meaning that the attacker cannot run into the end zone until the ball is passed.
That will help the pink team work on the timing of their runs and the weight of their passes to get behind yellow’s back four.
For yellow, they can score in either of the two goals, but the shot must be taken from one of those two wings.
Either team can send as many players into the wings as they would like.
So yellow’s advantage comes by springing an outside-back into the wings before pink can respond or by switching the point of attack to push the far-sided outside-back into the wing.
In terms of coaching points, we want to focus on yellow’s ability to spring their outside-backs into the wings.
They must remain organised out of possession and remain compact to prevent pink from playing into the end zone.
Upon winning the ball, they want to get the outside-backs forward to claim the unoccupied space in the wings.
Watch for their reactions in transition and the timing of their movements forward.
Again, it’s too late, and they lose the shooting lane to goal.
Too soon, so before possession is secured, and they leave the team vulnerable if the ball is lost.
Our second exercise is a 9v9 game emphasising transitioning from attack to defence.
Realistically, this game can have both elements if you choose.
Simply determine how you want to set up the players.
In this exercise, the teams are set out in a 3-4-2.
Only the central attacking midfielder and goalkeepers are missing from each team.
To prepare both teams to execute the transition between the two formations, set them up the same way.
That said, this is also adaptable to an upcoming opponent’s shape, which will give the team, especially the wide players, a chance to gain reps before the match starts.
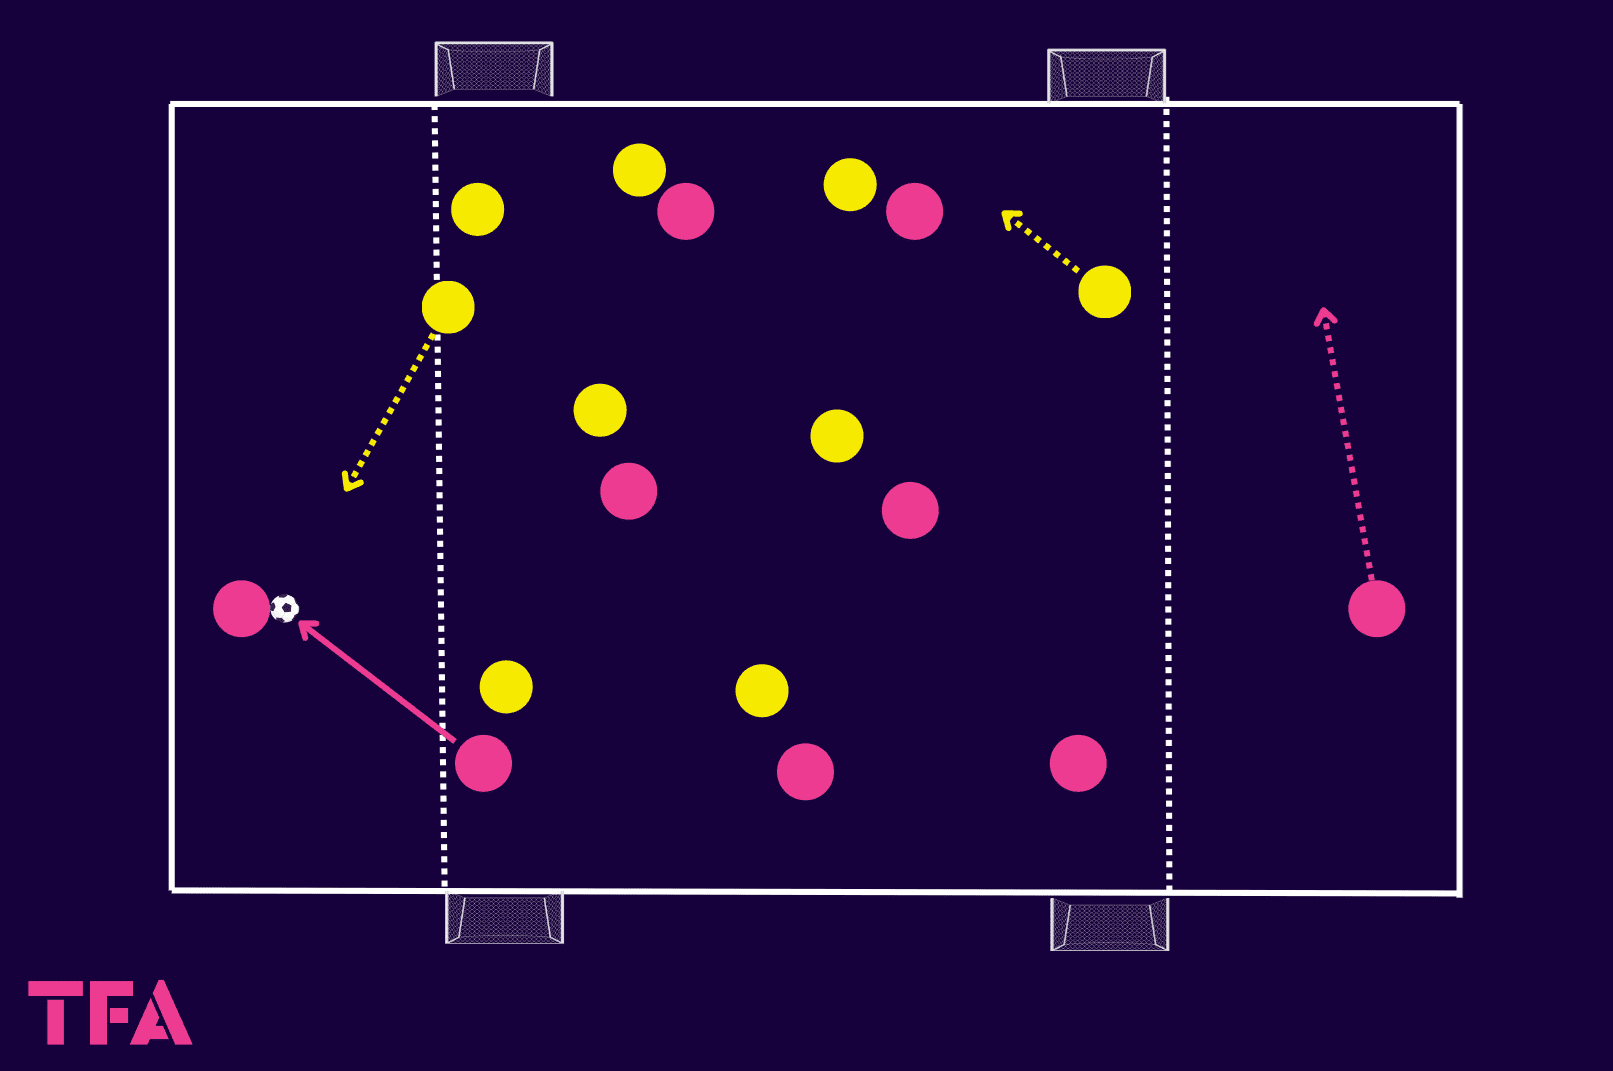
In terms of dimensions, adapt the size to your team.
For adults, I may use the full width of the pitch and 40 yards from one end line to the other.
The goals are positioned with the exterior post on the line that marks out the wings.
If the players have a habit of standing in front of the goal, feel free to drop them 5-yd out of the playing surface.
Set the rule that the attacking team must have one player in each wing while the defensive team can only defend in the wing near the ball.
One way to play this game is to enforce the wing rules but without restricting how many players can enter the ball-near wing.
The attacking team can use that space to create overloads near the ball, while the defending team can practice funnelling into the wings and increasing the intensity of their pressure.
A slight adaptation would be strict regulation of numbers in the wings.
The attacking team can only have one player in each, and the defending team may only have one player in that wide space.
This definitely changes the game, encouraging more wing play and 1v1s.
This exercise focuses on each team’s efficiency to enter the wings in attack and recover into their lines in defence.
Remember that it’s the near wing-back or wide midfielder that we want to join the midfield, making a group of three in this game, while the far-sided wide midfielder recovers into the backline to give us four defenders.
When the ball is lost, the team transitioning to defence must work hard to prevent the opponent from pulling forward.
Back is fine.
Delay the attacking team’s progression up the pitch to allow the far-sided midfielder to recover into a deeper and more central position.
Conclusion
Articles on the pros and cons of playing a 3-5-2 or a 4-4-2 and the spaces each allows teams to attack and defend are topics of their own.
We could spend several thousand more words discussing each system of play and the ways they help us engage the opponent.
But this article had a much narrower focus.
We wanted to look specifically at the transition from one formation to the other.
It was in clarifying the positional roles that we directed our attention.
The training exercises are specifically designed to help coaches focus on a very specific moment of the game, tracking the efficiency of the players to move from one role to the other.
The idea of playing with the back three in possession, keeping that 3-2 rest defence intact, is very appealing.
Connecting it to another system of play, and one that is still very common in the game, simply adds another weapon to the team’s arsenal.
Connecting the transitional moments between the two is critical to implementing the tactics.
We’ve only scratched the surface, but this tactical analysis should give an idea of how to move from two very different formations fluidly in-game.


Comments