The possession-dominant teams featured in our high xG shot creation tactical analysis often make the game look easier.
While there is beauty in simplicity, and they pull it off well, a certain degree of quality is necessary to execute attacking sequences with those levels of precision.
We certainly won’t assume that any given team can replicate what Manchester City can do in the final third.
That’s simply unrealistic.
This week’s article touches on the same topic but from a different angle.
Our tactical theory highlights clubs that are more tactically balanced.
Against your average opponent, they’ll have slightly more of the ball and will spend less time scaling the walls in the final third.
These teams offer an alternative route to goal.
Our objective is to figure out how they create consistently high-quality goal-scoring opportunities.
Shot Creation From Defending Tactics
Much like the tactical analysis on how possession-dominant teams create high xG shots, we’ll start this tactical theory piece from the defensive angle.
One thing we want to capture is the variety of approaches.
Many of these teams will set out in a high press, especially against similar or weaker opponents, but they are also well-versed in mid-block defending.
We want to cover the entire gamut of their defensive approach and how defending tactics lead to attacking opportunities.
Fiorentina – Serie A
We’ll start in Serie A with Fiorentina.
Right away, we can see the distinctive man-oriented approach in the high press.
As the ball moves from the left half-space to the left wing, Fiorentina shifts from tighter man marking to third defenders, moving into a more zonal orientation.
The players nearest the ball tend to stay with their marks, while those furthest from it, especially those higher up the pitch, will often have two responsibilities.
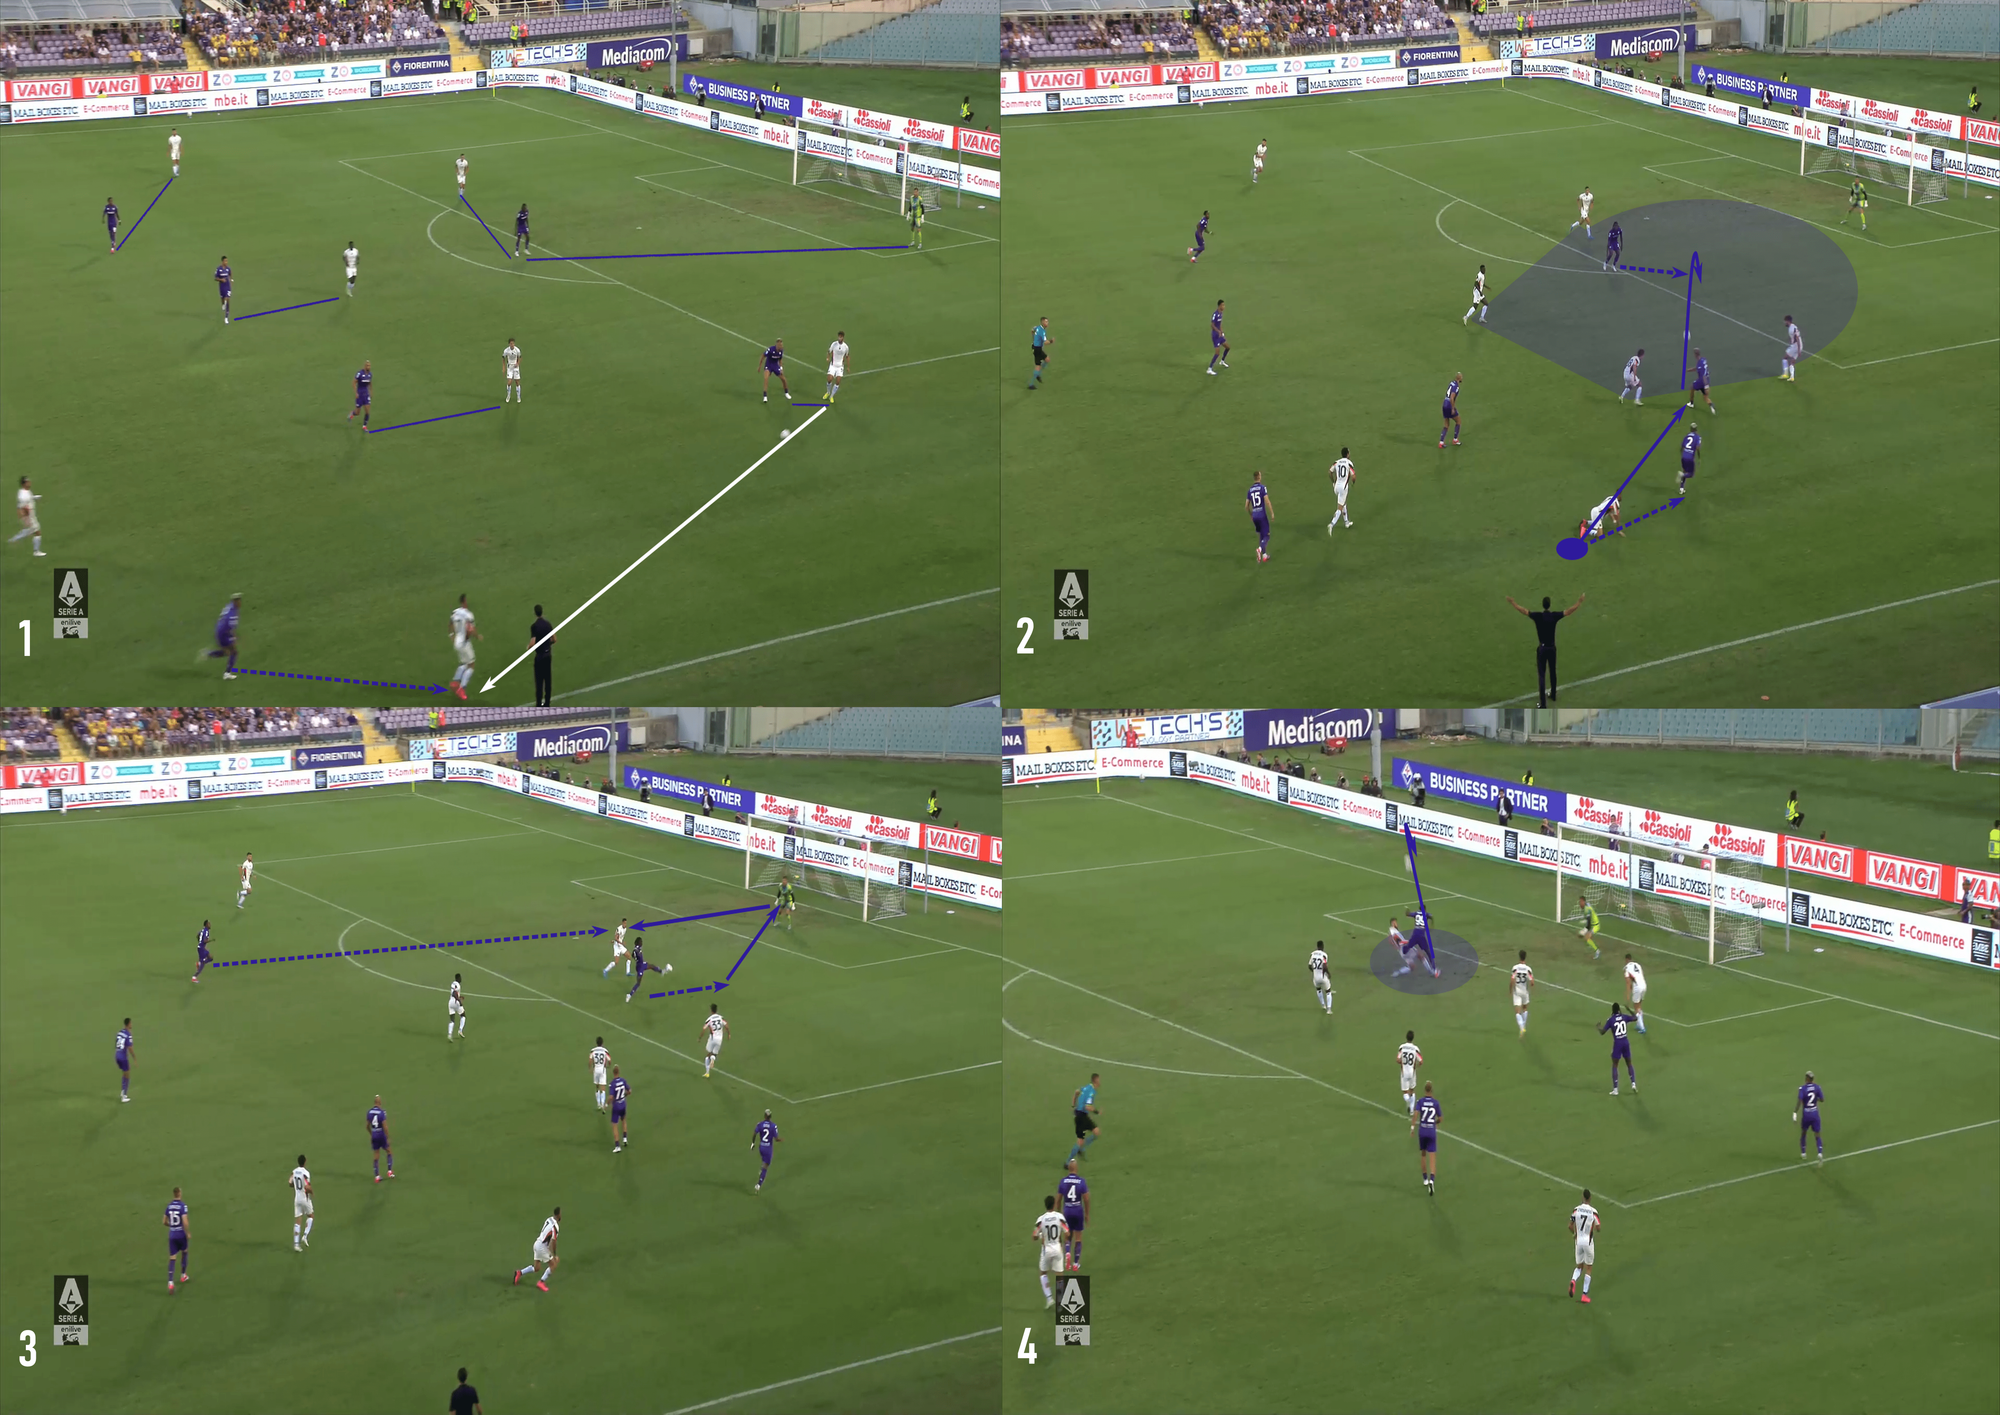
In the sequence, as the ball was played into the left wing, Fiorentina was well-prepared to pressure the opponent’s first touch and poke it away.
Their out-of-possession structure allowed them to recover the ball and play into their highest forward quickly.
He was splitting the centrebacks, giving him the time and space to take a touch towards goal and fire a shot.
The shot was saved, but the second chance from the rebound spilt right into the heart of the box.
It’s tough to say who had contact on this play, but if Fiorentina was a split second faster to the ball, the shot from the second chance is close to a gimme.
One of the key points of the Fiorentina sequence was how their structure allowed them to link up and progress up the pitch quickly.
Two forward passes led to a chance on goal.
Chelsea Vs Newcastle United
Out-of-possession structure is a crucial component of successful attacking transitions.
Chelsea‘s second goal against Newcastle United, the Cole Palmer screamer at the near post, was the product of excellent defensive structure.
As Newcastle looked to play through their midfield, the Chelsea press quickly collapsed on the ball carrier, eliminating angles to play out of the press.
He had space to run into as they poked the ball forward to Palmer.
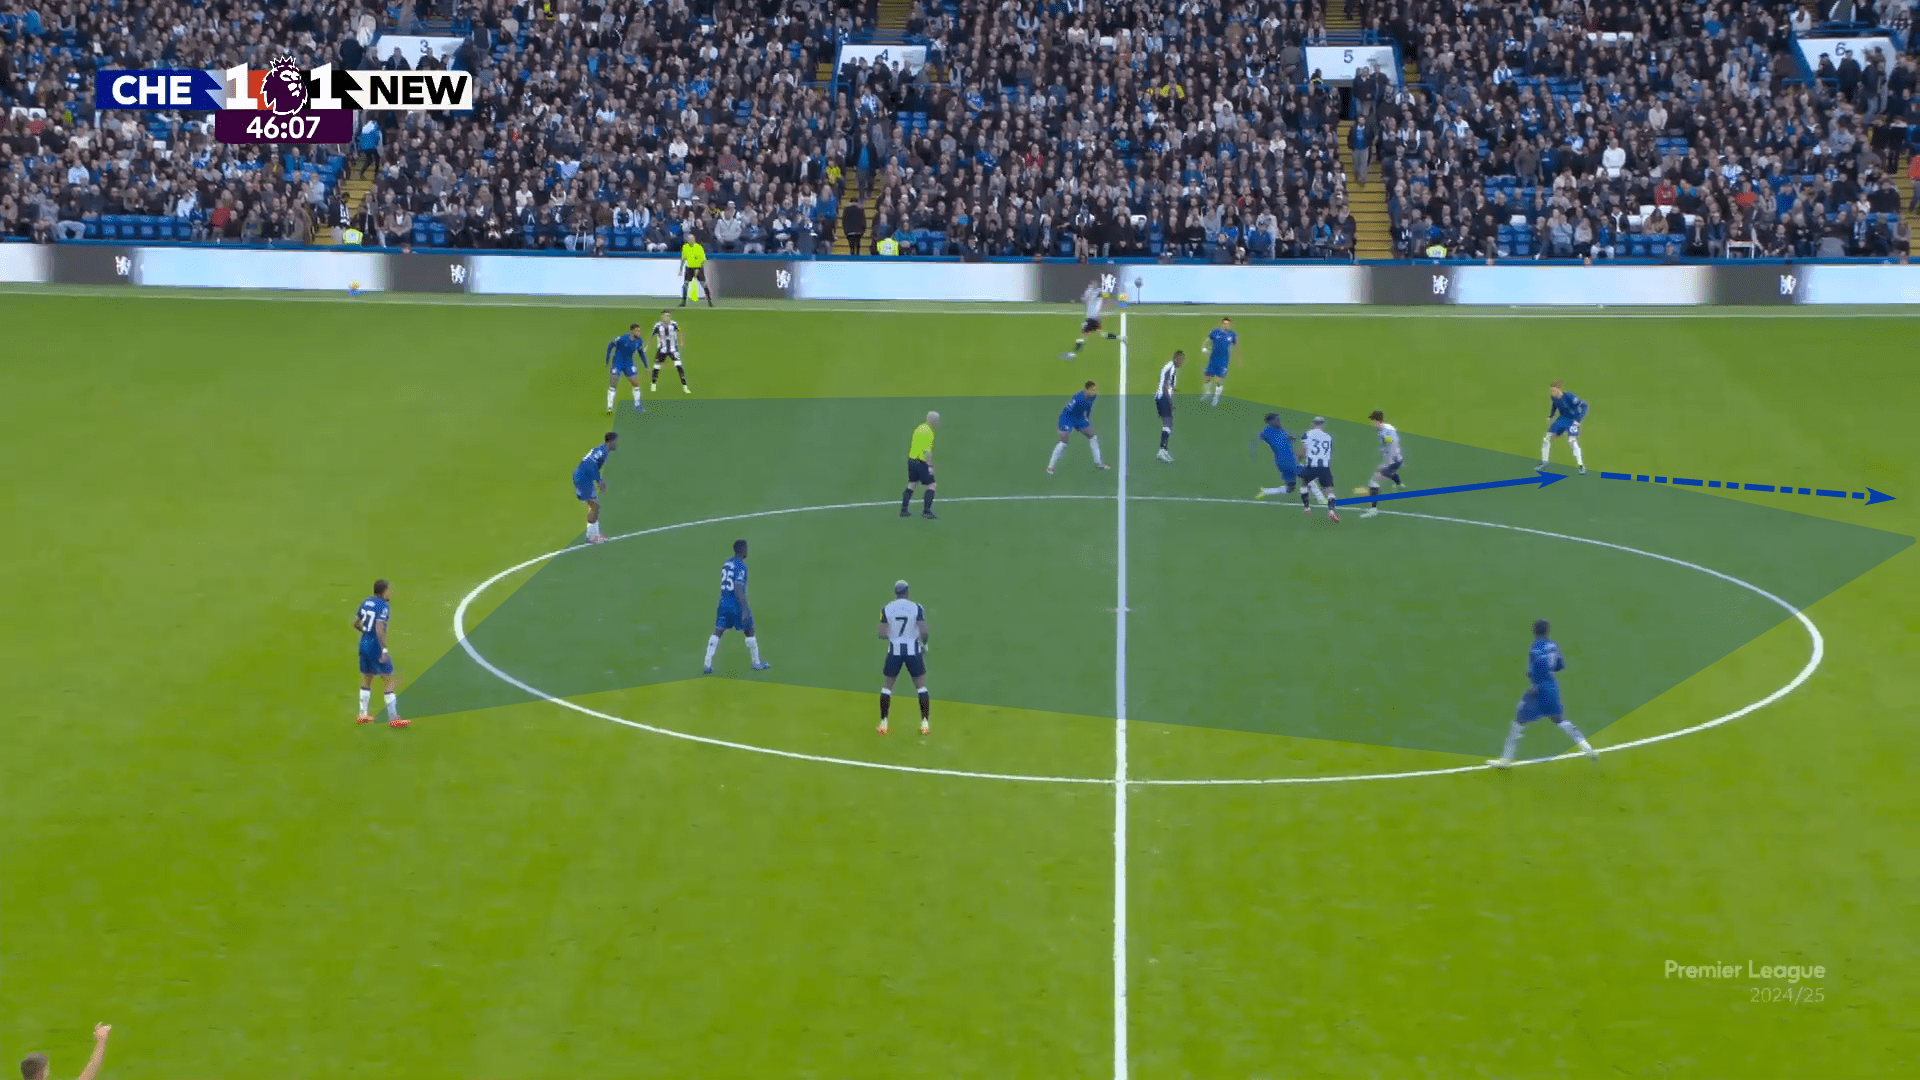
As he entered the middle third, we can see the numbers situation.
Nico Jackson did well to attack the centre and limit Newcastle’s ability to close down the space available to Palmer.
He carried the ball 40 m untouched.
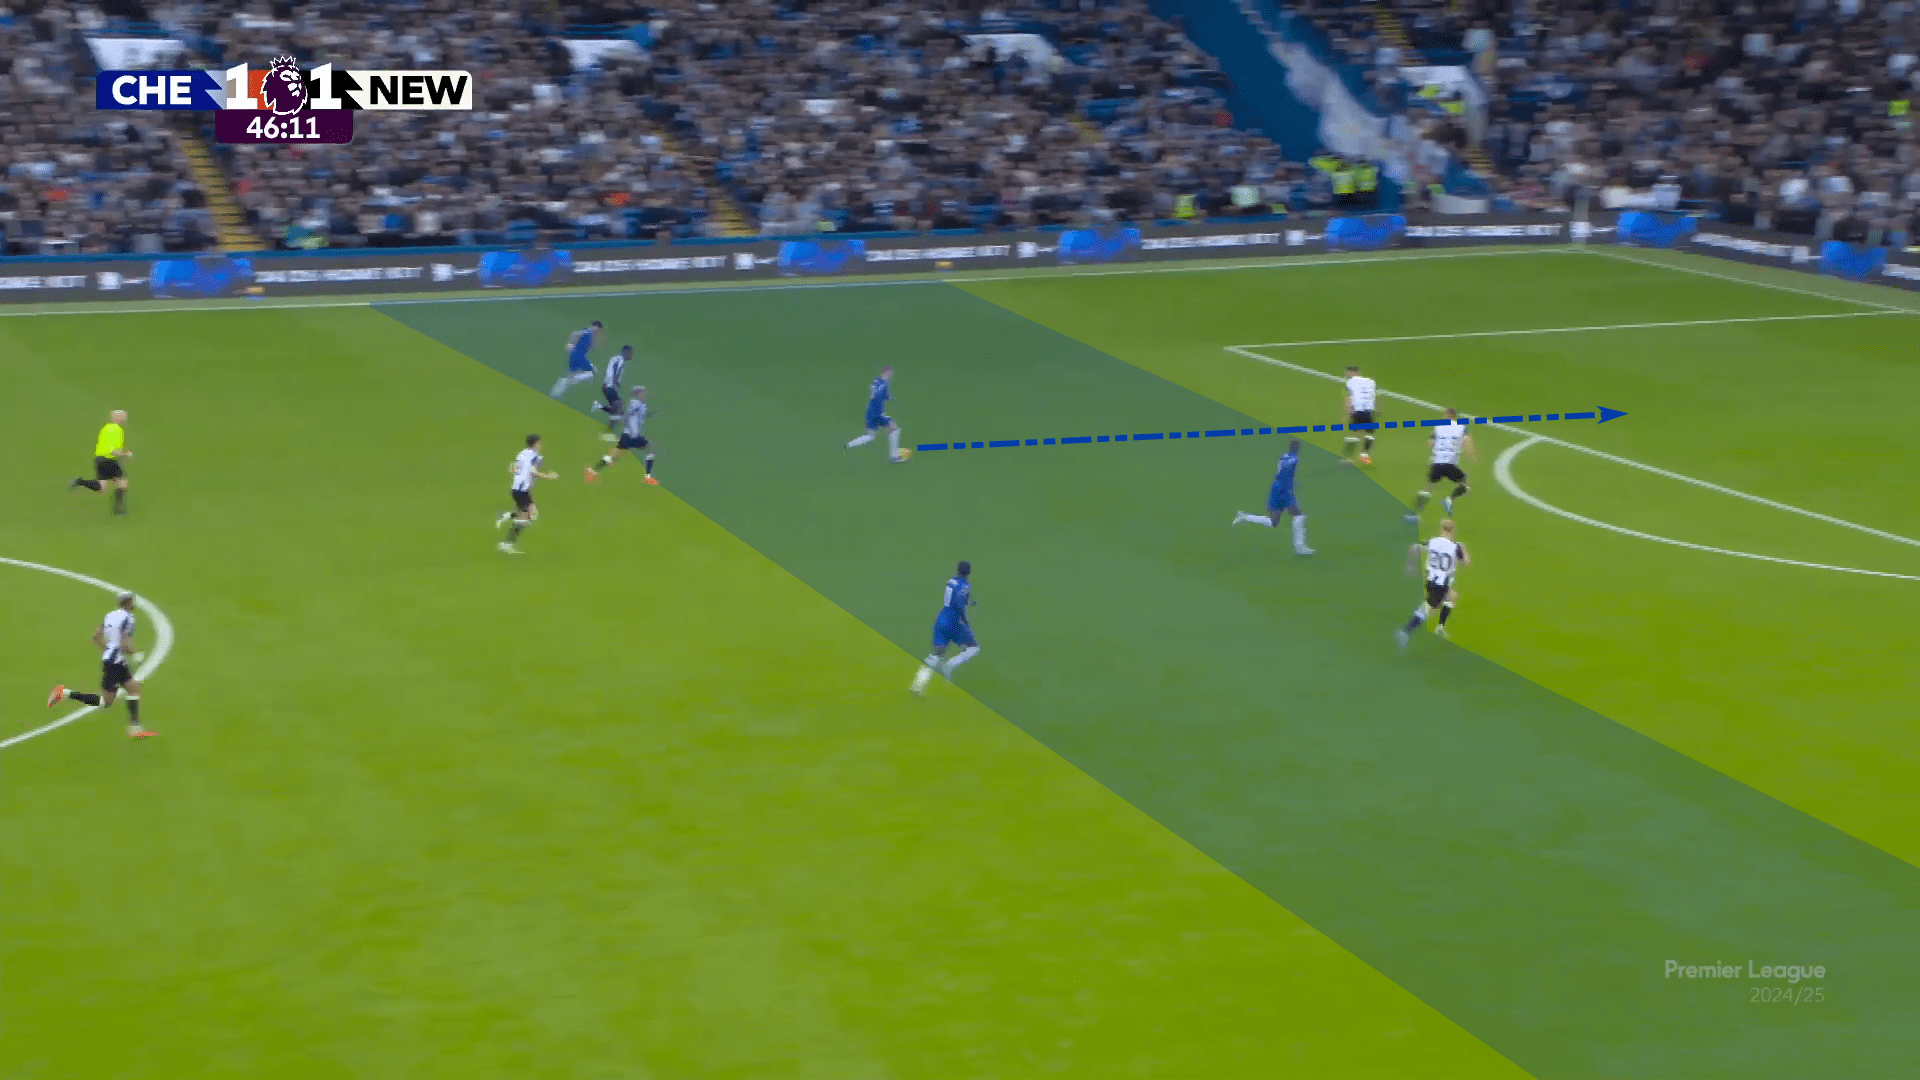
While his shot was contested, no one was between him and the goal, and Nico Jackson’s central movement impacted how Newcastle defended the counterattack.
Chelsea’s counterattack exploited the space conceded by Newcastle’s in-possession structure.
Lyon Vs Lille OSC
Moving to France, we get a different look from Lyon, perhaps the biggest star of this tactical analysis.
Space is slightly tighter in this example because the opponents are vertically compact.
Even once Lyon wins the ball, there’s some work to do to keep it against Lille OSC.
If one thing stood out, it’s Lyon’s impetus to play forward.
Whether on the counterattack or in open play, their game has a direct feel that’s refreshing to watch.
When space is available, they are eager to attack it.
This counterattack falls along those lines.
Right away, we see that there is direct opposition as the ball is turned over.
A brilliant individual effort helps Lyon keep it, allowing them to drive forward into midfield.
As they carry the ball forward, the opposition press starts to adapt.
They initially move towards the ball to slow the ball carrier and then attempt the recovery.
As they step towards the ball, a forward pass followed by a ball into the wings beats the counter-press and fully launches the counterattack.
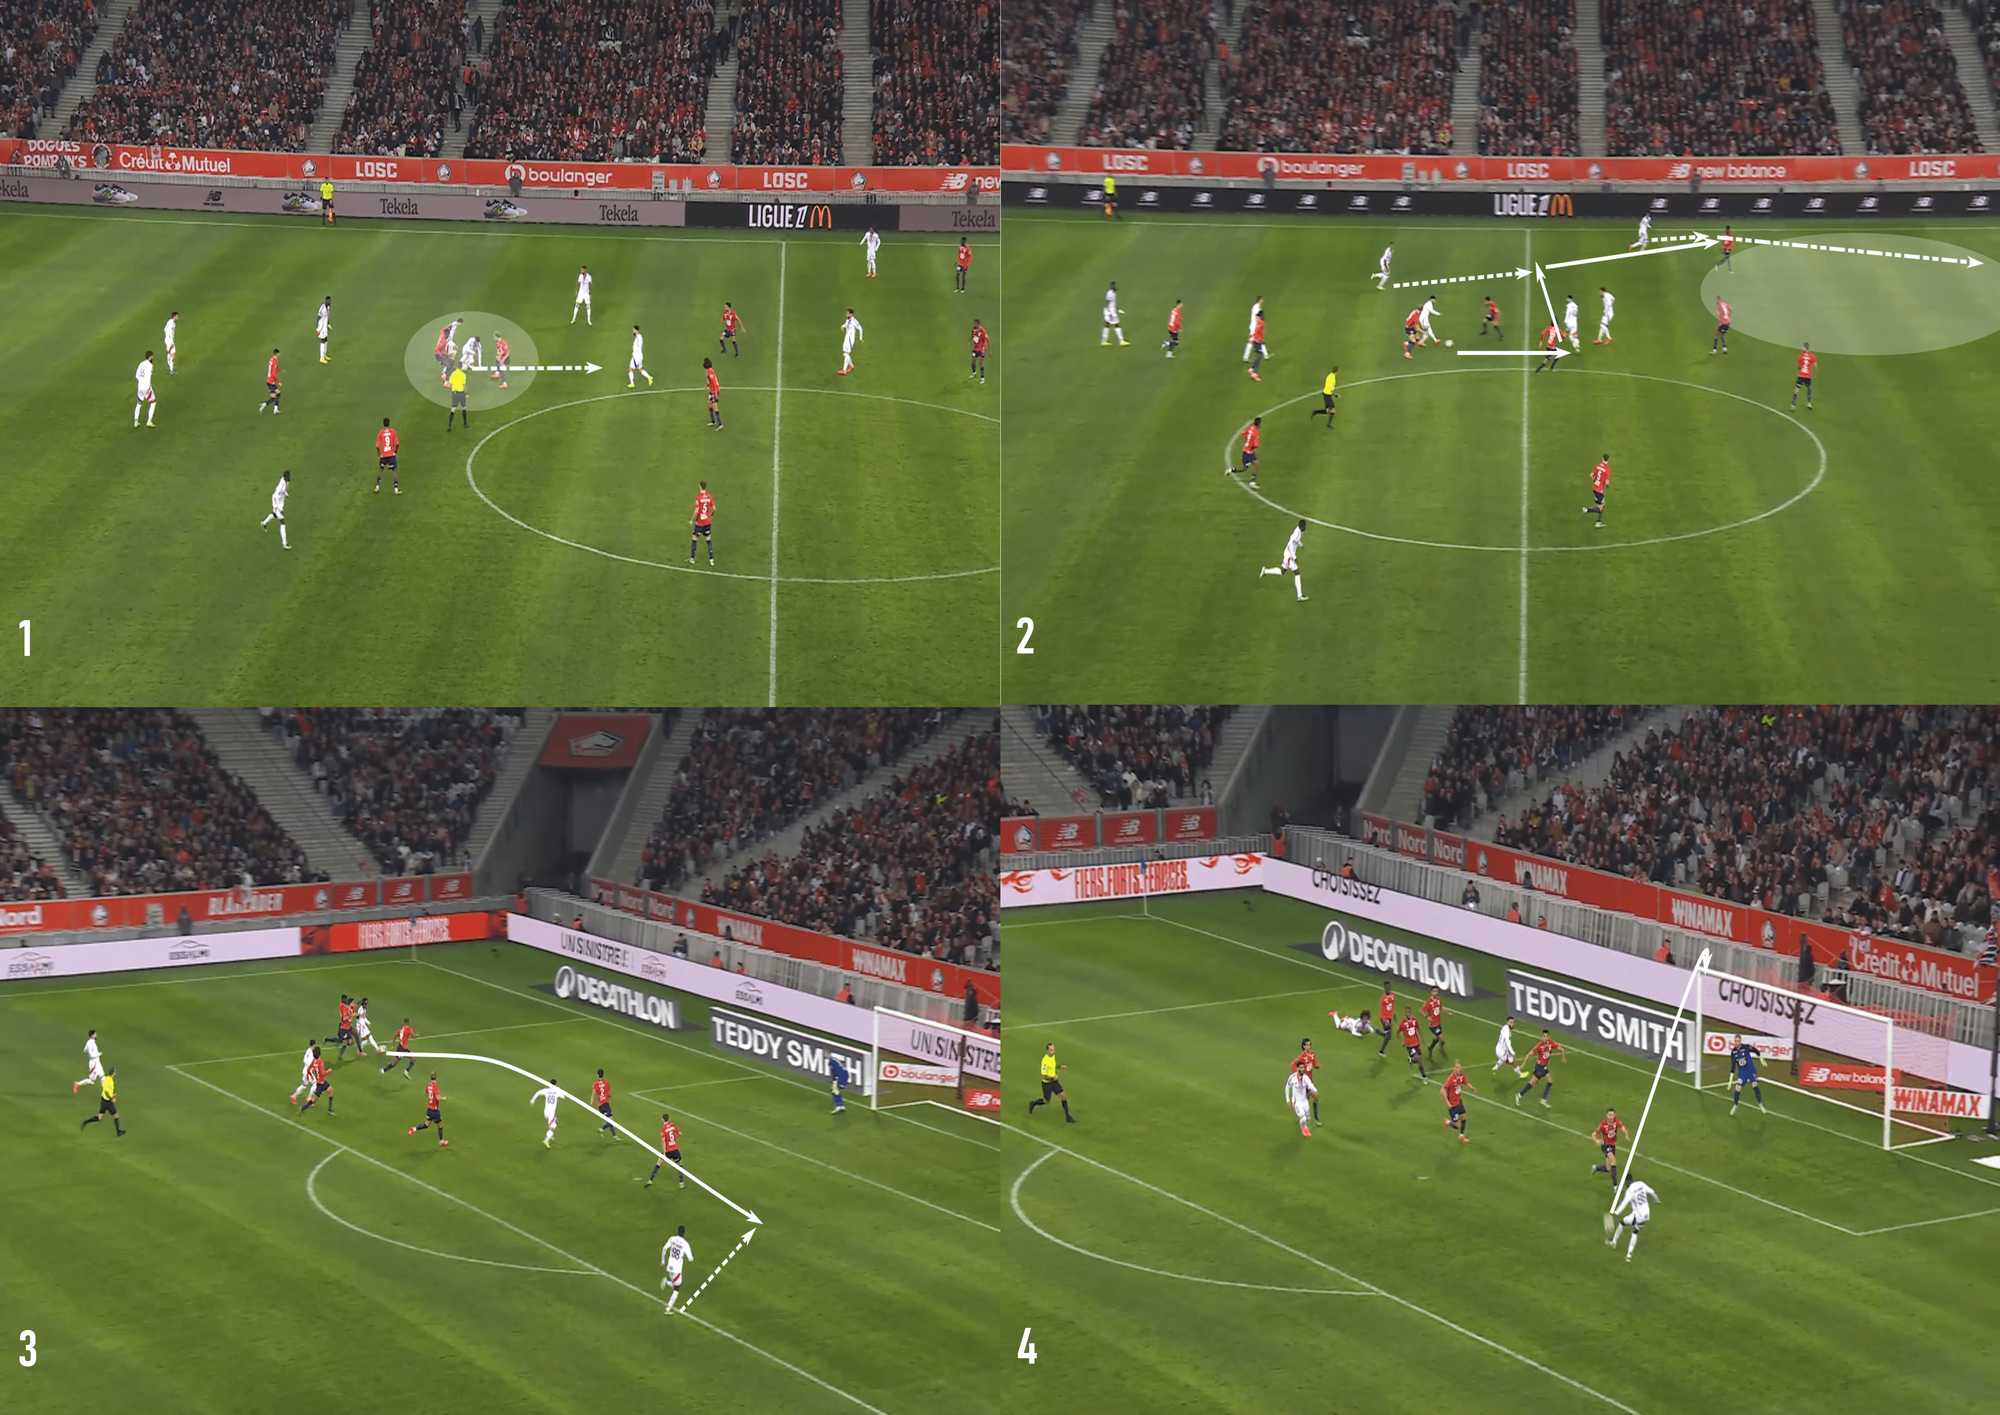
The ball is played forward to their high and wide winger, who wins his 1v1 battle and carries it into the box.
This is an excellent example of how dynamic wing play and 1v1 attacking are such a creative Force.
As he carries the ball into the box, look at the numbers of those who move towards the ball to stop the immediate threat.
Lyon has two players prepared to attack the service as they move towards the ball.
It falls to their man at the far post, whose first touch shot narrowly misses the frame, but it’s a golden opportunity created by Lyon’s mid-block and eagerness to play forward.
In each example, the structure of the press created the connection to transition to attack.
The benefits of a press recovery are that the defensive team is more tightly connected, knows where their teammates are, and can quickly attack an expansive opponent.
There’s space for the taking, and the team transitioning to attack is typically the better suited to get to those areas.
The Importance Of Wing Play In Chance Creation
Lyon is the perfect segue for a look at wing play.
One thing that was noticeable with each team in this tactical analysis was the effectiveness of the wingers.
The wide players were vital to the team’s attacking success, whether on the counterattack or in open play.
From the counter, they represent an opportunity to get behind outside backs and attack the areas of the pitch where space is more readily available.
In possession, success in the wings typically came from 1v1 to 3v3 scenarios.
By limiting the numbers committed to the wings, teams ensured they had numbers in possession centrally if a transition to defence was needed, plus they had numbers available to run into the box.
Fulham Vs West Ham
The first example we’ll look at is a unique one, coming from Fulham directly off a kickoff.
Granted, it’s not your typical in-possession tactics here, but what Fulham did well was quickly establish a 2v2 in the left wing.
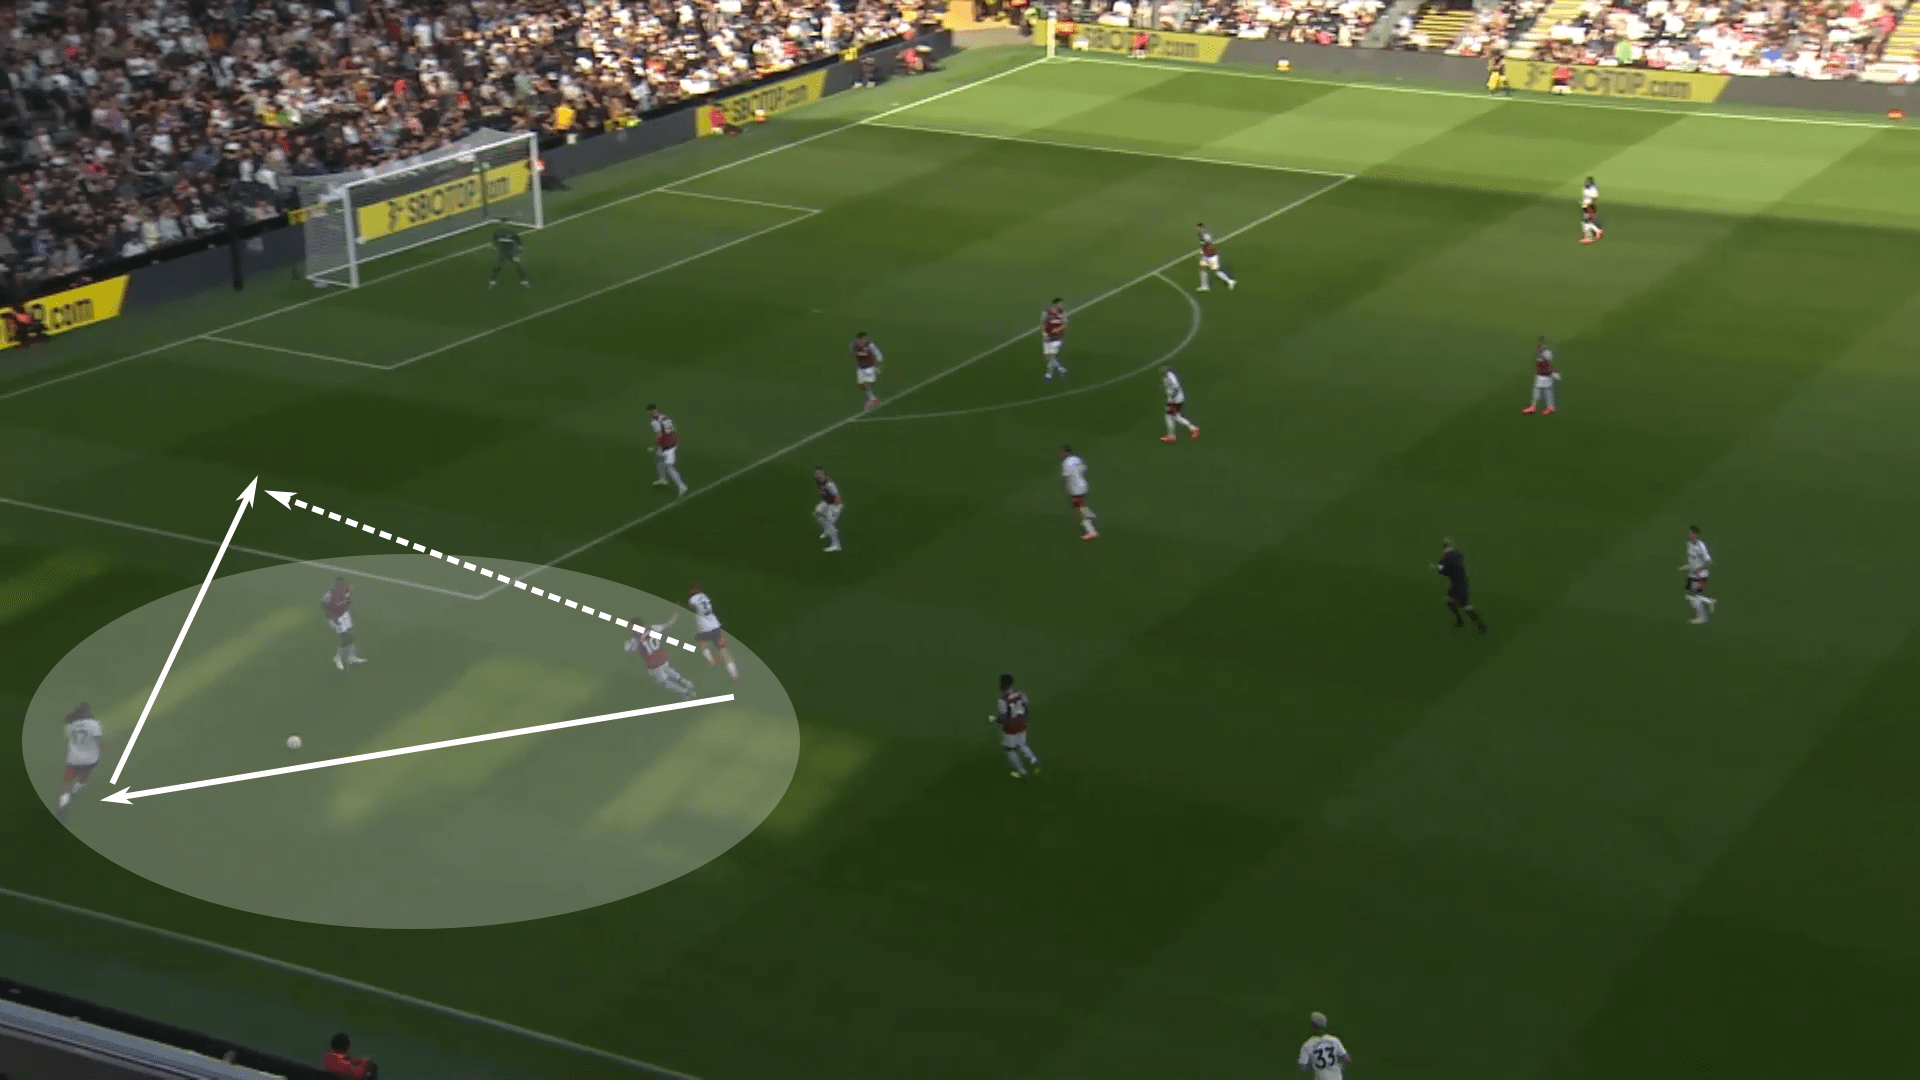
With that 2v2 in place, they played a give-and-go, got behind the West Ham backline, and sent a service in.
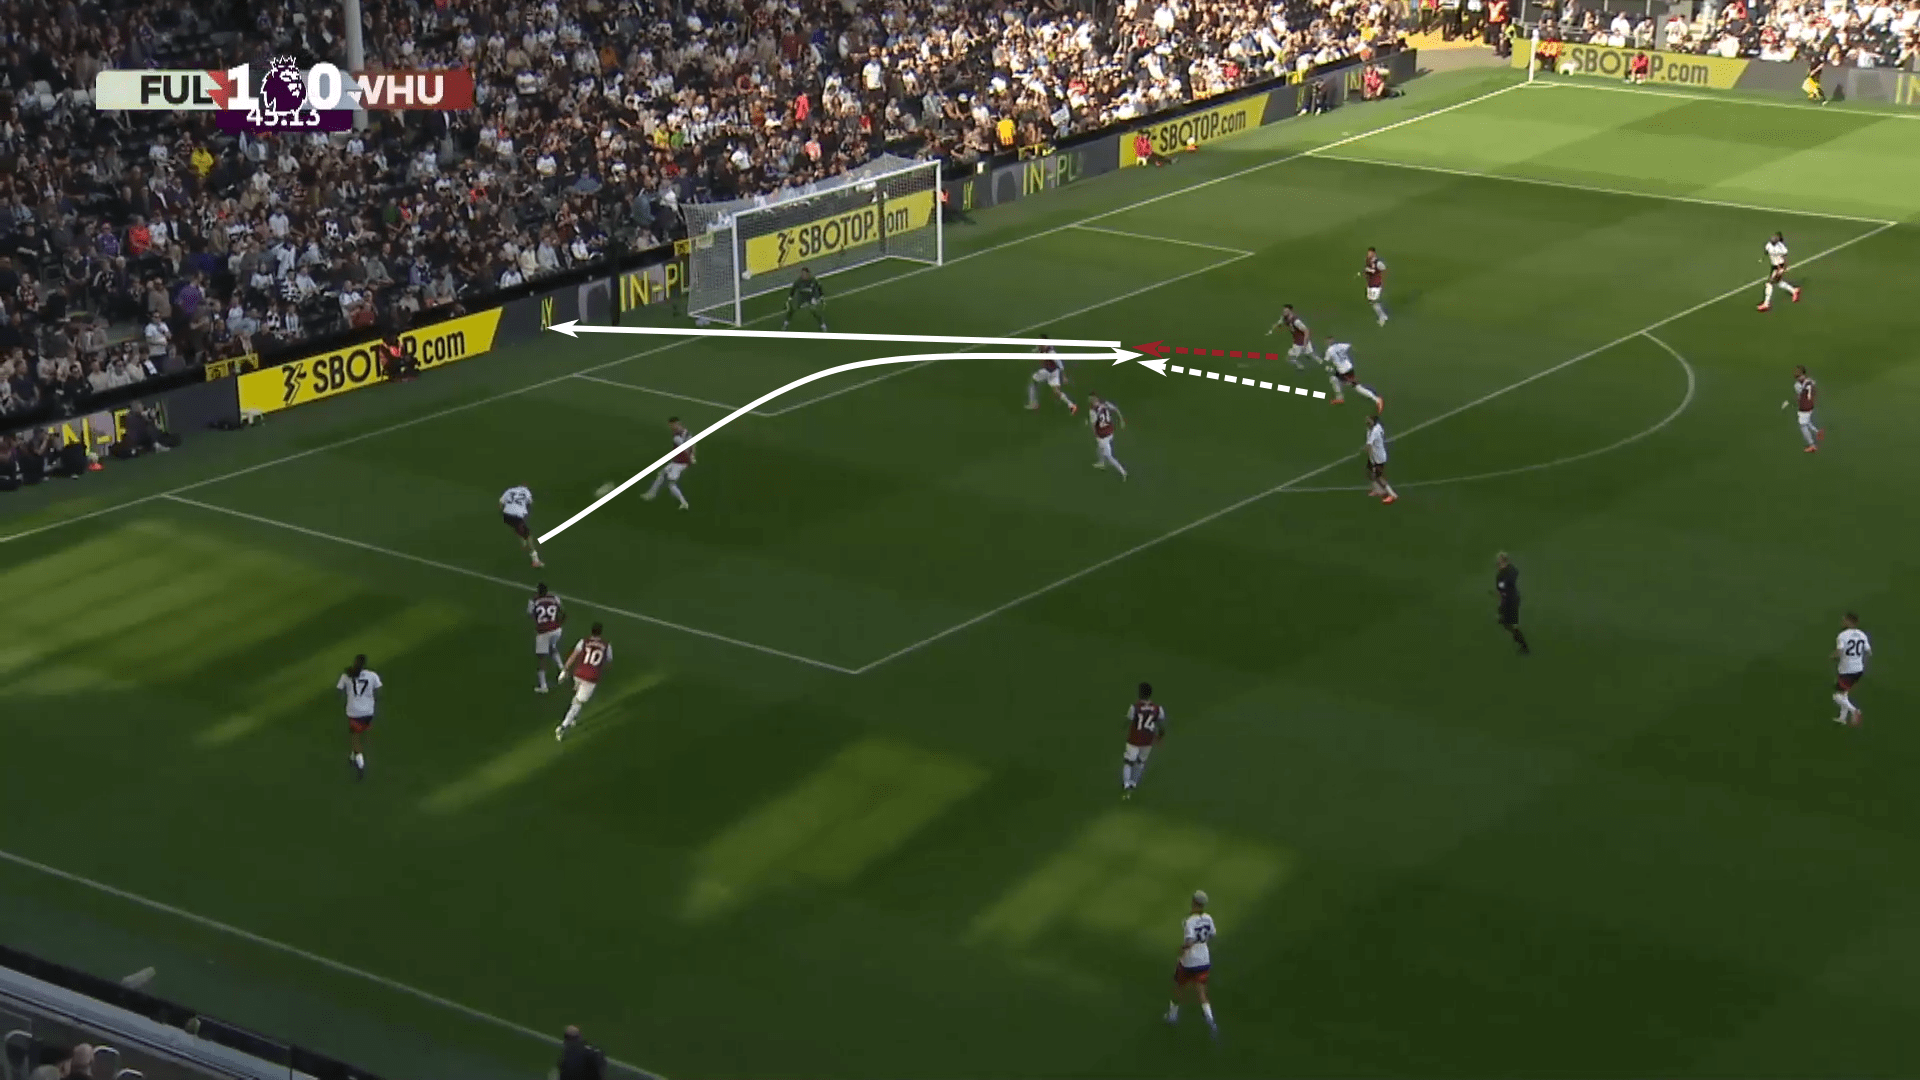
To succeed in the wings, either a great enough advantage to progress through that channel is needed, or the threat posed by the numbers in the wings must create an opportunity to attack elsewhere.
On that second point, overloading in the wing creates a numeric imbalance that opponents must respond to.
If the opponent responds, then the wing attack creates opportunities to attack elsewhere.
In other words, draw the opponent to the left to play in the centre or right.
If the opponent does not bring enough numbers or does not have the quality to defend against the threat posed, then attacking through that same wing is the best solution.
Lyon gives us that example.
Even though the opponent moves enough players to their right to contain the situation, the lack of pressure on the ball runs from the highest players to drive the backline towards their goal, and free players within the press give Lyon the conditions to continue attacking through the wing.
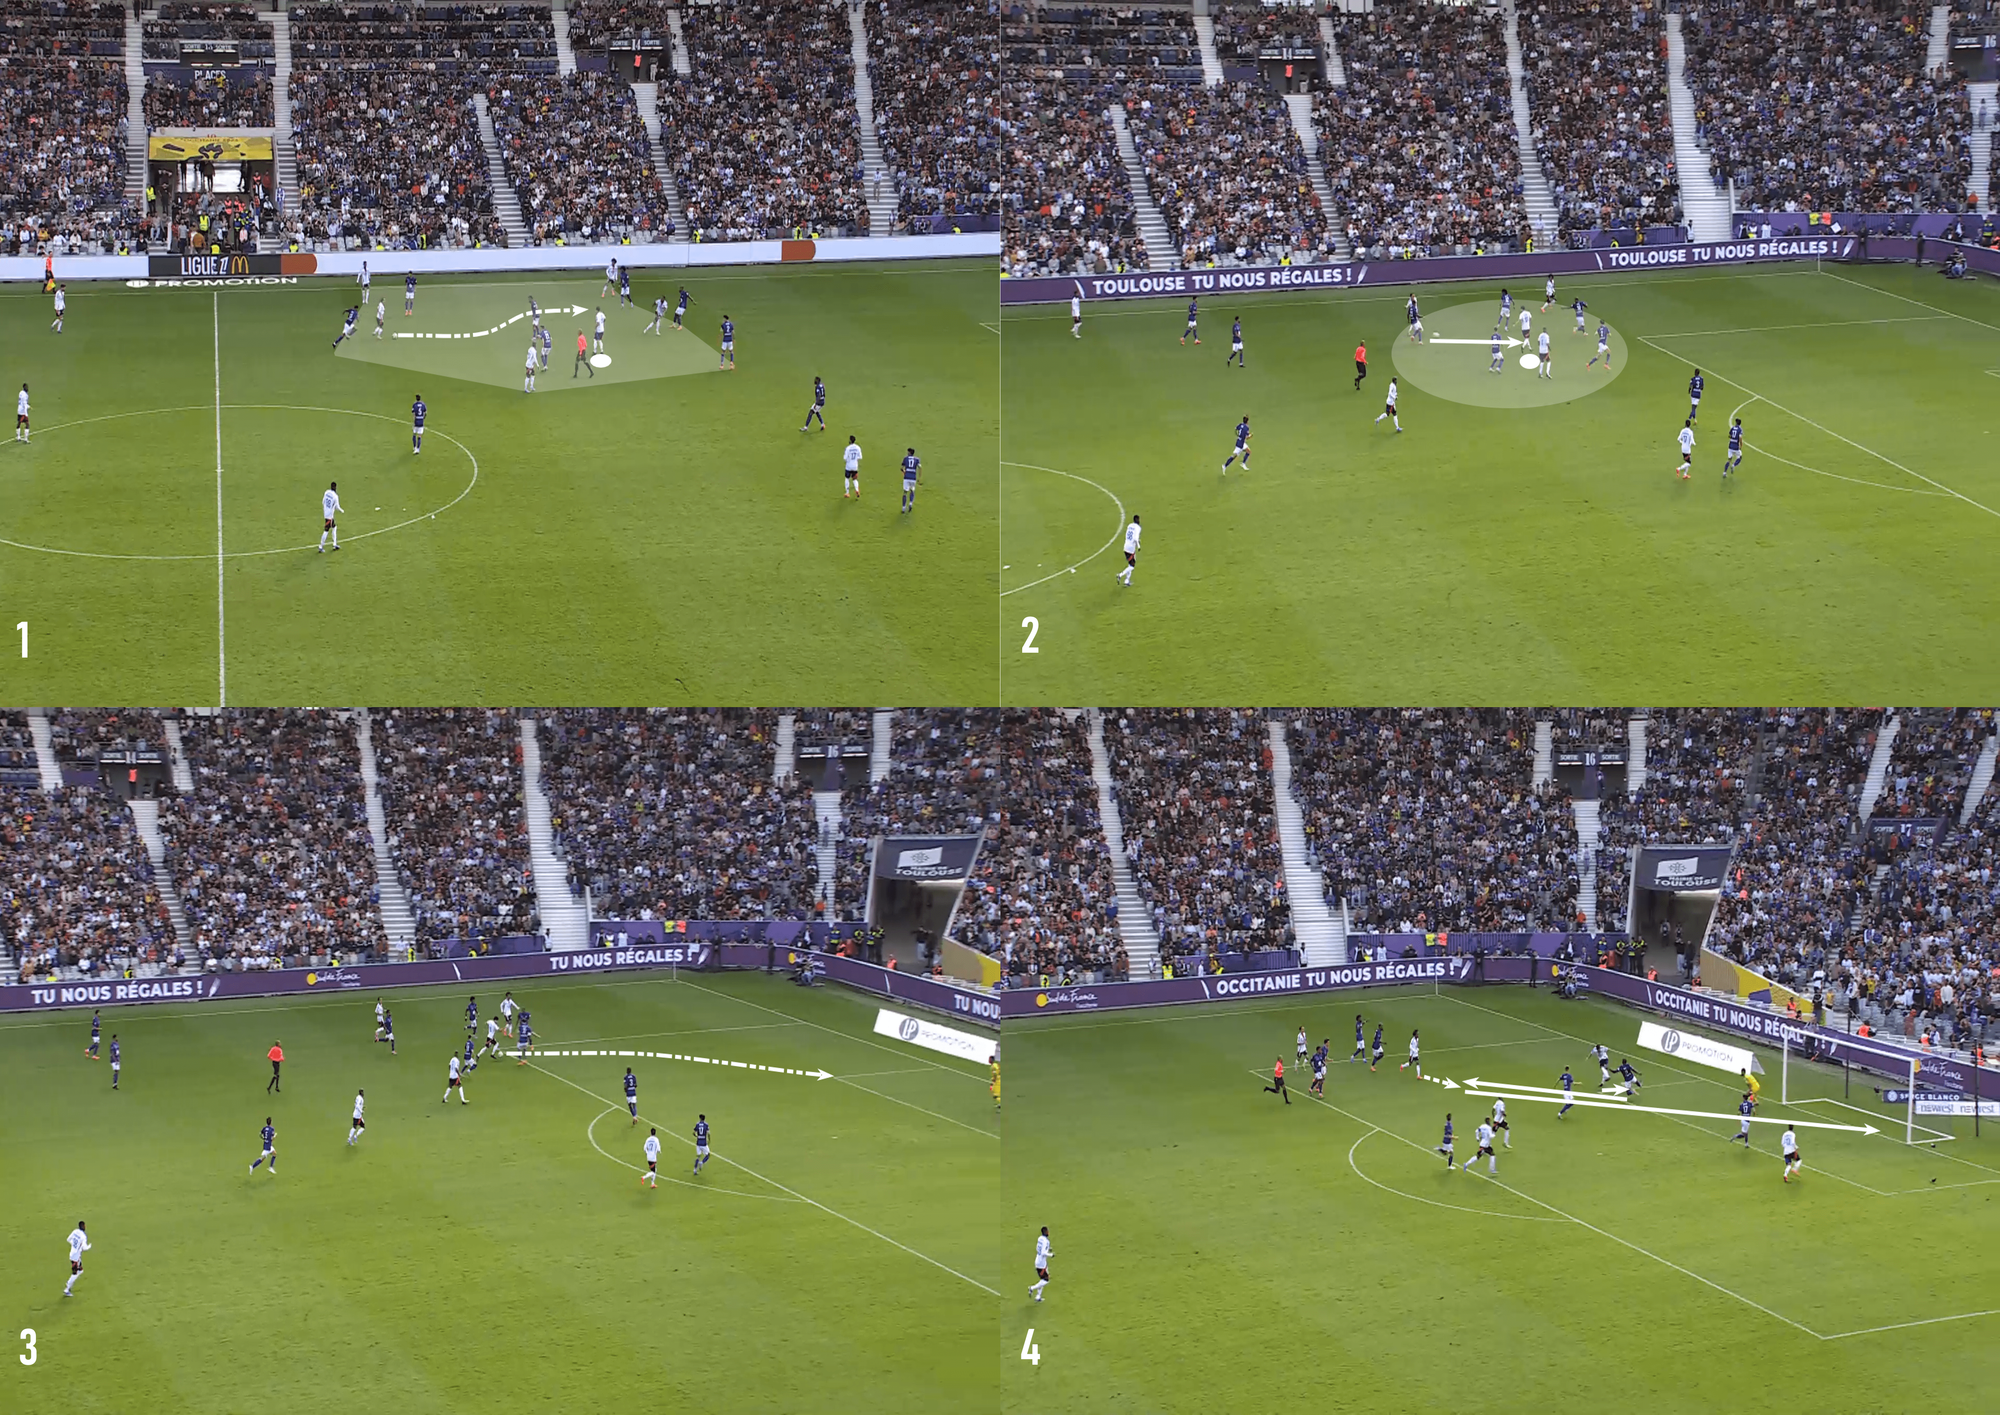
The free player between the lines and some final-third creativity give Lyon the breakthrough moment.
They pushed into the box and created two quality opportunities, the second finding the back of the net.
Lazio Vs Porto
Lazio gives us an alternative example.
While Porto is admittedly sitting deeper to preserve the away draw in the Europa League, Lazio used a 4v3 on the left wing to create a pocket of space centrally.
As that central space opened up, they attacked it and used it to complete the switch of play.
As a result, Porto’s press was constantly chasing, always a second or two behind the play.
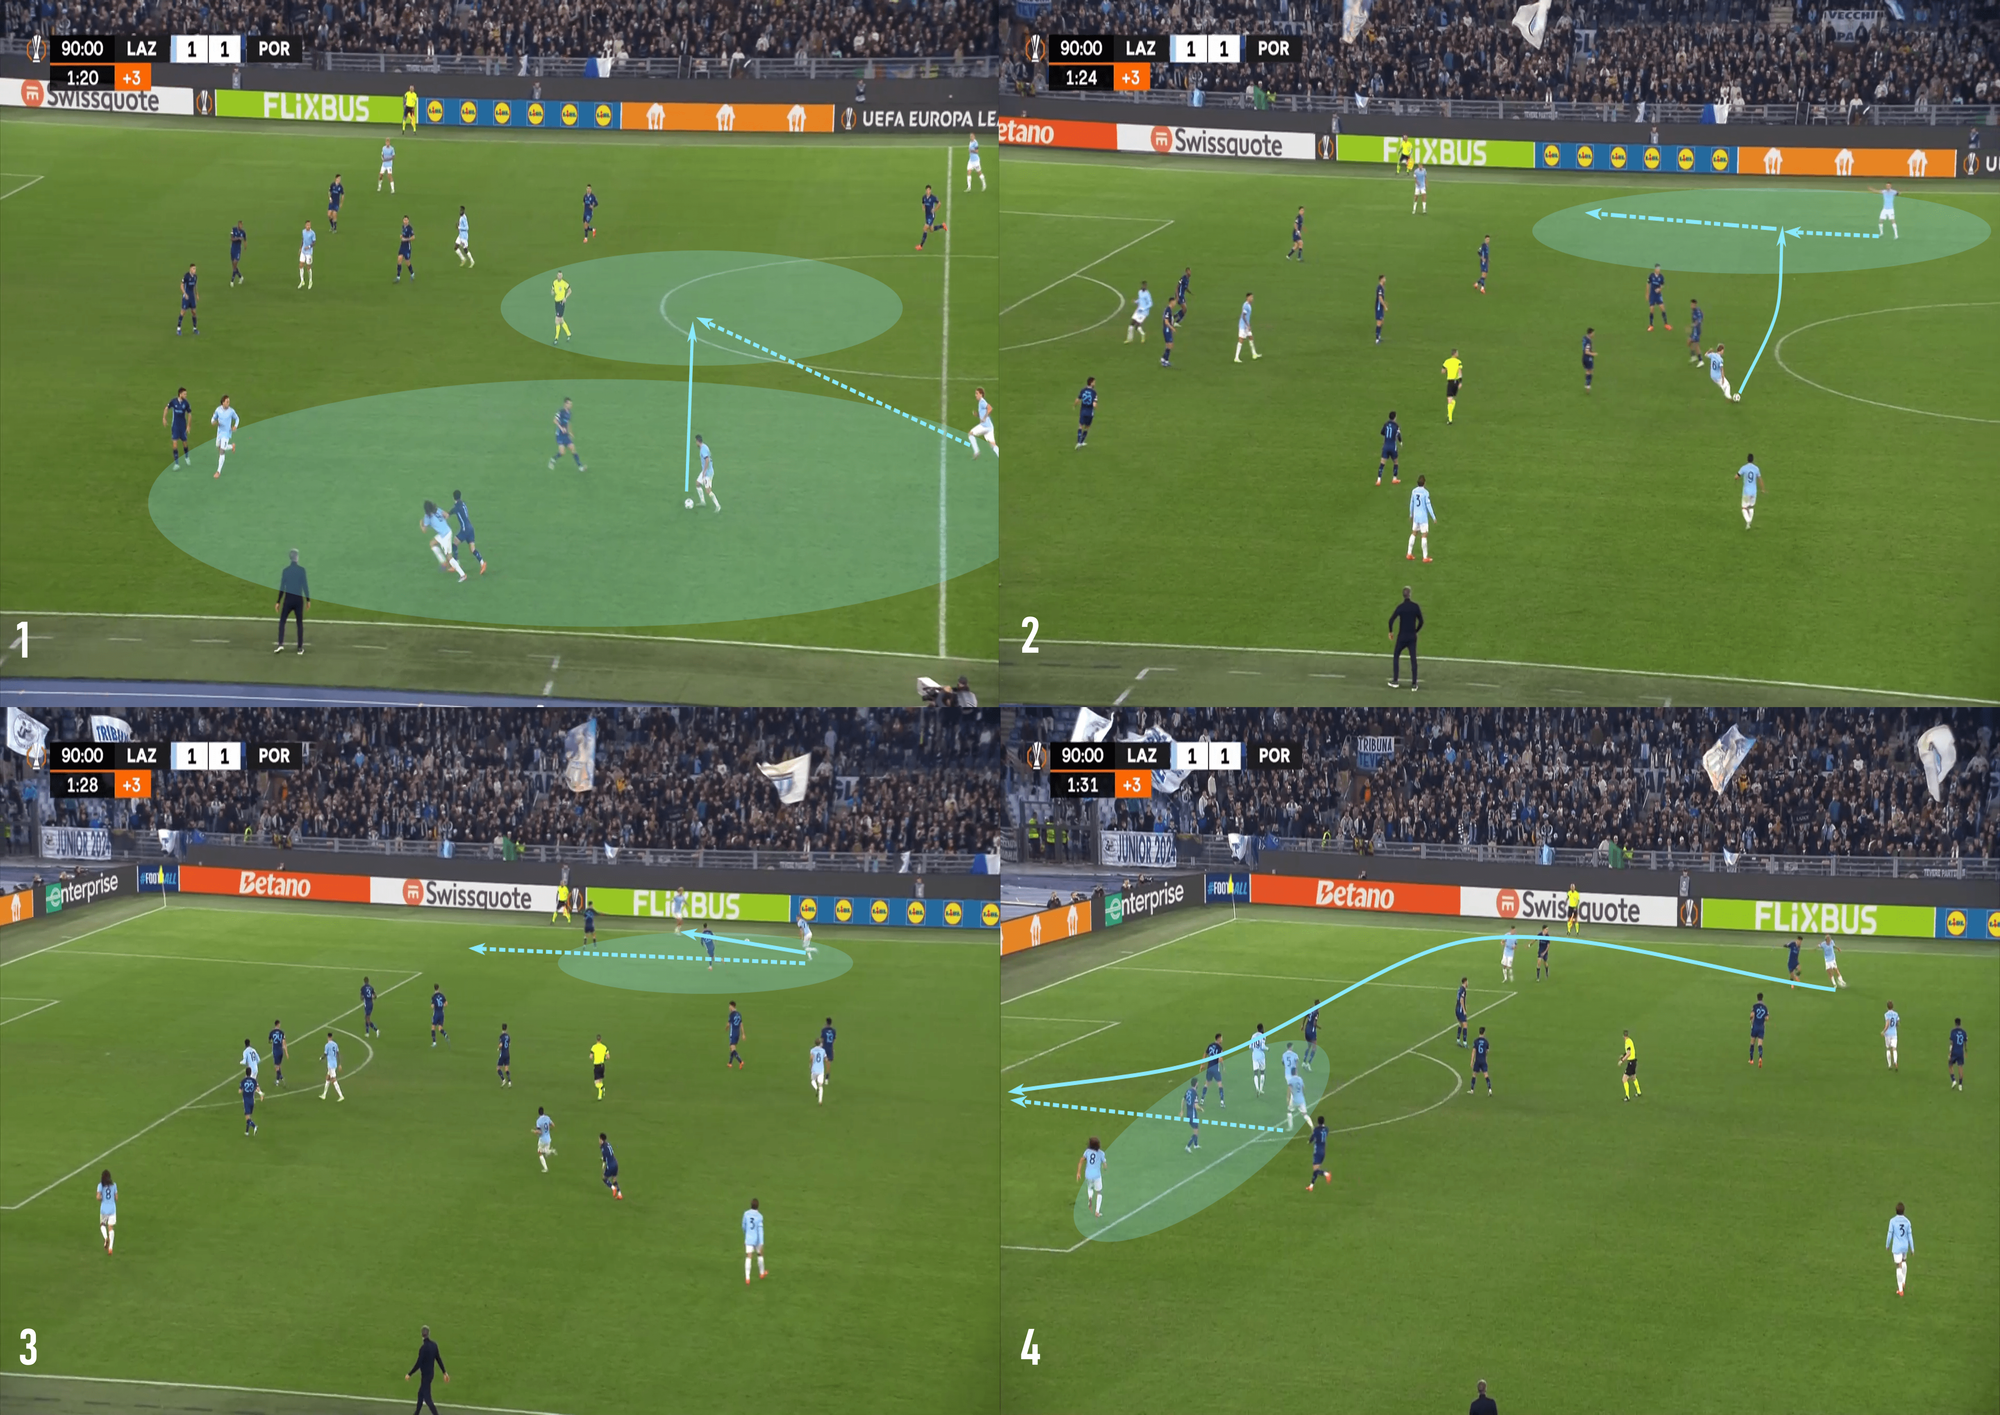
As they pushed numbers to Lazio’s right wing to apply pressure, the Italian side used Porto’s wide-moving momentum against them, cutting inside and sending an early cross.
There is some fortune to this sequence as the ball skips through the box onto Pedro’s foot, but we can also see the impact of the ball movement on the Porto press.
As the ball shifts from side to side, the press loses its shape, and the backline loses the support it needs.
That lack of cover is coupled with Lazio moving additional numbers into high, central positions in preparation for the early cross.
Switching the point of attack from one wing to the other disorganized Porto and created the opportunity to attack the box with a numeric advantage.
The end of the sequence comes centrally, but it’s created by Lazio’s wing play.
Attacking Accelerations
The most common attacking theme in high xG shooting opportunities was a shift in attacking tempo.
Teams would use low-tempo ball circulation, particularly in the middle third of the pitch, to move the opponent’s block and extend the distance between their lines.
As gaps emerged within the press or there was an opportunity to play behind, these teams claimed their moment for an attacking acceleration.
That shift from a slower ball circulation with minimal, if any, progression of the pitch to a pace that quickly advances towards the opponent’s goal had quite an impact on opponents.
In most cases, the low-tempo circulation lulled the opponents into a state of ease.
Shifting to an up-tempo, more direct attack threw the opponents into a state of chaos.
They started the sequences behind the play and were constantly reacting and chasing until the shots were taken.
Brentford Vs Tottenham
Starting in the EPL, Brentford gives us a great example against Tottenham.
With Spurs situated in a mid-block, Brentford moved the ball through their left wing, passing in a triangular shape.
Once they had a player on the ball facing forward and Tottenham’s highline lost track of runners, Brentford played over the top.
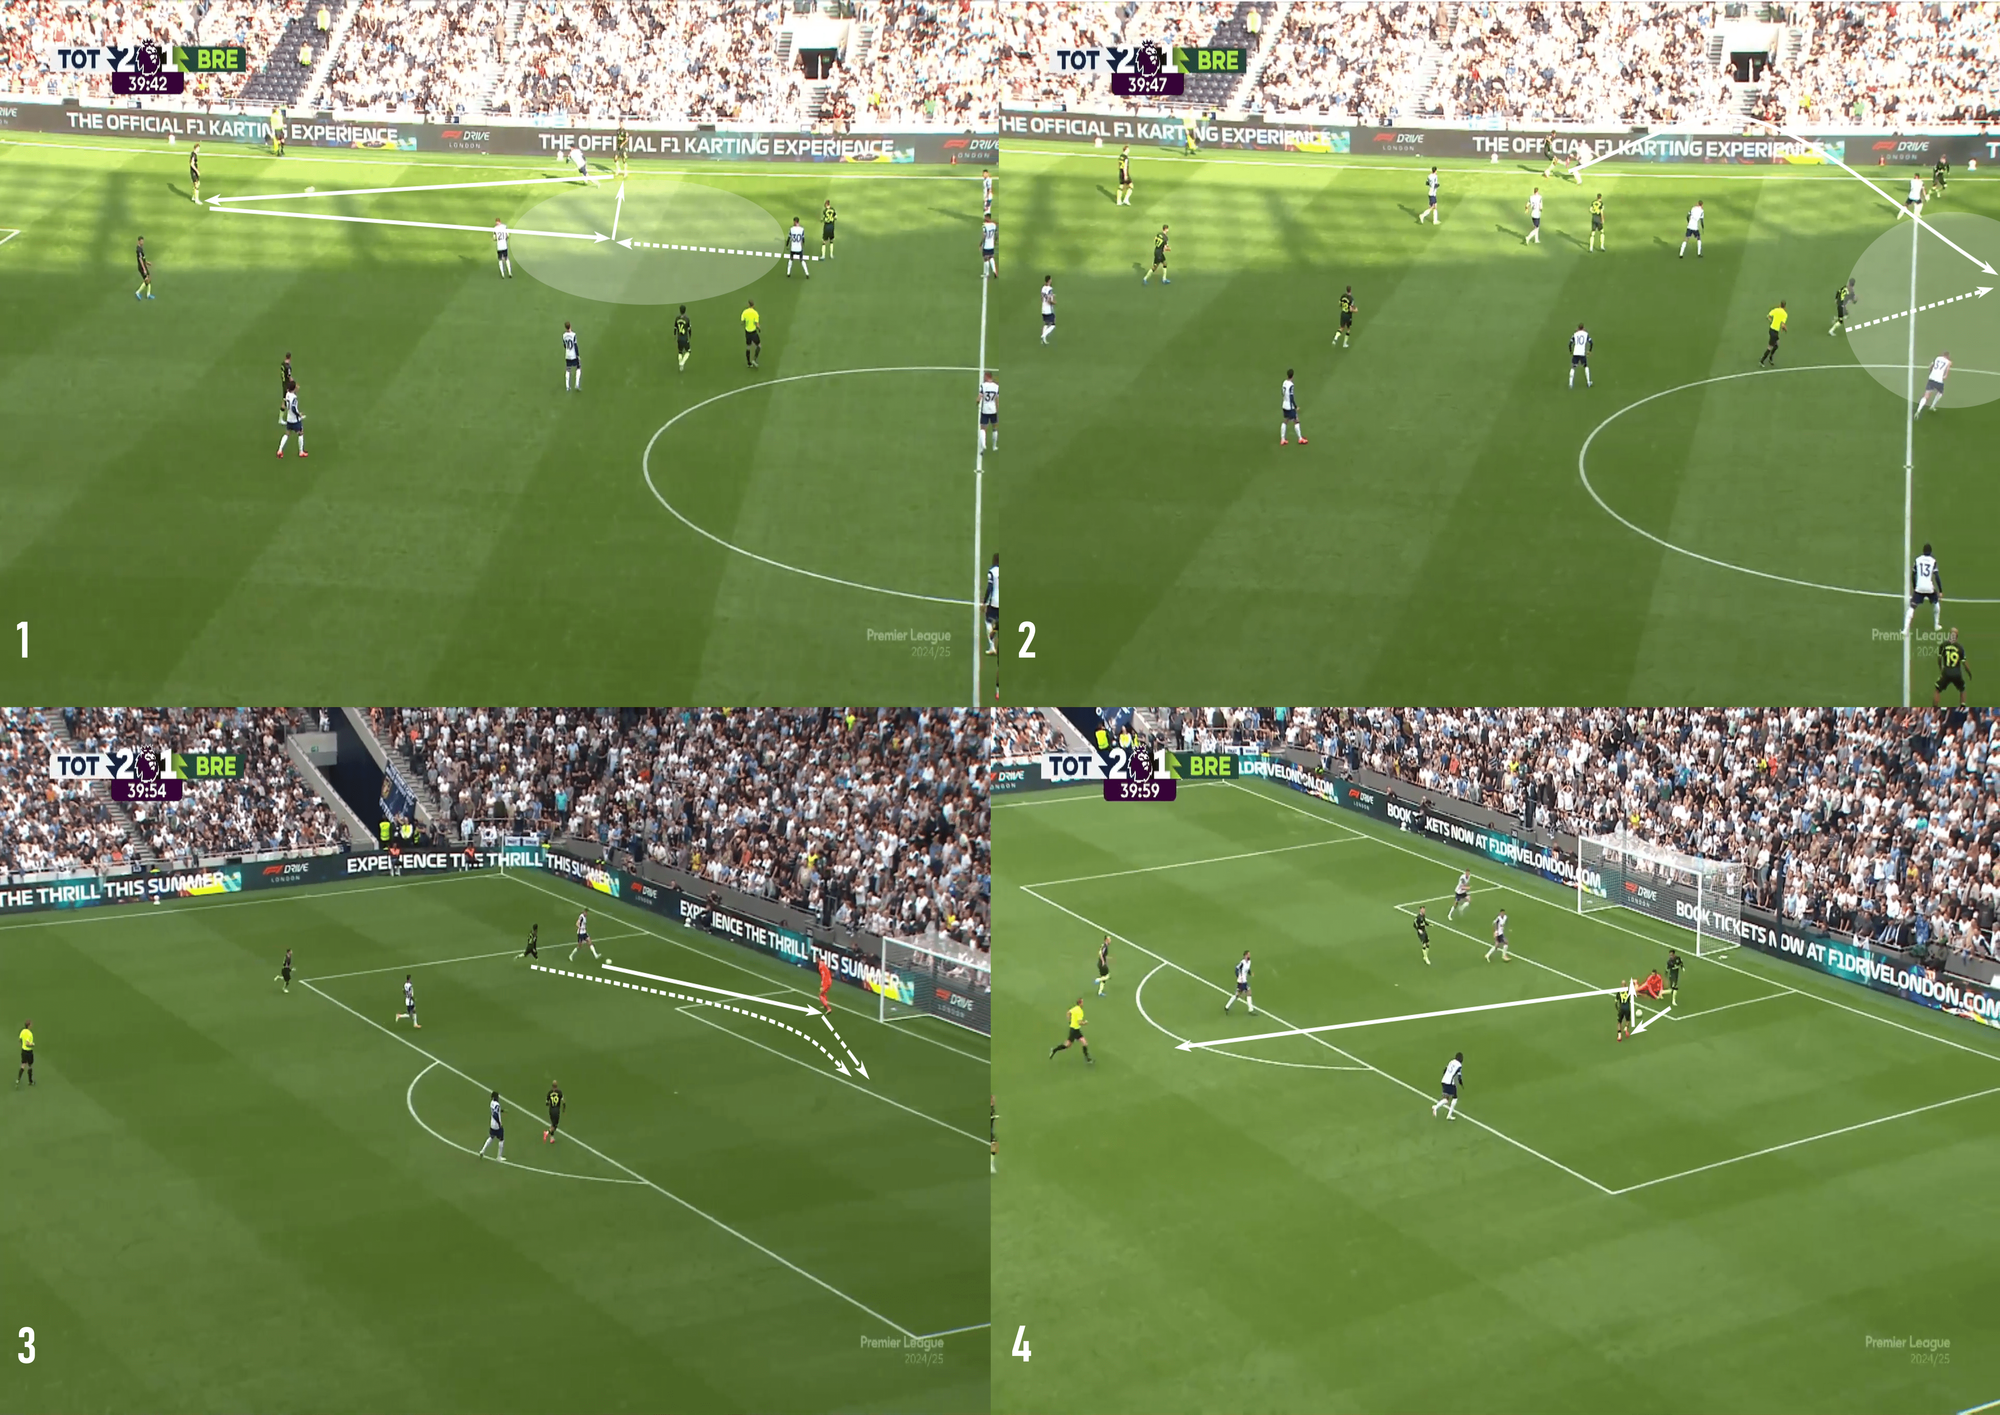
Spurs actually won the ball and played it back to their goalkeeper, but Brentford doesn’t give up once the low-risk, high-reward pass is intercepted.
Instead, they quickly counterpressed and applied pressure on the goalkeeper, taking the ball off of him.
A phenomenal save kept the shot in the image labelled “4” out of the net, but it’s the kind of high-quality chance Brentford was after once they played behind and chased the ball.
However, not each of these attacking accelerations followed the low-risk-high-reward model.
AC Milan Vs Lazio
Up against AC Milan, Lazio gave us an example of a precise acceleration against an organized mid-block.
Initially, the space available was in the wings.
As the ball was moved into the left wing, the Lazio player cut inside to find additional room to operate in the half-space.
As he moved inside, his teammate ahead of him moved wider, opening a gap in the Milan backline.
That’s when a precise through ball was played.
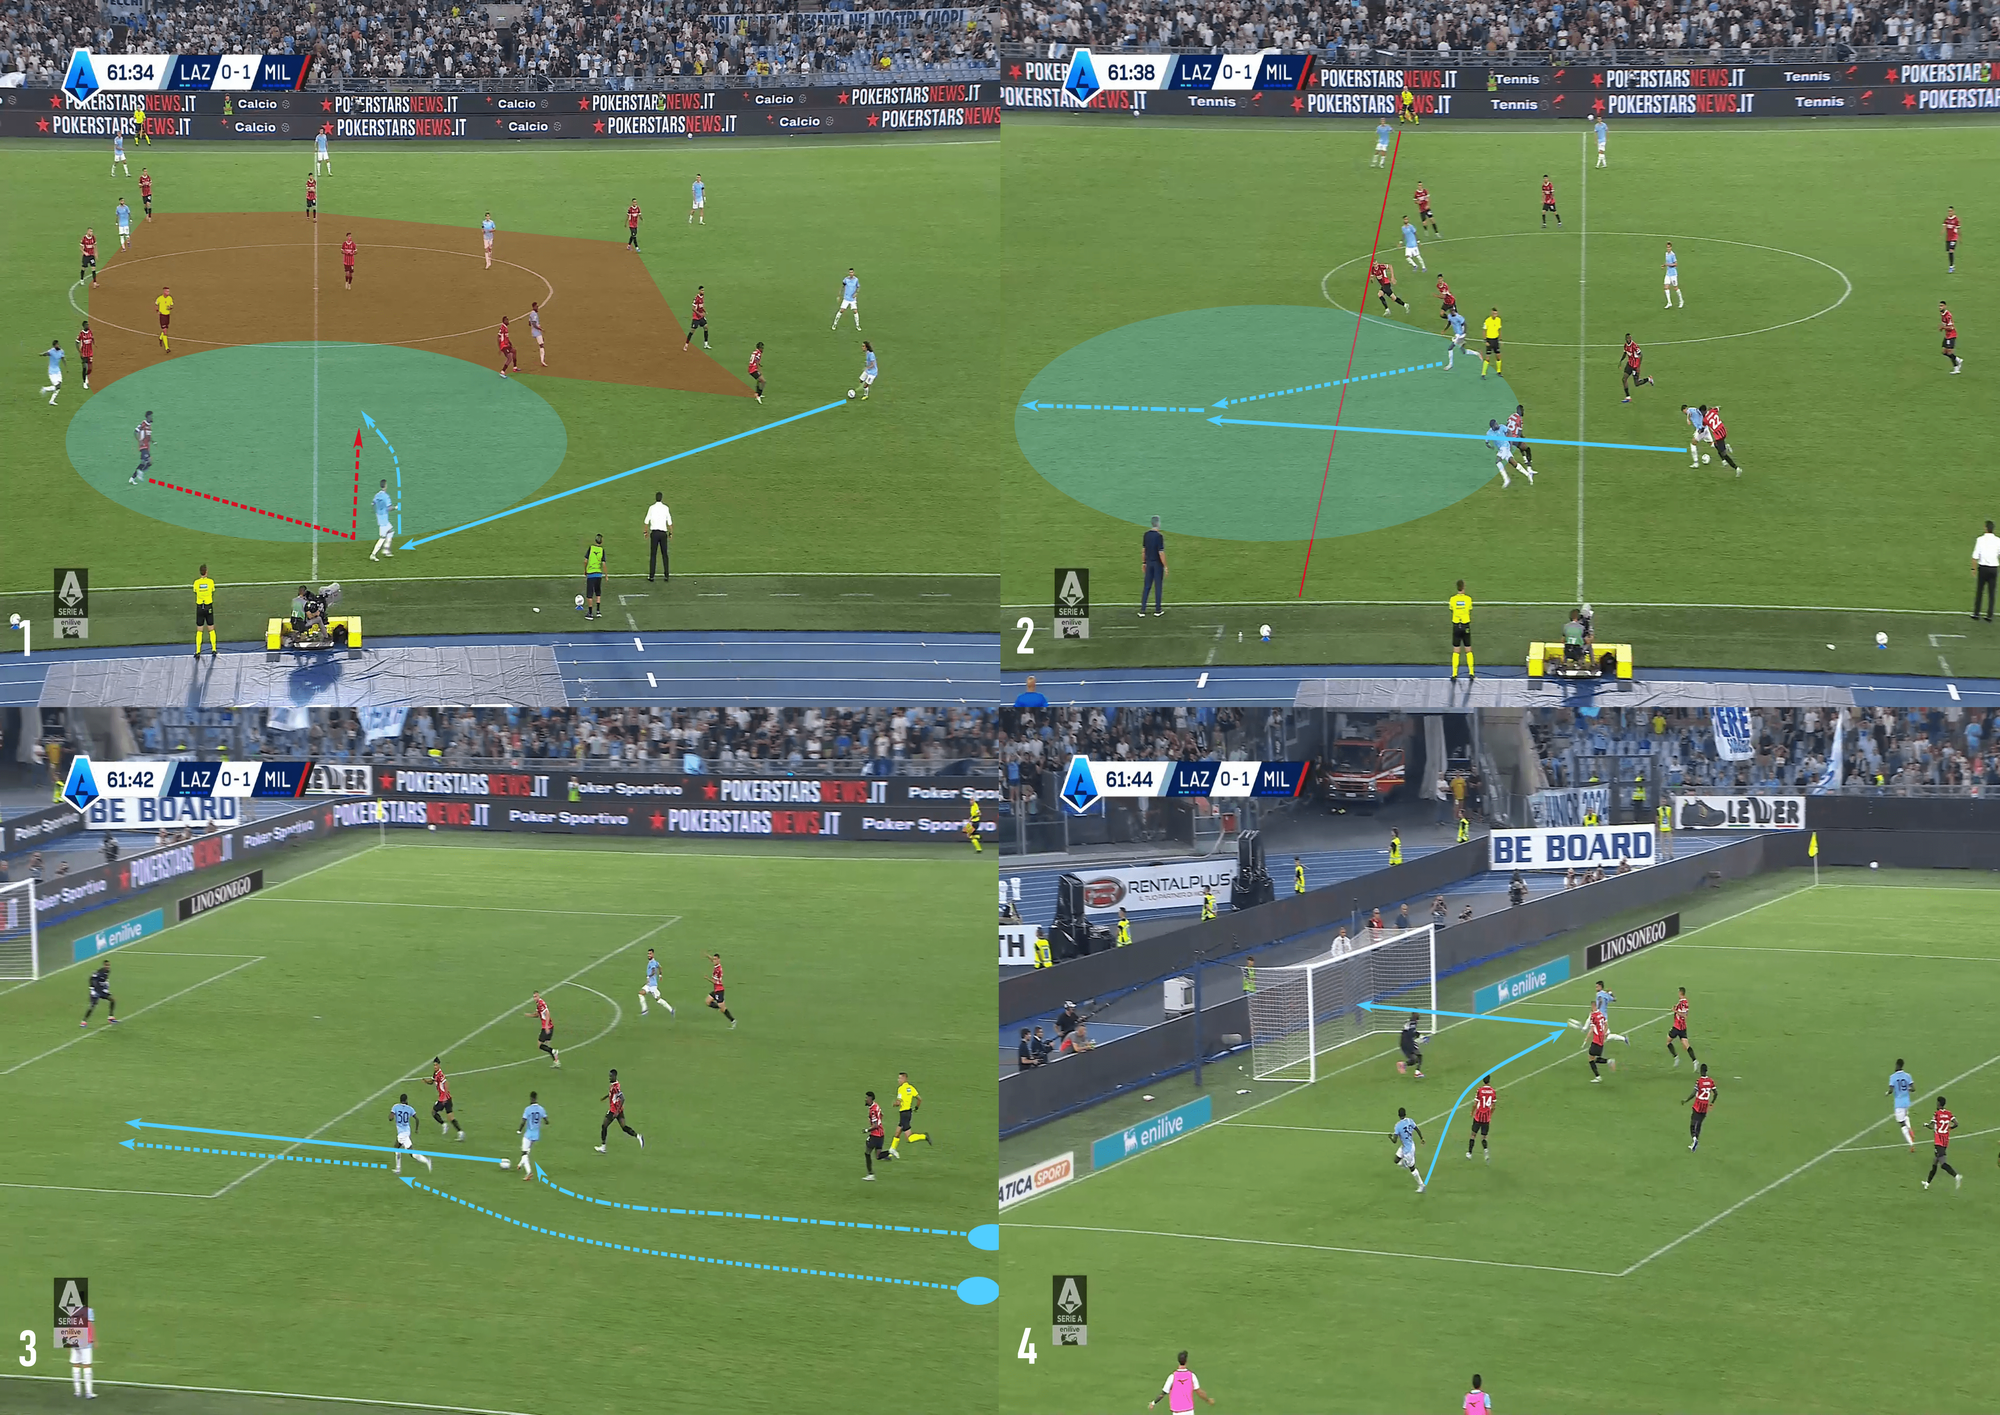
Lazio created a 2v1 to enter the Milan box and hit a forceful service into the 6-yard box that was redirected in.
One of the key ideas at play here is the acceleration started with the free player in the wing.
Space was initially wide, yet he knew he could signal a shift in attacking tempo by cutting inside and starting a dynamic positional rotation.
That rotation created the moment of disarray Lazio was looking for.
Once the Milan lines were unsettled, Lazio was quick to play forward.
The wings played a prominent role in attacking accelerations.
In most cases, this is where the free player was positioned.
Once he got on the ball, this selection of teams did well to create from the wings by cutting to the inside or attacking through that same wing.
Below, Lyon saw their opportunity for a 1v1 in the wing and took it.
One key point is that they are well positioned to take a risk wide in the middle third.
Should they lose possession, they have numbers behind the ball and are well-positioned centrally.
They did win the 1v1 duel, forcing the opponents to bring additional numbers into the wings to try to contain the threat.
As that happened, the players behind the ball retreated into a single line with three in the wing and three centrally.
With three opponents moving into the wing, the next pass must go forward into the large shaded area in the second image.
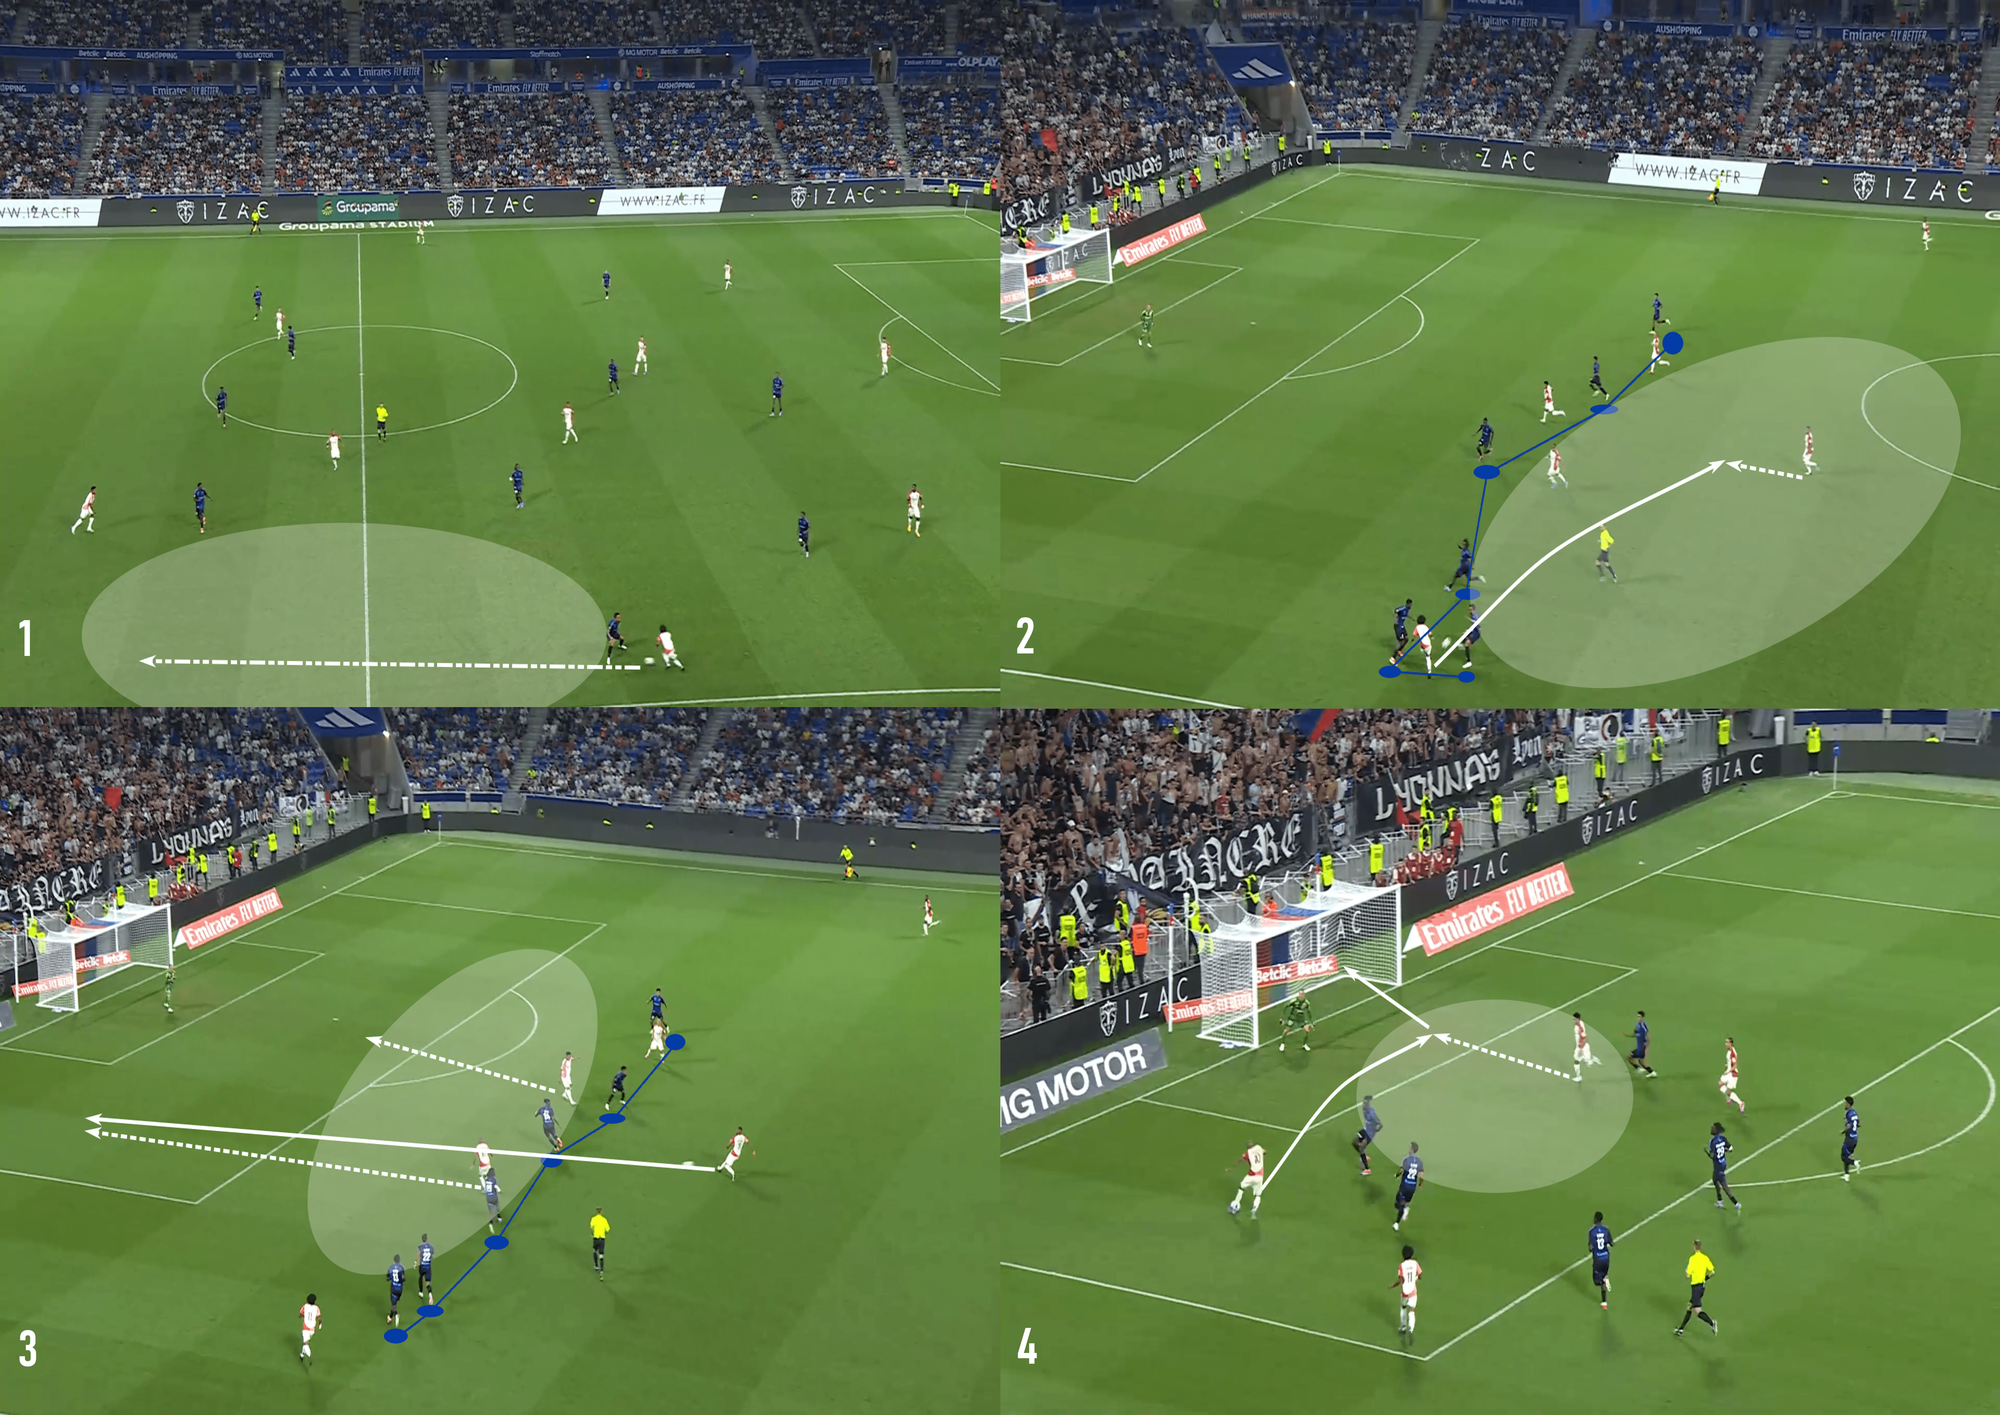
With a player on the ball, facing forward, and running at the backline, Lyon’s highest players were well-positioned to offer vertical runs.
They offered, and the through ball was played, leading to a box entry and a finish from inside the six-yard box.
Chelsea Vs Liverpool
Finally, Chelsea’s goal against Liverpool started with the same out-to-in movement, but we see some difference as we note the subsequent steps.
As the ball was played wide, Chelsea had three players centrally.
As the winger cut inside, the nearest central midfielder offered a diagonal run into the left half-space, leaving the centre of the pitch for the remaining midfielder.
That shaded area in image 2 put him on the ball in a forward-facing position in the middle of the Liverpool block.
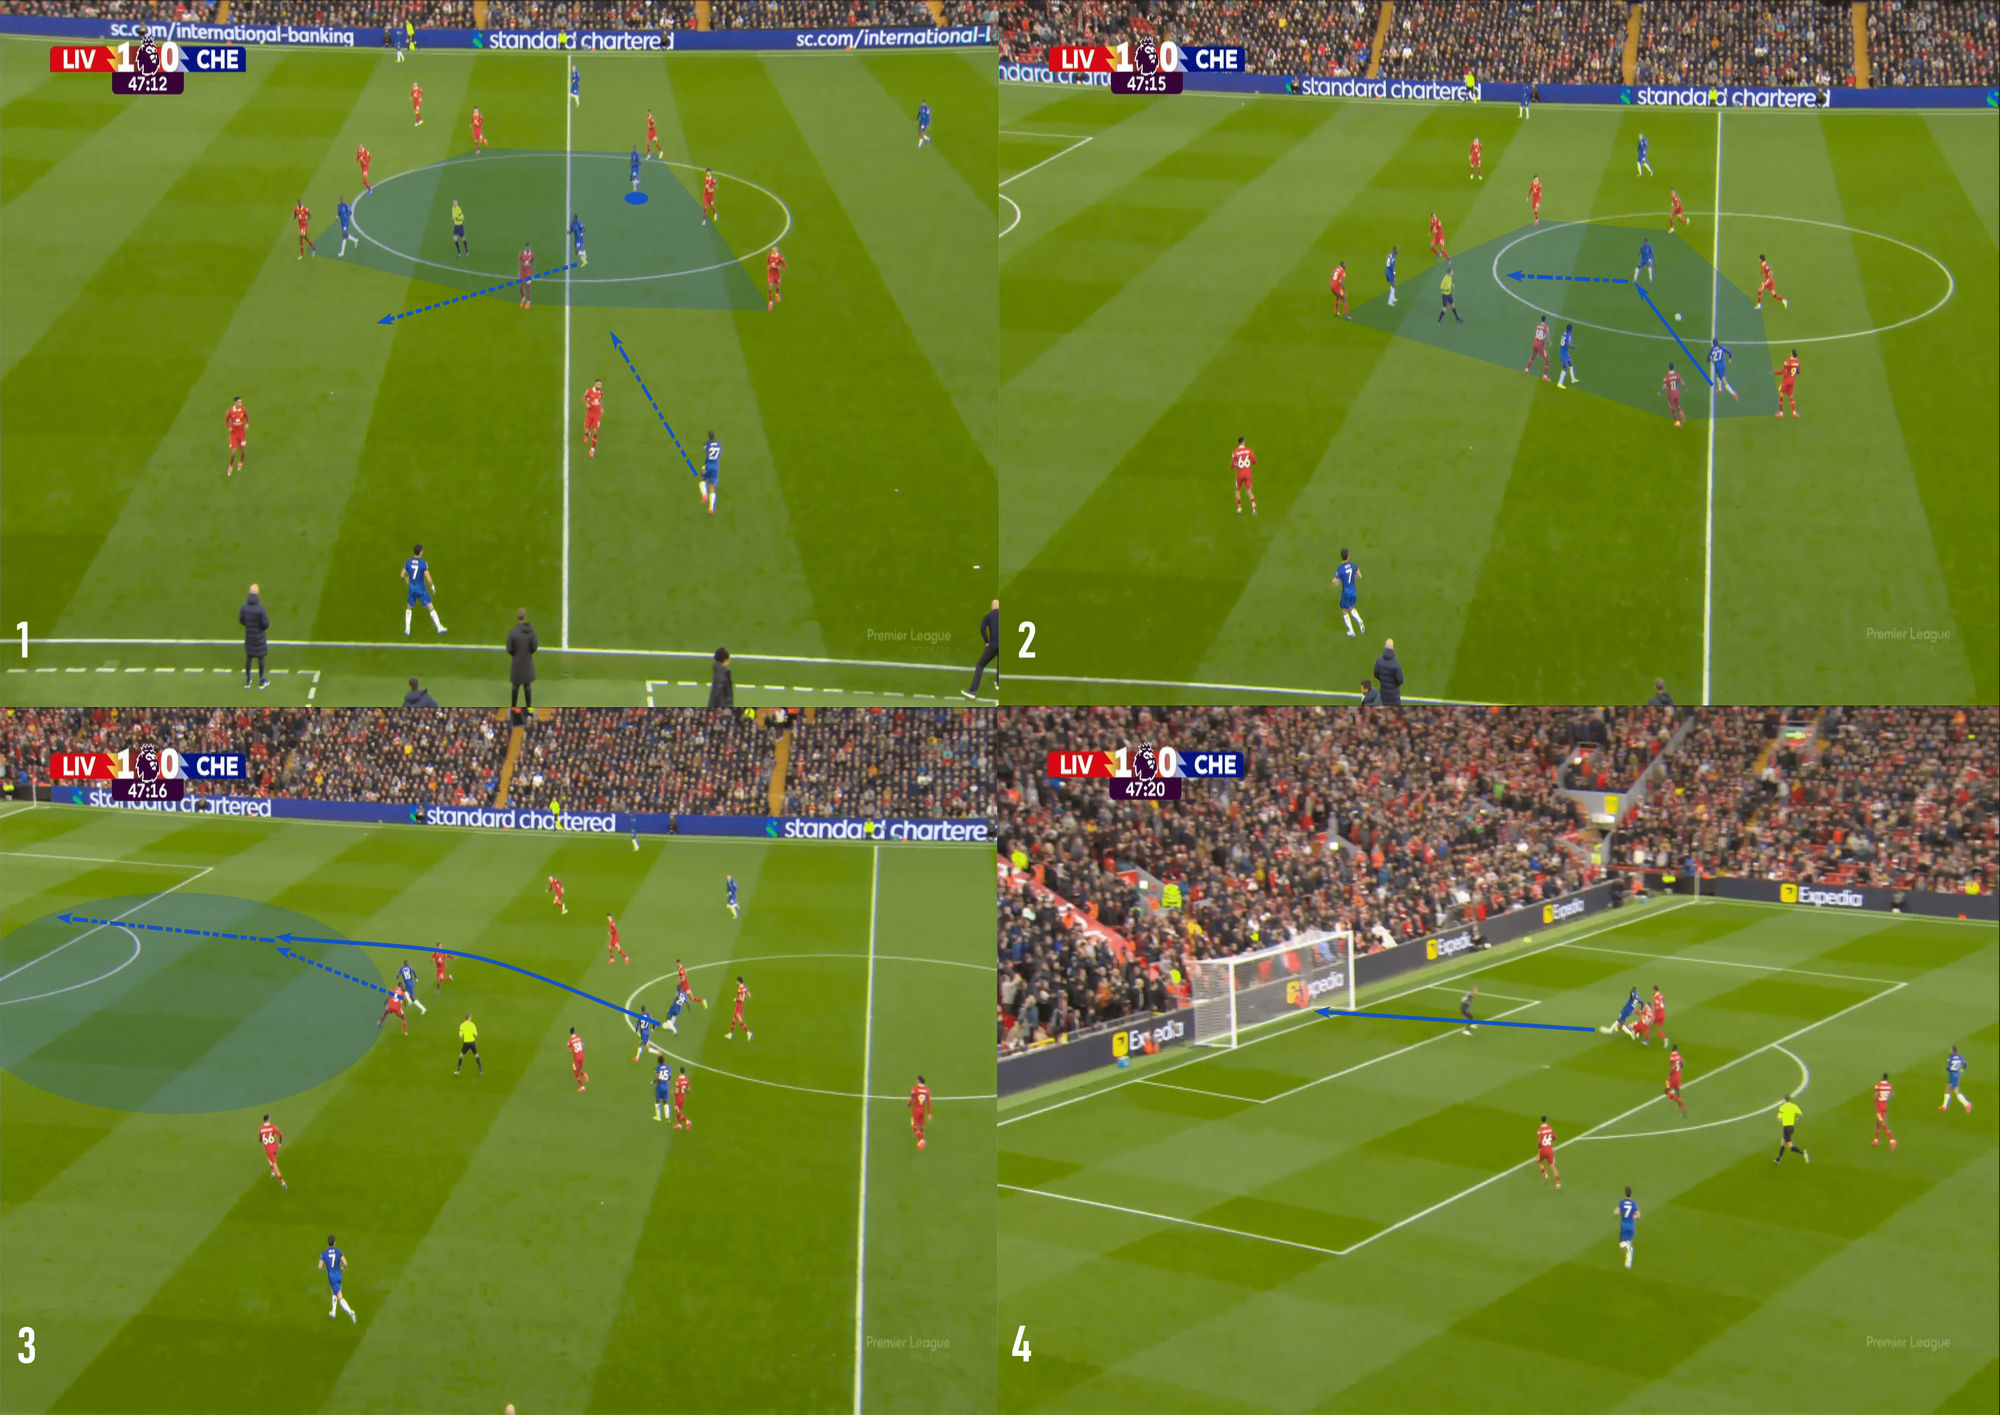
Again, those body orientation cues signalled the highest players to start their runs.
Jackson saw his opportunity and was played behind the backline.
He slid the ball past Alisson for the tying goal.
Looking through each of these examples, the ball into the wing served as a cue for a more dynamic set of actions.
Whether a 1v1, pass through that same wing, or even cutting inside to create a dynamic positional rotation, the creativity and attacking quality of the wide players served a crucial role in signalling the attacking acceleration.
Once the team found itself with the first attacker in a forward-facing position and runners attacking space in front of him, these teams were willing to take a chance on the low-risk, high-reward, more direct pass.
Once they were in a position to progress up the pitch quickly, they routinely took it.
Conclusion
The clubs in this analysis may not have the same level of possession dominance as the ones covered two weeks ago.
Still, they certainly can match the calibre of the shooting opportunities created by those other teams.
While there were some common themes in the way possession-dominant and more balanced teams created high xG shots through their defensive tactics, we did get a sense of how the more balanced teams found value in the wings and through attacking accelerations.
Even with those attacking accelerations, wing play was important to each of these teams.
For one, that’s where they routinely created space to attack.
The second point is that there is less risk of losing the ball in the wings than in more central regions of the pitch.
Finally, given the space available on the wings, it’s a natural location to shift the tempo of the attack.
The goal is to take space while it’s readily available.
These teams have given us a new way to look at chance creation, particularly from the middle third.
That’s often where these sequences started.
Whether the attacks start in the final third or the middle third, the objective is the same… create high-quality goal-scoring opportunities and put the ball in the back of the net.




Comments