It is no secret that Serie A has played host to some incredible games this season, and this tie between Torino and Sassuolo was no exception. The home side prevailed in a 3-2 win that required a monumental fightback in the final moments of the game after being 2-0 for much of the game. A win was vital for the hosts, who are currently fighting to retain their status as a Serie A club, while Sassuolo are unlikely to close the gap and qualify for the Europa League this campaign. Torino will fancy their chances at survival, especially after this win – and even more so when you consider they have a game in hand on the teams around them. They will definitely want to carry their second-half performance into tough fixtures like the upcoming one against Juventus on April 3rd.
This tactical analysis will put a scope on how Sassuolo were able to take a seemingly healthy 2-0 lead in the first half and how Torino’s efforts were in vain for the first 77 minutes. There will also be an analysis of the four tactical switches deployed by the home side that allowed them to execute such a comeback and take all three points – defending more efficiently in wide areas, pressing with higher intensity in the right areas, committing more players forward in attack with a clear purpose and plan, and finally – the introduction of Simone Zaza.
Lineups
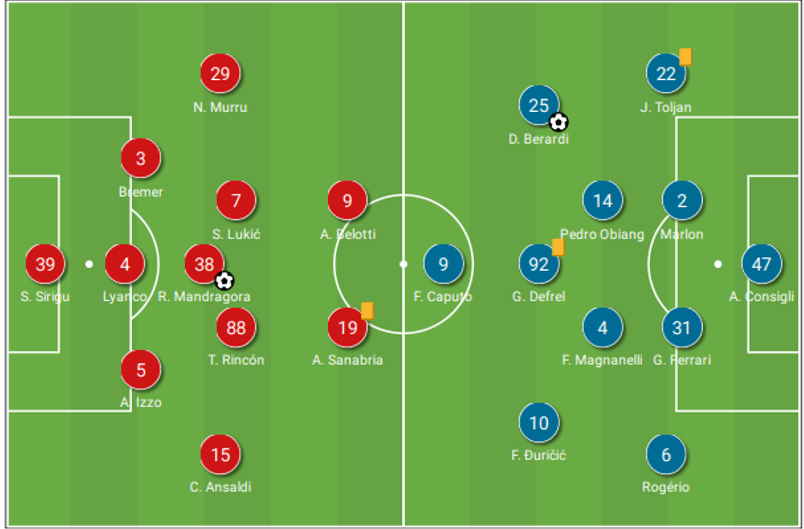
It is difficult to believe that Torino find themselves so far down the table when you consider some of the talent they have at their disposal. Experienced goalkeeper Salvatore Sirigu, wing-back Cristian Ansaldi, and forward Andrea Belotti for example, who all started this fixture. Belotti was partnered up front with Antonio Sanabria in their 5-3-2 formation. The midfield consisted of Tomás Rincón, Rolando Mondragora and Saša Lukić, with wide support from Cristian Ansaldi and Nicola Murru at wing-back positions. The central back three involved Armando Izzo, Lyanco, and Gleison Bremer. Simone Zaza was one of five substitutions used and had an immense impact, scoring twice.
Visitors Sassuolo lined up in their familiar 4-2-3-1 shape, with Francesco Caputo leading the line. Behind him, support came in the form of Grégoire Defrel through the middle – Domenico Berardi and Filip Đuričić out wide. Former Premier League midfielder Pedro Obiang lined up in a deep midfield role alongside Franceso Magnanelli. Sassuolo’s back four from left to right was Rogério, Gian Marco Ferrari, Marlon, and Jeremy Toljan; Andrea Consigli between the sticks.
How Sassuolo took a 2-0 lead
From the get-go, Sassuolo looked to dominate the ball, with their formation and the player roles they were assigned allowing them to play with a high & wide shape. This forced Torino’s wide midfielders to drop deeper, almost as full-backs, allowing Sassuolo more space to build in wide areas in the midfield third.
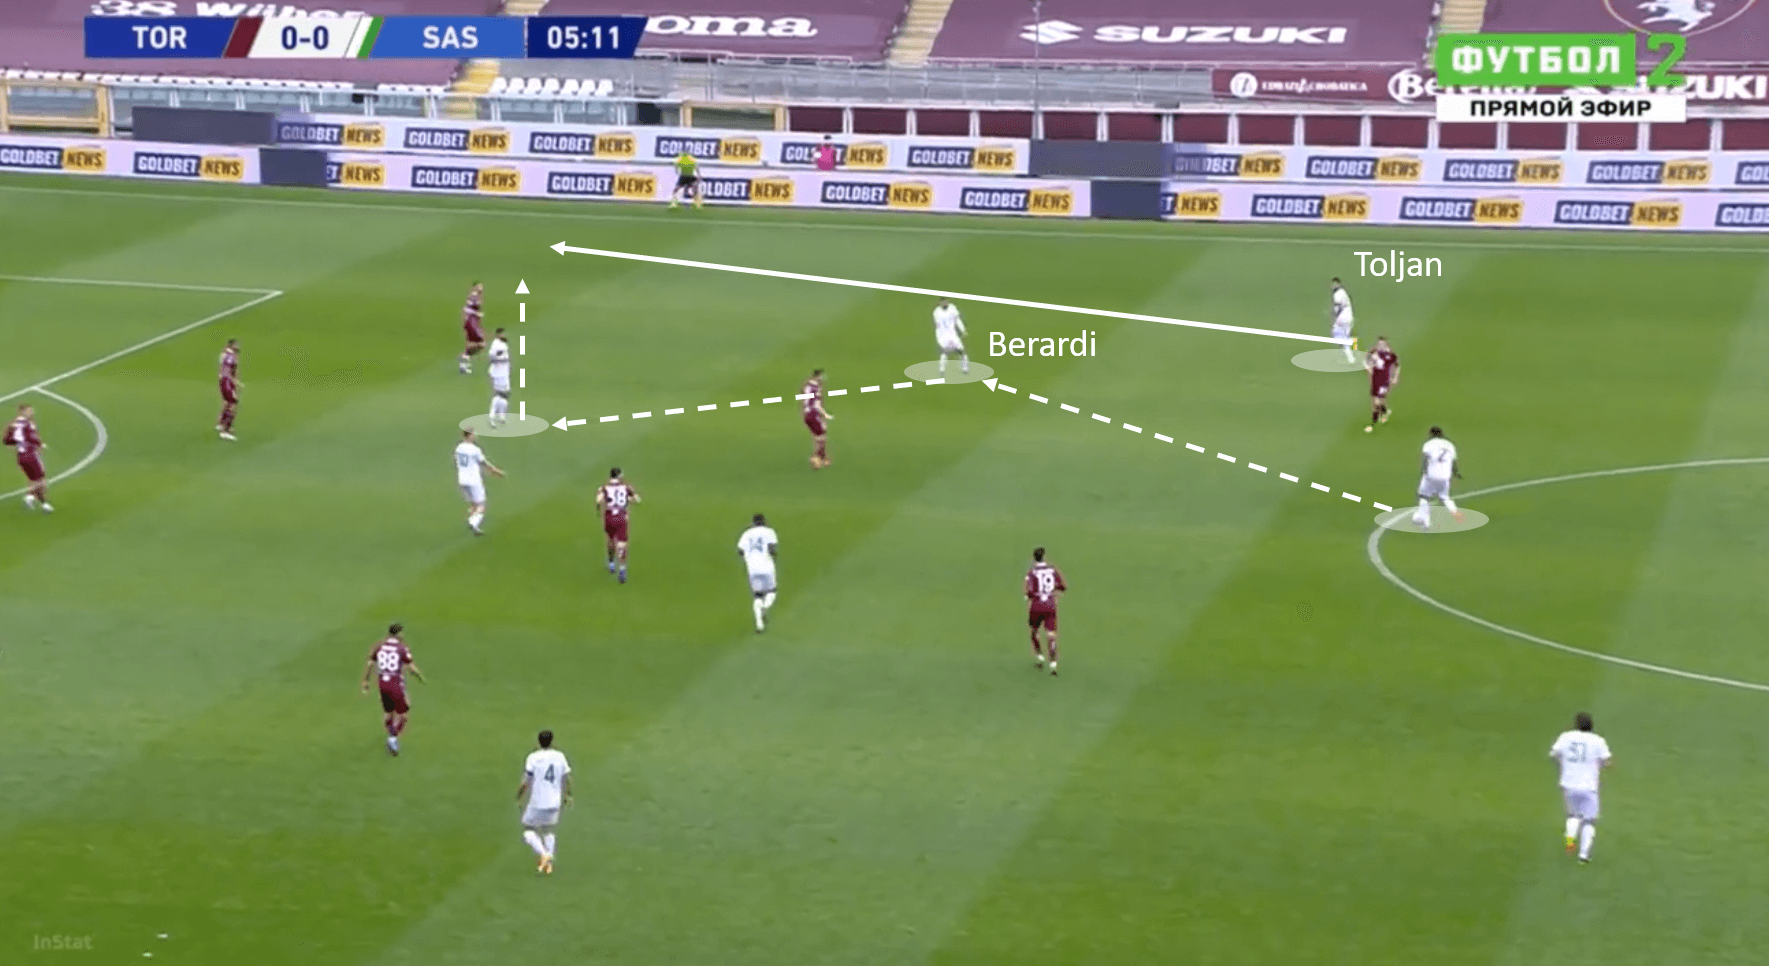
The image above shows exactly that – Torino having to retreat and drop a little deeper while also defending narrowly, allowing Sassuolo to exploit the wide areas. After receiving the ball from Marlon, Berardi had a couple of options around him, and his first touch and body shape indicated an attacking intent. With right-back Toljan making an overlapping run down the right flank, Berardi played the ball into Defrel, allowing Toljan to take up a higher position before receiving the ball. From there, some intricate combination play allowed Sassuolo into the box before Berardi finished off the attack he helped build, with a venomous half-volley.
Before this point, the early moments of the game saw Torino apply a mid-block rather than dropping deep and inviting pressure in their own third. Having their defenders higher up the pitch allowed the midfield and especially the attacking players to be more aggressive off the ball. It was a mistake in possession at the back that allowed Sassuolo to capitalise and force Torino into a more defensive shape as seen above. The defending from Torino for that first goal is perhaps one of the reasons they find themselves struggling this season – they reacted quickly enough to get defensive reinforcements in place after losing the ball, but their positioning (both individually and as units) made it quite easy for Sassuolo to break them down.
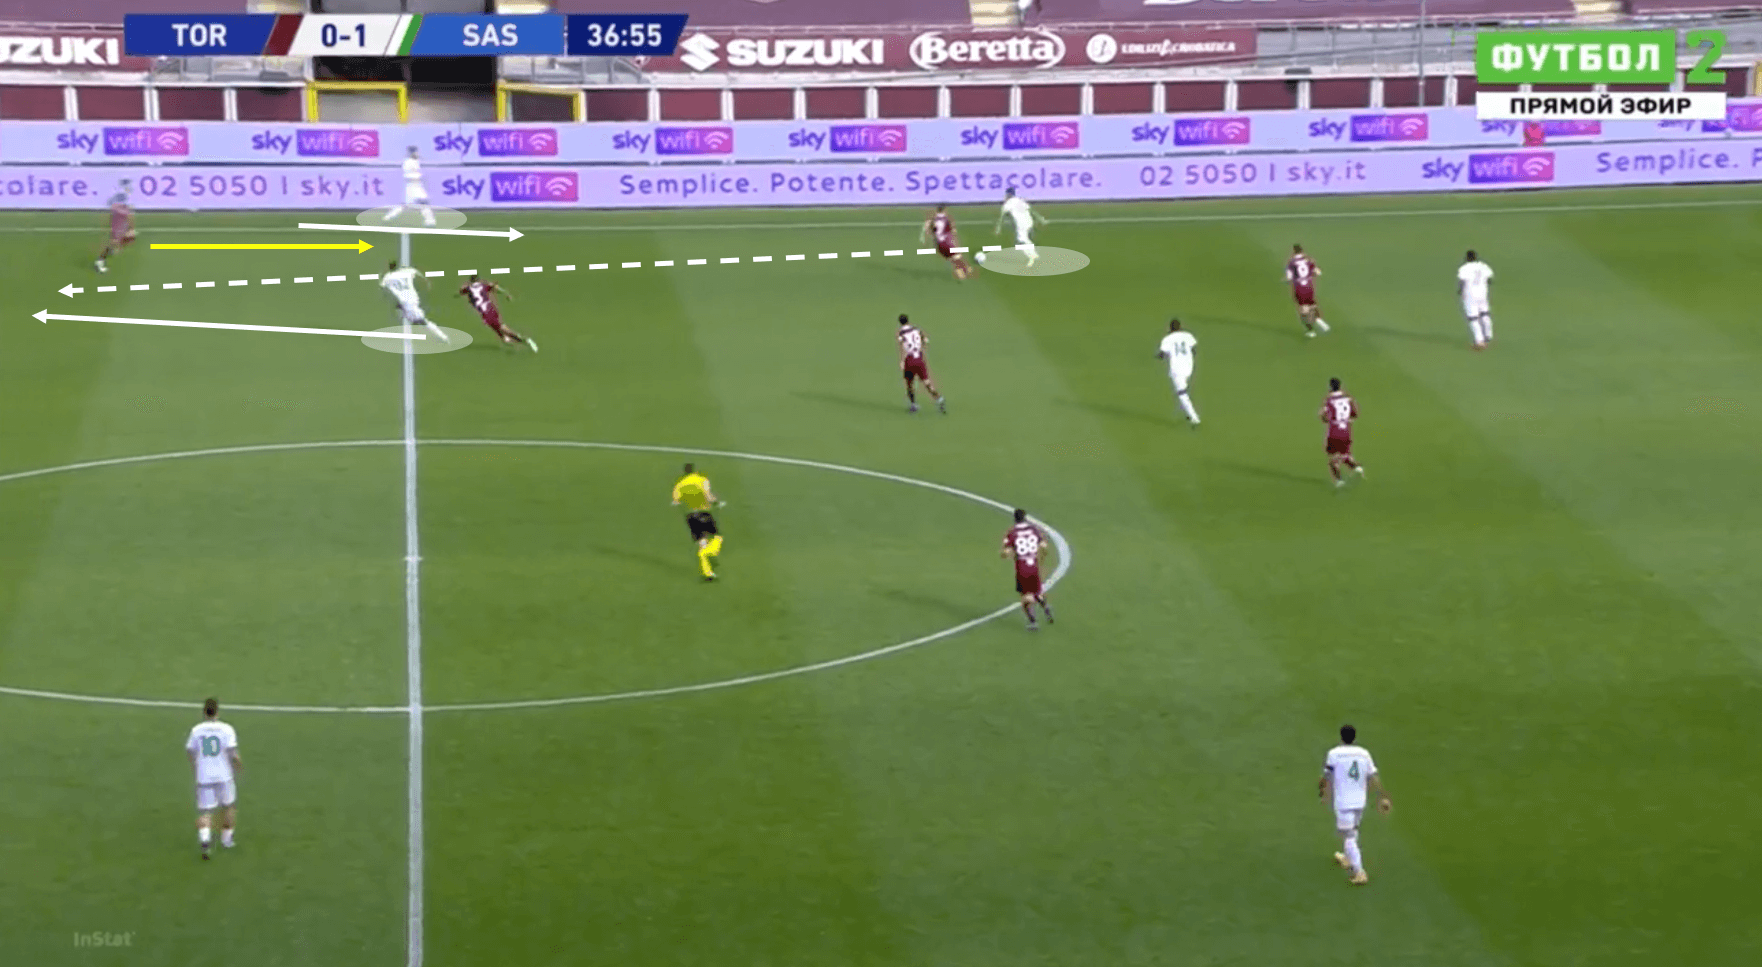
This second image is another example of Sassuolo exploiting the wings, but in a slightly different fashion to the first analysis. Here, we saw Berardi stay right on the touchline, but dropped deeper rather than running in behind. This not only made himself an option to pass to but also dragged his marker with him, which opened up a huge space in the channel for Defrel to take advantage of, having already lost his marker before the pass was even played. Defrel did a good job of carrying the ball towards the Torino penalty area, before releasing for a pass. At that point, Torino’s defence were once again scrambling and struggled to halt the Sassuolo attack. The visitors won a corner from this move, which they scored from to double their lead. By this point in the game, it became apparent that Sassuolo were very aware of the weaknesses (both tactical and technical) in the Torino side, looking to cause havoc down the flanks time and time again – Torino struggled to comfortably deal with this on a consistent basis.
Torino’s 2nd half defensive improvements
It was apparent from the very beginning of the second half that Torino had a different energy to them – their urgency and attacking intent on the ball was clear, and their hunger to win the ball back and defend more efficiently also became clear. They attempted to defend generally higher, allowing the midfield and attack units to press with the cover behind them, whilst also seemingly fixing their first-half issues of being exposed in wide areas and being unorganised out of possession, particularly in midfield.
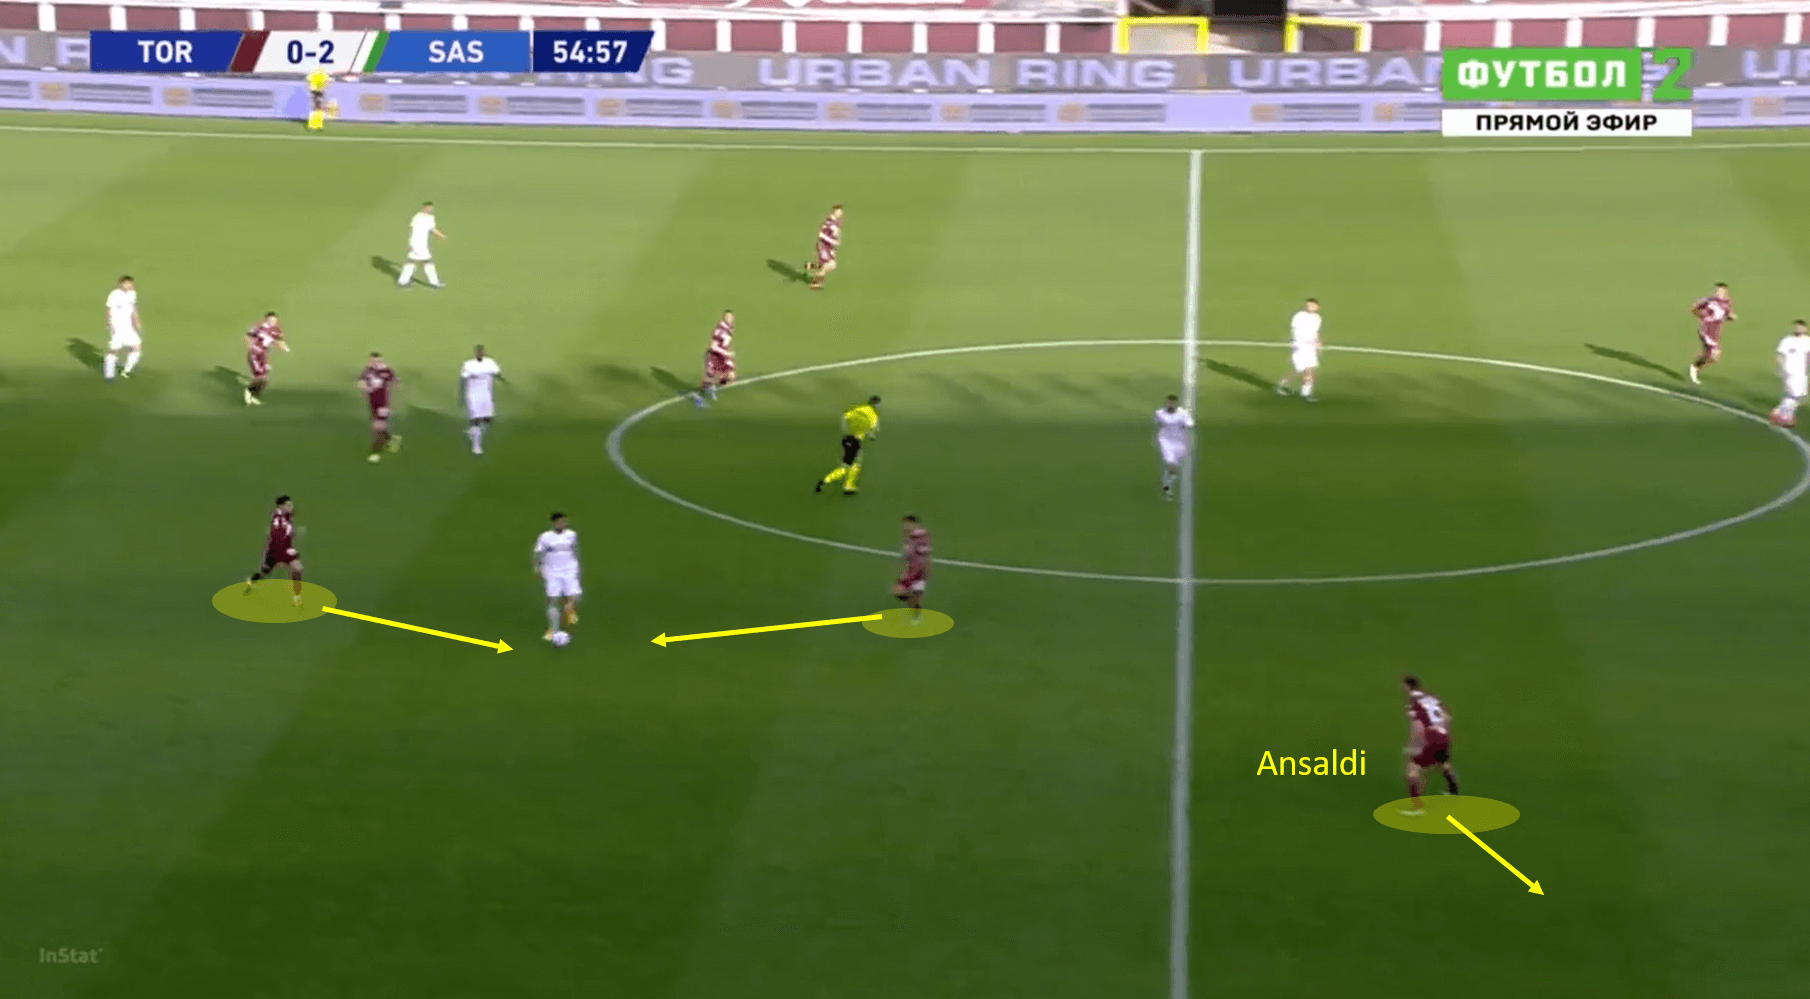
Above, we have one example of a counterpress in the midfield third, after a failed Torino attack. The two Torino midfielders closest to the Sassuolo man on the ball apply immediate pressure, forcing him to act quickly. This is a sound method, and would usually bring in positive results, but Ansaldi’s involvement saw him complete only half of his duty in this scenario. Yes, he provided cover to the press and was positioned slightly wide to limit the space Sassuolo have on the wing. But his positioning is too uncertain, and renders his effort redundant, as we can see below.
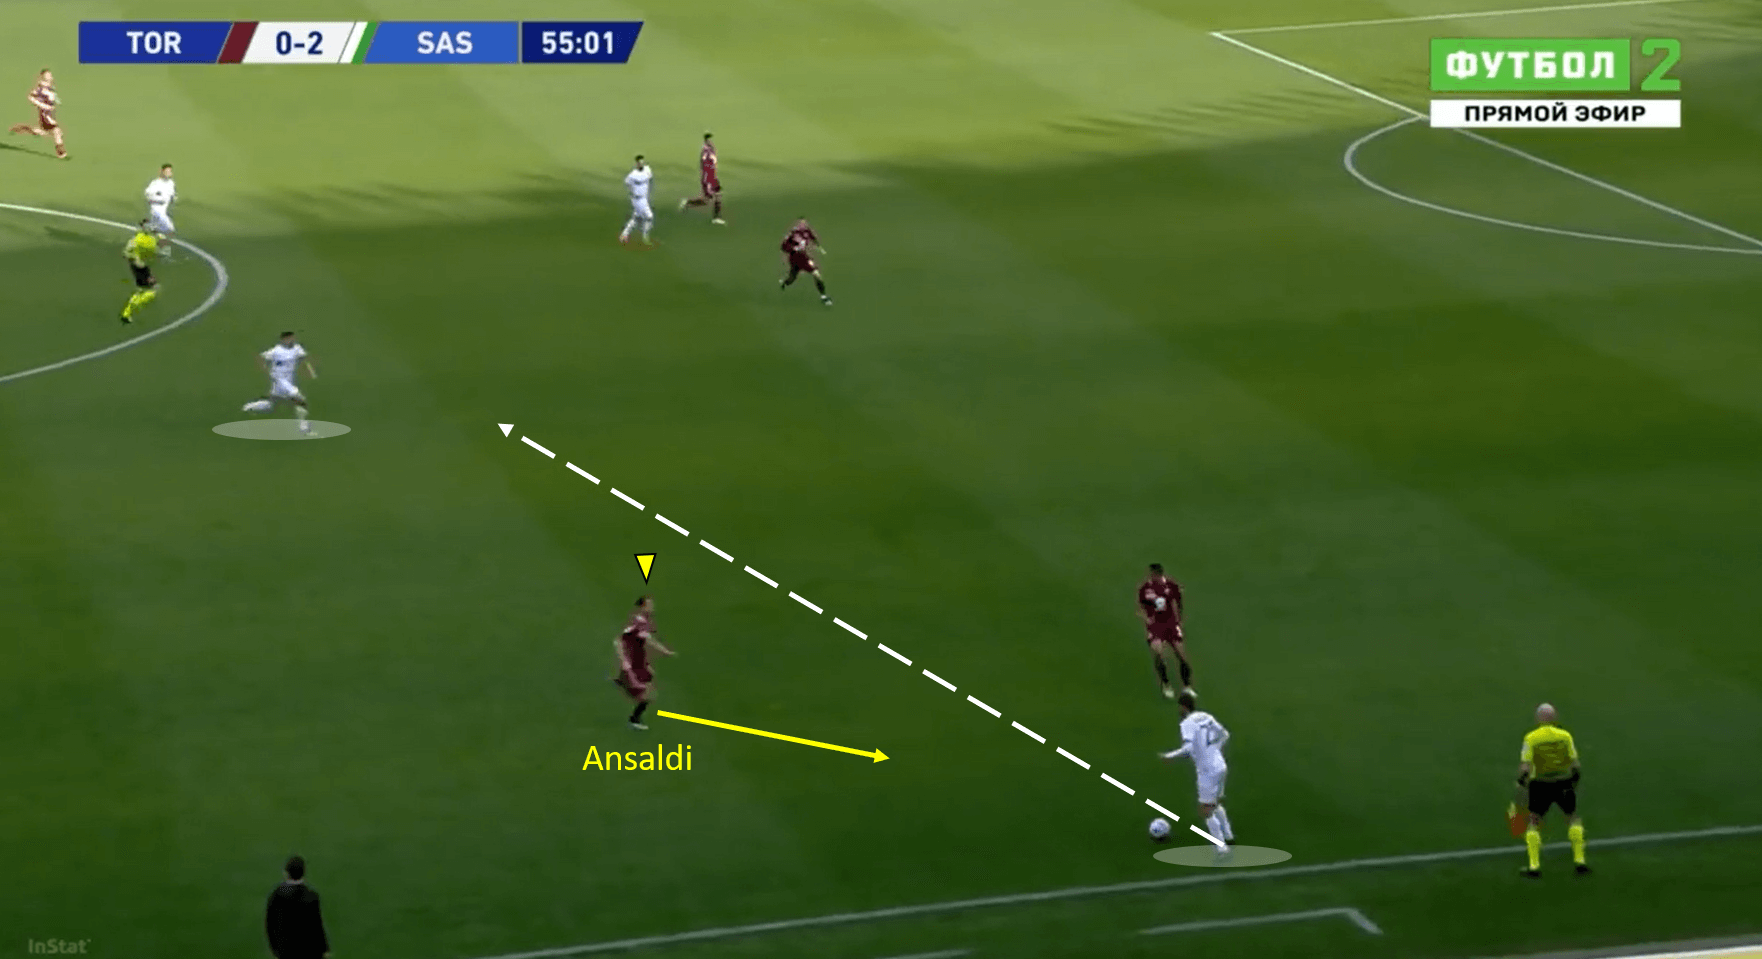
Ansaldi is not close enough nor does he react quick enough to stop the winger from doing any damage once he received the ball, and he is too wide to stop the play from continuing through the middle. He found himself scrambling to close the ball down but couldn’t make the distance up quick enough. This allowed Sassuolo to attack centrally after that pass was made – luckily for Ansaldi & co. Torino’s defence looked a lot more stable in the second half and they were able to comfortably handle this situation. This whole situation could’ve been avoided if Ansaldi did one of two things: he either sits in a more central spot, close to the highlighted Sassuolo player to limit his availability, or he sits wider to begin with, to be able to close the wide player down quick enough to stop the pass going through.
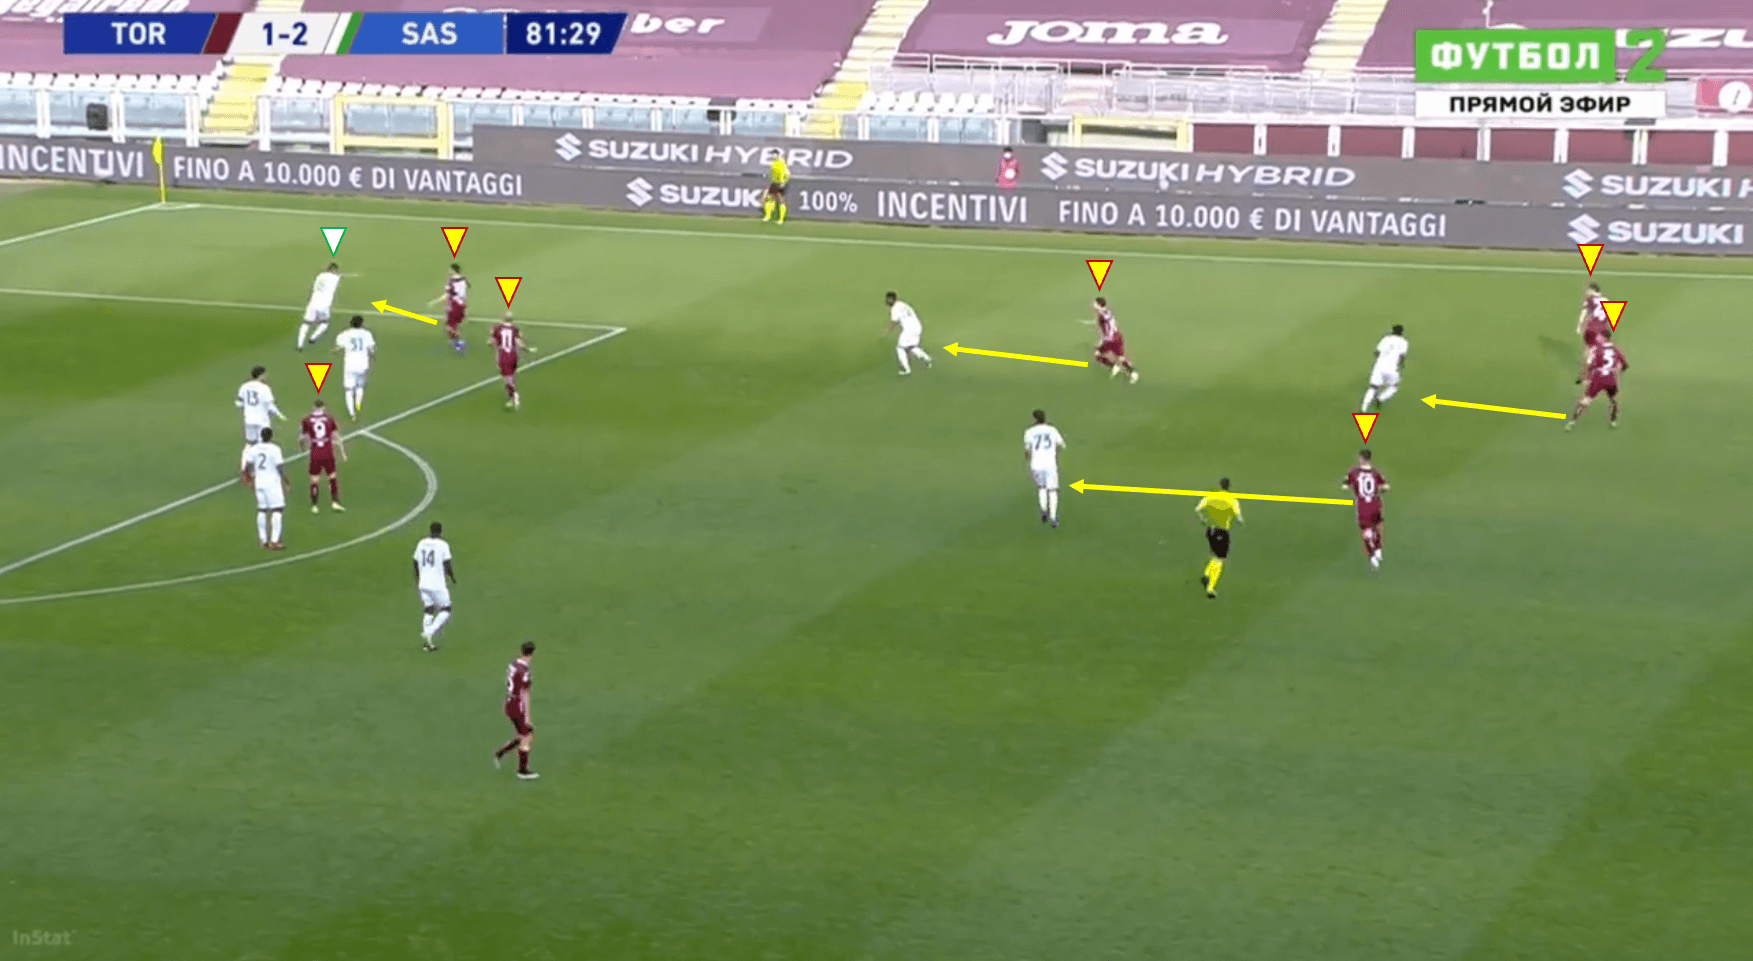
This image above is another example of Torino’s tenacity off the ball as they looked to poach an equaliser. While they spent a lot of the second half applying pressure and defending in higher places of the pitch, there was much more intensity and urgency around these stages of the game. Their first goal injected extra life into them and fuelled their desire to confirm the comeback. They made their presence known with 3 players applying pressure in the attacking zone, with 4 players behind offering cover and ready to pick up any loose balls or apply pressure to the next opponent who picked up the ball. Sassuolo showed a lack of composure and ability to deal with this intense pressure and Torino found success in regaining the ball on more than one occasion.
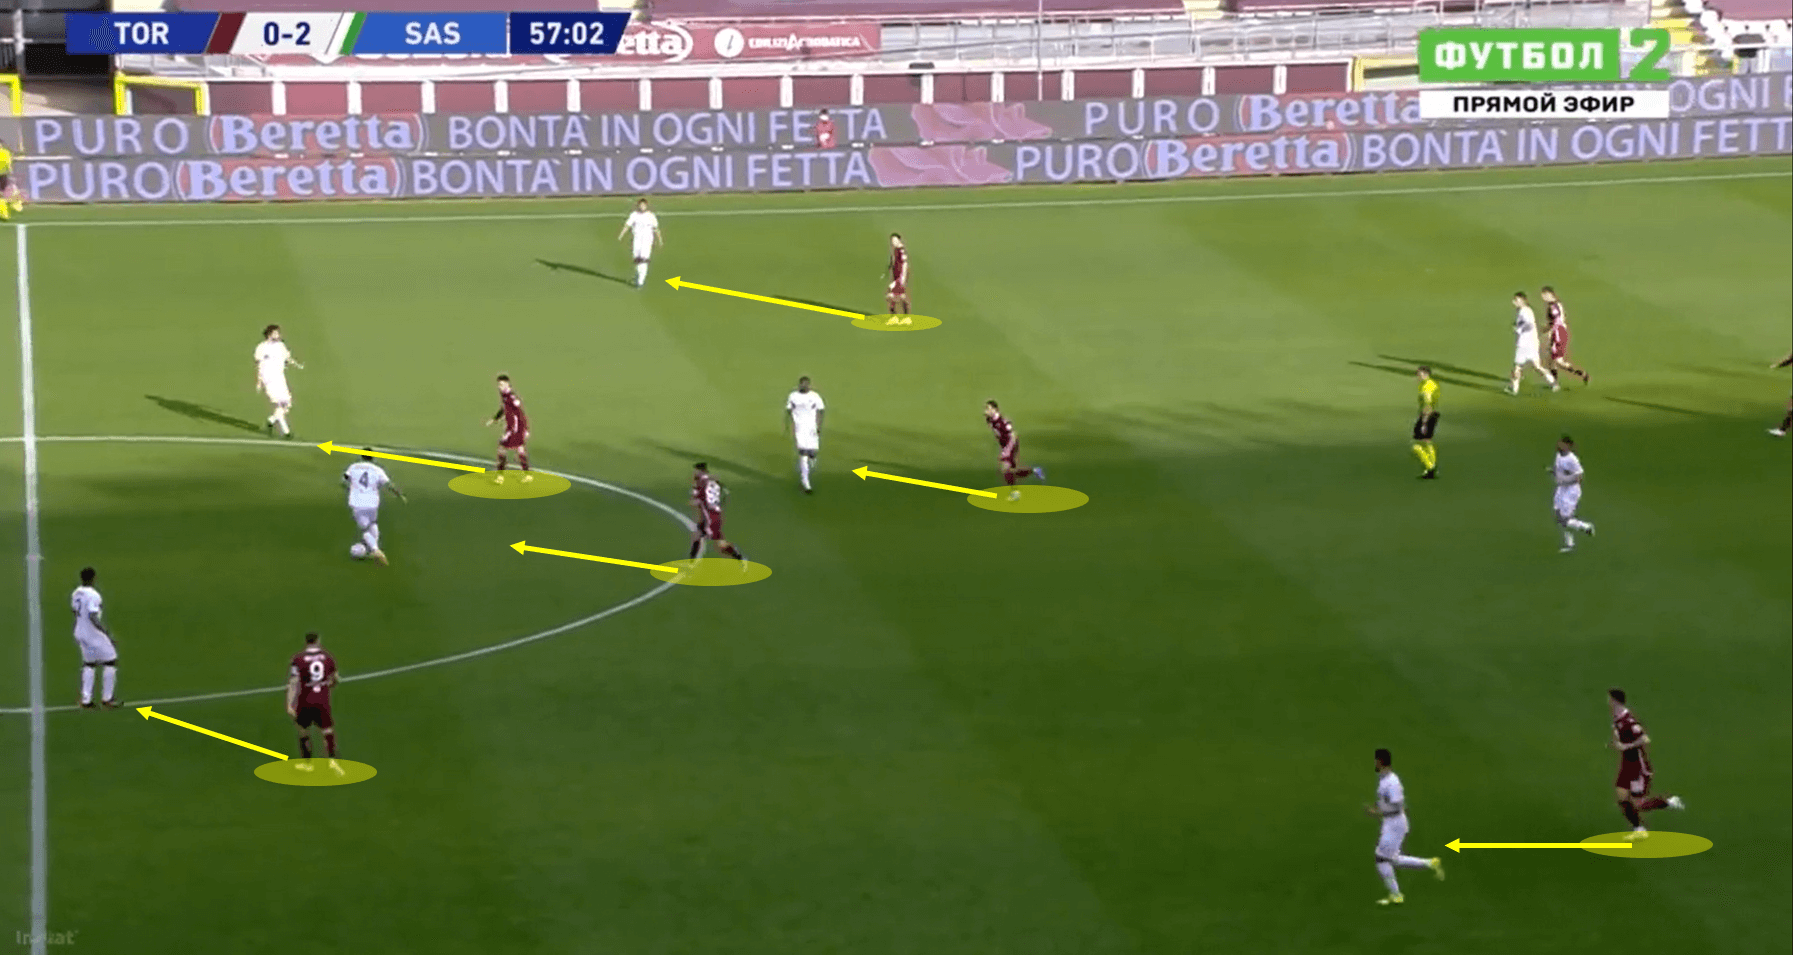
In this analysis, we will put a scope on how Torino typically approached off-the-ball situations when Sassuolo looked to build possession in their half. While Sassuolo were not completely shut out in the second half, they were very limited in their attacks compared to the first half, and credit must go to Torino for this. Not opting to defend deep, the hosts looked to press their counterparts in midfield zones such as above, to force a turnover in possession.
The important points in this set up allowed them success and ultimately drove them on to pick up an amazing win. Even after committing three or four players to apply immediate pressure higher up, they still deployed wide men on both flanks to mark the Sassuolo wingers to avoid a repeat of the first half. This severely limited the visitors’ wing play and forced them to explore other options. However, the presence of the front four in the press made it extremely difficult for Sassuolo to make progress through the middle either. Torino’s ability to react at the start of these situations, and get into this sort of shape quickly, enabled them to catch Sassuolo off-guard and stop the attack.
Torino’s attacking adjustments
As mentioned, Torino appeared to iron out their issues at half-time, both in and out of possession. As the game grew on, they became more and more dangerous in attack as they grew in confidence, as well as sensing the nervousness of the Sassuolo players under pressure. There were 2 key changes that eventually allowed them to unlock the Sassuolo defence – they sent more players forward to attack – which allowed them to pack the box out and get crosses in, which suited their second adjustment: the introduction of Simone Zaza.
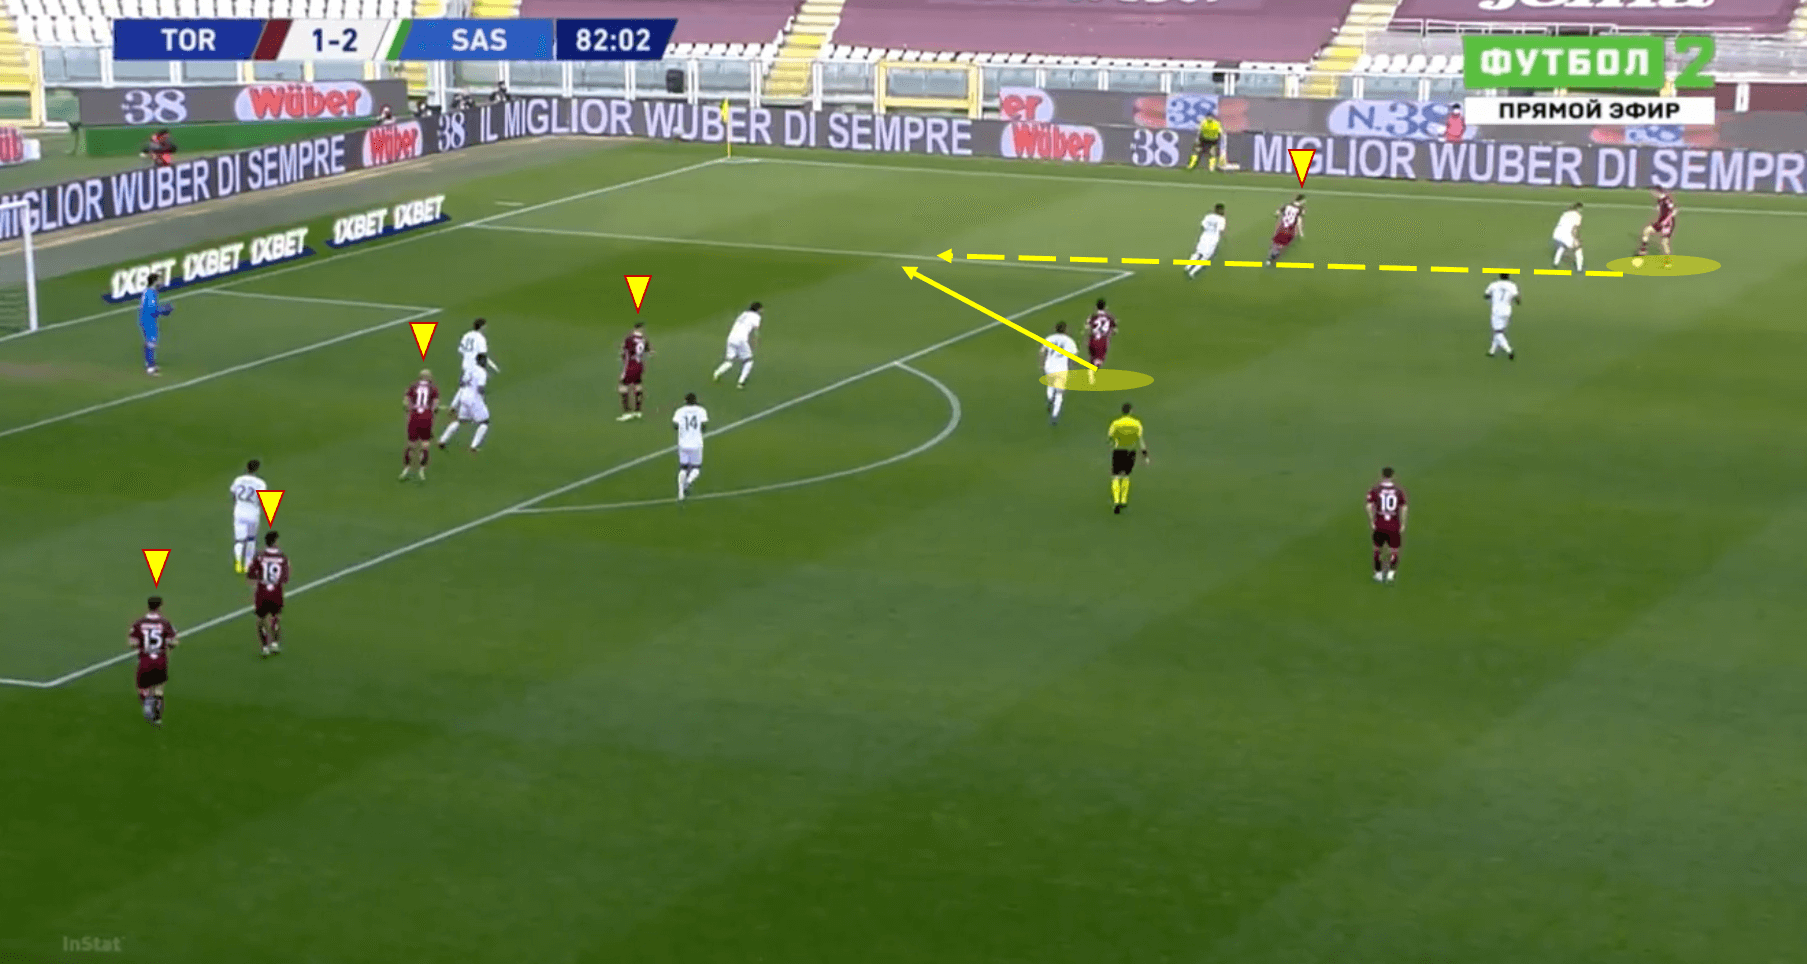
The analysis above shows Torino looking overwhelm Sassuolo with a high number of players in attack. A method we saw often from the home side was to load the box with 3-5 players, with locations varying from the centre of the box to the back post area, occupying the defenders and limiting Sassuolo’s ability to press in midfield. This positioning also left the near-side of the box more exposed, which they looked to exploit in this situation as Simone Verdi made a darting run into that space. Torino registered 22 shots in this game, with 11 of them on target, with many of them coming in the latter stages of the game as they were able to create spaces and situations like the one above.
Their shape of 5-3-2 was adapted to allow them to have width in attack – the wing-backs would get forward to offer support and be available to put crosses, allowing the attacking midfielders and wingers to make those underlapping runs in and around the box.
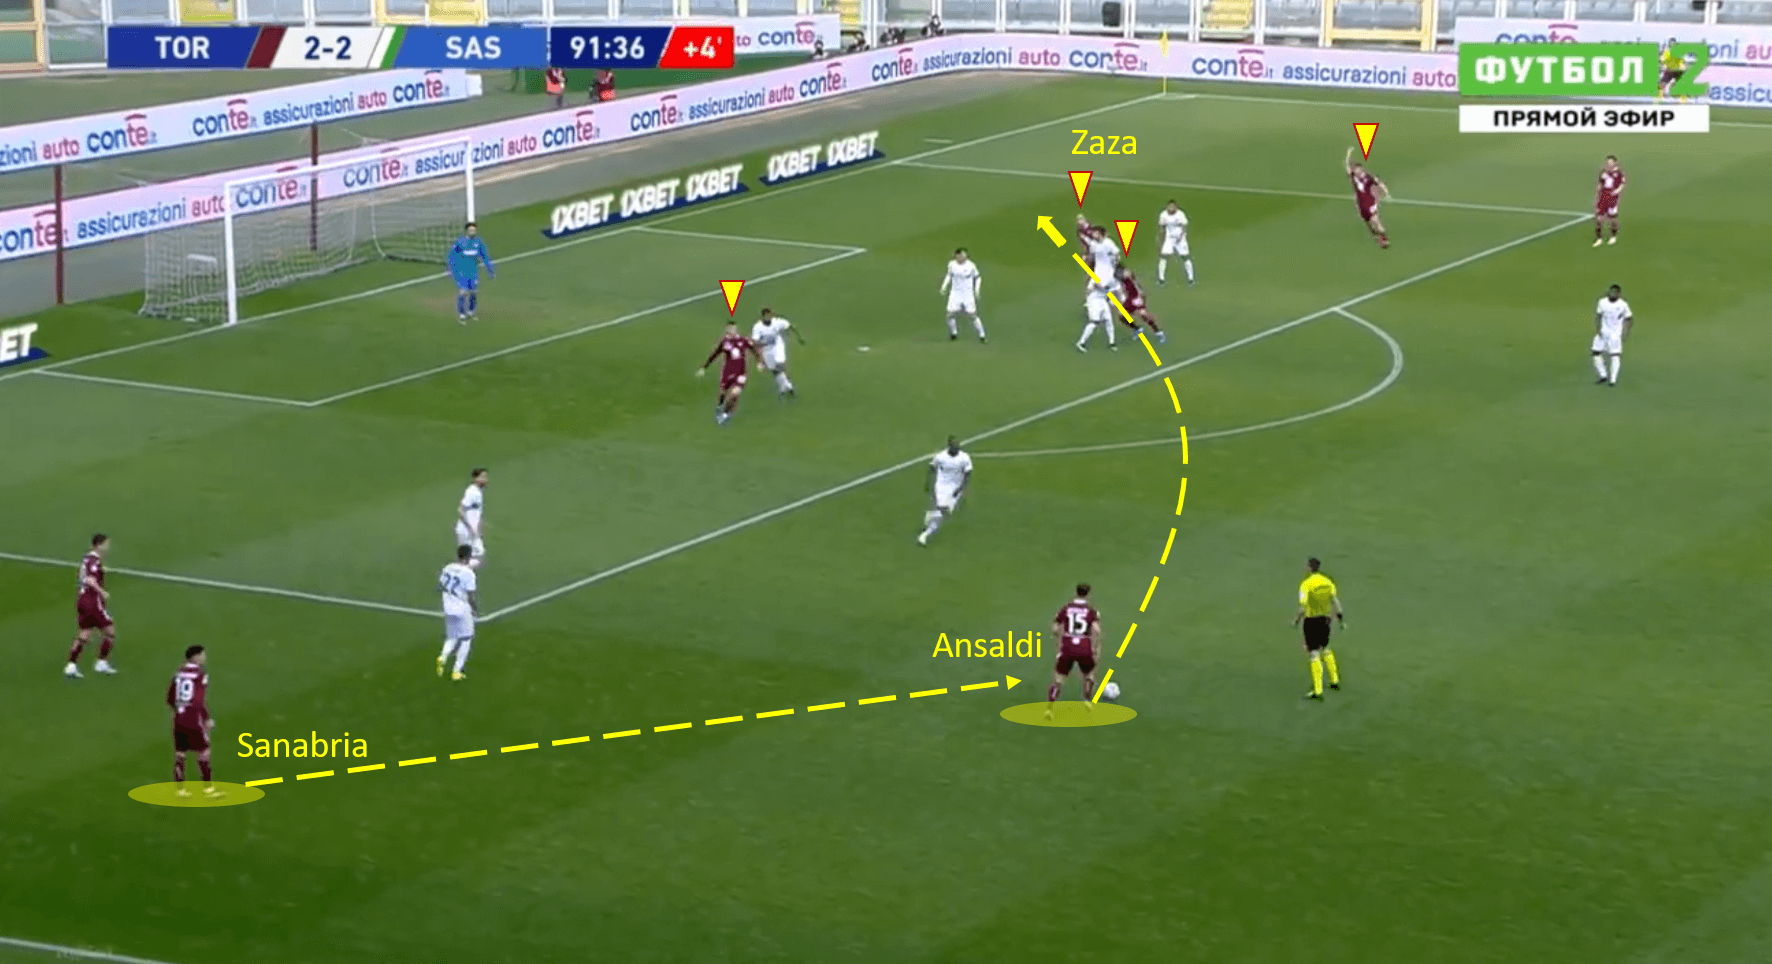
Here we see a similar situation to the previous analysis, but a different approach of attack. Again, we see most of Torino’s attacking options take residence towards the back post, with the wide options causing the Sassuolo defence to be unorganised. This allowed Zaza to position himself in a little bit of space between defenders, hold his line to remain onside before meeting Ansaldi’s lofted cross to put his side 3-2 up. Zaza’s style as a forward makes him extremely effective when Torino need to attack in this fashion, as he is a physical presence and can be very deadly in the box. He would often occupy defenders when his side had the ball, sometimes sharply dropping into space to receive the ball before laying it off again. Out of possession, he was very useful too, applying high pressure with high intensity to force a rushed long ball clearance.
Conclusion
Both sides performed completely different in each half of this game – Torino’s timid and unorganised defending in the first half allowed Sassuolo to attack the flanks and take a seemingly-healthy 2-0 lead into the break. Whatever Torino discussed and altered at half-time clearly worked a trick, as they looked an entirely different side. Their ability to stop Sassuolo being a threat in attack while limiting their possession altogether was a huge part of them getting back into the game as it allowed Torino more time on the ball via turnovers. Furthermore, their switch to an attacking system that favoured wide build-up play with plenty of deliveries towards players with aerial dominance proved to be too much for Sassuolo. Simone Zaza’s goalscoring efforts turned the game around, but his work aside from the brace was inspiring – pressing at any given chance, always making himself a good option in attack. A win like this could give Torino a major boost in the final stages of the Serie A campaign as they look to confirm their status for next season.


Comments