Tottenham Hotspur hosted Brighton & Hove Albion looking to maintain their fine start in their new stadium. Yet to concede a goal after three matches at their new home, Spurs were looking to take advantage of Arsenal and Chelsea dropping points as they seek Champions League qualification for a fourth successive season, as well as the honour of calling themselves the top club in London.
Brighton came into the fixture with their own issues, as a run of poor results has turned a seemingly solid second Premier League season into a scrap to avoid the drop. With a point secured at Wolves in their last game, a similar result would do the Seagulls wonders in their bid to keep their distance from Cardiff in 18th place.
This tactical analysis will examine how Spurs looked to break down a deep-lying Brighton defence, and how the Seagulls looked to contain Mauricio Pochettino’s men.
Lineups
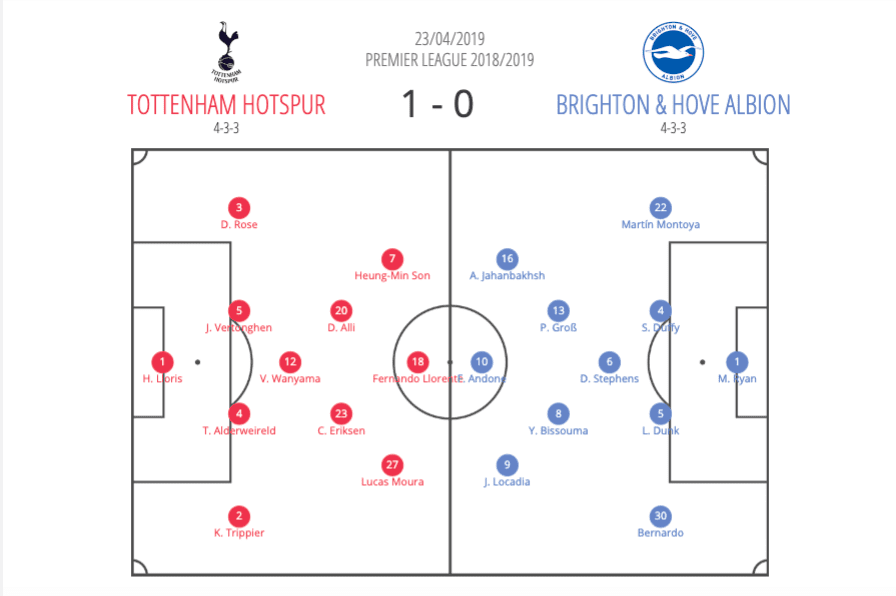
As expected, this game was yet another attack vs defence exercise that seems to characterise a lot of games that feature a lower-half team visiting one of the top six. What was perhaps unexpected however was the complete lack of ambition shown by Brighton to offer a counter-attacking threat to Spurs. This is not a criticism of their strategy; Chris Hughton set them up to take a point off of Spurs and they almost got what they came for.
Lined up in a very deep 4-5-1 system, the Seagulls protected their goal at all costs ensuring a majority of the game was played in front of them. Wingers Jurgen Locadia and Alireza Jahanbakhsh would both drop deep to create a chain of five across the midfield, and the back four would remain extremely narrow.
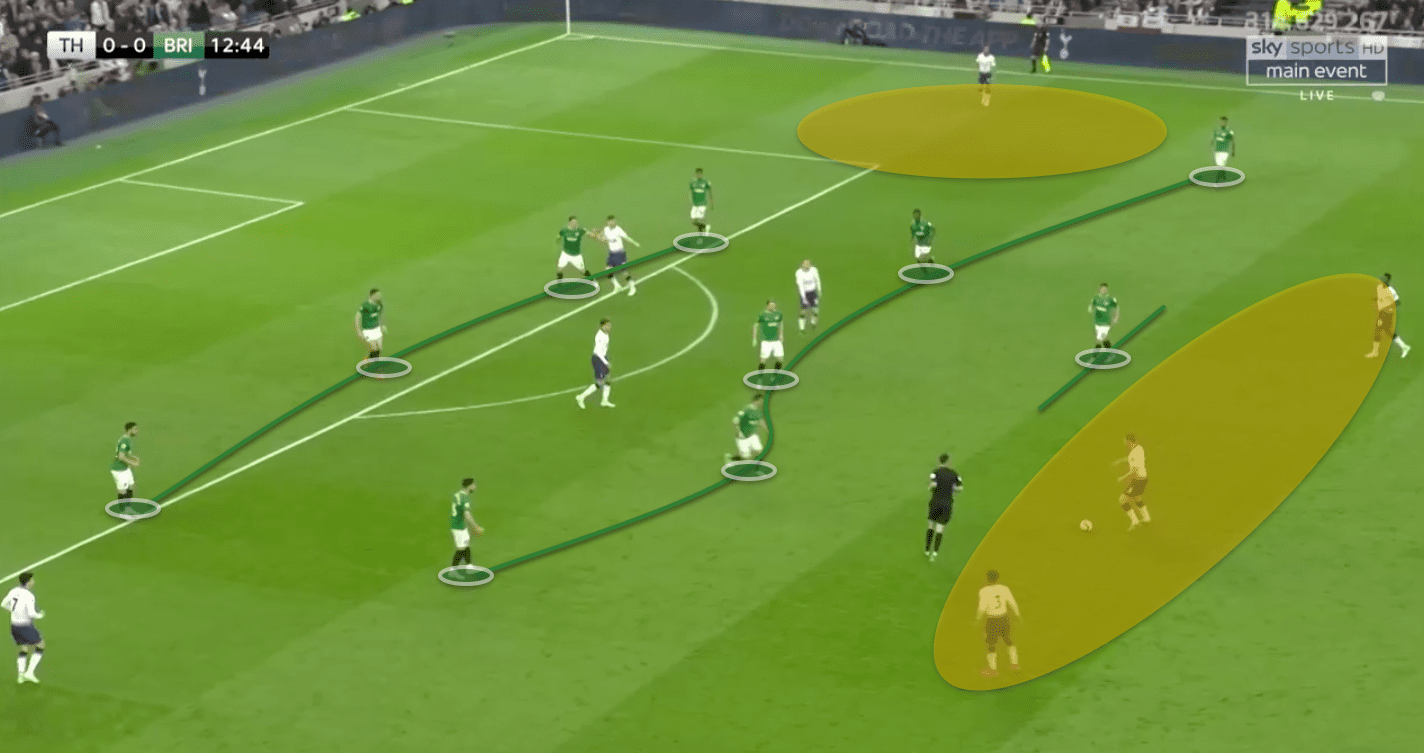
This system gave Spurs space in front of the block and down the sides, and with Florian Andone also dropping to within 30 yards of his own goal, Spurs struggled to penetrate centrally, as well as switch the play effectively.
In carrying out their defensive duties, Brighton were pinned back with just Andone isolated up front. When Brighton did recover the ball, they simply had no other outlet than to hit the channels which was mopped up time and time again by Jan Vertonghen and Toby Alderweireld.
You sense this wasn’t a concern for Hughton, as whilst this surrendered possession to Spurs, it enabled the Seagulls to not surrender their position. This meant no moments of transition for Spurs to take advantage of, as Brighton did not lose their shape and were ready to contain the next attack that came their way.
Spurs began the game in a slightly unusual 4-3-3 system, as Mauricio Pochettino looks to squeeze even more from a fatigued and very thin squad. This included the use of in-form Son Heung-min and Lucas Moura as wingers hugging both touchlines, with full-backs Danny Rose and Kieran Trippier pinched in as inverted full-backs. Ahead of them Dele Alli and Christian Eriksen operated as number eights in support of Fernando Llorente.
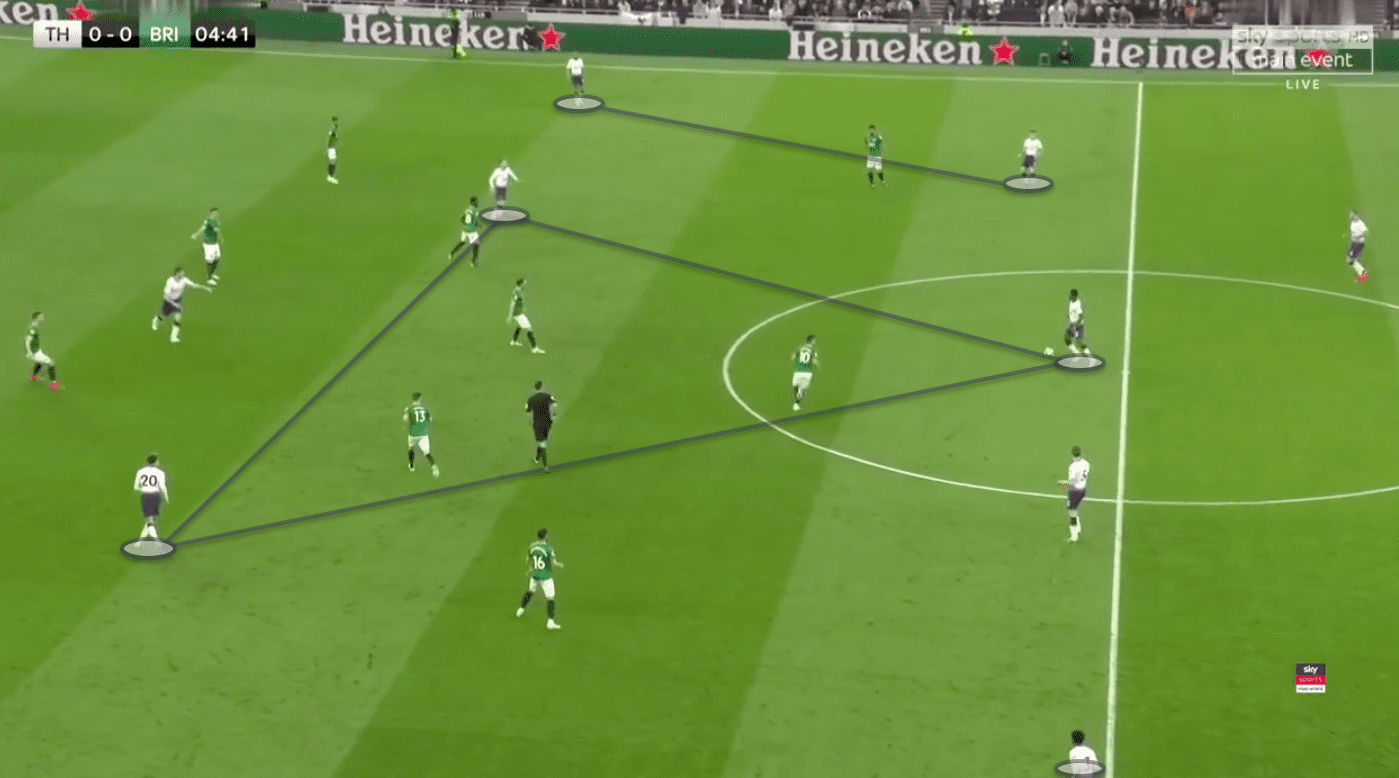
Why did Pochettino operate in this manner? This was likely in anticipation of Brighton using a 4-5-1 as they did against Manchester City recently, against which Son and Moura could stretch the pitch horizontally and look to beat the opposing full-back and enter the penalty area.
With Brighton playing so deep, there was no possibility to gain numerical superiority, so the reasoning was likely to be that Son and Moura had qualitative superiority over their full back in one-on-one situations.
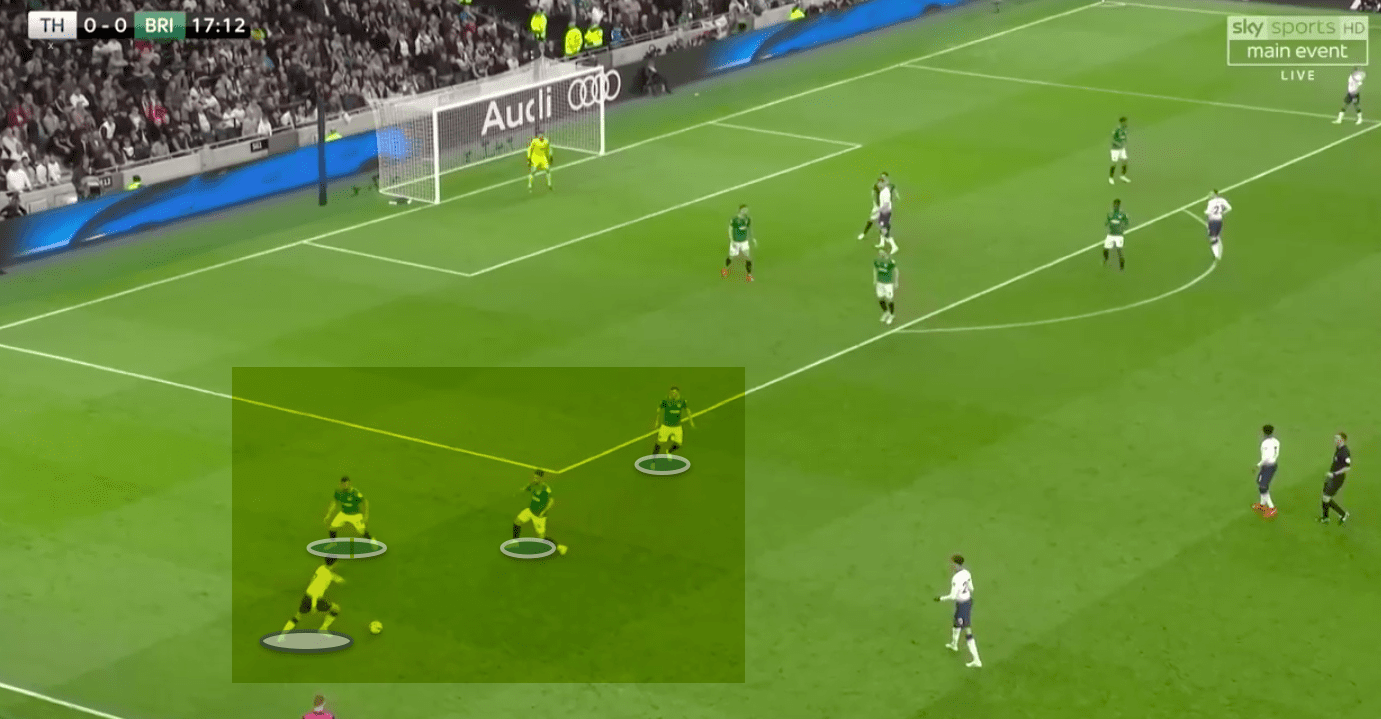
What happened however was the deep positioning of Brighton meant that even when Son or Moura received the ball, there was always one or even two covering defenders. As Eriksen and Dele moved into higher positions they attracted markers with them which further clogged up the area Spurs were looking to attack. Without the presence of Harry Winks Spurs also lacked the ability to move the ball at pace from side to side, so every time the ball arrived at either winger’s feet there was simply too much traffic in the way.
With Brighton dropping so deep, and prioritising marking and tracking forward players, this allowed the Spurs backline to advance aggressively high up the field under no pressure whatsoever. This allowed their defenders to drive forward into central spaces but their decision making when they arrived in the last third didn’t enable Spurs to create quality chances.
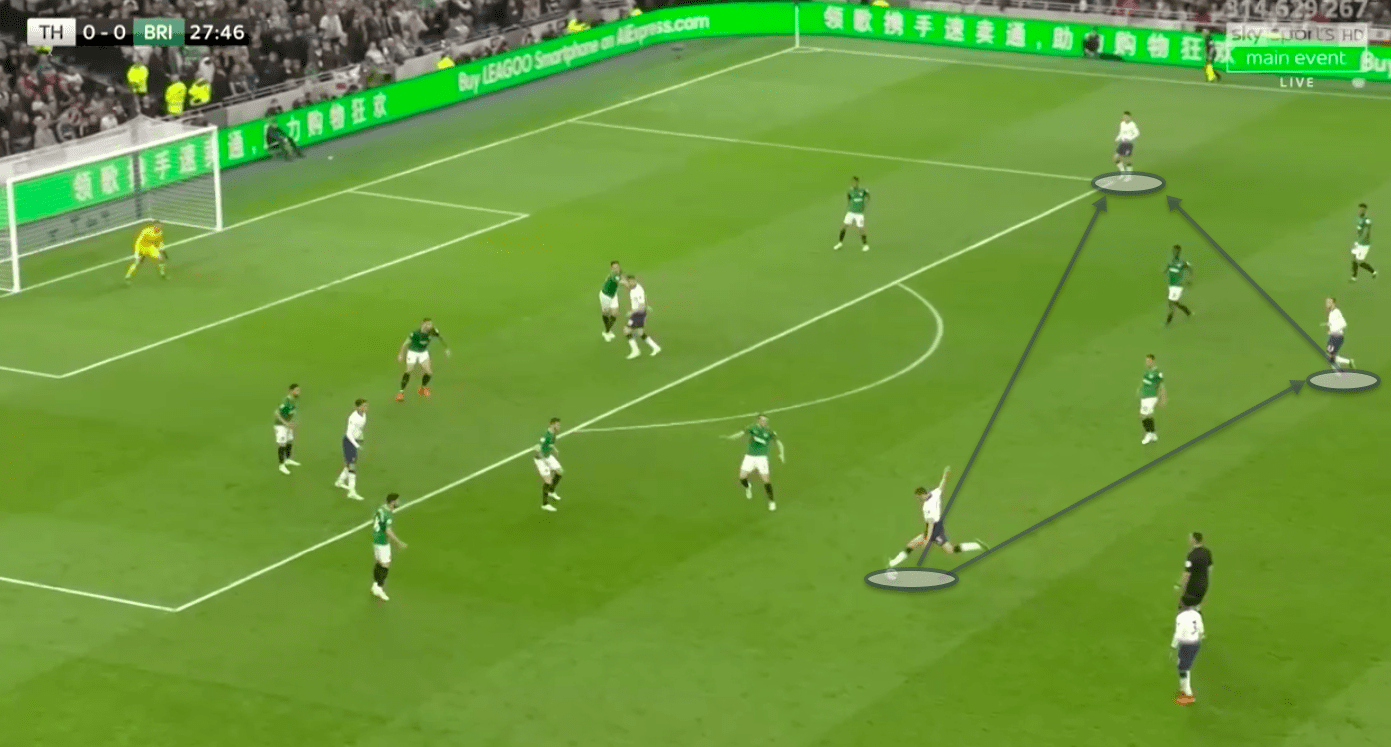
Here Jan Vertonghen has driven in with the ball and opts to shoot. Notice Lucas Moura in a good position on the right side, where Spurs may have looked to find him via a switch of play from Vertonghen himself, or via Christian Eriksen. This was a situation where the absence of Harry Winks’ ability to move the ball quickly from side to side was sorely missed.
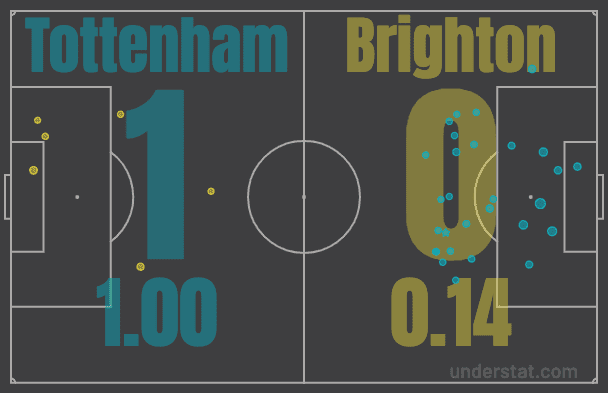
With Spurs able to arrive 20-30 yards from goal unimpeded, they were able to shoot from long range at will. In the 90 minutes Spurs had 21 long shots, out of their total of 29 attempts, a running theme of the game.
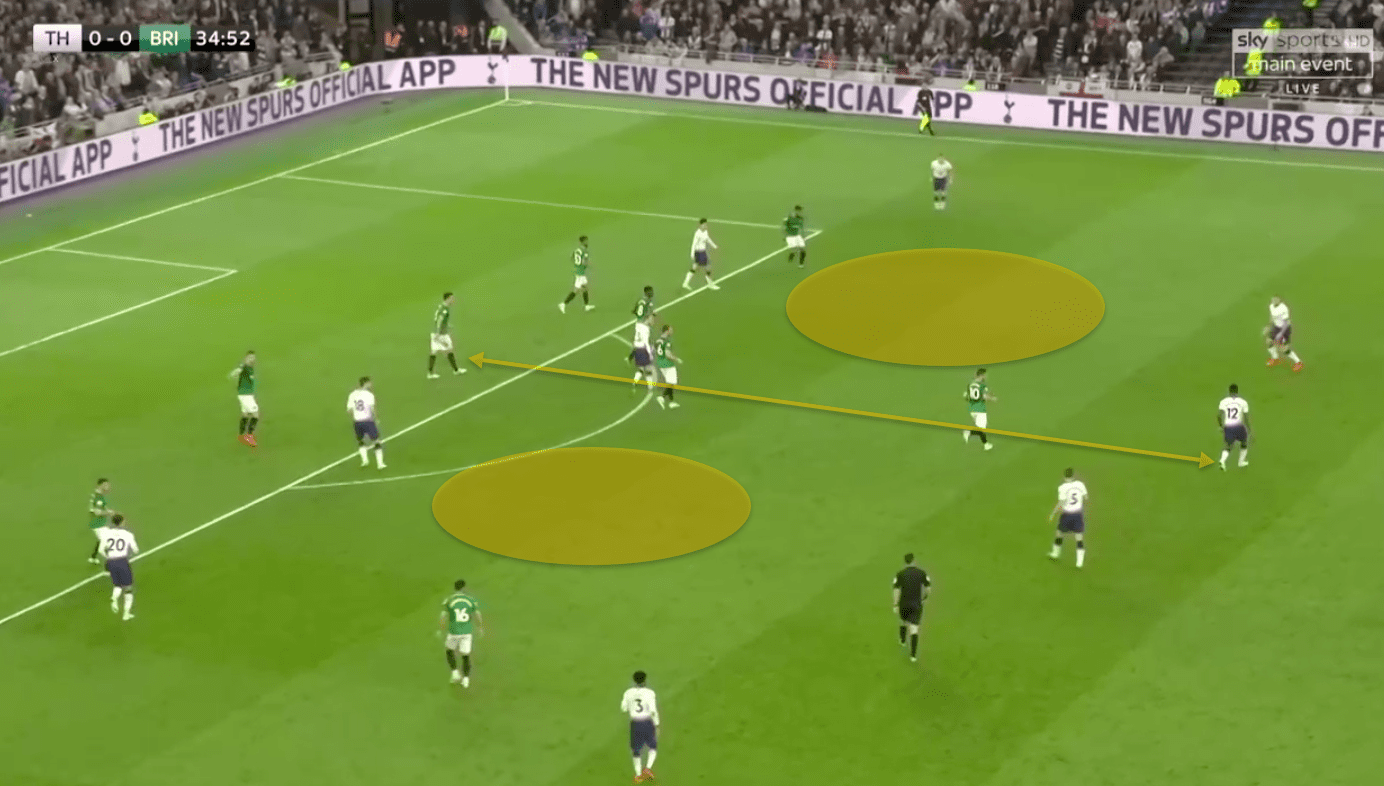
Here Spurs have moved their lines up the pitch to create a situation whereby all players except Hugo Lloris are positioned in the final third of the pitch. The distance between Spurs deepest outfielder, Victor Wanyama, and the last line of Brighton’s defence is no more than 20 yards. This condensed the play so much that Spurs were almost denying themselves space to operate in, and created situations where they either had to take on a long shot, or hope that Eriksen or Dele could fashion a chance in the tightest of gaps.
Second-half switch from Pochettino
With the Tottenham 4-3-3’s use of wide wingers not bearing fruit, Pochettino decided to switch things at the break and asked Moura and Son to take up inside positions with Rose and Trippier now staying wider and playing more traditional full-back roles.
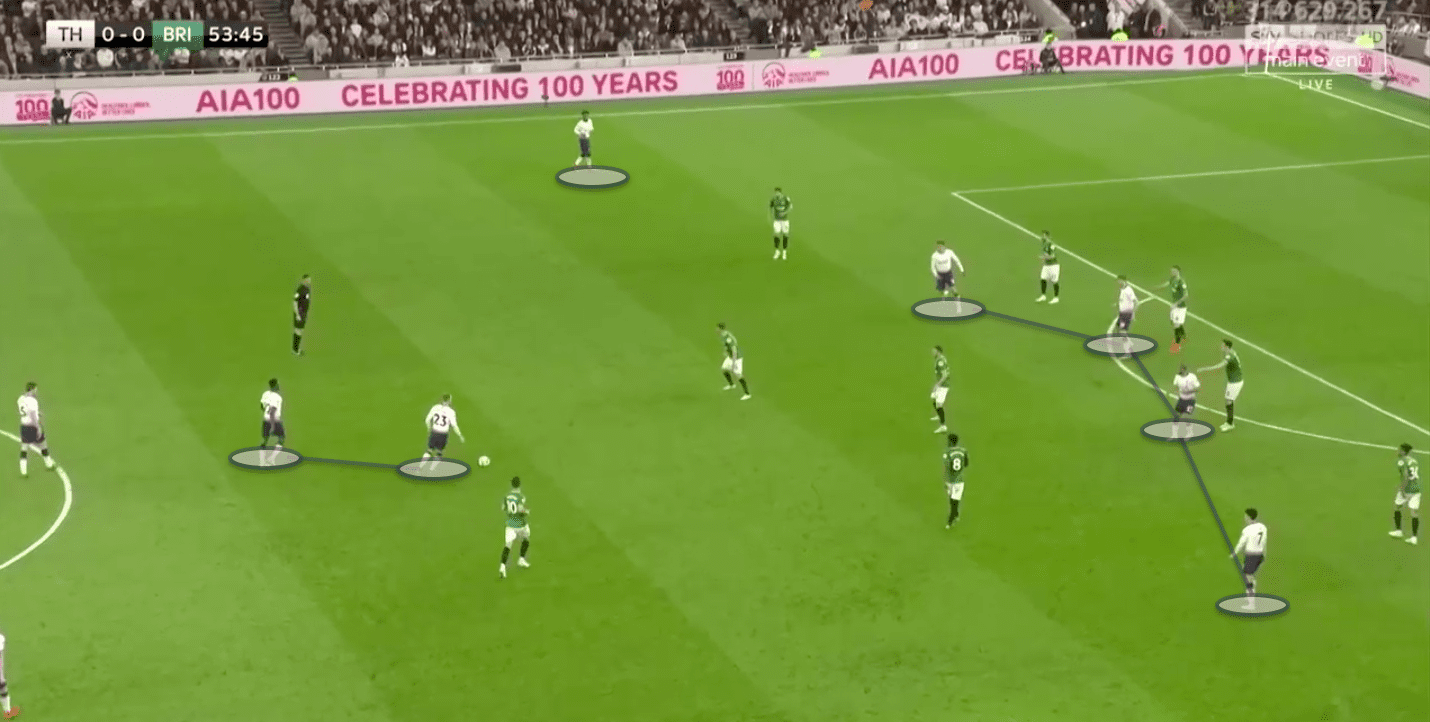
Christian Eriksen now took up a more withdrawn playmaking role to create a 4-2-3-1 of sorts. With both Spurs full-backs now stationed extremely high up the pitch however, they often had five or six players occupying the last line of the Brighton defence.
Presumably, this switch was to afford Llorente more support in and around the penalty area, and to get both Spurs full-backs into crossing situations where they could flood the box and look to take advantage of second ball opportunities.
In reality, this created so much congestion in central areas with Spurs players now stationed on so few lines of play, that it did not create sufficient angles for Spurs to combine and create free players in front of the Brighton defence. When the ball was played wide to Rose and Trippier, Spurs’ crossing was sub-par and was easily dealt with by Dunk and Duffy, who are both excellent in the air.
The kitchen sink
As the second half wore on Spurs were still failing to create quality chances as an increasingly dogged Brighton abandoned any pretence of a counter-attacking strategy.
Pochettino’s half-time switch had not come off so he decided to throw the kitchen sink at the problem. On came Vincent Janssen for his first Spurs appearance since 2017. Pochettino looked to further overload the Brighton backline, in the hope of forcing a mistake, or a lucky bounce falling their way.
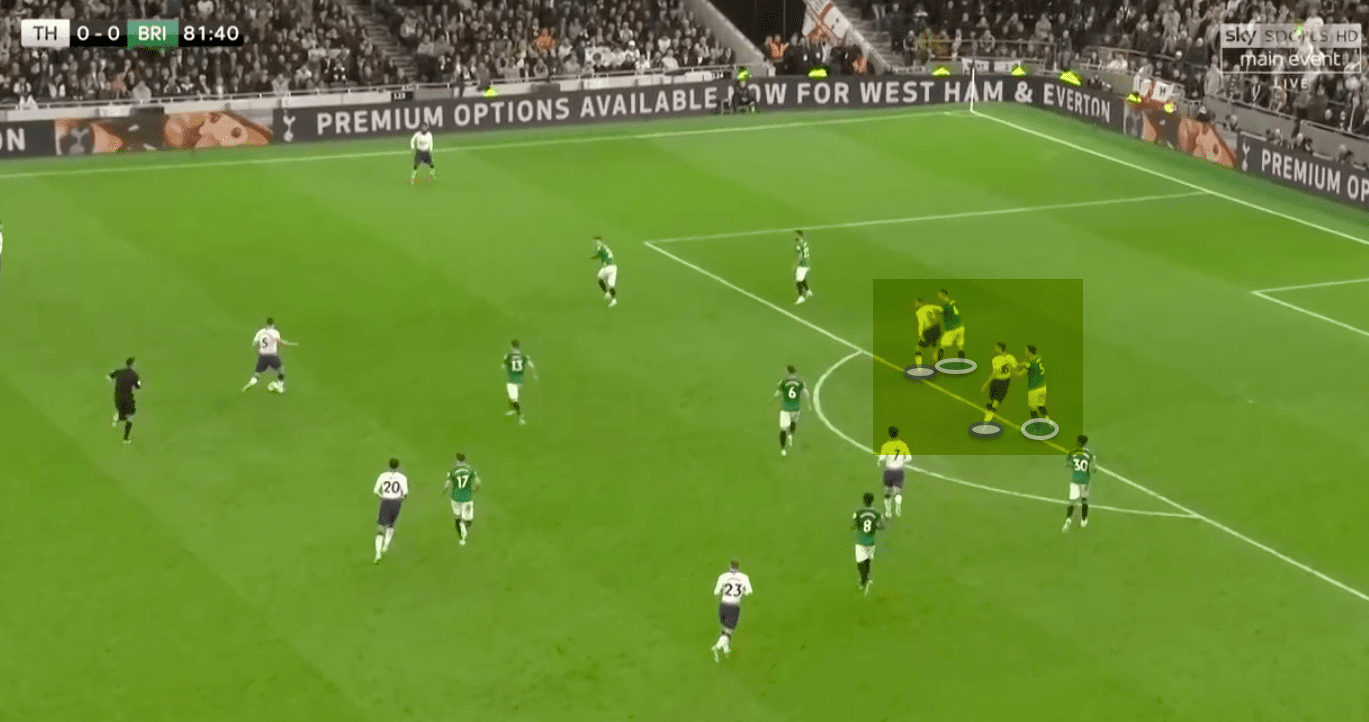
Now Llorente was joined by Janssen in pinning both Brighton centre-backs. This meant there was no longer a spare covering defender who could come out and block long shots.
This was far from a sophisticated approach, but with a patchwork squad and no space to operate in, the Argentine manager perhaps reasoned that if they blew hard enough the Brighton house would eventually fall down.
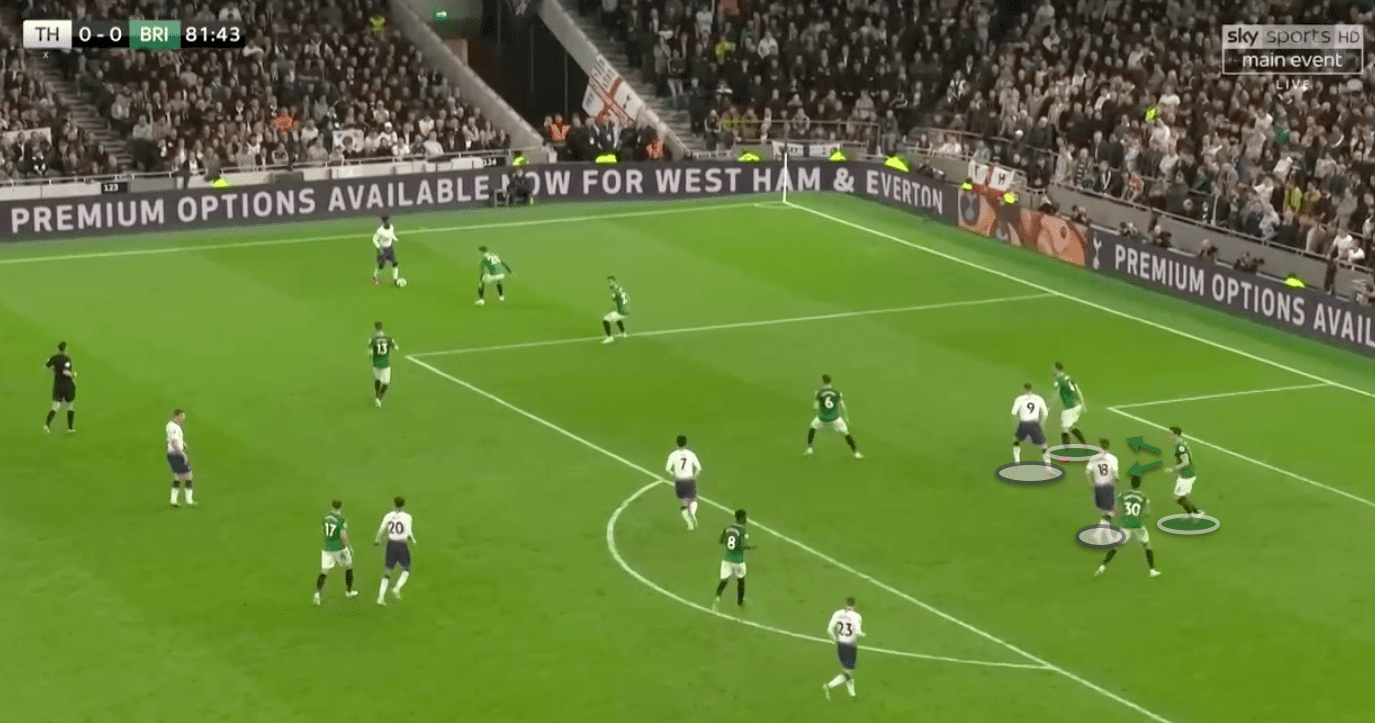
From a Brighton perspective, notice the excellent body shape of Dunk, who is in a position to see both his marker and the ball, demonstrating how effectively the Seagulls dealt with Spurs crosses all game.
Winning goal vindicates Pochettino
As the clock ticked away, Spurs finally found a way through as Christian Eriksen’s long-range strike found the bottom corner.
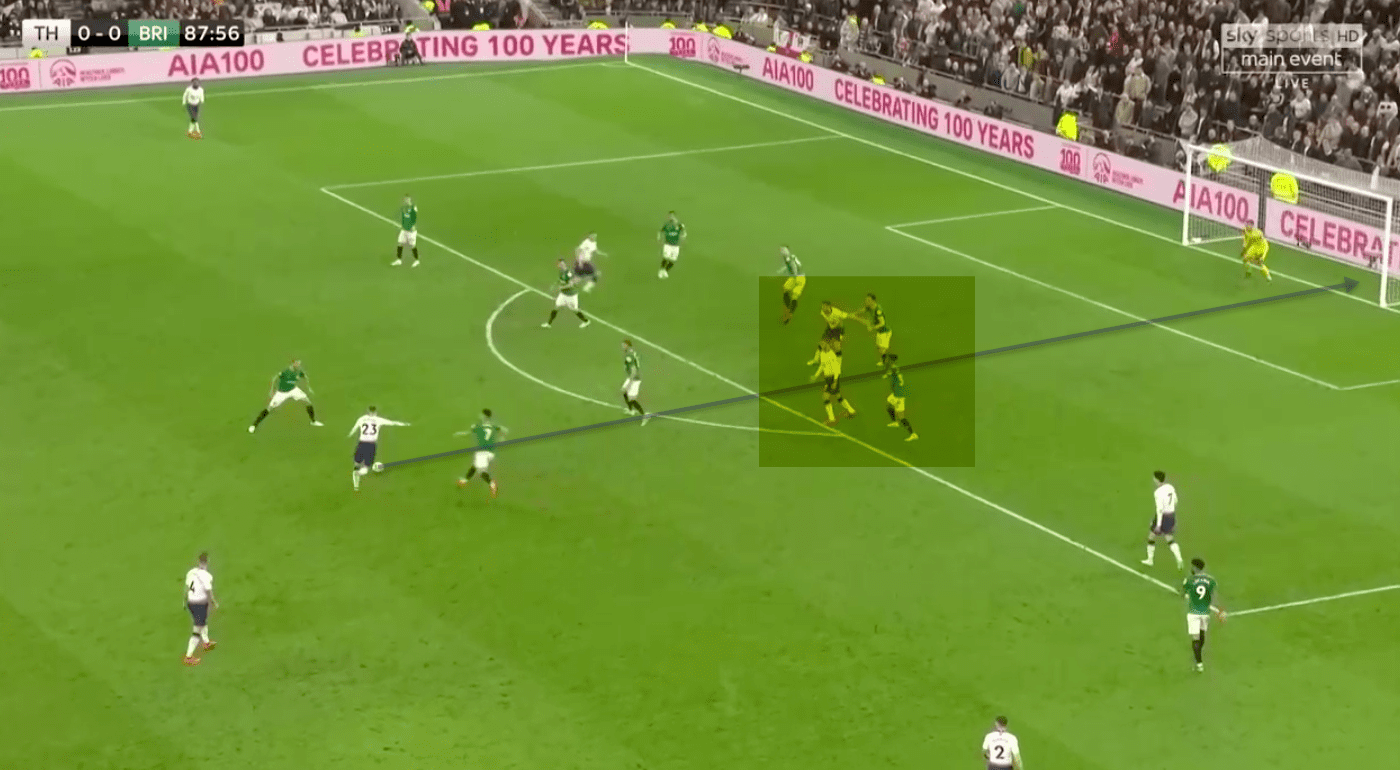
Pochettino’s rather basic approach paid off as both Dunk and Duffy weren’t able to block the long-range strike as they were both occupied by Llorente and Janssen. This also acted as an efficient screen on the goalkeeper, who was unsighted and had to react late to Eriksen’s strike.
Whilst this goal acted as vindication of Pochettino’s approach, Brighton will feel that by restricting Eriksen to a long-range strike on his left foot, they had done their job defensively. Understat’s expected goal model estimated the goal at 0.02 xG; in other words, a very low value shot.
Just about deserved for Spurs
In the end Spurs took the points and cemented themselves as favourites to finish third, and secure a top-three finish for the fourth season running. It was probably just about deserved, despite them not having it all their own way against a very resilient Brighton display. Some may criticise the Seagull’s approach, but they effectively shut down a Spurs attack which still boasts a lot of attacking talent despite the absence of Harry Kane.
Spurs’ shot locations were an excellent case study in the value of understanding expected goals and creating high value opportunities, as despite raining 29 shots on goal many were speculative in the extreme. The sheer volume of shots did however pay off on this occasion, but Pochettino may want to examine this in future, as 1.0 xG from 29 shots is certainly not a reliable strategy.
One thing that isn’t in doubt though is Spurs’ mental resilience. Pochettino has created a Spurs side who do not panic and believe they will always get over the line, a far cry from the Tottenham of old. With the limitations that the Argentine manager has had to work with this season, it is still remarkable that Spurs find themselves where they do. This is credit to one of the most talented coaches of his generation, who is squeezing the absolute maximum out of his squad.
Brighton, however, will want to see the back of this season. After comfortably staying up last season, they went on an interesting summer recruitment drive but Hughton has perhaps understandably remained loyal to the players who secured safety in the 2017/18 campaign. If they retain their Premier League status, they will need to look at why they have not kicked on from a promising first season in the Premier League. Brighton do not lack effort, but they probably have enough talent in the squad to not get into a similar situation next season, should they stay up.
If you love tactical analysis, then you’ll love the digital magazines from totalfootballanalysis.com – a guaranteed 100+ pages of pure tactical analysis covering topics from the Premier League, Serie A, La Liga, Bundesliga and many, many more. Buy your copy of the April issue for just ₤4.99 here, or even better sign up for a ₤50 annual membership (12 monthly issues plus the annual review) right here.



Comments