Two of the biggest clubs in footballing folklore faced off in the second leg of the UEFA Europa League quarter-finals earlier in the week, with Serie A side Roma picking up a 2-1 win in Amsterdam in the first leg, thanks to a late goal from Ibañez. Eredivisie leaders Ajax have been scoring for fun this season but struggled to find the goal to keep them in the competition, despite all of their possession. This tactical analysis will take a look at how Roma approached the game – how they set out to defend their lead, as well as an analysis of Ajax’s attacking methods. If Roma want to get the better of the likes of Juventus and Inter in Serie A, they have some positives and negatives to work through.
Lineups
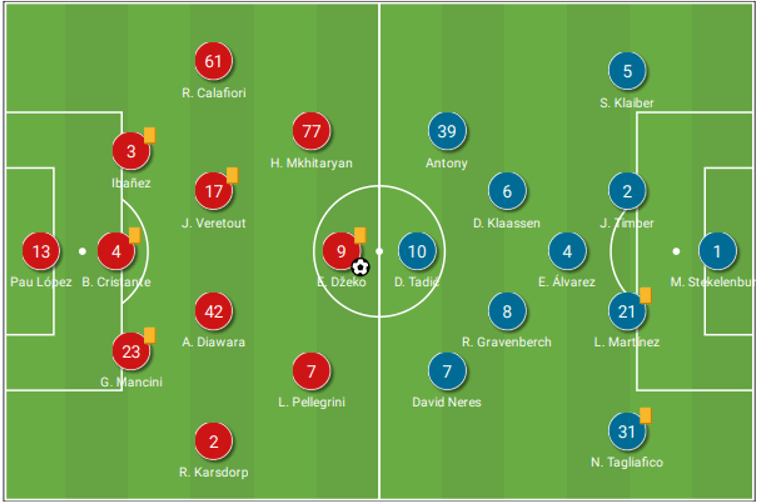
Hosts Roma deployed a 3-4-3 formation, which really spent a lot of time being a 5-3-2 or 5-4-1 under the pressure of the Ajax attack. The back three consisted of Ibañez, Bryan Cristante, and Gianluca Mancini – Rick Karsdorp and Riccardo Calafiori playing as the wing-backs. Jordan Veretout lined up next to Amadou Diawara in the centre of the park, who also spent a lot of the game undertaking defensive duties. Goalscorer Edin Džeko lead the line.
Erik ten Hag set his Ajax side up in their 4-3-3 formation, with just the one defensive midfielder in Edson Álvarez, allowing Davy Klaassen and Ryan Gravenberch to have more of an attacking influence on the game. Antony and David Neres occupied the wide areas, with Dusan Tadić as the striker. Of course, there was no Seb Haller due to the error that saw him left out of Ajax’s Europa League squad.
Roma’s robust defending
In recent weeks, Roma have been no strangers to playing with less possession and being under immense pressure from the opposition, and they were up for that fight again in this tie. To their advantage, however, they were able to predict what kind of tactics they would have to deploy due to Ajax needing a goal to get back into the game on aggregate. As we see below, their wing-backs were absolutely vital in allowing Roma to carry out their plans.
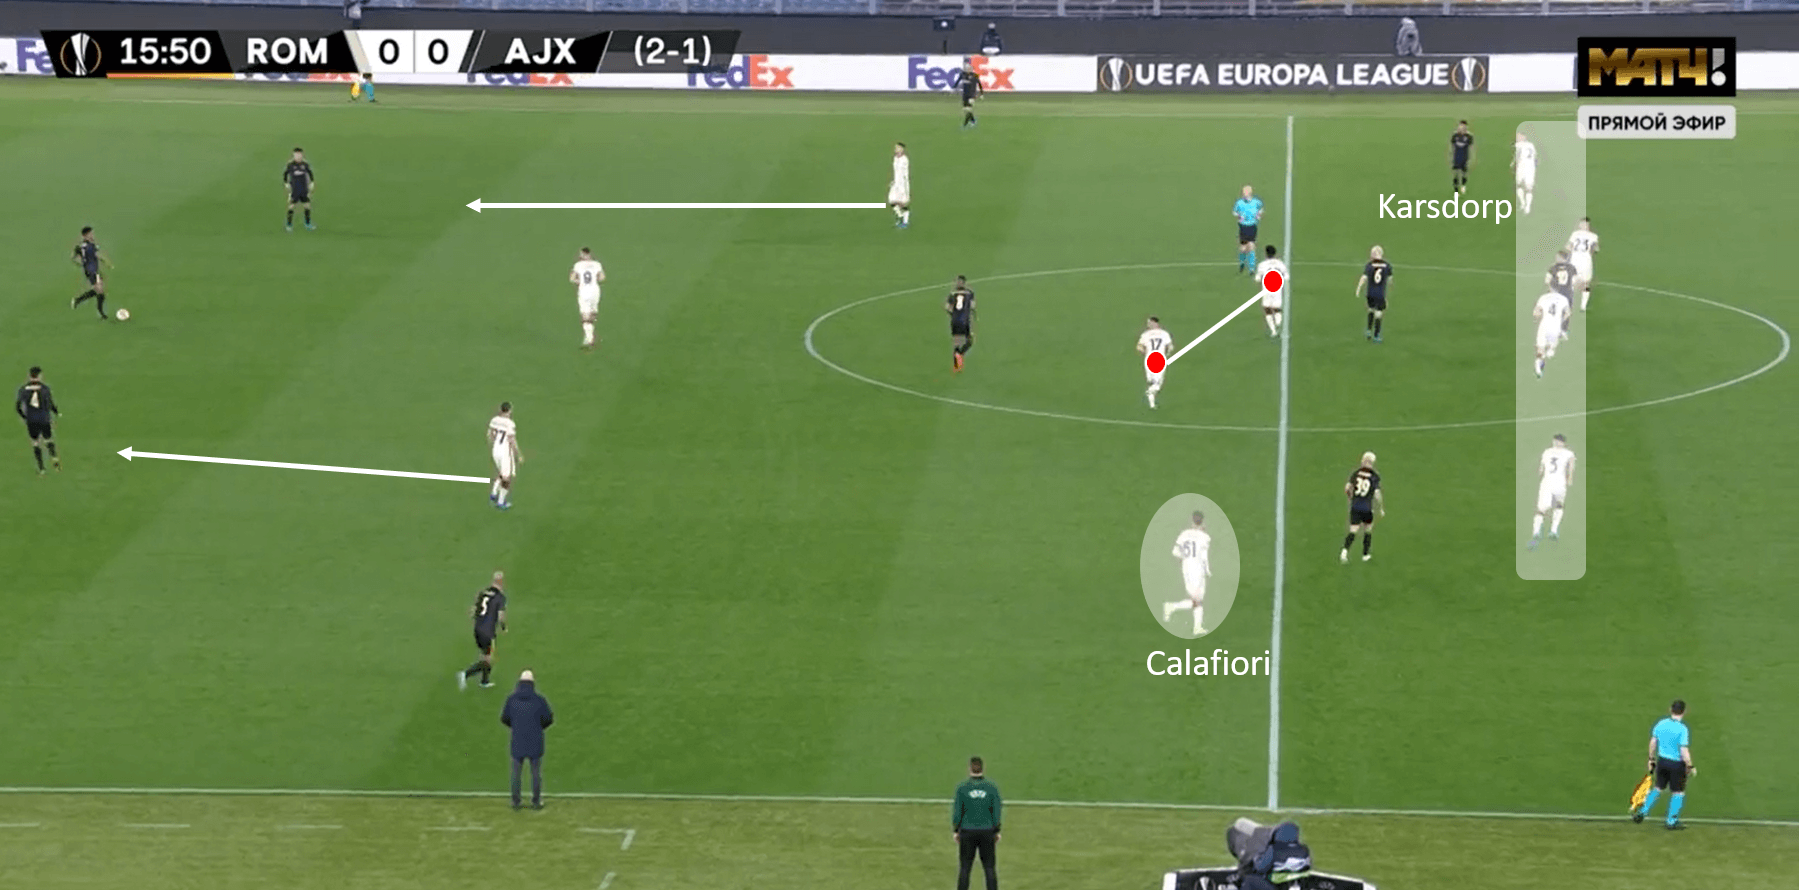
Roma would occasionally transform into a flat back four, with the wing-back of the opposite side of the side of Ajax’s possession tucking into a more traditional full-back position. The wing-back on the far side, Calafiori in this case, remains a little further up the pitch, holding almost a half-back position to occupy to Ajax right-back – should he choose to. As we can see from the next analysis image, Roma were well-drilled and prepared to play in this way. It is also noteworthy that Roma, despite the amount of defending they were required to do, maintained a high-line in close proximity to their midfield unit, which added to Ajax’s struggle,
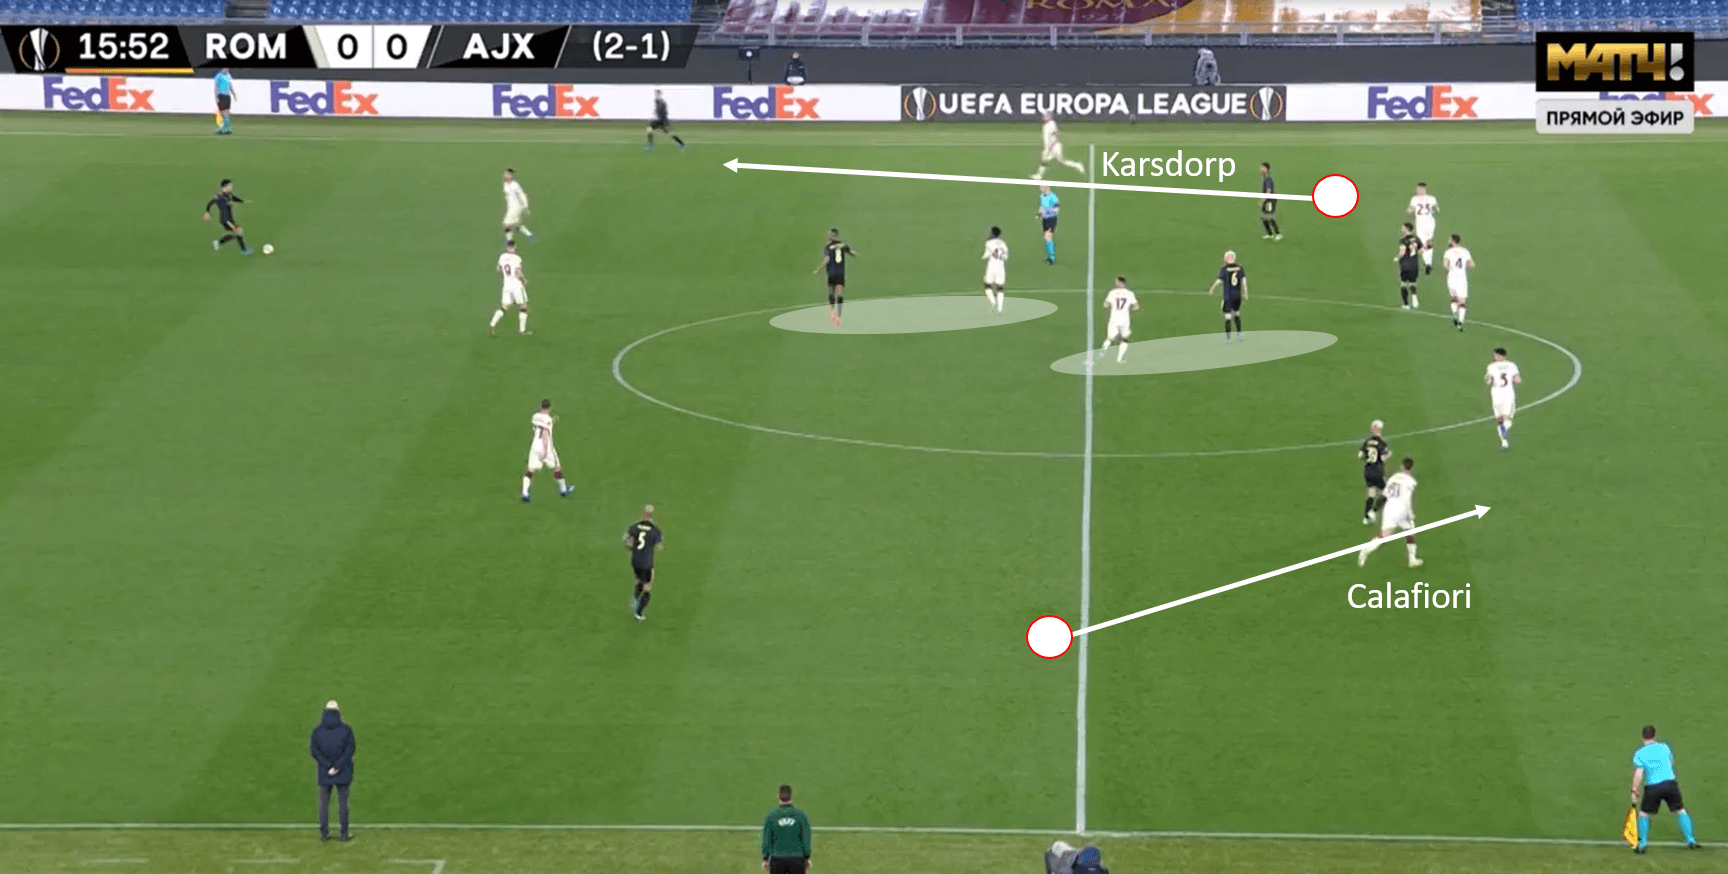
As Ajax’s possession drifts to the left flank, they execute the switch which allows Karsdorp at right-back to resume the role of the wing-back and apply some pressure to Nicolas Tagliafico (Ajax left-back). As this happens, Calafiori tucks inside to join the backline, allowing Roma’s defensive shape to stay intact and give Ajax very little room to manoeuvre.
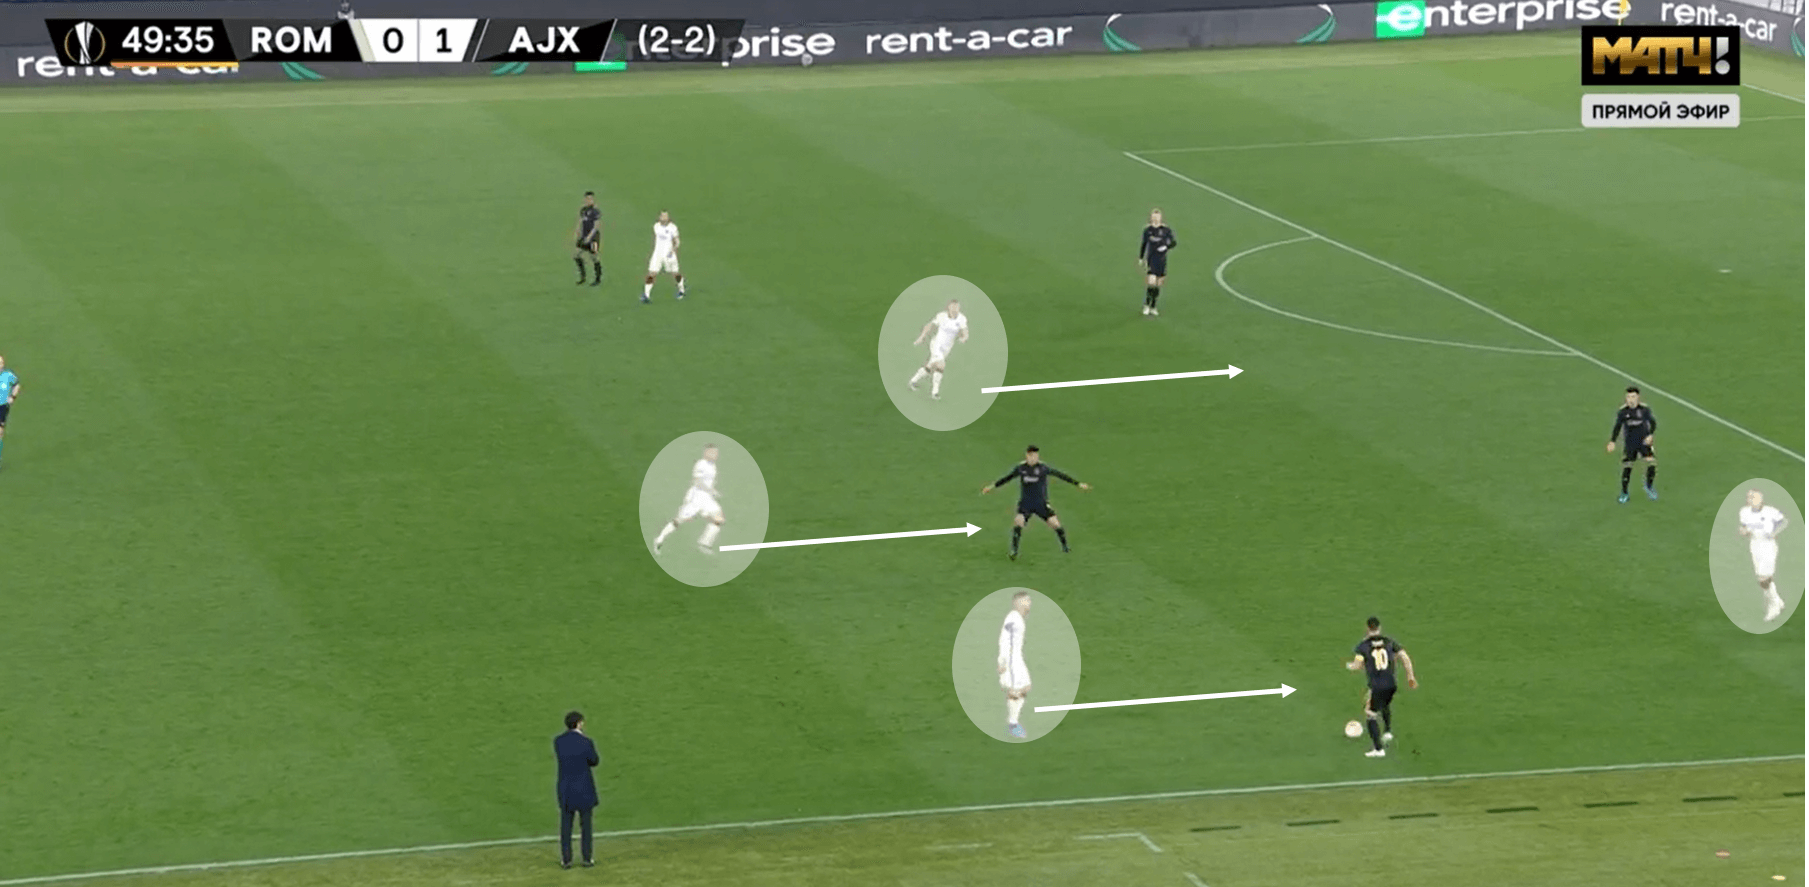
Roma’s defending wasn’t just impressive when they were pinned into their own half – they also demonstrated good know-how of pressing in Ajax’s half to cause the Dutch side to struggle in making it out. Reacting upon the occurrence of a pressing trigger, we would see the front 3 of Roma, and occasionally a midfielder, apply pressure to Ajax when they had possession in their own half. These triggers included a poor touch that caused the Ajax player to turn and face his own goal with the ball, too much time taken by one player on the ball, or a pass that had a lack of pace.
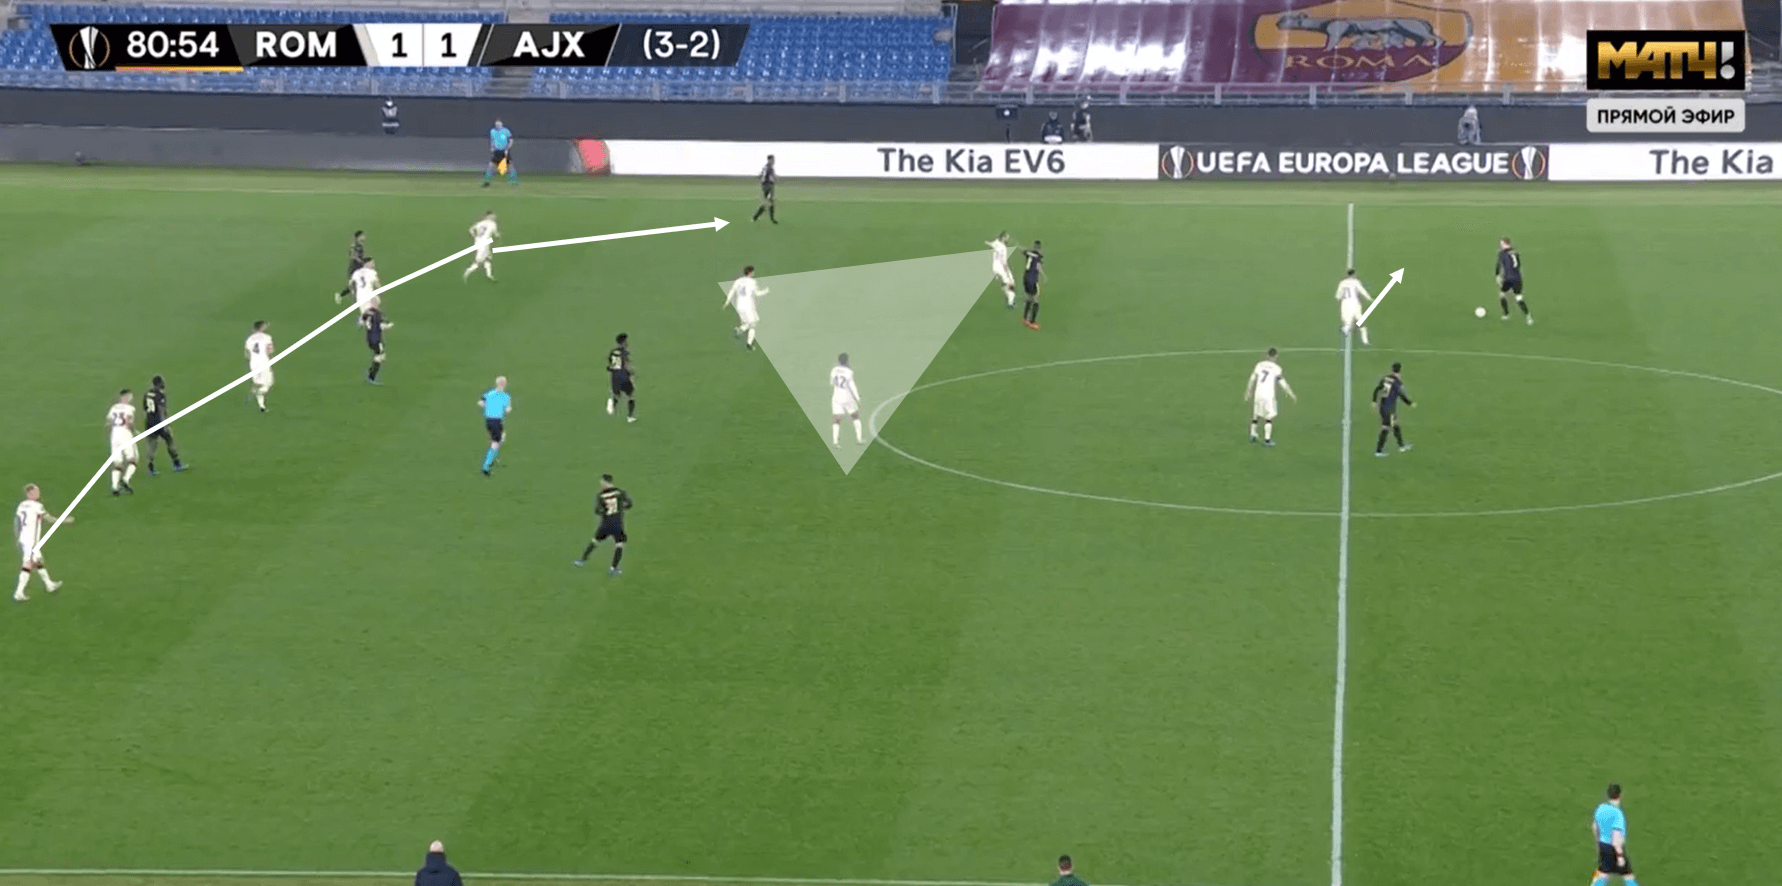
In this analysis example, we see how Roma sometimes adjusted to a shape that allowed Ajax space in their full-back areas but set up their midfield and defence that made it next-to-impossible for Ajax to penetrate. The back 5 were compact but remained compact and organised, while not caving in and dropping deeper. The triangular shape applied in midfield also left very little space for Ajax centrally, while the front 2 for Roma hurried the Ajax backline by applying minimal pressure.
Roma pick their moments
Coming into the second leg, Roma didn’t require another goal, which is why they didn’t hugely commit to sending players forward on many occasions. We would see them explore a few different avenues of counterattacking, as analysed below.
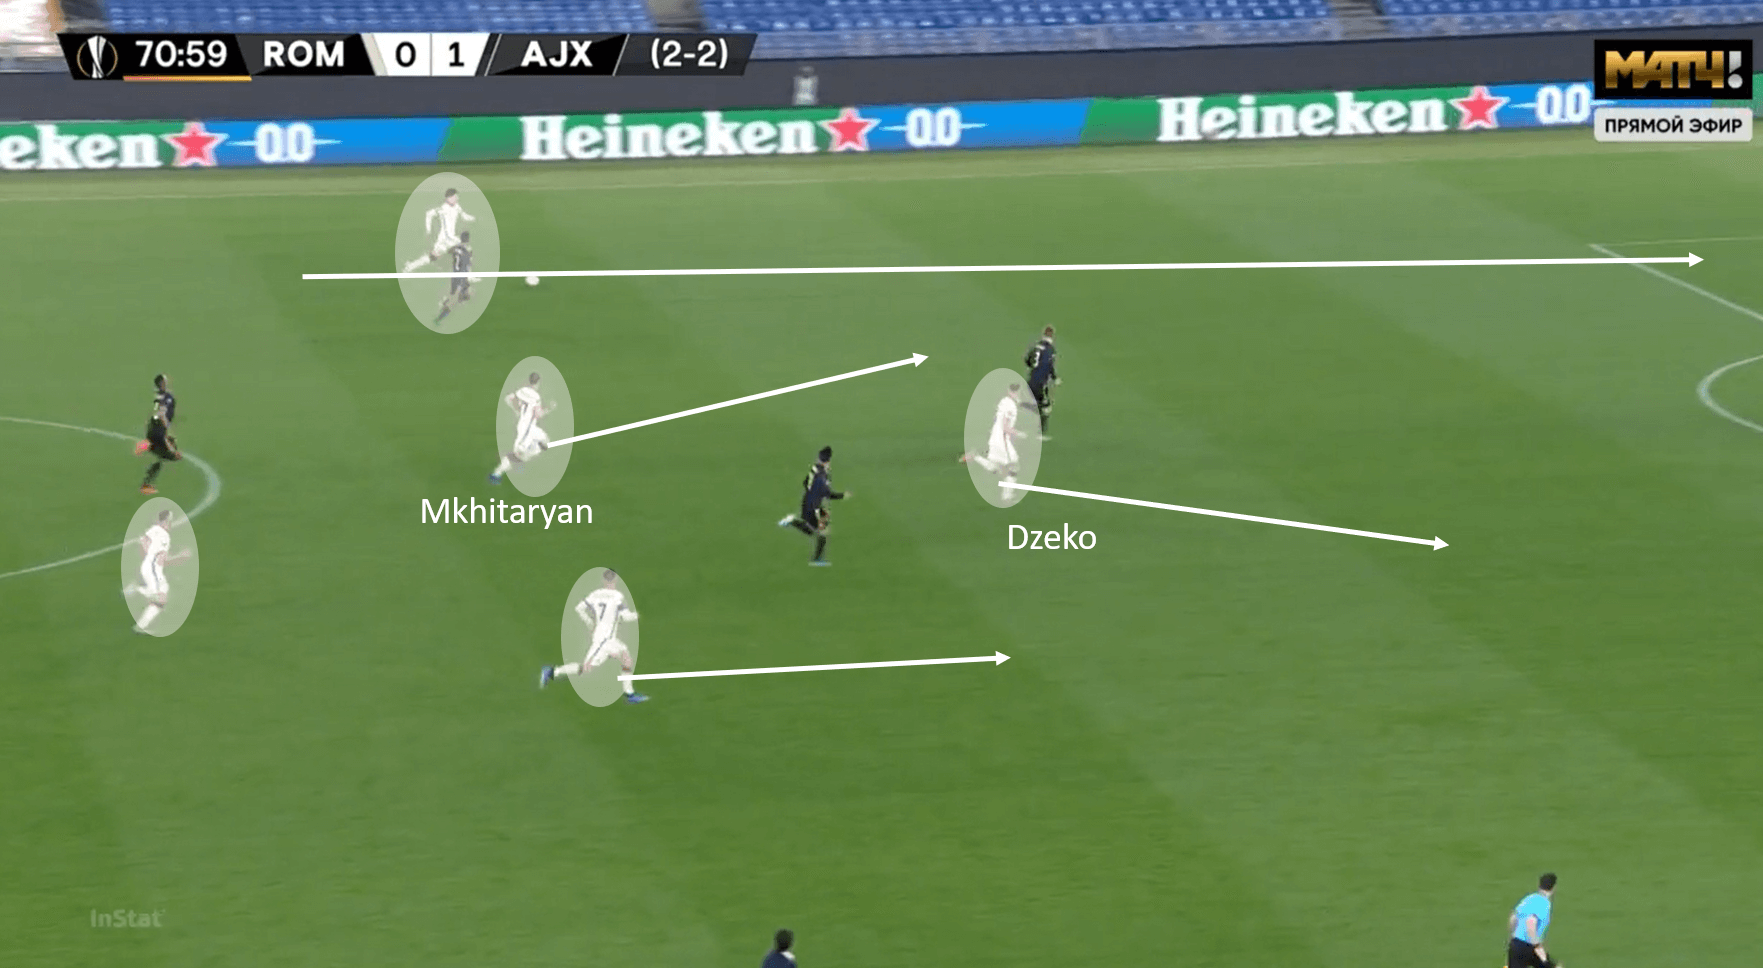
In this first example, Ajax’s failed corner allowed their counterparts to break out in numbers and exploit spaces left by the visitors. Mkhitaryan started the move with a clever pass on the spin which sprayed the ball out wide to the opposite flank where there was more space to work with. From there, Roma outnumbered Ajax which allowed the free players to take up dangerous positions. The attack came to a desirable end for Roma when Dzeko peeled away from his marker, and a deflected cross fell to his feet before the Bosnian striker buried the chance.
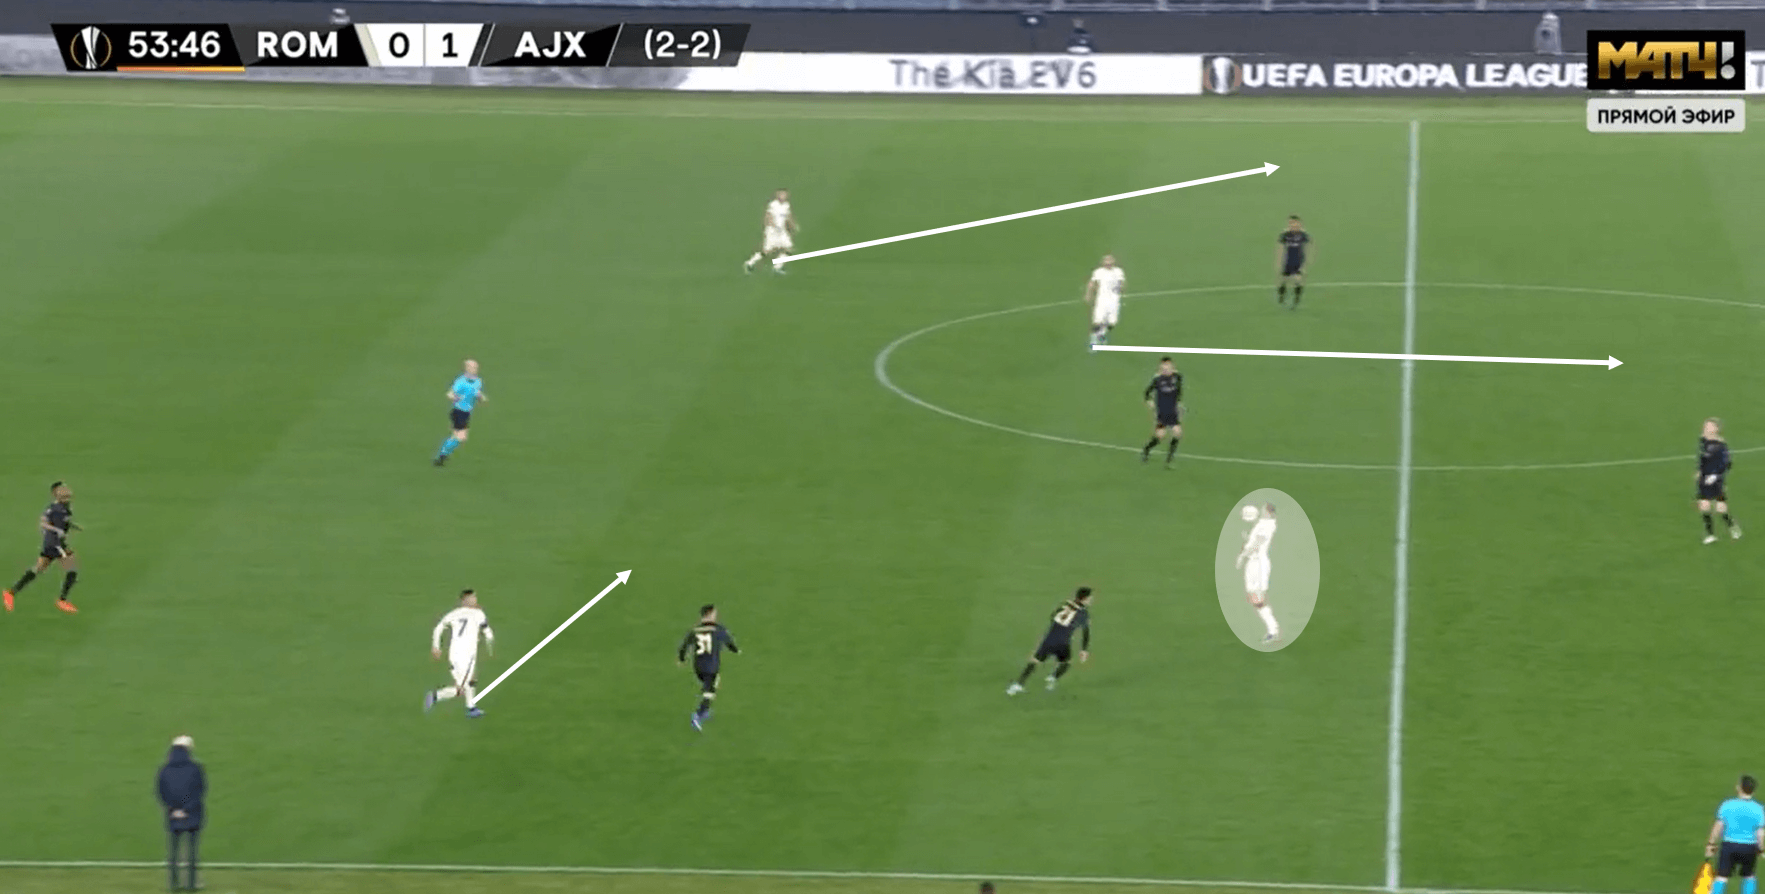
Edin Dzeko also served as a useful outlet in some situations. He would drop deeper, and since Ajax committed a lot of players forward, the striker would have some room to control the ball and hold it up momentarily before releasing a pass. As he received the ball in positions such as the ones above, we see runners making their move in a variety of area – one of them again being the opposite flank.
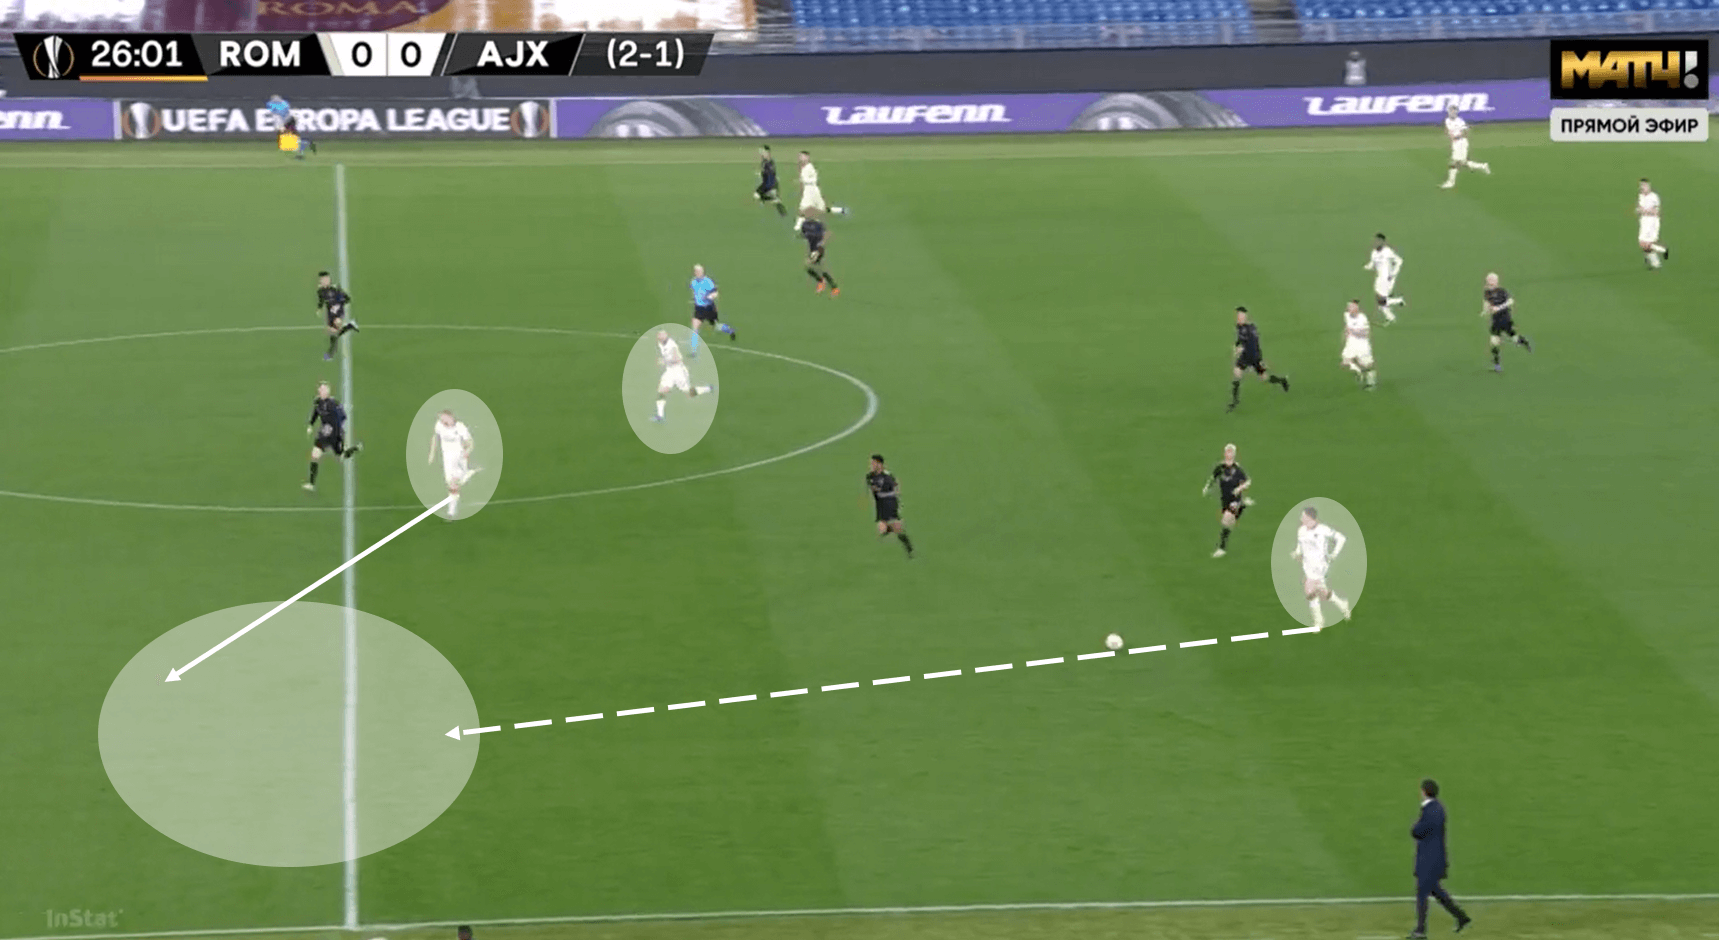
As mentioned, two important elements in the counterattacking mentality of Roma was to A) exploit spaces out wide due to the Ajax full-backs assisting in attack and B) Edin Dzeko using his physicality to bring other players into the equation. We see this above, as they look to capitalise on a turnover in possession. This wasn’t the most successful strategy in terms of attacking success, but it was helpful in allowing them to hold the ball for a few seconds with less pressure.
What did Ajax do with all that possession?
Despite having 72% possession and a pass accuracy of 86%, Ajax only managed 10 shots on goal, with just 3 being on target. Much of this was down to the defensive tactics set by Roma which made it difficult for the Amsterdam club to play through the thirds, but there were areas that Ajax could improve in to attack with more fluidity and poise.
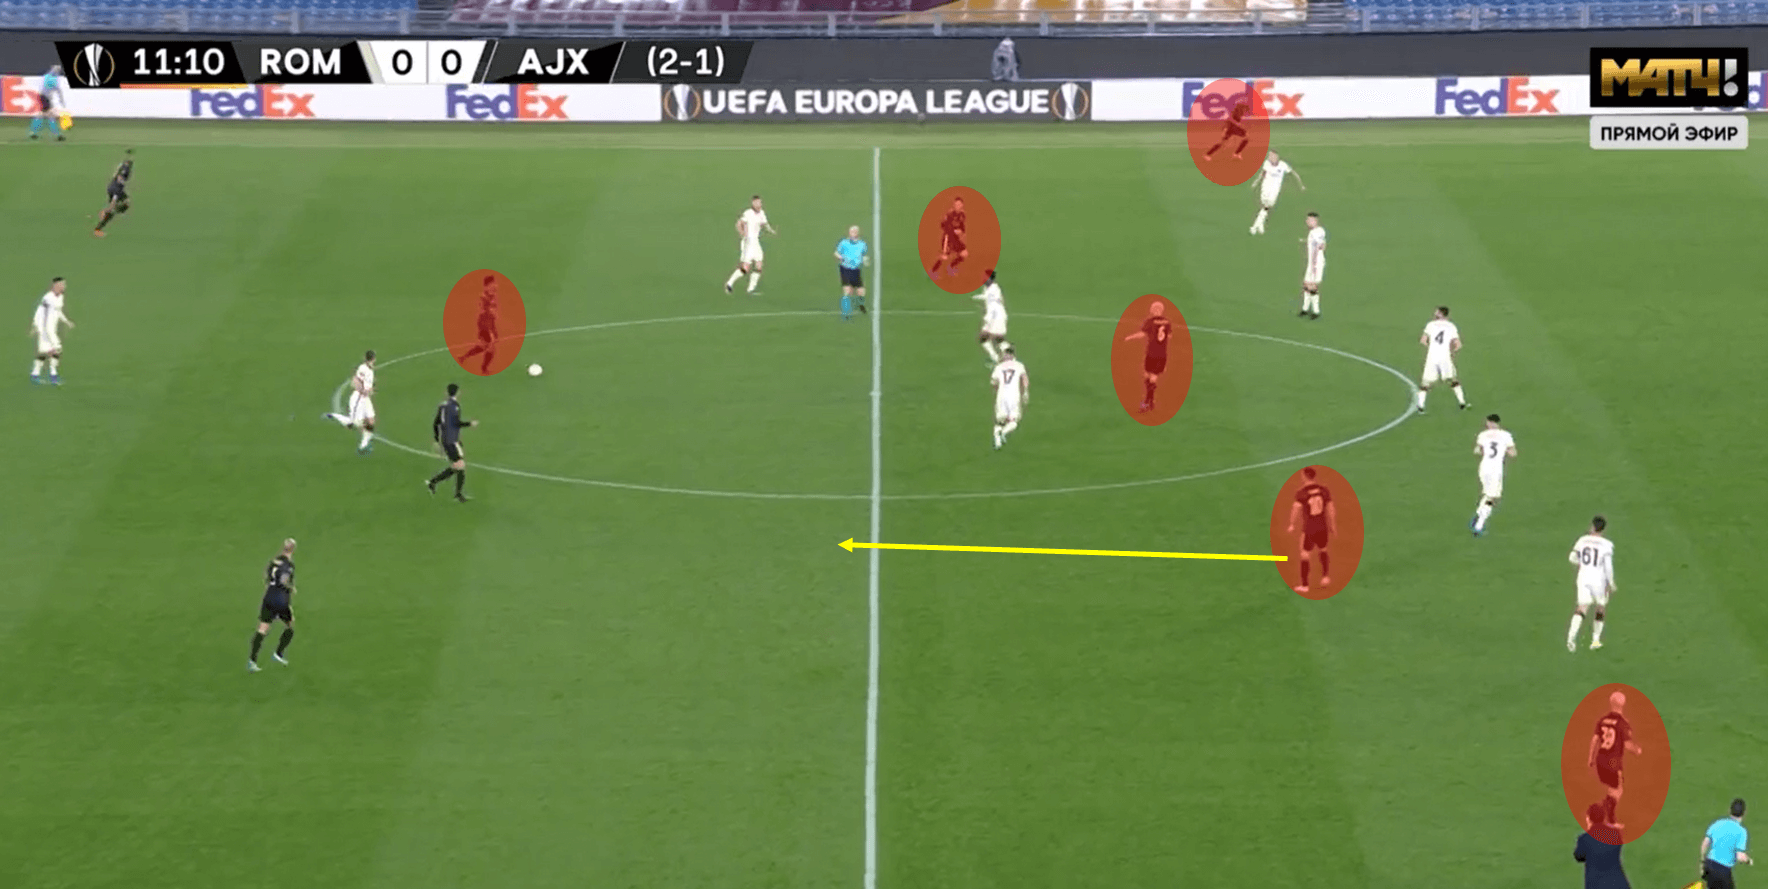
As we can see, the intent is all there for Ajax to attack with numbers high up the pitch. Their issue in this instance, and so many others, was the positioning of passing options. Alvarez has set himself up to progress the attack, and despite having 5 players forward, none of them are really in helpful positions – apart from the wingers who are occupying the wing-backs well. To combat this, we have highlighted that Tadic was in a perfect position to drop to the half-way line, where he could receive the ball on the half-turn and have a much better chance of progressing the attack.
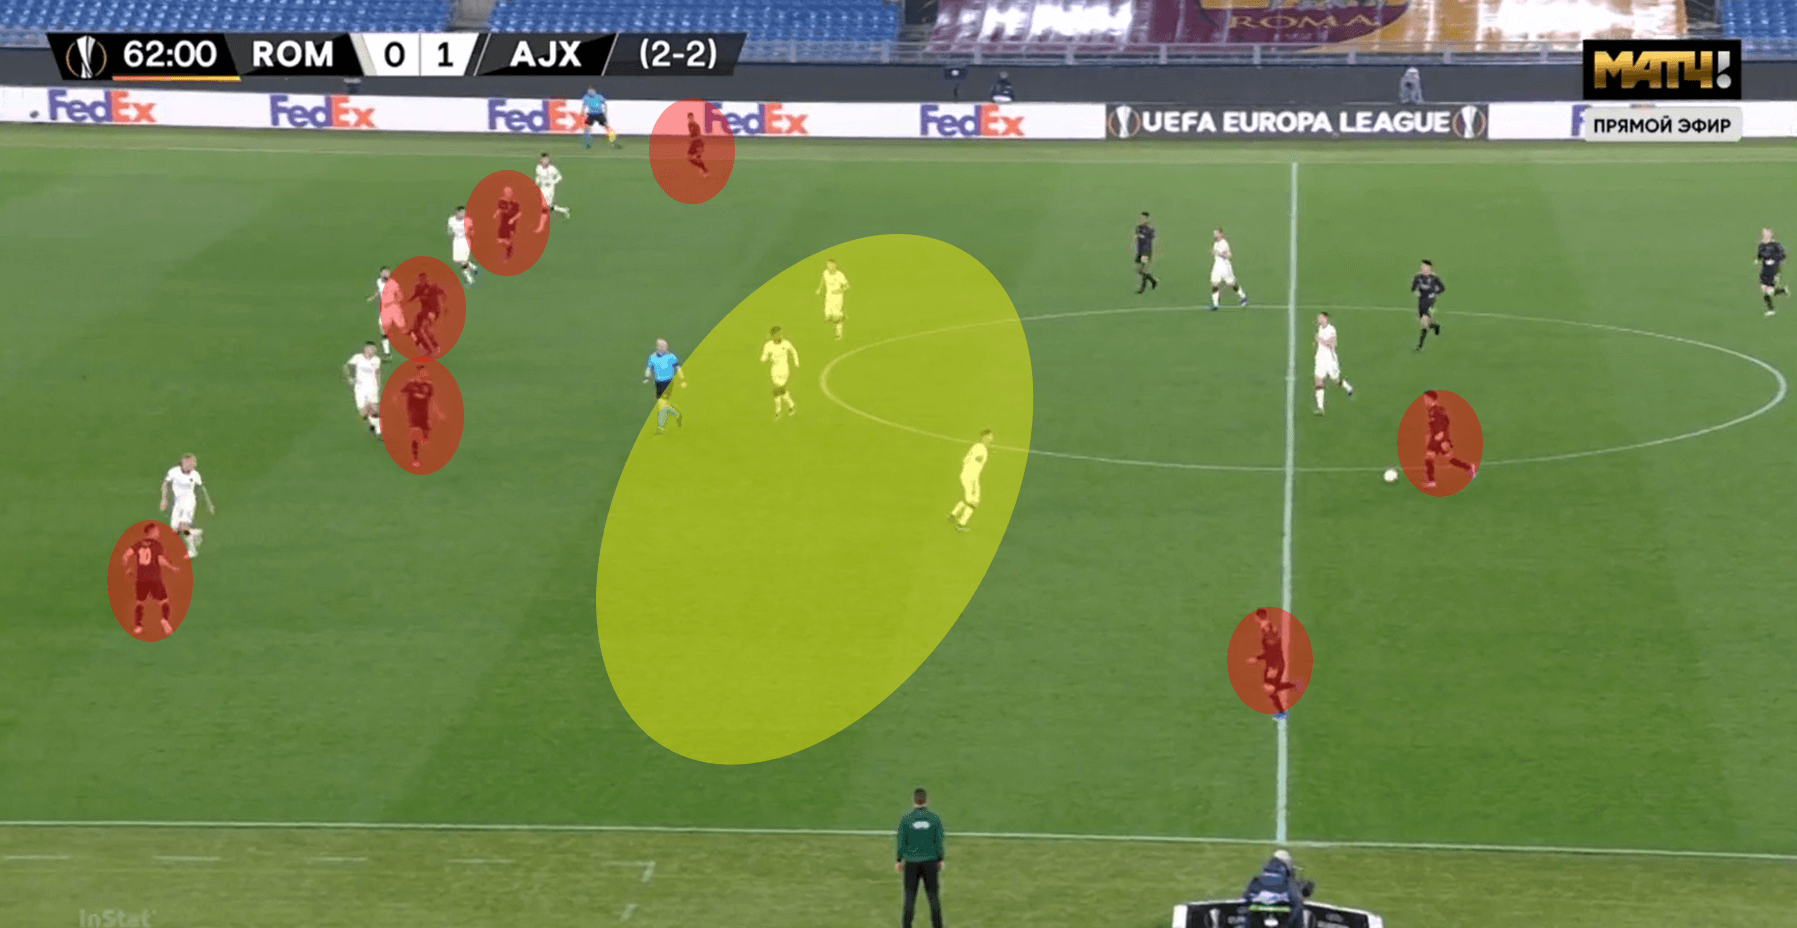
Ajax had a similar issue on other occasions in regards to not having options in close proximity. Often, they would send all/most of their midfielders forward to position themselves in-line with the defenders – this would be an effective method if they had a player drop in a little deeper to link up the play. In central areas, Ajax don’t have the quickest players, making it difficult to execute that killer-ball over the top/through the defence. If they had a creative player, maybe Ryan Gravenberch, in the yellow zone, he would be able to link up the attack, whether that would be playing into wide areas or into the middle.
Conclusion
Roma were the deserved winner having won the battle tactically. Ajax demonstrated a clear understanding of their instructions, but they need to implement a plan B, as well as a solution to teams who defend in the way Roma did. To Roma’s credit, this eliminated Ajax’s threat apart from one brilliant ball over to the top, which is where their goal came from. If Roma can maintain this defensively solidarity, that will serve them very well in the remainder of the 2020/21 Europa League.


Comments