After quite some time the UEFA Nations League made its return and in group 1 of League B, we have four teams on the same level, making it one of the most interesting groups of this tournament. On the first matchday, Norway hosted Austria while in the other match of this group Northern Ireland faced Rumania.
Austria played in this first match of the UEFA Nations League without their two greatest stars; David Alaba who is on holiday after winning the UCL with Bayern Munich and Marko Arnautović who currently plays in the Chinese Super League. This would make his time at the national team very complicated due to the coronavirus. On the other side, Norway had their newest superstar Erling Haaland with them, but Martin Ödegaard of Real Madrid was not available.
In this tactical analysis, we will look at the tactics of both teams which led to the 2:1 victory of Austria over Norway.
Starting line-ups
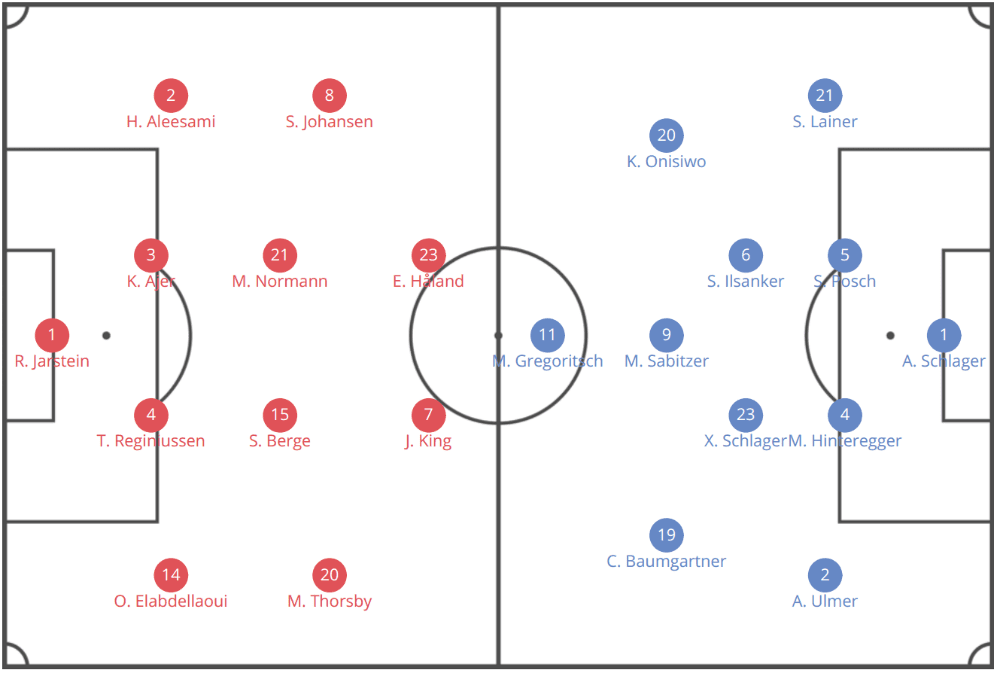
The coach of Norway Lars Lagerbäck went with his typical 4-4-2 formation with Rune Jarstein in goal, Haitam Aleesami and Omar Elabdellaoui as full-backs and the central defence was made of Kristoffer Ajer and Tore Reginiussen. Sander Berge and Tore Reginiussen played in the central of midfield and Stefan Johansen as well as Morten Thorsby had the task to provide width. The greatest quality and fear was clearly in their attack with Joshua King and Haaland.
On the other side, Franco Foda lined up his team in a 4-2-3-1 formation with Alexander Schlager between the sticks while the back four was made of Andreas Ulmer, Martin Hinteregger, Stefan Posch and Stefan Lainer. Stefan Ilsanker and Xaver Schlager played in front of the back four and the three offensive players behind the lone striker Michael Gregoritsch were Christoph Baumgartner, Marcel Sabitzer and Karim Onisiwo.
Austria’s build-up structures and Norway’s compact 4-4-2
Austria were clearly the side in this game which dominated the match, had more possession as well as more goalscoring chances while Norway mainly sat back deeper in a compact 4-4-2 block. Occasionally and especially more frequently in the second half, Norway tried to press higher. However, it was not that efficient as not the whole team pushed forward together, which meant that Austria would always have at least one free player.
In the first section of this tactical analysis, we will focus on the different build-up structures of Austria during the game since for a huge majority of the game we saw that they passed the ball around at about the height of the halfway line and looked for a forward pass while Norway just waited for them to make a mistake.
Occasionally they dropped even deeper to lure out Austria and have then more space for the counter-attacks. Below, we can see an example in which they defend with 10 men very deep in their own half.

However, Foda probably expected exactly that low block from Norway and therefore wanted his team to be variable to firstly not just attack and build-up with one pattern throughout the 90 minutes and secondly to exploit the different strengths of his players. In the image below I illustrated the basic structure of Austria during the opening phase of the build-up to get a first feeling for their positionings.
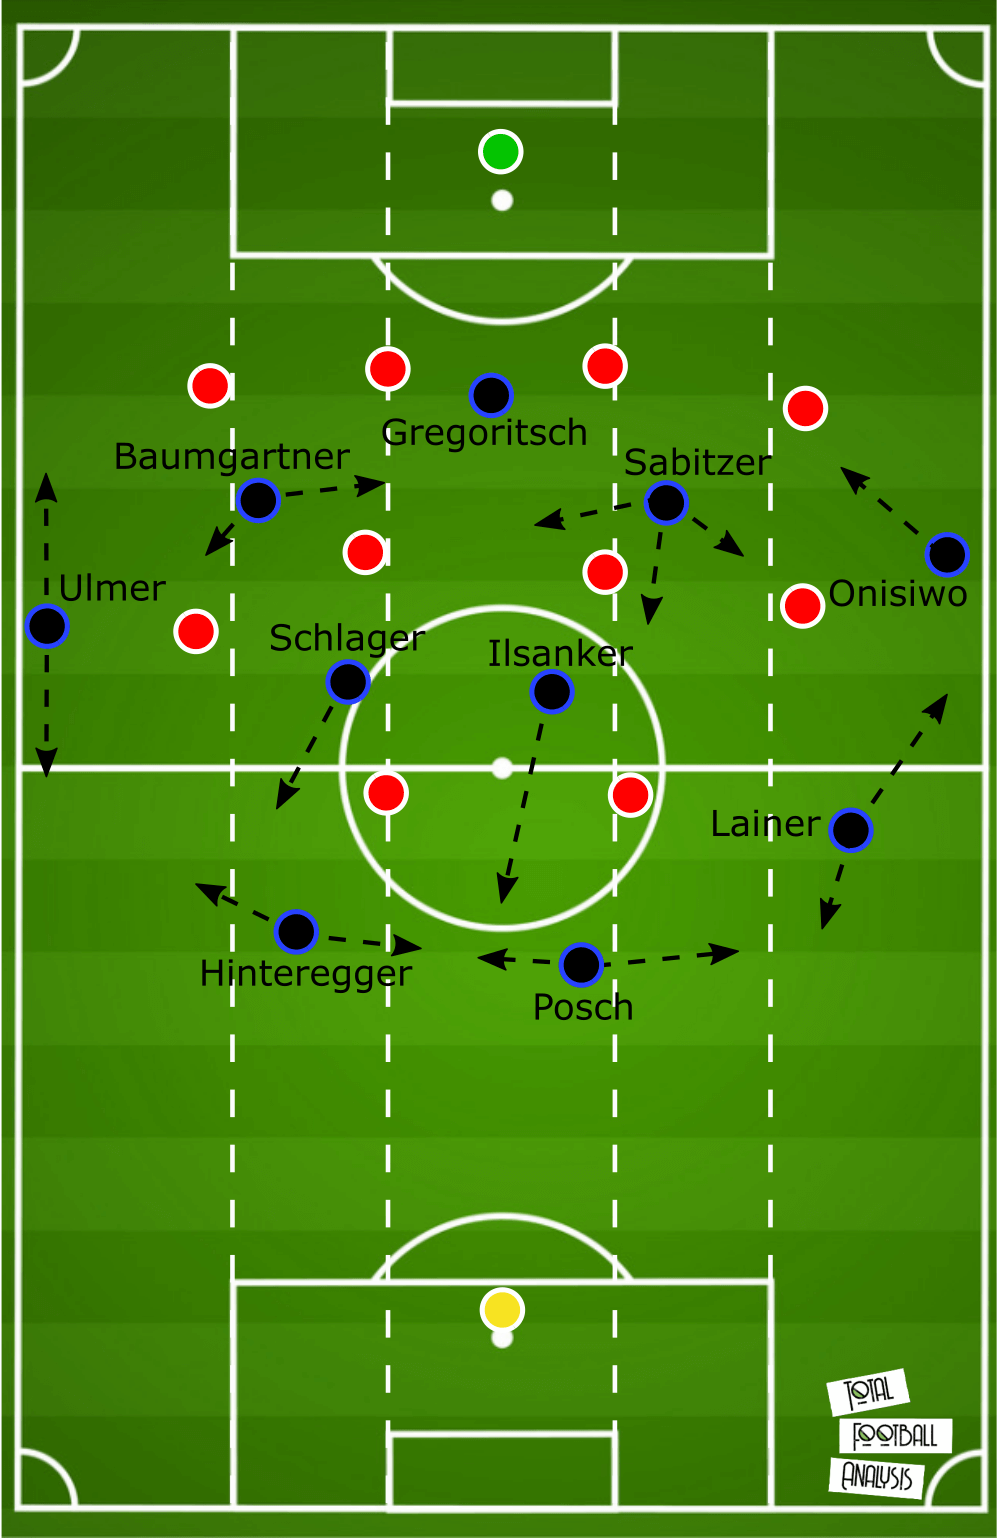
Here it is interesting that Foda wanted his team to build up their attacks in almost every situation patiently with three players at the back. They used different movements to create this back three and also Austria used several ways to progress the ball, as we will see in the second part of this tactical analysis. The most common way to create the back three was that Ilsanker would drop between the two centre-backs who split wide and give the full-backs the chance to push forward while the wingers tucked in to not occupy the exact same space.
Then, Schlager logically had to stay a bit deeper to give them at least one option in the deeper areas in the centre. Sabitzer had throughout this game much freedom and sometimes then dropped deeper to support Schlager in the centre. We can see below an example of Ilsanker dropping between the centre-backs.
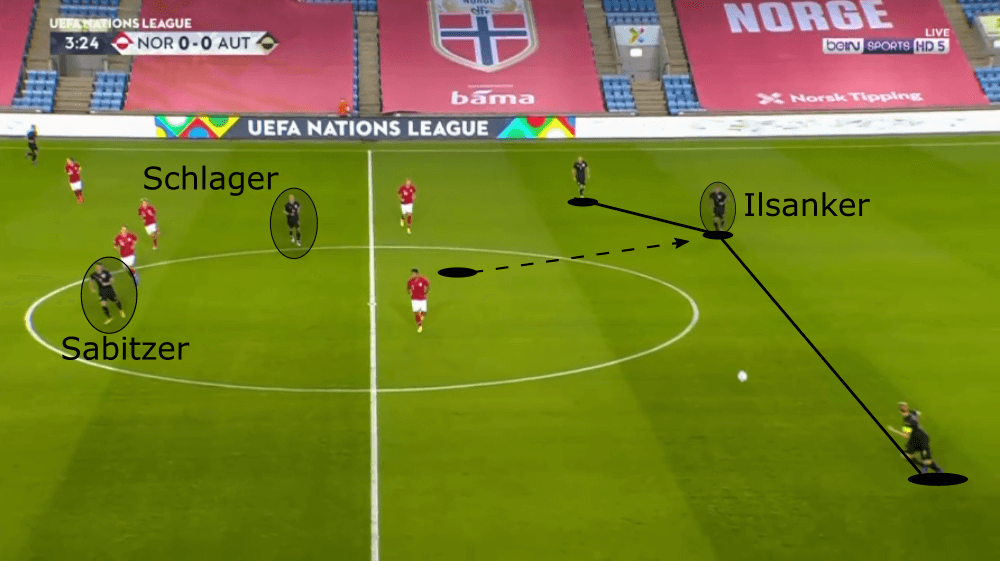
When Ilsanker dropped between the central defender, Hinteregger had on the left side the option to dribble forward and then play decent passes from the left side into the centre what is one of his central strengths.
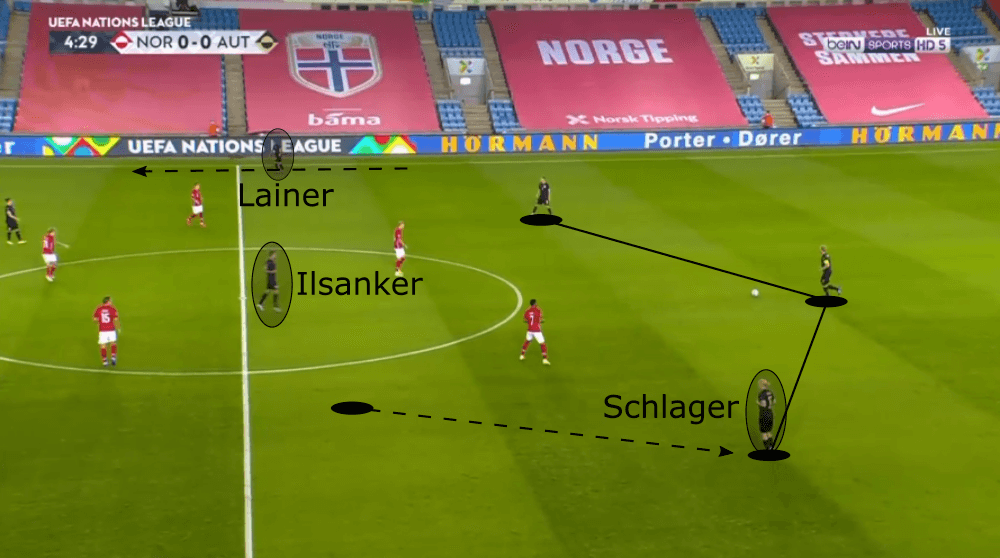
However, Hinteregger has also the ability to play great diagonal passes to either wing to exploit the deep runs of the full-backs. To be in the perfect position for that, he needed to be in the centre of the back three and both full-backs have to be in higher areas to receive such passes. To create this situation, the left defensive midfielder (Schlager) dropped on the left side to be the third man. Additionally, Schlager is more dynamic compared to Ilsanker and he more likely starts forward dribbles from this position. An example of Schlager dropping to the left side can be seen below.

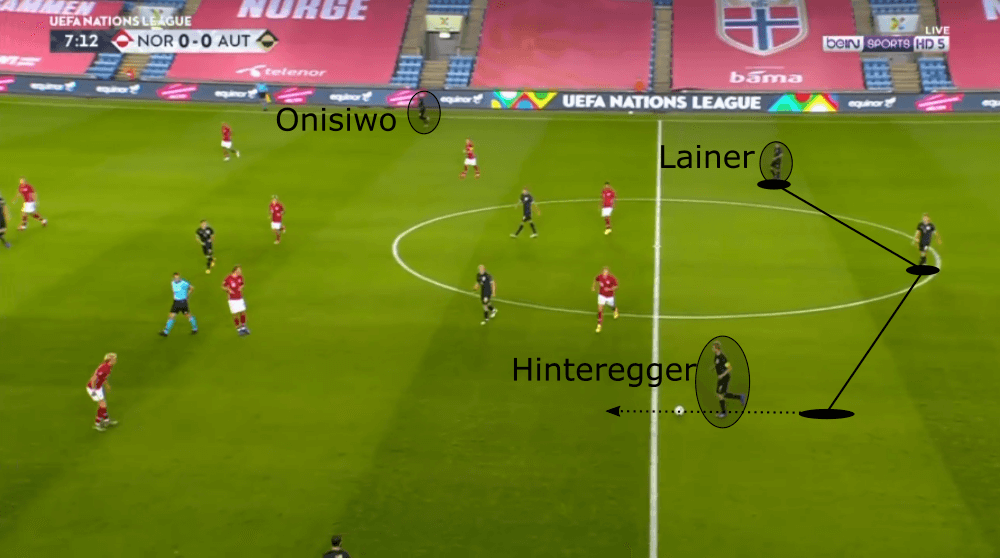
The third way to create the back three was to let Lainer not run forward, but stay deeper. We saw throughout the game a slight asymmetric approach since Ulmer always immediately moved forward and Baumgartner positioned more centrally while on the other side Lainer mainly stayed a bit deeper and started his deep runs at a later stage of the attack.
As long as he was positioned as deep as in the example below, Onisiwo stayed near the touchline and provided the width. Another reason for that slight asymmetric approach was probably that Baumgartner feels very comfortable in the half-spaces while Onisiwo can exploit his technique and pace better on the wing.
How Austria tried to progress the ball and create chances
In this part of the tactical analysis, we will have a look at Austria’s tactics for the progression of the ball and how they tried to create goalscoring chances. Since Baumgartner permanently moved to the centre to join there Sabitzer & Gregoritsch and Onisiwo did so on occasions, there were sometimes quite a few Austrians in the centre in the final third.
This was for two simple reasons: Firstly, by having so many players in the centre further up the pitch, they had in this area enough players to receive line-breaking passes from Hinteregger or Schlager and lay them off. Secondly, as soon as the ball was played wide towards either full-back, there were enough players in the centre to convert deliveries into a goal. Austria’s opening goal in the first half was scored by Gregoritsch after a cross by Ulmer and Baumgartner almost scored by a header in the second half showing that this was an effective plan.
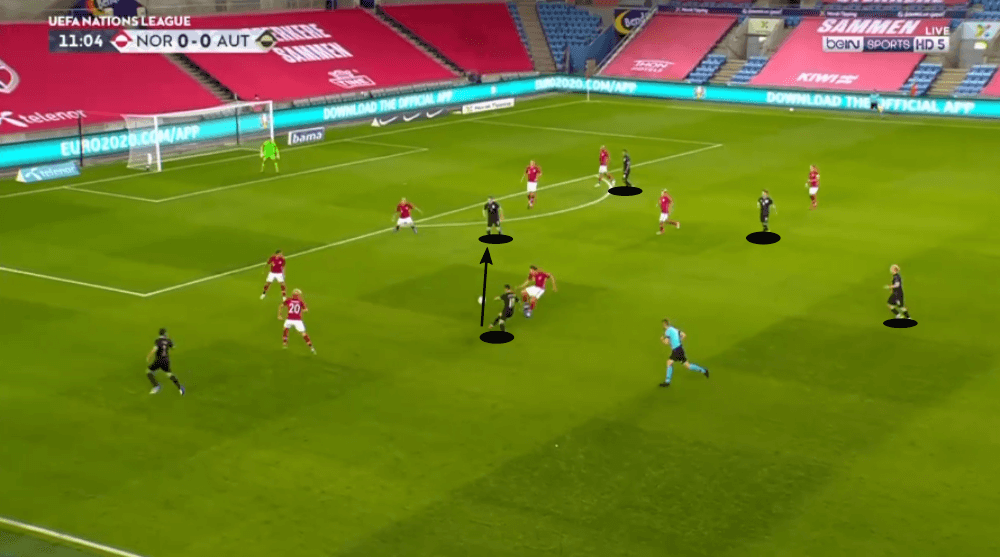
Another reason behind the pattern was that Lainer started his forward runs at a later stage during the attack while Ulmer permanently stayed higher. By letting Lainer start his runs in deeper areas, it enabled him to pick up speed before he entered the final third. This meant that it would be harder for the opposition to defend against him. Additionally Austria could get themselves in a very dangerous situation if they were able to exploit that with through passes like the one in the example below.
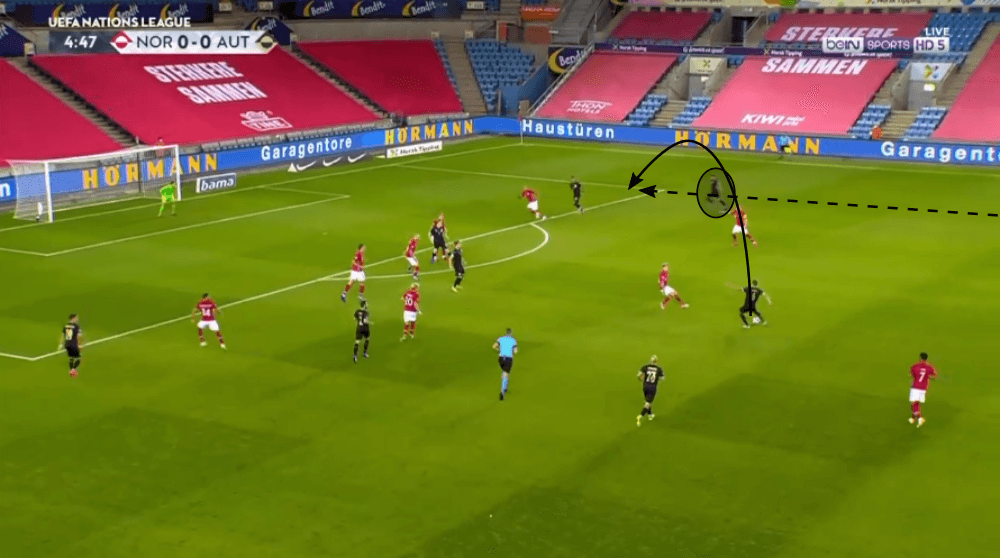
Besides, Ulmer is already 34 years old and not that fast anymore. He can exploit his strengths more when he has the ball at his feet rather than receiving through passes. Considering this, the slightly asymmetric formation by Foda made perfect sense.
Anyways, the man in Austria’s squad who was most of the time responsible for the progression of the ball was Hinteregger. From a central position, he often played great through passes towards Lainer or decent long balls to Ulmer while on the left side he dribbled forward to lure a player of Norway out of his position to then play a line-breaking pass.
The player of Eintracht Frankfurt had to get subbed off after 40 minutes due to an injury, but until then he was probably the best player on the pitch by playing decent line-breaking passes like the one below.
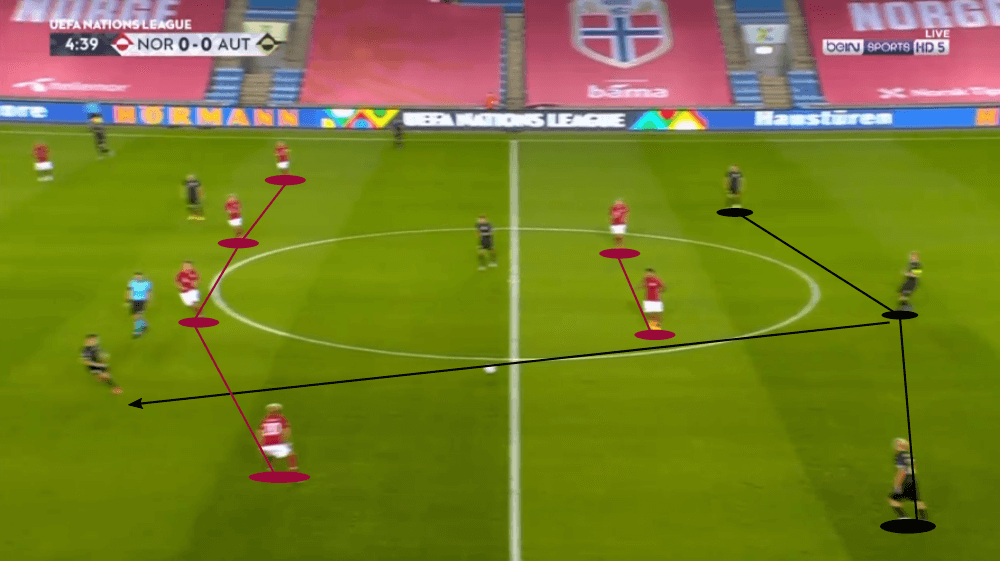
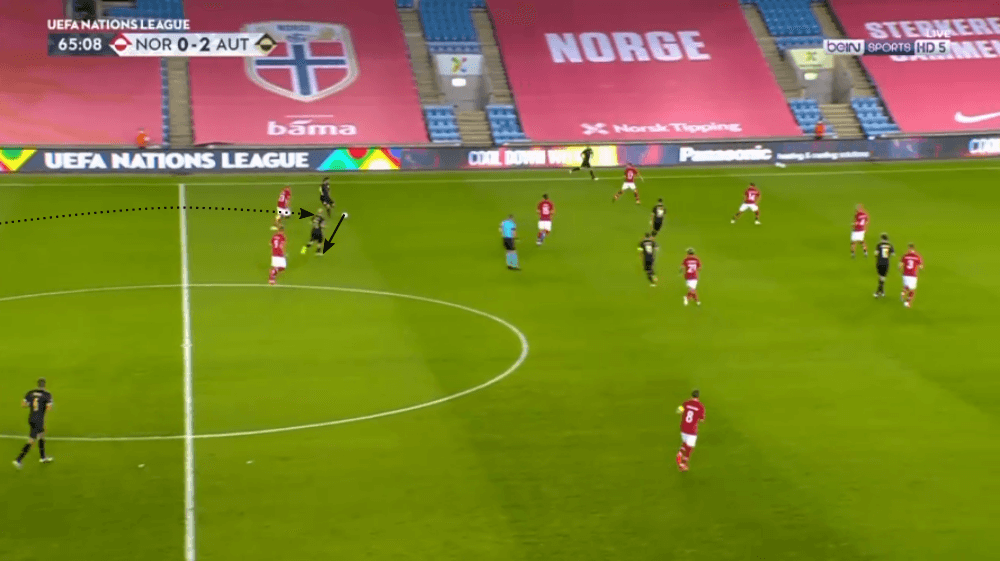
However, Aleksandar Dragović replaced the injured Hinteregger what heavily influenced the game since Dragović can not play that decent passes and additionally is right-footed. This limited his actions on the left side.
When he was able to bring himself in a decent position like in the example below, he had to go then for the simple option as he is not confident enough to play a line-breaking pass with the left foot. Due to that, Austria were less dangerous in the second half and the 2-0 in the 54th minute was a hand penalty which resulted out of a set-piece. This clearly showed how important Hinteregger was for the offensive tactics of Foda.
Exploiting the offensive behaviour of Lainer and Ulmer
Lagerbäck and his team had the plan to hit Austria on the break and wanted to especially get dangerous during the offensive transition. The central idea was during this phase of the game to use the free space on the wings when Lainer and Ulmer were positioned higher.
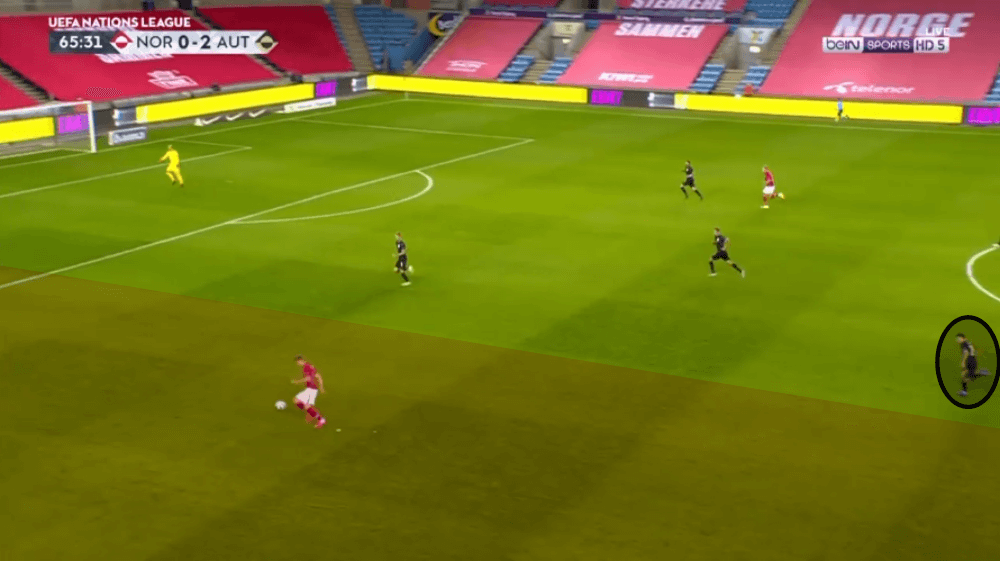
Therefore, we could often see that after the recovery they tried to play as quickly as possible forward to then exploit these free spaces in the wide-areas. Norway’s only goal of the day was scored in the 66th minute exactly out of such a counter-attack as they were able to find Alexander Sörloth in that space with a through ball. He then delivered a low cross which Haaland converted into a goal. In the image below you can see how much space he had and note how Lainer tries to get back, but he was once more positioned very high during the own possession phase.
However, this counter-attack was by far the most dangerous action of Norway in this whole game. In the next section of this tactical analysis, we will see why they had during their own possession phase a hard time to progress the ball further up the pitch while during the offensive transition Austria’s counter-pressing often stopped the counter-attacks after less than a few seconds.
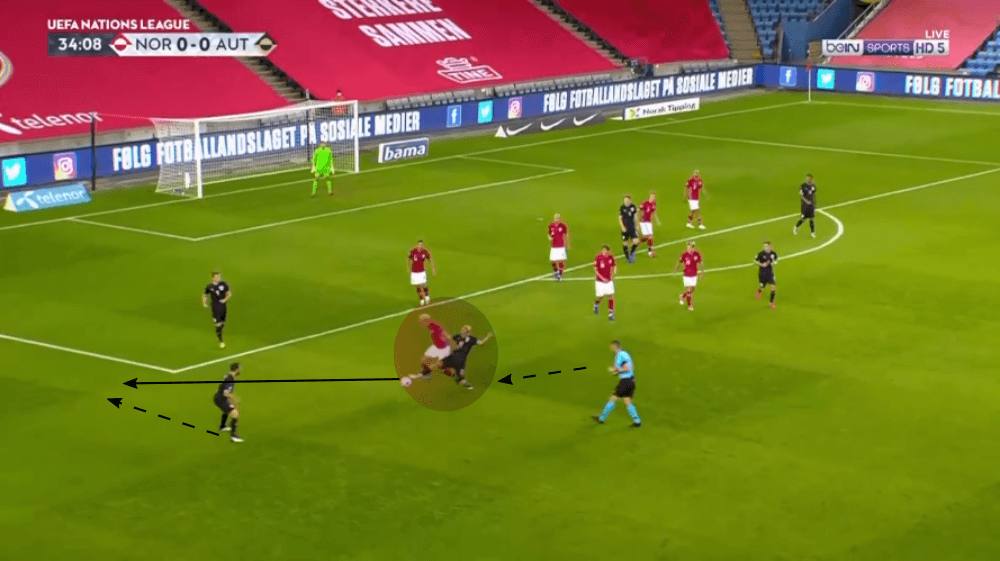
Especially Schlager was with his power and aggression very important for the counter-pressing of Austria as we can see below too. In this situation, Schlager won back the ball for his team after losing it just moments ago and with this sliding tackle, he played the ball to Ulmer who delivered the cross which Gregoritsch converted into the 1-0.
Norway’s problems with Austria’s press
In this final part of the tactical analysis, we will look at Norway’s build-up tactics and Austria’s behaviour out of possession. Lagerbäck’s team stayed in their 4-4-2 during the build-up with one central midfielder occasionally dropping deeper.
Foda decided to mirror this formation by moving Sabitzer forward next to Gregoritsch who would press the centre-backs while Schlager and Ilsanker followed the two central midfielders of the opposition. In the wide-areas, the wingers moved forward to the full-backs and Ulmer and Lainer looked after Thorsby and Johansen. Haaland and King were marked by the central defenders of Austria.
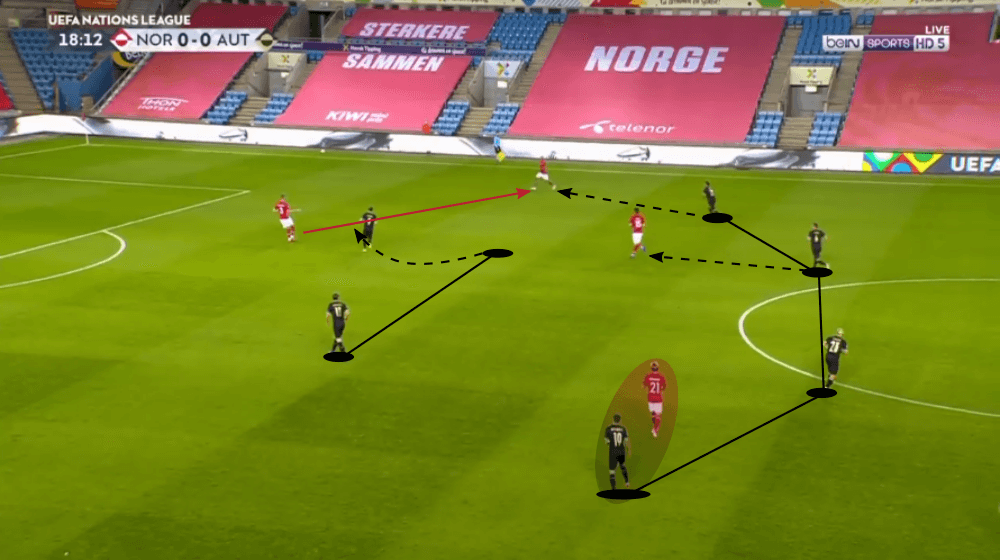
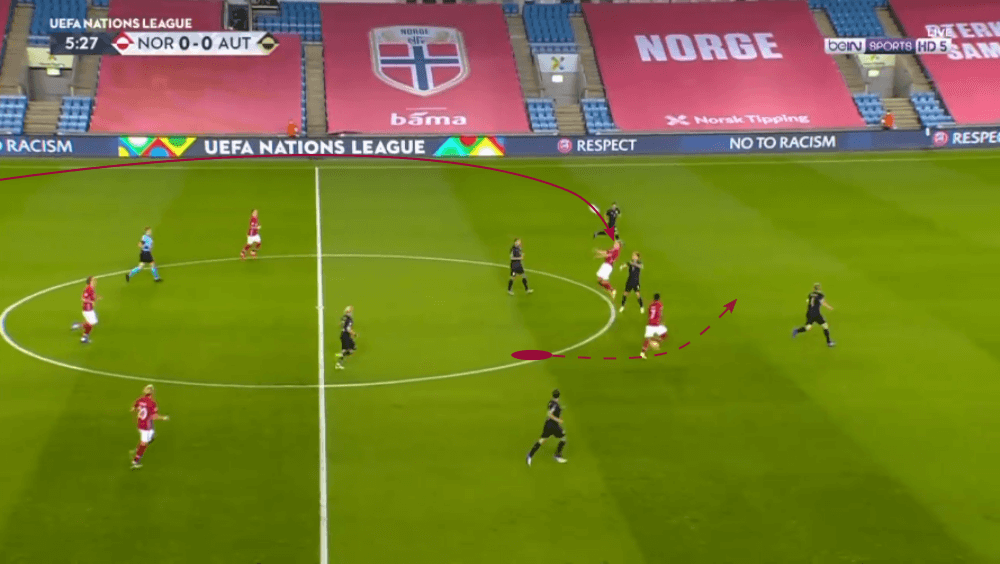
We saw then mostly that one of the two strikers used a curved run to force the oppositional centre-back to play the ball to the wide-areas where then the actual high press started. Norway tried to get out of these situations with short passes, but rarely succeeded due to the good pressing and the lack of good ball-playing men in the deeper areas. Below, we can see an example for the curved run of Sabitzer and the man-orientated approach by Austria.
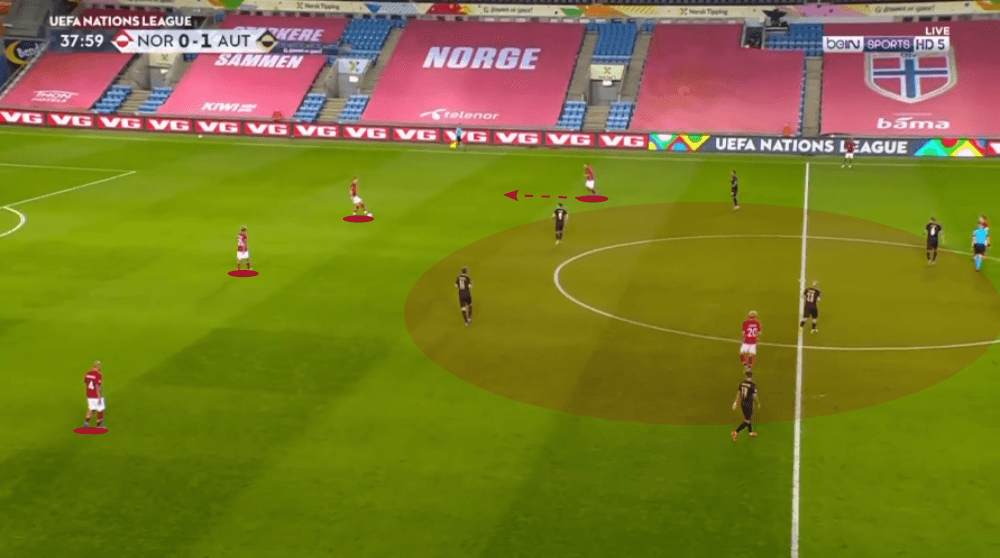
In the second half, Austria did not permanently press high up the pitch and decided to drop deeper in several situations. However, the positioning of Norway’s players was very questionable since we saw often that both central midfielders dropped quite deep while also the two full-backs stayed close to the central defenders. The wingers only slightly moved inwards, and both strikers stayed higher up the pitch. Considering this, they had almost no players in the central midfield and due to that they were rarely able to progress the ball further up the pitch since they wanted to have a build-up with short passes, but there were not options for forward passes.
We can see a perfect example below as Berge and Normann are both positioned deep, Aleesami is positioned slightly higher on the left and the winger Thorsby (#20) is the only man in the centre.
When they had no chance to progress the ball further up the pitch due to the lack of passing options or Austria’s high press, they tried to find Haaland with a long ball, with King looking to make a deep run behind the last line of the defence as they hoped that Haaland would win the header. An example is illustrated in the image below. However, Austria’s central defenders mainly won those aerial duels and additionally, Foda’s side had more players in the correct space to win the second ball.
Conclusion
Overall, Austria definitely deserved this win due to variability and good (counter-)pressing. Additionally, the performance of Norway was quite disappointing and especially their lack of ideas in possession was astonishing.
We learned additionally that Lagerbäck’s greatest weapon is currently clearly Haaland while Hinteregger is in the absence of Alaba and Arnautović the most important player of Austria.



Comments