Wrexham currently sit top of the National League and are in an FA Cup fourth-round replay with Sheffield United after an incredibly impressive performance in the first game.
Wrexham have this season scored 23 goals from set-pieces, with 7 of those goals coming off the back of long throws into the box. Ben Tozer’s amazing and rare ability to launch a long throw-in and around the six-yard box, with a low trajectory and fast pace, has made Wrexham a danger from any throw-in in the final third, with this being a very rare method of chance creation that when you go climbing up the ladder, only Brentford are capable of in the Premier League.
In this tactical analysis, we will delve into the tactics used by Wrexham during attacking long throw-ins, with an analysis of how they have created so many high-quality chances from them. This set-piece analysis will look at the different methods they’ve used when attacking throw-ins, and why this method of chance creation has the potential to become more common in football.
Why can throw-ins be effective?
The first and most obvious reason as to how throw-ins differ from any other offensive set-piece is the fact that players cannot be offside when receiving the ball from the throw-in taker. Throw-ins always start in positions where there is a clear path to the goal, so in its simplest form, a throw-in can be launched towards a player standing next to the goal, who cannot be offside due to the rules of the game. This obviously can only be the case when the throw-in taker has a big enough throw that can reach the goal without being intercepted by defenders in between the thrower and the goal. As a result, teams must always defend deep inside their own six-yard box to prevent opposition attackers from receiving a free header on goal from a yard or two out.
Defending deep results in the offside line dropping so deep that it basically means attacking players can never be offside. This image below shows how deep the line is, as the defenders are forced to mark the attacking Wrexham players who pretty much stand inside the opponent’s goal. A benefit of no risk of offside is the ability to both distract the goalkeeper and the potential to receive the ball close to the goal, where one flick can be enough to score a goal. This part of a throw-in will be discussed in detail further down the post.
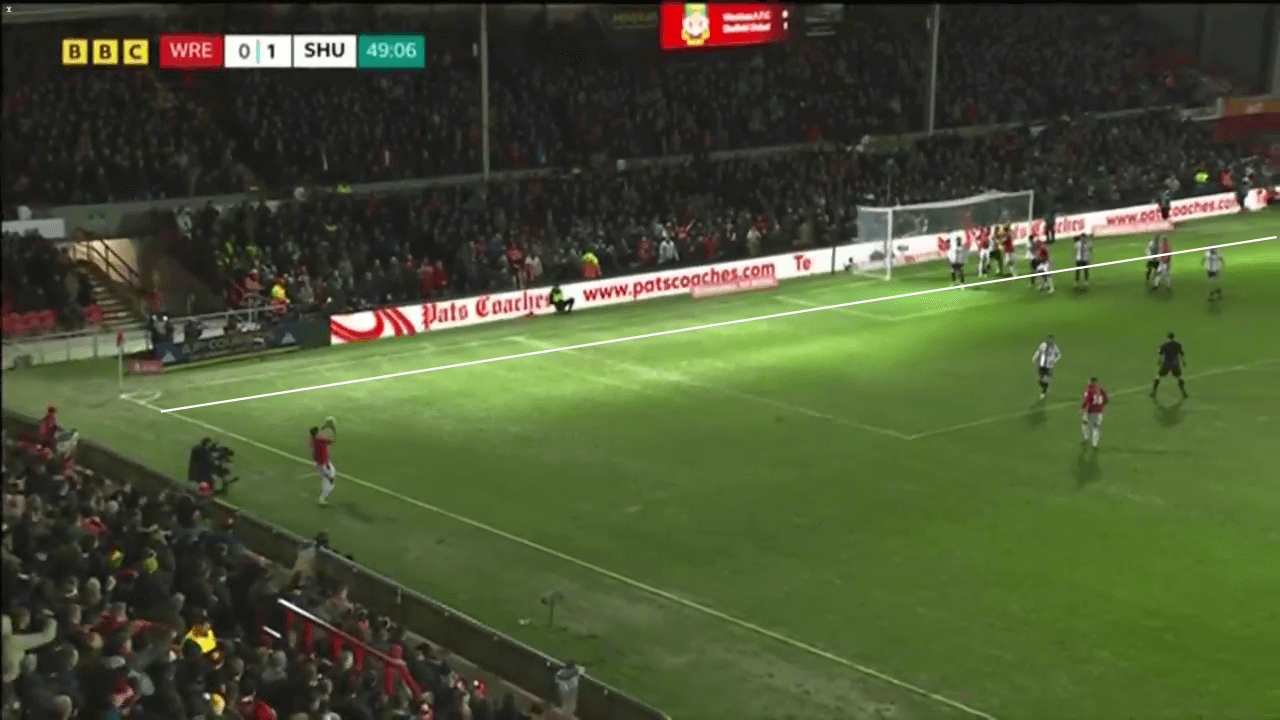
Furthermore, unlike in free kicks, not being offside means that players can affect the keeper’s positioning and vision without committing any fouls. There are two different options a goalkeeper can take when defending against attacking throw-ins; a passive or aggressive approach. If a goalkeeper is passive and waits on his line, attacking teams can simply set up blocks, preventing the goalkeeper from coming off his line. This as a result creates the opportunity for the ball to be delivered into the six-yard box, where any flick towards the goal will be enough to result in a goal as the goalkeeper is rooted to the line.
Should the goalkeeper be ready to be more aggressive or front-footed with their approach, attacking players can steer the goalie away from the goal. This is something that is never seen during any other set piece as a goalkeeper will usually never leave the bounds of the goal until the ball is in play. However, if a goalie remains on their line for a throw-in, it becomes nearly impossible to reach the ball, due to the trajectory of the delivery, where throw-ins can be more flat and direct than from a corner due to the extra control people have with their arms.
When a throw is really flat and quick, goalkeepers lose their advantage of being able to use their hands as the added vertical reach becomes redundant and they will never reach the ball before an attacker due to their deeper starting position.
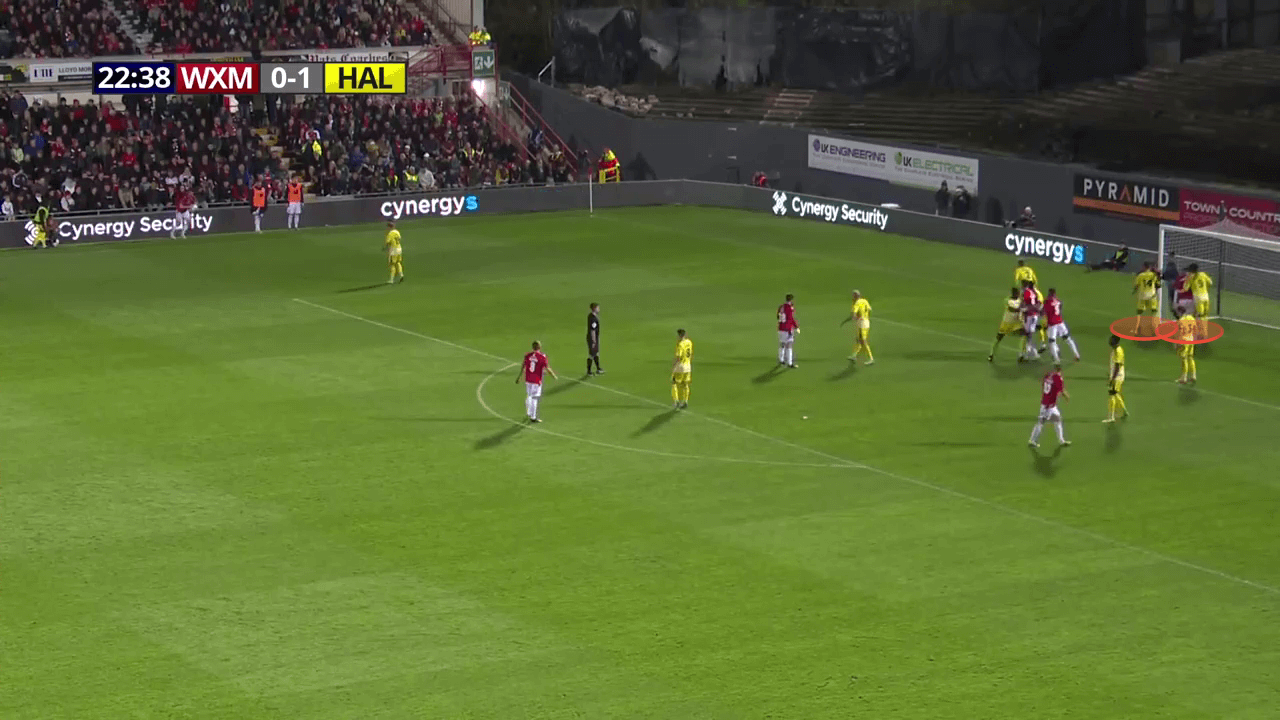
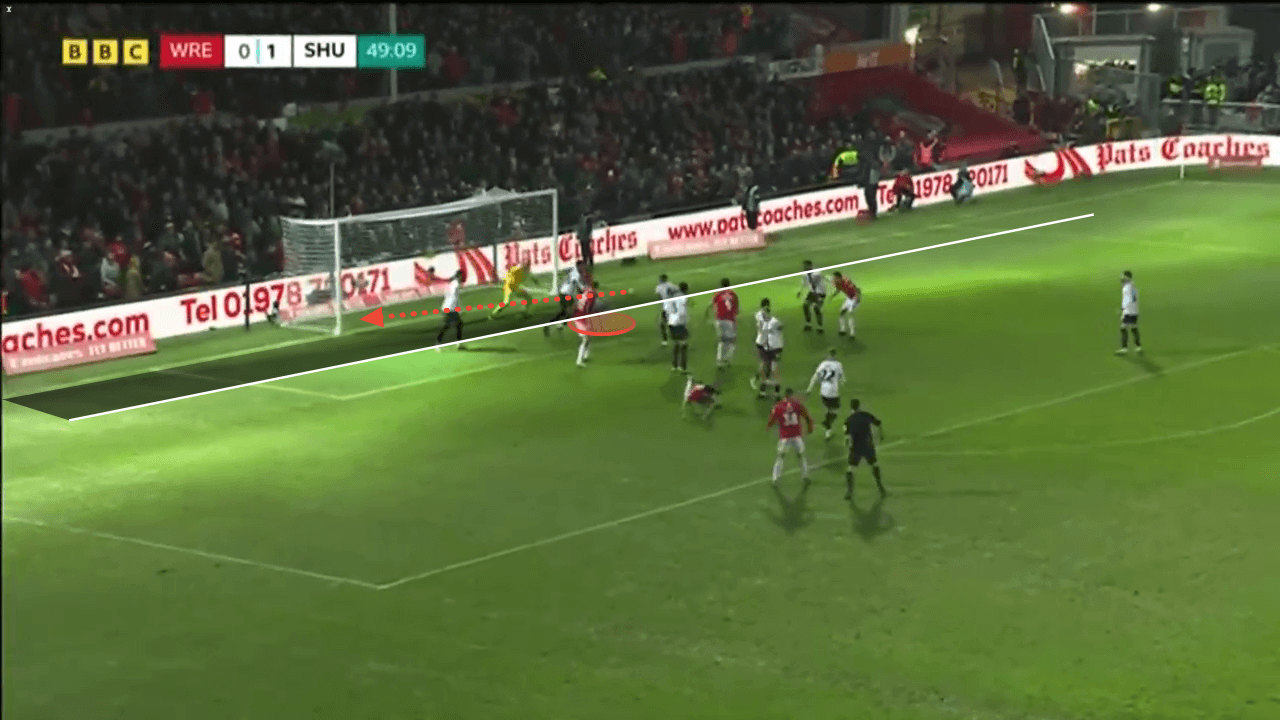
Circling back to the possibilities when a goalkeeper’s stance is more front-footed, attackers can anchor themselves between the goal and the goalkeeper. Setting yourself up between the keeper and the centre of the goal means that you can prevent them from protecting their own goal, meaning that any potential efforts on goal are much more likely to go in now that the goalkeeper is out of position. This image below, shows the Wrexham players forcing the goalkeeper towards his near post.
Once these players plant their feet and use their bodies, they can force the goalkeeper to stay by the post or to take the long way around to get back to goal. Either way, by the time the throw is delivered and the attempt is made, the goalkeeper cannot get back into his correct position, meaning that the effort on goal is much more likely to result in a goal, with the goalkeeper either being stuck by the post or inside his own goal trying to avoid the screen.
These subtle differences make throw-ins extremely unique set-piece opportunities, which can be exposed as long as the team has someone in the squad with the throwing range of the likes of Ben Tozer.
Different methods of chance creation
Once the ball is delivered, some similarities arise between throw-ins and corner kicks. Both set-pieces are about the attacker reaching the ball before their markers, with one of the ways to do so being through arriving at the blindside of the defenders. The angle of the body that defenders set up at, compared to doing so from corners enables them to have a greater view of the area around them, with the slower pace of delivery in comparison to corners also giving them more time to scan their surroundings whilst the ball is in flight.
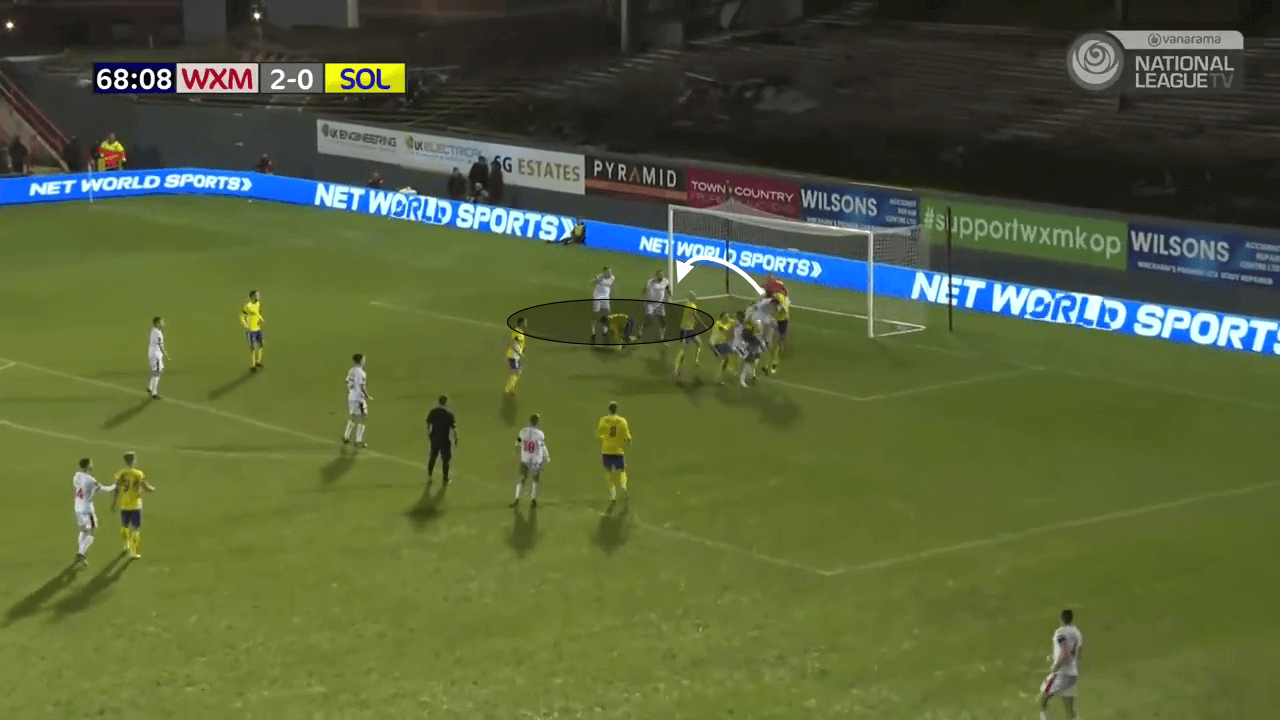
With that being said, defenders cannot see everything around them, so blindside runs are still a possibility, with the only requirement being that the starting position of the attacker is closer to the goal, where they can be completely out of view of the defenders. This example below shows the starting position of the Wrexham attacker where in order to be completely hidden from the defenders, he must be directly behind their back and close to the goal. As a result, the attacking run towards the ball actually took him further from away the goal.
This isn’t an effective way to score goals, as you cannot see where you aim your header and it is difficult to put power on a header aiming behind you, with the ability to generate power from headers incredibly important from throw-ins where the ball is coming in at a slower pace. This means that rather than trying to score in these situations, it’s more sensible to flick the ball into an area where the ball moves closer to goal, but remains away from the goalkeeper’s reach.
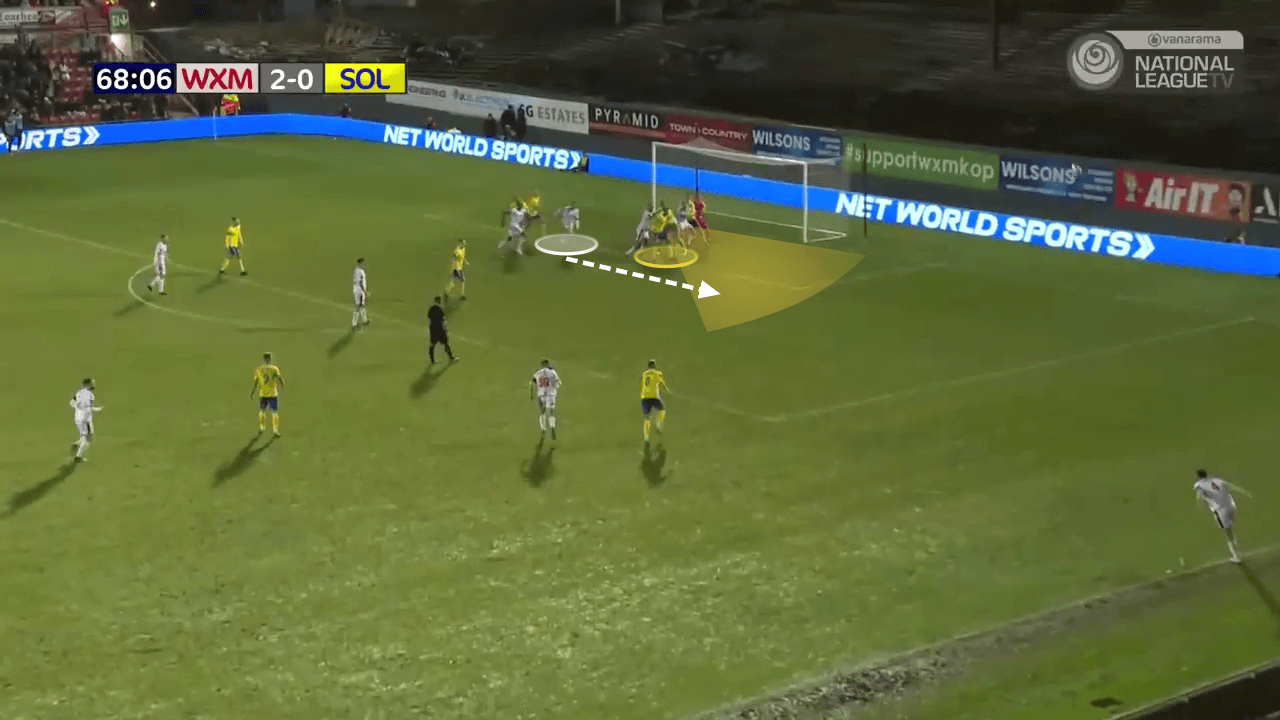
This area is usually at the back of the six-yard box, where players can make their runs into that area, whilst defending teams usually keep their eyes on the ball and forget to track the runners who are in space. As the throw is taken, players understand that the need for a second ball is of the utmost importance, and so there will always be players attacking the back post who usually remain free.
Usually, a free shot from inside the six-yard box is created, which makes for a high-quality chance that should be scored the majority of the time. For this to work, it’s important that the first contact made with the ball is unselfish and only made with the intention of assisting the team, rather than resulting in a tame effort on goal.
Another way in which Wrexham have created dangerous opportunities from throw-ins is through the deeper starting positions of the attackers. With the slower flight of the ball, it becomes easier for attacking players to judge the trajectory of the ball and end up connecting with it. A run from deep is usually a very strong method for creating high-quality chances as the attacker can use their running momentum to out-jump the static defenders and use their momentum to power their headed effort into the goal.
The problem that has always remained with runs from deep is that it’s hard to perfectly co-ordinate due to the fact that it’s hard to change direction at a high speed, especially when the ball comes in so quickly that the reaction time is reduced massively.
However, with throw-ins, it becomes much easier to track the flight of the ball and so the likelihood of deep runners successfully judging the flight of the ball increases. The running momentum can be enough to help attackers have the adequate power needed on their headers to result in a goal, should the headed attempt be on target. This means that deep runs are more likely to have the first contact on the ball in comparison to corners, and although the players themselves need to generate the power, it’s a possible outcome which makes deep runs for throw-ins an adequate method of chance creation.
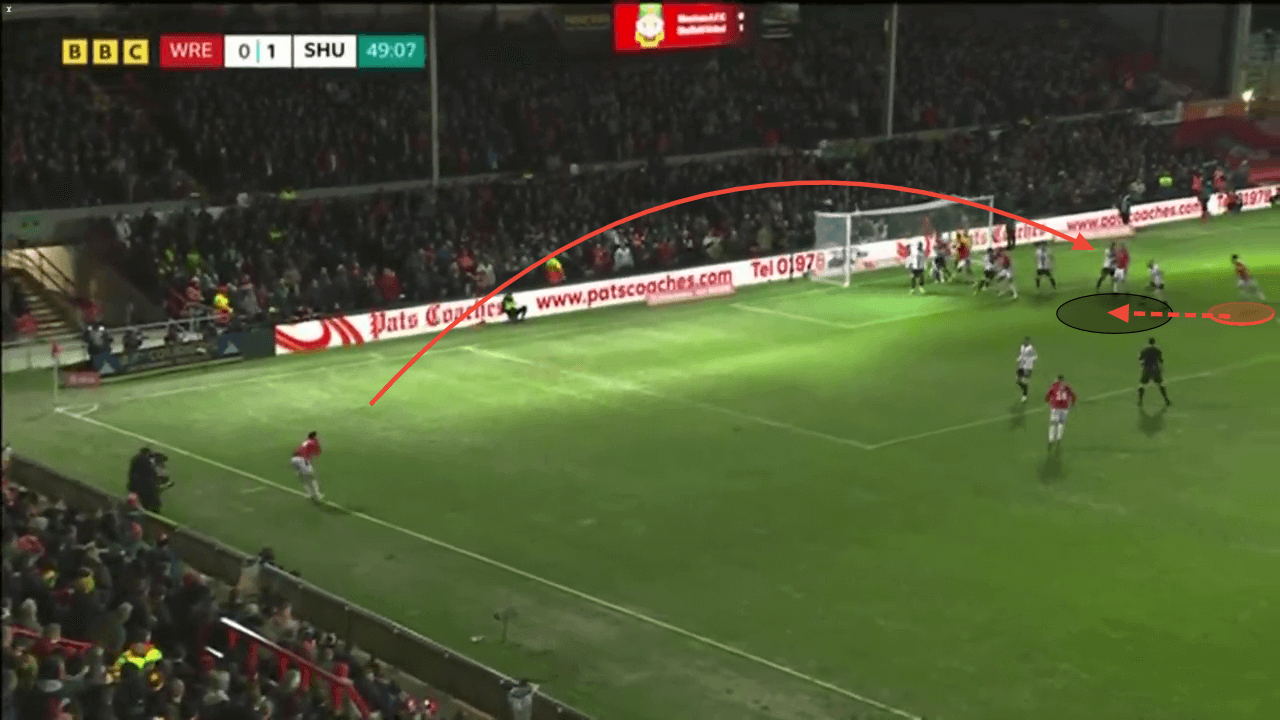
Pictured below, we can see another use of the flick-on from the near post towards the back post, however against a block slightly nearer to the ball. The optimal location of the first flick-on is around the area in line with the front post. In the previous example, the defenders were much deeper and left space open at the front post. In order to keep that space open until the last second, a blindside run was required to prevent the defending team from covering the open space.
In the example below, the space at the front post is not there. Rather, we can see around three defenders in line with the front post. During these scenarios, the Wrexham players have had to attempt to anchor their positions in front of the defenders, to preserve as much of the space as they could. When they set up in front of the defenders, there is less opportunity for the flick on having the adequate power needed to reach the back post, so more space is required at the back post to increase the chances of it being successful.
In an attempt to create that space at the back post, all the Wrexham players start closer to the near post before making late runs into the back post area once the throw has been taken. This routine requires excellent timing, and the ability for attacking players to either hold their position or escape their marker depending on their roles.
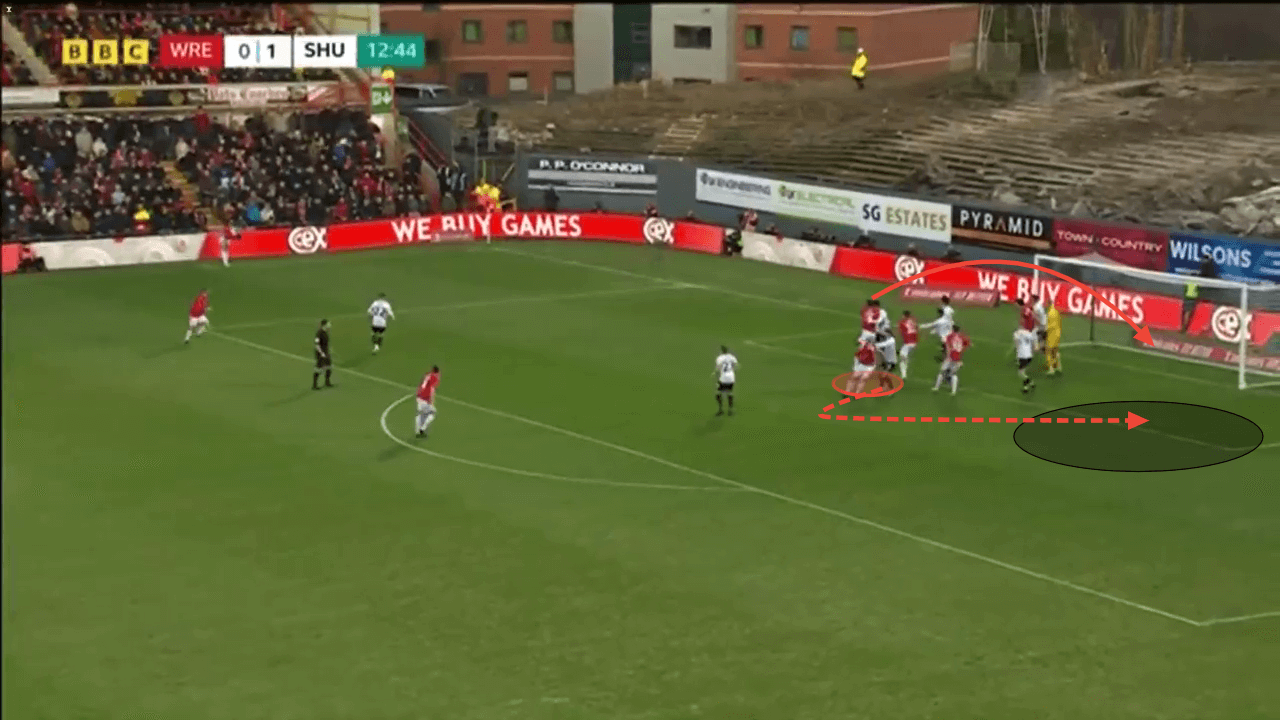
One way in which Wrexham have been creative in adapting against tight man-marking is through their body movements to create separation. During corners, body feints allow players to create space for themselves to attack. However, during throw-ins, the starting positions are much closer to the goal, so players must be creative to figure out ways of creating that separation with minimal space around them.
In this example below, once the Halifax defender comes too tight to the Wrexham attacker, they roll their marker, meaning that they have to follow the path drain in the image. This only occurs when there is contact and potential grabbing of each other during set pieces. The defender has grabbed the attacker, and holding onto the right arm of the Wrexham player means that they will not be goal side when the attacker rolls them. The Halifax defenders are left with two options; either holding on and being in the wrong position, or letting go and allowing their marker to move away. When the defender lets go in the example below, they have their back turned to their marker, meaning they lose track and the attacker can go for the header unopposed.
Sustaining Pressure
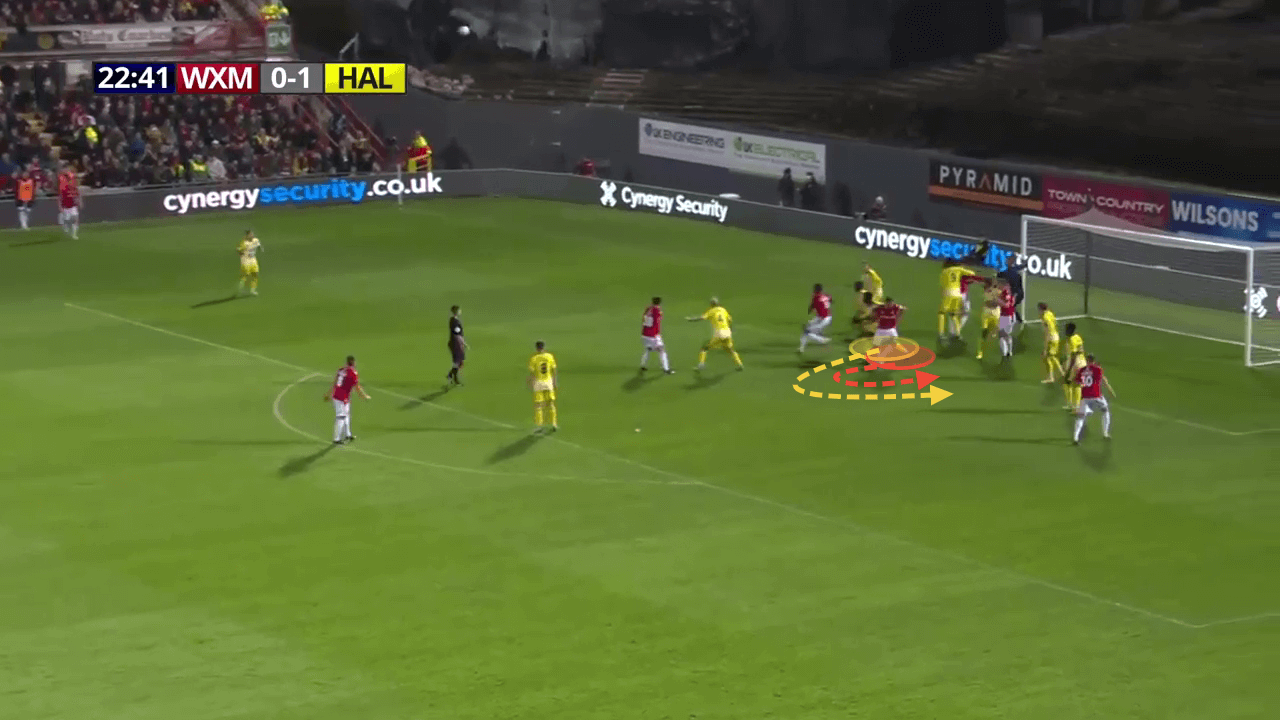
Throw-ins like corners and other attacking scenarios, force defending teams to throw large numbers of defenders into their own box, meaning that attacking teams have the potential to sustain pressure by getting to second balls early. The positioning of the Wrexham player on the edge of the box is important to note. The player does not have to be worried about the ball going over his head as the headed clearance from a throw has little potential of going over him meaning he doesn’t need to be further back.
However, the players still want to maintain some distance between themselves and the furthest defender, so that if a ball does get cleared into the area around the penalty spot, the Wrexham player will have the ability to attack the ball, using their running momentum to out jump the defensive player and get to the second ball first, helping it to stay in the penalty area and thus sustain attacking pressure.
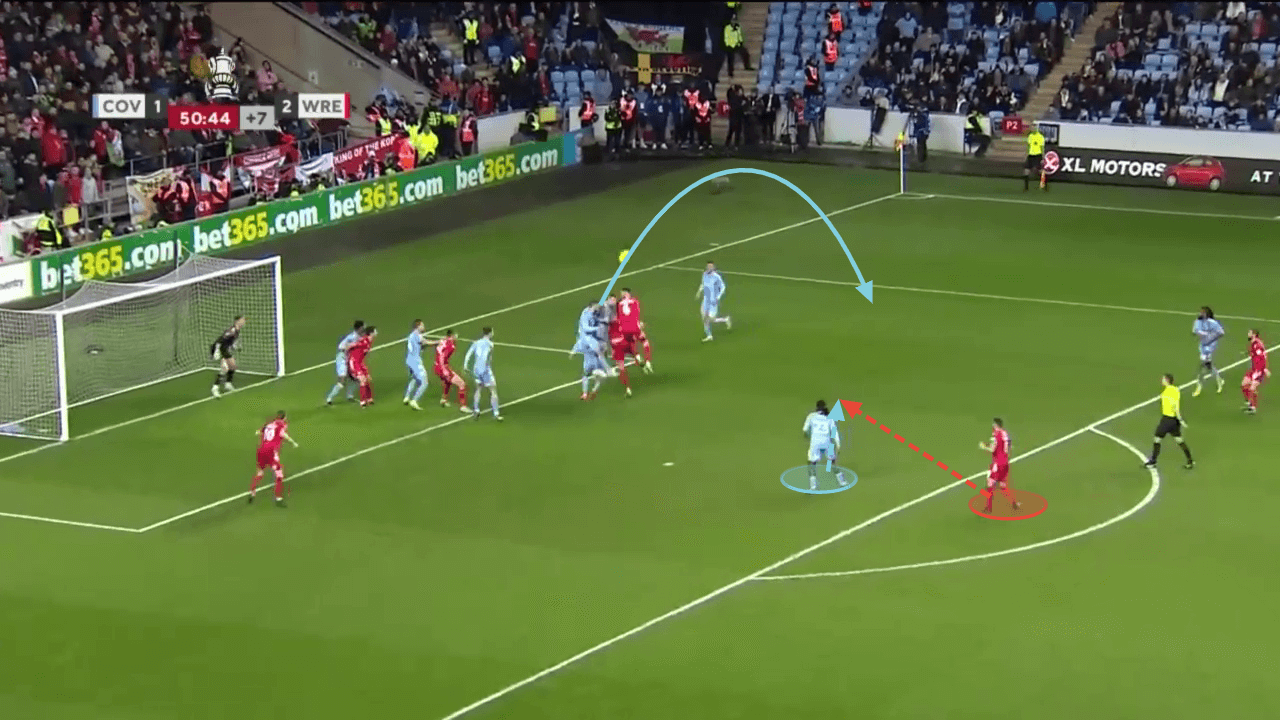
We mentioned earlier that the offside line is very deep due to the nature of throw-ins. As a result, it is much easier for teams to score from second balls, as the ball can land anywhere in or around the six-yard box, and Wrexham will probably have players located there ready to tap the ball in. When that ball is headed back in, Wrexham’s players are on high alert and use their reactions to attack the ball again before the defenders can clear it.
When the contact is made inside the six-yard box, it doesn’t matter if the contact is strong or not as any change of direction to the ball will leave the goalkeeper with no time to react and probably end up in the goal.
Summary
This set-piece analysis has detailed the many different reasons why throw-ins are such a unique and effective method of scoring goals and could be utilised more often. We have described the many different ways in which Wrexham have created numerous chances from throw-ins, and how this is a part of the game which is extremely hard to defend against.
Some teams are naive and don’t defend with the same numbers as they would for corners, although for the likes of Wrexham, they are almost equally dangerous from both scenarios. Throw-ins are a part of the game which have not been talked about nearly as much as they could be, should more teams acquire talented long throw-takers.


Comments