Defending from set-pieces is still a topic that invokes much debate in the footballing community, with the debate of man-to-man vs zonal marking still one which splits opinion.
Anyone who has played football in their life is likely to have used man to man marking from set-pieces, simply because its simplicity leads to less time needed coaching it, which obviously lends itself well to grassroots or youth football.
Zonal marking is seen as the more modern, complex approach to defending corners, and because of its increased complexity, it requires more coaching and so is not a system many average football fans or grassroots players are used to.
While it has certainly gained popularity in more recent years, like most things in football it isn’t a brand-new concept, with Alan Hansen stating that the Liverpool teams he played in always used zonal marking. Most teams now use a mix of both systems, and so when we refer to zonal marking it is often a mix of the systems which contains more zonal duties.
Purely zonal marking is rare at the top level.
This tactical analysis will not focus on which of the systems is more effective, but will instead give a comprehensive guide to zonal marking, as this is an area of football which is still often misunderstood by coaches, players and fans.
What is zonal marking?
Zonal marking, as in open play, is when players cover space on the pitch rather than players.
The basic theory behind this is that you do not react to the opposition’s movement, and so key spaces should always be covered and the opposition should not be able to find a free pocket of space.
Players are allocated a specific space/zone and it is their job to clear the ball if it enters their zone.
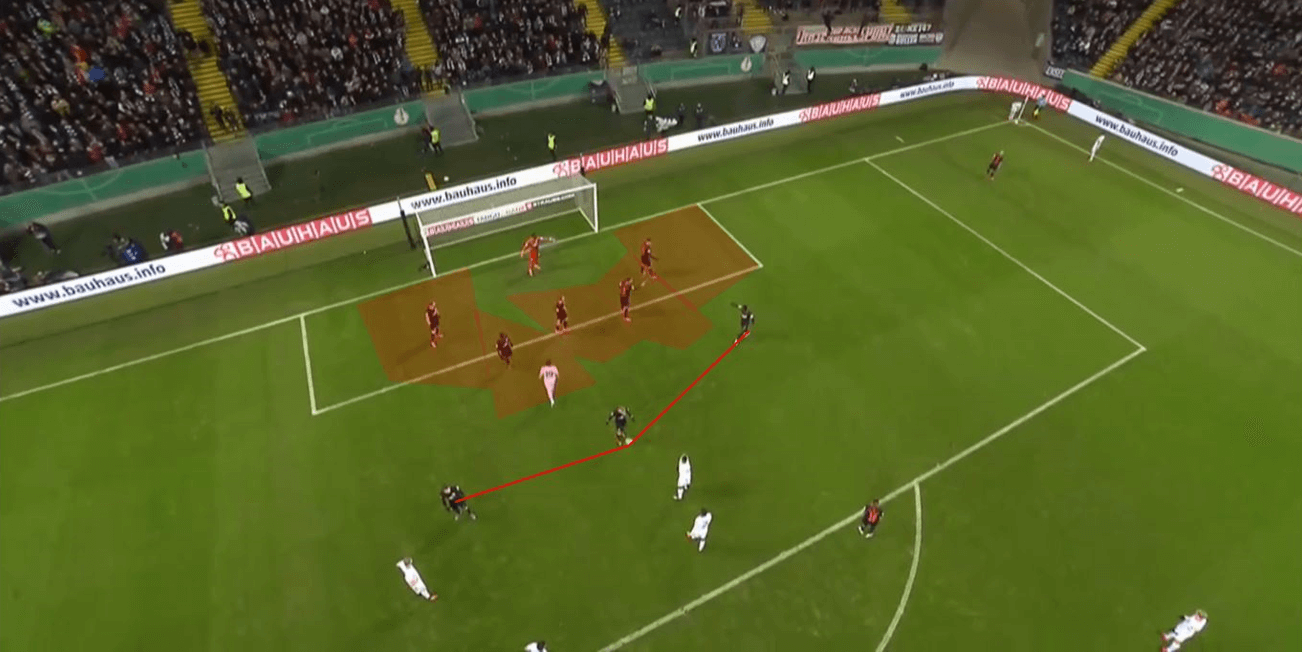
We can see an example below of a zonal setup here, with RB Leipzig here using a five player zonal system with the opposition threatening a short corner.
Each player in the first line can cover a zone, with the near post (one player), centre (three players) and back post all covered in Leipzig’s structure here.
Each zonal player has a realistic area they can/need to cover within their zone, and the size/shape of this depends on the height of their positioning, spacing between teammates and body positioning.
For example, if we look at the back post, because the Leipzig player sits deeper at the back post there is decreased coverage of the higher back post zone.
The second line consists of three players who act as blockers for deeper runners, something I’ll detail later.
First line structures
Zonal structures in the first line change depending on the number of players and the spacing and staggering between players (e.g the height and width of their positioning).
For this section looking at first line structures, we’ll assume the team defending is using man to man marking in the second line and that an inswinger is being defended just for simplicity.
When looking at zonal defending, there are nine positional zones that individuals can take up, with the names and positions of each highlighted in this diagram.
The near post can be defended higher, so just near the edge or outside of the six-yard box towards the corner, or it can be occupied near to the goal, centrally, or the further away from the goal (front post far).
The central area can be split into three horizontally and you can’t really fit anymore than three players into this area without them just getting in each other’s way.
Naturally, if they are more towards the near post they are ‘near (side) central’ or if they are closer to the back post they are far central.
The back post is simply split into deep and high back post.
This is just to make it easier for me to highlight which zones I am talking about and gives a bit of clarity when saying something like “more centrally towards the back post” for example.
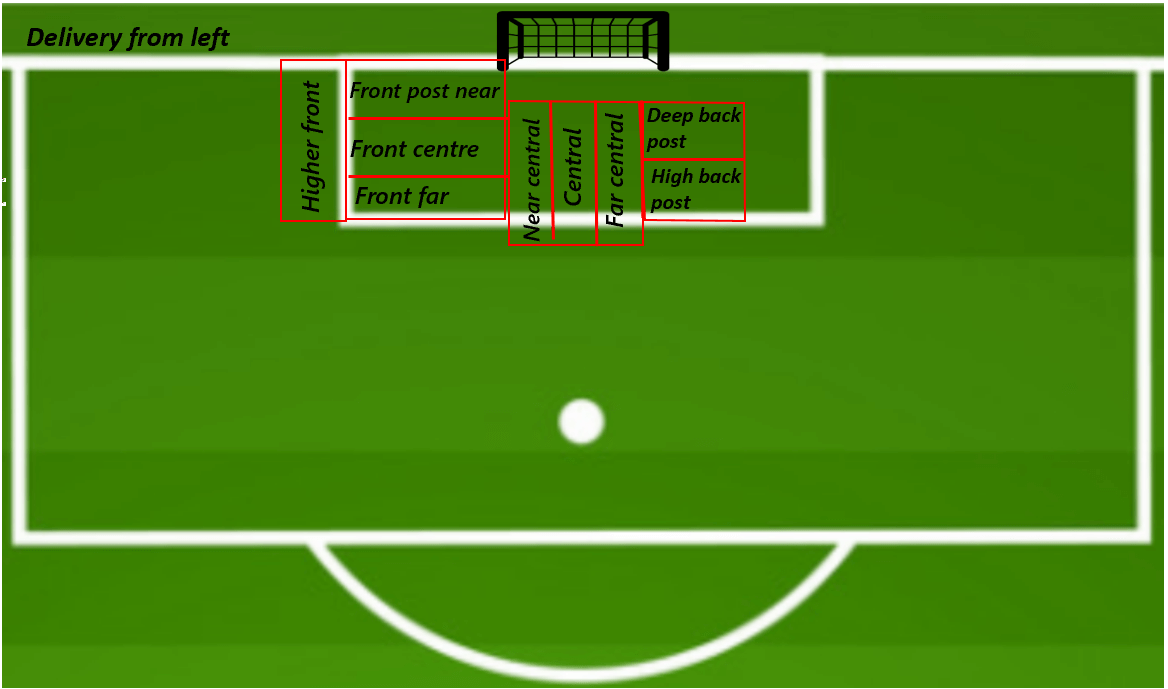
Those zones aren’t and should not all be covered by one defending team, as some zones are too close together to really be occupied usefully and they only deal with the first line.
Instead this just gives a guide into where a zonal player can position themselves.
Two player zonal structure
To look at structures, we’ll start with a two-player zonal system in the first line, which is a fairly common structure in football and is more man oriented.
I should add that these systems can differ based on subtleties in which zones players occupy, but these examples show the most generic structures.
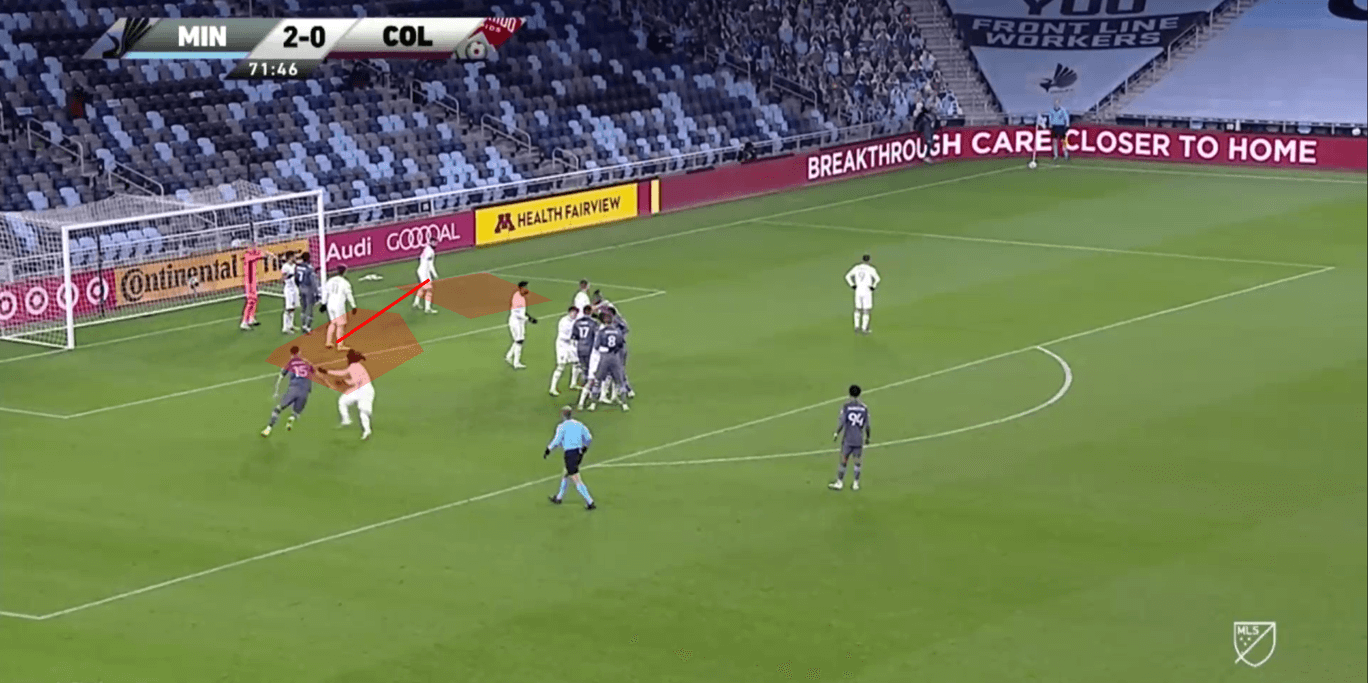
Here we see Colorado Rapids using a two-player zonal structure with six-man markers, and I have labelled the general space in which each zonal marker can cover.
The near post player covers the front post central area, and so can generally cover more space than would be allowed if he was on the near or far side of this area.
They also have a central zonal marker who sits in front of the goalkeeper just inside the six-yard box.
If the ball comes into either of these areas highlighted, the respective zonal marker should win the ball.
Because this is a mainly man-oriented system, there are only two zonal markers.
Obviously then, the amount of zonal coverage is fairly low, and so when planning routines around zonal markers, you naturally look for where they can’t cover.
The back post is an obvious weakness for this system here, as is the far front post area.
A common weakness in this two-player system though is that because there are only two players working to cover these spaces, these two players have to stretch to do as much as they can to cover their zones.
Therefore, the space between both zonal markers can also be a weakness, and so you rely on the man to man marking in the second line to stop the first contact in here.
If they don’t then that’s a pretty good chance at a goal.
Zonal marking then is all about spacing.
As an individual you want to be in an optimal position as far away but at the same time as close to your nearest teammates as possible.
In a two-player system, this means a compromise of the back post or front post area if you are going to protect the gap in the middle.
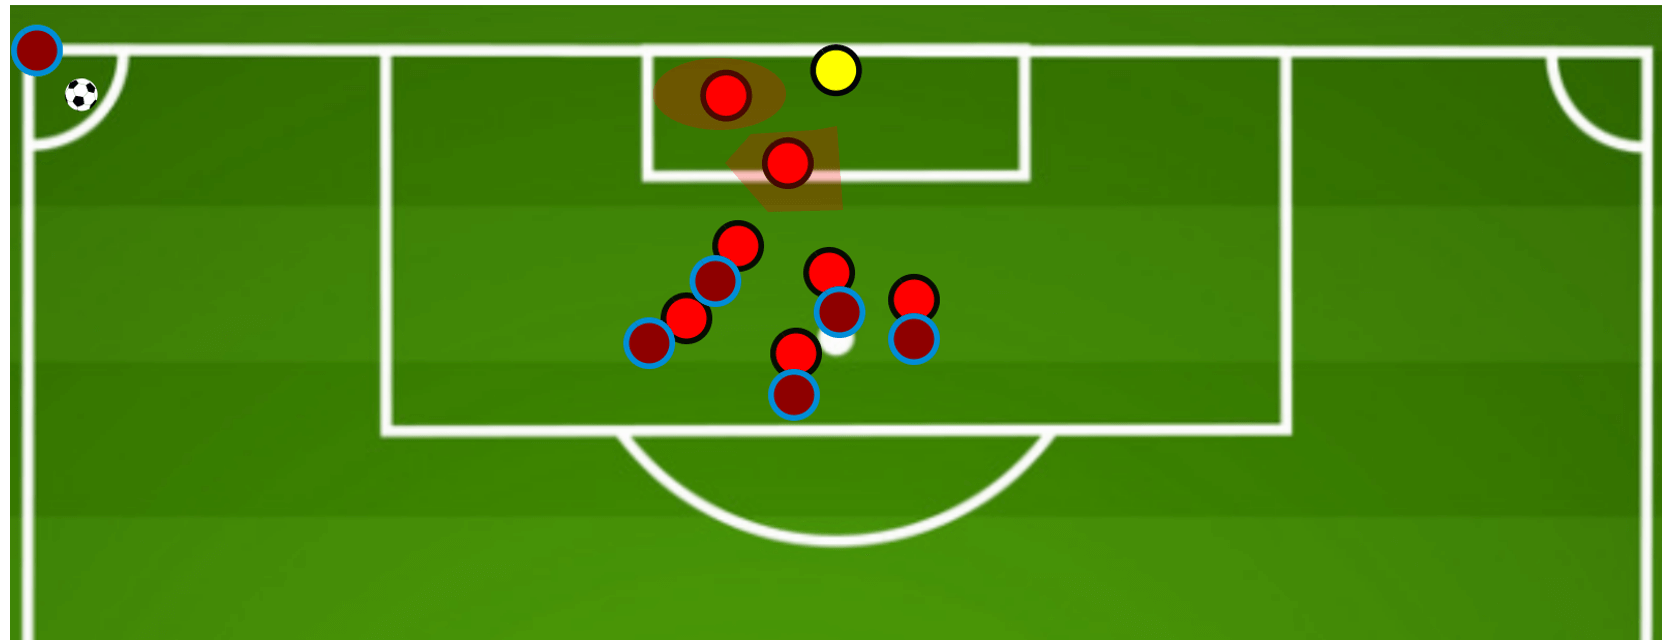
We can see this here with the central zonal player moving towards the near post now, which opens the back post further.
You’ll notice zonal coverage is still poor here, and that’s because this is a mainly man to man system, however it is useful in explaining the concept of zones.
Three player zonal structure
Three player zonal structures have a greater degree of variation, simply because you can add a player at the front or back post depending on your preference.
Adding an extra player naturally increases the amount of space you can cover across the box, and we can see how Newcastle United space their three-player zonal structure in the first line below.
Newcastle favour occupation of the near post, and so place a near front post marker and a central front post marker in this area.
The central player is also quite far over here, and so you will notice some overlap in their coverage.
The near front post player covers very little space, but they cut off the danger of the ball going directly towards the goalkeeper.
They also position five-man markers in the box (who mark well against the Palace train here), as well as two players towards the edge of the box, so their formation resembles a 3-5-2 if you want to think of it as that.
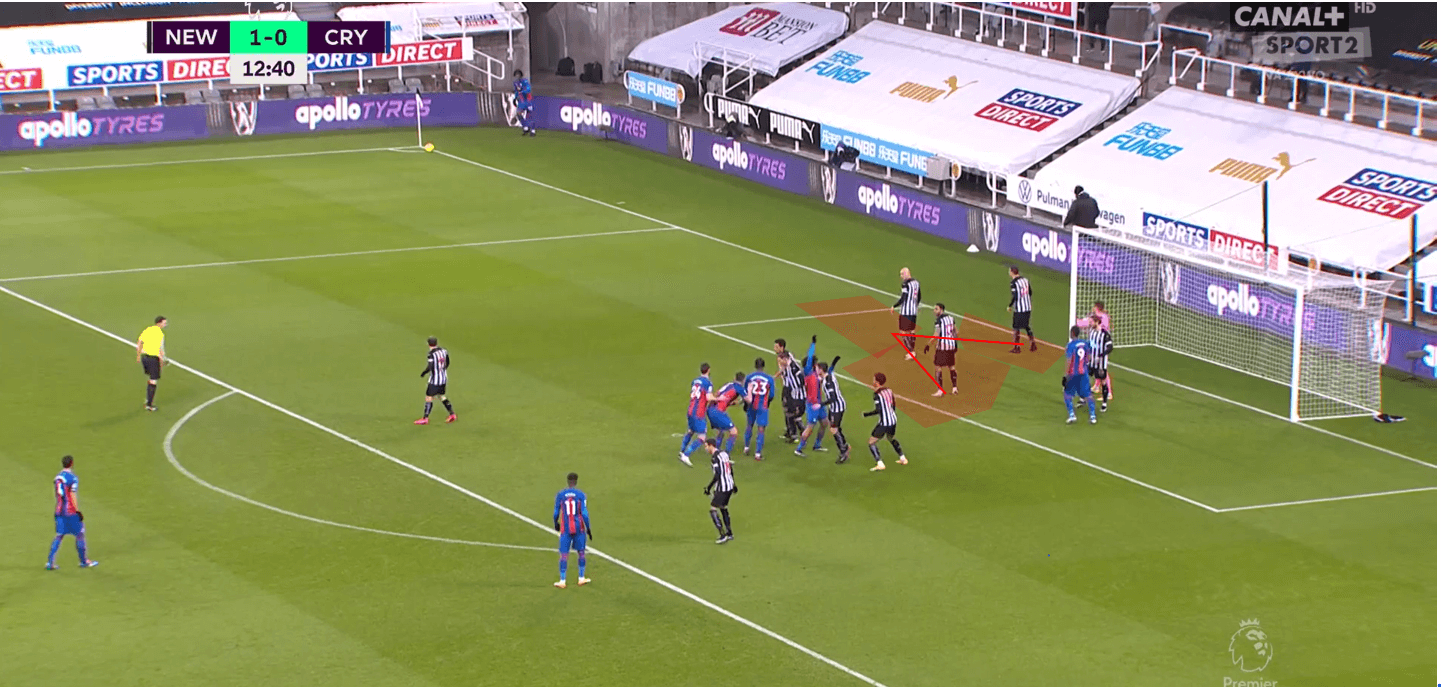
The main weaknesses again then are obviously the places without zonal coverage, and so the back post and higher near post areas are vulnerable.
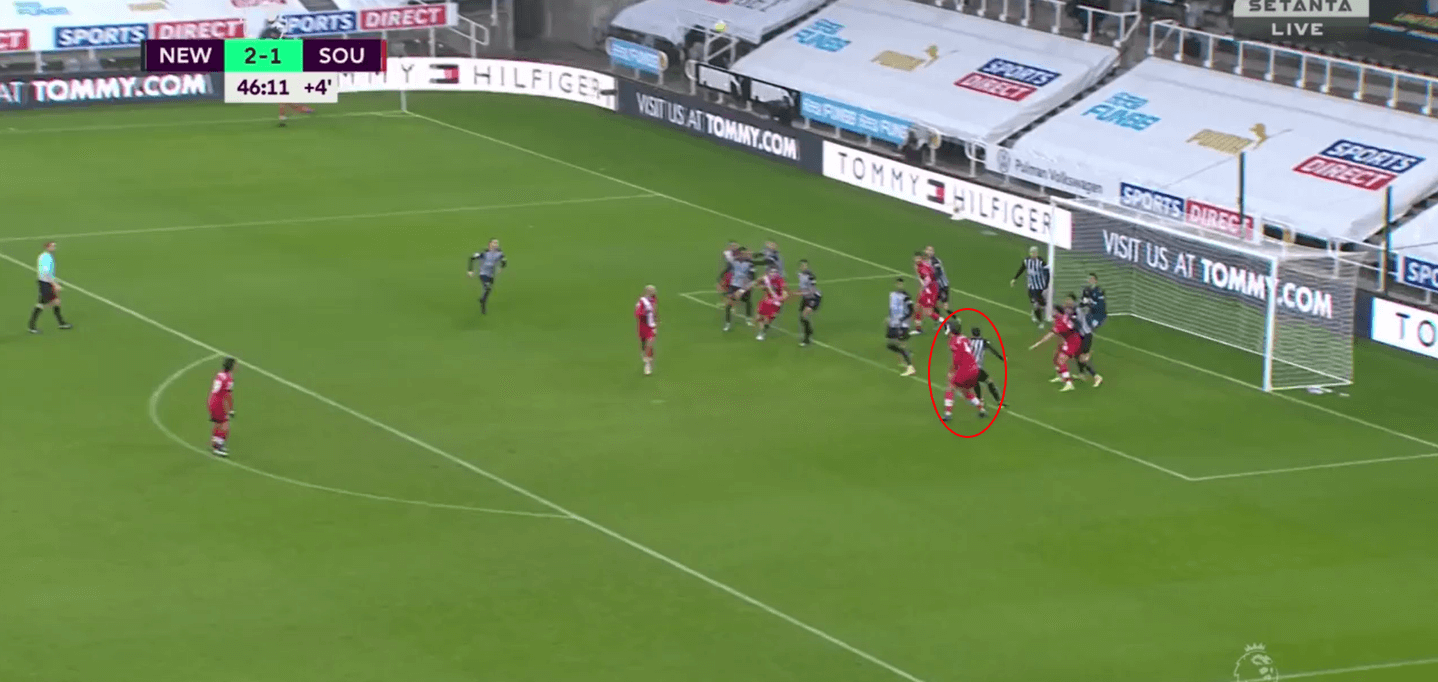
Southampton looked to take advantage of the lack of back post coverage recently by overloading the near post with man markers in order to isolate Jannik Vestergaard 1v1 at the back post.
Vestergaard won first contact twice at the back post in the game with one being a shot on target, and especially at the back post it can be very difficult for a man marker to stop the header.
I wrote all about the back post in an analysis linked here.
This system is again therefore somewhat dependent on a defender tracking his marker, and contrary to popular belief if an attacker or team knows what they are doing, this can become quite difficult.
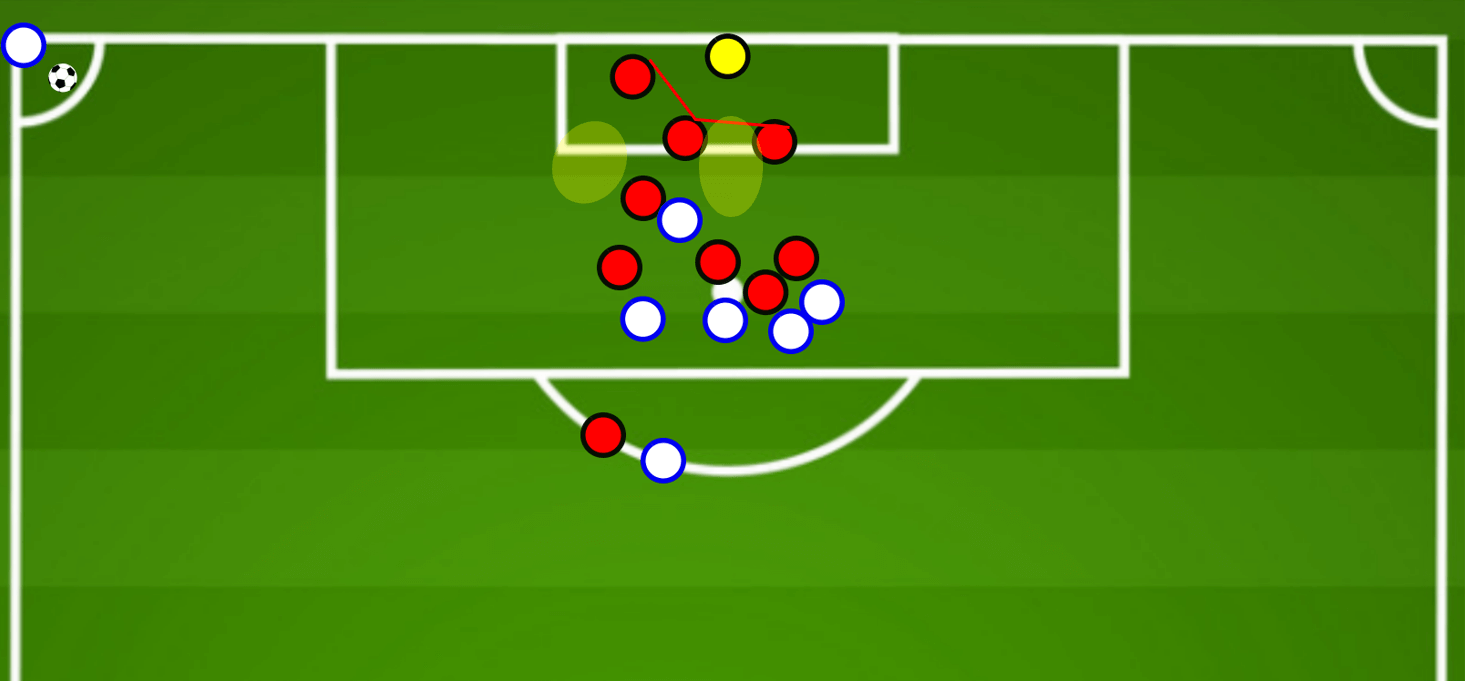
You could also space the structure in this way, so you now have two players in the central area and one player occupying the near post, however this naturally reduces coverage of the near post.
Having only two players stretched across the centre can also cause issues if they become too far apart, which is something teams can try to manipulate using their attackers. In a 3-5-1 structure here, all deeper runners can be marked and some key spaces can be covered.
Four player zonal structure
When teams get to four player zonal structures you would probably refer to them as using zonal marking, as there is now a clearer emphasis on covering space.
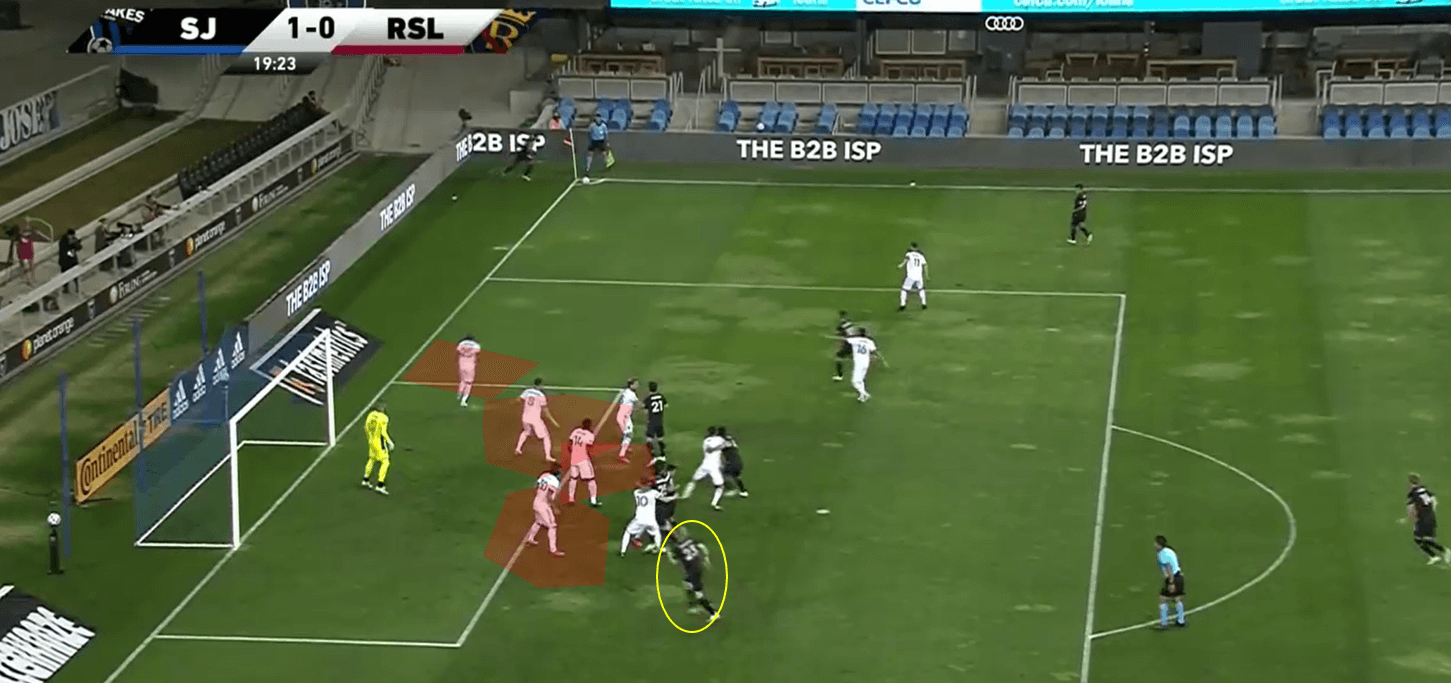
Real Salt Lake used a conventional 4-5-1 structure last season, with four zonal markers in the first line spaced as seen here.
The front post is covered by a near side front post zonal marker hugging the line, while three central players are spaced across the three central zones.
If you space well as they do here, you can eat into the back post and front post coverage while still maintaining good coverage in the centre.
Like in open play, if there’s three of you, you can simply spread out more.
The sacrifice to this, particularly when the opponents threaten a short corner, is that not all deep runners can always be marked, and so a free run at the back post is allowed, as well as poor coverage of the edge of the box.
One thing I haven’t touched on is the increased space the goalkeeper can get with zonal defences, and so they themselves can act almost as a zonal marker, with their coverage increased by the space and run up they are allowed, as well as because they can obviously reach with their hands.
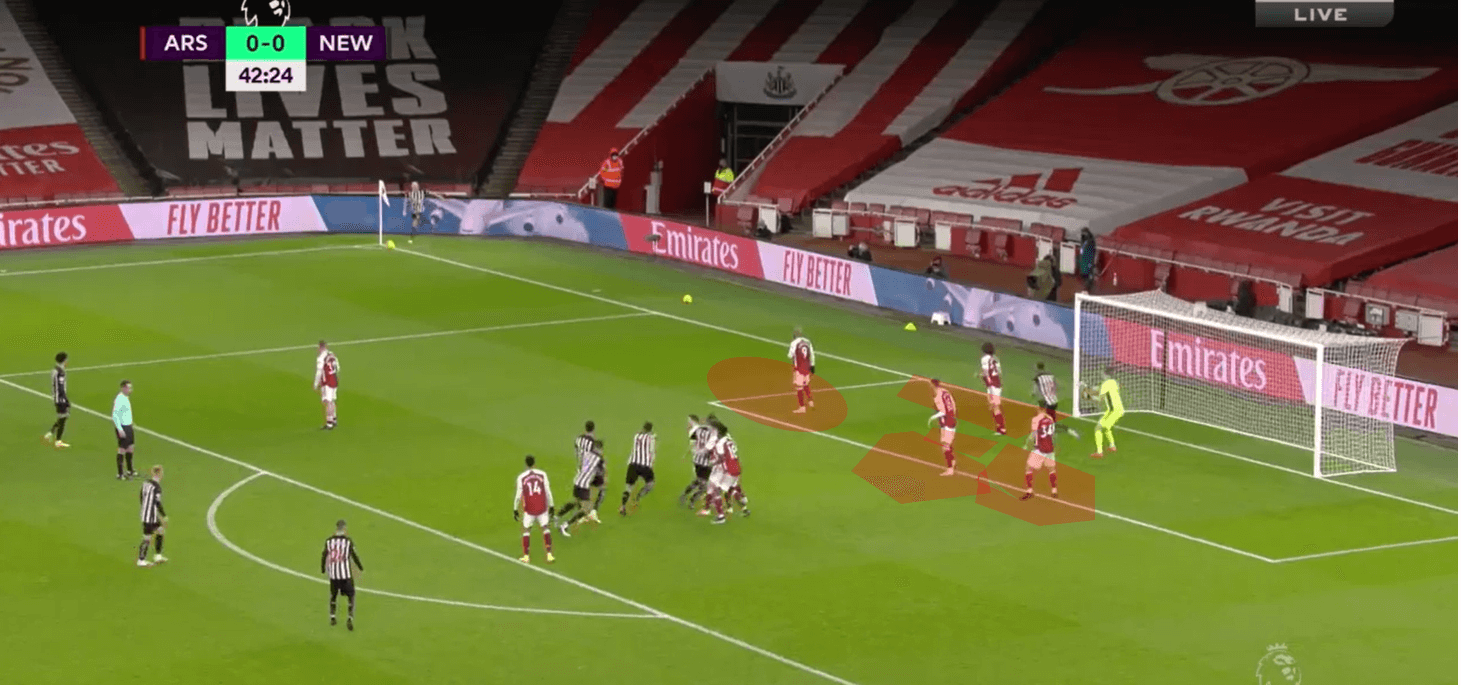
Arsenal use a four-man zonal system which is spaced slightly differently, with a front post far marker used while a deeper front post near side marker is also used.
When this is combined with two central players, it covers the near post well other than a small gap between the far side near post player and central player.
They have coverage either side of this space though, and so actually delivering into here is difficult.
I suppose Burnley also use a four-player zonal system due to their use of players on both posts no matter the delivery.
We can see this structure here, where although they have four players in the first zonal line, because two of them are so deep on either post, central occupation becomes stretched and a space between the two opens up.
They move into a 4-6 structure to mark all deep runners, with one man marker near the goalkeeper.
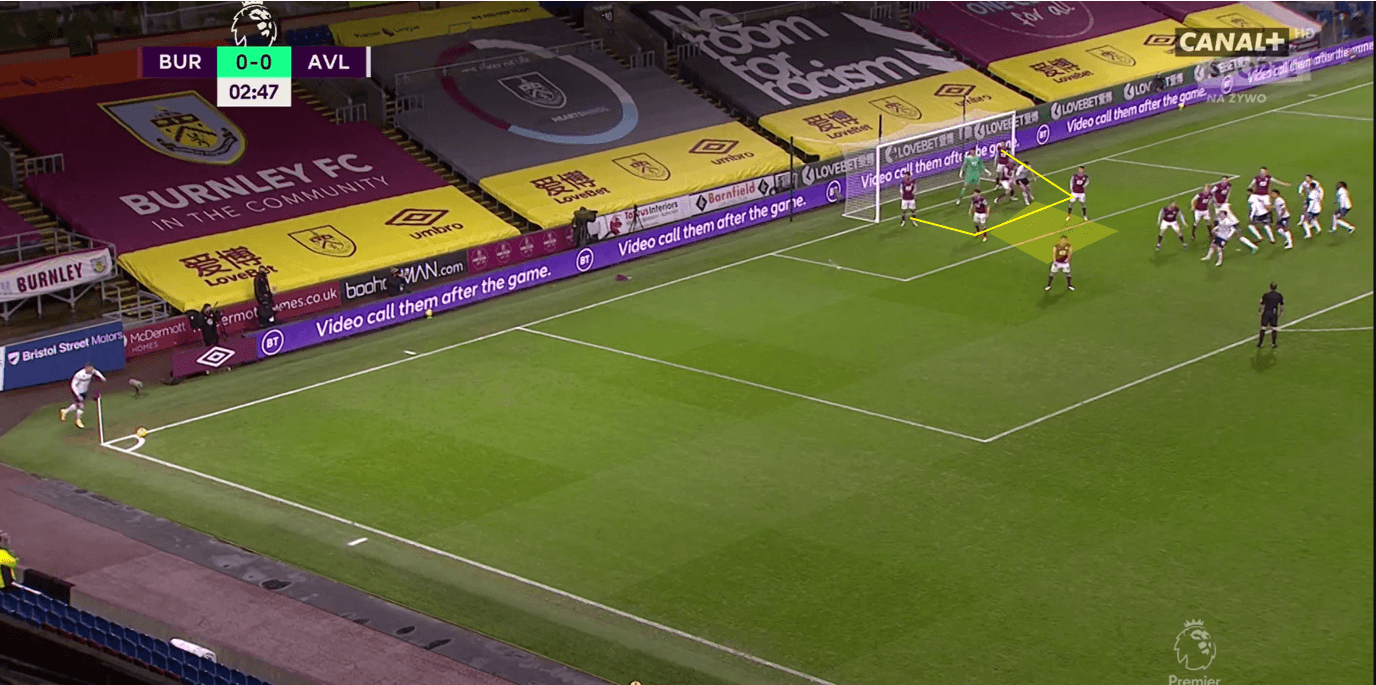
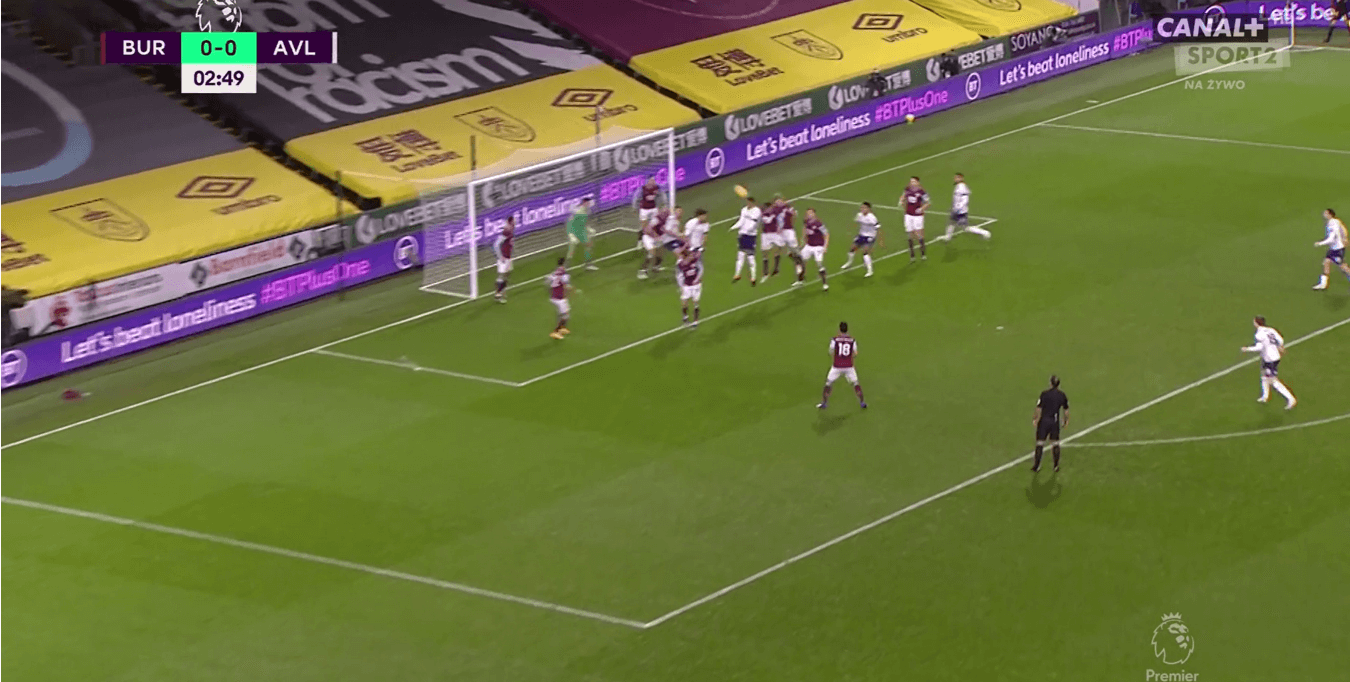
Because of this spacing problem, a good delivery finds the space between the two central markers, and Villa are able to win the first contact for a decent opportunity they cannot take.
If they do get an accurate header here, I don’t think the players on the posts are doing anything, and by having them there we see central occupation as well as occupation of the edge of the box is reduced.
This is why using players on the posts is somewhat of an outdated concept.
Five player zonal structure
Many teams use the five-player zonal structure, and it has been favoured this season by Manchester City.
We can see their structure here, with a 5-4-1 formation used.
The five player zonal system staggers very well, and consists of a front post central player, three players in each central zone, and one player in a deeper back post role.
Their line of four-man marks who they can, and players in and around the zonal structure are left alone.
Villa look to block Ederson a bit here to reduce his coverage.
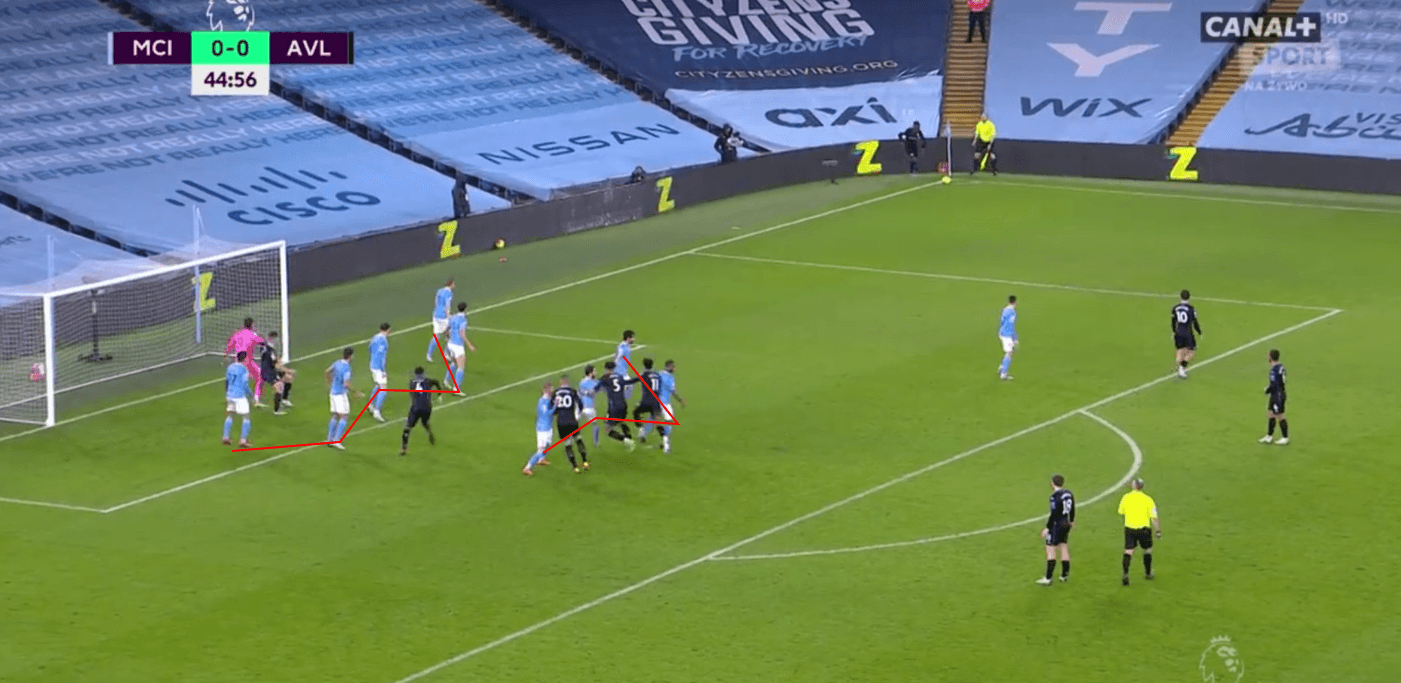
I mentioned earlier that spacing and staggering are key to any zonal system, and I’ve illustrated why City’s staggering of their zonal markers is very good in this diagram.
We can see here that each player’s zonal coverage is shown, with virtually all of the six-yard box covered except one very small space left by the deeper central City defender.
When players stagger well, the overall area that the zonal structure covers is increased, as players are allowed to push higher due to having cover in behind.
The zonal coverage of the two players next to the deeper central player increases because he sits deep, as he can then cover the space behind them.
If you look at the first example in this analysis from RB Leipzig and also here, you’ll notice they are spaced one behind, one in front, one behind, one in front, one behind again.
If you just use common sense and pretend you are trying to stop something running towards the goal while making contact with you, you wouldn’t just stand in a flat line, as if they get through that’s it.
Staggering increases the overall area you cover, so it is harder to find space to break through.
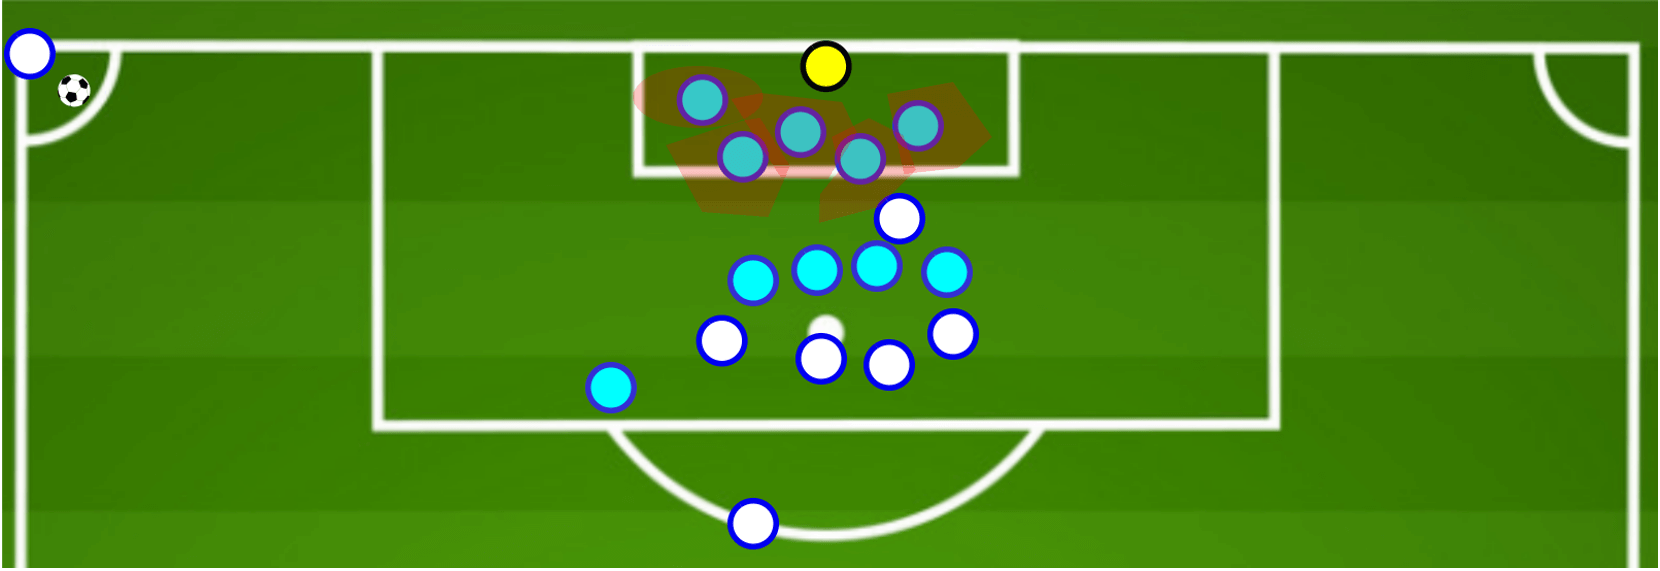
As a result, when the ball gets played into a deeper area, the far central zonal defender does a good job of pushing out, and wins the header against Tyrone Mings who is slowed down by the man marking used on him.
So much for easily outjumping zonal defenders…
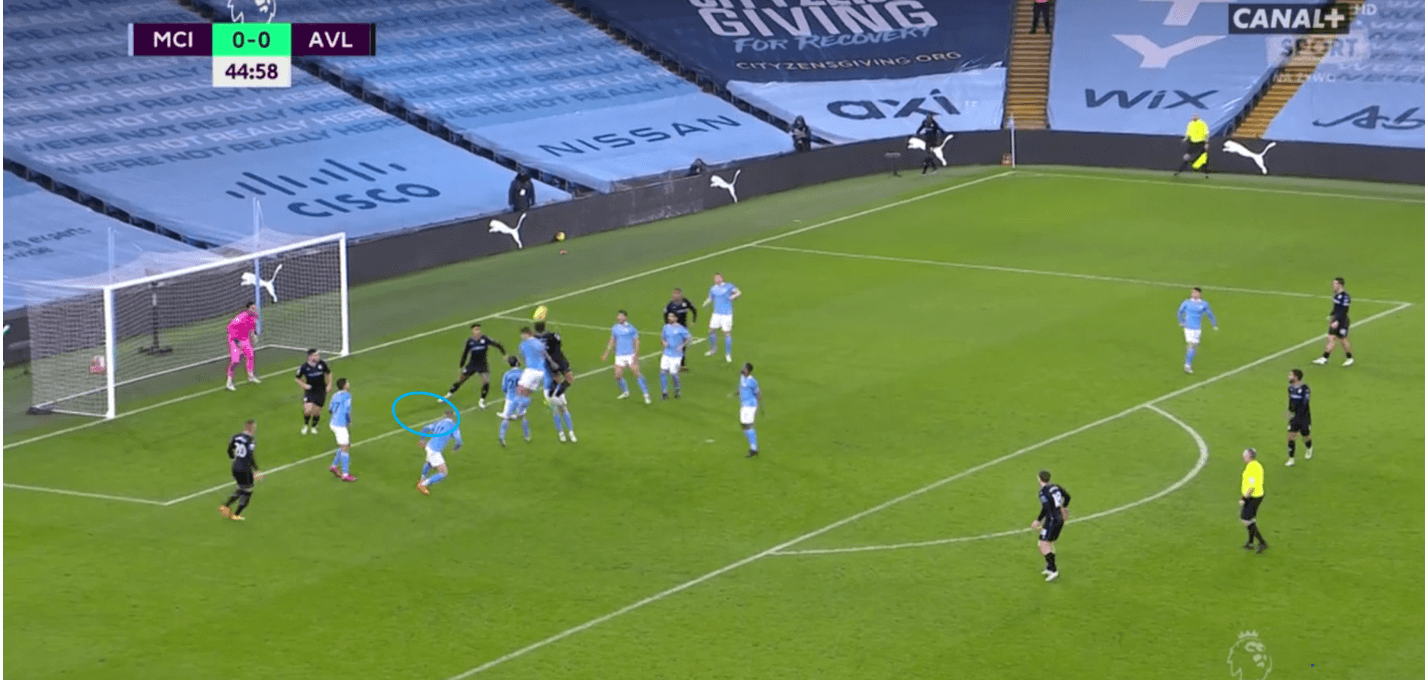
Staggering has to be done well though and is almost a matter of inches forward or back.
We can see in this example here Jonny Evans drops really quite deep within Leicester’s structure, and so the space in front of him is conceded.
Leeds play a good delivery into this area and score, as Jonny Evans can’t push out enough to win/challenge the first contact, and Leicester don’t block players off well in their six-player zonal structure.
Six player zonal structure
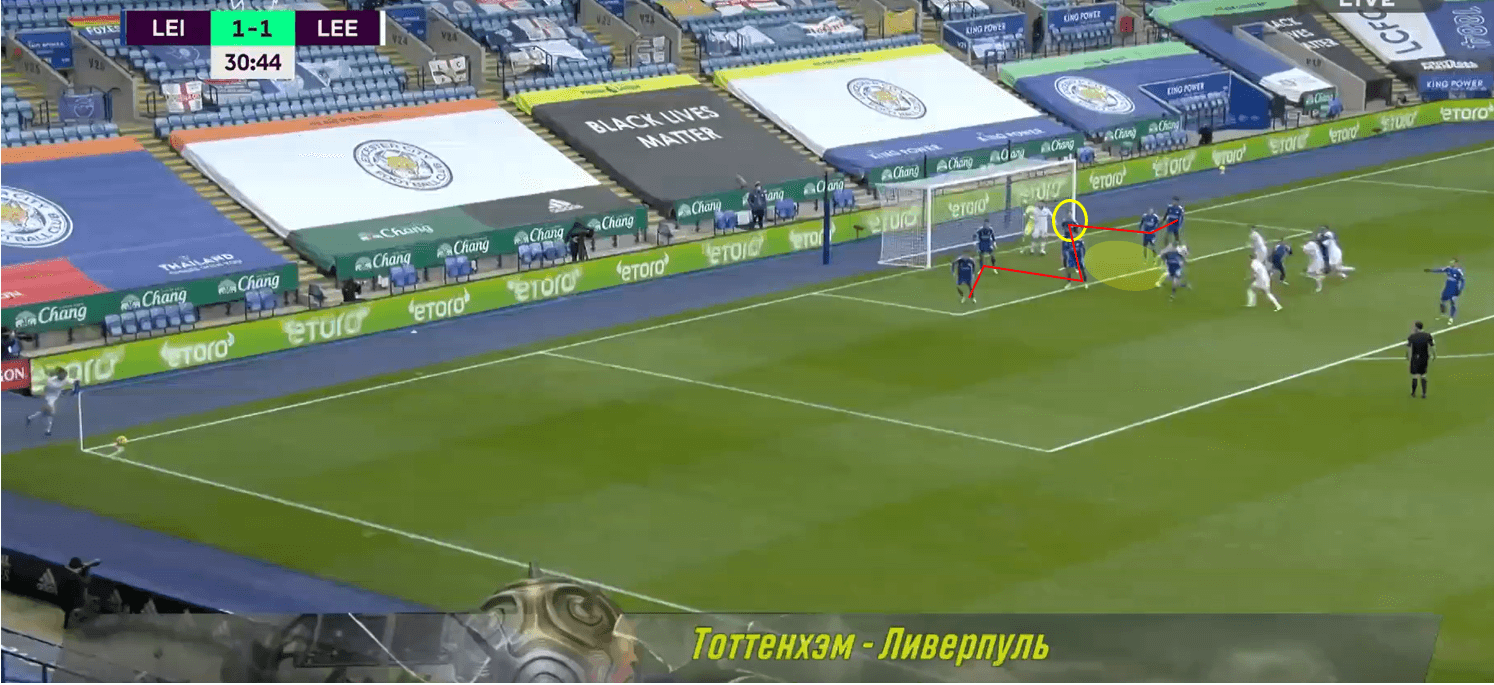
Liverpool have used a six-player zonal structure for a few years now, and space the near post with a player on the higher near post area, a player in the near front post area, and a near post central player.
This triangle of players makes it extremely difficult to head the ball at the near post.
They then have two other players spaced in the two central areas, and a player higher on the back post.
They use a 6-2-2 formation here, and so they cannot mark all players in the centre, but they do their best to block them, as I’ll discuss shortly.
Liverpool place their best headers in the central near post and central far post zone, as height at the near post helps to deal with fast inswingers, while a tall powerful centre back (e.g.
Van Dijk) can track the ball and push out well from the central far post zone, and can also challenge against players who might have a run up.
The other near post players don’t need to be too tall, as deliveries to the near post usually rely on getting to the ball first more than anything due to the pace on the ball, so you need brave players here.
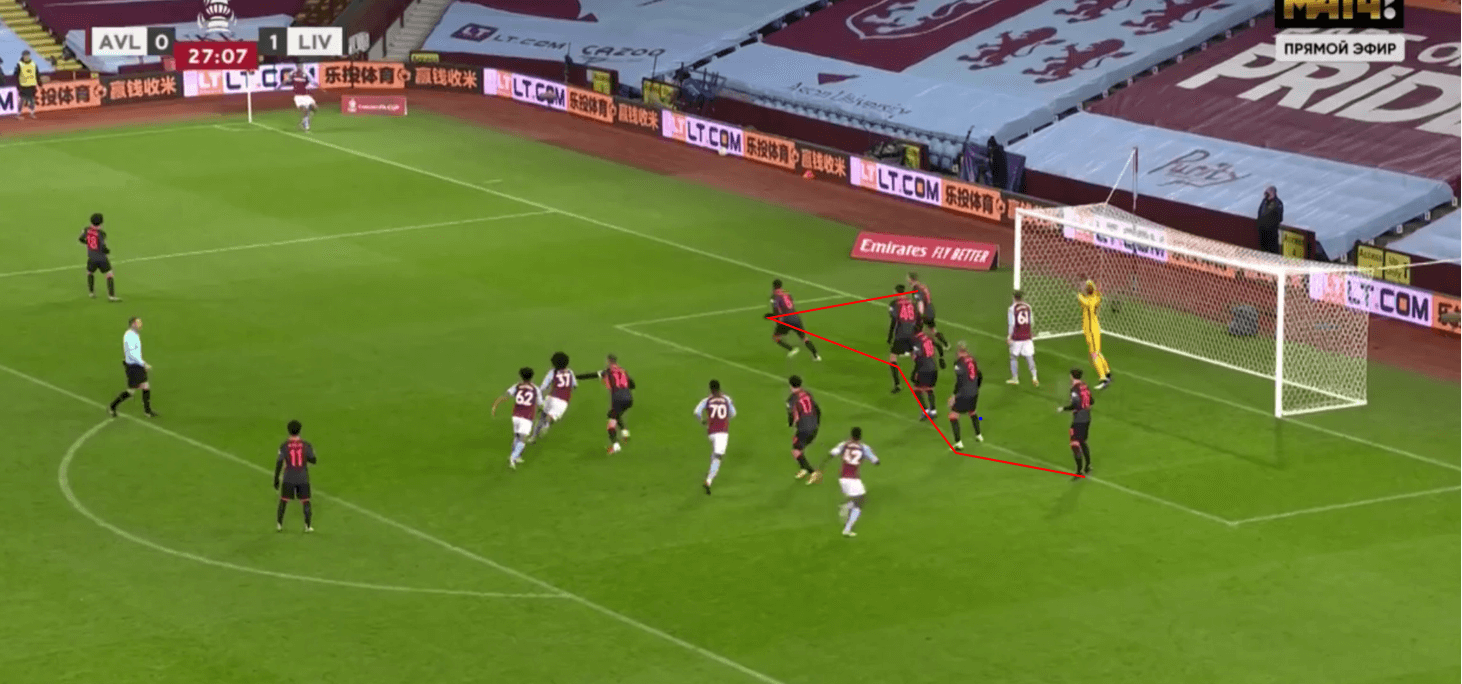
Everton also used a six-player zonal system last season, but with different spacing and staggering, Everton used a higher near post zonal player along with two other plays at the near post, with then two central players and a back post player.
This is a subtle difference in staggering around the near post which increases higher near post occupation, but Liverpool’s probably has slightly better central occupation.
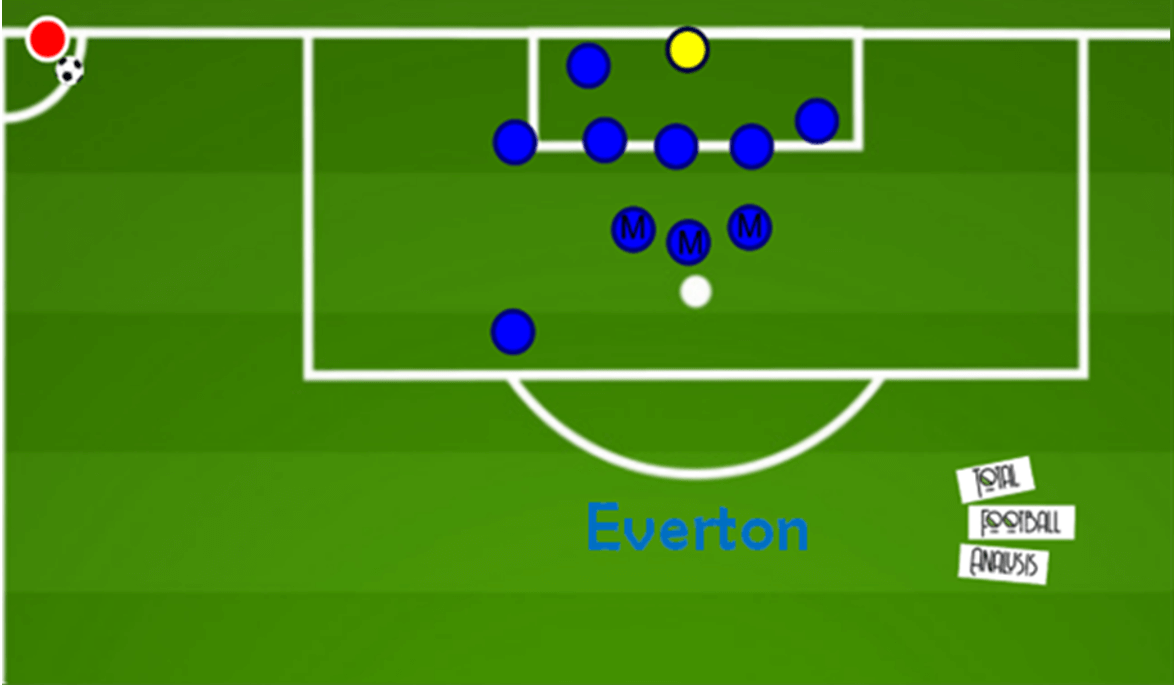
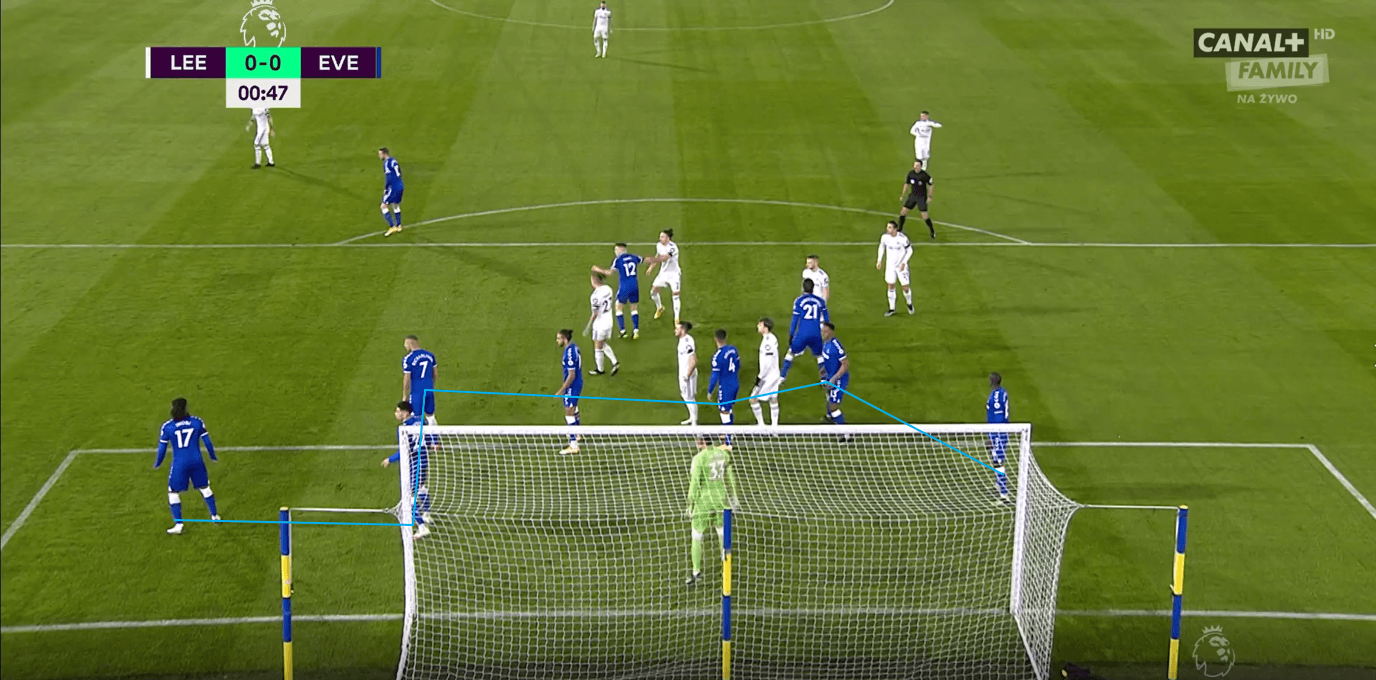
More recently Everton have used a seven-player zonal structure and so set up with a 7-2-1 shape.
This includes three near post players, one higher, one closer to the post and one higher.
It also includes a central zonal player in each central zone, as well as a deeper back post player.
As a result, there are no real weak points or spacing issues due to the number of players committed back, and so if you want to create a spacing issue you have to make one or aim deliveries deeper, which keeps the ball further from Everton’s goal.
The downside is of course the lack of man-to-man occupation, although two players block to slow the opposition.
The second defensive line
For the second line, teams have three options of what they can use: Blockers, player markers, or zonal players.
Using man to man marking in the second line is a basic concept, but if the zonal line consists of lots of players, it is impossible to mark all of them from deep as we have discussed.
As a result, runners can get free and have a free run at a zonal defender if you can’t mark everyone.
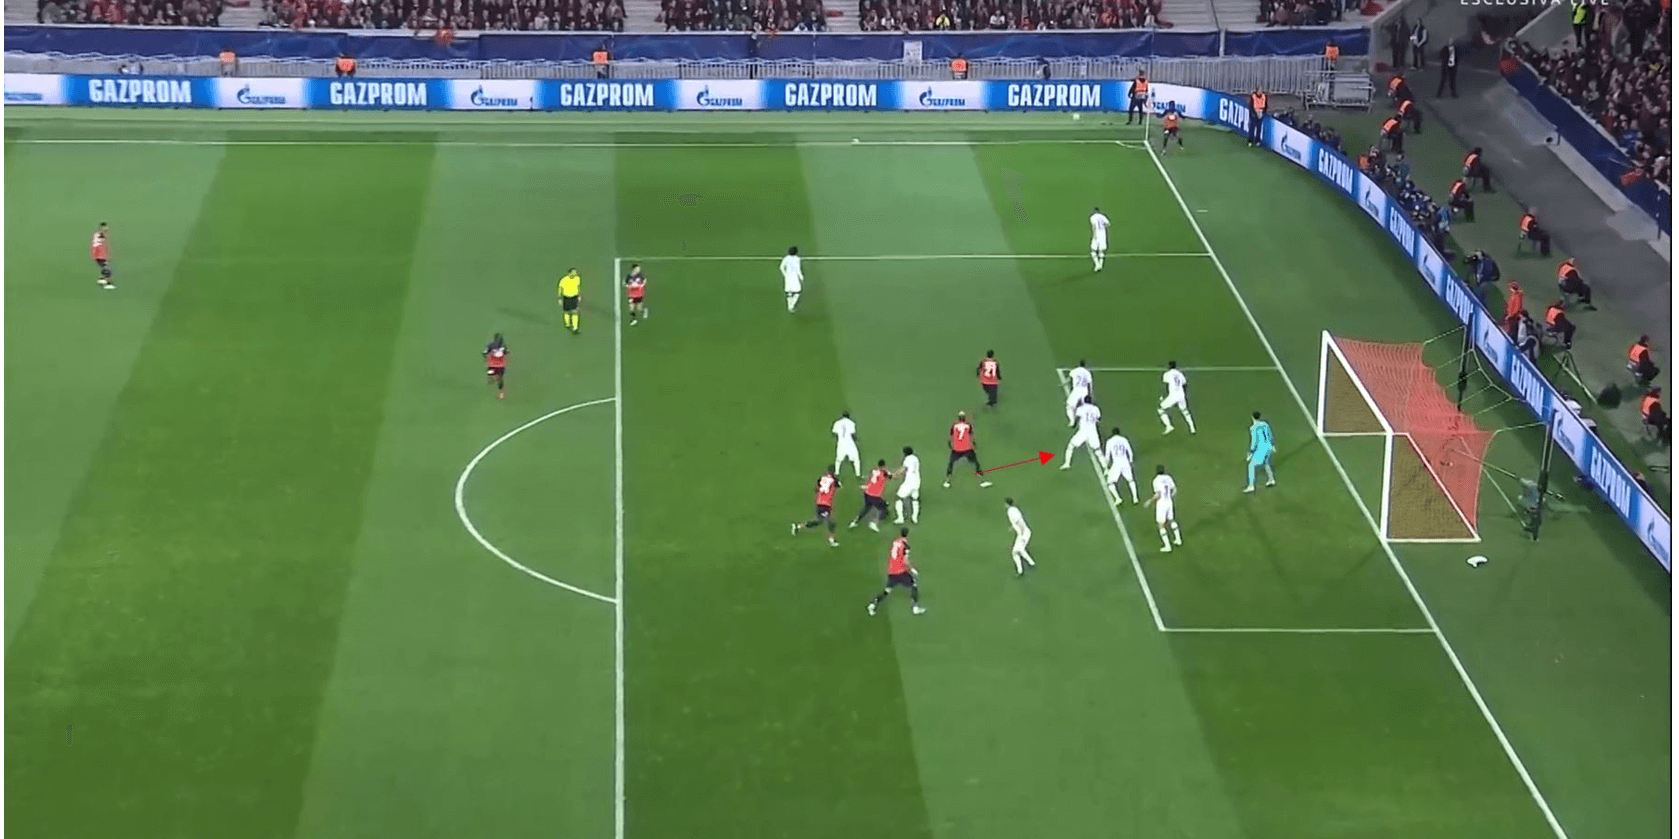
Chelsea struggled with this last year within their zonal system, as players could just get a free run at the zonal line and head the ball.
We can see here Victor Osimhen isn’t marked between the lines and so can score.
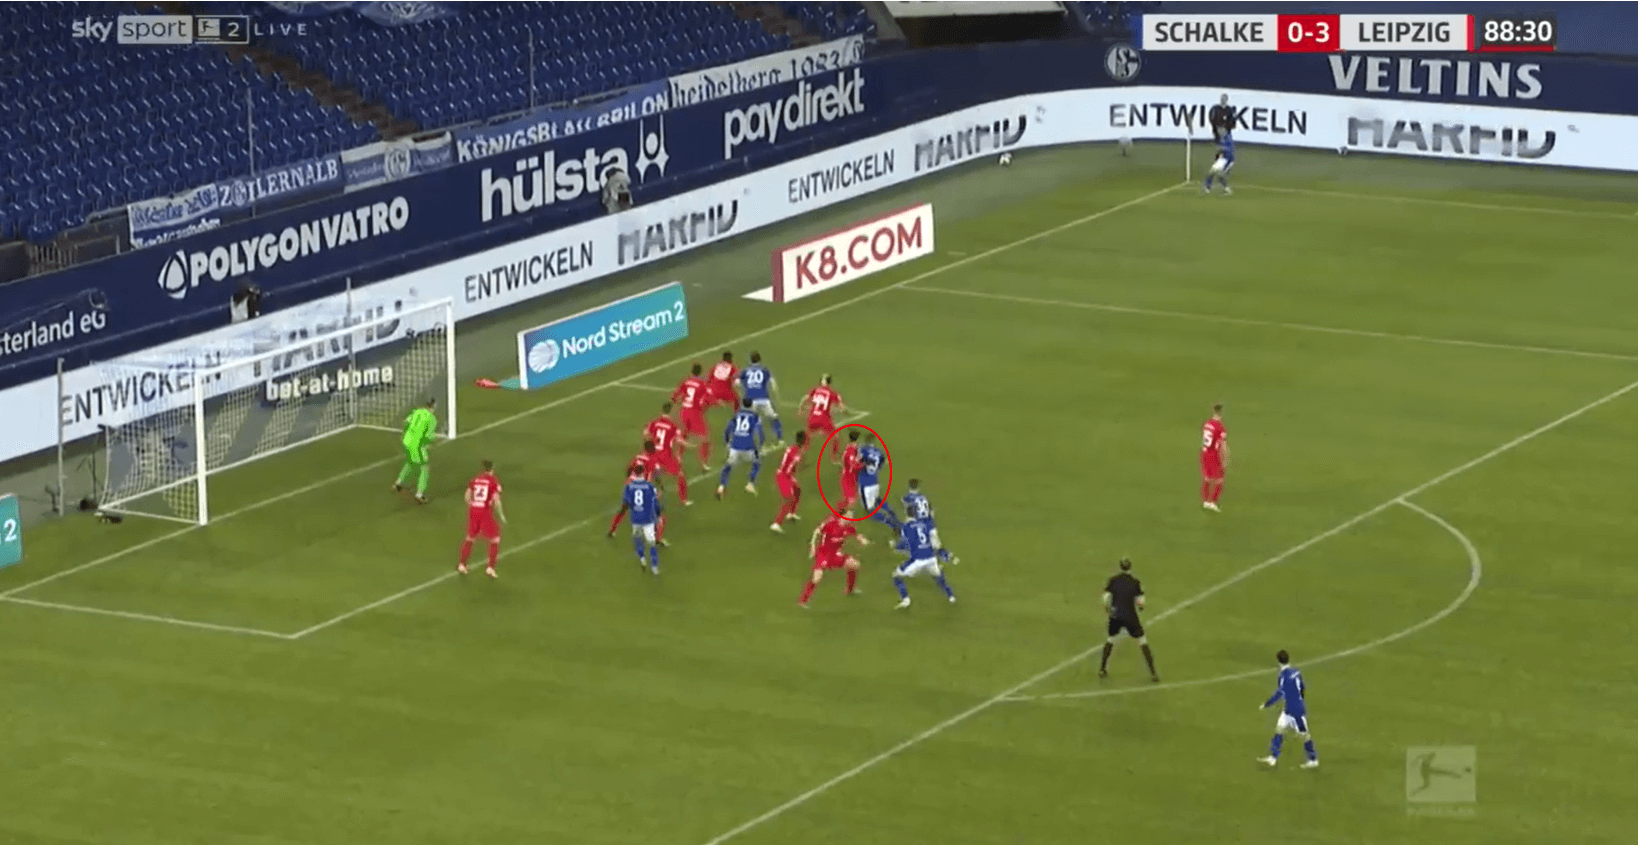
When players act as blockers they can be somewhat zonal too, as they look to keep players away from a certain space, although blockers can also be man oriented.
The difference between this and strict man marking is that they do not follow players tightly, and so if players start deep they aren’t pulled right the way out.
We can see an example of blockers in the second line with Leipzig here, with the player circled doing a good job of slowing his player down and preventing him from getting a run.
The central most blocker switches off and allows a run from deep without covering the man or the space, and so Schalke are able to win the first contact.
If we compare this scene and the previous Chelsea scene, we can see though that the space between the first and second line is decreased when using blockers, and this helps to defend against deeper outswinging deliveries.
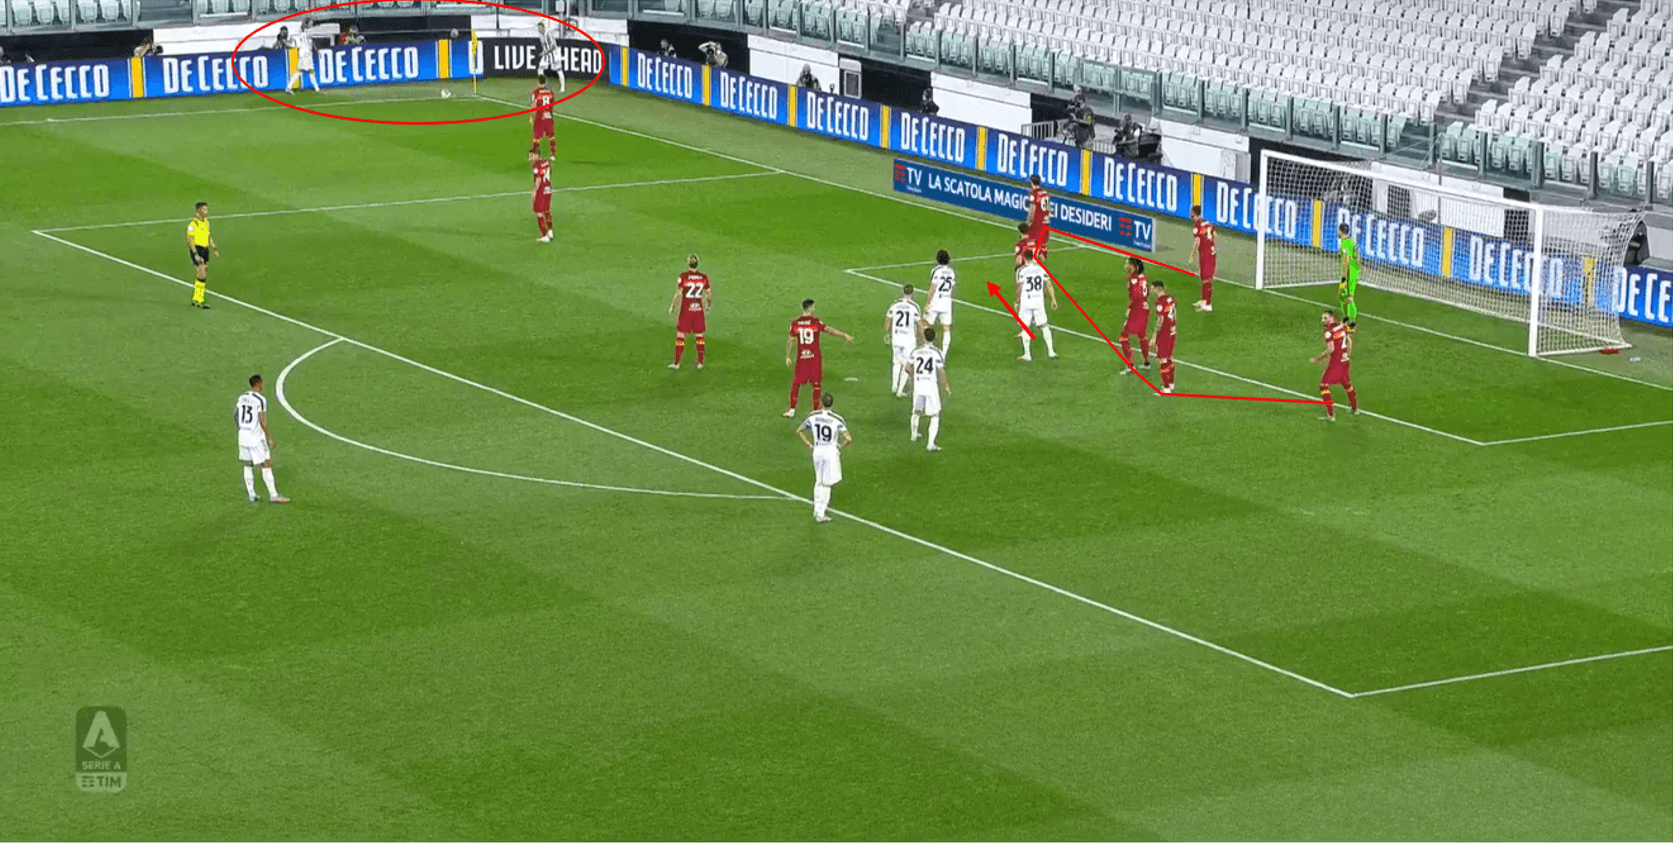
Purely zonal marking sees a second line being formed ahead of the first.
Roma used this last season with the aim being to help launch counter attacks and to increase coverage around the edge of the box, however their second line is far too high here and Juventus just get a large space to use.
Juventus also use two players over the corner to confuse the height of both lines.
Inswinger vs outswinger
A common question people asked around zonal marking was ‘what changes between inswinging and outswinging deliveries?’.
The answer is quite simple in that it simply affects the height of the zonal structure as a result of the flight of the ball.
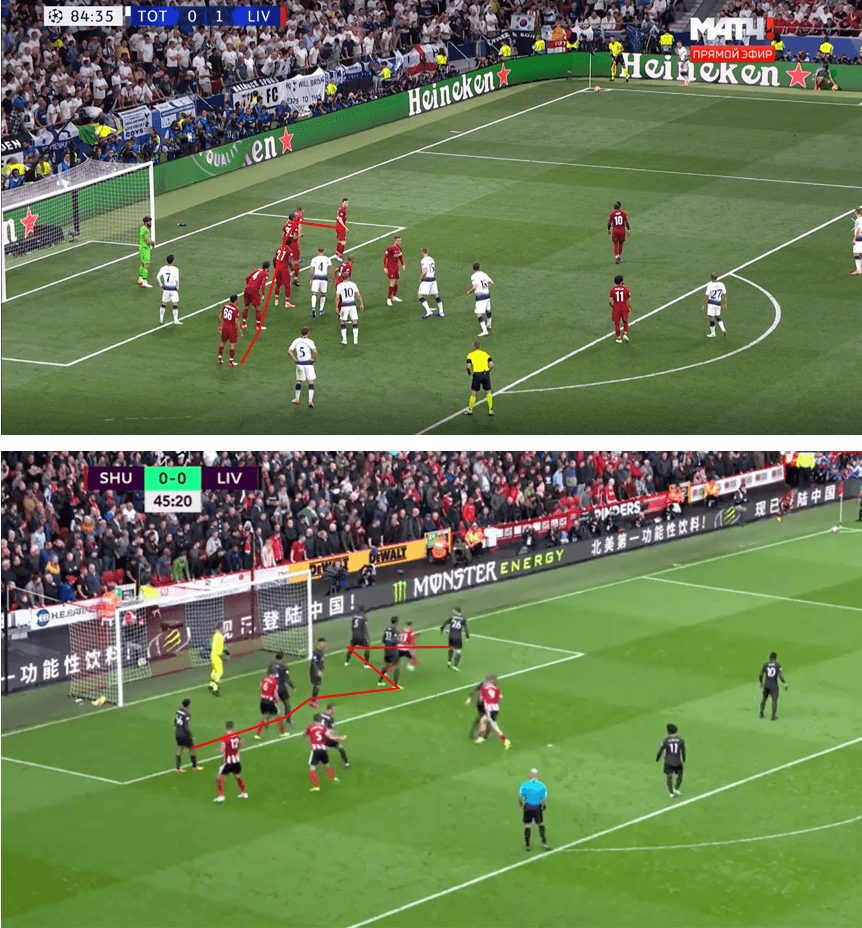
Here we can see an example of Liverpool defending against an outswinger (top) and inswinger (bottom).
Outswingers obviously swing away from goal, and so the shape of the zonal structure now mirrors this in that it gets further from goal the longer it gets.
The front post near zone along the line doesn’t need to be occupied, as an outswinging delivery cannot access this area well at all without going out.
The inswinging delivery can, and so this zone is now occupied.
The shape naturally pushes higher also, as outswingers send the ball deeper and so zonal players have to push outside the six-yard box to be effective.
This is a common downfall for some zonal marking teams, as they can often get their height wrong which leads to goals being conceded.
These examples also show us Liverpool’s more man-oriented blocking approach in the second line, as well as showing how Liverpool’s high line from outswingers allows them to catch most flick ons offside, as they do here with Son at the back post.
Second phases and short corners
A general advantage to zonal structures is their ability to deal with second phase attacks, in that the structure remains organised regardless of the opposition’s movements.
If executed properly, the structure in the first phase should be roughly the same in the second phase, and so key zones should be covered and attackers can’t become isolated.
With man marking, players can move around anywhere the opposition takes them, and so your second phase structure is somewhat random.
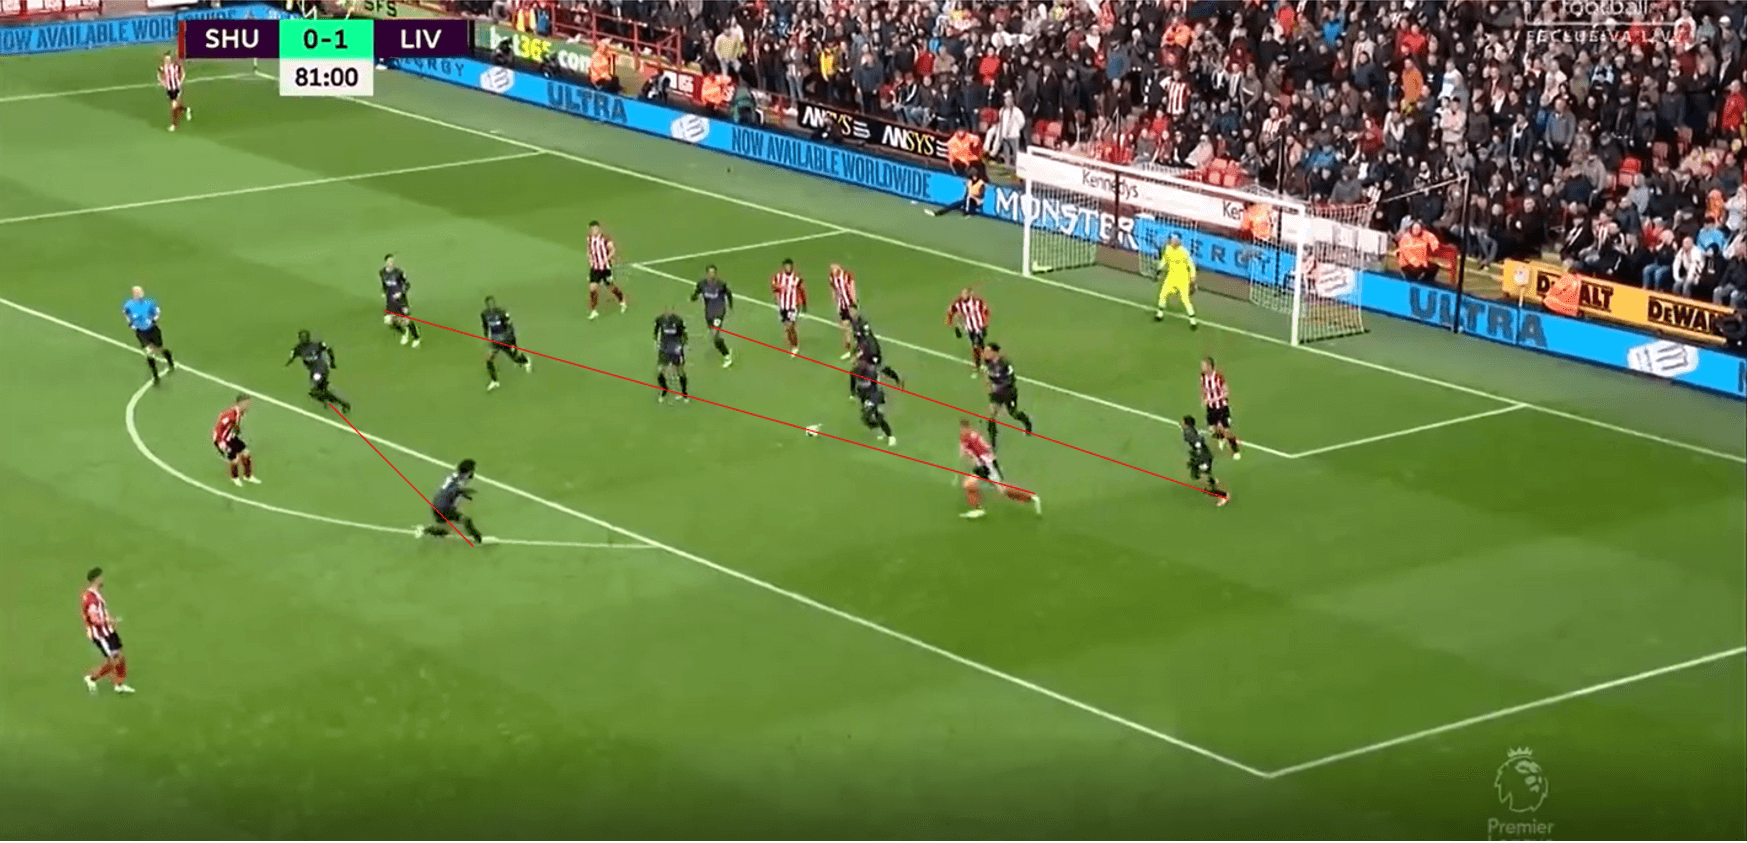
We can see an example here where Liverpool’s second phase structure remains organised in regimented lines during the second phase, and so players can organise pushing out quickly and maintaining spacing well.
The spaces that can be exploited are generally the same ones that can be exploited from the first phase, and so it is possible to still score of course, but it makes second phases less chaotic.
Short corners can be reacted to in different ways by zonal systems, and the usual question I ask when analysing an opposition team is how their zonal structure reacts when a corner is played short.
Some teams will commit their near post zonal player short and force the rest of the zonal line to shift across, and this of course reduces the overall coverage of the zonal system.
Other teams don’t adjust their zonal structure, and instead send a player from the edge of the box or a man marker to press across.
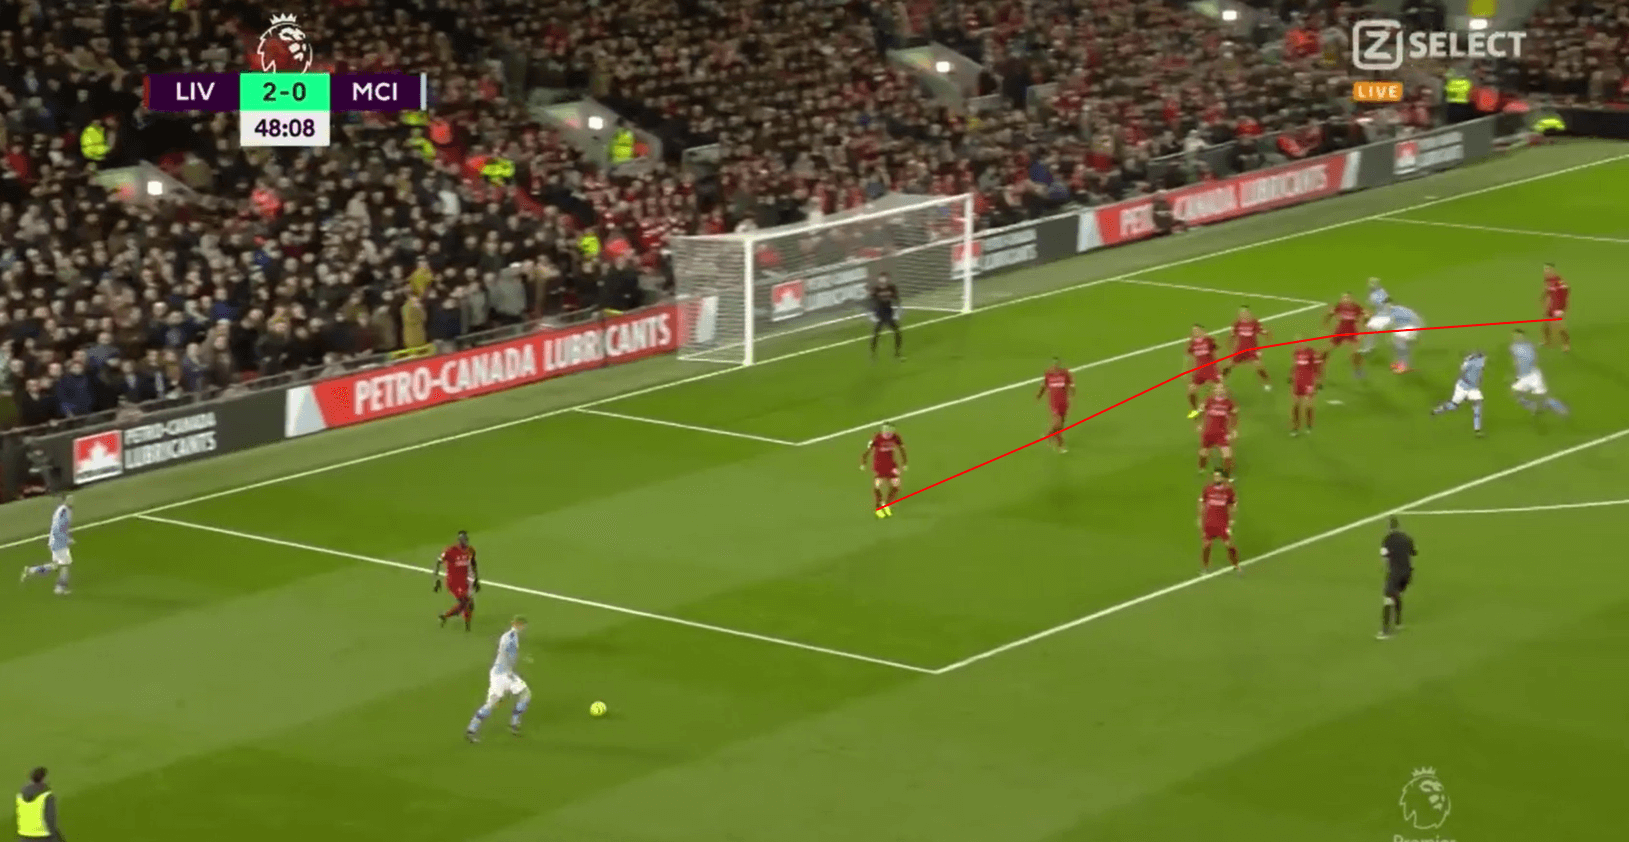
Liverpool only send one player across from the edge of the box, and almost use their zonal line pushing out as an extra defender.
We see they execute this against Manchester City, where they don’t stop the cross but still have a compact structure to defend.
They are also able to push very high up quickly due to the organised structure, and so this eliminates the 2v1.
The largest space is seen between Alexander Arnold and the far central player, but this is difficult to access and Virgil Van Dijk is nearby.
Attackers will often commit short by making runs from inside the box, and these can also be used as decoy runs against structures that use zonal players to react to short corners.
We can see a very good example of this below from Manchester City Women.
They commit a player short from inside the box and West Ham react by moving the far front post marker with the short player.
This space is therefore vacated.
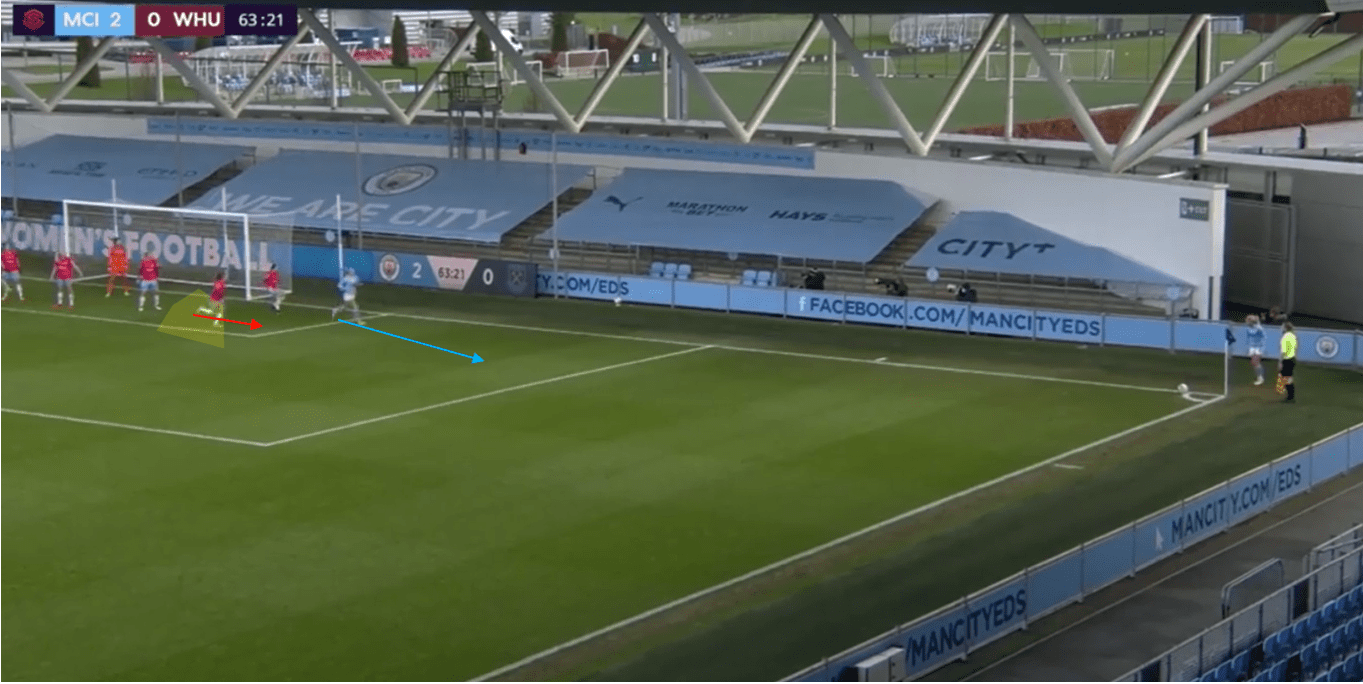
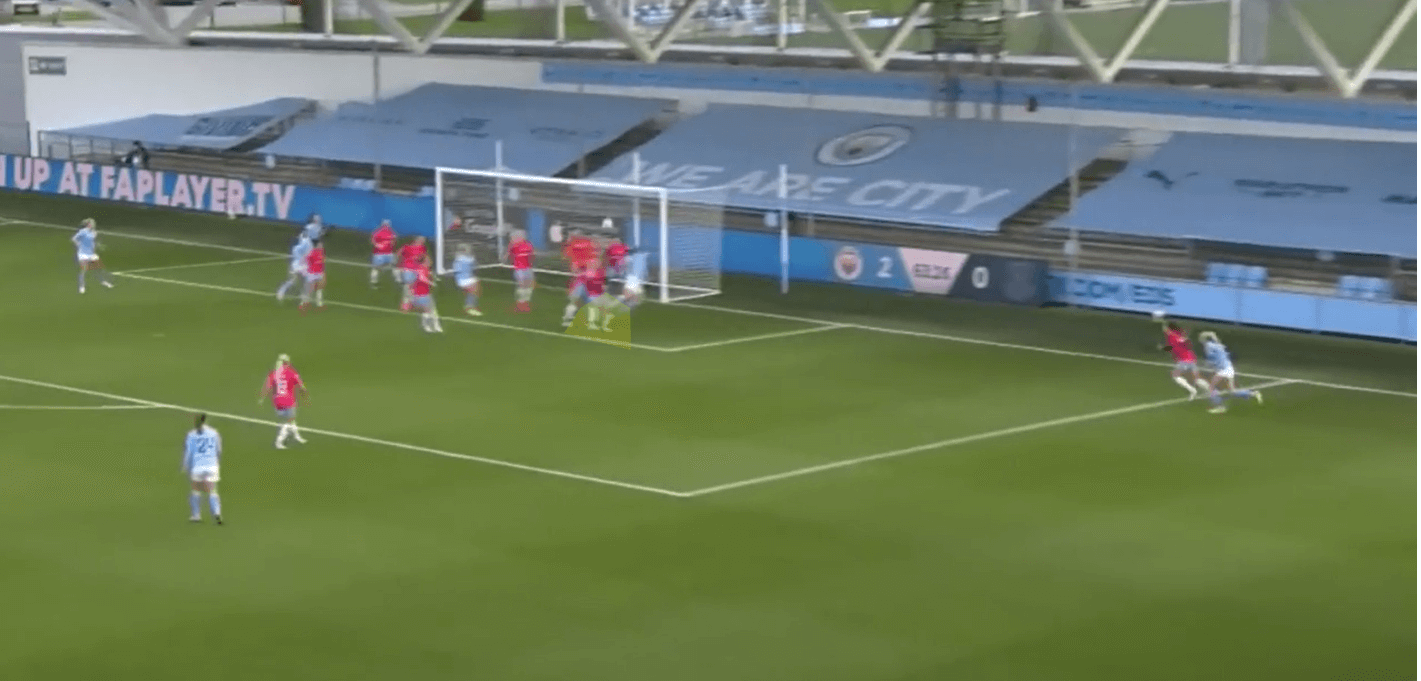
City don’t play the short corner, and instead then make a run into that space vacated by the zonal marker.
Zonal coverage is reduced, and so they can win the first contact and score.
This is the main weakness behind using zonal players to defend against short corners.
Attackers also often move higher to get in amongst zonal structures, and teams are left with the choice of do they mark them or not? Marking these players reduces coverage of deeper runners, however it does help to try and prevent blindside runs ahead of a zonal marker being made, which is also often another cause of goals conceded by a zonal system.
Key coaching points
I have covered some of the key coaching points already while outlining systems, but here is a bullet pointed list of key ideas when zonal marking:
- Maintain optimal spacing between zonal players
- Stagger at the correct height depending on the delivery
- Read the flight of the ball and move out bravely if the ball is in your zone
- Do not react to the ball unless it is in your zone
- Be on your toes and prepared to jump or run outwards
- Don’t allow free runs onto zonal players
- Cover space further out and on the edge of the box to prevent being exploited
The main coaching point within that which I’ll explain here is the idea of not reacting unless the ball is in your zone, as this is a common mistake by players within zonal systems.
Players have to become very good at reading the flight of the ball and reacting or not reacting to it.
If players move out of their zone and don’t win the ball, not only do they get in the way of their teammates trying to win the ball, but they also allow for flick ons elsewhere.
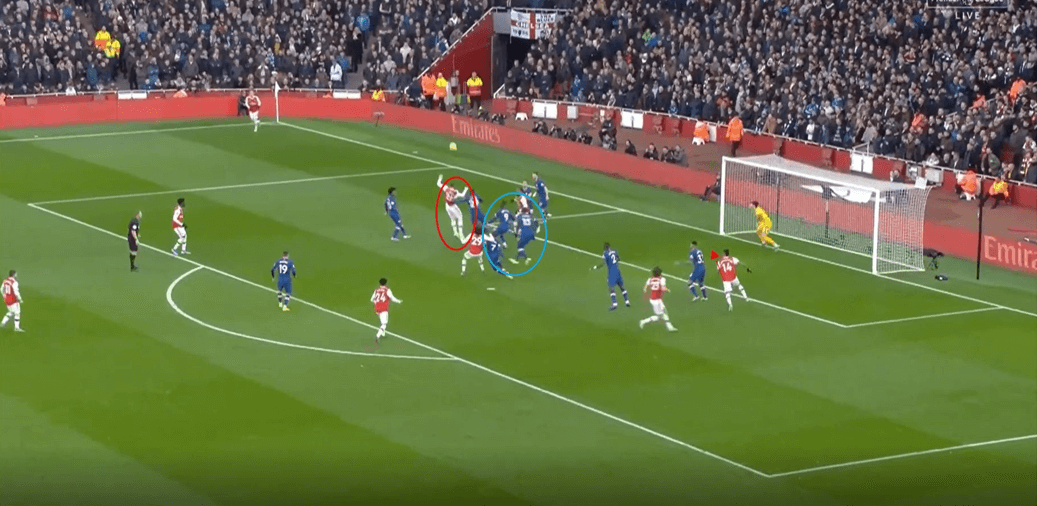
Again we look at Chelsea from last season, where we see the ball is played deeper towards the near post area.
Chelsea’s central zonal players both move towards the ball and don’t get anywhere near it, and so they leave a large central space for the ball to be flicked down into Aubameyang.
It is the same concept as in open play where if you operate in a closed block and move out to ‘press’, make sure either everyone goes so you play offside or go and win the ball.
Some teams look to try and stretch zonal coverage using overloads or underloads, and the key for defending against this is that if one player shifts across, everyone else should too.
The zonal system should not be dependent on the opponent, but slight shifts towards either post can occur depending on the opposition.
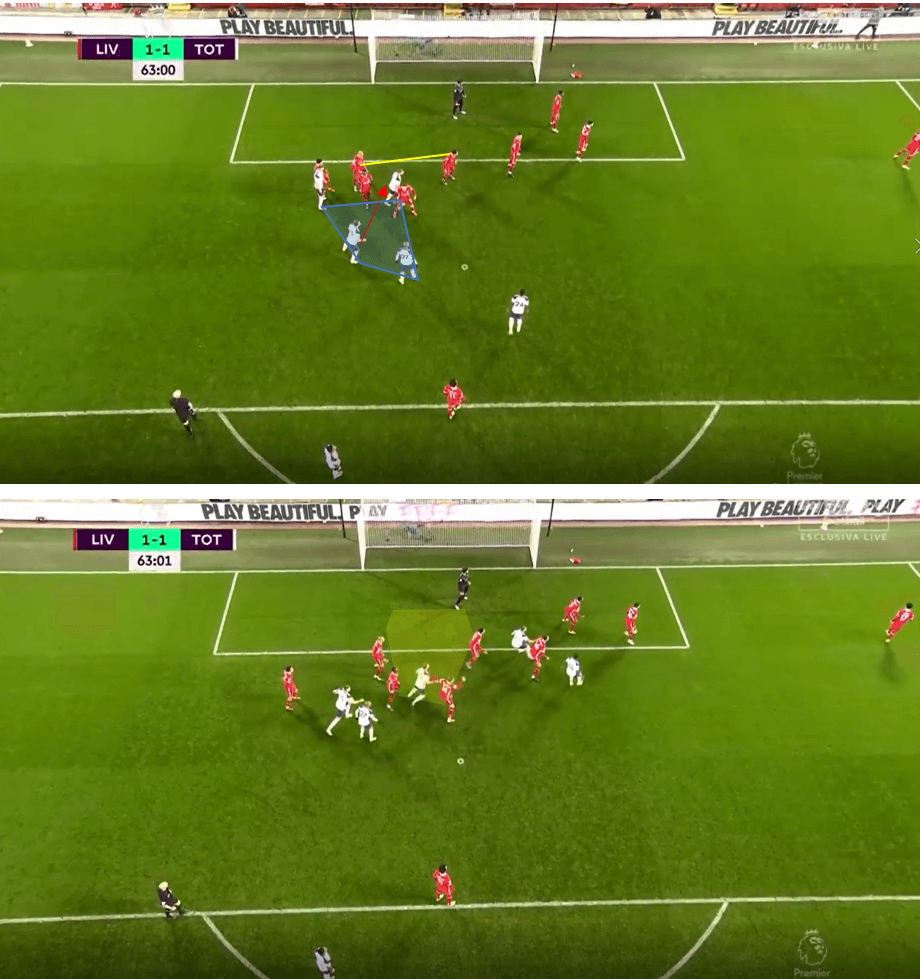
Tottenham exploited this well against Liverpool, where they used an outswinger and overloaded the back post.
Liverpool’s two zonal markers closest to the back post shifted across quite far in reaction to this, and so Tottenham created space between the two that they could run through.
Harry Kane makes his way through the blockers and gets a free header just on the edge of the six yard box.
If players get headers between zones, your zonal marking has failed, and so you have to keep optimal spacing between each defender.
Either everyone shifts slightly, or no one does.
The main skills involved in zonal marking are maintaining your spacing between teammates, moving out quickly and far enough to win the header, and knowing when to move out by reading the flight of the ball.
Teams who don’t get the hang of this usually concede goals, and so like any system, if you perform it badly it isn’t very useful.
Three common phrases
To end, I thought I’d debunk the three phrases the average football fan would say about zonal marking.
Number one: “Zonal marking lets you get a run on a player.”
Yes, zonal marking can let attackers get a run on static defenders, but only if blockers or markers don’t do their job.
The aim is to slow these attackers down to allow zonal players to clear, and if teams are coached properly they can man mark specific threats who can outjump zonal markers, as not every player can.
Number two: “It’s simple, stick with your player they are your responsibility”.
Man marking is simple, however it is also very simple to overcome and as an individual it is not hard to create enough separation to win the header.
I have done lots of work on individual movement to dismark from set-pieces, looking at wide receivers in the NFL, and am confident that if you coach players properly they can lose their marker no matter how ‘committed’ they are.
In short, it can actually be quite hard to track your runner if the attacker knows what they are doing.
Number three: “I’ve never seen a zone score a goal.”.
Zones also don’t score goals in open play, but most of us don’t run around chasing a specific opponent for 90 minutes, as it leaves spaces wide open and leads to massive problems if one player becomes free.
The same applies for set-pieces, in that football as an invasion game is also about covering space to prevent opponents moving through it, and so protecting key areas from set-pieces is useful in this regard when done properly.
Conclusion
Hopefully that has given you a detailed guide to zonal marking and the tactics around it.
Naturally it does not include everything as I could probably write another 15,000 words if I had to, but this gives the basics of zonal marking and the theory behind them.
The piece hasn’t sought to compare the advantages and disadvantages of man-to-man vs zonal structures, however if you want to explore this I have done webinars and articles on the subject too.
I also work as a set-piece consultant with professional clubs including a team in the Women’s Super League, and so if you want to improve your team’s set-pieces or even just have a discussion feel free to contact me!


Comments