As more and more teams start to adopt a philosophy, tactics normally used by ‘bigger’ sides have become more commonplace among lesser sides. We’ve seen newly promoted teams like Norwich and Sheffield United sticking to their style of play, with varying degrees of success. One of the tactics that has become more popular over the last few years is positional play. While some coaches have built the majority of their tactical system around complex positional play, an increasing amount of coaches are beginning to incorporate positional play in their tactics without integrating an entire positional play system. In this tactical analysis, I’ll take a look at one of these facets, using rotations to create superiorities in the build-up.
Types of superiorities
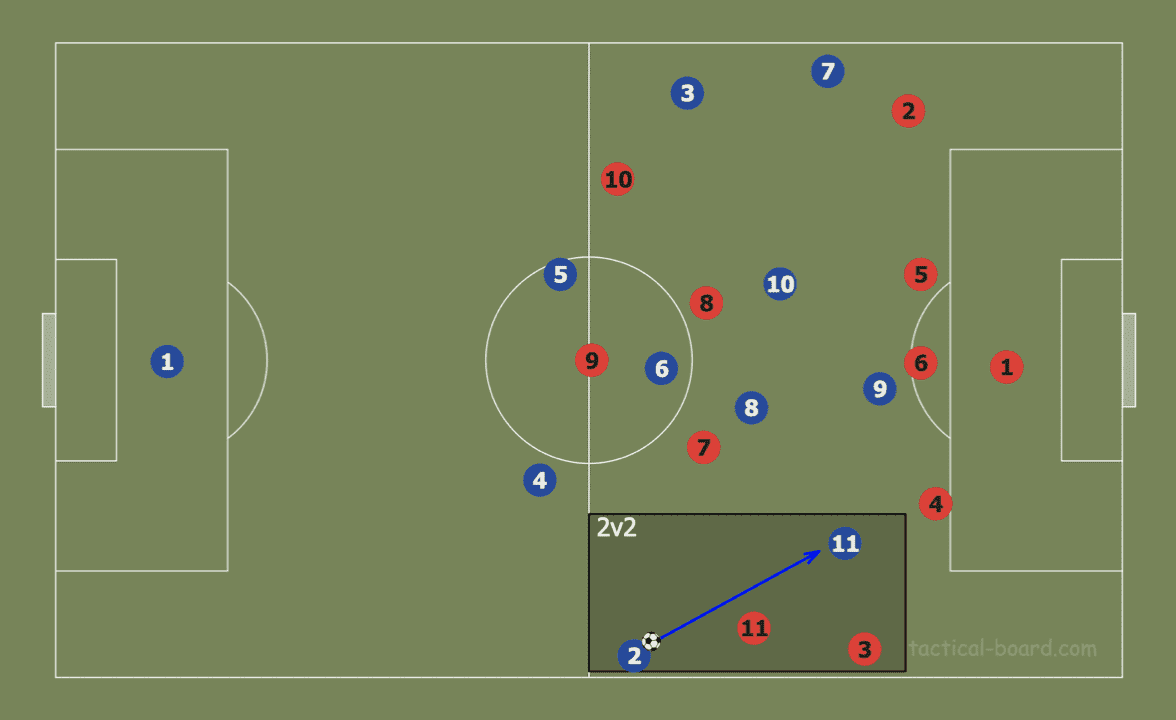
In this analysis, I’ll be focusing on numerical and positional superiorities. A numerical superiority is simply having more players than the opponent in a certain area, while a positional superiority, is simply put, the creation of a free man. The below two images show examples of numerical and positional superiorities, respectively.
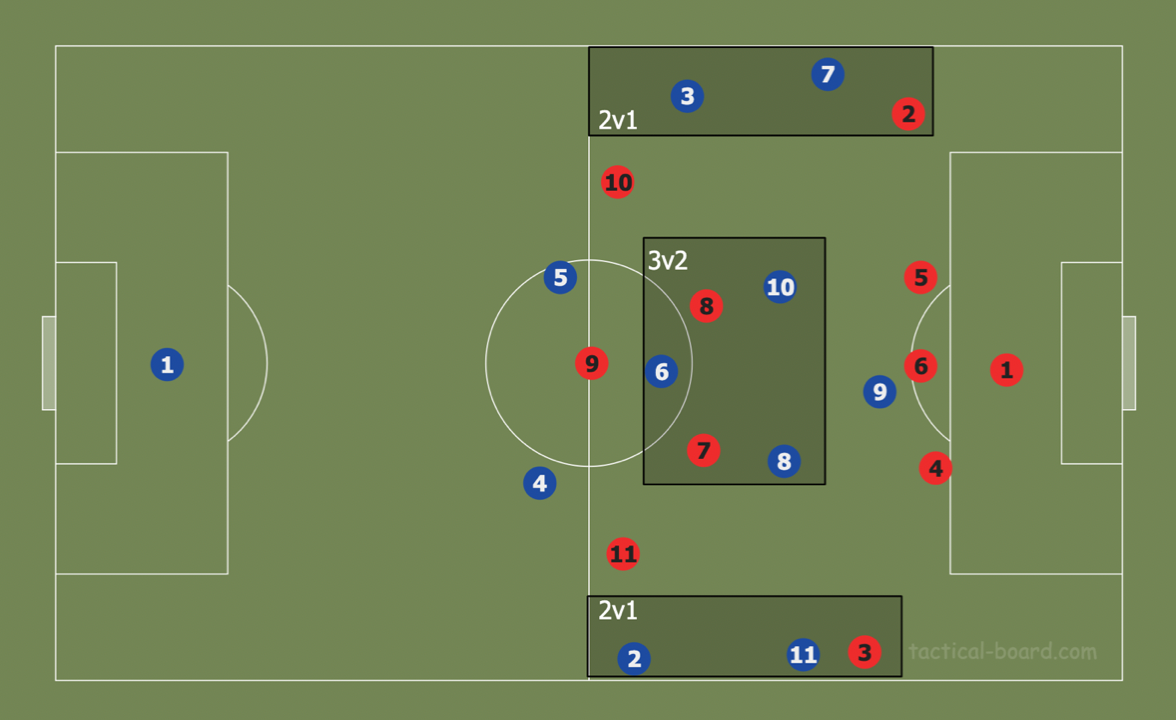
In the above example, the blue team have created 3 numerical superiorities, a 2v1 on each wing and a 3v2 in the centre.
The above example shows how, despite not having a numerical superiority, the blue side have created a free man, and thus a positional superiority due to the movement of the blue #11, who frees themselves from their marker.
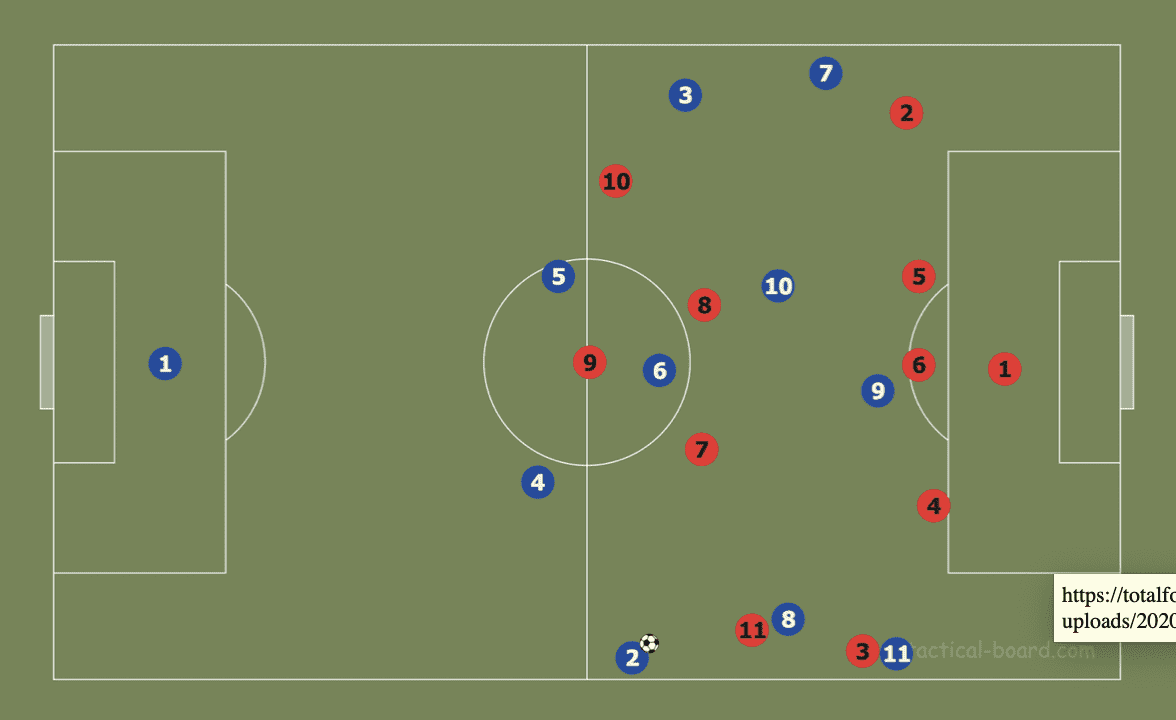
Usually, a numerical superiority will also lead to a positional one, this is not always the case, as shown in the below example, where, due to poor positioning, the blue team do not have a positional superiority despite having a numerical one.
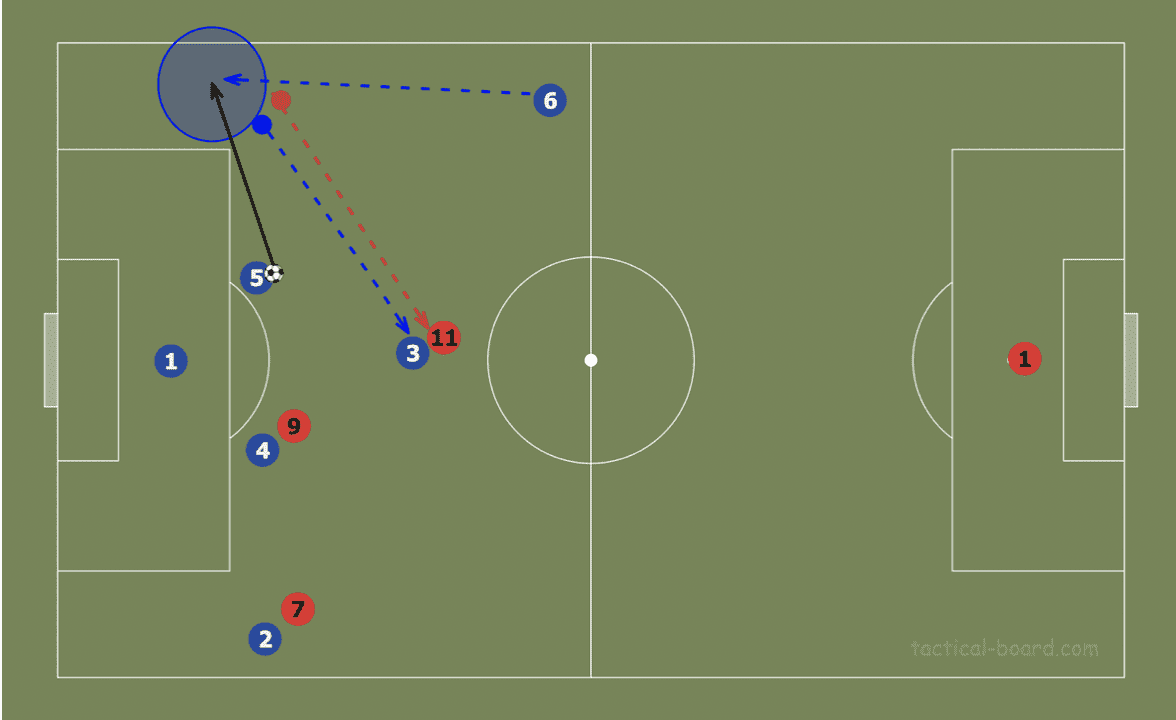
The above examples are simple, idealised scenarios with no actual rotations being made. Obviously, in an in-game scenario there are many more variables to account for. The below example shows a more realistic situation. The red team are pressing in an aggressive 3-5-2, which becomes a 3-3-4 to match up against the blue team’s 4-3-3. At first sight, there are no free men for the blue team to advance possession through.
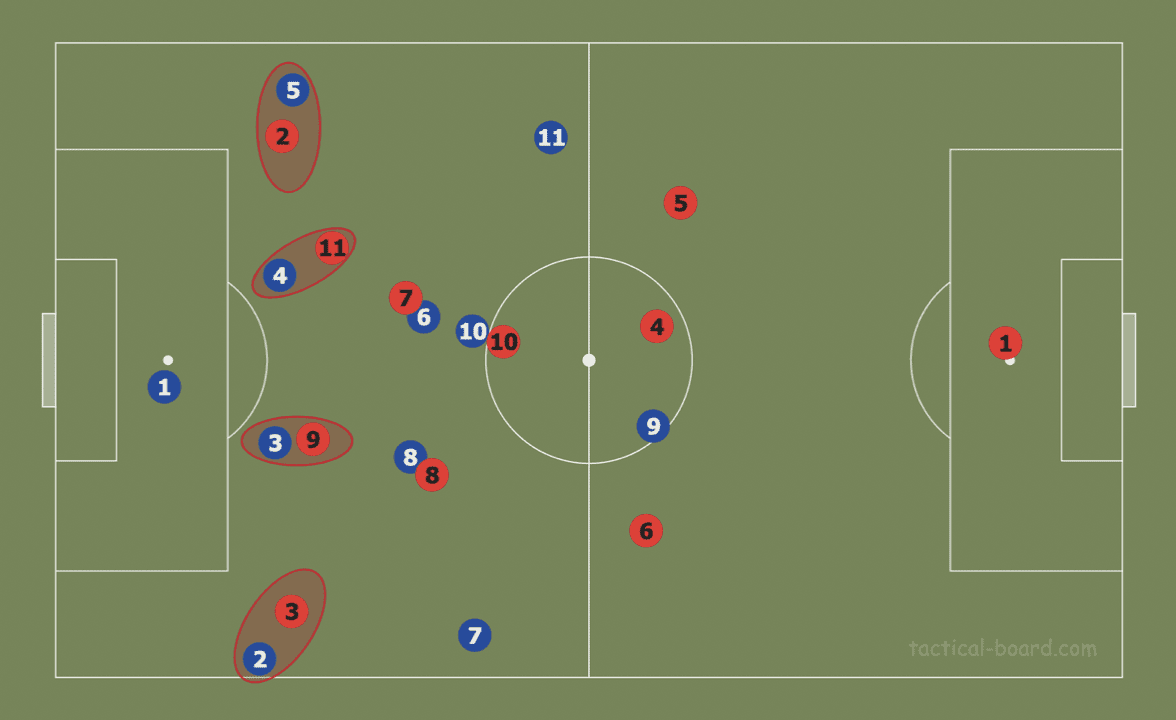
Due to the nature of football, the team in possession always – in theory – have an advantage, as they can play with all 11 players, while the defending team can only press with 10, as pressing with a goalkeeper is frankly suicidal. This advantage is enhanced by pinning. If we take a closer look at the above image, the blue wingers #7 and #11 are unmarked, red #5 could press #11 but, should #6 press #7, #9 can make a dangerous run in behind, hence red #6 is pinned, and blue #7 is truly open.
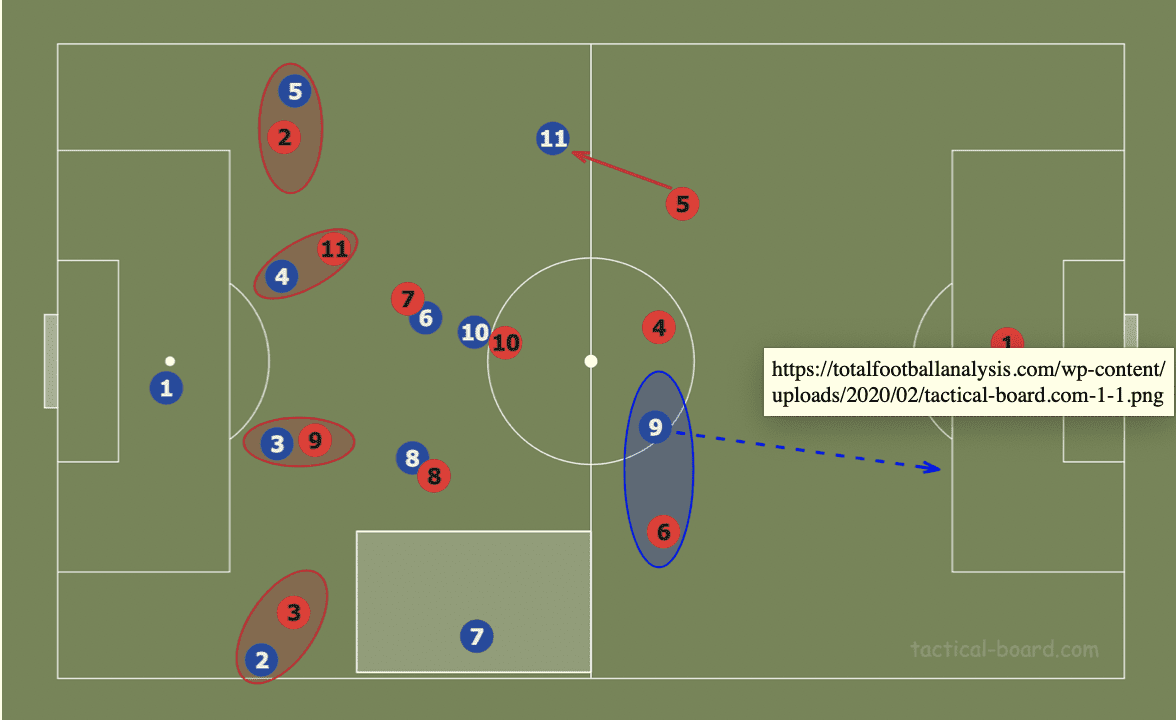
However, this doesn’t help the blue team all that much as #7 is too far removed from the area of build-up, but we can fix this by using rotations. If one of the blue midfielders drops to join their defensive line, one of the red midfielders will be forced to follow them or else a free man is created.
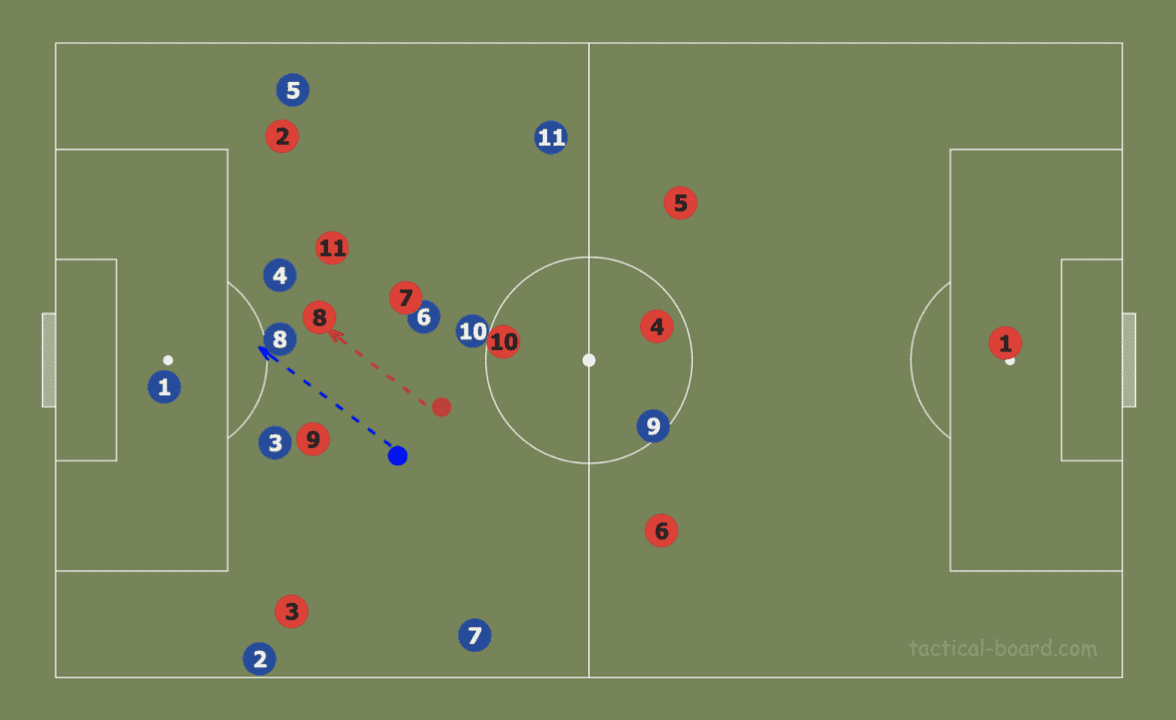
As a consequence of this movement, a gap is created where the midfielders have vacated. Which #7 can occupy, thus creating a free man in midfield.
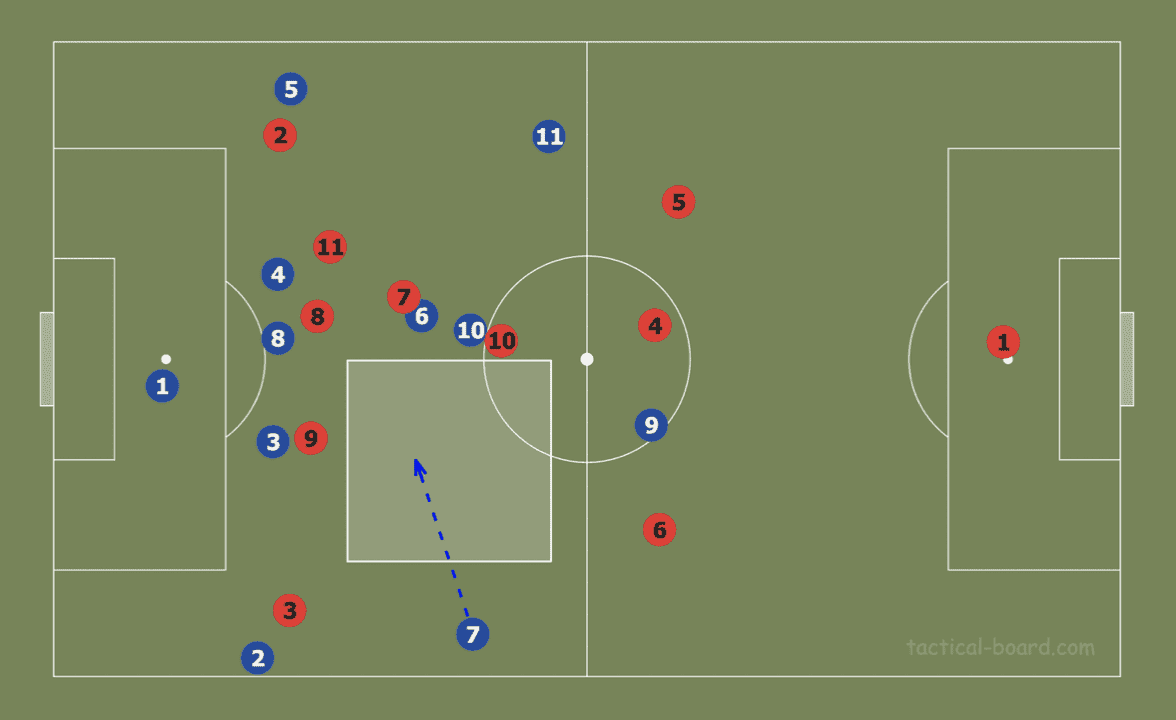
In the scenario just shown, the blue team used a multitude of individual ideas and principles to create a free man. Rather than focusing on macro movements which have infinite possibilities such as the one above, the rest of this analysis will present some ideas, that, when used in tandem will allow the team to create superiorities.
For the purpose of this piece, I’ll be defining a rotation as a player moving into a space in which their position is not usually found, so a central defender moving slightly laterally will not be classified as a rotation, I’ll only be dealing with more substantial movements.
Now that we’ve covered what superiorities and rotations are, let’s take a look at some ideas.
Creating superiorities by rotating defenders
The most simple way to create a positional superiority in build-up is to utilise movements made by defenders to create space for themselves or others. Below I’ve defined 3 ways in which defenders can rotate to create superiorities
- Fullbacks/Wingbacks
- Inverting
- Shifting
- Centre backs
- Forward movements
Fullbacks: inverting
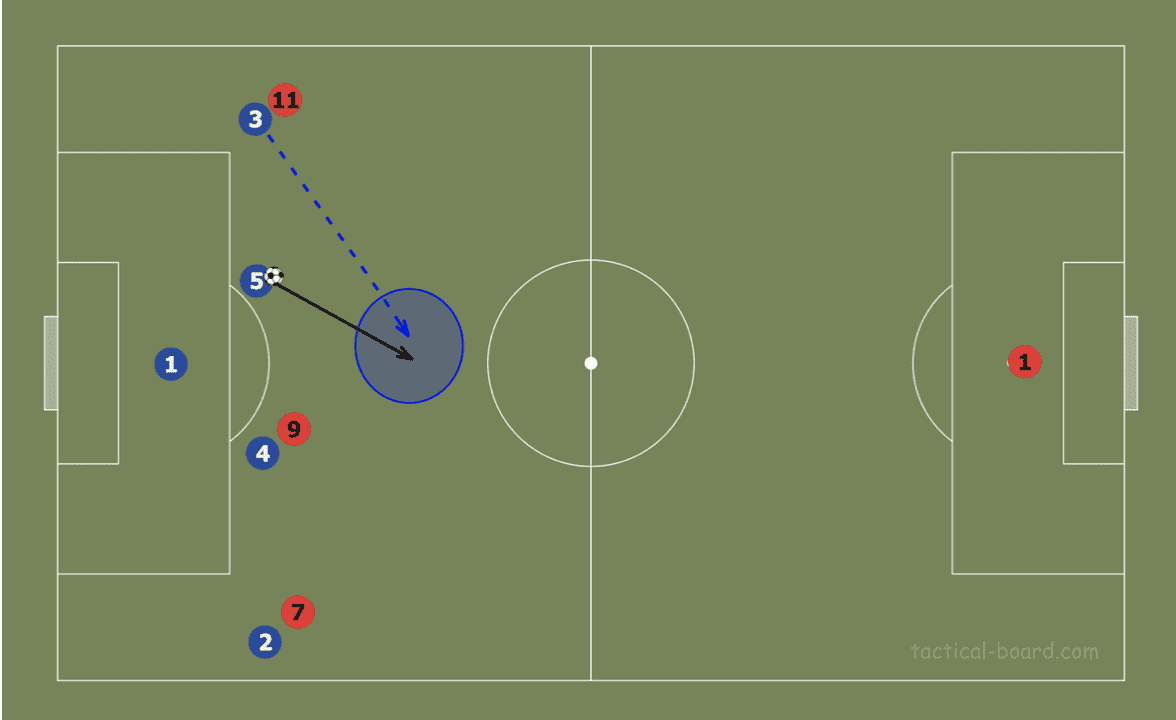
An inverted movement from a fullback is from their natural position out wide coming inside to a midfield position.
In the below examples, we see the left fullback inverting creating space for himself and his teammate in each example, respectively.
Fullbacks: shifting
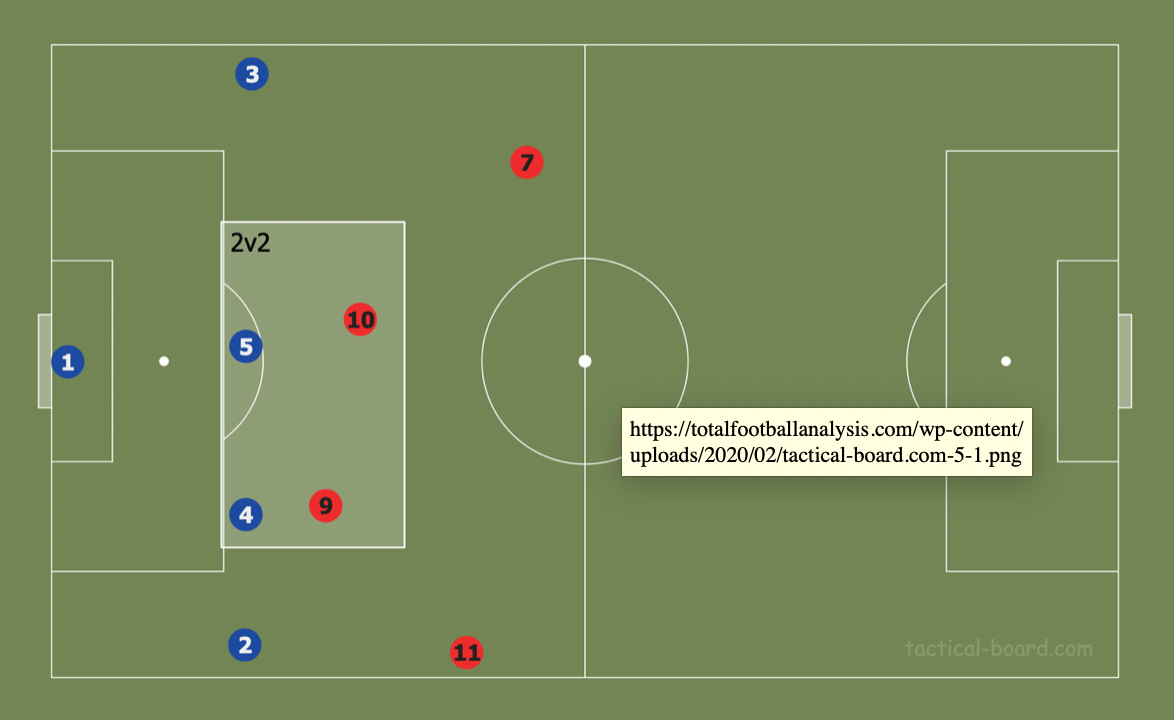
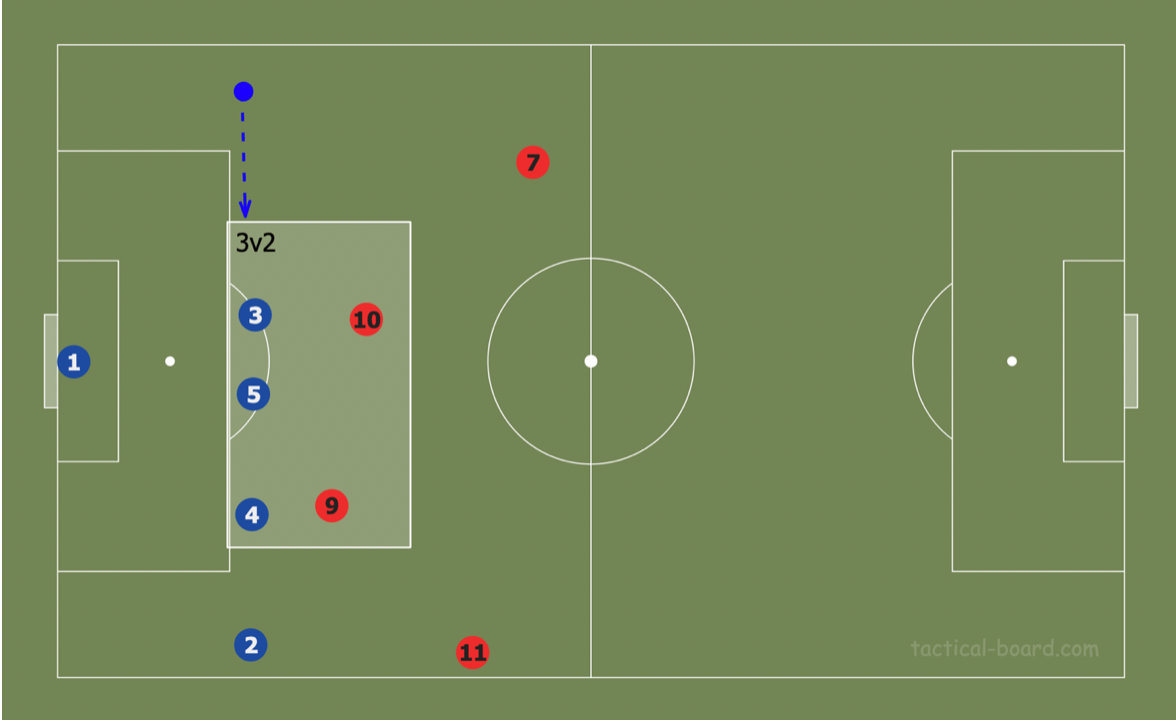
A shifting movement is similar to inverting, but it is when a fullback takes up a much less advanced position, which is more akin to a central defender’s position. In the below examples, the blue team are in a 2v2 situation centrally, but as the blue #3 shifts over, they create a numerical superiority.
Centre backs: forward movements
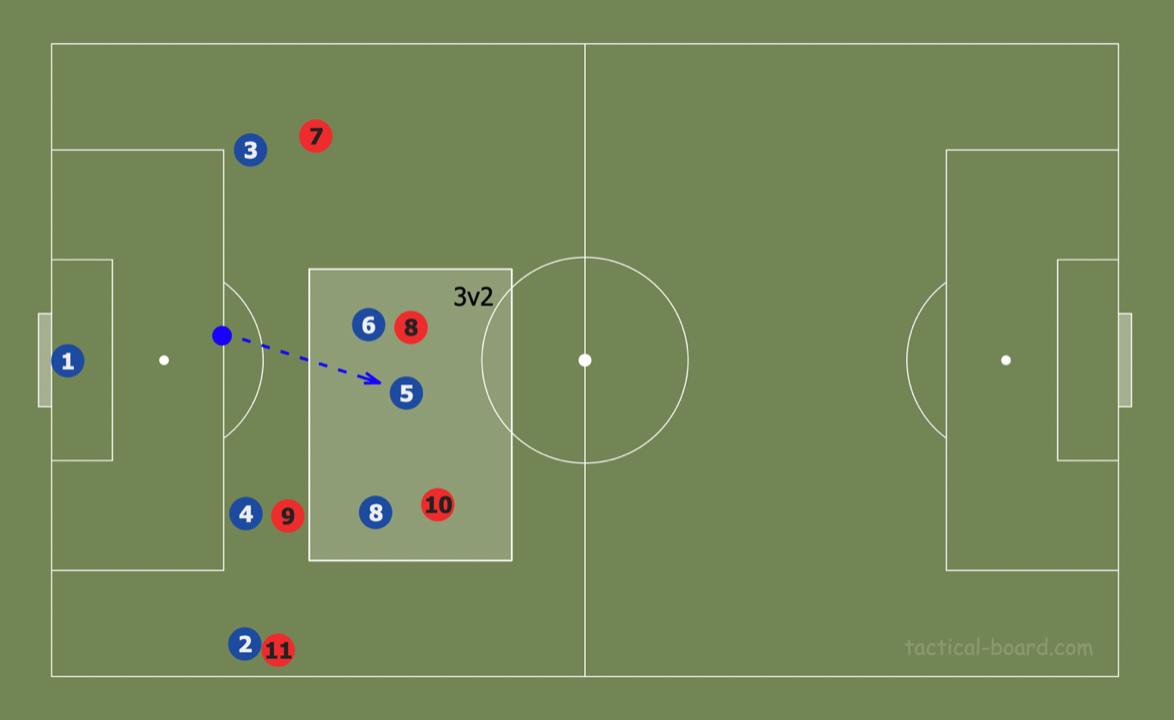
Using centre backs in rotations is extremely risky, as it leaves the team extremely exposed in defensive transition, however, it can be very advantageous as a midfield overload in build-up greatly increases penetration potential. In the below example the centre back makes a forward movement from his initial position, overloading the midfield.
Due to the obvious risk associated with using a central defender in this way, it’s quite a rare strategy, although it isn’t completely unheard of, former Stuttgart manager Tim Walter was known to use daring rotations such as these, which you can read about in the free TFA 2020 magazine.
There are more ways in which defenders can change their positioning to gain advantages, such as a fullback taking up a more advanced position, but as that is becoming more commonplace among modern fullbacks it doesn’t fit into our criteria for a rotation. Only using defenders in rotations limits the possibilities, as using midfielders and even forwards is a much more risk free way to create superiorities, while still maintaining numbers at the back.
Creating superiorities by rotating midfielders
Unlike rotating defenders, there are more possibilities and less risk when using midfielders, however, depending on how the midfielders are utilised the team may sacrifice central penetration. Below I’ve defined 7 ways in which (central) midfielders can rotate depending on the structure of the midfield.
- Single pivot midfield structure
- Drop
- Provide width
- Double pivot midfield structure
- Staggering (1 drops)
- Staggering (1 provides width)
- Both provide width
- Both drop
- 1 provides width, 1 drops
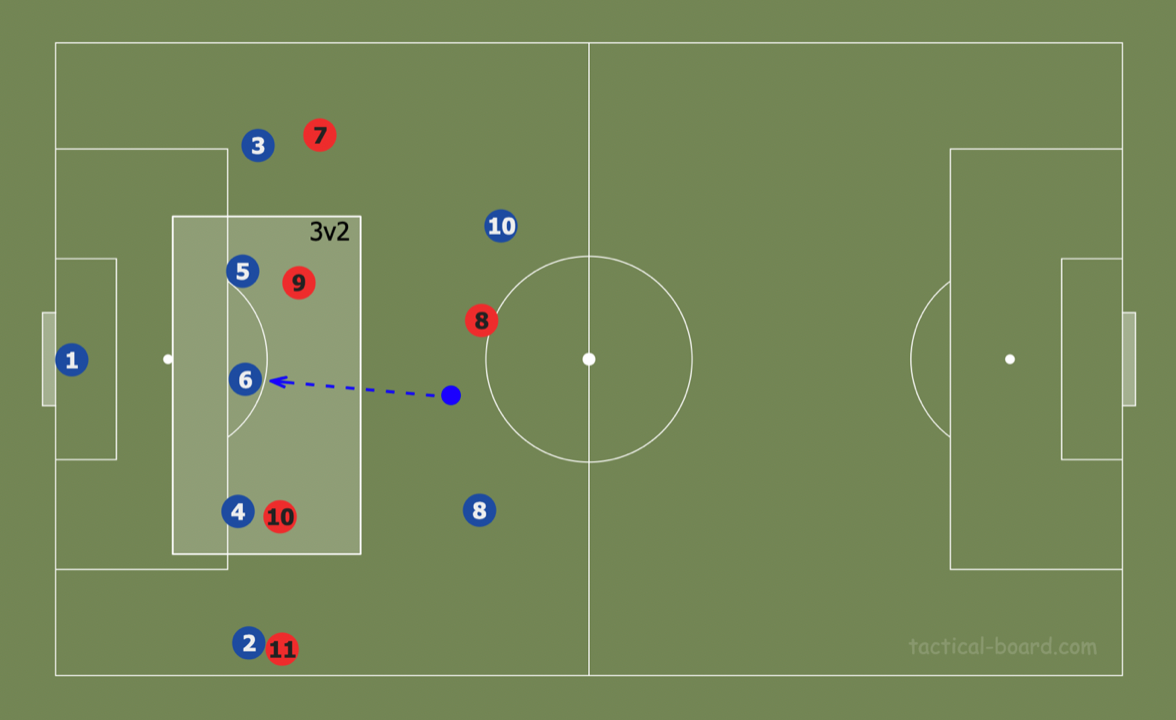
Single pivot: dropping
This is one of the most common rotations in modern football. It involves a sole defensive midfielder dropping into the defensive line. In the below example, the defensive midfielder drops into the back line, creating a 3v2 overload.
Single pivot: provide width
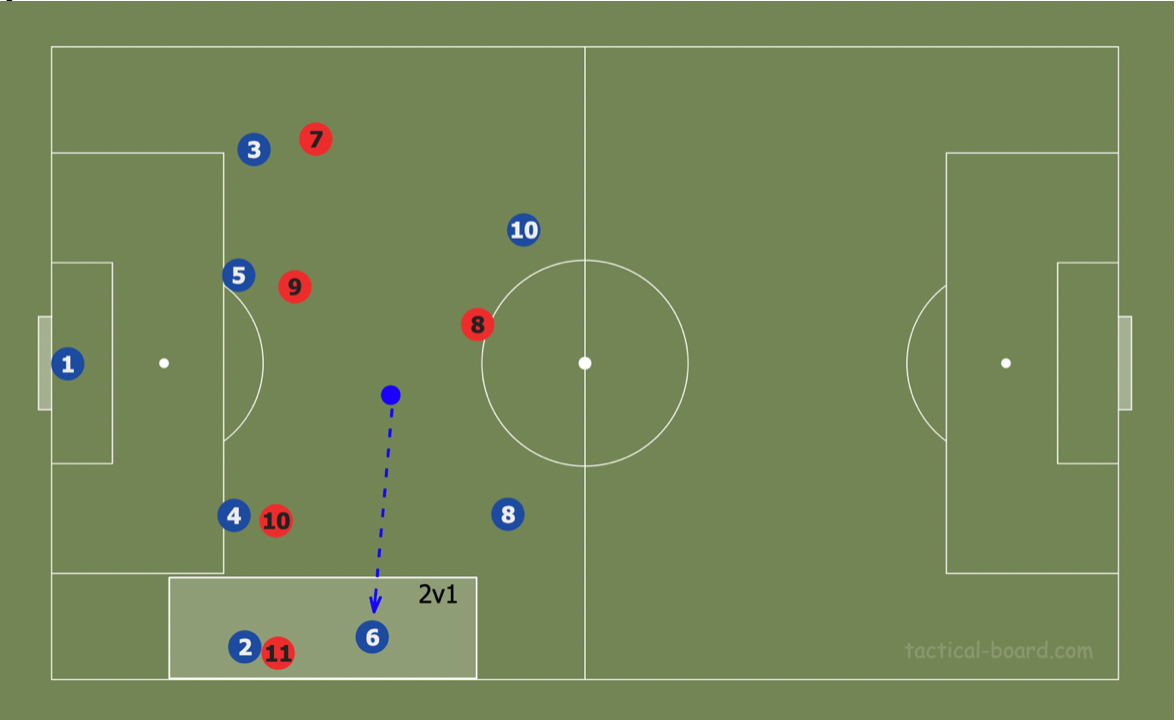
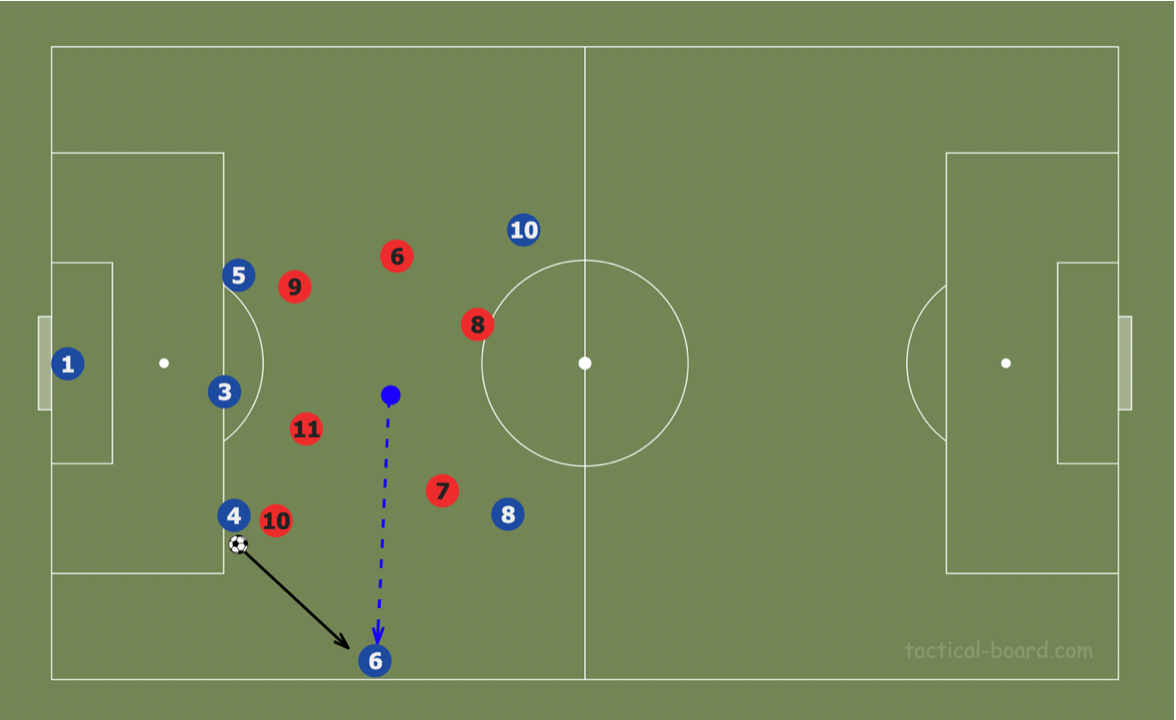
This rotation involves a sole defensive midfielder taking up a wide position to provide width. This would be most effective against teams who press in a narrow manner, with the midfielder either creating an overload out wide or acting as a passing option, which the two examples below show.
Double pivot: staggering (1 drops)
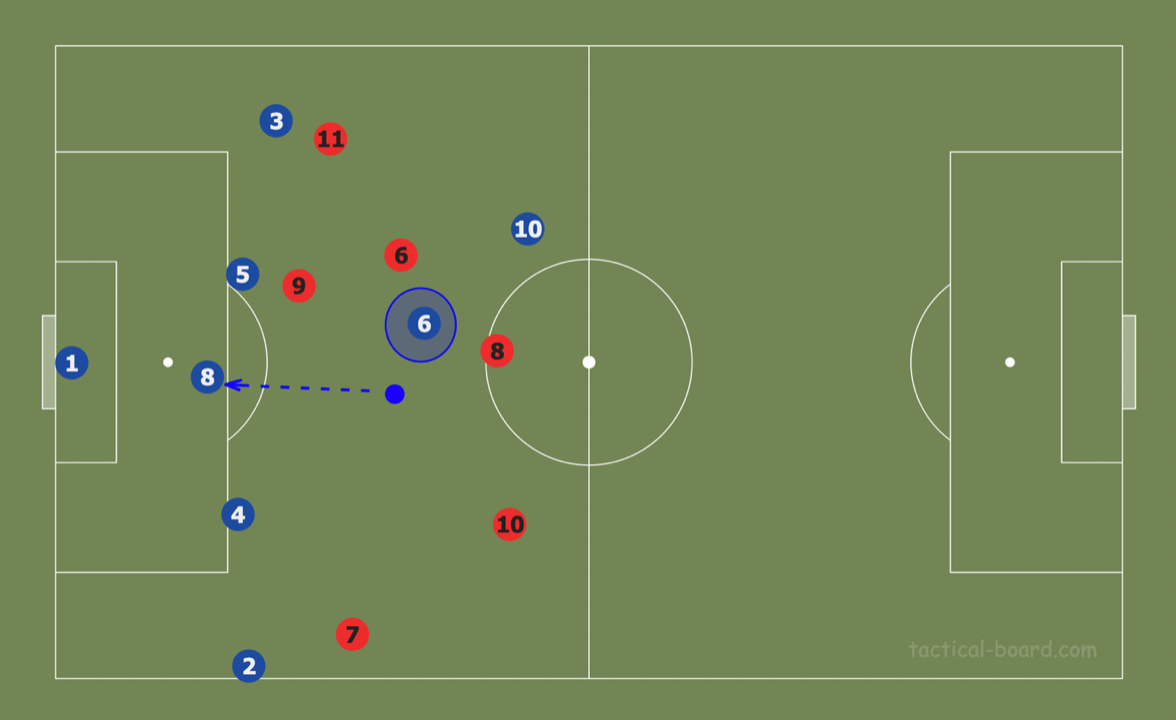
This is very similar to the single pivot dropping, with the difference being that less central penetration is sacrificed by still having one of the midfielders hold their position. In the below example, one midfielder drops while the other holds their position, maintaining presence in midfield.
Double pivot: staggering (1 provides width)
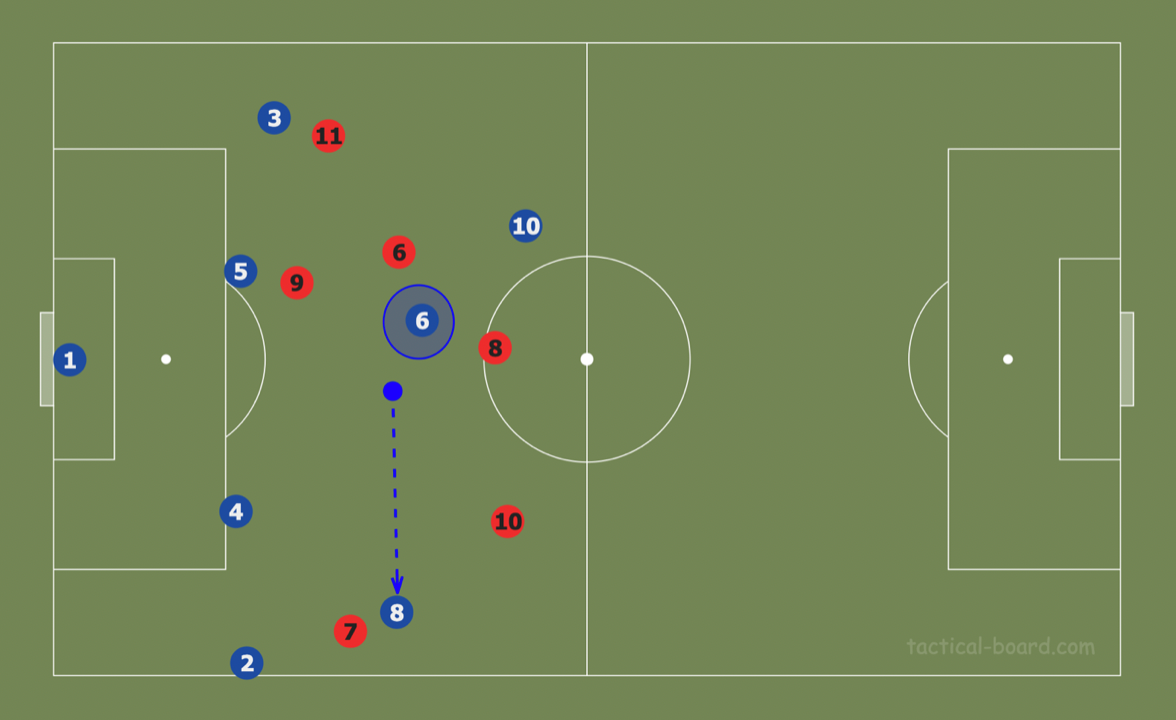
This rotation also is very similar to its single pivot counterpart, with the only difference being one of the pivots remain in position, which lessens the penetration deficit that would normally happen if all deeper midfield presence was vacated. In the below example we can see this, with the blue #8 adding width to the team while #6 maintains central presence.
Double pivot: both provide width or both drop
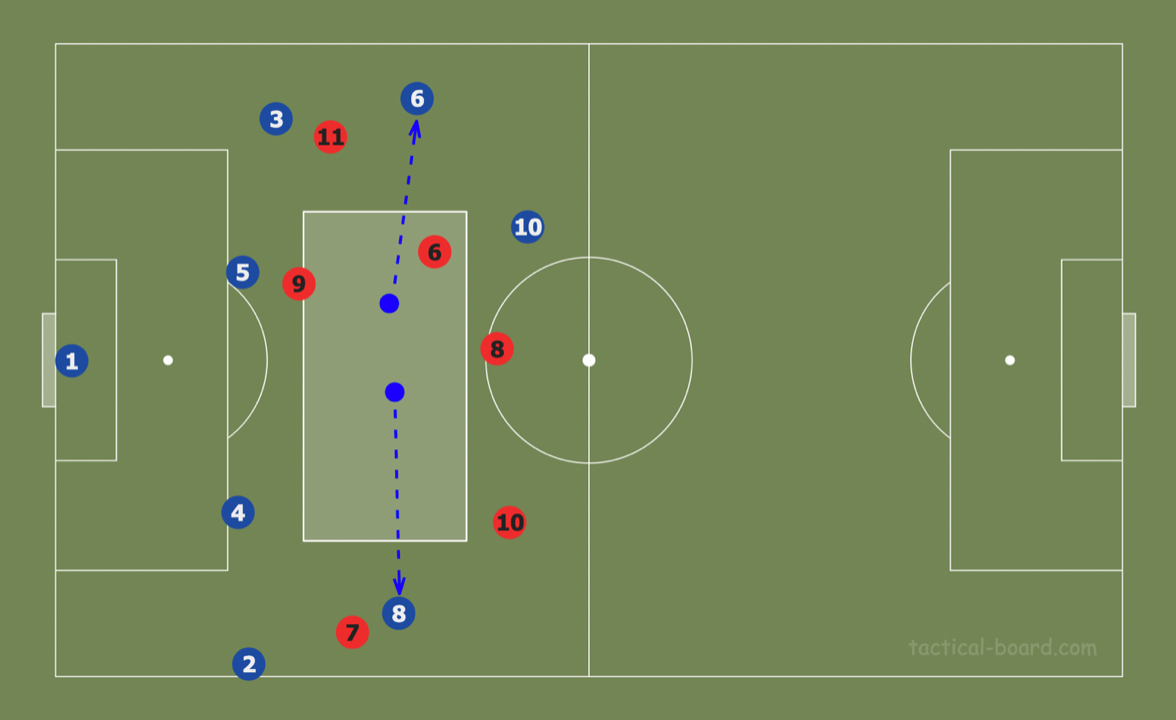
These rotations are when we start to blur the lines between practical and theory. Having both midfielders provide width would seriously detriment any type of central progression, the only way I see this rotation being effective is if the tea using it is playing with absolutely no width in the build-up phase while having other midfielders which can add some semblance of penetration. In the first example we can see that both midfielders have taken up wide positions, leaving a gap in midfield.
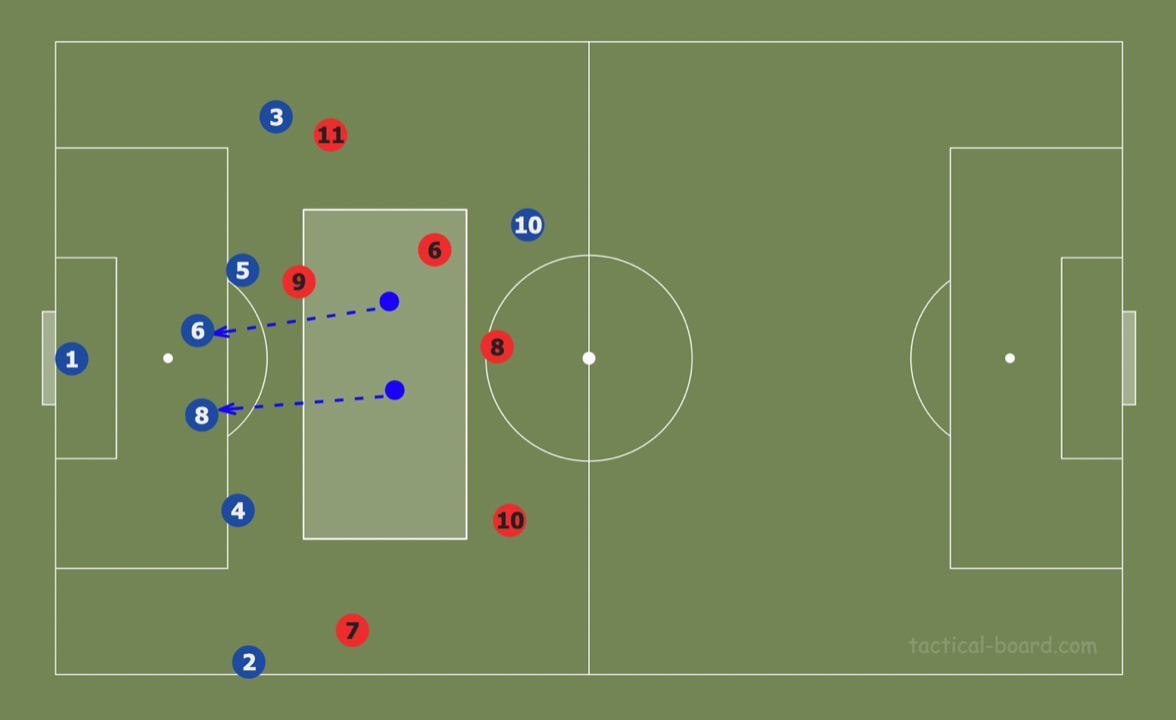
In the second example below we can see that both midfielders drop, creating 4 centre backs in this case with almost no midfield presence.
Double pivot: 1 drops, 1 provides width
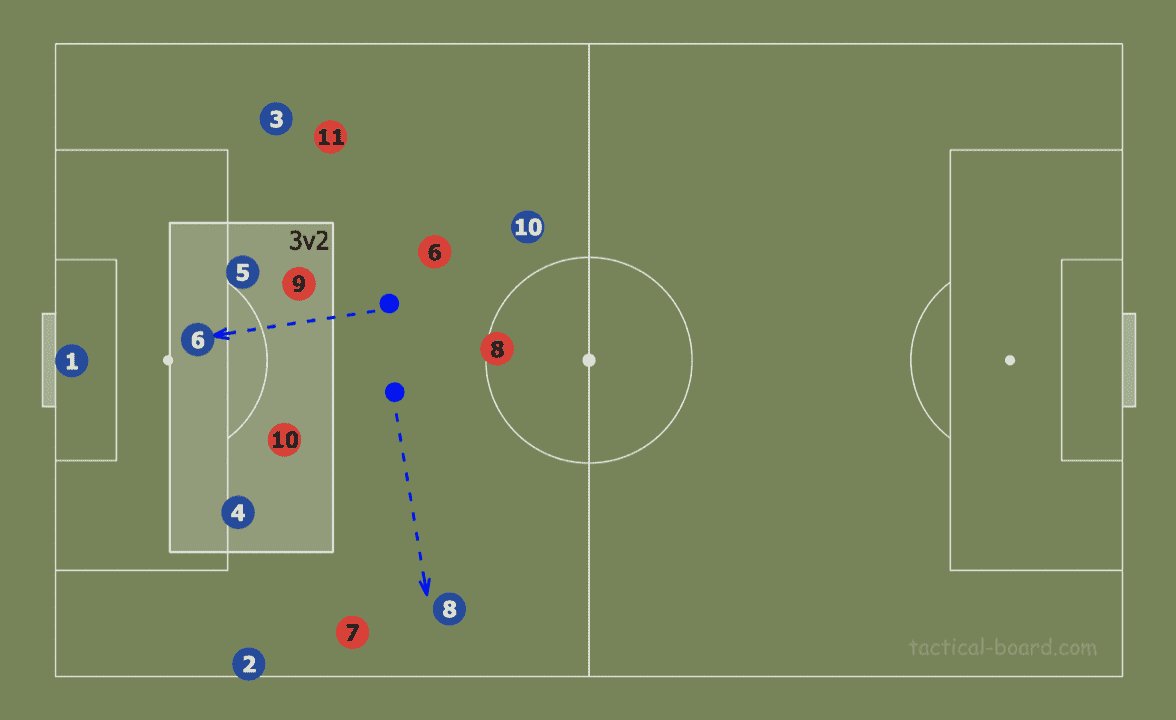
This rotation is also not entirely practical, but it can have some uses. If the team is looking to progress play using width, the dropping midfielder can create an overload vs the opponent’s first line of pressure, while the other midfielder provides a passing option out wide. We can see this happening in the below example, with the blue #8 providing a passing option out wide while the #6 drops, overloading the opponent in that zone with a 3v2.
Conclusion
As more teams adopt high pressing approaches, teams that intend to play out from the back need to come up with solutions to beat a press. Rotations are so efficient as, when used effectively, they create a superiority, either freeing up space for the player making the rotation or a teammate.


Comments